1
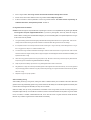
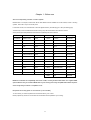
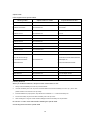
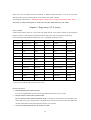
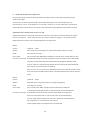
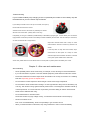
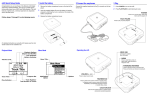
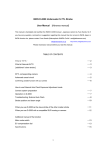
INON D-2000 Underwater S-TTL Strobe
User Manual
[Basic manual]
This manual is translated and rewritten the INON D-2000 manual , Japanese version by Yuzo Kanda. So if
you have any question, comments or suggestion regarding this manual then do not ask to INON Japan or
INON America Inc, please contact Yuzo Kanda (Naturephoto KANDA Co.ltd / uwdigitalcamera.com)
[email protected]
http://www.uwdigitalcamera.com
Please read this manual through and the manual of your camera and housing before you use.
[ Safety Precautions ]
Please read the following precautions carefully as they contain highly important information related to
personal and product safety. Precautions designated “WARNING!” refers to those situations, which could
result in serious injury or death.
Precautions marked “Danger” or “CAUTION!” refers to those situations or conditions, which could result in
personal injury or property damage. Please observe all precautions
! Warning
・
Do not disassemble or remodel D-2000.
The strobe contains very high voltage circuitry, it could lead to severe electric shock and injury.
・
Never touch electric circuit
Even if it is not installed battery, there is the possibility to get an electric shock.
・
When you think it flooded or malfunction, stop using underwater or even on land
immediately.
On this case, please remove batteries ASAP and request to repair or service to us.
・
Do not drop water or a foreign body in the battery box.
・
Do not fire the strobe at near face ( Especially , take care of infants)
・
Do not fire this strobe with the reflector placed on a table or the floor as that may
cause overheating of the internal circuitry and/or fire.
・
Do not use any solvent or other chemical to maintenance or cleaning.
・
Keep this product out of the reach of babies, infants and children.
!Danger
Safety precautions about battery.
Follow these precautions to avoid damage to batteries and strobe, and depending on the type of batteries,
possible buildup and explosion of flammable gas.
1
・
Do not use non-specified batteries
You can use these batteries.
a)
AA Nickel Metal Hydride battery (1.2V) * recommended
b)
AA Nicad battery (1.2V)
c)
AA alkaline battery (1.5V)
d)
AA Lithium battery (1.5V)
e) AA oxy ride dry cell battery (1.5V) *
Battery voltage of the oxy ride dry cell battery, there is 1.735V. So do not turn on built in focus light before
their voltage is lower than 1.5V. Usually it will drop down to 1.5V with over 20 times flashing at Full position.
・
Do not mix different battery types, different manufactures or batteries having different
remaining charges.
・
Do not attempt to charge non-chargeable batteries.
・
Make sure battery +/- positions are placed in Battery Box.
・
Do not intentionally short the batteries or circuits.
・
Do not use battery charging devices that are not compliant with the battery
manufacturer’s recommendation.
!Caution
・
Never repeatedly fire the strobe continuously, for example, to test, discharge or refresh the batteries.
・
If you use this strobe in air plane or near the medical equipment, please follow the instruction of them.
・
Protect the D-2000 from excessive impact shock and vibration. Do not drop, do not leave on a vibrating
boat deck. Especially, protect the Optical sensor.
・
Do not leave the D-2000 exposed to direct sunlight or other areas of high temperature.
・
Do not leave the strobe closed when traveling to or from high altitudes. Always remove the battery cap
or O-ring.
・
Please remove batteries after using.
・
Violent impact can severely damage it, and don’t “Back roll” or “Giant stride” with D-2000, please take it
hand to hand.
[ Before Use ]
The D-2000 strobe is a dual use underwater and land external strobe with G.N.20 (ISO100, Air) and
following main futures.
・
Underwater TTL auto exposure in S-TTL, from high-end digital cameras to point-and-shoot digital
cameras.
・
24 steps External Auto control mod e and 13 steps manual mode.
・
Film camera’s TTL mode is supported. ( Nikonos type is compatible, but it is required “optical signal
converter TTL” and optical cable)
2
・
Integral Shutter linked Auto off Focus light is installed.
・
Clear photo system to completely block all visible light from camera’s built in strobe, so you can take
more clear images without “backscatter”.
Before use, please follow these 4 steps guidance
STEP 1
Your D-2000 comes from the factory with the following parts.
1. D-2000 Body
2. Battery Box Cap
3. magnet, cap screw and a tool
4. Extra O-ring
5. INON grease
6. Light filter
x2
7. Instruction manual ( Japanese version x 2 )
Prepare for the required accessories
To use the external strobe D-2000, it will be required some optional accessories. Please confirm
these items are prepared. If you have any question, please ask us easily.
1. 4 x AA type batteries. (Nickel Metal Hydride battery is recommended)
2. Optical cable kit for your housing. It is provided for each housing model.
3. Housing tray and arm
3
[Basic manual]
Before operating the unit, please read this manual carefully. Keep it for future reference.
TABLE OF CONTENTS
Names of D-2000 parts and function
・・・5
Measures to prevent accidental Flooding
・・・6
Chapter 1 : Before use
About corresponding camera or strobe system
・・・8
Required connecting parts or accessories ( not included )
・・・8
Installing Batteries
・・・9
Connecting the optical cable
・ ・ 10
Chapter 2 : Easy using ( S-TTL mode)
S-TTL control
・ ・ 11
How to use S-TTL
・ ・ 11
Adjustment of the strobe power at S-TTL mode
・ ・ 12
Trouble shooting
・ ・ 14
Chapter 3 : After care and maintenance
About handling
・ ・ 14
Post dive care
・ ・ 15
Overhaul and Maintenance service
・ ・ 15
4
Names of D-2000 parts and function
1. Flash tubes
2. Focus light
3. Light adjustment sensor
4. +1/4EV compensation Switch
5. Slave sensor
6. Battery box
7. Battery box Inner cap
8. Battery box Inner cap screw
9. Battery box outer cap
10. 6mm threaded socket for Z adapter or YS bolt
11. Main mode switch
You can set
S-TTL mode, S-TTL “Low” mode, External Auto Flash exposure Adjustment mode or Manual mode.
12. Strobe ready lamp (Red)
When the strobe is ready for flash, it light on Red lamp.
13. TTL monitor lamp (Green)
When D-2000 could controls its power correctly with S-TTL, S-TTL ”Low” or External Auto mode, it light on Green lamp.
14. EV compensation dial
When you use D-2000 at S-TTL or S-TTL “Low” mode, it works as the EV compensation set dial. And when you use
D-2000 at External auto mode, this dial works as Aperture value set dial, and when you use D-2000 at manual mode, it
works as the power control set dial.
15. Advanced Cancel circuit switch ( magnet switch hole)
When you use D-2000 with the camera that do not pre-flash and at External mode or manual, set the magnet here.
Then the advanced cancel circuit will be OFF.
16. Focus light switch
Off mode: position set at “Light” as in picture,
Single mode: Push this switch once and release. The light will turn on and then turn off automatically as the internal
5
strobe fires or if shutter not released, after about 8 seconds.
Continuous mode: By pushing switch and turning it to either right or left “Lock” position while pressing, then the focus
light will turn on and shine continuously until the shutter is released. Then the focus light will turn on again automatically
0.5 seconds after the image is captured.
When you use the focus light at “continuous mode” it will turn on again automatically, and the off time is approximately 0.5
seconds, at the case of using slow shutter speeds it will turn on again while the shutter is still open, exposing the image
with light from the focus light. So please use “Off mode” or “Single mode” when you use slow shutter speed.
17. Focus light filter seal
When you use S-TTL or S-TTL”Low” mode, paste this on the
window at focus light. This filter prevent the focus light have an
effect on the accuracy of TTL control. And it makes easy to close
fishes or else , they are sensitive to light.
18. Magnet screw tightener
19. Magnet
20. Magnet switch screw
21. INON grease
22. Battery box spare O-ring
Measures to prevent accidental Flooding
The D-2000 is waterproof due to a rubber O-ring that seals the internal circuitry from the elements. There is only one user
serviceable O-ring: the Battery Box O-ring. This O-ring requires frequent inspection and care to ensure its watertight
integrity. Since most flooding occurs due an O-ring related problem we strongly recommend you to Inspect the O-ring
(and clean, grease or replace as necessary) each time before using the strobe..
O-ring inspection locations and methods
Inspect and maintain these three points:
1.
The O-ring itself
2.
O-ring contact surfaces
3.
O-ring grooves and Battery Box outer cap O-ring contact surface
4.
If O-ring is properly seated in groove
5.
Grease
First, inspect the O-ring as it is seated in the groove. There is a high chance that the strobe will flood if placed in water if
any of the following are evident.
1.
If hair, sand or other debris is attached to the O-ring. Remove O-ring and wipe-off the debris.
2.
If the O-ring is cut or cracked. The O-ring must be removed and replaced with a new O-ring
6
3.
If the O-ring is twisted. The O-ring must be removed and reinstalled uniformly with no twists.
4.
If there is hair, sand or other debris on the O-ring contact surfaces. Wipe of any debris
5.
If there is a scratch or other imperfection on the O-ring contact surfaces. The strobe must be inspected by an
authorized technician, and repaired if possible. Contact us.
O-ring Maintenance Method
Grease: INON O-rings are compounded with a special type of oil that is not compatible with all grease types. Do not
use the grease except the supplied INON Grease. If you use any other grease, which may cause the O-rings to
swell or deform, causing poor seal and water leakage. If you use non-INON grease , then please replace the O-ring to
a new one as soon as possible.
1.
O-ring and sealing surface should be lightly lubricated with INON grease lubricant on a regular basis. This should
always be done before storing the strobe and before a first dive after taking the strobe out of storage.
2.
It is important never to use a sharp instrument when removing an o-ring as this may cause damage to the o-ring or
the o-ring groove. A hairpin or a credit card works well.
3.
The removed o-ring should be examined for damage. Check to make sure that the o-ring is free from nicks and cuts
and that it retains its original round profile. O-rings that appear to be damaged should be discarded immediately and
replaced with new o-rings
4.
Clean the o-ring grooves (where the o-rings sit) with a Q-tip. Be sure to remove any lint the Q-tip may leave behind.
Inspect the groove and the O-ring contact surfaces for damage.
5.
Wipe the part of the battery cap that the o-ring seals against with a clean lint free cloth.
6.
Re-grease the o-rings with a thin layer of INON grease until it appears to be smooth and shiny. Do not over grease it
use just enough grease so that the o-ring will pull smoothly through your fingers. Excessive amounts will only attract
dirt to the o-ring.
7.
Replace o-rings in its proper position.
After Installing O-ring
After Installing the O-ring in the groove, making sure that it is seated uniformly and not twisted. Then add a little extra
grease to the O-ring and liberally grease O-ring contact surface on the battery box. A Iittle extra grease is necessary due
to friction when screwing down the battery box cap. too much friction.
When the battery box cap is fully screwed down and seated on the O-ring surface, Iook at the O-ring through the
transparent edge of the cap. You should see a continuous, uniform contact line between the cap and O ring. If the contact
line is not uniform, or twisted, contaminated with hair, Iint or sand etc. there is a good chance the strobe will flood.
Remove cap, re-seat O-ring and remove contaminants as necessary.
7
Chapter 1 : Before use
About corresponding camera or strobe system
INON D-2000 is a complex, multi-function device with different futures available for 6 kinds camera, strobe or housing
systems, and it has 4 ways to control its power.
In this basic manual, it is instructed how to use with digital cameras ( Pre-flashing type or Non pre-flashing type)
The other way to use as a slave strobe or with housing, they will be instructed in the “advance manual”
At the present (Oct.2004) INON had confirmed the compatibility with these cameras.
Manufacturer
OLYMPUS
camera model
housing
C-200Z,C-300Z
PT-009
μ -30,25,25,15
Manufacturer
Canon
camera model
housing
IXY D300
WP-DC100
PT-016
IXY D300a
WP-DC500
μ -40
PT-026
IXY D500,D450,D400
WP-DC800
C-40Z
PT-012
A20,10
WP-DC200
X-2,X-1
PT-014
A40,30
WP-DC200s
X-3
PT-024
A70,60
WP-DC700
C-755,745,750,740
PT-018
A80
WP-DC900
C-770,760
PT-022
A85,75
WP-DC30
C-3030,3000,2020
PT-005,007,010
A95
WP-DC50
C-3040,2040
PT-007,010
S50,45,S40,S30
WP-DC300
C-4040,4100
PT-010
S1IS
WP-DC20
C-5050
PT-015
E4100,3200,2200
WP-CP1
C-5060
PT-020
E5200,4200
WP-CP2
C-8080
PT-023
Fuji
F710
WP-FX701
SONY
P100
MPK-PHB
Nikon
INON had confirmed the compatibility with these models, but they tested models which are supplied INON
optical cable kit. So if you can attach INON cable on your housing, then it may compatible with D-2000. So please
ask us easily that your camera is compatible or not.
Required connecting parts or accessories ( not included )
To use D-2000, you will be required some accessories like tray, arm or else.
Please prepare tray and arm to use D-2000 with comfortable and compatible for your housing.
8
About the batteries
The D-2000 can use the following batteries.( Batteries are not included in D-2000)
AA type Alkaline batteries x 4
AA type Nicad batteries x 4
AA type NiMH batteries x 4
AA type oxy ride dry cell batteries x 4 *
Caution 1 : Do not use other kind batteries with merge. We recommend to use with same
manufacturer, same kind and same model batteries. And if you use oxy ride dry cell batteries,
Please read followed caution. The recommended battery is NiMH battery.
Caution 2 : The electric current of the oxy ride dry cell battery is same as the alkaline dry cell,
but at survey value (as for oxy ride dry cell battery itself inscription 1.5V) there was 1.735V
regarding the voltage plane. So if you turn on the focus light of D-2000 when its voltage is
still high, it makes easy to burn out light bulb. To prevent it, please turn on the focus light after
the battery voltage is low. ( about 20 times or more full flashing make its voltage lower than 1.5V)
・
Do not mix different battery types, different manufactures or batteries having different remaining charges.
・
Do not attempt to charge non-chargeable batteries.
・
Make sure battery +/- positions are placed in Battery Box.
・
Do not intentionally short the batteries or circuits.
・
Do not use battery charging devices that are not compliant with the battery manufacturer’s recommendation.
When you do not use D-2000, please remove batteries.
And it depending on the type of batteries, possible buildup and explosion of flammable (hydrogen) gas.
IF you ever feel suspicion that the D-2000 is not operating correctly, immediately stop using D-2000 and
remove batteries promptly.
And request to repair or service to us .
9
Optical cable
INON supplies these optical cables.
Housing model
OLYMPUS PT-005/007/010
Optical cable kit / model
required attachment tool
Optical cable kit W2
AD mount adapter or M67 mount adapter
OLYMPUS PT-012/009
Optical cable kit W4
for PT012/009
AD mount adapter or M67 mount adapter
OLYMPUS PT-014
Optical cable kit W6
OLYMPUS PT-015
Optical cable kit W5
OLYMPUS PT-016
Optical cable kit W8
OLYMPUS PT-018
Optical cable kit W7
OLYMPUS PT-020
Optical cable kit W9
OLYMPUS PT-022
Optical cable kit W10
OLYMPUS PT-023
Optical cable kit W16
OLYMPUS PT-024
Optical cable kit W15
for PT014
AD mount adapter for PT016
AD mount adapter for PT024
AD mount adapter for DC300 DC200S
Canon WP series housings
DC-300/200/200S/100/500
,DC100/500,DC700/30,DC800,DC900/50
Optical cable kit W3
or M67adapter for
700/800/900/30/50
DC300,DC200/200S,DC100/500
Canon WP-DC20
Optical cable kit W5
M67 adapter for DC20
NIKON WP-CP1
Optical cable kit W12
AD mount adapter forCP1
NIKON WP-CP2
Optical cable kit W11
AD mount adapter forCP2
FUJI WP-FX701
Optical cable kit W13
AD mount adapter forFX701
SONY MPK-PHB
Optical cable kit W14
AD mount adapter for PHB
Installing Batteries
When you install the batteries, always turn Main mode switch to OFF
1.
Slowly unscrew the Battery box outer cap counterclockwise.
2.
Unscrew the Battery box inner cap screw counterclockwise and remove the Battery box inner cap. ( at this time
please be aware not to lost the inner cap screw)
3.
Install the batteries in proper position, Pay attention the indications of + / - inside of the battery box.
4.
Put the inner battery cap and screw down the battery box inner cap screw.
5.
After checking the O-ring and contact surface, slowly screw down the battery box cap clockwise.
Do not turn on main mode switch before installing the optical cable.
Connecting the arm and the optical cable
10
Attach your arm to the D-2000, please use “Z-adapter” or “INON YS attachment bolt kit”. If you will not use proper
attachment tool or use some other length bolt, it may break the mount base of D-2000.
Connecting with “Optical cable D” , and D-2000 requires “ IR filter seal” to control its power with “S-TTL” mode.
And when you disconnecting arm or cable, turn off main mode switch for your safety.
Chapter 2 : Easy using ( S-TTL mode)
S-TTL control
D-2000 strobe achieved "Real TTL" control with most digital cameras. From high-end cameras to point-and-shoot
cameras, it works TTL auto exposure, programmed mode or other modes, that you should do is only shooting.
At the present (Oct.2004) INON had confirmed the “S-TTL” compatibility with these cameras
Manufacturor
OLYMPUS
camera model
housing
C-200Z,C-300Z
PT-009
μ -30,25,25,15
Manufacturor
Canon
camera model
housing
IXY D300
WP-DC100
PT-016
IXY D300a
WP-DC500
μ -40
PT-026
IXY D500,D450,D400
WP-DC800
C-40Z
PT-012
A20,10
WP-DC200
X-2,X-1
PT-014
A40,30*2
WP-DC200s
X-3
PT-024
A70,60*2
WP-DC700
C-755,745,750,740
PT-018
A80*2
WP-DC900
C-770,760
PT-022
A85,75*2
WP-DC30
C-3030,3000,2020
PT-005,007,010
A95*2
WP-DC50
C-3040,2040
PT-007,010
S50,45,S40,S30*2
WP-DC300
C-4040,4100
PT-010
S1IS*2
WP-DC20
C-5050 *1
PT-015
E4100,3200,2200
WP-CP1
C-5060*1
PT-020
E5200,4200
WP-CP2
C-8080*1
PT-023
P100
MPK-PHB
Nikon
SONY
*1: When you use built in strobe with “slave mode”, it does not work “S-TTL”
*2: When you use “Manual mode”, it does not work “S-TTL”
How to use S-TTL
1.
Paste the Red filter seal of the focus light.
If you don’t use this RED filter, at some case the light influence the accuracy of S-TTL control.
2.
Set your camera’s “Flash mode” at enforce mode.
Do not set flash mode at “Red eye reduction mode”. And there are some case that it is impossible to use
enforce flash mode by your camera. ( EX: it is impossible to use enforce flash mode with Canon IXY digital series
cameras except Manual mode.) Please refer the instruction of your camera.
3.
Turn on main mode switch and set it to “S-TTL-Low” mode
11
4.
Set the “EV controller dial” at position “B”
Using the focus light and confirm the strobe light beams to the object correctly. And this light helps speedy focusing.
And shoot the images.
At almost case, you will have good result that is well controlled strobe light. So it is no need to adjust any more.
But the accuracy of S-TTL control depends on it of the built in strobe. So if you use D-2000 with a point-and-shoot
camera that strobe control accuracy is not so good, on this case it will be need to adjust the EV compensation of D-2000.
Adjustment of the strobe power at S-TTL mode
INON D-2000 has the EV controller dial. There are some case that you have better to control the strobe power with this
function by the reason of
“strobe control accuracy of your camera”, “situation of imaging” or “ your favorite” and else.
INON introduced some cases, it will be need the adjustment of the strobe power.
Case 1:
Camera:
OLYMPUS μ -series
Situation
Macro mode “ON” and using tele zoom, and the working distance 30-40cm or closer.
Result:
Over exposure ( too bright )
How to adjust
Set your strobe mode “S-TTL Low” and adjust the power with the EV controller dial if it is need.
the source of the trouble
At this situation and with this camera, the aperture is closed to f14 and the built in strobe flashes
Full power. And this camera controls its exposure level with changing the sensibility of CCD.
So S-TTL system can not detect the stop signal of the built in strobe power and D-2000 flashes
with Full power, too. And the result is over exposure.
But if you use "S-TTL Low" mode, then D-2000 flashes with the same power with the built in strobe
Even if the built in strobe flashes with Full power, but D-2000 flashes the same power of the built in
strobe.
Case 2:
Camera:
OLYMPUS μ -series
Situation
Wide angle, and in enough ambient light. Ex. backlight photographing.
Result:
Under exposure ( too dark )
How to adjust
Set your strobe mode “S-TTL ” and adjust the power with the EV controller dial.
Or changing the ambient light condition, or a little zooming up and use closed aperture.
the source of the trouble
At this situation and with this camera, the built in strobe flashes with a slight power.
Even if the camera strobe mode is " enforce mode " but it only do pretend flashing.
So S-TTL system detect the slight power of the built in strobe power and D-2000 flashes
with a slight power, too. And the result is under exposure.
And the captured image is like a exposure with only ambient light
12
How to Adjust exposure level
1. Use EV controller dial : Position “B” [± 0] ,turn to “A” side then [ + ] compensation, and turn to “C” side then
[ – ] compensation.
[+] compensation: 3 steps
[ – ] compensation : 5 steps (the range surrounded by Yellow arc )
2. Select to use “S-TTL” mode or “S-TTL Low” mode
“S-TTL Low” is the standard mode, but if you think it will be under exposure then please use “S-TTL” mode.
a)
When you use D-2000 at “S-TTL Low” mode and using EV controller +3, but it is still under exposure
b)
When you use diffuser panel.
c)
When you use closed aperture.
At these case, please use “S-TTL” mode.
3. You can use the EV compensation or strobe power compensation of your camera.
Adjust strobe power to [–] compensation (over exposure and adjust it to dark)
You can adjust the power to –5 step
Adjust strobe power to [+] compensation (under exposure and adjust it to bright)
You can adjust the power to +3 step
If you could not have proper exposure by this control, then turn mode switch to “S-TTL” mode.
And when you use “S-TTL” mode, you can use EV controller dial with the same way.
Do not fire D-2000 continuously over 15 times, if you need to fire D-2000 continuously, then once
stop photographing and cool down the circuit for over 3 minuets.
13
Trouble shooting
If your D-2000 suddenly stop charging, there is a possibility the trouble of inner battery cap with
the batteries that you use. Please cope as follows.
If your battery terminals on the inner cap are crushed, Then pull up
the terminals and secure the contact.
And still it does not work, then there is a possibility it is caused
with dirt of the contact face. ( battery side or inner cap)
It depending on the type of batteries, possible buildup of flammable (hydrogen) gas . And the battery box of D-2000 is
highly sealed. And it build up residue on the battery terminals and battery box terminals. This can cause poor connection,
so clean the terminals as in images below.
Wipe each terminal surface with a Q-tips or cotton
swab soaked in alcohol to remove any residue or oil
similar.
If this step does not fully clean the terminal, dap a
small amount of silver polish on a Q-tips or cotton
swab and wipe terminal surface until clean. And clean
off any silver polish residue with a clean swab.
At this case, please take care not to adhere alcohol or silver polish on plastic parts as the battery box or else.
Chapter 3 : After care and maintenance
About handling
・
Never repeatedly fire the strobe continuously, for example, to test, discharge or refresh the batteries.
・
If you use this strobe in air plane or near the medical equipment, please follow the instruction of them.
・
Protect the D-2000 from excessive impact shock and vibration. Do not drop, do not leave on a vibrating
boat deck. Especially, protect the Optical sensor .
・
Do not leave the D-2000 exposed to direct sunlight or other areas of high temperature.
・
Do not leave the strobe closed when traveling to or from high altitudes. Always remove the battery cap
or O-ring. This strobe is strong against external pressure but it is not designed to withstand a build up
of internal pressure. You must loosen the cap of battery box before taking D -2000 on board aircraft.
・
Please remove batteries after using.
・
Do not disassemble or remodel D-2000.
The strobe contains very high voltage circuitry, it could lead to severe electric shock and injury.
・
Never touch electric circuit
Even if it is not installed battery, there is the possibility to get an electric shock.
・
When you think it flooded or malfunction, stop using underwater or even on land immediately.
14
On this case, please remove batteries ASAP and request to repair or service to us.
・
Do not drop water or a foreign body in the battery box.
・
Do not fire this strobe with the reflector placed on a table or the floor as that may cause overheating of
the internal circuitry and/or fire.
・
Do not use any solvent or other chemical to maintenance or cleaning.
・
Please take care about handling of batteries ( refer page
)
Post dive care
1.
After using D-2000 under water, be sure to wash it thoroughly with fresh water, while leaving all caps on
waterproofing components closed.
2.
After washing with fresh water, wipe it with a dry, soft cloth and dry in the shade.
3.
After using, remove batteries from the battery component. When removing them, wipe water away
completely so that water drops will not get into the component or terminal plate.
4.
Apply a thin coat of grease over the O-ring
5.
When not using for a prolonged period of time, store unit with care away from high temperature, high
humidity, direct sunlight, or severe cold. And the cap of battery component is removed and sealed in
zippered airtight container or in something like this.
6.
When not using for a prolonged period of time, please recharge and test flashing D-2000 once in a
month. Then you can maintain the Condenser of D-2000 in good condition.
Never use petroleum solvents, such as thinner, to clean the D-2000.
Overhaul and Maintenance service
We recommend the maintenance at a fixed time. The periodical inspection, once for 1 years and the
overhaul, once for 3 years. And if you use D-2000 frequently, then it is better to have in shorter.
About Maintenance, please request to us. And INON D-2000 has warranty for a year from the day you
purchased. But this warranty is valid only in Japan. So For warranty work, the item needs to be shipped
back to Japan. In principle, when item is purchased from us, the full Japanese warranty applies. However, if
it is shipped to Japan for repair or maintenance, the owner must bear transport ation costs to Japan.
INON D-2000 English “ Basic manual “ Ver 1.01
15
12, Dec.2004