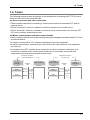
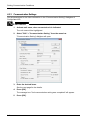
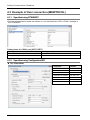
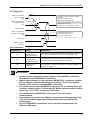
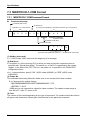
1
Safety Precautions Observe the following notices to ensure personal safety or to prevent accidents. To ensure that you use this product correctly, read this User’s Manual thoroughly before use. Make sure that you fully understand the product and information on safety. This manual uses two safety flags to indicate different levels of danger. WARNING If critical situations that could lead to user’s death or serious injury is assumed by mishandling of the product. -Always take precautions to ensure the overall safety of your system, so that the whole system remains safe in the event of failure of this product or other external factor. -Do not use this product in areas with inflammable gas. It could lead to an explosion. -Exposing this product to excessive heat or open flames could cause damage to the lithium battery or other electronic parts. -Battery may explode if mistreated. Do not recharge, disassemble or dispose of fire. CAUTION If critical situations that could lead to user’s injury or only property damage is assumed by mishandling of the product. -To prevent excessive exothermic heat or smoke generation, use this product at the values less than the maximum of the characteristics and performance that are assured in these specifications. -Do not dismantle or remodel the product. It could cause excessive exothermic heat or smoke generation. -Do not touch the terminal while turning on electricity. It could lead to an electric shock. -Use the external devices to function the emergency stop and interlock circuit. -Connect the wires or connectors securely. The loose connection could cause excessive exothermic heat or smoke generation. -Ground the protective earth (PE) terminal (Class D grounding). Failure to do so could lead to an electric shock. -Do not allow foreign matters such as liquid, flammable materials, metals to go into the inside of the product. It could cause excessive exothermic heat or smoke generation. -Do not undertake construction (such as connection and disconnection) while the power supply is on. It could lead to an electric shock. Copyright / Trademarks -This manual and its contents are copyrighted. -You may not copy this manual, in whole or part, without written consent of Panasonic Industrial Devices SUNX Co., Ltd. -Windows is a registered trademark of Microsoft Corporation in the United States and other countries. -Ethernet is a registered trademark of Fuji Xerox Co., Ltd. and Xerox Corp. -All other company names and product names are trademarks or registered trademarks of their respective owners. PLC_BATPE_ET Introduction Thank you for buying a Panasonic product. Before you use the product, please carefully read the installation instructions and the users manual, and understand their contents in detail to use the product properly. Types of Manual There are different types of users manual for the FP7 series, as listed below. Please refer to a relevant manual for the unit and purpose of your use. The manuals can be downloaded on our website: http://industrial.panasonic.com/ac/e/dl_center/manual/ . Unit name or purpose of use Manual name Manual code FP7 CPU Unit Users Manual (Hardware) WUME-FP7CPUH FP7 CPU Unit Command Reference Manual WUME-FP7CPUPGR FP7 CPU Unit Users Manual (Logging Trace Function) WUME-FP7CPULOG FP7 CPU Unit Users Manual (Security Function) WUME-FP7CPUSEC FP7 CPU Unit Users Manual (LAN Port Communication) WUME-FP7LAN FP7 series Users Manual (SCU communication) WUME-FP7COM FP7 Extension Cassette (Communication) (Ethernet type) FP7 series Users Manual (Communication cassette Ethernet type) WUME-FP7CCET FP7 Extension (Function) Cassette Analog Cassette FP7 Analog Cassette Users Manual WUME-FP7FCA FP7 Power Supply Unit FP7 CPU Unit Instructions for Built-in LAN Port Instructions for Built-in COM Port FP7 Extension Cassette (Communication) (RS-232C/RS485 type) FP7 Digital Input/Output Unit FP7 Digital Input/Output Unit Users Manual WUME-FP7DIO FP7 Analog Input Unit FP7 Analog Input Unit Users Manual WUME-FP7AIH FP7 Analog Output Unit FP7 Analog Output Unit Users Manual WUME-FP7AOH FP7 High-speed counter Unit FP7 High-speed counter Unit Users Manual WUME-FP7HSC FP7 Pulse Output Unit FP7 Pulse Output Unit Users Manual WUME-FP7PG FP7 Positioning Unit FP7 Positioning Unit Users Manual WUME-FP7POSP FP7 Serial Communication Unit FP7 series Users Manual (SCU communication) WUME-FP7COM PHLS System PHLS System Users Manual WUME-PHLS Programming Software FPWIN GR7 FPWIN GR7 Introduction Guidance WUME-FPWINGR7 Table of Contents Table of Contents 1. Communication Functions of CPU Unit ............................ 1-1 1.1 1.2 1.3 1.4 Communication Ports of CPU Unit ......................................................... 1-2 1.1.1 Types and Purposes of Communication Ports........................................1-2 1.1.2 AFP7CCET1 Port Specifications.............................................................1-3 1.1.3 Types of communication cassette...........................................................1-3 1.1.4 Configurator WD......................................................................................1-3 Available Function For Each COM Port ................................................. 1-4 1.2.1 Applications that can be Used in Each Port ............................................1-4 1.2.2 Restrictions..............................................................................................1-4 Overview of Communication Functions.................................................. 1-5 1.3.1 MEWTOCOL Master/Slave Communication ...........................................1-5 1.3.2 General-Purpose Communication...........................................................1-6 Terms ..................................................................................................... 1-7 2. Installation and Wiring........................................................ 2-1 2.1 2.2 2.3 Attaching a Communication Cassette .................................................... 2-2 2.1.1 Setting of Switches................................................................................2-2 2.1.2 Attachment Instructions...........................................................................2-2 Installation Environment and Wiring for LAN Ports ................................ 2-3 2.2.1 Before Installation and Wiring .................................................................2-3 2.2.2 Installation Environment and Noise Control Measures ...........................2-3 Wiring the LAN Port................................................................................ 2-4 3. I/O Number Allocation ........................................................ 3-1 3.1 ii Input/Output Signals Used for Communication ...................................... 3-2 3.1.1 Occupied Area for Communication cassette (Ethernet type)..................3-2 3.1.2 I/O Number Allocation .............................................................................3-2 Table of Contents 4. Setting Communication Conditions ..................................4-1 4.1 Settings Using FPWIN GR7.................................................................... 4-2 4.2 Specified using Configurator WD............................................................ 4-4 4.3 4.4 4.5 4.2.1 Start Configurator WD and Serach units.................................................4-4 4.2.2 IP Address Settings.................................................................................4-5 4.2.3 Communication Settings .........................................................................4-6 4.2.4 Option Settings........................................................................................4-8 4.2.5 Target IP address for unit number Setting ............................................4-10 4.2.6 Initialization ot the environment setting of the cassette ........................4-11 Example of User connection (MEWTOCOL) ........................................ 4-12 4.3.1 Specified using FPWINGR7..................................................................4-12 4.3.2 Specified using Configuration WD ........................................................4-12 4.3.3 Example of MEWTOCOL Master Communication...............................4-14 Example of User connection (General Communication)...................... 4-16 4.4.1 Specified using FPWINGR7..................................................................4-16 4.4.2 Specified using Configuration WD ........................................................4-16 Example of System connection ............................................................ 4-18 4.5.1 Specified using Configuration WD ........................................................4-18 4.5.2 Specified using FPWIN GR7.................................................................4-19 5. MEWTOCOL Master/Slave Communication ......................5-1 5.1 5.2 5.3 List of MEWTOCOL / MEWTOCOL7 Supporting Commands ................ 5-2 5.1.1 List of MEWTOCOL Commands .............................................................5-2 5.1.2 List of MEWTOCOL7 Commands ...........................................................5-2 MEWTOCOL-COM Master Communication (RECV).............................. 5-3 5.2.1 Read Data from an External Device .......................................................5-3 5.2.2 Precaution When Using TCP Client Mode..............................................5-5 5.2.3 RECV Instruction (When MEWTOCOL-COM is Used)...........................5-5 MEWTOCOL-COM Master Communication (SEND).............................. 5-6 5.3.1 Write Data into an External Device .........................................................5-6 5.3.2 Precautions When Using TCP Client Mode ............................................5-8 iii Table of Contents 5.3.3 SEND Instruction (When MEWTOCOL-COM is Used)...........................5-8 6. General-Purpose Communication ..................................... 6-1 6.1 6.2 6.3 6.4 Operation of General-Purpose Communication ..................................... 6-2 6.1.1 Read Data from an External Device........................................................6-2 6.1.2 Write Data into an External Device .........................................................6-2 Sending Operation ................................................................................. 6-3 6.2.1 Overview of Sending Operation ..............................................................6-3 6.2.2 Contents of Sent Data .............................................................................6-5 6.2.3 GPSEND (General-Purpose Communication Sending Instruction) ........6-6 6.2.4 Precautions on Sending Data .................................................................6-7 Receiving Operation............................................................................... 6-8 6.3.1 Overview of Receiving Operation............................................................6-8 6.3.2 Contents of Received Data ...................................................................6-10 6.3.3 Precautions on Receiving Data.............................................................6-10 6.3.4 Operations of the "Reception done copy" flag and multiplex reception 6-11 6.3.5 GPRECV (General-Purpose Communication Receiving Instruction) ...6-12 Sending/Receiving Flag Operation....................................................... 6-13 6.4.1 No Header (Start Code), Terminator (End Code) "CR": .......................6-13 6.4.2 Start Code "STX", End Code "ETX": .....................................................6-14 7. Specifications...................................................................... 7-1 7.1 Specifications ......................................................................................... 7-2 7.1.1 7.2 7.3 iv Communication .......................................................................................7-2 MEWTOCOL-COM Format .................................................................... 7-4 7.2.1 MEWTOCOL-COM Command Format ...................................................7-4 7.2.2 MEWTOCOL-COM Response Format....................................................7-6 MEWTOCOL7-COM Format .................................................................. 7-8 7.3.1 MEWTOCOL7-COM Command Format .................................................7-8 7.3.2 MEWTOCOL7 Response Format .........................................................7-10 1 Communication Functions of CPU Unit Communication Functions of CPU Unit 1.1 Communication Ports of CPU Unit 1.1.1 Types and Purposes of Communication Ports Communication Port of CPU Unit (In the above figure, a communication cassette (Ethernet type) is attached to the COM.1 and COM.2 ports.) Functions of Ports (1) COM.1 and COM.2 ports Attach a separately sold communication cassette to use these ports. (2) COM.0 port, GT power supply terminals This is an RS-232C port that is equipped to a standard model of CPU unit. It is equipped with power supply terminals (5V DC and 24V DC) to which a GT series display can be connected. (3) LAN port This is equipped to a standard model of CPU unit. This is used for connection to Ethernet. (4) USB port This is equipped to a standard model of CPU unit. This is used for connecting tool software. REFERENCE 1-2 See the "FP7 CPU unit User's manual (LAN port communication)" for the detailed information of communication method via built-in LAN port in the CPU unit. There is the deference of the usage between the Communication cassette(Ethernet type) AFP7CCET1 and built-in LAN port. 1.1 Communication Ports of CPU Unit 1.1.2 AFP7CCET1 Port Specifications 100BASE-TX / 10BASE-T connector (RJ45) When an Ethernet (100BASE-TX, 10BASE-T) is being used, this connector is used to connect the communication cassette and the hub, using a UTP cable. Pin no. Signal name 1 TX+ 2 TX- 3 RX+ 4 Not used 5 Not used 6 RX- 7 Not used 8 Not used Functions of LED lamps (1) LINK Turns ON when the connection is connected between the communication cassette AFP7 CCET1 and external equipment. (2) ACK Flashes when some communication is in progress with a connected device (e.g. sending/receiving a command or response). 1.1.3 Types of communication cassette Model no. Communication interface Communication ports that can be allocated COM.1 AFP7CCET1 User connection COM.2 ● System connection ● (Note) See 1.2 for the information of "User connection" or "System connection". 1.1.4 Configurator WD The communication tool software “Configurator WD” is required to set Ethernet communication for the AFP7CCET1 The Configurator WD can be downloaded from our website free of charge. http://industrial.panasonic.com/ac/e/dl_center/software/ (Member registration is required. Free of charge) 1-3 Communication Functions of CPU Unit 1.2 Available Function For Each COM Port 1.2.1 Applications that can be Used in Each Port Mode Type of connection COM port MEWTOCOL7-COM MEWTOCOL-COM Master User connection COM.1 System connection COM.2 ○(Note) Slave General Communication ● ● ● (Note): MEWTOCOL7-COM do not support Master communication function. User connection It can be used for data communication between external Ethernet equipment connected on LAN to open virtual connection via communication cassette AFP7CCET1. Any one of the following condition can be used, MEWTOCOL master communication *1 connection, MEWTOCOL slave communication *3 connection or General Communication*1 connection Parameters are set using the software FPWIN GR7 and Configurator WD. System connection It can be used to connect tool software via communication cassette AFP7CCET1. Only 1 connection is available. COM.2 is allocated and communication conditions are fixed. Parameters are set using the software Configurator WD. 1.2.2 Restrictions Behavior after the power has been turned on It takes approx. 5 seconds to Initialize communication cassette AFP7CCET1, after the power has been turned on. Data transfer cannot be executed during initialzaition process. Please program to start communication, after the connection flag turns ON. Restriction of broadcast communication Broadcast communication do not support communication via router, because generally a router do not forward broadcast packets. Broadcast communication put a load on all other equipment on the network. Please evaruate the effects on other equipment enough, before a broadcast communication executed. Restriction to connect tool software communication Althogh there is no limitation of connection, if you selecte "UDP" as a protocol mode, but FPWIN GR7 do not support UDP communication. 1-4 1.3 Overview of Communication Functions 1.3 Overview of Communication Functions 1.3.1 MEWTOCOL Master/Slave Communication Overview of function Execute communication using MEWTOCOL-COM, a communication protocol used by our PLC. In master communication, PLC executes communication by sending commands to devices that support MEWTOCOL, and receiving responses. Messages in accordance with the protocol are automatically generated by PLC. In the user program, reading and writing can be done simply by specifying the station no. and memory address and executing SEND/RECV instructions. Slave communication is performed when the computer or display connected to PLC has the sending right, and sends commands, and PLC returns responses. In slave communication, PLC responds automatically, so no program concerning communication is necessary on the PLC side. The data size that can be sent or received in a single communication is up to 507 words for register transmission (up to 1,014 words for MEWTOCOL7-COM) and 1 bit for bit transmission. FP7 CPU Ethernet LAN IP XXXXXX IP XXXXXX Master communication Device supporting MEWTOCOL-COM Command Response Send/receive data using MEWTOCOL-COM Slave communication Command Response 1-5 Communication Functions of CPU Unit 1.3.2 General-Purpose Communication Overview of function General-purpose communication is used when PLC executes communication in accordance with the protocol of the partner device. Formulation and sending of command messages to the partner device, and reception processing of responses from the partner device, are performed by the user program. Sending/receiving of data with an external device is executed via given operation memory (e.g. data register). Data are sent by converting commands in accordance with the partner device as strings into ASCII text, setting them into a given data register, and executing GPSEND instruction. Response received from the partner device is temporarily saved in the buffer. Based on the reception done flag, GPRECV instruction is executed. The ASCII strings can be converted into numerical data, etc. as necessary, by the user program. The data size that can be sent or received in a single communication is up to 4,096 bytes. (including control codes) FP7 CPU Ethernet LAN Send Operation memory Receive External device IP XXXXXX IP XXXXXX Message/data Send/receive message/data Message/data Applications of general-purpose communication This is used for connection with devices made by differing manufacturers that have dedicated communication protocols. 1-6 1.4 Terms 1.4 Terms The following terms are used for settings on the software for connecting the FP7 CPU unit to Ethernet LAN, and in the Users Manuals. Server connection and client connection These indicate methods for connecting a virtual communication line between FP7 and an external device. "Server connection" refers to a method to wait for connection from another client. "Client connection" refers to a method to connect a virtual communication line from the FP7 CPU unit to another external device port. Master communication and slave communication These indicate methods for actually sending/receiving messages and data between FP7 and an external device. In master communication, PLC sends commands and receives responses. In slave communication, commands are received from an external device, and responses are returned. In a system using FP7, whether server connection or client connection is selected, once connection is opened and a virtual communication line is connected, commands and responses can be sent and received from both sides. Virtual line connection from FP7 CPU Virtual line connection from external device FP7 CPU (server connection) IP XXXXXX Master communication Slave communication Ethernet LAN Command Response Command Response External device (client connection) FP7 CPU (client connection) IP XXXXXX IP XXXXXX Master communication Slave communication Ethernet LAN External device (server connection) IP XXXXXX Command Response Command Response 1-7 Communication Functions of CPU Unit 1-8 2 Installation and Wiring Installation and Wiring 2.1 Attaching a Communication Cassette 2.1.1 Setting of Switches Two switches are mounted on the circuit board of communication cassette AFP7CCET1. SW1 is used to initialize comunication condtions. SW2 is reserved. Please turn OFF during nomal use. REFERENCE See 4.2.6 for initialization of communication conditions 2.1.2 Attachment Instructions When an optional communication cassette is to be used, attach it in the following procedures. PROCEDURE 1. Using a flathead screwdriver, remove the cover on the side of the CPU unit. 2. Attach a desired communication cassette. 2-2 2.2 Installation Environment and Wiring for LAN Ports 2.2 Installation Environment and Wiring for LAN Ports 2.2.1 Before Installation and Wiring Noise resistance of Ethernet The Ethernet is a network used in offices and buildings, where there is comparatively little noise. It does not have a higher resistance to noise than ordinary FA application networks. Caution is required when installing the hub, and when laying cables. 2.2.2 Installation Environment and Noise Control Measures Measures that can be taken in the installation environm ent The CPU unit, transceiver, hub, and communication cables should be installed as far as possible from high-voltage wires, high-voltage equipment, power lines, power equipment, equipment that generates strong breaker surges, and the wiring for any of this equipment. At least 100 mm of clearance should be allowed when installing the equipment. 100mm or more 100mm or more Noise-generating device/cable 100mm or more Ethernet LAN When a device must be installed or a cable must be laid near a noise-generating device for special reasons, take measures such as: • install a programmable controller and a hub within a metal panel, • laying a communication cable inside a metal duct, • attaching a ferrite core near the CPU unit on the communication cable, etc. An alternative measure is to use an optical transceiver close to the noise-generating section of the equipment and install an optical fiber to keep the noise from affecting nearby equipment. (This is also effective as a lightning shield for outdoor wiring.) Metal panels and metal ducts should be grounded at a grounding resistance of 100 Ω or less. Also, metal panels and metal ducts should be insulated so that they do not come in contact with communication devices or cables. 2-3 Installation and Wiring 2.3 Wiring the LAN Port Selection of UTP cables Use Category 5 UTP cable. It is recommended to use a UTP cable of 10 m or shorter, taking account of noise resistance. In an environment where noise may occur, attach a ferrite core near the CPU unit on the UTP cable. It is also recommended to use a shielded cable. NOTE 2-4 For installation of 100BASE-TX or 10BASE-T hub, laying of cables, etc., please consult a specialized construction company. If this construction work is done incorrectly, it can adversely affect the entire network, and can cause accidents. 3 I/O Number Allocation I/O Number Allocation 3.1 Input/Output Signals Used for Communication 3.1.1 Occupied Area for Communication cassette (Ethernet type) A fixed area is allocated as follows. List of occupied words and I/O points by unit Unit Type Occupied words (occupied I/O points) Model number Input Communication cassette (Ethernet type) CPU Unit AFP7CCET1 4words(64points) WX0 - WX3 Output 2words(32points) WY0 - WY1 3.1.2 I/O Number Allocation Input signal (COM.1 port for User connection) Communica tion port Name Description Effective operation mode X0 For COM.1 Port Generalpurpose communicatio n Reception done flag When the unit completes the data reception, it turns on (1). Waiting for data reception: 0, Reception completed: 1 Generalpurpose communication X1 - X3 - Not used Do not use this. - X4 For COM.1 Port Generalpurpose communicatio n Reception done (copy) flag It turns on (1) if there are copied data when GPRECV instruction is executed. It turns off (0) when END instruction is executed. (Note 1) Reading completed: 1 No data to be read: 0 Generalpurpose communication X5 - X7 - Not used Do not use this. - X8 For COM.1 Port Generalpurpose communicatio n Clear to send flag It turns on (1) when the unit is set to the general-purpose communication mode. It turns off (0) in other modes. Generalpurpose communication X9 - XB - Not used Do not use this. - XC For COM.1 Port Master communicatio n Clear to send flag It turns on (1) when the unit is set to modes other than the general-purpose communication mode. It turns off (0) in other modes. MEWTOCOL XD - XF - Not used Do not use this. Generalpurpose communication - Input signal X10 For COM.1 Port Reset done When the communication channel is reset under the output Y10, the flag is turned on (1) once the resetting operation is completed. Resetting done: 1 Y10 is off: 0 X11 - X1F - Not used Do not use this. (Note 1): The general-purpose communication reception done (copy) flag is effective after the execution of the RECV instruction until one of the following instructions is executed. This flag does not remain ON across several scans. Execute 1: END instruction (scan header), and 2: RECV instruction 3-2 3.1 Input/Output Signals Used for Communication Input signal (COM.1 port User connection, COM.2 port for System connection) Effective operation mode Input signal Communica tion port X20 For COM.2 Port Start status flag 0: During start process 1: Start process done Normally X21 For COM.2 Port Link status flag 0: Link Up 1: Link Down Normally X22 For COM.2 Port Initialized flag 0: Normal operation 1: During initialized process Normally X23 - X27 - Not used Do not use this. - X28 For COM.2 Port Error status flag 0: Normal 1: Error occured Normally X29 For COM.2 Port DHCP acquisition flag 0: Normal 1: Acquisition error occurred Normally X2A For COM.2 Port Ver up error flag 0: Normal 1: Ver up error occured Normally X2B - X2F - Not used Do not use this. - X30 For COM.1 Port Connection status flag User connection 0: Disconnected 1: Connected Normally X31 For COM.1 Port TCP Server connection Full flag User connection 0: Not full 1: Full Normally X32 For COM.1 Port TCP Client connection failure flag User connection 0: Success0 1: Failure Normally X33 - Not used Do not use this. - X34 For COM.2 Port Connection status flag System connection 0: Disconnected 1: Connected Normally X35 - X3F - Not used Do not use this. - Name Description 3-3 I/O Number Allocation Output signal (COM.1port: User connection use) Output signal Communica tion port Name Description Effective operation mode Y0 For COM.1 Port Sending done result Reports the results of sending in master communication or general-purpose communication. Normal completion: 0, Abnormal completion: 1 MEWTOCOL Generalpurpose communication Y1 - Y7 - Not used Do not use this. - Y8 For COM.1 Port Generalpurpose communicati on Sending active flag It turns on (1) during sending in the generalpurpose communication mode. (Note 1) Sending done: 0, Sending: 1 Generalpurpose communication Y9 - YB - Not used Do not use this. - YC For COM.1 Port Master communicati on Sending active flag It turns on (1) during sending in the master communication mode. Sending done: 0, Sending: 1 MEWTOCOL YD - YF - Not used Do not use this. - Generalpurpose communication - Y10 For COM.1 Port Request to reset CH By turning on (1) Y10, the communication channel can be reset. Without a request to reset = 0, With a request to reset = 1 After ON (1) is output and the completion of the reset is confirmed by X10, return to OFF (0). The reset is performed only once when this signal rises. This function can be used to delete unnecessary received data or to clear errors before starting normal reception. 1:Sending canceled 2:Reception canceled 3:Re-set communication parameters 4:Clear error information (only for errors that can be cleared) Y11 - Y1F - Not used Do not use this. (Note 1) When transmission is completed within one scan, it turns off when the GPSEND instruction is executed in the subsequent scan. NOTE 3-4 Each contact (Y0, Y8, YC) in the table above is used for reading the operation status. Do not write over it with a user program. (excluding Y10) 4 Setting Communication Conditions Setting Communication Conditions 4.1 Settings Using FPWIN GR7 Set the "Communication Mode", "Station no." and others in the FPWIN GR7. These configuration will downloaded to the PLC with Programs as a Project. PROCEDURE 1. Select "Options" > "FP7 Configuration" from the menu bar, The "FP7 Configuration" dialog box opens. 2. Select "Built-in SCU". Setting items for "Built-in SCU" appear. 3. Press [OK], after setting for communication conditions of COM.1 port. Set conditions are incorporated into the project that is being edited. KEY POINTS 4-2 Select the "Built-in SCU" for the Communication cassette AFP7CCET1 to recognised as serial communication in the internal system. Settings for the COM.2 ports is not available for the Communication cassette AFP7CCET1. 4.1 Settings Using FPWIN GR7 Specified using FPWINGR7 (COM.1port) Parameter Permissible range for AFPCCET1 Description Communication mode MEWTOCOL-COM MEWTOCOL-7 General-purpose Communication Select the mode MEWTOCOL or General-purpose Communication to match the settings of Configurator WD. Station No. 1to99 (MEWTOCOL-COM) 1to999 (MEWTOCOL7-COM) It is not available for the General-purpose Communication mode. Baud rate 230400 bps Data length 8bits Parity ODD Stop bit 1bits RS/CS N/A Send waiting time 0-100ms Terminator setting CR / CR+LF / Time CR is fixed for the MEWTOCOL mode. CR, CR+LF or Time can be selected to match the settings of Configurator WD. Terminator judgement time 0-10000*0.01ms It is avallable, if terminator setting is "Time". Set the time to match the settings of Configurator WD. Header STX N/A Modem initialization Not initialize These parameters are fixed regardless of the settings in the FPWINGR7. These parameters are fixed regardless of the settings in the FPWINGR7. KEY POINTS The parameters "Communication mode", "Station No.", "Send waiting time", "Terminator setting" and "Terminator judgement time" are available in the FPWINGR. 4-3 Setting Communication Conditions 4.2 Specified using Configurator WD 4.2.1 Start Configurator WD and Serach units The communication tool software “Configurator WD” is required to set Ethernet communication for the Communication cassette AFP7CCET1. The setting is saved in the Communication cassette AFP7CCET1. PROCEDURE 1. Start "Configurator WD". 2. Click [Search unit] icon, after confirmation to connect the PLC to the PC via the communication cassette AFP7CCET1. Connected units are indicated, if they are connected correctly. If FP7 CCET is not indicated, please reconfirm the connection. 4-4 4.2 Specified using Configurator WD 4.2.2 IP Address Settings Set the IP address in the "Setting IP Address" dialogbox of Configurator WD. PROCEDURE 1. Activate unit name, when connected unit is indicated. The unit name will be highlighted. 2. Select "Edit" > "Setting IP Address" from the menu bar. The "IP AddressSetting" dialogbox will open. 3. Enter the IP Address. 4. Press [OK]. The message box "IP Address is updated" will appear. IP Address Setting Parameter Description Default Obtain IP address automatically (Note1) When selecting “Obtain an IP address automatically”, an IP address is obtained from the DHCP server. When selecting “Use the following IP address”, an IP address is set manually. Use the following IP address Unit name Unit name for can be specified to identify iCommunication cassette AFP7 CCET1 in the Configurator WD. FP7 CCET1 IP address (Note1) IP address of Communication cassette AFP7 CCET1 Set an IP address other than 0.0.0.0 and 255.255.255.255. 192.168.1.5 Subnet mask Netmask of Communication cassette AFP7 CCET1 255.255.255.0 Default Gateway Gateway of Communication cassette AFP7 CCET1 192.168.1.1 (Note1): When an error occurs, its cause will be confirmed by specified I/O. See 3.1.2 I/O Number Allocation. 4-5 Setting Communication Conditions 4.2.3 Communication Settings Set the parameters for the User connection in the "Communication Setting" dialogbox of Configurator WD. PROCEDURE 1. Activate unit name, when connected unit is indicated. The unit name will be highlighted. 2. Select "Edit" > "Communication Setting" from the menu bar. "Communication Setting" dialigbox will open. 3. Enter the desired items. See the next page for the details. 4. Press [OK]. The message box "Unit communication setting was completed" will appear. 5. Press [OK]. 4-6 4.2 Specified using Configurator WD Communication Settings Parameters Description Default Protocol Mode Protocol Mode of Communication cassette AFP7 CCET1 Select TCP or UDP. TCP Action Mode Action Mode of Communication cassette AFP7 CCET1 Select Client Mode or Server Mode. Server Mode Communication Mode Communication Mode of Communication cassette AFP7 CCET1. Select MEWTOCOL or General communication to match the communication mode setting of FPWINGR7. MEWTOCOL Send type Method for transmitting data to partner devices. Select UNICAST or BROADCAST. It is valid when selecting UDP in the communication protocol. UNICAST Source Port No. Port number that AFP7 CCET1 opens. Range: 502 to 32767 9095 Timeout If AFP7 CCET not communicate with a destination device during this setting time (seconds) in the state that connection is established, connection will be cut. Range:0 to 1800s When 0 is set, the connection will not be cut. 15 Destination IP Address Specify IP address of destination Set an IP address other than 0.0.0.0 and 255.255.255.255. 192.168.1.100 Destination Port No. Specify port number of destination Range: 502 to 32767 9094 Source Port No. Source port number of a destination device Range: 0, 1025 to 32767 When 0 is set, optional. 9095 Timeout If AFPX-COM5 not communicate with a destination device during this setting time (seconds) in the state that connection is established, connection will be cut. Range: 0 to 1800 s When 0 is set, the connection will not be cut. 15 Server Setting (Note1) Client Setting (Note2) (Note1): This parameter is valid, if "Server Mode" is selected. (Note2): This parameter is valid, if "Client Mode" is selected. 4-7 Setting Communication Conditions 4.2.4 Option Settings Set the parameters in the option dialogbox of Configurator WD for the User connection or System connection. PROCEDURE 1. Activate unit name, when connected unit is indicated. The unit name will be highlighted. 2. Select "Edit" > "Communication Setting" from the menu bar. "Communication Setting" dialigbox will open. 3. Press [Option]. "Option" dialigbox will open. 4. Enter the desired items. See the next page for the details. 5. Press [OK]. "Communication Setting" dialigbox will open. 6. Press [OK] in the "Communication Setting" dialigbox. The message box "Unit communication setting was completed" will appear. 7. Press [OK]. 4-8 4.2 Specified using Configurator WD Option Setting Parameter Description Default End code This is the code for the AFP7 CCET1 to confirm the end of the message (data) to be received from the FP7 CPU unit. CR, CR+LF or NONE can be selected. Reception continues until the end of the message (CR, CR+LF) will be received. When selecting NONE, the end code is not confirmed. CR Judgement time without termination Set the wait time for the end code. If the next message (data) is not received within the judgment time without termination (ms) after the last received message (data), the AFP7 CCET1 judges that is no termination, and performs the following operation. (End code: when selecting CR, CR+LF) The received message (data) is discarded. For TCP, the connection is disconnected. (End code: when selecting NONE) The message (data) is transmitted to the connected destination. 20ms Destination unit number and IP address is specified A command is transmitted to the IP address corresponding to the unit number. N/A Unit Number Specify a station number Specify a value between 1 and 99 in decimal format N/A IP Address Specify IP address 192.168.1.100 Action Mode Server Mode is fixed for the "System connection". Server Mode Protocol Mode Protocol Mode of Communication cassette AFP7 CCET1 TCP is fixed. TCP Communication Mode Communication Mode of Communication cassette AFP7 CCET1 MEWTOCOL is fixed. MEWTOCOL Source Port No. Port number that AFP7 CCET1 opens. Range:1025 to 32767 9094 Timeout If AFP7 CCET1 not communicate with a destination device during this setting time (seconds) in the state that connection is established, connection will be cut. Range:0 to1800s When 0 is set, the connection will not be cut. 15 sec Target IP Address for unit number System connection 4-9 Setting Communication Conditions 4.2.5 Target IP address for unit number Setting "Target IP address for unit number Setting" is available, in case of the following condtions. Protocol Mode:TCP or UDP (UNICAST) Action Mode:Client Mode Communication Mode:MEWTOCOL PROCEDURE 1. Press [Option]. "Option" dialigbox will open. 2. Check the checkbox "Destination unit number and IP address is specified”. 3. Double-click the line of the desired unit number. "Target IP address for unit number setting " dialigbox will open. 4. Enter IP Address for unit number 5. Press [OK]. 4-10 4.2 Specified using Configurator WD 4.2.6 Initialization ot the environment setting of the cassette The Ethernet communication environment setting of the AFP7CCET1 can be initialized. PROCEDURE 1. Turn on the SW1 at the back of the AFP7CCET1. 2. Install the AFP7CCET1 on the FP7 CPU unit and turn on the power supply. 3. Start "Configrator WD". 4. Press [Search Unit] icon in the Configrator. If FP7CCET1 is detected, it has sucessfully initialized. 5. Turn off the power supply of the FP7 CPU unit. Remove the AFP7CCET1. 6. Turn off the SW1 at the back of the AFP7CCET1. 7. Install the AFP7CCET1 on the FP7 CPU unit. KEY POINTS The Ethernet communication setting (including the IP address) cannot be changed when the SW1 of the AFP7CCET1 is on. Always turn it off after initialization. 4-11 Setting Communication Conditions 4.3 Example of User connection (MEWTOCOL) 4.3.1 Specified using FPWINGR7 Set the communication mode and station no. into the field built-in SCU >COM.1 settings in the FPWINGR7. Setting items for COM.1 port (AFP7CCET1) Setting item Setting descripyion Communication Mode MEWTOCOL-COM Station No. 1to99 4.3.2 Specified using Configuration WD TCP Client Mode 4-12 Parameter Default Protocol Mode TCP Action Mode Client Mode Communication Mode MEWTOCOL Destination IP Address 192.168.1.100 Destination Port No. 9094 Source Port No. 9095 Timeout 15 sec 4.3 Example of User connection (MEWTOCOL) KEY POINTS Connection request will be performed when data transfer is executed. Please execute master communication command after confirming the connection status flag (X30) is OFF. When a connection successfully established, connection status flag (X30) turns ON. If a connection failed, connection status flag (X30) stays OFF and TCP client connection failure flag (X32) turns ON. Please reconfirm the conditions of destination or connection. If it needs to continue data transfer between the same connected equipment , please execute master communication command after confirming the connection status flag (X30) is ON. Timeout value of respons reception for AFP7CCET1 is the same as connection termination timeout during no communication. Set the timeout of SEND/RECV instruction longer than the timeout during no communication to judge the timeout of response reception. Enter the "Time setting" filed of "CPU Configuration" in the "FP7 configuration" dialig box of FPWIN GR7. UDP Client mode Parameter Default Protocol Mode UDP Action Mode Client Mode Communication Mode MEWTOCOL Send type UNICAST /BROADCAST (Note1) Destination IP Address 192.168.1.100 Destination Port No. 9094 Source Port No. 9095 Timeout 15 sec (Note): The parameter "IP Address" is not available, if BROADCAST is selected. 4-13 Setting Communication Conditions 4.3.3 Example of MEWTOCOL Master Communication The following example shows how to set the parameters, for the master communication from home station. 1) MEWTOCOL Master Communicationin the TCP mode Parameter Dialogbox IP Address Communication Setting Option Example Field Slave1 Slave2 IP Address 192.168.1.5 192.168.1.11 192.168.1.12 Subnet Mask 255.255.255.0 255.255.255.0 255.255.255.0 Default Gateway 192.168.1.1 192.168.1.1 192.168.1.1 Protocol Mode TCP TCP TCP Action Mode Client Mode Server Mode Server Mode Communication Mode MEWTOCOL MEWTOCOL MEWTOCOL Destination IP Address 192.168.1.11 N/A N/A Destination Port No 9094 N/A N/A Source Port No 0 9094 9094 Timeout 0 0 0 Destination unit number and IP address is specified Activated N/A N/A No.1 192.168.1.11 N/A N/A No.2 192.168.1.12 N/A N/A IP Address for unit no. 4-14 Home 4.3 Example of User connection (MEWTOCOL) 2) MEWTOCOL Master Communicationin the UDP UNICAST mode Parameter Dialogbox IP Address Communication Setting Option Example Field Home Slave1 Slave2 IP Address 192.168.1.5 192.168.1.11 192.168.1.12 Subnet Mask 255.255.255.0 255.255.255.0 255.255.255.0 Default Gateway 192.168.1.1 192.168.1.1 192.168.1.1 Protocol Mode UDP UDP UDP Action Mode Client Mode Server Mode Server Mode Communication Mode MEWTOCOL MEWTOCOL MEWTOCOL Send type UNICAST UNICAST UNICAST Destination IP Address 192.168.1.11 N/A N/A Destination Port No 9094 N/A N/A Source Port No 0 9094 9094 Destination unit number and IP address is specified Activated N/A N/A No.1 192.168.1.11 N/A N/A No.2 192.168.1.12 N/A N/A IP Address for unit no. 3) MEWTOCOL Master Communicationin the UDP BROADCAST mode Parameter Dialogbox IP Address Communication Setting Option Example Field Home Slave1 Slave2 IP Address 192.168.1.5 192.168.1.11 192.168.1.12 Subnet Mask 255.255.255.0 255.255.255.0 255.255.255.0 Default Gateway 192.168.1.1 192.168.1.1 192.168.1.1 Protocol Mode UDP UDP UDP Action Mode Client Mode Server Mode Server Mode Communication Mode MEWTOCOL MEWTOCOL MEWTOCOL Send type BROADCAST BROADCAST BROADCAST Destination IP Address 192.168.1.11 N/A N/A Destination Port No 9094 N/A N/A Source Port No 0 9094 9094 N/A N/A N/A 4-15 Setting Communication Conditions 4.4 Example of User connection (General Communication) 4.4.1 Specified using FPWINGR7 Set the communication mode and format into the field built-in SCU >COM.1 settings in the FPWINGR7. Setting of COM.1port (AFP7CCET1) Parameter Setting description Communication mode General Communication Terminator setting CR, CR+LF, Time Terminator judgement time 0 to 100ms 4.4.2 Specified using Configuration WD TCP Client Mode Parameter 4-16 Default Protocol Mode TCP Action Mode Client Mode Communication Mode General Communication Send type UNICAST Destination IP Address 192.168.1.100 Destination Port No. 9094 Source Port No. 9095 Timeout 15 sec 4.4 Example of User connection (General Communication) TCP Server Mode Parameter Default Protocol Mode TCP Action Mode Server Mode Communication Mode General Communication Destination IP Address 192.168.1.100 Source Port No. 9095 Timeout 15 sec Parameter Default UDP mode Protocol Mode UDP Action Mode Client Mode Communication Mode General Communication Destination IP Address 192.168.1.100 Destination Port No. 9094 Source Port No. 9095 Timeout 15 sec (Note): The parameter "Destination IP Addres" is not available, if BROADCAST is selected. 4-17 Setting Communication Conditions 4.5 Example of System connection 4.5.1 Specified using Configuration WD System connection is used, when the tool software e.g. FPWIN GR7 is used via LAN port. Settings are necessary in the IP Address dialogbox and Option dialogbox for the System connection Setting IP Address dialogbox Option dialogbox KEY POINTS 4-18 Select "Server Mode", "TCP" and "MEWTOCOL" for the System connection. And it need not set in the "Communication Setting" dialog box. 4.5 Example of System connection 4.5.2 Specified using FPWIN GR7 Please specify the following settings to connect with PLC via Communication cassette AFP7CCET1 using tool software FPWINGR7. PROCEDURE 1. Select "Online" > "Communications settings" from the menu bar. "Communication Settings" dialogbox will open. 2. Select "LAN". 3. Enter the same IP Address and the same Source Port no. into “Connection destination” field, as the setting in the Configurator WD. 4. Press [OK]. 5. Select "Online" > "Switch to Online Mode" from the menu bar. 4-19 Setting Communication Conditions 4-20 5 MEWTOCOL Master/Slave Communication MEWTOCOL Master/Slave Communication 5.1 List of MEWTOCOL / MEWTOCOL7 Supporting Commands 5.1.1 List of MEWTOCOL Commands Commands to be used Type of instruction Read contact area Write contact area Code Description RC Reads ON/OFF status of contact. (RCS) - Specifies only one point. (RCP) - Specifies multiple contacts. (RCC) - Specifies a range in word units. WC Turns ON or OFF the contact. (WCS) - Specifies only one point. (WCP) - Specifies multiple contacts. (WCC) - Specifies a range in word units. Read data area RD Reads the contents of a data area. Write data area WD Writes data to a data area. Register or Reset contacts monitored MC Registers the contact to be monitored. Register or Reset data monitored MD Registers the data to be monitored. Monitoring start MG Monitors a registered contact or data using MC and MD. Preset contact area (fill command) SC Embeds the area of a specified range in a 16-point on/off pattern. Preset data area (fill command) SD Writes the same contents to the data area of a specified range. Read the status of PLC RT Reads the specifications of the programmable controller and error codes if an error occurs. Abort AB Aborts reception of multiple frame responses before completion. (Note) Some devices are not accessible due to format restrictions of MEWTOCOL-COM communication commands. 5.1.2 List of MEWTOCOL7 Commands Commands to be used Type of instruction Code Description Read data area MMRD Reads the contents of a data area. Write data area MMWT Writes data to a data area. REFERENCE 5-2 For details of MEWTOCOL commands, please see 7.2 MEWTOCOL-COM Format and 7.3 MEWTOCOL7-COM Format. 5.2 MEWTOCOL-COM Master Communication (RECV) 5.2 MEWTOCOL-COM Master Communication (RECV) 5.2.1 Read Data from an External Device Instructions In master communication, PLC has the sending right, and executes communication by sending commands to devices that support MEWTOCOL, and receiving responses. Messages in accordance with the protocol are automatically generated by PLC. In the user program, reading and writing can be done simply by specifying the station no. and memory address and executing SEND/RECV instructions. External device supporting MEWTOCOL-COM PLC Command message %01#RD0040000401 (BCC) CR DT100 100 DT101 0 ・・・・・・ ・・・・・・・・ ・・・・・・ ・・・・・・・・ %01$RD64000000 (BCC) CR DT00400 100 DT00401 0 ・・・・・・ ・・・・・・・・ ・・・・・・ ・・・・・・・・ Response message Specify and read station no. and address based on RECV instruction Sample program Send commands from the COM1 port of the CPU unit, read data from the data area of an external device (station no. 1) DT400 - DT401, and write the content into PLC's data register DT100 - DT101. Confirm that the unit is in the master mode (XC), and that the sending process is not in progress for the same port (YC), and start up the SEND instruction. In the UNITSEL instruction, specify the slot No. (U0) and the COM. port No. (U1). In the RECV instruction, specify and execute the partner station no. (U1), initial address (DT400), No. of data (U2), and initial address on the PLC side to save data (DT100). XC R0 YC R100 ( DF ) R100 Master communication Clear to send flag Master communication Sending active flag Execute RECV UNITSEL RECV.US U0 U1 S1 S2 U1 DT400 U2 DT100 DT0 S1 S2 n D1 D2 Starting conditions for RECV execution Clear to send flag: ON Sending active flag: OFF Settings for communication port S1: Slot 0 S2: COM1 RECV processing S1: Partner station no. (U1) S2: Data address (DT400) n: No. of data (U2) D1: Data saving area (DT100) D2: Execution result code (DT0) 5-3 MEWTOCOL Master/Slave Communication Timing chart Master communication Clear to send flag (XC) Master communication Sending active flag (YC) Conditions to enable execution of RECV instruction Clear to send flag (XC): ON Sending active flag (YC): OFF Confirm ON Confirm OFF Sending active flag (YC): Sending data: ON, Sending done: OFF Execute RECV Master communication Sending done result flag (Y0) Sending done result flag (Y0): Normal completion: OFF Abnormal completion: ON Sending data Response reception processing I/O allocation COM port no. 1 Name Explanation XC Master communication Clear to send flag Turns ON when MEWTOCOL-COM or MEWTOCOL7 is set for the communication mode, and the unit is in the RUN mode. YC Master communication Sending active flag Turns ON during sending data based on SEND/RECV instruction. Turns OFF when the sending process is completed. Y0 Sending done result flag Reports completion result of sending data in general-purpose communication or master communication. (Normal completion: 0, Abnormal completion: 1) (Note 1) Each contact is used for reading the operation status. Do not write over it with a user program. KEY POINTS 5-4 Specify the port targeted for communication, using UNITSEL instruction immediately before SEND/RECV instruction. Master communication is only valid when MEWTOCOL is selected. Confirm that the "Master communication Clear to send flag" (XC) for the targeted channel is ON, and execute SEND/RECV instruction. You cannot execute other SEND/RECV instruction for a communication port in master communication. Confirm that the "Master communication Sending active flag" (YC) is OFF, and execute instruction. You cannot execute SEND/RECV instruction for a port in slave communication. If no response is received, the "Master communication Sending active flag" (YC) remains ON throughout the timeout setting time specified in CPU configuration. Up to 16 SEND/RECV instructions can be executed simultaneously for different COM. ports. 5.2 MEWTOCOL-COM Master Communication (RECV) 5.2.2 Precaution When Using TCP Client Mode Connection request will be performed when data transfer is executed. Please execute master communication command after confirming the connection status flag (X30) is OFF. When a connection successfully established, connection status flag (X30) turns ON. If a connection failed, connection status flag (X30) stays OFF and TCP client connection failure flag (X32) turns ON. Please reconfirm the conditions of destination or connection. If it needs to continue data transfer between the same connected equipment , please execute master communication command after confirming the connection status flag (X30) is ON. 5.2.3 RECV Instruction (When MEWTOCOL-COM is Used) Instruction format Items Settings Setting range i Specify the operation unit. US / SS S1 Specify the partner station no. 1 - 99 S2 Specify the device initial address of the source node data area in the partner node. (Note 1)( Note 2) 0 - 99999 n Specify the No. of sent data. (Note 3) 1 - 509 words or 1 bit D1 Specify the device initial address of the receiver node data area in the source node. (Note1) (Note1) D2 Specify the device area in the source node to save the execution result code (one word). (Note 4) - (Note 1) Transmission methods vary by the type of device to be specified for the operands [S2] and [D1]. Device to be specified for [S2] and [D1] Transmission method 16 bit device: WX, WY, WR, WL, DT, LD Register transmission 1 bit device: X; Y; R; L; DT,n; LD, Bit transmission (Note 2) Bit device DT, n and LD, n cannot be specified for the header of the sender data in the partner node. (Note 3) The No. of sent data is on a word basis for register transmission, and on a bit basis for bit transmission. (Note 4): Device that can be specified for [D2] are: WX, WY, WR, WL, DT, LD. Saved as one word in the specified area. 0: Normal completion 1: Communication port is being used for master communication 2: Communication port is being used for slave communication 3: No. of master communication instructions that can be used simultaneously has been exceeded 4: Sending timeout 5: Response reception timeout 6: Received data error 5-5 MEWTOCOL Master/Slave Communication 5.3 MEWTOCOL-COM Master Communication (SEND) 5.3.1 Write Data into an External Device Instructions In master communication, PLC has the sending right, and executes communication by sending commands to devices that support MEWTOCOL, and receiving responses. Messages in accordance with the protocol are automatically generated by PLC. In the user program, reading and writing can be done simply by specifying the station no. and memory address and executing SEND/RECV instructions. External device supporting MEWTOCOL-COM PLC Command message %01#WDD004000040164000000 (BCC) CR DT100 100 DT101 0 ・・・・・・ ・・・・・・・・ ・・・・・・ ・・・・・・・・ %01$WD (BCC) CR DT00400 100 DT00401 0 ・・・・・・ ・・・・・・・・ ・・・・・・ ・・・・・・・・ Response message Specify and write station no. and address based on SEND instruction Sample program Send commands from the COM1 port of the CPU unit, and write the content of PLC's data register DT100 - DT101 into the data area of an external device (station no. 1) DT400 DT401. Confirm that the unit is in the master mode (XC), and that the sending process is not in progress for the same port (YC), and start up the SEND instruction. In the UNITSEL instruction, specify the slot No. (U0) and the COM. port No. (U1). In the SEND instruction, specify and execute the sender initial address (DT100), No. of data (U2), "Transmit to" station no. (U1), and initial address (DT400). XC R0 YC R100 ( DF ) R100 Master communication Clear to send flag Master communication Sending active flag Execute SEND UNITSEL SEND.US 5-6 U0 U1 S1 S2 DT100 U2 U1 DT400 DT0 S1 n D1 D2 D3 SEND execution condition Clear to send flag: ON Sending active flag: OFF Settings for communication port S1: Slot 0 (U0) S2: COM1 (U1) SEND process S: Data saving area (DT100) n: No. of sent data (U2) D1: Area code of the receiver (U1) D2: "Forward to" address (DT400) D3: Execution result code (DT0) 5.3 MEWTOCOL-COM Master Communication (SEND) Timing chart Master communication Clear to send flag (XC) Master communication Sending active flag (YC) Conditions to enable execution of SEND instruction Clear to send flag (XC): ON Sending active flag (YC): OFF Confirm ON Confirm OFF Sending active flag (YC): Sending data: ON, Sending done: OFF Execute SEND Master communication Sending done result flag (Y0) Sending done result flag (Y0): Normal completion: OFF Abnormal completion: ON Sending data Response reception processing I/O allocation COM port no. 1 Name Explanation XC Master communication Clear to send flag Turns ON when MEWTOCOL-COM or MEWTOCOL7 is set for the communication mode, and the unit is in the RUN mode. YC Master communication Sending active flag Turns ON during sending data based on SEND/RECV instruction. Turns OFF when the sending process is completed. Y0 Sending done result flag Reports completion result of sending data in general-purpose communication or master communication. (Normal completion: 0, Abnormal completion: 1) (Note 1) Each contact is used for reading the operation status. Do not write over it with a user program. KEY POINTS Specify the port targeted for communication, using UNITSEL instruction immediately before SEND/RECV instruction. Master communication is only valid when MEWTOCOL is selected. Confirm that the "Master communication Clear to send flag" (XC) for the targeted channel is ON, and execute SEND/RECV instruction. You cannot execute other SEND/RECV instruction for a communication port in master communication. Confirm that the "Master communication Sending active flag" (YC) is OFF, and execute instruction. You cannot execute SEND/RECV instruction for a port in slave communication. If no response is received, the "Master communication Sending active flag" (YC) remains ON throughout the timeout setting time specified in CPU configuration. Up to 16 SEND/RECV instructions can be executed simultaneously for different COM. ports. 5-7 MEWTOCOL Master/Slave Communication 5.3.2 Precautions When Using TCP Client Mode Connection request will be performed when data transfer is executed. Please execute master communication command after confirming the connection status flag (X30) is OFF. When a connection successfully established, connection status flag (X30) turns ON. If a connection failed, connection status flag (X30) stays OFF and TCP client connection failure flag (X32) turns ON. Please reconfirm the conditions of destination or connection. If it needs to continue data transfer between the same connected equipment , please execute master communication command after confirming the connection status flag (X30) is ON. 5.3.3 SEND Instruction (When MEWTOCOL-COM is Used) Instruction format Setting items Settings Setting range i Specify the operation unit. US / SS S Specify the header of the source node data area. (Note 1) - n Specify the No. of sent data. 1 - 507 words or 1 bit D1 Specify the partner station no. (Note 2) (Note 3) 0 - 99 D2 Specify the initial address of the receiver node data area in the partner node. (Note 4) 0 - 99999 D3 Specify the device area in the source node to save the execution result code (one word). (Note 5) (Note 1) Transmission methods vary by the type of device to be specified for the operands [S] and [D2]. Device to be specified for [S2] and [D1] Transmission method 16 bit device: WX, WY, WR, WL, DT, LD Register transmission 1 bit device: X, Y, R, L, DT, n, LD, n Bit transmission (Note 2) The No. of sent data is on a word basis for register transmission, and on a bit basis for bit transmission. (Note 3) When "0" is specified for partner station no., global transmission is applied. In this case, no response message is received from the partner side. (Note 4) Bit device DT, n and LD, n cannot be specified for the header of the receiver data in the partner node. (Note 5): Device that can be specified for [D3] are: WX, WY, WR, WL, DT, LD. Saved as one word in the specified area. 0: Normal completion 1: Communication port is being used for master communication 2: Communication port is being used for slave communication 3: No. of master communication instructions that can be used simultaneously has been exceeded 4: Sending timeout 5: Response reception timeout 6: Received data error 5-8 6 General-Purpose Communication General-Purpose Communication 6.1 Operation of General-Purpose Communication 6.1.1 Read Data from an External Device Read data from a partner device In general-purpose communication, communication is executed by sending commands that suit the partner device, and receiving responses. Command messages are sent by formulating a data table for message in accordance with the protocol, on the given data register, and subsequently executing GPSEND instruction. PLC External device Send command message ABCD (CR) DT100 U4 40001 21 DT101 H 42 41 40002 43 DT102 H 44 43 ・・・・・・ ・・・・・・・・ ・・・・・・ ・・・・・・・・ ・・・・・・ ・・・・・・・・ 1 2 3 4 (CR) Receive response message Send command based on GPSEND instruction Receive response based on GPRECV instruction 6.1.2 Write Data into an External Device Write data into a partner device In general-purpose communication, communication is executed by sending commands that suit the partner device, and receiving responses. Command messages are sent by formulating a data table for message in accordance with the protocol, on the given data register, and subsequently executing GPSEND instruction. PLC Send command message ABCD 1 2 (CR) External device DT100 U6 40001 21 DT101 H 42 41 ・・・・・・ ・・・・・・・・ DT102 H 44 43 ・・・・・・ ・・・・・・・・ DT103 H 32 31 ・・・・・・ ・・・・・・・・ XYZ (CR) Receive response message Send command based on GPSEND instruction Receive response based on GPRECV instruction KEY POINTS 6-2 There is no relevance between the operation of transmission by GPSEND instruction and the operation of reception by GPRECV instruction. The builtin SCU in the CPU unit is always clear to receive data. 6.2 Sending Operation 6.2 Sending Operation 6.2.1 Overview of Sending Operation Instructions Sending in the general-purpose communication is performed by formulating a data table for sending on the given operation memory, and subsequently executing GPSEND instruction. PLC External device Send message/data DT100 U5 DT101 BA DT102 DC DT103 ・・E ABCDE (CR) 00001 Send data based on GPSEND instruction ・・・・・・・・ 00002 ・・・・・・・・ ・・・・・・ ・・・・・・・・ ・・・・・・ ・・・・・・・・ Sample program Confirm that the unit is in the general-purpose communication mode (X8), and that the general-purpose sending process is not in progress for the same port (Y8), and start up the sending program. In the SSET instruction, convert a given message into an ASCII text string, and specify the number of strings to be sent in the data register DT100, and the message to be sent from the data register DT101. In the UNITSEL instruction, specify the slot No. (U0) and the COM. port No. (U1). In the GPSEND instruction, specify and execute the header of the table where the message to be sent is saved (DT101) and the No. of characters (DT100). R0 X8 R101 Y8 R100 ( DF ) R100 General purpose communication Clear to send flag General-purpose communication Sending active flag R100 ( DF ) SSET “ABCDE” DT100 S1 S2 R100 UNITSEL GPSEND . US Y8 U0 U1 S1 S2 DT101 DT100 DT0 S n D R101 ( DF / ) GPSEND execution conditions Clear to send flag: ON Sending active flag: OFF Data conversion S1: Sent Data S2: Save Sent Data DT100: No. of Sent Characters DT101 onward: Sent Data Settings for communication port S1: Slot 0 (U0) S2: COM1 (U1) SEND processing S: Header of Sent Data (DT101) n: No. of Sent Characters (DT100) D: Execution Result Code (DT0) Confirm sending completion Reset GPSEND execution conditions 6-3 General-Purpose Communication Timing chart Data in the table [S] specified by GPSEND instruction are sent, in ascending order from lower bytes. During the sending process, the "General-purpose communication Sending active flag" (Y8) turns ON. The flag is turned OFF when sending is completed. (The flag does not turn off right after the execution of the instruction. It turns off at the beginning of the second scan.) The sending result (0: normal completion, 1: abnormal completion) is saved in the generalpurpose communication sending result flag (Y0). General purpose communication Clear to send flag (X8) Conditions to enable execution of GPSEND instruction Clear to send flag (X8): ON Sending active flag (Y8): OFF Confirm ON General-purpose Confirm OFF communication Sending active flag (Y8) Sending active flag (Y8): Sending data: ON, Sending done: OFF Execute GPSEND Sending done result flag (Y0) Sending done result flag (Y0): Normal completion: OFF Abnormal completion: ON Sending data I/O allocation COM port no. X8 Y8 Y0 Name General-purpose communication Clear to send flag General-purpose communication Sending active flag Sending done result flag Explanation Turns ON when the unit is set to the general-purpose communication mode. Turns ON during sending data based on general-purpose communication GPSEND. Turns OFF when the sending process is completed. Reports completion result of sending data in genera-purpose communication or master communication. (Normal completion: 0, Abnormal completion: 1) (Note 1) Each contact is used for reading the operation status. Do not write over it with a user program. (Note 2) When the sending time is shorter than the scan time, the "General-purpose communication Sending active flag" (Y8) turns OFF when the GPSEND instruction is executed in the subsequent scan following data sending completion. In all cases, it is turned ON for at least one scan time. KEY POINTS 6-4 Specify the port targeted for communication, using UNITSEL instruction immediately before GPSEND instruction. Maintain the ON conditions for GPSEND instruction until sending is completed and the general-purpose communication sending active flag (Y8) turns OFF. 6.2 Sending Operation 6.2.2 Contents of Sent Data Strings data sent by the GPSEND instruction are converted into ASCII text and saved in a given data register. Sent data table Once the sent data are converted into strings data using the SSET instruction, the No. of characters is saved in the header area. The sent data are saved starting with lower bytes of the subsequent address. U5 DT100 After executing SSET instruction, the No. of characters is set. DT101 H42(B) H41(A) DT102 H44(D) H43(C) DT103 ----- H45(E) DT104 ----- ----- Strings of the No. of bytes specified by GPSEND instruction are sent, in ascending order from lower bytes. KEY POINTS The start code and the end code specified in the configuration menu are automatically added to the sent data. Do not include the start code or the end code into sent data. The maximum volume of data that can be sent is 4,096 bytes. If the start code is set to valid, the maximum size is 4,096 bytes including the start code and the end code. It is also possible to send binary data. 6-5 General-Purpose Communication 6.2.3 GPSEND (General-Purpose Communication Sending Instruction) Instruction format Items Settings Setting range i Specify the operation unit. US / SS (Note 1) S Specify the header of the source node data area. (Note 2) n Specify the No. of sent bytes. 1 to 4094, -1 to -4096 (Note 1) (Note 3) D Specify the device area in the source node to save the execution result (one word). (Note 4) (Note 1) When a K constant (integer with a symbol) is specified for the No. of sent bytes [n], select SS for operation unit [i]. When a U constant (integer without a symbol) or an H constant (hexadecimal integer), select US for operation unit [i]. (Note 2): Device that can be specified for S are: WX, WY, WR, WL, DT, LD. (Note 3) If a negative value is specified, the end code is not automatically added to the sent data. (Where SCU is targeted) (Note 4): Device that can be specified for D are: WX, WY, WR, WL, DT, LD. Once the sending process is completed, the sent bytes are saved. When an error occurs, "FFFFH" is saved. KEY POINTS 6-6 Specify the port targeted for communication, using UNITSEL instruction immediately before GPSEND instruction. Maintain the ON conditions for GPSEND instruction until sending is completed and the general-purpose communication sending active flag (Y8) turns OFF. Confirm that the "General-purpose communication Clear to send flag" for the targeted COM port has turned ON, and execute GPSEND instruction. When GPSEND instruction is executed for a communication port in the sending process, the sending active flag and the sending result are updated. GPSEND instruction cannot be used in an interrupt program. 6.2 Sending Operation 6.2.4 Precautions on Sending Data Procedures when the end code is not added in the sending process When you do not wish to add the terminator (end code) in the sending process, use a negative value for specifying the No. of sent bytes. R0 X8 R101 Y8 R100 ( DF ) General-purpose communication Clear to send flag R100 General-purpose communication Sending active flag R100 ( DF ) SSET “ABCDE” DT100 S1 S2 R100 ( DF ) NEG.SS DT100 DT100 S1 D U0 U1 S1 S2 DT101 DT100 DT0 S n D R100 UNITSEL GPSEND . SS Y8 R101 ( DF / ) GPSEND execution conditions Clear to send flag: ON Sending active flag: OFF Data conversion S1: Sent Data S2: Save Sent Data DT100: No. of Sent Characters DT101 onward: Sent Data Because no end code is added, use a negative value for specifying the No. of sent bytes. Settings for communication port S1: Slot 0 (U0) S2: COM1 (U1) SEND processing S: Header of Sent Data (DT101) n: No. of Sent Characters (DT100) D: Execution Result Code (DT0) Confirm sending completion Reset GPSEND execution conditions KEY POINTS When you do not wish to add the terminator (end code), use a negative value for specifying the No. of sent data in GPSEND instruction. Select "SS" for operation unit. 6-7 General-Purpose Communication 6.3 Receiving Operation 6.3.1 Overview of Receiving Operation Instructions In the general-purpose communication mode, data received from the partner device are saved in eight reception buffers for each COM port. When the GPRECV instruction is executed in a user program, data in the reception buffer can be copied into a given operation memory. PLC External device Reception buffer (eight for each COM port) ・・・・・・ H 31 32 33 34 35 ・・・・・・ ・・・・・・・・ Receive message/data 1 2 3 4 5(CR) Operation ・・・・・・ ・・・・・・・・ memory DT200 ・・・・・・ U5 DT201 H 32 31 DT202 H 34 33 DT203 H ・・・35 00001 21 00002 43 00003 ・・5 ・・・・・・ ・・・・・・・・ ・・・・・・・・ Transfer the strings received based on GPRECV instruction to a given data register Sample program When the reception done flag (X0) turns ON, the reception program is started up by the GPRECV instruction. In the UNITSEL instruction, specify the slot No. (U0) and the COM. port No. (U1). In the GPRECV instruction, specify and execute the header of the data table where the received message is saved (DT200) and the final address (DT209). X0 R100 ( DF ) R100 UNITSEL GPRECV . US U0 U1 S1 S2 DT200 DT209 S1 S2 GPRECV execution conditions Reception done flag: ON Settings for communication port S1: Slot 0 Built in CPU (U0) S2: COM1 (U1) GPRECV processing S1: Header of Received Data (DT200) S2: Terminator of Received Data (DT209) I/O allocation COM port no. 1 6-8 Name Explanation X0 General-purpose communication Reception done flag Turns ON when the receiving process is completed in the general-purpose communication mode. X4 General-purpose communication Reception copy done flag Turns ON when the GPRECV instruction is executed and the received data have been copied into the specified operation memory. Turns OFF when there are no applicable data. 6.3 Receiving Operation Timing chart Data received from an external device are saved in the same reception buffer. When the terminator (end code) is received, the “reception done” flag (X0) turns on. Subsequently, the following data are saved in the buffer upon reception. 8 data can be received consecutively. Start receiving Received data 1 2 ・・・ 5 ( CR) A B ・・・ ON Reception done flag X0 OFF ON GPRECV execution condition R100 OFF Execute GPRECV instruction When the GPRECV instruction is executed, data are copied into the specified area, and the reception done flag (X0) turns OFF. The reception done flag (X0) turns OFF when the I/O refresh is executed at the beginning of the subsequent scans. Reception buffer Received data Cr Reception done flag (X0) Cr Reception done flag (X0): When reception has been done: ON, When copying of received data has been done based on GPRECV instruction: OFF Execute GPRECV Saving method for received data When data are saved in a given data register from the reception buffer, based on GPRECV instruction, the data are saved in the following manner. U5 DT200 Saves the received No. of bytes. DT201 H32(2) H31(1) DT202 H34(5) H33(3) DT203 ----- H35(4) DT204 ----- ----- ----- ----- ----- The received data are saved in ascending order from lower bytes. If the received No. of bytes is smaller than the area specified by the GPRECV command, the data are not overwritten. 6-9 General-Purpose Communication 6.3.2 Contents of Received Data When data are copied into a given data register, based on GPRECV instruction, the data are saved in the following manner. Example: The data “12345 CR” is transmitted from a device with RS-232C device. At the beginning of the data register, the No. of received bytes is saved. The received data are saved in ascending order from lower bytes to higher bytes, starting with DT201. DT203 DT202 DT201 DT200 Higher byte Lower byte Higher byte Lower byte Higher byte Lower byte Higher byte Lower byte H0D (CR) H35 (5) H34 (4) H33 (3) H32 (2) H31 (1) H0 H5 Received No. of bytes KEY POINTS The received data that are copied based on the GPRECV instruction do not include a start code or end code. It is also possible to receive binary data based on the GPRECV instruction. In this case, the terminator should be specified using "Time". 6.3.3 Precautions on Receiving Data Reset communication ports If a communication abnormality has occurred, communication ports can be reset by turning on the "Request to reset" signal (Y10) by the user program. Once reset is completed, (X10) turns ON. Subsequently, turn OFF the "Request to reset" (Y10). R100 X10 Y10 CH1 error reset done Request to reset CH1 ( DF ) Request to reset an error Y10 Reset CH1 of COM port Request to reset CH1 Procedure for repeated reception of data For repeated reception of data, perform the following steps 1 to 4: (1) Receive data. (2) Turn on the "General-purpose communication reception done" flag (X0). (3) Specify a port to receive data based on the UNITSEL instruction. (4) Execute the GPRECV instruction and read the received data from the reception buffer. 6-10 6.3 Receiving Operation 6.3.4 Operations of the "Reception done copy" flag and multiplex reception Operation and function of the "reception done copy" flag (X4) The "reception done copy" flag (X4) turns ON when the GPRECV instruction is executed and data are copied from the reception buffer to the specified operation memory, and turns OFF when the END instruction is executed. Processing in the case of multiplex reception If the time from the reception of data in the reception buffer to the subsequent data reception is shorter than the PLC scan time, and the receiving frequency is high, it is possible that the reception done flag (X0) remains ON and cannot detect sequential receptions. In cases where it is necessary to process sequentially received data, constantly execute the GPRECV instruction, in combination with the "reception done copy" flag (X4). Referring to the "reception done copy" flag (X4), you can confirm whether there are lately received data. Reception buffer data CR CR In the case of sequential receptions, the reception done flag (X0) remains ON. Reception done flag (X0) Execute GPRECV instruction Reception done copy flag (X4) 1 scan time After always executing GPRECV instruction, confirm whether there are lately received data referring to the reception done copy flag (X4). 6-11 General-Purpose Communication 6.3.5 GPRECV (General-Purpose Communication Receiving Instruction) Instruction format Setting items Settings i Specify the operation unit. US / SS D1 Specify the initial address of the data area to save the received data. (Note 1) D2 Specify the final address of the data area to save the received data. (Note 2) Setting range (Note 1): Device that can be specified for D1 are: WX, WY, WR, WL, DT, LD. (Note 2): Device that can be specified for D2 are: WX, WY, WR, WL, DT, LD. KEY POINTS 6-12 Specify the port targeted for communication, using UNITSEL instruction immediately before GPRECV instruction. When the general-purpose communication reception done flag is ON for the targeted COM port, execute GPRECV. When multiplex reception is carried out, the reception done flag (X0) remains ON after the received data are copied based on GPRECV instruction. Therefore, the received data cannot be copied by when the “reception done” signal rises. 6.4 Sending/Receiving Flag Operation 6.4 Sending/Receiving Flag Operation 6.4.1 No Header (Start Code), Terminator (End Code) "CR": The “reception done” flag, the “sending active” flag, the GPSEND instruction, and the GPRECV instruction are related as follows: Data received from external device A B C A A B B CR D E F G D D D D E E E F F Stored No. of bytes received A <1> Data can be received until eight receive bu ffers are all filled up even if the reception done flag is turned on. C Write pointer SCU receive bu ffer <2> <3> G <1> <2> <3> <4> After GPRECV instruction is ON executed, reception done flag turns off at the beginning of next scan or later. Reception done flag X0 OFF ON GPRECV instruction execution OFF GPSEND instruction execution OFF ON ON General-purpose communication Sending active flag Y8 Transmitted data Receive bu ffer specified using GPRECV instruction OFF 1 3 2 3 CR No. of bytes received A B C The COM port has eight reception buffers. The reception process is continued after the reception done flag (X0) turns ON. The reception done flag (X0) does not turn OFF immediately following the execution of GPRECV instruction. It will be turned off at the beginning of the next scan or later. After GPSEND instruction is executed, data transmission is started in several μs to several tens of ms. For time before transmission is started, please refer to the communication cycle time (SM208-SM210) using the system monitor function. 6-13 General-Purpose Communication After GPSEND instruction is executed, dual sending to the same port is not possible until the "sending General-purpose communication Sending active flag" (Y8) turns OFF. The "General-purpose communication Sending active flag" (Y8) turns OFF in instruction execution in the next scan or later following completion of data sending. 6.4.2 Start Code "STX", End Code "ETX": Receiving process: Reception done flag and GPRECV instruction are related as follows: Data received from external device A B C STX D E ETX F G A A A D D D F F B B B B E E G C C C C C <3> <0> <1> <2> <2> <2> STX H ETX F H H G G G <0> <1> <1> Stored A Write pointer SCU receive bu ffer No. of bytes received <1> <2> Even in a "reception done" status, received data is continued into another buffer, because there are 4,096 x <1> 8 reception buffers. Upon reception of the start code, the reception pointer is initialized. Upon reception of the start code, the reception pointer is initialized. ON Reception done flag X0 OFF ON GPSEND instruction execution Receive bu ffer specified using GPRECV instruction OFF 2 No. of bytes received D E When the start code is set to "STX", the data are saved in the reception buffer. When the start code is received, the receive pointer is initialized. If there are two headers, data following the second header overwrites the data in the reception buffer. The COM port has eight reception buffers. The reception process is continued after the reception done flag (X0) turns ON. The reception done flag (X0) does not turn OFF immediately following the execution of GPRECV instruction. It will be turned off at the beginning of the next scan or later. If there are no received data following execution of GPRECV instruction, the reception done copy flag (X4) turns OFF. 6-14 6.4 Sending/Receiving Flag Operation KEY POINTS The data without the Code STX at the reception is saved in the reception buffer, and the “reception done” flag turns on when the end code is received. However, if the code STX is added in the middle of the data, the data are saved from the beginning of the reception buffer. Sending process: Sending done flag and GPSEND instruction are related as follows: SCU send buffer STX a b ETX STX c d e ETX STX STX STX STX STX STX STX STX STX a a a a c c c c c b b b d d d d d ETX ETX ETX b ETX Transmission pointer Transmitted data e e e e e ETX ETX ETX ETX ETX ON GPSEND instruction execution OFF ON General-purpose communication Sending active flag Y8 OFF Header (STX) and terminator (ETX) are automatically added to the data to be sent. The data are transmitted to an external device. After GPSEND instruction is executed, data transmission is started in several μs to several tens of ms. For time before transmission is started, please refer to the communication cycle time (SM208-SM210) using the system monitor function. After GPSEND instruction is executed, dual sending to the same port is not possible until the "sending general-purpose communication flag" (Y8) turns OFF. The "General-purpose communication Sending active flag" (Y8) turns OFF in GPSEND instruction execution in the next scan or later following completion of data sending to an external device. The "General-purpose communication Sending active flag" (Y8) always remains on for at least 1 scan time. 6-15 General-Purpose Communication 6-16 7 Specifications Specifications 7.1 Specifications 7.1.1 Communication COM.1 port (User connection) Communication port Setting range Default Station no. 1 - 99 (MEWTOCOL-COM) 1 - 999 (MEWTOCOL7-COM) 1 Baud rate 230400 bps 230400 Data length 8 bits 8 bits Parity Odd Odd Stop bit 1 bit 1 bit End code CR, CR+LF, ETX , or time (0.01 ms – 100 ms, by the unit of 0.01 ms) CR Start code Without STX Without STX RS/CS controlled No Invalid Send Waiting 0 to 100ms 0ms Modem initialization Invalid Invalid Communicati on format (Note1): Permissible communication condtions depend on communication mode (MEWTOCOL or General-perpose Communication) COM.2 port (System connection) Communication port Setting range Default Station no. 1 - 99 (MEWTOCOL-COM slave) 1 - 999 (MEWTOCOL7-COM slave) 1 Baud rate 230400 bps 230400 Data length 8 bits 8 bits Parity Odd Odd Stop bit 1 bit 1 bit End code CR CR Start code Without STX Without STX RS/CS controlled No Invalid Send Waiting 0 to 100ms 0ms Modem initialization Invalid Invalid Communicati on format (Note): Permissible communication mode is MEWTOCOL only. 7-2 7.1 Specifications Communication cassette AFP7CCET1 Items Description Interface 100BASE-TX / 10BASE-T Baud rate 100 Mbps, 10 Mbps auto-negotiation Transmission system Baseband Max. segment length 100 m (Note 2) Communication cable UTP (Category 5) (Note 1) Max. distance between nodes 100BASE-TX: 2 segments No. of nodes 254 units Types of connection User connections System connections (Note 3) Communication protocol TCP/IP, UDP/IP TCP/IP DHCP IP address assigned automatically Numbers of connection depend on communication mode MEWTOCOL-COM Master:1 connection 10BASE-T: 5 segments MEWTOCOL-COM Slave:3 connection MEWTOCOL-COMSlave: 1 connection MEWTOCOL7-COM Slave:3 connection MEWTOCOL7-COMSlave:1 connection General Communication:1 connection (Note 1) Switching between different speeds is done automatically by auto negotiation function. (Note 2) The standards cite 100 m as the maximum, but noise resistance measures such as attaching a ferrite core may be necessary in some cases, depending on the usage environment. Also, it is recommended to position a hub near the control board, and limit the length within 10 m (Note 3) Used when connecting tool software via LAN. 7-3 Specifications 7.2 MEWTOCOL-COM Format 7.2.1 MEWTOCOL-COM Command Format Command message (1) Header (2) Station no. of destination (01 to 99, decimal) (3) Text (Content depends on type of command) (4) Check code (BCC, hexadecimal) (5) Terminator % or < 0 1 # R C S R 0 0 0 1 C R (Two- Onedigit) digit) Target that reads the value (internal relay R1) Specified item (specifies that only 1 point should be read) Command name (e.g. read contact area) Command code (Indicates that this is a command) (1) Header (start code) Commands must always have a “%” (ASCII code: H25) or a “<” (ASCII code: H3C) at the beginning of a message. (2) Station no. The station no. of the PLC to which you want to send the command must be specified. The station no. of the PLC is specified by the system register. In the case of the FP7 CPU unit, the station no. is specified in the FPWIN GR7 configuration menu. In 1:1 communication, specify "01" (ASCII code: H3031) or "EE" (ASCII code: H4545). (3) Text The content of this varies depending on the type of command. The content should be noted in all upper-case characters, following the fixed formula. (4) Check code This is a BCC (block check code) for error detection using horizontal parity. The BCC should be created so that it targets all of the text data from the header to the last text character. The BCC starts from the header and checks each character in sequence, using the exclusive OR operation, and replaces the final result with ASCII code. It is normally part of the calculation program and is created automatically. By entering "**" (ASCII code: H2A2A) instead of BCC, you can omit BCC. (5) Terminator (end code) Messages must always end with a “CR” (ASCII code: H0D). 7-4 7.2 MEWTOCOL-COM Format NOTE The method for writing text segments in the message varies depending on the type of command. When the message to be sent contains a large number of characters, send the command divided in several times. When the message contains a large number of characters, the response is sent divided in several times. KEY POINTS An expansion header “<” is supported to send and receive single frames of up to 2048 characters as well as general “%”. Type of header No. of characters that can be sent in 1 frame % Max. 118 characters < Max. 2048 characters 7-5 Specifications 7.2.2 MEWTOCOL-COM Response Format Response message After PLC receives a command, it returns the processing result. (1) Header (start code) A “%” (ASCII code: H25) or “<” (ASCII code: H3C) must be at the beginning of a message. The response must start with the same header that was at the beginning of the command. (2) Station no. This is the station no. of the PLC that processed the command. (3) Text The content of this varies depending on the type of command. If the processing is not completed successfully, an error code will be stored here, so that the content of the error can be checked. (4) Check code This is a BCC (block check code) for error detection using horizontal parity. The BCC starts from the header and checks each character in sequence, using the exclusive OR operation, and converts the final result. (5) Terminator (end code) The message should end with "CR" (ASCII code: H0D). 7-6 7.2 MEWTOCOL-COM Format NOTE If no response is returned, the communication format may not be correct, or the command may not have arrived at the PLC, or the PLC may not be functioning. Check to make sure all of the communication specifications (e.g. baud rate, data length, and parity) match. If the response contains an “!” instead of a “$”, the command was not processed successfully. The response will contain a communication error code. Check the meaning of the error code. Station no. and command name are always identical in a command and its corresponding response (see below). This makes the correspondence between a command and a response clear. Command % 0 1 # R Same Response % C C R Same 0 1 $ R C C R 7-7 Specifications 7.3 MEWTOCOL7-COM Format 7.3.1 MEWTOCOL7-COM Command Format Command message (1) Header (start code) (3) Frame No. (2) Station no. of the receiver > @ E E E 0 (4) Text (to be specified in accordance with the type of command) 0 # 0 0 M M R D Command name Command code value Command ID code * * * (5) Check code (16bit CRC (CCITT) ) * CR (6) Terminator (end code) (1) Header (start code) A “>” (ASCII code: H3E) must be at the beginning of a message. (2) Station no. The station no. of the receiving PLC to which you want to send the command must be specified with "@ and three digits". The station no. of the PLC is specified by the system register. In the case of the FP7 CPU unit, the station no. is specified in the FPWIN GR7 configuration menu. In 1:1 communication, specify "001" (ASCII code: H303031) or "EEE" (ASCII code: H45H4545). (3) Frame No. This indicates the sending frame No. Make sure to use consecutive frame numbers. E.g. Commands for multiple frames >@EEE00#00MMRDD001G0DT0000000001000****CR >@EEE01****& CR * Make sure to use consecutive values for frame numbers. The usable number range is from 00 to FF. After FF, return to 00. (4) Text The content of this varies depending on the type of command. The content should be noted in all upper-case characters, following the fixed formula for the particular command. 7-8 7.3 MEWTOCOL7-COM Format (5) Check code This is a CRC (Cyclic Redundancy Check) to detect errors using a generating polynomial of hamming codes. This should be created so that it targets all of the text data from the header to the last text character. CRC is a value given by replacing the result of calculation by CRC-16-CCITT with ASCII code. It is normally part of the calculation program and is created automatically. (6) Terminator (end code) Messages must always end with a “CR” (ASCII code: H0D). KEY POINTS The method for writing text segments in the message varies depending on the type of command. When the message to be sent contains a large number of characters, send the command divided in several times. When the message contains a large number of characters, the response is sent divided in several times. In MEWTOCOL7 command, up to 4096 characters can be sent/received in a single frame. Type of header No. of characters that can be sent in 1 frame > Max. 4096 characters 7-9 Specifications 7.3.2 MEWTOCOL7 Response Format Response message (1) Header (start code) (2) Station no. of the receiver (3) Frame No. > @ E E E 0 0 $ 0 (4) Text (to be specified in accordance with the type of command) 0 M M R D Command name (data area read) Command code value Response code (normal status: $, abnormal status: !) CR Data (normal status: read data, abnormal status: error code) (5) Check code (16bit CRC (CCITT) ) (6) Terminator (end code) (1) Header (start code) A “>” (ASCII code: H3E) must be at the beginning of a message. The response must start with the same header (start code). (2) Station no. This is the station no. of the PLC that processed the command. (3) Frame No. This is the frame number where the command was processed. (4) Text The content of this varies depending on the type of command. If the processing is not completed successfully, an error code will be stored here, so that the content of the error can be checked. 7-10 7.3 MEWTOCOL7-COM Format (5) Check code This is a CRC (Cyclic Redundancy Check) to detect errors using a generating polynomial of hamming codes. This should be created so that it targets all of the text data from the header to the last text character. CRC is a value given by replacing the result of calculation by CRC-16-CCITT with ASCII code. It is normally part of the calculation program and is created automatically. (6) Terminator (end code) The message should end with "CR" (ASCII code: H0D). NOTE If no response is returned, the communication format may not be correct, or the command may not have arrived at the PLC, or the PLC may not be functioning. Check to make sure all of the communication specifications (e.g. baud rate, data length, and parity) match between the computer and the PLC. If the response contains an “!” instead of a “$”, the command was not processed successfully. The response will contain a communication error code. Check the meaning of the error code. Station no. and command name are always identical in a command and its corresponding response (see below). This makes the correspondence between a command and a response clear. Command > @ E Same Response > @ E E 0 0 # 0 0 Same E E E M M R D CR R D CR Same 0 0 $ 0 0 M M 7-11 Specifications 7-12 Record of changes Manual No. Date Record of Changes WUME-FP7CCET-01 DEC.2013 First Edition