1
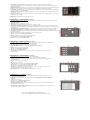
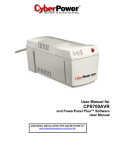
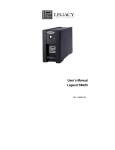
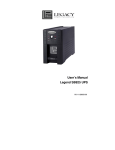
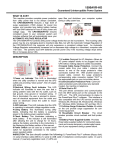
SeeUPS2020 Plus
Software User’s Manual
K09-1120002-00
Overview
SeeUPS2020 Plus is designed for use with Windows 95, Windows 98, Windows Me, Windows NT, Windows 2000
SeeUPS2020 Plus is equipped with a Scheduled Shutdown feature that can automatically save and close
and Windows XP. It works in conjunction with the UPS to provide full protection of valuable computer systems,
open files and then shutdown the computer and UPS at a user specified date and time as well as start the
applications and data. In the event of a power failure, SeeUPS2020 Plus automatically saves and closes open
computer at a user specified date and time. Use of this feature is optional and is not required for the power failure
files under auto-assigned file names or existing files names after software controlled delay. The computer and UPS
shutdown to occur.
are automatically shutdown to conserve battery power. Files with auto-assigned names will be saved under
The use of the SeeUPS2020 Plus software is optional. The UPS unit will provide full surge suppression and battery
C:\PCTemp, where C is the name of your main hard drive. Files that have previously been saved will be saved in
backup without the software. You must use the software if you wish to have the automatic shutdown feature.
their original location.
Installation Guide
(Legacy UPSs can provide surge suppression and battery backup without the software. However, if you
For Windows 2000
need to schedule for UPS Auto-shutdown, then it is necessary to install the software.)
1.
Click on Start, point to Settings, and then click Contr o l Panel.
2.
Double-click on Power Options.
3.
On the UPS Tab, click Select.
USB Function (Optional)
1.
Turn off your UPS
4.
In the UPS Selection Dialog Box, under Manufactur e r s , click None.
2.
Connect the serial interface cable to your UPS and the open serial port on the rear panel of the computer. If you
5.
Exit to the desktop and shutdown the computer.
would like to use USB interface, please connect the USB adapter with the Serial Cable then connect the USB
6.
T u r n the UPS off and unplug it.
to your computer. (See the figure)
7.
Connect the ser i al interfac e cable to the UPS and an open ser i al por t on the back of the c o mputer. (Note:
Plug the UPS into an AC outlet, turn the UPS on and start your computer.
Follow the instructions on the User’s Manual to complete the installation.
8.
Plug the UPS into an AC outlet, tur n the UPS on and then star t your computer.
9.
Windows will find new hardwar e .
3.
4.
You must use the ser i al cable that was supplied with the unit).
10. Inser t the software disk into the CDrom dr i ve and follow the on-screen instructions.
11. When the installat i on is completed, r emove the CD.
For Windows 95 /98 /ME
1.
Turn the UPS off and unplug it.
2.
Connect the serial interface cable to serial port on the UPS and an open serial port on the back of the
computer. (Note: You must use the serial cable that was supplied with the unit).
3.
Plug the UPS into an AC outlet, turn the UPS on, and then start your computer.
4.
Windows will find new hardware.
5.
Insert the SeeUPS2020 Plus CD into the CDrom drive, then follow the on-screen instructions.
6.
When the installation is completed, remove the CD.
For Windows NT
For Windows XP (Home and Professional)
1. Click on Start and then click on Control Panel.
2. Double-click on Power Options then click on the UPS tab.
3. Set the manufacturer to None.
4. Exit to the desktop and shutdown your computer.
5. Turn the UPS off and unplug it.
6. Connect the serial interface cable to serial port on the UPS and an open serial port on the back of the computer.
(Note: You must use the serial cable that was supplied with the unit).
7. Plug the UPS into an AC outlet, turn the UPS on and start your computer.
8. Windows will find new hardware.
9. Insert the SeeUPS2020 Plus disk into the CDrom drive.
1.
Click on Start, point to Settings, and then click Control Panel.
10. Follow the on-screen instructions.
2.
Double-click on the UPS Icon.
11. When the installation is completed, remove the CD.
3.
Remove the check mark from the box labeled UPS is installed on, and Click OK.
4.
Acknowledge the message that the UPS is in an unknown state.
5.
Exit t o the desktop, then shutdown your computer.
When the installation is completed, the SeeUPS2020 Plus software will appear on your screen for a few seconds,
6.
Turn the UPS off and unplug it.
and then minimize. It will appear as a blue and white battery icon located in the system tray, near the clock.
7.
Connect the serial interface cable to serial port on the UPS and an open serial port on the back of the
computer. (Note: You must use the serial cable that was supplied with the unit).
8.
Plug the UPS into an AC outlet, turn the UPS on and then start your computer.
9.
Click on Start, point t o Settings, and then click Control Panel.
10. Double-click on Add / Remove Programs.
11. Insert the SeeUPS2020 Plus CD into the CDrom drive, and then click Install.
12. Follow the on-screen instructions.
13. When the installation is completed, remove the CD.
Operating Instructions
SeeUPS2020 Plus Main Menu (See Figure 1 )
1. Log: Click on the log button to open the Log Window.
2. Power: Click on the power button will exit the software window.
3. Minimize Button: Click this button to minimize the software.
4. Setup: Click the setup button to open the Setup Window.
5. Model: This shows the model of the UPS that is being used.
6. Version: This shows the hardware version.
7. Status Bar: The area display messages about the status of the software.
8. Schedule: Click this button to open the Schedule Window.
SeeUPS2020 Plus Main Window Description (See Fi gure 2 )
1. Battery Level: This indicator displays the current charge on the battery. The indicator will display a red color when a power
failure occurs.
2. Input Voltage: This reading shows the current input voltage of the utility power. The input normally appears in green, but
will turn red if the input voltage is not operating normally.
3. Frequency: This indicator displays the frequency of the utility power.
4. Scheduled On: SeeUPS2020 Plus can be scheduled to turn your computer system on. This indicator displays scheduled
on settings that will occur in the next seven days.
5. Final Countdown: When SeeUPS2020 Plus detects that the utility voltage is not operating normally, the final countdown will
begin. When the countdown reaches zero, SeeUPS2020 Plus will save and close any open files, and then shut down the operating system in an
intelligent and orderly manner.
6. Approximate Backup Time: This indicator shows the approximate amount of backup time that is available, based upon the battery capacity and
the load on the system. This indicator can appear in red, yellow, or green, depending upon the number of minutes available.
7. Scheduled Off: SeeUPS2020 Plus can be set to automatically shutdown the computer system at a user specified time. scheduled off settings that
are set to occur within seven days will be displayed.
8. Temperature: This indicator displays the internal operating temperature of the unit. If the temperature exceeds 158°F (70°C), the indicator will
change from green to red.
9. Load Level: This indicator shows the % of capacity of the battery outlets that is currently being used. This indicator appears in green or gray, but
will turn red if the load exceed 90%.
10. Output Voltage: This indicator shows the output voltage of the UPS.
SeeUPS2020 Plus Setup Window (See Figure 3 )
1.
UPS is Installed On: This shows the current port that the UPS is using. The port assigned to the UPS needs to be used exclusively for the
SeeUPS2020 Plus software.
2.
Buzzer On: This toggles the audible alarm on and off..
3.
Play Sound: Voice is being played when the UPS is turning on or facing a power outage.
4.
Time between Power Failure and Shutdown: This is the user controllable delay between when the power fails and the software starts the
shutdown process. If unchecked, the unit will run on battery until the low battery signal is received (2 minutes of backup time remaining) and then start
the shutdown process.
5.
Time between Power Failure and Initial Warning: This setting determines the delay between when the power fails and the first audible alarm.
6.
Delay between Warning Messages: User adjustable setting for the delay between the audible alarms that occur during a power failure.
7.
UPS Self-Test: Allows the user to test the UPS without having to unplug the unit from the wall. When Run is clicked, the unit will switch to battery
power and the unit will beep.
8.
About: This button will display information about the software, as well as contact information.
9.
Advance: This button opens the Advanced Setup Window.
10. Default: Click this button to return the software to original factory settings.
11. Cancel: This button exits the window without saving changes.
12. OK: This button exits the window and saves changes.
SeeUPS2020 Plus Advanced Setup (See Figure 4 )
1. Low Battery Voltage: This sets the low battery cut-off level. The user can slightly extend the UPS run time by adjusting this setting.
2. High-Voltage Failure: Sets the upper level where the UPS will switch to battery.
3. Low-Voltage Failure: Sets the lower level where the UPS will switch to battery.
4. Battery-Mode Output Voltage: Sets the voltage that the unit will output when running on battery.
5. Default: Restores the settings to the factory defaults.
6. Cancel: Exits the window without saving changes.
7. OK: Exits the windows and saves changes.
8. Cold Start: When enabled, the UPS can start in the absence of AC power. To maximize battery life, it is recommended
to keep this disabled.
SeeUPS2020 Plus Schedule Menu (See Figure 5 )
1. Special Setting: This setting allows you to schedule a one-time startup/shutdown.
2. Schedule Display: This area displays the days/dates and times of any scheduled startups and shutdowns.
3. Turn On: Select the day/date and time that you want the computer system to restart. Can only be used in conjunction with
a scheduled shutdown.
4. Delete: Delete the selected item from the schedule.
5. Add: Adds an item to the schedule.
6. Cancel: This button is used to exit the log window without saving any changes.
7. OK: This button is used to exit the shutdown window and save any changes.
Pl e a s e note: You must click Add to add the item to the schedule.
8. Turn Off: Select the day/date and time that you want the system to shutdown. This is optional to use and has no effect
on whether your computer will shut down during a power failure.
9. Weekly Setting: Allow you to schedule a shutdown/startup based on the day of the week
SeeUPS2020 Plus Log Menu (See Figure 6 )
1. Event Option Button: When this option is selected, the log will display different SeeUPS2020 Plus events, such as power
failure, program start, and program end.
2. Log Display: This area displays the information as selected by the Event, Closed Application Information, or Data Record
option button.
3. Clear: Clears the selected log.
4. Cancel: Exits the screen without saving any changes.
5. OK: Exits the screen and saves any changes.
6. Data Record Option Button: When selected, the log will display a record of the items that are shown in the main window, such
as input/output voltage and temperature.
7. Closed Application Information Option Button: When this option is selected, the log will display the names and locations of any
files that were auto-saved by the software
Entire contents copyright ©2006 Legacy Power Conversion, Inc.
All rights reserved. Reproduction in whole or in part without permission is prohibited.