1
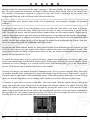
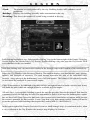
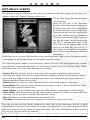
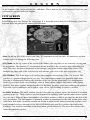
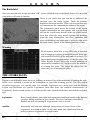
L
E
G
I
O
N
NOTES
1
L
E
G
I
O
N
TECHNICAL SUPPORT
Should you experience a technical problem concerning the operation of this
product, please contact our technical support staff. Before you call, please read the
README.TXT file on the LEGION CD to see any last minute recommendations
pertinent to your problem. Also, check out the Support page on our web site listed
below. When you call, please be at your computer and have the following
information available:
•Computer make and model•Windows version•Total system RAM
•Total Hard Drive space•Video card make and model.
Phone#:
(514) 844-2433, Mon.-Fri. 9am-6pm
Fax#:
(514) 844-4337, Attn: Support
Internet e-mail:
For prompt technical support via email,
please fill out our online form at
http://www.strategyfirst.com/Support/ContactForm.asp.
For any other technical support questions or concerns,
contact us at [email protected].
Strategy First web site: http://www.strategyfirst.com
Legion official web site: http://www.slitherine.co.uk
2
L
E
G
I
O
N
CONTENTS
Introduction
4
System Requirements
Installation
4
4
Getting Started
5
Tutorial
Getting Started
Managing Your Cities
Fighting Your Enemies
Sweet Victory
Main Menu
5
5
6
7
8
8
Campaign Screen
Strategic Map
Resource Indicators
Terrain Indicator Window
9
11
12
12
Empire Overview Screen
12
Diplomacy Screen
14
City Screen
15
Combat
Ordered Formations
Irregular Formations
Order Icons
The Battlefield
Winning
18
18
19
19
20
20
The Combatants
Units
20
22
Buildings
29
Credits
33
3
L
E
G
I
O
N
INTRODUCTION
Legion is an epic game of conquest, battle, diplomacy, and economics. As ruler of your own nation or
city-state, you'll strive to outmaneuver, out-fight, out-talk and out-produce up to 20 enemies in an
intense struggle to rule the boot of Italy, Britannia, or Gaul.
Slitherine, Paradox Entertainment, and Strategy First
have gone to great lengths to create a game that
faithfully recreates the trials and tribulations of the
Roman Empire. The battlefield includes Roman
Legions, archers, cavalry, hoplites, and nobles.
Authentic cities such as Roma and Hernici dot the
bucolic landscape, and gamers may build
bathhouses, vineyards, stables, and a host of other
buildings that allow players to improve and mold
their empire as they see fit.
Yet all of your battles will not be won by the sword
alone. There are numerous other city-states on the
map, and each one has its own agenda. If you wish to
rule, you must learn when to fight, and when to
negotiate. Make no mistake, Legion places a high
value on diplomacy. The gamer who tries to bull their
way through the game, fighting all comers, will
seldom -if ever- win.
SYSTEM REQUIREMENTS
To play Legion you'll need the following hardware.
•Windows® 9x/2000/ME/XP
•Pentium 233 Mhz MMX
•64 Mb RAM
•250 Mb Free Hard Drive Space
•2Mb Video Card DirectX Compatible
•DirectX Compatible Sound Card
•DirectX 8.0 or higher
Installation
• Place your Legion CD in your CD-ROM drive. This should trigger your computer's Autoplay function,
which displays the Legion installation screen. Follow the prompts to install the game.
• If, however, you are one of those unlucky people, Autoplay may not kick in. If such is the case, click
Start>Run>D:\ (The CD-ROM drive in which you placed Legion)>Setup.exe. That
should do the trick and get you installing in no time.
• Once the game is installed you may play by selecting Programs>Strategy First>Legion
4
L
E
G
I
O
N
GETTING STARTED
Legion is a richly detailed strategy game. Yet despite this strategic detail, the interface is simple, and
easy to learn. You'll play the game from four screens – Campaign, City, Battle, and Diplomacy – and
occasionally interface with a handful of others. Follow along as we describe Legion and explain how
to play.
TUTORIAL
Legion is a fascinating game, but to understand a fascinating game can take a bit of time. To minimize
the time you spend learning and maximize the time you spend having fun, we have included this tutorial.
It won't make you a Legion expert, but it will get you up and playing quickly. Please follow along.
Getting Started
From the Main Menu select New Game. Doing so displays the Campaign Selection Screen. Choose to
play the Tutorial and click Start. This takes you to the Campaign Screen. You enter the screen with your
Roma army selected. Right-click anywhere on the map to deselect the army. Notice that you may scroll
the map by moving the mouse cursor to a map edge.
Your city (Roma) is identified with a red
flag, and your borders, which define the
area that you currently control, are marked
with smaller flags of the same color.
Passing your cursor over a city displays a
small tool tip window full of useful
information. You may select a friendly city
or army by left-clicking on them. Left
click on Roma now.
5
L
E
G
I
O
N
Managing Your Cities
The City Screen will fill your monitor. It is from your empire's City Screens that you will manage your
economy, build your infrastructure, and recruit your conquering armies. On the left side of the screen
are the squads that you may recruit to swell your army's ranks. These are called the Troop Buy Icons.
On the right side of the screen are the buildings you may construct to aid your economy. These are called
the Building Buy Icons. Passing the mouse cursor over a squad or a building displays useful information
on the icon below your cursor.
The bottom of the screen is mainly filled with the Resource Production Window, which displays
economic information. We'll cover this in detail later in the manual. For now, be aware that your
economy runs on food, ore, and lumber. These commodities are produced by farms, mines, and lumber
mills, and production is enhanced by various other structures such as shrines.
The number of workers present in a building also improves production. Note the lumber mill on the right
of the City Window (the large oval window centered on the City Screen). It has two white worker
silhouettes. Notice that left-clicking on the structure will add a third worker (white silhouette). This
raises your production of lumber, as shown in the Resource Production Window, but lowers your
worker pool as shown by the reduction (from three to two) of white worker silhouettes in the window
directly beneath the City Window. Don't worry about this now. Your city will continue to grow and
the worker will soon be replaced. Understand, however, that this work force not only mans your
production facilities, but comprises the squads in your army. You must have workers available to recruit
new squads.
The construction of other buildings enables you to recruit new troop types. Use the advancement arrows
below the Building Buy Icons to browse through the available buildings. Locate and left-click on the
Fletcher to build the building. Click OK to close the City Screen. Once again you'll see the Campaign
Screen. All potential builds are completed in the spring.
Let us reiterate that point. All potential builds are completed in the spring. That means if you begin
construction in the summer it will take three turns to erect your building, but if you start your project in
the winter it will be ready the next turn.
6
L
E
G
I
O
N
Click the hourglass located in the center of the right-hand icon panel four times. Each click moves time
forward to the next season. This will advance the game to spring.
Once again open Roma's City Screen. You'll notice Roma has a brand new Fletcher, and that you may
now recruit auxiliary archers as demonstrated by their appearance among the Unit Buy Icons. Left click
twice on the archers to recruit a pair of squads. Note that this will use two workers from your available
pool of workers.
Archers take a lot of wood, so let's increase our lumber production. We could build another lumber mill,
but that would use a valuable construction slot. Construction slots are the undeveloped squares
surrounding your city, and there are only so many. On the other hand, we could upgrade the lumber mill
to a large lumber mill. The large lumber mill will replace the existing mill and increase lumber
production... just what we need. Advance the building buy icons to the large lumber mill and left-click
on it. Return to the Campaign Screen and advance the game four turns.
Fighting Your Enemies
Notice that the auxiliary archer squads appear as a separate army at Roma. Select them (by left-clicking
on them) and move your cursor over Roma. You'll see the merge army cursor appear. Left click and the
archers will merge with Roma's garrison. We'll cover merging armies in greater detail later in the
manual. End the turn and once again select the armies when the new turn dawns. The area in which the
army may move will be shaded. Left click on the southern extreme of the shaded area to advance the
army to the Latin border.
Okay, now we are all ready to go to war,
but have no one to fight. Let's fix that.
Click the scroll on the Campaign Screen's
icon panel. This opens the Diplomacy
Screen. From here you may pay tribute,
make and break alliances, make peace,
and start war. Select the Latins in the
left-hand panel and then click the Declare
War button on the right-hand panel. Now
you are at war. Return to the Campaign
Screen and advance the turn.
Advance your army to the Latins' city.
This may take a couple of turns. If you are
within range of the city your cursor will
change to crossed swords when passed
over the city. Click and you will be
transported to the Deployment Screen.
The Deployment Screen is where you plan your battles. Each of your squads is represented by a blue
square and its unit icon. Left-clicking on a squad shows the squad's armor, mobility, organization, and
morale on the right-hand panel. You may move your squads by dragging them anywhere on your third
7
L
E
G
I
O
N
of the map (as delineated by the thin black line). You may also change the squads' formation and orders.
Again, we cover this in great detail in the battle section of the manual. For now, it's enough to know that
your archers and auxiliaries will work best in the rough terrain, as represented by darker ground and
gray squares. Note that two units may not overlap. Place your squads as you wish and click okay.
Now you'll see the results of your orders on the Battles Screen as your squads advance and fight in
real-time. To win a battle, you must break an opposing army. This is accomplished by demoralizing their
squads. When a squad's morale drops too far the squad breaks and runs. When too many squads have
broken an army will rout from the field. As in ancient times, there is very little you can do to alter the
battle's outcome once the armies meet, so enjoy the show. We know that you'll win this one.
Sweet Victory
After your victory return to the campaign screen. You'll be notified that you have not only won the
battle, but the campaign as well. Who said you can't conquer a Roman enemy in a day? You will be
automatically taken to the game results screen before returning to the game menu. Notice that the power
bar to the right of Roma's line is much longer than its rivals. You control over 40% of the map and your
empire is at least 25% bigger than your closest rival. Those are Legion's victory conditions and you are
the victor.
Of course this was only a simple tutorial. Legion is chock full of detail, nuances, and challenges that
will keep you glued to your screen for hours, plotting the conquest of your rivals. It won't be easy, but
it will be fun. Good luck.
Main Menu
Once you've witnessed the game's opening movies you'll be whisked away to the main menu. From here
you may choose to start a new game, load a saved game or quit.
Selecting Load Game displays a list of your saved games. Select one,
choose Okay, and your game will begin. Selecting New Game brings up
the Campaign Selection screen. This screen allows you to choose from
several campaigns and whether you wish to play with a historical or
alternative setting. The choice is yours.
• Unification of Italy: This campaign takes place in Italy. The Romans begin in control of the central
region that includes Roma.
• Conquest of Britain: Now you are fighting for England and Wales. The Romans begin in the south-central
portion of the map.
•T he Gallic Wars: France is the battlefield du jour. The Romans start in the east-central section of
the map.
•Pacifying the North: The battle for control of the northern section of the British Isles. Romans
begin in the south-center.
•Tutorial: A small tutorial that teaches basic play.
Playing with the Romans is by no means mandatory. You may play with any of the tribes on the map.
8
L
E
G
I
O
N
Once you have selected your campaign (or even before you have selected it) you may choose whether
you wish to play with historical or alternative settings. Historical settings more closely mimick the
world as it existed during the time of the Roman Empire. Alternative settings allow the player to play
under conditions which are more configurable, but less historically accurate.
In an alternative history set up the player chooses which nation type they wish to play (Roman, Greek,
Tribal, Gallic, etc.) and which nation they wish to control (Etruria, Aequians etc). They also choose
which nation types they will play against. In other words you could play as the Romans against other
Romans, or play the Greeks against Romans, Tribals and Celts. You may also choose to play on either
a random or a pre-set alternative history (7 different options).
CAMPAIGN SCREEN
Once the game begins, you are taken to the Campaign Screen. It is from here that you will do most of
your campaigning (hence the name). The screen is divided into several sections and we will cover each
in turn. The central portion of the screen shows the area surrounding your currently selected army, town,
or piece of terrain.
Towns are displayed as groups of buildings with the controlling player's flag fluttering overhead. Notice
that the towns will grow on the map as you develop them. Armies are shown as soldiers with the owning
player's flag. Although the opposing player's armies may not be inspected, the taller the banner they are
carrying, the more powerful the army. You'll discover exactly what they have up their sleeve when you
engage them in combat.
A town's name turns red on the campaign screen when the population of the city has maxed out - each
size of town hall has a different population limit.
Small flags, the same color as the banner over your cities and armies, define the limit of your territorial
possessions. Conquering cities will expand those possessions. When an enemy army enters an area that
you control, the army's icon changes from a gray, generic soldier to an icon depicting the principal squad
in the army.
On the other hand, friendly armies have the number of squads in the army indicated below the army.
Clicking on the army provides additional information as shown across the bottom of the Campaign
Screen in the Squad Panel.
Passing your cursor over a squad displayed in the Squad Panel shows the squad's current and potential
strength. Under strength squads will recover troops when in friendly territory, but do so faster when in
cities. Hence, when moving into enemy territory, it's best to fight a battle and then rest in the newly
captured town.
Beside each squad are two icons. The man's head icon represents the health of the unit. The greater the
unit's casualties, the lower the unit's health. As a unit's health drops, a skull on a different colored
background will replace the man's head icon.
9
L
E
G
I
O
N
Medals beside the squad represent the unit's experience. The more medals, the more experience the unit
has. The more experience a unit has, the better it fights. So keep those squads alive if you want to win.
The amount of experience required to progress to the next level is indicated by the medal icon
background filling up with a different color like the health icon.
Understand that more doesn't mean better. Ten Legionnaires will normally slaughter 40 peasants
with ease.
To move an army select it (by left-clicking on it), and then left click where you want it to move.
Right-clicking de-selects the army. When you select an army its range of movement is grayed on the
map. Note that all armies, and the squads which comprise them, are not created equally. Some types of
units are faster than others, and each moves at differing rates of speed through the terrain. Accordingly,
a Legion will take quite a while to cross Italy's central mountains, but Velites will scale those hills rather
quickly. By the same token, cavalry will zip through the plains, but crawl through the forests. Note that
rivers are impassible to all but skirmishers and light cavalry.
As you have no doubt noticed, armies are often glued together from different types of warriors. In such
cases the army moves at a rate equal to the slowest squad in the army over that type of terrain. This
means mixed armies are likely to move more slowly as they are always suffering the worst movement
penalty for any terrain they are in.
To attack an enemy army or town, select your army, ensure your target army or town is within your
troop's movement range, and left click on the enemy. When your cursor moves over an eligible enemy
formation or town it changes to a crossed sword cursor. Left-clicking takes you to the Deployment
Screen. We'll discuss that in greater detail later in the manual.
You may also merge your armies from the Campaign screen. To do so select a friendly army, then click
on another friendly army within the first army's movement range. If the sum of both armies' squads is
less than eight (8), the armies will automatically merge. If the sum is greater than eight a screen will pop
onto your monitor that allows you to choose which squads you wish to allocate to which army.
To transfer a squad from one army to the other, select the squad. With the squad selected click on an
empty slot in the other army. Empty slots are the blank slots without a picture of a soldier.You may also
display the squad's current and maximum strength by passing the cursor over it. Note that the squads
shown in the Squad Transfer Screen will use the strength and experience icons previously explained in
the Squad Screen. The transfer squad pop-up box also allows you to rearrange the order of your army.
Clicking first on one squad and then on a second swaps the two.
10
L
E
G
I
O
N
Although the Squad Transfer Screen allows you to designate who populates your army's front and rear
echelon, it's not critical where you place your troops. At least not yet... you'll have time to arrange them
whenever you go to the Deployment Screen.
You may also add troops to a town garrison in a similar manner. Select an army, and select a town within
its movement range. If the town currently has a garrison the Squad Transfer Screen will display. Transfer
squads as detailed above.
Armies are not all you can manipulate from the Campaign Screen. This is also your window into the
City Screen. Left-clicking on a city brings up the City Screen, and we'll cover that in greater detail later
in the user manual. Passing your cursor over a city displays the city's name, its population, the potential
food, ore, and wood production, and the city's garrison.
The resource potential is an efficiency rating. In other words, a rating of 100 equals 100% of a building's
potential production. A rating of zero means that the resources cannot be produced and any buildings
that collect that type of resource cannot be built.
To the right of the main window in the Campaign Screen is an information panel. Let's take a look at it.
Strategic Map
On the top of the panel is the strategic map. This is a map of the entire playing area.
Each city-state's holdings are color coded. Cites are designated by a white circle
rimmed in black. Armies are shown as a white circle without rim. Left-clicking on the
strategic map moves the main window to the area clicked. Below the strategic window
is the current date. Legion turns are three months long, and there are four – winter,
spring, summer, and fall – in a year.
Below the strategic map are a set of buttons that allow you to manipulate the game.
These buttons are perhaps the most important set of general controls in the game.
Hence, we will look at each in turn.
Empire Overview
Below the Strategic Map area is a small gold globe. Clicking on this globe
displays the Empire Overview Screen. We'll cover this in detail a bit later.
Next/Last Army
Two triangles flank the Empire Overview globe. Clicking on these will take you to your next army,
or return to the previously selected army. Your army list loops so that continually advancing
through your armies will return you to the original army.
Diplomacy
The first icon in the next row (it looks like a scroll) is the diplomacy icon. Clicking on this icon
displays the Diplomacy Screen. Again, this will be explained later in the manual. When offers from
other nations are pending the button is highlighted.
11
L
E
G
I
O
N
Next Turn
The center, hourglass, icon in the second row advances the game to the next turn.
Options Menu
The right-hand icon in the second row brings up the Options Menu. From the Options Menu you
may load a saved game, save your current game, or quit the game.
• Clicking Save brings up the Save Menu. Clicking Save on the Save Menu automatically saves
your game with a time stamp.
• Clicking Load on the Options Menu presents a list of previously saved games. Select the game
that you wish to load and then click Load.
• Choosing Quit from the Options Menu quits your current game and returns you to the
main menu.
• You may also adjust both the Sound and Video options by clicking on the corresponding buttons.
Jump to City
Clicking the left button on the third row centers the map on one of your cities. This is useful if you
lose sight of your territory or forget which side you are currently playing.
Game Results
Clicking the left button on the third row displays the Game Results Screen. This screen lists every
nation & city-state in the game, their victories and defeats, the number of enemy troops killed,
casualties suffered, cities owned, and a bar-like power depiction.
Resource Indicators
Below the aforementioned three tiers of icons are the resource indicators. These indicators display the
total amount of food, ore, and wood and the per-turn deficit or surplus.
Terrain Indicator Window
Located below the Resource Indicators, this window displays the terrain under the current cursor
position.
EMPIRE OVERVIEW SCREEN
The Empire Overview Screen displays a wealth of useful information. The top of the screen names the
empire that you are playing. Hopefully, this knowledge isn't new. The top-center window in the screen
presents information about your cities. Listed across the top of the window are City, Population, Food,
Ore, Wood, Building, and Men. They are defined below:
•City:
The name of the city.
•Population: Current population of the city. As the city grows, so does its population. Some buildings,
•Food:
•Ore:
12
such as bathhouses, enhance that growth.
The amount of food produced by the city. Building farms enhances food production.
The amount of ore produced by the city. Mines produce more ore.
L
E
G
I
O
N
The amount of wood produced by the city. Building lumber mills enhances wood
production.
•Buildings: Displays the building currently under construction in the city.
•Recruiting: This shows the number of squads being recruited at this city.
•Wood:
Left-clicking highlights a city. Subsequently clicking View in the bottom right of the Empire Overview
Screen displays the selected city's City Screen. Double-clicking a city also pops the City Screen. We'll
cover that later in the user manual.
Note that clicking on a city moves the window in the strategic map to the location of the selected city.
Below the City Window is the Resource Window. The window displays your total income, army upkeep,
balance, and stockpile of resources. The total income represents the sum of the individual cities'
incomes. Army upkeep is the maintenance cost of all your armies. The balance is the quarterly surplus
or deficit and the stockpile is your overall surplus.
Cities share resources. So although a city may not have enough resources to build a specific unit, it may
still build the unit if there are enough resources available in your empire.
All units have a pre-requisite building (consult the unit list provided later in the manual) that must be
constructed before the unit may be built. If a unit cannot be built it is because the building they require
has not been built. Note, however, that some cities cannot build farms/mines or lumber mills because
the resource potential for that resource is zero. Note that a city that cannot produce lumber will not be
given the option to build buildings that require the Lumber Mill (i.e. the Fletcher's).
In the bottom right of the Empire Overview Screen is a small strategic map. As mentioned earlier, when
a city is selected in the City Window the strategic map displays its location.
13
L
E
G
I
O
N
DIPLOMACY SCREEN
The diplomacy screen is where you will enter into negotiations with other nations & city-states. It is
from here that your "foreign" relations policy is set.
The top of the screen lists the nation that
you are playing.
Along the left side of the Diplomacy
Screen is a list of the nations in the game.
Clicking on the name of a nation indents
the territory that they occupy on the map.
These nations may also have icons beside
them that indicate special conditions.
Crossed swords indicate that you are at
war with the nation. A scroll means that
you have a message from them. Click
View Offer on the bottom right of the
screen to see what they have to say. A
dove means you are allied to the nation,
and the skull means that nation has been
eliminated.
By the same token, you may click territories on the map in the center of the screen. Clicking the territory
will highlight, in the left-hand panel, the nation that owns the territory.
The right-hand panel contains several diplomacy options. The top of the panel displays the currently
selected nation. Underneath this display are five buttons: Declare War, Form Alliance, Offer Tribute,
Information, and View Offer. Their meanings are as follows:
• Declare War: This declares war on a rival nation. You can enter a neighbor's territory before
declaring war, but for every turn you spend within the neighbor's territory the relationship with that
nation will drop. Allies are more tolerant of your armies, but still get annoyed if your soldiers are
posted within their borders for too long.
• Offer Peace: If you are at war with a nation the Declare War button toggles to offer peace.
•Form Alliance: This asks the selected tribe to form an alliance with you. It's not a bad idea to soften
them up with a couple of tributes first.
• Break Alliance: If you are allied with a nation the Offer Alliance button toggles to break alliance.
• Offer Tribute: Click this button to offer the selected nation a tribute. If you have something that they
want they will ask you for it. Clicking Okay will send it along.
• Info: Clicking here provides information on the selected tribe.
•View Offer: If someone has sent you a diplomatic overture, this allows you to read it.
Note that you may not only display territories by tribal color in the central map, but also by their
relationship to your empire. Those colored in red have a strong dislike of you. Those in green are allies.
Others are colored in varying shades of orange and yellow. It's best to offer alliances to those in green.
The red guys just don't want to be bothered.
14
L
E
G
I
O
N
At the bottom of the screen are resource indicators. These indicate the total amount of food, ore, and
wood and the per-turn deficit or surplus.
CITY SCREEN
Left clicking on a city displays the city screen. It is from this screen that you will manage your cities,
and turn them into prosperous centers of civilization.
• Date: In the top left of the screen is the date. It's important to track the date. All purchases and new
recruits arrive in Spring the following year.
• City Name: In the top center of the screen is the name of the city that you are currently viewing and
its population. The fraction (2/3 for instance) means that this is the second of three cities that you
own. This city's location is displayed on the strategic map at the bottom right of the screen. The
triangles on either side of the selected city will advance your view to the next or previous city.
• City Window: This is the large oval window that comprises the majority of the City Screen. This
window is a graphical depiction of your city. The empty brown squares are potential build areas.
Housing is automatically built by the denizens of the city. On the other hand, civic buildings are
built by your hand. Some civic buildings, such as farms, mines, lodges, and lumber mills require
workers. The more workers assigned to the civic building, the more goods that building will produce.
Left click a civic building to add a worker, right click a civic building to remove a worker.
•Av ailable Workers: The small window directly below the city window shows the number of available
workers in the city. These workers are used to man civic buildings and form the cadre of new squads
for your army. Each city has a total number of available workers, which is governed by the size of the
city's population. The total number of potential workers is represented by the dark worker icons (they
look like a little man). Available workers are shown in white. In the above picture the city has seven
total potential workers (the total of the light AND dark icons), and five workers (the light icons)
available. Free workers contribute to the population growth of the city. The more free workers the
faster the population grows.
15
L
E
G
I
O
N
• Building Buy Icons: To the right of the City Window are the building buy icons. These represent the
buildings that are available for purchase. If a building is grayed out you do not have enough resources
to buy it or you already have a building under construction. Passing your mouse cursor over a building
pops a tool tip that displays the cost to buy the building. From left to right, this cost is the amount of
food, ore, and wood. See below for additional details. Passing your cursor over a building icon also
provides additional information in the information panel at the bottom of the page. Included in this
information are the quarterly tax costs that are added or subtracted from the amount of food, ore, and
wood produced by the city each quarter. Some buildings, such as town halls and village halls, actually
collect taxes, while others, such as lumber mills, cost taxes to keep running.
You may only construct one building per city at a time. Once you have chosen to build a structure the
other selections will be grayed out until your selection is built. If there are no buildings shown, you have
no more room for construction. You may make additional room by demolishing an existing building.
Some buildings are upgrades of existing buildings and these do not require building space, but instead
replace the buildings they are upgrading.
Perchance the most important building is the town or city hall. Erecting this structure provides more
open ground for additional buildings. Village halls have the least bureaucracy, require little upkeep, and
generate the highest tax profit. Conversely, the larger the hall, the more red tape there is and the less
efficient things are so less tax is generated. On the other hand large cities have more workers, so the
production from the additional workers counterbalances the small loss in efficiency inherent in a larger
city hall.
•Tr oop Buy Icons: Arranged in a semi-circle to the left of the City Window are the troop buy icons.
These icons allow you to purchase troops. They work much like the building buy icons. Passing your
cursor over a troop icon displays the cost of purchasing the squad. The information window displays
details of the unit's abilities. Be aware that you must have the resources to build and maintain the
squads, and the workers to man them.
As we have said before, all squads are not created alike. More on this later, but suffice to say that you
get what you pay for. Peasants are cheap, but they won't stand up in a fight with cavalry. Legionaries
are expensive, but fight well. Yet, cost is not the only measure of troop's worth. Even the best legionaries
can flounder in the forest terrain where loosely organized troops such as Javelinmen prevail. So choose
your troops well.
• Resource Production Window: Directly below the available worker icons is the Resource
Production Window. This window shows what you are producing, what you are using, and your stock
pile of resources.
From top to bottom, the three resources shown are food, ore, and wood. Displayed over the resources is
the resource potential of the city.
16
L
E
G
I
O
N
The first column shows the basic amount of each produced in a quarter in this city. You may raise this
number by increasing the number of workers assigned to resource production buildings, such as lumber
mills, or by erecting additional resource production buildings. The second column (titled "Bon"),
displays the bonus production based on the buildings in the city. Shrines, temples, vineyards and guilds
all supply production bonuses based on a mixture of happiness and training that leads to higher
production. The third column, which is titled Tax, details the amount of tax either collected or used by
the city's buildings. Note that troop upkeep does not affect this column. Troops are supported from
empire total funds, which are represented on the far right of this window.
The fourth column is your quarterly balance. This represents your gain or loss per quarter for THIS city.
This gain or loss is directly added or subtracted from the total of all your empire's city gains (or losses)
to give the empire totals. Finally, the Empire Totals show the total amount of "on-hand" resources in
your empire, stockpiled resources, and their quarterly change. Obviously, you want to keep this
per-quarter change positive.
Understanding the interaction of buildings, assigned workers, squad upkeep, and resources is the
cornerstone to playing Legion well. You must have enough resources to raise a squad, and upkeep
squads, if you hope to conquer the world.
It's important to manage each city well. Destroy old buildings, and build universal efficiency
enhancements, such as shrines, early. They help all resource production.
Building space is limited; it isn't possible for one city to hold all the available buildings. For example,
if your town is focusing on resource production, you'll need shrines, guilds and the resource collection
buildings. These all take space and leave little room for troop recruitment buildings. One solution is to
have each city specialize. For instance, one town might produce lumber, another food and ore, while a
third recruits squads. Unfortunately, if you lose one of these cities your war effort will be crippled. It is
up to you to decide how to manage your empire.
Moving a cursor over a city in the campaign screen pops a tool tip window that displays the resource
potential of the city. It is important to maximize the city's potential. For example, a city in or near
woodlands may have a high wood resource potential. Use this potential by building a large wood mill
and carpenter's guild in the city.
Don't forget that cities can be formidable bastions. Building a fort within the city adds squads to any
army defending the city. It's a great way to field an oversize army in defense of your city. Note - cities
without an army are captured without a fight, the garrison only assists in city's defense. It will not fight
unless there is also a friendly army in the city.
• Garrison Army: To the left of the Resource Production Window is the Garrison Window. If an army
currently garrisons the city its picture shows here. Clicking Select will select this army and return you
to the campaign screen.
• Strategic Map: To the right of the Resource Production Window is the Strategic Map Window. This
window functions just like the other strategic maps. When you choose a city, its location is shown in
the window.
17
L
E
G
I
O
N
• Icon Panel: To the right of the Strategic Map Window is the City Screen icon panel. Click on the top
button, and then click on an eligible building in order to sell it. Some resources are refunded when you
sell. The three windows below this button display the training level of squads raised in this city, the
rate of population growth, scouting/intelligence level of the city. You may increase the training level
of the squads raised in the city by building facilities such as the Training Ground. You can increase
population growth by erecting a bathhouse, herbalist or apothecary. Clicking "OK" at the bottom of the
Icon Panel closes the panel and returns to the Campaign screen.
COMBAT
Much, if not all, of the land you claim when playing Legion will be contested. To win the land you will
have to fight for it. This fighting is done from the Legion Deployment Screen and Battle screen.
Although the battles are resolved in real-time, Legion is not a real-time strategy game. The decisions
that you make in the Deployment Screen often dictate whether you win or lose. If you attack a group of
peasants with a large force of Legionaries the deployment is much academic. On the other hand, by
using the terrain and a combination of formation/orders, small and inexperienced force can overcome a
much larger battle-hardened one.
Choosing to attack an enemy army or garrisoned city will display the Deployment Screen (as shown
above). It is here that you plan your strategy for the battle. The blue-boxed units on the left side of the
screen comprise your army. The opposing general's army is on the right side of the battlefield. Hills,
buildings, ruins, and forests are shown on the Deployment Screen as contours on the terrain and grey
blocks. This is important information. Each type of squad has unique attributes. The smart general will
use the terrain to enhance those attributes.
You may position your units by clicking on and dragging them. You must, however, position them on
your third of the battlefield as defined by the thin, black line. In addition to positioning your units you
may also set their formation, and give them basic movement orders. Let's look at the formations first.
Note: you cannot start the battle if you have two formations overlying each other. The game will not
allow you to proceed until this has been resolved.
Ordered Formations
Every unit has a list of formations that it can use. For example, only the formations specifically listed
for Legionaries may be used by Legionaries. These are highly effective formations that give the squads
the most "bang for the buck."
Column:
Block:
Line:
18
The column packs quite a punch, but is susceptible to being outflanked.
The block is a powerful formation. This puts a lot of troops in a small space.
This formation covers the most frontage, but it's thin and fractures easily. Use it when you
want to prevent your troops from being flanked.
L
E
G
I
O
N
A strong offensive formation used to break through opposing line formations.
Unfortunately, if the wedge doesn't secure a quick victory it may become
surrounded.
Angled Line:
The angled line is used to either protect a friendly flank or attempt to turn an
enemy flank.
Crescent:
This formation is used when attempting to suck an enemy formation into the
middle and envelop them with the wings of the crescent. Effective against
cavalry.
Checkerboard:
The checkerboard formation is less dispersed than the shallow mob, but not
as compact as the line formation. It's a good formation for archers and cavalry
to cover a large area of your line, though like the line it is brittle.
Checkerboard Block:
A forceful grouping predominantly used by cavalry on the attack.
Checkerboard Column: Similar to the column formation, but more dispersed.
Wedge:
Irregular Formations
Irregular Formations are not as compact as ordered formations. As with ordered formations, the
formations you can use are listed with each unit. Usually, units with lower cohesion and training rely on
irregular formations.
Shallow Mob: The shallow mob is similar to the line formation, but it doesn't cover as wide an area.
Deep Mob: The deep mob is a strong attack formation that packs a lot of irregular punch into a small
area. Good for the attack.
Angled Mob: The angled mob is used to either protect a flank or attempt to turn an enemy flank.
Order Icons
The Order Icons allow the player to plan his battlefield strategy by dictating when and how far troop
formations will move. There are two rows of icons. We will look at each in turn.
• The top left icon orders troops to hold for a few seconds and then advance.
• The next icon to the right orders troops to hold a bit longer and then advance.
• The third icon from the left in the top row orders troops to hold for a relatively long period of time and
then advance.
• The top right icon orders troops to advance normally (this is the default order).
• The bottom left icon orders troops to advance rapidly. This is great for throwing your cavalry at lightly
armed troops such as Javelinmen or archers.
• The second icon from the left on the bottom row orders troops to advance for a short distance and then
hold.
• The third icon from the left on the bottom row orders troops to advance a medium distance and then
hold.
• The right-hand bottom icon orders troops to advance the furthest and then hold.
19
L
E
G
I
O
N
The Battlefield
Once you position your troops and click "OK" you are whisked away to the Battle Screen. It is here that
your orders will come to fruition.
There is not much that you can do to influence the
outcome once the battle begins. That's an accurate
depiction of ancient warfare. There was no expedient way
to communicate the commander's wishes to his troops.
The information panel across the bottom of the screen
supplies information on your squads, and you can keep
tabs on the overall army morale at the top of the screen.
Note that when the army morale reaches the breaking
point the army disintegrates and flees, remember that
when establishing your battle plan. Use tactics that crush
the most enemy squads in the shortest amount of time.
Winning
We all want to know how to win. Why play if you can't
win? Emerging victorious is straightforward: When one
side controls over 40% of the map and it is at least 25%
larger than the next biggest nation, it wins the game. The
Game Results Screen shows the overall standings of
each nation, casualties, etc., and how close the nation is
to winning the game. The longer the power bar, the
closer they are to winning the game.
THE COMBATANTS
Legion is not difficult to learn, but it is a challenge to master. Part of that mastering is learning the units.
Hence we've included a section on the combatants to speed that learning process. The first section
describes troop types, vice specific units. For example, Legionaries are a troop type; both the Roman
Legion and Praetorian are specific Legionaries units that share the common characteristics of
Legionaries. In the second section, we list the specific units. Included with those unit statistics are their
type.
Legionaries:
Heavy battle infantry; their tight-knit organization and high morale make them an
awesome killing machine in open terrain. They are somewhat vulnerable if
flanked and less devastating in rough terrain, such as woods.
Auxillia:
Reasonably well armored; although strong troops are not as fierce as the
Legionaries in a stand up fight. On the other hand, they fight better than the
heavily armored Legionaries in rough terrain.
20
L
E
G
I
O
N
Loose Spearmen:
The spearmen are excellent rough terrain troops but cannot stand up to heavy
infantry. Loose spearmen are effective against cavalry, but not as effective as
tight spearmen. They function reasonably well in difficult terrain, and are fairly
mobile.
Cavalry:
Cavalry work well against lightly armored troops in the open. They will also
damage heavily armored troops if they are able to turn the troop's flank. Avoid
using them in rough terrain. Do, however, use them to pursue fleeing enemy
troops. This maximizes your victory. Cavalry usually works best when placed on
your army's flank.
Skirmishers:
These are lightly armored missile troops that fight in open formations. They are
best used to weaken the enemy before contact or support your attacks from
behind heavier troops. These troops perform well in rough terrain, but will suffer
if used in the open, especially against cavalry.
Bowmen:
Bow and arrow equipped men, fighting in tighter formations than skirmishers.
Their tight formation makes them less vulnerable to cavalry, but they lose badly
to enemy foot. Good for supporting your ground assaults. Protect your archers;
don't make them pull their swords. Whenever possible, advance them onto a hill.
They do their best work from there.
Close Spearmen:
Close spearman are heavy infantry. They are heavily armored and equipped with
a long thrusting spear. They can hold their own against most other infantry and
their spear makes them very resistant to cavalry charges.Use them in the open to
thwart cavalry charges and wreck havoc against enemy infantry. Try to avoid
employing them in rough terrain.
Light Cavalry:
Don't use these troops against Hoplites. Neither should they be employed in
rough terrain. Used properly against light infantry, disordered troops, or against
the enemy's flank, cavalry can be a devastating force. Keep in mind that light
cavalry cannot "trample" infantry like their heavier brethren.
Close Warband:
Heavy infantry that can fight in tighter formations than the loose warband, but are
much less organized than Legionaries. They do well in the open, but suffer in
rough terrain. Be aware, however, they are slow.
Loose Warband:
These men are similar to the close warbands. They fight as individuals, and work
well in rough terrain. But don't expect them to last long in the open; they are
irregulars, and won't take a lot of punishment before they break.
21
L
E
G
I
O
N
Units
The above are types of units. What follows are the specific units in Legion. Each does fit into one of the
categories, but you'll find more information than just the category below.
Auxilia
Type
Armour
Mobility
Organisation
Morale
Disorder Penalty
Cost
Formations
Pre-requisites
Built By
Auxilia
Medium
Medium
Ordered
Medium
Medium
Metal
Line
Block
Column
Angled Line
Crescent
Wedge
Blacksmith
Roman
Auxiliary Archer
Type
Armour
Mobility
Organisation
Morale
Disorder Penalty
Cost
Formations
Pre-requisites
Built By
Bowmen
Medium
Medium
Ordered
Medium
Medium
Wood
Checkerboard Line
Checkerboard Block
Checkerboard Column
Line
Block
Column
Fletcher
Roman
British Light Cavalry
Type
Armour
Mobility
Organisation
22
Light Cavalry
Light
Very High
Irregular
L
Morale
Disorder Penalty
Cost
Formations
Pre-requisites
Built By
E
G
I
O
N
Medium
Low
Food
Checkerboard Line
Checkerboard Block
Checkerboard Column
Paddock
British
Pictish
British Warband
Type
Armour
Mobility
Organisation
Morale
Disorder Penalty
Cost
Formations
Pre-requisites
Built By
Loose Warband
Medium
Medium
Irregular
Medium
Medium
Metal
Irregular Block
Irregular Column
Irregular Angled Line
Blacksmith
British
Celtiberians
Type
Armour
Mobility
Organisation
Morale
Disorder Penalty
Cost
Formations
Pre-requisites
Built By
Auxilia
Medium
Medium
Irregular
Medium
Medium
Metal
Irregular Block
Irregular Column
Irregular Angled Line
Blacksmith
Spanish
Celtic Nobles
Type
Armour
Mobility
Organisation
Morale
Cavalry
Medium
Very High
Irregular
High
23
L
Disorder Penalty
Cost
Formations
Pre-requisites
Built By
E
G
Low
Food
Checkerboard Line
Checkerboard Block
Checkerboard Column
Paddock
Celtic
German
Spanish
Celtic Warband
Type
Armour
Mobility
Organisation
Morale
Disorder Penalty
Cost
Formations
Pre-requisites
Built By
Loose Warband
Medium
Medium
Irregular
Medium
Medium
Metal
Irregular Block
Irregular Column
Irregular Angled Line
Blacksmith
Celtic
Equites
Type
Armour
Mobility
Organisation
Morale
Disorder Penalty
Cost
Formations
Pre-requisites
Built By
Cavalry
Medium
Very High
Ordered
Medium
Low
Food
Checkerboard Line
Checkerboard Block
Checkerboard Column
Stables
Roman
Fanatic
Type
Armour
Mobility
Organisation
Morale
24
Loose Warband
None
High
Irregular
High
I
O
N
L
Disorder Penalty
Cost
Formations
Pre-requisites
Built By
E
G
I
O
N
Medium
Food & Metal
Irregular Block
Irregular Column
Irregular Angled Line
Barracks
Celtic
German
Pictish
British
Spanish
German Warband
Type
Armour
Mobility
Organisation
Morale
Disorder Penalty
Cost
Formations
Pre-requisites
Built By
Close Warband
Low
Medium
Irregular
High
HighMedium
Metal
Irregular Block/Irregular Column/Irregular Angled Line
Blacksmith
German
Gladiators
Type
Armour
Mobility
Organisation
Morale
Disorder Penalty
Cost
Formations
Pre-requisites
Built By
Close Warband
High
Medium
Irregular
High
LowMedium
Metal
Irregular Block
Irregular Column
Irregular Angled Line
Gladiator School
Roman
Hill Tribe Warriors
Type
Armour
Mobility
Organisation
Morale
Auxilia
Medium
Medium
Ordered
High
25
L
Disorder Penalty
Cost
Formations
Pre-requisites
Built By
E
G
I
O
N
Medium
Metal
Line
Block
Column
Angled Line
Crescent
Blacksmith
Tribal
Hoplite
Type
Armour
Mobility
Organisation
Morale
Disorder Penalty
Cost
Formations
Pre-requisites
Built By
Close Spearmen
High
Low
Ordered
Medium
High
Food & Metal
Line
Block
Column
Angled Line
Crescent
Barracks
Greek
Italiot Greek Cavalry
Type
Armour
Mobility
Organisation
Morale
Disorder Penalty
Cost
Formations
Pre-requisites
Built By
Cavalry
Medium
Very High
Ordered
High
Low
Food
Checkerboard Line/Checkerboard Block/Checkerboard Column
Stables/Paddock
Greek
Tribal
Legion
Type
Armour
Mobility
Organisation
26
Legionaries
High
Low
Ordered
L
Morale
Disorder Penalty
Cost
Formations
Pre-requisites
Built By
E
G
I
O
N
High
Medium
Food & Metal
Line
Block
Column
Angled Line
Crescent
Wedge
Barracks
Roman
Peltasts
Type
Armour
Mobility
Organisation
Morale
Disorder Penalty
Cost
Formations
Pre-requisites
Built By
Auxilia
Medium
Medium
Irregular
Medium
Medium
Metal
Irregular Block
Irregular Column
Irregular Angled Line
Blacksmith
Greek
Peasants
Type
Armour
Mobility
Organisation
Morale
Disorder Penalty
Cost
Formations
Pre-requisites
Built By
Close Warband
None
Low
Irregular
Low
None
Food
Irregular Block
Irregular Column
Farm
All
Pictish Warband
Type
Armour
Mobility
Organisation
Loose Spearmen
Medium
Medium
Irregular
27
L
Morale
Disorder Penalty
Cost
Formations
Pre-requisites
Built By
E
G
I
O
N
Medium
Medium
Metal
Irregular Block
Irregular Column
Irregular Angled Line
Blacksmith
Pictish
Praetorian
Type
Armour
Mobility
Organisation
Morale
Disorder Penalty
Cost
Formations
Pre-requisites
Built By
Legionaries
High
Low
Ordered
Very High
Medium
Food & Metal & Wood
Line
Block
Column
Angled Line
Crescent
Wedge
Imperial Residence
Roman
Tribal Archer
Type
Armour
Mobility
Organisation
Morale
Disorder Penalty
Cost
Formations
Pre-requisites
Built By
28
Skirmishers
None
High
Irregular
Low
Low
Wood
Checkerboard Line/Checkerboard Block/Checkerboard Column
Fletcher
Greek
Tribal
Celtic
German
Spanish
British
Pictish
L
E
G
I
O
N
Tribal Javelinmen
Type
Armour
Mobility
Organisation
Morale
Disorder Penalty
Cost
Formations
Pre-requisites
Built By
Skirmishers
Low
High
Irregular
Low
Low
Wood
Checkerboard Line
Checkerboard Block
Checkerboard Column
Lumber mill
Greek
Tribal
Celtic
German
Spanish
British
Pictish
Velite
Type
Armour
Mobility
Organisation
Morale
Disorder Penalty
Cost
Formations
Pre-requisites
Built By
Skirmishers
Low
High
Ordered
Low
Low
Wood
Checkerboard Line
Checkerboard Block
Checkerboard Column
Lumber mill
Roman
BUILDINGS
Buildings are another key element of Legion. There are numerous buildings that may be constructed and
each one serves a distinct purpose. Below are the major buildings and a description of how they can help
you conquer the world.
Farm: The farm is your basic food producing structure. Once built, a farm produces food
units. The more workers assigned, the more units produced. The farm also allows peasants to
be recruited.
29
L
E
G
I
O
N
Vineyard: The vineyard produces food and gives a small boost to the city's worker
productivity. Like the large farm, the vineyard is an upgrade of the small farm.
Large Farm: The large farm is the largest food production building. Once constructed it
produces more units per worker assigned than either the farm or vineyard.
Fishing Village: Similar to a farm, but may be built on a lake. There are three types of
blocking buildings/spaces that can start in a city: lakes, mountains and forest. Lakes and
mountains can only be upgraded to a fishing village or mine. The forest may be cleared just
as if you were selling a building, which creates a bumper crop of lumber.
Mine: The mine is the basic ore producing building. There are two types of mines, those that can be built
on flat ground and those that upgrade a piece of mountain in the city area.
This is a normal Roman/Greek mine.
This is the mountain that starts in some cities.
It can be upgraded to a mine, but only mine.
Large Mine: The large mine is the largest ore producing building. It does not take a
construction slot, but rather upgrades and replaces an existing mine.
Lodge: The lodge is the only multiple production unit in the game. Once built it produces a
small amount of every resource. The amount produced depends on the resource potential of
the city.
Lumber mill: The lumber mill is the basic wood producing building. It allows
javelinmen/velites to be recruited.
Large Lumber mill: The large lumber mill produces more wood units per worker than the
lumber mill. This is the best wood producer that your money can buy.
Village/Town/City Hall: The village/town/city hall series of buildings are key to growing your city.
Construction of the next larger town hall provides additional construction room for buildings, and
increases the size of squads raised in that city. Each nation type has its own unique graphical set of
village/town/city halls.
Village Hall
30
L
E
G
I
O
N
Town Hall
City Hall
Bathhouse: The bathhouse reduces disease and increases the population growth in your city.
Shrine: The shrine makes your people happy. When people are happy they work harder, and
hard working peasants produce more goods for themselves and your army. You'll see a rise in
your city's efficiency once the shrine is erected.
Temple: The temple replaces the shrine. Again, it makes the people happier and raises their
efficiency, which in turn leads to higher production.
Training Camp: The training camp increases the training level of your soldiers. Additionally,
it allows you to raise higher caliber squads. Its main purpose is to supply heavy infantry for
that nation e.g. Legionaries, Hoplites etc.
Warrior's Long Hall: Kind of the Tribal nations, equivalent to the Roman's training camp, it
increases the training level of your soldiers. Additionally, it allows you to raise higher caliber
squads.
Blacksmith: Once the blacksmith or its equivalent is built your tribe's medium infantry
become available.
Paddock or Stables: The paddock provides the horse for your cavalry. You must erect the
paddock in order to raise cavalry in a city.
Fletcher: The fletcher provides bows and arrows for your troops. You must build a fletcher in
order to raise archer squads in your city.
Fort (Small, Medium, and Large): The forts provide extra squads to fight in your city's
defense. A small fort adds one squad, a medium fort two, and a large fort three. The fort
allows you to recruit medium sized squads.
Barracks: The barracks trains large numbers of men. This in turn allows you to create large
squads.
Quartermaster: The quartermaster manages the army's supplies. Building this structure
allows even larger squads to be built and maintained. With the quartermaster building
constructed, you may create huge squads.
31
L
E
G
I
O
N
CREDITS PARADOX ENTERTAINMENT
CEO
Theodore Bergquist
Executive Producer
Fredrik Malmberg
3D graphics
Dick Sjöström
Additional contributions
Johan Andersson
Stefan Thulin
Henrik Fåhraeus
Patric Backlund
Joakim Bergqwist
Beta testers
Aaron Seltzer
Alex Taylor
Andrew Greenhalgh
Arthur Skrinjer
Bret C. Rediker
Brian Knauff
Bruce Durham
Chris Estes
Chris Madson
Chris Pick
Chris Young
Christian Feicht
Christian Roy
Craig Fisher
Cris Hq
Cris Rogers
Curt Northey
Dan Thompson
Daryl Hosler
Dave Madigan
David Felcan
Derek Pullem
Eddie Savois
Frank Thein
Fredrik Rexhammar
Gary Lanham
Gerald Sutton
Goffrey Giggs
Göran Hennström
Harri Laatikainen
Henrik Hogberg
Henry Chang
32
Hugh Thompson
Jacob Kjærsgård Lester
Jeff Friedlander
Jeff Stokes
Jeff Wang
Jens Kullenius
Jens Nahrgang
Johan van Ketwich
John Davies
John Furlow
John R. Thomas
Joseph Hower
Juan Pablo Soca
K.C. Komosky
Kent Smallwood
Kevin Shope
Khurram Wadiwalla
Larry M. Jones, II
Laura Powell
Loïc Brient
MAJOR John W. Shawkins
Margus Laul
Markus Herrmann
Matt DiMaria
Matt Peppin
Matthew Carroll
Matthew Sanchez
Michael Llaneza
Michael Ng
Michael Olsson
Moshe Malyevshevsky
Nicolai Thorning
Niklas Edwall
Oskar Melén
Patrick Hendriks
Per Andreasen
Petter Carnbro
Pierre Bach
Pål Gjerde
Ralph H. Anderson
Richard A Bottens
Richard Ruth
Rick Kreitlein
Rikard Drugge
Roberto Narducci
Ron Silva
Scott Hogan
Sefan Dhs
Shannon A. Ward
Simon Kidd
Simon Scarrow
Sipko G. Riemersma
Stephen Haikio
Steve Lemieux
Taylor Williams
Thomas Hautesserres
Thomas Johansson
Thomas Maertz
Timothy Linden
Tobias Bodlund
Vincent R. Taijeron
Yann Denoual
L
E
G
I
O
N
CREDITS
STRATEGY FIRST INC.
Quality Assurance
Marketing
Quality Assurance Mana ger
Phillip DeRosa
Product Manager
Prokopios “Pro” Sotos
Director of Marketing
Steve Milburn
Director of Communications
Christina Ginger
Packaging and Design
Philippe Brindamour
Julie Binette
Anne Lalonde
Web Design
Hugo Trépanier
Serge Mongeau
Quality Assurance Team
Michel Chouinard
Yan Favreau-Lippé
Ethan Petty
Ludovic Pinard
Sylvain Schmidt
Eric Tougas
Customer Support
Danny Kodais
Nabil Yared
DISTRIBUTION
INFOGRAMES INC.
Senior V.P.
Wim Stocks
V.P. Third Party/Value/Affiliates
Ezra Chen
Senior Buyer
Gardnor Wong
Product Line Liaison
Brian McCreary
SLITHERINE SOFTWARE
Technical Director
President
Don McFatridge
David Parsons
Senior V.P.
Brian Clarke
Fad
PR Associates
Kelly Ekins
Michèle Fortier
Marketing Associate
Reluca State
V.P. Creative Development
Richard Therrien
Marketing Assistant
Ryan Bastien
V.P. Product Development
Chuck Kroegel
Manual
Mark H. Walker
V.P. Systems
Dave Hill
V.P. Business Development
Steve Wall
Director of Product Development
Jamie McNeely
Creative Director
Lead Designer
Iain McNeil
Business Manager
JD McNeil
IND MUSIC
All game music and SFX
David Reeks & Iain Stevens
Special Thanks to
Nicolas Fincher, Philip Veale, Colin
Malcolm & Paul Robinson
USES BINK VIDEO TECHNOLOGY. COPYRIGHT
(C) 1997-2002 BY RAD G AME TOOLS INC.
USES MILES SOUND SYSTEM. COPYRIGHT
(C) 1997-2002 BY RAD GAME TOOLS INC .
33
L
E
G
I
O
N
LICENSE AGREEMENT AND LIMITED WARRANTY
PLEASE READ THIS LICENSE CAREFULLY BEFORE USING THE SOFTWARE. THIS DOCUMENT IS AN AGREEMENT BETWEEN YOU AND
STRATEGYFIRST INC. (THE ìCOMPANYî). THE COMPANY IS WILLING TO LICENSE THE ENCLOSED SOFTWARE TO YOU ONLY ON THE
CONDITION THAT YOU ACCEPTALLTHE TERMS CONTAINED IN THIS AGREEMENT. BYUSING THE SOFTWARE YOU ARE AGREEING TO BE
BOUND BYTHE TERMS OF THIS LICENSE.
1. Ownership and License. This is a license agreement and NOTan agreement for sale. The software contained in this package (the ìSoftwareî) is the property of the
Company and/or its Licensors. You own the disk/CD on which the Software is recorded, but the Company and/or its Licensors retain title to the Software and related
documentation. Your rights to use the Software are specified in this Agreement, and the Company and/or its Licensors retain all rights not expressly granted to you
in this Agreement.
2. Permitted Uses. You are granted the following right to the Software :
(a) Right to Install and Use. You may install and use the Software on a single computer. If you wish to use the Software on more than one computer, please contact
the Company for information concerning an upgraded license allowing use of the Software with additional computers.
(b) Right to Copy. You may make and maintain one copy of the Software for backup and archival purposes, provided that the original and each copy of the Software
are kept in your possession.
3. Prohibited Uses. The following uses of the Software are prohibited. If you wish to use the Software in a manner prohibited below, please contact the Company at
the address, phone, or fax numbers listed above for information regarding a ìSpecial Use License. îOtherwise, you may NOT :
(a) Make or distribute copies of the Software or documentation, or any portion thereof, except as expressly provided in this Agreement.
(b) Use any backup or archival copy of the Software (or allow someone else to use such copy) for any purpose other than to replace the original copy in the event it
is destroyed or becomes defective;
(c) Alter, decompile, modify reverse engineer or disassemble the Software, create derivative works based upon the Software, or make any attempt to bypass, unlock
or disable any protective or initialization system on the Software;
(d) Rent, lease, sub-license, time-share, or transfer the Software or documentation, or your rights under this Agreement.
(e) Remove or obscure any copyright or trademark notice(s) on the Software or documentation;
(f) Upload or transmit the Software, or any portion thereof, to any electronic bulletin board, network, or other type of multi-use computer system regardless of purpose;
(g) Include the Software in any commercial products intended for manufacture, distribution, or sale; or
(h) Include the Software in any product containing immoral, scandalous, controversial, derogatory, obscene, or offensive works.
4. Termination. This license is effective upon the first use, installation, loading or copying of the Software. You may terminate this Agreement at any time by
destruction and disposal of the Software and all related documentation. This license will terminate automatically without notice from the Company if you fail to
comply with any provisions of this license. Upon termination, you shall destroy all copies of the Software and any accompanying documentation.
All provisions of this Agreement as to warranties, limitation of liability, remedies or damages shall survive termination.
5. Copyright Notice. The Company and/or our Licensors hold valid copyright of the Software. Nothing in this Agreement constitutes a waiver of any right under
Canadian Copyright law or any other federal or provincial law. This program is protected by Canadian federal and international copyright laws.
6. Miscellaneous. This Agreement shall be governed by the laws of Canada and the Province of Quebec. If any provision, or any portion, of this Agreement is found
to be unlawful, void, or for any reason unenforceable, it shall be severed from, and shall in no way affect the validity or enforceability of the remaining provisions of
the Agreement.
7. Limited Warranty and Disclaimer of Warranty. For a period of 90 days from the date on which you purchased the Software, the Company warrants that the media
on which the Software is supplied will be free from defects in materials and workmanship under normal use. If the Software fails to conform to this warranty, you
may, as your sole and exclusive remedy, obtain a replacement free of charge if you return the Software to us with a dated proof of purchase. The Company does not
warrant that the Software or its operations or functions will meet your requirements, nor that the use thereof will be without interruption or error.
EXCEPTFOR THE EXPRESS WARRANTYSETFORTH ABOVE, THE COMPANYDISCLAIMS ALL WARRANTIES, EXPRESS OR IMPLIED, INCLUDING
AND WITHOUTLIMITATION, THE IMPLIED WARRANTIES OF MERCHANTABILITYAND FITNESS FOR A PARTICULAR PURPOSE. EXCEPTFOR
THE EXPRESS WARRANTY SET FORTH ABOVE, THE COMPANY DOES NOT WARRANT, GUARANTEE OR MAKE ANY REPRESENTATION
REGARDING THE USE OR THE RESULTS OF THE USE OF THE SOFTWARE IN TERMS OF ITS CORRECTNESS, ACCURACY, RELIABILITY,
CURRENTNESS OR OTHERWISE.
IN NO EVENT SHALL THE COMPANYOR ITS EMPLOYEES OR LICENSORS BE LIABLE FOR ANY INCIDENTAL, INDIRECT, SPECIAL, OR
CONSEQUENTIALDAMAGES ARISING OUTOF OR IN CONNECTION WITH THE LICENSE GRANTED UNDER THIS AGREEMENTINCLUDING AND
WITHOUTLIMITATION, LOSS OF USE, LOSS OF DATE, LOSS OF INCOME OR PROFIT, OR OTHER LOSS SUSTAINED AS A RESULT OF INJURYTO
ANY PERSON, OR LOSS OF OR DAMAGE TO PROPERTY, OR CLAIMS OF THIRD PARTIES, EVEN IF THE COMPANY OR AN AUTHORIZED
REPRESENTATIVE OF THE COMPANYHAS BEEN ADVISED OF THE POSSIBILITYOF SUCH DAMAGES, IN NO EVENTSHALLLIABILITYOF THE
COMPANYFOR DAMAGES WITH RESPECT TO THE SOFTWARE EXCEED THE AMOUNTS ACTUALLYP AID BYYOU, IF ANY, FOR THE SOFTWARE.
SOME JURISDICTIONS DO NOTALLOWTHE
LIMITATION OR EXCLUSION OF LIABILITYFOR INCIDENTALOR CONSEQUENTIALDAMAGES SO THE ABOVE LIMITATION OR EXCLUSION
MAY NOTAPPL YTO YOU.
ACKNOWLEDGEMENT
YOU ACKNOWLEDGE THAT YOU HAVE READ THIS AGREEMENT, UNDERSTAND IT AND AGREE TO BE BOUND BY ITS TERMS AND
CONDITIONS. YOU ALSO AGREE THAT THIS AGREEMENTIS THE COMPLETE AND EXCLUSIVE STATEMENTOF THE AGREEMENTBETWEEN
YOU AND THE COMPANY AND SUPERCEDES ALL PROPOSALS OR PRIOR ENDORSEMENTS, ORAL OR WRITTEN, AND ANY OTHER
COMMUNICATIONS BETWEEN YOU AND THE
COMPANYOR ANYREPRESENTATIVE OF THE COMPANYRELATING TO THE SUBJECTMATTER OF THIS AGREEMENT.
34