1
U Disk DDS 2.0 User Manual
0
Index
U Disk DDS 2.0 User Manual ............................................................................................................. 0
1. Introduction ...................................................................................................................... 2
2. Glossary ............................................................................................................................. 2
3. List ..................................................................................................................................... 2
4. Key Introduction ................................................................................................................ 2
5. Constraint .......................................................................................................................... 2
6. Centerm DDS booting disk tool 2.0 Introduction .............................................................. 3
6.1 Centerm DDS booting disk tool Installation ................................................................ 3
6.2 Centerm DDS booting disk generation ........................................................................ 4
7. Using Centerm DDS booting disk to backup/restore OS image ........................................ 5
7.1 Power on TC first, press “F12” to enter Boot Menu .................................................... 5
7.2 How to backup Window OS image? .......................................................................... 6
Enter DDS interface ................................................................................................... 6
Enter Windows Deploy .............................................................................................. 7
Enter the DDS file name ............................................................................................ 8
Windows image backup schedule ............................................................................. 8
Check Windows image whether the backup was successful .................................... 9
7.3 How to restore Windows system?............................................................................. 10
Check *.dds file ....................................................................................................... 10
Enter Windows Deploy ............................................................................................ 10
Enter the file list view, select the dds file to system restore ................................... 11
Restore Windows image progress ........................................................................... 11
Windows image successfully restore ...................................................................... 12
7.4 How to restore Linux system ..................................................................................... 12
Check **.dat file ...................................................................................................... 12
Enter Centerm DDS homepage ............................................................................... 13
Enter Linux Deploy .................................................................................................. 14
Restoring Linux image ............................................................................................. 14
7.5 How to restore Windows CE system ......................................................................... 15
Check **.dat file ...................................................................................................... 15
Enter Centerm DDS homepage ............................................................................... 16
Enter Windows CE Deploy ....................................................................................... 17
Restoring WinCE image ........................................................................................... 17
1
1. Introduction
U Disk DDS 2.0 is a software used to image backup and OS restore for Window, Linux and WinCE
2. Glossary
Term
Description
UDisk
A booting U disk created by Centerm DDS tool
DDS
Desktop Distribution System
USB HDD
An option of booting from USB
3. List
List
Description
UdiskDDSBoot_2.0.0.32587(2013081601).exe
Centerm DDS booting disk tool 2.0
U Disk
4 G or more
ddsimage.dds
Windows image generated from backup
xxx.dat
Data or file, used for Linux and WinCE update
4. Key Introduction
Key
Description
SPACE
Select from different entries
ENTER
To enter different interface
Moving left and right
Moving up and down
Tab key
Switch between list and function button
5. Constraint
2 or more pen drives are not allowed to simultaneously insert during backup or restore
DDS file name length is 0~46 characters
2
Allow 30 DDS files simultaneously saved to a pen drive
UDisk DDS can pull out OS image directly, containing driver and other files etc. Restore OS
image to a destination, the DDS OS image must be matched with hardware platform. For
example, driver on x86 is running on ARM will result in blue screen.
Using UDisk to backup Window OS image, OS shall be encapsulated first, which includes
uninstalling driver, cleaning identified mark, static IP and ARP cache for restoring OS image
among different platforms
6. Centerm DDS booting disk tool 2.0 Introduction
Centerm DDS booting disk tool is used to enable a pen drive to have OS deployment function
for Windows, WinCE and Linux, now version no is 2.0
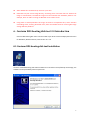
6.1 Centerm DDS booting disk tool Installation
Centerm Udisk DDS booting tool shall be installed on a PC before restore/backup an OS image, the
software can be provided by Centerm personnel.
3
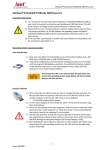
Operation: double click the setup.exe, then follow guide to click “Next”
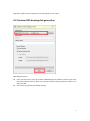
6.2 Centerm DDS booting disk generation
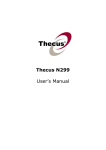
Operating Instruction:
Insert a 4G pen drive to a PC, open Centerm DDS booting tool to detect a pen drive, pen drive
information will be shown in drop box as well as shown by clicking “Refresh” button in the
right of list box.
Click “Start” to generate with default settings
4
7. Using Centerm DDS booting disk to backup/restore OS
image
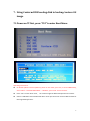
7.1 Power on TC first, press “F12” to enter Boot Menu
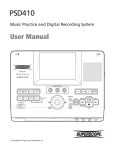
Operating Instructions:
For WinCE update on Fusion platform, power on thin client, press ”F2”, to enter CMOS Setup,
select “Boot”->”Extended BIOS Boot” ->”Disable”, press “F10” to save and exit.
Press “F12” to enter boot menu, the content might be different depends on the model.
Choose “USB-HDD” General USB Flash disk or other pen drive mark to enter DDS interface for
OS image backup/restore.
5
7.2 How to backup Window OS image?
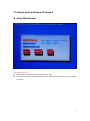
Enter DDS interface
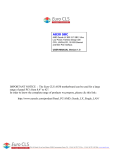
Operating Instructions:
Enter Centerm DDS, check the information on the right
Press “Space” to select “Windows Deploy”, press “TAB and Arrow key to switch; press “ENTER”
to confirm.
6
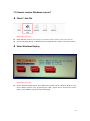
Enter Windows Deploy
Operating Instructions:
After enter Windows Deploy, view notice on right button in the interface
Press ”Space” key, select “Backup To Image” entry, press “TAB” or “Arrow” key to switch, press
“Enter” key to go to the next page of the wizard.
7
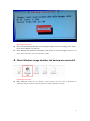
Enter the DDS file name
Operating Instructions:
dds file name is displayed by default ddsimage,without a suffix, For example ddsimage.dds,
does not allow such input
File name length ranges from 0 to 46 characters
The existing file name will be prompted
Only allow enter numbers and letters, the following characters are illegal characters:
~ ! @ # $ % ^ & * ( ) _ - += { [ ] } \ | ; : ‘ “ , < . > / ?
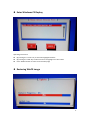
Windows image backup schedule
Operating Instructions:
Now, Centerm DDS is backing up the Windows image, Please don’t remove the power, to
prevent disk junk data
Windows image successfully extracted, generated image
files ddsimage.dds
8
Operating Instructions:
After successful backup Windows, Screen displays "Backup success!" message, press “Enter”
key to select “Reboot” to restart TC
Now, Windows has backed up successfully, after restart TC, press F12 again, enter the boot
menu, select “IDE HDD” entry, normal into the system.
Check Windows image whether the backup was successful
Operating Instructions:
Open USB disk, enter the root directory, Check whether the new name is generated as
"ddsimage.dds" file, if there is, the backup was successful, otherwise re-backup.
9
7.3 How to restore Windows system?
Check *.dds file
Operating Instructions:
Open USB disk, enter the root directory, View whether there is already exists suffix. DDS file
Such as ddsimage.dds file is a Windows system image file that is used to restore the system
Enter Windows Deploy
Operating Instructions:
Similar Windows image backup, enter DDS main interface, select “Windows Deploy” entry,
select “Restore System” entry, by pressing the "TAB", "Arrow" key to switch to the "Next"
button, press "ENTER" to go to the next wizard page
10
Enter the file list view, select the dds file to system restore
Operating Instructions:
By the "Arrow" keys to select the dds files, such as "DI945.dds"
selected, by the "TAB" key to switch to the bottom of the three-dimensional buttons
Switch to “OK” button, press “Enter” key, enter the next wizard page
Note: List View to support 30 dds file
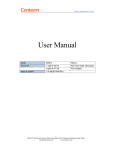
Restore Windows image progress
Operating Instructions:
Now, Centerm DDS is restoring the Windows image, Please don’t remove the power, to prevent
disk junk data
11
Windows image successfully restore
Operating Instructions:
Backup Windows successfully, the screen displays "Restore success!" Message, press the
"Enter" key to select "Reboot" to restart TC.
For the Fusion platform machines, such as GM800A, GM810B: Press "F12", Select from "HDD"
to boot into the system.
For other platforms machines, restart, press "F12", select from "BootNC" to boot into the
system.
7.4 How to restore Linux system
Check **.dat file
Operating Instructions:
Open USB disk drive into the root directory of USB disk, see if there is files suffix called dat
**.dat file use to WinCE system restoring
There can be multiple suffixes named dat files
12
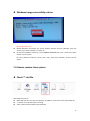
Enter Centerm DDS homepage
Operating Instructions:
The same operation as backup Windows image,boot TC and then press F12,choose“USBHDD” item,enter Centerm DDS,for details, see 7.1
Press“Space”key,select“Linux Deploy”item,by pressing“Arrow” key,select“Next”
highlight,press "ENTER" button to enter the next wizard page
13
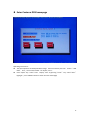
Enter Linux Deploy
Operating Instructions:
By pressing the "Arrow" key to select the highlighted dat file
By pressing the "TAB" key to switch the focus to highlight the "OK" button
Press "ENTER" button to enter the next wizard page
Restoring Linux image
14
Operating Instructions:
Now Centerm DDS is restoring Linux image,do not disconnect the power at this time,in
order to avoid disk dirty data retention
After Linux system restore, it will the automatic restart
For Fusion platform device,such as GM800A、GM810B:Pressing "F12" select from "HDD"
boot into the system.
For other platform device,restart,press“F12”
,choose from "Boot NC" boot into the system
7.5 How to restore Windows CE system
Check **.dat file
Operating Instructions:
Open USB disk drive into the root directory of USB disk, see if there is files suffix called dat
**.dat file use to WinCE system restoring
There can be multiple suffixes named dat files
15
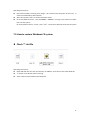
Enter Centerm DDS homepage
Operating Instructions:
The same operation as backup Windows image,TC boot press F12,choose“USB-HDD”
item,enter Centerm DDS,for details, see 7.1
Press“Space”key,select“Windows CE Deploy”item,by pressing“Arrow” key,select
“Next” highlight,press "ENTER" button to enter the next wizard page
16
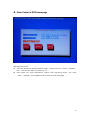
Enter Windows CE Deploy
Operating Instructions
By pressing the "Arrow" key to select the highlighted dat file
By pressing the "TAB" key to switch the focus to highlight the "OK" button
Press "ENTER" button to enter the next wizard page
Restoring WinCE image
17
Operating Instructions:
Now Centerm DDS is restoring WinCE image,do not disconnect the power at this time,in
order to avoid disk dirty data retention
After WinCE system restore, it will the automatic restart
For Fusion platform device,such as GM800A、GM810B:Power up thin client, press “F2”
,
enter the CMOS Setup,choose“Boot”->"Extended BIOS Boot", choose“Enable”
,press
“F10” save and exit to restart, restart process press "F12" Select from "HDD" boot into the
system.
For other platform device,restart,press“F12”
,choose from "BootNC" boot into the system
18