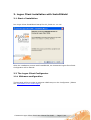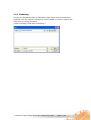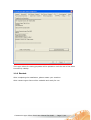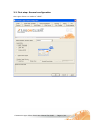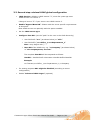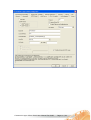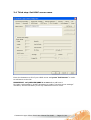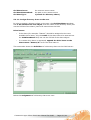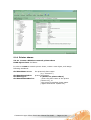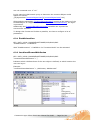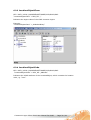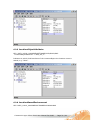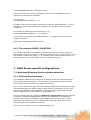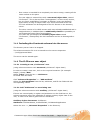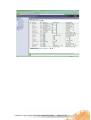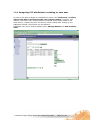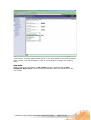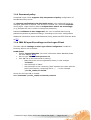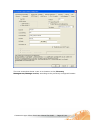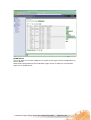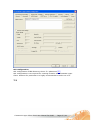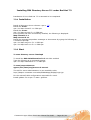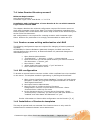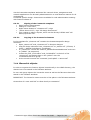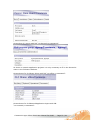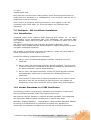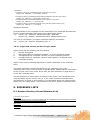
1
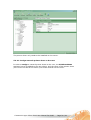
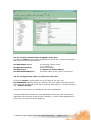
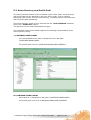
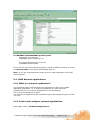
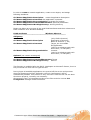
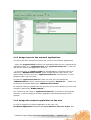
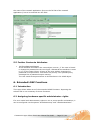
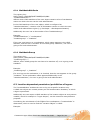
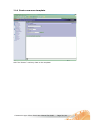
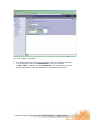
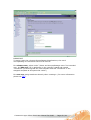
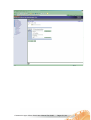
Comtarsia Logon Client 2006 LDAP manual Installation, basic and extended configuration of the Comtarsia Logon Client 2006 for various LDAP directory servers Version: 4.1.13.4, 04-Jul-2006 Index 1. 2. Introduction ...................................................................................4 Logon Client installation with InstallShield ....................................5 2.1 Start of installation .......................................................................5 2.2 The Logon Client Configurator.........................................................5 2.2.1 Minimum configuration ..............................................................5 2.2.2 Licensing .................................................................................6 2.2.3 Restart ....................................................................................7 3. Quickstart for an LDAP Logon ........................................................8 3.1 Prerequisites ................................................................................8 3.1.1 Client ......................................................................................8 3.1.2 Server.....................................................................................8 3.2 First step: General configuration .....................................................9 3.3 Second step: minimal LDAP global configuration.............................. 10 3.4 Third step: Set LDAP server name ................................................. 12 3.5 Fourth step: Logon on the LDAP server .......................................... 13 4. LDAP is taking over ......................................................................13 4.1 User Groups ............................................................................... 14 4.1.1 Group allocation by equal name ................................................ 14 4.1.2 Manual group mapping ............................................................ 14 4.1.2.1 Power User/Administrators .............................................. 14 4.1.2.2 Free configurable Group Mapping ..................................... 14 4.2 Few words about getting the BaseDN............................................. 15 5. Optional LDAP attributes..............................................................17 5.1 Introduction ............................................................................... 17 5.2 LDAP Directory and Printer Shares................................................. 17 5.2.1 Directory shares ..................................................................... 17 5.2.1.1 Create directory share .................................................... 17 5.2.1.2 Assign directory share to the user .................................... 18 5.2.2 Printer shares......................................................................... 19 5.2.2.1 Create a Windows network printer share ........................... 19 5.2.2.2 Assign network printer share to the user ........................... 20 5.2.2.3 Create a printer share assigned on LPT port....................... 21 5.2.2.4 Assign printer share on LPT port to the user ...................... 21 5.3 Home Directory and Profile Path.................................................... 22 5.4 LDAP Network Applications ........................................................... 23 5.4.1 What is a network application? ................................................. 23 5.4.2 Create and configure network applications.................................. 23 5.4.3 Assign icons to the network applications..................................... 26 5.4.4 Assign the network application to the user.................................. 26 5.5 Further Comtarsia Attributes ........................................................ 27 6. Extended LDAP Functions.............................................................27 6.1 Introduction ............................................................................... 27 6.2 Assigning hardware specific administrator- rights ............................ 27 6.2.1 HwAdminAttribute................................................................... 28 6.2.2 HwAdminGroup ...................................................................... 28 6.3 Location dependent permission/prohibition of logons........................ 28 6.3.1 EnableLocation ....................................................................... 29 6.3.2 LocationAllowedAttributes ........................................................ 29 6.3.3 LocationObjectClass ................................................................ 30 6.3.4 LocationObjectCode ................................................................ 30 6.3.5 LocationObjectAttribute ........................................................... 31 6.3.6 LocationBasedEnvironment....................................................... 31 6.3.7 The variable VALID_LOCATION ................................................. 32 Comtarsia Logon Client 2006 User Manual for LDAP Page 2 / 61 7. LDAP Server specific configurations .............................................32 7.1 Netscape Directory Server schema-extension.................................. 32 7.1.1 The Comtarsia schema ............................................................ 32 7.1.2 Including the Comtarsia schema into the server .......................... 33 7.1.3 The CLCPerson user object ....................................................... 33 7.1.3.1 Creating a new „CLC Person“ user .................................... 33 7.1.3.2 Add “CLCPerson” to an existing user................................. 33 7.1.3.3 Support of password expiration........................................ 34 7.2 IBM Directory Server 5.1 ............................................................. 34 7.2.1 Including Comtarsia schema file................................................ 34 7.2.2 Assigning CLC attributes to existing or new user.......................... 36 7.2.3 Create new user template ........................................................ 39 7.2.4 Creating Shares and Network Applications.................................. 41 7.2.5 Password policy ...................................................................... 44 7.2.6 IBM DS specific settings on the Logon Client ............................... 44 7.3 Installing IBM Directory Server 5.1 under Red Hat 7.3...................... 48 7.3.1 Installation ............................................................................ 48 7.3.2 Start ..................................................................................... 48 7.4 Lotus Domino Directory server 6 ................................................... 49 7.4.1 Domino access writing authorisation via LDAP............................. 49 7.4.2 SSL configuration.................................................................... 49 7.4.3 Installation of Comtarsia templates ........................................... 49 6.4.3.1 Signing of the Comtarsia templates .................................. 50 6.4.3.2 Copying of the Comtarsia elements .................................. 50 7.4.4 Hierarchic objects ................................................................... 50 7.4.5 Configuration of the Logon Client Domino LDAP Server................. 52 7.5 Configuring an OpenLDAP Server under Linux SuSE 8.0 Professional .. 52 7.5.1 The following rpm packages are required ................................... 52 7.5.2 Adapting the configuration ....................................................... 53 7.5.3 Creating an SSL key................................................................ 53 7.5.4 Starting the OpenLDAP server .................................................. 54 7.6 Cookbook - SSL Certificate Installation........................................... 55 7.6.1 Introduction ........................................................................... 55 7.6.2 Vendor Standards for X.509 Certificates ..................................... 55 7.6.3 SSL and Comtarsia Logon Client................................................ 56 7.6.4 Technical Implementation ........................................................ 57 7.6.5 Creating a test environment ..................................................... 57 7.6.5.1 Creating a root certificate authority .................................. 58 7.6.5.2 Creating a server certificate/key Pair ................................ 58 7.6.5.3 Creating a client certificate/key pair ................................. 58 7.6.5.4 Converting a certificate to format PKCS#12 ....................... 58 7.6.5.5 Checking a certificate ..................................................... 58 7.6.5.6 Importing a certificate .................................................... 58 7.6.5.7 Supported security modes in Logon Client ......................... 59 8. REFERENCE LISTS ........................................................................59 8.1 Domino Directory Server Reference List ......................................... 59 8.2 IBM Directory Server 5.1 Reference List ......................................... 60 8.3 Open LDAP ................................................................................ 60 9. Glossary .......................................................................................61 Comtarsia Logon Client 2006 User Manual for LDAP Page 3 / 61 1. Introduction This manual will lead through the installation of the Comtarsia Logon Client 2006, and subsequently will describe a configuration in few simple steps for a relaxed basic LDAP implementation. An extended configuration guide for more optional LDAP functions is included in the second part of the manual; server specific configuration for server specific settings, short glossary and finally a reference list follows. The “Quickstart” is intended to give the instructions for setting up the Comtarsia Logon Client 2006 for minimum LDAP functionalities, such as a user/password authentication in a user management of an LDAP directory server. The chapter “Optional LDAP attributes” will give more detailed explanation and configuration proposal for the optimal use of the whole range of LDAP functionalities of the Comtarsia Logon Client, such as the possibility of assigning home directory, profile path and various resources to the user. In the chapter “Server specific configuration” several setup options are described, custom-tailored to each particular server type, though with special attention to the LDAP server schema extension with the Comtarsia LDAP schema file. The successful integration of the Comtarsia schema file into the LDAP server is the most significant step to enable LDAP functionalities. Here is also to be found a cookbook for SSL configuration, as well as certificate maintenance. Comtarsia Logon Client 2006 User Manual for LDAP Page 4 / 61 2. Logon Client installation with InstallShield 2.1 Start of installation Run Logon Client InstallShield setup file CLC_2006-4.1.x.x.exe After the installation process with InstallShield, the Comtarsia Logon Client 2006 Configurator will be started. 2.2 The Logon Client Configurator 2.2.1 Minimum configuration The last step will be to make a minimum LDAP setup on the Configurator. (Please see “Quickstart for an LDAP Logon”) Comtarsia Logon Client 2006 User Manual for LDAP Page 5 / 61 2.2.2 Licensing In case of a purchased copy of Comtarsia Logon Client 2006 for production purposes, the own specific License Key can be loaded, in order to replace the demo key for testing purposes. (Under Licensing/“Load other licensekey”) Comtarsia Logon Client 2006 User Manual for LDAP Page 6 / 61 The Logon Client for testing purposes will be operative until the end of the demo License Key validity. 2.2.3 Restart After completing the installation, please restart your machine. After restart Logon Client will be available and ready for use. Comtarsia Logon Client 2006 User Manual for LDAP Page 7 / 61 3. Quickstart for an LDAP Logon This chapter describes the Comtarsia Logon Client minimum configuration steps in order to successfully log onto an LDAP server, and enable a simple user/password authentication. Also minimum SSL configuration is described. Further configuration options of above please see in the respective chapter for the particular server type in the “Server specific configuration”. 3.1 Prerequisites 3.1.1 Client • Microsoft Windows 2000/XP workstation • Comtarsia Logon Client installed. Installation guide please see under “Installation with InstallShield” 3.1.2 Server Following servers (LDAP Version 2 and 3) are currently supported: 9 9 9 9 9 9 9 9 9 Sun One Directory Server iPlanet Netscape Directory Server OpenLDAP IBM RACF Directory Server Lotus Domino Novell eDirectory IBM Directory Server 3.x/4.x IBM Directory Server 5.1 Comtarsia Logon Client 2006 User Manual for LDAP Page 8 / 61 3.2 First step: General configuration Set Logon Client run mode to “LDAP”. Comtarsia Logon Client 2006 User Manual for LDAP Page 9 / 61 3.3 Second step: minimal LDAP global configuration • LDAP Version: default is LDAP Version “3”, since few years ago most LDAP servers run Version 3. Change it here to “2” if your server runs LDAP Version 2. • Enable “Append Base DN”. Please mind the server specific requirements at this point. Most LDAP servers act optimally with this option enabled. • Set the LDAP server type • Configure User DN: (set the “path” to the user in the LDAP hierarchy) 9 User DN Prefix “cn=” (as shown below) or “uid=“ 9 User DN Suffix “,ou=Office_1,ou=Departement_1” Note: entry begins with “,” ! 9 Base DN of the LDAP tree, e.g. “o=Company” (as shown below) or “dc=companyname, dc=com” The complete UserDN will be composed as follows: UserDN = UserDN Prefix+Username+UserDN Suffix+BaseDN Example: cn=Testuser,ou=Office_1,ou=Departement_1,o=Company • For testing purposes SSL might be disabled (according to server configuration) • Enable “Advanced LDAP Logon” (optional) Comtarsia Logon Client 2006 User Manual for LDAP Page 10 / 61 Comtarsia Logon Client 2006 User Manual for LDAP Page 11 / 61 3.4 Third step: Set LDAP server name Enter the hostname or IP of your LDAP server and press “Add Server” in order to add server to the list. IMPORTANT: only SERVER NAME is to set and to add here!!! For basic configuration it is NOT necessary to enable “Use this server settings” checkbox, and not necessary to fill any fields below server name. Comtarsia Logon Client 2006 User Manual for LDAP Page 12 / 61 3.5 Fourth step: Logon on the LDAP server The computer must reboot after installation. If only configuration changes were made, reboot is NOT required. The Logon Client dialog will appear. Enter user name and password. Select “LDAP LOGON” as domain and press OK. Option “Advanced LDAP Logon” Instead of pressing “OK” after entering user name, password and domain, you can also select “Advanced LDAP Logon”. This opens another dialog which allows to temporarily overwrite some of the values of the above mentioned LDAP configuration settings. It can make life easy, if you would like to test a setup different to your current configuration, but these settings will not be saved and are only valid for a single logon. 4. LDAP is taking over Already acquired a taste for LDAP? The following chapter describes a more advanced configuration and use of the Comtarsia Logon Client 2006 for LDAP logon. Please note, that following features are not mandatory for a simple LDAP logon, and they can be applied without having extended the LDAP server’s schema file with the Comtarsia schema extension. Comtarsia Logon Client 2006 User Manual for LDAP Page 13 / 61 4.1 User Groups Comtarsia Logon Client 2006 supports LDAP user group objects of type • objectClass=„groupOfNames“ (OID: 2.5.6.9) • objectClass=„groupOfUniqueNames“ (OID: 2.5.6.17). (Future versions will allow you to freely select object class in order to handle special cases.) This classes have multi value attribute “member” or „uniqueMember“, these hold the UserDN-s of each group member. The user has to be entered into the attribute field with his full User-DN. 4.1.1 Group allocation by equal name At an LDAP logon with Comtarsia Logon Client 2006 also the LDAP server side group memberships are scanned. A user, identified as member of the particular LDAP group, becomes member of the corresponding local system group. (i.e. if LDAP group name=local system group name). Example: If the user is member of group „Marketing“ on the LDAP server he will also become member of the local „Marketing“ group if it exists. No further configuration is necessary. 4.1.2 Manual group mapping By enabling Group Mapping / “Use manual Groupmapping” in the CLC Configurator, there are further options to transfer memberships from LDAP to local system groups. Please see them below. 4.1.2.1 Power User/Administrators LDAP groups „WSADMIN“ and „PUSERS“ are mapped (depending on the local operating system language) to the equivalent local groups, in English version Power User/Administrators, see “Individual Groupmapping”. Example: If the LDAP user is member of group “WSADMIN” on the LDAP server, he becomes member of the local administrators group. NOTE: these groups can be freely named. 4.1.2.2 Free configurable Group Mapping Under “Add Groupmapping” it is possible to map any LDAP group to local groups; the membership of the respective user will be taken over from the LDAP server group to the local group. To keep the setup procedure simple, if the requested local group is not yet set up, the Logon Client will ask whether to create it. Comtarsia Logon Client 2006 User Manual for LDAP Page 14 / 61 The maximum supported number of groups per user is 251. 4.2 Few words about getting the BaseDN This is now the suitable time to say more about how the Logon Client discovers the LDAP BaseDN, and which settings are important to be considered. - If LDAP BaseDN is set in the registry, it will be used. - If the LDAP server supports LDAP version 3 and the LDAP version is set to „3“ in the registry, the Logon Client tries to discover the BaseDN via LDAP query. Note: Most LDAP servers support more than one single BaseDN. The administrator has to make sure, that the BaseDN used by the Logon Client gets returned as first entry. This can be easily checked for example with an LDAP browser. - If no BaseDN was found, it will be constructed (split up) out of the local computer’s full qualified hostname. e.g.: domain = „company.com“ Comtarsia Logon Client 2006 User Manual for LDAP Page 15 / 61 BaseDN = „dc = company, dc= com“ Comtarsia Logon Client 2006 User Manual for LDAP Page 16 / 61 5. Optional LDAP attributes 5.1 Introduction The Comtarsia LDAP schema-extension allows beyond the essential user/password authentication and group memberships the use of further LDAP features at an LDAP logon. (For basic configuration please see “Quickstart for an LDAP Logon”). For the currently supported LDAP server types and the according Comtarsia schema-extension installation manuals please see under “Server specific configuration”. After a successful schema file extension and completed Comtarsia Logon Client configuration, the following values are automatically queried off the LDAP server by the Comtarsia Logon Client 2006: 1. Directories and printer shares 2. Profile path and home directory 3. Network applications 5.2 LDAP Directory and Printer Shares The object class CLCShare defines in the Comtarsia schema-extension the directory and printer shares on the LDAP server. Both share types can be assigned to LDAP users (object type CLCPerson) by assigning the attribute CLCShareName, and filling the name of the respective share into the field. Assignments are automatically queried off by Comtarsia Logon Client at LDAP logon time and are connected according to the specifications to the user’s workstation. A maximum of 25 directory shares as well as 9 printer shares (LPT1 – LPT9) are supported. 5.2.1 Directory shares 5.2.1.1 Create directory share LDAP object class: CLCShare. In order to create a directory share, create new object, and assign following attributes: CLCShareName: CLCShareDescription: the name of the directory share share description Comtarsia Logon Client 2006 User Manual for LDAP Page 17 / 61 CLCShareServer: CLCShareRemotePath: CLCShareType: the resource server name the path on the remote server 1(stands for directory share) 5.2.1.2 Assign directory share to the user In order to assign a directory share to the user, the CLCShareName attribute has to be added to the user object, and the name of the directory share (but not the full DN of the share!) has to be entered into the field. Drive letters: - if the share (for example: “Datas1”) should be assigned to the next available drive letter, only the name of the share has to be entered into the CLCShareName field, but not the full DN of the share object! - if a certain drive letter is requested, append the drive letter to the share name: “Datas1/G” as for the drive letter G. This screenshot shows the definition of a directory share on the LDAP server: Below the assignment of a directory share to a user: Comtarsia Logon Client 2006 User Manual for LDAP Page 18 / 61 5.2.2 Printer shares 5.2.2.1 Create a Windows network printer share LDAP object class: CLCShare. In order to create a network printer share, create a new object, and assign following attributes: CLCShareName or cn: the printers’s share name (e.g. “Printer13”) CLCShareDescription: printer description CLCShareType: 2 (stands for printer share) CLCShareRemoteDevice: - either the share name of the printer (“Printer13”), or - the printer’s complete object name (“Apple LaserWriter 16/640 PS”). Comtarsia Logon Client 2006 User Manual for LDAP Page 19 / 61 The printer driver only needs to be installed on the server. 5.2.2.2 Assign network printer share to the user In order to assign a network printer share to the user, the CLCShareName attribute has to be added to the user object, and the name of the printer share (but not the full DN of the share!) has to be entered into the field. Comtarsia Logon Client 2006 User Manual for LDAP Page 20 / 61 5.2.2.3 Create a printer share assigned on LPT port In order to create a printer share assigned on the LPT port, create a new object, and assign the following attributes: CLCShareName or cn: CLCShareDescription: CLCShareType: CLCShareRemoteDevice: the printers’s share name e.g. “Printer13” printer description 2 (stands for printer share) the share name of the printer (“Printer13”) 5.2.2.4 Assign printer share on LPT port to the user In order to assign a printer share on an LPT port to the user, the CLCShareName attribute has to be added to the user object, the printer share name (but not the full DN of the share) entered, followed by “/” and the LPT port, e.g. “Printer13/LPT3” The printer driver has to be installed on the client workstation. The basic difference between the two possibilities is the fact, that for Windows applications the network printer will be necessary, in case of DOS applications a printer on a LPT port has to be assigned. Comtarsia Logon Client 2006 User Manual for LDAP Page 21 / 61 5.3 Home Directory and Profile Path As further practical feature of the Comtarsia Logon Client 2006, home directory and profile path can be assigned to the user during logon, with or without specifying a drive letter for the home directory, or setting up the home directory and the profile path separately. The home directory string is to be entered into the “CLCProfilePath” attribute field of the “CLCPerson” object. This attribute will be read automatically at logon. The Comtarsia Logon Client 2006 supports the following interpretations of the home directory string: \\COMTW2K\HOME\USER1 The next available drive letter is assigned to the UNC Path \\COMTW2K\HOME\USER1. The profile path is set to \\COMTW2K\HOME\USER1\PROFILE. H:\COMTW2K\HOME\USER1 Drive letter H: is assigned to UNC path \\COMTW2K\HOME\USER1. The profile path is set to H:\COMTW2K\HOME\USER1\PROFILE. Comtarsia Logon Client 2006 User Manual for LDAP Page 22 / 61 H:\WOMBAT\test3!WOMBAT\profiles\test3 Refers to a user directory \\WOMBAT\test3 residing on "H:" The user profile directory is now on \\WOMBAT\profiles\test3. If you like the user and profile directories to reside on different shares you have to separate paths in the field CLCProfilePath with "!". Note: If you are using Samba as resource server, path separation is strongly recommended. 5.4 LDAP Network Applications 5.4.1 What is a network application? The Comtarsia Logon Client provides a functionality to make use of LDAP application definitions, i.e. it offers the possibility to create shortcuts automatically for the required applications on the workstation. This is also processed during logon. This function is supported by the Comtarsia Logon Client beginning with version 3.0.4.22. 5.4.2 Create and configure network applications LDAP object class: “CLCNetworkApplication“. Comtarsia Logon Client 2006 User Manual for LDAP Page 23 / 61 In order to create a network application, create a new object, and assign following attributes: CLCNetworkApplicationDescription: network application description CLCNetworkApplicationCommand: the application command CLCNetworkApplicationProgramPosition: program file location CLCNetworkApplicationCommandParameters: optional parameters CLCNetworkApplicationWorkingDirectory: working directory Please see below an overview of the used LDAP attributes and their relevance to build a shortcut on a Windows desktop: LDAP attributes Windows Shortcut -----------------------------------------------------------------------Obligatory cn (only LDAP relevance) CLCNetworkApplicationDescription Description of shortcut Name of shortcut (*.lnk) CLCNetworkApplicationCommand Target, the executable file/applikation (may be an absolute path with drive letter, or UNC path) CLCNetworkApplicationProgramPosition Location (may be an absolute path with drive letter, or UNC path) Optional (can remain unassigned) CLCNetworkApplicationCommandParameters Target CLCNetworkApplicationWorkingDirectory Start in This function is modelled after the OS/2 „Workspace on demand“ feature, but it is fully functional on other server types as well. During logon all available applications are queried off the server and previous shortcuts matching the filter (defined in the CLC Configurator) will be automatically deleted. This function is only relevant in case the PC has not been shut down properly, normally not necessary. Shortcuts are then (re)created according to the filter and the various CLC Configurator settings. Please see below. Comtarsia Logon Client 2006 User Manual for LDAP Page 24 / 61 If a .lnk file is present on the resource server just this lnk-file will be copied to the client workstation. Other present shortcuts stay untouched as long as the name does not collide with the filter. Directories defined in “NWAFolderNamePath“ and “NWAFolderName“ are created with administrator privileges and therefore can be located in places which are usually non-writable to regular users (e.g. %ALLUSERSPROFILE%). The following figure shows a configured network application on the LDAP server. Comtarsia Logon Client 2006 User Manual for LDAP Page 25 / 61 5.4.3 Assign icons to the network applications There are two basic solutions of storing the icons for the network applications. - either the program folder contains the application AND the icon (named as the application itself, e.g. “application.exe” and “applicationname.ico“), then this icon will be used for the application shortcut. - or all icons have an common folder for all applications, the folder has to be defined by “NWADefaultIconPath“ when configuring the Logon Client. The Logon Client will look up for the “applicationname.ico“ here as next, if in the program folder was not found. In case the “applicationname.ico“ does not exist, the icon defined by “NWADefaultIcon” will be used instead, for example “default.ico” – which is to be stored in the folder defined by “NWADefaultIconPath“. All required icons are copied from the resource server into a directory on the local computer (defined by “NWAIconPath”). If a shortcut by the name of “applicationname.lnk” is present in the program directory, it will be used and all other application specific parameters will be ignored. 5.4.4 Assign the network application to the user In order to assign the network application to the user, the CLCNetworkApplication attribute has to be added to the user object, and Comtarsia Logon Client 2006 User Manual for LDAP Page 26 / 61 the name of the network application (but not the full DN of the network application!) has to be entered into the field. 5.5 Further Comtarsia Attributes • CLCForcePasswordChange If this attribute included in the users object is set to „1“ the user is forced to change his password at the next logon. Afterwards the attribute is reset to „0“ by the Logon Client. A logon of the user without changing his password is not permitted. This action has priority over optional policy messages like a password expire warning. The user needs write permissions to this attribute in his LDAP object. 6. Extended LDAP Functions 6.1 Introduction The Logon-Client takes care of the extended LDAP Functions. Importing the scheme-file is not necessary for these functions. 6.2 Assigning hardware specific administrator- rights If a user needs local administrator-rights on one or more specific workstations, it can be configured via the options “HwAdminGroup” and “HwAdminAttribute”. Comtarsia Logon Client 2006 User Manual for LDAP Page 27 / 61 6.2.1 HwAdminAttribute The registry key: HKEY_LOCAL_MACHINE\SOFTWARE\PCS\GINA "hwadminattribute"="" defines which LDAP-attribute of the user object contains a list of workstation names on which the user can be local administrator. In the LDAP attribute of the user object, which is configured as “HwAdminAttribute”, contains a list of workstation names on which the user needs local administrator rights (i.g. Developer ->Developerworkstation) Additionally the user has to be member of the “HwAdminGroup”. Example: “hwadminattribute” = “workstations” “hwadmingroup” = “hwadmin” If the user now logs on to a workstation, which name appears in the LDAP attribute, and the user is member of the LDAP-group “hwadmin”, the user is going to be local administrator. 6.2.2 HwAdminGroup The registry key: HKEY_LOCAL_MACHINE\SOFTWARE\PCS\GINA "hwadmingroup"="" defines, which LDAP-group the user has to be member off, so it is going to be HwAdmin. Example: „hwadmingroup“ = „hwadmin“ If a user logs on the workstation, it is checked, that the user appears in the group “hwadmin”. If the workstation name appears additionally in the “HwAdminAttribute”, the user is going to be local administrator. 6.3 Location dependent permission/prohibition of logons The “LocationModus” enables the user to log on at specific locations only. A LDAP user object can contain primary as well as alternative locations, on which a logon is permitted. Additionally one can export a LDAP attribute of the location object as environment variable, which for example in “Logon-Scripts”, can be reused on many different purposes. Considering the sub domain of the FQDN of the workstation a “LocationCode” is determined, which is used to find the “Location-Object” in LDAP. Example: Comtarsia Logon Client 2006 User Manual for LDAP Page 28 / 61 ws1.vie.comtarsia.com Æ “vie” In this case the LDAP search query to determine the Location-Object would appear as follows: „(&(objectclass=[LocationObjectClass])([LocationObjectCode]=vie) Afterwards the parameter [LocationObjectAttribute] is going to be read out of the LocationObject. If it appears in one of the [LocationAllowedAttributes], the logon is permitted. Additionally the [LocationBasedEnvironment] variables are exported as environment variables. To design this function as flexible as possible, one has to configure a lot of parameters. 6.3.1 EnableLocation KEY: HKEY_LOCAL_MACHINE\SOFTWARE\PCS\GINA\LDAP “EnableLocation” = DWORD:0 With “EnableLocation” = DWORD:1 the “Location-Mode” can be activated. 6.3.2 LocationAllowedAttributes KEY: HKEY_LOCAL_MACHINE\SOFTWARE\PCS\GINA\LDAP “LocationAllowedAttributes” = „“ Indicates which LDAP attribute of the user object is defined, at which location the user can log on. Example: “LocationAllowedAttributes” = „ANPrimaer, ANAlternativ“ Comtarsia Logon Client 2006 User Manual for LDAP Page 29 / 61 6.3.3 LocationObjectClass KEY: HKEY_LOCAL_MACHINE\SOFTWARE\PCS\GINA\LDAP “LocationObjectClass” = REG_SZ: „” Indicates the object class of the LDAP-Location object. Example: “LocationObjectClass” = „ANSubsiddiary“ 6.3.4 LocationObjectCode KEY: HKEY_LOCAL_MACHINE\SOFTWARE\PCS\GINA\LDAP “LocationObjectCode” = REG_SZ: „ANCode“ Indicates the LDAP attribute of the LocationObject, which contains the location code, i.g. “vien”. Comtarsia Logon Client 2006 User Manual for LDAP Page 30 / 61 6.3.5 LocationObjectAttribute KEY: HKEY_LOCAL_MACHINE\SOFTWARE\PCS\GINA\LDAP “LocationObjectAttribute” = REG_SZ „L“ Indicates in which LDAP attribute of the LocationObject the location name is stated, e.g. “Wien”. 6.3.6 LocationBasedEnvironment KEY: HKEY_LOCAL_MACHINE\SOFTWARE\PCS\GINA\LDAP Comtarsia Logon Client 2006 User Manual for LDAP Page 31 / 61 “LocationBasedEnvironment” = REG_MULTI_SZ: „“ With this setting the values of attributes of the the LocationObjects can be exported as environment variables. For example: “LocationBasedEnvironment” = „L“ At logon of the user the Logon Client tries to read the LDAP attribute “L” out of the location object and exports the content of the attribute as environment variable “L”. If necessary a mapping can be carried out, e.g.: “LocationBasedEnvironment” = „L=Location“ In this case the content of the LDAP attribute “L” is exported as environment variable “Location”. Please see: AttributeBasedEnvironment 6.3.7 The variable VALID_LOCATION The variable %VALID_LOCATION% is always then set, if a location check has taken place. If the current user is valid for the logon on the current location, then the variable contains the value „1“. If a location check has not taken place, for example because of a local logon, then this variable is not set. 7. LDAP Server specific configurations 7.1 Netscape Directory Server schema-extension 7.1.1 The Comtarsia schema The Comtarsia LDAP schema-extension is delivered with the Comtarsia Logon Client 2006 software package. It is intended to be included into the directory server’s schema files (instructions please see below). After a successful server start with the extended LDAP schema beyond a simple user authentication the whole range of LDAP logon functionalities of the Logon Client will be available: the possibility to assign directory and printer shares, network applications, home directory, profile path, etc. For this purpose the user needs the CLCPerson object class assigned, and the CLCShare / CLCNetworkApplication with the corresponding CLC-attributes herewith also has to be available. With extended schema they can be well managed in the directory server, enabling all Comtarsia Logon Client 2006 functions (instructions please see below). There are two versions of the Comtarsia schema file: Comtarsia Logon Client 2006 User Manual for LDAP Page 32 / 61 - One version is intended for a completely new server setup, creating all the users earliest to this point. The user object is created here with a structural object class, named “CLCPerson”. This is derived from “inetorgperson” in the current version, but it is freely modifiable if necessary to another (even user defined) object class, as long as object class “top” will be inherited at the end. The CLC-attributes can be assigned to the CLC Person on the directory server. - The other version is for LDAP servers with users already established and in use/production, it enables them to additionally obtain the possibility to use Comtarsia Logon Client functionalities. The users will get assigned an auxiliary object class named “CLCPerson”, consequently the CLC-attributes are free to be assigned to them. 7.1.2 Including the Comtarsia schema into the server The directory server has to be stopped. The schema-extension file is to be stored into the servers respective ...\config\schema folder. The server can be started again. 7.1.3 The CLCPerson user object 7.1.3.1 Creating a new „CLC Person“ user (using schema-extension with structural „CLCPerson“ object class) In order to create a new user, click on the required container (for example: People ) choose “New” Select “Other” from the list => CLCPerson Fill fields with user data. Click “Advanced Properties” => “Add attribute” Select the CLC-attributes from the list, add them, and fill the fields with the corresponding values. 7.1.3.2 Add “CLCPerson” to an existing user (using the schema-extension with auxiliary „CLCPerson“ object class) If there are users already in regular use/production on the LDAP server, the schema-extension offers the possibility to add an auxiliary object class to the user, in order to be able to grant him CLC-attributes. Auxiliary object class name: CLCPerson. Attributes: CLCShareName, CLCProfilePath, CLCNetworkApplication Select the user => „Advanced Properties“ in the Directory. Comtarsia Logon Client 2006 User Manual for LDAP Page 33 / 61 Click on the „Object class“ => „Add value“. Select „CLCPerson“ from the list, and add. Now all attributes are enabled to be assigned to the user. Select „Add Attribute“, add CLCShareName, CLCProfilePath and CLCNetworkApplication, fill attributes fields with corresponding values. Assuming that the CLC LDAP objects (directory and printer shares, network applications, etc.) are already created, all users configured as described above are fully able to get those assigned and able to use them after logon with Comtarsia Logon Client. 7.1.3.3 Support of password expiration The warning from the Netscape directory server, that the user password is expired becomes available during logon. The Comtarsia Logon Client is able to act accordingly and prompts the user in order to change his password before it actually expires. 7.2 IBM Directory Server 5.1 This chapter describes the minimal configuration required for IBM Directory Server 5.1 to work with Comtarsia Logon Client. For further information regarding IBM directory server please refer to the IBM online help as well as the references given at the end of this document. [1] 7.2.1 Including Comtarsia schema file With the tool /usr/bin/ldapxcfg, under the section “Manage schema files” the Comtarsia schema can be attached to the “Current schema files” in the Directory Server. It is advisable to store this file in the server’s schema file folder. (e.g. when running the server on Linux: /etc/ldapschema/comtarsia.schema.ibmds) As next the Directory Server has to be restarted, including the Comtarsia schema file as described above. The following object classes (and its relevant attributes) will appear on the Web Administration Tool GUI under “Schema Management/Manage Object classes” • CLCNetworkApplication: Structural • CLCPerson: Auxiliary • CLCShare: Structural Comtarsia Logon Client 2006 User Manual for LDAP Page 34 / 61 Comtarsia Logon Client 2006 User Manual for LDAP Page 35 / 61 7.2.2 Assigning CLC attributes to existing or new user In order to be able to assign CLC attributes to users, the “CLCPerson” auxiliary object class has to be added to the user’s object classes. To take it into account, that users were created before Comtarsia schema was added to the LDAP server, respectively there will be new users created after setting up the additional schema, the solution can be different. EXISTING user can be directly edited under “Manage Entries”=> Add auxiliary class. Comtarsia Logon Client 2006 User Manual for LDAP Page 36 / 61 Under “Other attributes” are the CLC attributes now available to be assigned. In case many users have to be updated, there is a reasonable opportunity of creating a new user template with CLC attributes included. In the respective realm, where the user belongs, the former template can be simply replaced with the new one. Comtarsia Logon Client 2006 User Manual for LDAP Page 37 / 61 “CLC Person” auxiliary object class will be in this case added to the new template. (See “Create new user template”), and is now available to assign the existing users. NEW USER When creating a new system, new realms will be created based on new templates. New users will be created immediately with CLC attributes in the new realm. Comtarsia Logon Client 2006 User Manual for LDAP Page 38 / 61 7.2.3 Create new user template Add “CLC Person” auxiliary class to the template. Comtarsia Logon Client 2006 User Manual for LDAP Page 39 / 61 The next steps are following: • • • the “Naming attribute” has to be changed to “cn” to follow this example in the “Required” tab the “userPassword” has to be included a new “Tab” is created, named “Comtarsia”. This tab contains the CLCspecific attributes. These can be added to the tab as shown below. Comtarsia Logon Client 2006 User Manual for LDAP Page 40 / 61 New realms will be created based on this new template, or as mentioned before, formerly created realms can be updated with it. In both cases the CLC attributes are immediately available on the tab “Comtarsia”. 7.2.4 Creating Shares and Network Applications Shares are to be created under “Directory Management/Add an entry/Structural object class”. Select “CLCShare” structural object class and fill in the “Required” and optionally the “Other” attributes. Network Applications are to be created under “Directory Management/Add an entry/Structural object class”. Select “CLCNetworkApplication” structural object class and fill in the “Required” and optionally the “Other” attributes. Comtarsia Logon Client 2006 User Manual for LDAP Page 41 / 61 IMPORTANT: To assign users the relevant Shares/Network Applications, the user’s corresponding CLC attributes have to be filled in. For existent user, select under “/Users and Groups/Manage users” the intended user. At “Edit user” fill in attributes on the recently created tab named “Comtarsia”.(Presuming that the new template with tab “Comtarsia” is the assigned template at this particular realm.) For new user assign attributes directly when creating it. (For more information please see [4]). Comtarsia Logon Client 2006 User Manual for LDAP Page 42 / 61 Comtarsia Logon Client 2006 User Manual for LDAP Page 43 / 61 7.2.5 Password policy Comtarsia Logon Client supports fully the password policy configuration of the IBM Directory Server. All relevant notifications from the LDAP server (user password has to be changed, password is expired, user account is locked, etc.) become available during logon. Logon Client is able to analyse these and to act accordingly (e.g. prompts the user in order to change his password.). Password validation is also supported, the user is notified about wrong password syntaxes at password change, according to the server configuration. Additional information about LDAP Password Policy please see IETF Internet draft at [5]. 7.2.6 IBM DS specific settings on the Logon Client The main specific settings on the Logon Client Configurator for IBM 5.1 Directory Server are as follows: LDAP Global • Enable “Append BaseDN” (for more information about BaseDN please see also chapter 4.2 ) • Server type: IBM Directory Server 5.1 • User DN has to be constructed by setting o Base DN to the correct organisation name, in this example “o=level1” o User DN Prefix is “cn=” o User DN Suffix is the remaining “path” between the name and the top of the hierarchy, beginning with a “,” -- in this example “,cn=lin_realm,ou=level2” Hence this full User DN is created: cn=”username”,cn=lin_realm,ou=level2,o=level1 Comtarsia Logon Client 2006 User Manual for LDAP Page 44 / 61 The next screenshot shows a user in its location in the /Directory Management/Manage entries, according to the previously configured location. Comtarsia Logon Client 2006 User Manual for LDAP Page 45 / 61 LDAP Server The next step is to set the LDAP server name in the Logon Client Configurator as shown below. With these configurations the Comtarsia Logon Client is ready for a successful logon on an LDAP server. Comtarsia Logon Client 2006 User Manual for LDAP Page 46 / 61 SSL configuration SSL configuration of IBM Directory Server 5.1 please see [6] SSL configuration is not required for a testing scenario with Comtarsia Logon Client. However for production it is highly recommended to make use of it. 7.3 Comtarsia Logon Client 2006 User Manual for LDAP Page 47 / 61 Installing IBM Directory Server 5.1 under Red Hat 7.3 Installation of Linux Red Hat 7.3 is assumed to be completed. 7.3.1 Installation Install all Directory Server relevant .rpm-s. [2] Install the client: rpm -ihv ldap-clientd-5.1-1.i386.rpm Install the server: rpm -ihv ldap-serverd-5.1-1.i386.rpm If the product has been successfully installed, the following is displayed: ldap-clientd-5.1-1 ldap-serverd-5.1.1 Install the language-dependent messages or documents by typing the following at a command prompt: rpm -ihv ldap-msg-xxx-5.1-1.i386.rpm rpm -ihv ldap-html-xxx-5.1-1.i386.rpm 7.3.2 Start To start directory server: ibmslapd To install the Web Administration Tool with SSL enabled: Type the following at a command prompt: rpm -ihv ldap-webadmind-5.1-1.i386.rpm To start/stop webserver: appsrv/bin/start(stop)Server.sh server1 The GUI for server administration is now available under http://ldapsrv.comtarsia.com:9080/IDSWebApp/IDSjsp/Login.jsp For this manual’s SSL configurations was GSKit 5.0 used. Install gskbas-5.0-4.rpm. To start: gsk5ikm. Comtarsia Logon Client 2006 User Manual for LDAP Page 48 / 61 7.4 Lotus Domino Directory server 6 Minimum Requirements: Lotus Domino Release 5 Comtarsia Logon Client 2006 Build <= 3.1.27.4 Installation and Configuration of Lotus Domino 6 for use with Comtarsia Logon Client Version 2006 This chapter describes the minimal configuration required for Domino server to work with Comtarsia Logon Client 2006. For further information regarding Lotus Domino please refer to the Notes client online help as well as the references given at the end of this document. SSL configuration is not required for a testing scenario with Comtarsia Logon Client. However for production it is strongly recommended to make use of it. 7.4.1 Domino access writing authorisation via LDAP The following configuration steps are required for changing a Domino password via LDAP. ATTENTION: In Domino Release 6 password changes via LDAP need a few minutes before they get active, at Domino Release 6.5 password changes are immediately active. • • • • • • Open Domino Administrator „Configuration“ -> Directory-> LDAP -> choose settings Upon first access you will be asked whether you want to create a new document -> choose „yes“ Now choose-> LDAP „Allow LDAP-User write access“->“yes” and save it. Then restart the Domino server 7.4.2 SSL configuration To be able to access Domino services via SSL a SSL certificate has to be installed on the server. The simplest method is generating a „Self-Signed Certificate“. 1. Open „Server Certificate Admin Database“ (certsrv.nsf) and choose the option “Create key ring with self signed certificate” to create a “Self Signed Certificate”. 2. Now open Domino Administrator 3. Now you have to configure the key file name: Configuration->Server->Current Server Document->Ports>Internet Ports->SSL key file name 4. In the document Server->Current Server Document->Ports>Internet Ports->Directory you have to set “SSL Port Status” to “enabled” and “SSL Name and Password” to “yes”. Further information on Domino SSL configuration can be found in [3, 4] 7.4.3 Installation of Comtarsia templates This step is optional and not essential if the Domino Server is only used for authentication/ password change/ group assignment Comtarsia Logon Client 2006 User Manual for LDAP Page 49 / 61 Via the Comtarsia templates attributes like network drives, assignments and network applications can be easily administrated in a usual Domino manner for all workstations. Comtarsia specific design elements are available for web administration starting with Domino Release 6 6.4.3.1 Signing of the Comtarsia templates Open Domino administrator Change in “Files-View” Right mouse button to “clcnames.ntf”->Sign “Active Server’s ID” / sign ”All design Documents” This creates an admin request, which can be directly fulfilled with “tell adminp process new” 6.4.3.2 Copying of the Comtarsia elements In the template file „clcnames.ntf“ contains the Comtarsia specific design elements. • Open „names.nsf“ and „clcnames.ntf“ in Domino designer • Copy all design elements from „clcnames.ntf“ to „names.nsf“ (2 Forms, 2 Views, 1 Shared Code/Agent, 3 subforms) • In „names.nsf“ choose the subform „$PersonExtensibleSchema“ and set it to „hidden“ (at properties) • Create the roles „CLCCreator“ and „CLCModifier“ in the ACL of the „names.nsf“ and assign them to the „Admin“ user the “Localdomainservers“ group. • At the console execute the command „load updall –r names.nsf“ 7.4.4 Hierarchic objects In order to organize the Domino objects hierarchically in the LDAP directory, the domain has to be stated in the fullname-attribute. In user and group objects the hierarchic name as well as the flat name has to be stated in the fullname-attribute. IMPORTANT: The hierarchic name must be in first place in the fullname-attribute. Screenshot of a user with DN “cn=Dom User2,o=comtarsia”: Comtarsia Logon Client 2006 User Manual for LDAP Page 50 / 61 Screenshot of a group with DN “cn=dgroup2,o=comtarsia”: At share or network application projects it is only necessary to fill in the hierarchic name in the fullname-attribute. Screenshots of a CLCShare object with DN “cn=office,o=comtarsia”: Screenshots of a CLCNetworkApplication object with DN: “cn=msword,o=comtarsia”: Comtarsia Logon Client 2006 User Manual for LDAP Page 51 / 61 7.4.5 Configuration of the Logon Client Domino LDAP Server A logon with the Comtarsia Logon client to the Domino LDAP server can be done with a ShortName or with a FullName. A LDAP BaseDN can only be used if the user as well as the groups are created hierarchically. In this case, the user name must be contained full hierarchically in the field FullName, for example Test User Test User/Comtarsia For a sign on with Domino ShortName there are two opportunities: UserDN: uid=SHORTNAME or UserDN: SHORTNAME For further information for configuration of Lotus Domino for support of the ShortName-Logon please see the reference list at the end of this manual. The password being used is defined in the “internet password” field in the person’s document. Logon Client configuration: - Option AppendBaseDN is deactivated - The field UserDNPrefix should be set by a ShortName logon to “uid=”, by a FullName logon to „cn=“ - LDAP Server type is “Domino” - LDAPEnableSSL is set accordingly to the Domino configuration. Now the Comtarsia Logon Client can authenticate to the Domino LDAP server. 7.5 Configuring an OpenLDAP Server under Linux SuSE 8.0 Professional 7.5.1 The following rpm packages are required - openldap2-client-2.0.23-53 - openldap2-2.0.23-53 - openssl-0.9.6c-29 (only for ssl support) Comtarsia Logon Client 2006 User Manual for LDAP Page 52 / 61 You can check if these packages are installed with the following commands: ngc4321:/home/stefan # rpm -q -a | grep openldap openldap2-client-2.0.23-53 openldap2-2.0.23-53 ngc4321:/home/stefan # rpm -q -a | grep openssl openssl-0.9.6c-29 openssl-devel-0.9.6c-29 ngc4321:/home/stefan # These packages can be installed with “yast” or directly with “rpm” if required. The OpenLDAP configuration files are found under /etc/openldap. LDAP client tools reside in /usr/bin. The LDAP server (slapd) lies in directory /usr/lib/openldap. 7.5.2 Adapting the configuration ldap.conf: BASE dc=comtarsia, dc=com slapd.conf: Access Control, each user may modify his entry, read others and read the userPassword anonymous (for auth): access to * by self write by users read by anonymous auth ldfb database definitions: suffix "dc=comtarsia,dc=com" rootdn "cn=Manager,dc=comtarsia,dc=com" SSL: For using SSL the following lines have to be appended at the end of slapd.conf file. # Certificates TLSCertificateFile /etc/openldap/server.pem TLSCertificateKeyFile /etc/openldap/server.pem TLSCACertificateFile /etc/openldap/server.pem 7.5.3 Creating an SSL key openssl req -new -x509 -nodes -out server.pem -keyout server.pem -days 365 In the following dialog “Common Name” should be the name of the LDAP server. ngc4321:/etc/openldap # openssl req -new -x509 -nodes -out server.pem keyout server.pem -days 365 Using configuration from /usr/share/ssl/openssl.cnf Generating a 1024 bit RSA private key ......++++++ ............++++++ writing new private key to 'privkey.pem' ----- Comtarsia Logon Client 2006 User Manual for LDAP Page 53 / 61 You are about to be asked to enter information that will be incorporated into your certificate request. What you are about to enter is what is called a Distinguished Name or a DN. There are quite a few fields but you can leave some blank For some fields there will be a default value, If you enter '.', the field will be left blank. ----Country Name (2 letter code) [AU]:AT State or Province Name (full name) [Some-State]:Vienna Locality Name (eg, city) []:Vienna Organization Name (eg, company) [Internet Widgits Pty Ltd]:Comtarsia Organizational Unit Name (eg, section) []:SD Common Name (eg, YOUR name) []:ngc4321.comtarsia.com Email Address []:[email protected] ngc4321:/etc/openldap # 7.5.4 Starting the OpenLDAP server without SSL: /etc/init.d/ldap start with SSL: cd /usr/lib/openssl ./slapd -h "ldap:/// ldaps:///" or ./slapd -d 9 -h "ldap:/// ldaps:///" for debugging output Now the OpenLDAP server is configured completely and all that is left is to import LDAP data. We recommend to use a LDAP GUI for administration, e.g. http://www.iit.edu/~gawojar/ldap/index.html (requires JAVA JRE 1.4) Log in as manager (cn=Manager,dc=comtarsia,dc=com; passowrd=secret) and import the following LDIF file: dn: dc=comtarsia,dc=com dc: comtarsia objectClass: organization objectClass: dcObject o: comtarsia dn: cn=Manager, dc=comtarsia,dc=com objectClass: person sn: Manager cn: Manager dn: cn=user1, dc=comtarsia,dc=com objectClass: person sn: user1 cn: user1 userPassword: test You can also import the LDIF file from the command prompt (see "man ldapadd"). To add additional users import an LDIF file looking like this: dn: cn=user1, dc=comtarsia,dc=com objectClass: person sn: user1 Comtarsia Logon Client 2006 User Manual for LDAP Page 54 / 61 cn: user1 userPassword: test Now login with user accounts is also possible, which should have permission to modify their own attributes (e.g. userPassword); if this is not the case the ACL in sldapd.conf is not set correctly. If the result is as expected, nothing prevents you from logging on with the Comtarsia Logon Client 2006. (for more information see “Optional LDAP attributes”) 7.6 Cookbook - SSL Certificate Installation 7.6.1 Introduction Comtarsia Logon Client supports LDAP beginning with release 3.0. To insure confidentiality of the transmitted data (user passwords, user permission data etc.) between Logon Client and LDAP server it is possible to make use of SSL encryption. SSL (Secure Socket Layer) was originally developed by Netscape. In the meantime many notable software vendors began to support this protocol for data encryption and digital signatures. SSL is based on asymmetric encryption (private key / public key) and usage of X.509 certificates on server and/or client. Hereby the following combinations are possible: a) Server uses a so-called Self Signed Certificate. Clients do not use a certificate. b) Server uses a CA (Certificate Authority) Signed Certificate. The client has to have at least the CA certificate to be able to validate the authenticity of the server certificate. (Server Authentication) c) Server uses a CA Signed Certificate. Clients use a Self Signed Certificate and additionally require the CA certificate (for validating the server certificate). d) Client as well as Server has CA Signed Certificates. In this case the Client also has to have the CA certificate so that the Server can validate the authenticity of the Client certificate. (This is called Client Authentication.) 7.6.2 Vendor Standards for X.509 Certificates The following vendors use proprietary standards and formats for creating and storing certificates and PKI (Public Key Infrastructure) keys. RSA (Rhivest, Shamir, Adelman): supports PKCS#n standards. They developed the asymmetric RSA encryption schema which is named after them. Netscape: Supports PKCS#11 – Cryptographic Token Interface Standard, PKCS#7 for saving of certificates and for certificate revocation lists, PKCS#12 for interchange of certificates and PKI keys, keyX.db and certX.db as permanent Comtarsia Logon Client 2006 User Manual for LDAP Page 55 / 61 storage for certificates and PKI keys in the file system (key and/or certificate store). For asymmetric encryption the RSA method is supported. Available tools: certutil, signtool, … OpenSSL: supports these formats: PKCS#7, PKCS#12, X509. RSA as well as Diffie-Hellman (DH) are used as asymmetric methods. For signing DSA (Digital Signature Algorithm) is supported. As encoding type for certificates in OpenSSL are available the DER format, the PEM format (base64 encoded version of DER) and the NET format. Available Tools: openssl x509, openssl pkcs7, openssl crl2pkcs7, openssl pkcs12, openssl genrsa, … Sun Java Secure Socket Extensions (JSSE): supports PKCS#7 (PEM encoded) for the import of signed certificates into the Java Key Store. Available Tools: keytools, java signer – a program for signing of Java Archives (.jar),… Microsoft Cryptographic Service Provider: does not support PKCS#11! Uses a proprietary method for accessing key and certificate stores. Creation of client certificates is done by Microsoft Certificate Services. A Certificate Request has to be submitted on a specific web page of the Internet Information Server (IIS) of the certification provider. This page also triggers the generation of private/public key pairs in the key store. The signed CSR can be loaded as PKCS#7. Microsoft also supports the PKCS#12 format for import/export of client and server certificates from and to the Microsoft Key Store. RSA and Diffie-Hellman are both supported for use as PKI encryption method. The used encoding type of the MS-CSP is the PKCS#7 DER format. Microsoft is maintaining a certificate store by the name of „MY“ for each user in the user profile. Additionally there are system wide certificate stores for each workstation (and service). Certificates and keys are saved as files in the file system as well as in the registry. Available tools: certutil, certificate snap in for Management Console (mmc), certificate management in IE, MS Certificate Services (for Windows 2000 Server). (The list above does not claim to be complete.) 7.6.3 SSL and Comtarsia Logon Client For a maximum of conformity and compatibility with the target operating system for Comtarsia Logon Client (Windows), to enable potential synergy effects (reuse of client certificates of other applications) and to be able to employ smart cards the decision was made to use the Microsoft Cryptographic Service Provider for the Comtarsia Logon Client. However to reduce vendor dependance it is planned to provide automatic functions for importing, exporting and interchanging of common certificate and key formats in the Logon Client. The goal is to use formats PKCS#7 and PKCS#11 which are supported by RSA, Netscape, OpenSSL, Sun JSSE as well as Microsoft as mentioned above. Thought has been given to develop a add-on product (with graphical user interface) which allows to directly access key and certificate stores of other vendors (e.g. Netscapes certX.db and keyX.db) in order to be able to exchange certificates and keys with the Microsoft Certificate Store and for example to make preperations for automatic software distribution easier. Comtarsia Logon Client 2006 User Manual for LDAP Page 56 / 61 7.6.4 Technical Implementation Above documentation only mentions usage of asymmetric keys. To keep things simple we did not mention that asymmetric encryption only is used for the exchange of symmetric keys (so-called “session keys”), which are the ones really used to encrypt transmitted data. The reason for the usage of asymmetric keys is, it is much more processing intensive for encryption and decryption. As mentioned before Logon Client uses the Microsoft SSL stack. Microsoft’s architectural model implements this functionality by means of the socalled CryptAPI, which similar to PKCS#11 consists of an abstract definition of interfaces and functions. Function calls to the CryptAPI are forwarded to a “Cryptographic Service Provider (CSP)” which performs encrypting and decrypting as well as all SSL relevant functions. This is a module by itself. By default Windows 2000 comes with “Microsoft Base Cryptographic Provider” installed. This only supports symmetric key lenghts of 40 or 56 Bits (DES) because US export restrictions forbade sale of US products with stronger encryption to foreign countries. This restriction has fallen and therefore it is recommended to update by means of Windows Update to “Microsoft Enhanced Cryptographic Provider” or “Microsoft 1 Strong Cryptographic Provider” . Logon Client does support all three providers and if multiple CSPs are installed it always chooses the one allowing for the maximum level of data security. The following prerequisites are necessary to use SSL encryption: SSL must have been activated and a server certificate been installed on the respective LDAP Server. This can either be a Self Signed Certificate or a CA Signed Certificate (see Introduction a) or b)). Additionally a Self Signed or CA Signed Certificate may be installed on the client (see Introduction c) or d)). Certificates and matching private keys (for all but the CA certificate) must be loaded into the clients or servers so-called Certificate Store. On the client you can use the provided program import_key.exe, which is explained below. On the server the installation is done as documented by the vendor (an example HowTo for OpenLDAP is to be found in the supplied documentation) A description of how to create a Certificate Authority follows below. 7.6.5 Creating a test environment OpenSSL was chosen as software to create a Test Certificate Authority because it can be seen as standard software for it is protected by GNU Public License and freely available on the Internet. Beside this there are lots of documentation available in the Internet and OpenSSL is executable under Unix (Linux) as well as Windows (by means of cygwin, see www.redhat.com/cygwin). After OpenSSL has been installed the configuration file openssl.cnf is located in subdirectory /usr/ssl. Well-made documentation for OpenSSL Version 0.9.2b can be found at http://www.dfn-pca.de/certify/ssl/handbuch/ossl092/ossl092.html. 1 The providers mentioned are RSA Full Providers, which are used by LDAP Logon Client. Comtarsia Logon Client 2006 User Manual for LDAP Page 57 / 61 7.6.5.1 Creating a root certificate authority openssl req -out ca.pem -new -x509 -creates CA file "ca.pem" and CA key "privkey.pem" openssl crl2pkcs7 -nocrl -certfile ca.pem -out ca.p7b -inform PEM -outform DER 7.6.5.2 Creating a server certificate/key Pair openssl genrsa -out server.key 1024 openssl req -key server.key -new -out server.req openssl x509 -req -in server.req -CA CA.pem -CAkey privkey.pem -CAserial file.srl -out server.pem -file "file.srl" contains a 2-digit number e.g.: "00" 7.6.5.3 Creating a client certificate/key pair openssl genrsa -out client.key 1024 openssl req -key client.key -new -out client.req openssl x509 -req -in client.req -CA CA.pem -CAkey privkey.pem -CAserial file.srl -out client.pem -file "file.srl" contains a 2-digit number e.g.: "00" 7.6.5.4 Converting a certificate to format PKCS#12 openssl pkcs12 -export -in client.pem -inkey client.key -keyex -CAfile ca.pem name "client" -out client.pfx 7.6.5.5 Checking a certificate openssl.exe x509 -text -noout -sha1 -fingerprint -in clien.pem 7.6.5.6 Importing a certificate You can import the client certificate, the matching private key and the CA certificate (if existing) into the client key store with import_key. USAGE: import_key -s<format_option> [-v] [<options>] -s<format_option> Switch between PKCS7 and PKCS12 format -v Use verbose mode PKCS7 format options (-sPKCS7): -f<pkcs#7_file> PKCS#7 certificate file -k<keyfile> PEM format private key (not encrypted) -C Certificate only. -A Add certificate to the CA store PKCS12 format options (-sPKCS12): -f<pkcs#12_file> PKCS#12 certificate and key file. -p<pkcs#12_password> PKCS#12 password. Comtarsia Logon Client 2006 User Manual for LDAP Page 58 / 61 examples: to import a pkcs#12 certificate and key into the user store: import_key -sPKCS12 -v -fclient.pfx -psecret to import a pkcs#7 certificate and a PEM encoded key into the user store: import_key -sPKCS7 -v -fclient.p7b -kclient.key to import a pkcs#7 certificate without a key into the user store import_key -sPKCS7 -v -C -fserver.p7b to import a pkcs#7 certificate without a key into the system store (CA) import_key -sPKCS7 -v -A -fca.pem Supported formats: Formats PKCS#12 for certificate and key and PKCS#7 for certificate and PEM only for key (without password encryption) are supported for import. e.g.: import_key –sPKCS12 –fMyClientCert.pfx –pSECRET import_key –sPKCS7 –fMyClientCert.p7b -kMyPrivateKey.pem You have to use PKCS#7 to import Certifcate Authority certificates. z.B.: import_key –sPKCS7 –fMyCACert.p7b –A 7.6.5.7 Supported security modes in Logon Client Logon 0: 1: 2: 3: Client has the following security options: No SSL encryption Self Signed Server certificate accepted, no client certificate present. CA Signed Server certificate required, no client certificate present. CA Signed Server certificate required, Self Signed or CA Signed client certificate present. Logon Client uses to following algorithm to locate certificates in the certificate store: The client certificate is being searched for in the respective user’s “My-“ certificate store. First it tries to find a certificate which ‘Subject Name’ is the same as the current user’s user name. If this fails, the first certificate is used which is in the user certificate store. The CA certificate (if used) has to be located in the “Root“ User Certificate Store (only accessible by the current user) or in the “Root“ System Certificate Store (accessible by all users on this machine). CA certificates which are imported with import_key.exe using option –A are stored in the “Root” System Certificate Store. 8. REFERENCE LISTS 8.1 Domino Directory Server Reference List [1] Domino Short-Names: http://www12.lotus.com/ldd/doc/domino_notes/Rnext/help6_admin.nsf/f4b82fbb75e942a6852566ac0037f284/b6 ebd85402ab04ea85256c1d0039955c?OpenDocument http://www12.lotus.com/ldd/doc/domino_notes/Rnext/help6_admin.nsf/f4b82fbb75e942a6852566ac0037f284/c2 b8e9676cb9d73c85256c1d00393778?OpenDocument Comtarsia Logon Client 2006 User Manual for LDAP Page 59 / 61 [2] Default Domain Document: http://www12.lotus.com/ldd/doc/domino_notes/Rnext/help6_admin.nsf/f4b82fbb75e942a6852566ac0037f284/62 b8e37b261352b685256c1d003954b8?OpenDocument#413064780829246853 [3] Setting up SSL on a Domino server: http://www12.lotus.com/ldd/doc/domino_notes/Rnext/help6_admin.nsf/f4b82fbb75e942a6852566ac0037f284/0e fb03569412411385256c1d00398e86?OpenDocument [4] Setting up Notes and Internet clients for SSL authentication: http://www12.lotus.com/ldd/doc/domino_notes/Rnext/help6_admin.nsf/f4b82fbb75e942a6852566ac0037f284/43 8e83bd82998bfe85256c1d00399165?OpenDocument [5] Customizing the LDAP service configuration: http://www12.lotus.com/ldd/doc/domino_notes/Rnext/help6_admin.nsf/f4b82fbb75e942a6852566ac0037f284/05 5defea478ecc6585256c1d003937eb?OpenDocument [6] Domino Directory Services: http://www12.lotus.com/ldd/doc/domino_notes/Rnext/help6_admin.nsf/b3266a3c17f9bb7085256b870069c0a9/a 7be0edb2008082385256c1d0039335a?OpenDocument 8.2 IBM Directory Server 5.1 Reference List [1] Product documentation home: http://www-3.ibm.com/software/network/directory/library/index.html#v51 [2] Installation: ftp://ftp.software.ibm.com/software/network/directory/library/v51/ldapinst.htm# HDRLINCLI [3] Password Policy ftp://ftp.software.ibm.com/software/network/directory/library/v51/admin_gd.htm #Header_116 [4] SSL configuration ftp://ftp.software.ibm.com/software/network/directory/library/v51/admin_gd.htm #Header_84 [5] Adding an entry ftp://ftp.software.ibm.com/software/network/directory/library/v51/admin_gd.htm #Header_260 [6] LDAP Password Policy RFC http://www.ietf.org/internet-drafts/draft-behera-ldap-password-policy-06.txt 8.3 Open LDAP http://www.OpenLDAP.org/ Comtarsia Logon Client 2006 User Manual for LDAP Page 60 / 61 9. Glossary OID Object identifiers, strings of numbers, allocated in a hierarchical manner, used for a variety of protocols. All LDAP object have a unique OID. Definition of OIDs comes from ITU-T recommendation X.208. RACF Resource Access Control Facility - is the IBM security management product for its mainframe operating systems, OS/390 (MVS) and VM. RFC Request for Comments - is an Internet formal document or standard that is the result of committee drafting and subsequent review by interested parties. Some RFCs are informational in nature. Of those that are intended to become Internet standards, the final version of the RFC becomes the standard and no further comments or changes are permitted. Change can occur, however, through subsequent RFCs that supercede or elaborate on all or parts of previous RFCs. The University of Southern California maintains a searchable index of all Requests for Comments from the Internet Engineering Task Force (IETF). LDAP Lightweight Directory Access Protocol - is a proposed open standard for accessing global or local directory services over a network and/or the Internet. The word Protocol is the key word in the definition, LDAP is NOT hardware or software. It is a protocol that defines how a client and server will communicate with one another. The Lightweight Directory Access Protocol is defined in a series of Requests For Comments, better known as RFC(s). A very good source for all of the LDAP RFCs can be found in the OpenLDAP, http://www.OpenLDAP.org/ , software bundle that can be downloaded free of charge from the Internet. Some of the more important RFC numbers are RFC 1777 for LDAPv2 and RFC 2251 for LDAPv3. SSL Secure Sockets Layer, is the standard security technology for creating an encrypted link between a client and a server. This link ensures that all data passed between the server and client remains private and integral. SSL is an industry standard. In order to be able to generate an SSL link, a server requires an SSL Certificate. TLS Transport Layer Security protocol. The TLS protocol provides communication privacy over the Internet. The protocol allows client/server applications to communicate in a way that is designed to prevent eavesdropping, tampering, or message forgery. The protocol is composed of two layers: the TLS Record Protocol and the TLS Handshake Protocol. CLC Abbreviation of Comtarsia Logon Client 2006 – mostly used in combination with the Configurator as “CLC Configurator”, or with Comtarsia Logon Client 2006 specific LDAP object classes, e.g. “CLCPerson”. Comtarsia Logon Client 2006 User Manual for LDAP Page 61 / 61