1
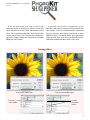
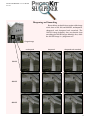
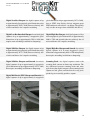
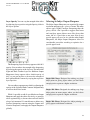
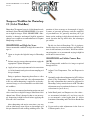
PhotoKit SHARPENER 1.2.2 User Manual 8-27-04 PhotoKit™ SHARPENER: A Complete Sharpening Workflow Solution Sharpening has long been one of the most essential but least-understood aspects of digital imaging. PhotoKit SHARPENER provides, not just a set of sharpening tools, but a complete sharpening workflow from capture to output that is designed to produce optimum sharpness on any image, from any source, reproduced on any output device, while still leaving enough control to address both the differing requirements of individual images and the differing tastes of individual users. If you simply want to start using PhotoKit SHARPENER right away, you can skip ahead to “Using PhotoKit SHARPENER” on page 4, but the following discussion may be useful to help you understand why we created the sharpening workflow and how it works. Why sharpen? Sharpening is necessary for several reasons, each of which imposes its own demands, and sometimes those demands contradict each other. Whenever we turn photons into pixels, we lose some sharpness, because no matter how high the resolution of our capture devices, they sample a fixed grid of pixels, turning the continuous gradations of tone and color that exist in the real world into discrete pixels. Some lenses render the scene more sharply than others, but even the finest lenses still introduce some softness. Sometimes we want to make the image sharper than it really was, to tell a story, make a point, or emphasize an area of interest. Sharpening can be a creative tool. Output devices also introduce some softness. When we turn pixels into halftone dots or stochastic dithers of inks, or even into continuous-tone dots on dye-sub printers or film recorders, we lose sharpness again. We need to apply sharpening to counteract the softness introduced by both capture and output, and to satisfy our creative goals. The Sharpening Problem When we try to use a single round of sharpening on a digital image, we immediately encounter a problem. The image source requires one kind of sharpening, the image content needs another, while the output medium needs still another sharpening treatment. Why is this? Different capture mechanisms—film formats and digital cameras—have their own signature combinations of detail and noise. The challenge is to sharpen the detail without exaggerating the noise, so successful sharpening must take into account the relationship between image detail and the noise of the image source, whether film grain or a digital camera filter mosaic. Incorrect sharpening makes the grain or noise more, rather than less, obvious. 1 PhotoKit SHARPENER 1.2.2 User Manual 8-27-04 Different subjects need different treatments. Apparent sharpness depends on the contrast along what we see as edges. A close subject with soft detail such as a head shot has wider edges than a high-frequency image such as a forest full of trees, so each requires a different treatment in terms of sharpening radius. Incorrect sharpening either obscures small details, or oversharpens textured areas such as skin tones. Output processes differ in the way they render the conversion from pixels to printed dots, so sharpening that works well for an inkjet printer may fail when sent to a halftone output process such as a web press, or to a continuous-tone process like a film recorder. Incorrect sharpening either produces insufficiently-sharp results, or makes obvious sharpening haloes along high-contrast edges. No matter how hard weʼve tried to reconcile these three demands in a single round of sharpening, weʼve never been happy with the results. Independently, several of the PixelGenius team had developed a two-pass approach to sharpening—performing a round of gentle sharpening close to capture time, and a second round tailored for the specific output process—but we each did things a little differently, proceeding as much by instinct as anything else. To create PhotoKit SHARPENER, we first analyzed what weʼd been doing independently, then we tested thousands of images from different sources and sent them to a variety of outputs. The result is PhotoKit SHARPENER. The Sharpening Workflow Solution The solution, a well-thought-out sharpening workflow, is relatively simple in concept. Rather than try to address all the factors that influence sharpening in a single edit, The sharpening workflow splits sharpening into three stages. Capture Sharpening is applied early in the image-editing process, and aims simply to restore any sharpness that was lost in the capture process. Creative Sharpening is usually applied locally to accentuate specific features in an image—for example, we often give eyes a little extra sharpness in head shots. Output Sharpening is applied to files that have already been sized to final output resolution, and is tailored to a specific type of output process. The benefit of dividing sharpening into these three phases is that it lets us handle the various competing needs separately. Capture Sharpeners compensate for the image source and image type, without having to worry about output issues, Creative Sharpeners apply directly to the image at hand without having to worry about image sources (since theyʼve already been handled by the Capture Sharpeners), and Output Sharpeners concentrate solely on the needs of the output process (since the image has already been sharpened adequately in the two previous phases). 2 PhotoKit SHARPENER 1.2.2 User Manual 8-27-04 The three sets of sharpeners have been carefully tuned to work together. You can archive images that have had Capture Sharpening and Creative Sharpening applied; then, when you want to produce a printed or web version of the image, you can simply resize to the required dimensions, apply the appropriate Output Sharpener, and output the file. This provides three key benefits: Ease of use. At each stage of the sharpening workflow, you can make relatively simple decisions rather than try to address all the sharpening issues with a single edit. You can even automate large parts of the sharpening workflow by writing Photoshop Actions to call the individual Sharpeners. Optimal sharpening. Addressing each sharpening issue separately means that you can produce much better results than would be possible using a single round of sharpening, so your output is tack-sharp, without obvious and offensive sharpening haloes. Repurposability. Uncoupling output sharpening from the rest of the sharpening process means that you can keep a single version of the image, and simply produce different versions, optimally sharpened for output, when you need them. The PhotoKit SHARPENER Advantage Many other great sharpening tools are available to Photoshop users, but PhotoKit SHARPENER is the only one designed from the ground up to provide a complete sharpening workflow. And PhotoKit SHARPENER offers some other significant advantages. Non-Destructive Sharpening All sharpening effects are implemented as Layers or Layer Sets, leaving the source image untouched, whether itʼs a flat file or a complex layered construction. Sharpening effects remain non-destructive and adjustable until the user flattens the layered image, or merges the sharpening effects into a normal pixel layer. Automation PhotoKit SHARPENERʼs default settings are designed with automation in mind. You can safely batch-process images using PhotoKit SHARPENER without worrying whether or not it will wreck your images. Control Most sharpening tools offer a take-it-or-leave-it result. PhotoKit SHARPENER produces layers at default opacities that allow you to increase or decrease the amount of sharpening after youʼve run the effect. For even more control, the Capture and Output Sharpener effects return separate layers for the light and dark sharpening contours. Additionally, those Capture Sharpeners that apply Smoothing do so on a third separate layer. Finally, for even more control, the Capture Expert Sharpeners return the sharpening layer mask with each sharpening layer, allowing further fine-tuning by editing the layer mask. 3 PhotoKit SHARPENER 1.2.2 User Manual 8-27-04 PhotoKit Basics Using PhotoKit SHARPENER All PhotoKit products, including PhotoKit SHARPENER, follow the same basic rules. First and foremost, PhotoKit never harms the original image. All PhotoKit effects are applied on additional layers, leaving the original source image untouched. Second, PhotoKit effects offer great flexibility by using all currently visible layers as the source for the effect. This lets you control exactly how effects are applied. For example, if you want to compare two different effects—two different Capture Sharpeners, for example—you simply run the first effect, then turn off the visibility for that effect in the Layers palette before running the second one. Comparing effects Run the first effect, then... hide the result. Run the second effect, then... compare the results by turning each layer set on and off. 4 PhotoKit SHARPENER 1.2.2 User Manual 8-27-04 If, on the other hand, you want to look at the cumulative result of running two effects, run the first effect and leave the result visible, then run the second effect. The second effect then takes the first effect into account when it runs. This is the normal workflow for applying a Capture Sharpener followed by an Output Sharpener, for example. A possibly non-obvious consequence of this behavior is that when you want to add layer-based edits (for example, a Curves or Hue/Saturation Adjustment Layer) to an image that already contains one or more PhotoKit effects, you should add the new adjustments at the top of the layer stack, above the PhotoKit effects, rather than underneath them in the Layer stack. Stacking effects Run the first effect, then... leave the result visible. Run the second effect, then... view the cumulative results. 5 PhotoKit SHARPENER 1.2.2 User Manual 8-27-04 Sharpening Basics Sharpening is basically a very localized contrast adjustment. Increasing the contrast along edges in the image produces the appearance of increased sharpness. an edge, and then increasing the contrast around it. The typical result is a sharpening “halo” along edges. Digital sharpeners simulate this effect by looking at each pixel, deciding whether or not it represents part of Edges in images consist of lighter pixels contrasting with darker ones, so when that contrast gets exaggerated to increase the apparent sharpness of the edge, the resulting halo has darker pixels that we refer to as the “Dark Contour,” and lighter pixels that we refer to as the “Light Contour.” In an ideal scenario, the dark pixels are darkened to exactly the same visual extent as the light pixels are lightened. However, this ideal is rarely met in practice, so often we see some tonal shifting between the sharpened and unsharpened versions of the image. In many cases, this tonal shift is unobjectionable or even desirable, but we recognize that such judgements are highly subjective, so in PhotoKit SHARPENER we provide the ability to adjust the strength of the light and dark contours independently. Unsharpened Sharpened If youʼve ever wondered why Photoshopʼs principal sharpening tool, the Unsharp Mask filter, is called Unsharp Mask when the result is to make the image appear sharper, the simple answer is that it replicates an analog darkroom technique called unsharp masking. The original negative is duplicated, then the original and the duplicate are attached to one side of a transparent carrier (often a piece of window glass). When the enlarger is focused on the negative on the bottom of the glass, the negative on top acts as an outof-focus, or unsharp, mask that increases the contrast along the edges in the image. This image and graph depict an edge transition— from 40 to 60 percent. Each tick mark across the bottom of the graph represents a column of pixels. After sharpening, the transition is accentuated— it’s darker on the dark side, and lighter on the light side, creating a halo around the edge. 6 PhotoKit SHARPENER 1.2.2 User Manual 8-27-04 This is a capability that weʼve long wished for in Photoshop. As it turns out, the capability was there all along, but finding it and rendering it usable required considerable ingenuity. Now that we have it, we wonder how we managed to do without it for all these years! Controlling Dark and Light Contours On this image, the default sharpener settings darken the image slightly. Adjusting the opacities of the light and dark contours independently—to 70% for the light contour and 45% for the dark contour—produces a result thatʼs sharp, but is closer to the original tonal values. Original Capture sharpen at default opacities Unsharpened detail at 200% Light contour at 70%, dark contour at 45% 7 PhotoKit SHARPENER 1.2.2 User Manual 8-27-04 PhotoKit SHARPENER Menus As we explained earlier, good sharpening has to take into account the characteristics of the capture medium, the content of the image, and the properties of the output device. Addressing all these issues in a single round of sharpening is, we believe, impossible, so PhotoKit SHARPENER divides sharpening into three phases: Capture Sharpen, Creative Sharpen, and Output Sharpen. The three sharpening phases appear as separate commands on Photoshopʼs Automate submenu—PhotoKit Capture Sharpener Expert/ PhotoKit Capture Sharpener…, PhotoKit Creative Sharpener…, and PhotoKit Output Sharpener…— arranged in the order in which theyʼre typically used. For best results, we recommend starting out with unsharpened files (turn off any sharpening in the scanner or capture software), and using PhotoKit SHARPENER to apply all sharpening. Turning off sharpening in scanner or camera capture software isnʼt always easy, though we havenʼt yet encountered a case where it was impossible. If Capture Sharpening oversharpens images, itʼs likely that some sharpening is being applied beforehand, in which case youʼll need to dig deeper in the capture software to find the Off switch! PhotoKit SHARPENER Image Requirements PhotoKit SHARPENER has only two requirements for images. Images must be in 8-bit/channel RGB Mode (16bit/channel is supported in Photoshop CS only). Images must contain a true Background layer. If your image doesnʼt contain a Background layer, you can create one in Photoshop 6 or 7 by selecting the bottom layer in the stack, then choosing New>Background From Layer from the Layer menu. Select the bottom layer in the stack... PhotoKit SHARPENER’s three types of sharpening appear on Photoshop’s Automate submenu in the order in which they’re typically used. ...then choose New>Background From Layer. 8 PhotoKit SHARPENER 1.2.2 User Manual 8-27-04 Capture Sharpeners Capture Sharpeners are designed to apply gentle sharpening early in the workflow. The sharpening is concentrated in the midtones, applying relatively little sharpening to shadows and highlights (no sharpening is applied to pixels lighter than level 250 or darker than level 10). That way, we leave sufficient “headroom” to apply sharpening tailored for different output processes, while allowing you to work on a reasonably sharp image. The Capture Sharpeners may be gentler than the sharpening techniques youʼre used to, but when theyʼre combined with Output (and, optionally, Creative) Sharpeners, they produce very sharp results. Capture Sharpener and Capture Sharpener Expert The only difference between Capture Sharpener and Capture Sharpener Expert sets is that the latter returns the sharpening mask as a Layer mask for the Light and Dark Contour layers. Preserving the layer mask lets you fine-tune the sharpening by editing the layer mask—see page 19 for some examples. If you donʼt edit the layer mask, Capture Sharpener Expert effects produce identical results to Capture Sharpener effects. Applying Capture Sharpeners in Photoshop 6 or 7 Before applying Capture Sharpeners in Photoshop 6 or 7, we recommend that you make any large initial tone or color edits on a high-bit capture whenever possible. Two ways of accomplishing this are: Make large initial corrections in the scanner or capture software. Bring the file into Photoshop in 16-bit/channel mode, perform the large initial corrections, then downsample to 8-bit/channel mode. The two are functionally equivalent—choose whichever method is more comfortable for you. We make this recommendation simply because itʼs always better to make big corrections in 16-bit/channel mode, and because itʼs often necessary to make these corrections before you can begin to make any reasonable decisions about sharpening. Once youʼve made your initial corrections in highbit mode, you can apply a Capture Sharpener. Applying Capture Sharpeners in Photoshop CS Since Photoshop CS supports 16-bit layers, Sharpener works on 16-bit/channel images in Photoshop CS. Hence we recommend that you acquire images in 16-bit/channel mode, make your initial corrections in 16-bit/channel mode, apply Capture Sharpener in 16-bit/channel mode, and stay in 16-bit/channel mode until the file size makes it uncomfortable to do so, or you need to use Photoshop tools that donʼt work on 16-bit/channel images. Note, however, that for 8-bit/channel captures such as JPEG, there is rarely any benefit to upsampling from 8 to 16-bit/channel mode. Selecting a Capture Sharpener Set The Capture Sharpener sets are named for the image source. The film sets are effective at almost any scanning resolution—the key factor is the relationship between the edges you wish to sharpen and the inherent noise structure (grain) of the film. The digital sets are organized by capture size. Choose the Capture Sharpener set that corresponds most closely to your image source. The Capture Sharpener sets are described in more detail on the following pages. 9 PhotoKit SHARPENER 1.2.2 User Manual 8-27-04 35 Positive Film: for scans from 35mm positive film. 35 Positive Film METW: for scans from 35mm positive film of close subjects with soft detail and very wide edges, such as portraits. The METW (Modified Edge Transition Width) algorithms are designed to emphasize wide edges while minimizing grain. 6x6 Negative Film: for scans from medium-format negative film (6x6, 6x7, 6x9). 4x5 Positive Film: for scans from large format positive film (4x5). 4x5 Negative Film: for scans from large format negative film (4x5). Note: If your scanner offers Applied Science Fictionʼs GEM (Grain Enhancement Module) technology, and you apply GEM to negative scans, you may get better results if you use one of the positive film effects rather than the negative effects, since the latter use more aggressive grain suppression. A 35mm positive image with soft detail and wide edges may benefit from the 35 Positive Film METW sharpeners. 35 Slow Negative Film: for scans from 35mm negative film at speeds of up to 400 ISO. 35 Fast Negative Film: for scans from 35mm negative film at speeds faster than 400 ISO. 6x6 Positive Film: for scans from medium-format positive film (6x6, 6x7, 6x9). The Digital Capture sets are organized by capture size, and by the degree of smoothing they apply, from least to most. Unless itʼs obvious that an image needs smoothing (it already has visible noise or artifacting), we recommend that you try the option without smoothing first. The amount of noise present in a digital image usually correlates with the ISO speed at which the image was shot. But cameras vary widely in their behavior, so itʼs difficult to provide a set of magic numbers that dictate when smoothing is required. As a general rule, itʼs unlikely that images captured at 400 ISO or slower will need smoothing, and equally unlikely that images captured at 1600 ISO or faster wonʼt require smoothing, but thereʼs a large gray area in between. The images on the following page are illustrative of varying degrees of noise, and show the effects of sharpening alone, and sharpening with smoothing. 10 PhotoKit SHARPENER 1.2.2 User Manual 8-27-04 Sharpening and Smoothing Illo showing images from noiseless to noisy, with Original image sharpen Shown below are details from versions of the image at left, shot at 100, 400, and 800 ISO, unsharpened, sharpened, and sharpened and smoothed. The 100 ISO image definitely does not benefit from smoothing; the 800 ISO image definitely does; while the 400 ISO image is a judgement call. and sharpen + unsharpened smoothing sharpened sharpened and smoothed applied. 100 ISO 400 ISO 800 ISO 11 PhotoKit SHARPENER 1.2.2 User Manual 8-27-04 Digital Low-Res Sharpen: for digital captures of up to approximately 4 megapixels (pixel dimensions of up to approximately 2500 x 1600) that are relatively free of noise and hence donʼt require smoothing. (pixel dimensions of up to approximately 3072 x 2048), shot as JPEG, that display obvious magenta-green JPEG artifacts as well as noise—see below. (We typically only see this on images shot at 800 ISO and above.) Digital Low-Res Smoothed Sharpen: for noisier digital captures of up to approximately 4 megapixels (pixel dimensions of up to approximately 2500 x 1600) that require some smoothing in addition to sharpening. Digital High-Res Sharpen: for digital captures of 8 or more megapixels (pixel dimensions of approximately 4000 x 2700 and upwards) that are relatively free of noise and hence donʼt require smoothing. Digital Mid-Res Sharpen: for digital captures of up to approximately 6 megapixels (pixel dimensions of up to approximately 3072 x 2048) that are relatively free of noise and hence donʼt require smoothing. Digital High-Res Sharpen and Smooth: for noisier digital captures of 8 or more megapixels (pixel dimensions of approximately 4000 x 2700 and upwards) that require smoothing in addition to sharpening. Digital Mid-Res Sharpen and Smooth: for noisier digital captures of up to approximately 6 megapixels (pixel dimensions of up to approximately 3072 x 2048) that require smoothing in addition to sharpening. Scanning Back: for digital captures made with scanning back cameras at almost any resolution. The key difference between scanning backs and more typical one-shot digital cameras is that scanning backs capture real red, green, and blue data for every pixel, producing an essentially grainless capture. Digital Mid-Res de-JPEG Sharpen and Smooth: for digital captures of up to approximately 6 megapixels unsharpened De-JPEG Sharpen and Smooth 12 PhotoKit SHARPENER 1.2.2 User Manual 8-27-04 Choosing a Capture Sharpener Effect Each Capture Sharpener set contains four effects, tailored to emphasize different edge widths, and labeled SuperFine Edge Sharpen, Narrow Edge Sharpen, Medium Edge Sharpen, and Wide Edge Sharpen, respectively. (The sole exception is scanning backs, where the images are so clean that thereʼs no need to emphasize edges and downplay non-edges.) Choosing between these four flavors of sharpening is not an exact science (if it were, weʼd have a less- ambiguous naming convention), and is to some degree a matter of taste. In some rare cases, applying Wide Edge Sharpen to an image with tiny details may obscure rather than reveal them, and applying SuperFine Edge Sharpen to a head shot may overemphasize skin texture, but on the vast majority of images the differences will be subtle, and a matter of nuance rather than “right” or “wrong” sharpening. The following examples, however, may provide a general rule of thumb. SuperFine Edge Sharpen is designed for busy images with tiny details right at the limit of the capture mediumʼs ability to resolve. This effect is rarely needed, but we added it to PhotoKit SHARPENER after receiving a small but significant number of images from users who found that the Narrow Edge Sharpen effect was still too coarse, and obscured useful detail. These detail images show SuperFine Edge Sharpen, near right, and Narrow Edge Sharpen, far right. 13 PhotoKit SHARPENER 1.2.2 User Manual 8-27-04 Narrow Edge Sharpen is designed for “high-frequency,” busy images with lots of tiny details. The differences between Narrow Edge Sharpen and SuperFine Edge Sharpen are quite subtle, but unless youʼre concerned with details around the single-pixel level, Narrow Edge Sharpen is usually a better choice for high-frequency images than SuperFine Edge Sharpen. Bear in mind that all the effects will sharpen all edges to some extent—the difference is simply one of emphasis. Each of the edge widths emphasizes a different general tendency in the image. Once you gain some experience using PhotoKit SHARPENER, youʼll find that itʼs relatively easy to match the effect to the image to produce the results you want. These detail images show Narrow Edge Sharpen, near right, and Wide Edge Sharpen, far right. The Wide Edge Sharpen actually obscures some of the finer details and produces wide sharpening contours that look unnatural. 14 PhotoKit SHARPENER 1.2.2 User Manual 8-27-04 Medium Edge Sharpen is designed for “normal” images, like the examples shown here. When in doubt, itʼs the safest setting to use—think of it as the “standard” setting, with SuperFine, Narrow and Wide Edge Sharpening being reserved for those images that need them. 15 PhotoKit SHARPENER 1.2.2 User Manual 8-27-04 Wide Edge Sharpen is designed for close subjects with relatively soft detail, where the goal is to emphasize edges without applying significant sharpening to textured areas such as skin, such as the examples shown below. These images all have relatively wide edges as their dominant features, making them good candidates for Wide Edge Sharpen. 16 PhotoKit SHARPENER 1.2.2 User Manual 8-27-04 SuperFine, Narrow, Medium, and Wide Edges Compared On any single image, the differences between SuperFine, Narrow, Medium, and Wide Edge Sharpen may be quite subtle. The image details below show the same image with SuperFine, Narrow, Medium, and Wide Edge Sharpen applied. SuperFine Edge Sharpen Narrow Edge Sharpen Medium Edge Sharpen Wide Edge Sharpen 17 PhotoKit SHARPENER 1.2.2 User Manual 8-27-04 Post-Effect Controls After youʼve run the effect, PhotoKit returns a Layer Set, named for the effect, that contains a Light Contour layer, a Dark Contour layer, and in some cases, a Smoothing Layer. This allows for substantial tweaking of the sharpening effect after it has been applied. Layer Opacity: You can vary the strength of the effect by adjusting layer opacities using the Opacity slider in the Layers palette. Layer Masking: You can localize the sharpening effect by adding a layer mask to the Sharpening Layer Set by selecting the layer set, then either choosing Add Layer Mask from the Layer menu, or by clicking the Add Layer Mask icon in the Layers palette. The Sharpening Layer Set always appears with 100% opacity. You can reduce the strength of the sharpening by lowering the opacity of the layer set. The individual Light and Dark Contour layers for Capture Sharpeners always appear with a default opacity of 66%, so you can increase or decrease the strength of the light and dark contours independently by varying the respective layer opacities. You may find that you often want to reduce the opacity of the smoothing layers, or even turn them off entirely. But the sharpening layers are based on the result of the smoothing layers, so even if you wind up discarding them, theyʼve still played a useful role. Layer masks appear on the Channels palette whenever the layer to which they belong is selected. Click the layer mask’s tile to activate it for editing. To reveal the effect, then paint it out, choose Add Layer Mask>Reveal All from the Layer menu, or click the Add Layer Mask icon in the Layers palette, then paint on the Layer Mask with Black paint. To hide the effect, then paint it in, choose Add Layer Mask>Hide All from the Layers menu, or Option-click/ Alt-click the Add Layer Mask icon in the Layers palette, then paint on the Layer Mask with White paint. Layer masks appear on the Layers palette beside the layer to which they belong. Click the layer mask’s icon to activate it for editing— when it’s active, the icon has a border. 18 PhotoKit SHARPENER 1.2.2 User Manual 8-27-04 Capture Sharpen Expert In PhotoKit SHARPENER 1.2, weʼve added a new Capture Sharpen Expert set. These sets work identically to the similarly-named Capture Sharpen sets. The only difference is that they preserve the mask through which sharpening is performed as a layer mask. Layer masks control the visibility of the layer to which they apply: white in the layer mask makes the layer fully visible, black hides, intermediate grays make it partly visible. Editing the layer mask allows you to fine-tune the effect of the Sharpening layer. Selected Layer mask Layer masks One very easy way to fine-tune the sharpening is to adjust the contrast of the Layer mask using Levels (Curves works too, but Levels offers the advantages of speed and simplicity). In the example shown here, we pull the white input slider down, creating more white pixels in the Layer mask, and hence more sharpening. On the Light Contour layer, we also make a midtone adjustment using the gray slider to darken the midtones, compensating for the white slider move so that areas we want to leave unsharpened are indeed left that way. Light contour edit Dark contour edit before editing after editing 19 PhotoKit SHARPENER 1.2.2 User Manual 8-27-04 Capture Sharpener Expert Often, a simple gamma adjustment using the gray slider in Levels is useful. In the example shown here, a gamma correction of 1.8 was applied to the Light Contour layerʼs mask to produce slightly increased sharpening. The simple rules to follow: The Capture Sharpener Expert sets are designed for those users who want the ultimate in control. The examples shown here are relatively unsubtle—we wanted to make sure that the before-and-after difference is obvious. Use them only when you want to make subtler changes than can be achieved by adjusting the layer opacities. Adjusting the black input slider in Levels creates more black pixels, and hence protects more of the image from the effect. Adjusting the white input slider in levels creates more white pixels, and hence applies the effect to more of the image. Adjusting the gray input slider in Levels changes the slope between pixels that are affected and pixels that are protected. Before gamma adjustment After gamma adjustment 20 PhotoKit SHARPENER 1.2.2 User Manual 8-27-04 Flattening the Capture Sharpen Layer Set Once youʼre happy with the results of the Capture Sharpener, you may wish to flatten the layer set to reduce the file size and the concomitant demands on memory, scratch disk space, and storage. You can either flatten the image, which burns all the changes into the Background layer, or, if you wish to keep your Background layer intact, merge the effect into a new layer. The trade-off in doing so is that you make a smaller file, but you lose editability since you no longer have separate sharpening layers. We recommend that you flatten images before a mode change—from RGB to CMYK, for example—but you neednʼt do so for RGB-to-RGB conversions. Flattening the image: Choose Flatten Image from the Layer menu. All layer-based edits are burned into the Background layer. Merge to a new layer: Create a new layer by choosing New>Layer from the Layer menu or by clicking on the Add Layer icon in the Layers palette. (If a Layer Set is currently targeted, the new layer will appear inside the layer set—drag it out of the set before proceeding.) Then choose Merge Visible from the Layer menu while holding down the Option (Mac) or Alt (Windows) key, or press Command-Option-Shift-E (Mac) or ControlAlt-Shift-E (Windows). The sharpened image is copied to the new layer. Finally, delete the sharpening Layer Set to reduce the file size. Warning: Do not use the Merge Layer Set command on the Layer menu to collapse the layer set, because it wonʼt produce the expected visual result. This is a known Photoshop issue that applies to any layer set containing layers that use blending modes other than Normal, and that do not have a pixel layer set to Normal blending as the bottom layer in the set. Creative Sharpeners The Creative Sharpeners are designed to apply to images after running Capture Sharpeners and before Output Sharpeners. By nature, the primary use of Creative Sharpeners is for localized sharpening or smoothing of areas in an image. While most images may fall into one of the primary categories weʼve chosen such as Narrow, Medium, and Wide edges, in general all images exhibit some cross-category tendencies. Additionally, the content of an image may dictate that certain areas of an image need more sharpening or even more smoothing, to optimize the composition. The Creative Sharpening effects are divided into three sets: Sharpening Brushes, Smoothing Brushes, and Sharpening Effects. Sharpening and Smoothing Brushes Sets Each Sharpening Brush category uses the same concept of selecting sharpening based upon narrow, medium, and wide edges as do the Capture Sharpeners. However, each category also has three strengths of sharpening, from 1 - 3, with 3 being the strongest. In addition, we have added a special effects sharpener, called HazeCutter, which adds a warming color correction to sharpening that can particularly help images where aerial haze causes both softening and cooling color balance in distant scenes. 21 PhotoKit SHARPENER 1.2.2 User Manual 8-27-04 The Depth of Field Brush has the ability to add additional edge sharpening above and beyond traditional sharpening. While itʼs impossible to make an out of focus object appear to be “in-focus”, the DOF Brushes add as much edge contrast as possible and can indeed considerably improve soft areas of an image. Warning: As with all sharpening effects, you should understand that it is possible to oversharpen an image and therefore ruin it. We suggest the user take a subtle approach when using the Sharpening Brushes. However, also remember that all PhotoKit effects return fully editable layers that can always be lowered in opacity or turned off, so we encourage you to experiment and see how far you can push the edge. One trick to making an area of an image appear sharper is to add a suggestion of softness elsewhere in the image. While applying a Sharpening Brush to a personʼs eyes and lips, for example, you may add smoothing to skin or other areas you wish to deemphasize using the Smoothing Brushes. There are three simple smoothing brushes: Fog Brush, Diffusion Brush, and Smoothing Brush. Each brush comes with three strengths 1 - 3. The Fog Brushes apply a lightening blur effect, similar to shooting with a fog filter over the lens, so highlights attain a soft glow. The Diffusion Brushes apply a darkening blur, similar to applying diffusion over an enlarger lens when making B&W prints, so the shadows expand and you see a “dark glow” around shadows. The Smoothing Brushes apply a gentle low level blur that can be very useful for smoothing skin or other areas of unwanted texture. 22 PhotoKit SHARPENER 1.2.2 User Manual 8-27-04 Weʼve also included three special smoothing brushes for solving specific image problems. The EdgeProtected Smoothing and the Edge-Protected Smooth Noise brushes only apply their effects to non-edge areas of the image, so you can apply the smoothing to large open areas without applying special layer masks to protect the edges. The Edge-Protected Smooth Noise brush has the added benefit of adding back in a low level of soft noise or grain that can help when working on images with higher ISOs. The JPEG Brushes are special effects brushes to help mitigate the noisy magenta-and-green shadow artifacts found with some cameras. Applying the Sharpening and Smoothing Brushes The Sharpening and Smoothing Brushes return a layer with the sharpening effects applied to the pixels of the layer, but hidden by a layer mask. When run, the layer mask is auto-generated, and to reveal the sharpening, you need only paint “white” on the layer mask. way to toggle between White/Black and Black/White is to type the “x” key. This exchanges the foreground and background colors. Warning: When using Layer Masks, if you select and activate a different layer, and then return to the pixel layer with the layer mask, be sure to click on the actual layer mask to target the mask and not the pixel layer. Otherwise, the painting will be applied over your pixels instead of on the mask. You should practice and become familiar with working on layer masks. Sharpening Effects Set The Sharpening Effects Set is a collection of heavy duty effects. They include the three sharpening routines found in the original PhotoKit plug-in, but enhanced by returning a layer set with Light and Dark Contour layers (the original series only returned single layers). The Sharpening Brushes automatically select a large soft brush and set your color swatches to the layer mask default of white/black; however, due to certain limits, we can not automatically reduce either the opacity or the flow of the paintbrush. You, the user, need to actively reduce the overall opacity or flow of the layer masks brush yourself. An easy keyboard method of changing a brushʼs opacity is to simply press a number key after the effect is run. Pressing the 5 key will give you 50% opacity (or flow depending on your brush options); a 3 gives 30%. We suggest using an opacity of between 10%-30% for gentle buildup of effects and a 50% opacity for a quick buildup. Remember, you can always paint away the effect by selecting black as the foreground color, so you can always adjust your final blend very precisely. An easy 23 PhotoKit SHARPENER 1.2.2 User Manual 8-27-04 The Edge Sharpen effects apply sharpening only to simple edges, in three strengths from 1–3. The High Pass Sharpen effects use an Overlay blend mode to enhance edge halos, while the Luminance Sharpen has an additional strength and applies sharpening only to the luminosity of an image. All result in global sharpening over the entire image, but they can be manipulated by adjusting the default 66% layer opacities, or by adding your own layer masks. The two additional effects included in the Sharpening Effects are Super Sharpener and Super Grain in varying strengths and, in the case of the grains, various sizes of grain. The Super Sharpeners are special purpose tools— use them with caution. If your image is already sharp, these effects may indeed vastly oversharpen those areas in your image. But the Super Sharpeners can actually create textural detail where none was visible before. In general, you should use these effects at the default opacity of 50% or less. Also, be sure you examine sharp-edged areas of your image and either add a layer mask to locally reduce the opacities or use the eraser tool to eliminate those areas in your image that break. The Super Grain effects add a digital replication of photographic film grain while sharpening an image. These grain effects can be usefully applied over retouching to help integrate the overall textural appearance, and hide irregularities. Adding a low level of photographic grain to digital captures can also make the capture look more “film-like”. As with all of the Creative Sharpeners, you should use judgement and self-discipline to resist over-applying these effects. Remember, while the image is still in layer form, you can exercise enormous control over the flavor and strength of sharpening or smoothing, but once itʼs flattened, you canʼt undo the effects. Also remember to leave some headroom for the final stage of the sharpening workflow, the Output Sharpeners, which will handle destination-specific sharpening requirements. Output Sharpeners The Output Sharpeners are designed to apply to images that have already had Capture and Creative Sharpeners applied, and have been resized to final output dimensions. They add the final snap to images that are almost ready for output. To make life easier, the Output Sharpener sets for print show you the current image size and resolution, using the units youʼve chosen in Photoshopʼs Rulers and Units preference (if your rulers are set to pixels, PhotoKit SHARPENER shows you the current pixel dimensions, and the resolution in pixels per inch). The Web and Multimedia Output Sharpeners simply show the pixel dimensions, because thatʼs all they care about. The Output Sharpeners for print display the current image size and resolution. The Web and Multimedia Sharpeners display the current image pixel dimensions. 24 PhotoKit SHARPENER 1.2.2 User Manual 8-27-04 Applying Output Sharpeners We recommend applying Output Sharpeners as the final step before color space conversion from working RGB to an RGB or CMYK output color space. In the majority of cases, you should be able to take your image—sharpened with Capture and Creative Sharpeners—simply resize it to the required output resolution, then apply the Output Sharpener. If the resizing is extreme—more than 50%—you may want to perform the resizing in increments, but you generally shouldnʼt have to apply any additional sharpening before running the Output Sharpener. Like the Capture Sharpeners, the Output Sharpeners return a Layer Set containing a Light Contour sharpening layer and a Dark Contour sharpening layer. However, with the exception of the Halftone Output Sharpeners, the default opacity of the output sharpening layers is 50%, so you have somewhat more freedom to increase or decrease the sharpening effect. The default settings should provide good results: the extra headroom lets you tailor the effect for specific output conditions or for image-specific concerns. The Output Sharpeners are divided into four sets, to address four different types of output: Contone Output Sharpeners, Halftone Output Sharpeners, Inkjet Output Sharpeners, and Web and Multimedia Output Sharpeners. Selecting a Contone Output Sharpener The Contone Output Sharpeners are designed for final output sharpening of images destined for continuoustone printing processes such as dye-sublimation and photographic printers. The effects are organized by resolution, in pixels per inch, at final output size. For best results, we recommend resampling images to the specific pixel resolution, but if itʼs only slightly off— 308 ppi for a 300-ppi device, for example, itʼs probably OK to apply the 300-ppi sharpening and send the file without resampling. Simply choose the closest Output Sharpener to the fileʼs actual resolution. Contone 80: This very low resolution is typically used for creating very large prints on devices such as the Durst Lambda or the Cymbolics/Gretag LightJet photographic printers. Contone 150: This resolution is usually used as the low-resolution option on 300-ppi printers. Contone 200: This resolution is usually used as the low-resolution option on 400-ppi printers. Contone 267: This is the low-resolution setting for the Fuji Pictrography 3500. 25 PhotoKit SHARPENER 1.2.2 User Manual 8-27-04 Contone 300: This setting is for files sent to 300ppi printers at true 300-ppi resolution. (Most dyesublimation printers and many models of the LightJet have a native resolution of 300 ppi.) Contone 400: This setting is for files sent to 400ppi printers at true 400-ppi resolution. (The Fuji Pictrography 3500 and the Durst Lambda, for example, are 400-ppi printers. Post-Effect Controls After youʼve run the effect, PhotoKit returns a Layer Set, named for the Contone Output Sharpener, that contains a Light Contour and a Dark Contour layer, both at a default opacity of 50%. This allows for substantial tweaking of the sharpening effect after it has been applied. Layer Opacity: You can vary the strength of the effect by adjusting layer opacities using the Opacity slider in the Layers palette. The Sharpening Layer Set always appears with 100% opacity. You can reduce the strength of the sharpening by lowering the opacity of the layer set. The individual Light and Dark Contour layers for Contone Output Sharpeners always appear with a default opacity of 50%, so you can increase or decrease the strength of the Light and Dark Contours independently by varying the respective layer opacities. The adjustments are designed to address two issues—variations between the apparent sharpness of the image on different papers, and image-specific concerns such as apparent tone shifts caused by sharpening. Matte papers can typically tolerate a little more sharpening than glossy ones. If you find that thatʼs the case, you can adjust the opacity of the Light and Dark Contours equally to produce the desired degree of sharpening. You can address apparent tone shifts by adjusting the opacity of the Light and Dark Contours independently to achieve the desired result. While itʼs possible to add a Layer Mask to an Output Sharpener and apply the effect selectively, we strongly advise against doing so, because the result will almost always look unnatural. Itʼs much better to address any localized sharpening concerns using the Capture and Creative Sharpeners, and apply the Output Sharpener globally. 26 PhotoKit SHARPENER 1.2.2 User Manual 8-27-04 Selecting a Halftone Output Sharpener The Halftone Output Sharpeners are designed for final output sharpening of images destined for output processes that use a conventional halftone rosette, such as the majority of printing presses as well as dot-based digital proofing systems such as the Kodak Approval. In addition, some color laser printers, and some inkjet printers driven by RIPs, use conventional halftone rosettes. The key parameters for halftone output sharpening are: coated or uncoated paper stock; the frequency of the line screen, expressed in lines per inch (lpi); and the pixel resolution at final output size in pixels per inch (ppi). Uncoated papers generally benefit from a slightly stronger sharpen than coated ones, while the interaction between pixels and halftone dots, which is dictated by the Quality Factor—the relationship between pixel resolution and screen frequency—is key to sharpening the pixels to produce the desired halftone dots. The Halftone Output Sharpeners are organized by screen frequency (lpi), coated vs uncoated stock, and resolution in ppi. For each supported screen frequency, we offer a set that corresponds to a Quality Factor of 2—a resolution of double the line screen—which is typically used for premium work, and a Quality Factor of 1.5—a resolution of 1.5 times the line screen—which is often used to save storage space and transmission time on less-critical work. We donʼt recommend using a Quality Factor of less than 1.5 for halftone output. We recommend using a Quality Factor of 2 when the image contains fine diagonal lines or contains many important small details, but a Quality Factor of 1.5 is sufficient for most work. If figuring out what 1.5 times the line screen is for a 133-line screen makes your brain hurt, note that weʼve done the math for you. For each line screen, the lower ppi value corresponds to a Quality Factor of 1.5, and the higher one corresponds to a Quality Factor of 2. 85-lpi Coated 127.5 ppi: For images printed with an 85 lpi screen on coated stock at a Quality Factor of 1.5. This combination is rare—coated stocks are generally printed at a higher line screen—but if you do print to coated stock at 85 lpi, youʼll get better results using a Quality Factor of 2, so this setting is recommended only when you donʼt have enough resolution for a Quality Factor of 2. 85-lpi Uncoated 127.5 ppi: For typical newspaper printing with a Quality Factor of 1.5. 85-lpi Coated 170 ppi: Again, its rare to print an 85-lpi screen on coated stock, but if you do, using a Quality Factor of 2 and applying this sharpener will produce the best possible results. 85-lpi Uncoated 170 ppi: For high-quality newspaper printing with a Quality Factor of 2. 27 PhotoKit SHARPENER 1.2.2 User Manual 8-27-04 120-lpi Coated 180 ppi: For typical flyer and “blowaway” card work on coated stock with a Quality Factor of 1.5. 150-lpi Uncoated 225 ppi: For high-quality offset print on uncoated stock with a Quality Factor of 1.5. 120-lpi Uncoated 180 ppi: For typical newspaper advertising inserts with a Quality Factor of 1.5. 150-lpi Coated 300 ppi: For high-quality offset print on coated stock, such as trade magazine covers, with a Quality Factor of 2. 120-lpi Coated 240 ppi: For high-quality flyers and bulk mailers on coated stock with a Quality Factor of 2. 120-lpi Uncoated 240 ppi: For high-quality newspaper advertising inserts with a Quality Factor of 2. 133-lpi Coated 199.5 ppi: For trade magazines, midrange books, and other materials printed at 133 lpi on coated stock with a Quality Factor of 1.5. 133-lpi Uncoated 199.5 ppi: For trade magazines, mid-range books, and other materials printed at 133 lpi on uncoated stock with a Quality Factor of 1.5. 133-lpi Coated 266 ppi: For trade magazines, midrange books, and other materials printed at 133 lpi on coated stock with a Quality Factor of 2. 133-lpi Uncoated 266 ppi: For trade magazines, midrange books, and other materials printed at 133 lpi on uncoated stock with a Quality Factor of 2. 150-lpi Coated 225 ppi: For high-quality offset print on coated stock with a Quality Factor of 1.5. 150-lpi Uncoated 300 ppi: For high-quality offset print on uncoated stock with a Quality Factor of 2. 175-lpi Coated 262.5 ppi: For premium printing on Coated stock, such as high-quality magazine covers or coffee-table books, with a Quality Factor of 1.5. 175-lpi Uncoated 262.5 ppi: For premium printing on uncoated stock, such as high-quality posters or coffeetable books, with a Quality Factor of 1.5. 175-lpi Coated 350 ppi: For premium printing on Coated stock, such as high-quality magazine covers or coffee-table books, with a Quality Factor of 2. 175-lpi Uncoated 350 ppi: For premium printing on uncoated stock, such as high-quality posters or coffeetable books, with a Quality Factor of 2. Post-Effect Controls After youʼve run the effect, PhotoKit returns a Layer Set, named for the Halftone Output Sharpener, that contains a Light Contour and a Dark Contour layer, both at a default opacity of 66%. This allows for substantial tweaking of the sharpening effect after it has been applied. 28 PhotoKit SHARPENER 1.2.2 User Manual 8-27-04 Layer Opacity: You can vary the strength of the effect by adjusting layer opacities using the Opacity slider in the Layers palette. The Sharpening Layer Set always appears with 100% opacity. You can reduce the strength of the sharpening by lowering the opacity of the layer set. The individual Light and Dark Contour layers for Halftone Output Sharpeners always appear with a default opacity of 66%, so you can increase or decrease the strength of the Light and Dark Contours by varying the respective layer opacities. You can address apparent tone shifts by adjusting the opacity of the Light and Dark Contours independently to achieve the desired result. While itʼs possible to add a Layer Mask to an Output Sharpener and apply the effect selectively, we strongly advise against doing so, because the result will almost always look unnatural. Itʼs much better to address any localized sharpening concerns using the Capture and Creative Sharpeners, and apply the Output Sharpener globally. Selecting an Inkjet Output Sharpener The Inkjet Output Sharpeners are organized by output resolution and paper type—glossy vs matte. The matte effects apply slightly stronger sharpening than the glossy effects. Our experience suggests that luster and semigloss papers behave more like glossy than matte, but itʼs a good idea to run some tests on any specific paper you use a lot. As with the other Output Sharpeners, the Inkjet Output Sharpeners allow for considerable post-effect tweaking to optimize for a specific paper stock. Inkjet 180 Glossy: Designed for making very large inkjet prints on glossy papers where you donʼt have enough pixels to print at a higher resolution. Inkjet 180 Matte: Designed for making very large inkjet prints on matte papers where you donʼt have enough pixels to print at a higher resolution. Inkjet 240 Glossy: Designed for inkjet printing on glossy papers at moderate resolution. 29 PhotoKit SHARPENER 1.2.2 User Manual 8-27-04 Inkjet 240 Matte: Designed for inkjet printing on matte papers at moderate resolution. Inkjet 300 Glossy: Designed for inkjet printing on glossy papers from files that are already at the ubiquitous 300 ppi resolution. Inkjet 300 Matte: Designed for inkjet printing on matte papers from files that are already at the ubiquitous 300 ppi resolution. contains a Light Contour and a Dark Contour layer, both at a default opacity of 50%. This allows for substantial tweaking of the sharpening effect after it has been applied. Layer Opacity: You can vary the strength of the effect by adjusting layer opacities using the Opacity slider in the Layers palette. The Sharpening Layer Set always appears with 100% opacity. You can reduce the strength of the sharpening by lowering the opacity of the layer set. Inkjet 360 Glossy: Designed for ʻnormalʼ highresolution inkjet printing on glossy papers. Inkjet 360 Matte: Designed for ʻnormalʼ highresolution inkjet printing on matte papers. Inkjet 480 Glossy: Designed for super-high-resolution inkjet printing on glossy papers. Inkjet 480 Glossy Fine: Designed for super-highresolution inkjet printing on glossy papers using the printerʼs highest resolution. This effect is optimized for Epson printers printing on glossy papers at the printersʼ 2880 dpi setting. On other papers, we found no benefit to creating a special sharpener, and very little difference (except in speed) between 1440 dpi and 2880 dpi. Inkjet 480 Matte: Designed for super-high-resolution inkjet printing on matte papers. Post-Effect Controls After youʼve run the effect, PhotoKit returns a Layer Set, named for the Inkjet Output Sharpener, that The individual Light and Dark Contour layers for Inkjet Output Sharpeners always appear with a default opacity of 50%, so you can increase or decrease the strength of the Light and Dark Contours by varying the respective layer opacities. The adjustments are designed to address two issues, variations between the apparent sharpness on different papers, and image-specific concerns such as apparent tone shifts caused by sharpening. 30 PhotoKit SHARPENER 1.2.2 User Manual 8-27-04 Matte papers typically tolerate more sharpening than glossy ones, while Luster and Semigloss papers fall somewhere inbetween. You can adjust the opacity of the Light and Dark Contours equally to produce the desired degree of sharpening for different paper stocks. You can address apparent tone shifts by adjusting the opacity of the Light and Dark Contours independently to achieve the desired result. While itʼs possible to add a Layer Mask to an Output Sharpener and apply the effect selectively, we strongly advise against doing so, because the result will almost always look unnatural. Itʼs much better to address any localized sharpening concerns using the Capture and Creative Sharpeners, then apply the Output Sharpener globally. Selecting a Web and Multimedia Output Sharpener The Web and Multimedia Output Sharpeners are designed to apply a final sharpening to images destined for on-screen viewing on the Internet, on CD-ROM, on multimedia kiosks, or for any other situation where the monitor is the final output. The Web and Multimedia Output Sharpeners resemble the Capture Sharpeners more than they do the other Output Sharpeners in that they are organized in terms of pixel dimensions and SuperFine, Narrow, Medium, or Wide Edges. The pixel dimension refers to the width of the image in pixels. The criteria for choosing SuperFine, Narrow, Medium, and Wide Edge Sharpen are the same as for the Capture Sharpeners. In the vast majority of cases, youʼll want to use the same choice of edge width on both Capture and Web and Multimedia Output Sharpeners. Note: The Output Sharpeners for print processes— Contone, Halftone, and Inkjet—are likely to produce results that appear quite ugly on screen when viewed at zoom levels of Actual Pixels or higher. They will, however, produce excellent results in the final print. Bear in mind that, depending on the print process and the pixel density, it may take up to four pixels to produce a single dot of ink, so the Actual Pixels view can be very misleading. You can get a better idea of the final appearance by viewing the image at 50% or even 25% view (avoid the “odd” zoom percentages such as 66.7% and 33.3% because Photoshop applies heavy antialising to those views), but the only way to really see the result is by viewing the final print. 31 PhotoKit SHARPENER 1.2.2 User Manual 8-27-04 1024-pixel Narrow, Medium, Wide Edge Sharpen: For 1024-pixel wide images. PhotoKit SHARPENER Workflow for Photoshop 6 and 7 800-pixel Narrow, Medium, Wide Edge Sharpen: For 800-pixel wide images. PhotoKit SHARPENER allows many different workflows, but they all share the following common characteristics: 600-pixel Narrow, Medium, Wide Edge Sharpen: For 600-pixel wide images. 400-pixel Narrow, Medium, Wide Edge Sharpen: For 400-pixel wide images. 250-pixel Narrow, Medium, Wide Edge Sharpen: For 250-pixel wide images. 100-pixel Narrow, Medium, Wide Edge Sharpen: Yes, even thumbnails can benefit from some sharpening! Note: this effect is only available in Photoshop 7 (Photoshop 6 doesnʼt support the required blending modes). Capture Sharpening is applied shortly after conversion to 8 bits/channel Creative Sharpening, when used, is applied after Capture Sharpening and before Output Sharpening. Output Sharpening is always applied at final output resolution, and is only intended for one specific output process. Aside from these very general guidelines, there are no hard-and-fast rules. PhotoKit SHARPENER lends itself equally well to automated workflows that use batch processes and to labor-of-love, handworkintensive workflows that require human intervention at every stage of the process. you can download some detailed sample workflows at www.pixelgenius.com/ sharpener/workflows. What follows is a general overview of the sharpening workflow. If possible, make any major necessary corrections to tone and color on high-bit (more than 8-bits/ channel) data, either by editing in the scanner or capture software, or by importing the image into Photoshop as a 16-bit/channel file. (If you shoot JPEG, youʼre limited to 8 bits per channel, so you can apply the Capture Sharpener immediately if you wish. 32 PhotoKit SHARPENER 1.2.2 User Manual 8-27-04 Choose a Capture Sharpener, based on the image source, the amount of noise, and the characteristics of the edges—Narrow, Medium, Wide—that you want to emphasize. Apply the Capture Sharpener. Address any localized sharpening issues—for example, add extra sharpness to eyes using a Sharpening Brush, or reduce skin texture using a Smoothing Brush. If you intend to repurpose the image for multiple outputs, save this version as an archive file—it will serve as the “master” for the versions for different outputs. Resize the image to final output size. Apply the appropriate Output Sharpener. Note that you can build multiple output sharpeners into the same file, as long as the resolution requirements are the same for each output process. For example, a 300-ppi image may contain output sharpening for 300-ppi inkjet print on matte, 300-ppi inkjet print on glossy, 300-ppi continuous-tone, and 150-lpi halftone. Just remember to turn off any existing output sharpening before adding a new output sharpen, and remember to turn on the appropriate output sharpen when creating a print file. If you prefer an automated workflow, you can edit your workflow actions to call a Capture Sharpener as soon as the image is in 8-bit/channel mode, and an Output Sharpener as soon as the image has been resized to final output dimensions. 33 PhotoKit SHARPENER 1.2.2 User Manual 8-27-04 Sharpener Workflow for Photoshop CS (16-bit Workflow) Photoshop CS supports layers in 16-bit/channel mode, and hence allows PhotoKit SHARPENER 1.1 to operate on high-bit images. While SHARPENERʼs functionality is otherwise unchanged, high-bit operation changes our workflow recommendations for Capture Sharpening as follows: question of when to merge or downsample is largely a matter of personal preference and the capability of your hardware. Itʼs generally true that youʼll get better results working in high-bit mode than in 8-bit mode, but after the big initial edits, the advantages get smaller. SHARPENER and High-bit Scans The file size limit in Photoshop CS is 4 gigabytes, but files that size tax current hardware (and often, the user of said hardware) to its limits. We all have different pain points, so we recommend staying in high-bit mode until it starts to hurt. Our recommended workflow for high-bit scanned images is: Open or Acquire the high-bit image in Photoshop CS. Before carrying out any other operations, apply the appropriate Capture Sharpener. Apply at least your major tone and color corrections in 16-bit/channel mode prior to downsampling to 8 bits per channel. Doing so produces sharpening that allows a wider range of subsequent tonal and color adjustments than is the case when sharpening is applied to an alreadycorrected image, as we recommend in our 8-bit/channel workflow. We always recommend performing major tone and color correction on high-bit images rather than 8-bit/ channel ones. Whatʼs changed is that we can now apply sharpening in high-bit mode before applying the tone and color corrections. After sharpening and major corrections, you may wish to either merge some layers or downsample to 8 bits per channel to avoid working with huge files. The SHARPENER and Adobe Camera Raw (ACR) Our recommended workflow for images acquired through ACR is: Adjust Color Temperature, Tint, and Exposure in ACR, Optionally, make other adjustments in ACRʼs Adjust panel (Color Temperature, Tint, and Exposure are the only adjustments that cannot be replicated in Photoshop, so they must be done in ACR. The other adjustments may be performed wherever itʼs more convenient for you to do so.) In the Detail panel, set Sharpness to a low value— we recommend a default of 0, and in no case do we recommend a value higher than 10. Adjust Luminance Smoothing and Color Noise Rreduction to taste. If you need to make adjustments in the Lens or Calibrate panels, do so. 34 PhotoKit SHARPENER 1.2.2 User Manual 8-27-04 Acquire the image in 16-bit/channel mode, at the cameraʼs native resolution (i.e., with no upsizing or downsizing). In Photoshop, apply the appropriate Capture Sharpener. If resizing is desired, resize the Capture-sharpened file using Bicubic Smoother to upsample, or Bicubic Sharper to downsample. As with scanned images, digital captures will generally produce better results when edited in high-bit mode, and since the files are typically smaller than scans, you may not hit the pain point quite as soon as you would with scans. The operations listed above are the ones we strongly recommend performing on the image in high-bit mode. After that, we recommend staying in high-bit mode “until it hurts.” 35 PhotoKit SHARPENER 1.2.2 User Manual 8-27-04 We hope that PhotoKit SHARPENER will be a useful addition to your digital workflow. We welcome feedback and input. Towards that end, weʼve created a Yahoo Groups email list. You can join the email list by sending an email to: [email protected] The PhotoKit Users Group home page is: http://groups.yahoo.com/group/PhotoKit/ For a set of sample workflow tutorials, please visit: http://www.pixelgenius.com/sharpener/workflows.html The PhotoKit SHARPENER product page is at:http://www.pixelgenius.com/sharpener For answers to frequently-asked questions, visit: http://www.pixelgenius.com/sharpener/PhotoKit-Sharpener-FAQ.html If you have questions about your order or purchase transaction, please email: [email protected] and put SHARPENER in the subject line. If you have technical questions regarding installation or use of PhotoKit SHARPENER, please send an email to: [email protected] and put SHARPENER in the subject line. Pixel Genius will be working on an entire suite of PhotoKit versions including color correction, B&W toning and others. You can check for updates at any time by clicking on the Update button of the PhotoKit SHARPENER dialog box, or by visiting http://pixelgenius.com/updates.html P IXEL G ENIUS Version 1.2 Plug-in © 2004 by Pixel Genius, LLC - All rights Reserved. Product Design: Martin Evening, Bruce Fraser, Seth Resnick, Andrew Rodney and Jeff Schewe Engineering Design: Mike Skurski Engineering: Pixel Genius, LLC & Mike Skurski http://www.pixelgenius.com [email protected] 36