1
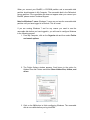
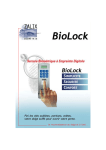
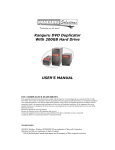
Kanguru BioAES™
User Manual
User Manual v1.0
Copyright Kanguru Solutions - 2008
Kanguru BioAES – User Guide
Table of Contents
Table of Contents .................................................................................................. 1
1.
Notices and Warranty Information............................................................... 2
2.
Introduction ................................................................................................... 3
3.
Kanguru BioAES Drive .................................................................................3
4.
Features ......................................................................................................... 4
5.
Specifications ................................................................................................ 5
6.
Package Contents ......................................................................................... 6
7.
System Requirements ..................................................................................7
8.
Installation ..................................................................................................... 7
9.
Getting Started .............................................................................................. 8
5.1
Starting Kanguru BioLock ....................................................................... 8
9.2.1.
Setup Wizard ............................................................................. 10
9.2.2.
Setting up a password ............................................................... 10
9.2.3.
Fingerprint Registration ............................................................. 12
10. Working with Kanguru BioLock Software................................................. 15
10.1. Encrypting files and folders ................................................................... 17
10.2. Security settings ................................................................................... 19
10.2.1. Password Settings ..................................................................... 20
10.2.2. Fingerprint Settings ................................................................... 20
11. Safely remove hardware ............................................................................. 21
12. Tech Support ............................................................................................... 21
1
1. Notices and Warranty Information
Please be aware of the following points before using the Kanguru BioAES
Copyright© 2008, Kanguru Solutions. All rights reserved.
DOS®, Windows 95®, Windows 98®, Windows NT®, Windows 2000®, Windows ME®, Windows XP®,
®
®
®
and Windows Vista are registered trademarks of Microsoft Inc. Apple and Macintosh are registered
trademarks of Apple Computer Inc. IBM and OS/2 are registered trademarks of the International
Business Machines Corporation. All other brand or product names are trademarks of their respective
companies or organizations.
Kanguru Solutions will not be held responsible for any illegal use of this product nor any losses
incurred while using this product. The user himself is responsible for the copyright laws, and is fully
responsible for any illegal actions taken.
EXPORT LAW COMPLIANCE
Regardless of any disclosure made to Kanguru Solutions pertaining to the ultimate destination of the
specific Kanguru product, you warrant that you will not export, directly or indirectly, any Kanguru
Product without first obtaining the approval of Kanguru Solutions and the appropriate export license
from the Department of Commerce or other agency of the United States Government. Kanguru has a
wide range of products and each product family has different license requirements relative to exports.
CUSTOMER SERVICE
To obtain service or technical support for your system, please contact Kanguru Solutions Technical
Support Department at 508-376-4245, or visit www.Kanguru.com for web support.
LIMITED WARRANTY
Kanguru Solutions guarantees that every Kanguru BioAES will be free from defects in workmanship
and materials for 3 year from the date of purchase. This product carries a *3 year limited warranty on
all internal components. The warranty does not cover any USB cables, or other devices used in
conjunction with the Kanguru BioAES. This warranty does not apply if, in the judgment of Kanguru
Solutions, the product fails due to damage from handling, accident, abuse, misuse, or if it has been
used in a manner not conforming to the product’s instructions, has been modified in anyway, or the
warranty labels have been removed. If the product proves defective during this warranty period, call
Kanguru Solutions Technical Support in order to obtain a RMA required for service. When returning a
product, mark the RMA number clearly on the outside of the package, and include a copy of your
original proof of purchase.
In no event shall Kanguru Solutions’ liability exceed the price paid for the product from direct, indirect,
special, incidental, or consequential software, or its documentation. Kanguru Solutions offers no
refunds for its products. Kanguru Solutions makes no warranty or representation, expressed, implied,
or statutory, with respect to its products or the contents or use of this documentation and all
accompanying software, and specifically disclaims its quality, performance, merchantability, or fitness
for any particular purpose. Kanguru Solutions reserves the right to revise or update its products,
software, or documentation without obligation to notify any individual or entity.
Kanguru Solutions
1360 Main St., Millis, MA 02054
P: 508.376.4245 • F: 508.376.4462
www.kanguru.com
2
2. Introduction
The Kanguru BioAES™ is a biometric 256-bit AES encrypted USB flash drive. It
helps keep sensitive data secure and available wherever you may be.
With the Kanguru BioAES drive you can:
•
Copy & encrypt your data using AES 256 Bit encryption.
•
Secure all the data by using fingerprint and password protection.
Warning
While using Kanguru BioAES, you should never disconnect the USB drive
without closing Kanguru BioLock interface properly first. Do this via the exit
button and then use the “Safely Remove Hardware” option in Windows (see
description within this manual).
3. Kanguru BioAES Drive
The Kanguru BioAES is a compact biometric 256-bit AES encrypted USB flash drive.
Two-factor authentication makes it one of the most secure ways to transport your
data. The Kanguru BioAES uses a biometric sensor that will recognize up to 10
fingerprints or thumbprints and only after an authorized fingerprint is confirmed and
the correct password is entered can a user access the confidential information.
3
The Kanguru BioAES, although sophisticated in design and technology, is very easy
to use. The Bio AES comes with a user friendly setup wizard that walks you through
the password setup and fingerprint scanning process. As an added benefit, all saved
passwords, fingerprints, as well as the security program itself are stored directly on
the drive. It can be used with most Windows platforms and you never have to install
anything to use it meaning no administrator privileges are required!
4. Features
•
High capacity internal storage
•
Simple drag and drop 256bit AES data encryption
•
Store up to 10 fingerprints
•
Administrator privileges on the PC not necessary; works with any user level
privileges.
•
Application runs entirely from the Bio AES, you never have to install any software
•
Device is preloaded and ready to go out of the box
•
Two factor (Password + Fingerprint) strong authentication
•
High Speed USB2.0 Interface
•
Top grade fingerprint sensor-500 DPI
•
Windows 2000/XP/Vista/7 compatible
•
Custom printing available
4
5. Specifications
General
Model Number
AES-SB-MD Series
Interface
USB 2.0
Capacities
1GB1 thru 16G2
Reading Speed
10MB/sec
Writing Speed
5MB/sec
Memory Type
Solid State Portable Storage (NAND Flash Memory)
Encryption
256 Bit AES
Fingerprint Capacity
Store up to 10 fingerprints
Fingerprint Sensor
Capacitive Slide Sensor
Sensor Resolution
500 DPI
Field Size
192 x 16 Pixels
Gray Level
265 levels (8 bits/pixel)
False Rejection Rate
1/1000
False Acceptance Rate 1/1,000,000
Allowable Rotation
+/-15º
Scanning Speed
1 sec
Matching Speed
<10ms
Write Cycles
1,000,000
Data Retention
10 yrs
OS Compatibility
- Windows 2000
- Windows XP
- Windows Vista
- Windows 7
5
Size
Weight
19g
Dimensions
85mm x 27mm x 13mm
Power
Operating Current
<120mA
1
Kanguru Solutions defines a megabyte (MB) as 1,000,000 bytes and
2
a gigabyte (GB) as 1,000,000,000 bytes
6. Package Contents
•
Kanguru BioAES USB storage device
•
USB Extension Cable
•
Neck Strap
•
Quick Start Guide
•
Registration Information
6
7. System Requirements
Operating System:
o Windows 2000 Service Pack 4
o Windows XP Service Pack 2
o Windows Vista
o Windows 7
1 Available USB port (USB 2.0 Recommended)
256MB of internal DDR RAM or more better
500MHz internal CPU or faster
8. Installation
The Kanguru BioAES is pre-installed with Kanguru BioLock software, which is
necessary for encrypting your files. No installation is needed on your PC.
Administrator privileges are also not necessary.
When connecting your Kanguru BioAES drive, the Kanguru BioLock application
should start itself automatically.
To start the Kanguru BioLock manually, you can start the ‘BioLockLauncher.exe’
file from your Kanguru BioAES device’s CD-ROM partition by double clicking on the
file. Alternatively, you can simply double click on the CD-ROM partition icon in My
Computer to launch the BioLock application.
7
9. Getting Started
5.1
Starting Kanguru BioLock
Manually opening the BioLockLauncher.exe application is only required if the
application does not auto run.
To start using your Kanguru BioAES, plug in the device to an available USB port and
open My Computer or Windows Explorer.
Open the Kanguru BioAES’s ‘CD-ROM drive partition’ with the drive letter (E: drive as
pictured below) depending on your computer. Double-click on the
‘BioLockLauncher.exe’ file to start the application manually.
The BioLockLauncher.exe file will remain on the Kanguru BioAES CD-ROM
partition so you can use the application when you switch between different
computers without any difficulty. Please always run the application directly from
the CD-ROM partition of your Bio AES and not from the hard disk on your
desktop/laptop.
8
When you connect your BioAES, a CD-ROM partition and a removable disk
partition should appear in My Computer. The removable disk is the Defender’s
secure partition. If the removable disk does not appear when you connect your
BioAES, please contact Technical Support.
Note for Windows 7 users: Windows 7 users may not see the removable disk
partition until you have logged in to BioLock. This is normal.
If you are running Windows 7 and for any reason you need to see the
removable disk before you have logged in, you will need to configure Windows
in the following manner:
1. From My Computer, click on the Organize tab and then select Folder
and search options.
2. The Folder Options window appears. Scroll down to the option for
Hidden Files and Folders and select Show hidden files, folders, and
drives.
3. Click on the OK button to finish configuring Windows. The removable
disk is now visible before you log into KDM.
9
9.2.1.
Setup Wizard
When plug in your Bio AES initially, you will be greeted by the Setup Wizard.
With the help of the Setup Wizard you will set up a password and fingerprint(s) to
secure your data.
To begin, just follow the simple instructions and you’ll be encrypting your data within
minutes. The grey/blue bar at the bottom of the window above, as well as the list of
steps on the top left both indicates your progress through the setup wizard.
9.2.2.
Setting up a password
The password that you choose must have at least 6 characters. For security reasons,
it is recommended that you incorporate upper and lowercase letters, numbers and
symbols to achieve maximum security.
10
After you have entered your password in both areas, press <Apply>, then click the
<Next> button to continue.
If your passwords do not match or there is any other issue with the password which
you have entered in the Set Password section, an explanation will be visible in the
Password Info Section below.
Note: The Password Info section updates in real time. It may tell you that your
confirmation password is too short or does not match before you have finished retyping the entire password. Please disregard the messages in this Info box until you
are finished completing the Password or Confirm Password fields.
11
9.2.3.
Fingerprint Registration
In order to use your Kanguru BioAES you must register at least one fingerprint. To do
this, select the finger that you want to use by selecting a gray fingertip with your
mouse cursor. Also you can use the number keys to select a finger instead of your
mouse. When the finger is selected, the finger tip will flash dark gray and light gray.
After choosing the finger for registration, you will receive a message asking you to
swipe that finger over the fingerprint sensor. Swipe your finger over the sensor until
you receive a message saying that the fingerprint registration was successfully
completed. For the registration to be valid, you have to enter the same finger at least
three times in a readable way. The Kanguru BioAES can store up to 10 fingerprints.
12
If the registration was successful then the selected finger tip will be highlighted in a
neon green color and you will receive a message in the top right info box noting that
the enrollment was a success.
In order to register your fingerprint in a readable way, please make sure that you
swipe your finger over the fingerprint sensor in the same way (orientation) at least 3
times. The Kanguru BioAES should be lying on a flat surface (connected via the
supplied USB extension cable) so you can swipe your finger aligned to the fingerprint
sensor. Swiping your finger at a too steep angle against the sensor will lead to an
unreadable result. Also, do not apply too much pressure to the sensor and please
make sure that your fingers are dry and clean. It should take you about 1 second to
swipe your finger from the top of the drive to the bottom.
The fingerprint enrollment tutorial shows a visual demonstration of how to register a
fingerprint. To access the fingerprint enrollment tutorial, click the “See fingerprint
enrollment tutorial” button located on the right sign of the ‘Enroll Fingerprint’
screen.
13
After you have successfully registered a fingerprint(s) click <Next>. Now the Kanguru
BioAES will set up your security parameters. Once the security parameters are set,
you will be guided to the final setup screen.
Click <Finish> to complete and close the Setup Wizard. You can cancel setup at any
time. You only have to run the BioLockLauncher.exe again to bring the setup wizard
back and complete setup.
14
10. Working with Kanguru BioLock Software
After completing the Setup Wizard the Kanguru BioLock application will start. For
security reasons, you will first be asked to enter your password and then swipe an
enrolled finger.
To continue, first enter your password and press Login, then swipe an enrolled
finger over the sensor.
Note: if you enter your password incorrectly 7 times in a row, then your data
will be automatically erased for security purposes. On the 6th attempt you will
be warned of this to prevent accidental erasure of data via an onscreen
message.
In the event you have forgotten your password, you can use the <Restore to factory
default> function.
This will reset the device to factory setting;
15
file wiping all saved fingerprints, passwords, and data. The next time you insert your
Kanguru BioAES or run BioLockLauncher.exe the setup wizard will begin.
Warning!
Using the Restore to factory default function will format and wipe all data off
the device! All data on the device will be lost! Please use with caution.
To cancel logon to the secure part of the Kanguru BioAES, simply press the
<Cancel> button. Reinserting your Kanguru BioAES or manually running
BioLockLauncher.exe will bring this logon window back.
16
10.1. Encrypting files and folders
A key feature of the Kanguru BioAES is Drag & Drop functionality, allowing you to
simply drag files that you wish encrypt with high level 256bit AES onto the BioLock
interface window. Kanguru BioLock automatically encrypts these files, ensuring that
your data stays safe and private.
You can see the status of file encryption/decryption with the help of the progress bar.
When the bar reaches the end, your files have been copied and encrypted.
17
Navigating through your encrypted files is just like using Windows Explorer. Clicking
on an item with the right mouse button will give you access to options such as
“Refresh”, “Copy” and “Delete”. Double clicking with the left mouse button will allow
you to open a file with its default handling application.
Note: before dismounting your secure drive and/or unplugging the Bio AES,
you must save and close any applications accessing files on your secure drive.
Failure to do so could result in loss of data or windows errors.
After the secure drive is unlocked, the BioLock interface appears to allow copying
and encrypting/decrypting of files. Copying files from your hard drive to the Kanguru
BioAES through Windows Explorer is not recommended! If you happen to do this
accidentally, then your files will be encrypted automatically regardless. You will notice
that the files you have copied via Windows Explorer have disappeared from the drive.
This is because Kanguru BioLock automatically encrypted and moved your files into
encrypted folders. You can now find these files using the BioLock interface.
18
We recommend copying files to your Bio AES by using the BioLock interface only.
Either utilize the Drag & Drop feature, or the shortcut keys for copying and pasting,
Ctrl+C and Ctrl+V. The commands Right Click Copy and Right Click Paste
are also allowed.
In the toolbar area of Kanguru BioLock you can find additional icons that you can
also use to copy and encrypt your files. This toolbar is shown below.
Note: These files are saved on the private partition of your biometric portable storage
device and they are only accessible when the Kanguru BioLock interface is running.
When you exit the BioLock interface, the secure partition of the Bio AES, labeled
“Kanguru Bio” will revert back to the public partition and all encrypted files on the
Kanguru BioAES will not be accessible.
To exit Kanguru BioLock application, select the File menu and choose Exit, or simply
click the “X” button in the upper-right corner of the BioLock application window.
Do not disconnect the Kanguru BioAES without properly exiting the Kanguru BioLock
application. Doing so may result in file damage or corruption.
10.2. Security settings
The security settings can be modified from within Kanguru BioLock. After logging in,
you can modify you password and add or remove fingerprints. You can access the
security settings menu by selecting Options Security Settings from the toolbar
menu or by pressing the hotkey Ctrl + O.
19
10.2.1. Password Settings
To change your password, first enter your current password in the box labeled Old
Password, then enter the new password you wish to use in the New Password box.
Finally, confirm this new password once more and once all three fields are completed
appropriately, click the <Apply> button. A pop up window will notify you that the
password change was performed successfully.
10.2.2. Fingerprint Settings
To add a new fingerprint, click the finger you wish to add or type the number that
corresponds to the finger you wish to add. The finger tip will blink gray when
selected.
Once the finger you wish to add is selected, slide the correct fingerprint across the
sensor. In order to enroll the fingerprint correctly, you will be required to slide the
finger top across the Kanguru BioAES sensor a minimum of 3 times. If you have
trouble, please press the See fingerprint enrollment tutorial button to view a quick
tutorial on how to enroll a fingerprint.
To delete a fingerprint record, simply click the tip of the finger that you wish to delete
or press the corresponding number key. These fingers should have a green fingernail
tip. When prompted if you are sure you wish to delete, click YES.
20
11. Safely remove hardware
Before you unplug your Kanguru BioAES from the USB port of your computer, you
should use the “Safely Remove Hardware” option from the system tray, otherwise
you risk corrupting the data on your Kanguru BioAES Drive.
To Safely Remove Hardware, left click on the system tray icon, and then select the
Drive you want to remove from the list.
Windows XP/2000:
Windows Vista:
A message will appear indicating that the portable storage device can now be
securely removed. If a message saying “The device cannot be stopped right now”
appears, please make sure any Windows Explorer windows or applications
accessing files on the Bio AES are closed. Then try again.
12. Tech Support
If you experience any problems installing your Kanguru BioAES or have any
technical questions regarding any of our products, please call our tech support
department. Our tech support is free and available Monday thru Friday, 9am to
5pm EST.
Call 1-508-376-4245 or
visit our website at www.Kanguru.com
21