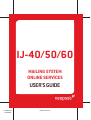
1
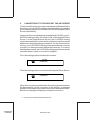
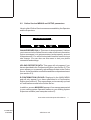
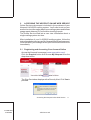
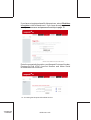
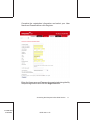
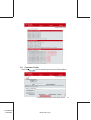
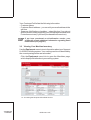
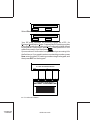
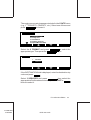
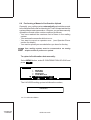
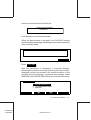
TABLE OF CONTENTS
1.
2.
SERVICES OFFERED BY THE NEOPOST ONLINE SERVICES SERVER ......................................................................... 3
CONNECTIONS TO THE NEOPOST ONLINE SERVER ... 4
2.1 Manually Connecting to the Server ............................ 5
2.2 Online Service MENUS and SETUP parameters ...... 7
3.
ACCESSING THE NEOPOST ONLINE WEB SERVICE ...... 9
3.1 Registering and Accessing Your Account Online ....... 9
3.2 Customer Profile .................................................... 13
3.3 Viewing Your Machine Inventory .............................. 14
4.
STANDARD EDITION ........................................................... 18
4.1 Ink Management Service ........................................ 18
4.2 Rate Protection Service – Downloading a New Rate19
5.
PROFESSIONAL EDITION .................................................. 21
5.1 Uploading Reports Data to the Online Server .......... 21
5.2 Manually Uploading Reports Data ........................... 22
5.3 Department Resets ................................................ 24
6.
E-CONFIRMATION EDITION .............................................. 26
6.1 Customer Profile – E-Confirmation Service ............ 27
6.2 How Your E-Confirmation Service Works ................ 29
6.3 Processing Electronic Confirmations with an
SE Scale ................................................................ 31
6.4 Processing-EConfirmation items using a Weighing
Platform.................................................................. 34
6.5 eConfirmation Errors .............................................. 37
6.6 Performing a Manual eConfirmation Upload ........... 40
7.
TROUBLESHOOTING ........................................................ 43
8.
INDEX ................................................................................... 44
1
4132887Q/A
11/28/2006
ORIG-0021-1/A
Special icons
Signals an essential piece of information that cannot be
missed.
Signals an important issue.
2
4132887Q/A
11/28/2006
ORIG-0021-2/A
1.
SERVICES OFFERED BY THE NEOPOST ONLINE
SERVICES SERVER
Online Services simplify the use of your mailing system, add value
to your mailing operation, and improve the productivity of your
mailroom. Your IJ-40/50/60 mailing machine is engineered to
take full advantage of all the features and capabilities of Online
Services.
Neopost’s Online Services and capabilities include:
- Neopost’s exclusive online reporting – The usage on your
machine is available from your personal, secure web account,
simplifying tracking and reporting on your postage expenses.
- eConfirmation Services – Save money with USPS discounts on
Delivery and Signature Confirmation services, and simplify the
process of sending Certified Mail. Monitor delivery of all of your
tracked mail from your Neopost web account.
- Rate Updates – Maintain current postal rates with automatic,
electronic, convenient downloads into your Neopost mailing
machine. No more memory cards and PROMs at rate change!
- Ink alerts – Never run out of ink again! The Online Server
monitors your mailing machine’s ink supply and e-mails an alert
notification when it’s time to re-order.
- Remote diagnostics and technical support – Experienced
Neopost technical professionals analyze your mailing machine’s
error logs, diagnose your mailing machine before an on-site
service visit and your system software can be updated remotely,
reducing service delays.
Your mailing system connects to Neopost’s Online Server via the
same telephone connection you use to add postage to your meter.
All connections are secure, and all data is maintained under strict
privacy policies.
As a Neopost customer, you have a web account accessible from
the Neopost home page: http://www.neopostinc.com/. At this site
click on "Support" and select "My Neopost". This account provides
information about your mailing system and access to Neopost’s
Online Services. See the Accessing Neopost Online Web Services section for instructions on logging in to your web account.
This user guide will walk you through these Online Services on
your IJ-40/50/60 mailing system.
Services Offered by the Neopost Online Services Server
4132887Q/A
11/28/2006
ORIG-0021-3/A
3
2.
CONNECTIONS TO THE NEOPOST ONLINE SERVER
To fully benefit from the convenience and power of Neopost Online
Services, your IJ-40/50/60 mailing system should be connected to
a live analog telephone line so that it can link to the Neopost Online
Server automatically.
At a pre-set time (usually between midnight and 5:00 AM), your IJ40/50/60 mailing system will initiate a call to the Neopost Online
Server. For the Usage Reports service, the IJ-40/50/60 mailing
system automatically connects at the end of each month to upload
department and postal category statistics. For the eConfirmation
service, your IJ-40/50/60 mailing system automatically connects
at night if you have processed transactions that day. For the Ink
Management service, the IJ-40/50/60 mailing system automatically
connects when it’s time to re-order ink supplies.
First, the mailing system initializes the modem.
DIALING
PLEASE WAIT . . .
Then the mailing system connects to the Neopost Online Server.
TRANSACTION IN PROGRESS
PLEASE WAIT . . .
When the connection is established, the mailing system performs
the data transfer. At the conclusion of the session, a message
displays, indicating the successful connection and data transfer.
Below is a message indicating a successful connection.
4 Connections to the Neopost Online Server
4132887Q/A
11/28/2006
ORIG-0021-4/A
ONLINE S ERVER CALL COM PLETE
CONTINUE
If the call fails, an error message will be displayed (See the
Troubleshooting section for a description of failed connections.)
You can also connect to the Online Server manually. You can
perform a generic Online Server Call, as described below, or you
can perform a specific action, such as a rate download, or usage
report data upload, etc. See the appropriate section for details.
It is strongly recommended that you leave the IJ-40/50/60
mailing system turned on, in sleep mode, and connected
to a live analog telephone line during the night, to let the
connection to the Neopost Online Server occur
automatically.
2.1 Manually Connecting to the Server
To manually connect to the server:
- Go in supervisor mode by pressing SUPERVIS
SUPERVIS
key
USER
- Enter supervisor PIN;
- Select ONLINE SERVICES from the IJ-40/50/60 menu and
press OK .
Connections to the Neopost Online Server
4132887Q/A
11/28/2006
ORIG-0021-5/A
5
SUPERVISOR
1
2
3
4
5
SECURITY & DEPT
REGISTERS
TEXT
LOAD FROM M EMORY CARD
ONLINE SERVICES
ESCAPE
OK
Select the appropriate option from the Online Services menu
and press OK .
ONLINE SERVICES
1
ONLINE SERVER CALL
ESCAPE
OK
The IJ-40/50/60 mailing system initializes the modem, connects
to the server, and performs any pending uploads and/or
downloads. The mailing system then disconnects and displays
any appropriate message.
6 Connections to the Neopost Online Server
4132887Q/A
11/28/2006
ORIG-0021-6/A
2.2 Online Service MENUS and SETUP parameters
Here is a list of Online Services menus accessible by the Operator
and the Supervisor
ONLINE SERVICES
1
2
ONLINE S ERV ER CALL
UPLOADS REP ORTS DATA
ES CAP E
OK
ONLINE SERVER CALL: This menu is always present. It allows
you to connect to the Online Server in order to retrieve information
(rate or messages) or to set parameters (scale capacity, amount
of departments). You will be instructed to use this menu during a
rate change. You can also use this menu to test your phone
connection and settings.
UPLOAD REPORTS DATA: This menu will only appear if you
have subscribed to the Professional Edition (see section 5). This
menu allows you to manually upload Reports data to the Online
Server. It also should be used before and after a department reset
(see section 5.3).
E-CONFIRMATION UPLOAD: Displayed in the MAIN MENU
and will only appear if you have subscribed to e-Confirmation
Edition (see section 6). This menu allows you to manually up-load
e-Confirmation records to the Online Server.
In addition, a menu MAILBOX appears if a message was posted
in your mailing system Operator mailbox or your mailing system
Supervisor mailbox (see examples section 5).
Connections to the Neopost Online Server
4132887Q/A
11/28/2006
ORIG-0021-7/A
7
In Supervisor mode you can also access SETUP parameters by
pressing the SETUP key. Use the menu TELEPHONE SETTINGS
to add a PREFIX if your phone system requires a prefix (generally
0 or 9) to access to an outside line.
SERVER SETTINGS menu should only be used when
instructed by a customer service representative.
8 Connections to the Neopost Online Server
4132887Q/A
11/28/2006
ORIG-0021-8/A
3.
ACCESSING THE NEOPOST ONLINE WEB SERVICE
Online Service web access is included in the purchase of your
Neopost IJ-40/50/60 mailing system. You’ll want to set up your
account to view information about your mailing system and access
usage report data and E-Confirmation tracking reports.
The Online Service Web lets a user view information about a
single mailing system at a time.
After installation of your IJ-40/50/60 mailing system, follow the
instructions below to set up your My Neopost User ID and password.
Once activated, you can begin to use your Online Services account
immediately.
3.1 Registering and Accessing Your Account Online
Access the Neopost home page (www.neopostinc.com).
Click the Support button and choose My Neopost from the
drop-down menu.
The Sign On window displays with a Security Alert. Click Yes to
proceed.
Accessing the Neopost Online Web Service
4132887Q/A
11/28/2006
ORIG-0021-9/A
9
If you have not registered as a My Neopost user, select Click Here
to register in the left hand menu. If you have already registered,
enter your username and password and skip to page 12.
Enter the requested information; your Neopost Customer Number,
Postage-On-Call (POC) Account Number and Meter Serial
Number then click Continue.
10 Accessing the Neopost Online Web Service
4132887Q/A
11/28/2006
ORIG-0021-10/A
Complete the registration information and select your User
Name and Password then click Register.
Enter the Username and Password you selected during the My
Neopost registration and click the Sign On button.
Accessing the Neopost Online Web Service
4132887Q/A
11/28/2006
ORIG-0021-11/A
11
The My Services page displays the Neopost Online Services
selection in the side bar.
Select Neopost Online Services to display the Online Services
Home page
12 Accessing the Neopost Online Web Service
4132887Q/A
11/28/2006
ORIG-0021-12/A
3.2 Customer Profile
Click the
link to access your account information.
Accessing the Neopost Online Web Service
4132887Q/A
11/28/2006
ORIG-0021-13/A
13
Your Customer Profile lists the following information:
- Customer Name
- Customer Email address – you can edit your email address in the
edit box
- Suppress Notifications checkbox – select this box if you do not
wish to receive emails regarding your Ink Management and Rate
Protection services (if you have purchased these services).
If you have purchased an eConfirmation service, your
profile will contain additional information regarding email
notifications (see page 27).
3.3 Viewing Your Machine Inventory
Use the Equipment menu to view information about your Neopost
IJ-40/50/60 mailing system. Your mailing machine is identified by
the current postage meter serial number.
Click the Equipment menu link to open the Machines page,
which displays details about your mailing system.
14 Accessing the Neopost Online Web Service
4132887Q/A
11/28/2006
ORIG-0021-14/A
Your Machines page displays the following information about your
mailing system:
- your customer name
- the IJ-40/50/60 mailing system’s installation address
- the postage meter serial number.
For installed or connected mailing machine hardware:
- the Device ID number
- the type of device
- a description of the device
- the status of the device: Allocated, Active, or Inactive.
Click the
link to access your customer profile.
Click the
printer.
link to print this information to your default
Click the
link to open the Neopost Customer Web
Application User Guide as a PDF file.
link to export the data as a comma-separated
Click the
value (.csv) spreadsheet file. You can then import this file into
Excel or some other application.
Click the Meter link to view more detailed information about your
mailing system devices.
The Device Details page displays the following information:
Accessing the Neopost Online Web Service
4132887Q/A
11/28/2006
ORIG-0021-15/A
15
-
Meter – your mailing system postage meter serial number
Type – the model number for your mailing machine
Status – the mailing system’s status: ACTIVE or INACTIVE
Installation Address – the mailing system’s installation address
Services & Upgrades – the services and/or features upgrades
installed: name, activation date, and status (Active or Inactive).
The bottom part of the Device Details page displays more detailed
information about your mailing system:
16 Accessing the Neopost Online Web Service
4132887Q/A
11/28/2006
ORIG-0021-16/A
- Software Description – the version number of the software
installed
- Activation Date – the activation date of the software installed
(yyyy-mm-dd)
- Active Rate Version – the version number of the rate installed
- Effective Date – the effective date of the rate installed (yyyy-mmdd)
- Part Number – the part number of the rate installed
Click the
link to access your customer profile.
Click the
printer.
link to print this information to your default
link to open the Neopost Customer Web
Click the
Application User Guide as a PDF file.
Accessing the Neopost Online Web Service
4132887Q/A
11/28/2006
ORIG-0021-17/A
17
4.
STANDARD EDITION
The STANDARD EDITION contract provides two services: Ink
Management and Rate Protection.
The Ink Management service will send an electronic update to
the Online Server when the mailing machine’s ink supply is running
low or about to expire. You will receive an email message informing
you of either condition so that a replacement can be ordered.
Rate Protection ensures that the most current postal rates are
installed on your mailing system. After the Postal Service announces
a change to its rate and fee schedule, the Online Server downloads
the new rates into your mailing machine. Your mailing machine will
automatically switch to the approved rates on the effective date of
the rate change.
4.1 Ink Management Service
If you have purchased the Ink Management service, the IJ-40/50/
60 mailing system monitors for both low ink status and expiration
date for the cartridge. When an ink cartridge needs replacement,
the mailing system displays an alert message and initiates a
connection to the Neopost Online Server.
When the Online Server processes the alert, Neopost sends an email reminder that a replacement will need to be ordered.
The email notification is sent to the email address in your online
profile. (Access the Neopost Customer Web application and click
link to edit this email address.)
the
18 Standard edition
4132887Q/A
11/28/2006
ORIG-0021-18/A
4.2 Rate Protection Service – Downloading a New Rate
The Rate Protection service makes certain that you always have the
latest postal rates loaded on your IJ-40/50/60 mailing system.
When a new rate is announced by the Post Office, Neopost prepares
the necessary rate changes and sends an email notification about
the pending rate change to the email address in your online profile.
(Access the Neopost Customer Web application and click the
link to edit this email address.) Follow the instructions in
the email.
The Neopost Online Server schedules an automatic rate download
to occur at the appropriate time. The rate download will happen
during a regular call to the Neopost Online Server – you do not need
to do anything to receive the new rate package.
If your mailing machine is not covered by the Rate Protection service, you must contact your Neopost Customer
Service representative to obtain the new rate package.
Upon placing the order, a similar process will electronically
download the new rate for you.
To confirm download of a new rate package (manual call
only):
When the automatic rate package download has been successfully
completed, your IJ-40/50/60 mailing system displays a message:
Me ssage
SD L 200 Dow nload completed for file USPS
ESCAPE
RESET
In addition to that, a message is sent to the Mailbox (see the icon
in the main screen).
Contact your supervisor.
Standard edition
4132887Q/A
11/28/2006
ORIG-0021-19/A
19
The following steps must be followed by the Supervisor to
access to the supervisor Mailbox.
Press
button on the keyboard then press button under
and enter the supervisor pin number.
SUPERVIS
SUPERVIS
USER
Select ONLINE SERVICES and press OK . Select Mailbox
menu. There you will find the new message in the mailbox.
ONLINE S ERVICES
1
2
3
ONLINE S ERV ER CALL
UP LOAD REPORTS DATA
MAILBOX
ESCAPE
Press
OK
OK
to display your mailbox.
Download completed for pack #rate 04.05
A
ESCAPE
Press
Press
ESCAPE
RESET
RESET
to close your mailbox.
to erase the message and close your mailbox.
20 Standard edition
4132887Q/A
11/28/2006
ORIG-0021-20/A
5.
PROFESSIONAL EDITION
The PROFESSIONAL EDITION contract lets you upload statistics
data from your mailing machine, so you can view or print reports
using the Neopost Online Service Web application.
5.1 Uploading Reports Data to the Online Server
The Online Services Reports page provides detailed departmental/
account reports for your mailing system. including:
Monthly and Daily activity data – the total amount of postage used
and the number of items.
Monthly Postal product data – the total amount of postage used
and the number of items mailed within the different mail classes
(postal product codes).
Postal products are determined by using a scale or weigh
platform to calculate the postal rate. Postage values
selected manually will be assigned to a category "no
product code".
MonthlyDepartmentaccountdata –thetotalamountofpostageusedand
the number of items mailed per department account or cost center.
If you do not turn on the department mode of your mailing
machine on the first day of usage your data will be stored
to Miscellaneous Department. Miscellaneous Department
is not uploaded to the Neopost Online Server as part of
your departmental usage.
Connection data – a log of all the connection activity between the
IJ-40/50/60 mailing system and the Neopost Online Server for a
defined period.
Departments are defined during installation and are maintained
on the IJ-40/50/60 mailing system. (Refer to the IJ-40/50/60
Mailing System User Guide for instructions on defining
departments).
Professional edition
4132887Q/A
11/28/2006
ORIG-0021-21/A
21
Activity data is uploaded to the Neopost Online Server
monthly and is stored on the server for 13 months. Data is
uploaded automatically at the close of each month.
5.2 Manually Uploading Reports Data
Your IJ-40/50/60 mailing system automatically uploads reports
activity data after midnight on the last day of the month. (See the
Automated Connections section for details.) However, if there
was a connection failure or if the mailing machine is not connected
to an analog telephone line, you can manually upload reports
statistics data from your IJ-40/50/60 mailing system to the Neopost
Online.
To manually upload usage data:
Press MENU button then select ONLINE SERVICES from the IJ40/50/60 Main Menu and press OK .
MAIN MENU
1
2
3
4
5
REGISTERS
CARTRIDGE
SUPERVISOR
CLEAR MAIL PATH
E-CONFIRMATION UPLOAD
ESCAPE
OK
then by pressing
MAIN MENU
6
ONLINE SERVICES
ESCAPE
OK
E-CONFIRMATION UPLOAD is displayed only if e-confirmation records are currently stored in the machine.
22 Professional edition
4132887Q/A
11/28/2006
ORIG-0021-22/A
Select UPLOAD REPORTS DATA from the ONLINE
SERVICES menu and press OK .
ONLINE S ERVICES
1
2
3
ONLINE S ERV ER CALL
UP LOAD REPORTS DATA
MAILBOX
ESCAPE
OK
The IJ-40/50/60 mailing system initializes the modem,
DIALING
PLEASE WAIT . . .
connects to the Neopost Online Server,
TRANSACTION IN PROGRESS
PLEASE WAIT . . .
and uploads your reports statistics data.
When the data transfer is complete, the IJ-40/50/60 mailing
system displays a message, indicating the successful completion
of the transaction.
ONLINE SERVER CALL COMPLETE
CONTINUE
You can now view your departmental/account data for one mailing
system at a time by clicking the Reports menu in the Neopost
Customer Web application. Click the
link to open the
Neopost Customer Web Application User Guide for detailed
instructions on viewing your usage reports data.
Professional edition
4132887Q/A
11/28/2006
ORIG-0021-23/A
23
5.3 Department Resets
The IJ-40/50/60 mailing system allows you to perform a department
reset. Resetting a department means clearing all the department
values (refer to IJ-40/50/60 mailing system user’s guide).
To reset one or more departments you should follow these 3 steps:
1. Upload the Department data to the Online Server by following
the steps described in the previous section «Manually Uploading
Your Usage Data».
2. Perform the reset of one or more departments (this can only be
done in supervisor mode, menu Department)
3. Upload the Department data a second time to the Online
Server by following the steps described in the previous section
«Manually Uploading Your Usage Data». This will ensure a
proper synchronization of data between the server and the
mailing system.
If you did not perform a manual upload before the reset IJ40/50/60 mailing system will propose you to do so. If you
choose to reset without connecting to the Online server, the
department will be set to 0 on the mailing system and the
department statistics will be erased without upload to the
server. This data can not be recovered.
At the end of step 3, the values for the departments that were reset
are cleared on the device as well as on the Online server.
If you do more than one reset the same day on the same department,
the values displayed on the Online server web application will not be
cleared but will remain as they were after the first reset.
The Online Server will store the values you upload before the reset
until the end of the monthly period, and then add them to the values
uploaded at the end of the monthly period, thereby displaying the full
total for the monthly period for this department.
24 Professional edition
4132887Q/A
11/28/2006
ORIG-0021-24/A
For more details you can refer to the Online guide or you can
view or/and download directly from your Online server web
application (click on Guide).
Professional edition
4132887Q/A
11/28/2006
ORIG-0021-25/A
25
6.
E-CONFIRMATION EDITION
The E-CONFIRMATION EDITION contract enables the E-Confirmation Services. With E-Confirmation Services, your mailing
machine can capture and process USPS Delivery Confirmation,
Signature Confirmation, and Certified Mail tracking label numbers.
After upload to the Online Server, simply log on to the Neopost
Customer Web application, click on the Tracking tab, and monitor
all of your USPS Confirmation Service delivery tracking records at
a glance, or in detail, in one convenient location.
In addition to online tracking, you can activate and receive e-mail
status updates for your tracked parcels.
E-Confirmation not only increases efficiency in your mailroom, it
cuts postage expense. You’ll realize postage savings on your
tracked parcels because the Postal Service provides a discount
on its retail Delivery and Signature Confirmation fees when parcel
tracking data is uploaded electronically to the Postal Server. The
special rate is identified as eConfirmation on your mailing system
and in these instructions.
To be eligible for Postal Service discounts on Delivery
Confirmation and Signature Confirmation services, you
must use e identified tracking labels that are only available
from Neopost. Any other label will cause an input error
message. Your IJ-40/50/60 mailing machine cannot process
confirmation service tracking labels obtained from a Post
Office retail counter.
The "e" in the upper left corner of the label expedites
processing and indicates the discount to the letter carrier.
eDelivery Confirmation
You receive an email with the date and time of the delivery. The
dates and times of any unsuccessful deliveries are also noted.
eDelivery Confirmation is available with First Class, Priority, or
Package Service (including Parcel Post, Media Mail, etc.).
26 E-Confirmation Edition
4132887Q/A
11/28/2006
ORIG-0021-26/A
eSignature Confirmation
You receive an email with the date and time of the delivery and
the name of the person who signed for the parcel. You can obtain
a copy of the proof-of-delivery signature via FAX or email from the
USPS. The dates and times of any unsuccessful deliveries are
also noted. eSignature Confirmation is available with First Class,
Priority, or Package Service (including Parcel Post, Media Mail,
etc.).
eCertified Mail
You receive an email with the date and time of the delivery. The
recipient’s signature is obtained upon delivery and a record is
maintained by the USPS. This service is typically used for letters
rather than parcels.
In order to use the eConfirmation services, you must have an SE
scale or a Weighing Platform connected to your IJ-40/50/60
mailing machine.
6.1 Customer Profile – E-Confirmation Service
If you have purchased the E-Confirmation Edition with USPS
tracking, the Profile link on the Online Services web page displays
a section where you can activate and define your e-mail notifications, as well as enter and maintain e-mail addresses for the
notifications.
The notification settings are initially set to OFF. They will need to
be set up in order to activate the e-mail notification services.
To access your customer profile:
Click the
link on any page.
E-Confirmation Edition
4132887Q/A
11/28/2006
ORIG-0021-27/A
27
Make any necessary changes/corrections to the Delivery
Confirmation information and click the Save Account
Information button.
- Email Daily Report To – the email address of the person who is
to receive a daily summary status for the eConfirmation tracking
records uploaded the previous day.
- Email Notifications To – the email address of the person who is
to receive email notifications about the following events (if the
checkbox is selected):
- When Sent – when the eConfirmation mailing information is
forwarded to the USPS
- When Delivered – when the status of the mailing is received
from the USPS
- When Not Received – notification that no delivery confirmation was provided by the USPS after x days
- Within – indicates how many days must pass before a
When Not Received alert is sent. When an update has not
been received from the USPS dated within the last x days
(e.g., within the last 24 hours at the time of the status check),
the email alert is sent. This status is checked once a day
28 E-Confirmation Edition
4132887Q/A
11/28/2006
ORIG-0021-28/A
6.2 How Your E-Confirmation Service Works
You can track mail delivery through the Neopost Online server
because the server is in constant communication with the USPS.
The diagram below shows how tracking information flows from
your mailroom, through the Neopost Online server and on to the
USPS, and then back to you.
HOW THE PROCESS WORKS IN YOUR MAILROOM.
Apply a tracking label (supplied by Neopost) to your mail. For
information about ordering new labels, click on the Supplies
menu.
You can only use tracking labels that are supplied by
Neopost. Any other labels will cause an input error message.
Select the appropriate rate and eConfirmation service on your
SE scale or directly on your machine display (Weighing Platform).
E-Confirmation Edition
4132887Q/A
11/28/2006
ORIG-0021-29/A
29
Apply the metered postage to your mail.
Deposit your mail with the USPS (E-Confirmation does not
require additional special paper work, as do retail mail
confirmations).
Upload your daily mailing information to the Neopost Online
Server. (This function is performed automatically during a call
between midnight and 5:00 AM).
Receive USPS updates about your mail’s delivery status via
emails from the Neopost Online server. You can also check the
status of your mail on the web by logging on to Online Services
and clicking on the Tracking menu of the Neopost Customer
link to open the Neopost
Web application (Click the
Customer Web Application User Guide for more details).
GETTING ECONFIRMATION STATUS INFORMATION
Mailing status information is available in two ways:
- Via the My Neopost web site. This application is supported by
the Neopost Online server
- Via emails from the Neopost Online server.
You can log on to the My Neopost web site with a password 24
hours a day, 7 days a week.
Email notifications arrive when a change in your mail’s status
occurs at USPS.
30 E-Confirmation Edition
4132887Q/A
11/28/2006
ORIG-0021-30/A
6.3 Processing Electronic Confirmations with an SE Scale
In Scale mode, you put one mailing item on the scale and generate
one tape at a time.
Affix an eDelivery Confirmation label, an eSignature Confirmation
label, or a eCertified Mail label to your parcel. Be sure to use the
one with the lowest eConfirmation tracking number. (When you
open a package of eConfirmation labels, the label on the right
usually has the lowest eConfirmation number. eConfirmation
numbers are in sequential order and, ignoring the last digit on the
right, the numbers increment by 1.)
Check that the scale shows a zero weight reading with nothing on
the platform. If not, press ZERO on the keypad.
Place the parcel on the scale.
Select the type of service – First Class, Priority (1ST/PRIORITY),
or Parcel Post (PRCL POST).
Press Special Services key.
At this point, you can select CERT (Certified Mail)
Select Special Service
Reg
Cert
RRcpt
More
or press MORE to select the DC
(Delivery Confirmation) or
(Signature Confirmation) options.
SC
Select Special Service
DC
ReDel
SC
Delivery and Signature Confirmation are only available
when used with pieces mailed at the First Class Parcel
rate. You cannot affix a Delivery or Signature Confirmation label to a letter. However, if the parcel is over .75 inch
thick, or is a box, regardless of thickness, it qualifies for
the First Class Parcel rate.
E-Confirmation Edition
4132887Q/A
11/28/2006
ORIG-0021-31/A
31
Thickness over 0.75 In?
Yes
No
Select Electronic (E-con).
Electronic or Retail?
E-con
Retail
Your SE scale identifies the tracking number as a PIC, for
Package Identification Code. Compare the PIC tracking number
in the display with the number on the eConfirmation label affixed
to your parcel. If they match, press
. If not, press +1 or –1 to
.
make them match, and then press Yes
If your scale is eConfirmation compatible and you are using it for
the first time or if you need to enter a new tracking number, press
New, enter the new PIC tracking number using the keypad, and
then press ENT on the keypad.
Yes
Current PIC is
9114621683408000060816
Yes
+1
-1
New
United States Postal Service
DELIVERY CONFIRMATION
91114621683408000060816
32 E-Confirmation Edition
4132887Q/A
11/28/2006
ORIG-0021-32/A
Enter the 5 digit destination zip code. You will be asked to
confirm it. If you enter an invalid zip code, an error message
displays and you will be asked to re-enter the zip code. The fee
for the eConfirmation service briefly displays and is added to the
postage displayed on the scale.
If required, add other Retail Special Services.
Print the postage tape
- With the mailing system in User mode, press the
PRINT/TAPE button on the scale keypad.
LOWESTRATE
SETMETER
3
RESET
PRINT/TAPE
CLR
In Scale mode, the SETMETER button on the scale is
disabled.
- To print postage, select
select
.
Normal
. To print a value of $0,
Zero
Select Value type ?
Normal
Zero
There may be situations where you need to print a $0.00
value tape. See operator error section for details.
If the Department specified on the mailing machine differs from
E-Confirmation Edition
4132887Q/A
11/28/2006
ORIG-0021-33/A
33
that specified on the scale, you will be asked to input the correct
department number.
Affix the tape to your parcel and mail it.
After the tape is printed, an eConfirmation record is created in
the mailing system.
6.4 Processing-EConfirmation items using a Weighing
Platform
The weighing platform must be connected to your mailing machine
(see your Neopost IJ-40/50/60 Mailing System User Manual for
instructions).
Using your weighing platform to send a package and request
eConfirmation service is simple.
Make certain your weighing platform is connected to your mailing
machine and selected on the User Screen.
Make certain your weighing platform (WP) is “zeroed.” Remove
all items from the WP and press
twice, after the second time
weight value must be zero.
Place the eConfirmation label on the package. Place your
package on the WP. The previously-selected rate class displays
on the screen. To select a different rate class, select 1 RATE ,
press MODIFY , and choose the rate class.
WEIGH PLATFORM
1
2
3
RATE
FORMAT
SERVICE
1st Class/Priority
1st Letter
NONE
0.0
0z
ACCEPT
MODIFY
34 E-Confirmation Edition
4132887Q/A
11/28/2006
ORIG-0021-34/A
The most common rate classes are included in the 1 RATE menu
(e.g., 1ST/PRIORITY, PRIORITY, etc.). Select one of these and
to choose it.
press
SELECT
RATES
1
2
3
4
5
1st Class/Priority
Priority Flat
1st Postcard
Package Services
Express Mail PO-Addr
ESCAPE
SELECT
Select the 2 FORMAT and press
to select the
SELECT
appropriate type. Then press the SELECT button.
FORMATS
1
2
1st Letter
1st Parcel
ESCAPE
SELECT
If the DESTINATION field is displayed, enter the destination zip
code and press OK .
Select 3 SERVICES and press
then select the
MODIFY
appropriate eConfirmation service and press ON/OFF or OK
button to select it.
E-Confirmation Edition
4132887Q/A
11/28/2006
ORIG-0021-35/A
35
SERVICES
1
2
3
4
5
Oversize surcharge
Del Conf eService
Del Conf FC/Pri
Sig Conf eService
Sig Conf
ACCEPT
ON/OFF
SERVICES
6
7
8
9
10
Certified eService
Certified Mail
COD
Registered
Insurance
ACCEPT
ON/OFF
You can then select and ADD other options or press ACCEPT .
Press the ACCEPT button on the WEIGH PLATFORM screen
to display the ECONFIRMATION screen.
In the E-CONFIRMATION screen, check the Tracking Label Number.
The machine automatically suggests the next Tracking Label
Number in the sequence.
Use the labels in order to avoid typing the full number each time.
Press C to enter a new Tracking Label Number.
To change the Tracking Label Number, use the arrow button to
highlight the numbers to change and enter number using keypad.
When the Tracking Label Number is correct press OK button
If ENTER ZIP screen is displayed, enter the correct zip code and
press OK button.
On the IJ-40/50/60 mailing machine, press
.
The machine prints the tape and creates an eConfirmation record
(see below for instructions on how to access this record). Apply
the tape to the package.
Leave the machine ON and connected at night to automatically
upload the record to the USPS. You can also upload records
manually (see below for instructions).
36 E-Confirmation Edition
4132887Q/A
11/28/2006
ORIG-0021-36/A
6.5 eConfirmation Errors
Error Messages During The Postage Creation Phase
The mailing machine automatically checks for the following error
conditions:
- You select a service and use the wrong label
- You use the same label twice during the day (before you upload
any records)
- You modify the zip code inconsistently
- You type an invalid PIC #
In these cases, just follow the instructions.
Error After Postage Has Been Printed and Records Uploaded.
You may see that some records contain one or more errors. Such
information is displayed in the device mailbox message or on the
daily report.
Go to the Tracking page on the Neopost Customer Web
application.
Check the item status. Generally errors are caused by using
invalid destination zip codes, or by creating duplicate PIC #s. In
this case, the item will NOT be tracked.
You should delete the record on the web site.
If the mail has not been sent yet, you can restart the
process with new labels and print 00.000 tapes or
complementary postage tapes.
OPERATOR ERROR CORRECTION
Occasionally, the operator may make a mistake in mixing tracking
labels, typing the wrong destination zip code, or selecting the
wrong service. If the mail has not gone yet, you can correct these
errors without paying extra postage and while still getting your mail
tracked.
E-Confirmation Edition
4132887Q/A
11/28/2006
ORIG-0021-37/A
37
I already printed postage. I placed the wrong eConfirmation
label on a mail piece. I need to change the Tracking Number
(PIC#).
Place a new eConfirmation label on the item on top of the
previous one.
DO NOT PLACE THE ITEM ON THE WP – This will allow you to
create a 00.000 tape.
Follow all the standard steps for processing a package by
choosing the same rate class, eConfirmation service and options,
and destination zip code.
Print a postage tape with the 0.000 value (no weight).
Your mail machine will create the new eConfirmation record. If
the posting date is unchanged, there is no need to affix the
postage tape to your parcel. If the posting date is changed, affix
the 00.000 postage tape adjacent to the postage tape already
on the package.
I already printed postage. I need to change the Zip Code or
the eConfirmation Service (e.g., use eSignature Confirmation instead of eDelivery Confirmation).
Step 1: Follow the instructions in Step1 to change Zip Code or eConfirmation Service. If additional postage is required due to
the change, continue to Step 2
Place a new label on the item on top of the previous one.
DO NOT PLACE THE ITEM ON THE WP – This will allow you to
create a 00.000 tape.
Follow all the standard steps for processing a package by
choosing the same rate class and enter the new eConfirmation
service and options or destination zip code.
38 E-Confirmation Edition
4132887Q/A
11/28/2006
ORIG-0021-38/A
Print a postage tape with the 0.000 value (no weight). Your mail
machine will create the new eConfirmation record. (with the
correct zip code and e-confirmation service).
Manually upload the eConfirmation records and delete the first
PIC # on the Neopost Customer Web application so that it will not
be tracked.
Step 2: If more postage is required due to a change in zip code
or eConfirmation service.
Correcting the zip code or changing the eConfirmation service
may result in an additional charge for postage. In such cases,
you’ll also need to create a postage tape for the difference and
affix it to your package.
Place the parcel on the weighing platform. Follow the standard
steps for processing a package. Be sure to input the corrected
zip code or eConfirmation service and options, along with the
correct mail class.
Your mailing machine will calculate and display the postage for
delivery of the package with the new zip code or new eConfirmation service.
Manually calculate the difference between the corrected postage
and the postage already affixed to the parcel.
Remove the parcel from the weighing platform.
Using the mailing machine keyboard, enter the value that you
calculated as the difference between the corrected postage and
the postage already affixed to the parcel.
Print a new postage tape, and affix the tape adjacent to the
postage tape already on the package.
E-Confirmation Edition
4132887Q/A
11/28/2006
ORIG-0021-39/A
39
6.6 Performing a Manual eConfirmation Upload
Generally, your mailing system automatically uploads the records
to the Neopost Online server late at night. Thus it is important that the
system always remain powered on. However, you can also manually
upload the records under certain conditions as follows:
- You have reached the maximum limit of items in the mailing
system.
- Your automatic connection did not occur.
- You want to correct an operator error. (see Operator Errors
section for details)
- You want to upload your records before you leave for the day.
Your mailing system must be connected to an analog
telephone line to perform an upload.
To upload eConfirmation data manually:
Select MENU button, select E-CONFIRMATION UPLOAD and
press OK .
MAIN MENU
1
2
3
4
5
REGISTERS
CARTRIDGE
SUPERVISOR
CLEAR MAIL PATH
E-CONFIRMATION UPLOAD
ESCAPE
OK
The IJ-40/50/60 mailing system initializes the modem,
DIALING
PLEASE WAIT . . .
40 E-Confirmation Edition
4132887Q/A
11/28/2006
ORIG-0021-40/A
connects to the Neopost Online Server,
TRANSACTION IN PROGRESS
PLEASE WAIT . . .
and uploads your eConfirmation data.
When the data transfer is complete, the IJ-40/50/60 mailing
system displays a message, indicating the successful completion
of the records upload.
ONLINE S ERVER CALL COM PLETE
CONTINUE
Press CONTINUE .
After the transaction is completed, a message displays,
indicating if the number of records and the content were correct.
Messages will also be posted in the machine mailbox of the
operator and the supervisor. To access the message, select
MAILBOX in the ONLINE SERVICES menu in Supervisor mode.
ONLINE S ERVICES
1
2
3
ONLINE S ERV ER CALL
UP LOAD REPORTS DATA
MAILBOX
ESCAPE
OK
E-Confirmation Edition
4132887Q/A
11/28/2006
ORIG-0021-41/A
41
Press
to clear the mail box, or press
RESET
close the message.
ESCAPE
to
50 Pa cka ges w e re proce ssed w ith no e rror,
Ple a se che ck our w e bsite w w w .neopostinc.com
ESCAP E
RESET
How can I request a Proof of Delivery letter online?
A proof of delivery letter is available for Express Mail® or Signature Confirmation® service. For signature Confirmation® service Your Neopost Online service web provides you directly
a link to the USPS web site and populates the tracking
number for you (click on the Signature Confirmation item
status link to access to the detail page, then click on Proof of
Delivery). There is no additional fee for this service.
How can I request a Proof of Delivery letter for my Certified
Mail™, insured, COD or Registered Mail™ item?
You can obtain a Proof of Delivery letter (which will include the
signature of the person who accepted the article) for these items
by purchasing a Return Receipt After Mailing from your local Post
Office™.
42 E-Confirmation Edition
4132887Q/A
11/28/2006
ORIG-0021-42/A
7.
TROUBLESHOOTING
Message
Connection error
connection & retry
Cause/solution
check 1. Please check phone cable
2. Phone number incorrect or
missing.
3. Prefix incorrect or missing
4. No dialtone. Check phone
line. Call supervisor.
EC201 EConf upload failed! The server has an error with the
meter. Error with server’s
Server Error. Try again.
attempt to communicate to
device. Try again
Troubleshooting
4132887Q/A
11/28/2006
ORIG-0021-43/A
43
8.
INDEX
C
P
Connection data 21
Customer Profile 13, 27
Password 9, 10
Postal product data 21
Print 15, 17, 21, 33, 37, 38, 39
D
R
Daily activity 21
Department statistics 24
Rate Protection 19
Registering 9
E
E CONFIRMATION UPLOAD 7
E-Confirmation 26, 27, 29
E-mail 3, 18, 26, 27
ECertified Mail 27, 31
EDelivery Confirmation 26, 31
Error 5, 26, 29, 33, 37, 40
ESignature Confirmation 27, 31
G
Guide 3, 17, 21, 23, 25
M
MAILBOX 7
Mailbox 20, 37
Manual upload 24
Monthly activity 21
S
SE Scale 31
SE scale 27, 29, 32
SETUP 7
STANDARD EDITION 18
Supervisor 7, 8, 20, 24
supervisor 41
Supplies 4, 29
U
UPLOAD REPORTS DATA 7, 23
Usage Reports service 4
USPS 3, 26, 27, 28, 29, 30, 36, 42
O
Online reporting 3
ONLINE SERVER CALL 7
Online Services
MENUS 7
SETUP 7
44 Index
4132887Q/A
11/28/2006
ORIG-0021-44/A
IJ-40/50/60
MAILING SYSTEM
ONLINE SERVICES
USER'S GUIDE
4132887Q/A
11/28/2006
ORIG-0020-01/A
4132887Q/A - 11/28/2006
4132887Q/A
11/28/2006
ORIG-0020-04/A