1
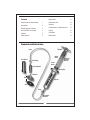
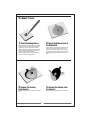
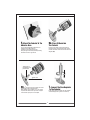
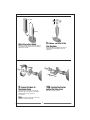
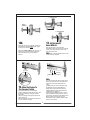
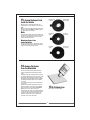
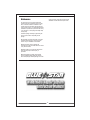
Windshield Repair System
Instruction Manual
... The Professionals First Choice
Contents
Helpful hints
11
Components and nomenclature
1
Expected results
12
Introduction
2
Remarks
12
Identifying types of breaks
2
Characteristics of Ultraviolet resin
12
About the Blue Star system
3
Drilling
12
Cautions
3
Drilling tips
12
Repair process
4
Maintenance
13
Components and Nomenclature
Plunger
Hose
Upper
Notch
Cure Guard
Slip Fitting
Additional
Pressure
Notches
Lower
Notch
Flow Regulator
Spring Clip
Pedestal
Tabs
Injector
Seal
Valve
Hose-Valve
Interlock
1
Introduction
Types of Breaks.
Every year thousands of windshields are damaged by
flying rocks that affect the outer layer of the safety
glass. Glass breaks can be filled with a transparent
resin that protects the broken areas and substantially
restores the visibility to the repaired area. This
patented windshield repair system can repair many of
these different types of breaks. Since all breaks are
not alike, there will be a small percentage that cannot
be repaired. This manual provides a step-by-step
procedure for repairing the different type of breaks in
windshields. In addition to becoming familiar with the
procedure, it is important to understand the basic
principals and different types of breaks that will assist
you in performing the repair.
All breaks are different, no two breaks are ever alike.
They may appear to be alike, but each has unique
characteristics. They do, however, have shapes that
can be classified as being of a particular type. The five
most common breaks are:
About auto safety glass
A. Safety Glass is a lamination of two plates of glass
sandwiching a transparent binder. Breaks in a
windshield usually only affect the outer plate of
lamination and does not penetrate the entire
windshield. Glass breaks can be filled with a
transparent resin which protects the broken areas and
substantially restores the visibility to the repair area.
B. Stone chips and bulls eye breaks in automobile
windshields mar the visibility through the glass, but
most often will not affect the useability of the glass. In
many cases, such breaks can be repaired, eliminating
expensive time consuming replacement of the entire
glass.
C. When an object strikes the outer layer of glass with
sufficient force, it causes a small hole on impact. This
permits air to enter the damaged area. This air space
creates a diffusion of light, resulting in and obstruction
of vision.
D. The objective of this windshield repair system is to
penetrate the glass surface through the pit of the
break with a transparent liquid resin. The resin
replaces the entrapped air, cures, and restores
visibility, since it has the same index of refraction as
the glass. The resin once cured also bonds the loose
glass within the damaged area.
E. In most cases, the repair will not be totally invisible;
there will always be traces of a repair. At the point of
impact where the surface glass is missing, a slight
imperfection will be visible. And in some cases,
hairline remains of the radial cracks, called scars, may
be visible when viewed at certain angles.
Nevertheless, at least 90% of the optical diffusion will
be eliminated, restoring transparency and rendering
the area structurally sound. Further cracking will be
prevented.
1.Bulls Eye
This break is cone shaped with the PIT (point of
impact) at the surface, and the base at the inner liner.
2. Combination Break
This break is a Bulls Eye type combined with radial
cracks.
3. Daisy
This break is non-symmetrical and consists of one or
more cones with radial cracks having a flower type
appearance.
4. Star
This break consists of a pit with radial cracks. The
cracks do not penetrate through to the lamination.
There is little or no air to displace, allowing a
minimum of resin to penetrate. Results will vary
2
depending on the air passages.
Drilling a hole through the pit is recommended in order
to get the resin to flow into the radial crack.
sunburn to your eyes and skin. The light produces a
high concentration of ultraviolet rays which should be
avoided. Mere glances at the lamp are not dangerous.
5. Crack
4. Never attempt a repair while rain or other moisture
is forming on the glass. The glass should be dry at all
times.
Moisture can often be removed or reduced by
compressed air. Hot air from an electric hair dryer or
car defroster will be sufficient in most cases.
Cracks are difficult to repair requiring special tools and
training.. Not recommended for repairing long cracks.
Small cracks, 2" or smaller can be repaired by drilling
a small hole(s) along the crack and using a thin based
resin.
5. Always place the resin cap on the bottle tightly, to
insure it does not leak.
The resin is very thin-based and must be treated with
care.
6. In the event the resin spills on the car surface,
clean it up immediately, before it has a chance to cure
(harden).
The Blue Star system
This is a professional windshield repair system and is
designed to be easy to use. After you have made
several repairs and become familiar with the process,
you will find that repairs take very little time and
produce excellent results.
The system has been designed to eliminate most of
the guess work from the repair process. However,
since all windshield breaks cannot be repaired, you
must use your own judgement before attempting a
repair.
Cautions
1. Always keep the resin bottle away from direct
sunlight. Although the bottle itself is an adequate
shield from ultraviolet rays, if a small portion is
exposed, it may cause a chain reaction and cure
within the bottle.
2. When making repairs outdoors use a sun screen to
prevent the ultraviolet sun rays from curing the resin
until the repair process is complete.
Note:
The sun's rays can also be present on cloudy days.
Take care to insure the device is covered when
performing repairs outdoors.
In the event the sun's UV rays cure the resin in the
pedestal, the resin will not be able to remain liquid and
will not be able to penetrate the break cavity.
3. Blue Star recommends the use of a UV curing lamp
to cure the resin after the break is filled with the
chemical resin.
When using an ultraviolet lamp, do not look into the
light. Looking into an ultraviolet lamp can cause
3
The Repair Process
1. Clean The Damaged Area
2. Mount The Adhesive Seal To
Use the Carbide tip probe carefully to probe the
pit, freeing all the loose glass particles from the
crushed cone, and to clean the hole of all the
debris. Clear the loose glass from the break area.
Clean the area surrounding the break with a dry
cloth. Use glass cleaner if available.
When using glass cleaner, spray the cleaner on
the cloth, not into the damaged area.
The Windshield
3. Remove The Backing
4. Remove The Backing From
Peel the backing off one side of the adhesive seal.
Line up the hole in the seal with the PIT of the
break (pointing the tab upward). Press the seal to
the glass.Run your fingers around the seal several
times while pressing downward to insure a good
bond.
From The Seal
The Pedestal
Peel the backing from the top side of the adhesive
seal.
Peel the backing from the bottom of the pedestal..
4
5. Mount The Pedestal To The
6a. Place UV Resin Into
Adhesive Base
The Pedestal
Line up the pedestal with the adhesive seal
making sure the TABS match up.
Lightly press the pedestal to the seal.
Run your fingers around the pedestal pressing
downward to insure a good bond.
Place the resin bottle's pouring spout into the
pedestal opening and squeeze the bottle slowly
until the resin level reaches the level shown in the
diagram (6B).
Joining point of
pedestal base and
pedestal stem
*Resin Level
6b.
*The resin level is the joining point of the
pedestal base and the pedestal stem.
7. Connect The Flow Regulator
When making repairs outdoors, use a sun screen
to prevent the ultraviolet sun rays from curing the
resin until the repair process is complete.
Firmly press the flow regulator onto the pedestal
with a twisting motion. (press fit connection)
To The Pedestal
5
Cure Guard
Regulator
8. Connect The Hose To The
Flow Regulator
Note: Using a Cure Guard
When doing repairs outdoors, be sure to place the
Cure Guard over the regulator first before making
connection in step (8).
Firmly press the hose slip fitting onto the flow
regulator with a twisting motion. (press fit
connection)
a
9. Connect The Hose To
10a. Position The Plunger
The Injector Valve
and Set The Valve Lever
Connect the other end of the hose having lok
fitting to the tip of the injector valve with a
slight twisting motion. (press fit
connection)
Move the valve lever to the left.
Note: If necessary, two hoses can be joined
together to obtain a longer length.
6
c
b
10b. Release the plunger from the spring
10c. With the plunger completely inserted,
clip and push the plunger completely into the
injector barrel.
position the valve lever to the upright position.
LEVER TO
LEFT
Lower Notch
11. Lock The Plunger In
12a. Increase The Vacuum
The Vacuum Position
Position the valve lever to the left and slide the
plunger to the bottom of the injector barrel.
With the valve lever in the upright position, hold
the injector barrel with one hand and pull the
plunger Slowly upward with the other hand. Lock
the plunger by engaging the lower notch in the
plunger with the spring clip.
Note: Air is being removed during this step and
bubbles can be seen entering the pedestal. Now
go to step (12) to increase vacuum.
7
1. LEVER TO LEFT
LEVER
UPRIGHT
2. LEVER UPRIGHT
12b.
13. Fill The Injector
Return the valve lever to the upright, position and
while pulling the plunger slowly upward, engage
the spring clip in the lower notch.
Barrel With Air.
Move the valve lever to the left and then
immediately position the valve lever to the upright
position. The air that enters the injector barrel
stops the vacuum action.
Repeat steps 12A and 12B then, let sit for 5 to 10
minutes. Air is again being removed during this
step and bubbles can be seen entering the
pedestal.
Note: Step 13 must be repeated 3 times for the
vacuum to be fully dissipated.
Upper Notch
3rd notch
*Additional pressure notches
Note:
The resin is being forced under pressure into the
break cavity. Since the resin flow is different for
each break, some breaks will fill faster then
others.
*Additional pressure can be obtained by using
the additional pressure notches (AP) in the
plunger stem. Caution should be used when
applying additional pressure and the following
considerations are suggested.
1. When applying additional pressure, run your
fingers around the mounted pedestal to insure a
good bond to compensate for the added pressure.
2. Use the third notch only when you have
determined the repair is almost complete and the
device is to be removed.
14. Move The Plunger To
The Pressure Position
Insure that the valve lever is in the upright
position. Holding the injector with one hand, rotate
the plunger, releasing the spring clip from the
lower notch.
Depress the plunger and engage the upper notch
with the spring clip.
Remove hands from plunger and allow the device
to sit for 10 minutes, or longer.
8
15. Review The Repair From
Damage prior
to repair
Break visible
through seal
Incomplete
repair
Traces of
air pockets
Complete
repair
No traces of
air pockets
Inside The Vehicle
A. If the break is completely filled with resin,
without traces of air pockets, go to the next step
(16).
B. If the break is partially filled having traces of air
pockets, repeat steps (10a) thru (15), repeating
the vacuum & pressure cycles.
Note:
All breaks are not alike and each have different air
pockets and air passages for the resin to flow into.
Therefore some breaks might require repeated
vacuum and pressure steps.
Monitoring Repairs From
Inside The Vehicle
The hose allows for ease of operation as well as
operating the injector barrel, while monitoring the
repair process from inside the vehicle.
16. Remove The Device
From The Windshield
You can remove the device quickly and easily
from the windshield by following these simple
steps.
1. Rotate the plunger, releasing it from the spring
clip and allowing the plunger to move freely. (This
step relieves the pressure in the injector barrel)
2. Separate the Flow Regulator from the pedestal
by twisting and pulling upward on the regulator
connection.
3. Loosen the outer edges of the pedestal with a
safety razor.
4. Remove the pedestal by holding the tab and
pulling downward. The grooves in the pedestal
allow it to bend for easy removal. Do not force.
5. Wipe excess resin with a clean cloth.
Continue using the safety razor until the pedestal
is removed. Place a rag below the pedestal when
removing to absorb the excess resin from the
pedestal. The pedestal can be cleaned and reused with a new seal or discarded.
17a. UV Curing Prep
Place a drop of resin in the Pit
9
17b. Place a strip of mylar or cellophane
17c. Take a razor blade and with an upward
over the repaired break area.
motion, smooth out the mylar. The upward motion
will insure that the resin fills the pit and is held in
place with the mylar until the curing procedure is
completed.
*
18a. Curing with a UV Lamp
18b. Curing with the sun
Place the ultraviolet curing lamp over the repaired
area and turn on the lamp for 5 minutes. The UV
resin will cure (harden).
Note: The center of the bulb provides the highest
UV intensity.
If using a battery type UV lamp, it may take
*longer
to cure if the batteries do not have a
satisfactory charge.
If a UV curing lamp is not used, place the vehicle
in the sun to cure the resin. The curing time will
vary depending on the intensity of the sun.
The resin will remain liquid until a sufficient UV
light source is applied.
10
19. Finish
Remove the mylar from the repaired area. With a
razor blade, scrape the excess resin from the
windshield. Scrape the resin in one direction only.
Polish the repaired area with the plastic polish
provided.
Should you remove the pedestal and find that it
was removed to soon, another pedestal can be
mounted and the repair started over. Since the
resin is still liquid, the air passages are not
blocked. Be sure to clean the glass prior to
mounting another seal.
Helpful Hints
It is important to clean out the break PIT using the
carbide tip probe. There are some breaks that do
not have a large enough pit for the resin to
penetrate.
Repairs to the windshield which are in the direct
vision of the driver should be avoided.
The probe can be used to enlarge the pit simply by
probing with the probe. The probe can scratch the
glass, so be careful when using it and avoid any
unnecessary scratches.
The product design has taken most of the
judgement out of the repair process. However,
since all breaks are not repairable, good
judgement is required in determining which breaks
can and cannot be repaired.
Once the seal is placed on the windshield, it is
helpful to view the break from inside of the vehicle
to establish a visual reference. The reference
allows you to monitor the progress of the repair
while the repair is taking place.
Since the process normally is performed
unattended once it is set up, you can change the
specified time intervals and coordinate these time
intervals with other duties. However, if you are
performing the repair within a specified time span,
the specified intervals are recommended.
11
Expected Results
Remarks
If you've followed the step-by-step. instructions,
you can expect to achieve the following results:
Please note that the process is a repair, not a new
glass. Cosmetic (visual) results of a repair attempt
will range from perfect or invisible to no obvious
improvement.
A. The outline of the pit will be visible and it will
depend upon the original size.
Excellent repairs can be made simply and quickly
but there are some basic limitations to consider.
B. Hairline cracks may still be visible, and their
visibility will depend upon the type of break being
repaired. Combination breaks will in most cases,
have hairline cracks which are dependent upon
the severity of the breaks.
A. To avoid possible glare distraction, repairs
should not be attempted in the drivers critical
vision area.
B. Old breaks with relatively large pit areas (point
of impact with glass missing) usually collect
contamination from moisture. This moisture may
be wind driven or washed into the break by the
wiper blade.
C. In cases where the resin is not able to penetrate
the break, slight air pockets within the break may
be visible.
D. The repair process accomplishes two things.
C. There are some breaks that do not have a large
enough pit (point of impact surface damage) to
allow resin to penetrate the break, resulting in little
or no improvement.
1. It bonds the loose glass below the surface, and
prevents the break from developing into a crack.
2. It restores the visibility. Once open air cavities
are filled with resin, the distortion is removed.
In these cases, use of the carbide tip probe to
open up the pit is required, and/or drilling a small
hole may be necessary, in order to open up an air
passage for the resin to penetrate the break cavity.
quite small, the radial cracks immediately adjacent
to the impact pit are quite small, and the radial
cracks immediately adjacent to the impact pit are
very thin. Resin often enters such cracks very
slowly or not at all.
Characteristics of Ultraviolet
Resin
A. The UV resin cures through the absence of air
and by exposure to ultraviolet rays. It will cure
merely by being exposed to ultraviolet rays, but it
does take longer, and the surface will remain
tacky. The absence of air alone will not cure it.
Drilling can also be used to stop a stress crack
from travelling. Stress cracks that start at the edge
of the windshield can be prevented from spreading
and filled with a resin, provided the crack is small.
B. The normal curing cycle with the two
conditions present is approximately five minutes
in either direct sunlight or under the UV lamp, and
20 to 30 minutes on a cloudy day.
Drilling TIps
C. The resin is not affected by hot or cold weather,
but it is recommended that it be kept out of
freezing temperatures.
2. Use a fine Diamond or carbide tip probe to
mark a spot on the glass where the drilling is to
take place.
Remember: The special UV resin will always
remain liquid until a UV light source is applied.
3. Keep the drill motor running at all times while
the drill bit is in the hole being drilled. Stop the
motor only after you withdraw the drill bit to avoid
any stress on the glass.
1. Use a fine carbide drill bit.
Drilling
4. Drill at short intervals to avoid excess heat.
Although the majority of beaks will not require
drilling, you should be familiar with the method in
the even you want to consider doing it.
5. Do not drill to the inner liner.
6. Extreme care must be taken when drilling glass.
Excess stress can cause cracks.
Normally, drilling is required when the impact pit is
12
ranges of motion a few times to insure proper
distribution of lubricant inside injector barrel.
Maintenance
The injector barrel is a powerful vacuum and
pressure pump and is frequently used on a daily
basis. A routine schedule of maintenance will
provide trouble free operation and extend the life
of the injector barrel. It is recommended that these
maintenance procedures be performed after every
15 to 20 repairs, or if the plunger assembly stops
moving freely.
1. Remove plunger assembly by depressing the
spring clip on the barrel and pulling out the
plunger.
2. Clean inside of injector barrel with a soft cloth
moistened with Isopropyl or rubbing alcohol.
Allow to dry for a minimum of five minutes.
3. Remove rubber seal from plunger and
thoroughly clean with soft cloth and alcohol. Allow
to dry for five minutes.
4. Replace rubber seal on plunger and lubricate
with a general purpose silicone spray or
equivalent.
5. Re-install plunger assembly by depressing
spring clip while pushing plunger into injector
barrel. Work plunger assembly through it's normal
13
Warranty
Blue Star Products, Inc. warrants all equipment and chemical to be free from
workmanship defects when used under normal usage of such as prescribed
in the Instruction Booklet for a period of ninety (90) days from the date of
purchase. Such equipment or chemical, within the period of the warranty,
shall be replaced or repaired at manufacturer option without charge to the
consumer only when it has been determined in good faith such defect was
due to materials and/or workmanship.
Manufactured by:
Blue Star Products, Inc.
Patented, US, Canada and Foreign Countries.
14
Patented, United States, Canada and Foreign Countries
©Blue Star Products, Inc. 2007
Blue Star Products, Inc. 355 Marcus Blvd. Hauppauge, NY 11788
Tel: 631.231.5222 Web site: www.bluestar-products.com