1
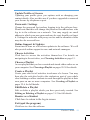
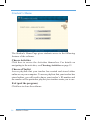
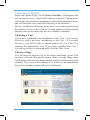
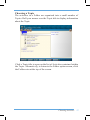
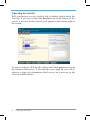
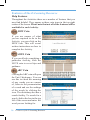
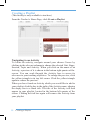
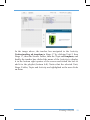
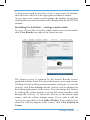
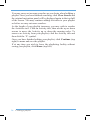
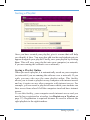
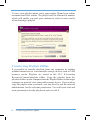
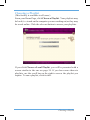
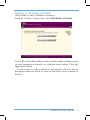
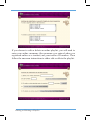
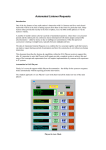
Unit 2
E-Learning
Resource
Copyright notice
Copyright © University of Cambridge School Classics Project 2009.
All Rights Reserved. This multimedia software may not be used,
sold, licensed, transferred, copied, or reproduced in whole or in part
or in any manner or form other than in accordance with the License
Agreement provided with this multimedia software or without prior
consent of the University of Cambridge School Classics Project.
CAMBRIDGE
LATIN COURSE
Unit 2
E-Learning Resource
© University of Cambridge School Classics Project 2009
Contents
Introduction
3
Intended Users
3
The Cambridge Latin Course
4
Content of Unit 2
5
Assessment
6
Electronic Activities
7
Installation
9
Licensing and Logging In
10
Teachers’s Home
12
Student’s Home
14
Choosing Activities
15
Choosing a Unit
15
Choosing a Stage
15
Choosing a Folder
16
Choosing a Topic
17
Choosing an Activity
18
Features of the E-Learning Resource
20
Creating a Playlist
22
Saving a Playlist
27
Transferring Playlists Offline
28
Choosing a Playlist
29
Editing or Deleting a Playlist
31
Glossary 33
Terms and Conditions of Use
34
2
Contents
Introduction
Welcome to the Cambridge Latin Course Unit 2 E-Learning
Resource. The Resource supports school-based teachers and
students using Unit 2 of the Cambridge Latin Course. A multiuser site licence from the Cambridge University Press (CUP) is
required to access the software. All users of the DVD will need
a copy of the textbook (ISBN 978-0-521-78229-5). The textbook
is available from bookstores or directly from Cambridge University
Press (www.cambridge.org/us/education/latin/). To request a multiuser site license, please contact CUP by email (orders@cambridge.
org), by phone (800 872 7423) or by mail (Cambridge University
Press, 100 Brook Hill Drive, West Nyack, NY 10994-2133).
Intended Users
The Resource has been designed for a range of users:
• specialist Latin teachers
• non-specialist teachers delivering Latin to a class of students
• students learning with a specialist Latin teacher
• students learning with a non-specialist classroom teacher.
Email [email protected] for technical support
Intended Users
3
The Cambridge Latin Course
The Cambridge Latin Course is the UK’s most successful Latin
course, with over 4,000,000 copies sold. A story-based reading
course, it traces the lives of a group of characters in the Roman world
of the first century AD. Language and culture are integrated from
the very outset by using as much authentic Roman subject matter as
possible. The Course is set firmly in a Roman context and frequently
introduces historical characters. Its systematic presentation of social,
political, and historical aspects of Roman culture is both a valuable
part of general education and an essential preparation for the reading
of Roman authors. The Course therefore presents language not as an
end in itself, but as a means of gaining access to literature and to the
culture from which it springs.
Unit 2 focuses first on life in Roman Britain before moving further
afield to Egypt. Other titles in the Course take the reader to Pompeii
and Imperial Rome.
Unit 2 builds on the progress made in Unit 1 to form a coherent
program of study in its own right (see Content of Unit 2, p. 5).
4
The Cambridge Latin Course
Content of Unit 2
Unit 2 is divided into 8 Stages (or chapters). The main language
features in Unit 2 include:
• vocative, genitive, and ablative cases, singular and plural, using
nouns of all declensions
• pluperfect tense, all persons, using verbs of the 1st, 2nd, 3rd,
and 4th conjugations
• word order
• further pronouns
• prepositional phrases
• adjectives of the 1st, 2nd, and 3rd declensions
• irregular verbs (volo, nolo, possum)
• relative clauses
• present infinitive
• present participle
• present imperative
• longer sentences with postquam, simulac etc.
The main civilization topics include:
• the Romans in Britain: the British tribes, Roman conquest an
Romanization, trade
• slavery and economy in Roman Britain
• Cogidubnus
• the palace at Fishbourne
• Alexandria: the city, the Pharos, underwater discoveries
• Egypt: craftmanship and peasant life
• the worship of Isis
• medicine and science.
Contents of Unit 2
5
Assessment
At the end of every Stage, students are encouraged to carry out selfassessment by completing Progress Records. Formal assessment
tests, which should be marked by the teacher, are offered at the end
of each Stage. At the end of Stage 18 an attainment test is provided to
assess a student’s ability to translate the language up to that Stage.
6
Assessment
Electronic Activities
The Resource houses approximately 1,000 activities in a number
of media and of various types, marked with standard icons:
simple text and image screens
videos (short story and Stage introductions,
dramatizations and documentaries)
audio-based materials
question-and-answer activities
interactive, including drag and drop, materials
teaching activities
print resources (such as Teacher’s Notes and
Activity Sheets)
web links.
Duration of Activities
The activities vary in length from 30 seconds to 1 hour, but the
majority last 4-5 minutes, enabling study via different media in any
one Session. The duration given to an activity is a suggested duration
only – users should devote the time they feel is warranted to any
given activity. No duration is given to scripts for videos, teacher’s
notes and notes for independent learners, exploring activities, web
links, and certain extension activities where it is neither possible nor
desirable to suggest a duration.
Electronic Activities
7
Source for Activities
The majority of the activities on the Resource have been newly
commissioned for the DVD. Teachers who are familiar with the
Cambridge Latin Course will be aware that some activities are
digital adaptations of activities found in the Omnibus Workbook
and the Activity Masters for Unit 2. Where such activities
have been used in the Resource, their content has often been
altered for the new medium, resulting in changes such as the
addition, removal, or reorganization of individual questions.
The DVD was originally created to support the UK edition of the
Cambridge Latin Course. While every effort has been made to align
activities with the North American edition, this has not been possible
with the dramitizations.
Access to Answers
Teachers should be aware that the Resource contains the answers
to many activities in the textbook and its associated print materials.
Full translations of all stories in Unit 2 are found in the Teacher’s
area. Teachers have access to many more answers than students and
therefore access to the Teacher’s area is available through passwordprotected log-in only.
The majority of the textbook’s Practicing the Language activities
have also been reproduced in electronic format. Teachers who are
concerned about student access to these materials should discuss the
situation with their network manager and take appropriate steps to
limit student access as desired.
Organization of Activities
The software organizes the activities in each Stage into the following
folders: Introduction, Stories, Language, Civilization, Completion.
It is hoped that this arrangement of the activities will allow teachers
to quickly identify activities appropriate for specific learning aims.
8
Electronic Activities
Installation
The E-Learning Resource can be run directly from the DVD or
installed onto standalone or networked PCs and Apple Macintosh
computers. To install the Resource onto your computer, you will
need to have 5Gb of hard disc space available. The Unit 2 Resource
can be combined with a previously installed Unit 1 Resource, or
installed separately.
PC
Insert the DVD into your DVD drive. The installation routine should
auto-run, but if it does not, double-click ‘PC_installer_Unit_2.exe’
and follow the instructions.
Mac
Insert the DVD into your DVD drive. Double-click
‘Mac_installer_Unit_2.osx’ and follow the instructions.
PC and Mac
Because there is a large number of files on the DVD, the software
installation may take 20 minutes or longer, depending upon the
speed of your computer. It is recommended that you restart your
computer after installing the software. Should the installer fail to
operate, simply locate the ‘CLC E-Learning Resource’ folder on
the DVD and drag it onto your computer. If you already have the
Unit 1 Resource installed, allow the contents of the Unit 2 ‘CLC
E-Learning Resource’ folder to replace the contents of your existing
folder where necessary. If you do this there are two things to note:
• if you have entered them in Unit 1, your Teacher password and
license details will be reset.
• if you have any playlists you should make a copy of your existing playlists folder and replace it after copying the Unit 2 ‘CLC E-Learning Resource’ folder.
Network Installation
Network managers should be aware that the software contains
facilities for teachers to change passwords and to create and save
playlists of activities. To use these facilities, teachers will need read/
write privileges to the following text files only:
Installation
9
• prefs.txt (located in the CLC E-Learning Resource\Content\Data
folder)
• any text files in the ‘playlists’ folder (CLC E-Learning
Resource\Content\playlists).
Students require read-only access to the software.
Network managers should also be aware that the software checks
for an internet connection on start-up by attempting to download a
small text file. The software therefore needs to have the necessary
privileges to be able to access the internet. If access to the internet is
not available, most aspects of the software will function correctly,
but online registration and playlisting will be inaccessible to the
teacher.
Please use the Passwords/Settings facility on the Teacher’s Home
Page to access proxy server settings.
Installation Support
Should you encounter any problems with the installation, please
email [email protected].
Licensing and Logging In
When you launch the Cambridge Latin Course Unit 2 E-Learning
Resource for the first time, you are asked for details of your multiuser site license for the software. Use of the software in a school or
other institution requires a multi-user site license. The multi-user
site licene can be obtained from the Cambridge University Press
(see Introduction, p. 3).
10
Licensing and Logging In
Once you have entered your license number and security code, you
will be taken to a log-in screen allowing you to log in as a student
or teacher.
No password is required to access the software as a student. Since
teachers have access to all answers, access for these users is
password-protected. The default password for teachers is [please
contact Cambridge University Press at [email protected]].
Licensing and Logging In
11
Teacher’s Home
The Teacher’s Home Page gives teachers access to all aspects of
the software.
Register as a Teacher
Registering as a teacher enables you to:
• store your playlists online – your students can access them
from any computer connected to the internet (e.g. you will be
able to create playlists at home and use them on the school
network without having to transfer any files)
• receive an email whenever we release an update to the
program.
When you register, you will be asked to supply an online username.
Once you have registered, you will be given an individual Teacher
ID number. This information allows us to establish an online area
for your playlists, which only you will have access to. Please write
down your username and ID number and keep them safely.
Please note that we will not, under any circumstances, disclose
your details to a third party.
12
Teacher’s Home
Update Profile or License
Updating your profile gives you options such as changing your
contact details. Also use this area if you have upgraded or renewed
your license by telephone or post.
Passwords / Settings
Change the password for teachers logging in to the software here.
Please note that this will change the password for all teachers who
log in to the software on a network. You may supply an email
address to which your new password may be sent, should you forget
it. Settings for networks with proxy servers and for alternative fonts
may also be accessed here.
Online Support & Updates
From time to time we will release updates to the software. We will
also provide online support to users and network managers.
Choose Activities
Click here to access the activities themselves. For details on
navigating to the activities, see Choosing Activities on page 15.
Choose a Playlist
Access playlists that you have created and stored either online or on
your computer. See Choosing a Playlist on pages 29-30 for details.
Create a Playlist
Create your own list of activities in advance of a lesson. You may
then play the activities back to the students as part of your whole
class teaching or allow students to work through the playlist at their
own pace on one or more computers. See Creating a Playlist on
pages 22-6 for full details.
Edit/Delete a Playlist
Edit or delete a playlist which you have previously created. See
Editing or Deleting a Playlist on pages 31-2 for full details.
Reenter as a Student
Click here to return to the log-in screen
Exit (quit the program)
Click here to close the software.
Teacher’s Home 13
Student’s Home
The Student’s Home Page gives students access to the following
features of the software.
Choose Activities
Click here to access the Activities themselves. For details on
navigating to the activities, see Choosing Activities on page 15.
Choose a Playlist
Access playlists that your teacher has created and stored either
online or on your computer. To access playlists that your teacher has
stored online, you will need to know your teacher’s ID number and
the number of the particular playlist your teacher wants you to use.
Exit (quit the program)
Click here to close the software.
14
Student’s Home
Choosing Activities
From your Home Page, click Choose Activities. (Throughout the
E-Learning Resource, single clicks only are required. Clicking twice
will result in the software attempting to carry out an instruction twice
and will therefore slow down the response of the software.)
Please note that the following notes show screen shots taken from
the teacher’s access to the software. Certain options and information
shown in the screen shots may not be available to students.
Choosing a Unit
If you have combined your installation of the Unit 2 E-Learning
Resource with a previous installation of the Unit 1 E-Learning
Resource, you will be able to choose either Unit 1 or Unit 2 by
clicking the appropriate icon. If you have installed the Unit 2
E-Learning Resource independently, click the Unit 2 icon.
Choose a Stage
You will now be shown a list of the Stages that make up the Unit
you have selected. Moving the mouse cursor over the Stage icons
will display rollover text which contains notes for both teachers and
students. If you access the software as a student or an independent
learner, the teacher’s notes will not be displayed.
Choosing Activities 15
To access a Stage, click the relevant Stage icon. To return to the
Unit option screens, click the Unit coin in the top left of the screen.
Choosing a Folder
Clicking a Stage icon will take you to an individual Stage menu
screen, where you will be presented with a choice of five folders:
Introduction, Stories, Language, Civilization, and Completion.
Rolling the mouse cursor over a Folder displays the total duration
of all Activities in that Folder. A Folder contains a set of Activities
organized into Topics. To open a Folder, click on the relevant Folder
icon. To return to the Stage option screen, click the Stage coin at the
top of the screen.
16
Choosing Activities
Choosing a Topic
The activities in a Folder are organized into a small number of
Topics. Roll your mouse over the Topic title to display information
about the Topic.
Click a Topic title to open up the list of Activities contained within
the Topic. Alternatively, to return to the Folder option screen, click
the Folder coin at the top of the screen.
Choosing Activities
17
Choosing an Activity
Roll your mouse over an Activity title to display details about the
Activity. If you have ticked the Preview box at the bottom of the
screen, a preview of the Activity will appear in the bottom right of
the screen.
To run an Activity, click its title. Notice the Cover pages tick box at
the bottom of the screen. If you turn the cover page on, you will be
taken to a page of information which serves as a preview to the
Activity which follows.
18
Choosing Activities
Once you have read the information on the cover page, click the
CONTINUE button to go to the related Activity.
If you are logged in as a teacher, the cover page will also
feature a Teacher tab. Click this tab to show a teacher’s note on the
Activity which follows.
Choosing Activities
19
Features of the E-Learning Resource
Help Features
Throughout the Activities there are a number of features that you
may find helpful. They appear as three coin icons in the top right
corner of the screen. Please note that not all of the features will be
available for each Activity.
HOW Coin
If you are unsure of what
you are required to do in the
Activity, you can click on the
HOW coin. This will reveal
written instructions on how to
complete the Activity.
NOTE Coin
If you need help completing a
particular Activity, click the
NOTE coin to reveal tips and
guidance.
ABC Coin
Clicking the ABC coin will open
the Unit 2 dictionary. You can
use this to check the meaning
of any words you are unsure
of, listen to the pronunciation
of a word and see the endings
of the words by clicking the
icon. The dictionary also has a
search facility. To search for a
word, click in the box in the top
left of the screen and enter the
word you are looking for.
20
Features of the E-Learning Resource
In some Activities, you will notice three dolphins displayed at
the top of the screen. These indicate the number of attempts you are
allowed to complete the Activity. For every unsuccessful attempt,
one of the dolphins will change colour, from yellow to black.
As well as the help coins, there are various other coins which are
displayed at the top of the screen. These are designed to help you
navigate through the materials.
Click to return to your Home Page.
Click to return to the Unit selection screen.
Click to return to the Stage selection screen.
Click to return to the Folder selection screen.
Click to hide the E-Learning Resource. To show the ELearning Resource again, click the software in the ‘task bar.’
Features of the E-Learning Resource
21
Creating a Playlist
(This facility is only available to teachers.)
From the Teacher’s Home Page, click Create a Playlist.
Navigating to an Activity
To locate an activity, navigate around your chosen Course by
clicking in the relevant columns to change the selected Unit, Stage,
Session, Topic and Activity. When you click on the name of an
Activity, a preview of it is shown in the bottom right quarter of the
screen. You can work through the Activity here to assess its
relevance to your teaching objectives. To enlarge the preview, click
the yellow triangle in its top left corner. Click the yellow triangle
again to reduce the preview.
When you have found an Activity which you would like to add to
your playlist, click the box to the right of the Activity name, altering
the empty box to a black tick. The title of the Activity will then
appear in your playlist, located in the bottom left quarter of the
screen. Clicking the tick box again will remove the Activity from
your playlist.
22
Creating a Playlist
In the image above, the teacher has navigated to the Activity
Understanding ad templum in Stage 17 by clicking Unit 2, then
Stage 17, then the Stories Folder, then the Topic ad templum, and
finally the teacher has clicked the name of the Activity to display
it in the bottom right quarter of the screen and ticked the box to
add it to the playlist (bottom left). Notice that the selected Unit,
Stage, Folder, Topic and Activity are highlighted as the user clicks
on them.
Creating a Playlist
23
Searching for Activities – entering search criteria
The software contains a search facility to help you find Activities
to add to your playlist. To activate the search facility, click Open
Search at the top of the playlisting screen.
The software allows you to search for Activities by keyword, page
number, intended user group, and/or medium type. Use the
SETTINGS column on the left to select which of these criteria you
would like to search by. Click each of the four criteria you wish to
employ in your search and tell the search engine whether you wish
it to find activities which match all the criteria you set, or activities
which match any one criterion. (A ‘Match all’ search will return
fewer activities than a ‘Match any’ search.)
To search for activities which match a particular keyword, first
select the appropriate keywords to display using the Keyword dropdown menu (choose from Unit 1 only, Unit 2 only or Units 1 & 2,
and from either language or civilization keywords). Then click the
appropriate Match button to search for activities which match all
keywords or activities which match any keyword. Finally, click the
boxes to the left of the keywords you wish to search by.
To search for activities which match a particular page range, first
choose the appropriate Unit by clicking a Stage number in that Unit,
or by clicking all. If you wish, you may further limit the page range
using the up and down arrows on the page range boxes to the left.
To limit your search to activities relevant to a particular user group,
click the box to the left of the appropriate group.
24
Creating a Playlist
To limit your search to activities of one or more types of medium,
click the box to the left of the appropriate medium or media.
As you enter your various search settings, the number of activities
which match your search criteria will be displayed in the SETTINGS
column.
Searching for Activities – viewing search results
To view a list of the Activities which match your search results,
click View Results (top right of the Search screen).
The Search screen is replaced by the Search Results screen,
populated with the list of Activities which meet your search criteria.
Clicking an Activity title generates a number of options. To view the
Activity, click View Activity and the Activity will be displayed in
the bottom right quarter of the screen. You can enlarge the Activity
by clicking the yellow triangle in its top left corner and then work
through the Activity. To return the Activity to the bottom right
corner, click the yellow triangle again. If you wish to add the
Activity to your playlist, click Add to Playlist. If you wish to view
where the Activity appears in the course, click View Position in
Course.
Creating a Playlist
25
You may carry out as many searches as you desire when building a
playlist. Once you have finished searching, click Close Search and
the original navigation panel will be displayed again in the top half
of the screen. You may continue adding Activities to your playlist
as before or carry out more searches.
As the length of your playlist increases, you may wish to reorder
the Activities in it. Click an Activity title, then use the up or down
arrows to move the Activity up or down the running order. To
remove an Activity from your playlist, click the Activity title and
then click the ‘X’ symbol.
Once you have finished editing your playlist, click Continue (top
right) to name and save the playlist.
If at any time you wish to leave the playlisting facility without
saving your playlist, click Home (top left).
26
Creating a playlist
Saving a Playlist
Once you have created your playlist, give it a name that will help
you identify it later. You may also add teacher and student notes to
appear alongside your playlist. Finally, save your playlist by clicking
Save. This will save your playlist onto your computer (or network,
if you are running the software over a network).
Saving a Playlist Online
When you save a playlist, it is automatically saved on your computer
(or network if you are running the software over a network). If you
wish, you may also save the same playlist online. This facility
allows you to create a playlist on any computer with internet access
and use it again on any other computer with internet access. For
example, you can create a playlist at home which your students can
later access from school if all the computers involved have internet
access.
To use this facility, your computer needs internet access and you
need to have registered as a teacher (see Register as a Teacher on
page 12). Registration is required because we need to allocate the
right playlists to the right teachers.
Saving a playlist
27
To save your playlist online, enter your teacher ID and your online
username and click online. The playlist will be allocated a number
which will enable you and your students to select it more easily
when choosing a playlist.
Transferring Playlists Offline
It is possible to transfer playlists from one computer to another
without internet access via removable storage devices such as USB
memory sticks. Playlists are stored in the CLC E-Learning
Resource\Content\playlists folder. Copy the playlist from the
playlists folder on one computer into the Playlist folder on the target
computer or network via a removable storage device. If you wish to
copy the playlist onto a network, you may need to ask the network
administrator for the relevant permission. You will need read and
write permissions for the playlist in order to edit it.
28
Transferring Playlists Offline
Choosing a Playlist
(This facility is available to all users.)
From your Home Page, click Choose a Playlist. Your playlists may
be local (i.e. stored on the computer you are working on) or they may
be saved online. Click the relevant button to access your playlists.
If you click Choose a Local Playlist, you will be presented with a
screen similar to the one on page 30. If you have more than six
playlists, use the scroll bar on the right to access the playlist you
require. To run a playlist, click its title.
Choosing a Playlist
To access an online playlist, click Choose an Online Playlist.
Enter your teacher ID and the playlist number if you know it and
click . To see all your playlists, click . To run a
playlist, click its title.
Choosing a Playlist
Editing or Deleting a Playlist
(This facility is only available to teachers.)
From the Teacher’s Home Page, click Edit/Delete a Playlist.
You will be offered the ability to edit or delete either a playlist stored
on your computer or network, or a playlist stored online. Click the
appropriate button.
If you choose to edit or delete a local playlist, click its title in
the upper window to edit it, or click its title in the lower window to
delete it.
Editing or Deleting a Playlist
31
If you choose to edit or delete an online playlist, you will need to
enter your online username (the username you entered when you
registered online as a teacher) and your teacher ID number. Then
follow the onscreen instructions to either edit or delete the playlist.
Editing or Deleting a Playlist
This is a legal agreement between you (the ‘customer’) and the University of Cambridge School
Classics Project for the Cambridge Latin Course Unit 2 E-Learning Resource. By placing this DVDROM in the DVD drive of your computer, you agree to the terms of this license.
(a) You are purchasing only the right to use the DVD-ROM and are acquiring no rights, express or
implied, to the software itself, or the enclosed copy, other than those rights granted in this limited
license for not-for-profit educational use only.
(b) (i) If you are purchasing this DVD-ROM for individual use, the University of Cambridge School
Classics Project grants you the license to install and use this software on a single computer. (ii) If you
are purchasing this DVD-ROM for use in an institution, and wish to display this software with a data
projector, install and use this software simultaneously on a number of computers, or install and use
this software on a single secure network server for access from computers on a single site, you will
need to obtain a separate multi-user site license. To obtain a multi-user site license, please contact
the University of Cambridge School Classics Project at: [email protected] or Cambridge
School Classics Project, 11 West Road, Cambridge, CB3 9DP. Multi-user site licenses are valid for
a limited period and must be renewed if you wish to continue using the Cambridge Latin Course
Unit 2 E-Learning Resource. There is a charge for the multi-user site license.
(c) You shall not: (i) copy or authorize copying of the DVD-ROM, (ii) translate the DVD-ROM, (iii)
reverse-engineer, alter, adapt, disassemble, or decompile the DVD-ROM, (iv) transfer, sell, lease,
lend, profit from, assign or otherwise convey all or any portion of the DVD-ROM, (v) operate the
DVD-ROM from a mainframe system or (vi) charge for demonstration of, or training in the use of,
the DVD-ROM or include demonstration of, or training in the use of, the DVD-ROM at any event
to which access is charged.
All titles and material contained within the DVD-ROM are protected by copyright and all other applicable
intellectual property laws and international treaties. Therefore, you may not copy the DVD-ROM except
for making one copy of the DVD-ROM solely for backup or archival purposes. You may not alter,
remove or destroy any copyright notice or other material placed on or with this DVD-ROM.
The DVD-ROM is supplied ‘as-is’ with no express guarantee as to its suitability. To the extent permitted
by applicable law, the University of Cambridge School Classics Project is not liable for costs of
procurement of substitute products, damages, or losses of any kind whatsoever resulting from the
use of this product, or errors or faults in the DVD-ROM, and in every case the University of Cambridge
School Classics Project’s liability shall be limited to the suggested list price or the amount actually paid
by the customer for the product, whichever is lower.
Without prejudice to any other rights, the University of Cambridge School Classics Project may
terminate this license if you fail to comply with the terms and conditions of the license. In such event,
you must destroy all copies of the DVD-ROM.
This agreement is governed by the laws of the England, without regard to its conflict of laws provision,
and each party irrevocably submits to the exclusive jurisdiction of the courts of the England. The parties
disclaim the application of the United Nations Convention on the International Sale of Goods.