1
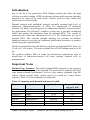
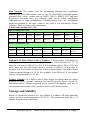
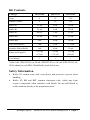
Table of Contents Introduction…………………………………………………………. 2 Important Notes………………….…………………………………. 2 Storage and Stability………………………………………………... 3 Before Starting……………………………………………….…….. 4 Kit Contents………………………………………………....……… 5 Safety Information………………………………………….………. 5 EZgene™ EndoFree Plasmid ezFlow Miniprep II Spin Protocol….. 6 EZgene™ EndoFree Plasmid ezFlow Miniprep II Spin/Vacuum Protocol …………………………………………………………….. 8 Purification of Low-Copy-Number Plasmid and Cosmid………….. 9 Trouble Shooting Guide...........................................................……... 12 Biomiga EZgeneTM EndoFree ezFlow Plasmid Miniprep Kit II Page 1 Introduction Key to the kit is our proprietary DNA binding systems that allow the high efficient reversible binding of DNA to the mini column while proteins and other impurities are removed by wash buffer. Nucleic acids are then eluted with sterile water or elution buffer. Plasmid isolated with traditional protocol normally contains high level of endotoxins (lipopolysaccharides or LPS). For transfection of endotoxin sensitive cell lines or microinjection, the endotoxins should be removed before the applications. The EZgene™ endofree system uses a specially formulated buffer that extracts the endotoxin from the plasmid DNA. Two rounds of extraction will reduce the endotoxin level to 0.1 EU (Endotoxin) per µg of plasmid DNA. The endofree plasmid miniprep kit provides an efficient endotoxin removal step into the traditional purification procedure to produce transfection grade plasmid DNA. This kit is designed for fast and efficient purification of plasmid DNA from 3 to 12 mL of E. coli culture. The mini column II has a DNA binding capacity of 80 µg. The purified endofree DNA is ready for downstream applications such as transfection of endotoxin-sensitive cell lines, primary cultured cells or microinjection. Important Notes Plasmid Copy Numbers: The yield of plasmid DNA depends on the origin of the replication and the size of the plasmid. The protocols are optimized for high copy number plasmid purification. For low copy number plasmids, both the culture volume and the buffer volume need to be scaled up 2 times. Please reference Table 1 for the commonly used plasmids. Table 1 Commonly used plasmid and expected yield. Plasmid Origin pSC101 pACYC pSuperCos pBR322 pGEMR pBluescriptR pUC pSC101 P15A pMB1 pMB1 Muted pMB1 ColE1 Muted pMB1 Copy Numbers 5 10-12 10-20 15-20 300-400 300-500 500-700 Expected Yield (µg per 1 mL) 0.1-0.2 0.4-0.6 0.4-1 0.6-1 6-7 6-8 8-12 Page 2 Biomiga EZgeneTM EndoFree ezFlow Plasmid Miniprep Kit II Host Strains: The strains used for propagating plasmid have significant influence on yield. Host strains such as Top 10, and DH5a yield high-quality plasmid DNA. endA+ strains such as JM101, JM110, HB101, TG1 and their derivatives, normally have low plasmid yield due to either endogenous endonucleases or high carbohydrates released during lysis. We recommend transform plasmid to an endA- strain if the yield is not satisfactory. Please reference Table 2 for the endA information. Table2 endA strains of E. Coli. EndA- Strains of E. Coli DH5α DH1 DH21 JM106 JM109 SK2267 SRB TOP10 DH10B JM103 JM107 SK1590 MM294 Stbl2™ BJ5182 DH20 JM105 JM108 SK1592 Select96™ Stbl4™ XLO XL1Blue XL10Gold EndA+ Strains of E. Coli C600 HB101 JM110 TG1 JM101 JM83 All NM strains RR1 ABLE® C ® TB1 ABLE K TKB1 HMS174 CJ236 KW251 DH12S LE392 ™ ES1301 M1061 All Y strains P2392 PR700 Q358 BL21(DE3) BL21(DE3) pLysS BMH 71-18 Optimal Cell Mass (OD600 x mL of Culture): This procedure is designed for isolating plasmid grown in standard LB medium (Luria Bertani) for 12 -16 hours to a density of OD600 2.0 to 3.0. If rich medium such as TB or 2xYT are used, make sure the cell density doesn’t exceed 3.0 (OD600). A high ratio of biomass over lysis buffers result in low DNA yield and purity. The mini column II has an optimal biomass of 10-36. For example, if the OD600 is 3.0, the optimal culture volume should be 3-12 mL. Culture Volume: Use a flask or tube 4 times bigger in volume than the culture medium to secure optimal condition for bacteria growth. Don’t exceed the maximum culture volume suggested in the protocol. Incomplete lysis due to over amount of bacterial culture results in lower yield and less purity. Storage and Stability Buffer A1 should be stored at 4°C once RNase A is added. All other materials can be stored at room temperature (22-25°C). The guaranteed shelf life is 12 months from the date of purchase. Biomiga EZgeneTM EndoFree ezFlow Plasmid Miniprep Kit II Page 3 Before Starting Two endotoxin removal procedures are provided. Protocol A removes endotoxin during the purification of plasmid DNA and Protocol B removes endotoxin after the purification of plasmid DNA. Prepare all components and get all necessary materials ready by examining this instruction booklet and become familiar with each steps and pay special attention to the followings, Important RNase A: It is stable for half a year under room temperature. Spin down RNase A vial briefly. Add the RNase A solution to buffer A1 and mix well before use. Add 8 mL (PD1222-00) or 60 mL (PD1222-01) or 96 mL (PD1222-02) 96-100% ethanol to each DNA Wash Buffer bottle before use. Buffer B1 precipitates below room temperature. It is critical to warm up the buffer at 50°C to dissolve the precipitates before use. Buffer N3 may form precipitates below 10°C, warm up at 37°C to dissolve the precipitates before use. Keep the cap tightly closed for Buffer B1 after use. Ensure the availability of centrifuge capable of 13,000 rpm. Carry out all centrifugations at room temperature. Materials supplied by users 96-100% ethanol. 1.5 mL and 2.0 mL microcentrifuge tubes. High speed microcentrifuge or Vacuum manifold. Page 4 Biomiga EZgeneTM EndoFree ezFlow Plasmid Miniprep Kit II Kit Contents Catalog # PD1222-00 PD1222-01 PD1222-02 Preps 4 50 250 ezBind Columns 4 50 250 Buffer A1 2.5 mL 25 mL 125 mL Buffer B1 2.5 mL 25 mL 125 mL Buffer N3 400 µL 5 mL 25 mL Buffer KB 2.5 mL 30 mL 135 mL Buffer RET 4 mL 50 mL 250 mL DNA Wash Buffer* 2 mL 15 mL 3 x 24 mL Endofree Elution Buffer 1 mL 10 mL 30 mL 0.25 mg (17.5µL) 2.5 mg (175 µL) 12.5 mg (625 µL) 1 1 1 RNase A(20 mg/mL) User Manual *Add 8 mL (PD1222-00) or 60 mL (PD1222-01) or 96 mL (PD1222-02) 96100% ethanol to each DNA Wash Buffer bottle before use. Safety Information Buffer N3 contain acetic acid, wear gloves and protective eyewear when handling. Buffer N3, KB and RET contains chaotropic salts, which may form reactive compounds when combines with bleach. Do not add bleach or acidic solutions directly to the preparation waste. Biomiga EZgeneTM EndoFree ezFlow Plasmid Miniprep Kit II Page 5 EZgene TM Plasmid ezFlow Miniprep Spin Protocol: 1. Inoculate 3-12 mL LB containing appropriate antibiotic with a single colony from a freshly streaked selective plate. Grow at 37°C for 14-16 hours with vigorous shaking. Note: Do not use a streaked plate that has been stored at 4°C. Note: Do not inoculate culture directly with glycerol stock. Note: This protocol is optimized for E. coli strain cultured in LB medium. When using TB or 2xYT medium, special care needs to be taken to ensure the cell density doesn’t exceed 3.0 (OD600). Buffers need to be scaled up if over amount of cultures are being processed. 2. Harvest the bacterial culture by centrifugation for 1 minute at 13,000 rpm. Pour off the supernatant and blot the inverted tube on a paper towel to remove residue medium. Remove the residue medium completely. Note: Residue medium will cause, Poor cell lysis and thus lower DNA yield. Loose pellet after centrifugation in step 6. 3. Add 400 µL Buffer A1 and completely resuspend bacterial pellet by vortexing or pipetting. (Complete resuspension is critical for bacterial lysis and lysate neutralization). 4. Add 450 µL Buffer B1, mix gently by inverting 10 times (do not vortex) and incubate at room temperature for 5 minutes. Note: Do not incubate for more than 5 minutes. 5. Add 80 µL Buffer N3, mix completely by inverting/shaking the vial for 5 times. Note: It is critical to mix the solution well, if the mixture still appears conglobated, brownish or viscous; more mixing is required to completely neutralize the solution. 6. Centrifuge the lysate at 13,000 rpm for 10 minutes at room temperature. Note: If the lysate doesn’t appear clean, reverse the tube angle, centrifuge for 5 more minutes and then transfer the clear lysate to DNA column. 7. Carefully transfer about 750 µL clear lysate(no more than 800 µL) to a clean 2.0 mL tube and add 1 volume of Buffer RET (For example, 800 Page 6 Biomiga EZgeneTM EndoFree ezFlow Plasmid Miniprep Kit II µL of Buffer RET to 800 µL of clear lysate), and 400 µL of 100% ethanol. Mix well by sharp hand shaking for 3 times. 8. Transfer 700 µL of the lysate/ethanol mixture to a DNA spin column and centrifuge at 13,000 rpm for 20s. Discard the flow-through liquid and transfer the remaining lysate/ethanol mixture to the column. Centrifuge at 13,000 rpm for 30s and discard the flow-through, put the column back to the collection tube. 9. Add 500 µL Buffer KB into the spin column, centrifuge at 13,000 rpm for 1 minute. Remove the spin column from the tube and discard the flowthrough. Put the column back to the collection tube. Note:This step is important to remove residual protein contaminations especially for endA+ strains and be highly recommended for high qual i ty plasmid DNA. 10. Add 650 µL DNA Wash Buffer and centrifuge at 13,000 rpm for 20s. Discard the flow-through liquid and insert the column, with the lid open, back to the collection tube. Repeat step “10”. 11. Centrifuge the column, with the lid open, at 13,000 rpm for 5 -10 minutes to remove the residual ethanol. Note: Residual ethanol can be removed more efficiently with the column lid open. It is critical to remove residual ethanol completely. 12. Transfer the column to a 1.5 mL tube and add 50-100 µL of Endofree Elution Buffer Incubate for 1 minute at room temperature and centrifuge at 13,000 rpm for 1 minute to elute DNA. Reload the eluate into the column (use the same 1.5 mL tube) and incubate for 1 minute, centrifuge at 13,000 rpm for 1 minute to elute DNA. Note: The eluted DNA is ready for transfection of endotoxin-sensitive cell lines, primary cultured cells or microinjection. 13. The DNA concentration can be calculated as follows, DNA concentration (µg/mL) = OD260nm x 50 x dilution factor. Note: Two elutions give rise to maximum DNA yield. Use less Endofree Elution Buffer if high concentration is desired. Biomiga EZgeneTM EndoFree ezFlow Plasmid Miniprep Kit II Page 7 EZgene TM Plasmid ezFlow Miniprep Spin/Vacuum Protocol: 1. Set up the vacuum manifold according to manufacture’s instruction and connect the column to the manifold. 2. Carry out step 1-7 in previous protocol on page 6 and 7. 3. Carefully transfer the solution from step 7 in the previous protocol to a DNA column and turn on the vacuum to allow the lysate pass through the column. Repeat until the remaining solution pass through the column. 4. Add 500 µL Buffer KB to the column and allow the buffer pass the column by vacuum. Note:This step is important to remove residual protein contaminations especially for endA+ strains and be highly recommended for high qual i ty plasmid DNA. 5. Add 650 µL of DNA Wash Buffer to the column and allow the vacuum to draw the liquid through the manifold. Turn off the vacuum. Repeat step 5. 6. Transfer the column, with the lid open, to a 2 mL collection tube and centrifuge at 13,000 rpm for 5 - 10 minutes. 7. Transfer the column to an endofree 1.5 mL tube and add 50 -100 µL of EndoFree Elution Buffer. Incubate for 1 minute and centrifuge at 13,000 rpm for 1 minute to elute DNA. Reload the eluate into the column (use the same 1.5 mL tube) and incubate for 1 minute, centrifuge at 13,000 rpm for 1 minute to elute DNA . Note: The eluted DNA is ready for transfection of endotoxin-sensitive cell lines, primary cultured cells or microinjection. Page 8 Biomiga EZgeneTM EndoFree ezFlow Plasmid Miniprep Kit II Purification of Low-Copy-Number Plasmid/Cosmid The yield of low copy number plasmid is normally around 0.1 – 1 µg /mL of overnight culture. For isolating low copy number or medium copy number plasmid DNA, use the following guideline: 1. Culture volume: Use 2 x volumes of the high copy number culture. Use 10 mL for miniprep kit. 2. Use 2 x volumes of the Buffer A1, Buffer B1, Buffer N3, Buffer RET and 100% ethanol. Additional buffers can be purchased from Biomiga. 3. Use same volume of DNA Wash Buffer and Endofree Elution Buffer. Purification of plasmid > 12 kb For isolating plasmid DNA > 12 kb, use the following guideline: 1. 2. Culture volume: Use 2 x volumes of the culture. Use 2 x volumes of the Buffer A1, Buffer B1, Buffer N3, Buffer RET and 100% ethanol. Additional buffers can be purchased from Biomiga. 3. Use same volume of Wash Buffer (DNA Wash Buffer) and EndoFree Elution Buffer 4. Pre-warm the Endofree Elution Buffer at 65°C and let the column stand for 5 min after adding Endofree Elution Buffer. Biomiga EZgeneTM EndoFree ezFlow Plasmid Miniprep Kit II Page 9 Trouble Shooting Guide Problems Possible Reasons Suggested Improvements Low Yield Poor Cell lysis. Resuspend pellet thoroughly by votexing and pipetting prior adding Buffer B1. Make fresh Buffer B1 if the cap had not been closed tightly. (Buffer B1: 0.2 M NaOH and 1%SDS). Low Yield Bacterial culture Grow bacterial 12-16 hours. Spin down overgrown or not fresh. cultures and store the pellet at - 20°C if the culture is not purified the same day. Do not store culture at 4°C over night. Low Yield Low copy-number plasmid. Increase culture volume according to instructions on page 9. No DNA Plasmid lost in Host E.coli Prepare fresh culture. Genomic DNA contamination Over-time incubation Do not vortex or mix aggressively after after adding Buffer B1. adding Buffer B1. Do not incubate more than 5 minutes after adding Buffer B1. RNA contamination RNase A not added to Buffer A1. Add RNase A to Buffer A1. Plasmid DNA floats Ethanol traces not out of wells while completely removed running in agarose gel, from column. DNA doesn’t freeze or smell of ethanol Make sure that no ethanol residual remaining in the silicon membrane before elute the plasmid DNA. Recentrifuge or vacuum again if necessary. No phase partitioning Temperature is lower after centrigugation than 23°C. Make sure the temperature is greater than 23°C for centrifugation or incubate the sample at 60°C for 5 min and then perform centrifugation Page 10Biomiga EZgeneTM EndoFree ezFlow Plasmid Miniprep Kit II