1
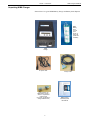
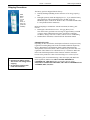
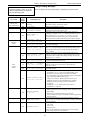
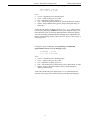
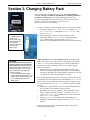
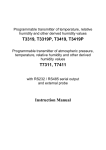
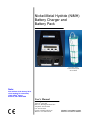
Nickel-Metal Hydride (NiMH)
Battery Charger and
Battery Pack
12-cell pack shown;
6-cell and 9-cell packs
also available
Note:
New address (mid-January 2010;
check website for exact date)
13431 NE 20th Street
Bellevue, WA 98005 USA
User’s Manual
Sea-Bird Electronics, Inc.
1808 136th Place NE
Bellevue, Washington 98005 USA
Telephone: 425/643-9866
Fax: 425/643-9954
E-mail: [email protected]
Website: www.seabird.com
Manual Version #004, 12/23/09
Firmware Version 1.3 and later
Limited Liability Statement
Extreme care should be exercised when using or servicing this equipment. It should be used or serviced
only by personnel with knowledge of and training in the use and maintenance of oceanographic
electronic equipment.
SEA-BIRD ELECTRONICS, INC. disclaims all product liability risks arising from the use or servicing
of this system. SEA-BIRD ELECTRONICS, INC. has no way of controlling the use of this equipment
or of choosing the personnel to operate it, and therefore cannot take steps to comply with laws
pertaining to product liability, including laws which impose a duty to warn the user of any dangers
involved in operating this equipment. Therefore, acceptance of this system by the customer shall be
conclusively deemed to include a covenant by the customer to defend, indemnify, and hold SEA-BIRD
ELECTRONICS, INC. harmless from all product liability claims arising from the use or servicing of
this system.
2
Table of Contents
NiMH Charger & Batteries
Table of Contents
Section 1: Introduction ........................................................................ 4
About this Manual .............................................................................................4
Quick Start .........................................................................................................4
Unpacking NiMH Charger.................................................................................5
Shipping Precautions .........................................................................................6
Section 2: Description of Charging System ....................................... 7
Description.........................................................................................................7
Specifications.....................................................................................................8
Charger Controls and Display............................................................................9
Charger Display Messages........................................................................10
Section 3: Charging Battery Pack .................................................... 12
Section 4: Charger Maintenance ...................................................... 13
Section 5: Battery Characteristics and Handling............................ 14
Battery Self-Discharge.....................................................................................14
Battery Charging Temperature.........................................................................14
Battery Conditioning and Voltage Droop ........................................................14
Battery Storage ................................................................................................15
Battery Life ......................................................................................................15
Battery Safety and Handling............................................................................15
Appendix I: Replacement Parts........................................................ 16
Index.................................................................................................... 17
3
Section 1: Introduction
NiMH Charger & Batteries
Section 1: Introduction
This section includes a Quick Start procedure, photos of a standard NiMH
Battery Charger and Battery Pack shipment, and battery shipping precautions.
About this Manual
This manual is to be used with the NiMH Battery Charger. We have included
detailed specifications, operating procedures, and helpful notes throughout
the manual.
Sea-Bird welcomes suggestions for new features and enhancements of our
products and/or documentation. Please contact us with any comments or
suggestions ([email protected] or 425-643-9866). Our business hours are
Monday through Friday, 0800 to 1700 Pacific Standard Time (1600 to 0100
Universal Time) in winter and 0800 to 1700 Pacific Daylight Time (1500 to
0000 Universal Time) the rest of the year.
Quick Start
Note:
The battery pack can remain in the
instrument housing while being
charged. See the instrument manual
for details on accessing the battery
pack.
WARNING!
Do not disconnect the battery
pack from the charger while the
Charger Active lamp is on.
Disconnecting the battery pack while
the lamp is on may cause a small
spark. The user may feel a small
shock, especially if the connector is
damp.
• If you need to interrupt the battery
charger, press the Reset button.
The Charger Active lamp should
turn off; it is now safe to
disconnect the battery pack.
Follow these steps to get a Quick Start using the Battery Charger. The manual
provides step-by-step details for performing each task:
1.
Connect the charger to the power supply and turn on power to the charger.
2.
Connect the charger cable to the charger and the battery pack.
3.
(Approximately once every six charging cycles) When the charger
displays READY, press the Discharge button. The top line of the display
shows DISCHARGE during the discharge cycle. When the discharge is
complete, the top line of the display shows EMPTY.
4.
Press the Charge button. The top line of the display shows FAST
CHARGE during all or most of the charging cycle. When charging is
complete, the top line of the display shows BATTERY FULL.
5.
Turn off power to the charger. Disconnect the charger cable from the
charger and the battery pack.
4
Section 1: Introduction
NiMH Charger & Batteries
Unpacking NiMH Charger
Shown below is a typical NiMH Battery Charger and Battery Pack shipment.
NiMH
Battery
Pack
(12-cell
pack
shown; 6and 9-cell
packs also
available)
NiMH
Charger
AC power cable
Charger cable
Nickel-Metal Hydride (NiMH)
Battery Charger and
Battery Pack
Spare fuses (2) for
NiMH battery charger –
stored in compartment
inside charger
(to access, see Section 4:
Charger Maintenance)
5
NiMH Charger
and Battery Pack
User Manual
Section 1: Introduction
NiMH Charger & Batteries
Shipping Precautions
NiMH
Battery
Pack
(12-cell
pack
shown; 6and 9-cell
packs also
available)
The battery pack was shipped from the factory:
• Partially discharged (holding no more than 30% of its energy capacity),
and
• Packaged separately within the shipping box (i.e., if you order the battery
pack and charger with an instrument such as an SBE 17plus V2
SEARAM, 19plus V2 SEACAT Profiler CTD, or 25 SEALOGGER CTD,
it is not placed inside the instrument).
Before attempting to communicate with the instrument, the battery pack
must be:
• Recharged, as described in Section 3: Charging Battery Pack.
Note: If the battery pack has been in storage for approximately 6 months
or longer, charge and discharge the battery pack before recharging.
See Battery Storage in Section 5: Battery Characteristics and Handling.
• Installed in the instrument, as described in the instrument manual.
IMPORTANT NOTE:
Depending on their classification, the shipment of batteries is subject to safety
regulation concerning Dangerous Goods or Hazardous Material imposed by
the U.S. Department of Transportation (DOT) and the International Air
Transportation Association (IATA). Other countries may also have their own
regulations. These batteries are considered to be dry cell batteries. DOT and
IATA both forbid transportation of these batteries inside the instrument
because of the potential of a short circuit and dangerous evolution of heat.
WARNING!
• Discharge the battery pack to
30% or less of its energy before
shipping.
• Do not ship the battery pack
inside the instrument.
If the battery pack is inside the housing, it does not comply with DOT and
IATA regulations, and therefore MUST NOT BE SHIPPED VIA
COMMERCIAL AIRCRAFT (those governed by DOT or IATA),
INCLUDING PASSENGER AIRLINES, OR CARGO CARRIERS SUCH
AS FEDEX, DHL, UPS, ETC.
6
Section 2: Description of Charging System
NiMH Charger & Batteries
Section 2: Description of Charging System
This section describes the functions and features of the Nickel Metal Hydride
(NiMH) charging system.
Description
The NiMH battery charger is an externally powered (90-250 VAC),
microprocessor-controlled, intelligent, battery-conditioning charger designed
for indoor shipboard or laboratory use. The charger automatically detects the
presence and type of a connected battery. The charger allows in-instrument
charging; there is no need to remove the battery pack from the instrument
housing. The user interface consists of a power switch, three momentary
pushbuttons, a 2-line by 20-character LCD display, and a yellow LED. User
controls are limited to charging, discharging, and resetting the charger.
Sea-Bird currently manufactures three battery packs that can be used with the
NiMH charger:
• PN 801512 - 12-cell, 14.4 volts, 8 Amp-hours
• PN 801511 - 9-cell, 10.8 volts, 8 Amp-hours
• PN 801510 - 6-cell, 7.2 volts, 8 Amp-hours
The charger and 12-cell battery pack are shipped as standard equipment
with the SBE 17plus V2 SEARAM. The charger and 9-cell battery pack
are available as options with the SBE 19plus V2 SEACAT Profiler and
SBE 25 SEALOGGER CTD.
7
Section 2: Description of Charging System
NiMH Charger & Batteries
Specifications
Battery Charger
2 line display, 20 characters each line,
character height 5 mm (0.2 inch)
Display
200 Watts maximum
Input Power
90-250 VAC / 47-63Hz / 1.5A
Fuse
Fuse – 5x20mm, 250VAC 3 Amp Fast-Blow
For indoor use; do not get wet.
Environmental
The NiMH charger should always be used with a
three-terminal outlet that includes a protective earth.
Materials
Anodized aluminum housing
Dimensions
15.8 x 33.0 x 7.9 cm (6.2 x 13 x 3.1 inches)
Weight
2.7 kg (6 lbs)
Batteries (typical values)
Number of Cells
For use with SBE:
12
17, 17plus
Power Available
to Instrument
Output Voltage 1
Output Power 2
14.4V
Charging
Charge
Delivered 2, 3
Charge Time
550 KJ
10.8V
8 Amp-hours
6
7.2V
2
415 KJ
275 KJ
120 minutes
(from fully discharged)
Discharging
9
19, 19plus, 19plus V2, 25
Discharge
Capacity 3
Discharge Time
(from full charge)
440 KJ
330 KJ
220 KJ
75 minutes
110 minutes
140 minutes
Notes:
1
Output voltage of a fully charged, new battery pack is typically more than the
nominal values listed.
2
All of the charge delivered to the battery pack cannot actually be extracted by
the instrument. For a typical battery pack, Sea-Bird recommends assuming
that 75% of the delivered charge is available to power the instrument
For example, for a 12-cell battery pack:
75% * 550 KJ charge delivered = 412 KJ charge available.
Converting, 412 KJ = 8 Amp-hours (see Note 3 for conversion).
If you note during charging that the battery pack temperature rises above
45 °C, we recommend derating the battery pack capacity to 70% of the
delivered charge.
3
Battery capacity is historically measured in Amp-hours. New technology
makes it convenient to measure capacity in Kilo-Joules, which is a more
accurate indication of battery charge. The following formulas provide a
nominal conversion between Kilo-Joules and Amp-hours:
Amp-hours = Kilo-Joules * 1000 / (3600 * Battery Voltage)
Kilo-Joules = Amp-hours * 3600 * Battery Voltage / 1000
8
Section 2: Description of Charging System
NiMH Charger & Batteries
Charger Controls and Display
There are three user-selectable control buttons:
•
Discharge – The Discharge button starts a discharge cycle, in which the
battery pack is discharged across a 2-ohm shunt, leaving the battery pack
with (nominally) no energy. Discharge continues until the battery voltage
drops to 0.9 volts per cell. During the Discharge cycle the charger displays
the elapsed time, battery pack voltage, battery pack temperature, current
being removed from the battery pack, and total energy discharged from
the battery.
The discharge cycle takes approximately 75 minutes for a fully charged
12-cell battery pack, 110 minutes for a 9-cell pack, and 140 minutes for a
6-cell pack.
Sea-Bird recommends that you discharge the battery pack after
(approximately) every six recharges. Occasionally discharging the
battery pack prevents voltage droop, which can affect battery capacity in
the long term. See Battery Conditioning and Voltage Droop in Section 5:
Battery Characteristics and Handling.
•
Charge – The Charge button starts a charge cycle. During the charge
cycle the charger displays the elapsed time, battery pack voltage, battery
pack temperature, current being delivered to the battery pack, and total
energy delivered to the battery. Depending on temperature, amount of
remaining charge in the battery pack, and condition of the battery pack,
the charge cycle may consist of a warm-up charge, refill charge, fast
charge, and/or top off charge.
The charge cycle duration depends on the battery temperature; in general,
cooler batteries charge faster. Typical charge time is 2 hours.
•
Reset – The Reset button cancels any in-progress activity (such as
charging or discharging), resets the device, and clears any errors.
There are two display indicators:
•
Charger Active lamp - bright yellow LED. If the lamp is on, do not
disconnect the battery pack. Disconnecting the battery while the lamp is
on may cause a small spark. The user may feel a small shock, especially
if the connector is damp.
Use the Reset button to interrupt the charger’s discharge or recharge cycle
before disconnecting the battery. After you press the Reset button, the
lamp will turn off, indicating it is safe to disconnect the battery.
•
LCD display - 2-line by 20-character backlit LCD. The display changes
with the operational mode. If a recognized battery is connected, the
bottom line of the display shows the battery voltage. If no battery is
connected, the display shows NO BATTERY.
Typical LCD display messages are detailed below.
9
Section 2: Description of Charging System
NiMH Charger & Batteries
Charger Display Messages
Note:
Values for voltage, current, etc. in the
table are typical values you might see
for a 12-cell battery pack.
User Action
Charger
Active
Lamp?
Power turned on or
battery pack
connected to charger
-
Off
-
The LCD displays the following messages, depending on operation status:
LCD Display Text
Description
DETECT
BATTERY
Message displays for a few seconds when power is turned on or
when battery pack is connected to charger.
Off
NO BATTERY
SELF TEST
DISCONNECT BATTERY
-
Off
READY NIMH14.4
15.5V 25C
Battery is not connected to charger.
Charger performs a short self test when power is turned on, which
requires that you disconnect battery pack.
Valid battery pack is connected to charger, and is ready to be
discharged or charged. NIMH14.4 should match label on top of
battery pack (NIMH14.4, NIMH10.8, or NIMH7.2). If not,
disconnect and then reconnect battery pack; if it still does not
match, there may be problem with battery pack, cable, or charger.
Press
Discharge
button
On
Off
Off
DISCHARGE H:MM:SS
12.2V 25C 6.0A 350KJ
EMPTY
H:MM:SS
12.2V 25C 1.0A 440KJ
On
WARM-UP CHARGE MM:SS
15.5V -1C 0.1A 3KJ
On
REFILL CHARGE
MM:SS
8.4V 25C 0.1A 5KJ
On
FAST CHARGE H:MM:SS
15.5V 25C 5.0A 350KJ
On
TOP OFF
H:MM:SS
15.5V 41C 1.5A 450KJ
Off
BATTERY FULL H:MM:SS
15.5V 38C 1.5A 550KJ
Off
CHARGE FAILED H:MM:SS
12.2V 25C 6.0A 500KJ
-
Off
INVALID BATTERY
13.3V 35C
-
Off
THERMISTOR ERROR
-
Off
INTERNAL ERROR
Press
Charge
button
This is typical message during discharge cycle.
Battery discharge cycle is complete, and battery pack is
successfully discharged.
You may see this after pressing Charge button, if battery pack is
cold (< 3 °C). Charger charges at low current until battery pack is
warm enough to fast-charge; message then typically changes to
FAST CHARGE.
You may see this after pressing Charge button, if battery pack
voltage is very low (< 0.8V/cell). Charger charges at low current
until voltage raises enough to fast-charge; message then typically
changes to FAST CHARGE.
This is typical message during charge cycle, indicating highcurrent, fast-charging of battery pack.
You may see this towards end of charging cycle, indicating
reduction of charge rate, when battery is nearly full or if
temperature > 40 °C.
Battery charge cycle is complete, and battery pack is
successfully charged.
Error message results from one of following:
• Temperature > 50 °C – Note energy added to battery pack.
Place battery pack and charger in a cooler environment.
Then charge again; add energy from both charge cycles together
to get total energy added to battery pack.
• Charger timer expired – Battery pack may be hot, old, or
damaged. See above to check if temperature is problem.
Otherwise, battery pack may need to be conditioned *
or replaced.
• Voltage/cell > 1.8 V – Battery pack may need to be
conditioned * or replaced.
Error message results from one of following:
• Battery pack is wet, dirty, or damaged. Clean / dry battery pack
and try again.
• There may be problem with battery pack or cable.
• Incorrect battery pack type is connected, and is not supported by
charger firmware.
Battery thermistor indicates unreasonable temperature, outside
range of -10 to +65 °C. Battery pack, charger, or charger cable may
need to be replaced.
Error message; possible causes include:
• CPU errors.
• Timer resets.
• Software errors.
Turn power off and then on, and check again. If error message
persists, charger may need to be replaced.
* See Battery Conditioning and Voltage Droop in Section 5: Battery Characteristics and Handling.
10
Section 2: Description of Charging System
NiMH Charger & Batteries
Looking at a typical LCD display during charging:
FAST CHARGE 1:23:45
15.5V 25C 5.0A 350KJ
where
• 1:23:45 = elapsed time since charging began
• 15.5V = output of battery pack, in Volts
• 25C = temperature of battery pack, in °C
• 5.0A = current being delivered to battery pack at this moment, in Amps
• 350KJ = energy added to battery pack by charger during this charge, in
Kilo-Joules
At the end of the charge, the display shows BATTERY FULL and the bottom
line shows the total energy added to the battery pack during the charge. Note
that if the battery pack was not fully discharged before starting the charging
cycle, the total energy added during while charging may be significantly less
than the specified energy capacity (Specifications in Section 2: Description of
Charging System).
Looking at a typical LCD display during discharge (recommended
approximately once for every six charging cycles):
DISCHARGE 1:03:45
12.2V 25C 6.0A 350KJ
where
• 1:03:45 = elapsed time since discharge began
• 12.2V = output of battery pack, in Volts
• 25C = temperature of battery pack, in °C
• 6.0A = current being removed from battery pack at this moment, in Amps
• 350KJ = energy removed from battery pack by charger during this
discharge, in Kilo-Joules
At the end of the discharge, the display shows EMPTY and the bottom line
shows the total energy removed from the battery pack during the discharge.
11
Section 3: Charging Battery Pack
NiMH Charger & Batteries
Section 3: Charging Battery Pack
This section describes charging the battery pack. After (approximately)
every six recharges, Sea-Bird recommends that you discharge the battery
pack before recharging it. Occasionally discharging the battery pack
prevents voltage droop, which can affect battery capacity in the long term.
See Battery Conditioning and Voltage Droop in Section 5:
Battery Characteristics and Handling.
Power
switch
1.
Connect the charger to the power supply and turn on power to the charger.
A. The charger displays SELF TEST REQUIRED, and then SELF
TEST COMPLETED. It then displays DETECT BATTERY, and
then NO BATTERY.
B. Connect the charger cable to the charger and battery pack.
C. The charger displays DETECT BATTERY, and then it displays
READY and the battery type (for example, NIMH14.4).
The battery type should match the label on the top of the battery pack.
2.
(Approximately once every six charging cycles) Press the Discharge
button. The Charger Active lamp comes on. The top line of the display
shows DISCHARGE during the discharge cycle. When the discharge is
complete, the top line of the display shows EMPTY and the Charger
Active lamp turns off.
• Discharge time varies, depending on the number of batteries and
amount of remaining charge in the battery pack. For a fully charged
battery pack, discharge time is approximately 75 minutes for 12-cells,
110 minutes for 9 cells, and 140 minutes for 6-cells.
3.
Press the Charge button. The Charger Active lamp comes on. The top line
of the display shows the charging mode; it should display FAST CHARGE
for all or most of the charging cycle. When charging is complete, the top
line of the display shows BATTERY FULL and the Charger Active lamp
turns off.
• Charge time is approximately 2 hours for a fully discharged battery
pack, regardless of the number of cells in the pack.
• Depending on battery pack conditions – temperature and existing
battery voltage at beginning of charge – you may see WARM-UP
CHARGE or REFILL CHARGE momentarily or for several minutes
before FAST CHARGE appears.
• You may see TOP OFF towards the end of the charging cycle,
indicating a reduction in the charge rate, before BATTERY FULL
appears.
4.
Turn off power to the charger. Disconnect the charger cable from the
charger and the battery pack.
Note:
The battery pack can
remain in the
instrument housing
while charging. See
the instrument
manual for details on
accessing the
battery pack.
WARNING!
Do not disconnect the battery pack
from the charger while the Charger
Active lamp is on. Disconnecting the
battery pack while the lamp is on may
cause a small spark. The user may
feel a small shock, especially if the
connector is damp.
• If you need to interrupt the battery
charger, press the Reset button. The
Charger Active lamp should turn off;
it is now safe to disconnect the
battery pack.
12
Section 4: Charger Maintenance
NiMH Charger & Batteries
Section 4: Charger Maintenance
The charger uses two fuses. If one fuse blows, Sea-Bird recommends
that you replace both fuses. The charger has a storage compartment for
spare fuses.
To access the fuses and spares:
WARNING!
Do not open the fuse
compartment without
unplugging the power cable
from the charger.
1.
Unplug the power cable from the charger.
2.
Insert the end of a screwdriver into the slot, and pry the fuse compartment
out of the charger.
3.
Using the tip of a screwdriver, gently push the spare fuses out of the fuse
holder. Remove each spare from its individual holder. Place new spares in
the individual holders, and replace the holders.
Push
spare
fuses
out of
holder
4.
Remove the blown fuses, and replace with the spares.
Remove
blown
fuses as
shown
5.
Replace the fuse holder in the charger.
13
Section 5: Battery Characteristics and Handling
NiMH Charger & Batteries
Section 5: Battery Characteristics
and Handling
See Specifications in Section 2: Description of Charging System for battery
capacity, discharge time, and charge time.
Battery Self-Discharge
All batteries show a decline in charge over time, even when not connected to a
load. This decline is called self-discharge. NiMH batteries self-discharge up to
20% in the first 24 hours after charging, then as much as 15% per month.
• Self-discharge is highly temperature-dependent. NiMH batteries self
discharge about three times faster at 40 °C than at 20 °C.
• Age also effects self discharge. Older battery packs self-discharge faster
than new ones.
To ensure maximum capacity, charge the battery pack no more than
12 hours before use.
Battery Charging Temperature
NiMH battery packs last longer when charged at a low temperature. Charge the
battery pack in a cool environment away from heat sources, including sunlight.
Rapid changes in temperature may interfere with the charge cycle. An ambient
temperature change of 1 to 2 °C per minute may cause early or late termination
of the charge cycle. Moving a charging battery pack from a cold to a warm
environment may cause early termination of the charge cycle. If you must
move the battery pack while charging:
1. Write down the energy already added to the battery pack.
2. Press the Reset button to interrupt the charging cycle.
3. Press the Charge button to re-start the charging process. Add the energy
from this charging cycle to the energy noted in Step 1 to get the total
energy added to the battery pack.
Battery Conditioning and Voltage Droop
Voltage droop is a common problem in NiMH and Ni-Cad batteries. Often
inappropriately referred to as memory effect, it is a phenomenon in which the
average battery voltage during discharge decreases, resulting in decreased
battery capacity. Voltage droop may be generated in several ways; the most
significant are long-term storage (6 months or more), repeated partial
discharge, and overcharging. Voltage droop can be avoided in normal
oceanographic applications by occasionally (approximately every six
charges) discharging partially spent battery packs with the charger before
recharging.
Battery conditioning is the process of charging and fully discharging a battery.
This is usually repeated several times to restore the full capacity of a battery
pack suffering from voltage droop. The maximum benefit of conditioning
occurs within five charge/discharge cycles. One or two cycles are usually
sufficient when a battery pack is removed from long-term storage.
14
Section 5: Battery Characteristics and Handling
NiMH Charger & Batteries
Battery Storage
Store battery packs in a cool place, free from excessive temperature or
humidity. High temperatures significantly increase the aging process. To
reduce aging, fully charge battery packs before storage (30 days or more).
Charge, discharge, and then recharge batteries in long-term storage at least
once every six months.
Battery Life
If handled and stored properly, the battery pack should operate properly
(discharge and recharge adequately) for approximately 5 years or
500 charge/discharge cycles.
If the battery pack appears to be dead after long-term storage, battery
conditioning (five charge/discharge cycles) can result in the recovery of
approximately 90% of capacity. See Battery Conditioning and Voltage
Droop above.
Battery Safety and Handling
WARNING!
See Shipping Precautions in
Introduction before transporting
the battery pack.
•
•
•
•
•
•
•
•
•
NiMH battery packs are capable of explosive discharge of energy.
Never short circuit the battery terminals.
Never expose NiMH battery packs to temperatures above 55 °C.
Do not attempt to disassemble, repair, charge, or discharge a damaged
battery pack.
Do not dispose of NiMH battery packs in fire; they will explode. Recycle
the battery packs or send them back to Sea-Bird for recycling.
Sea-Bird will recycle the packs at no charge; shipping costs are the
user’s responsibility.
Do not attempt to use the NiMH battery packs in devices not intended for
their use. If you are considering using the pack in an instrument that it was
not originally purchased with, consult Sea-Bird.
Use only the recommended Sea-Bird battery charger.
Keep NiMH battery packs dry and free from salt spray.
NiMH battery packs fit tightly in the instrument housings. When placing a
battery pack in an instrument, align it carefully and slowly insert it
straight into the housing. If not careful, the battery pack shrink wrap can
be torn.
15
Appendix I: Replacement Parts
NiMH Charger & Batteries
Appendix I: Replacement Parts
Part
Number
Part
Application Description
Quantity
801512
12-cell, 14.4-volt battery
For use with SBE 17plus
pack
-
801511
9-cell, 10.8-volt battery For use with SBE 19plus,
pack
19plus V2, or 25
-
801510
6-cell, 7.2-volt battery
pack
-
801509
4-pin to 6-pin cable,
3.0 m (10 ft)
17015 AC power cable
20165
Fuse, 5x20 mm, 3.0A
(UL), 250V, Fast Blow
16
Battery charger to
battery pack
1
Provides AC power to
battery charger
1
For battery charger.
Charger
uses 2; up
to 2
additional
spare fuses
can be
stored
inside
housing.
Index
NiMH Charger & Batteries
Index
B
F
Batteries
shipping precautions · 6
Battery
characteristics · 14
charging · 12, 14
conditioning · 14
discharging · 12, 14
handling · 14
life · 15
safety · 15
self-discharge · 14
specifications · 8
storage · 15
temperature · 14
voltage droop · 14
Buttons · 9
Fuse · 13
C
Parts
photos · 5
replacement · 16
L
LCD · 9, 10
M
Maintenance · 13
O
Operating · 12
P
Charge button · 9
Charger
buttons · 9
charge button · 9
Charger Active lamp · 9
controls · 9
discharge button · 9
display · 9, 10
fuse · 13
LCD · 9, 10
maintenance · 13
reset button · 9
specifications · 8
Charger Active lamp · 9
Charging · 12
Controls · 9
Q
Quick start · 4
R
Replacement parts · 16
Reset button · 9
S
Safety · 15
Shipping precautions · 6
Specifications · 8
System description · 7
D
Description · 7
Discharge button · 9
Discharging · 12
Display · 9, 10
U
Unpacking NiMH Charger · 5
17