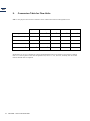
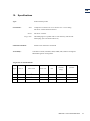
1
RL2000
R EFERENCE L EAK
User’s manual
EN
Contents
1. Safety ...................................................................................................................................................... 3
2. Contents of delivery ................................................................................................................................ 4
3. Quick guide for calibration of hand probes ............................................................................................ 5
3.1.
Installing the leak .......................................................................................................................... 5
3.2.
Setting pressure ............................................................................................................................. 7
3.3.
Purging leak .................................................................................................................................. 7
3.4.
Setting calibration parameters in the Sensistor ISH2000 Detector ............................................... 7
3.5.
Calibrating ..................................................................................................................................... 7
4. Setting up your leak ................................................................................................................................ 8
4.1.
The certificate ............................................................................................................................... 8
5. Caring for your leak ................................................................................................................................ 9
6. Recalibration of your reference leak ....................................................................................................... 9
7. Trouble-shooting................................................................................................................................... 10
8. Conversion Table for Pressure Units .................................................................................................... 11
9. Conversion Table for Flow Units ......................................................................................................... 12
10. Specifications ........................................................................................................................................ 13
2
INFICON – User’s manual RL2000
EN
1.
Safety
Hydrogen is not flammable when diluted sufficiently with nitrogen. It is at this stage that the international
standard ISO 10156 classifies the recommended tracer gas mix (5% Hydrogen / 95% Nitrogen) as nonflammable.
Three safety aspects, however, must be considered when working with the recommended tracer gas mix.
•
Compressed gas contains large amounts of energy. Failure of connectors, hoses etc can result in
serious personal injury. This warning is valid for all compressed gases, including air.
•
The tracer gas mix contains no oxygen. Releasing large amounts of gas in a confined space can
lead to asphyxiation and death. This warning is valid for all oxygen deficient gases including
Nitrogen and Helium.
•
Pure hydrogen mistakenly purchased is flammable! Check that your cylinder has a green label!
The recommended tracer gas mixture contains no oxygen.
Releasing large amounts of gas in confined spaces may
displace the air and create a risk for asphyxiation.
Hazard
Hazard
Compressed gases contain energy!
Be very careful never to use higher pressures than specified
for your coupling, hoses, regulators etc.
Maximum pressure for the leak itself is 3 MPa (30 bar).
INFICON – User’s manual RL2000
3
EN
2.
Contents of delivery
Your delivery contains the following items (see figure below):
•
•
•
•
•
•
•
•
•
•
•
•
Reference leak assembly comprising leak and purge valve assembly.
Diffuser house (for hand probe calibration).
Diffuser filter (2 off).
White probe guide ring for calibration of probes with 8 mm tip.
Black probe guide ring for calibration of probes with 10 mm tip.
Red G1/8 gasket.
Collet nut for connection to 1/4” tubing (marked red).
2.5 mm Allen key (hex drive) for purge valve and assembly of diffuser.
Calibration certificate.
Pressure correction curve.
Delivery and storage box.
This manual.
Diffuser house
Allen key
Reference
leak assembly
11 mm probe
guide ring
G1/8” gasket
Collet nut for
¼” tubing
(red mark)
9 mm probe
guide ring
Diffuser filter
(2 off)
To use your leak you will also need the following:
•
•
•
4
Tracer gas. This should be the identical to the gas as used for your leak test (typically 5% H2 in 95%
N2).
Pressure regulator to set correct tracer gas pressure for feeding the leak.
Pressure gauge (manometer) to monitor the setting of the pressure regulator. Remember that the
calibration certificate is only valid if the correct pressure is fed to the leak! Use a gauge (or
manometer) that reads correctly (±2% of reading or better).
INFICON – User’s manual RL2000
EN
3.
Quick guide for calibration of hand probes
Below is a condensed step-by-step description in how to set up and use your reference leak to calibrate
the range of hand held detector probes from INFICON.
If you have acquired the leak for other purposes, simply skip the non-applicable steps.
Detailed instructions for incorporating your leak in automated test systems etc are available from your
supplier.
3.1.
Installing the leak
Before assembling the leak, we recommend that you make a copy of the certificate and the pressure
correction curve. Keep the originals in a safe place.
•
Choose the correct probe guide ring from the table below.
Probe configuration
Ring
Colour
Hand Probe H50 without tip protection cap.
9 mm
White
Hand Probe H50 with tip protection cap.
11 mm
Black
Sniffer Probe H55 (AP55 System)
11 mm
Black
Counter Flow Probe H57 (AP57 System)
11 mm
Black
Insertion Probe H65
9 mm
White
Other probes with 6 - 8.5 mm tip
9 mm
White
Other probes with 8.6 - 10.5 mm tip
11 mm
Black
•
Assemble diffuser according to the figure below:
Probe guide ring.
Diffuser filter
(use one)
Set screw
Diffuser house
INFICON – User’s manual RL2000
5
EN
Install the leak in a panel if desired, or assemble diffuser and leak with red gasket as spacer. See figure
below:
Purge valve plug.
Open to purge leak.
Installed in panel.
Do not use red gasket.
Install red gasket as spacer
between leak and valve.
•
•
Connect the leak to the tracer gas supply as shown in the figure below. Remember that the
accuracy of your pressure regulator and gauge will directly influence the accuracy of your
calibration.
Use plastic pneumatic hose for tracer gas supply.
The unmarked collet nut is for 6 x 4 mm hose.
The nut with red mark is for 1/4” x 5/32” hose.
Remove collet nut from coupling. Slide nut over end of hose with threads facing end of hose.
Push hose fully on to connector, slide nut down and tighten by hand. Tighten the nut another ½
turn using a 12 mm key or adjustable spanner.
Leak outlet
Purge plug
Pressure gauge
Reference leak
assembly
Pressure
regulator
Tracer gas
source
6
INFICON – User’s manual RL2000
EN
3.2.
Setting pressure
3.3.
Purging leak
•
•
•
•
Set the regulator to the pressure indicated on the calibration certificate. See further under
“Setting up your leak” below.
Open the purge valve (see figure above) for a few seconds to bleed out all remaining air in the
hoses.
Close the purge valve firmly.
Check the pressure gauge again and readjust pressure if necessary.
Leak is ready to use just a few seconds after it has been purged.
3.4.
•
•
•
Setting calibration parameters in the Sensistor ISH2000 Detector
Set Calibration Time to 10 s (standard value). For probes other than passive hand probes, refer to
the respective probe manual.
Set Calibration Coefficient to calibrated leak rate value stated on the calibration certificate.
Set the Leak rate unit to that specified on the calibration certificate.
(You may also use other flow units. Use the flow conversion table below. Remember though, to
recalculate the leak rate value. The Calibration Coefficient must be changed to the new value.
See further in the “Sensistor ISH2000 PLUS Use’sr Manual”.
3.5.
•
•
•
•
•
Calibrating
Start the calibration from the Sensistor ISH2000 menu (or by operating switch on front of APC
unit).
When the bar on the display starts growing, quickly insert probe into diffuser , maintaining a
straight connection. See figure below:
Remove probe when detector has analysed the gas.
If detector asks you to re-calibrate, wait > 30s and then calibrate again.
If detector indicates “Calibration OK”, press Save.
INFICON – User’s manual RL2000
7
EN
4.
Setting up your leak
4.1.
The certificate
ID number of leak.
This number is engraved
on the leak.
Downstream (outlet) pressure.
This is normally atmospheric, i.e. leak
outlet is open to room atmosphere.
Upstream (inlet) pressure and
gas calibrated for.
Calibrated leak flow.
The first thing you must look at when setting up your leak is the leak specification. This must be correctly
correlated to the data on the calibration certificate.
•
•
•
•
Check for what gas the leak limit is specified.
Check that the certificate quotes this gas. If not you must recalculate the corresponding flow for this
gas. Ask your supplier for assistance.
Read the calibrated leak flow stated on the certificate.
Check what upstream (inlet) pressure the leak is calibrated at.
N.B. The calibrated flow of the reference leak does not need to be exactly the same as the leak limit.
As long as the detector is set up correctly (see section 3.2 above) you will measure correctly within the
leak limit.
We recommend that the flow of the reference leak is within 0.5 to 5 times the leak limit. However it
should not be outside the range of 0.1 to 10 times the leak limit.
8
INFICON – User’s manual RL2000
EN
5.
Caring for your leak
The leak is a precision instrument and a vital part of your quality assurance system. Handle it with care at
all times. It is not necessarily sensitive to dust or dirt but we recommend that you follow the rules below
to safeguard the function and accuracy of your leak.
•
•
•
•
•
Do not expose the leak to liquids of any kind. Be particularly mindful of oil and other heavy, nonvolatile compounds.
Keep your probe tips clean so that you do not make the diffuser filter dirty. A dirty and partly
clogged diffuser filter can reduce the leak flow.
Change diffuser filter when it appears dirty.
Extra filters can be ordered separately (part number T.B.A.).
If you need to clean the exterior of the leak, use a lint free, textile cloth, wetted with pure alcohol
(iso-propyl alcohol or ethanol). Make sure cloth is not too wet. It must not drip alcohol.
Send in the leak for recalibration at regular intervals. See further below.
IMPORTANT
Never touch the surface of the sinter plug behind the
white filter!
The leak will be destroyed if this surface is
contaminated!
6. Recalibration of your reference leak
The type of sintered metal powder leaks delivered by INFICON is very stable and does not normally
change with time unless they are contaminated with oil or dirt etc.
As it is not evident to the eye if such clogging has occurred, we recommend that you have the leak
recalibrated at regular intervals.
Send the leak to your supplier or directly to INFICON, Sweden.
INFICON – User’s manual RL2000
9
EN
7.
Trouble-shooting
Symptom
Cause
Remedy
No or low gas signal from
leak.
Probe tip filter is clogged.
Replace external filter (white).
Detector calibration failed
Send in probe for service if bronze filter is
clogged.
Probe was not correctly inserted.
Insert probe according to section 3.5
Residual air has not been purged
out.
Purge leak. See section 3.3 above.
Gas pressure is set too low.
Adjust gas pressure. See section 3.2
Tracer gas is not connected.
Connect gas. See sections 3.1 through 3.3
above.
Wrong gas connected.
Check that correct gas is connected. Gas
should be identical to tracer gas used.
Normally 5% H2 / 95% N2
Signal was different from last
calibration.
Wait 30 s and try again. If failing more
than 3 times see next symptom.
Probe was not properly inserted
Insert probe according to section 3.5
Probe tip filter is clogged.
Replace external filter (white).
Send in probe for service if bronze filter is
clogged.
Detector display shows:
“Sensitivity too low for
alarm level”.
Alarm level is set below detector or
probe specification.
Set correct level.
Probe tip filter is clogged.
Replace external filter (white).
See User’s Manuals of Sensistor ISH2000
Detector and your AP unit (if not H50).
Send in probe for service if bronze filter is
clogged.
Sensor status bar on
detector display is shorter
than earlier.
Sensitivity of probe is too low.
Replace probe. Send defect probe for
sensor replacement. Sensor in AP29 can
be replaced by you.
Probe tip filter is clogged.
Replace external filter (white).
Send in probe for service if bronze filter is
clogged.
Sensor has lost some sensitivity.
10
INFICON – User’s manual RL2000
This is normal after some time. Detector
will let you know when sensitivity is too
low.
EN
8. Conversion Table for Pressure Units
N.B. A free physical unit converter software can be ordered from [email protected].
*The old unit kp/cm2 is often referred to as ”kilo per
cm2”, ”kilos”, “kg/cm2”or even “kilograms of pressure”.
The correct unit should however be kp/cm2 (kilo pond /
square centimetre).
** mwc and mmwc means meter water column and mm
water column.
INFICON – User’s manual RL2000
11
EN
9.
Conversion Table for Flow Units
N.B. A free physical unit converter software can be ordered from [email protected].
g/a R134
mm3/s = µl/s
atm⋅cc/s = ml/s
mbar⋅l/s
Pa⋅m3/s
1 g/year of R134a =
1
8.0x10⁻³
8.0x10⁻⁶
7.9⋅10-6
7.9x10⁻⁷
1 mm3/s = 1 µl/s =
125
1
1.0x10⁻³
9.87x10⁻⁴
9.87x10⁻⁵
1 atm⋅cc/s = 1 ml/s =
1.25x10⁵
1000
1
0.987
0.0987
1 mbar⋅l/s =
1.27x10⁵
1013
1.013
1
0.10
1 Pa⋅m3/s =
1.27x10⁶
1.013x10⁴
10.13
10
1
NOTE that it is not very common for pressure normalised flow units to be used. It is for instance common
that cc/s is used in place of the more acceptable term, atm cc/s. It is, however, normally safe to assume
that normalised units are implied.
12
INFICON – User’s manual RL2000
EN
10.
Specifications
Type:
Sintered metal powder.
Connections:
Inlet:
Compression connector for 6 x 4 mm and 1/4" x 5/32” tubing.
ISO G1/8” internal behind connector.
Outlet:
ISO G1/8” external.
Purge valve:
Threaded plug to be opened with 2.5 mm Allen key. M5 internal
behind plug. (Fits also male UNF10-32)
Calibration methods:
Stated on the calibration certificated
Traceability:
Traceable to UKAS, NAMAS, NIST, NMIJ, NPL, PTB etc through the
Mutual Recognition Arrangement.
Target flow for standard leaks:
Downstream
pressure
Type
Part nr
Flow value
Flow unit
Gas
Upstream
pressure
(barg)
A
590-420
5x10⁻² ±10%
atm ml/s
Air
1
1 atm
B
590-421
5x10⁻³ ±10%
atm ml/s
Air
1
1 atm
atm ml/s
Air
1
1 atm
C
590-422
-4
5x10 ±10%
INFICON – User’s manual RL2000
13