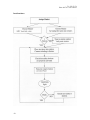
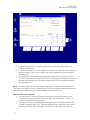
1
DRAFT
Baker WinTATS
Traction Armature Testing System
Part No. 71-030E V5 EN
User Manual
Read this manual entirely before using this product. Failure to follow the
instructions and safety precautions in this manual can result in serious injury,
damage to the product, or incorrect readings. Keep this manual in a safe,
readily accessible location for future reference.
Copyright © 2013, Baker Instrument Company, an SKF Group Company
All rights reserved.
4812 McMurry Ave., Suite 100, Fort Collins, CO 80525 USA
Telephone: (970) 282-1200, Fax: (970) 282-1010
Customer Service: 1-800-752-8272
-1-
71-103 V5 EN
Baker WinTATS
Information furnished in this manual by SKF Condition Monitoring Center – Fort Collins (formerly Baker
Instrument Company) is believed to be accurate and reliable. However, SKF assumes no responsibility for
the use of such information or for any infringements of patents or other rights of third parties that may
result from its use. No license is granted by implication or otherwise under any patents of SKF.
Warning
SKF assumes no liability for damages consequent to the use of this product. No part of this document
may be reproduced in part or in full by any means such as photocopying, photographs, electronic
recording, videotaping, facsimile, etc., without written permission from SKF, Fort Collins, Colorado.
Note: This equipment has been tested and found to comply with the limits for a Class A digital device,
pursuant to Part 15 of the FCC rules. These limits are designed to provide reasonable protection against
harmful interference with the equipment is operated in its installation. This equipment generates uses
and can radiate radio frequency energy and, if not installed and used in accordance with the product
manual, may cause harmful interference to radio communications. If this equipment does cause harmful
interference, the user will be required to correct the interference.
Due to the phenomena observed and the material properties being measured, this equipment does
radiate radio frequency energy while in the active test mode. Care must be exercised to ensure this
radio-frequency energy causes no harm to individuals or other nearby equipment.
Note on Software
While the Baker WinTATS has PC-based software, it has a specific configuration and directory structure
that is necessary for the unit to function correctly. If these directories or files are tampered with, the unit
may not function correctly or reliably.
Software License Agreement for Baker WinTATS traction armature test system software
The User (also known as the “Licensee”) must carefully read the following terms and conditions before
opening the software envelope; upon opening the software envelope or use of the software the User
wholly agrees to and accepts these terms and conditions. If the User/Licensee does not agree with these
terms and conditions, they must promptly return the package unopened to receive a full refund.
The Baker WinTATS Program and Documentation are the property of SKF as copyright owner. SKF
licenses its software for use; it does not transfer ownership. By the acts of opening the sealed diskette
package and making full payment of the required amounts, the User has been granted a personal, nonexclusive license to utilize the Program and Documentation. The term “Program” refers to both the
specific Baker WinTATS software already installed on the test equipment simultaneously purchased (the
“Test Equipment Version”). The term “Documentation” refers to the associated instructions and reference
materials. Both “Program” and “Documentation” also include any enhancements, modifications, revisions,
or additions, which SKF directly or indirectly releases to the User.
− License: The license granted permits the User to do only the following:
− Use the Test Equipment Version on only the SKF test equipment provided;
− Use the Program and Documentation for business and commercial purposes only;
− Reproduce the Program only as necessary to use it and create no more than two copies of the
Program in machine readable form for back-up purpose, only; and
− Utilize the Documentation only in conjunction with the use of the Program.
These are the only rights granted. The user/licensee has no right to, among other things: to use the
Program on more than one computer or on a computer which has not been approved for use; to transfer
sublicense or rent the program, or to authorize another to do so or to create derivative works based
upon any part of the Program. The rights granted by the licensee shall terminate (without refund)
automatically upon the User’s failure to abide by the terms or conditions of this License or by any
combination by the User to any infringement of any proprietary rights owned or licensed by SKF. In event
-2-
71-103 V5-EN
Baker WinTATS User Manual
of any termination, the User agrees to return all Programs, Program diskettes, Documentation and all
copies thereof. In addition SKF from time to time updates its Programs and Documentation for registered
users. If the User is not registered, it may not receive an update. In the event an update is received, the
User agrees to destroy or return the original Program or Documentation and acknowledges that the
update will be governed by the terms of this license also.
Limited Software Warranty
SKF warrants to the user for a period of one year from delivery to the original purchaser that if properly
installed and operated the Program will perform substantially in accordance with the Documentation
provided. The User will notify SKF in writing within ten days of discovering any error by sending:
a.) A list of the command sequence or other input which causes the suspected repeatable error;
b.) A printout or a summary of the result; and
c.) The Part Number and Revision of the Program.
In the event of any failure of the Program to perform substantially in accordance with the
Documentation, SKF agrees to repair or replace, at its sole option, the Program or Documentation. In the
event such failure cannot be corrected within a reasonable period of time, a percentage of the price paid
by the User attributable to the Program will be refunded.
In no case shall SKF or its agents be liable for any loss of data, lost profits, special, incidental,
consequential, indirect, or other similar damages arising from breach of contract, negligence or any other
legal theory. In any event, SKF’s total liability shall be limited to only a refund of the portion of the price
paid attributable to the Program. Any implied warranties including warranties of merchantability or
fitness for a particular purpose are limited in duration to thirty (30) days from the date of original delivery
to the user. Some states do not allow limitations on how long an implied warranty may last on incidental
or consequential damages, so the above limitation may not apply.
SKF shall be responsible only to the User; no responsibility to any third party shall be created. This
warranty set forth above is in lieu of all other express warranties, whether oral or written and the
remedies set forth above are the User’s sole and exclusive remedies. The agents, employees, distributors,
and dealers of SKF are not authorized to make modifications to this warranty or additional warranties on
its behalf. Accordingly, additional statements such as advertising or sales presentations cannot expand or
create warranties and should not be relied upon. This warranty gives specific legal rights. Other rights
vary from state to state.
General Conditions and Covenants
The validity and Interpretation of this License Agreement shall be governed by Colorado Law except as to
copyright and other proprietary matters which may be preempted by United States laws and
international treaties. In the event of any violation of this License Agreement, SKF reserves the right to
pursue any state law remedies (including contractual remedies) or remedies under federal laws or both.
The User consents to exclusive jurisdiction in either state or federal courts in Colorado or both as
appropriate and agrees that the prevailing party shall be entitled to its attorney fees and costs. No
decision, act or inaction of SKF shall be construed to be a waiver of any right or remedy, and pursuit of
any state or federal causes shall not be deemed an election or remedies. In the event any provision of
this License Agreement shall be deemed unenforceable, or void, or invalid, such provision shall be
modified so as to make it valid and enforceable and as so modified the entire agreement shall remain in
full force and effect. This License Agreement sets forth the entire understanding and agreement between
the parties and no written or oral representative of any kind whatsoever shall in any way modify or
expand the terms of this agreement. In the event of any conflict or inconsistency between the terms of
this agreement and any Documentation, this agreement shall preempt such Documentation to the extent
inconsistent.
WARNING: All material associated with this license is copyrighted material.
-3-
71-103 V5-EN
Baker WinTATS User Manual
Federal law provides severe civil and criminal penalties for the unauthorized reproduction, distribution, or
use of copyrighted materials (Title 17, United States Code). The Federal Bureau of Investigation
investigates allegation of criminal infringement for enforcement. Should there be any questions
concerning this agreement, contact SKF at 4812 McMurry Avenue, Suite 100, Fort Collins, Colorado
80525. Telephone 970-282-1200; Fax 970-282-1010.
Any user of the Baker WinTATS system will be bound by the terms and conditions of this product
upon: a.) opening the software envelope or using the program; b.) a reading of this agreement.
Any user of the Baker WinTATS system, upon implicit agreement of these terms, acknowledges
this is a complete and exclusive statement of the agreement and supersedes any proposal,
dealings, whether oral or written and any other communications relating to the subject matter of
this agreement.
Important notice concerning warranty and repairs
The warranty is void if the Baker WinTATS is shipped without shock absorbing packing material. If the
Baker WinTATS fails, whether it is under warranty or not, call the SKF Condition Monitoring Center in
Fort Collins, Colorado Service Department before returning the unit for repair. If the unit needs inhouse repair, our service staff might direct the shipment of the unit to the closest authorized service
center. This might save both time and money. When contacting the Service Department at the SKF
Condition Monitoring Center in Fort Collins, Colorado, or one of CMC-Fort Collins’ Authorized Service
Centers, please have the model and serial numbers (located on the rear panel of the unit) available. If
the unit is out of warranty, a purchase order will be required if the unit is returned for repair.
Customer service number: (970) 282-1200
Hardware warranty information
All products manufactured by SKF are warranted against defective materials and workmanship for a
period of one year from the date of delivery to the original purchaser. Any product that is found to be
defective within the warranty period will, at the option of SKF, be repaired or replaced. This warranty
does not apply to products damaged by improper use. The purchaser shall assume all responsibility and
expense for removal, reinstallation, freight, or “on-site” service charges in connection with the foregoing
remedies.
SKF’s liability to purchaser relating to the product whether in contract or in part arising out of
warranties, representations, instructions, installation, or defects from an cause, shall be limited
exclusively to correcting the product and under the conditions as aforesaid.
Virus alert
The Baker WinTATS contains computer software that is vulnerable to damage from computer viruses.
Before shipment, SKF scanned all data to ensure the Baker WinTATS is virus-free. Before inserting any
disks into the disk drive or connecting the Baker WinTATS to a computer network, scan all disks for
viruses.
-4-
71-103 V5-EN
Baker WinTATS User Manual
Note on Software ...................................................................................................................................................... 2
Software License Agreement for Baker WinTATS traction armature test system software.......................... 2
Limited Software Warranty ..................................................................................................................................... 3
General Conditions and Covenants ......................................................................................................................... 3
Important notice concerning warranty and repairs ..................................................................................... 4
Hardware warranty information ............................................................................................................................. 4
Virus alert .......................................................................................................................................................... 4
Chapter 1 ........................................................................................................................................................................................ 8
General Information ...................................................................................................................................................................... 8
General Information.............................................................................................................................................. 8
Getting Started.................................................................................................................................................. 8
Instructions for use.........................................................................................................................................11
Shortcut/programming keyboard functions................................................................................................12
Chapter 2 ...................................................................................................................................................................................... 14
Assign Master ............................................................................................................................................................................... 14
Assign Master ......................................................................................................................................................14
Chapter 3 ...................................................................................................................................................................................... 16
Automatic Test ............................................................................................................................................................................. 16
Automatic tests....................................................................................................................................................16
Control console functions ..............................................................................................................................16
Safety ...............................................................................................................................................................17
Chapter 4 ...................................................................................................................................................................................... 18
Results........................................................................................................................................................................................... 18
Results..................................................................................................................................................................18
Display results .................................................................................................................................................18
4.2 Print results ..............................................................................................................................................20
Armature..........................................................................................................................................................20
Print results without a waveform .....................................................................................................................21
Chapter 5 ...................................................................................................................................................................................... 23
Program Master........................................................................................................................................................................... 23
Program Master..................................................................................................................................................23
Create Winding Group....................................................................................................................................23
Create Parameter Group ...................................................................................................................................24
AC Hipot Test folder .......................................................................................................................................26
DC Hipot Test folder.......................................................................................................................................26
Resistance Test folder....................................................................................................................................28
Armature folder ..............................................................................................................................................28
Surge Test folder ............................................................................................................................................29
Create Master Group ..........................................................................................................................................29
AC Hipot/DC Hipot Test folder ......................................................................................................................30
Resistance Test Folder...................................................................................................................................31
Armature Folder .............................................................................................................................................32
Surge test folder .............................................................................................................................................33
Save and close.................................................................................................................................................34
Modify Existing Parameter or Master file ........................................................................................................34
Modify Parameter file.....................................................................................................................................34
Modify Master file ...........................................................................................................................................35
-5-
71-103 V5-EN
Baker WinTATS User Manual
Delete Master, Parameter, or Winding files................................................................................................35
Copy/Archive Master ......................................................................................................................................35
Chapter 6 ...................................................................................................................................................................................... 36
Option menu items ...................................................................................................................................................................... 36
Options menu ......................................................................................................................................................36
Set temperature compensation....................................................................................................................37
Temperature compensation..........................................................................................................................37
Auto assign after editing master.......................................................................................................................37
Continue on fail ...................................................................................................................................................37
Pause on fail ........................................................................................................................................................38
Save results .........................................................................................................................................................38
Update key lock state..........................................................................................................................................38
Reset parts counter ............................................................................................................................................38
Set serial number ...............................................................................................................................................38
Chapter 7 ...................................................................................................................................................................................... 40
Utility.............................................................................................................................................................................................. 40
Utility.....................................................................................................................................................................40
Utility self test..................................................................................................................................................40
Manual test mode...........................................................................................................................................41
Armature retest...................................................................................................................................................41
Figure 7-4: Armature re-test ................................................................................................................................................... 43
Chapter 8 ...................................................................................................................................................................................... 44
Standards and safety .................................................................................................................................................................. 44
Publishing and documentation..........................................................................................................................44
Electrical and calibration standards..................................................................................................................44
Return of equipment ..........................................................................................................................................44
Warning................................................................................................................................................................44
Maintenance and user safety ............................................................................................................................45
Chapter 9 ...................................................................................................................................................................................... 46
Maintenance ................................................................................................................................................................................. 46
Maintenance and troubleshooting ....................................................................................................................46
Basic operation....................................................................................................................................................46
Maintenance schedule........................................................................................................................................46
Chapter 10.................................................................................................................................................................................... 48
Operation ...................................................................................................................................................................................... 48
Principles of operation........................................................................................................................................48
Power flow ...........................................................................................................................................................48
PC sub-rack .........................................................................................................................................................49
TATS sub-rack (high voltage)............................................................................................................................49
Test bus concept .................................................................................................................................................49
AC Hipot tests ......................................................................................................................................................50
DC Hipot tests......................................................................................................................................................50
Resistance test ....................................................................................................................................................50
Surge test.............................................................................................................................................................51
Analysis of the surge test waveform ................................................................................................................51
Armature indexing ..............................................................................................................................................52
Chapter 11.................................................................................................................................................................................... 54
Technical specifications............................................................................................................................................................... 54
Chapter 12.................................................................................................................................................................................... 56
Self tests and troubleshooting ................................................................................................................................................... 56
-6-
71-103 V5-EN
Baker WinTATS User Manual
Self-test routine..................................................................................................................................................56
AC hipot test ........................................................................................................................................................56
Resistance power supply test ............................................................................................................................58
DC Hipot (high-voltage DC power supply) test ...............................................................................................58
Surge test.............................................................................................................................................................59
Test lead multiplexer board troubleshooting ..................................................................................................60
Armature rotation (index) troubleshooting......................................................................................................60
Baker WinTATS and Baker WinTATS-EXP sub-rack power supply troubleshooting ...............................60
Baker WinTATS manual test procedures ........................................................................................................61
Comprehensive spare parts list (high voltage) ................................................................................................64
Chapter 13.................................................................................................................................................................................... 66
Test fixture interface ................................................................................................................................................................... 66
Keyance optical sensor alignment and checkout procedure .........................................................................66
Optical sensor adjustment .............................................................................................................................66
Sensor angle adjustment...............................................................................................................................66
Chapter 14.................................................................................................................................................................................... 70
Software maintenance................................................................................................................................................................ 70
Maintaining Baker WinTATS software.............................................................................................................70
Creating a backup file .........................................................................................................................................70
Reinitializing the Baker WinTATS .....................................................................................................................70
Baker WinTATS/Windows 7 software installation..........................................................................................70
Steps to install Windows 7 ............................................................................................................................71
Baker WinTATS user selections for a specific unit.....................................................................................72
Baker WinTATS driver installation ...............................................................................................................74
Installation procedure for Windows 7 network...............................................................................................75
Index .............................................................................................................................................................................................. 78
-7-
71-103 V5-EN
Baker WinTATS User Manual
Chapter 1
General Information
In this chapter:
− Getting started
− Test flow chart
− Instructions for use
− Shortcut/programming keyboard functions
General Information
The Baker WinTATS Traction Armature Test System is one of the most advanced electric motor test
systems available for production line testing of all types of armatures. It is designed for a wide range of
applications. Its software is designed for easy navigation via intuitive menus. The purpose of this manual
is to provide a ready reference for how to use the features and functionality of the Baker WinTATS.
Chapters 1 through 5 cover the basic functions and common applications of the instrument; chapters 6
through 12 provide in-depth descriptions of less frequently used features, such as master programs and
parameter settings.
Getting Started
Baker WinTATS software is already installed in the system. Turn the menu key on the front of the control
panel to the unlock position. Press the main <power> switch. The following screen will appear.
-8-
71-103 V5-EN
Baker WinTATS User Manual
Figure 1-1: Startup view
The flow chart on the next page describes the startup sequences.
-9-
71-103 V5-EN
Baker WinTATS User Manual
Test Flow Chart
-10-
71-103 V5-EN
Baker WinTATS User Manual
Instructions for use
Figure 1-2: Menus
The Baker WinTATS traction armature software is a total windows based operating system. There are
task bar buttons and ‘F()’ hot keys to speed up the operator interface. The learned masters are created
by three distinct phases. The winding group is the base level, and is descriptive of the lead structure. The
parameter group is programmed with lead map, testing voltages, and characteristics. The final phase is
the master group. This contains the pass/fail limits and signature waveform of the armature.
Important Note:
Since this is a Windows based system, you are required to close the
Microsoft Windows operating system prior to power down. It is necessary to engage the
‘Emergency Stop’ control as a first step to power down.
-11-
71-103 V5-EN
Baker WinTATS User Manual
Shortcut/programming keyboard functions
To operate the Baker WinTATS program, you will use the following keys:
Keys
Function
<F1>, <F2>, <F3>, <F4>, <F5>
Calls the corresponding drop down menus (Assign Master,
etc.)
<F1>
<F2>
<F3>
<F4>
<F5>
Assign Master to Station 1
Assign Master to Station 2
Assign Master to Both Stations
Serial Number/Comment for Station 1
Serial Number/Comment for Station 2
<Esc>
Exit the current screen or pull down menu and return to the previous screen.
Numbers
-12-
Fill in numerical values.
71-103 V5-EN
Baker WinTATS User Manual
-13-
71-103 V5-EN
Baker WinTATS User Manual
Chapter 2
Assign Master
Inside this chapter
− Assign Master function use
Assign Master
Function: Assign Master recalls existing Masters and assigns a Master to a station.
Figure 2-1: Assign Master to Station 1
Press the F2 key to provide a list of existing master files available for selection (F2 for station 2). If the
number of masters is small, merely click on the desired master. If the list is large, type the first few
characters of the master name, and a drop-down menu will appear. The number of selection options
decreases with additional characters; when the desired master appears, click it to open. The “Master”
drop down menu can also be used to assign a master. See Figure 1-2.
-14-
71-103 V5-EN
Baker WinTATS User Manual
-15-
71-103 V5-EN
Baker WinTATS User Manual
Chapter 3
Automatic Test
Inside this chapter:
− Automatic test functions
− Safety
Automatic tests
Function: Use of manual controls when an automatic test is initiated on an armature.
Control console functions
Function: Each test station has a control console. After the Master has been assigned, the control
console becomes the user interface to the Baker WinTATS .It has a number of buttons and signal lamps.
The buttons are:
<Start>
-Start test
<Stop>
-Stop test or fail acknowledge
On some machines there are also:
<Statistics Reset>
- Deletes the last statistics and retests the part
<Master Enable>
- Re-power after emergency - switches off main power in case of
emergency
Signal lamps:
“TESTING”
“PASS”
“FAIL”
- Indicates that test is proceeding
- Test piece passed all tests.
-Test piece failed at least one test
Optional FAIL lamps may be specified to alert when a given test has failed. An optional FAIL buzzer
emits an audible warning that the test has failed.
See Figure 3-1 for the screen display during a test for an armature that passed.
-16-
71-103 V5-EN
Baker WinTATS User Manual
Figure 3-1: Passed test display
Safety
For user safety, the Baker WinTATS user station has a safety switch that prevents testing when the
safety switch is not enabled. Tests will NOT start unless the safety is enabled. If the safety switch is
opened while testing, any test in progress will be aborted immediately.
IMPORTANT NOTICE: Use of the safety switch to stop a test diminishes the relay lifetime and voids
the warranty on relays. Relays perform a hot switch when the safety switch is activated. Use the safety
switch only in case of emergency. Always use the <stop> button to stop testing.
-17-
71-103 V5-EN
Baker WinTATS User Manual
Chapter 4
Results
Inside this chapter
− Display results
− Print results
− Print results without waveforms
Results
Function: The Windows testing screen provides you with a constant visual of the current testing data,
the current bar number, and a history of testing.
Upon the completion of the test, the data can be printed as well as saved to hard drive in an ‘.xml’ format
to be downloaded via floppy disk or network.
Display results
Function: Display test results on your Baker WinTATS screen.
The upper box section displays the results of the AC HiPot and/or DC HiPot. It will also
contain at the completion of the test, the resistance balance result, the surge balance
result, and the span test calculation if selected during Parameter build. (Section 5.1)
In Figure 4-1, the lower box section displays the current and history data formatted into three bars per
row. It will automatically scroll to show current bar result at the bottom while never losing the history.
Fail results are displayed in red and also are indicated with an asterisk for the 10 worst results.
-18-
71-103 V5-EN
Baker WinTATS User Manual
Figure 4-1: Display armature results
-19-
71-103 V5-EN
Baker WinTATS User Manual
The master waveform is an average of 10 learned bar to bar waveforms and is stored on the hard drive.
During the test each bar to bar waveform captured is compared against the master and displayed as an
Error-Area Ratio (EAR) percent value. Only the 10 worst failed waveforms are retained for viewing
and/or printing. Refer to Figure 4-2.
4.2 Print results
Function: Print test results.
Armature
Example:
-20-
71-103 V5-EN
Baker WinTATS User Manual
Figure 4.2: Armature print results 1
The printout includes:
Test date/time and PASS/FAIL status
Master parameters, including armature specific, number of bars, armature type, average resistance and
ohms per slope
DC and AC hipot values
Resistance for each bar
Surge error for each bar
The resistance balance
The 180 degree span resistance value (calculated by software, or by user-entered)
The surge balance
The serial number of the tested part
Any user entered comments
The Master waveform and the worst 10 failed surge waveforms
Print results without a waveform
Function: The Baker WinTATS will print test results as in “Print Results” (see section 4.2), but will not
include a printed waveform. This can be selected by the Printer Icon on the task bar.
-21-
71-103 V5-EN
Baker WinTATS User Manual
-22-
71-103 V5-EN
Baker WinTATS User Manual
Chapter 5
Program Master
Inside this chapter:
− New Master and Modify Armature functions
− Create Winding Group
− Create Parameter Group
− Create Master Group
− Modify Master
− Delete Master
− Save/Archive Masters
Program Master
Function: To create an armature test master for a specific model using the three-level format.
Create Winding Group
Function: To create a base level winding file for master creation.
Figure 5-1: Winding file
-23-
71-103 V5-EN
Baker WinTATS User Manual
When selected, a field will appear to enter lead designators (Bar1, Bar2). The same winding file can be
used for an unlimited number of masters.
Create Parameter Group
Function: To create the mid level parameter file containing the standardized customer parameters for a
wide range of masters.
Figure 5-2.1: Parameter Choose Winding file
When selected, a field appears requesting a Winding file. <Open> the desired one. The Parameter field
has a list of the tests available. <Add the Tests> in the order desired.
(NOTE: For traction armatures it is necessary to choose the “armature: test as one.
(NOTE: Although any order of tests may be chosen SKF recommends selection of the tests in the
order shown in Figure 5-2-2).
For reference purposes, a test name may be changed by clicking on it, then retyping the name. Press
<enter> to complete. When ready, click <EDIT>.
-24-
71-103 V5-EN
Baker WinTATS User Manual
Figure 5-2-2: Parameter folder ADD TEST
-25-
71-103 V5-EN
Baker WinTATS User Manual
Figure 5-2.3: Parameter AC hipot folder
AC Hipot Test folder
Function: The AC HiPot test measures the AC leakage current of the armature and can detect arcs in
order to sense breakdowns which can go undetected during DC HiPot.
There is an entry for testing voltage and one for time in seconds. In the test leads block click ‘BAR1’ as
active and ‘BAR2’ as active.
DC Hipot Test folder
Function: DC HiPot testing checks the integrity of an insulation system by measuring the leakage current
between winding and ground.
The DC Hipot folder is identical to the AC Hipot folder.
-26-
71-103 V5-EN
Baker WinTATS User Manual
Figure 5-2-4: Parameter Resistance folder
-27-
71-103 V5-EN
Baker WinTATS User Manual
Resistance Test folder
Function: Resistance testing primarily checks for poor connection and, incorrect coil size. Kelvin
connections enable low-resistance windings to be tested accurately and repeatedly. Temperature
compensation is standard.
This folder is simply a lead assignment for bar–to-bar tests.
Armature folder
Function: The Armature folder is not actually a true test. It is a module to designate the desired types of
processed results.
Figure 5-2.5: Parameter Armature folder
Input the number of armature bars. A Resistance/Surge skip figure may also be assigned. The Resistance
Balance test, when selected, will provide a pass/fail designation based on any deviation from average
resistance (rather than from actual). The Surge Balance test, when selected, provides a pass/fail reading
based on any deviation from the average Error-Area Ratio (EAR) percentage rather than an individual
EAR percent value. The Resistance Span test is based on the summed total resistance.
NOTE: Real-time values of resistance and surge EAR will still be displayed.
-28-
71-103 V5-EN
Baker WinTATS User Manual
Surge Test folder
Function: High-voltage surge or impulse tests check for insulation weaknesses between turns, layers,
coils and phases of a winding. Surge tests also can detect other faults which change the inductance or
losses in a winding, such as reversed coils and improperly annealed steel. Armatures can be compared to
each other and/or compared to a master armature.
Figure 5-2-6: Parameter Surge Folder
The surge test voltage is entered. The number of pulses that are used is also entered. The number of
pulses refers to the practice of energizing the armature steel to approach core saturation to increase
surge repeatability. In this setup BAR1 is made ‘Active’ while BAR2 is left on ‘Ground’. When finished, click
<OK> and then click <Save and Close>. A query box will appear to enter the name of the completed
Parameter file.
Create Master Group
Function: To create the final-level master file that contains the pass/fail limits of a specific armature
model.
NOTE: Prior to start, it will be necessary to align the optics to a slot.
-29-
71-103 V5-EN
Baker WinTATS User Manual
Figure 5-3-1: Master File parameter selection screen
Select “Create Master” from the task bar icon, or with the ‘Master’ drop-down menu. When selected, a
field should appear that requests a Parameter file. Select the file and click Open. Click the <Edit Test>
button to begin.
AC Hipot/DC Hipot Test folder
Function: To enter pass/fail leakage current (milliamps for AC Hipot and micro amps for DC Hipot) for
the part under test.
The test voltage chosen in the Parameter file is displayed here for reference, but can not be changed
here. There is a ‘Skip’ test button if desired. This will skip the test and complete the rest.
-30-
71-103 V5-EN
Baker WinTATS User Manual
Figure 5-3-2: Master AC HiPot Folder
Figure 5-3-3: Master Resistance Folder
Resistance Test Folder
Function: Input the bar to bar pass/fail limits for the armature model.
The resistance folder has two types of pass/fail limits. The first is using a nominal value with a ‘%’
limit. The second is using an actual resistance value in ohms for the upper and lower limits. A <Skip
Test> is also available if needed.
-31-
71-103 V5-EN
Baker WinTATS User Manual
Armature Folder
Function: To select the type of indexing and pass/fail limits.
Figure 5-3-4: Master Armature Folder
−
−
−
−
−
The armature folder contains the selection for optical or resistive indexing (*see note).
If the Resistive Balance was selected in the parameter, the pass/fail ‘%’ limit enters here.
If the Surge Balance was selected in the parameter, the pass/fail ‘%’limit enters here.
If the Span Test was selected in the parameter, the pass/fail limits in ohms enter here.
This folder in not a test but is necessary for armature testing. There is not <Skip Test>.
*NOTE: Resistive indexing is a custom test that uses a resistance test to align the contacts. Special
conditions must be met on the fixture contacts to accomplish this test. Contact SKF for more details.
-32-
71-103 V5-EN
Baker WinTATS User Manual
Surge test folder
Function: Baker WinTATS digitizes and stores and averages 10 Master surge waveforms from an
armature during the “Acquire Waveform” process. Waveforms are displayed on the monitor while
programming to ensure a Master waveform is a “good waveform.” Armature index information is also
acquired at this time.
Figure 5-3-5: Master Surge Folder
The Surge folder contains the <Acquire Waveform> button that performs a learn routine. The system will
index to find a bar, then it will perform a resistance test. Next, it will index again to obtain a bar width. It
will surge test as “1st” bar. It will proceed to index to the next bar and capture a waveform. The waveform
is then displayed in a graph and compared with the previous average to meet the entered EAR%
requirement for pass/fail as a proper waveform to average. A query box will appear to alert the operator
to reject or accept this waveform. This will be repeated to obtain a final 10 waveform average for a
master waveform. During the learn cycle, a count will be kept of the averaged waveforms. When finished,
click the <Accept Waveform> button to save. A Manual Voltage Compensation selection and box is used
to add additional voltage to obtain requested peak value. You must <Reject Waveform> and <Acquire
Waveform> again for the new setting. The test voltage selected in the parameter is displayed but is not
changeable here. A <Skip Test> button is supplied to skip the surge test if desired. It is still necessary to
learn the armature to obtain the optical indexing information.
-33-
71-103 V5-EN
Baker WinTATS User Manual
Save and close
Function: After completion, to name the armature model for future use.
Figure 5-3.6: Master Save and Close
When the process is finished, click the <OK> button to obtain a new field. Click the <Save and Close>
button. A ‘Save As’ box will appear to enter the name of the armature model learned. Enter the name
and click the <Save> button. The new master will be saved on the hard drive to be ‘Assigned’ when
needed.
Modify Existing Parameter or Master file
Function: Make changes to existing parameter or master files on the hard drive.
Modify Parameter file
Function: To change the testing voltages, time, and/or test names.
From the ‘Master’ drop-down menu chose ‘Modify Master.’ A field will appear to choose an existing
parameter file. Select the parameter file and click <Open>. This makes it possible to edit any folder as
needed. The order of testing can not be edited, however, nor is it possible to remove any test that has
already been selected. Follow the same save-and-close procedure as describe above. You can save as the
same parameter name or give it a new name. This is useful for times when the same model may have
different testing voltages for different customers.
-34-
71-103 V5-EN
Baker WinTATS User Manual
Modify Master file
Function: To change the pass/fail limits of any test and to relearn an armature.
From the ‘Master’ drop-down menu, chose ‘Modify Master.’ A field will appear to choose an existing
Master file. Select the Master file and click <Open>. This enables any folder to be edited as needed.
However, test voltages in any folder can not be edited. Click the <Skip Test> button to skip a test if
needed. Make the needed changes to hipot leakage currents, resistance pass/fail limits, surge EAR% limit,
balance limits, and span limits. In the Surge folder, click <Reject Waveform> button to remove existing
“learn” information. Click the <Acquire Waveform> button and “relearn” the armature as before. Follow
the same save-and-close procedure as before.
Delete Master, Parameter, or Winding files
Function: Delete any unwanted file using Windows operations
Follow the Modify (Winding, Parameter, or Master) start. When the field to choose appears just right click
on the unwanted file and delete it.
NOTE: The Master is built on a three-level system. If you remove a parameter used by a specific master,
that master will be unusable.
Copy/Archive Master
Function: To create backup copies of existing files using Windows operations
-35-
71-103 V5-EN
Baker WinTATS User Manual
Chapter 6
Option menu items
Inside this chapter:
− Set temperature compensation
− Use temperature compensation
− Auto assign
− Continue on fail
− Pause on fail
− Save results
− Update key lock status
− Reset parts counter
− Set serial number
Options menu
Function: The options specify the manner in which the automatic test is performed.
Figure 6.0: Options menu
-36-
71-103 V5-EN
Baker WinTATS User Manual
Set temperature compensation
Function: To set the type of temperature measurement and the compensated value.
This drop-down menu gives the option of selecting the hardware type available for the measurement of
resistance temperature compensation. This can be done via external means and manually entered or via
a sensing device and automatically entered.
The compensated temperature can also be entered according to customer specifications.
The formula shown is in accordance with IEEE 1997 standard for compensation. The ‘User Enter at Start
of Test’ is a custom switch that allows an operator to input armature temperature for a temperature
compensation calculation instead of a sensor.
Figure 6-1: Options-Set Temperature Compensation
Temperature compensation
Function: This is an option for a user to toggle temperature compensation on or off. The “on” status of
the switch is indicated by the presence of the temperature reading in the bottom right side of the screen.
Auto assign after editing master
Function: This switch will automatically assign any master that has been edited.
Continue on fail
Function: This switch will allow the testing to continue pass a single failed test, otherwise a failure at
any point in the testing will stop the total test.
-37-
71-103 V5-EN
Baker WinTATS User Manual
Pause on fail
Function: This switch will allow a pause condition to occur during a failure to allow an operator to clear
a slot, retest, and resume testing. Works with 6.4 Continue on Fail.
Save results
Function: This switch when enabled will save the results of the test to a DATA directory in .xml format.
This results data can then be downloaded to a floppy, CD, or network.
Update key lock state
Function: The Menu Access lock on the control panel will lockout an operator from changing any preset
testing voltages and limits by not allowing Modify operation. The state of the key is sampled during
software launch but will need to be updated here if changed while in the software program.
Reset parts counter
Function: This is an operator switch to reset the total number of parts tested. The count is found at the
bottom left of the screen.
Set serial number
Function: This switch will cause a field to appear where the operator can enter a part serial number to
be added to the results data. When entered, it will be shown on the main testing screen during testing. It
will also be added to the printout on the first page. It will also be added to the stored results for
reference. There is also provided a comments section if needed.
-38-
71-103 V5-EN
Baker WinTATS User Manual
-39-
71-103 V5-EN
Baker WinTATS User Manual
Chapter 7
Utility
Inside this chapter:
− Utility self-test
− Manual test mode
− Armature retest
Utility
Function: A series of special test functions provided for the customer’s convenience.
Utility self test
Function: To perform a diagnostic check of the testing circuit and communication pathways and display
the results for the operator.
Figure 7-1: Self test result
The Self Test routine is a diagnostic tool for the operator. It does not test the fixture.
-40-
71-103 V5-EN
Baker WinTATS User Manual
NOTE: It is necessary to remove the contacts from the armature during test.
Manual test mode
Function: To give the operator a process to single or multiple test an armature without pass/fail limits to
give actual results.
Use the drop down menu “Test” and select <Manual Test Mode> or press F7. Each test has an enable
box and editable voltages. For a waveform, enter the voltage after enabling and click the <New Surge
Master> button. Press the <Start> on the control panel.
NOTE: For resistance and surge it is necessary to index the armature correctly.
Figure 7-2: Manual test mode
Armature retest
Function: The Armature Retest allows the user to retest a specific bar after an automatic test has been
completed and replace the failed result with pass result in the Results data.
-41-
71-103 V5-EN
Baker WinTATS User Manual
Figure 7-3: Armature re-test
Figure 7-3 displays the results for a failed bar 94 resistance. The operator will have two choices to make.
He can accept the failure to the data base and print out by pressing the <STOP> button on the control
panel. To perform the armature retest operation he must press the <RETEST> button on the control
panel. The operator will select the “Test” pull down menu and select “Armature Retest”.
NOTE: If the armature retest still shows the armature failed. Press the <STOP> button on the control
panel to send the failed data to the data base and printer.
-42-
71-103 V5-EN
Baker WinTATS User Manual
Figure 7-4: Armature re-test
The user enters the desired bar number to go to, retests that bar by clicking the <Perform Bar Retest>
button. The tester will then index the armature without testing until the requested bar. The tester will
perform a resistance and surge test. If the operator accepts the new results he will replace the automatic
test value with the retest value by clicking the <Accept Retest Results> button. The current station
Master Waveform is used for surge error comparison. If more than one retest is needed repeat the
process. You may close the retest menu at any time to check progress or locate a bad bar and reopen the
menu without loss of bar count location. ‘If a new <START> is begun all retest is over.’
When completed the “Fail” shown in red upper right will change to “Pass” in green. You printout will show
a pass and print all green.
NOTE: If a group of bars have failed, record all bar numbers for use before armature retest. Retest the
bars in order from lowest to highest as the armature will index to the selected bar before retesting.
WARNING
It is necessary to ensure proper operation (indexing) of the armature retest. Verify the
armature has not been moved since completion of the test run.
-43-
71-103 V5-EN
Baker WinTATS User Manual
Chapter 8
Standards and safety
Inside this chapter:
− Publishing and documentation
− Electrical and calibration standards
− Return of equipment
− Warning
− Maintenance and user safety
Publishing and documentation
Information furnished in this manual by SKF is believed to be accurate and reliable; however, SKF
assumes no responsibility for the use of such information nor for any infringements of patents or other
rights of third parties that may result from its use. No license is granted by implication or otherwise
under any patent rights of SKF.
No part of this document may be reproduced in part or in full by any means such as photocopying,
photographs, electronic recording, videotaping, facsimile, etc., except for enclosed Calibration Check
Sheets in Appendix B, without the expressed written permission of SKF.
Electrical and calibration standards
All SKF standards are either certified directly or are traceable to certification by the National Institute of
Science and Technology, formerly the United States Bureau of Standards. To obtain other information
concerning calibration, contact SKF.
Return of equipment
Before returning any equipment or instrument components to SKF, the following steps should be taken:
1)
2)
3)
Notify SKF Condition Monitoring Center – Fort Collins Service Dept. at (970) 282-1200. Give the
service representative a full description of the reason for the return, including and diagnostic or
troubleshooting actions taken. Please provide the specific model and serial number of the
instrument.
Equipment returned to SKF must be packaged in such a manner that it will reach the factory
undamaged from transit.
For non-warranty repairs, SKF CMC-Fort Collins will submit a cost estimate for your approval prior
to your shipping.
Warning
SKF assumes no liability for damages consequent to the use or maintenance of this product.
-44-
71-103 V5-EN
Baker WinTATS User Manual
Maintenance and user safety
PLEASE READ THE FOLLOWING BEFORE PERFORMANCE OF ANY SERVICE ON A
BAKER WINTATS UNIT
1)
2)
3)
Contact with the test leads on this instrument can cause harmful or fatal shock.
WARNING: Never touch test leads or windings while a test is in progress.
Ensure the Baker WinTATS unit is properly grounded. Use a three-lead grounded supply or an
extra ground lead if you are unsure of ground supply.
For capacitor start motors or systems with surge arrestors/power factor capacitors, DISCONNECT
all capacitors from the test circuit before testing.
The Baker WinTATS is NOT APPROVED for use in an explosive environment.
4)
5)
A safety protection network minimizes electric shock hazard:
−
−
−
−
The computer monitors safety switches and begins a test only when safety switches are engages.
The Baker WinTATS hardware overrides all computer signals and prevents application of highvoltage to an unsafe test station.
An EMERGENCY STOP button is mounted on the front panel of the Baker WinTATS and interrupts
all high voltage power supplies.
A red light mounted on top of the Baker WinTATS is illuminated during all test procedures.
DANGER
-45-
71-103 V5-EN
Baker WinTATS User Manual
Chapter 9
Maintenance
Inside this chapter:
− Maintenance and troubleshooting
− Basic operation
− Maintenance schedule
Maintenance and troubleshooting
Baker WinTATS has been designed for long-term reliability. The Baker WinTATS has a limited one-year
warranty against defects in materials and workmanship.
Baker WinTATS has also been designed for easy troubleshooting and repair. The instrument has builtin self-test and diagnostic capabilities. The self-test enables the instrument to conduct tests on internal
loads to verify that they are functioning properly. Failure of the Self-Test is indicated by test results
highlighted in red. This troubleshooting guide will provide step-by-step information to isolate and
correct problems.
Basic operation
Baker WinTATS is divided into two basic sub-racks: the PC sub-rack and the Baker WinTATS sub-rack.
The computer boards provide digital and analog I/O to control and gather data from the Baker WinTATS
boards. The PC platform also processes data to determine the success or failure of a test. The Baker
WinTATS boards provide test signals to the winding. There are normally four or five different test signal
sources:
1) Low-voltage DC power supply for winding resistance tests.
2) High-voltage DC power supply for DC HiPot tests.
3) High-voltage DC power supply/SCR stack for surge tests.
4) High-voltage AC power supply for AC HiPot tests.
Test signals are routed to the winding under test through a test bus. Any of the power supplies can be
switched onto the test bus through high-voltage relays located on the Readout/MUX board. Only one
supply at a time can be routed onto the bus. The test bus can be connected to any combination of test
leads through high-voltage relays. In single station TATS units, these relays are located on the
Readout/MUX board. On two-station units, these relays are located on the TL/MUX boards. Each Test
Lead Multiplexer (TL/MUX) board is capable of switching two test leads.
Maintenance schedule
The only scheduled maintenance, which must be performed on the WINTATS8800, is to change the
lithium batteries which back up the RAM on the PC mother boards. These batteries should be replaced
every five years to ensure that the instrument does not loose memory.
The filter, located on the front panel of the PC sub-rack, should be removed and cleaned at least Baker
WinTATS once a week. This can be accomplished by washing with warm water and a mild detergent or
by blowing the dust free.
-46-
71-103 V5-EN
Baker WinTATS User Manual
Fixtures, such as test stands, may need routine maintenance. Test leads and contacts, for example,
wear out from normal operation. The frequency of component replacement and routine scheduled
maintenance will vary from customer to customer because of amount of use.
-47-
71-103 V5-EN
Baker WinTATS User Manual
Chapter 10
Operation
Inside this chapter:
− Principles of operation
− Power flow
− PC sub rack
− Baker WinTATS sub-rack
− Test bus concept
− AC Hipot test
− DC Hipot test
− Resistance test
− Surge test
− Analysis of surge test waveforms
− Armature indexing
Principles of operation
The Baker WinTATS is the most advanced integrated electrical winding test instrument on the market
today. All common winding tests, such as hipot, resistance and surge, are contained in one single IBMcompatible PC platform. Both manual and automatic modes of operation are available. The computer
controls all individual tests and monitors results in both modes of operation. Self-test capability is a
standard feature of the WINTATS8800.
The Baker WinTATS is divided into two sections: the PC sub-rack and the Baker WinTATS sub-rack.
Certain customer-specified options ordered with the instrument may cause the Baker WinTATS-EXP
sub-rack to be included. The PC sub-rack contains the computer and all low-voltage computer-to-test
module interfacing. The Baker WinTATS sub-rack contains all of the high-voltage test modules and
relays. It is tightly shielded to prevent interference with the PC sub-rack.
Most of the circuitry and power supplies in the Baker WinTATS are contained in plug-in circuit boards
and modules for quick troubleshooting and replacement. Some heat-generating and larger components
are present. These are mounted on the instrument’s rear panel to quickly dissipate excess heat directly
to the outside air. All circuit boards and sub-rack mounted power supplies conform to PC or Eurocard
packaging standards of modular board depth and height. This provides standard two-piece pin and
socket connectors for greater reliability and lower insertion force.
Power flow
There are two separate circuits of main power flow in the Baker WinTATS; one is to the PC sub-rack and
the other to the Baker WinTATS sub-rack (and Baker WinTATS-EXP sub-rack, if present). The main
power switch/circuit breaker interrupts power to all circuits and is the only switch controlling power to
the PC sub-rack. The Baker WinTATS sub-rack (and the Baker WinTATS-EXP sub-rack, if present)
power and all fixture power is also interrupted by the EMERGENCY STOP <switches> on the instrument.
Activation of the EMERGENCY STOP <switch> allows the operator to safely service all test modules in the
Baker WinTATS sub-rack and fixture while power is still applied to the computer.
-48-
71-103 V5-EN
Baker WinTATS User Manual
PC sub-rack
The PC sub-rack contains the PC motherboard, disk drives, digital and analog I/O cards, peripheral cards
and the computer power supply. All boards in this sub-rack conform to IBM-compatible PC standards
and dimensions.
The computer and interface hardware are based on the standard 16-bit bus, which is an IBMcompatible PC standard. This system meets the requirements of small, real-time industrial systems and
allows for easy component replacement. Now an industry standard, the PC bus is supported by many
generic board manufacturers around the world. The PC-based computer system is ideal for the Baker
WinTATS because of its high performance, ruggedness, low cost, and worldwide support.
The single-board computer used in the Baker WinTATS is a generic PC system. The Microsoft
Windows 7™ operating system is used. It supplies program modules for terminal, printer and disk-drive
interfacing. All operating program and system program modules are stored permanently in the harddrive.
There are at least five boards located in the PC sub-rack besides the motherboards; the Fast ADC
board, the AIO board, the DIO board, the Super VGA board and the IDE Controller (which includes the
parallel and printer ports).
The PC sub-rack also houses the low-voltage computer power supply. This +5 volt, +/- 12 volt supply
is dedicated to the computer, and powers all computer boards as well as peripherals such as the hard
disk drive.
TATS sub-rack (high voltage)
The Baker WinTATS sub-rack contains safety and signal conditioning circuitry, high-voltage power
supplies and high-voltage switching relays. All boards in this sub-rack are triple-height, extended-depth
Eurocards that measure 366.8 by 280 millimeters in size.
There are four boards in the Baker WinTATS sub-rack: the AST-HV power and logic board, the ASTHVDC board, the AST stack board and the AST MUX/Readout board. The Baker WinTATS -EXP sub-rack
(if present) will contain one or more TL/MUX boards. All of these boards are manufactured by SKF.
The Baker WinTATS Power and Logic board contains a 12-volt power supply for the Baker WinTATS
sub-rack, safety interlock controls and a programmable 20 amp, constant-current power supply for the
Resistance test.
The Baker WinTATS-HVDC board is a programmable (300 to 15,000 volts) DC power supply that uses
off-line, resonant mode, switching power supply technology. Also located on this board is the highvoltage discharge capacitor, used for the surge test.
The AST-STACK (cap) board is a stacked-thyrister circuit, used as the surge test discharge switch. It
can hold off 18,000 volts and momentarily conducts 500 amperes or more.
The AST-MUX/Readout board contains the surge test pulse-shaping circuitry, a voltage divider for the
Surge Test signal, an AC HiPot voltage divider and up to seven high-voltage relays. This board serves as
the test source multiplexer for all test supplies and as a test lead multiplexer for one or two test leads.
Note: No option boards may be installed in the Baker WinTATS sub-rack. The Baker WinTATS-EXP subrack allows up to four high-voltage option boards.
Test bus concept
The single-line, test bus concept allows unlimited flexibility in the interconnection of test modules and
numerous test leads. Each test module (resistance, surge, and hipot) is isolated from the test bus by a
high-voltage relay. Only one test module may be active at a time. While the active module is connected to
the test bus, all others are disconnected. Each test lead is normally disconnected from the bus and
grounded. Any or all test leads may be selected to be connected to the test bus for the various tests.
-49-
71-103 V5-EN
Baker WinTATS User Manual
AC Hipot tests
Hipot tests, either AC or DC, are used to test a motor’s winding-to-core insulation. The AC Hipot test
applies a high-voltage AC signal, at line frequency, to the entire winding while the core is held at zero
volts. The current flowing through the winding-to-core insulation is measured to 0.5 milli-ampere
resolution. The current flow during the AC hipot test is usually dominated by reactive currents due to the
winding-to-core capacitance, which varies due to winding design. The AC hipot test simulates actual
stresses on the winding-to-core insulation during use and is considered a pass/fail test.
Because of the high-voltage sine wave requirement for the AC hipot test, it is not feasible to
generate this power electronically. It is therefore transformer generated from the AC mains. Most of the
AC hipot components are bulky and are mounted to the rear panel of the WINTATS.The output voltage is
adjusted by a variable autotransformer, which feeds the high-voltage step-up transformer. The variable
autotransformer is controlled by a stepper motor. The actual voltage applied to the load is measured by
the computer and adjusted to the program voltage. The AC hipot voltage is thus independent of
variations of the AC mains.
During the AC hipot test, the power supplied by the high-voltage transformer is switched onto
the test bus and all test leads connected to the winding are connected to the test bus. The voltage and
current is conditioned on the WINTATS8800-MUX/Readout board and supplied to the AIO board.
Short-circuit AC hipot current is limited resistively to 200 milli-amperes.
DC Hipot tests
Like the AC hipot test, the DC hipot also tests the winding-to-core insulation.
The DC hipot test applies a high voltage current to the entire winding while the winding core is held at
zero volts. The current flowing through the winding-to-core insulation is measured to one-microampere
resolution. The current flow during the DC hipot test is independent of the winding-to-core capacitance.
The DC hipot test is an accurate, quantitative measure of the bulk resistivity and contamination of the
winding-to-core insulation.
The AST-HVDC board supplies the high-voltage onto the test bus. The output voltage is programmed
by the analog output line of the AIO board and is regulated by the AST-HVDC board. All test leads
connected to the winding are connected to the test bus. The current flow is measured on the AST-HVDC
board and is supplied to the AIO board.
Short-circuit DC hipot current is electronically limited by the AST-HVDC board to 8 milli-Amperes.
Resistance test
The winding resistance test is used to identify faults in the winding, such as high-resistance connections,
improper wire gauge and incorrect turn counts.
The resistance of a winding under test is computed from Ohm’s Law (R=V/I) or the resistance of the
winding is equal to the voltage across the winding divided by the current through the winding. As in most
resistance measurement circuits, the current passing through the winding is forced to a constant value
by the instrument. The voltage is then measured across the winding and multiplied by a scaling factor to
compute the resistance. The constant current power supply in the Baker WinTATS has four current
ranges: 0.03, 0.2, 2 and 20 Amperes. The current it supplies is switched onto the test bus, then through
the test lead multiplexer into the winding under test. The maximum voltage produced by the constant
current power supply is 5 volts.
A true differential, four-wire resistance measurement technique is used in the Baker WinTATS to
eliminate errors due to test bus relay, test lead and contact resistances. The voltage across the winding is
measured exactly at the winding terminals and is not affected by voltage drops across the stray
-50-
71-103 V5-EN
Baker WinTATS User Manual
resistances. There is a high-voltage isolation relay in each voltage sense line, which is used to protect the
computer from high-voltage tests. These relays are normally open and only close during low-voltage
resistance testing.
Surge test
The Surge test is used to test turn-to-turn, layer-to-layer and phase-to-phase insulation within a
winding. No other test procedure exists to find incipient faults in winding turn insulation. The Surge test
is also capable of detecting incorrect turn counts or improper winding connections.
The Surge test is a high-voltage, direct capacitive discharge applied to a winding terminal while other
winding terminals are held at zero volts. The output of the AST-HVDC board is switched to the surge
pulse forming network and the output of this network is switched onto the test bus. The AST-HVDC
board charges the surge capacitor to the programmed voltage. The stacked thyristor circuit is then
triggered to generate the high-voltage pulse, which is applied to the winding under test. The waveform
generated by the interaction of the surge pulse and the winding under test is digitized by the Fast ADC
board and analyzed by the computer.
A Surge Balance or Phase Difference option is found in the “Parameter” operation. The user can
specify a numerical value for surge Balance between 0 and 99 percent. The Surge Balance or Phase
Difference takes the maximum surge value and subtracts the minimum surge value from it. This
percentile value, which is the largest surge difference among all phases tested, establishes an acceptable
range within which a surge test value is acceptable.
When the surge balance is activated (a zero value deactivates this option), all of the test armature
bards are examined if comparison to the master fails. If the test armature’s bar-to-bar comparison is
within the user specified value (between 1 and 99 percent), the armature will pass the surge test.
Analysis of the surge test waveform
Since there are so many winding elements that affect the Surge test waveform, it is difficult to predict
the exact shape of the waveform from mathematical models of the winding. However, a waveform
comparison technique is a very powerful tool used to detect subtle changes in a test waveform. Typically,
two matched surge circuits are connected to two identical windings. One of which is known to be “good”
(the master) and the other, the winding under test. The waveforms from each winding are displayed
simultaneously on a duel-trace oscilloscope. If the windings are identical and fault-free, the waveforms
will superimpose on the oscilloscope. Only one trace waveform will be visible. If one winding contains a
turn insulation fault or other differences from the master winding, two waveforms will be visible on the
oscilloscope.
The Baker WinTATS uses the waveform comparison technique, although comparison is done digitally
by the computer. A known, good master is not required at the test station since a master waveform is
learned and stored in the Baker WinTATS’ computer memory.
The waveform comparison algorithm used by the Baker WinTATS is the SKF exclusive and patented
Error-Area Ratio (EAR) method. The EAR method produces a percentage error number, which is directly
proportional to the severity of the winding fault. This technique provides high noise immunity and is selfcompensating to variations in waveform amplitude, frequency and Q-factor decay. The EAR method
provides reliable detection of turn-to-turn insulation faults and incorrect turn counts, previously difficult
to detect with peak or average DC voltage detection means used in earlier generation automatic surge
test instruments.
Typically, surge test waveforms of good windings will compare to the master waveform within 0-15
percent error. Single-turn shorts will product a 10-40 percent error and multi-turn shorts will produce
an error of 30-75 percent.
-51-
71-103 V5-EN
Baker WinTATS User Manual
Armature indexing
This description only applies to universal, rotating type armature test fixtures. The armature is rotated by
means of a rubber drive wheel contacting the body of the armature or by a chuck attached to the pinion
end of the armature. Both the wheel and the chuck assembly are driven by a stepper motor under
computer control.
Usually, one or two optical sensors are used to sense the commutator slots as the armature rotates.
The stepper motor pulse counts is used to sense that the distance between all slots are similar or an
indexing error message occurs
-52-
71-103 V5-EN
Baker WinTATS User Manual
-53-
71-103 V5-EN
Baker WinTATS User Manual
Chapter 11
Technical specifications
Inside this chapter:
- Technical specifications for Baker WinTATS
Computer/Processor: Microsoft Windows PC-compatible
Architecture: Industrial PC Packaging
Display: High-resolution VGA color monitor
Hard Disk Drive: 10 GB or larger, per spec
Communications: RS-232 (standard); other network interfaces are available
AC hipot voltage: Programmable 100- to 5000 V AC in 50 V AC Increments, 50/60 Hz, 2000 V A,
linear ramp-up and ramp-down
AC hipot current: 200 mA max, 0.5 mA resolution, programmable pass/fail limit in 1.0 mA increments
Duration: Programmable in one-second increments
Leakage current method installed: “total or absolute leakage current”
DC hipot voltage: Programmable 100 to 15000 VDC in 50 VDC increments
DC hipot current: 500 uA max, 1 uA resolution, programmable pass/fail limit in 1 uA increments
Duration: Programmable in one-second increments
Resistance:
- Auto-ranging
- Digit resolution
- 0.4 percent of full scale accuracy in each range
- Kelvin leads and contacts for bar-to-bar testing
- Ambient temperature compensated to 25 °C
- Infrared temperature sensing is optional
Resistance range:
100 micro-ohms – 2 milli-ohms
2 milli-ohms – 20 milli-ohms
20 milli-ohms – 200 milli-ohms
200 milli-ohms – 2 ohms
2 ohms – 20 ohms
20 ohms – 200 ohms
Current:
20 A
20 A
2A
200 mA
20 mA
200 mA
Surge test specifications:
- Voltage: Programmable 50 to 1500 volts peak bar-to-bar in 50-Volt increments.
- Z Transformer: Step down 10 to 1
- Pulse Energy: 11.25 Joules max.
- Discharge Capacitor: 0.10 uF
- Load: Greater than 1 uH
- Digitizing Rate: 5 Msamples/second
Programmable pass/fail percentage limit based on SKF’s patented Error Area Ratio technique.
-54-
71-103 V5-EN
Baker WinTATS User Manual
Fixtures:
Baker WinTATS can be configured with standard or customized heavy-duty fixtures that rotate the
armature while testing. Fixtures are available for testing a wide range of armature sizes from integral
horsepower DC drive and transit motors to large locomotive and utility generator armatures. Most
rotation fixtures employ optical sensors to sense commutator slots for armature indexing.
-55-
71-103 V5-EN
Baker WinTATS User Manual
Chapter 12
Self tests and troubleshooting
Inside this chapter:
− Self-test routine
− AC hipot test
− Resistance power supply test
− DC hipot test
− Surge test
− Test lead multiplexer board troubleshooting
− AC hipot troubleshooting
− Armature rotation troubleshooting
− Baker WinTATS and Baker WinTATS-EXP sub-rack power supply troubleshooting
− Comprehensive spare parts list
Self-test routine
The self test routine ensures proper operation of the Baker WinTATS in AC hipot test mode, and DC hipot
test mode, Resistance test mode and surge test mode. Self test does not check the reliability of the AC
hipot test. All self tests are performed on internal loads. The test lead multiplexer (TL/MUX) boards are
not thoroughly exercised during the self-test. Test fixtures are not energized or tested during self test.
Any errors are denoted by the individual test results being displayed in red. No other indication of Baker
WinTATS component failure is noted on screen. In order to troubleshoot any component failure in the
Baker WinTATS, maintenance must first eliminate certain possibilities (see Figure 7.1). The Baker
WinTATS must be powered during the self test. The EMERGENCY STOP <switches> must be deactivated
to energize the Baker WinTATS sub-rack to accomplish this test.
AC hipot test
During the test, the user should be able to see and hear the 4023-820 stepper motor rotate the variac.
The stepper motor and variac are mounted on brackets on the rear panel. If the stepper motor does not
rotate, the failure is either the stepper motor itself, the 230T stepper motor driver or the +24 VDC power
supply.
Caution: Dangerous voltages are used in AC hipot tests.
Use extreme care when conducting this procedure.
If the stepper motor rotates, but there is no high-voltage output signal, use the Baker WinTATS
Harness Wiring Diagram to verify that the AC line signals are present with a volt meter. The signal should
be traceable through the SSR-240D80 and PRD-WAGO240 relays. Also check the choke resistors,
variac, high-voltage transformer and associated wiring. A high-voltage probe may be needed to check
signals on the HVAC line. Trace the HVAC signal to the MUX/readout board. If the HVAC signal is present,
but the test bus signal is not, the failure may be on the KC-2 relay on the MUX/readout board. If the
signal is present on the test bus, the problem is most likely a failed TL-MUX board (if present).
An open circuit AC hipot test should produce a leakage current close to zero milliamps. A large open
circuit leakage current is indicative of a failed high-voltage relay. A failed high-voltage relay may also
produce high leakage current during the DC hipot test.
-56-
71-103 V5-EN
Baker WinTATS User Manual
The micro-switch on the variac tells the computer that the variac is zeroed. If the variac repeatedly
bangs against its stops, the switch is probably faulty.
-57-
71-103 V5-EN
Baker WinTATS User Manual
Resistance power supply test
The first function in the Self Test routine is the Resistance Power Supply Test. This function verifies the
operation of the Resistance Test and the analog I/O (AIO) board. The low-voltage DC constant current
power supply used in this test is contained on the Baker WinTATS Power and logic board. The highvoltage relay, which switches this supply onto the Test Bus, is located on the MUX/Readout board. The
MUX/Readout board contains a 0.1 ohm resistor used as the internal load for the Self Test. A value is
displayed for each of the four supply current ranges. If the value is outside of an acceptable range, the
Resistance test result in Self Test will be displayed on screen in red. The normally accepted values for
each of the four current ranges are listed in the table below. A failure of this test is normally indicative of
a failed Baker WinTATS Power and Logic board or AIO board. Sometimes the first and second ranges will
indicate a failure, while the third and fourth ranges pass. This indicates that the failure is not the power
supply.
Resistance self test expected values
Range
Expected values
100 x R0
100 x R1
10 X R2
1 x R3
0
1000
1780
1750
Troubleshooting: During the resistance test, the yellow LED on the two larger 5 VDC power supplies
should illuminate. If the self test fails and the yellow LEDs does not illuminate, test voltage input pins on
those power supplies for 24-30 VDC. If the voltage input power is present, replace the Power and Logic
board.
If the yellow LEDs do not illuminate during the self test, replace the AIO board in the computer. Also
ensure that the voltage drops across the R1 0.1 ohm resistor on the MUX/readout board. During the
fourth range, there should be a 2 VDC signal on the resistor.
DC Hipot (high-voltage DC power supply) test
The second self test that the Baker WinTATS performs is the high-voltage DC power supply test. This
test is necessary for DC hipot tests and for charging the capacitor, which is discharged to generate the
surge pulse. The power supply uses witching technology to reduce size and weight within the instrument.
It is entirely contained on the HVDC board.
The power supply is tested in the DC hipot test mode. A voltage divider network and a current sensing
resistor measures the output voltage and current. The supply is set to 4000 Volts. The measured output
voltage and current are displayed. If the output voltage is low and the output current is low, there may be
a failure of the HVDC board.
If the output voltage is low and the output current is high, there is a short circuit. The failure may be
on the HVDC board or a high-voltage relay failure on one of the other boards. To identify the problem,
the boards must be removed one at a time and replaced until the failed board is isolated. The front panel
of the Baker WinTATS sub-rack must be removed to reach the Baker WinTATS boards. Power to the
Baker WinTATS sub-rack is removed by depressing the emergency stop switch. This avoids removing
power to the PC sub-rack when removing each board.
-58-
71-103 V5-EN
Baker WinTATS User Manual
Caution:Dangerous voltages are present on boards in the Baker WinTATS sub-rack.
Use extreme caution when conducting this procedure.
Remove the boards, listed in the table below, one at a time and repeat the self test each time. Ensure
that the Baker WinTATS sub-rack is not energized when removing boards.
Boards with potential short-circuit failures
Slot Number
Board Type
Baker WinTATS-HV
Sub-rack
44
64
Baker WinTATS – Stack
WINTATS8800-MUX Readout
Baker WinTATS-HV-EXP
Sub-rack
24
49
Baker WinTATS-TL MUX
Baker WinTATS-TL MUX
The resistance test will fail if the MUX/readout board is removed. The surge test will fail when the stack
board is removed. The faulty board has been isolated when the DC hipot test passes. If removing all other
boards does not eliminate the problem, the fault is located on the HVDC board.
Surge test
The last test that the Baker WinTATS performs in the self test mode is the surge test. The high-voltage
DC power supply is switched to the SCR stack located on the AST stack board. The voltage is set to 3000
volts and the voltage and current are measured. If the voltage is low and the current is high, there is a
possible short circuit on the stack board.
If the leakage current is low and the voltage is normal, the voltage is reduced to 3000 volts. The SCR
stack is triggered by the PC fast ADC board. The surge pulse is routed to the surge readout board. The
PC F Baker WinTATS ADC board senses the signal from the surge readout board and digitizes the
waveform. If the waveform peak value is not close to the expected value, the surge test result will be
displayed in red. This failure is indicative of a short circuit on the Stack board or on the PC Fast ADC
board. Several tests are necessary to isolate the failed board.
Connect an oscilloscope with a high-voltage probe to test lead one. The black lead(s) are ground. Enter
the “Manual Test” mode on the Baker WinTATS and initiate a single-phase test. Use the oscilloscope
trigger to capture the surge waveform. The waveform will be a fast-rise time pulse with an exponential
decay of a millisecond or less. Tests of windings will result in a sinusoidal, exponentially decaying
waveform. If a surge waveform is present on the scope, but not on the Baker WinTATS screen, the
failure is probably on the PC Fast ADC board digitizing circuit.
If the surge pulse is not present on the test leads and you can hear the high frequency signal indicating
that the HVDC power supply is charged, replace the PC Fast ADC board to determine if it is sending the
trigger pulse to the Stack board. Also check the coaxial cables labeled “trigger” and “signal.”
-59-
71-103 V5-EN
Baker WinTATS User Manual
Test lead multiplexer board troubleshooting
Test Lead Multiplexer Board troubleshooting verifies that the Test Lead Multiplexer (TL/MUX) board
high-voltage relays do not breakdown when high-voltage is applied to the Test Bus. Place the Baker
WinTATS into the Automatic Test mode of operation. Connect a known “good” coil to the test leads.
Program the instrument, initiate an Automatic Test (with the appropriate master and all tests specified)
and observe the results on the screen. Irregular (non-sinusoidal) surge waveforms or incorrect resistance
readings indicate a failed TL/MUX board. Replace the suspect board and perform the test again.
Armature rotation (index) troubleshooting
If the instrument is configured for armature testing and the armature does not rotate during the
automatic test, attempt to rotate it using the jog buttons. If the armature still does not rotate, check the
stepper motor, gearbox and drive wheels for mechanical failure. Also check the stepper motor
translator/drive located on the fixture.
Verify all connections to the stepper motor drive. Check the 48 VDC power supply. Another potential
cause of a failure to rotate is the stepper motor driver board in the computer. In some cases, the stepper
motor driver can reset. The Baker WinTATS power must be cycled to reactivate the stepper motor driver.
Baker WinTATS and Baker WinTATS-EXP sub-rack power supply troubleshooting
These sub-racks require +12 and +24 volt power supplies. Some units may also require a +48 volt
power supply. Power is delivered through quick connect terminals on the rear of the back-planes.
Voltage levels can be easily checked at these terminals using a voltmeter. The terminals are labeled on
the front side of the back-planes. The wires are color-coded as shown in the table below.
Baker WinTATS sub rack power supply wiring
Supply voltage
Wire color
+12 V RTN
+12 V
+ 24 V
+ 48 V
Green
Yellow
Orange
Orange
Twelve-volt power for the Baker WinTATS Sub-rack is supplied by the Melcher PSR 124 power
supply, located on the AST Power and Logic board. It requires a +24 Volt input. If the output voltage is
not present, ensure that the Emergency Stop Switch on the front panel is depressed. Check the wiring or
replace the power supply as required.
Twenty-four and 48 Volt power for the sub-rack is supplied by the power supply located on the rear
panel. The supply is shown on the Baker WinTATS harness wiring diagram. If the output voltage is not
present, check the wiring or replace the power supply as required.
-60-
71-103 V5-EN
Baker WinTATS User Manual
Baker WinTATS manual test procedures
NOTE: This procedure is provided to the customer as a tool for diagnostics and troubleshooting of the
Baker WinTATS tester. It is software that manually controls relays and power supplies without the
safeguards of the Baker WinTATS testing software. Only qualified personnel should use this procedure
with guidance from SKF (1-800-752-8272). The improper use of this software can cause damage to the
personnel using it and/or to the equipment. SKF is not to be held responsible for the improper use of this
software.
The testing screen is divided into several areas. The upper section is used for digital inputs such as switch
closures, power supply status, rotation direction, etc. These are active lows indicated by a check mark in
the box. A generalized description of each DI line is given below. The large center area is a list of the
available digital outputs. These are user interfaced to turn on relays, lamps, power supplies, etc. They can
initiate tests on specific leads, connect relay matrix, isolate trouble areas, etc. They are also an active low
indicated by a mouse click in the adjacent box with a check mark. There is a ‘Reset All’ button at the
bottom to reset all lines together (be sure to power down all power supplies before resetting).
A generic list of the digital outputs is given below. The lower area is used to display the analog values.
The system uses 0-5 vdc/vac analog values from the testing boards to the Baker AIO board in the
computer. The analog values of voltage and current are converted into digital values to be used by the
software for analysis. They are values that ride on a noise level that is evident. The maximum count is
4095 (hexidecimal for 8-bit processor) that represents 5 V or greater input. They should never be at
hard ‘0’ or ‘4095’ as this condition indicates a fault. A generic list of the analog inputs is given below. The
AIO board generates a 0-5 vdc signal to set the HVDC power supply to requested voltage. The area in the
upper right is for this purpose with ‘255’ representing maximum output of the supply. The last area on
the right is used to control the AC HiPot stepper motor which drives the variac. You can drive the variac
up, down, or reset it back to its zero position. (Indicated by a check in the digital input box #15.)
Digital inputs:
0
Power
1
Keylock
2
Supply Status
3
Master Enable
4
Station 1 Safety Sw
5
Station 1 Start
6
Station 1 Stop
7
Spare
8
Spare
9
Station 2 Stop
10
Jog Forward
11
Jog Reverse
Digital outputs:
0
Resistance Open Lead
1
HVDC Relay
2
Surge Relay
3
Resistance P/S Enable
4
Resistance Scale 0
5
Resistance Scale 1
-61-
12
13
14
15
16
17
18
19
20
21
22
Jog Speed
Station 1 Retest
Station 2 Retest
ACHipot Variac Zero
Spare
Spare
Station 1 Auto Start
Station 2 Auto Start
Unused
Unused
Unused
23
Unused
71-103 V5-EN
Baker WinTATS User Manual
6
7
8
9
10
11
12
13
14
15
16
17
18
19
20
21
22
23
24
25
26
27
28
29
30
31
32
33
34
35
36
37
38
39
40
41
42
43
44
45
46
47
HVDC P/S Enable
Enable Test Lead 1
Enable Test Lead 2
Enable Test Lead 3
Enable Feedback 1
Enable Feedback 2
Enable Feedback 3
Station 1 Testing
Station 1 Pass
Station 1 Fail
TL-4/ROT-1/
TL-5/ROT-2/
TL-6/ROT-3/
Test in Progress
FB-5
FB-6/Enable Rotation P/S
Station 2 Testing
Station 2 Pass
ACHipot Relay
Enable ACHipot P/S
ACHipot AC Relay
ACHipot Variac Step
ACHipot Variac Direction
ACHipot Variac
Station 2 Fail
Motor Pulse Scale
TL-7/TL-4/
TL-8/TL-5/
TL-9/TL-6/
FB-7/FB-4/
FB-8/FB-5/
FB-9/FB-6/
Enable Rotation Sensor
Enable Rotation Sensor Station SW
TL-10/TL-7/ROT-4
TL-11/TL-8/ROT-5
TL-12/TL-9/ROT-6
FB-10/FB-7/
FB-11/FB-8/
FB-12/FB-9/
Station Switch
Relay Matrix
Analog inputs:
0
Noise Level
1
Resistance Feedback
2
Program Output
3
DC-V Analog
-62-
8
9
10
11
FB-1 Analog
FB-2 Analog
FB-3 Analog
FB-4 Analog
16
17
18
19
Temperature Sta-2
FB-10 Analog
FB-11 Analog
FB-12 Analog
71-103 V5-EN
Baker WinTATS User Manual
4
5
6
7
DC-I Analog
Temperature Sta-1
AC-V Analog
AC-I Analog
12
13
14
15
FB-5 Analog
FB-6 Analog
FB-7 Analog
FB-8 Analog
20
21
22
23
FB-13 Analog
FB-14 Analog
FB-15 Analog
FB-16 Analog
Figure 12-1: Baker WinTATS Mantest
NOTE: The section in the lower right operates and communicates with the indexing function of the
Baker WinTATS system fixture and the computer.
To operate the indexing function first select Ch 1 (Ch 2 for station 2). The direction desired. Click the
<Init S.M.C> button to initialize the board. Click the <Start Slow> button to begin the jogging function.
The “Optical Sensor =” will show recognition of the bar or slot by the optics. To witness an index
operation, click the <Learn> button to index one bar. The number of steps it took to achieve the index will
be displayed in the box. This verifies proper operation of the 80-539 Stepper Motor Controller, Stepper
Motor circuit, and the optics.
The “I. Res” button is for future use.
-63-
71-103 V5-EN
Baker WinTATS User Manual
Comprehensive spare parts list (high voltage)
Quantity
Description
Manufacturer
Baker part number
1
HV Power and Logic Board
Baker
80-518
1
HV HVDC Board
Baker
80-519
1
HV Stack Board
Baker
80-520
1
MUX/Readout Board
Baker
80-521
1
HV TL/MUX
Baker
80-527
1
Miscellaneous lamps, fuses, relays,
belts, etc…
Various
12
Commutator Contact Brushes
Baker
40-612-001
1
Stepper Motor Controller Board, Dual
Channel
Baker
80-539
1
Optical Encoder
Renco
32-500
1
Stepper Motor Driver Module,
CNO162
Centent
28-508
1
Opto Sensor, PS-49
Keyence
20-525
1
Opto Sensor Amplifier, PS-X28
Keyence
20-526
1
Baker WinTATS A/D Board
Baker
80-535
1
24 VDC Power Supply
Sola
28-500
1
48 VDC Power Supply
Elpac
28-501
1
5 VDC Power Supply
Sola
28-509
-64-
71-103 V5-EN
Baker WinTATS User Manual
-65-
71-103 V5-EN
Baker WinTATS User Manual
Chapter 13
Test fixture interface
Inside this chapter:
• Optical sensor adjustment
• Sensor angle adjustment
• Keyance optical sensor alignment & checkout procedure
• Optical sensor adjustment
• Sensor angle adjustment
Keyance optical sensor alignment and checkout procedure
If your TATS head on the test fixture is fitted with two Keyence PS-49 optical sensors, the sensors are
located near the front part of the head next to the TATS contact. The optical sensor amplifiers are
located under the TATS head mounting bracket. Proper settings on the amplifiers are:
Dark: on
Timer: off
Optical sensor adjustment
To adjust the optical sensors, remove the TATS contact pressure indicating wheel. Once this is removed,
the adjusting screws of the optical sensor mounting bracket are exposed.
Typically, the horizontal (in/out) movement of the optical sensor bracket will not need adjustment. This
adjustment is set at the factory and controls the focus of the optical sensor light beam on the armature
bars. Proper focus is achieved when the sensor light beam is a small red dot with an even smaller black
dot in its center.
The vertical (up/down) adjustment of the optical sensors is extremely critical and may require
adjustment due to differences in reflectivity of armature bars and/or separators. The ideal situation for
adjusting the sensors is to move the Baker WinTATS head in place and adjust the contact pressure. Since
the TATS contact pressure wheel indicator is not longer attached, the red and green indicating lights will
not function. To set proper contact pressure, turn the linear slide adjusting knob until the contacts just
touch a bar, and then an additional .030". Next, using the jog button with the slow jog speed selected,
rotate the armature Baker WinTATS a slot and then a bar. While doing this, observe that the red
indicator light on the optical sensor amplifier is lit on a slot and off on a bar. Likewise, observe that the
green light on the amplifier is lit on a bar and off on a slot. If this is not the case, adjust the sensitivity
screw on the amplifier to achieve the desired effect, the sensor angle may need to be adjusted.
Sensor angle adjustment
To adjust the sensor angle, loosen the nut on the side of the optical sensor bracket. Slightly rotate both
optical sensors until the sensor light beam is perpendicular with the commutator bar directly in front of
the optical sensors. This angle is difficult to determine, but if one looks at the optical sensor mounting
bracket itself, the light source part of the sensor should be parallel with the side of the mounting sensor
for proper adjustment (see sketch below).
-66-
71-103 V5-EN
Baker WinTATS User Manual
Once the adjustment has been made, tighten the nuts on the optical sensor mounting bracket and jog
the armature while observing the status of the red and green indicator lights on the optical sensor
amplifiers. Repeat the above adjustment procedure until the desired effect of sensing on a slot (red light
lit, green light off) and not sensing on a bar (green light on, red light off) is achieved. Re-assemble all
components and make sure that all optical sensor bracket screws and nuts are tight.
-67-
71-103 V5-EN
Baker WinTATS User Manual
-68-
71-103 V5-EN
Baker WinTATS User Manual
-69-
71-103 V5-EN
Baker WinTATS User Manual
Chapter 14
Software maintenance
Inside this chapter:
• Maintaining Baker WinTATS software
• Creating a back up file
• Reinitializing Baker WinTATS
Maintaining Baker WinTATS software
Baker WinTATS’ operating software is IBM PC compatible and uses the MS-DOS operating system.
As with any computer, software files should be backed-up periodically in the event of
inadvertent deletion. The following steps are provided to assist you in creating a back-up for all
operations. SKF recommends backing up your Baker WinTATS files as new masters are needed.
The following are all of the directories and files necessary for proper operation of the
WINTATS8800:
1)
2)
baker
baker\
3)
4)
baker\MAS
baker\config
5)
6)
7)
8)
baker\data
baker\WNG
baker\par
baker\doc
This directory is the root of all Baker WinTATS functions.
This contains all of the Baker WinTATS program files, which include AST.EXE,
I/O CONFIG0.CFG, and SYSCONFIG0.CFG
The masters are stored in this sub-directory.
This sub-directory contains all of the Baker WinTATS configuration files;
FLD_CAL.TXT, CAL.TXT, MASTER.TXT and ATO.TXT
This sub-directory is where the results are stored in a “TestResults.XML” file.
The winding files are stored in the sub directory.
The parameter files are stored in this sub directory.
This sub-directory holds the related documents for customer use.
Creating a backup file
There are numerous ways to create back-up files for the WINTATS.SKF recommends the following
method. Files should be backed up periodically.
1) Close the testing program.
2) Have a number of preformatted double-side, high density 3 1/2" floppy disks readily available.
Depending on how large your database is, you may require a number of disks to back-up all files.
3) Open Windows Explorer. Right click the desired file to save. Select. Send to Floppy A.
4) Ensure that all of the files and sub-directories listed on the previous page are present in the
directory.
Reinitializing the Baker WinTATS
Using the provided Compact Disk, reinstall all necessary directories to files.
Baker WinTATS/Windows 7 software installation
-70-
71-103 V5-EN
Baker WinTATS User Manual
Steps to install Windows 7
1) Enter BIOS and setup CDROM to Boot. Boot up the computer with the Windows 7 setup disk
installed. When prompted press <enter>.
2) Do not have any support disks, press <enter>. Disk larger than support, press <enter>.
3) Scroll thru licensing agreement using ‘page down’ and press ‘F8’.
4) Create partition in unpartitioned space, press ‘C’.
5) Create partition, use default setting, press <enter>.
6) Install Windows on highlighted partition, press <enter>.
7) Format using the FAT32 file system, press <enter>.
8)
9)
10)
11)
12)
13)
14)
15)
16)
17)
18)
Setup will format the partition and choose location for files, ‘\WINNT’, press <enter>.
Skip the exhaustive examination, press <esc>.
Setup copies needed files to hard disk, when finished remove disk (CD) press <enter>.
Install default files. Gathering information, click <next>.
Enter name as BAKER, organization as BAKER, the click <next>.
Enter OEM number from the original booklet and click <next>.
Enter computer name as BAKER, administrator password as baker, confirms with baker, <next>.
Do not create an emergency disk. Install most common components. <next>
Do not connect to network at this time if no network card is installed. Finish setup. <Finish>
Remove any disks and restart Windows.
Install the display drivers from the software provided for the display card used. From the display
properties dialog select the settings tab. Set the display properties to 1024X768 pixels, 256 or
better colors mode, refresh at 70 HZ.
19) Set the virtual memory for 600 MB (both initial and maximum) from Control
Panel>System>Performance. (Set).
20) Restart the computer for all settings to take effect.
Installation of Baker WinTATS’ Windows 7 software and support programs
1) Install the Baker WinTATS Windows install disk in the CD ROM drive. Open Windows Explorer.
2) Select all folders and drag into the C: root directory.
3) In the Baker directory make the following files writeable (Acctfile.cfg, Part.ctr, Stsconfig0.cfg,
I/Oconfig0.cfg, ASTClient.log, AST.log, Statistics.log) by right-clicking them and select the Properties
menu and unchecking the Read-only box.
4) Click the C:\Accessories\Aguage directory. Run the Setup.exe program and follow the default
selections until it finishes installing the Angular Gauge Active X controls.
5) Right-click the C:\Accessories\System32 folder and select the Copy menu option. Right-click C\winnt
and select the Paste menu option. If it asks to Overwrite confirmation, select <Yes for All>.
6) Run the C:\Accessories\oledb\setup.exe and finish the rest of its setup using default settings.
7) Click the Start>Programs>Command Prompt menu to bring up the Command Prompt window. Type
the following, cd c:\winnt\system32 in the Command Prompt window. Then type regsvr32
vcf132.ocx in the window and <enter>. A dialog should come up with message “DLLRegisterServer
in vcf132.ocx succeeded.” (If step 5 was successful.)
8) Run the winzip95.exe program in the C:\Accessories\Winzip directory and agree with all default
choices.
9) Double-click the file BCB3_360c.zip in the C:\Accessories\Slgraph directory. Winzip will start up
displaying contents of the zip file. In WinZip’s content window, double-click the setup.exe program to
run it. Agree with all default choices and when prompted for a password, type 1342-crhf-4681.
-71-
71-103 V5-EN
Baker WinTATS User Manual
10) Create an “WINTATS” icon on the desktop by creating a shortcut to the C:\BAKER\AST.exe program.
Rename the shortcut to “Baker WinTATS 8800”. Right-click the icon, select change icon, and
browse for the cobra.ico in C:\Baker directory.
11) Create a “MANTEST” icon on the desktop by creating a shortcut to the C:\BAKER\MANTEST.exe
program. Rename the shortcut to “TATS MANTEST” and change the icon as in step 10.
12) Restart Windows 7.
13) Install the Borland database engine onto the computer. Open C:\Accessories\BCB\BCB directory
and launch Setup.exe. (If not present, insert the C++ Builder 3 disc into the CD-ROM drive.) Run the
Setup.exe, it does not run automatically. Choose Custom installation and unselect “C++Builder3”
and “SQL Links”. Continue until the end using defaults and overwrites.
14) Go to the Control Panel>BDE Administrator. Choose Configuration>Drivers>Native>DBASE. On the
right hand side of Definition page change the LEVEL to ‘3’. Accept the changes as you exit.
15) Change the Windows desktop wallpaper to C:\BAKER\LogoBaker2.bmp by right clicking the desktop
and selecting Properties>Background Wallpaper. Locate .bmp by using Browse button. Also choose
Baker Blue for background.
16) Restart Windows again to have changes made selectable.
Baker WinTATS user selections for a specific unit
1) The proper operation of the Baker WinTATS unit depends on the correct programming of the
configuration file. When completing this section a copy should be made of the Sysconfig.cfg and
I/Oconfig.cfg files into the C:\BAKER\TEMP directory. It is also important to ‘write protect’ these
files to avoid corruption by accidental use.
2) Double click the C:\BAKER\Dalconfig.exe to open the I/Oconfig0.cfg file. Set the ‘Number of
Stations’ box and the ‘Number of TL Mux Boards’ box. Then select the tests that the unit will be
running. (This is dependent upon the hardware build of the Baker WinTATS unit.) If a plc is to
be used, select the Master box and enter the correct digital lines as per the hardware build. Next
enter the correct digital input and output lines for Station 1 and if used, Station 2. (These also
are based upon the hardware build of the Baker WinTATS unit.) In the System I/O area enter
the station switch and keylock digital lines is used. (Hardware builds). Again if a plc is to be used
there is a box for Miscellaneous I/O digital lines again dependent upon hardware build. When
complete click the close file in the upper right corner. Click the save option. Right click the file
I/Oconfig0.cfg and select properties. Select Read-Only to
-72-
71-103 V5-EN
Baker WinTATS User Manual
protect.
Figure 14-1: Dalconfig0.cfg File
3) Double-click the C:\BAKER\Sysconfig.exe program to open the Sysconfig0.cfg file. Set the ‘# of
Stations’ box, the ‘# of Leads per Station’ box (hardware build), the ‘Language’ of choice, and the
‘Baker WinTATS SN’ which may be software dependent. The Options area is used for optional
hardware used on this specific unit. The IR probe is checked if Exergen Infared probes are used.
If left unchecked the unit will default to the Solid State temp probe of most units. The PLC box is
checked for plc operation and number of Master lines. The Fail Printer is checked only if fail
printer software is installed in Windows. The Barcode/Serial Interface is selected when a serial
barcode scanner is to be used. (It must be set up according to manufacturers spec’s.) The
Station 2 Cal Temp Gain is to be checked only if a Station 2 temperature sensor us used. Along
the bottom is the Test Bus area. Select the tests that will be used on this Baker WinTATS unit
(hardware dependent). (The Armature test must be selected!)
4) This section will deal with the Lead Map and testing parameters. A copy can be obtained from
SKF (1-800-752-8272) if not available. Select the Lead Map button at bottom of page. Enter
the correct digital output line for the lead map of the Baker WinTATS unit under program. The
AST unit will not operate correctly if these numbers are not correct. In the AC Hipot block
select the Max AC Current that is hardware built for this WINTATS. Consult Baker about these
settings. The Phase 1, 2, & 3 digital lines will apply rotation power during Rotation Test #1 of
the Master. When complete, close the folder by clicking the close folder button at the upper right
corner. Select save to save the entries made to the Sysconfig0.cfg file. It is necessary to lock this
file by right clicking the file Sysconfig0.cfg and selecting Read-Only.
-73-
71-103 V5-EN
Baker WinTATS User Manual
Figure 14-2: SysConfig0.cfg File
5) Complete the programming by copying the I/Oconfig.cfg and the Sysconfig0.cfg files to the
C:\Baker\Temp directory.
6) If a modem or network card is to be installed it can be done now. Power down the computer and
install the hardware. Power up the computer and install the software. Set up the network as
customer designs.
7) If any problems are encountered following this routine contact SKF for assistance at 1-800752-8272. Baker heartily encourages the customer to limit the personnel allowed to access this
procedure as an improper set up can render the Baker WinTATS unit unuseable and possibly
could damage the unit.
NOTE: For software builds that do not use a Menu lockout key it is necessary to perform this routine.
Type regedit in the Start>Run box. Go to Registry\Hkey_Current_User\Software\Cobra5000\Options and
right click options to ADD string value. Type CheckKeyLock and set the value to 0.
Baker WinTATS driver installation
1) The Baker WinTATS unit has SKF computer boards used to control and analyze the tests.
These boards need to communicate with the new Baker WinTATS Windows 7 software. The
drivers for these boards need to be loaded.
2) Select the Start>Control Panel>Add/Remove Hardware. Launch the Hardware Wizard. Select
the ‘Add\Troubleshoot New Device’. Then select ‘Add New Device’. Next, choose ‘No, I want to
select from list’ option. Select ‘Other Device’. Select the ‘Have Disk’ option and choose the
-74-
71-103 V5-EN
Baker WinTATS User Manual
3)
4)
5)
<Browse> button. Locate the .inf file in the C:\AST Driver\AST\AIO directory. Open it and select
OK. The .inf is loaded but not the actual driver. Choose the <next> button and get a warning
message. Click OK to see property screen, click OK. Now select <next> to Files Needed screen.
Select Browse and locate the .sys file in the C:\AST Driver\AST\AIO\sys\objfre\i386 directory.
Click open then click OK. Select finish. The driver is loaded. You do not have to restart the
computer yet.
Continue to ‘Add\Troubleshoot New Device’, then Add New Device. Select ‘No, I want to select
from list’ option. Now you have a new option called Baker Drivers, select this option. Select
‘Have Disk’ and Browse for a new .inf file located in the C:\AST Drivers\AST\DIO1 directory
called Dio1_0X300.inf. Open it and click OK. Click <next> to get the warning message again.
Click OK then click OK again. After clicking <next> at the files needed screen click Browse.
Locate the .sys file in the C:\AST Driver\AST\DIO1\Sys\objfre\i386 directory called
dio1_0X300.sys. Click open and OK to load this driver. Select finish. Do not restart computer at
this time, there are more to load.
Continue to ‘Add\Troubleshoot New Device’, then Add New Device. Select ‘No, I want to select
from list’ option. Select Baker Drivers, select ‘Have Disk’ and browse for a new .inf file located in
C:\AST Drivers\AST\Fastatodio directory called fastatodio2000.inf. Open it and click OK. Click
<next> and get warning. Click OK twice to get to Files Needed screen. Select browse to get to
C:\AST Drivers\AST\Fastatodio\Sys\objfre\i386 directory and open the file fastatodio.sys. Click
OK and finish.
Continue to ‘Add\Troubleshoot New Device’, then Add New Device. Select ‘No, I want to select
from list’ option. Select Baker Drivers, select ‘Have Disk’ and browse for a new .inf file located in
C:\AST Drivers\AST\Baker_SMC directory called Baker_SMC .inf. Open it and click OK. Click
<next> and get warning. Click OK twice to get to Files Needed screen. Select browse to get to
C:\AST Drivers\AST\Baker_SMC\Sys\objfre\i386 directory and open the file Baker_SMC. Click OK
and finish. It is now time to restart the computer. The loaded drivers will now be linked to the
Windows upon reboot.
Installation procedure for Windows 7 network
To configure your computer on the network, you will need the following items:
1)
2)
3)
PCI Network card with install software drivers
Windows 7 install CD that accompanies the computer upgrade.
Computer name and Network Workgroup name.
When you want to go online you will need to have the network cable connected.
1)
2)
3)
4)
-75-
Install the Network card into the computer PCI slot available.
Boot the computer and uninstall the Ethernet drivers using “MY COMPUTER” and selecting
Properties. Select the Hardware tab and then the Device Driver menu. Right click the Ethernet
drivers and uninstall. (Note: These are drivers installed by Windows 7 and may not be for your
network card. It prevents the Windows 7 plug and play to detect your new network card and
must be removed.)
Reboot the computer and let the software detect new hardware. Start the Hardware Wizard
and search for suitable drivers. Select the source drive for your network card software drivers.
Install the drivers and finish.
Go to “MY COMPUTER” and right click to Properties. Select Network Identification tab and
choose Network ID. Start the Wizard and respond to your network settings.
71-103 V5-EN
Baker WinTATS User Manual
5)
6)
7)
-76-
If prompted by the computer to install the “Windows 7 Install CD”, do so and select ADD FILES
menu. Select the network files that are not loaded and load them.
Reboot the computer again. Right click on MY COMPUTER and select Properties again. Select
the Sharing Tab. Select the “New Share” button. Here you will control who will have access to
your computer and what level they can share.
Depending on the access speed of your network you may have to wait several minutes for the
network to recognize and log in you as a new station. You will know if you are communicating
with the service by selecting “START\SETTINGS|NETWORK AND….”. Here you will see the
polling and data rate. Eventually you will find your computer in the “Computers Near Me”
selection.
71-103 V5-EN
Baker WinTATS User Manual
-77-
71-103 V5-EN
Baker WinTATS User Manual
Index
A
AC HiPot · 18, 21, 26, 30, 31, 46, 48, 49, 50, 54, 56,
61
Archive Masters · 23
armature · 11, 16, 19, 21, 23, 24, 26, 28, 29, 31, 32,
33, 34, 35, 37, 41, 42, 43, 51, 52, 55, 60, 66, 67
Armature · 8, 20, 21, 23, 28, 32, 33, 40, 41, 42, 43, 48,
52, 56, 60, 73
armatures · 8, 24, 55
Assign Master · 12, 14
Auto assign · 36, 37
Automatic Test · 16, 60
C
Continue on fail · 36, 37
D
DC HiPot · 18, 26, 30, 46, 48, 50, 54, 56, 58, 59
F
FAIL · 16, 21
M
Manual test mode · 40, 41
Master · 11, 14, 16, 21, 23, 29, 30, 31, 32, 33, 34, 35,
41, 43, 61, 72, 73
Master Group · 11, 23, 29
O
PASS · 16, 21
pass/fail limits · 11, 29, 31, 32, 35, 41
Pause on fail · 36, 38
printout · 3, 21, 38, 43
R
Reset parts counter · 36, 38
Resistance Span test · 28
Resistance Test · 28, 31, 58
Results · 18, 20, 21, 41, 43
S
safety · 17, 44, 45, 49
Safety · 16, 17, 61
safety switch · 17
Set serial number · 36, 38
span test · 18
Standards · 44
Surge · 21, 28, 29, 32, 33, 35, 41, 48, 49, 51, 54, 56,
59, 61
surge balance · 18
Surge Test · 29, 49, 51
T
task bar · 11, 21, 30
temperature compensation · 36, 37
TESTING · 16
Testing Flow Chart · 10
U
unlock · 8
Update key lock status · 36
Utility · 40
Option · 36
W
P
waveform · 11, 20, 21, 33, 41, 51, 59, 60
Winding Group · 11, 23
Parameter Group · 11, 23, 24
-78-