1
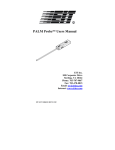
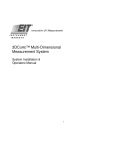
UV Power Puck® II
UVICURE® Plus II
User's Manual
0
Table of Contents
Introduction................................................................................................................................................................................................3
The Process Values....................................................................................................................................................................................4
Operation and Features ..............................................................................................................................................................................5
Operating the Radiometer ..........................................................................................................................................................................6
Setup & Default Modes .............................................................................................................................................................................7
Explanation of Settings:.............................................................................................................................................................................9
PC Communications ................................................................................................................................................................................10
Installing the Software .........................................................................................................................................................................10
USB Port Users....................................................................................................................................................................................11
Serial COM Port Users ........................................................................................................................................................................11
Identifying and Setting COM Ports .....................................................................................................................................................11
Using the Communication Software ........................................................................................................................................................11
Diagnostics & Error Messages ................................................................................................................................................................12
Low Battery Indicator..........................................................................................................................................................................12
Over-Temperature State.......................................................................................................................................................................12
Over-Range State.................................................................................................................................................................................13
Other Error Codes................................................................................................................................................................................13
Replacing the Batteries ............................................................................................................................................................................14
Maintenance – Cleaning and Calibration.................................................................................................................................................15
Cleaning...............................................................................................................................................................................................15
Calibration ...........................................................................................................................................................................................15
Warranty and Returns ..............................................................................................................................................................................16
New Product Warranty ........................................................................................................................................................................16
1
Calibration and Repair Warranty .........................................................................................................................................................17
Returning the Instrument to EIT Instrument Markets..............................................................................................................................18
Address for Returning All Instruments to EIT-IM ..................................................................................................................................19
Appendix A..............................................................................................................................................................................................20
Display Cleaning Instructions..............................................................................................................................................................20
Optics Cleaning Instructions................................................................................................................................................................20
Appendix B..............................................................................................................................................................................................23
COM Port Identification and Settings with Keyspan USB Serial Adaptor: ........................................................................................23
Appendix C..............................................................................................................................................................................................24
Specifications.......................................................................................................................................................................................24
2
Introduction
The EIT Instrument Markets UV Power Puck® II and UVICURE® Plus II are advanced versions of the UV Power
Puck® and UVICURE® Plus radiometers widely used throughout the global UV industry. With user selectable sample
rates, reference modes, UV irradiance profile graphs, PC communications, and other features, these new instruments
can be used for fast conveyor lines or slower lines, and measurements are compatible with other EIT products. The
instruments are simple to use with one-button operation.
The UV Power Puck® II and UVICURE® Plus II are self-contained, electro-optic radiometers that measure and display
total UV energy and UV irradiance in a UV curing system. The UV Power Puck® II and UVICURE® Plus II combine
compact size and robust design to withstand the extremes of UV curing environments while providing accurate
measurement.
The carefully designed optical sensing systems only measure wavelengths that are relevant to the UV process. The
output of the sensing system is converted to digital form and displayed on an easy-to-read OLED display.
The UV Power Puck® II simultaneously measures four different ranges of ultraviolet wavelengths with one pass through
the UV process. The UV Power Puck® II default wavelengths are UVA (320-390nm), UVB (280-320nm), UVC (250260nm) and UVV (395-445nm). The UVICURE® Plus II includes a choice of one of the EIT wavelength bands. The
instrument reading includes total energy and peak irradiance of all four transmission bands for the UV Power Puck® II
and one band for the UVICURE® Plus II.
EIT Instrument Markets UV Power Puck® II and UVICURE® Plus II are manufactured in the USA. Patent Pending.
3
The Process Values
The two process values read by the UV Power Puck® II and UVICURE® Plus II are total energy and peak irradiance.
The irradiance reading is instantaneous and is the highest amount of UV energy that the unit senses during an
exposure run. The irradiance value is energy at one instant in time during the exposure run. The radiometers
measure and display irradiance in watts or milliwatts per square centimeter (W/cm2, mW/cm2).
Total energy is a factor of irradiance over time. The instruments derive this value from the irradiance values during the
exposure run and the length of time of the run. Total energy is measured in joules or millijoules per square centimeter
(J/cm2, mJ/cm2).
Reaching the energy and irradiance values specified by your process is necessary for achieving a complete UV cure.
Ultraviolet Radiation
Although this product is not a source of UV light, it is used in a
UV environment. Refer to the UV source's documentation for
recommended protective measures against UV radiation
present in the UV environment.
4
Operation and Features
Display
Setup Mode Button
Soft Button Operation
Buttons perform the
function indicated on the
display bottom line.
On / Off Button
Depress and Hold until
screen is illuminated.
Run / Exit Run Button
Press to enter Run
Mode.
Press to Exit Run Mode.
Unit Serial Number
Alarm
PC Connector
Battery Door
5
Operating the Radiometer
Turning “ON” the Radiometer: Press and Hold the ON / OFF button until the display illuminates. The display will
briefly display the Radiometer Model Name, Serial Number, Software Version, Calibration Date, Range, and
Wavelength Bands installed. The display will then enter the default mode and display the data from the last run before
the unit was turned off.
Turning “OFF” the Radiometer: Press and Hold the ON / OFF button. A tone will sound. When tone stops, release
the button. The unit turns off.
Entering the “RUN” MODE: A short press of the “RUN” button clears the memory and puts the unit in the “RUN”
mode. The display shows “RUNNING” after shortly displaying the internal temperature of the unit. Confirm that the
unit displays “RUNNING” before initiating a reading.
Place the radiometer on the belt or object with the optic window looking toward the UV source. The display and
buttons will be facing away from the UV source. When the radiometer exits the curing chamber, the display will still
be flashing “RUNNING”.
CAUTION: Exposing the display to high UV radiation will damage the display.
Exiting the “RUN” MODE: A short press of the “STOP” button (Soft button display bar indicates “STOP” next to the
“ON / OFF” button) will exit the “RUN” mode and will return to the same default mode prior to making the exposure
run, but will display the new value.
6
Setup & Default Modes
To enter the Setup Mode, use the soft button to the left of the display, Press and hold for 0.5 second, then
release. The Setup screen will display the current settings. Default modes will appear preceded with an *asterisk.
The setup screen below shows all possible choices for each mode.
SETUP
*MODE:
SMOOTH: *OFF
UNITS:
DISPLAYS:
*ALL CHANNEL REFERENCE
ON
*J/W
mJ/mW
uJ/ uW
LOW *MEDIUM HIGH
SAVE
Ð
Î
GRAPH
EXIT
UV Power Puck® II Setup Screen
7
SETUP
*MODE:
SMOOTH:
UNITS:
DISPLAYS:
*GRAPH REFERENCE TOGGLE
*OFF
ON
*J/W
mJ/mW
uJ/ uW
LOW *MEDIUM
HIGH
SAVE
Ð
Î
EXIT
UVICURE® Plus II Setup Screen
To change selections, use the down Ð and right Î arrow buttons located under the arrows to scroll in the
indicated direction. To change the default selection, first select the line, then the setting on each line. Press the
SAVE button to save the setting as the new default. An *asterisk will appear next to the setting.
When changes are completed, press the EXIT button to return to the default mode.
8
Explanation of Settings:
MODE:
ALL CHANNEL (UV Power Puck® II Only) – displays Joules and Watts for each of the four (4) UV bands
(UVA, UVB, UVC, UVV)
TOGGLE (UVICURE® Plus II Only) – Pressing the SEL button, the user can “toggle” between the GRAPH
mode and REFERENCE mode.
REFERENCE – Make a run, data will appear next to the UV band. CAUTION: Be sure you want to
overwrite the current data on the REF line before pressing SAVE. Press SAVE, data is transferred to the
REF line. The data will remain until it is overwritten. The difference or change between the current run data
and the reference data is displayed as a percentage change on the %DIFF line.
GRAPH – Illustrates the irradiance profile for the UV source(s). UV Data is stored and displayed as a graph
of time (X axis) vs. intensity (Y axis) for each UV lamp source.
SMOOTH:
OFF – Displays the Peak Irradiance as measured at 2048 samples per second.
ON – Displays the Peak Irradiance as measured at 25 samples per second.
UNITS: J/W, mJ/mW, µJ/ µW – Select the unit values
DISPLAYS: LOW, MEDIUM, HIGH – Select the display intensity
SAVE Ð Î EXIT – Soft Button Indicators
9
PC Communications
Installing the Software
1. Insert the PP2™ communication software CD-Rom into your CD-Rom drive.
If “Auto Run” is set to “On” for your CD drive, the program will begin
loading automatically. Click on the ‘Finish’ and/or ‘Next’ buttons until
installation is complete.
If “Auto Run” is not turned on, follow the steps below:
2.
3.
4.
5.
6.
7.
Click on the Start button on your Windows toolbar.
Click on Run.
Click on Browse.
Select the drive where the CD Installation Disk is located.
Select the setup.exe file and double-click it.
Follow the on screen prompts by clicking on the ‘Finish’ and/or ‘Next’
buttons until installation is complete.
The UV Power Puck® II and UVICURE® Plus II can be connected to your PC via the supplied USB Serial Port
Adapter or via a serial COM port on your PC. EIT Instrument Markets recommends that you use the supplied
Keyspan USB Serial Port Adapter to connect your instrument to the PC.
10
USB Port Users
Install the Keyspan Software for your USB Serial Port adapter as per manufacturer's instructions. Attach the supplied
Interface Cable from your UV Power Puck® II and UVICURE® Plus II to the USB Serial Port Adapter. Connect the
USB Adapter cables to the USB port on your PC.
Serial COM Port Users
Attach the supplied Interface Cable to the serial COM Port to be used and to the UV Power Puck® II and UVICURE®
Plus II
Identifying and Setting COM Ports
Plug the cable from the unit into the serial port or USB port. Serial port users can identify which COM ports are
available by using the Device Manager, under System, in the Windows Control Panel. Keyspan USB Serial Port
Adapter users with Windows® 2000 and XP can identify and change the COM port utilized by using the Keyspan
Serial Assistant. (For more detailed instructions for USB connection users, refer to Appendix B on how to locate,
identify, or change the designated COM port).
Using the Communication Software
Follow the instructions provided with the Communications software CD.
11
Diagnostics & Error Messages
The UV Power Puck® II and UVICURE® Plus II continuously conduct internal self-diagnostics. If the unit detects an
internal problem, it will display one or more of the following error codes in the upper left corner on the display. Error
codes are two alphanumeric characters preceded by an *. If two errors are experienced at the same time, both error
codes will flash alternately on the screen every 0.5 seconds. Certain error codes may indicate problems that require
returning the unit to the factory for service.
Low Battery Indicator
*LB – Low Battery
If this happens during an exposure run, the reading is still valid. The low battery indicator is designed to illuminate
early enough so that your data remains valid. Under severe low battery conditions, the unit does not operate.
Therefore, confirm that the unit flashes “RUNNING” before initiating a reading.
Over-Temperature State
*OT – Over Temperature
If the internal temperature of the UV Power Puck® or UVICURE® Plus exceeds 65o C during an exposure run, the
unit will emit a steady beeping tone after the run. However, the data it has collected is accurate and can be read by
pressing the Select button. When doing this, the beeping tone stops and you can scroll through the data readings. In
addition, if the internal temperature of the unit exceeds 75o C, the unit beeps once then displays the internal
temperature continuously. The unit will not operate until the internal temperature drops below 75o C. The maximum
internal temperature is 80°C. If the internal temperature exceeds 80°C, the warranty is voided. CAUTION: If you
12
press the Reset button to initiate the RUN mode before the unit cools to 75oC, all data from the previous exposure run
is cleared from memory. The unit beeps and again continuously displays the temperature.
Over Range State
*OR – Over Range
The over range error message will be displayed if the peak irradiance value is too large for the instrument to measure.
Note that a unit’s full scale range will be marginally higher than the normal range. Readings that exceed the nominal
range and do not result in an *OR error are valid.
Other Error Codes
For all other error codes, please call EIT for disposition.
13
Replacing the Batteries
The UV Power Puck® II or UVICURE® Plus II should be turned OFF.
1. Loosen the screw on the battery door and remove the door.
2. Remove the old batteries.
3. Install two new AAA size alkaline cells, observing polarity. Both cells are installed in the same direction. The
proper direction is indicated on the PCB and on the housing inside the battery compartment. The unit is designed
so it will not operate with reversed cells.
4. Replace the door and the screw.
+
-
SIZE AAA ALKALINE
+
-
SIZE AAA ALKALINE
+
14
Maintenance – Cleaning and Calibration
Cleaning
USE A SOFT CLOTH TO CLEAN THE DISPLAY WINDOW.
WARNING - DO NOT USE ACETONE TO CLEAN THE DATA DISPLAY SCREEN. IT MAY DAMAGE
THE DISPLAY.
To clean the optical surface, refer to the Optics Cleaning Instructions provided in Appendix A. Note that cleaning the
window too often can cause calibration problems. Use caution when touching the mirrored surface.
Calibration
EIT Instrument Markets recommends that UV Power Puck® II and UVICURE® Plus II be calibrated every six months.
Refer to the "Returning the Instrument to EIT Instrument Markets" section for instructions on how to ship your unit in
for calibration.
15
Warranty and Returns
New Product Warranty
EIT Instrument Markets warrants that all goods described in this manual (except consumables) shall be free from
defects in material and workmanship. Such defects must become apparent within six months after delivery of the
goods to the buyer.
EIT Instrument Markets' liability under this warranty is limited to replacing or repairing the defective goods at our
option. EIT Instrument Markets shall provide all materials and labor required to adjust, repair, and/or replace the
defective goods at no cost to the buyer only if the defective goods are returned, freight prepaid, to EIT Instrument
Markets during the warranty period.
EIT Instrument Markets shall be relieved of all obligations and liability under this warranty if:
1.
2.
3.
The user operates the device with any accessory, equipment, or part not specifically approved or
manufactured by EIT Instrument Markets, unless the buyer furnishes reasonable evidence that such
installations were not a cause of the defect. This provision shall not apply to any accessory, equipment,
or part that does not affect the proper operation of the device.
Upon inspection, the goods show evidence of becoming defective or inoperable due to abuse,
mishandling, misuse, accident, alteration, negligence, improper installation, lack of routine maintenance,
or other causes beyond our control.
The goods have been repaired, altered, or modified by anyone other than EIT Instrument Markets
authorized personnel.
16
4.
The buyer does not return the defective goods, freight prepaid, to EIT Instrument Markets within the
applicable warranty period.
There are no warranties that extend beyond the description on the face hereof. This warranty is in lieu of - and is
exclusive of - any and all other expressed, implied, or statutory warranties or representations. This exclusion includes
merchantability and fitness, as well as any and all other obligations or liabilities of EIT Instrument Markets. EIT
Instrument Markets shall not be responsible for consequential damages resulting from malfunctions of the goods
described in this manual.
No person, firm, or corporation is authorized to assume for EIT Instrument Markets, any additional obligation or
liability not expressly provided for herein except in writing duly executed by an officer of EIT Instrument Markets.
If any portion of this agreement is invalidated, the remainder of the agreement shall remain in full force and effect.
This warranty shall not apply to any instrument or component not manufactured by EIT Instrument Markets.
Calibration and Repair Warranty
EIT Instrument Markets will warranty calibration and/or repair services just performed, for 90 days. This Calibration
and Repair Warranty does not apply to nor cover repairs that may otherwise occur to the instrument. Such repairs
may be covered under the New Product Warranty based on the age of the instrument.
17
Returning the Instrument to EIT Instrument Markets
1.
Warranty Repair, Non-Warranty Repair, and Instruments being Returned for Calibration:
You do not need to contact EIT Instrument Markets before returning your unit for warranty repair. An RMA is not
required.
When returning the UV Power Puck® II or UVICURE® Plus II, please return the equipment in the original (or
equivalent) packaging. You will be responsible for damage incurred from inadequate packaging, if the original
packaging is not used.
The customer is responsible for insuring the unit during transportation to EIT Instrument Markets.
Equipment repaired under warranty will be returned to the user with no charge for the repair or shipping. EIT
Instrument Markets will notify you of repairs not covered by warranty and their cost prior to performing any work
on the equipment.
EIT Instrument Markets reserves the right to make changes in design at any time without incurring any obligation
to install the same on units previously purchased.
18
Address for Returning All Instruments to EIT-IM
Ship the unit, freight prepaid, to the address below:
EIT-IM
108 Carpenter Drive
Sterling, VA 20164 USA
Attention: Calibration Department
Include your company name, address, telephone number, fax number, and e-mail address on your
shipping documents. EIT Instrument Markets will contact you if any additional information is needed.
19
Appendix A
Display Cleaning Instructions
Use of a Soft Cloth is Recommended for Cleaning the Display Window. Use of Isopropyl
Alcohol is acceptable.
WARNING – DO NOT USE ACETONE TO CLEAN THE DATA DISPLAY SCREEN. IT MAY DAMAGE
THE DISPLAY.
Optics Cleaning Instructions
The following guidelines are for cleaning the optical surfaces on EIT Instrument Markets instruments. However, EIT
Instrument Markets cannot have full knowledge of contaminants present in all applications and as a result cannot test
for their effects. Therefore, we cannot assume responsibility for damage to customer instruments, which results from
following these directions once the warranty period has expired. In addition, customers are advised to obtain and read
the MSDS for any chemical used for cleaning optics, and for taking necessary precautions. EIT Instrument Markets
makes no claim for the safety of any of these chemicals.
1. LOOK.
Closely examine the optical surface. If no contaminant is visible, it is best not to clean the instrument. The optics are
delicate and handling should be minimized. The two exceptions to this rule are when:
20
a.) It is known that a process chemical has come in contact with the instrument's optics, or
b.) A shift in readings has been observed with the instrument, and the design of the UV system is such that
contamination of the radiometer is a possible cause of the measurement error.
2. BLOW.
The next step is to use compressed gas to remove any loose material from the surface of the optics. This step is
necessary because loose material, especially silicates and other abrasive components, can cause scratching of the
optical surface during the remaining steps. Compressed gasses we recommend, in order of preference, are:
(a)
(b)
(c)
(d)
Dry nitrogen
Chemtronics® Duster (p/n's ES1017, ES1217, ES1617) or similar tetrafluoroethane-based products
A rubber air bulb (typically found in camera supply shops)
Compressed air from an oil-free, instrument grade system, sometimes referred to as instrument air
In the case of any compressed gas, it is best to avoid making the optic too cold. The resulting condensation, while
typically easy to remove, presents added difficulty in the cleaning process.
Two common practices are not recommended. Blowing on the optics with the mouth is not recommended; various
components of saliva are extremely difficult to remove from the optics. Ordinary compressed air (sometimes referred to
as shop air) should also be avoided because of the difficulty in removing oil from the optical surface.
3. FLOOD.
Apply a liberal amount of solvent to the window. The purpose of the solvent is to loosen the contaminants from the
surface, so surface tension can remove the contaminant in step 4. The solvents used depend on what the user has
available, and what contaminants are expected in the field. EIT Instrument Markets recommends cleaning the optic
once with isopropyl alcohol, and once with acetone for best results (DO NOT USE ACETONE ON THE DATA
DISPLAY). Other suitable solvents include de-ionized water, methyl alcohol, and ethyl alcohol. Customers working
21
with non-polar chemicals may find Methyl-ethyl-ketone (MEK) to be an effective solvent. Customers should avoid using
solutions containing detergents.
4. WIPE
Using a lint-free wipe or a cotton swab, wipe the surface clean. Either the wipe or swab needs to be thoroughly wet
with the solvent, so the surface tension of the solvent will allow the contaminant to be captured on the wipe. Users may
find it convenient to start again at step 3 with a second solvent. A source for lint free wipes is Kimberly Clark, Inc.'s
Kimwipes®.
EIT Instrument Markets does not recommend wiping the surface with a dry wipe or swab of any kind. The absence of
solvent greatly increases the chance for the optical surface to be abraded.
EIT Instrument Markets can provide cleaning advice, assistance, and repair or replacement in cases where these
guidelines fail to remove contaminants. Following these guidelines will help customers get long life and accurate
readings from their radiometers.
22
Appendix B
COM Port Identification and Settings with Keyspan USB Serial Adaptor:
Locating, identifying, and changing the COM port in Windows® 2000 and XP Operating Systems
1. Go to the Start Menu.
2. Click on “All Programs”.
3. Locate and highlight the “Keyspan USB Serial Adaptor” folder, then click on “Keyspan Serial Assistant” from the
drop down window.
4. The “Keyspan USB Serial Adaptor Assistant” screen will appear.
5. Click on “Port Mapping”.
6. The COM Port selected by Keyspan during installation will appear.
7. Open the EIT communications software program.
8. Click on “Setup”
9. Use the up and down arrows to select the COM port number that matches the Keyspan selected COM port.
10. Click on “EXIT”.
23
Appendix C
Specifications (Specifications subject to change without notice)
Display
Range
Accuracy
Spectral Response
Spectral Ranges
(UV Power Puck® II)
Spectral Ranges
(UVICURE® Plus II)
Spatial Response
Operating Temperature
Time-Out Period
Battery
Battery Life
Dimensions
Weight
Package Material
Carrying Case Material
Carrying Case Weight
Carrying Case
Dimensions
Easy to Read, Yellow Text on Black Background
10 Watt: UVA, UVB, UVV - 10mW/cm² to 10W/ m²; UVC - 5mW/cm² to 1W/cm²
Low Power Versions: UVA, UVB, UVC, UVV: 100microW/cm² to 100mW/cm²
+/- 10%; +/- 5% typical
Approximately cosine
4-channel continuous monitoring.320-390nm (UVA), 280-320nm (UVB), 250-260nm (UVC), 395445nm (UVV)
1-channel continuous monitoring. 320-390nm (UVA), 280-320nm (UVB), 250-260nm (UVC), 395445nm (UVV)
Approximately cosine
0-75°C Internal temperature; tolerates high external temperatures for short periods (audible alarm
indicates when temperature has exceeded tolerance)
2 minutes DISPLAY mode (no key activity). A no time-out mode can be activated by EIT-IM.
Two user-replaceable AAA Alkaline Cells
Approx. 20 hours with display on
4.60 x 0.50 inches; 117 mm x 12.7 mm (D x H)
10.1 ounces (289 grams)
Aluminum, stainless steel
Cut polyurethane interior, scuff resistant nylon exterior cover
9 ounces (260 grams)
10.75 x 3.5 x 7.75 inches; 274 x 89 x 197 mm (W x H x D).
24
Regulatory Statements
United States:
NOTE: This equipment has been tested and found to comply with the limits for a Class A digital device, pursuant to part 15 of
the FCC Rules. These limits are designed to provide reasonable protection against harmful interference when the equipment is
operated in a commercial environment. This equipment generates, uses, and can radiate radio frequency energy and, if not
installed and used in accordance with the instruction manual, may cause harmful interference to radio communications.
Operation of this equipment in a residential area is likely to cause harmful interference in which case the user will be required
to correct the interference at his own expense.
European Union Countries:
This equipment is a Class A device, suitable for use in all establishments other than domestic and those directly connected to
a low voltage power supply network which supplies buildings used for domestic purposes.
This equipment is in conformity with the following standards and therefore bears CE marking:
IEC 61326-1:2005
EN55011: 1998
EN61000-4-2: 1995, A1: 1998, A2: 2001
EN 61000-4-3: 2002, A1: 2002
following the provisions of the applicable directives:
98/34/EEC and amendments
89/336/EEC and amendments.
Designed and manufactured in the USA. Patent Pending.
25
Electronic Instrumentation & Technology, Inc.,
EIT Instrument Markets Group
108 Carpenter Drive, Sterling, VA 20164 USA
Telephone: 703-707-9067 • Fax: 703-478-0815
www.eitinc.com/instruments
EIT 100200:PP2 Rev B
26