1
Mellanox BXOFED Stack for Linux
User Manual
Rev 1.50
www.mellanox.com
Mellanox Technologies Confidential
Rev 1.50
NOTE:
THIS INFORMATION IS PROVIDED BY MELLANOX FOR INFORMATIONAL PURPOSES
ONLY AND ANY EXPRESS OR IMPLIED WARRANTIES, INCLUDING, BUT NOT LIMITED TO, THE IMPLIED WARRANTIES OF MERCHANTABILITY AND FITNESS FOR A
PARTICULAR PURPOSE ARE DISCLAIMED. IN NO EVENT SHALL MELLANOX BE LIABLE FOR ANY DIRECT, INDIRECT, INCIDENTAL, SPECIAL, EXEMPLARY, OR CONSEQUENTIAL DAMAGES (INCLUDING, BUT NOT LIMITED TO, PROCUREMENT OF
SUBSTITUTE GOODS OR SERVICES; LOSS OF USE, DATA, OR PROFITS; OR BUSINESS
INTERRUPTION) HOWEVER CAUSED AND ON ANY THEORY OF LIABILITY,
WHETHER IN CONTRACT, STRICT LIABILITY, OR TORT (INCLUDING NEGLIGENCE
OR OTHERWISE) ARISING IN ANY WAY OUT OF THE USE OF THIS HARDWARE, EVEN
IF ADVISED OF THE POSSIBILITY OF SUCH DAMAGE.
Mellanox Technologies
350 Oakmead Parkway
Sunnyvale, CA 94085
U.S.A.
www.mellanox.com
Tel: (408) 970-3400
Fax: (408) 970-3403
Mellanox Technologies, Ltd.
PO Box 586 Hermon Building
Yokneam 20692
Israel
Tel: +972-4-909-7200
Fax: +972-4-959-3245
© Copyright 2009. Mellanox Technologies, Inc. All Rights Reserved.
Mellanox®, BridgeX®, ConnectX®, InfiniBlast®, InfiniBridge®, InfiniHost®, InfiniRISC®, InfiniScale®, InfiniPCI®, and PhyX® and
Virtual Protocol Interconnect® are registered trademarks of Mellanox Technologies, Ltd.
CORE-Direct™ and FabricIT™ are trademarks of Mellanox Technologies, Ltd.
All other marks and names mentioned herein may be trademarks of their respective companies.
2
Document Number: 3253
Mellanox Technologies
Mellanox Technologies Confidential
3
Table of Contents
Table of Contents . . . . . . . . . . . . . . . . . . . . . . . . . . . . . . . . . . . . . . . . . . . . . . . . . . . . . . . . . . . . . . . . . 3
List of Tables . . . . . . . . . . . . . . . . . . . . . . . . . . . . . . . . . . . . . . . . . . . . . . . . . . . . . . . . . . . . . . . . . . . . . 8
Revision History . . . . . . . . . . . . . . . . . . . . . . . . . . . . . . . . . . . . . . . . . . . . . . . . . . . . . . . . . . . . . . . . . . 9
Preface . . . . . . . . . . . . . . . . . . . . . . . . . . . . . . . . . . . . . . . . . . . . . . . . . . . . . . . . . . . . . . . . . . . . . . . . . 10
Intended Audience . . . . . . . . . . . . . . . . . . . . . . . . . . . . . . . . . . . . . . . . . . . . . . . . . . . . . . . . . . . . . . . . .
Documentation Conventions . . . . . . . . . . . . . . . . . . . . . . . . . . . . . . . . . . . . . . . . . . . . . . . . . . . . . . . . .
Typographical Conventions . . . . . . . . . . . . . . . . . . . . . . . . . . . . . . . . . . . . . . . . . . . . . . . . . . .
Common Abbreviations and Acronyms . . . . . . . . . . . . . . . . . . . . . . . . . . . . . . . . . . . . . . . . . .
Related Documentation . . . . . . . . . . . . . . . . . . . . . . . . . . . . . . . . . . . . . . . . . . . . . . . . . . . . . . . . . . . . .
................................................................................
Chapter 1
Mellanox BXOFED Overview . . . . . . . . . . . . . . . . . . . . . . . . . . . . . . . . . . . . . . . . . . . 13
1.1
1.2
1.3
1.4
1.5
Chapter 2
Introduction to Mellanox BXOFED - - - - - - - - - - - - - - - - - - - - - - - - - - - - - - - - - - - - - - - - - - Introduction to Mellanox VPI Adapters- - - - - - - - - - - - - - - - - - - - - - - - - - - - - - - - - - - - - - - - BXOFED Package Contents - - - - - - - - - - - - - - - - - - - - - - - - - - - - - - - - - - - - - - - - - - - - - - - Architecture - - - - - - - - - - - - - - - - - - - - - - - - - - - - - - - - - - - - - - - - - - - - - - - - - - - - - - - - - - 1.4.1 mthca HCA (IB) Driver . . . . . . . . . . . . . . . . . . . . . . . . . . . . . . . . . . . . . . . . . . . . . . . . . . . .
1.4.2 mlx4 VPI Driver . . . . . . . . . . . . . . . . . . . . . . . . . . . . . . . . . . . . . . . . . . . . . . . . . . . . . . . . . .
1.4.3 Mid-layer Core . . . . . . . . . . . . . . . . . . . . . . . . . . . . . . . . . . . . . . . . . . . . . . . . . . . . . . . . . . .
1.4.4 Open-FCoE . . . . . . . . . . . . . . . . . . . . . . . . . . . . . . . . . . . . . . . . . . . . . . . . . . . . . . . . . . . . . .
1.4.5 ULPs . . . . . . . . . . . . . . . . . . . . . . . . . . . . . . . . . . . . . . . . . . . . . . . . . . . . . . . . . . . . . . . . . . .
1.4.6 MPI . . . . . . . . . . . . . . . . . . . . . . . . . . . . . . . . . . . . . . . . . . . . . . . . . . . . . . . . . . . . . . . . . . . .
1.4.7 InfiniBand Subnet Manager . . . . . . . . . . . . . . . . . . . . . . . . . . . . . . . . . . . . . . . . . . . . . . . . .
1.4.8 Diagnostic Utilities . . . . . . . . . . . . . . . . . . . . . . . . . . . . . . . . . . . . . . . . . . . . . . . . . . . . . . . .
1.4.9 Performance Utilities . . . . . . . . . . . . . . . . . . . . . . . . . . . . . . . . . . . . . . . . . . . . . . . . . . . . . .
Quality of Service - - - - - - - - - - - - - - - - - - - - - - - - - - - - - - - - - - - - - - - - - - - - - - - - - - - - - - -
13
13
13
14
15
15
16
16
16
17
17
17
17
18
Installation . . . . . . . . . . . . . . . . . . . . . . . . . . . . . . . . . . . . . . . . . . . . . . . . . . . . . . . . . . . 19
2.1
2.2
2.3
2.4
Chapter 3
10
10
10
11
12
12
Hardware and Software Requirements - - - - - - - - - - - - - - - - - - - - - - - - - - - - - - - - - - - - - - - - - 19
2.1.1 Hardware Requirements . . . . . . . . . . . . . . . . . . . . . . . . . . . . . . . . . . . . . . . . . . . . . . . . . . . . 19
2.1.2 Software Requirements. . . . . . . . . . . . . . . . . . . . . . . . . . . . . . . . . . . . . . . . . . . . . . . . . . . . . 19
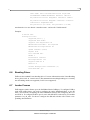
Downloading BXOFED - - - - - - - - - - - - - - - - - - - - - - - - - - - - - - - - - - - - - - - - - - - - - - - - - - - 20
Installing BXOFED - - - - - - - - - - - - - - - - - - - - - - - - - - - - - - - - - - - - - - - - - - - - - - - - - - - - - - 20
2.3.1 Pre-installation Notes . . . . . . . . . . . . . . . . . . . . . . . . . . . . . . . . . . . . . . . . . . . . . . . . . . . . . . 20
2.3.2 Installation Script . . . . . . . . . . . . . . . . . . . . . . . . . . . . . . . . . . . . . . . . . . . . . . . . . . . . . . . . . 21
2.3.2.1 Install Return Codes . . . . . . . . . . . . . . . . . . . . . . . . . . . . . . . . . . . . . . . . . . . . . . . 22
Uninstalling BXOFED - - - - - - - - - - - - - - - - - - - - - - - - - - - - - - - - - - - - - - - - - - - - - - - - - - - - 22
Working With VPI . . . . . . . . . . . . . . . . . . . . . . . . . . . . . . . . . . . . . . . . . . . . . . . . . . . . 23
3.1 Port Type Management - - - - - - - - - - - - - - - - - - - - - - - - - - - - - - - - - - - - - - - - - - - - - - - - - - 3.2 InfiniBand Driver - - - - - - - - - - - - - - - - - - - - - - - - - - - - - - - - - - - - - - - - - - - - - - - - - - - - - - 3.3 Ethernet Driver - - - - - - - - - - - - - - - - - - - - - - - - - - - - - - - - - - - - - - - - - - - - - - - - - - - - - - - - 3.3.1 Overview. . . . . . . . . . . . . . . . . . . . . . . . . . . . . . . . . . . . . . . . . . . . . . . . . . . . . . . . . . . . . . . .
3.3.2 Loading the Ethernet Driver . . . . . . . . . . . . . . . . . . . . . . . . . . . . . . . . . . . . . . . . . . . . . . . . .
3.3.3 Unloading the Driver . . . . . . . . . . . . . . . . . . . . . . . . . . . . . . . . . . . . . . . . . . . . . . . . . . . . . .
3.3.4 Ethernet Driver Usage and Configuration . . . . . . . . . . . . . . . . . . . . . . . . . . . . . . . . . . . . . .
3.4 Fibre Channel over Ethernet - - - - - - - - - - - - - - - - - - - - - - - - - - - - - - - - - - - - - - - - - - - - - - - 3.4.1 Overview. . . . . . . . . . . . . . . . . . . . . . . . . . . . . . . . . . . . . . . . . . . . . . . . . . . . . . . . . . . . . . . .
3.4.2 Installation . . . . . . . . . . . . . . . . . . . . . . . . . . . . . . . . . . . . . . . . . . . . . . . . . . . . . . . . . . . . . .
3.4.3 FCoE Basic Usage . . . . . . . . . . . . . . . . . . . . . . . . . . . . . . . . . . . . . . . . . . . . . . . . . . . . . . . .
3.4.3.1 FCoE Configuration . . . . . . . . . . . . . . . . . . . . . . . . . . . . . . . . . . . . . . . . . . . . . . .
3.4.3.2 Starting FCoE Service . . . . . . . . . . . . . . . . . . . . . . . . . . . . . . . . . . . . . . . . . . . . .
Mellanox Technologies
Mellanox Technologies Confidential
23
24
24
24
24
25
25
26
26
27
27
28
28
Rev 1.50
4
3.4.3.3 Stopping FCoE Service. . . . . . . . . . . . . . . . . . . . . . . . . . . . . . . . . . . . . . . . . . . . .
3.4.4 FCoE Advanced Usage. . . . . . . . . . . . . . . . . . . . . . . . . . . . . . . . . . . . . . . . . . . . . . . . . . . . .
3.4.4.1 Manual vHBA Control . . . . . . . . . . . . . . . . . . . . . . . . . . . . . . . . . . . . . . . . . . . . .
3.4.4.2 Creating vHBAs That Use PFC . . . . . . . . . . . . . . . . . . . . . . . . . . . . . . . . . . . . . .
3.4.4.3 Creating vHBAs That Use Link Pause . . . . . . . . . . . . . . . . . . . . . . . . . . . . . . . . .
Chapter 4
IPoIB. . . . . . . . . . . . . . . . . . . . . . . . . . . . . . . . . . . . . . . . . . . . . . . . . . . . . . . . . . . . . . . . 31
4.1 Introduction - - - - - - - - - - - - - - - - - - - - - - - - - - - - - - - - - - - - - - - - - - - - - - - - - - - - - - - - - - 4.2 IPoIB Mode Setting - - - - - - - - - - - - - - - - - - - - - - - - - - - - - - - - - - - - - - - - - - - - - - - - - - - - - 4.3 IPoIB Configuration - - - - - - - - - - - - - - - - - - - - - - - - - - - - - - - - - - - - - - - - - - - - - - - - - - - - 4.3.1 IPoIB Configuration Based on DHCP . . . . . . . . . . . . . . . . . . . . . . . . . . . . . . . . . . . . . . . . .
4.3.1.1 DHCP Server . . . . . . . . . . . . . . . . . . . . . . . . . . . . . . . . . . . . . . . . . . . . . . . . . . . .
4.3.1.2 DHCP Client (Optional) . . . . . . . . . . . . . . . . . . . . . . . . . . . . . . . . . . . . . . . . . . . .
4.3.2 Static IPoIB Configuration . . . . . . . . . . . . . . . . . . . . . . . . . . . . . . . . . . . . . . . . . . . . . . . . . .
4.3.3 Manually Configuring IPoIB . . . . . . . . . . . . . . . . . . . . . . . . . . . . . . . . . . . . . . . . . . . . . . . .
4.4 Subinterfaces - - - - - - - - - - - - - - - - - - - - - - - - - - - - - - - - - - - - - - - - - - - - - - - - - - - - - - - - - 4.4.1 Creating a Subinterface. . . . . . . . . . . . . . . . . . . . . . . . . . . . . . . . . . . . . . . . . . . . . . . . . . . . .
4.4.2 Removing a Subinterface . . . . . . . . . . . . . . . . . . . . . . . . . . . . . . . . . . . . . . . . . . . . . . . . . . .
4.5 Verifying IPoIB Functionality - - - - - - - - - - - - - - - - - - - - - - - - - - - - - - - - - - - - - - - - - - - - - - 4.6 The ib-bonding Driver - - - - - - - - - - - - - - - - - - - - - - - - - - - - - - - - - - - - - - - - - - - - - - - - - - - 4.6.1 Using the ib-bonding Driver . . . . . . . . . . . . . . . . . . . . . . . . . . . . . . . . . . . . . . . . . . . . . . . . .
4.7 IPoIB Performance Tuning - - - - - - - - - - - - - - - - - - - - - - - - - - - - - - - - - - - - - - - - - - - - - - - - 4.8 Testing IPoIB Performance - - - - - - - - - - - - - - - - - - - - - - - - - - - - - - - - - - - - - - - - - - - - - - - - -
Chapter 5
Overview - - - - - - - - - - - - - - - - - - - - - - - - - - - - - - - - - - - - - - - - - - - - - - - - - - - - - - - - - - - - - 41
RDS Configuration - - - - - - - - - - - - - - - - - - - - - - - - - - - - - - - - - - - - - - - - - - - - - - - - - - - - - - 41
EoIB . . . . . . . . . . . . . . . . . . . . . . . . . . . . . . . . . . . . . . . . . . . . . . . . . . . . . . . . . . . . . . . . 42
6.1 Introduction - - - - - - - - - - - - - - - - - - - - - - - - - - - - - - - - - - - - - - - - - - - - - - - - - - - - - - - - - - 6.2 EoIB Topology - - - - - - - - - - - - - - - - - - - - - - - - - - - - - - - - - - - - - - - - - - - - - - - - - - - - - - - - 6.2.1 External ports (eports) and GW . . . . . . . . . . . . . . . . . . . . . . . . . . . . . . . . . . . . . . . . . . . . . .
6.2.2 Virtual Hubs (vHubs) . . . . . . . . . . . . . . . . . . . . . . . . . . . . . . . . . . . . . . . . . . . . . . . . . . . . . .
6.2.3 Virtual NIC (vNic) . . . . . . . . . . . . . . . . . . . . . . . . . . . . . . . . . . . . . . . . . . . . . . . . . . . . . . . .
6.3 EoIB Configuration - - - - - - - - - - - - - - - - - - - - - - - - - - - - - - - - - - - - - - - - - - - - - - - - - - - - - 6.3.1 EoIB Host Administered vNic . . . . . . . . . . . . . . . . . . . . . . . . . . . . . . . . . . . . . . . . . . . . . . .
6.3.1.1 Central configuration file - /etc/infiniband/mlx4_vnic.conf. . . . . . . . . . . . . . . . .
6.3.1.2 vNic specific configuration files - ifcfg-ethX. . . . . . . . . . . . . . . . . . . . . . . . . . . .
6.3.2 Extracting BridgeX host name . . . . . . . . . . . . . . . . . . . . . . . . . . . . . . . . . . . . . . . . . . . . . . .
6.3.3 mlx4_vnic_confd . . . . . . . . . . . . . . . . . . . . . . . . . . . . . . . . . . . . . . . . . . . . . . . . . . . . . . . . .
6.3.4 EoIB Network Administered vNic . . . . . . . . . . . . . . . . . . . . . . . . . . . . . . . . . . . . . . . . . . . .
6.3.5 VLAN Configuration . . . . . . . . . . . . . . . . . . . . . . . . . . . . . . . . . . . . . . . . . . . . . . . . . . . . . .
6.3.5.1 Configuring VLANs . . . . . . . . . . . . . . . . . . . . . . . . . . . . . . . . . . . . . . . . . . . . . . .
6.3.6 EoIB Multicast Configuration . . . . . . . . . . . . . . . . . . . . . . . . . . . . . . . . . . . . . . . . . . . . . . .
6.3.7 EoIB and QoS . . . . . . . . . . . . . . . . . . . . . . . . . . . . . . . . . . . . . . . . . . . . . . . . . . . . . . . . . . . .
6.3.8 IP Configuration Based on DHCP . . . . . . . . . . . . . . . . . . . . . . . . . . . . . . . . . . . . . . . . . . . .
6.3.8.1 DHCP Server . . . . . . . . . . . . . . . . . . . . . . . . . . . . . . . . . . . . . . . . . . . . . . . . . . . .
6.3.9 Static EoIB Configuration . . . . . . . . . . . . . . . . . . . . . . . . . . . . . . . . . . . . . . . . . . . . . . . . . .
6.4 Sub Interfaces (VLAN) - - - - - - - - - - - - - - - - - - - - - - - - - - - - - - - - - - - - - - - - - - - - - - - - - - 6.5 Retrieving EoIB information - - - - - - - - - - - - - - - - - - - - - - - - - - - - - - - - - - - - - - - - - - - - - - - 6.5.1 mlx4_vnic_info. . . . . . . . . . . . . . . . . . . . . . . . . . . . . . . . . . . . . . . . . . . . . . . . . . . . . . . . . . .
6.5.2 ethtool . . . . . . . . . . . . . . . . . . . . . . . . . . . . . . . . . . . . . . . . . . . . . . . . . . . . . . . . . . . . . . . . . .
6.5.3 Link state. . . . . . . . . . . . . . . . . . . . . . . . . . . . . . . . . . . . . . . . . . . . . . . . . . . . . . . . . . . . . . . .
6.6 Bonding Driver - - - - - - - - - - - - - - - - - - - - - - - - - - - - - - - - - - - - - - - - - - - - - - - - - - - - - - - - 6.7 Jumbo Frames- - - - - - - - - - - - - - - - - - - - - - - - - - - - - - - - - - - - - - - - - - - - - - - - - - - - - - - - - 6.8 Module Parameters - - - - - - - - - - - - - - - - - - - - - - - - - - - - - - - - - - - - - - - - - - - - - - - - - - - - - -
Chapter 7
42
42
43
43
43
44
44
45
45
46
46
47
47
48
48
48
48
49
49
49
49
49
51
51
52
52
53
SDP . . . . . . . . . . . . . . . . . . . . . . . . . . . . . . . . . . . . . . . . . . . . . . . . . . . . . . . . . . . . . . . . . 54
7.1
7.2
Rev 1.50
31
31
31
32
32
33
33
34
35
35
36
36
36
37
38
38
RDS . . . . . . . . . . . . . . . . . . . . . . . . . . . . . . . . . . . . . . . . . . . . . . . . . . . . . . . . . . . . . . . . . 41
5.1
5.2
Chapter 6
28
28
29
29
30
Overview - - - - - - - - - - - - - - - - - - - - - - - - - - - - - - - - - - - - - - - - - - - - - - - - - - - - - - - - - - - - - 54
libsdp.so Library - - - - - - - - - - - - - - - - - - - - - - - - - - - - - - - - - - - - - - - - - - - - - - - - - - - - - - - - 54
Mellanox Technologies
Mellanox Technologies Confidential
5
7.3
7.4
7.5
7.6
7.7
Chapter 8
Overview - - - - - - - - - - - - - - - - - - - - - - - - - - - - - - - - - - - - - - - - - - - - - - - - - - - - - - - - - - - - SRP Initiator- - - - - - - - - - - - - - - - - - - - - - - - - - - - - - - - - - - - - - - - - - - - - - - - - - - - - - - - - - 8.2.1 Loading SRP Initiator . . . . . . . . . . . . . . . . . . . . . . . . . . . . . . . . . . . . . . . . . . . . . . . . . . . . . .
8.2.2 Manually Establishing an SRP Connection . . . . . . . . . . . . . . . . . . . . . . . . . . . . . . . . . . . . .
8.2.3 SRP Tools - ibsrpdm and srp_daemon . . . . . . . . . . . . . . . . . . . . . . . . . . . . . . . . . . . . . . . . .
8.2.4 Automatic Discovery and Connection to Targets. . . . . . . . . . . . . . . . . . . . . . . . . . . . . . . . .
8.2.5 Multiple Connections from Initiator IB Port to the Target. . . . . . . . . . . . . . . . . . . . . . . . . .
8.2.6 High Availability (HA). . . . . . . . . . . . . . . . . . . . . . . . . . . . . . . . . . . . . . . . . . . . . . . . . . . . .
8.2.7 Shutting Down SRP . . . . . . . . . . . . . . . . . . . . . . . . . . . . . . . . . . . . . . . . . . . . . . . . . . . . . . .
Overview - - - - - - - - - - - - - - - - - - - - - - - - - - - - - - - - - - - - - - - - - - - - - - - - - - - - - - - - - - - - Prerequisites for Running MPI- - - - - - - - - - - - - - - - - - - - - - - - - - - - - - - - - - - - - - - - - - - - - - 9.2.1 SSH Configuration . . . . . . . . . . . . . . . . . . . . . . . . . . . . . . . . . . . . . . . . . . . . . . . . . . . . . . . .
9.3 MPI Selector - Which MPI Runs - - - - - - - - - - - - - - - - - - - - - - - - - - - - - - - - - - - - - - - - - - - - 9.4 Compiling MPI Applications- - - - - - - - - - - - - - - - - - - - - - - - - - - - - - - - - - - - - - - - - - - - - - - 9.5 OSU MVAPICH Performance- - - - - - - - - - - - - - - - - - - - - - - - - - - - - - - - - - - - - - - - - - - - - - 9.5.1 Requirements . . . . . . . . . . . . . . . . . . . . . . . . . . . . . . . . . . . . . . . . . . . . . . . . . . . . . . . . . . . .
9.5.2 Bandwidth Test Performance . . . . . . . . . . . . . . . . . . . . . . . . . . . . . . . . . . . . . . . . . . . . . . . .
9.5.3 Latency Test Performance . . . . . . . . . . . . . . . . . . . . . . . . . . . . . . . . . . . . . . . . . . . . . . . . . .
9.5.4 Intel MPI Benchmark . . . . . . . . . . . . . . . . . . . . . . . . . . . . . . . . . . . . . . . . . . . . . . . . . . . . . .
9.6 Open MPI Performance - - - - - - - - - - - - - - - - - - - - - - - - - - - - - - - - - - - - - - - - - - - - - - - - - - 9.6.1 Requirements . . . . . . . . . . . . . . . . . . . . . . . . . . . . . . . . . . . . . . . . . . . . . . . . . . . . . . . . . . . .
9.6.2 Bandwidth Test Performance . . . . . . . . . . . . . . . . . . . . . . . . . . . . . . . . . . . . . . . . . . . . . . . .
9.6.3 Latency Test Performance . . . . . . . . . . . . . . . . . . . . . . . . . . . . . . . . . . . . . . . . . . . . . . . . . .
9.6.4 Intel MPI Benchmark . . . . . . . . . . . . . . . . . . . . . . . . . . . . . . . . . . . . . . . . . . . . . . . . . . . . . .
76
76
76
77
78
79
79
79
80
80
82
82
82
83
84
Quality of Service . . . . . . . . . . . . . . . . . . . . . . . . . . . . . . . . . . . . . . . . . . . . . . . . . . . . 86
10.1
10.2
10.3
10.4
10.5
10.6
10.7
10.8
10.9
Chapter 11
68
68
68
68
69
72
72
73
74
MPI . . . . . . . . . . . . . . . . . . . . . . . . . . . . . . . . . . . . . . . . . . . . . . . . . . . . . . . . . . . . . . . . . 76
9.1
9.2
Chapter 10
55
55
56
57
57
65
65
SRP . . . . . . . . . . . . . . . . . . . . . . . . . . . . . . . . . . . . . . . . . . . . . . . . . . . . . . . . . . . . . . . . . 68
8.1
8.2
Chapter 9
Configuring SDP- - - - - - - - - - - - - - - - - - - - - - - - - - - - - - - - - - - - - - - - - - - - - - - - - - - - - - - 7.3.1 How to Know SDP Is Working . . . . . . . . . . . . . . . . . . . . . . . . . . . . . . . . . . . . . . . . . . . . . .
7.3.2 Monitoring and Troubleshooting Tools . . . . . . . . . . . . . . . . . . . . . . . . . . . . . . . . . . . . . . . .
Environment Variables - - - - - - - - - - - - - - - - - - - - - - - - - - - - - - - - - - - - - - - - - - - - - - - - - - - Converting Socket-based Applications - - - - - - - - - - - - - - - - - - - - - - - - - - - - - - - - - - - - - - - - BZCopy – Zero Copy Send - - - - - - - - - - - - - - - - - - - - - - - - - - - - - - - - - - - - - - - - - - - - - - - - Testing SDP Performance - - - - - - - - - - - - - - - - - - - - - - - - - - - - - - - - - - - - - - - - - - - - - - - - - -
Overview - - - - - - - - - - - - - - - - - - - - - - - - - - - - - - - - - - - - - - - - - - - - - - - - - - - - - - - - - - - QoS Architecture - - - - - - - - - - - - - - - - - - - - - - - - - - - - - - - - - - - - - - - - - - - - - - - - - - - - - - Supported Policy - - - - - - - - - - - - - - - - - - - - - - - - - - - - - - - - - - - - - - - - - - - - - - - - - - - - - - CMA features - - - - - - - - - - - - - - - - - - - - - - - - - - - - - - - - - - - - - - - - - - - - - - - - - - - - - - - - IPoIB - - - - - - - - - - - - - - - - - - - - - - - - - - - - - - - - - - - - - - - - - - - - - - - - - - - - - - - - - - - - - - SDP- - - - - - - - - - - - - - - - - - - - - - - - - - - - - - - - - - - - - - - - - - - - - - - - - - - - - - - - - - - - - - - RDS - - - - - - - - - - - - - - - - - - - - - - - - - - - - - - - - - - - - - - - - - - - - - - - - - - - - - - - - - - - - - - SRP - - - - - - - - - - - - - - - - - - - - - - - - - - - - - - - - - - - - - - - - - - - - - - - - - - - - - - - - - - - - - - - OpenSM Features - - - - - - - - - - - - - - - - - - - - - - - - - - - - - - - - - - - - - - - - - - - - - - - - - - - - - -
86
87
87
88
88
88
89
89
89
OpenSM – Subnet Manager . . . . . . . . . . . . . . . . . . . . . . . . . . . . . . . . . . . . . . . . . . . . 90
11.1 Overview - - - - - - - - - - - - - - - - - - - - - - - - - - - - - - - - - - - - - - - - - - - - - - - - - - - - - - - - - - - - 90
11.2 opensm Description - - - - - - - - - - - - - - - - - - - - - - - - - - - - - - - - - - - - - - - - - - - - - - - - - - - - - 90
11.2.1 Syntax . . . . . . . . . . . . . . . . . . . . . . . . . . . . . . . . . . . . . . . . . . . . . . . . . . . . . . . . . . . . . . . . . 90
11.2.2 Environment Variables . . . . . . . . . . . . . . . . . . . . . . . . . . . . . . . . . . . . . . . . . . . . . . . . . . . . 96
11.2.3 Signaling . . . . . . . . . . . . . . . . . . . . . . . . . . . . . . . . . . . . . . . . . . . . . . . . . . . . . . . . . . . . . . . 96
11.2.4 Running opensm . . . . . . . . . . . . . . . . . . . . . . . . . . . . . . . . . . . . . . . . . . . . . . . . . . . . . . . . . 97
11.2.4.1 Running OpenSM As Daemon . . . . . . . . . . . . . . . . . . . . . . . . . . . . . . . . . . . . . . 97
11.3 osmtest Description - - - - - - - - - - - - - - - - - - - - - - - - - - - - - - - - - - - - - - - - - - - - - - - - - - - - - 97
11.3.1 Syntax . . . . . . . . . . . . . . . . . . . . . . . . . . . . . . . . . . . . . . . . . . . . . . . . . . . . . . . . . . . . . . . . . 97
11.3.2 Running osmtest . . . . . . . . . . . . . . . . . . . . . . . . . . . . . . . . . . . . . . . . . . . . . . . . . . . . . . . . 100
11.4 Partitions - - - - - - - - - - - - - - - - - - - - - - - - - - - - - - - - - - - - - - - - - - - - - - - - - - - - - - - - - - - - 100
11.4.1 File Format . . . . . . . . . . . . . . . . . . . . . . . . . . . . . . . . . . . . . . . . . . . . . . . . . . . . . . . . . . . . 101
Mellanox Technologies
Mellanox Technologies Confidential
Rev 1.50
6
11.5 Routing Algorithms - - - - - - - - - - - - - - - - - - - - - - - - - - - - - - - - - - - - - - - - - - - - - - - - - - - - - 103
11.5.1 Effect of Topology Changes . . . . . . . . . . . . . . . . . . . . . . . . . . . . . . . . . . . . . . . . . . . . . . . 104
11.5.2 Min Hop Algorithm . . . . . . . . . . . . . . . . . . . . . . . . . . . . . . . . . . . . . . . . . . . . . . . . . . . . . 104
11.5.3 Purpose of UPDN Algorithm . . . . . . . . . . . . . . . . . . . . . . . . . . . . . . . . . . . . . . . . . . . . . . 104
11.5.3.1 UPDN Algorithm Usage . . . . . . . . . . . . . . . . . . . . . . . . . . . . . . . . . . . . . . . . . . 105
11.5.4 Fat-tree Routing Algorithm . . . . . . . . . . . . . . . . . . . . . . . . . . . . . . . . . . . . . . . . . . . . . . . 106
11.5.5 LASH Routing Algorithm . . . . . . . . . . . . . . . . . . . . . . . . . . . . . . . . . . . . . . . . . . . . . . . . 107
11.5.6 DOR Routing Algorithm . . . . . . . . . . . . . . . . . . . . . . . . . . . . . . . . . . . . . . . . . . . . . . . . . 108
11.5.7 Routing References. . . . . . . . . . . . . . . . . . . . . . . . . . . . . . . . . . . . . . . . . . . . . . . . . . . . . . 108
11.5.8 Modular Routine Engine. . . . . . . . . . . . . . . . . . . . . . . . . . . . . . . . . . . . . . . . . . . . . . . . . . 109
11.6 Quality of Service Management in OpenSM - - - - - - - - - - - - - - - - - - - - - - - - - - - - - - - - - - - - 110
11.6.1 Overview. . . . . . . . . . . . . . . . . . . . . . . . . . . . . . . . . . . . . . . . . . . . . . . . . . . . . . . . . . . . . . 110
11.6.2 Advanced QoS Policy File . . . . . . . . . . . . . . . . . . . . . . . . . . . . . . . . . . . . . . . . . . . . . . . . 110
11.6.3 Simple QoS Policy Definition . . . . . . . . . . . . . . . . . . . . . . . . . . . . . . . . . . . . . . . . . . . . . 112
11.6.4 Policy File Syntax Guidelines. . . . . . . . . . . . . . . . . . . . . . . . . . . . . . . . . . . . . . . . . . . . . . 112
11.6.5 Examples of Advanced Policy File. . . . . . . . . . . . . . . . . . . . . . . . . . . . . . . . . . . . . . . . . . 112
11.6.6 Simple QoS Policy - Details and Examples . . . . . . . . . . . . . . . . . . . . . . . . . . . . . . . . . . . 116
11.6.6.1 IPoIB . . . . . . . . . . . . . . . . . . . . . . . . . . . . . . . . . . . . . . . . . . . . . . . . . . . . . . . . . 118
11.6.6.2 SDP . . . . . . . . . . . . . . . . . . . . . . . . . . . . . . . . . . . . . . . . . . . . . . . . . . . . . . . . . . 118
11.6.6.3 RDS. . . . . . . . . . . . . . . . . . . . . . . . . . . . . . . . . . . . . . . . . . . . . . . . . . . . . . . . . . 118
11.6.6.4 iSER . . . . . . . . . . . . . . . . . . . . . . . . . . . . . . . . . . . . . . . . . . . . . . . . . . . . . . . . . 118
11.6.6.5 SRP . . . . . . . . . . . . . . . . . . . . . . . . . . . . . . . . . . . . . . . . . . . . . . . . . . . . . . . . . . 119
11.6.6.6 MPI . . . . . . . . . . . . . . . . . . . . . . . . . . . . . . . . . . . . . . . . . . . . . . . . . . . . . . . . . . 119
11.6.7 SL2VL Mapping and VL Arbitration . . . . . . . . . . . . . . . . . . . . . . . . . . . . . . . . . . . . . . . . 119
11.6.8 Deployment Example . . . . . . . . . . . . . . . . . . . . . . . . . . . . . . . . . . . . . . . . . . . . . . . . . . . . 121
11.7 QoS Configuration Examples - - - - - - - - - - - - - - - - - - - - - - - - - - - - - - - - - - - - - - - - - - - - - - 121
11.7.1 Typical HPC Example: MPI and Lustre . . . . . . . . . . . . . . . . . . . . . . . . . . . . . . . . . . . . . . 121
11.7.2 EDC SOA (2-tier): IPoIB and SRP. . . . . . . . . . . . . . . . . . . . . . . . . . . . . . . . . . . . . . . . . . 122
11.7.3 EDC (3-tier): IPoIB, RDS, SRP . . . . . . . . . . . . . . . . . . . . . . . . . . . . . . . . . . . . . . . . . . . . 123
Chapter 12
InfiniBand Fabric Diagnostic Utilities. . . . . . . . . . . . . . . . . . . . . . . . . . . . . . . . . . . 125
12.1 Overview - - - - - - - - - - - - - - - - - - - - - - - - - - - - - - - - - - - - - - - - - - - - - - - - - - - - - - - - - - - - 125
12.2 Utilities Usage- - - - - - - - - - - - - - - - - - - - - - - - - - - - - - - - - - - - - - - - - - - - - - - - - - - - - - - - - 125
12.2.1 Common Configuration, Interface and Addressing . . . . . . . . . . . . . . . . . . . . . . . . . . . . . 125
12.2.2 IB Interface Definition . . . . . . . . . . . . . . . . . . . . . . . . . . . . . . . . . . . . . . . . . . . . . . . . . . . 126
12.2.3 Addressing . . . . . . . . . . . . . . . . . . . . . . . . . . . . . . . . . . . . . . . . . . . . . . . . . . . . . . . . . . . . 126
12.3 ibdiagnet - IB Net Diagnostic - - - - - - - - - - - - - - - - - - - - - - - - - - - - - - - - - - - - - - - - - - - - - - 127
12.3.1 SYNOPSYS . . . . . . . . . . . . . . . . . . . . . . . . . . . . . . . . . . . . . . . . . . . . . . . . . . . . . . . . . . . 127
12.3.2 Output Files. . . . . . . . . . . . . . . . . . . . . . . . . . . . . . . . . . . . . . . . . . . . . . . . . . . . . . . . . . . . 128
12.3.3 ERROR CODES . . . . . . . . . . . . . . . . . . . . . . . . . . . . . . . . . . . . . . . . . . . . . . . . . . . . . . . . 129
12.4 ibdiagpath - IB diagnostic path- - - - - - - - - - - - - - - - - - - - - - - - - - - - - - - - - - - - - - - - - - - - - - 129
12.4.1 SYNOPSYS . . . . . . . . . . . . . . . . . . . . . . . . . . . . . . . . . . . . . . . . . . . . . . . . . . . . . . . . . . . 129
12.4.2 Output Files. . . . . . . . . . . . . . . . . . . . . . . . . . . . . . . . . . . . . . . . . . . . . . . . . . . . . . . . . . . . 130
12.4.3 ERROR CODES . . . . . . . . . . . . . . . . . . . . . . . . . . . . . . . . . . . . . . . . . . . . . . . . . . . . . . . . 130
12.5 ibv_devices- - - - - - - - - - - - - - - - - - - - - - - - - - - - - - - - - - - - - - - - - - - - - - - - - - - - - - - - - - - 131
12.6 ibv_devinfo - - - - - - - - - - - - - - - - - - - - - - - - - - - - - - - - - - - - - - - - - - - - - - - - - - - - - - - - - - 131
12.7 ibstatus- - - - - - - - - - - - - - - - - - - - - - - - - - - - - - - - - - - - - - - - - - - - - - - - - - - - - - - - - - - - - - 133
12.8 ibportstate- - - - - - - - - - - - - - - - - - - - - - - - - - - - - - - - - - - - - - - - - - - - - - - - - - - - - - - - - - - - 135
12.9 ibroute - - - - - - - - - - - - - - - - - - - - - - - - - - - - - - - - - - - - - - - - - - - - - - - - - - - - - - - - - - - - - - 140
12.10 smpquery - - - - - - - - - - - - - - - - - - - - - - - - - - - - - - - - - - - - - - - - - - - - - - - - - - - - - - - - - - - 144
12.11 perfquery - - - - - - - - - - - - - - - - - - - - - - - - - - - - - - - - - - - - - - - - - - - - - - - - - - - - - - - - - - - 147
12.12 ibcheckerrs - - - - - - - - - - - - - - - - - - - - - - - - - - - - - - - - - - - - - - - - - - - - - - - - - - - - - - - - - - 151
12.13 mstflint- - - - - - - - - - - - - - - - - - - - - - - - - - - - - - - - - - - - - - - - - - - - - - - - - - - - - - - - - - - - - 153
12.14 ibv_asyncwatch - - - - - - - - - - - - - - - - - - - - - - - - - - - - - - - - - - - - - - - - - - - - - - - - - - - - - - - 156
Appendix A Boot over IB (BoIB)
158
A.1 Overview
A.2 Burning the Expansion ROM Image
A.3 Preparing the DHCP Server in Linux Environment
Rev 1.50
Mellanox Technologies
Mellanox Technologies Confidential
158
159
160
7
A.4
A.5
A.6
A.7
A.8
A.9
A.10
Subnet Manager – OpenSM
TFTP Server
BIOS Configuration
Operation
Diskless Machines
iSCSI Boot
WinPE
163
163
164
164
166
169
185
Appendix B ConnectX EN PXE
186
B.1 Overview
186
B.2 Burning the Expansion ROM Image
187
B.3 Preparing the DHCP Server in Linux Environment
187
B.4 TFTP Server
189
B.5 BIOS Configuration
189
B.6 Operation
189
B.7 Diskless Machines
190
B.8 iSCSI Boot
192
12.15 iSCSI Boot Example of SLES 10 SP2 OS - - - - - - - - - - - - - - - - - - - - - - - - - - - - - - - - - - - - - 193
B.9 WinPE
208
Appendix C Performance Troubleshooting
C.1
C.2
PCI Express Performance Troubleshooting
InfiniBand Performance Troubleshooting
Appendix D ULP Performance Tuning
209
209
211
D.1 IPoIB Performance Tuning
D.2 Ethernet Performance Tuning
D.3 MPI Performance Tuning
211
212
212
Appendix E SRP Target Driver
214
E.1 Prerequisites
E.2 How-to run
E.3 How-to Unload/Shutdown
214
216
219
Appendix F mlx4 Module Parameters
F.1
F.2
F.3
F.4
209
220
mlx4_core Parameters
mlx4_ib Parameters
mlx4_en Parameters
mlx4_fc Parameters
220
221
221
221
Glossary . . . . . . . . . . . . . . . . . . . . . . . . . . . . . . . . . . . . . . . . . . . . . . . . . . . . . . . . . . . . . . . . . . . . . . . 222
Mellanox Technologies
Mellanox Technologies Confidential
Rev 1.50
8
List of Tables
Table 1:
Typographical Conventions . . . . . . . . . . . . . . . . . . . . . . . . . . . . . . . . . . . . . . . . . . . . . . . 10
Table 2:
Abbreviations and Acronyms . . . . . . . . . . . . . . . . . . . . . . . . . . . . . . . . . . . . . . . . . . . . . . 11
Table 3:
Reference Documents . . . . . . . . . . . . . . . . . . . . . . . . . . . . . . . . . . . . . . . . . . . . . . . . . . . 12
Table 4:
mlnxofedinstall Return Codes . . . . . . . . . . . . . . . . . . . . . . . . . . . . . . . . . . . . . . . . 22
Table 5:
Supported ConnectX Port Configurations . . . . . . . . . . . . . . . . . . . . . . . . . . . . . . . . . . . . 23
Table 6:
Useful MPI Links . . . . . . . . . . . . . . . . . . . . . . . . . . . . . . . . . . . . . . . . . . . . . . . . . . . . . . . 76
Table 7:
ibdiagnet Output Files . . . . . . . . . . . . . . . . . . . . . . . . . . . . . . . . . . . . . . . . . . . . . . . . . . 128
Table 8:
ibdiagpath Output Files . . . . . . . . . . . . . . . . . . . . . . . . . . . . . . . . . . . . . . . . . . . . . . . . . 130
Table 9:
ibv_devinfo Flags and Options . . . . . . . . . . . . . . . . . . . . . . . . . . . . . . . . . . . . . . . . . . . 132
Table 10:
ibstatus Flags and Options . . . . . . . . . . . . . . . . . . . . . . . . . . . . . . . . . . . . . . . . . . . . . . . 133
Table 11:
ibportstate Flags and Options . . . . . . . . . . . . . . . . . . . . . . . . . . . . . . . . . . . . . . . . . . . . . 136
Table 12:
ibportstate Flags and Options . . . . . . . . . . . . . . . . . . . . . . . . . . . . . . . . . . . . . . . . . . . . . 140
Table 13:
smpquery Flags and Options . . . . . . . . . . . . . . . . . . . . . . . . . . . . . . . . . . . . . . . . . . . . . 144
Table 14:
perfquery Flags and Options . . . . . . . . . . . . . . . . . . . . . . . . . . . . . . . . . . . . . . . . . . . . . 148
Table 15:
ibcheckerrs Flags and Options . . . . . . . . . . . . . . . . . . . . . . . . . . . . . . . . . . . . . . . . . . . . 151
Table 16:
mstflint Switches . . . . . . . . . . . . . . . . . . . . . . . . . . . . . . . . . . . . . . . . . . . . . . . . . . . . . . 153
Table 17:
mstflint Commands . . . . . . . . . . . . . . . . . . . . . . . . . . . . . . . . . . . . . . . . . . . . . . . . . . . . 154
Table 18:
Supported Mellanox Technologies Devices (and PCI Device IDs) . . . . . . . . . . . . . . . . 158
Table 19:
Supported Mellanox Technologies Devices (and PCI Device IDs) . . . . . . . . . . . . . . . . 186
Rev 1.50
Mellanox Technologies
Mellanox Technologies Confidential
9
Revision History
Rev 1.50 (September 27, 2010)
• Added Section 2, “Installation,” on page 19
Rev 1.10 (February 23, 2010)
• First release
Mellanox Technologies
Mellanox Technologies Confidential
Rev 1.50
10
Preface
This Preface provides general information concerning the scope and organization of this
User’s Manual. It includes the following sections:
• Intended Audience (page 10)
• Documentation Conventions (page 10)
• Related Documentation (page 12)
Intended Audience
This manual is intended for system administrators responsible for the installation, configuration, management and maintenance of the software and hardware of VPI (InfiniBand,
Ethernet, FCoE, FCoIB) systems comprising servers with adapter cards, VPI gateways
and InfiniBand switch platforms. It is also intended for application developers.
Documentation Conventions
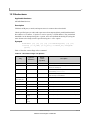
Typographical Conventions
Table 1 - Typographical Conventions
Description
Rev 1.50
Convention
File names
file.extension
Directory names
directory
Commands and their parameters
command param1
Optional items
[ ]
Mutually exclusive parameters
{ p1 | p2 | p3 }
Optional mutually exclusive parameters
[ p1 | p2 | p3 ]
Prompt of a user command under bash shell
hostname$
Prompt of a root command under bash shell
hostname#
Prompt of a user command under tcsh shell
tcsh$
Environment variables
VARIABLE
Code example
if (a==b){};
Comment at the beginning of a code line
!, #
Characters to be typed by users as-is
bold font
Keywords
bold font
Variables for which users supply specific values
Italic font
Mellanox Technologies
Mellanox Technologies Confidential
Example
11
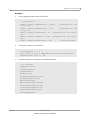
Table 1 - Typographical Conventions
Description
Convention
Emphasized words
Italic font
Pop-up menu sequences
menu1 --> menu2 -->... -->
item
Note
Note:
Warning
Warning!
Example
These are emphasized words
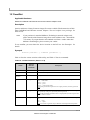
Common Abbreviations and Acronyms
Table 2 - Abbreviations and Acronyms
Abbreviation / Acronym
Whole Word / Description
B
(Capital) ‘B’ is used to indicate size in bytes or multiples of bytes (e.g., 1KB = 1024
bytes, and 1MB = 1048576 bytes)
b
(Small) ‘b’ is used to indicate size in bits or multiples of bits (e.g., 1Kb = 1024 bits)
FCoE
Fibre Channel over Ethernet
FW
Firmware
HCA
Host Channel Adapter
HW
Hardware
IB
InfiniBand
LSB
Least significant byte
lsb
Least significant bit
MSB
Most significant byte
msb
Most significant bit
NIC
Network Interface Card
SW
Software
VPI
Virtual Protocol Interconnect
Mellanox Technologies
Mellanox Technologies Confidential
Rev 1.50
12
Related Documentation
Table 3 - Reference Documents
Document Name
Description
InfiniBand Architecture Specification, Vol. 1, Release
1.2.1
The InfiniBand Architecture Specification that is provided by
IBTA
IEEE Std 802.3ae™-2002
(Amendment to IEEE Std 802.3-2002)
Document # PDF: SS94996
Part 3: Carrier Sense Multiple Access with Collision Detection (CSMA/CD) Access Method and Physical Layer Specifications
Amendment: Media Access Control (MAC) Parameters, Physical
Layers, and Management Parameters for 10 Gb/s Operation
Rev 1.50
Fibre Channel BackBone 5 standard (for Fibre Channel
over Ethernet)
Document # INCITS xxx-200x Fibre Channel Backbone
http://www.t11.org draft
BridgeX Programmer’s Reference Manual
Document # 2936PM
Describes the software interface used by developers
to write a driver for Mellanox BridgeX devices.
Mellanox Technologies
Mellanox Technologies Confidential
13
1
Mellanox BXOFED Overview
1.1
Introduction to Mellanox BXOFED
BXOFED, or OFED with BridgeX® support, is a single Virtual Protocol Internconnect
(VPI) software stack based on the OpenFabrics (OFED) Linux stack, and operates across
all Mellanox network adapter solutions supporting 10, 20 and 40Gb/s InfiniBand (IB);
10Gb/s Ethernet (10GigE); Fibre Channel over Ethernet (FCoE); Fibre Channel over
InfiniBand (FCoIB) connected via Mellanox BridgeX® gateways; Ethernet over InfiniBand (EoIB) connected via Mellanox BridgeX® gateways; and 2.5 or 5.0 GT/s PCI
Express 2.0 uplinks to servers.
All Mellanox network adapter cards are compatible with OpenFabrics-based RDMA protocols and software, and are supported with major operating system distributions.
1.2
Introduction to Mellanox VPI Adapters
Mellanox VPI adapters, which are based on Mellanox ConnectX® / ConnectX®-2 adapter
devices, provide leading server and storage I/O performance with flexibility to support the
myriad of communication protocols and network fabrics over a single device, without sacrificing functionality when consolidating I/O. For example, VPI-enabled adapters can support:
• Connectivity to 10, 20 and 40Gb/s InfiniBand switches, Ethernet switches, emerging
Data Center Ethernet switches, InfiniBand to Ethernet and Fibre Channel Gateways,
and Ethernet to Fibre Channel gateways
• Fibre Channel over Ethernet (FCoE) and Fibre Channel over InfiniBand (FCoIB)
• Ethernet over InfiniBand (EoIB)
• A single firmware image for dual-port ConnectX® / ConnectX®-2 adapters that supports independent access to different convergence networks (InfiniBand, Ethernet or
Data Center Ethernet) per port
• A unified application programming interface with access to communication protocols
including: Networking (TCP, IP, UDP, sockets), Storage (NFS, CIFS, iSCSI, NFSRDMA, SRP, iSER, Fibre Channel, Clustered Storage, and FCoE), Clustering (MPI,
DAPL, RDS, sockets), and Management (SNMP, SMI-S)
• Communication protocol acceleration engines including: networking, storage, clustering, virtualization and RDMA with enhanced quality of service
1.3
BXOFED Package Contents
Note:
For instructions on installing the package, please refer to Chapter 2, “Installation”.
BXOFED contains the following software components:
• Network adapter drivers
Mellanox Technologies
Mellanox Technologies Confidential
Rev 1.50
Mellanox BXOFED Overview
14
• mthca (IB only)
• mlx4 (VPI), which is split into the following modules: mlx4_core (low-level helper),
mlx4_ib (IB), mlx4_en (Ethernet), mlx4_fc (FCoE), and mlx4_vnic (EoIB)
• Mid-layer core
• Verbs, MADs, SA, CM, CMA, uVerbs, uMADs
• Upper Layer Protocols (ULPs)
• IPoIB, RDS, SDP, SRP Initiator
• MPI
• Open MPI stack supporting the InfiniBand interface
• OSU MVAPICH stack supporting the InfiniBand interface
• MPI benchmark tests (OSU BW/LAT, Intel MPI Benchmark, Presta)
• OpenSM: InfiniBand Subnet Manager
• Utilities
• Diagnostic tools
• Performance tests
• Documentation
1.4
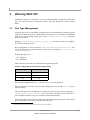
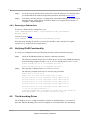
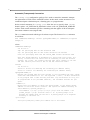
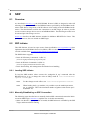
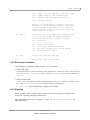
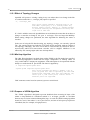
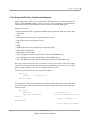
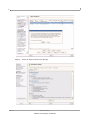
Architecture
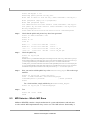
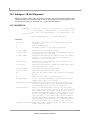
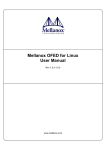
Figure 1 shows a diagram of the Mellanox BXOFED stack, and how upper layer protocols
(ULPs) interface with the hardware and with the kernel and user spaces. The application
level also shows the versatility of markets that BXOFED applies to.
Rev 1.50
Mellanox Technologies
Mellanox Technologies Confidential
15
Figure 1: BXOFED Stack
Cluster Management
mlx4_vnic
The following sub-sections briefly describe the various components of the BXOFED
stack.
1.4.1 mthca HCA (IB) Driver
mthca is the low level driver implementation for the following Mellanox Technologies HCA
(InfiniBand) devices: InfiniHost, InfiniHost III Ex and InfiniHost III Lx.
1.4.2 mlx4 VPI Driver
mlx4 is the low level driver implementation for the ConnectX adapters designed by Mellanox Technologies. The ConnectX can operate as an InfiniBand adapter, as an Ethernet
NIC, or as a Fibre Channel HBA. To accommodate the supported configurations, the
driver is split into four modules:
mlx4_core
Handles low-level functions like device initialization and firmware commands processing. Also
controls resource allocation so that the InfiniBand and Ethernet functions can share the device
without interfering with each other.
mlx4_ib
Handles InfiniBand-specific functions and plugs into the InfiniBand midlayer
Mellanox Technologies
Mellanox Technologies Confidential
Rev 1.50
Mellanox BXOFED Overview
16
mlx4_en
A 10GigE driver under drivers/net/mlx4 that handles Ethernet specific functions and plugs into the
netdev mid-layer
mlx4_fc
Handles the FCoE functions using ConnectX Fibre Channel hardware offloads
mlx4_vnic
Handles the EoIB functions using ConnectX Ethernet hardware offloads
1.4.3 Mid-layer Core
Core services include: management interface (MAD), connection manager (CM) interface, and Subnet Administrator (SA) interface. The stack includes components for both
user-mode and kernel applications. The core services run in the kernel and expose an interface to user-mode for verbs, CM and management.
1.4.4 Open-FCoE
The FCoE feature is based on and interacts with the Open-FCoE project. BXOFED
includes the following open-fcoe.org modules: libfc and fcoe. See Section 3.4, “Fibre Channel over Ethernet”.
1.4.5 ULPs
IPoIB
The IP over IB (IPoIB) driver is a network interface implementation over InfiniBand. IPoIB encapsulates IP datagrams over an InfiniBand connected or datagram transport service. IPoIB preappends the IP datagrams with an encapsulation header, and sends the outcome over the InfiniBand
transport service. The transport service is Reliable Connected (RC) by default, but it may also be
configured to be Unreliable Datagram (UD). The interface supports unicast, multicast and broadcast. For details, see Chapter 4, “IPoIB”.
EoIB
The Ethernet over IB (EoIB) mlx4_vnic module is a network interface implementation over InfiniBand. EoIB encapsulates Layer 2 datagrams over an InfiniBand Datagram (UD) transport service.
The InfiniBand UD datagrams encapsulates the entire Ethernet L2 datagram and its payload. For
details, see Chapter 6, “EoIB”.
RDS
Reliable Datagram Sockets (RDS) is a socket API that provides reliable, in-order datagram delivery
between sockets over RC or TCP/IP. For more details, see Chapter 5, “RDS”.
SDP
Sockets Direct Protocol (SDP) is a byte-stream transport protocol that provides TCP
stream semantics. SDP utilizes InfiniBand's advanced protocol offload capabilities.
Because of this, SDP can have lower CPU and memory bandwidth utilization when compared to conventional implementations of TCP, while preserving the TCP APIs and
Rev 1.50
Mellanox Technologies
Mellanox Technologies Confidential
17
semantics upon which most current network applications depend. For more details, see
Chapter 7, “SDP”.
SRP
SRP (SCSI RDMA Protocol) is designed to take full advantage of the protocol offload and RDMA
features provided by the InfiniBand architecture. SRP allows a large body of SCSI software to be
readily used on InfiniBand architecture. The SRP driver—known as the SRP Initiator—differs
from traditional low-level SCSI drivers in Linux. The SRP Initiator does not control a local HBA;
instead, it controls a connection to an IO controller—known as the SRP Target—to provide access
to remote storage devices across an InfiniBand fabric. The SRP Target resides in an IO unit and
provides storage services. See Chapter 8, “SRP”.
1.4.6 MPI
Message Passing Interface (MPI) is a library specification that enables the development of
parallel software libraries to utilize parallel computers, clusters, and heterogeneous networks. Mellanox BXOFED includes the following MPI implementations over InfiniBand:
• Open MPI – an open source MPI-2 implementation by the Open MPI Project
• OSU MVAPICH – an MPI-1 implementation by Ohio State University
Mellanox BXOFED also includes MPI benchmark tests such as OSU BW/LAT, Intel MPI
Benchmark, and Presta.
1.4.7 InfiniBand Subnet Manager
All InfiniBand-compliant ULPs require a proper operation of a Subnet Manager (SM) running on the InfiniBand fabric, at all times. An SM can run on any node or on an IB switch.
OpenSM is an InfiniBand-compliant Subnet Manager, and it is installed as part of
BXOFED.1 See Chapter 11, “OpenSM – Subnet Manager”.
1.4.8 Diagnostic Utilities
Mellanox BXOFED includes the following two diagnostic packages for use by network
and data-center managers:
• ibutils – Mellanox Technologies diagnostic utilities
• infiniband-diags – OpenFabrics Alliance InfiniBand diagnostic tools
1.4.9 Performance Utilities
A collection of tests written over uverbs intended for use as a performance micro-benchmark. As an example, the tests can be used for hardware or software tuning and/or functional testing. See PERF_TEST_README.txt under docs/.
1. OpenSM is disabled by default. See Chapter 11, “OpenSM – Subnet Manager” for details on enabling it.
Mellanox Technologies
Mellanox Technologies Confidential
Rev 1.50
Mellanox BXOFED Overview
18
1.5
Quality of Service
Quality of Service (QoS) requirements stem from the realization of I/O consolidation over
an IB network. As multiple applications and ULPs share the same fabric, a means is
needed to control their use of network resources.
QoS over Mellanox BXOFED for Linux is discussed in Chapter 11, “OpenSM – Subnet
Manager”.
Rev 1.50
Mellanox Technologies
Mellanox Technologies Confidential
19
2
Installation
This chapter describes how to install and test the BXOFED for Linux package on a single
host machine with Mellanox InfiniBand and/or Ethernet adapter hardware installed. The
chapter includes the following sections:
• Hardware and Software Requirements (page 19)
• Downloading BXOFED (page 20)
• Installing BXOFED (page 20)
• Uninstalling BXOFED (page 22)
2.1
Hardware and Software Requirements
2.1.1 Hardware Requirements
Platforms
• A server platform with an adapter card based on one of the following Mellanox Technologies’ InfiniBand HCA devices:
• ConnectX® (VPI, IB, EN, FCoE) (firmware: fw-25408)
• InfiniHost® III Ex (firmware: fw-25218 for Mem-Free cards, and fw-25208 for
cards with memory)
• InfiniHost® III Lx (firmware: fw-25204)
• InfiniHost® (firmware: fw-23108)
Note:
For the list of supported architecture platforms, please refer to the BXOFED
Release Notes file.
Required Disk Space for Installation
• 400 MB
2.1.2 Software Requirements
Operating System
• Linux operating system
Note:
For the list of supported operating system distributions and kernels, please
refer to the BXOFED Release Notes file.
Installer Privileges
• The installation requires administrator privileges on the target machine
Mellanox Technologies
Mellanox Technologies Confidential
Rev 1.50
Installation
20
2.2
Downloading BXOFED
Step 1.
Verify that the system has a Mellanox network adapter (HCA/NIC) installed by ensuring that you can see ConnectX/ConnectX-2 or InfiniHost entries in the display.
The following example shows a system with an installed Mellanox HCA:
host1# lspci -v | grep Mellanox
02:00.0 InfiniBand: Mellanox Technologies MT25418 [ConnectX IB DDR,
PCIe 2.0 2.5GT/s] (rev a0)
Step 2.
Download the BXOFED-X.X.X-Y.Y.Y.tgz file to your target Linux host. If this package
is to be installed on a cluster, it is recommended to download it to an NFS shared directory.
Step 3.
Extract the package using
tar xzvf BXOFED-X.X.X-Y.Y.Y.tgz
Step 4.
Use the md5sum utility to confirm the file integrity of the downloaded tarball. Run the
following command and compare the result to the value provided on the download
page.
host1$ md5sum BXOFED-1.4.1-1.1.2.tgz
2.3
Installing BXOFED
The installation script, mlnxofedinstall, performs the following:
• Discovers the currently installed kernel
• Uninstalls any software stacks that are part of the standard operating system distribution
or another vendor's commercial stack
• Installs the MLNX_OFED_LINUX binary RPMs (if they are available for the current
kernel)
• Identifies the currently installed InfiniBand and Ethernet network adapters and automatically1 upgrades the firmware
2.3.1 Pre-installation Notes
• The installation script removes all previously installed BXOFED packages and reinstalls from scratch. You will be prompted to acknowledge the deletion of the old packages.
Note:
Pre-existing configuration files will be saved with the extension “.conf.saverpm”.
• If you need to install BXOFED on an entire (homogeneous) cluster, a common strategy
is to mount the ISO image on one of the cluster nodes and then copy it to a shared file
system such as NFS. To install on all the cluster nodes, use cluster-aware tools (such as
pdsh).
1. The firmware will not be updated if you run the install script with the ‘--without-fw-update’ option.
Rev 1.50
Mellanox Technologies
Mellanox Technologies Confidential
21
• If your kernel version does not match with any of the offered pre-built RPMs, you can
add your kernel version by using the “mlnx_add_kernel_support.sh” script
located under the docs/ directory.
Usage:
mlnx_add_kernel_support.sh -i|--iso <mlnx iso>[-t|--tmpdir
<local work dir>][-v|--verbose]
Example
The following command will create a MLNX_OFED_LINUX ISO image for RedHat 5.2
under the
/tmp directory.
MLNX_OFED_LINUX-1.4-rhel5.2/docs/mlnx_add_kernel_support.sh -i
/mnt/MLNX_OFED_LINUX-1.4-rhel5.2.iso
All Mellanox, OEM, OFED, or Distribution IB packages will be
removed.
Do you want to continue?[y/N]:y
Removing OFED RPMs...
Running mkisofs...
Created /tmp/MLNX_OFED_LINUX-1.4-rhel5.2.iso
2.3.2 Installation Script
BXOFED includes an installation script called install.pl. Its usage is described below.
You will use it during the installation procedure described in Section 2.3, “Installing
BXOFED,” on page 20.
Usage
./install.pl [OPTIONS]
Note:
If no options are provided to the script, then all available RPMs are installed.
Options
-c|--config <packages config_file>
Example of the configuration file can be found under
docs
-n|--net <network config file>
Example of the network configuration file can be
found under docs
-p|--print-available Print available packages for the current platform
and create a corresponding ofed.conf file. The
installation script exits after creating ofed.conf.
--with-fc
Install FCoE support — Available on RHEL5.2 ONLY
--with-32bit
Install 32-bit libraries (default). This is relevant
for x86_64 and ppc64 platforms.
--without-32bit
Skip 32-bit libraries installation
--without-ib-bonding Skip ib-bonding RPM installation
Mellanox Technologies
Mellanox Technologies Confidential
Rev 1.50
Installation
22
--without-depcheck
Skip Distro's libraries check
--without-fw-update
Skip firmware update
--force-fw-update
Force firmware update
--force
Force installation (without querying the user)
--all
Install all kernel modules, libibverbs, libibumad,
librdmacm, mft, mstflint, diagnostic tools, OpenSM,
ib-bonding, MVAPICH, Open MPI, MPI tests, MPI selector, perftest, sdpnetstat and libsdp srptools, rdstools, static and dynamic libraries
--hpc
Install all kernel modules, libibverbs, libibumad,
librdmacm, mft, mstflint, diagnostic tools, OpenSM,
ib-bonding, MVAPICH, Open MPI, MPI tests, MPI selector, dynamic libraries
--basic
Install all kernel modules, libibverbs, libibumad,
mft, mstflint, dynamic libraries
--msm
Install all kernel modules, libibverbs, libibumad,
mft, mstflint, diagnostic tools, OpenSM, ib-bonding,
dynamic libraries
NOTE: With --msm flag, the OpenSM daemon is configured to run upon boot.
-v|-vv|-vvv
Set verbosity level
-q
Set quiet - no messages will be printed
2.3.2.1
Install Return Codes
Table 4 lists the install script return codes and their meanings.
Table 4 - mlnxofedinstall Return Codes
Return Code
2.4
Meaning
0
The Installation ended successfully
1
The installation failed
2
No firmware was found for the adapter device
3
Failed to start the mst driver
Uninstalling BXOFED
Use the script /usr/sbin/uninstall.sh to uninstall the BXOFED package. The
script is part of the ofed-scripts RPM.
Rev 1.50
Mellanox Technologies
Mellanox Technologies Confidential
23
3
Working With VPI
VPI allows ConnectX / ConnectX-2 1 ports to be independently configured as either IB or
Eth. If a ConnectX port is configured as Eth, it may also function as a Fibre Channel
HBA.
3.1
Port Type Management
ConnectX ports can be individually configured to work as InfiniBand or Ethernet or Fibre
Channel over Ethernet ports. By default both ConnectX ports are initialized as InfiniBand
ports. If you wish to change the port type use the connectx_port_config script after
the driver is loaded.
Running “/sbin/connectx_port_config -s” will show current port configuration for all ConnectX devices.
Port configuration is saved in the file: /etc/infiniband/connectx.conf. This
saved configuration is restored at driver restart only if restarting via “/etc/init.d/
openibd restart”.
Possible port types are:
• eth – Ethernet
• ib – Infiniband
Table 5 lists the ConnectX port configurations supported by VPI.
Table 5 - Supported ConnectX Port Configurations
Port 1 Configuration
Port 2 Configuration
ib
ib
ib
eth
eth
eth
Note that the configuration Port1 = eth and Port2 = ib is not supported.
Also note that FCoE can run only on a port configured as “eth” and the mlx4_en driver
must be loaded.
The port link type can be configured for each device in the system at run time using the “/
sbin/connectx_port_config” script. This utility will prompt for the PCI device
to be modified (if there is only one it will be selected automatically).
In the next stage the user will be prompted for the desired mode for each port. The desired
port configuration will then be set for the selected device.
1. In this document, ConnectX will be used to indicate also ConnectX-2 devices.
Mellanox Technologies
Mellanox Technologies Confidential
Rev 1.50
Working With VPI
24
Note:
This utility also has a non-interactive mode:
/sbin/connectx_port_config [[-d|--device <PCI device ID>] -c|--conf <port1,port2>]"
3.2
InfiniBand Driver
The InfiniBand driver, mlx4_ib, handles InfiniBand-specific functions and plugs into the InfiniBand midlayer.
3.3
Ethernet Driver
3.3.1 Overview
The Ethernet driver, mlx4_en, exposes the following ConnectX capabilities:
• Single/Dual port
• Fibre Channel over Ethernet (FCoE)
• Up to 16 Rx queues per port
• Rx steering mode: Receive Core Affinity (RCA)
• Tx arbitration mode: VLAN user-priority (off by default)
• MSI-X or INTx
• Adaptive interrupt moderation
• HW Tx/Rx checksum calculation
• Large Send Offload (i.e., TCP Segmentation Offload)
• Large Receive Offload
• Multi-core NAPI support
• VLAN Tx/Rx acceleration (HW VLAN stripping/insertion)
• HW VLAN filtering
• HW multicast filtering
• ifconfig up/down + MTU changes (up to 10K)
• Ethtool support
• Net device statistics
• CX4 connectors (XAUI) or XFP
3.3.2 Loading the Ethernet Driver
By default, the Mellanox BXOFED stack does not load mlx4_en. To cause the mlx4_en
module to load at driver start-up, set “MLX4_EN_LOAD=yes” in file /etc/infiniband/openib.conf prior to start-up. Alternatively, if you do not wish to stop and
restart the driver, mlx4_en can be loaded by running “/sbin/modprobe mlx4_en”.
The result is a new net-device appearing in 'ifconfig -a'.
Rev 1.50
Mellanox Technologies
Mellanox Technologies Confidential
25
3.3.3 Unloading the Driver
If /etc/infiniband/openib.conf had MLX4_EN_LOAD=yes at driver startup, then you can unload the mlx4_en driver by running: /etc/init.d/openibd
stop
Otherwise, unload mlx4_en by running:
#> modprobe -r mlx4_en
3.3.4 Ethernet Driver Usage and Configuration
• To assign an IP address to the interface run:
#> ifconfig eth<n> <ip>
where 'x' is the OS assigned interface number.
• To check driver and device information run:
#> ethtool -i eth<n>
Example:
#> ethtool -i eth2
driver: mlx4_en (MT_04A0140005)
version: 1.4.0 (March 2009)
firmware-version: 2.6.000
bus-info: 0000:13:00.0
• To query stateless offload status run:
#> ethtool -k eth<n>
• To set stateless offload status run:
#> ethtool -K eth<n> [rx on|off] [tx on|off] [sg on|off] [tso
on|off]
• To query interrupt coalescing settings run:
#> ethtool -c eth<n>
• By default, the driver uses adaptive interrupt moderation for the receive path, which
adjusts the moderation time according to the traffic pattern. To enable/disable adaptive
interrupt moderation, use the following command:
#> ethtool -C eth<n> adaptive-rx on|off
Above a higher limit of packet rate, adaptive interrupt moderation will set the moderation time to its highest value; below a lower limit of packet rate, adaptive interrupt moderation will set the moderation time to
its lowest value.
Mellanox Technologies
Mellanox Technologies Confidential
Rev 1.50
Working With VPI
26
To set the values for packet rate limits and moderation time high/low values, use the following command:
#> ethtool -C eth<n> [pkt-rate-low N] [pkt-rate-high N] [rxusecs-low N]
[rx-usecs-high N]
• To set interrupt coalescing settings when adaptive moderation is disabled, run:
#> ethtool -c eth<n> [rx-usecs N] [rx-frames N]
Note:
usec settings correspond to the time to wait after the *last* packet sent/
received before triggering an interrupt
• To query pause frame settings run:
#> ethtool -a eth<n>
• To set pause frame settings run:
#> ethtool -A eth<n> [rx on|off] [tx on|off]
• To obtain additional device statistics, run:
#> ethtool -S eth<n>
• The mlx4_en parameters can be found under /sys/module/mlx4_en (or /sys/
module/mlx4_en/parameters, depending on the OS) and can be listed using the
command:
#> modinfo mlx4_en
To set non-default values to module parameters, the following line should be added to the file
/etc/modprobe.conf:
"options mlx4_en <param_name>=<value> <param_name>=<value> ..."
3.4
Fibre Channel over Ethernet
3.4.1 Overview
The FCoE feature provided by Mellanox BXOFED allows connecting to Fibre Channel
(FC) targets on an FC fabric using an FCoE-capable switch or gateway. Key features
include:
• T11 and pre-T11 frame format
• Complete hardware offload of SCSI operations in pre-T11 format
• Hardware offload of FC-CRC calculations in pre-T11 format
• Zero copy FC stack in pre-T11 format
Rev 1.50
Mellanox Technologies
Mellanox Technologies Confidential
27
• VLANs and PFC (Priority-flow-control, that is PPP)
The FCoE feature is based on and interacts with the Open-FCoE project. The mlx4_fc
module is designed to replace the original fcoe module and to allow using ConnectX
hardware offloads.
Mellanox BXOFED also includes the following open-fcoe.org modules:
• libfc
Used by the mlx4_fc module to handle FC logic such as fabric login and logout, remote port login and
logout, fc-ns transactions, etc
• fcoe
Implements FCoE fully in software. Will load instead of mlx4_fc to support T11 frame format. Works on
top of standard Ethernet NICs, including mlx4_en.
See http://www.open-fcoe.org for further information on the Open-FCoE project.
3.4.2 Installation
To install the FCoE feature, you should run the install script (described in Section 2.3)
with the --with-fc option.
3.4.3 FCoE Basic Usage
After loading the driver, userspace operations should create/destroy vHBAs on required
Ethernet interfaces. This can be done manually by issuing commands to the driver using
simple sysfs operations. Alternatively, it can be handled automatically by the dcbxd daemon if the interface is connected to an FCoE switch supporting DCBX negotiation of the
FCoE feature (e.g., Cisco Nexus).
Once a vHBA is instantiated on an Ethernet interface, it immediately attempts to log into
the FC fabric. Provided that the FC fabric and FC targets are well configured, LUNs will
map to SCSI disk devices (/dev/sdXXX).
vHBAs instantiated automatically by the dcbxd daemon are created on a VLAN 0 interface with VLAN priority set to the value negotiated with the switch.
This takes advantage of PFC, which allows pausing FCoE traffic when needed without
pausing the entire Ethernet link. Also, with proper configuration of the FCoE switch, the
link's maximum bandwidth can be divided as needed between FCoE and regular Ethernet
traffic.
Instantiating vHBAs manually allows creating them on VLAN interfaces with any arbitrary VLAN id and priority, as well as on the regular, without VLAN, Ethernet interfaces.
Using the regular interface means that PFC cannot be used.
Mellanox Technologies
Mellanox Technologies Confidential
Rev 1.50
Working With VPI
28
In this case, it is highly recommended that both the FCoE switch and the mlx4_en driver
be configured to use link pause (regular flow-control). Otherwise, any FCoE packet drop
will trigger SCSI errors and timeouts.
3.4.3.1
FCoE Configuration
After installation, please edit the file /etc/mlxfc/mlxfc.conf and set the following variables:
• FC_SPEC – set to "T11" or "pre-T11" as supported by your FCoE switch.
Note:
Only pre-T11 format is offloaded in hardware.
• DCBX_IFS – provide a space separated list of Ethernet devices to monitor the use of
the DCBX protocol for the FCoE feature availability. vHBAs are automatically created
on these interfaces if the FCoE switch is configured for automatic FCoE negotiation.
• MTU – if MTU of the Ethernet device is changed from the default (1500), put the correct value here.
Configure the mlx4_en Ethernet driver to support PFC. Add the following line to the file /
etc/modprobe.conf, and restart the network driver
options mlx4_en pfctx=0xff pfcrx=0xff
3.4.3.2
Starting FCoE Service
Make sure the network is up (modprobe mlx4_en). Then, run
#> /etc/init.d/mlxfc start
vHBAs will be instantiated on DCBX monitored interfaces, and SCSI LUNs will get
mapped.
For Manual instantiation of vHBAs, please see Section 3.4.4.1, “Manual vHBA Control”.
3.4.3.3
Stopping FCoE Service
Run:
#> /etc/init.d/mlxfc stop
Note:
Only when the mlxfc service is stopped and the mlx4_en module is removed
can the mlx4_core module be removed as well.
3.4.4 FCoE Advanced Usage
Advanced usage will probably be needed when connected to FCoE switches that do not
support the Cisco-like FCoE DCBX auto-negotiation.
Rev 1.50
Mellanox Technologies
Mellanox Technologies Confidential
29
3.4.4.1
Manual vHBA Control
Manual control allows creating and destroying vHBAs, and signaling link-up and linkdown to existing vHBAs. This is done using sysfs operations.
When using the pre-T11 stack, the sysfs directory is located at /sys/class/mlx4_fc.
When using the T11 stack, the sysfs directory is located at /sys/module/fcoe.
Both directories contain the same entries.
In the following, the sysfs directory will be referred to as $FCSYSFS.
To create a new vHBA on an Ethernet interface (e.g., eth3), run:
#> echo "eth3" > $FCSYSFS/create
To destroy a previously created vHBA on an interface (e.g., eth3), run:
#> echo "eth3" > $FCSYSFS/destroy
To signal "link-up" to an existing vHBA (e.g., on eth3), run:
#> echo "eth3" > $FCSYSFS/link_up
To signal "link-down" to an existing vHBA (e.g., on eth3), run:
#> echo "eth3" > $FCSYSFS/link_down
3.4.4.2
Creating vHBAs That Use PFC
To create a vHBA that uses the PFC feature, it is required to configure the Ethernet driver
to support PFC, create a VLAN Ethernet interface, assign it a priority, and start a vHBA
on the interface.
The following steps demonstrate the creation of such a vHBA.
To configure the mlx4_en Ethernet driver to support PFC, add the following line to the file
/etc/modprobe.conf and restart the network driver.
options mlx4_en pfctx=0xff pfcrx=0xff
To create a VLAN with an ID (e.g., 55) on interface (e.g., eth3), run:
#> vconfig add eth3 55
#> ifconfig eth3.55 up
To set the map of skb priority 0 to the requested vlan priority (e.g., 6), run:
#> vconfig set_egress_map eth3.55 0 6
To create the vHBA, enter:
#> echo "eth3.55" > $FCSYSFS/create
Mellanox Technologies
Mellanox Technologies Confidential
Rev 1.50
Working With VPI
30
3.4.4.3
Creating vHBAs That Use Link Pause
The mlx4_en Ethernet driver supports link pause by default. To change this setting, you
can use the following command:
#> ethtool -A
eth<x> [rx on|off] [tx on|off]
To create a vHBA, run:
#> echo "eth3.55" > $FCSYSFS/create
Rev 1.50
Mellanox Technologies
Mellanox Technologies Confidential
31
4
IPoIB
4.1
Introduction
The IP over IB (IPoIB) driver is a network interface implementation over InfiniBand.
IPoIB encapsulates IP datagrams over an InfiniBand Connected or Datagram transport
service. This chapter describes the following:
• IPoIB mode setting (Section 4.2)
• IPoIB configuration (Section 4.3)
• How to create and remove subinterfaces (Section 4.4)
• How to verify IPoIB functionality (Section 4.5)
• The ib-bonding driver (Section 4.6)
• IPoIB performance tuning (Section 4.7)
• How to test IPoIB performance (Section 4.8)
4.2
IPoIB Mode Setting
IPoIB can run in two modes of operation: Connected mode and Datagram mode. By
default, IPoIB is set to work in Connected mode. This can be changed to become Datagram mode by editing the file /etc/infiniband/openib.conf and setting
‘SET_IPOIB_CM=no’.
After changing the mode, you need to restart the driver by running:
/etc/init.d/openibd restart
To check the current mode used for out-going connections, enter:
cat /sys/class/net/ib<n>/mode
4.3
IPoIB Configuration
Unless you have run the installation script install with the flag ‘-n’, then IPoIB has not
been configured by the installation. The configuration of IPoIB requires assigning an IP
address and a subnet mask to each HCA port, like any other network adapter card (i.e., you
need to prepare a file called ifcfg-ib<n> for each port). The first port on the first HCA in
the host is called interface ib0, the second port is called ib1, and so on.
An IPoIB configuration can be based on DHCP (Section 4.3.1) or on a static configuration
(Section 4.3.2) that you need to supply. You can also apply a manual configuration that persists only until the next reboot or driver restart (Section 4.3.3).
Mellanox Technologies
Mellanox Technologies Confidential
Rev 1.50
IPoIB
32
4.3.1 IPoIB Configuration Based on DHCP
Setting an IPoIB interface configuration based on DHCP (v3.1.2 which is availabe via
www.isc.org) is performed similarly to the configuration of Ethernet interfaces. In other
words, you need to make sure that IPoIB configuration files include the following line:
• For RedHat:
BOOTPROTO=dhcp
• For SLES:
BOOTPROTO=’dchp’
Note:
If IPoIB configuration files are included, ifcfg-ib<n> files will be
installed under:
/etc/sysconfig/network-scripts/ on a RedHat machine
/etc/sysconfig/network/ on a SuSE machine
Note:
A patch for DHCP is required for supporting IPoIB. The patch file for DHCP
v3.1.2, dhcp.patch, is available under the docs/ directory.
Standard DHCP fields holding MAC addresses are not large enough to contain an IPoIB
hardware address. To overcome this problem, DHCP over InfiniBand messages convey a
client identifier field used to identify the DHCP session. This client identifier field can be
used to associate an IP address with a client identifier value, such that the DHCP server
will grant the same IP address to any client that conveys this client identifier.
Note:
Refer to the DHCP documentation for more details how to make this association.
The length of the client identifier field is not fixed in the specification. For BXOFED, it is
recommended to have IPoIB use the same format that Boot over IB uses for this client
identifier – see Section A.3.1, “Configuring the DHCP Server,” on page 160.
4.3.1.1
DHCP Server
In order for the DHCP server to provide configuration records for clients, an appropriate
configuration file needs to be created. By default, the DHCP server looks for a configuration file called dhcpd.conf under /etc. You can either edit this file or create a new
one and provide its full path to the DHCP server using the -cf flag. See a file example at
docs/dhcpd.conf of this package.
The DHCP server must run on a machine which has loaded the IPoIB module.
To run the DHCP server from the command line, enter:
dhcpd <IB network interface name> -d
Example:
host1# dhcpd ib0 -d
Rev 1.50
Mellanox Technologies
Mellanox Technologies Confidential
33
4.3.1.2
DHCP Client (Optional)
Note:
A DHCP client can be used if you need to prepare a diskless machine with an
IB driver. See Step 13 under “Example: Adding an IB Driver to initrd (Linux)”.
In order to use a DHCP client identifier, you need to first create a configuration file that
defines the DHCP client identifier. Then run the DHCP client with this file using the following command:
dhclient –cf <client conf file> <IB network interface name>
Example of a configuration file for the ConnectX (PCI Device ID 25418), called dhclient.conf:
# The value indicates a hexadecimal number
interface "ib1" {
send dhcp-client-identifier 00:02:c9:03:00:00:10:39;
}
Example of a configuration file for InfiniHost III Ex (PCI Device ID 25218), called
dhclient.conf:
# The value indicates a hexadecimal number
interface "ib1" {
send dhcp-client-identifier 20:00:55:04:01:fe:80:00:00:00:00:00:00:00:02:c9:02:00:23:13:92;
}
In order to use the configuration file, run:
host1# dhclient –cf dhclient.conf ib1
4.3.2 Static IPoIB Configuration
If you wish to use an IPoIB configuration that is not based on DHCP, you need to supply
the installation script with a configuration file (using the ‘-n’ option) containing the full IP
configuration. The IPoIB configuration file can specify either or both of the following data
for an IPoIB interface:
• A static IPoIB configuration
• An IPoIB configuration based on an Ethernet configuration
Note:
See your Linux distribution documentation for additional information about
configuring IP addresses.
The following code lines are an excerpt from a sample IPoIB configuration file:
# Static settings; all values provided by this file
IPADDR_ib0=11.4.3.175
NETMASK_ib0=255.255.0.0
NETWORK_ib0=11.4.0.0
Mellanox Technologies
Mellanox Technologies Confidential
Rev 1.50
IPoIB
34
BROADCAST_ib0=11.4.255.255
ONBOOT_ib0=1
# Based on eth0; each '*' will be replaced with a corresponding
octet
# from eth0.
LAN_INTERFACE_ib0=eth0
IPADDR_ib0=11.4.'*'.'*'
NETMASK_ib0=255.255.0.0
NETWORK_ib0=11.4.0.0
BROADCAST_ib0=11.4.255.255
ONBOOT_ib0=1
# Based on the first eth<n> interface that is found (for
n=0,1,...);
# each '*' will be replaced with a corresponding octet from
eth<n>.
LAN_INTERFACE_ib0=
IPADDR_ib0=11.4.'*'.'*'
NETMASK_ib0=255.255.0.0
NETWORK_ib0=11.4.0.0
BROADCAST_ib0=11.4.255.255
ONBOOT_ib0=1
4.3.3 Manually Configuring IPoIB
To manually configure IPoIB for the default IB partition (VLAN), perform the following
steps:
Note:
Step 1
This manual configuration persists only until the next reboot or driver restart.
To configure the interface, enter the ifconfig command with the following items:
• The appropriate IB interface (ib0, ib1, etc.)
• The IP address that you want to assign to the interface
• The netmask keyword
• The subnet mask that you want to assign to the interface
The following example shows how to configure an IB interface:
host1$ ifconfig ib0 11.4.3.175 netmask 255.255.0.0
Step 2.
(Optional) Verify the configuration by entering the ifconfig command with the appropriate interface identifier ib# argument.
The following example shows how to verify the configuration:
host1$ ifconfig ib0
b0 Link encap:UNSPEC
00-00-00-00
inet addr:11.4.3.175
Rev 1.50
HWaddr 80-00-04-04-FE-80-00-00-00-00-00-00Bcast:11.4.255.255
Mellanox Technologies
Mellanox Technologies Confidential
Mask:255.255.0.0
35
UP BROADCAST MULTICAST
MTU:65520
Metric:1
RX packets:0 errors:0 dropped:0 overruns:0 frame:0
TX packets:0 errors:0 dropped:0 overruns:0 carrier:0
collisions:0 txqueuelen:128
RX bytes:0 (0.0 b)
Step 3.
4.4
TX bytes:0 (0.0 b)
Repeat Step 1 and Step 2 on the remaining interface(s).
Subinterfaces
You can create subinterfaces for a primary IPoIB interface to provide traffic isolation.
Each such subinterface (also called a child interface) has a different IP and network
addresses from the primary (parent) interface. The default Partition Key (PKey), ff:ff,
applies to the primary (parent) interface.
This section describes how to
• Create a subinterface (Section 4.4.1)
• Remove a subinterface (Section 4.4.2)
4.4.1 Creating a Subinterface
To create a child interface (subinterface), follow this procedure:
Note:
In the following procedure, ib0 is used as an example of an IB subinterface.
Step 1
Decide on the PKey to be used in the subnet. Valid values are 0-255. The actual PKey
used is a 16-bit number with the most significant bit set. For example, a value of 0 will
give a PKey with the value 0x8000.
Step 2.
Create a child interface by running:
host1$ echo <PKey> > /sys/class/net/<IB subinterface>/create_child
Example:
host1$ echo 0 > /sys/class/net/ib0/create_child
Step 3.
This will create the interface ib0.8000.
Verify the configuration of this interface by running:
host1$ ifconfig <subinterface>.<subinterface PKey>
Using the example of Step 2:
host1$ ifconfig ib0.8000
ib0.8000 Link encap:UNSPEC
00-00-00-00-00-00
BROADCAST MULTICAST
HWaddr 80-00-00-4A-FE-80-00-00-00-00-
MTU:2044
Metric:1
RX packets:0 errors:0 dropped:0 overruns:0 frame:0
TX packets:0 errors:0 dropped:0 overruns:0 carrier:0
collisions:0 txqueuelen:128
RX bytes:0 (0.0 b)
TX bytes:0 (0.0 b)
Mellanox Technologies
Mellanox Technologies Confidential
Rev 1.50
IPoIB
36
Step 4.
As can be seen, the interface does not have IP or network addresses. To configure those,
you should follow the manual configuration procedure described in Section 4.3.3.
Step 5.
To be able to use this interface, a configuration of the Subnet Manager is needed so that
the PKey chosen, which defines a broadcast address, be recognized (see Chapter 11,
“OpenSM – Subnet Manager”).
4.4.2 Removing a Subinterface
To remove a child interface (subinterface), run:
echo <subinterface PKey> /sys/class/net/<ib_interface>/
delete_child
Using the example of Step 2:
echo 0x8000 > /sys/class/net/ib0/delete_child
Note that when deleting the interface you must use the PKey value with the most significant bit set (e.g., 0x8000 in the example above).
4.5
Verifying IPoIB Functionality
To verify your configuration and your IPoIB functionality, perform the following steps:
Step 1
Verify the IPoIB functionality by using the ifconfig command.
The following example shows how two IB nodes are used to verify IPoIB functionality.
In the following example, IB node 1 is at 11.4.3.175, and IB node 2 is at 11.4.3.176:
host1# ifconfig ib0 11.4.3.175 netmask 255.255.0.0
host2# ifconfig ib0 11.4.3.176 netmask 255.255.0.0
Step 2.
Enter the ping command from 11.4.3.175 to 11.4.3.176.
The following example shows how to enter the ping command:
host1# ping -c 5 11.4.3.176
PING 11.4.3.176 (11.4.3.176) 56(84) bytes of data.
64 bytes from 11.4.3.176: icmp_seq=0 ttl=64 time=0.079 ms
64 bytes from 11.4.3.176: icmp_seq=1 ttl=64 time=0.044 ms
64 bytes from 11.4.3.176: icmp_seq=2 ttl=64 time=0.055 ms
64 bytes from 11.4.3.176: icmp_seq=3 ttl=64 time=0.049 ms
64 bytes from 11.4.3.176: icmp_seq=4 ttl=64 time=0.065 ms
--- 11.4.3.176 ping statistics --5 packets transmitted, 5 received, 0% packet loss, time 3999ms rtt
min/avg/max/mdev = 0.044/0.058/0.079/0.014 ms, pipe 2
4.6
The ib-bonding Driver
The ib-bonding driver is a High Availability solution for IPoIB interfaces. It is based on
the Linux Ethernet Bonding Driver and was adapted to work with IPoIB. The ib-bonding
Rev 1.50
Mellanox Technologies
Mellanox Technologies Confidential
37
package contains a bonding driver and a utility called ib-bond to manage and control the
driver operation.
The ib-bonding driver comes with the ib-bonding package (run “rpm -qi ib-bonding” to get the package information).
4.6.1 Using the ib-bonding Driver
The ib-bonding driver can be loaded manually or automatically.
Manual Operation
Use the utility ib-bond to start, query, or stop the driver. For details on this utility, please
read the documentation for the ib-bonding package under
/usr/share/doc/ib-bonding-0.9.0/ib-bonding.txt on RedHat, and
/usr/share/doc/packages/ib-bonding-0.9.0/ib-bonding.txt on SuSE.
Automatic Operation
There are two ways to configure automatic ib-bonding operation:
1.
Using the openibd configuration file, as described in the following steps:
a.
Edit the file /etc/infiniband/openib.conf to define bonding parameters.
Example:
# Enable the bonding driver on startup.
IPOIBBOND_ENABLE=yes
# # Set bond interface names
IPOIB_BONDS=bond0,bond8007
# Set specific bond params; address and slaves
bond0_IP=10.10.10.1/24
bond0_SLAVES=ib0,ib1
bond8007_IP=20.10.10.1
bond1_SLAVES=ib0.8007,ib1.8007
b.
Restart the driver by running:
/etc/init.d/openibd restart
2.
Using a standard OS bonding configuration. For details on this, please read the documentation for the ib-bonding package under
/usr/share/doc/ib-bonding-0.9.0/ib-bonding.txt on RedHat, and
/usr/share/doc/packages/ib-bonding-0.9.0/ib-bonding.txt on SuSE.
Notes
• If the bondX name is defined but one of bondX_SLAVES or bondX_IPs is missing,
then that specific bond will not be created.
• The bondX name must not contain characters which are disallowed for bash variable
names such as ‘.’ and ‘-’.
Mellanox Technologies
Mellanox Technologies Confidential
Rev 1.50
IPoIB
38
• Using /etc/infiniband/openib.conf to create a persistent configuration is
not recommended. Do not use it unless you have no other option. It is not guaranteed
that the first method will be supported in future versions of BXOFED.
4.7
IPoIB Performance Tuning
When IPoIB is configured to run in connected mode, TCP parameter tuning is performed
at driver startup to improve the throughput of medium and large messages.
4.8
Testing IPoIB Performance
This section describes how to verify IPoIB performance by running the Bandwidth (BW)
test and the Latency test. These tests are described in detail at the following URL:
http://www.netperf.org/netperf/training/Netperf.html
Note:
For UDP best performance, please use IPoIB in Datagram mode and not in
Connected mode.
To verify IPoIB performance, perform the following steps:
Step 1
Download Netperf from the following URL:
http://www.netperf.org/netperf/NetperfPage.html
Step 2.
Compile Netperf by following the instructions at
http://www.netperf.org/netperf/NetperfPage.html.
Step 3.
Start the Netperf server.
The following example shows how to start the Netperf server:
host1$ netserver
Starting netserver at port 12865
Starting netserver at hostname 0.0.0.0 port 12865 and family
AF_UNSPEC
host1$
Step 4.
Run the Netperf client. The default test is the Bandwidth test.
The following example shows how to run the Netperf client, which starts the Bandwidth
test by default:
host2$ netperf -H 11.4.17.6 -t TCP_STREAM -c -C -- -m 65536
TCP STREAM TEST from 0.0.0.0 (0.0.0.0) port 0 AF_INET to 11.4.17.6
(11.4.17.6) port 0 AF_INET
Rev 1.50
Recv
Send
Demand
Send
Socket Socket
Recv
Message
Utilization
Elapsed
Size
Size
remote
Size
Time
bytes
us/KB
bytes
secs.
bytes
Throughput
10^6bits/s
Mellanox Technologies
Mellanox Technologies Confidential
Service
Send
Recv
Send
local
remote
local
% S
us/KB
% S
39
87380
1.431
16384
65536
10.00
2483.00
7.03
5.42
1.854
You must specify the IPoIB IP address when running the Netperf client.
Note:
The following table describes parameters for the netperf command:
Option
Description
-H
Where to find the server
11.4.17.6
IPoIB IP address
-t <Test Name>
Specify the test to perform. Options are TCP_STREAM, TCP_RR, etc.
-c
Client CPU utilization
-C
Server CPU utilization
--
Separates the global and test-specific parameters
-m
Message size, which is 65536 in the example above
Note that the run example above produced the following results:
• Throughput is 2.483 gigabits per second
• Client CPU utilization is 7.03 percent of client CPU
• Server CPU utilization is 5.42 percent of server CPU
Step 5.
Run the Netperf Latency test.
Run the test once, and stop the server so that it does not repeat the test.
The following example shows how to run the Latency test, and then stop the Netperf
server:
host2$ netperf -H 11.4.17.6 -t TCP_RR -c -C -- -r1,1
TCP REQUEST/RESPONSE TEST from 0.0.0.0 (0.0.0.0) port 0 AF_INET to
11.4.17.6 (11.4.17.6) port 0 AF_INET
Local /Remote
Socket Size
S.dem
Request Resp.
Elapsed Trans.
CPU
CPU
Send
Recv
remote
Size
Size
Time
Rate
local
remote local
bytes
us/Tr
bytes
bytes
secs.
per sec
% S
% S
us/Tr
1
1
5.61
6.79
22.549
bytes
16384 87380
27.296
16384
10.00
19913.18
S.dem
87380
Mellanox Technologies
Mellanox Technologies Confidential
Rev 1.50
IPoIB
40
The following table describes parameters for the netperf command:
Option
Description
-H
Where to find the server
11.4.17.6
IPoIB IP address
-t <Test Name>
Specify the test to perform. Options are TCP_STREAM, TCP_RR, etc.
-c
Client CPU utilization
-C
Server CPU utilization
--
Separates the global and test-specific parameters
-r 1,1
The request size sent and how many bytes requested back
Note that the run example above produced the following results:
• Client CPU utilization is 5.61 percent of client CPU
• Server CPU utilization is 6.79 percent of server CPU
• Latency is 25.11 microseconds. Latency is calculated as follows:
0.5*(1 / Transaction rate per sec) * 1,000,000 = one-way average latency in usec.
Step 6.
To end the test, shut down the Netperf server.
host1$ pkill netserver
Rev 1.50
Mellanox Technologies
Mellanox Technologies Confidential
41
5
RDS
5.1
Overview
Reliable Datagram Sockets (RDS) is a socket API that provides reliable, in-order datagram delivery between sockets over RC or TCP/IP. RDS is intended for use with Oracle
RAC 11g.
For programming details, enter:
host1$ man rds
5.2
RDS Configuration
The RDS ULP is installed as part of Mellanox BXOFED for Linux. To load the RDS module upon boot, edit the file /etc/infiniband/openib.conf and set
“RDS_LOAD=yes”.
Note:
For the changes to take effect, run: /etc/init.d/openibd restart
Mellanox Technologies
Mellanox Technologies Confidential
Rev 1.50
EoIB
42
6
EoIB
6.1
Introduction
The Ethernet over IB (EoIB) mlx4_vnic module is a network interface implementation
over InfiniBand. EoIB encapsulates Layer 2 datagrams over an InfiniBand Datagram
(UD) transport service. The InfiniBand UD datagrams encapsulates the entire Ethernet L2
datagram and its payload.
Figure 2: EoIB in the OSI Model
In order to perform this operation the module performs an address translation from Ethernet layer 2 MAC addresses (48 bits long) to InfiniBand layer 2 addresses made of LID/
GID and QPN. This translation is done by the module and is totally invisible to the OS and
user. In this regard, EoIB differs from IPoIB which exposes a 20 Bytes HW address to the
OS.
The mlx4_vnic module is designed for Mellanox's ConnectX family of HCAs and
intended to be used with Mellanox's BridgeX gateway family. Having a BridgeX gateway
is a requirement for using EoIB. It performs two operations:
• Enables the layer 2 address translation required by the mlx4_vnic module.
• Enables routing of packets from the InfiniBand fabric to a 1 or 10 GigE Ethernet subnet.
6.2
EoIB Topology
EoIB is designed to work over an InfiniBand fabric. In order for it to work properly it
requires the presence of two entities:
• Subnet Manager (SM)
• BridgeX gateway
The required subnet manager configuration is similar to that of other InfiniBand applications and ULPs and is not unique to EoIB. Refer to Chapter 11, “OpenSM – Subnet Man-
Rev 1.50
Mellanox Technologies
Mellanox Technologies Confidential
43
ager” for more information on SM and OpenSM. Other then the subnet manager and the
BridgeX you will most likely need one or more InfiniBand switches and probably some
Ethernet switches as well. A simple EoIB setup will look something like this:
The BridgeX gateway is at the heart of EoIB. On one side, usually referred to as the “internal” side, it is connected to the InfiniBand fabric by one or more links. On the other side,
usually referred to as the “external” side, it is connected to the Ethernet subnet by one or
more ports. The Ethernet connections on the BridgeX's external side are called external
ports or eports. Every BridgeX that is in use with EoIB needs to have one or more eports
connected.
6.2.1 External ports (eports) and GW
The combination of a specific BridgeX box and a specific eport is referred to as a gateway
(GW). The GW is an entity that is visible to the EoIB host driver and is used in the configuration of the network interfaces on the host side. For example in host administered vnics
the user will request to open an interface on a specific GW identifying it by the BridgeX
box and eport name. Distinguishing between GWs is important because they determine
the network topology and affect the path that a packet traverses between hosts. A packet
that is sent from the host on a specific EoIB interface will be routed to the Ethernet subnet
through a specific external port connection on the BridgeX box.
6.2.2 Virtual Hubs (vHubs)
Virtual hubs connect zero or more EoIB interfaces (on internal hosts) and an eport through
a virtual hub. Each vHub has a unique virtual LAN (VLAN) id. Virtual hub participants
can send packets to one another directly without the assistance of the Ethernet subnet
(external side) routing. This means that two EoIB interfaces on the same vHub will communicate solely using the InfiniBand fabric. EoIB interfaces residing on two different
vHubs (whether on the same GW or not) can not communicate directly.
There are two types of vHub - a default vHub (one per GW) which has no VLAN ID, and
vHubs which have unique, different VLAN IDs. Each vHub belongs to a specific GW
(BridgeX + eport), and each GW has one default vHub, and zero or more VLAN-associated vHubs A specific GW can have multiple vHubs, distinguishable by their unique virtual LAN (VLAN) id. Traffic coming from the Ethernet side on a specific eport will be
routed to the relevant vHub group based on its VLAN tag (or to the default vHub for that
GW if no VLAN ID is present).
6.2.3 Virtual NIC (vNic)
A virtual NIC is a network interface instance on the host side. The vNic behaves like regular HW network interface.
A vNic belongs to a single vHub on a specific GW. The host can have multiple interfaces
that belong to the same vHub
Mellanox Technologies
Mellanox Technologies Confidential
Rev 1.50
EoIB
44
Figure 3: eports, vNics, and vHubs
6.3
EoIB Configuration
The mlx4_vnic module supports two different modes of configuration: host administration
and network administration. In the first, the vNic is configured on the host side, and in the
latter the configuration is done by the BridgeX and this configuration is passed to the host
mlx4_vnic driver using the EoIB protocol. Both modes of operation require the presence
of a BridgeX gateway in order to work properly.
The EoIB driver supports a mixture of host and network administered vNics.
6.3.1 EoIB Host Administered vNic
In host administered mode vNics are configured using static configuration files located on
the host side. These configuration files define the number of vNics, and the vHub that each
host administered vNic will belong to (i.e., the vNic's BridgeX box, eport and VLAN id
properties). The mlx4_vnic_confd service is used to read these configuration files and
pass the relevant data to the mlx4_vnic module. Two forms of configuration files are supported: a central configuration file (mlx4_vnic.conf), and vNic-specific configuration files
(ifcfg-ethXX); both supply the same functionality. If both forms of configuration files
exist, the central configuration file has precedence and only this file will be used.
Rev 1.50
Mellanox Technologies
Mellanox Technologies Confidential
45
6.3.1.1
Central configuration file - /etc/infiniband/mlx4_vnic.conf
The mlx4_vnic.conf file consists of lines, each describing one vNic. The following file
format is used:
name=eth44 mac=00:25:8B:27:14:78 ib_port=mlx4_0:1 vid=0 vnic_id=5
bx=00:00:00:00:00:00:03:B2 eport=A10
name=eth45 mac=00:25:8B:27:15:78 ib_port=mlx4_0:1 vnic_id=6
bx=00:00:00:00:00:00:03:B2 eport=A10
name=eth47 mac=00:25:8B:27:16:84 ib_port=mlx4_0:1 vid=2 vnic_id=7
bx=BX001 eport=A10
name=eth40 mac=00:25:8B:27:17:93 ib_port=mlx4_0:1 vnic_id=8
bx=BX001 eport=A10
The fields used in the file have the following meaning:
6.3.1.2
name
The name of the interface that is displayed when
running ifconfig.
mac
The mac address to assign to the vnic.
ib_port
Device name and port number in the form [device
name]:[port number]. The device name can be
retrieved by running ibv_devinfo and using the output of hca_id field. The port number can have a value
of 1 or 2.
vid
vLan ID (an optional field). If it exists the vNic
will be assigned the VLAN id specified. This value
must be between 0 and 4095. If no vid is specified,
the vNic will be assigned to the default vHub associated with the (bx, eport) pair GW.
vnic_id
A unique number per vNic between 0 and 32K.
bx
The BridgeX box system GUID or system name string.
eport
The string describing the eport name.
vNic specific configuration files - ifcfg-ethX
EoIB configuration can use the well known ifcfg-ethX files used by the network service to
derive the needed configuration. In this usage model a separate file is required per vNic.
We will need to update the ifcfg-ethX file and add some new attributes to it.
On Red Hat the new file will be of the form:
DEVICE=eth2
HWADDR=00:30:48:7d:de:e4
BOOTPROTO=dhcp
ONBOOT=yes
BXADDR=BX001
BXEPORT=A10
VNICVLAN=0
(Optional field)
VNICIBPORT=mlx4_0:1
Mellanox Technologies
Mellanox Technologies Confidential
Rev 1.50
EoIB
46
The fields used in the file have the following meaning:
DEVICE
The name of the interface that is displayed when
running ifconfig. This field is optional; if it is
not present the trailer of the configuration file
name (e.g. ifcfg-eth47 => "eth47") is used.
BXADDR
The BridgeX box system GUID or system name string.
BXEPORT
The string describing the eport name.
VNICVLAN
An optional field. If it exists the vNic will be
assigned the VLAN id specified. This value must be
between 0 and 4095.
VNICIBPORT
Device name and port number in the form [device
name]:[port number]. The device name can be
retrieved by running ibv_devinfo and using the output of hca_id filed. The port number can have a value
of 1 or 2.
HWADDR
The mac address to assign the vnic.
Other fields available for regular ethernet interfaces in the ifcfg-ethX files may also be
used.
6.3.2 Extracting BridgeX host name
In order to configure host administered vNics the BridgeX box address needs to be known
on the host. The simplest way to learn this information is by loging into the BridgeX box
and querying the information. One way to perform this is by connecting through ssh to the
BridgeX and running:
bridge-1128b8 #
enable
bridge-1128b8 # configure terminal
bridge-1128b8 (config) # show bxm
The result will display the system GUID and some more information:
BXM status
System GUID
: 00:02:C9:03:00:11:08:C7
An alternative is to replace the last command with:
bridge-1128b8 (config) # show hosts
The result will display the system name and some more information:
Hostname: bridge-1128b8
6.3.3 mlx4_vnic_confd
After updating the configuration files you are ready to create the host
Rev 1.50
Mellanox Technologies
Mellanox Technologies Confidential
47
administered vNics. To create the vNics you will use the mlx4_vnic_confd service
that is located at /etc/init.d/. To use the service run:
To start / load new vnics:
# mlx4_vnic_confd start
To stop all host administrated vNics:
# mlx4_vnic_confd stop
To restart (close and then open) all host administrated vNics:
# mlx4_vnic_confd restart
To update system according to up to date configuration files. This option will not modify
vNics with a valid configuration that was not changed:
# mlx4_vnic_confd reload
6.3.4 EoIB Network Administered vNic
In network administered mode the configuration of the vNic is done by the BridgeX. If a
vNic is configured for a specific host, it will appear on that host once a connection is
established between the BridgeX and the mlx4_vnic module. This connection between the
mlx4_vnic modules and all available BridgeX boxes is established automatically when the
mlx4_vnic module is loaded. If the BridgeX is configured to remove the vnic, or if the
connection between the host and BridgeX is lost, the vNic interface will disappear (running ifconfig will not display the interface). Similar to host administered vNics, a network
administered vNic resides on a specific vHub.
See BridgeX documentation on how to configure a network administered vNic.
To disable network administered vnics on the host side load mlx4_vnic module with the
net_admin module parameter set to 0.
6.3.5 VLAN Configuration
As explained in the topology section, a vNic instance is associated with a specific vHub
group. This vHub group is connected to a BridgeX external port and has a VLAN tag attribute. When creating / configuring a vNic you define the VLAN tag it will use (via the vid
or the VNICVLAN fields. If these fields are absent, the vnic will not have a VLAN tag). If
the vNic has a VLAN tag, it will be present in all EoIB packets sent by the vNics and will
be verified on all packets received on the vNic. When passed from the InfiniBand side to
the Ethernet side the EoIB encapsulation will be stripped but the VLAN tag will remain.
For example, if the vNic "eth23" is associated with a vHub that uses BridgeX "bridge01",
eport "A10" and VLAN tag 8, all incoming and outgoing traffic on eth23 will use a VLAN
tag of 8. This will be enforced by both BridgeX and destination hosts. When a packet is
passed from the internal fabric to the Ethernet subnet through the BridgeX it will have a
"true" Ethernet VLAN tag of 8.
Mellanox Technologies
Mellanox Technologies Confidential
Rev 1.50
EoIB
48
The VLAN implementation used by EoIB uses OS un-aware VLANs. This is in many
ways similar to switch tagging in which an external Ethernet switch adds / strips tags on
traffic preventing the need of OS intervention. EoIB does not support OS aware VLANs in
the form of vconfig.
6.3.5.1
Configuring VLANs
To configure VLAN tag for a vNic just add the VLAN tag property to the configuration
file in host administrated mode, or configure the vNic on the appropriate vHub in network
administered mode.
In host administered mode if a vHub with the requested VLAN tag is not available yet, it
will most likely be created automatically.
Host administered VLAN configuration in centralized conf file:
Add "vid=<vlan tag>" or remove vid property for no VLAN
Host administered VLAN configuration with ifcfg-ethX configuration files
"VNICVLAN=<vlan tag>" or remove VNICVLAN property for no VLAN
Note:
Using a VLAN tag value of 0 is not recommended because the traffic using it
would not be separated form non VLAN traffic.
6.3.6 EoIB Multicast Configuration
Configuring Multicast for EoIB interfaces is identical to multicast configuration for native
Ethernet interfaces.
Note:
EoIB maps Ethernet multicast addresses to InfiniBand MGIDs (Multicast
GID). The map is done in a way that ensures that different vHubs use mutually exclusive MGIDs. This prevents vNics on different vHubs from communicating with one another.
6.3.7 EoIB and QoS
EoIB enables the use of InfiniBand service levels. At this time EoIB supports the use of a
single SL for all vNics. The configuration of the SL is performed through the BridgeX.
Refer to BridgeX documentation for the use of non default SL.
6.3.8 IP Configuration Based on DHCP
Setting an EoIB interface configuration based on DHCP (v3.1.2 which is available via
www.isc.org) is performed similarly to the configuration of Ethernet interfaces. In other
words, you need to make sure that EoIB configuration files include the following line:
For RedHat:
BOOTPROTO=dhcp
Rev 1.50
Mellanox Technologies
Mellanox Technologies Confidential
49
For SLES:
BOOTPROTO='dchp'
Note:
6.3.8.1
If EoIB configuration files are included, ifcfg-eth<n> files will be installed
under: /etc/sysconfig/network-scripts/ on a RedHat machine, /etc/sysconfig/
network/ on a SuSE machine
DHCP Server
No special configuration is needed to use a DHCP server with EoIB. The DHCP server
can run on a server which is located on the Ethernet side (using any Ethernet HW) or on a
server located on the InfiniBand side and running EoIB module.
6.3.9 Static EoIB Configuration
If you wish, you can use an EoIB configuration that is not based on DHCP. Static configuration is performed in a similar fashion to a typical Ethernet device. See your Linux distribution documentation for additional information about configuring IP addresses.
Note:
6.4
Ethernet configuration files are located at: /etc/sysconfig/network-scripts/ on
a RedHat machine, /etc/sysconfig/network/ on a SuSE machine
Sub Interfaces (VLAN)
EoIB interfaces do not support creating sub interfaces via the vconfig command. In order
to create interfaces with VLAN refer to Chapter 6.3.5, “VLAN Configuration”.
6.5
Retrieving EoIB information
6.5.1 mlx4_vnic_info
To retrieve information about EoIB interfaces, use the script mlx4_vnic_info. This script
gives detailed information about a specific vNic or all EoIB vNic interfaces. If network
administered vNics are enabled this script can also be used to discover the available
BridgeXs from the host side. To do this simply run:
# mlx4_vnic_info | grep SYSTEM_GUID
or
# mlx4_vnic_info | grep SYSTEM_NAME
To get the full vNic information simply type:
# mlx4_vnic_info
or
# mlx4_vnic_info eth10
Mellanox Technologies
Mellanox Technologies Confidential
Rev 1.50
EoIB
50
A typical output for a single interface looks something like:
NETDEV_NAME
eth10
NETDEV_LINK
up
NETDEV_OPEN
yes
NETDEV_QSTOP
no
GW_PORT_ID
0
SL
0
GW_QPN
0x800000
GW_LID
0x0004
IB_PORT
mlx4_0:1
IB_LOG_LINK
LinkUp
IB_PHY_LINK
Active
IB_MTU
2048
MTU
1500
RX_RINGS_NUM
8
RX_RINGS_LIN
no
SW_RSS
yes
SW_RSS_SIZE
16
TX_RINGS_NUM
1
TX_RINGS_ACT
1
NDO_TSS
no
NDO_TSS_SIZE
1
PROMISC_MCAST yes
MCAST_MASK
0
NO_BXM
no
LRO_ENABLED
yes
LRO_NUM
32
NAPI_ENABLED
yes
VNIC_PER_PORT 1
Rev 1.50
VNIC_NUM
2
PKEY
0xffff
PKEY_INDEX
0x0000
QPN
0x80060
LID
0x0003
MAC
00:00:00:00:02:00
VID
0x000
VLAN USED
0
GID
fe:80:00:00:00:00:00:00:00:02:c9:03:00:00:22:85
GW_PORT_NAME
A10
SYSTEM_NAME
unnamed_system
SYSTEM_GUID
00:00:00:00:00:05:67:90
Mellanox Technologies
Mellanox Technologies Confidential
51
GW_EPORT
up
Other useful options for this script include:
-h
print usage
-v
print script version
-l
list all virtual nics
-s
print short info
6.5.2 ethtool
Another way to retrieve interface info and change its configuration is through the use of
the standard ethtool application. EoIB interfaces support ethtool in a similar way to HW
Ethernet interfaces. The supported Ethtool options include the following options:
-c, -C
Show and update interrupt coalesce options
-g
Query RX/TX ring parameters
-k, -K
Show and update protocol offloads
-i
Show driver information
-S
Show adapter statistics
For more information on ethtool run: ethtool -h
6.5.3 Link state
An EoIB interface has two different link states that it can report. The first is the physical
link state of the interface and the second is the link state of the external port associated
with the vNic interface. The physical link state of the port is by itself made up of the actual
HCA port link state and the status of the vNics connection with the BridgeX. If the HCA
port link state is down or the EoIB connection with the BridgeX has failed the link will be
reported as down. This is because without the connection to the BridgeX the EoIB protocol does not work so no data can be sent on the wire. The mlx4_vnic driver can also report
the status of the external BridgeX port status. This information can be retrieved through
the mlx4_vnic_info script GW_EPORT field value. If the eport_state_enforce module
parameter is set then the external port state will be reported as the vNic interface link state.
Naturally if the connection between the vNic and the BridgeX is broken (and there for the
external port state is unknown) the link will be reported as down.
Note:
A link state of down on a host administrated vNics, when the BridgeX is connected and the InfiniBand fabric seems OK, is a good indication of a BridgeX
(system name or system GUID) or eport mis-configuration. Check the value
of BXADDR and BXEPORT in the configuration file.
To query the link state run:
ifconfig <interface name> and check for "RUNNING" in the result text.
Example:
# ifconfig eth2
eth2
Link encap:Ethernet
HWaddr 00:25:8B:00:04:00
Mellanox Technologies
Mellanox Technologies Confidential
Rev 1.50
EoIB
52
inet6 addr: fe80::225:8bff:fe00:400/64 Scope:Link
UP BROADCAST RUNNING MULTICAST
MTU:1500
Metric:1
RX packets:49 errors:0 dropped:11 overruns:0 frame:0
TX packets:25 errors:0 dropped:0 overruns:0 carrier:0
collisions:0 txqueuelen:1000
RX bytes:11278 (11.0 KiB)
TX bytes:5821 (5.6 KiB)
An alternative is to use ethtool <interface name> and test for "Link detected".
Example:
# ethtool eth2
Settings for eth2:
Supported ports: [ ]
Supported link modes:
Supports auto-negotiation: No
Advertised link modes:
Not reported
Advertised auto-negotiation: No
Speed: Unknown! (10000)
Duplex: Full
Port: Twisted Pair
PHYAD: 0
Transceiver: internal
Auto-negotiation: off
Supports Wake-on: d
Wake-on: d
Current message level: 0x00000000 (0)
Link detected: yes
6.6
Bonding Driver
EoIB uses the standard Linux bonding driver. For more information on the Linux Bonding
driver please refer to <kernel-source>/Documentation/networking/bonding.txt. Currently
not all bonding modes are supported (LACP is not supported).
6.7
Jumbo Frames
EoIB supports jumbo frames up to the InfiniBand limit of 4Kbytes. To configure EoIB to
work with jumbo frames you need to configure the entire InfiniBand fabric to use 4K
MTU. This includes configuring the SM, InfiniBand switches and configuring the ConnectX HCA. To configure the HCA port to work with 4K MTU set the mlx4_core module
parameter "set_4k_mtu". For how to configure the SM and switches refer to their corresponding documentation.
Rev 1.50
Mellanox Technologies
Mellanox Technologies Confidential
53
6.8
Module Parameters
The mlx4_vnic driver supports the following module parameters. These parameters are
intended to enable more specific configuration of the mlx4_vnic driver to customer needs.
The mlx4_vnic is also effected by module parameters of other modules (like the
set_4k_mtu of mlx4_core) but these will not be addressed here. The available module
parameters include:
• tx_rings_num: Number of TX rings used per vNic, use 0 for #cores [default 0]
• rx_rings_num: Number of RX rings, use 0 for #cores [default 0]. The receive rings service all vNics that use the HCA port.
• mcast_create: Create multicast group during join request [default 0] (int). If set
mlx4_vnic will request the mcast group to be created and not only "joined". The creation operation is usually the responsibility of the BridgeX.
• eport_state_enfroce: Bring vNIC link indication up only when corresponding External
Port is up [default 0].
• lro_num: Number of LRO sessions per ring or disable=0 [default 32]
• napi_weight: NAPI weight [default 32]
• max_tx_outs: Max outstanding TX packets [default 16]
• linear_small_pkt: Use linear buffer for small packets [default 1]. If set causes packet
copy for small packets.
• net_admin: Network administration enabled [default 1]. If disabled no network administered interfaces will be opened.
Mellanox Technologies
Mellanox Technologies Confidential
Rev 1.50
SDP
54
7
SDP
7.1
Overview
Sockets Direct Protocol (SDP) is an InfiniBand byte-stream transport protocol that provides TCP stream semantics. Capable of utilizing InfiniBand's advanced protocol offload
capabilities, SDP can provide lower latency, higher bandwidth, and lower CPU utilization
than IPoIB running some sockets-based applications.
SDP can be used by applications and improve their performance transparently (that is,
without any recompilation). Since SDP has the same socket semantics as TCP, an existing
application is able to run using SDP; the difference is that the application’s TCP socket
gets replaced with an SDP socket.
It is also possible to configure the driver to automatically translate TCP to SDP based on
the source IP/port, the destination, or the application name. See Section 7.5.
The SDP protocol is composed of a kernel module that implements the SDP as a new
address-family/protocol-family, and a library (see Section 7.2) that is used for replacing the
TCP address family with SDP according to a policy.
This chapter includes the following sections:
• “libsdp.so Library” on page 54
• Configuring SDP (page 55)
• Environment Variables (page 57)
• Converting Socket-based Applications (page 57)
• Note that the default value of ‘sdp_zcopy_thresh’ is 64KB, but is may be too low for some systems. You will need to experiment with your hardware to find the best value. (page 65)
7.2
libsdp.so Library
libsdp.so is a dynamically linked library, which is used for transparent integration of
applications with SDP. The library is preloaded, and therefore takes precedence over glibc
for certain socket calls. Thus, it can transparently replace the TCP socket family with SDP
socket calls.
The library also implements a user-level socket switch. Using a configuration file, the system administrator can set up the policy that selects the type of socket to be used. libsdp.so also has the option to allow server sockets to listen on both SDP and TCP
interfaces. The various configurations with SDP/TCP sockets are explained inside the /
etc/libsdp.conf file.
Rev 1.50
Mellanox Technologies
Mellanox Technologies Confidential
55
7.3
Configuring SDP
To load SDP upon boot, edit the file /etc/infiniband/openib.conf and set
“SDP_LOAD=yes”.
Note:
For the changes to take effect, run: /etc/init.d/openibd restart
SDP shares the same IP addresses and interface names as IPoIB. See IPoIB configuring in
Section 4.3 and Section 4.3.3.
7.3.1 How to Know SDP Is Working
Since SDP is a transparent TCP replacement, it can sometimes be difficult to know that it
is working correctly. The sdpnetstat program can be used to verify both that SDP is
loaded and is being used:
host1$ sdpnetstat -S
This command shows all active SDP sockets using the same format as the traditional
netstat program. Without the ‘-S’ option, it shows all the information that netstat
does plus SDP data.
Assuming that the SDP kernel module is loaded and is being used, then the output of the
command will bve as follows:
host1$ sdpnetstat -S
Proto Recv-Q Send-Q Local Address
sdp
0
0 193.168.10.144:34216
sdp
0 884720 193.168.10.144:42724
rmi
Foreign Address
193.168.10.125:12865
193.168.10.:filenet-
The example output above shows two active SDP sockets and contains details about the
connections.
If the SDP kernel module is not loaded, then the output of the command will be something
like the following:
host1$ sdpnetstat -S
Proto Recv-Q Send-Q Local Address
Foreign Address
netstat: no support for `AF INET (tcp)' on this system.
To verify whether the module is loaded or not, you can use the lsmod command:
host1$ lsmod | grep sdp
ib_sdp1250200
The example output above shows that the SDP module is loaded.
If the SDP module is loaded and the sdpnetstat command did not show SDP sockets,
then SDP is not being used by any application.
Mellanox Technologies
Mellanox Technologies Confidential
Rev 1.50
SDP
56
7.3.2 Monitoring and Troubleshooting Tools
SDP has debug support for both the user space libsdp.so library and the ib_sdp kernel module.. Both can be useful to understand why a TCP socket was not redirected over
SDP and to help find problems in the SDP implementation.
User Space SDP Debug
User-space SDP debug is controlled by options in the libsdp.conf file. You can also
have a local version and point to it explicitly using the following command:
host1$ export LIBSDP_CONFIG_FILE=<path>/libsdp.conf
To obtain extensive debug information, you can modify libsdp.conf to have the log
directive produce maximum debug output (provide the min-level flag with the value
1).
The log statement enables the user to specify the debug and error messages that are to be
sent and their destination. The syntax of log is as follows:
log [destination (stderr | syslog | file <filename>)] [min-level 19]
where options are:
destination
send log messages to the specified destination:
stderr: forward messages to the STDERR
syslog: send messages to the syslog service
file <filename>: write messages to the file
/var/log/filename for root. For a regular
user, write to /tmp/<filename>.<uid> if filename is
not specified as a full path; otherwise, write to
<path>/<filename>.<uid>
min-level
verbosity level of the log:
9: print errors only
8: print warnings
7: print connect and listen summary (useful for tracking
SDP usage)
4: print positive match summary (useful for config file
debug)
3: print negative match summary (useful for config file
debug)
2: print function calls and return values
1: print debug messages
Examples:
To print SDP usage per connect and listern to STDERR, include the following statement:
log min-level 7 destination stderr
A non-root user can configure libsdp.so to record function calls and return values in
the file
Rev 1.50
Mellanox Technologies
Mellanox Technologies Confidential
57
/tmp/libsdp.log.<pid> (root log goes to /var/log/libsdp.log for this
example) by including the following statement in libsdp.conf:
log min-level 2 destination file libsdp.log
To print errors only to syslog, include the following statement:
log min-level 9 destination syslog
To print maximum output to the file /tmp/sdp_debug.log.<pid>, include the following statement:
log min-level 1 destination file sdp_debug.log
Kernel Space SDP Debug
The SDP kernel module can log detailed trace information if you enable it using the
'debug_level' variable in the sysfs filesystem. The following command performs this:
host1$ echo 1 > /sys/module/ib_sdp/debug_level
Note:
Depending on the operating system distribution on your machine, you may
need an extra level—parameters— in the directory structure, so you may need
to direct the echo command to /sys/module/ib_sdp/parameters/
debug_level.
Turning off kernel debug is done by setting the sysfs variable to zero using the following
command:
host1$ echo 0 > /sys/module/ib_sdp/debug_level
To display debug information, use the dmesg command:
host1$ dmesg
7.4
Environment Variables
For the transparent integration with SDP, the following two environment variables are
required:
1.
2.
3.
7.5
LD_PRELOAD – this environment variable is used to preload libsdp.so and it
should point to the libsdp.so library. The variable should be set by the system
administrator to /usr/lib/libsdp.so (or /usr/lib64/libspd.so).
LIBSDP_CONFIG_FILE – this environment variable is used to configure the policy
for replacing TCP sockets with SDP sockets. By default it points to: /etc/libsdp.conf.
SIMPLE_LIBSDP – ignore libsdp.conf and always use SDP
Converting Socket-based Applications
You can convert a socket-based application to use SDP instead of TCP in an automatic
(also called transparent) mode or in an explicit (also called non-transparent) mode.
Mellanox Technologies
Mellanox Technologies Confidential
Rev 1.50
SDP
58
Automatic (Transparent) Conversion
The libsdp.conf configuration (policy) file is used to control the automatic transparent replacement of TCP sockets with SDP sockets. In this mode, socket streams are converted based upon a destination port, a listening port, or a program name.
Socket control statements in libsdp.conf allow the user to specify when libsdp
should replace AF_INET/SOCK_STREAM sockets with AF_SDP/SOCK_STREAM
sockets. Each control statement specifies a matching rule that applies if all its subexpressions must evaluate as true (logical and).
The use statement controls which type of sockets to open. The format of a use statement
is as follows:
use <address-family> <role> <program-name|*> <address|*>:<port
range|*>
where
<address-family>
can be one of
sdp: for specifying when an SDP should be used
tcp: for specifying when an SDP socket should not be matched
both: for specifying when both SDP and AF_INET sockets should be used
Note that both semantics is different for server and client roles. For
server, it means that the server will be listening on both SDP and TCP
sockets. For client, the connect function will first attempt to use SDP
and will silently fall back to TCP if the SDP connection fails.
<role>
can be one of
server or listen: for defining the listening port address family
client or connect: for defining the connected port address family
<program-name|*>
Defines the program name the rule applies to (not including the path). Wildcards with same semantics as ‘ls’ are supported (* and ?). So db2* would match
on any program with a name starting with db2. t?cp would match on ttcp, etc.
If program-name is not provided (default), the statement matches all programs.
<address|*>
Either the local address to which the server binds, or the remote server
address to which the client connects. The syntax for address matching is:
<IPv4 address>[/<prefix_length>]|*
IPv4 address = [0-9]+\.[0-9]+\.[0-9]+\.[0-9]+ each sub number < 255
prefix_length = [0-9]+ and with value <= 32. A prefix_length of 24
matches the subnet mask 255.255.255.0. A prefix_length of 32 requires
matching of the exact IP.
<port range>
start-port[-end-port] where port numbers are >0 and <65536
Rev 1.50
Mellanox Technologies
Mellanox Technologies Confidential
59
Note that rules are evaluated in the order of definition. So the first match wins. If no match
is made, libsdp will default to both.
Examples:
• Use SDP by clients connecting to machines that belongs to subnet 192.168.1.*
use sdp connect *
family
192.168.1.0/24:*
program
role
address:port[-range]
• Use SDP by ttcp when it connects to port 5001 of any machine
use sdp
listen
ttcp
*:5001
• Use TCP for any program with name starting with ttcp* serving ports 22 to 25
use tcp
server
ttcp*
*:22-25
• Listen on both TCP and SDP by any server that listen on port 8080
use both
server
*
*:8080
• Connect ssh through SDP and fallback to TCP to hosts on 11.4.8.* port 22
use both
connect *
11.4.8.0/24:22
Explicit (Non-transparent) Conversion
Use explicit conversion if you need to maintain full control from your application while
using SDP. To configure an explicit conversion to use SDP, simply recompile the application replacing PF_INET (or PF_INET) with AF_INET_SDP (or AF_INET_SDP) when
calling the socket() system call in the source code. The value of AF_INET_SDP is
defined in the file sdp_socket.h or you can define it inline:
#define AF_INET_SDP 27
#define PF_INET_SDP AF_INET_SDP
You can compile and execute the following very simple TCP application that has been
converted explicitly to SDP:
Compilation:
gcc sdp_server.c -o sdp_server
gcc sdp_client.c -o sdp_client
Usage:
Server:
host1$ sdp_server
Client:
host1$ sdp_client <server IPoIB addr>
Example:
Server:
Mellanox Technologies
Mellanox Technologies Confidential
Rev 1.50
SDP
60
host1$ ./sdp_server
accepted connection from 15.2.2.42:48710
read 2048 bytes
end of test
host1$
Client:
host2$
./sdp_client 15.2.2.43
connected to 15.2.2.43:22222
sent 2048 bytes
host2$
sdp_client.c Code
/*
* usage: ./sdp_client <ip_addr>
*/
#include
#include
#include
#include
#include
<stdio.h>
<stdlib.h>
<stdint.h>
<unistd.h>
<string.h>
#include
#include
#include
#include
<sys/types.h>
<sys/socket.h>
<netinet/in.h>
<arpa/inet.h>
#define DEF_PORT 22222
#define AF_INET_SDP 27
#define PF_INET_SDP AF_INET_SDP
#define TXBUFSZ 2048
uint8_t tx_buffer[TXBUFSZ];
int
main(int argc, char **argv)
Rev 1.50
Mellanox Technologies
Mellanox Technologies Confidential
61
{
if ( argc < 2) {
printf("Usage: sdp_client <ip_addr>\n");
exit(EXIT_FAILURE);
}
int sd = socket(PF_INET_SDP, SOCK_STREAM, 0);
if ( sd < 0) {
perror("socket() failed");
exit(EXIT_FAILURE);
}
struct sockaddr_in to_addr = {
.sin_family = AF_INET,
.sin_port = htons(DEF_PORT),
};
int ip_ret = inet_aton(argv[1], &to_addr.sin_addr);
if ( ip_ret == 0) {
printf("invalid ip address '%s'\n", argv[1]);
exit(EXIT_FAILURE);
}
int conn_ret = connect(sd, (struct sockaddr *) &to_addr,
sizeof(to_addr));
if ( conn_ret < 0) {
perror("connect() failed");
exit(EXIT_FAILURE);
}
printf("connected to %s:%u\n",
inet_ntoa(to_addr.sin_addr),
ntohs(to_addr.sin_port) );
ssize_t nw = write(sd, tx_buffer, TXBUFSZ);
if ( nw < 0) {
perror("write() failed");
exit(EXIT_FAILURE);
} else if ( nw == 0) {
printf("socket was closed by remote host\n");
Mellanox Technologies
Mellanox Technologies Confidential
Rev 1.50
SDP
62
}
printf("sent %zd bytes\n", nw);
close(sd);
return 0;
}
sdp_server.c Code
/*
* Usage: ./sdp_server
*/
#include
#include
#include
#include
<stdio.h>
<stdlib.h>
<stdint.h>
<unistd.h>
#include
#include
#include
#include
#include
#include
#include
<sys/types.h>
<sys/socket.h>
<netinet/in.h>
<arpa/inet.h>
<sys/epoll.h>
<errno.h>
<assert.h>
#define RXBUFSZ 2048
uint8_t rx_buffer[RXBUFSZ];
#define DEF_PORT 22222
#define AF_INET_SDP 27
#define PF_INET_SDP AF_INET_SDP
int
main(int argc, char **argv)
{
Rev 1.50
Mellanox Technologies
Mellanox Technologies Confidential
63
int sd = socket(PF_INET_SDP, SOCK_STREAM, 0);
if ( sd < 0) {
perror("socket() failed");
exit(EXIT_FAILURE);
}
struct sockaddr_in my_addr = {
.sin_family = AF_INET,
.sin_port = htons(DEF_PORT),
.sin_addr.s_addr = INADDR_ANY,
};
int retbind = bind(sd, (struct sockaddr *) &my_addr,
sizeof(my_addr) );
if ( retbind < 0) {
perror("bind() failed");
exit(EXIT_FAILURE);
}
int retlisten = listen(sd, 5/*backlog*/);
if ( retlisten < 0) {
perror("listen() failed");
exit(EXIT_FAILURE);
}
// accept the client connection
struct sockaddr_in client_addr;
socklen_t client_addr_len = sizeof(client_addr);
int cd = accept(sd, (struct sockaddr *) &client_addr,
&client_addr_len);
if ( cd < 0) {
perror("accept() failed");
exit(EXIT_FAILURE);
}
printf("accepted connection from %s:%u\n",
inet_ntoa(client_addr.sin_addr),
ntohs(client_addr.sin_port) );
Mellanox Technologies
Mellanox Technologies Confidential
Rev 1.50
SDP
64
ssize_t nr = read(cd, rx_buffer, RXBUFSZ);
if ( nr < 0) {
perror("read() failed");
exit(EXIT_FAILURE);
} else if ( nr == 0) {
printf("socket was closed by remote host\n");
}
printf("read %zd bytes\n", nr);
printf("end of test\n");
close(cd);
close(sd);
return 0;
}
Rev 1.50
Mellanox Technologies
Mellanox Technologies Confidential
65
7.6
BZCopy – Zero Copy Send
BZCOPY mode is only effective for large block transfers. By setting the /sys parameter
‘sdp_zcopy_thresh’ to a non-zero value, a non-standard SDP speedup is enabled.
Messages longer than ‘sdp_zcopy_thresh’ bytes in length cause the user space buffer to be pinned and the data to be sent directly from the original buffer. This results in less
CPU usage and, on many systems, much higher bandwidth.
Note that the default value of ‘sdp_zcopy_thresh’ is 64KB, but is may be too low
for some systems. You will need to experiment with your hardware to find the best value.
7.7
Testing SDP Performance
This section describes how to verify SDP performance by running the Bandwidth (BW)
test and the Latency test. These tests are described in detail at the following URL:
http://www.netperf.org/netperf/training/Netperf.html
To verify SDP performance, perform the following steps:
Step 1
Download Netperf from the following URL:
http://www.netperf.org/netperf/NetperfPage.html
Step 2.
Compile Netperf by following the instructions at
http://www.netperf.org/netperf/NetperfPage.html.
Step 3.
Create libsdp.conf (configuration file).
host1# cat > $HOME/libsdp.conf << EOF
> use sdp server * *:*
> use sdp client * *:*
> EOF
Step 4.
Start the Netperf server such that you force SDP to be used instead of TCP.
host1# LD_PRELOAD=libsdp.so LIBSDP_CONFIG_FILE=$HOME/libsdp.conf
netserver
Starting netserver at port 12865
Starting netserver at hostname 0.0.0.0 port 12865 and family
AF_UNSPEC
host1#
Step 5.
Run the Netperf client such that you force SDP to be used instead of TCP. The default
test is the Bandwidth test.
host2# LD_PRELOAD=libsdp.so LIBSDP_CONFIG_FILE=$HOME/libsdp.conf
netperf \
-H 11.4.17.6 -t TCP_STREAM -c -C -- -m 65536
TCP STREAM TEST from 0.0.0.0 (0.0.0.0) port 0 AF_INET to 11.4.17.6
(11.4.17.6) port 0 AF_INET
Recv
Send
Demand
Send
Utilization
Mellanox Technologies
Mellanox Technologies Confidential
Service
Rev 1.50
SDP
66
Socket Socket
Recv
Message
Elapsed
Size
Size
remote
Size
Time
bytes
us/KB
bytes
secs.
10^6bits/s
65536
10.00
5872.60
bytes
87380
1.911
16384
Throughput
Send
Recv
Send
local
remote
local
% S
us/KB
17.12
2.166
% S
19.41
You must specify the SDP/IPoIB IP address when running the Netperf client.
Note:
The following table describes parameters for the netperf command:
Option
Description
-H
Where to find the server
11.4.17.6
SDP/IPoIB IP address
-t <Test Name>
Specify the test to perform. Options are TCP_STREAM, TCP_RR, etc.
-c
Client CPU utilization
-C
Server CPU utilization
--
Separates the global and test-specific parameters
-m
Message size, which is 65536 in the example above
Note that the run example above produced the following results:
• Throughput is 5.872 gigabits per second
• Client CPU utilization is 19.41 percent of client CPU
• Server CPU utilization is 17.12 percent of server CPU
Step 6.
Run the Netperf Latency test such that you force SDP to be used instead of TCP.
Run the test once, and stop the server so that it does not repeat the test.
host2# LD_PRELOAD=libsdp.so LIBSDP_CONFIG_FILE=$HOME/libsdp.conf
netperf \
-H 11.4.17.6 -t TCP_RR -c -C -- -r1,1
TCP REQUEST/RESPONSE TEST from 0.0.0.0 (0.0.0.0) port 0 AF_INET to
11.4.17.6 (11.4.17.6) port 0 AF_INET
Local /Remote
Socket Size
S.dem
Request Resp.
Elapsed Trans.
CPU
CPU
Send
Recv
remote
Size
Size
Time
Rate
local
remote local
bytes
us/Tr
bytes
bytes
secs.
per sec
% S
% S
us/Tr
1
1
15.72
23.36
33.469
bytes
16384 87380
49.729
Rev 1.50
10.00
37572.83
Mellanox Technologies
Mellanox Technologies Confidential
S.dem
67
16384
87380
The following table describes parameters for the netperf command:
Option
Description
-H
Where to find the server
11.4.17.6
SDP/IPoIB IP address
-t <Test Name>
Specify the test to perform. Options are TCP_STREAM, TCP_RR, etc.
-c
Client CPU utilization
-C
Server CPU utilization
--
Separates the global and test-specific parameters
-r 1,1
The request size sent and how many bytes requested back
Note that the run example above produced the following results:
• Client CPU utilization is 15.72 percent of client CPU
• Server CPU utilization is 23.36 percent of server CPU
• Latency is 13.31 microseconds. Latency is calculated as follows:
0.5*(1 / Transaction rate per sec) * 1,000,000 = one-way average latency in usec.
Step 7.
To end the test, shut down the Netperf server.
host1# pkill netserver
Mellanox Technologies
Mellanox Technologies Confidential
Rev 1.50
SRP
68
8
SRP
8.1
Overview
As described in Section 1.4.5, the SCSI RDMA Protocol (SRP) is designed to take full
advantage of the protocol offload and RDMA features provided by the InfiniBand architecture. SRP allows a large body of SCSI software to be readily used on InfiniBand architecture. The SRP Initiator controls the connection to an SRP Target in order to provide
access to remote storage devices across an InfiniBand fabric. The SRP Target resides in an
IO unit and provides storage services.
Section 8.2 describes the SRP Initiator included in Mellanox BXOFED for Linux. This
package, however, does not include an SRP Target.
8.2
SRP Initiator
This SRP Initiator is based on open source from OpenFabrics (www.openfabrics.org) that
implements the SCSI RDMA Protocol-2 (SRP-2). SRP-2 is described in Document # T10/
1524-D available from www.t10.org/ftp/t10/drafts/srp2/srp2r00a.pdf.
The SRP Initiator supports
• Basic SCSI Primary Commands -3 (SPC-3)
(www.t10.org/ftp/t10/drafts/spc3/spc3r21b.pdf)
• Basic SCSI Block Commands -2 (SBC-2)
(www.t10.org/ftp/t10/drafts/sbc2/sbc2r16.pdf)
• Basic functionality, task management and limited error handling
8.2.1 Loading SRP Initiator
To load the SRP module, either execute the “modprobe ib_srp” command after the
BXOFED driver is up, or change the value of SRP_LOAD in /etc/infiniband/
openib.conf to “yes”.
Note:
For the changes to take effect, run: /etc/init.d/openibd restart
Note:
When loading the ib_srp module, it is possible to set the module parameter
srp_sg_tablesize. This is the maximum number of gather/scatter entries per I/
O (default: 12).
8.2.2 Manually Establishing an SRP Connection
The following steps describe how to manually load an SRP connection between the Initiator and an SRP Target. Section 8.2.4 explains how to do this automatically.
• Make sure that the ib_srp module is loaded, the SRP Initiator is reachable by the SRP
Target, and that an SM is running.
Rev 1.50
Mellanox Technologies
Mellanox Technologies Confidential
69
• To establish a connection with an SRP Target and create an SRP (SCSI) device for that
target under /dev, use the following command:
echo -n id_ext=[GUID value],ioc_guid=[GUID value],dgid=[port GID
value],\
pkey=ffff,service_id=[service[0] value] > \
/sys/class/infiniband_srp/srp-mthca[hca number]-[port number]/
add_target
See Section 8.2.3 for instructions on how the parameters in this echo command may be obtained.
Notes:
• Execution of the above “echo” command may take some time
• The SM must be running while the command executes
• It is possible to include additional parameters in the echo command:
max_cmd_per_lun - Default: 63
max_sect (short for max_sectors) - sets the request size of a command
io_class - Default: 0x100 as in rev 16A of the specification
(In rev 10 the default was 0xff00)
initiator_ext - Please refer to Section 9 (Multiple Connections...)
• To list the new SCSI devices that have been added by the echo command, you may use
either of the following two methods:
• Execute “fdisk -l”. This command lists all devices; the new devices are included in
this listing.
• Execute “dmesg” or look at /var/log/messages to find messages with the
names of the new devices.
8.2.3 SRP Tools - ibsrpdm and srp_daemon
To assist in performing the steps in Section 6, the BXOFED distribution provides two utilities,
ibsrpdm and srp_daemon, which
• Detect targets on the fabric reachable by the Initiator (for Step 1)
• Output target attributes in a format suitable for use in the above “echo” command (Step
2)
The utilities can be found under /usr/sbin/, and are part of the srptools RPM that may
be installed using the Mellanox BXOFED installation. Detailed information regarding the
various options for these utilities are provided by their man pages.
Below, several usage scenarios for these utilities are presented.
ibsrpdm
ibsrpdm is using for the following tasks:
1.
Detecting reachable targets
Mellanox Technologies
Mellanox Technologies Confidential
Rev 1.50
SRP
70
a.
To detect all targets reachable by the SRP initiator via the default umad device (/dev/umad0),
execute the following command:
ibsrpdm
This command will output information on each SRP Target detected, in human-readable form.
Sample output:
IO Unit Info:
port LID:
0103
port GID:
fe800000000000000002c90200402bd5
change ID:
0002
max controllers: 0x10
controller[ 1]
GUID:
0002c90200402bd4
vendor ID: 0002c9
device ID: 005a44
IO class : 0100
ID:
LSI Storage Systems SRP Driver
200400a0b81146a1
service entries: 1
service[ 0]: 200400a0b81146a1 /
SRP.T10:200400A0B81146A1
b.
To detect all the SRP Targets reachable by the SRP Initiator via another umad device, use the following command:
ibsrpdm -d <umad device>
2.
Assistance in creating an SRP connection
a.
To generate output suitable for utilization in the “echo” command of Section 8.2.2, add the
‘-c’ option to ibsrpdm:
ibsrpdm -c
Sample output:
id_ext=200400A0B81146A1,ioc_guid=0002c90200402bd4,
dgid=fe800000000000000002c90200402bd5,pkey=ffff,
service_id=200400a0b81146a1
b. To establish a connection with an SRP Target using the output from the ‘libsrpdm -c’
example above, execute the following command:
echo -n id_ext=200400A0B81146A1,ioc_guid=0002c90200402bd4,
dgid=fe800000000000000002c90200402bd5,pkey=ffff, service_id=200400a0b81146a1 > /
sys/class/infiniband_srp/srp-mthca0-1/add_target
The SRP connection should now be up; the newly created SCSI devices should appear in the listing
obtained from the ‘fdisk -l’ command.
Rev 1.50
Mellanox Technologies
Mellanox Technologies Confidential
71
srp_daemon
The srp_daemon utility is based on ibsrpdm and extends its functionality. In addition to
the ibsrpdm functionality described above, srp_daemon can also
• Establish an SRP connection by itself (without the need to issue the “echo” command
described in Section 8.2.2)
• Continue running in background, detecting new targets and establishing SRP connections with them (daemon mode)
• Discover reachable SRP Targets given an infiniband HCA name and port, rather than
just by
/dev/umad<N> where <N> is a digit
• Enable High Availability operation (together with Device-Mapper Multipath)
• Have a configuration file that determines the targets to connect to
1.
srp_daemon commands equivalent to ibsrpdm:
"srp_daemon -a -o"
is equivalent to "ibsrpdm"
"srp_daemon -c -a -o" is equivalent to "ibsrpdm -c"
Note:
1.
These srp_daemon commands can behave differently than the equivalent
ibsrpdm command when /etc/srp_daemon.conf is not empty.
srp_daemon extensions to ibsrpdm
• To discover SRP Targets reachable from the HCA device <InfiniBand HCA name>
and the port <port num>, (and to generate output suitable for 'echo',) you may execute:
host1# srp_daemon -c -a -o -i <InfiniBand HCA name> -p <port
number>
Note:
To obtain the list of InfiniBand HCA device names, you can either use the
ibstat tool or run ‘ls /sys/class/infiniband’.
• To both discover the SRP Targets and establish connections with them, just add the e option to the above command.
• Executing srp_daemon over a port without the -a option will only display the reachable targets via the port and to which the initiator is not connected. If executing with
the -e option it is better to omit -a.
• It is recommended to use the -n option. This option adds the initiator_ext to the connecting string. (See Section 8.2.5 for more details).
• srp_daemon has a configuration file that can be set, where the default is /etc/
srp_daemon.conf. Use the -f to supply a different configuration file that configures
the targets srp_daemon is allowed to connect to. The configuration file can also be
used to set values for additional parameters (e.g., max_cmd_per_lun, max_sect).
• A continuous background (daemon) operation, providing an automatic ongoing
detection and connection capability. See Section 8.2.4.
Mellanox Technologies
Mellanox Technologies Confidential
Rev 1.50
SRP
72
8.2.4 Automatic Discovery and Connection to Targets
• Make sure that the ib_srp module is loaded, the SRP Initiator can reach an SRP Target,
and that an SM is running.
• To connect to all the existing Targets in the fabric, run “srp_daemon -e -o”. This utility will scan the fabric once, connect to every Target it detects, and then exit.
Note:
srp_daemon will follow the configuration it finds in /etc/srp_daemon.conf.
Thus, it will ignore a target that is disallowed in the configuration file.
• To connect to all the existing Targets in the fabric and to connect to new targets that will
join the fabric, execute srp_daemon -e. This utility continues to execute until it is either
killed by the user or encounters connection errors (such as no SM in the fabric).
• To execute SRP daemon as a daemon you may run “run_srp_daemon” (found under
/usr/sbin/), providing it with the same options used for running srp_daemon.
Note:
Make sure only one instance of run_srp_daemon runs per port.
• To execute SRP daemon as a daemon on all the ports, run “srp_daemon.sh” (found
under
/usr/sbin/). srp_daemon.sh sends its log to /var/log/srp_daemon.log.
• It is possible to configure this script to execute automatically when the InfiniBand
driver starts by changing the value of SRPHA_ENABLE in /etc/infiniband/
openib.conf to “yes”. However, this option also enables SRP High Availability that
has some more features – see Section 8.2.6).
Note:
For the changes in openib.conf to take effect, run:
/etc/init.d/openibd restart
8.2.5 Multiple Connections from Initiator IB Port to the Target
Some system configurations may need multiple SRP connections from the SRP Initiator to
the same SRP Target: to the same Target IB port, or to different IB ports on the same Target HCA.
In case of a single Target IB port, i.e., SRP connections use the same path, the configuration is enabled using a different initiator_ext value for each SRP connection. The
initiator_ext value is a 16-hexadecimal-digit value specified in the connection command.
Also in case of two physical connections (i.e., network paths) from a single initiator IB
port to two different IB ports on the same Target HCA, there is need for a different
initiator_ext value on each path. The conventions is to use the Target port GUID as the
initiator_ext value for the relevant path.
If you use srp_daemon with -n flag, it automatically assigns initiator_ext values according
to this convention. For example:
id_ext=200500A0B81146A1,ioc_guid=0002c90200402bec,\
dgid=fe800000000000000002c90200402bed,pkey=ffff,\
service_id=200500a0b81146a1,initiator_ext=ed2b400002c90200
Rev 1.50
Mellanox Technologies
Mellanox Technologies Confidential
73
Notes:
1.
2.
3.
It is recommended to use the -n flag for all srp_daemon invocations.
ibsrpdm does not have a corresponding option.
srp_daemon.sh always uses the -n option (whether invoked manually by the user, or
automatically at startup by setting SRPHA_ENABLE to yes).
8.2.6 High Availability (HA)
Overview
High Availability works using the Device-Mapper (DM) multipath and the SRP daemon.
Each initiator is connected to the same target from several ports/HCAs. The DM multipath
is responsible for joining together different paths to the same target and for fail-over
between paths when one of them goes offline. Multipath will be executed on newly joined
SCSI devices.
Each initiator should execute several instances of the SRP daemon, one for each port. At
startup, each SRP daemon detects the SRP Targets in the fabric and sends requests to the
ib_srp module to connect to each of them. These SRP daemons also detect targets that
subsequently join the fabric, and send the ib_srp module requests to connect to them as
well.
Operation
When a path (from port1) to a target fails, the ib_srp module starts an error recovery process. If this process gets to the reset_host stage and there is no path to the target from this
port, ib_srp will remove this scsi_host. After the scsi_host is removed, multipath switches
to another path to this target (from another port/HCA).
When the failed path recovers, it will be detected by the SRP daemon. The SRP daemon
will then request ib_srp to connect to this target. Once the connection is up, there will be a
new scsi_host for this target. Multipath will be executed on the devices of this host, returning to the original state (prior to the failed path).
Prerequisites
Installation for RHEL4/5: (Execute once)
• Verify that the standard device-mapper-multipath rpm is installed. If not, install it from
the RHEL distribution.
Installation for SLES10: (Execute once)
• Verify that multipath is installed. If not, take it from the installation (you may use
‘yast’).
• Update udev: (Execute once - for manual activation of High Availability only)
• Add a file to /etc/udev/rules.d/ (you can call it 91-srp.rules). This file should have one
line:
Mellanox Technologies
Mellanox Technologies Confidential
Rev 1.50
SRP
74
ACTION=="add", KERNEL=="sd*[!0-9]", RUN+="/sbin/multipath
%M:%m"
Note:
When SRPHA_ENABLE is set to "yes" (see Automatic Activation of High
Availability below), this file is created upon each boot of the driver and is
deleted when the driver is unloaded.
Manual Activation of High Availability
Initialization: (Execute after each boot of the driver)
1.
2.
3.
4.
Execute modprobe dm-multipath
Execute modprobe ib-srp
Make sure you have created file /etc/udev/rules.d/91-srp.rules as described above.
Execute for each port and each HCA:
srp_daemon -c -e -R 300 -i <InfiniBand HCA name> -p <port number>
This step can be performed by executing srp_daemon.sh, which sends its log to /var/log/srp_daemon.log.
Now it is possible to access the SRP LUNs on /dev/mapper/.
Note:
It is possible for regular (non-SRP) LUNs to also be present; the SRP LUNs
may be identified by their names. You can configure the /etc/multipath.conf file to change multipath behavior.
Note:
It is also possible that the SRP LUNs will not appear under /dev/mapper/
. This can occur if the SRP LUNs are in the black-list of multipath. Edit the
‘blacklist’ section in /etc/multipath.conf and make sure the SRP
LUNs are not black-listed.
Automatic Activation of High Availability
• Set the value of SRPHA_ENABLE in /etc/infiniband/openib.conf to
"yes".
Note:
For the changes in openib.conf to take effect, run:
/etc/init.d/openibd restart
• From the next loading of the driver it will be possible to access the SRP LUNs on /dev/
mapper/
Note:
It is possible that regular (not SRP) LUNs may also be present; the SRP LUNs
may be identified by their name.
• It is possible to see the output of the SRP daemon in /var/log/srp_daemon.log
8.2.7 Shutting Down SRP
SRP can be shutdown by using “rmmod ib_srp”, or by stopping the BXOFED driver (“/
etc/init.d/openibd stop”), or as a by-product of a complete system shutdown.
Rev 1.50
Mellanox Technologies
Mellanox Technologies Confidential
75
Prior to shutting down SRP, remove all references to it. The actions you need to take
depend on the way SRP was loaded. There are three cases:
1.
Without High Availability
When working without High Availability, you should unmount the SRP partitions that were mounted
prior to shutting down SRP.
2.
After Manual Activation of High Availability
If you manually activated SRP High Availability, perform the following steps:
3.
a.
Unmount all SRP partitions that were mounted.
b.
Kill the SRP daemon instances.
c.
Make sure there are no multipath instances running. If there are multiple instances, wait for them
to end or kill them.
d.
Run: multipath -F
After Automatic Activation of High Availability
If SRP High Availability was automatically activated, SRP shutdown must be part of the driver shutdown
("/etc/init.d/openibd stop") which performs Steps 2-4 of case b above. However, you still have to
unmount all SRP partitions that were mounted before driver shutdown.
Mellanox Technologies
Mellanox Technologies Confidential
Rev 1.50
MPI
76
9
MPI
9.1
Overview
Mellanox BXOFED for Linux includes the following MPI implementations over InfiniBand:
• Open MPI – an open source MPI-2 implementation by the Open MPI Project
• OSU MVAPICH – an MPI-1 implementation by Ohio State University
These MPI implementations, along with MPI benchmark tests such as OSU BW/LAT,
Intel MPI Benchmark, and Presta, are installed on your machine as part of the Mellanox
BXOFED for Linux installation. Table 6 lists some useful MPI links.
Table 6 - Useful MPI Links
MPI Standard
http://www-unix.mcs.anl.gov/mpi
Open MPI
http://www.open-mpi.org
MVAPICH MPI
http://nowlab.cse.ohio-state.edu/projects/mpi-iba/
MPI Forum
http://www.mpi-forum.org
This chapter includes the following sections:
• Prerequisites for Running MPI (page 76)
• MPI Selector - Which MPI Runs (page 77)
• Compiling MPI Applications (page 78)
• OSU MVAPICH Performance (page 79)
• Open MPI Performance (page 82)
9.2
Prerequisites for Running MPI
For launching multiple MPI processes on multiple remote machines, the MPI standard
provides a launcher program that requires automatic login (i.e., password-less) onto the
remote machines. SSH (Secure Shell) is both a computer program and a network protocol
that can be used for logging and running commands on remote computers and/or servers.
9.2.1 SSH Configuration
The following steps describe how to configure password-less access over SSH:
Step 1
Rev 1.50
Generate an ssh key on the initiator machine (host1).
Mellanox Technologies
Mellanox Technologies Confidential
77
host1$ ssh-keygen -t rsa
Generating public/private rsa key pair.
Enter file in which to save the key (/home/<username>/.ssh/id_rsa):
Enter passphrase (empty for no passphrase):
Enter same passphrase again:
Your identification has been saved in /home/<username>/.ssh/id_rsa.
Your public key has been saved in /home/<username>/.ssh/id_rsa.pub.
The key fingerprint is:
38:1b:29:df:4f:08:00:4a:0e:50:0f:05:44:e7:9f:05 <username>@host1
Step 2.
Check that the public and private keys have been generated.
host1$ cd /home/<username>/.ssh/
host1$ ls
host1$ ls -la
total 40
drwx------
Step 3.
2 root root 4096 Mar
5 04:57 .
drwxr-x--- 13 root root 4096 Mar
4 18:27 ..
-rw-------
1 root root 1675 Mar
5 04:57 id_rsa
-rw-r--r--
1 root root
5 04:57 id_rsa.pub
404 Mar
Check the public key.
host1$ cat id_rsa.pub
ssh-rsa
AAAAB3NzaC1yc2EAAAABIwAAAQEA1zVY8VBHQh9okZN7OA1ibUQ74RXm4zHeczyVxpY
HaDPyDmqezbYMKrCIVzd10bH+ZkC0rpLYviU0oUHd3fvNTfMs0gcGg08PysUf+12FyY
jira2P1xyg6mkHLGGqVutfEMmABZ3wNCUg6J2X3G/uiuSWXeubZmbXcMrP/
w4IWByfH8ajwo6A5WioNbFZElbYeeNfPZf4UNcgMOAMWp64sL58tkt32F+RGmyLXQWZ
L27Synsn6dHpxMqBorXNC0ZBe4kTnUqm63nQ2z1qVMdL9FrCma1xIOu9+SQJAjwONev
aMzFKEHe7YHg6YrNfXunfdbEurzB524TpPcrodZlfCQ== <username>@host1
Step 4.
Now you need to add the public key to the authorized_keys2 file on the target
machine.
host1$ cat id_rsa.pub | xargs ssh host2 \
"echo >>/home/<username>/.ssh/authorized_keys2"
<username>@host2's password:
// Enter password
host1$
For a local machine, simply add the key to authorized_keys2.
host1$ cat id_rsa.pub >> authorized_keys2
Step 5.
Test.
host1$ ssh
host2
uname
Linux
9.3
MPI Selector - Which MPI Runs
Mellanox BXOFED contains a simple mechanism for system administrators and end-users
to select which MPI implementation they want to use. The MPI selector functionality is
Mellanox Technologies
Mellanox Technologies Confidential
Rev 1.50
MPI
78
not specific to any MPI implementation; it can be used with any implementation that provides shell startup files that correctly set the environment for that MPI. The Mellanox
BXOFED installer will automatically add MPI selector support for each MPI that it
installs. Additional MPI's not known by the Mellanox BXOFED installer can be listed in
the MPI selector; see the mpi-selector(1) man page for details.
Note that MPI selector only affects the default MPI environment for future shells. Specifically, if you use MPI selector to select MPI implementation ABC, this default selection
will not take effect until you start a new shell (e.g., logout and login again). Other packages (such as environment modules) provide functionality that allows changing your environment to point to a new MPI implementation in the current shell. The MPI selector was
not meant to duplicate or replace that functionality.
The MPI selector functionality can be invoked in one of two ways:
1.
2.
9.4
The mpi-selector-menu command.
This command is a simple, menu-based program that allows the selection of the system-wide
MPI (usually only settable by root) and a per-user MPI selection. It also shows what the current selections are. This command is recommended for all users.
The mpi-selector command.
This command is a CLI-equivalent of the mpi-selector-menu, allowing for the same functionality as mpi-selector-menu but without the interactive menus and prompts. It is suitable
for scripting.
Compiling MPI Applications
Note:
A valid Fortran compiler must be present in order to build the MVAPICH
MPI stack and tests.
The following compilers are supported by Mellanox BXOFED's MVAPICH and Open
MPI packages: Gcc, Intel and PGI. The install script prompts the user to choose the compiler with which to install the MVAPICH and Open MPI RPMs. Note that more than one
compiler can be selected simultaneously, if desired.
Compiling MVAPICH Applications
Please refer to http://mvapich.cse.ohio-state.edu/support/mvapich_user_guide.html.
To review the default configuration of the installation, check the default configuration file:
/usr/mpi/<compiler>/mvapich-<mvapich-ver>/etc/mvapich.conf
Compiling Open MPI Applications
Please refer to http://www.open-mpi.org/faq/?category=mpi-apps.
Rev 1.50
Mellanox Technologies
Mellanox Technologies Confidential
79
9.5
OSU MVAPICH Performance
9.5.1 Requirements
• At least two nodes. Example: host1, host2
• Machine file: Includes the list of machines. Example:
host1$ cat /home/<username>/cluster
host1
host2
host1$
9.5.2 Bandwidth Test Performance
To run the OSU Bandwidth test, enter:
host1$ /usr/mpi/gcc/mvapich-<mvapich-ver>/bin/mpirun_rsh -np 2 \
-hostfile /home/<username>/cluster \
/usr/mpi/gcc/mvapich-<mvapich-ver>/tests/osu_benchmarks-<osu-ver>/
osu_bw
# OSU MPI Bandwidth Test v3.0
# Size
Bandwidth (MB/s)
1
4.62
2
8.91
4
17.70
8
32.59
16
60.13
32
113.21
64
194.22
128
293.20
256
549.43
512
883.23
1024
1096.65
2048
1165.60
4096
1233.91
8192
1230.90
16384
1308.92
32768
1414.75
65536
1465.28
131072
1500.36
262144
1515.26
524288
1525.20
1048576
1527.63
2097152
1530.48
4194304
1537.50
Mellanox Technologies
Mellanox Technologies Confidential
Rev 1.50
MPI
80
9.5.3 Latency Test Performance
To run the OSU Latency test, enter:
host1$ /usr/mpi/gcc/mvapich-<mvapich-ver>/bin/mpirun_rsh -np 2 \
-hostfile /home/<username>/cluster \
/usr/mpi/gcc/mvapich-<mvapich-ver>/tests/osu_benchmarks-<osu-ver>/
osu_latency
# OSU MPI Latency Test v3.0
# Size
Latency (us)
0
1.20
1
1.21
2
1.21
4
1.21
8
1.23
16
1.24
32
1.33
64
1.49
128
2.66
256
3.08
512
3.61
1024
4.82
2048
6.09
4096
8.62
8192
13.59
16384
18.12
32768
28.81
65536
50.38
131072
93.70
262144
178.77
524288
349.31
1048576
689.25
2097152
1371.04
4194304
2739.16
9.5.4 Intel MPI Benchmark
To run the Intel MPI Benchmark test, enter:
host1$ /usr/mpi/gcc/mvapich-<mvapich-ver>/bin/mpirun_rsh -np 2 \
-hostfile /home/<username>/cluster \
/usr/mpi/gcc/mvapich-<mvapich-ver>/tests/IMB-<IMB-ver>/IMB-MPI1
#--------------------------------------------------#
Intel (R) MPI Benchmark Suite V3.0, MPI-1 part
#---------------------------------------------------
Rev 1.50
Mellanox Technologies
Mellanox Technologies Confidential
81
#
#
#
#
#
#
#
#
#
#
#
#
#
#
#
#
Date
:
Machine
:
System
:
Release
:
Version
:
MPI Version
:
MPI Thread Environment:
Sun Mar 2 19:56:42 2008
x86_64
Linux
2.6.16.21-0.8-smp
#1 SMP Mon Jul 3 18:25:39 UTC 2006
1.2
MPI_THREAD_FUNNELED
Minimum message length in bytes:
Maximum message length in bytes:
0
4194304
MPI_Datatype
MPI_Datatype for reductions
MPI_Op
MPI_BYTE
MPI_FLOAT
MPI_SUM
:
:
:
# List of Benchmarks to run:
#
#
#
#
#
#
#
#
#
#
#
#
#
PingPong
PingPing
Sendrecv
Exchange
Allreduce
Reduce
Reduce_scatter
Allgather
Allgatherv
Alltoall
Alltoallv
Bcast
Barrier
#--------------------------------------------------# Benchmarking PingPong
# #processes = 2
#--------------------------------------------------#bytes #repetitions
t[usec]
Mbytes/sec
0
1000
1.25
0.00
Mellanox Technologies
Mellanox Technologies Confidential
Rev 1.50
MPI
82
1
2
4
8
16
32
64
128
256
512
1024
2048
4096
8192
16384
32768
65536
131072
262144
524288
1048576
2097152
4194304
1000
1000
1000
1000
1000
1000
1000
1000
1000
1000
1000
1000
1000
1000
1000
1000
640
320
160
80
40
20
10
1.24
1.25
1.23
1.26
1.29
1.36
1.52
2.67
3.03
3.64
4.89
6.30
8.91
14.07
18.85
30.47
53.67
99.78
191.80
373.92
742.31
1475.20
2956.95
0.77
1.52
3.09
6.07
11.83
22.51
40.25
45.74
80.48
134.22
199.69
309.85
438.24
555.20
828.93
1025.75
1164.57
1252.80
1303.44
1337.19
1347.14
1355.75
1352.75
#-- OUTPUT TRUNCATED
9.6
Open MPI Performance
9.6.1 Requirements
• At least two nodes. Example: host1, host2
• Machine file: Includes the list of machines. Example:
host1$ cat /home/<username>/cluster
host1
host2
host1$
9.6.2 Bandwidth Test Performance
To run the OSU Bandwidth test, enter:
host1$ /usr/mpi/gcc/openmpi-<ompi-ver>/bin/mpirun -np 2 \
Rev 1.50
Mellanox Technologies
Mellanox Technologies Confidential
83
--mca mpi_leave_pinned 1 -hostfile /home/<username>/cluster \
/usr/mpi/gcc/openmpi-<ompi-ver>/tests/osu_benchmarks-<osu-ver>/
osu_bw
# OSU MPI Bandwidth Test v3.0
# Size
Bandwidth (MB/s)
1
1.12
2
2.24
4
4.43
8
8.96
16
17.38
32
34.69
64
69.31
128
121.29
256
212.70
512
326.50
1024
461.78
2048
597.85
4096
543.06
8192
829.64
16384
1137.22
32768
1386.08
65536
1520.89
131072
1622.73
262144
1659.33
524288
1679.36
1048576
1675.35
2097152
1668.89
4194304
1671.78
9.6.3 Latency Test Performance
To run the OSU Latency test, enter:
host1$ /usr/mpi/gcc/openmpi-<ompi-ver>/bin/mpirun -np 2 \
--mca mpi_leave_pinned 1 -hostfile /home/<username>/cluster \
/usr/mpi/gcc/openmpi-<ompi-ver>/tests/osu_benchmarks-<osu-ver>/
osu_latency
# OSU MPI Latency Test v3.0
# Size
Latency (us)
0
1.23
1
1.37
2
1.55
Mellanox Technologies
Mellanox Technologies Confidential
Rev 1.50
MPI
84
4
8
16
32
64
128
256
512
1024
2048
4096
8192
16384
32768
65536
131072
262144
524288
1048576
2097152
4194304
1.54
1.55
1.58
1.59
1.59
1.78
2.05
2.69
3.75
6.14
10.07
12.77
18.36
30.52
48.92
93.18
171.92
341.08
737.97
1729.27
4226.58
9.6.4 Intel MPI Benchmark
To run the Intel MPI Benchmark test, enter:
host1$ /usr/mpi/gcc/openmpi-<ompi-ver>/bin/mpirun -np 2 \
--mca mpi_leave_pinned 1 -hostfile /home/<username>/cluster \
/usr/mpi/gcc/openmpi-<ompi-ver>/tests/IMB-<IMB-ver>/IMB-MPI1
#--------------------------------------------------#
Intel (R) MPI Benchmark Suite V3.0, MPI-1 part
#--------------------------------------------------# Date
: Mon Mar 10 12:57:18 2008
# Machine
: x86_64
# System
: Linux
# Release
: 2.6.16.21-0.8-smp
# Version
: #1 SMP Mon Jul 3 18:25:39 UTC 2006
# MPI Version
: 2.0
# MPI Thread Environment: MPI_THREAD_SINGLE
# Minimum message length in bytes:
0
# Maximum message length in bytes:
4194304
#
Rev 1.50
# MPI_Datatype
:
MPI_BYTE
# MPI_Datatype for reductions
:
MPI_FLOAT
# MPI_Op
:
MPI_SUM
Mellanox Technologies
Mellanox Technologies Confidential
85
#
# List of Benchmarks to run:
# PingPong
# PingPing
# Sendrecv
# Exchange
# Allreduce
# Reduce
# Reduce_scatter
# Allgather
# Allgatherv
# Alltoall
# Alltoallv
# Bcast
# Barrier
#--------------------------------------------------# Benchmarking PingPong
# #processes = 2
#--------------------------------------------------#bytes #repetitions
t[usec]
Mbytes/sec
0
1000
1.47
0.00
1
1000
1.57
0.61
2
1000
1.56
1.22
4
1000
1.53
2.49
8
1000
1.55
4.92
16
1000
1.60
9.52
32
1000
1.62
18.86
37.90
64
1000
1.61
128
1000
1.80
67.65
256
1000
2.05
119.26
512
1000
2.67
183.08
1024
1000
3.74
260.97
2048
1000
6.15
317.84
4096
1000
10.15
384.74
8192
1000
12.75
612.84
16384
1000
18.47
845.85
32768
1000
30.84
1013.28
65536
640
48.88
1278.77
131072
320
86.36
1447.43
262144
160
163.91
1525.26
524288
80
335.82
1488.90
1048576
40
726.25
1376.94
2097152
20
1786.35
1119.60
4194304
10
4253.59
940.38
#-- OUTPUT TRUNCATED
Mellanox Technologies
Mellanox Technologies Confidential
Rev 1.50
Quality of Service
86
10 Quality of Service
10.1 Overview
Quality of Service (QoS) requirements stem from the realization of I/O consolidation over
an IB network. As multiple applications and ULPs share the same fabric, a means is
needed to control their use of network resources.
Figure 4: I/O Consolidation Over InfiniBand
Servers
Unified I/O
Administrator
QoS
Manager
IPC
Storage
InfiniBand Subnet
Net.
Filer
IB-Ethernet
Gateway
IB-Fibre
Channel
Gateway
Block Storage
QoS over Mellanox BXOFED for Linux is discussed in Chapter 11, “OpenSM – Subnet
Manager”.
The basic need is to differentiate the service levels provided to different traffic flows, such
that a policy can be enforced and can control each flow utilization of fabric resources.
The InfiniBand Architecture Specification defines several hardware features and management interfaces for supporting QoS:
• Up to 15 Virtual Lanes (VL) carry traffic in a non-blocking manner
• Arbitration between traffic of different VLs is performed by a two-priority-level
weighted round robin arbiter. The arbiter is programmable with a sequence of (VL,
weight) pairs and a maximal number of high priority credits to be processed before low
priority is served
• Packets carry class of service marking in the range 0 to 15 in their header SL field
• Each switch can map the incoming packet by its SL to a particular output VL, based on
a programmable table VL=SL-to-VL-MAP(in-port, out-port, SL)
• The Subnet Administrator controls the parameters of each communication flow by providing them as a response to Path Record (PR) or MultiPathRecord (MPR) queries
Rev 1.50
Mellanox Technologies
Mellanox Technologies Confidential
87
DiffServ architecture (IETF RFC 2474 & 2475) is widely used in highly dynamic fabrics.
The following subsections provide the functional definition of the various software elements that enable a DiffServ-like architecture over the Mellanox BXOFED software stack.
10.2 QoS Architecture
QoS functionality is split between the SM/SA, CMA and the various ULPs. We take the
“chronology approach” to describe how the overall system works.
1.
2.
3.
4.
5.
6.
The network manager (human) provides a set of rules (policy) that define how the
network is being configured and how its resources are split to different QoS-Levels.
The policy also define how to decide which QoS-Level each application or ULP or
service use.
The SM analyzes the provided policy to see if it is realizable and performs the necessary fabric setup. Part of this policy defines the default QoS-Level of each partition.
The SA is enhanced to match the requested Source, Destination, QoS-Class, Service-ID, PKey against the policy, so clients (ULPs, programs) can obtain a policy
enforced QoS. The SM may also set up partitions with appropriate IPoIB broadcast
group. This broadcast group carries its QoS attributes: SL, MTU, RATE, and Packet
Lifetime.
IPoIB is being setup. IPoIB uses the SL, MTU, RATE and Packet Lifetime available
on the multicast group which forms the broadcast group of this partition.
MPI which provides non IB based connection management should be configured to
run using hard coded SLs. It uses these SLs for every QP being opened.
ULPs that use CM interface (like SRP) have their own pre-assigned Service-ID and
use it while obtaining PathRecord/MultiPathRecord (PR/MPR) for establishing connections. The SA receiving the PR/MPR matches it against the policy and returns the
appropriate PR/MPR including SL, MTU, RATE and Lifetime.
ULPs and programs (e.g. SDP) use CMA to establish RC connection provide the
CMA the target IP and port number. ULPs might also provide QoS-Class. The CMA
then creates Service-ID for the ULP and passes this ID and optional QoS-Class in
the PR/MPR request. The resulting PR/MPR is used for configuring the connection
QP.
PathRecord and MultiPathRecord Enhancement for QoS:
As mentioned above, the PathRecord and MultiPathRecord attributes are enhanced to
carry the Service-ID which is a 64bit value. A new field QoS-Class is also provided.
A new capability bit describes the SM QoS support in the SA class port info. This
approach provides an easy migration path for existing access layer and ULPs by not introducing new set of PR/MPR attributes.
10.3 Supported Policy
The QoS policy, which is specified in a stand-alone file, is divided into the following four
subsections:
Mellanox Technologies
Mellanox Technologies Confidential
Rev 1.50
Quality of Service
88
I. Port Group
A set of CAs, Routers or Switches that share the same settings. A port group might be a
partition defined by the partition manager policy, list of GUIDs, or list of port names based
on NodeDescription.
II. Fabric Setup
Defines how the SL2VL and VLArb tables should be setup.
Note:
In BXOFED this part of the policy is ignored. SL2VL and VLArb tables
should be configured in the OpenSM options file (opensm.opts).
III. QoS-Levels Definition
This section defines the possible sets of parameters for QoS that a client might be mapped
to. Each set holds SL and optionally: Max MTU, Max Rate, Packet Lifetime and Path Bits.
Note:
Path Bits are not implemented in BXOFED.
IV. Matching Rules
A list of rules that match an incoming PR/MPR request to a QoS-Level. The rules are processed in order such as the first match is applied. Each rule is built out of a set of match
expressions which should all match for the rule to apply. The matching expressions are
defined for the following fields:
• SRC and DST to lists of port groups
• Service-ID to a list of Service-ID values or ranges
• QoS-Class to a list of QoS-Class values or ranges
10.4 CMA features
The CMA interface supports Service-ID through the notion of port space as a prefix to the
port number, which is part of the sockaddr provided to rdma_resolve_add(). The CMA
also allows the ULP (like SDP) to propagate a request for a specific QoS-Class. The CMA
uses the provided QoS-Class and Service-ID in the sent PR/MPR.
10.5 IPoIB
IPoIB queries the SA for its broadcast group information and uses the SL, MTU, RATE
and Packet Lifetime available on the multicast group which forms this broadcast group.
10.6 SDP
SDP uses CMA for building its connections. The Service-ID for SDP is
0x000000000001PPPP, where PPPP are 4 hexadecimal digits holding the remote TCP/IP
Port Number to connect to.
Rev 1.50
Mellanox Technologies
Mellanox Technologies Confidential
89
10.7 RDS
RDS uses CMA and thus it is very close to SDP. The Service-ID for RDS is
0x000000000106PPPP, where PPPP are 4 hexadecimal digits holding the TCP/IP Port
Number that the protocol connects to.
The default port number for RDS is 0x48CA, which makes a default Service-ID
0x00000000010648CA.
10.8 SRP
The current SRP implementation uses its own CM callbacks (not CMA). So SRP fills in
the Service-ID in the PR/MPR by itself and use that information in setting up the QP.
SRP Service-ID is defined by the SRP target I/O Controller (it also complies with IBTA
Service-ID rules). The Service-ID is reported by the I/O Controller in the ServiceEntries
DMA attribute and should be used in the PR/MPR if the SA reports its ability to handle
QoS PR/MPRs.
10.9 OpenSM Features
The QoS related functionality that is provided by OpenSM—the Subnet Manager
described in Chapter 11—can be split into two main parts:
I. Fabric Setup
During fabric initialization, the Subnet Manager parses the policy and apply its settings to
the discovered fabric elements.
II. PR/MPR Query Handling
OpenSM enforces the provided policy on client request. The overall flow for such requests
is: first the request is matched against the defined match rules such that the target QoSLevel definition is found. Given the QoS-Level a path(s) search is performed with the
given restrictions imposed by that level.
Note:
QoS in OpenSM is described in detail in Chapter 11.
Mellanox Technologies
Mellanox Technologies Confidential
Rev 1.50
OpenSM – Subnet Manager
90
11 OpenSM – Subnet Manager
11.1 Overview
OpenSM is an InfiniBand compliant Subnet Manager (SM). It is provided as a fixed flow
executable called opensm, accompanied by a testing application called osmtest. OpenSM
implements an InfiniBand compliant SM according to the InfiniBand Architecture Specification chapters: Management Model (13), Subnet Management (14), and Subnet Administration (15).
11.2 opensm Description
opensm is an InfiniBand compliant Subnet Manager and Subnet Administrator that runs on
top of the Mellanox BXOFED stack. opensm performs the InfiniBand specification’s
required tasks for initializing InfiniBand hardware. One SM must be running for each
InfiniBand subnet.
opensm also provides an experimental version of a performance manager.
opensm defaults were designed to meet the common case usage on clusters with up to a
few hundred nodes. Thus, in this default mode, opensm will scan the IB fabric, initialize
it, and sweep occasionally for changes.
opensm attaches to a specific IB port on the local machine and configures only the fabric
connected to it. (If the local machine has other IB ports, opensm will ignore the fabrics
connected to those other ports). If no port is specified, opensm will select the first “best”
available port. opensm can also present the available ports and prompt for a port number to
attach to.
By default, the opensm run is logged to two files: /var/log/messages and /var/
log/opensm.log. The first file will register only general major events, whereas the
second file will include details of reported errors. All errors reported in this second file
should be treated as indicators of IB fabric health issues. (Note that when a fatal and nonrecoverable error occurs, opensm will exit.) Both log files should include the message
"SUBNET UP" if opensm was able to setup the subnet correctly.
11.2.1 Syntax
opensm [OPTIONS]
where OPTIONS are:
--version
Prints OpenSM version and exits
-F, --config <config file>
The name of the OpenSM config file. If not specified, /etc/opensm/opensm.conf will be used (if it
exists).
Rev 1.50
Mellanox Technologies
Mellanox Technologies Confidential
91
-c, --create-config <file name>
OpenSM will dump its configuration to the specified
file and exit. This is one way to generate an OpenSM
configuration file template.
-g, --guid <GUID in hexadecimal>
This option specifies the local port GUID value
with which OpenSM should bind. OpenSM may be bound
to 1 port at a time. If the GUID given is 0,
OpenSM displays a list of possible port GUIDs and
waits for user input. Without -g, OpenSM tries to
use the default port.
-l, --lmc <LMC value>
This option specifies the subnet's LMC value.
The number of LIDs assigned to each port is 2^LMC.
The LMC value must be in the range 0-7.
LMC
values > 0 allow multiple paths between ports. LMC
values > 0 should only be used if the subnet topology actually provides multiple paths between ports
(i.e., multiple interconnects between switches).
Without -l OpenSM defaults to LMC = 0, which allows
one path between any two ports.
-p, --priority <priority value>
This option specifies the SMA’s priority. This
will affect the handover cases, where the master is
chosen by priority and GUID. Range is 0 (default
and lowest priority) to 15 (highest).
-smkey <SM_Key_value>
This option specifies the SMA’s SM_Key (64 bits).
This will affect SM authentication. Note that
OpenSM version 3.2.1 and below used 1 as the default
value in a host byte order; now it is fixed but you
may need this option to interoperate with an old
OpenSM running on a little endian machine.
-r, --reassign_lids
This option causes OpenSM to reassign LIDs to all
end nodes. Specifying -r on a running subnet may
disrupt subnet traffic. Without -r, OpenSM
attempts to preserve existing LID assignments
resolving multiple use of same LID.
-R, --routing_engine <Routing engine names>
This option chooses routing engine(s) to use instead
of Min Hop algorithm (default). Multiple routing
engines can be specified separated by commas so that
Mellanox Technologies
Mellanox Technologies Confidential
Rev 1.50
OpenSM – Subnet Manager
92
specific ordering of routing algorithms will be
tried if earlier routing engines fail. Supported
engines: minhop, updn, file, ftree, lash, dor
-A, --ucast_cache
This option enables unicast routing cache and prevents routing recalculation (which is a heavy task
in a large cluster) when there was no topology
change detected during the heavy sweep, or when the
topology change does not require new routing calculation, e.g. when one or more CAs/RTRs/leaf
switches going down, or one or more of these
nodes coming back after being down. A very common
case that is handled by the unicast routing cache
is host reboot, which otherwise would cause two full
routing recalculations: one when the host goes
down, and the other when the host comes back
online.
-z, --connect_roots
This option enforces a routing engine (currently
up/down only) to make connectivity between root
switches and in this way to be fully IBA complaint. In many cases this can violate "pure" deadlock free algorithm, so use it carefully.
-M, --lid_matrix_file <file name>
This option specifies the name of the lid matrix
dump file from where switch lid matrices (min hops
tables will be loaded.
-U, --lfts_file <file name>
This option specifies the name of the LFTs file
from where switch forwarding tables will be loaded.
-S, --sadb_file <file name>
This option specifies the name of the SA DB
file from where SA database will be loaded.
dump
-a, --root_guid_file <file name>
Set the root nodes for the Up/Down or Fat-Tree
routing algorithm to the guids provided in the given
file (one to a line).
-u, --cn_guid_file <file name>
Set the compute nodes for the Fat-Tree routing algorithm to the guids provided in the given file (one to
a line).
Rev 1.50
Mellanox Technologies
Mellanox Technologies Confidential
93
-m, --ids_guid_file <file name>
Name of the map file with set of the IDs which will
be used by Up/Down routing algorithm instead of
node GUIDs (format: <guid> <id> per line).
-X, --guid_routing_order_file <file name>
Set the order port guids will be routed for the
MinHop and Up/Down routing algorithms to the guids
provided in the given file (one to a line).
-o, --once
This option causes OpenSM to configure the subnet
once, then exit. Ports remain in the ACTIVE state.
-s, --sweep <interval value>
This option specifies the number of seconds
between subnet sweeps.
Specifying -s 0 disables
sweeping. Without -s, OpenSM defaults to a sweep
interval of 10 seconds.
-t, --timeout <value>
This option specifies the time in milliseconds used
for transaction timeouts. Specifying -t 0 disables
timeouts. Without -t, OpenSM defaults to a timeout
value of 200 milliseconds.
-maxsmps <number>
This option specifies the number of VL15 SMP MADs
allowed on the wire at any one time. Specifying maxsmps 0 allows unlimited outstanding SMPs. Without -maxsmps, OpenSM defaults to a maximum of 4 outstanding SMPs.
-console [off | local | socket | loopback]
This option brings up the OpenSM console (default
off). Note that the socket and loopback options
will only be available if OpenSM was built with -enable-console-socket.
-console-port <port>
Specify an alternate telnet port for the socket console (default 10000). Note that this option only
appears if OpenSM was built with --enable-consolesocket.
-i, -ignore-guids <equalize-ignore-guids-file>
This option provides the means to define a set of
ports (by node guid and port number) that will be
ignored by the link load equalization algorithm.
Mellanox Technologies
Mellanox Technologies Confidential
Rev 1.50
OpenSM – Subnet Manager
94
-x, --honor_guid2lid
This option forces OpenSM to honor the guid2lid
file, when it comes out of Standby state, if
such file
exists
under OSM_CACHE_DIR, and is
valid. By default, this is FALSE.
-f, --log_file <file name>
This option defines the log to be the given file.
By default, the log goes to /var/log/opensm.log.
For the log to go to standard output use -f stdout.
-L, --log_limit <size in MB>
This option defines maximal log file size in MB.
When specified the log file will be truncated upon
reaching this limit.
-e, --erase_log_file
This option will cause deletion of the log file (if
it previously exists). By default, the log file is
accumulative.
-P, --Pconfig <partition config file>
This option defines the optional partition configuration file. The default name is /etc/opensm/partitions.conf.
--prefix_routes_file <file name>
Prefix routes control how the SA responds to path
record queries for off-subnet DGIDs.
By default,
the SA fails such queries. The PREFIX ROUTES section
below describes the format of the configuration
file. The default path is
/etc/opensm/prefix-routes.conf.
-Q, --qos
This option enables QoS setup. It is disabled by
default.
-Y, --qos_policy_file <file name>
This option defines the optional QoS policy file.
The default name is /etc/opensm/qos-policy.conf.
-N, --no_part_enforce
This option disables
switch external ports.
partition enforcement on
-y, --stay_on_fatal
Rev 1.50
Mellanox Technologies
Mellanox Technologies Confidential
95
This option will cause SM not to exit
initialization issues: if SM discovers
guids or a 12x link with lane reversal
ured. By default, the SM will exit
errors.
on fatal
duplicated
badly configon these
-B, --daemon
Run in daemon mode - OpenSM will run in the background.
-I, --inactive
Start SM in inactive rather than init SM state. This
option can be used in conjunction with the perfmgr
so as to run a standalone performance manager
without SM/SA. However, this is NOT currently implemented in the performance manager.
-perfmgr
Enable the perfmgr. Only takes effect if
perfmgr was specified at configure time.
--enable-
-perfmgr_sweep_time_s <seconds>
Specify the sweep time for the performance manager
in seconds (default is 180 seconds). Only takes
effect if
--enable-perfmgr was specified at configure time.
--consolidate_ipv6_snm_req
Consolidate IPv6 Solicited Node Multicast group
join requests into one multicast group per MGID
PKey.
-v, --verbose
This option increases the log verbosity level. The v option
may be specified multiple times
to further increase the verbosity level. See the -D
option for more information about log verbosity.
-V
This option sets the maximum verbosity level and
forces log flushing. The -V option is equivalent to
´-D 0xFF -d 2´. See the -D option for more information about log verbosity.
-D
This option sets the log verbosity level. A flags
field must follow the -D option. A bit set/clear in
the flags enables/disables a specific log level as
follows:
BIT
LOG LEVEL ENABLED
----
-----------------
0x01
ERROR (error messages)
0x02
INFO (basic messages, low volume)
0x04
VERBOSE (interesting stuff, moderate volume)
0x08
DEBUG (diagnostic, high volume)
Mellanox Technologies
Mellanox Technologies Confidential
Rev 1.50
OpenSM – Subnet Manager
96
0x10
FUNCS (function entry/exit, very high volume)
0x20
FRAMES (dumps all SMP and GMP frames)
0x40
ROUTING (dump FDB routing information)
0x80
currently unused
Without -D, OpenSM defaults to ERROR + INFO (0x3).
Specifying ‘-D 0’ disables all messages. Specifying
‘-D 0xFF’ enables all messages (see -V). High verbosity levels may require increasing the transaction
timeout with the -t option.
-d, --debug
This option specifies a debug option. These options
are not normally needed. The number following -d
selects the debug option to enable as follows:
OPT
Description
---
-----------------
-d0
Ignore other SM nodes
-d1
Force single threaded dispatching
-d2
Force log flushing after each log message
-d3
Disable multicast support
-h, --help
Display this usage info then exit
-?
Display this usage info then exit
11.2.2 Environment Variables
The following environment variables control opensm behavior:
• OSM_TMP_DIR
Controls the directory in which the temporary files generated by opensm are created. These files are:
opensm-subnet.lst, opensm.fdbs, and opensm.mcfdbs. By default, this directory is /
var/log.
• OSM_CACHE_DIR
opensm stores certain data to the disk such that subsequent runs are consistent. The default directory used is /var/cache/opensm. The following file is included in it:
• guid2lid – stores the LID range assigned to each GUID
11.2.3 Signaling
When opensm receives a HUP signal, it starts a new heavy sweep as if a trap has been
received or a topology change has been found.
Also, SIGUSR1 can be used to trigger a reopen of /var/log/opensm.log for
logrotate purposes.
Rev 1.50
Mellanox Technologies
Mellanox Technologies Confidential
97
11.2.4 Running opensm
The defaults of opensm were designed to meet the common case usage on clusters with up
to a few hundred nodes. Thus, in this default mode, opensm will scan the IB fabric, initialize it, and sweep occasionally for changes. To run opensm in the default mode, simply
enter:
host1# opensm
Note that opensm needs to be run on at least one machine in an IB subnet.
By default, an opensm run is logged to two files: /var/log/messages and /var/
log/opensm.log. The first file, message, registers only general major events; the
second file, opensm.log, includes details of reported errors. All errors reported in
opensm.log should be treated as indicators of IB fabric health. Both log files should
include the message “SUBNET UP” if opensm was able to setup the subnet correctly.
Note:
If a fatal, non-recoverable error occurs, opensm exits.
11.2.4.1 Running OpenSM As Daemon
OpenSM can also run as daemon. To run OpenSM in this mode, enter:
host1# /etc/init.d/opensmd start
11.3 osmtest Description
osmtest is a test program for validating the InfiniBand Subnet Manager and Subnet
Administrator. osmtest provides a test suite for opensm. It can create an inventory file of all
available nodes, ports, and PathRecords, including all their fields. It can also verify the
existing inventory with all the object fields, and matches it to a pre-saved one. See Section
11.3.2.
osmtest has the following test flows:
• Multicast Compliancy test
• Event Forwarding test
• Service Record registration test
• RMPP stress test
• Small SA Queries stress test
11.3.1 Syntax
osmtest [OPTIONS]
where OPTIONS are:
-f, --flow
This option directs osmtest to run a specific flow:
Flow
Description:
c = create an inventory file with all nodes, ports
and paths
Mellanox Technologies
Mellanox Technologies Confidential
Rev 1.50
OpenSM – Subnet Manager
98
a = run all validation tests (expecting an input
inventory)
v = only validate the given inventory file
s = run service registration, deregistration, and
lease test
e = run event forwarding test
f = flood the SA with queries according to the stress
mode
m = multicast flow
q = QoS info: dump VLArb and SLtoVL tables
t = run trap 64/65 flow (this flow requires running
of external tool)
Default = all flows except QoS
Rev 1.50
-w, --wait
This option specifies the wait time for trap 64/65
in seconds. It is used only when running -f t - the
trap 64/65 flow Default = 10 sec
-d, --debug
This option specifies a debug option. These
options are not normally needed. The number following -d selects the debug option to enable as
follows:
OPT
Description
---
-----------------
-d0
Ignore other SM nodes
-d1
Force single threaded dispatching
-d2
Force log flushing after each log message
-d3
Disable multicast support
-m, --max_lid
This option specifies the maximal LID number to be
searched for during inventory file build (Default =
100)
-g, --guid
This option specifies the local port GUID value
with which OpenSM should bind.
OpenSM may be
bound to 1 port at a time. If GUID given is 0, OpenSM
displays a list of possible port GUIDs and
waits for user input. Without -g, OpenSM tries to
use the default port.
-p, --port
This option displays a menu of possible local port
GUID values with which osmtest could bind
-i, --inventory
This option specifies the name of the inventory
file Normally, osmtest expects to find an inventory
file, which osmtest uses to validate real-time
information received from the SA during testing. If
-i is not specified, osmtest defaults to the
file osmtest.dat.
See -c option for related information
Mellanox Technologies
Mellanox Technologies Confidential
99
-s, --stress
This option runs the specified stress test instead
of the normal test suite Stress test options are as
follows:
OPT
Description
---
-----------------
-s1
Single-MAD response SA queries
-s2
Multi-MAD (RMPP) response SA queries
-s3
Multi-MAD (RMPP) Path Record SA queries
Without -s, stress testing is not performed
-M, --Multicast_Mode This option specify length of Multicast test:
OPT
Description
---
-----------------
-M1
Short Multicast Flow (default) - single mode
-M2
Short Multicast Flow - multiple mode
-M3
Long Multicast Flow - single mode
-M4
Long Multicast Flow - multiple mode
Single mode - Osmtest is tested alone, with no other
apps that interact with OpenSM MC
Multiple mode - Could be run with other apps
using MC with OpenSM. Without -M, default flow testing is performed
-t, --timeout
This option specifies the time in milliseconds used
for transaction timeouts. Specifying -t 0 disables
timeouts. Without -t, OpenSM defaults to a timeout
value of 200 milliseconds.
-l, --log_file
This option defines the log to be the given file.
By default the log goes to /var/log/osm.log. For
the log to go to standard output use -f stdout.
-v, --verbose
This option increases the log verbosity level. The
-v option may be specified multiple times to
further increase the verbosity level. See the -vf
option for more information about log verbosity.
-V
This option sets the maximum verbosity level and
forces log flushing. The -V is equivalent to '-vf
0xFF -d 2'. See the -vf option for more information
about log verbosity.
-vf
This option sets the log verbosity level. A flags
field must follow the -D option. A bit set/clear in
the flags enables/disables a specific log level as
follows:
BIT
LOG LEVEL ENABLED
Mellanox Technologies
Mellanox Technologies Confidential
Rev 1.50
OpenSM – Subnet Manager
100
----
-----------------
0x01 - ERROR (error messages)
0x02 - INFO (basic messages, low volume)
0x04 - VERBOSE (interesting stuff, moderate volume)
0x08 - DEBUG (diagnostic, high volume)
0x10 - FUNCS (function entry/exit, very high volume)
0x20 - FRAMES (dumps all SMP and GMP frames)
0x40 - ROUTING (dump FDB routing information)
0x80 - currently unused.
Without -vf, osmtest defaults to ERROR + INFO (0x3)
Specifying -vf 0 disables all messages Specifying vf 0xFF enables all messages (see -V) High verbosity levels may require increasing the transaction
timeout with the -t option
-h, --help
Display this usage info then exit.
11.3.2 Running osmtest
To run osmtest in the default mode, simply enter:
host1# osmtest
The default mode runs all the flows except for the Quality of Service flow (see Section
11.6).
After installing opensm (and if the InfiniBand fabric is stable), it is recommended to run
the following command in order to generate the inventory file:
host1# osmtest -f c
Immediately afterwards, run the following command to test opensm:
host1# osmtest -f a
Finally, it is recommended to occasionally run “osmtest -v” (with verbosity) to verify
that nothing in the fabric has changed.
11.4 Partitions
OpenSM enables the configuration of partitions (PKeys) in an InfiniBand fabric. By
default, OpenSM searches for the partitions configuration file under the name /usr/
etc/opensm/partitions.conf. To change this filename, you can use opensm with
the ‘--Pconfig’ or ‘-P’ flags.
The default partition is created by OpenSM unconditionally, even when a partition configuration file does not exist or cannot be accessed.
Rev 1.50
Mellanox Technologies
Mellanox Technologies Confidential
101
The default partition has a P_Key value of 0x7fff. The port out of which runs OpenSM is
assigned full membership in the default partition. All other end-ports are assigned partial
membership.
11.4.1 File Format
Notes:
• Line content followed after ‘#’ character is comment and ignored by parser.
General File Format
<Partition Definition>:<PortGUIDs list> ;
Partition Definition:
[PartitionName][=PKey][,flag[=value]][,defmember=full|limited]
where
PartitionName
string, will be used with logging. When omitted, an
empty string will be used.
PKey
P_Key value for this partition. Only low 15 bits
will
be used. When omitted,
P_Key will be autogenerated.
flag
used to indicate IPoIB capability of this partition.
defmember=full|limited
specifies default membership for port guid list.
Default is limited.
Currently recognized flags are:
ipoib
indicates that this partition may be used for IPoIB,
as a
result IPoIB capable MC group
will be created.
rate=<val>
specifies rate for this IPoIB MC group (default is 3
(10GBps))
mtu=<val>
specifies MTU for this IPoIB MC group (default is 4
(2048))
sl=<val>
specifies SL for this IPoIB MC group (default is 0)
scope=<val>
specifies scope for this IPoIB MC group (default is
2 (link local))
Note that values for rate, mtu, and scope should be specified as defined in the IBTA
specification (for example, mtu=4 for 2048).
PortGUIDs list:
Mellanox Technologies
Mellanox Technologies Confidential
Rev 1.50
OpenSM – Subnet Manager
102
PortGUID
GUID of partition member EndPort. Hexadecimal numbers should start from 0x, decimal numbers are
accepted too.
full or limited
indicates full or limited membership for this port.
When omitted (or unrecognized) limited membership is
assumed.
There are two useful keywords for PortGUID definition:
• 'ALL' means all end-ports in this subnet
• 'SELF' means subnet manager's port
An empty list means that there are no ports in this partition.
Notes:
• White space is permitted between delimiters ('=', ',',':',';').
• The line can be wrapped after ':' after a Partition Definition and between.
• A PartitionName does not need to be unique, but PKey does need to be unique.
• If a PKey is repeated then the associated partition configurations will be merged and the
first PartitionName will be used (see also next note).
• It is possible to split a partition configuration in more than one definition, but then they
PKey should be explicitly specified (otherwise different PKey values will be generated
for those definitions).
Examples:
Default=0x7fff : ALL, SELF=full ;
NewPartition , ipoib : 0x123456=full, 0x3456789034=limi,
0x2134af2306;
YetAnotherOne = 0x300 : SELF=full ;
YetAnotherOne = 0x300 : ALL=limited ;
ShareIO = 0x80 , defmember=full : 0x123451, 0x123452;
# 0x123453, 0x123454 will be limited
ShareIO = 0x80 : 0x123453, 0x123454, 0x123455=full;
# 0x123456, 0x123457 will be limited
ShareIO
=
0x80
:
defmember=limited
:
0x123456,
0x123457,
0x123458=full;
ShareIO = 0x80 , defmember=full : 0x123459, 0x12345a;
ShareIO = 0x80 , defmember=full :
0x12345b,
0x12345c=limited,
0x12345d;
Note:
Rev 1.50
The following rule is equivalent to how OpenSM used to run prior to the partition manager:
Mellanox Technologies
Mellanox Technologies Confidential
103
Default=0x7fff,ipoib:ALL=full;
11.5 Routing Algorithms
OpenSM offers five routing engines:
1.
Min Hop algorithm
Based on the minimum hops to each node where the path length is optimized.
2.
UPDN Unicast routing algorithm
Based on the minimum hops to each node, but it is constrained to ranking rules. This algorithm should be
chosen if the subnet is not a pure Fat Tree, and a deadlock may occur due to a loop in the subnet.
3.
Fat Tree Unicast routing algorithm
This algorithm optimizes routing for a congestion-free “shift” communication pattern. It should be chosen
if a subnet is a symmetrical Fat Tree of various types, not just a K-ary-N-Tree: non-constant K, not fully
staffed, and for any CBB ratio. Similar to UPDN, Fat Tree routing is constrained to ranking rules.
4.
LASH Unicast routing algorithm
Uses InfiniBand virtual layers (SL) to provide deadlock-free shortest-path routing while also distributing
the paths between layers. LASH is an alternative deadlock-free, topology-agnostic routing algorithm to
the non-minimal UPDN algorithm. It avoids the use of a potentially congested root node.
5.
DOR Unicast routing algorithm
Based on the Min Hop algorithm, but avoids port equalization except for redundant links between the
same two switches. This provides deadlock free routes for hypercubes when the fabric is cabled as a
hypercube and for meshes when cabled as a mesh.
OpenSM also supports a file method which can load routes from a table – see Modular
Routing Engine below.
The basic routing algorithm is comprised of two stages:
1.
MinHop matrix calculation
How many hops are required to get from each port to each LID? The algorithm to fill these tables is different if you run standard (min hop) or Up/Down. For standard routing, a "relaxation" algorithm is used
to propagate min hop from every destination LID through neighbor switches. For Up/Down routing, a
BFS from every target is used. The BFS tracks link direction (up or down) and avoid steps that will perform up after a down step was used.
2.
Once MinHop matrices exist, each switch is visited and for each target LID a decision is made as to what port should be used to get to that LID. This step is common
to standard and Up/Down routing. Each port has a counter counting the number of
target LIDs going through it. When there are multiple alternative ports with same
MinHop to a LID, the one with less previously assigned ports is selected.
If LMC > 0, more checks are added. Within each group of LIDs assigned to same target port:
a.
Use only ports which have same MinHop
b.
First prefer the ones that go to different systemImageGuid (then the previous LID of the same
LMC group)
c.
If none, prefer those which go through another NodeGuid
d.
Fall back to the number of paths method (if all go to same node).
Mellanox Technologies
Mellanox Technologies Confidential
Rev 1.50
OpenSM – Subnet Manager
104
11.5.1 Effect of Topology Changes
OpenSM will preserve existing routing in any case where there is no change in the fabric switches unless the -r (--reassign_lids) option is specified.
-r, --reassign_lids
This option causes OpenSM to reassign LIDs to all
end nodes. Specifying -r on a running subnet may
disrupt subnet traffic. Without -r, OpenSM attempts
to preserve existing LID assignments resolving multiple use of same LID.
If a link is added or removed, OpenSM does not recalculate the routes that do not have to
change. A route has to change if the port is no longer UP or no longer the MinHop.
When routing changes are performed, the same algorithm for balancing the routes is
invoked.
In the case of using the file based routing, any topology changes are currently ignored
The 'file' routing engine just loads the LFTs from the file specified, with no reaction to
real topology. Obviously, this will not be able to recheck LIDs (by GUID) for disconnected nodes, and LFTs for non-existent switches will be skipped. Multicast is not
affected by 'file' routing engine (this uses min hop tables).
11.5.2 Min Hop Algorithm
The Min Hop algorithm is invoked when neither UPDN or the file method are specified.
The Min Hop algorithm is divided into two stages: computation of minhop tables on
every switch and LFT output port assignment. Link subscription is also equalized with the
ability to override based on port GUID. The latter is supplied by:
-i <equalize-ignore-guids-file>
-ignore-guids <equalize-ignore-guids-file>
This option provides the means to define a set of
ports (by guid) that will be ignored by the link load
equalization algorithm. Note that only endports (CA,
switch port 0, and router ports) and not switch
external ports are supported.
LMC awareness routes based on (remote) system or switch basis.
11.5.3 Purpose of UPDN Algorithm
The UPDN algorithm is designed to prevent deadlocks from occurring in loops of the
subnet. A loop-deadlock is a situation in which it is no longer possible to send data
between any two hosts connected through the loop. As such, the UPDN routing algorithm
should be used if the subnet is not a pure Fat Tree, and one of its loops may experience
a deadlock (due, for example, to high pressure).
Rev 1.50
Mellanox Technologies
Mellanox Technologies Confidential
105
The UPDN algorithm is based on the following main stages:
1.
1.
2.
Auto-detect root nodes - based on the CA hop length from any switch in the subnet,
a statistical histogram is built for each switch (hop num vs number of occurrences).
If the histogram reflects a specific column (higher than others) for a certain node,
then it is marked as a root node. Since the algorithm is statistical, it may not find any
root nodes. The list of the root nodes found by this auto-detect stage is used by the
ranking process stage.
Note:
The user can override the node list manually.
Note:
If this stage cannot find any root nodes, and the user did not specify a guid list
file, OpenSM defaults back to the Min Hop routing algorithm.
Ranking process - All root switch nodes (found in stage 1) are assigned a rank of
0. Using the BFS algorithm, the rest of the switch nodes in the subnet are ranked
incrementally. This ranking aids in the process of enforcing rules that ensure loopfree paths.
Min Hop Table setting - after ranking is done, a BFS algorithm is run from each
(CA or switch) node in the subnet. During the BFS process, the FDB table of each
switch node traversed by BFS is updated, in reference to the starting node, based on
the ranking rules and guid values.
At the end of the process, the updated FDB tables ensure loop-free paths through the
subnet.
Note:
Up/Down routing does not allow LID routing communication between
switches that are located inside spine “switch systems”. The reason is that
there is no way to allow a LID route between them that does not break the
Up/Down rule. One ramification of this is that you cannot run SM on
switches other than the leaf switches of the fabric.
11.5.3.1 UPDN Algorithm Usage
Activation through OpenSM
• Use '-R updn' option (instead of old '-u') to activate the UPDN algorithm.
• Use '-a <root_guid_file>' for adding an UPDN guid file that contains the root nodes for
ranking. If the `-a' option is not used, OpenSM uses its auto-detect root nodes algorithm.
Notes on the guid list file:
1.
2.
A valid guid file specifies one guid in each line. Lines with an invalid format will be
discarded.
The user should specify the root switch guids. However, it is also possible to specify
CA guids; OpenSM will use the guid of the switch (if it exists) that connects the CA
to the subnet as a root node.
Mellanox Technologies
Mellanox Technologies Confidential
Rev 1.50
OpenSM – Subnet Manager
106
11.5.4 Fat-tree Routing Algorithm
The fat-tree algorithm optimizes routing for "shift" communication pattern. It should be
chosen if a subnet is a symmetrical or almost symmetrical fat-tree of various types. It supports not just K-ary-N-Trees, by handling for non-constant K, cases where not all leafs
(CAs) are present, any CBB ratio. As in UPDN, fat-tree also prevents credit-loop-deadlocks.
If the root guid file is not provided ('-a' or '--root_guid_file' options), the topology has
to be pure fat-tree that complies with the following rules:
• Tree rank should be between two and eight (inclusively)
• Switches of the same rank should have the same number of UP-going port groups1,
unless they are root switches, in which case the shouldn't have UP-going ports at all.
• Switches of the same rank should have the same number of DOWN-going port groups,
unless they are leaf switches.
• Switches of the same rank should have the same number of ports in each UP-going port
group.
• Switches of the same rank should have the same number of ports in each DOWN-going
port group.
• All the CAs have to be at the same tree level (rank).
If the root guid file is provided, the topology doesn't have to be pure fat-tree, and it should
only comply with the following rules:
• Tree rank should be between two and eight (inclusively)
• All the Compute Nodes2 have to be at the same tree level (rank). Note that non-compute
node CAs are allowed here to be at different tree ranks.
Topologies that do not comply cause a fallback to min hop routing. Note that this can
also occur on link failures which cause the topology to no longer be a “pure” fat-tree.
Note that although fat-tree algorithm supports trees with non-integer CBB ratio, the
routing will not be as balanced as in case of integer CBB ratio. In addition to this,
although the algorithm allows leaf switches to have any number of CAs, the closer the
tree is to be fully populated, the more effective the "shift" communication pattern will
be. In general, even if the root list is provided, the closer the topology to a pure and symmetrical fat-tree, the more optimal the routing will be.
The algorithm also dumps compute node ordering file (opensm-ftree-caorder.dump) in the same directory where the OpenSM log resides. This ordering file
provides the CN order that may be used to create efficient communication pattern, that
will match the routing tables.
1. Ports that are connected to the same remote switch are referenced as ‘port group’
2. List of compute nodes (CNs) can be specified by ‘-u’ or ‘--cn_guid_file’ OpenSM options.
Rev 1.50
Mellanox Technologies
Mellanox Technologies Confidential
107
Activation through OpenSM
• Use ‘-R ftree’ option to activate the fat-tree algorithm.
• Use ‘-a <root_guid_file>’ to provide root nodes for ranking. If the ‘-a’ option is not
used, routing algorithm will detect roots automatically.
• Use ‘-u <root_cn_file>’ to provide the list of compute nodes. If the ‘-u’ option is not
used, all the CAs are considered as compute nodes.
Note:
LMC > 0 is not supported by fat-tree routing. If this is specified, the default
routing algorithm is invoked instead.
11.5.5 LASH Routing Algorithm
LASH is an acronym for LAyered SHortest Path Routing. It is a deterministic shortest path
routing algorithm that enables topology agnostic deadlock-free routing within communication networks.
When computing the routing function, LASH analyzes the network topology for the shortest-path routes between all pairs of sources / destinations and groups these paths into
virtual layers in such a way as to avoid deadlock.
Note:
LASH analyzes routes and ensures deadlock freedom between switch pairs.
The link from HCA between and switch does not need virtual layers as deadlock will not arise between switch and HCA.
In more detail, the algorithm works as follows:
1.
2.
3.
LASH determines the shortest-path between all pairs of source / destination
switches. Note, LASH ensures the same SL is used for all SRC/DST - DST/SRC
pairs and there is no guarantee that the return path for a given DST/SRC will be the
reverse of the route SRC/DST.
LASH then begins an SL assignment process where a route is assigned to a layer
(SL) if the addition of that route does not cause deadlock within that layer. This is
achieved by maintaining and analysing a channel dependency graph for each layer.
Once the potential addition of a path could lead to deadlock, LASH opens a new
layer and continues the process.
Once this stage has been completed, it is highly likely that the first layers processed will contain more paths than the latter ones. To better balance the use of layers, LASH moves paths from one layer to another so that the number of paths in each
layer averages out.
Note that the implementation of LASH in opensm attempts to use as few layers as possible. This number can be less than the number of actual layers available.
In general LASH is a very flexible algorithm. It can, for example, reduce to Dimension
Order Routing in certain topologies, it is topology agnostic and fares well in the face of
faults.
It has been shown that for both regular and irregular topologies, LASH outperforms Up/
Down. The reason for this is that LASH distributes the traffic more evenly through a
Mellanox Technologies
Mellanox Technologies Confidential
Rev 1.50
OpenSM – Subnet Manager
108
network, avoiding the bottleneck issues related to a root node and always routes shortestpath.
The algorithm was developed by Simula Research Laboratory.
Use ‘-R lash -Q’ option to activate the LASH algorithm
Note:
QoS support has to be turned on in order that SL/VL mappings are used.
Note:
LMC > 0 is not supported by the LASH routing. If this is specified, the
default routing algorithm is invoked instead.
11.5.6 DOR Routing Algorithm
The Dimension Order Routing algorithm is based on the Min Hop algorithm and so uses
shortest paths. Instead of spreading traffic out across different paths with the same shortest distance, it chooses among the available shortest paths based on an ordering of dimensions. Each port must be consistently cabled to represent a hypercube dimension or a
mesh dimension. Paths are grown from a destination back to a source using the lowest
dimension (port) of available paths at each step. This provides the ordering necessary to
avoid deadlock. When there are multiple links between any two switches, they still represent only one dimension and traffic is balanced across them unless port equalization is
turned off. In the case of hypercubes, the same port must be used
throughout the fabric to represent the hypercube dimension and match on both ends of the cable. In the case
of meshes, the dimension should consistently use the same pair of ports, one port on
one end of the cable, and the other port on the other end, continuing along the mesh
dimension.
Use ‘-R dor’ option to activate the DOR algorithm.
11.5.7 Routing References
To learn more about deadlock-free routing, see the article “Deadlock Free Message
Routing in Multiprocessor Interconnection Networks” by William J Dally and Charles L
Seitz (1985).
To learn more about the up/down algorithm, see the article “Effective Strategy to Compute Forwarding Tables for InfiniBand Networks” by Jose Carlos Sancho, Antonio Robles, and Jose Duato at the Universidad Politecnica de Valencia.
To learn more about LASH and the flexibility behind it, the requirement for layers, performance comparisons to other algorithms, see the following articles:
• “Layered Routing in Irregular Networks”, Lysne et al, IEEE Transactions on Parallel
and Distributed Systems, VOL.16, No12, December 2005.
• “Routing for the ASI Fabric Manager”, Solheim et al. IEEE Communications Magazine, Vol.44, No.7, July 2006.
• “Layered Shortest Path (LASH) Routing in Irregular System Area Networks", Skeie
et al. IEEE Computer Society Communication Architecture for Clusters 2002.
Rev 1.50
Mellanox Technologies
Mellanox Technologies Confidential
109
11.5.8 Modular Routine Engine
Modular routing engine structure allows for the ease of “plugging” new routing modules.
Currently, only unicast callbacks are supported. Multicast can be added later.
One existing routing module is up-down "updn", which may be activated with '-R updn'
option (instead of old '-u').
General usage is:
host1# opensm -R 'module-name'
There is also a trivial routing module which is able to load LFT tables from a dump file.
Main features are:
• This will load switch LFTs and/or LID matrices (min hops tables)
• This will load switch LFTs according to the path entries introduced in the dump file
• No additional checks will be performed (such as “is port connected”, etc.)
• In case when fabric LIDs were changed this will try to reconstruct LFTs correctly if
endport GUIDs are represented in the dump file (in order to disable this, GUIDs may be
removed from the dump file or zeroed)
The dump file format is compatible with output of ‘ibroute’ utility and for whole fabric
can be generated with dump_lfts.sh script.
To activate file based routing module, use:
host1# opensm -R file -U /path/to/dump_file
If the dump_file is not found or is in error, the default routing algorithm is utilized. The
ability to dump switch lid matrices (aka min hops tables) to file and later to load these is
also supported.
The usage is similar to unicast forwarding tables loading from dump file (introduced
by 'file' routing engine), but new lid matrix file name should be specified by -M or -lid_matrix_file option. For example:
host1# opensm -R file -M ./opensm-lid-matrix.dump
The dump file is named ‘opensm-lid-matrix.dump’ and will be generated in the
standard opensm dump directory (/var/log
by
default)
when
OSM_LOG_ROUTING logging flag is set. When routing engine 'file' is activated, but the
dump file is not specified or cannot be opened, the default lid matrix algorithm will be
used.
There is also a switch forwarding tables dumper which generates a file compatible with
dump_lfts.sh output. This file can be used as input for forwarding tables loading by 'file'
routing engine. Both or one of options -U and -M can be specified together with ‘-R
file’.
Mellanox Technologies
Mellanox Technologies Confidential
Rev 1.50
OpenSM – Subnet Manager
110
11.6 Quality of Service Management in OpenSM
11.6.1 Overview
When Quality of Service (QoS) in OpenSM is enabled (using the ‘-Q’ or ‘--qos’ flags),
OpenSM looks for a QoS Policy file. During fabric initialization and at every heavy
sweep, OpenSM parses the QoS policy file, applies its settings to the discovered fabric
elements, and enforces the provided policy on client requests. The overall flow for such
requests is as follows:
• The request is matched against the defined matching rules such that the QoS Level definition is found
• Given the QoS Level, a path(s) search is performed with the given restrictions imposed
by that level
Figure 5: QoS Manager
There are two ways to define QoS policy:
• Advanced – the advanced policy file syntax provides the administrator various ways to
match a PathRecord/MultiPathRecord (PR/MPR) request, and to enforce various QoS
constraints on the requested PR/MPR
• Simple – the simple policy file syntax enables the administrator to match PR/MPR
requests by various ULPs and applications running on top of these ULPs
11.6.2 Advanced QoS Policy File
The QoS policy file has the following sections:
I) Port Groups (denoted by port-groups)
This section defines zero or more port groups that can be referred later by matching rules
(see below). Port group lists ports by:
• Port GUID
• Port name, which is a combination of NodeDescription and IB port number
• PKey, which means that all the ports in the subnet that belong to partition with a given
PKey belong to this port group
• Partition name, which means that all the ports in the subnet that belong to partition with
a given name belong to this port group
Rev 1.50
Mellanox Technologies
Mellanox Technologies Confidential
111
• Node type, where possible node types are: CA, SWITCH, ROUTER, ALL, and SELF
(SM's port).
II) QoS Setup (denoted by qos-setup)
This section describes how to set up SL2VL and VL Arbitration tables on various nodes in
the fabric. However, this is not supported in BXOFED. SL2VL and VLArb tables should
be configured in the OpenSM options file (default location - /var/cache/opensm/
opensm.opts).
III) QoS Levels (denoted by qos-levels)
Each QoS Level defines Service Level (SL) and a few optional fields:
• MTU limit
• Rate limit
• PKey
• Packet lifetime
When path(s) search is performed, it is done with regards to restriction that these QoS
Level parameters impose. One QoS level that is mandatory to define is a DEFAULT QoS
level. It is applied to a PR/MPR query that does not match any existing match rule. Similar
to any other QoS Level, it can also be explicitly referred by any match rule.
IV) QoS Matching Rules (denoted by qos-match-rules)
Each PathRecord/MultiPathRecord query that OpenSM receives is matched against the set
of matching rules. Rules are scanned in order of appearance in the QoS policy file such as
the first match takes precedence.
Each rule has a name of QoS level that will be applied to the matching query. A default
QoS level is applied to a query that did not match any rule.
Queries can be matched by:
• Source port group (whether a source port is a member of a specified group)
• Destination port group (same as above, only for destination port)
• PKey
• QoS class
• Service ID
To match a certain matching rule, PR/MPR query has to match ALL the rule's criteria.
However, not all the fields of the PR/MPR query have to appear in the matching rule.
Mellanox Technologies
Mellanox Technologies Confidential
Rev 1.50
OpenSM – Subnet Manager
112
For instance, if the rule has a single criterion - Service ID, it will match any query that has
this Service ID, disregarding rest of the query fields. However, if a certain query has only
Service ID (which means that this is the only bit in the PR/MPR component mask that is
on), it will not match any rule that has other matching criteria besides Service ID.
11.6.3 Simple QoS Policy Definition
Simple QoS policy definition comprises of a single section denoted by qos-ulps. Similar to
the advanced QoS policy, it has a list of match rules and their QoS Level, but in this case a
match rule has only one criterion - its goal is to match a certain ULP (or a certain application on top of this ULP) PR/MPR request, and QoS Level has only one constraint - Service
Level (SL).
The simple policy section may appear in the policy file in combine with the advanced policy, or as a stand-alone policy definition. See more details and list of match rule criteria
below.
11.6.4 Policy File Syntax Guidelines
• Leading and trailing blanks, as well as empty lines, are ignored, so the indentation in
the example is just for better readability.
• Comments are started with the pound sign (#) and terminated by EOL.
• Any keyword should be the first non-blank in the line, unless it's a comment.
• Keywords that denote section/subsection start have matching closing keywords.
• Having a QoS Level named "DEFAULT" is a must - it is applied to PR/MPR requests
that didn't match any of the matching rules.
• Any section/subsection of the policy file is optional.
11.6.5 Examples of Advanced Policy File
As mentioned earlier, any section of the policy file is optional, and the only mandatory
part of the policy file is a default QoS Level.
Here's an example of the shortest policy file:
qos-levels
qos-level
name: DEFAULT
sl: 0
end-qos-level
end-qos-levels
Port groups section is missing because there are no match rules, which means that port
groups are not referred anywhere, and there is no need defining them. And since this policy file doesn't have any matching rules, PR/MPR query will not match any rule, and
Rev 1.50
Mellanox Technologies
Mellanox Technologies Confidential
113
OpenSM will enforce default QoS level. Essentially, the above example is equivalent to
not having a QoS policy file at all.
The following example shows all the possible options and keywords in the policy file and
their syntax:
#
# See the comments in the following example.
# They explain different keywords and their meaning.
#
port-groups
port-group # using port GUIDs
name: Storage
# "use" is just a description that is used for logging
# Other than that, it is just a comment
use: SRP Targets
port-guid: 0x10000000000001, 0x100000000000050x1000000000FFFA
port-guid: 0x1000000000FFFF
end-port-group
port-group
name: Virtual Servers
# The syntax of the port name is as follows:
#
"node_description/Pnum".
# node_description is compared to the NodeDescription
of the node,
# and "Pnum" is a port number on that node.
port-name: vs1 HCA-1/P1, vs2 HCA-1/P1
end-port-group
# using partitions defined in the partition policy
port-group
name: Partitions
partition: Part1
pkey: 0x1234
end-port-group
# using node types: CA, ROUTER, SWITCH, SELF (for node that
runs SM)
# or ALL (for all the nodes in the subnet)
port-group
Mellanox Technologies
Mellanox Technologies Confidential
Rev 1.50
OpenSM – Subnet Manager
114
name: CAs and SM
node-type: CA, SELF
end-port-group
end-port-groups
qos-setup
# This section of the policy file describes how to set up
SL2VL and VL
# Arbitration tables on various nodes in the fabric.
# However, this is not supported in BXOFED - the section is
parsed
# and ignored. SL2VL and VLArb tables should be configured
in the
# OpenSM options file (by default - /var/cache/opensm/
opensm.opts).
end-qos-setup
qos-levels
# Having a QoS Level named "DEFAULT" is a must - it is
applied to
# PR/MPR requests that didn't match any of the matching
rules.
qos-level
name: DEFAULT
use: default QoS Level
sl: 0
end-qos-level
# the whole set: SL, MTU-Limit, Rate-Limit, PKey, Packet
Lifetime
qos-level
name: WholeSet
sl: 1
mtu-limit: 4
rate-limit: 5
pkey: 0x1234
packet-life: 8
end-qos-level
end-qos-levels
Rev 1.50
Mellanox Technologies
Mellanox Technologies Confidential
115
# Match rules are scanned in order of their apperance in the
policy file.
# First matched rule takes precedence.
qos-match-rules
# matching by single criteria: QoS class
qos-match-rule
use: by QoS class
qos-class: 7-9,11
# Name of qos-level to apply to the matching PR/MPR
qos-level-name: WholeSet
end-qos-match-rule
# show matching by destination group and service id
qos-match-rule
use: Storage targets
destination: Storage
service-id: 0x10000000000001, 0x100000000000080x10000000000FFF
qos-level-name: WholeSet
end-qos-match-rule
qos-match-rule
source: Storage
use: match by source group only
qos-level-name: DEFAULT
end-qos-match-rule
qos-match-rule
use: match by all parameters
qos-class: 7-9,11
source: Virtual Servers
destination: Storage
service-id: 0x0000000000010000-0x000000000001FFFF
pkey: 0x0F00-0x0FFF
qos-level-name: WholeSet
end-qos-match-rule
end-qos-match-rules
Mellanox Technologies
Mellanox Technologies Confidential
Rev 1.50
OpenSM – Subnet Manager
116
11.6.6 Simple QoS Policy - Details and Examples
Simple QoS policy match rules are tailored for matching ULPs (or some application on
top of a ULP) PR/MPR requests. This section has a list of per-ULP (or per-application)
match rules and the SL that should be enforced on the matched PR/MPR query.
Match rules include:
• Default match rule that is applied to PR/MPR query that didn't match any of the other
match rules
• SDP
• SDP application with a specific target TCP/IP port range
• SRP with a specific target IB port GUID
• RDS
• iSER
• iSER application with a specific target TCP/IP port range
• IPoIB with a default PKey
• IPoIB with a specific PKey
• Any ULP/application with a specific Service ID in the PR/MPR query
• Any ULP/application with a specific PKey in the PR/MPR query
• Any ULP/application with a specific target IB port GUID in the PR/MPR query
Since any section of the policy file is optional, as long as basic rules of the file are kept
(such as no referring to nonexisting port group, having default QoS Level, etc), the simple
policy section (qos-ulps) can serve as a complete QoS policy file.
The shortest policy file in this case would be as follows:
qos-ulps
default : 0 #default SL
end-qos-ulps
It is equivalent to the previous example of the shortest policy file, and it is also equivalent
to not having policy file at all. Below is an example of simple QoS policy with all the possible keywords:
qos-ulps
default
sdp, port-num 30000
ning on
: 0 # default SL
: 0 # SL for application run# top of SDP when a
destination
# TCP/IPport is 30000
Rev 1.50
Mellanox Technologies
Mellanox Technologies Confidential
117
sdp, port-num 10000-20000
sdp
top of SDP
rds
iser, port-num 900
cific
iser
ipoib, pkey 0x0001
tion with
ipoib
any, service-id 0x6234
: 0
: 1 # default SL for any other
# application running on
: 2 # SL for RDS traffic
: 0 # SL for iSER with a spe# target port
: 3 # default SL for iSER
: 0 # SL for IPoIB on parti# pkey 0x0001
: 4 # default IPoIB partition,
# pkey=0x7FFF
: 6 # match any PR/MPR query
with a
any, pkey 0x0ABC
# specific Service ID
: 6 # match any PR/MPR query
srp, target-port-guid 0x1234
# specific PKey
: 5 # SRP when SRP Target is
with a
located
# on a specified IB port
GUID
any, target-port-guid 0x0ABC-0xFFFFF : 6 # match any PR/MPR
query
# with a specific target
port GUID
end-qos-ulps
Similar to the advanced policy definition, matching of PR/MPR queries is done in order of
appearance in the QoS policy file such as the first match takes precedence, except for the
"default" rule, which is applied only if the query didn't match any other rule. All other sections of the QoS policy file take precedence over the qos-ulps section. That is, if a policy
file has both qos-match-rules and qos-ulps sections, then any query is matched first
against the rules in the qos-match-rules section, and only if there was no match, the query
is matched against the rules in qos-ulps section.
Note that some of these match rules may overlap, so in order to use the simple QoS definition effectively, it is important to understand how each of the ULPs is matched.
Mellanox Technologies
Mellanox Technologies Confidential
Rev 1.50
OpenSM – Subnet Manager
118
11.6.6.1 IPoIB
IPoIB query is matched by PKey or by destination GID, in which case this is the GID of
the multicast group that OpenSM creates for each IPoIB partition.
Default PKey for IPoIB partition is 0x7fff, so the following three match rules are equivalent:
ipoib
: <SL>
ipoib, pkey 0x7fff : <SL>
any,
pkey 0x7fff : <SL>
11.6.6.2 SDP
SDP PR query is matched by Service ID. The Service-ID for SDP is
0x000000000001PPPP, where PPPP are 4 hex digits holding the remote TCP/IP Port
Number to connect to. The following two match rules are equivalent:
sdp
: <SL>
any, service-id 0x0000000000010000-0x000000000001ffff : <SL>
11.6.6.3 RDS
Similar to SDP, RDS PR query is matched by Service ID. The Service ID for RDS is
0x000000000106PPPP, where PPPP are 4 hex digits holding the remote TCP/IP Port
Number to connect to. Default port number for RDS is 0x48CA, which makes a default
Service-ID 0x00000000010648CA. The following two match rules are equivalent:
rds
: <SL>
any, service-id 0x00000000010648CA : <SL>
11.6.6.4 iSER
Similar to RDS, iSER query is matched by Service ID, where the the Service ID is also
0x000000000106PPPP. Default port number for iSER is 0x0CBC, which makes a default
Service-ID 0x0000000001060CBC. The following two match rules are equivalent:
iser
: <SL>
any, service-id 0x0000000001060CBC : <SL>
Rev 1.50
Mellanox Technologies
Mellanox Technologies Confidential
119
11.6.6.5 SRP
Service ID for SRP varies from storage vendor to vendor, thus SRP query is matched by
the target IB port GUID. The following two match rules are equivalent:
srp, target-port-guid 0x1234
any, target-port-guid 0x1234
: <SL>
: <SL>
Note that any of the above ULPs might contain target port GUID in the PR query, so in
order for these queries not to be recognized by the QoS manager as SRP, the SRP match
rule (or any match rule that refers to the target port guid only) should be placed at the end
of the qos-ulps match rules.
11.6.6.6 MPI
SL for MPI is manually configured by MPI admin. OpenSM is not forcing any SL on the
MPI traffic, and that's why it is the only ULP that did not appear in the qos-ulps section.
11.6.7 SL2VL Mapping and VL Arbitration
OpenSM cached options file has a set of QoS related configuration parameters, that are
used to configure SL2VL mapping and VL arbitration on IB ports. These parameters are:
• Max VLs: the maximum number of VLs that will be on the subnet
• High limit: the limit of High Priority component of VL Arbitration table (IBA 7.6.9)
• VLArb low table: Low priority VL Arbitration table (IBA 7.6.9) template
• VLArb high table: High priority VL Arbitration table (IBA 7.6.9) template
• SL2VL: SL2VL Mapping table (IBA 7.6.6) template. It is a list of VLs corresponding
to SLs 0-15 (Note that VL15 used here means drop this SL).
There are separate QoS configuration parameters sets for various target types: CAs, routers, switch external ports, and switch's enhanced port 0. The names of such parameters are
prefixed by "qos_<type>_" string. Here is a full list of the currently supported sets:
• qos_ca_ - QoS configuration parameters set for CAs.
• qos_rtr_ - parameters set for routers.
• qos_sw0_ - parameters set for switches' port 0.
• qos_swe_ - parameters set for switches' external ports.
Here's the example of typical default values for CAs and switches' external ports (hardcoded in OpenSM initialization):
qos_ca_max_vls 15
qos_ca_high_limit 0
qos_ca_vlarb_high
0:4,1:0,2:0,3:0,4:0,5:0,6:0,7:0,8:0,9:0,10:0,11:0,12:0,13:0,14:0
Mellanox Technologies
Mellanox Technologies Confidential
Rev 1.50
OpenSM – Subnet Manager
120
qos_ca_vlarb_low
0:0,1:4,2:4,3:4,4:4,5:4,6:4,7:4,8:4,9:4,10:4,11:4,12:4,13:4,14:4
qos_ca_sl2vl 0,1,2,3,4,5,6,7,8,9,10,11,12,13,14,7
qos_swe_max_vls 15
qos_swe_high_limit 0
qos_swe_vlarb_high
0:4,1:0,2:0,3:0,4:0,5:0,6:0,7:0,8:0,9:0,10:0,11:0,12:0,13:0,14:0
qos_swe_vlarb_low
0:0,1:4,2:4,3:4,4:4,5:4,6:4,7:4,8:4,9:4,10:4,11:4,12:4,13:4,14:4
qos_swe_sl2vl 0,1,2,3,4,5,6,7,8,9,10,11,12,13,14,7
VL arbitration tables (both high and low) are lists of VL/Weight pairs. Each list entry contains a VL number (values from 0-14), and a weighting value (values 0-255), indicating
the number of 64 byte units (credits) which may be transmitted from that VL when its turn
in the arbitration occurs. A weight of 0 indicates that this entry should be skipped. If a list
entry is programmed for VL15 or for a VL that is not supported or is not currently configured by the port, the port may either skip that entry or send from any supported VL for that
entry.
Note, that the same VLs may be listed multiple times in the High or Low priority arbitration tables, and, further, it can be listed in both tables. The limit of high-priority VLArb
table (qos_<type>_high_limit) indicates the number of high-priority packets that can be
transmitted without an opportunity to send a low-priority packet. Specifically, the number
of bytes that can be sent is high_limit times 4K bytes.
A high_limit value of 255 indicates that the byte limit is unbounded.
Note:
If the 255 value is used, the low priority VLs may be starved.
A value of 0 indicates that only a single packet from the high-priority table may be sent
before an opportunity is given to the low-priority table.
Keep in mind that ports usually transmit packets of size equal to MTU. For instance, for
4KB MTU a single packet will require 64 credits, so in order to achieve effective VL arbitration for packets of 4KB MTU, the weighting values for each VL should be multiples of
64.
Below is an example of SL2VL and VL Arbitration configuration on subnet:
qos_ca_max_vls 15
qos_ca_high_limit 6
qos_ca_vlarb_high 0:4
qos_ca_vlarb_low 0:0,1:64,2:128,3:192,4:0,5:64,6:64,7:64
qos_ca_sl2vl 0,1,2,3,4,5,6,7,8,9,10,11,12,13,14,7
qos_swe_max_vls 15
qos_swe_high_limit 6
qos_swe_vlarb_high 0:4
Rev 1.50
Mellanox Technologies
Mellanox Technologies Confidential
121
qos_swe_vlarb_low 0:0,1:64,2:128,3:192,4:0,5:64,6:64,7:64
qos_swe_sl2vl 0,1,2,3,4,5,6,7,8,9,10,11,12,13,14,7
In this example, there are 8 VLs configured on subnet: VL0 to VL7. VL0 is defined as a
high priority VL, and it is limited to 6 x 4KB = 24KB in a single transmission burst. Such
configuration would suilt VL that needs low latency and uses small MTU when transmitting packets. Rest of VLs are defined as low priority VLs with different weights, while
VL4 is effectively turned off.
11.6.8 Deployment Example
Figure 6 shows an example of an InfiniBand subnet that has been configured by a QoS
manager to provide different service levels for various ULPs.
Figure 6: Example QoS Deployment on Infini-
11.7 QoS Configuration Examples
The following are examples of QoS configuration for different cluster deployments. Each
example provides the QoS level assignment and their administration via OpenSM configuration files.
11.7.1 Typical HPC Example: MPI and Lustre
Assignment of QoS Levels
• MPI
• Separate from I/O load
• Min BW of 70%
• Storage Control (Lustre MDS)
• Low latency
Mellanox Technologies
Mellanox Technologies Confidential
Rev 1.50
OpenSM – Subnet Manager
122
• Storage Data (Lustre OST)
• Min BW 30%
Administration
• MPI is assigned an SL via the command line
host1# mpirun –sl 0
• OpenSM QoS policy file
Note:
In the following policy file example, replace OST* and MDS* with the real
port GUIDs.
qos-ulps
default
:0 # default SL (for MPI)
any, target-port-guid OST1,OST2,OST3,OST4
:1 # SL for Lustre OST
any, target-port-guid MDS1,MDS2
:2 # SL for Lustre MDS
end-qos-ulps
• OpenSM options file
qos_max_vls 8
qos_high_limit 0
qos_vlarb_high 2:1
qos_vlarb_low 0:96,1:224
qos_sl2vl 0,1,2,3,4,5,6,7,15,15,15,15,15,15,15,15
11.7.2 EDC SOA (2-tier): IPoIB and SRP
The following is an example of QoS configuration for a typical enterprise data center
(EDC) with service oriented architecture (SOA), with IPoIB carrying all application traffic
and SRP used for storage.
QoS Levels
• Application traffic
• IPoIB (UD and CM) and SDP
• Isolated from storage
• Min BW of 50%
• SRP
• Min BW 50%
• Bottleneck at storage nodes
Administration
• OpenSM QoS policy file
Note:
Rev 1.50
In the following policy file example, replace SRPT* with the real SRP Target
port GUIDs.
Mellanox Technologies
Mellanox Technologies Confidential
123
qos-ulps
default
:0
ipoib
:1
sdp
:1
srp, target-port-guid SRPT1,SRPT2,SRPT3 :2
end-qos-ulps
• OpenSM options file
qos_max_vls 8
qos_high_limit 0
qos_vlarb_high 1:32,2:32
qos_vlarb_low 0:1,
qos_sl2vl 0,1,2,3,4,5,6,7,15,15,15,15,15,15,15,15
11.7.3 EDC (3-tier): IPoIB, RDS, SRP
The following is an example of QoS configuration for an enterprise data center (EDC),
with IPoIB carrying all application traffic, RDS for database traffic, and SRP used for
storage.
QoS Levels
• Management traffic (ssh)
• IPoIB management VLAN (partition A)
• Min BW 10%
• Application traffic
• IPoIB application VLAN (partition B)
• Isolated from storage and database
• Min BW of 30%
• Database Cluster traffic
• RDS
• Min BW of 30%
• SRP
• Min BW 30%
• Bottleneck at storage nodes
Administration
• OpenSM QoS policy file
Note:
In the following policy file example, replace SRPT* with the real SRP Initiator port GUIDs.
qos-ulps
default
: 0
ipoib, pkey 0x8001
: 1
Mellanox Technologies
Mellanox Technologies Confidential
Rev 1.50
OpenSM – Subnet Manager
124
ipoib, pkey 0x8002
: 2
rds
: 3
srp, target-port-guid SRPT1, SRPT2, SRPT3
: 4
end-qos-ulps
• OpenSM options file
qos_max_vls 8
qos_high_limit 0
qos_vlarb_high 1:32,2:96,3:96,4:96
qos_vlarb_low 0:1
qos_sl2vl 0,1,2,3,4,5,6,7,15,15,15,15,15,15,15,15
• Partition configuration file
Default=0x7fff,
ipoib : ALL=full;
PartA=0x8001, sl=1, ipoib : ALL=full;
PartB=0x8002, sl=2, ipoib : ALL=full;
Rev 1.50
Mellanox Technologies
Mellanox Technologies Confidential
125
12 InfiniBand Fabric Diagnostic Utilities
12.1 Overview
The diagnostic utilities described in this chapter provide means for debugging the connectivity and status of InfiniBand (IB) devices in a fabric. The tools are:
•
•
•
•
•
•
•
•
•
•
•
•
ibdiagnet - IB Net Diagnostic (page 127)
ibdiagpath - IB diagnostic path (page 129)
ibv_devices (page 131)
ibv_devinfo (page 131)
ibstatus (page 133)
ibportstate (page 135)
ibroute (page 140)
smpquery (page 144)
perfquery (page 147)
ibcheckerrs (page 151)
mstflint (page 153)
ibv_asyncwatch (page 156)
12.2 Utilities Usage
This section first describes common configuration, interface, and addressing for all the
tools in the package. Then it provides detailed descriptions of the tools themselves including: operation, synopsis and options descriptions, error codes, and examples.
12.2.1 Common Configuration, Interface and Addressing
Topology File (Optional)
An InfiniBand fabric is composed of switches and channel adapter (HCA/TCA) devices.
To identify devices in a fabric (or even in one switch system), each device is given a
GUID (a MAC equivalent). Since a GUID is a non-user-friendly string of characters, it is
better to alias it to a meaningful, user-given name. For this objective, the IB Diagnostic
Tools can be provided with a “topology file”, which is an optional configuration file specifying the IB fabric topology in user-given names.
For diagnostic tools to fully support the topology file, the user may need to provide the
local system name (if the local hostname is not used in the topology file).
To specify a topology file to a diagnostic tool use one of the following two options:
1.
On the command line, specify the file name using the option ‘-t <topology file
name>’
Mellanox Technologies
Mellanox Technologies Confidential
Rev 1.50
InfiniBand Fabric Diagnostic Utilities
126
2.
Define the environment variable IBDIAG_TOPO_FILE
To specify the local system name to an diagnostic tool use one of the following two
options:
1.
On the command line, specify the system name using the option ‘-s <local system
name>’
2.
Define the environment variable IBDIAG_SYS_NAME
12.2.2 IB Interface Definition
The diagnostic tools installed on a machine connect to the IB fabric by means of an HCA
port through which they send MADs. To specify this port to an IB diagnostic tool use one
of the following options:
1.
2.
On the command line, specify the port number using the option ‘-p <local port number>’ (see below)
Define the environment variable IBDIAG_PORT_NUM
In case more than one HCA device is installed on the local machine, it is necessary to
specify the device’s index to the tool as well. For this use on of the following options:
1.
2.
On the command line, specify the index of the local device using the following
option:
‘-i <index of local device>’
Define the environment variable IBDIAG_DEV_IDX
12.2.3 Addressing
Note:
This section applies to the ibdiagpath tool only. A tool command may
require defining the destination device or port to which it applies. The following addressing modes can be used to define the IB ports:
• Using a Directed Route to the destination: (Tool option ‘-d’)
This option defines a directed route of output port numbers from the local port to the destination.
• Using port LIDs: (Tool option ‘-l’):
In this mode, the source and destination ports are defined by means of their LIDs. If the fabric is configured to allow multiple LIDs per port, then using any of them is valid for defining a port.
• Using port names defined in the topology file: (Tool option ‘-n’)
This option refers to the source and destination ports by the names defined in the topology file. (Therefore, this option is relevant only if a topology file is specified to the tool.) In this mode, the tool uses the
names to extract the port LIDs from the matched topology, then the tool operates as in the ‘-l’ option.
Rev 1.50
Mellanox Technologies
Mellanox Technologies Confidential
127
12.3 ibdiagnet - IB Net Diagnostic
ibdiagnet scans the fabric using directed route packets and extracts all the available information regarding its connectivity and devices. It then produces the following files in the
output directory (which is defined by the -o option described below).
12.3.1 SYNOPSYS
ibdiagnet [-c <count>] [-v] [-r] [-o <out-dir>] [-t <topo-file>]
[-s <sys-name>] [-i <dev-index>] [-p <port-num>] [-wt]
[-pm] [-pc] [-P <<PM>=<Value>>] [-lw <1x|4x|12x>] [-ls
<2.5|5|10>]
[-skip <ibdiag_check/s>] [-load_db <db_file>]
OPTIONS:
-c <count>
Min number of packets to be sent across each link
(default = 10)
-v
Enable verbose mode
-r
Provides a report of the fabric qualities
-t <topo-file>
Specifies the topology file name
-s <sys-name>
Specifies the local system name. Meaningful only if
a topology file is specified
-i <dev-index>
Specifies the index of the device of the port used to
connect to the IB fabric (in case of multiple
devices on the local system)
-p <port-num>
Specifies the local device's port num used to connect to the IB fabric
-o <out-dir>
Specifies the directory where the output files will
be placed (default = /tmp)
-lw <1x|4x|12x>
Specifies the expected link width
-ls <2.5|5|10>
Specifies the expected link speed
-pm
Dump all the fabric links, pm Counters into ibdiagnet.pm
-pc
Reset all the fabric links pmCounters
-P <PM=<Trash>>
If any of the provided pm is greater then its provided value, print it to screen
-skip <skip-option(s)>Skip the executions of the selected checks. Skip
options (one or more can be specified): dup_guids
zero_guids pm logical_state part ipoib all
-wt <file-name>
Write out the discovered topology into the given
file. This flag is useful if you later want to check
for changes from the current state of the fabric. A
directory named ibdiag_ibnl is also created by this
option, and holds the IBNL files required to load
this topology. To use these files you will need to
set the environment variable named IBDM_IBNL_PATH to
that directory. The directory is located in /tmp or
in the output directory provided by the -o flag.
-load_db <file-name>>Load subnet data from the given .db file, and skip
subnet discovery stage.
Mellanox Technologies
Mellanox Technologies Confidential
Rev 1.50
InfiniBand Fabric Diagnostic Utilities
128
Note: Some of the checks require actual subnet discovery, and therefore would not run when load_db is
specified. These checks are: Duplicated/zero guids,
link state, SMs status.
-h|--help
Prints the help page information
-V|--version
Prints the version of the tool
--vars
Prints the tool's environment variables and their
values
12.3.2 Output Files
Table 7 - ibdiagnet Output Files
Output File
Description
ibdiagnet.log
A dump of all the application reports generate according to the provided flags
ibdiagnet.lst
List of all the nodes, ports and links in the fabric
ibdiagnet.fdbs
A dump of the unicast forwarding tables of the fabric switches
ibdiagnet.mcfdbs
A dump of the multicast forwarding tables of the fabric switches
ibdiagnet.masks
In case of duplicate port/node Guids, these file include the map between masked Guid and real Guids
ibdiagnet.sm
List of all the SM (state and priority) in the fabric
ibdiagnet.pm
A dump of the pm Counters values, of the fabric links
ibdiagnet.pkey
A dump of the the existing partitions and their member host ports
ibdiagnet.mcg
A dump of the multicast groups, their properties and member host ports
ibdiagnet.db
A dump of the internal subnet database. This file can be loaded in later runs using the -load_db option
In addition to generating the files above, the discovery phase also checks for duplicate
node/port GUIDs in the IB fabric. If such an error is detected, it is displayed on the standard output. After the discovery phase is completed, directed route packets are sent multiple times (according to the -c option) to detect possible problematic paths on which
packets may be lost. Such paths are explored, and a report of the suspected bad links is displayed on the standard output.
After scanning the fabric, if the -r option is provided, a full report of the fabric qualities is
displayed. This report includes:
• SM report
• Number of nodes and systems
• Hop-count information: maximal hop-count, an example path, and a hop-count histogram
• All CA-to-CA paths traced
• Credit loop report
• mgid-mlid-HCAs multicast group and report
• Partitions report
• IPoIB report
Rev 1.50
Mellanox Technologies
Mellanox Technologies Confidential
129
Note:
In case the IB fabric includes only one CA, then CA-to-CA paths are not
reported. Furthermore, if a topology file is provided, ibdiagnet uses the
names defined in it for the output reports.
12.3.3 ERROR CODES
1
2
3
4
5
6
-
Failed
Failed
Failed
Failed
Failed
Failed
to
to
to
to
to
to
fully discover the fabric
parse command line options
intract with IB fabric
use local device or local port
use Topology File
load requierd Package
12.4 ibdiagpath - IB diagnostic path
ibdiagpath traces a path between two end-points and provides information regarding
the nodes and ports traversed along the path. It utilizes device specific health queries for
the different devices along the path.
The way ibdiagpath operates depends on the addressing mode used on the command
line. If directed route addressing is used (-d flag), the local node is the source node and the
route to the destination port is known apriori. On the other hand, if LID-route (or byname) addressing is employed, then the source and destination ports of a route are specified by their LIDs (or by the names defined in the topology file). In this case, the actual
path from the local port to the source port, and from the source port to the destination port,
is defined by means of Subnet Management Linear Forwarding Table queries of the switch
nodes along that path. Therefore, the path cannot be predicted as it may change.
ibdiagpath should not be supplied with contradicting local ports by the -p and -d flags
(see synopsis descriptions below). In other words, when ibdiagpath is provided with the
options -p and -d together, the first port in the direct route must be equal to the one specified in the “-p” option. Otherwise, an error is reported.
Note:
When ibdiagpath queries for the performance counters along the path
between the source and destination ports, it always traverses the LID route,
even if a directed route is specified. If along the LID route one or more links
are not in the ACTIVE state, ibdiagpath reports an error.
Moreover, the tool allows omitting the source node in LID-route addressing, in which case
the local port on the machine running the tool is assumed to be the source.
12.4.1 SYNOPSYS
ibdiagpath {-n <[src-name,]dst-name>|-l <[src-lid,]dst-lid>|
-d <p1,p2,p3,...>} [-c <count>] [-v] [-t <topo-file>]
[-s <sys-name>] [-ic<dev-index>]c[-p <port-num>] [-o <out-dir>]
[-lw <1x|4x|12x>] [-ls <2.5|5|10>][-pm] [-pc]
[-P <<PM counter>=<Trash Limit>>]
Mellanox Technologies
Mellanox Technologies Confidential
Rev 1.50
InfiniBand Fabric Diagnostic Utilities
130
OPTIONS:
-n <[src-name,]dst-name>
Names of the source and destination ports (as defined in
the topology file; source may be omitted -> local port is
assumed to be the source)
-l <[src-lid,]dst-lid>
Source and destination LIDs (source may be omitted -->
the local port is assumed to be the source)
-d <p1,p2,p3,...>
Directed route from the local node (which is the source)
and the destination node
-c <count>
The minimal number of packets to be sent across each link
(default = 100)
-v
Enable verbose mode
-t <topo-file>
Specifies the topology file name
-s <sys-name>
Specifies the local system name. Meaningful only if a
topology file is specified
-i <dev-index>
Specifies the index of the device of the port used to
connect to the IB fabric (in case of multiple devices on
the local system)
-p <port-num>
Specifies the local device's port number used to connect
to the IB fabric
-o <out-dir>
Specifies the directory where the output files will be
placed (default = /tmp)
-lw <1x|4x|12x>
Specifies the expected link width
-ls <2.5|5|10>
Specifies the expected link speed
-pm
Dump all the fabric links, pm Counters into ibdiagnet.pm
-pc
Reset all the fabric links pmCounters
-P <PM=<Trash>>
If any of the provided pm is greater then its provided
value, print it to screen
-h|--help
Prints the help page information
-V|--version
Prints the version of the tool
--vars
Prints the tool's environment variables and their values
12.4.2 Output Files
Table 8 - ibdiagpath Output Files
Output File
Description
ibdiagpath.log
A dump of all the application reports generated according to the provided flags
ibdiagnet.pm
A dump of the Performance Counters values, of the fabric links
12.4.3 ERROR CODES
1 - The path traced is un-healthy
2 - Failed to parse command line options
Rev 1.50
Mellanox Technologies
Mellanox Technologies Confidential
131
3 - More then 64 hops are required for traversing the local port
to the
"Source" port and then to the "Destination" port
4 - Unable to traverse the LFT data from source to destination
5 - Failed to use Topology File
6 - Failed to load required Package
12.5 ibv_devices
Applicable Hardware
All InfiniBand devices.
Description
Lists InfiniBand devices available for use from userspace, including node GUIDs.
Synopsis
ibv_devices
Examples
1.
List the names of all available InfiniBand devices.
> ibv_devices
device
-----mthca0
mlx4_0
node GUID
---------------0002c9000101d150
0000000000073895
12.6 ibv_devinfo
Applicable Hardware
All InfiniBand devices.
Description
Queries InfiniBand devices and prints about them information that is available for use
from userspace.
Synopsis
ibv_devinfo [-d <device>] [-i <port>] [-l] [-v]
Mellanox Technologies
Mellanox Technologies Confidential
Rev 1.50
InfiniBand Fabric Diagnostic Utilities
132
Table 9 lists the various flags of the command.
Table 9 - ibv_devinfo Flags and Options
Flag
Optional /
Mandatory
Default
(If Not
Specified)
Description
-d <device>
--ibdev=<device>
Optional
First found device
Run the command for the provided IB device ‘device’
-i <port>
--ib-port=<port>
Optional
All device ports
Query the specified device port <port>
-l
--list
Optional
Inactive
Only list the names of InfiniBand devices
-v
--verbose
Optional
Inactive
Print all available information about the InfiniBand device(s)
Examples
1.
List the names of all available InfiniBand devices.
> ibv_devinfo -l
2 HCAs found:
mthca0
mlx4_0
Rev 1.50
Mellanox Technologies
Mellanox Technologies Confidential
133
2.
Query the device mlx4_0 and print user-available information for its Port 2.
> ibv_devinfo -d mlx4_0 -i 2
hca_id: mlx4_0
fw_ver:
node_guid:
sys_image_guid:
vendor_id:
vendor_part_id:
hw_ver:
board_id:
phys_port_cnt:
port:
2
state:
max_mtu:
active_mtu:
sm_lid:
port_lid:
port_lmc:
2.5.944
0000:0000:0007:3895
0000:0000:0007:3898
0x02c9
25418
0xA0
MT_04A0140005
2
PORT_ACTIVE (4)
2048 (4)
2048 (4)
1
1
0x00
12.7 ibstatus
Applicable Hardware
All InfiniBand devices.
Description
Displays basic information obtained from the local InfiniBand driver. Output includes
LID, SMLID, port state, port physical state, port width and port rate.
Synopsis
ibstatus
[-h] [<device name>[:<port>]]*
Table 10 lists the various flags of the command.
Table 10 - ibstatus Flags and Options
Flag
Optional /
Mandatory
Default
(If Not
Specified)
Description
-h
Optional
Print the help menu
<device>
Optional
All devices
Print information for the specified device. May specify more
than one device
<port>
Optional, but
requires specifying a device name
All ports of the
specified device
Print information for the specified port only (of the specified
device)
Mellanox Technologies
Mellanox Technologies Confidential
Rev 1.50
InfiniBand Fabric Diagnostic Utilities
134
Examples
1.
List the status of all available InfiniBand devices and their ports.
> ibstatus
Infiniband device 'mlx4_0' port 1 status:
default gid:
fe80:0000:0000:0000:0000:0000:0007:3896
base lid:
0x3
sm lid:
0x3
state:
4: ACTIVE
phys state:
5: LinkUp
rate:
20 Gb/sec (4X DDR)
Infiniband device 'mlx4_0' port 2 status:
default gid:
fe80:0000:0000:0000:0000:0000:0007:3897
base lid:
0x1
sm lid:
0x1
state:
4: ACTIVE
phys state:
5: LinkUp
rate:
20 Gb/sec (4X DDR)
Infiniband device 'mthca0' port 1 status:
default gid:
fe80:0000:0000:0000:0002:c900:0101:d151
base lid:
0x0
sm lid:
0x0
state:
2: INIT
phys state:
5: LinkUp
rate:
10 Gb/sec (4X)
Rev 1.50
Mellanox Technologies
Mellanox Technologies Confidential
135
2.
List the status of specific ports of specific devices.
> ibstatus mthca0:1 mlx4_0:2
Infiniband device 'mthca0' port 1 status:
default gid:
fe80:0000:0000:0000:0002:c900:0101:d151
base lid:
0x0
sm lid:
0x0
state:
2: INIT
phys state:
5: LinkUp
rate:
10 Gb/sec (4X)
Infiniband device 'mlx4_0' port 2 status:
default gid:
fe80:0000:0000:0000:0000:0000:0007:3897
base lid:
0x1
12.8 ibportstate
Applicable Hardware
All InfiniBand devices.
Description
Enables querying the logical (link) and physical port states of an InfiniBand port. It also
allows adjusting the link speed that is enabled on any InfiniBand port.
If the queried port is a swich port, then ibportstate can be used to
• disable, enable or reset the port
• validate the port’s link width and speed against the peer port
Synopsis
ibportstate [-d] [-e] [-v] [-V] [-D] [-G] [-s <smlid>] \
[-C <ca_name>] [-P <ca_port>] [-t <timeout_ms>] \
[<dest dr_path|lid|guid>] <portnum> [<op> [<value>]]
Mellanox Technologies
Mellanox Technologies Confidential
Rev 1.50
InfiniBand Fabric Diagnostic Utilities
136
Table 11 lists the various flags of the command.
Table 11 - ibportstate Flags and Options
Flag
Optional /
Mandatory
Default
(If Not
Specified)
Description
-h(help)
Optional
Print the help menu
-d(ebug)
Optional
Raise the IB debug level. May be used several times for higher
debug levels (-ddd or -d -d -d)
-e(rr_show)
Optional
Show send and receive errors (timeouts and others)
-v(erbose)
Optional
Increase verbosity level. May be used several times for additional verbosity (-vvv or -v -v -v)
-V(ersion)
Optional
Show version info
-D(irect)
Optional
Use directed path address arguments. The path is a comma separated list of out ports.
Examples:
‘0’ – self port
‘0,1,2,1,4’ – out via port 1, then 2, ...
-G(uid)
Optional
Use GUID address argument. In most cases, it is the Port
GUID. Example:
‘0x08f1040023’
-s <smlid>
Optional
Use <smlid> as the target lid for SM/SA queries
-C <ca_name>
Optional
Use the specified channel adapter or router
-P <ca_port>
Optional
Use the specified port
-t <timeout_ms>
Optional
Override the default timeout for the solicited MADs [msec]
<dest dr_path | lid
| guid>
Optional
Destination’s directed path, LID, or GUID.
<portnum>
Optional
Destination’s port number
<op> [<value>]
Optional
query
Define the allowed port operations: enable, disable, reset,
speed, and query
In case of multiple channel adapters (CAs) or multiple ports without a CA/port being specified, a port is chosen by the utility according to the following criteria:
1.
2.
Rev 1.50
The first ACTIVE port that is found.
If not found, the first port that is UP (physical link state is LinkUp).
Mellanox Technologies
Mellanox Technologies Confidential
137
Examples
1.
Query the status of Port 1 of CA mlx4_0 (using ibstatus) and use its output (the LID
– 3 in this case) to obtain additional link information using ibportstate.
> ibstatus mlx4_0:1
Infiniband device 'mlx4_0' port 1 status:
default gid:
fe80:0000:0000:0000:0000:0000:9289:3895
base lid:
0x3
sm lid:
0x3
state:
2: INIT
phys state:
5: LinkUp
rate:
20 Gb/sec (4X DDR)
> ibportstate -C mlx4_0 3 1 query
PortInfo:
# Port info: Lid 3 port 1
LinkState:.......................Initialize
PhysLinkState:...................LinkUp
LinkWidthSupported:..............1X or 4X
LinkWidthEnabled:................1X or 4X
Mellanox Technologies
Mellanox Technologies Confidential
Rev 1.50
InfiniBand Fabric Diagnostic Utilities
138
2.
Query the status of two channel adapters using directed paths.
> ibportstate -C mlx4_0 -D 0 1
PortInfo:
# Port info: DR path slid 65535; dlid 65535; 0 port 1
LinkState:.......................Initialize
PhysLinkState:...................LinkUp
LinkWidthSupported:..............1X or 4X
LinkWidthEnabled:................1X or 4X
LinkWidthActive:.................4X
LinkSpeedSupported:..............2.5 Gbps or 5.0 Gbps
LinkSpeedEnabled:................2.5 Gbps or 5.0 Gbps
LinkSpeedActive:.................5.0 Gbps
> ibportstate -C mthca0 -D 0 1
PortInfo:
# Port info: DR path slid 65535; dlid 65535; 0 port 1
LinkState:.......................Down
PhysLinkState:...................Polling
LinkWidthSupported:..............1X or 4X
LinkWidthEnabled:................1X or 4X
LinkWidthActive:.................4X
Rev 1.50
Mellanox Technologies
Mellanox Technologies Confidential
139
3.
Change the speed of a port.
# First query for current configuration
> ibportstate -C mlx4_0 -D 0 1
PortInfo:
# Port info: DR path slid 65535; dlid 65535; 0 port 1
LinkState:.......................Initialize
PhysLinkState:...................LinkUp
LinkWidthSupported:..............1X or 4X
LinkWidthEnabled:................1X or 4X
LinkWidthActive:.................4X
LinkSpeedSupported:..............2.5 Gbps or 5.0 Gbps
LinkSpeedEnabled:................2.5 Gbps or 5.0 Gbps
LinkSpeedActive:.................5.0 Gbps
# Now change the enabled link speed
> ibportstate -C mlx4_0 -D 0 1 speed 2
ibportstate -C mlx4_0 -D 0 1 speed 2
Initial PortInfo:
# Port info: DR path slid 65535; dlid 65535; 0 port 1
LinkSpeedEnabled:................2.5 Gbps
After PortInfo set:
# Port info: DR path slid 65535; dlid 65535; 0 port 1
LinkSpeedEnabled:................5.0 Gbps (IBA extension)
# Show the new configuration
> ibportstate -C mlx4_0 -D 0 1
PortInfo:
# Port info: DR path slid 65535; dlid 65535; 0 port 1
LinkState:.......................Initialize
PhysLinkState:...................LinkUp
Mellanox Technologies
Mellanox Technologies Confidential
Rev 1.50
InfiniBand Fabric Diagnostic Utilities
140
12.9 ibroute
Applicable Hardware
InfiniBand switches.
Description
Uses SMPs to display the forwarding tables—unicast (LinearForwardingTable or LFT) or
multicast (MulticastForwardingTable or MFT)—for the specified switch LID and the
optional lid (mlid) range. The default range is all valid entries in the range 1 to FDBTop.
Synopsis
ibroute [-h] [-d] [-v] [-V] [-a] [-n] [-D] [-G] [-M] [-s <smlid>] \
[-C <ca_name>] [-P <ca_port>] [-t <timeout_ms>] \
[<dest dr_path|lid|guid> [<startlid> [<endlid>]]]
Table 12 lists the various flags of the command.
Table 12 - ibportstate Flags and Options
Flag
Rev 1.50
Optional /
Mandatory
Default
(If Not
Specified)
Description
-h(help)
Optional
Print the help menu
-d(ebug)
Optional
Raise the IB debug level. May be used several times for higher
debug levels (-ddd or -d -d -d)
-a(ll)
Optional
Show all LIDs in range, including invalid entries
-v(erbose)
Optional
Increase verbosity level. May be used several times for additional verbosity (-vvv or -v -v -v)
-V(ersion)
Optional
Show version info
-a(ll)
Optional
Show all LIDs in range, including invalid entries
-n(o_dests)
Optional
Do not try to resolve destinations
-D(irect)
Optional
Use directed path address arguments. The path is a comma separated list of out ports.
Examples:
‘0’ – self port
‘0,1,2,1,4’ – out via port 1, then 2, ...
-G(uid)
Optional
Use GUID address argument. In most cases, it is the Port
GUID. Example:
‘0x08f1040023’
-M(ulticast)
Optional
Show multicast forwarding tables. The parameters <startlid>
and <endlid> specify the MLID range.
-s <smlid>
Optional
Use <smlid> as the target LID for SM/SA queries
-C <ca_name>
Optional
Use the specified channel adapter or router
-P <ca_port>
Optional
Use the specified port
-t <timeout_ms>
Optional
Override the default timeout for the solicited MADs [msec]
Mellanox Technologies
Mellanox Technologies Confidential
141
Table 12 - ibportstate Flags and Options
Flag
Optional /
Mandatory
Default
(If Not
Specified)
Description
<dest dr_path | lid
| guid>
Optional
Destination’s directed path, LID, or GUID
<startlid>
Optional
Starting LID in an MLID range
<endlid>
Optional
Ending LID in an MLID range
Examples
1.
Dump all Lids with valid out ports of the switch with Lid 2.
> ibroute 2
Unicast lids [0x0-0x8] of switch Lid 2 guid
0x0002c902fffff00a (MT47396 Infiniscale-III Mellanox
Technologies):
Lid Out
Destination
Port
Info
0x0002 000 : (Switch portguid 0x0002c902fffff00a:
'MT47396 Infiniscale-III Mellanox Technologies')
0x0003 021 : (Switch portguid 0x000b8cffff004016:
'MT47396 Infiniscale-III Mellanox Technologies')
0x0006 007 : (Channel Adapter portguid
0x0002c90300001039: 'sw137 HCA-1')
0x0007 021 : (Channel Adapter portguid
0x0002c9020025874a: 'sw157 HCA-1')
Mellanox Technologies
Mellanox Technologies Confidential
Rev 1.50
InfiniBand Fabric Diagnostic Utilities
142
2.
Dump all Lids with valid out ports of the switch with Lid 2.
> ibroute 2
Unicast lids [0x0-0x8] of switch Lid 2 guid
0x0002c902fffff00a (MT47396 Infiniscale-III Mellanox
Technologies):
Lid Out
Destination
Port
Info
0x0002 000 : (Switch portguid 0x0002c902fffff00a:
'MT47396 Infiniscale-III Mellanox Technologies')
0x0003 021 : (Switch portguid 0x000b8cffff004016:
'MT47396 Infiniscale-III Mellanox Technologies')
0x0006 007 : (Channel Adapter portguid
0x0002c90300001039: 'sw137 HCA-1')
0x0007 021 : (Channel Adapter portguid
0x0002c9020025874a: 'sw157 HCA-1')
3.
Dump all Lids in the range 3 to 7 with valid out ports of the switch with Lid 2.
> ibroute 2 3 7
Unicast lids [0x3-0x7] of switch Lid 2 guid
0x0002c902fffff00a (MT47396 Infiniscale-III Mellanox
Technologies):
Lid Out
Destination
Port
Info
0x0003 021 : (Switch portguid 0x000b8cffff004016:
'MT47396 Infiniscale-III Mellanox Technologies')
0x0006 007 : (Channel Adapter portguid
0x0002c90300001039: 'sw137 HCA-1')
Rev 1.50
Mellanox Technologies
Mellanox Technologies Confidential
143
4.
Dump
all
Lids
with
valid
out
ports
of
the
switch
with
portguid
> ibroute -G 0x000b8cffff004016
Unicast lids [0x0-0x8] of switch Lid 3 guid
0x000b8cffff004016 (MT47396 Infiniscale-III Mellanox
Technologies):
Lid Out
Destination
Port
Info
0x0002 023 : (Switch portguid 0x0002c902fffff00a:
'MT47396 Infiniscale-III Mellanox Technologies')
0x0003 000 : (Switch portguid 0x000b8cffff004016:
'MT47396 Infiniscale-III Mellanox Technologies')
0x0006 023 : (Channel Adapter portguid
0x0002c90300001039: 'sw137 HCA-1')
0x0007 020 : (Channel Adapter portguid
0x0002c9020025874a: 'sw157 HCA-1')
0x000b8cffff004016.
5.
Dump all non-empty mlids of switch with Lid 3.
> ibroute -M 3
Multicast mlids [0xc000-0xc3ff] of switch Lid 3 guid
0x000b8cffff004016 (MT47396 Infiniscale-III Mellanox
Technologies):
0
1
2
Ports: 0 1 2 3 4 5 6 7 8 9 0 1 2 3 4 5 6 7 8 9 0 1 2
3 4
MLid
0xc000
x
0xc001
x
0xc002
x
0xc003
x
0xc020
x
0xc021
x
0xc022
x
0xc023
x
0xc024
x
Mellanox Technologies
Mellanox Technologies Confidential
Rev 1.50
InfiniBand Fabric Diagnostic Utilities
144
12.10smpquery
Applicable Hardware
All InfiniBand devices.
Description
Provides a basic subset of standard SMP queries to query Subnet management attributes
such as node info, node description, switch info, and port info.
Synopsys
smpquery [-h] [-d] [-e] [-v] [-D] [-G] [-s <smlid>] [-V]
[-C <ca_name>] [-P <ca_port>] [-t <timeout_ms>]
[--node-name-map <node-name-map>]
<op> <dest dr_path|lid|guid> [op params]
Table 13 lists the various flags of the command.
Table 13 - smpquery Flags and Options
Flag
Rev 1.50
Optional /
Mandatory
Default
(If Not
Specified)
Description
-h(help)
Optional
Print the help menu
-d(ebug)
Optional
Raise the IB debug level. May be used several times for higher
debug levels (-ddd or -d -d -d)
-e(rr_show)
Optional
Show send and receive errors (timeouts and others)
-v(erbose)
Optional
Increase verbosity level. May be used several times for additional verbosity (-vvv or -v -v -v)
-D(irect)
Optional
Use directed path address arguments. The path is a comma separated list of out ports.
Examples:
‘0’ – self port
‘0,1,2,1,4’ – out via port 1, then 2, ...
-G(uid)
Optional
Use GUID address argument. In most cases, it is the Port
GUID. Example:
‘0x08f1040023’
-s <smlid>
Optional
Use <smlid> as the target LID for SM/SA queries
-V(ersion)
Optional
Show version info
-C <ca_name>
Optional
Use the specified channel adapter or router
-P <ca_port>
Optional
Use the specified port
-t <timeout_ms>
Optional
Override the default timeout for the solicited MADs [msec]
Mellanox Technologies
Mellanox Technologies Confidential
145
Table 13 - smpquery Flags and Options
Flag
Optional /
Mandatory
Default
(If Not
Specified)
Description
<op>
Mandatory
Supported operations:
nodeinfo <addr>
nodedesc <addr>
portinfo <addr> [<portnum>]
switchinfo <addr>
pkeys <addr> [<portnum>]
sl2vl <addr> [<portnum>]
vlarb <addr> [<portnum>]
guids <addr>
<dest dr_path | lid
| guid>
Optional
Destination’s directed path, LID, or GUID
Mellanox Technologies
Mellanox Technologies Confidential
Rev 1.50
InfiniBand Fabric Diagnostic Utilities
146
Examples
1.
Query PortInfo by LID, with port modifier.
> smpquery portinfo 1 1
# Port info: Lid 1 port 1
Mkey:............................0x0000000000000000
GidPrefix:.......................0xfe80000000000000
Lid:.............................0x0001
SMLid:...........................0x0001
CapMask:.........................0x251086a
IsSM
IsTrapSupported
IsAutomaticMigrationSupported
IsSLMappingSupported
IsSystemImageGUIDsupported
IsCommunicatonManagementSupported
IsVendorClassSupported
IsCapabilityMaskNoticeSupported
IsClientRegistrationSupported
DiagCode:........................0x0000
MkeyLeasePeriod:.................0
LocalPort:.......................1
LinkWidthEnabled:................1X or 4X
LinkWidthSupported:..............1X or 4X
LinkWidthActive:.................4X
LinkSpeedSupported:..............2.5 Gbps or 5.0 Gbps
LinkState:.......................Active
PhysLinkState:...................LinkUp
LinkDownDefState:................Polling
ProtectBits:.....................0
LMC:.............................0
LinkSpeedActive:.................5.0 Gbps
LinkSpeedEnabled:................2.5 Gbps or 5.0 Gbps
NeighborMTU:.....................2048
SMSL:............................0
VLCap:...........................VL0-7
InitType:........................0x00
VLHighLimit:.....................4
VLArbHighCap:....................8
VLArbLowCap:.....................8
InitReply:.......................0x00
MtuCap:..........................2048
VLStallCount:....................0
HoqLife:.........................31
OperVLs:.........................VL0-3
PartEnforceInb:..................0
PartEnforceOutb:.................0
Rev 1.50
Mellanox Technologies
Mellanox Technologies Confidential
147
2.
Query SwitchInfo by GUID.
> smpquery -G switchinfo 0x000b8cffff004016
# Switch info: Lid 3
LinearFdbCap:....................49152
RandomFdbCap:....................0
McastFdbCap:.....................1024
LinearFdbTop:....................8
DefPort:.........................0
DefMcastPrimPort:................0
DefMcastNotPrimPort:.............0
LifeTime:........................18
StateChange:.....................0
LidsPerPort:.....................0
PartEnforceCap:..................32
InboundPartEnf:..................1
OutboundPartEnf:.................1
3.
Query NodeInfo by direct route.
> smpquery -D nodeinfo 0
# Node info: DR path slid 65535; dlid 65535; 0
BaseVers:........................1
ClassVers:.......................1
NodeType:........................Channel Adapter
NumPorts:........................2
SystemGuid:......................0x0002c9030000103b
Guid:............................0x0002c90300001038
PortGuid:........................0x0002c90300001039
PartCap:.........................128
DevId:...........................0x634a
Revision:........................0x000000a0
12.11 perfquery
Applicable Hardware
All InfiniBand devices.
Mellanox Technologies
Mellanox Technologies Confidential
Rev 1.50
InfiniBand Fabric Diagnostic Utilities
148
Description
Queries InfiniBand ports’ performance and error counters. Optionally, it displays aggregated counters for all ports of a node. It can also reset counters after reading them or simply reset them.
Synopsys
perfquery [-h] [-d] [-G] [-a] [-l] [-r] [-C <ca_name>] [-P
<ca_port>] [-R]
[-t <timeout_ms>] [-V] [<lid|guid> [[port][reset_mask]]]
Table 14 lists the various flags of the command.
Table 14 - perfquery Flags and Options
Flag
Optional /
Mandatory
Default
(If Not
Specified)
Description
-h(help)
Optional
Print the help menu
-d(ebug)
Optional
Raise the IB debug level. May be used several times for higher
debug levels (-ddd or -d -d -d)
-G(uid)
Optional
Use GUID address argument. In most cases, it is the Port
GUID. Example:
‘0x08f1040023’
-a
Optional
Apply query to all ports
-l
Optional
Loop ports
-r
Optional
Reset the counters after reading them
-C <ca_name>
Optional
Use the specified channel adapter or router
-P <ca_port>
Optional
Use the specified port
-R
Optional
Reset the counters
-t <timeout_ms>
Optional
Override the default timeout for the solicited MADs [msec]
-V(ersion)
Optional
Show version info
<lid | guid>
[[port][reset_mask
]]
Optional
LID or GUID
Examples
perfquery -r 32 1
# read performance counters and reset
perfquery -e -r 32 1 # read extended performance counters and reset
perfquery -R 0x20 1
# reset performance counters of port 1 only
perfquery -e -R 0x20 1 # reset extended performance counters of port 1 only
Rev 1.50
Mellanox Technologies
Mellanox Technologies Confidential
149
perfquery -R -a 32
# reset performance counters of all ports
perfquery -R 32 2 0x0fff
perfquery -R 32 2 0xf000
1.
# reset only error counters of port 2
# reset only non-error counters of port 2
Read local port's performance counters.
> perfquery
# Port counters: Lid 6 port 1
PortSelect:......................1
CounterSelect:...................0x1000
SymbolErrors:....................0
LinkRecovers:....................0
LinkDowned:......................0
RcvErrors:.......................0
RcvRemotePhysErrors:.............0
RcvSwRelayErrors:................0
XmtDiscards:.....................0
XmtConstraintErrors:.............0
RcvConstraintErrors:.............0
LinkIntegrityErrors:.............0
ExcBufOverrunErrors:.............0
VL15Dropped:.....................0
Mellanox Technologies
Mellanox Technologies Confidential
Rev 1.50
InfiniBand Fabric Diagnostic Utilities
150
2.
Read performance counters from LID 2, all ports.
> smpquery -a 2
# Port counters: Lid 2 port 255
PortSelect:......................255
CounterSelect:...................0x0100
SymbolErrors:....................65535
LinkRecovers:....................255
LinkDowned:......................16
RcvErrors:.......................657
RcvRemotePhysErrors:.............0
RcvSwRelayErrors:................70
XmtDiscards:.....................488
XmtConstraintErrors:.............0
RcvConstraintErrors:.............0
LinkIntegrityErrors:.............0
ExcBufOverrunErrors:.............0
VL15Dropped:.....................0
3.
Read then reset performance counters from LID 2, port 1.
> perfquery -r 2 1
# Port counters: Lid 2 port 1
PortSelect:......................1
CounterSelect:...................0x0100
SymbolErrors:....................0
LinkRecovers:....................0
LinkDowned:......................0
RcvErrors:.......................0
RcvRemotePhysErrors:.............0
RcvSwRelayErrors:................0
XmtDiscards:.....................3
XmtConstraintErrors:.............0
RcvConstraintErrors:.............0
LinkIntegrityErrors:.............0
ExcBufOverrunErrors:.............0
VL15Dropped:.....................0
XmtData:.........................0
Rev 1.50
Mellanox Technologies
Mellanox Technologies Confidential
151
12.12ibcheckerrs
Applicable Hardware
All InfiniBand devices.
Description
Validates an IB port (or node) and reports errors in counters above threshold.
Check specified port (or node) and report errors that surpassed their predefined threshold.
Port address is lid unless -G option is used to specify a GUID address. The predefined
thresholds can be dumped using the -s option, and a user defined threshold_file (using the
same format as the dump) can be specified using the -t <file> option.
Synopsis
ibcheckerrs [-h] [-b] [-v] [-G] [-T <threshold_file>] [-s] [-N |
-nocolor] [-C ca_name] [-P ca_port] [-t timeout_ms] <lid|guid>
[<port>]
Table 15 lists the various flags of the command.
Table 15 - ibcheckerrs Flags and Options
Flag
Optional /
Mandatory
Default
(If Not
Specified)
Description
-h(help)
Optional
Print the help menu
-b
Optional
Print in brief mode. Reduce the output to show only if errors are
present, not what they are
-v(erbose)
Optional
Increase verbosity level. May be used several times for additional verbosity (-vvv or -v -v -v)
-G(uid)
Optional
Use GUID address argument. In most cases, it is the Port
GUID. Example: ‘0x08f1040023’
-T
<threshold_file>
Optional
Use specified threshold file
-s
Optional
Show the predefined thresholds
-N | -nocolor
Optional
-C <ca_name>
Optional
Use the specified channel adapter or router
-P <ca_port>
Optional
Use the specified port
-t <timeout_ms>
Optional
Override the default timeout for the solicited MADs [msec]
<lid | guid>
Mandatory with G flag
Use the specified port’s or node’s LID/GUID (with -G option)
[<port>]
Mandatory without
-G flag
Use the specified port
color mode
Use mono mode rather than color mode
Mellanox Technologies
Mellanox Technologies Confidential
Rev 1.50
InfiniBand Fabric Diagnostic Utilities
152
Examples
1.
Check aggregated node counter for LID 0x2.
> ibcheckerrs 2
#warn: counter SymbolErrors = 65535
(threshold 10) lid
2 port 255
#warn: counter LinkRecovers = 255
(threshold 10) lid
2 port 255
#warn: counter LinkDowned = 12 (threshold 10) lid 2 port
255
#warn: counter RcvErrors = 565 (threshold 10) lid 2 port
255
#warn: counter XmtDiscards = 441
(threshold 100)
2.
Check port counters for LID 2 Port 1.
> ibcheckerrs -v 2 1
Error check on lid 2 (MT47396 Infiniscale-III Mellanox
Technologies) port 1: OK
3.
Check the LID2 Port 1 using the specified threshold file.
> cat thresh1
SymbolErrors=10
LinkRecovers=10
LinkDowned=10
RcvErrors=10
RcvRemotePhysErrors=100
RcvSwRelayErrors=100
XmtDiscards=100
XmtConstraintErrors=100
RcvConstraintErrors=100
LinkIntegrityErrors=10
ExcBufOverrunErrors=10
VL15Dropped=100
Rev 1.50
Mellanox Technologies
Mellanox Technologies Confidential
153
12.13mstflint
Applicable Hardware
Mellanox InfiniBand and Ethernet devices and network adapter cards.
Description
Queries and burns a binary firmware-image file on non-volatile (Flash) memories of Mellanox InfiniBand and Ethernet network adapters. The tool requires root privileges for
Flash access.
If you purchased a standard Mellanox Technologies network adapter card,
please download the firmware image from www.mellanox.com > Downloads
> Firmware. If you purchased a non-standard card from a vendor other than
Mellanox Technologies, please contact your vendor.
Note:
To run mstflint, you must know the device location on the PCI bus. See Example 1 for
details.
Synopsis
mstflint [switches...] <command> [parameters...]
Table 16 lists the various switches of the utility, and Table 17 lists its commands.
Table 16 - mstflint Switches (Sheet 1 of 2)
Switch
Affected/
Relevant
Commands
Description
-h
Print the help menu
-hh
Print an extended help menu
-d[evice]
<device>
All
Specify the device to which the Flash is connected.
-guid <GUID>
burn, sg
GUID base value. 4 GUIDs are automatically assigned to the following values:
guid -> node GUID
guid+1 -> port1
guid+2 -> port2
guid+3 -> system image GUID.
Note: Port2 guid will be assigned even for a single port HCA; the HCA ignores this
value.
-guids <GUIDs...>
burn, sg
4 GUIDs must be specified here. The specified GUIDs are assigned the following values, repectively: node, port1, port2 and system image GUID.
Note: Port2 guid must be specified even for a single port HCA; the HCA ignores this
value. It can be set to 0x0.
-mac <MAC>
burn, sg
MAC address base value. Two MACs are automatically assigned to the following values:
mac -> port1
mac+1 -> port2
Note: This switch is applicable only for Mellanox Technologies Ethernet products.
Mellanox Technologies
Mellanox Technologies Confidential
Rev 1.50
InfiniBand Fabric Diagnostic Utilities
154
Table 16 - mstflint Switches (Sheet 2 of 2)
Switch
Affected/
Relevant
Commands
Description
-macs <MACs...>
burn, sg
Two MACs must be specified here. The specified MACs are assigned to port1 and
port2, repectively.
Note: This switch is applicable only for Mellanox Technologies Ethernet products.
-blank_guids
burn
Burn the image with blank GUIDs and MACs (where applicable). These values can be
set later using the sg command – see Table 17 below.
-clear_semaphore
No commands
allowed
Force clear the Flash semaphore on the device. No command is allowed when this
switch is used.
Warning: May result in system instability or Flash corruption if the device or another
application is currently using the Flash.
-i[mage] <image>
burn, verify
Binary image file
-qq
burn, query
Run a quick query. When specified, mstflint will not perform full image integrity
checks during the query operation. This may shorten execution time when running
over slow interfaces (e.g., I2C, MTUSB-1).
-nofs
burn
Burn image in a non-failsafe manner
-skip_is
burn
Allow burning the firmware image without updating the invariant sector. This is to
ensure failsafe burning even when an invariant sector difference is detected.
-byte_mode
burn, write
Shift address when accessing Flash internal registers. May be required for burn/write
commands when accessing certain Flash types.
-s[ilent]
burn
Do not print burn progress messages
-y[es]
All
Non-interactive mode: Assume the answer is “yes” to all questions.
-no
All
Non-interactive mode: Assume the answer is “no” to all questions.
-vsd <string>
burn
Write this string of up to 208 characters to VSD upon a burn command.
-use_image_ps
burn
Burn vsd as it appears in the given image - do not keep existing VSD on Flash.
-dual_image
burn
Make the burn process burn two images on Flash. The current default failsafe burn
process burns a single image (in alternating locations).
-v
Print version info
Table 17 - mstflint Commands (Sheet 1 of 2)
Command
Rev 1.50
Description
b[urn]
Burn Flash
q[uery]
Query miscellaneous Flash/firmware characteristics
v[erify]
Verify the entire Flash
bb
Burn Block: Burn the given image as is, without running any checks
sg
Set GUIDs
ri <out-file>
Read the firmware image on the Flash into the specified file
Mellanox Technologies
Mellanox Technologies Confidential
155
Table 17 - mstflint Commands (Sheet 2 of 2)
Command
Description
dc <out-file>
Dump Configuration: Print a firmware configuration file for the given image to the
specified output file
e[rase] <addr>
Erase sector
rw <addr>
Read one DWORD from Flash
ww <addr> < data>
Write one DWORD to Flash
wwne <addr>
Write one DWORD to Flash without sector erase
wbne <addr> <size>
<data...>
Write a data block to Flash without sector erase
rb <addr> <size> [out-file]
Read a data block from Flash
swreset
SW reset the target InfniScale IV device. This command is supported only in the InBand access method.
Possible command return values are:
0 - successful completion
1 - error has occurred
7 - the burn command was aborted because firmware is current
Examples
1.
Find Mellanox Technologies’s ConnectX® VPI cards with PCI Express running at
2.5GT/s and InfiniBand ports at DDR / or Ethernet ports at 10GigE.
> /sbin/lspci -d 15b3:634a
04:00.0 InfiniBand: Mellanox Technologies MT25418 [ConnectX IB DDR, PCIe 2.0 2.5GT/s] (rev a0).
In the example above, 15b3 is Mellanox Technologies’s vendor number (in hexadecimal), and 634a is the
device’s PCI Device ID (in hexadecimal). The number string 04:00.0 identifies the device in the form
bus:dev.fn.
Note:
1.
The PCI Device IDs of Mellanox Technologies’ devices can be obtained from
the PCI ID Repository Website at http://pci-ids.ucw.cz/read/PC/15b3.
Verify the ConnectX firmware using its ID (using the results of the example above).
Mellanox Technologies
Mellanox Technologies Confidential
Rev 1.50
InfiniBand Fabric Diagnostic Utilities
156
> mstflint -d 04:00.0 v
ConnectX failsafe image. Start address: 80000. Chunk
size 80000:
NOTE: The addresses below are contiguous logical
addresses. Physical addresses on flash may be different,
based on the image start address and chunk size
/0x00000038-0x000010db (0x0010a4)/ (BOOT2) - OK
/0x000010dc-0x00004947 (0x00386c)/ (BOOT2) - OK
/0x00004948-0x000052c7 (0x000980)/ (Configuration) OK
/0x000052c8-0x0000530b
/0x0000530c-0x0000542f
/0x00005430-0x0000634f
/0x00006350-0x0000f29b
/0x0000f29c-0x0004749b
/0x0004749c-0x0005913f
/0x00059140-0x0007a123
/0x0007a124-0x0007bdff
/0x0007be00-0x0007eb97
(0x000044)/
(0x000124)/
(0x000f20)/
(0x008f4c)/
(0x038200)/
(0x011ca4)/
(0x020fe4)/
(0x001cdc)/
(0x002d98)/
(GUID) - OK
(Image Info) - OK
(DDR) - OK
(DDR) - OK
(DDR) - OK
(DDR) - OK
(DDR) - OK
(DDR) - OK
(DDR) - OK
12.14ibv_asyncwatch
Applicable Hardware
All InfiniBand devices.
Description
Display asynchronous events forwarded to userspace for an InfiniBand device.
Synopsis
ibv_asyncwatch
Rev 1.50
Mellanox Technologies
Mellanox Technologies Confidential
157
Examples
1.
Display asynchronous events.
> ibv_asyncwatch
mlx4_0: async event FD 4
Mellanox Technologies
Mellanox Technologies Confidential
Rev 1.50
158
Appendix A: Boot over IB (BoIB)
A.1
Overview
This chapter describes “Mellanox Boot over IB” (BoIB), the software for Boot over Mellanox Technologies InfiniBand (IB) HCA devices. BoIB enables booting kernels or operating systems (OSs) from remote servers in compliance with the PXE specification.
BoIB is based on the open source project Etherboot/gPXE available at http://www.etherboot.org.
BoIB first initializes the HCA device. Then, it connects to a DHCP server to obtain its
assigned IP address and network parameters, and also to obtain the source location of the
kernel/OS to boot from. The DHCP server instructs BoIB to access the kernel/OS through
a TFTP server, an iSCSI target, or other service.
Mellanox Boot over IB implements a network driver with IP over IB acting as the transport layer. IP over IB is part of the Mellanox BXOFED for Linux software package (see
www.mellanox.com).
The binary code is exported by the device as an expansion ROM image.
A.1.1
Supported Mellanox HCA Devices and Firmware
Table 18 - Supported Mellanox Technologies Devices (and PCI Device IDs)
PCI Device ID
Decimal
(Hexadecimal)
Firmware Name
MT25408 ConnectX – IB@ SDR, PCI Express 2.0 2.5GT/s
25408 (0x6340)
fw-25408
MT25408 ConnectX – IB@ DDR, PCI Express 2.0 2.5GT/s
25418 (0x634a)
fw-25408
MT25408 ConnectX – IB@ DDR, PCI Express 2.0 5.0GT/s
26418 (0x6732)
fw-25408
MT25408 ConnectX – IB@ QDR, PCI Express 2.0 5.0GT/s
26428 (0x673c)
fw-25408
MT25208 InfiniHost® III Ex
25218 (0x6282)
fw-25218
MT25204 InfiniHost® III Lx
25204 (0x6274)
fw-25204
Device Name
A.1.2
Tested Platforms
See the Boot over IB Release Notes (boot_over_ib_release_notes.txt).
Rev 1.50
Mellanox Technologies
Mellanox Technologies Confidential
159
A.1.3
BoIB in Mellanox BXOFED
The Boot over IB binary files are provided as part of BXOFED. The following binary files
are included:
1.
PXE binary files for Mellanox HCA devices
• HCA: Single/Dual port ConnectX IB SDR (PCI DevID: 25408)
CONNECTX_IB_25408_ROM-X.X.XXX.rom
• HCA: Single/Dual port ConnectX IB DDR (PCI DevID: 25418)
CONNECTX_IB_25418_ROM-X.X.XXX.rom
• HCA: Single/Dual port ConnectX IB DDR & PCI Express 2.0 5.0GT/s (PCI DevID:
26418)
CONNECTX_IB_26418_ROM-X.X.XXX.rom
• HCA: Single/Dual port ConnectX IB QDR & PCI Express 2.0 5.0GT/s (PCI DevID:
26428)
CONNECTX_IB_26428_ROM-X.X.XXX.rom
• HCA: InfiniHost III Ex in Mem-Free mode (PCI DevID: 25218)
IHOST3EX_PORT1_ROM-X.X.XXX.rom (IB Port 1)
IHOST3EX_PORT2_ROM-X.X.XXX.rom (IB Port 2)
• HCA: InfiniHost III Lx (PCI DevID: 25204)
2.
IHOST3LX_ROM-X.X.XXX.rom (single IB Port device)
Additional documents under docs/:
• dhcpd.conf – sample DHCP configuration file
• dhcp.patch – patch file for DHCP v3.1.2
A.2
Burning the Expansion ROM Image
The binary code resides in the same Flash device of the device firmware. Note that the
binary files are distinct and do not affect each other. Mellanox’s mlxburn tool is available for burning, however it is not possible to burn the expansion ROM image by itself.
Rather, both the firmware and expansion ROM images must be burnt simultaneously.
mlxburn requires the following items:
1.
MST device name
After installing the MFT package run:
# mst start
# mst status
The device name will be of the form: /dev/mst/mt<dev_id>_pci{_cr0|conf0}
2.
3.
The firmware mlx file fw-<ID>-X_X_XXX.mlx
One of the expansion ROM binary files listed in Section A.1.3.
Mellanox Technologies
Mellanox Technologies Confidential
Rev 1.50
160
Firmware burning example:
The following command burns a firmware image and an expansion ROM image to the
Flash device of a ConnectX adapter card:
mlxburn -dev /dev/mst/mt25418_pci_cr0 -fw fw-25408-X_X_XXX.mlx \
-conf MHGH28-XTC.ini -exp_rom ConnectX_IB_25418_ROMX_X_XXX.rom
A.3
Preparing the DHCP Server in Linux Environment
The DHCP server plays a major role in the boot process by assigning IP addresses for
BoIB clients and instructing the clients where to boot from. BoIB requires that the DHCP
server runs on a machine which supports IP over IB.
A.3.1
Configuring the DHCP Server
A.3.1.1 For ConnectX Family Devices
When a BoIB client boots, it sends the DHCP server various information, including its
DHCP client identifier. This identifier is used to distinguish between the various DHCP
sessions. The value of the client identifier is composed of an 8-byte port GUID (separated
by colons and represented in hexadecimal digits).
Extracting the Port GUID – Method I
To obtain the port GUID, run the following commands:
Note:
The following MFT commands assume that the Mellanox Firmware Tools
(MFT) package has been installed on the client machine.
host1# mst start
host1# mst status
The device name will be of the form: /dev/mst/mt<dev_id>_pci{_cr0|conf0}. Use this device name to obtain
the Port GUID via the following query command:
flint -d <MST_DEVICE_NAME> q
Example with ConnectX IB DDR (& PCI Express 2.0 2.5GT/s) as the HCA device:
host1# flint -d /dev/mst/mt25418_pci_cr0 q
Image type:
ConnectX
FW Version:
2.6.000
Device ID:
25418
Chip Revision:
A0
Description:
Node
GUIDs:
MACs:
Board ID:
Rev 1.50
Port1
0002c90300001038
0002c90300001039
Port2
Sys image
0002c9030000103a 0002c9030000103b
0002c9001039
0002c900103a
n/a (MT_04A0110002)
Mellanox Technologies
Mellanox Technologies Confidential
161
VSD:
n/a
PSID:
MT_04A0110002
Assuming that BoIB is connected via Port 1, then the Port GUID is 00:02:c9:03:00:00:10:39.
Extracting the Port GUID – Method II
An alternative method for obtaining the port GUID involves booting the client machine
via BoIB. This requires having a Subnet Manager running on one of the machines in the
InfiniBand subnet. The 8 bytes can be captured from the boot session as shown in the figure below.
Placing Client Identifiers in /etc/dhcpd.confn
The following is an excerpt of a /etc/dhcpd.conf example file showing the format of
representing a client machine for the DHCP server.
host host1 {
next-server 11.4.3.7;
filename "pxelinux.0";
fixed-address 11.4.3.130;
option dhcp-client-identifier = 00:02:c9:03:00:00:10:39;
}
A.3.1.2 For InfiniHost III Family Devices (PCI Device IDs: 25204, 25218)
When a BoIB client boots, it sends the DHCP server various information, including its
DHCP client identifier. This identifier is used to distinguish between the various DHCP
sessions.
The value of the client identifier is composed of 21 bytes (separated by colons) having the
following components:
20:<QP Number - 4 bytes>:<GID - 16 bytes>
Note:
Bytes are represented as two-hexadecimal digits.
Extracting the Client Identifier – Method I
The following steps describe one method for extracting the client identifier:
1.
QP Number equals 00:55:04:01 for InfiniHost III Ex and InfiniHost III Lx HCAs.
Mellanox Technologies
Mellanox Technologies Confidential
Rev 1.50
162
2.
3.
GID is composed of an 8-byte subnet prefix and an 8-byte Port GUID. The subnet
prefix is fixed for the supported Mellanox HCAs, and is equal to
fe:80:00:00:00:00:00:00. The next steps explains how to obtain the Port GUID.
To obtain the Port GUID, run the following commands:
Note:
The following MFT commands assume that the Mellanox Firmware Tools
(MFT) package has been installed on the client machine.
host1# mst start
host1# mst status
The device name will be of the form: /dev/mst/mt<dev_id>_pci{_cr0|conf0}. Use this device name to obtain
the Port GUID via a query command.
flint -d <MST_DEVICE_NAME> q
Example with InfiniHost III Ex as the HCA device:
host1# flint -d /dev/mst/mt25218_pci_cr0 q
Image type:
Failsafe
FW Version:
5.3.0
Rom Info:
type=GPXE version=1.0.0 devid=25218 port=2
I.S. Version:
1
Device ID:
25218
Chip Revision:
A0
Description: Node
Port1
Port2
Sys image
0002c90200231390 0002c90200231391 0002c90200231392 0002c90200231393
GUIDs:
Board ID:
(MT_0370110001)
VSD:
PSID:
MT_0370110001
Assuming that BoIB is connected via Port 2, then the Port GUID is 00:02:c9:02:00:23:13:92.
Step 6.
The resulting client identifier is the concatenation, from left to right, of 20, the
QP_Number, the subnet prefix, and the Port GUID.
In the example above this yields the following DHCP client identifier:
20:00:55:04:01:fe:80:00:00:00:00:00:00:00:02:c9:02:00:23:13:92
Extracting the Client Identifier – Method II
An alternative method for obtaining the 20 bytes of QP Number and GID involves booting
the client machine via BoIB. This requires having a Subnet Manager running on one of the
Rev 1.50
Mellanox Technologies
Mellanox Technologies Confidential
163
machines in the InfiniBand subnet. The 20 bytes can be captured from the boot session as
shown in the figure below.
Concatenate the byte ‘20’ to the left of the captured 20 bytes, then separate every byte
(two hexadecimal digits) with a colon. You should obtain the same result shown in Step 6
above.
Placing Client Identifiers in /etc/dhcpd.conf
The following is an excerpt of a /etc/dhcpd.conf example file showing the format of
representing a client machine for the DHCP server.
host host1 {
next-server 11.4.3.7;
filename "pxelinux.0";
fixed-address 11.4.3.130;
option dhcp-client-identifier = \
20:00:55:04:01:fe:80:00:00:00:00:00:00:00:02:c9:02:00:23:13:92;
}
A.4
Subnet Manager – OpenSM
BoIB requires a Subnet Manager to be running on one of the machines in the IB network.
OpenSM is part of Mellanox BXOFED for Linux and can be used to accomplish this. Note
that OpenSM may be run on the same host running the DHCP server but it is not mandatory. For details on OpenSM, see “OpenSM – Subnet Manager” on page 90.
A.5
TFTP Server
When you set the ‘filename’ parameter in your DHCP configuration file to a non-empty
filename, the client will ask for this file to be passed through TFTP. For this reason you
need to install a TFTP server.
Mellanox Technologies
Mellanox Technologies Confidential
Rev 1.50
164
A.6
BIOS Configuration
The expansion ROM image presents itself to the BIOS as a boot device. As a result, the
BIOS will add to the list of boot devices “MLNX IB <ver>” for a ConnectX device or
“gPXE” for an InfiniHost III device. The priority of this list can be modified through
BIOS setup.
A.7
A.7.1
Operation
Prerequisites
• Make sure that your client is connected to the server(s)
• The BoIB image is already programmed on the adapter card – see Section A.2
• Start the Subnet Manager as described in Section A.4
• Configure and start the DHCP server as described in Section A.3
• Configure and start at least one of the services iSCSI Target (see Section A.1) and/or
TFTP (see Section A.5)
A.7.2
Starting Boot
Boot the client machine and enter BIOS setup to configure “MLNX IB” (for ConnectX
family) or “gPXE” (for InfiniHost III family) to be the first on the boot device priority list
– see Section A.6.
Note:
Rev 1.50
On dual-port network adapters, the client first attempts to boot from Port 1. If
this fails, it switches to boot from Port 2. Note also that the driver waits up to
45 sec for each port to come up.
Mellanox Technologies
Mellanox Technologies Confidential
165
If MLNX IB/gPXE was selected through BIOS setup, the client will boot from BoIB. The
client will display BoIB attributes and wait for IB port configuration by the subnet manager.
For ConnectX:
For InfiniHost III Ex:
After configuring the IB port, the client attempts connecting to the DHCP server to obtain
an IP address and the source location of the kernel/OS to boot from.
For ConnectX:
For InfiniHost III Ex:
Next, BoIB attempts to boot as directed by the DHCP server.
Mellanox Technologies
Mellanox Technologies Confidential
Rev 1.50
166
A.8
Diskless Machines
Mellanox Boot over IB supports booting diskless machines. To enable using an IB driver,
the (remote) kernel or initrd image must include and be configured to load the IB
driver, including IPoIB.
This can be achieved either by compiling the HCA driver into the kernel, or by adding the
device driver module into the initrd image and loading it.
The IB driver requires loading the following modules in the specified order (see Section
A.8.1 for an example):
• ib_addr.ko
• ib_core.ko
• ib_mad.ko
• ib_sa.ko
• ib_cm.ko
• ib_uverbs.ko
• ib_ucm.ko
• ib_umad.ko
• iw_cm.ko
• rdma_cm.ko
• rdma_ucm.ko
• mlx4_core.ko
• mlx4_ib.ko
• ib_mthca.ko
• ib_ipoib.ko
A.8.1
Example: Adding an IB Driver to initrd (Linux)
Prerequisites
1.
2.
3.
4.
The BoIB image is already programmed on the HCA card.
The DHCP server is installed and configured as described in Section A.3.1, “Configuring the DHCP Server”, and connected to the client machine.
An initrd file.
To add an IB driver into initrd, you need to copy the IB modules to the diskless
image. Your machine needs to be pre-installed with BXOFED.
Adding the IB Driver to the initrd File
Warning! The following procedure modifies critical files used in the boot proce-
dure. It must be executed by users with expertise in the boot process.
Improper application of this procedure may prevent the diskless machine
from booting.
Rev 1.50
Mellanox Technologies
Mellanox Technologies Confidential
167
Step a. Back up your current initrd file.
Step 7.
Make a new working directory and change to it.
host1$ mkdir /tmp/initrd_ib
host1$ cd /tmp/initrd_ib
Step 8.
Normally, the initrd image is zipped. Extract it using the following command:
host1$ gzip -dc <initrd image> | cpio -id
The initrd files should now be found under /tmp/initrd_ib
Step 9.
Create a directory for the InfiniBand modules and copy them.
host1$ mkdir -p /tmp/initrd_ib/lib/modules/ib
host1$ cd /lib/modules/`uname -r`/updates/kernel/drivers
host1$cp infiniband/core/ib_addr.ko /tmp/initrd_ib/lib/modules/ib
host1$cp infiniband/core/ib_core.ko /tmp/initrd_ib/lib/modules/ib
host1$cp infiniband/core/ib_mad.ko /tmp/initrd_ib/lib/modules/ib
host1$cp infiniband/core/ib_sa.ko /tmp/initrd_ib/lib/modules/ib
host1$cp infiniband/core/ib_cm.ko /tmp/initrd_ib/lib/modules/ib
host1$cp infiniband/core/ib_uverbs.ko /tmp/initrd_ib/lib/modules/ib
host1$cp infiniband/core/ib_ucm.ko /tmp/initrd_ib/lib/modules/ib
host1$cp infiniband/core/ib_umad.ko /tmp/initrd_ib/lib/modules/ib
host1$cp infiniband/core/iw_cm.ko /tmp/initrd_ib/lib/modules/ib
host1$cp infiniband/core/rdma_cm.ko /tmp/initrd_ib/lib/modules/ib
host1$cp infiniband/core/rdma_ucm.ko /tmp/initrd_ib/lib/modules/ib
host1$cp net/mlx4/mlx4_core.ko /tmp/initrd_ib/lib/modules/ib
host1$cp infiniband/hw/mlx4/mlx4_ib.ko /tmp/initrd_ib/lib/modules/ib
host1$cp infiniband/hw/mthca/ib_mthca.ko /tmp/initrd_ib/lib/modules/ib
host1$cp infiniband/ulp/ipoib/ib_ipoib.ko /tmp/initrd_ib/lib/modules/ib
Step 10.
IB requires loading an IPv6 module. If you do not have it in your initrd, please add it
using the following command:
host1$ cp /lib/modules/`uname -r`/kernel/net/ipv6/ipv6.ko \
/tmp/initrd_ib/lib/modules
Step 11.
To load the modules, you need the insmod executable. If you do not have it in your
initrd, please add it using the following command:
host1$ cp /sbin/insmod /tmp/initrd_ib/sbin/
Step 12.
If you plan to give your IB device a static IP address, then copy ifconfig. Otherwise,
skip this step.
host1$ cp /sbin/ifconfig /tmp/initrd_ib/sbin
Step 13.
If you plan to obtain an IP address for the IB device through DHCP, then you need to
copy the DHCP client which was compiled specifically to support IB;
Otherwise, skip this step.
To continue with this step, DHCP client v3.1.2 needs to be already installed on the
machine you are working with.
Mellanox Technologies
Mellanox Technologies Confidential
Rev 1.50
168
Copy the DHCP client v3.1.2 file and all the relevant files as described below.
host1# cp <path to DHCP client v3.1.2>/dhclient /tmp/initrd_ib/sbin
host1# cp <path to DHCP client v3.1.2>/dhclient-script /tmp/initrd_ib/
sbin
host1# mkdir -p /tmp/initrd_ib/var/state/dhcp
host1# touch /tmp/initrd_ib/var/state/dhcp/dhclient.leases
host1# cp /bin/uname /tmp/initrd_ib/bin
host1# cp /usr/bin/expr /tmp/initrd_ib/bin
host1# cp /sbin/ifconfig /tmp/initrd_ib/bin
host1# cp /bin/hostname /tmp/initrd_ib/bin
Create a configuration file for the DHCP client (as described in Section 4.3.1.2) and
place it
under /tmp/initrd_ib/sbin. The following is an example of such a file
(called
dclient.conf):
dhclient.conf:
# The value indicates a hexadecimal number
# For a ConnectX device
interface "ib0" {
send dhcp-client-identifier 00:02:c9:03:00:00:10:39;
}
# For an InfiniHost III Ex device
interface "ib1" {
send dhcp-client-identifier \
20:00:55:04:01:fe:80:00:00:00:00:00:00:00:02:c9:02:00:23:13:92;
}
Step 14.
Now you can add the commands for loading the copied modules into the file init.
Edit the file /tmp/initrd_ib/init and add the following lines at the point you
wish the IB driver to be loaded.
Warning! The order of the following commands (for loading modules) is critical.
echo “loading ipv6”
/sbin/insmod /lib/modules/ipv6.ko
echo “loading IB driver”
/sbin/insmod /lib/modules/ib/ib_addr.ko
/sbin/insmod /lib/modules/ib/ib_core.ko
/sbin/insmod /lib/modules/ib/ib_mad.ko
Rev 1.50
Mellanox Technologies
Mellanox Technologies Confidential
169
/sbin/insmod
/sbin/insmod
/sbin/insmod
/sbin/insmod
/sbin/insmod
/sbin/insmod
/sbin/insmod
/sbin/insmod
/sbin/insmod
/sbin/insmod
/sbin/insmod
/sbin/insmod
Note:
/lib/modules/ib/ib_sa.ko
/lib/modules/ib/ib_cm.ko
/lib/modules/ib/ib_uverbs.ko
/lib/modules/ib/ib_ucm.ko
/lib/modules/ib/ib_umad.ko
/lib/modules/ib/iw_cm.ko
/lib/modules/ib/rdma_cm.ko
/lib/modules/ib/rdma_ucm.ko
/lib/modules/ib/mlx4_core.ko
/lib/modules/ib/mlx4_ib.ko
/lib/modules/ib/ib_mthca.ko
/lib/modules/ib/ib_ipoib.ko
In case of interoperability issues between iSCSI and Large Receive Offload
(LRO), change the last command above as follows to disable LRO:
/sbin/insmod /lib/modules/ib/ib_ipoib.ko lro=0
Step 15.
Now you can assign an IP address to your IB device by adding a call to ifconfig or
to the DHCP client in the init file after loading the modules. If you wish to use the
DHCP client, then you need to add a call to the DHCP client in the init file after loading the IB modules. For example:
/sbin/dhclient -cf /sbin/dhclient.conf ib1
Step 16. Save the init file.
Step 17.
Close initrd.
host1$ cd /tmp/initrd_ib
host1$ find ./ | cpio -H newc -o > /tmp/new_initrd_ib.img
host1$ gzip /tmp/new_init_ib.img
At this stage, the modified initrd (including the IB driver) is ready and located at
/tmp/new_init_ib.img.gz. Copy it to the original initrd location and rename it
properly.
A.1
iSCSI Boot
Mellanox Boot over IB enables an iSCSI-boot of an OS located on a remote iSCSI Target.
It has a built-in iSCSI Initiator which can connect to the remote iSCSI Target and load
from it the kernel and initrd. There are two instances of connection to the remote iSCSI
Target: the first is for getting the kernel and initrd via BoIB, and the second is for loading other parts of the OS via initrd.
Note:
Linux distributions such as SuSE Linux Enterprise Server 10 SPx and Red
Hat Enterprise Linux 5.1 (or above) can be directly installed on an iSCSI tar-
Mellanox Technologies
Mellanox Technologies Confidential
Rev 1.50
170
get. At the end of this direct installation, initrd is capable to continue loading
other parts of the OS on the iSCSI target. (Other distributions may also be
suitable for direct installation on iSCSI targets.)
If you choose to continue loading the OS (after boot) through the HCA device driver,
please verify that the initrd image includes the HCA driver as described in Section A.8.
A.1.1
Configuring an iSCSI Target in Linux Environment
Prerequisites
Step a. Make sure that an iSCSI Target is installed on your server side.
You can download and install an iSCSI Target from the following location:
http://sourceforge.net/project/showfiles.php?group_id=108475&package_id=117141
Tip
Step 18.
Dedicate a partition on your iSCSI Target on which you will later install the operating
system
Step 19.
Configure your iSCSI Target to work with the partition you dedicated. If, for example,
you choose partition /dev/sda5, then edit the iSCSI Target configuration file /etc/
ietd.conf to include the following line under the iSCSI Target iqn line:
Lun 0 Path=/dev/sda5,Type=fileio
Tip
The following is an example of an iSCSI Target iqn line:
Target iqn.2007-08.7.3.4.10:iscsiboot
Step 20.
Start your iSCSI Target.
Example:
host1# /etc/init.d/iscsitarget start
Configuring the DHCP Server to Boot From an iSCSI Target
Configure DHCP as described in Section A.3.1, “Configuring the DHCP Server”.
Edit your DHCP configuration file (/etc/dhcpd.conf) and add the following lines
for the machine(s) you wish to boot from the iSCSI Target:
Filename "";
option root-path "iscsi:iscsi_target_ip::::iscsi_target_iqn";
The following is an example for configuring an IB device to boot from an iSCSI Target:
host host1{
filename "";
# For a ConnectX device comment out the following line
# option dhcp-client-identifier = 00:02:c9:03:00:00:10:39;
# For an InfiniHost III Ex comment out the following line
Rev 1.50
Mellanox Technologies
Mellanox Technologies Confidential
171
# option dhcp-client-identifier = \
# fe:00:55:00:41:fe:80:00:00:00:00:00:00:00:02:c9:03:00:00:0d:41;
option root-path "iscsi:11.4.3.7::::iqn.2007-08.7.3.4.10:iscsiboot";
}
A.0.1
iSCSI Boot Example of SLES 10 SP2 OS
This section provides an example of installing the SLES 10 SP2 operating system on an
iSCSI target and booting from a diskless machine via BoIB. Note that the procedure
described below assumes the following:
• The client’s LAN card is recognized during installation
• The iSCSI target can be connected to the client via LAN and InfiniBand
Prerequisites
See Section A.7.1 on page 164.
Warning! The following procedure modifies critical files used in the boot proce-
dure. It must be executed by users with expertise in the boot process.
Improper application of this procedure may prevent the diskless machine
from booting.
Procedure
Step a. Load the SLES 10 SP2 installation disk and enter the following parameters as boot options:
netsetup=1
WithISCSI=1
Mellanox Technologies
Mellanox Technologies Confidential
Rev 1.50
172
Rev 1.50
Step 21.
Continue with the procedure as instructed by the installation program until the “iSCSI
Initiator Overview” window appears.
Step 22.
Click the Add tab in the iSCSI Initiator Overview window. An iSCSI Initiator Discovery window will pop up. Enter the IP Address of your iSCSI target and click Next.
Mellanox Technologies
Mellanox Technologies Confidential
173
Step 23.
Tip
Details of the discovered iSCSI target(s) will be displayed in the iSCSI Initiator Discovery window. Select the target that you wish to connect to and click Connect.
If no iSCSI target was recognized, then either the target was not properly
installed or no connection was found between the client and the iSCSI target.
Open a shell to ping the iSCSI target (you can use CTRL-ALT-F2) and verify that
the target is or is not accessible. To return to the (graphical) installation screen,
press CTRL-ALT-F7.
Mellanox Technologies
Mellanox Technologies Confidential
Rev 1.50
174
Rev 1.50
Step 24.
The iSCSI Initiator Discovery window will now request authentication to access the
iSCSI target. Click Next to continue without authentication unless authentication is
required.
Step 25.
The iSCSI Initiator Discovery window will show the iSCSI target that got connected to.
Note that the Connected column must indicate True for this target. Click Next. (See figure below.)
Mellanox Technologies
Mellanox Technologies Confidential
175
Step 26.
The iSCSI Initiator Overview window will pop up. Click Toggle Start-Up to change
start up from manual to automatic. Click Finish.
Mellanox Technologies
Mellanox Technologies Confidential
Rev 1.50
176
Step 27.
Rev 1.50
Select New Installation then click Finish in the Installation Mode window.
Mellanox Technologies
Mellanox Technologies Confidential
177
Step 28.
Select the appropriate Region and Time Zone in the Clock and Time Zone window, then
click Finish.
Step 29.
In the Installation Settings window, click Partitioning to get the Suggested Partitioning
window.
Mellanox Technologies
Mellanox Technologies Confidential
Rev 1.50
178
Step 30.
Rev 1.50
Select Base Partition Setup on This Proposal then click Next.
Mellanox Technologies
Mellanox Technologies Confidential
179
Step 31.
In the Expert Partitioner window, select from the IET-VIRTUAL-DISK device the row
that has its Mount column indicating ‘swap’, then click Delete. Confirm the delete operation and click Finish.
Step 32.
In the pop-up window click No to approve deleting the swap partition. You will be
returned to Installation Settings window. (See image below.)
Mellanox Technologies
Mellanox Technologies Confidential
Rev 1.50
180
Step 33.
Rev 1.50
Select the Expert tab and click Booting.
Mellanox Technologies
Mellanox Technologies Confidential
181
Step 34.
Click Edit in the Boot Loader Settings window.
Mellanox Technologies
Mellanox Technologies Confidential
Rev 1.50
182
Rev 1.50
Step 35.
In the Optional Kernel Command Line Parameter field, append the following string to
the end of the line: “ibft_mode=off” (include a space before the string). Click OK and
then Finish to apply the change.
Step 36.
If you wish to change additional settings, click the appropriate item and perform the
changes, and click Accept when done.
Step 37.
In the Confirm Installation window, click Install to start the installation. (See image
below.)
Mellanox Technologies
Mellanox Technologies Confidential
183
Step 38.
Note:
At the end of the file copying stage, the Finishing Basic Installation window will pop up
and ask for confirming a reboot. You can click OK to skip count-down. (See image
below.)
Assuming that the machine has been correctly configured to boot from BoIB
via its connection to the iSCSI target, make sure that “MLNX IB” (for ConnectX family) or gPXE (for InfiniHost III family) has the highest priority in
the BIOS boot sequence.
Mellanox Technologies
Mellanox Technologies Confidential
Rev 1.50
184
Step 39.
Rev 1.50
Once the boot is complete, the Startup Options window will pop up. Select SUSE Linux
Enterprise Server 10 SP2 then press Enter.
Mellanox Technologies
Mellanox Technologies Confidential
185
Step 40.
The Hostname and Domain Name window will pop up. Continue configuring your
machine until the operating system is up, then you can start running the machine in normal operation mode.
Step 41.
(Optional) If you wish to have the second instance of connecting to the iSCSI Target go
through the IB driver, copy the initrd file under /boot to a new location, add the IB
driver into it after the load commands of the iSCSI Initiator modules, and continue as
described in Section A.8 on page 166.
Warning! Pay extra care when changing initrd as any mistake may prevent the
client machine from booting. It is recommended to have a back-up iSCSI
Initiator on a machine other than the client you are working with, to allow
for debug in case initrd gets corrupted.
In addition, edit the init file (that is in the initrd zip) and look for the following string
if [ "$iSCSI_TARGET_IPADDR" ] ; then
iscsiserver="$iSCSI_TARGET_IPADDR"
fi
Now add before the string the following line:
iSCSI_TARGET_IPADDR=<IB IP Address of iSCSI Target>
Example:
iSCSI_TARGET_IPADDR=11.4.3.7
A.1
WinPE
Mellanox BoIB enables WinPE boot via TFTP. For instructions on preparing a WinPE
image, please see http://etherboot.org/wiki/winpe.
Mellanox Technologies
Mellanox Technologies Confidential
Rev 1.50
186
Appendix B: ConnectX EN PXE
B.1
Overview
This appendix describes “Mellanox ConnectX EN PXE”, the software for Boot over Mellanox Technologies network adapter devices supporting Ethernet. Mellanox ConnectX EN
PXE enables booting kernels or operating systems (OSes) from remote servers in compliance with the PXE specification.
Mellanox ConnectX EN PXE is based on the open source project Etherboot/gPXE available at http://www.etherboot.org.
Mellanox ConnectX EN PXE first initializes the network adapter device. Then it connects
to a DHCP server to obtain its assigned IP address and network parameters, and also to
obtain the source location of the kernel/OS to boot from. The DHCP server instructs Mellanox ConnectX EN PXE to access the kernel/OS through a TFTP server, an iSCSI target,
or other service.
The binary code is exported by the device as an expansion ROM image.
B.1.1
Supported Mellanox Network Adapter Devices and Firmware
Table 19 - Supported Mellanox Technologies Devices (and PCI Device IDs)
PCI Device ID
Decimal
(Hexadecimal)
Firmware Name
MT25408 ConnectX – IB@ SDR, PCI Express 2.0 2.5GT/s
25408 (0x6340)
fw-25408
MT25408 ConnectX – IB@ DDR, PCI Express 2.0 2.5GT/s
25418 (0x634a)
fw-25408
MT25408 ConnectX – IB@ DDR, PCI Express 2.0 5.0GT/s
26418 (0x6732)
fw-25408
MT25408 ConnectX – IB@ QDR, PCI Express 2.0 5.0GT/s
26428 (0x673c)
fw-25408
MT25208 InfiniHost® III Ex
25218 (0x6282)
fw-25218
MT25204 InfiniHost® III Lx
25204 (0x6274)
fw-25204
Device Name
B.1.2
Tested Platforms
See
Mellanox
ConnectX
EN
(ConnectX_EN_PXE_release_notes.txt).
Rev 1.50
PXE
Mellanox Technologies
Mellanox Technologies Confidential
Release
Notes
187
B.1.3
ConnectX EN PXE in Mellanox BXOFED
The ConnectX EN PXE binary files are provided as part of the Mellaox BXOFED for
Linux ISO image. The following files are included:
1.
A PXE ROM image file for each of the supported Mellanox network adapter
devices. For example:
• ConnectX EN (PCI DevID: 25448)
CONNECTX_EN_25448_ROM-<version>.rom
B.2
Burning the Expansion ROM Image
The binary code resides in the same Flash device of the device firmware. Note that the
binary files are distinct and do not affect each other. Mellanox’s mlxburn tool is available for burning, however it is not possible to burn the expansion ROM image by itself.
Rather, both the firmware and expansion ROM images must be burnt simultaneously.
mlxburn requires the following items:
1.
MST device name
After installing the MFT package run:
# mst start
# mst status
The device name will be of the form: /dev/mst/mt<dev_id>_pci{_cr0|conf0}
2.
3.
The firmware mlx file fw-<ID>-X_X_XXX.mlx
One of the expansion ROM binary files listed in Section B.1.3.
Firmware burning example:
The following command burns a firmware image and an expansion ROM image to the
Flash device of a ConnectX adapter card:
mlxburn -dev /dev/mst/mt25448_pci_cr0 -fw fw-25408-X_X_XXX.mlx \
-conf MNEH28-XTC.ini -exp_rom ConnectX_EN_25448_ROMX_X_XXX.rom
B.3
Preparing the DHCP Server in Linux Environment
The DHCP server plays a major role in the boot process by assigning IP addresses for
ConnectX EN PXE clients and instructs the clients where to boot from.
When the ConnectX EN PXE boot session starts, the PXE firmware attempts to bring up a
ConnectX network link (port). If it succeeds to bring up a connected link, the PXE firmware communicates with the DHCP server. The DHCP server assigns an IP address to the
PXE client and provides it with the location of the boot program.
Mellanox Technologies
Mellanox Technologies Confidential
Rev 1.50
188
B.3.1
Configuring the DHCP Server
B.3.1.1 For ConnectX Family Devices
When a ConnectX EN PXE client boots, it sends the DHCP server various information,
including its DHCP hardware Ethernet address (MAC). The MAC address is 6 bytes long,
and it is used to distinguish between the various DHCP sessions.
Extracting the MAC Address – Method I
Run the following commands:
Note:
The following MFT commands assume that the Mellanox Firmware Tools
(MFT) package has been installed on the client machine.
host1# mst start
host1# mst status
The device name will be of the form: /dev/mst/mt<dev_id>_pci{_cr0|conf0}. Use this device name to obtain
the MAC address via a query command.
flint -d <MST_DEVICE_NAME> q
Example with ConnectX EN as the network adapter device:
host1# flint -d /dev/mst/mt25448_pci_cr0 q
Image type:
ConnectX
FW Version:
2.6.0
Rom Info:
type=GPXE version=1.3.0 devid=25448
Device ID:
25448
Chip Revision:
A0
Description:
Port1
Port2
MACs:
0002c90000bb
0002c90000bc
Board ID:
n/a (MT_0920110004)
VSD:
n/a
PSID:
MT_0920110004
Assuming that ConnectX EN PXE is connected via Port 1, then the MAC address is 00:02:c9:00:00:bb.
Extracting the MAC Address – Method II
The six bytes of MAC address can be captured from the display upon the boot of the ConnectX device session as shown in the figure below.
Rev 1.50
Mellanox Technologies
Mellanox Technologies Confidential
189
Placing MAC Addresses in /etc/dhcpd.conf
The following is an excerpt of a /etc/dhcpd.conf example file showing the format of
representing a client machine for the DHCP server running on a Linux machine.
host host1 {
next-server 11.4.3.7;
filename "pxelinux.0";
fixed-address 11.4.3.130;
hardware ethernet 00:02:c9:00:00:bb;
}
B.4
TFTP Server
If you have set the ‘filename’ parameter in your DHCP configuration to a non-empty filename, you need to install TFTP (Trivial File Transfer Protocol). TFTP is a simple FTPlike file transfer protocol used to transfer files from the TFTP server to the boot client as
part of the boot process.
B.5
BIOS Configuration
The expansion ROM image presents itself to the BIOS as a boot device. As a result, the
BIOS will add “MLNX NIC <ver>” to the list of boot devices. The priority of this list can
be modified through BIOS setup.
B.6
B.6.1
Operation
Prerequisites
• Make sure that your client is connected to the server(s)
• The ConnectX EN PXE image is already programmed on the adapter card – see Section
B.2
• Configure and start the DHCP server as described in Section B.3
• Configure and start at least one of the services iSCSI Target (see Section A.1) and/or
TFTP (see Section B.4)
B.6.2
Starting Boot
Boot the client machine and enter BIOS setup to configure MLNX NIC <ver> to be the
first on the boot device priority list – see Section B.5.
Note:
On dual-port network adapters, the client first attempts to boot from Port 1. If
this fails, it switches to boot from Port 2.
Mellanox Technologies
Mellanox Technologies Confidential
Rev 1.50
190
If “MLNX NIC” was selected through BIOS setup, the client will boot from ConnectX EN
PXE. The client will display ConnectX EN PXE attributes and will attempt to bring up a
port link.
If the Ethernet link comes up successfully, the client attempts connecting to the DHCP
server to obtain an IP address and the source location of the kernel/OS to boot from. The
client waits up to 30 seconds for a DHCP server response.
Next, ConnectX EN PXE attempts to boot as directed by the DHCP server.
B.7
Diskless Machines
Mellanox ConnectX EN PXE supports booting diskless machines. To enable using an
Ethernet driver, the (remote) kernel or initrd image must include and be configured to
load the driver.
This can be achieved either by compiling the adapter driver into the kernel, or by adding
the device driver module into the initrd image and loading it.
The Ethernet driver requires loading the following modules in the specified order (see Section B.7.1 for an example):
• mlx4_core.ko
• mlx4_en.ko
B.7.1
Example: Adding an Ethernet Driver to initrd (Linux)
Prerequisites
1.
Rev 1.50
The ConnectX EN PXE image is already programmed on the adapter card.
Mellanox Technologies
Mellanox Technologies Confidential
191
2.
The DHCP server is installed and configured as described in Section B.3.1, “Configuring the DHCP Server”, and connected to the client machine.
3.
4.
An initrd file.
To add an Ethernet driver into initrd, you need to copy the Ethernet modules to
the diskless image. Your machine needs to be pre-installed with BXOFED that is
appropriate for the kernel version the diskless image will run.
Adding the Ethernet Driver to the initrd File
Warning! The following procedure modifies critical files used in the boot proce-
dure. It must be executed by users with expertise in the boot process.
Improper application of this procedure may prevent the diskless machine
from booting.
Step a. Back up your current initrd file.
Step 42.
Make a new working directory and change to it.
host1$ mkdir /tmp/initrd_en
host1$ cd /tmp/initrd_en
Step 43.
Normally, the initrd image is zipped. Extract it using the following command:
host1$ gzip -dc <initrd image> | cpio -id
The initrd files should now be found under /tmp/initrd_en
Step 44. Create a directory for the ConnectX EN modules and copy them.
host1$ mkdir -p /tmp/initrd_en/lib/modules/mlnx_en
host1$ cd /lib/modules/`uname -r`/updates/kernel/drivers
host1$cp net/mlx4/mlx4_core.ko /tmp/initrd_en/lib/modules/mlnx_en
host1$cp net/mlx4/mlx4_en.ko /tmp/initrd_en/lib/modules/mlnx_en
Step 45.
To load the modules, you need the insmod executable. If you do not have it in your
initrd, please add it using the following command:
host1$ cp /sbin/insmod /tmp/initrd_en/sbin/
Step 46.
If you plan to give your Ethernet device a static IP address, then copy ifconfig. Otherwise, skip this step.
host1$ cp /sbin/ifconfig /tmp/initrd_en/sbin
Step 47.
Now you can add the commands for loading the copied modules into the file init.
Edit the file /tmp/initrd_en/init and add the following lines at the point you
wish the Ethernet driver to be loaded.
Warning! The order of the following commands (for loading modules) is critical.
echo “loading Mellanox ConnectX EN driver”
/sbin/insmod lib/modules/mlnx_en/mlx4_core.ko
/sbin/insmod lib/modules/mlnx_en/mlx4_en.ko
Mellanox Technologies
Mellanox Technologies Confidential
Rev 1.50
192
Step 48.
Now you can assign a static or dynamic IP address to your Mellanox ConnectX EN network interface.
Step 49.
Save the init file.
Step 50.
Close initrd.
host1$ cd /tmp/initrd_en
host1$ find ./ | cpio -H newc -o > /tmp/new_initrd_en.img
host1$ gzip /tmp/new_init_en.img
Step 51.
A.1
At this stage, the modified initrd (including the Ethernet driver) is ready and located
at
/tmp/new_init_ib.img.gz. Copy it to the original initrd location and
rename it properly.
iSCSI Boot
Mellanox ConnectX EN PXE enables an iSCSI-boot of an OS located on a remote iSCSI
Target. It has a built-in iSCSI Initiator which can connect to the remote iSCSI Target and
load from it the kernel and initrd. There are two instances of connection to the remote
iSCSI Target: the first is for getting the kernel and initrd via ConnectX EN PXE, and
the second is for loading other parts of the OS via initrd.
Note:
Linux distributions such as SuSE Linux Enterprise Server 10 SPx and Red
Hat Enterprise Linux 5.1 can be directly installed on an iSCSI target. At the
end of this direct installation, initrd is capable to continue loading other parts
of the OS on the iSCSI target. (Other distributions may also be suitable for
direct installation on iSCSI targets.)
If you choose to continue loading the OS (after boot) through the HCA device driver,
please verify that the initrd image includes the adapter driver as described in Section B.7.1.
A.1.1
Configuring an iSCSI Target in Linux Environment
Prerequisites
Step a. Make sure that an iSCSI Target is installed on your server side.
Tip
You can download and install an iSCSI Target from the following location:
http://sourceforge.net/project/showfiles.php?group_id=108475&package_id=117141
Step 52.
Dedicate a partition on your iSCSI Target on which you will later install the operating
system
Step 53.
Configure your iSCSI Target to work with the partition you dedicated. If, for example,
you choose partition /dev/sda5, then edit the iSCSI Target configuration file /etc/
ietd.conf to include the following line under the iSCSI Target iqn line:
Lun 0 Path=/dev/sda5,Type=fileio
Rev 1.50
Mellanox Technologies
Mellanox Technologies Confidential
193
Tip
The following is an example of an iSCSI Target iqn line:
Target iqn.2007-08.7.3.4.10:iscsiboot
Step 54.
Start your iSCSI Target.
Example:
host1# /etc/init.d/iscsitarget start
Configuring the DHCP Server to Boot From an iSCSI Target in Linux Environment
Configure DHCP as described in Section B.3.1, “Configuring the DHCP Server”.
Edit your DHCP configuration file (/etc/dhcpd.conf) and add the following lines
for the machine(s) you wish to boot from the iSCSI Target:
Filename "";
option root-path "iscsi:iscsi_target_ip::::iscsi_target_iqn";
The following is an example for configuring an Ethernet device to boot from an iSCSI
Target:
host host1{
filename "";
hardware ethernet 00:02:c9:00:00:bb;
option root-path "iscsi:11.4.3.7::::iqn.2007-08.7.3.4.10:iscsiboot";
}
1.1
iSCSI Boot Example of SLES 10 SP2 OS
This section provides an example of installing the SLES 10 SP2 operating system on an
iSCSI target and booting from a diskless machine via ConnectX EN PXE. Note that the
procedure described below assumes the following:
• The client’s LAN card is recognized during installation
• The iSCSI target can be connected to the client via a LAN and a ConnectX Ethernet
Prerequisites
See Section B.6.1 on page 189.
Warning! The following procedure modifies critical files used in the boot proce-
dure. It must be executed by users with expertise in the boot process.
Improper application of this procedure may prevent the diskless machine
from booting.
Procedure
Step a. Load the SLES 10 SP2 installation disk and enter the following parameters as boot options:
Mellanox Technologies
Mellanox Technologies Confidential
Rev 1.50
194
netsetup=1
Step 55.
Rev 1.50
WithISCSI=1
Continue with the procedure as instructed by the installation program until the “iSCSI
Initiator Overview” window appears.
Mellanox Technologies
Mellanox Technologies Confidential
195
Step 56.
Click the Add tab in the iSCSI Initiator Overview window. An iSCSI Initiator Discovery window will pop up. Enter the IP Address of your iSCSI target and click Next.
Mellanox Technologies
Mellanox Technologies Confidential
Rev 1.50
196
Step 57.
Tip
Rev 1.50
Details of the discovered iSCSI target(s) will be displayed in the iSCSI Initiator Discovery window. Select the target that you wish to connect to and click Connect.
If no iSCSI target was recognized, then either the target was not properly
installed or no connection was found between the client and the iSCSI target.
Open a shell to ping the iSCSI target (you can use CTRL-ALT-F2) and verify that
the target is or is not accessible. To return to the (graphical) installation screen,
press CTRL-ALT-F7.
Mellanox Technologies
Mellanox Technologies Confidential
197
Step 58.
The iSCSI Initiator Discovery window will now request authentication to access the
iSCSI target. Click Next to continue without authentication unless authentication is
required.
Step 59.
The iSCSI Initiator Discovery window will show the iSCSI target that got connected to.
Note that the Connected column must indicate True for this target. Click Next. (See figure below.)
Mellanox Technologies
Mellanox Technologies Confidential
Rev 1.50
198
Step 60.
Rev 1.50
The iSCSI Initiator Overview window will pop up. Click Toggle Start-Up to change
start up from manual to automatic. Click Finish.
Mellanox Technologies
Mellanox Technologies Confidential
199
Step 61.
Select New Installation then click Finish in the Installation Mode window.
Mellanox Technologies
Mellanox Technologies Confidential
Rev 1.50
200
Rev 1.50
Step 62.
Select the appropriate Region and Time Zone in the Clock and Time Zone window, then
click Finish.
Step 63.
In the Installation Settings window, click Partitioning to get the Suggested Partitioning
window.
Mellanox Technologies
Mellanox Technologies Confidential
201
Step 64.
Select Base Partition Setup on This Proposal then click Next.
Mellanox Technologies
Mellanox Technologies Confidential
Rev 1.50
202
Rev 1.50
Step 65.
In the Expert Partitioner window, select from the IET-VIRTUAL-DISK device the row
that has its Mount column indicating ‘swap’, then click Delete. Confirm the delete operation and click Finish.
Step 66.
In the pop-up window click No to approve deleting the swap partition. You will be
returned to Installation Settings window. (See image below.)
Mellanox Technologies
Mellanox Technologies Confidential
203
Step 67.
Select the Expert tab and click Booting.
Mellanox Technologies
Mellanox Technologies Confidential
Rev 1.50
204
Step 68.
Rev 1.50
Click Edit in the Boot Loader Settings window.
Mellanox Technologies
Mellanox Technologies Confidential
205
Step 69.
In the Optional Kernel Command Line Parameter field, append the following string to
the end of the line: “ibft_mode=off” (include a space before the string). Click OK and
then Finish to apply the change.
Step 70.
If you wish to change additional settings, click the appropriate item and perform the
changes, and click Accept when done.
Step 71.
In the Confirm Installation window, click Install to start the installation. (See image
below.)
Mellanox Technologies
Mellanox Technologies Confidential
Rev 1.50
206
Step 72.
Note:
Rev 1.50
At the end of the file copying stage, the Finishing Basic Installation window will pop up
and ask for confirming a reboot. You can click OK to skip count-down. (See image
below.)
Assuming that the machine has been correctly configured to boot from ConnectX EN PXE via its connection to the iSCSI target, make sure that
MLNX_EN has the highest priority in the BIOS boot sequence.
Mellanox Technologies
Mellanox Technologies Confidential
207
Step 73.
Once the boot is complete, the Startup Options window will pop up. Select SUSE Linux
Enterprise Server 10 then press Enter.
Mellanox Technologies
Mellanox Technologies Confidential
Rev 1.50
208
Step 74.
The Hostname and Domain Name window will pop up. Continue configuring your
machine until the operating system is up, then you can start running the machine in normal operation mode.
Step 75.
(Optional) If you wish to have the second instance of connecting to the iSCSI Target go
through the Ethernet driver, copy the initrd file under /boot to a new location, add
the Ethernet driver into it after the load commands of the iSCSI Initiator modules, and
continue as described in Section B.7 on page 190.
Warning! Pay extra care when changing initrd as any mistake may prevent the
client machine from booting. It is recommended to have a back-up iSCSI
Initiator on a machine other than the client you are working with, to allow
for debug in case initrd gets corrupted.
Next, edit the init file (that is in the initrd zip) and look for the following string
if [ "$iSCSI_TARGET_IPADDR" ] ; then
iscsiserver="$iSCSI_TARGET_IPADDR"
fi
Now add before the string the following line:
iSCSI_TARGET_IPADDR=<Ethernet IP Address of iSCSI Target>
Example:
iSCSI_TARGET_IPADDR=11.4.3.7
Also edit the file /boot/grub/menu.lst and delete the following string:
ibft_mode=off
A.1
WinPE
Mellanox ConnectX EN PXE enables WinPE boot via TFTP. For instructions on preparing a WinPE image, please see http://etherboot.org/wiki/winpe.
Rev 1.50
Mellanox Technologies
Mellanox Technologies Confidential
209
Appendix B: Performance Troubleshooting
B.1
PCI Express Performance Troubleshooting
For the best performance on the PCI Express interface, the adapter card should be installed
in an x8 slot with the following BIOS configuration parameters:
• Max_Read_Req, the maximum read request size, is 512 or higher
• MaxPayloadSize, the maximum payload size, is 128 or higher
Note:
A Max_Read_Req of 128 and/or installing the card in an x4 slot will significantly limit bandwidth.
To obtain the current setting for Max_Read_Req, enter:
setpci -d "15b3:" 68.w
To obtain the PCI Express slot (link) width and speed, enter:
setpci -d "15b3:" 72
1.
2.
If the output is neither 81 nor 82 card, then the card is NOT installed in an x8 PCI
Express slot.
The least significant digit indicates the link speed:
• 1 for PCI Express Gen 1 (2.5 GT/s)
• 2 for PCI Express Gen 2 (5 GT/s)
Note:
B.2
If you are running InfiniBand at QDR (40Gb/s 4X IB ports), you must run
PCI Express Gen 2.
InfiniBand Performance Troubleshooting
InfiniBand (IB) performance depends on the health of IB link(s) and on the IB card type.
IB link speed (10Gb/s or SDR, 20Gb/s or DDR, 40Gb/s or QDR) also affects performance.
Note:
1.
A latency sensitive application should take into account that each switch on
the path adds ~200nsec at SDR, and 150nsec for DDR.
To check the IB link speed, enter:
ibstat
Check the value indicated after the "Rate:" string: 10 indicates SDR, 20 indicates DDR, and 40 indicates
QDR.
Mellanox Technologies
Mellanox Technologies Confidential
Rev 1.50
210
2.
Check that the link has NO symbol errors since these errors result in the re-transmission of packets, and therefore in bandwidth loss. This check should be conducted for
each port after the driver is loaded. To check for symbol errors, enter:
cat /sys/class/infiniband/<device>/ports/1/counters/symbol_error
The command above is performed on Port 1 of the device <device>. The output value should be 0 if no
symbol errors were recorded.
3.
Bandwidth is expected to vary between systems. It heavily depends on the chipset,
memory, and CPU. Nevertheless, the full-wire speed should be achieved by the host.
• With IB @ SDR, the expected unidirectional full-wire speed bandwidth is ~900MB/
sec.
• With IB @ DDR and PCI Express Gen 1, the expected unidirectional full-wire speed
bandwidth is ~1400MB/sec. (See Section B.1.)
• With IB @ DDR and PCI Express Gen 2, the expected unidirectional full-wire speed
bandwidth is ~1800MB/sec. (See Section B.1.)
• With IB @ QDR and PCI Express Gen 2, the expected unidirectional full-wire speed
bandwidth is ~3000MB/sec. (See Section B.1.)
To check the adapter's maximum bandwidth, use the ib_write_bw utility.
To check the adapter's latency, use the ib_write_lat utility.
Note:
Rev 1.50
The utilities ib_write_bw and ib_write_lat are installed as part of
Mellanox BXOFED.
Mellanox Technologies
Mellanox Technologies Confidential
211
Appendix C: ULP Performance Tuning
C.1
IPoIB Performance Tuning
This section provides tuning guidelines of TCP stack configuration parameters in order to
boost IPoIB and IPoIB-CM performance.
Without tuning the parameters, the default Linux configuration may significantly limit the
total available bandwidth below the actual capabilities of the adapter card. The parameter
settings described below will increase the ability of Linux to transmit and receive data.
• Generally, if you increase the MTU (maximum transmission unit in bytes) you get better performance. The following MTUs are suggested (use ifconfig to modify the
MTU):
• IPoIB
2044 bytes
• IPoIB-CM64K bytes
• When IPoIB is configured to run in connected mode, TCP parameter tuning is performed at driver startup to improve the throughput of medium and large messages. The
driver startup scripts set the following TCP parameters as follows:
Note:
The following settings should not be applied when running in datagram mode
as they degrade the performance.
net.ipv4.tcp_timestamps=0
net.ipv4.tcp_sack=0
net.core.netdev_max_backlog=250000
net.core.rmem_max=16777216
net.core.wmem_max=16777216
net.core.rmem_default=16777216
net.core.wmem_default=16777216
net.core.optmem_max=16777216
net.ipv4.tcp_mem="16777216 16777216 16777216"
net.ipv4.tcp_rmem="4096 87380 16777216"
net.ipv4.tcp_wmem="4096 65536 16777216"
If you change the IPoIB run mode to datagram while the driver is running, then the tuned parameters do
not get restored to the default values suitable for datagram mode. It is recommended to change the IPoIB
mode only while the driver is down (by setting the line "SET_IPOIB_CM=yes" to "SET_IPOIB_CM=no"
in the file /etc/infiniband/openib.conf, and then restarting the driver).
Mellanox Technologies
Mellanox Technologies Confidential
Rev 1.50
212
C.2
Ethernet Performance Tuning
When the /etc/init.d/openibd script loads the mlx4_en driver, the following
network stack parameters are applied:
net.ipv4.tcp_timestamps=0
net.ipv4.tcp_sack=0
net.core.netdev_max_backlog=250000
net.core.rmem_max=16777216
net.core.wmem_max=16777216
net.core.rmem_default=16777216
net.core.wmem_default=16777216
net.core.optmem_max=16777216
net.ipv4.tcp_mem=”16777216 16777216 16777216”
net.ipv4.tcp_rmem=”4096 87380 16777216”
net.ipv4.tcp_wmem=”4096 65536 16777216”
C.3
MPI Performance Tuning
To optimize bandwidth and message rate running over MVAPICH, you can set tuning
paramters either using the command line, or in the configuration file:
/usr/mpi/<compiler>/mvapich-<mvapich-ver>/etc/mvapich.conf
Tuning Parameters in Configuration File
Edit the mvapich.conf file with the following lines:
VIADEV_USE_COALESCE=1
VIADEV_COALESCE_THRESHOLD_SQ=1
VIADEV_PROGRESS_THRESHOLD=2
Tuning Parameters via Command Line
The following command tunes MVAPICH parameters:
host1$ /usr/mpi/gcc/mvapich-<mvapich-ver>/bin/mpirun_rsh -np 2 \
-hostfile /home/<username>/cluster \
VIADEV_USE_COALESCE=1 VIADEV_COALESCE_THRESHOLD_SQ=1 \
VIADEV_PROGRESS_THRESHOLD=2 \
/usr/mpi/gcc/mvapich-<mvapich-ver>/tests/osu_benchmarks-<osu-ver>/
osu_bw
The example assumes the following:
• A cluster of at least two nodes. Example: host1, host2
• A machine file that includes the list of machines. Example:
host1$ cat /home/<username>/cluster
Rev 1.50
Mellanox Technologies
Mellanox Technologies Confidential
213
host1
host2
host1$
Mellanox Technologies
Mellanox Technologies Confidential
Rev 1.50
214
Appendix D: SRP Target Driver
The SRP Target driver is designed to work directly on top of OpenFabrics OFED software
stacks (http://www.openfabrics.org) or InfiniBand drivers in Linux kernel tree (kernel.org). It also interfaces with Generic SCSI target mid-level driver - SCST (http://
scst.sourceforge.net).
By interfacing with an SCST driver, it is possiblee to work with and support a lot of IO
modes on real or virtual devices in the backend.
1.
2.
3.
D.1
scst_disk – interfacing with the scsi sub-system to claim and export real scsi devices:
disks, hardware raid volumes, tape library as SRP luns
scst_vdisk – fileio and blockio modes. This allows turning software raid volumes,
LVM volumes, IDE disks, block devices and normal files into SRP luns
NULLIO mode allows measuring the performance without sending IOs to real
devices
Prerequisites
1.
Supported distributions: RHEL 5/5.1/5.2, SLES 10 sp1 and vanilla kernels > 2.6.16
On distribution default kernels you can run scst_vdisk blockio mode to obtain
good performance. You can also run scst_disk, i.e. scsi pass-thru mode; however, you have to compile scst with -DSTRICT_SERIALIZING enabled but
this does not yield good performance. It is required to recompile the kernel to
have good performance with scst_disk.
Note:
1.
Download and install the SCST driver.
a.
Download scst-1.0.0.tar.gz from http://scst.sourceforge.net/downloads.html
If your distribution is RHEL 5.2 please go to step <e>
b.
Untar and install scst-1.0.0
$ tar zxvf scst-1.0.0.tar.gz
$ cd scst-1.0.0
$ make && make install
c.
Save the following patch as /tmp/scsi_tgt.patch
--- scsi_tgt.h2008-07-20 14:25:30.000000000 -0700
+++ scsi_tgt.h2008-07-20 14:25:09.000000000 -0700
@@ -42,7 +42,9 @@
#endif
#if LINUX_VERSION_CODE < KERNEL_VERSION(2, 6, 19)
+/*
typedef _Bool bool;
Rev 1.50
Mellanox Technologies
Mellanox Technologies Confidential
215
+*/
#define true
1
#define false 0
#endif
@@ -2330,7 +2332,7 @@
void scst_async_mcmd_completed(struct scst_mgmt_cmd *mcmd, int status);
#if LINUX_VERSION_CODE < KERNEL_VERSION(2, 6, 24)
+/*
static inline struct page *sg_page(struct scatterlist *sg)
{
return sg->page;
@@ -2358,7 +2360,7 @@
sg->offset = offset;
sg->length = len;
}
+*/
#endif /* LINUX_VERSION_CODE < KERNEL_VERSION(2, 6, 24) */
static inline void sg_clear(struct scatterlist *sg)
d.
Patch scsi_tgt.h with /tmp/scsi_tgt.patch
$ cd /usr/local/include/scst;
$ cp scst.h scsi_tgt.h
$ patch -p0 < /tmp/scsi_tgt.patch
The above steps are for RHEL 5.2 distributions only.
Note:
e.
Save the following patch as /tmp/scst.patch
--- scst.h2008-07-20 14:25:30.000000000 -0700
+++ scst.h2008-07-20 14:25:09.000000000 -0700
@@ -42,7 +42,9 @@
#endif
#if LINUX_VERSION_CODE < KERNEL_VERSION(2, 6, 19)
+/*
typedef _Bool bool;
+*/
#define true
1
#define false 0
#endif
f.
Untar, patch, and install scst-1.0.0
$ tar zxvf scst-1.0.0.tar.gz
$ cd scst-1.0.0/include
Mellanox Technologies
Mellanox Technologies Confidential
Rev 1.50
216
$ patch -p0 < /tmp/scst.patch
$ cd ..
$ make && make install
g.
Save the following patch as /tmp/scsi_tgt.patch
--- scsi_tgt.h2008-07-20 14:25:30.000000000 -0700
+++ scsi_tgt.h2008-07-20 14:25:09.000000000 -0700
@@ -2330,7 +2332,7 @@
void scst_async_mcmd_completed(struct scst_mgmt_cmd *mcmd, int
status);
#if LINUX_VERSION_CODE < KERNEL_VERSION(2, 6, 24)
+/*
static inline struct page *sg_page(struct scatterlist *sg)
{
return sg->page;
@@ -2358,7 +2360,7 @@
sg->offset = offset;
sg->length = len;
}
+*/
#endif /* LINUX_VERSION_CODE < KERNEL_VERSION(2, 6, 24) */
static inline void sg_clear(struct scatterlist *sg)
h.
Patch scsi_tgt.h with /tmp/scsi_tgt.patch
$ cd /usr/local/include/scst
$ cp scst.h scsi_tgt.h
$ patch -p0 < /tmp/scsi_tgt.patch
4.
When you install Mellanox BXOFED remember to choose srpt=y
$ ./install.pl
D.2
How-to run
A. On an SRP Target machine:
1.
Rev 1.50
Please refer to SCST's README for loading scst driver and its dev_handlers drivers
(scst_disk, scst_vdisk block or file IO mode, nullio, ...)
Mellanox Technologies
Mellanox Technologies Confidential
217
Note:
Regardless of the mode, you always need to have lun 0 in any group's device
list. Then you can have any lun number following lun 0 (it is not required to
have the lun numbers in ascending order except that the first lun must always
be 0).
Setting SRPT_LOAD=yes in /etc/infiniband/openib.conf is not enough as it only causes
the loading of the ib_srpt module but it does not load scst and its dev_handlers.
Example 1: Working with VDISK BLOCKIO mode
(Using md0 device, sda, and cciss/c1d0)
a.
modprobe scst
b.
modprobe scst_vdisk
c.
echo "open vdisk0 /dev/md0 BLOCKIO" > /proc/scsi_tgt/vdisk/vdisk
d.
echo "open vdisk1 /dev/sda BLOCKIO" > /proc/scsi_tgt/vdisk/vdisk
e.
echo "open vdisk2 /dev/cciss/c1d0 BLOCKIO" > /proc/scsi_tgt/vdisk/vdisk
f.
echo "add vdisk0 0" >/proc/scsi_tgt/groups/Default/devices
g.
echo "add vdisk1 1" >/proc/scsi_tgt/groups/Default/devices
h.
echo "add vdisk2 2" >/proc/scsi_tgt/groups/Default/devices
Example 2: Working with real back-end scsi disks in scsi pass-thru mode
a.
modprobe scst
b.
modprobe scst_disk
c.
cat /proc/scsi_tgt/scsi_tgt
ibstor00:~ # cat /proc/scsi_tgt/scsi_tgt
Device (host:ch:id:lun or name)
0:0:0:0
4:0:0:0
5:0:0:0
6:0:0:0
7:0:0:0
Device handler
dev_disk
dev_disk
dev_disk
dev_disk
dev_disk
Now you want to exclude the first scsi disk and expose the last 4 scsi disks as IB/SRP luns for I/O.
echo
echo
echo
echo
"add
"add
"add
"add
4:0:0:0
5:0:0:0
6:0:0:0
7:0:0:0
0"
1"
2"
3"
>/proc/scsi_tgt/groups/Default/devices
>/proc/scsi_tgt/groups/Default/devices
>/proc/scsi_tgt/groups/Default/devices
>/proc/scsi_tgt/groups/Default/devices
Example 3: working with scst_vdisk FILEIO mode
(Using md0 device and file 10G-file)
a.
modprobe scst
Mellanox Technologies
Mellanox Technologies Confidential
Rev 1.50
218
2.
b.
modprobe scst_vdisk
c.
echo "open vdisk0 /dev/md0" > /proc/scsi_tgt/vdisk/vdisk
d.
echo "open vdisk1 /10G-file" > /proc/scsi_tgt/vdisk/vdisk
e.
echo "add vdisk0 0" >/proc/scsi_tgt/groups/Default/devices
f.
echo "add vdisk1 1" >/proc/scsi_tgt/groups/Default/devices
modprobe ib_srpt
B. On Initiator Machines
On Initiaor machines you can manualy do the following steps:
1.
2.
modprobe ib_srp
ipsrpdm -c -d /dev/infiniband/umadX
(to discover new SRP target)
3.
4.
umad0: port 1 of the first HCA
umad1: port 2 of the first HCA
umad2: port 1 of the second HCA
echo {new target info} > /sys/class/infiniband_srp/srp-mthca0-1/add_target
fdisk -l (will show the newly discovered scsi disks)
Example:
Assume that you use port 1 of first HCA in the system, i.e.: mthca0
[root@lab104 ~]# ibsrpdm -c -d /dev/infiniband/umad0
id_ext=0002c90200226cf4,ioc_guid=0002c90200226cf4,
dgid=fe800000000000000002c90200226cf5,pkey=ffff,service_id=0002c90200226cf4
[root@lab104 ~]# echo id_ext=0002c90200226cf4,ioc_guid=0002c90200226cf4,
dgid=fe800000000000000002c90200226cf5,pkey=ffff,service_id=0002c90200226cf4 >
/sys/class/infiniband_srp/srp-mthca0-1/add_target
OR
• You can edit /etc/infiniband/openib.conf to load srp driver and srp HA daemon automatically, that is: set SRP_LOAD=yes, and SRPHA_ENABLE=yes
Rev 1.50
Mellanox Technologies
Mellanox Technologies Confidential
219
• To set up and use high availability feature you need dm-multipath driver and multipath
tool
• Please refer to OFED-1.x SRP's user manual for more in-details instructions on how-to
enable/use the HA feature
The following is an example of ab SRP Target setup file:
#!/bin/sh
modprobe scst scst_threads=1
modprobe scst_vdisk scst_vdisk_ID=100
echo "open vdisk0 /dev/cciss/c1d0 BLOCKIO" > /proc/scsi_tgt/vdisk/
vdisk
echo "open vdisk1 /dev/sdb BLOCKIO" > /proc/scsi_tgt/vdisk/vdisk
echo "open vdisk2 /dev/sdc BLOCKIO" > /proc/scsi_tgt/vdisk/vdisk
echo "open vdisk3 /dev/sdd BLOCKIO" > /proc/scsi_tgt/vdisk/vdisk
echo "add vdisk0 0" > /proc/scsi_tgt/groups/Default/devices
echo "add vdisk1 1" > /proc/scsi_tgt/groups/Default/devices
echo "add vdisk2 2" > /proc/scsi_tgt/groups/Default/devices
echo "add vdisk3 3" > /proc/scsi_tgt/groups/Default/devices
modprobe ib_srpt
echo "add "mgmt"" > /proc/scsi_tgt/trace_level
echo "add "mgmt_dbg"" > /proc/scsi_tgt/trace_level
echo "add "out_of_mem"" > /proc/scsi_tgt/trace_level
D.3
How-to Unload/Shutdown
1.
Unload ib_srpt
$ modprobe -r ib_srpt
2.
Unload scst and its dev_handlers first
$ modprobe -r scst_vdisk scst
3.
Unload ofed
$ /etc/rc.d/openibd stop
Mellanox Technologies
Mellanox Technologies Confidential
Rev 1.50
220
Appendix E: mlx4 Module Parameters
In order to set mlx4 parameters, add the following line(s) to /etc/modpobe.conf:
options mlx4_core parameter=<value>
and/or
options mlx4_ib
parameter=<value>
and/or
options mlx4_en
parameter=<value>
and/or
options mlx4_fc
parameter=<value>
The following sections list the available mlx4 parameters.
E.1
mlx4_core Parameters
set_4k_mtu
Attempt to set 4K MTU to all ConnectX ports (int)
msi_x
Attempt to use MSI-X if nonzero (default 1)
enable_qos
Enable Quality of Service support in the HCA if > 0,
default 0)
block_loopback
Block multicast loopback packets if > 0 (default: 1)
internal_err_resetReset device on internal errors if non-zero (default
1)
debug_level
Enable debug tracing if > 0 (default 0)
log_num_qp
log maximum number of QPs per HCA (default is 17; max
is 20)
log_num_srq
log maximum number of SRQs per HCA (default is 16;
max is 20)
log_rdmarc_per_qp log number of RDMARC buffers per QP (default is 4;
max is 7)
Rev 1.50
log_num_cq
log maximum number of CQs per HCA (default is 16 max
is 19)
log_num_mcg
log maximum number of multicast groups per HCA
(default is 13; max is 21)
log_num_mpt
log maximum number of memory protection table
entries per HCA (default is 17; max is 20)
log_num_mtt
log maximum number of memory translation table segments per HCA (default is 20; max is 20)
log_num_mac
log maximum number of MACs per ETH port (1-7) (int)
log_num_vlan
log maximum number of VLANs per ETH port (0-7) (int)
Mellanox Technologies
Mellanox Technologies Confidential
221
use_prio
E.2
mlx4_ib Parameters
debug_level
E.3
Enable steering by VLAN priority on ETH ports (0/1,
default 0) (bool)
Enable debug tracing if > 0 (default 0)
mlx4_en Parameters
rss_xor
Use XOR hash function for RSS 0 (default is xor)
rss_mask
RSS hash type bitmask (default is 0xf)
num_lro
Number of LRO sessions per ring or disabled (0)
default is 32)
pfctx
Priority based Flow Control policy on TX[7:0].
Per priority bit mask (default is 0)
pfcrx
Priority based Flow Control policy on RX[7:0].
Per priority bit mask (default is 0)
inline_thold
E.4
Threshold for using inline data (default is 128)
mlx4_fc Parameters
log_exch_per_vhba
Max outstanding FC exchanges per virtual HBA (log).
Default = 9 (int)
max_vhba_per_port
Max vHBAs allowed per port. Default =
Mellanox Technologies
Mellanox Technologies Confidential
2 (int)
Rev 1.50
222
Glossary
The following is a list of concepts and terms related to InfiniBand in general and to Subnet
Managers in particular. It is included here for ease of reference, but the main reference
remains the InfiniBand Architecture Specification.
Channel Adapter (CA), Host Channel Adapter (HCA)
An IB device that terminates an IB link and executes transport functions. This may be an HCA (Host CA)
or a TCA (Target CA).
HCA Card
A network adapter card based on an InfiniBand channel adapter device.
IB Devices
Integrated circuit implementing InfiniBand compliant communication.
IB Cluster/Fabric/Subnet
A set of IB devices connected by IB cables.
In-Band
A term assigned to administration activities traversing the IB connectivity only.
LID
An address assigned to a port (data sink or source point) by the Subnet Manager, unique within the subnet, used for directing packets within the subnet.
Local Device/Node/System
The IB Host Channel Adapter (HCA) Card installed on the machine running IBDIAG tools.
Local Port
The IB port of the HCA through which IBDIAG tools connect to the IB fabric.
Master Subnet Manager
The Subnet Manager that is authoritative, that has the reference configuration information for the subnet.
See Subnet Manager.
Multicast Forwarding Tables
A table that exists in every switch providing the list of ports to forward received multicast packet. The
table is organized by MLID.
Network Interface Card (NIC)
A network adapter card that plugs into the PCI Express slot and provides one or more ports to an Ethernet
network.
Standby Subnet Manager
Rev 1.50
Mellanox Technologies
Mellanox Technologies Confidential
223
A Subnet Manager that is currently quiescent, and not in the role of a Master Subnet Manager, by agency
of the master SM. See Subnet Manager.
Subnet Administrator (SA)
An application (normally part of the Subnet Manager) that implements the interface for querying and
manipulating subnet management data.
Subnet Manager (SM)
One of several entities involved in the configuration and control of the subnet.
Unicast Linear Forwarding Tables (LFT)
A table that exists in every switch providing the port through which packets should be sent to each LID.
Virtual Protocol Interconnet (VPI)
A Mellanox Technologies technology that allows Mellanox channel adapter devices (ConnectX®) to
simultaneously connect to an InfiniBand subnet and a 10GigE subnet (each subnet connects to one of the
adpater ports)
Mellanox Technologies
Mellanox Technologies Confidential
Rev 1.50