1
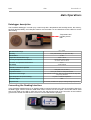
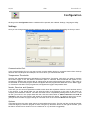
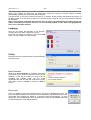
HTM
User's Manual
Version date 16/12/2008
Management Software for HumiStick
Temperature and Humidity Dataloggers
Software version 1.6
2/22
HTM
TecnoStick and HumiStick are registered marks of Tecnosoft srl
Tecnosoft s.r.l.
Via delle Regioni, 34, 20090 Segrate (Milano)
phone +39 02 26922888 - fax +39 02 26922875
e-mail: [email protected] - web: www.tecnosoft.net
TecnoSoft s.r.l.
TecnoSoft s.r.l.
HTM
3/22
INDEX
LICENSE AGREEMENT......................................................................................................................4
INTRODUCTION...............................................................................................................................5
SYSTEM REQUIREMENTS..................................................................................................................6
HARDWARE.........................................................................................................................................6
SOFTWARE..........................................................................................................................................6
INSTALLATION.................................................................................................................................7
MAIN OPERATIONS.........................................................................................................................9
DATALOGGER DESCRIPTION.......................................................................................................................9
CONNECTING THE READING INTERFACE........................................................................................................9
INSTALLING THE USB DRIVERS FOR THE TECNOSTICK I NTERFACE...........................................................................................10
LAUNCHING THE PROGRAM....................................................................................................................10
THE MAIN WINDOW...........................................................................................................................10
CONFIGURATION..........................................................................................................................12
SETTINGS..........................................................................................................................................12
COMMUNICATION PORT...........................................................................................................................................12
TEMPERATURE THRESHOLDS.........................................................................................................................................12
SENDER, RECEIVER AND OPERATOR.............................................................................................................................12
OPTIONS...............................................................................................................................................................12
LANGUAGE.......................................................................................................................................14
UTILITY............................................................................................................................................14
RESET DATABASE.....................................................................................................................................................14
RECYCLE BIN..........................................................................................................................................................14
START A NEW MISSION.................................................................................................................15
SETTING THE PARAMETERS.......................................................................................................................15
DELAY ACQUISITION SETTING.....................................................................................................................................15
ACQUISITION INTERVAL SETTING...................................................................................................................................15
TEMPERATURE THRESHOLDS SETTING..............................................................................................................................15
DATE AND TIME......................................................................................................................................................15
ADDITIONAL DATA...................................................................................................................................................15
IDENTIFICATION........................................................................................................................................................16
IDENTIFICATION OBJECTS LIST......................................................................................................................................16
NOTES..................................................................................................................................................................16
PROGRAMMING THE DATA LOGGER..........................................................................................................16
READ THE ACQUIRED DATA..........................................................................................................17
GENERAL.........................................................................................................................................17
TEMPERATURE AND HUMIDITY GRAPHS.......................................................................................................18
DATA TABLE......................................................................................................................................19
ALARMS..........................................................................................................................................19
THE OPERATIONS BUTTONS......................................................................................................................19
THE PRINT PREVIEW WINDOW.................................................................................................................20
DATA ARCHIVE.............................................................................................................................22
HELP MENU....................................................................................................................................23
INFORMATION...............................................................................................................................24
CLOSING THE PROGRAM.............................................................................................................25
4/22
HTM
TecnoSoft s.r.l.
License agreement
Read this license agreement thoroughly before using the Software. Using and copying this Software is subject to the
acceptance of this agreement.
If you choose to refuse the following conditions, please return this Software to the point of purchase for a complete refund.
This agreement involves Tecnosoft srl, Redecesio di Segrate, Milano, Italy (henceforth called Tecnosoft) and the User (be it
a physical or juridical person) for the following software products (henceforth called Software):
"Program" and any software product accompanying it.
Tecnosoft grants the user a non-exclusive right to use a copy of the software on a single computer provided that the user
accepts the following conditions.
1. User license. The Software is property of Tecnosoft and cannot be copied nor sold without the prior written
authorization of Tecnosoft. The Software is protected by Italian and European Laws and by International Treaties
concerning intellectual properties.
2. Additional licenses. The purchase of additional licenses conveys the right to use the Software on a corresponding
number of computers at the same time.
3. Exclusion of liabilities. Except for what stated by applicable laws, in no case can Tecnosoft be considered liable for
damages or losses, direct or indirect, including, but not limited to, loss or missing income, suspension of activities, loss of
information or any other monetary or economical damage, deriving from proper or improper use of the Software even
if Tecnosoft has been advised of the possibility of such damages. In any case, the responsibility of Tecnosoft for such
damages will be limited to the price paid for the Software. This clause is applied even if the User does not accept the
Software.
4. Use of Software results. It is User's responsibility to check that results given by the Software are correct and appropriate.
In no case the Software should be used if such use can be threatening to the health or life of human beings. This clause
is applied even if the User does not accept the Software.
5. Updates. If the Software is an update of a previous version, the license is transferred from the old version to the update.
Only the update can be used, unless the update is destroyed.
6. Separation of components. The Software is licensed as a single product. Components cannot be separated.
7. Limitations. The User cannot convert, decode, decompile or disassemble the Software, except for what is explicitly
requested by applicable laws.
TecnoSoft s.r.l.
HTM
5/22
Introduction
The HumiStick system is composed of a temperature and humidity Data Logger, a software and a reading
interface.
The HumiStick Data Logger is a miniaturized temperature acquisition device: its dimensions are 50X22 mm
and it's 15 mm high. It has several applications: temperature monitoring of transported and stored goods,
monitoring of fridges and freezers and other temperature sensitive environments in conformity with ISO 9001
standards. Its reduced size together with the fact that it doesn't need an external power supply make the
sensor an extremely versatile system for temperature measurement.
Thousands of readings could be stored and then downloaded via the probe and the application software.
Using the software provided in the kit, the user can view the acquired data in graphic and table format, with
the option of exporting the data in Excel (.XLS) file format, as well as program the data logger for future
missions.
Every Data Logger has its own unique serial number; each data logger can come (on your request) with
calibration certificate, which is valid for one year, in order to guarantee validity of acquired readings.
6/22
HTM
TecnoSoft s.r.l.
System Requirements
Hardware
Description
Minimum
Recommended
Microprocessor
Celeron 300
Pentium III 400
Memory
64 MB
128 MB
Video
800x600; 256 colours
1024x768; 16 Mil. colours
Free serial port (RS232) or free USB port
Software
Description
Operating system
Supported
Windows 2000 / XP / Vista
TecnoSoft s.r.l.
HTM
7/22
Installation
After having switched on the PC, insert the software CD in your CD-ROM reader; click on Start – Run and
type “D:\setup.exe” (N.B. Your CD-ROM device could have a different name to “D”).
When the installation program is running, carefully follow the instructions and select your preferred options
when requested. Following the welcome window, you will be asked for your details; the Name and Company
fields must be completed prior to clicking on the Next button.
The program will then ask you to a confirm the installation directory path; by clicking on the browse button
one can select a different installation directory. We recommended installing the software in the default
directory (C:\Program Files\Tecnosoft\HTM). The installation program will then ask for the Start menu group
in which you would like to install the link from which you can run the HTM program.
Click on Next to proceed: the last preparation window with allow you to confirm and verify all settings prior to
proceeding with the installation.
Click again on Next and program files will be copied to the hard disk. Once the installation is complete, click
on Finish to proceed.
8/22
HTM
TecnoSoft s.r.l.
Main Operations
Datalogger description
The HumiStick datalogger is made up by a main body with a temperature and humidity sensor, the memory,
the clock and the battery, and a flat part used for communication. On one side there is also a filter for correct
data reading.
Temperature and
Humidity sensor
filter
RH measurement range
Accuracy
RH Resolution
Temperature measurement range
Accuracy in temperature measurement
Resolution in temperature measurement
RH stability
0% ÷ 100%
±2% (10%-90% RH); ±4% (0%-100% RH)
0,1 RH
-30°C ÷ +65°C
±0,4°C from +5°C to +40°C
±1°C from -20°C to +65°C
0,2°C
<0,5% RH/year
Calibration certificate if requested
N° of acquisitions
Acquisition interval
Acquisition mission length
Expected product life (internal battery)
Protection degree
Response Time
1365 (date, time, RH and T)
from 1 per minute to 1 every 255 minutes
from 22 hours and 45 mins. with 1 acq. per minute till 241 days with
1 acq. every 255 mins.
10 years or 3.000.000 acquisitions
IP67
30 seconds; conditions:1/e (63%) in slowing moving air (0,03 m/s)
Connecting the Reading Interface
In the HumiStick package there is an interface able to read and transmit to the PC the acquisition data from
the Data Logger. There is a serial or USB cable used to connect it to the computer; connect the USB or serial
side of this cable to the USB or serial port on the PC and the other side to the connection of the interface
(you'll have to install the USB drivers in order to use the USB interface properly).
TecnoSoft s.r.l.
HTM
9/22
To read the Data Logger's data you have to insert the flat end of the device in the interface. You can insert
the logger from both sides.
Installing the USB drivers for the TecnoStick Interface
To install the drivers refer to the instructions from the installation menu.
Launching the Program
After the installation is completed double click on the HTM icon on the desktop to start the program, or select
the Start – Program Files (or All the Programs, if you're using Windows XP) – Tecnosoft - HTM – HTM.
After the program has been started, it may open a window called Create Database (see chapter
Configuration at page 11): click twice (not double click) on the Create button to proceed.
The Main Window
The Main Window of the program will open; its composed by a bar that will stay at the top of the screen and it
has a title, HTM (Humidity and Temperature Monitor), the three buttons of every Windows window (Iconize,
Enlarge, Close), and a series of buttons corresponding to the different program functions.
10/22
HTM
TecnoSoft s.r.l.
Configuration
Clicking on the Configuration button a window will be opened, with 3 labels: Settings, Language e Utility.
Settings
Here you can change several program settings so that it can be personalized depending on what you need.
Communication Port
In the Communication Port you can set to which port the reading device is connected. Select from the drop
down list with 8 COM ports and USB port, the one to which you connected the cable.
Temperature Thresholds
Set here the standard Maximum and Minimum Temeprature Thresholds, with which you want to program
each Data Logger; if the Set Default Thresholds option is selected, these thresholds will appear in the
programming window and you'll be able to change them anyway before starting the mission. If the option is
not activated, in the same program window will appear the last programmed thresholds for the Data Logger
or, if the device has been never programmed, will appear the logger's temperature limits.
Sender, Receiver and Operator
In this box you can set some parameters useful to track down the acquisition mission once it has been stored
in the Archive. In the Sender field you can write the origin of the transport or the name of the person or
company who started the mission. The other two fields can be completed by adding items to the list. To add
an item just write it in the proper field and then click the button below it: Add to Receivers and Add to
Operators; then the name typed in will appear in the list below the button. To delete a name from the list,
you'll just have to select it by right clicking on it and then click on the command Delete that will appear.
Options
In the last box there are some other options to personalize the program. The first one lets you set the number
of decimal digits you want the program to show: using the up and down arrows on the right of the field, you'll
be able to choose from a minimum of 0 to a maximum of 3 (1 decimal is suggested).
TecnoSoft s.r.l.
HTM
11/22
The second option, which you can select by clicking on the small box next to it will stop the mission of the
logger you're reading: the data won't be deleted, but, unless the memory is full (the mission is already
automatically stopped), the acquisitions will be stopped.
The third option, on the right, Download all memory, if checked, let the program download all the memory of
the Data Logger, even the part not used for the current mission. However, only the current mission data will
be displayed.
Note: if you program a delayed start mission and you check it by downloading the data and this last
option is selected, you stop the mission; if it is not already started, it won't start at the programmed
time, since it has been aborted.
Language
Here you can select the language of the program,
choosing from two: Italian, English and Fench.
Each time you change it, you'll have to click on the OK
button, exit the program and start it again.
Utility
Here there are two important buttons: Reset Database
and Recycle bin.
Reset Database
Clicking on Reset Database, a message will appear
and will ask you to reset the Database Archive of the
readings. In this way the tables of Archive will be
recreated and emptied (page 18): the saved
acquisitions files won't be lost, but you'll have to import
them again. Click on Create to proceed or Exit to
cancel.
Recycle bin
When you delete an item from the Data Archive, this won't be displayed any more but
it's not completely deleted: the acquisition file is transferred to the Data/Del folder, in the
main folder of the program (by default is C:\Program Files\Tecnosoft\HTM). To clean
the program from the delete files, click on this button: a Report will be displayed showing
you the thrash status. Click OK to continue.
12/22
HTM
TecnoSoft s.r.l.
Start a New Mission
To start a new mission and program a Data Logger, be sure that the interface is connected to the right PC
port and that a Data Logger is inserted in the interface. Then, click on the New Mission button in the Main
Window; after a while the Settings window will appear: it is divided in different boxes.
Setting the parameters
Delay Acquisition Setting
In these fields type the delay, in days (dd), hours (hh) and minutes (mm), with which you want the device to
start to acquire before the programming session. The maximum delay is 45 days, 12 hours and 15 minutes.
Acquisition Interval Setting
Set here the acquisition interval, the time between two acquisitions. You can set hours (hh) and minutes
(mm) of the interval, from a minimum of 1 minute to a maximum of 255 minutes (4 hours and 15 minutes).
Temperature Thresholds Setting
Set a Temperature Threshold (Maximum and/or Minimum) if you want, when a mission ends and you have
downloaded and saved the data, to see immediately when and how many times the temperature has gone
out of the alarm range. It's not possible to set the same value for both thresholds. If you set, in the
Configuration (page 10), the option that enables the default thresholds, here there will be the set values.
Otherwise, there will be displayed the last thresholds programmed for that specific Data Logger. If you set
thresholds out of the device's temperature range, the thresholds will be set exactly at the range limits.
Date and Time
Here you can see the PC date and time, so that you can synchronize the device with the clock on the
computer. Be sure it is correct, otherwise change it by double clicking on the time in the right bottom corner of
the Windows bar.
Additional Data
In the Additional Data box you can type in names useful to track down the mission you're about to start. In the
first field, Sender, there is the same name typed in the field in the Configuration window (see page 10). In this
TecnoSoft s.r.l.
HTM
13/22
way, since probably it will be always the same person/company to start the missions from the same PC, you
won't have to type it again each time. However, you can always change it by deleting its content and typing it
a new name. In the other two fields you can directly type in the name you want or select a name from the
drop down list. If you type here a name not in the list, this name won't be added to the list. To add a name to
the list, see the instructions at page 10.
Identification
Here you can see the device serial number. You can't edit this field.
Identification Objects list
In the upper field of this box you can type in one or more names of items to identify the transported objects or
the site you're monitoring. Each time you type in a value, click on Add or press Enter to add it to the list below
the field. Select an item and click on Delete to delete it.
Notes
In the Notes box you can type in your considerations about the mission, if you feel that might be useful fort he
operator who will download the data acquired.
Note: each time you add something to the fields described above, the blue bar at the bottom of the
window will become full. This is the available memory of the logger for these informations. When you
reach the limit, the program will tell you that you cannot add any more informations, unless you
delete some you already added. While programming a HumiStick, the more you add informations, the
more you have less memory for the acquisitions. The maximum number of acquisitions is 1365: if
you just type in the Sender, Receiver, Operator, some items in the Objects/Sites list and a brief note,
the number of acquisition wont' be less than 1365. If you add lots of notes or many items in the list,
you could have less available acquisitions.
Programming the Data Logger
After doing all the operations described above and filled in all the necessary fields, click on the Start Mission
button to send the programming informations to the Data Logger inserted in the interface. The first acquisition
will be made immediately after the programming operation ends, unless you set a delay. If you decided not to
start the programming of the device, just click on the Cancel button.
14/22
HTM
TecnoSoft s.r.l.
Read the Acquired Data
When you receive a Data Logger that has completed its mission, you can see the data acquired and edit
them. Be sure that the interface is connected to the PC and insert the Data Logger you wish to analyze. Click
on the Download Data button and wait for the bar under the buttons in the Main Window to become
completely blue (this operation might take a while depending on the number of acquisitions saved in the
device).
If in the Configuration window you set to stop the acquisitions before downloading the data (see page 10), the
next window will open. Otherwise, if the option is not selected, a message will ask you if you want to stop the
acquisitions: answer Yes or No to proceed.
The Acquisition Data window will be opened, and it has four labels: the upper part changes depending on the
label you select, while the bottom zone, with the operations buttons remains the same for each label (note
that in the next pictures, the bottom bar with these buttons is not present, but you'll find it at the end of this
chapter).
General
Here you can see all the programming parameters set by the operator who started the mission; there are
different boxes:
•
•
•
•
Acquisition Settings:
• Acquisition Interval: acquisition interval between two acquisitions.
• Delay: the delay time between programming and start of the mission. In the first field there are the
days (dd), while in the second there are the hours and minutes (hh/mm).
Acquisition Status:
• Acquisition Number: shows the number of acquisitions recorded.
• First Acquisition Date and Time: the date and time of the first acquisition of the mission you've
downloaded the data..
Temperature and thresholds:
• Temperature Thresholds °C: the thresholds set during programming.
• Temperature Registered °C: the limit values registered for the temperature.
• Humidity Registered %: the limit values for the humidity registered.
Other Informations:
• Identification: the serial number of the Data Logger.
TecnoSoft s.r.l.
HTM
15/22
•
•
•
•
Device Status: informations about the status of the device; it shows if the system is acquiring or in
standby. If the mission is not ended you'll see the message SYSTEM IS ACQUIRING, otherwise there
will be written SYSTEM IN STANDBY.
• Datalogger Date and Time: date and time of the internal clock of the device.
Other Data:
• Sender: the company or the person who sent the Data Logger.
• Receiver: the company or the person to whom the device is destined.
• Operator: it shows the code or the name of the operator who programmed the mission.
Objects/Sites: here you'll find the list of objects and sites monitored.
Notes: if the operator typed in some notes, you'll find them here.
Temperature and Humidity Graphs
Here you'll see the Graph of the acquisition. The Graph can display all the acquisitions recorded by the Data
Logger.
There are six lines in the Graph:
• red line: the maximum threshold set during programming;
• blue line: the minimum threshold set during programming;
• black line: the temperature acquisitions;
• dark blue line: the humidity acquisitions;
• grey line: the heat index values;
• purple line: the dew point values.
You can copy the graph to the clipboard and then paste it in a different program (MS Word, MS Excel, Paint,
ecc.). Click on Copy and then, after you opened the program you wish to copy the graph to, click on Paste
(or on Edit – Paste).
16/22
HTM
TecnoSoft s.r.l.
Data Table
These are the data that you saw in graph format in the previous label: there is the Date Acquisitions, along
with the time, the Temperature, expressed in C°, the Humidity, expressed in a percentage value and the Dew
Point, in °C. You can save this table in MS Excel format by clicking on the Save... button and, after you
chose where to save the file, give it a name and then click on Save to proceed. Double clicking on the header
of the columns, the Header Name window will open and you can type in a new name for it. Click OK to
confirm or Cancel to cancel. You can print the table on the default printer by clicking the Print button.
Alarms
Here there is the list of each time the recorded temperature has gone out of the range of the set thresholds.
Clicking on Print it is possible to print this table.
The operations buttons
Under the five labels there is a zone with some buttons that allows you to operate on the acquisitions.
TecnoSoft s.r.l.
HTM
17/22
On the left there is the Acquisition Interval box, divided in two parts, each with two fields: in the upper part,
called Acquisition Start Date and Time have to be set the date, in the first field, and the time, in the second,
that must be considered as the start of your mission in the Graphs and in the Table. If the data is after the
first acquisition recorded by the device, the data between the two dates won't be considered (but not
deleted!). The fields under the words Acquisition End Date and Time work in the same way, but these are for
the ending date you wish to see.
To proceed with this operation you'll have to click on the Refresh button in the right part of the box.
On the right side of the bar there are four buttons.
The first one, Print, has two options too. Clicking on it you'll be able to print a report of the acquisition with all
the parameters and the graph. If you select the first option, Preview (see page 17) the Print Preview window
will open; selecting the option Print Data Table the table will be included in the report.
The second button, Save, allows you to save the acquisition in the Archive (see page 18). Before saving an
acquisition you have to inizialize the archive (see page 11).
The third button, e-Mail, allows you to send the acquisition saved
to another person with the HTM installed on his machine. After
clicking on it, the Send acquisition by e.-mail window will open,
divided in different fields. In order to send an email with the HTM
software, you'll have to configure Outlook Express. The HTM uses
the account and settings of the Email client for Windows and
opens the New message window before sending the acquisition
file. To set the client with an account is very easy since the
software will guide you through all the parameters you have to set.
If you don't have an Internet connection or an account, you won't
be able to use this option.
In the first field, Account, select with which address you want to
send the file, if you created more than one account on your client.
In the next field, To, type in the receiver address: clicking on To
you'll open the Outlook address book. The attached file is the
acquisition file saved previously; the subject is the title of the mail
and the text is the text message: both these fields can be edited.
As soon as you select a receiver, clicking on Send a New message window of Outlook will open. Clicking on
Clear All, all the fields will be deleted and you'll have to type in new values; to cancel the operation click on
Exit.
The Print Preview Window
When you click on Print with the Print Preview option enabled, it will be opened a window with the same
name (Print Preview), where you can see the acquisition report that you're about to print. In the main part of
the window there is the document, while in the upper bar there are some functions buttons. The first one,
Zoom to fit, display the document so that it is visible completely on the screen. The second one, 100%,
zoom the document to its real dimensions, while Zoom to width zoom the document so that it's large as
much as the window is. The next four buttons allows you to switch between pages: the first and last arrow
bring you to the first and last page, the central ones can scroll one page after another. The Printer Setup
button allows you to select the printer on which you wish to print the report; the Print button send the
document to the printer. Save Report and Load Report allows you to save and load the report file, while
Close closes and cancel the print operation.
18/22
HTM
TecnoSoft s.r.l.
Data Archive
When you save an acquisition after importing data from a Data Logger, the saved files are stored in the Data
Archive. You have to reset the archive before starting to save (see page 11).
Clicking on the Archive Data button you'll open the new window; in the central area, below the grey bar, there
is the list with all the acquisition saved. In the left-top box, called Search Functions, you can set some search
parameters to find easily the acquisition you're looking for.
In the Object/Site Identification field you can type in the name or code of each item added in the list called, in
the programming window, Object/Site Identification (see page 13).
Instead, selecting the Mission Start Date From / To option and filling the fields below with the interval of days
to consider, there will be shown only the acquisition between these limits. Then, selecting an option from the
drop-down list called Field Name, which are the names of the columns of the Archive table, you'll be able to
select in the right field, Field Value, a value written at least in one saved acquisition. For example, if you
select in the left field Sender, in the right field you'll be able to select all the values listed in that column of the
Archive. After you selected the search parameters, click on the Search button to start. If the Archive remains
empty, it means that none of the saved acquisitions matches those parameters.
If you received by email or on a diskette an acquisition file, you can add it to your database by clicking on
Import Acquisition. In the next window you can choose the path from which to import the file. If you want to
give to another person a specific file, but you cannot send it via email, you can save the file on a disk: the
saved files are stored in the Data/Files folder, in the main folder of the program. To know which is the right
file you want to export, look at its name in the archive list, under the column File.
From the Archive you can see an acquisitions in details by double clicking on it: you'll open the Acquisition
Data window (see page 14).
The other buttons are: Cancel Acquisition which deletes the acquisitions selected from the list; if you want
to import the files put in the thrash bin, click on Import Acquisition and search the file in the Data\Del folder,
in the main directory of the program (which is by default C:\Program Files\Tecnosoft\HTM).
Then, there are Send E-mail, that it's the same of the one in the Acquisition Data window (see page 17) and
Exit, that closes the Archive window.
TecnoSoft s.r.l.
HTM
19/22
Help Menu
Click on the Help button to open the On-line Help window. Browse through the different subjects to know the
program in details and learn all the available functions. The On-line Help pages work exactly as web site
pages, with hyperlinks to go from one page to another.
20/22
HTM
TecnoSoft s.r.l.
Information
Clicking on Info from the Main Window the window with the license contract and the contacts informations
will appear.
TecnoSoft s.r.l.
HTM
21/22
Closing the program
To close the program just click on Exit, or on the X in the Main Window.
22/22
HTM
Company ISO 9001:2000 certified for firmware and software development
TecnoSoft s.r.l.