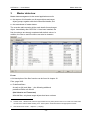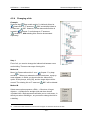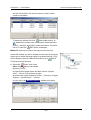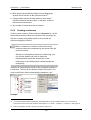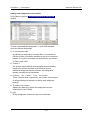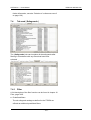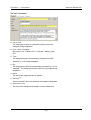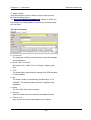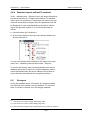
1
Version 3.1 The GSTOOL Manual This document and all of its component parts are protected by the law of copyright. Use of the document outside of the narrowly defined boundaries of copyright legislation without the approval of the Federal Office for Information Security BSI is illegal and is a punishable offence. This applies in particular to reproduction, translation, microfilming and saving and editing in electronic systems. © 2004 by Bundesamt für Sicherheit in der Informationstechnik Godesberger Allee 183, 53175 Bonn GSTOOL 3.1 - User Manual Table of contents Table of contents 0 1 Introduction .........................................................................................1 0.1 The IT Baseline Protection Manual .......................................................................1 0.2 0.2.1 0.2.2 0.2.3 0.2.4 GSTOOL ..................................................................................................................1 Development ............................................................................................................2 Features ...................................................................................................................2 Modeling of the IT Baseline Protection Manual in GSTOOL 3.1 ..............................3 Further development ................................................................................................6 0.3 System requirements .............................................................................................6 0.4 0.4.1 0.4.2 0.4.3 Warnings – notes – tips .........................................................................................7 Warnings ..................................................................................................................7 Notes ........................................................................................................................7 Tips...........................................................................................................................7 0.5 Naming and format conventions...........................................................................8 0.6 Problem reports......................................................................................................8 0.7 E-mail newsletter on GSTOOL 3.1 ........................................................................9 Installation – first-time use – deinstallation ...................................10 1.1 Installation.............................................................................................................10 1.2 Configuring the ‘sa’ password ............................................................................16 1.3 Licensing...............................................................................................................16 1.3.1 Licensed operation .................................................................................................17 1.3.2 Test operation.........................................................................................................18 1.4 Deinstallation ........................................................................................................19 1.5 Database server / databases ...............................................................................20 1.5.1 Database server .....................................................................................................21 1.5.2 Databases ..............................................................................................................22 2 General information on working with GSTOOL 3.1 .......................25 2.1 2.1.1 2.1.2 2.1.3 Starting the program ............................................................................................25 Selecting the server................................................................................................25 Selecting the database ...........................................................................................26 Registration type.....................................................................................................28 2.2 User interface........................................................................................................29 2.2.1 Menu bar ................................................................................................................29 2.2.2 Toolbar ...................................................................................................................29 -i- GSTOOL 3.1 - User Manual 3 Table of contents 2.2.3 2.2.4 2.2.5 2.2.6 Navigator ................................................................................................................30 Tree ........................................................................................................................31 Editing window........................................................................................................33 Changing the window width....................................................................................36 2.3 2.3.1 2.3.2 2.3.3 2.3.4 2.3.5 2.3.6 2.3.7 2.3.8 2.3.9 2.3.10 2.3.11 2.3.12 Default settings.....................................................................................................36 <Tools> - <Roles ...> ..............................................................................................37 <Tools> - <User ...>................................................................................................37 <Tools> - <Password> ...........................................................................................37 <Tools> - <Target object types ...>.........................................................................37 <Tools> - <Options> - | Common | .........................................................................43 <Tools> - <Options> - | Reports | ...........................................................................47 <Tools> - <Options> - | Report header |.................................................................47 <Tools> - <Options> - | Additional options | ...........................................................47 <Tools> - <Options> - | Display | ............................................................................48 <Tools> - <Options> - | Password | ........................................................................50 <Tools> - <Options> - | Path settings | ...................................................................50 <Tools> - <Translate currency> .............................................................................51 2.4 2.4.1 2.4.2 2.4.3 2.4.4 2.4.5 2.4.6 2.4.7 2.4.8 2.4.9 2.4.10 2.4.11 2.4.12 2.4.13 2.4.14 Basic functions.....................................................................................................52 <File> - <Data migration from GSTOOL 2.0>.........................................................52 <File> - <Data migration from GSTOOL 3.0>.........................................................55 <File> - <Import> - <Update BPM metadata> ........................................................58 <File> - <Exit> ........................................................................................................59 Copying objects ......................................................................................................60 <Edit> - <Reports> .................................................................................................61 <Edit> - <Modeling> ...............................................................................................61 <View> - <Notepad>...............................................................................................61 <Tools> - <Encryption ...> ......................................................................................61 <Database> - <Data backup and recovery...>........................................................63 NEW / PRIOR / CHANGED - display...........................................................................67 History ....................................................................................................................68 On-line help ............................................................................................................69 Configuring the database .......................................................................................70 Master data view ...............................................................................75 3.1 Determining the target object type .....................................................................77 3.2 3.2.1 3.2.2 3.2.3 3.2.4 Creating a new target object ...............................................................................78 Tab card | /Target object type/ |..............................................................................78 Tab card | Specific task | ........................................................................................81 Tab card | Protection requirement | ........................................................................81 Tab card | Audit information | .................................................................................83 - ii - GSTOOL 3.1 - User Manual Table of contents 3.2.5 Tab card | Links | ....................................................................................................84 3.2.6 Creating a target object ..........................................................................................84 3.3 Editing a target object..........................................................................................85 3.4 Deleting a target object........................................................................................86 3.4.1 Deleting individual target objects............................................................................86 3.4.2 Deleting several target objects at the same time....................................................86 4 5 Structure of target objects view ......................................................87 4.1 4.1.1 4.1.2 4.1.3 Presentation and structure rules ........................................................................87 Presentation ...........................................................................................................87 Filter........................................................................................................................92 Structure rules ........................................................................................................93 4.2 4.2.1 4.2.2 4.2.3 4.2.4 4.2.5 Linking of target objects......................................................................................98 Direct / indirect linking ............................................................................................98 Creating a new link ...............................................................................................100 Linking dependent target objects..........................................................................101 Changing a link.....................................................................................................103 Deleting a link .......................................................................................................106 4.3 Creating a target object .....................................................................................108 4.4 Deleting a target object......................................................................................109 Modeling view..................................................................................110 5.1 5.1.1 5.1.2 5.1.3 General ................................................................................................................110 Links between target objects and IT asset sets....................................................111 Tree presentation .................................................................................................112 Filter......................................................................................................................116 5.2 5.2.1 5.2.2 5.2.3 5.2.4 5.2.5 5.2.6 Modeling..............................................................................................................117 Tree presentation .................................................................................................117 Adding a safeguard ..............................................................................................121 Deleting a safeguard ............................................................................................123 Adding a module...................................................................................................124 Editing a module...................................................................................................127 Deleting a module.................................................................................................131 5.3 5.3.1 5.3.2 5.3.3 5.3.4 Modeling by drag-and-drop ...............................................................................132 Dragging safeguard to safeguard .........................................................................133 Dragging safeguard to module .............................................................................133 Dragging module to module .................................................................................133 Dragging module to target object .........................................................................134 5.4 Referencing.........................................................................................................135 - iii - GSTOOL 3.1 - User Manual 6 7 Table of contents 5.4.1 5.4.2 5.4.3 5.4.4 5.4.5 Preconditions and possibilities .............................................................................135 Creating a reference.............................................................................................136 Editing in the reference target ..............................................................................138 Deletion of referencing .........................................................................................138 Deletion of a reference source .............................................................................139 5.5 5.5.1 5.5.2 5.5.3 5.5.4 Basic Security Check .........................................................................................140 Tab card | Implementation |..................................................................................141 Tab card | Costs | .................................................................................................144 Tab card | Revision |.............................................................................................145 Tab card | Responsible |.......................................................................................146 Reports view....................................................................................150 6.1 Tree presentation ...............................................................................................150 6.2 Filters...................................................................................................................150 6.3 Report scope.......................................................................................................150 6.4 Choosing a report template...............................................................................151 6.5 Creating a report.................................................................................................151 6.6 Saving a report ...................................................................................................152 6.7 External processing of a report ........................................................................152 6.8 Printing a report..................................................................................................153 6.9 6.9.1 6.9.2 6.9.3 6.9.4 6.9.5 User defined templates ......................................................................................153 Template structure................................................................................................154 Overview of report templates................................................................................154 Tab card | Properties | ..........................................................................................156 Determining the scope of the report .....................................................................158 Report header.......................................................................................................162 BPM user defined view ...................................................................163 7.1 Tab card | Target object types |.........................................................................163 7.1.1 Filter......................................................................................................................163 7.1.2 List of target object types......................................................................................164 7.2 7.2.1 7.2.2 7.2.3 7.2.4 7.2.5 7.2.6 Tab card | Target object subtypes | ..................................................................165 Filter......................................................................................................................165 List of target object subtypes................................................................................165 Edit target object subtype .....................................................................................166 Create a new target object subtype......................................................................166 Delete a target object subtype..............................................................................167 View explanations for a target object subtype ......................................................167 - iv - GSTOOL 3.1 - User Manual 8 9 Table of contents 7.3 7.3.1 7.3.2 7.3.3 7.3.4 7.3.5 7.3.6 Tab card | Modules | ...........................................................................................167 Filter......................................................................................................................167 List of modules .....................................................................................................168 Open a module .....................................................................................................169 Adapt a module ....................................................................................................169 Define a new module............................................................................................175 Delete a module ...................................................................................................178 7.4 7.4.1 7.4.2 7.4.3 7.4.4 7.4.5 7.4.6 Tab card | Safeguards | ......................................................................................179 Filter......................................................................................................................179 List of safeguards .................................................................................................180 Opening a safeguard ............................................................................................181 Adapting a safeguard ...........................................................................................182 Define a new safeguard........................................................................................187 Deleting a safeguard ............................................................................................188 7.5 7.5.1 7.5.2 7.5.3 7.5.4 7.5.5 7.5.6 Tab card | Threats |.............................................................................................189 Filter......................................................................................................................189 List of threats ........................................................................................................190 Open a threat........................................................................................................190 Adapting a threat ..................................................................................................191 Define a new threat ..............................................................................................193 Deleting a threat ...................................................................................................195 7.6 Tab card | Protection requirement categories | ...............................................195 IT Baseline Protection Manual .......................................................197 8.1 BPM local view....................................................................................................197 8.2 BPM online view .................................................................................................197 Export / Import view........................................................................198 9.1 9.1.1 9.1.2 9.1.3 Text file export of target object .........................................................................199 Tab card | Properties | ..........................................................................................200 Export scope.........................................................................................................200 Carrying out the export .........................................................................................201 9.2 Target object import from text file ....................................................................201 9.2.1 Database size with target object import from text file ...........................................203 9.3 9.3.1 9.3.2 9.3.3 Standard export ..................................................................................................204 Tab card | Properties | ..........................................................................................205 Export scope.........................................................................................................205 Carrying out the export .........................................................................................206 9.4 Standard import..................................................................................................207 -v- GSTOOL 3.1 - User Manual Table of contents 9.4.1 9.4.2 9.4.3 9.4.4 Tab card | Common | ............................................................................................207 Carrying out the import .........................................................................................207 Processing a standard import...............................................................................208 Standard import without IT asset set ....................................................................209 9.5 9.5.1 9.5.2 9.5.3 Re-export.............................................................................................................209 Tab card | Properties | ..........................................................................................210 Export scope.........................................................................................................210 Carrying out the export .........................................................................................211 9.6 Re-import.............................................................................................................211 9.6.1 Tab card | Common | ............................................................................................212 9.6.2 Carrying out the import .........................................................................................212 9.7 One-way export...................................................................................................213 9.8 One-way import ..................................................................................................213 9.8.1 Data modification during a one-way import ..........................................................213 9.9 Deleting an export ..............................................................................................214 9.10 Deleting an import ..............................................................................................215 10 Filter .................................................................................................216 10.1 Tab card | Basic filter | .......................................................................................217 10.2 Tab card | Extended filters |...............................................................................217 11 Administration of rights .................................................................220 11.1 Roles....................................................................................................................221 11.1.1 Creating and editing roles.....................................................................................221 11.2 Users ...................................................................................................................230 11.2.1 Creating and editing users....................................................................................230 11.2.2 User roles .............................................................................................................235 11.3 11.3.1 11.3.2 11.3.3 Dynamic assignment of permissions ...............................................................236 Rights relating to a user’s own target objects.......................................................236 Rights relating to directly linked target objects .....................................................237 Rights relating to a user role.................................................................................238 12 The inheritance mechanism...........................................................240 12.1 Inheritance of the protection requirement .......................................................240 12.2 12.2.1 12.2.2 12.2.3 Inheritance of implementation status...............................................................241 Inheritance from safeguards to module ................................................................241 Inheritance from modules to layer or target object ...............................................243 Inheritance from layers or target objects to further up in the hierarchy ................244 - vi - GSTOOL 3.1 - User Manual 12.3 Table of contents Inheritance of qualification level achieved ......................................................245 13 The IT Baseline Protection methodology .....................................247 13.1 Rationale for adopting this approach...............................................................247 13.2 Structure of the IT Baseline Protection Manual...............................................249 13.2.1 Threat catalogues.................................................................................................250 13.2.2 Safeguard Catalogues..........................................................................................250 13.3 13.3.1 13.3.2 13.3.3 13.3.4 13.3.5 13.3.6 13.3.7 13.3.8 How to use the IT BPM in brief..........................................................................250 IT Structure Analysis ............................................................................................250 Assessment of protection requirements ...............................................................251 Modeling ...............................................................................................................253 Basic Security Check............................................................................................254 Supplementary security analysis ..........................................................................255 Implementation of IT security safeguards.............................................................256 IT Baseline Protection Certificate .........................................................................257 Maintenance of IT security ...................................................................................258 13.4 Sources of supply ..............................................................................................259 14 Appendix..........................................................................................260 14.1 Keyboard commands .........................................................................................260 14.2 Conventions for the numbering of modules....................................................263 14.3 14.3.1 14.3.2 14.3.3 Information regarding imports from text files .................................................263 Format requirements ............................................................................................263 Processing of import files .....................................................................................265 Post-processing of imported target objects ..........................................................265 14.4 14.4.1 14.4.2 14.4.3 14.4.4 Troubleshooting .................................................................................................267 Installation ............................................................................................................267 Database integration ............................................................................................268 Export/import ........................................................................................................269 General problems .................................................................................................270 14.5 Glossary ..............................................................................................................274 14.6 Index ....................................................................................................................278 - vii - GSTOOL 3.1 - User Manual 0 Introduction Introduction The statutory basis for the foundation of the BSI on 1 January 1991 was the Act for the Establishment of the BSI (BSIG of 17 December 1990). The BSI is a superior federal authority under the control of the Federal Ministry of the Interior. The goals which lay behind the establishment of the BSI include the promotion of IT security, starting with the German federal administration but extending beyond this. One of the functions of the BSI is to provide methods which assist with the conduct of security analyses and development of security concepts and security criteria, thus supporting those responsible for IT in their work. It is as part of this work that the BSI has developed the IT Baseline Protection Manual (IT BPM) and, subsequent to this, GSTOOL. 0.1 The IT Baseline Protection Manual Since it was begun in 1994, the IT Baseline Protection Manual (IT BPM) has developed into a standard reference work for the development of IT security concepts. Since 1995, federal government agencies have been under an obligation to apply the IT BPM when drawing up policies and safeguards aimed at protecting the IT assets they use. The Federal Commissioner for Data Protection and virtually all the Regional Commissioners for Data Protection recommend the IT BPM as the basis for the data protection compliant use of IT assets, as do also the Auditors-General of both the federal government and the Länder for the implementation of secure IT facilities. The latest information on the IT Baseline Protection Manual and its development can always be found at the following URL: http://www.bsi.bund.de/gshb/deutsch/index.htm. 0.2 GSTOOL GSTOOL was developed in 1998 to support the preparation of security concepts based on the IT BPM. -1- GSTOOL 3.1 - User Manual 0.2.1 Introduction Development Changes in the procedure set out in the IT BPM and a number of additional necessary modifications resulted in the need for a complete redesign of the GSTOOL in 2001. Compared with earlier versions, GSTOOL 3.0 and GSTOOL 3.1 incorporate the following new features: • • • • • • • Modeling based on the layer model certification status can be checked networking capability multi-lingual capability multiple security concepts can be managed encryption of user-specific data for exports simple updating of the database by e-mail or over the internet 0.2.2 Features Support for security concepts GSTOOL supports the following activities relating to the creation and implementation of IT security concepts in accordance with the IT BPM: • • • • • • • • • • IT Baseline Protection compliant Modeling and layer model the capture of information about IT systems, IT structure analysis the capture of information regarding applications the assessment of protection requirements the implementation of safeguards the basic security check the evaluation of costs report generation audits the IT Baseline Protection Certificate Support functions • the administration of multiple security concepts in a single tool (ability to handle multiple customers) • networking capability -2- GSTOOL 3.1 - User Manual • • • • Introduction two languages offered: German / English encryption of user-specific data for exports tracking of changes simple updating of the database by e-mail or over the internet • import function for databases created using versions 2.0 1998-2000 • etc. New functions in GSTOOL 3.1 Following the successful market launch of GSTOOL 3.0 in January 2003, GSTOOL 3.1 is the latest release of the product. A number of small improvements have been implemented on the following new or enhanced functions: • Drag&Drop in →Modeling (see section 5.3, page 132ff). • Direct linking of new target objects is preselectable (see section Link target objects after creation, page 46ff).) • Threats can be adapted and user defined (see section 7.5.4 and 7.5.5, page 191ff). • The report facilities have been completely revised (see section 6, page 150ff). • The export and import functions have been completely revised and simplified (see section 9 page 198ff). • The number of multiple-choice selections in lists has been expanded. • • The filter functions have been extensively enhanced. An import function has been introduced for databases created with Version 3.0. 0.2.3 Modeling of the IT Baseline Protection Manual in GSTOOL 3.1 GSTOOL 3.1 supports the development of IT security concepts based on the IT BMP. Essentially it reproduces Chapter 2 of the IT BMP. -3- GSTOOL 3.1 - User Manual Introduction IT BMP, 2.1 IT Structure Analysis The IT structure analysis1 entails gathering data about and structuring the present situation. This is not supported by GSTOOL 3.1 and has to be carried out using other tools outside of GSTOOL 3.1. The results of this work flow into →Master data (group size) and →Structure of target objects (links). IT BPM, 2.2 Assessment of Protection Requirements The assessment of protection requirements2 is supported by GSTOOL 3.1 to the extent that the conclusions and rationale can be incorporated into →Master data and the inheritance of protection requirements is effected in →Structure of target objects. IT BPM, 2.3 IT Baseline Protection Modeling The IT assets also have to be defined by the user in order to use GSTOOL 3.1. The collection of this information is not supported by the tool. The assignment of target objects to the various layers is performed entirely using GSTOOL 3.1, on the basis of the target object type and subtype selected by the user. Similarly, the →Modeling module of the tool is used to carry out a first-pass assignment of modules in accordance with section 2.3.1 of the IT BPM3. However, this assignment should be viewed only as a working suggestion, as the conditions specified in section 2.3.1 of the IT BPM for the individual assignments are not known to the tool at this point. These suggestions need to be checked by the user and, if necessary, adapted. 1 See also section 13.3.1 IT Structure Analysis, page 250ff. 2 See also section 13.3.2 Assessment of protection requirements, page 251ff. 3 See also section 13.3.3 Modeling, page 253ff. -4- GSTOOL 3.1 - User Manual Introduction IT BPM, 2.4 Basic Security Check The basic security check (BSC)4 is fully supported by GSTOOL 3.1. All the conclusions relating to the implementation of safeguards and the associated explanations are entered into the tool by the user and are colour coded. IT BPM, 2.5 Supplementary Security Analysis The supplementary security analysis5 effectively opens the IT BPM to high and very high protection requirements. The associated need to customise threats and safeguards and to add additional ones according to the needs of one’s own circumstances is fully supported by GSTOOL 3.1 in the →BPM user defined module. IT BPM, 2.6 Implementation of IT Security Safeguards The following steps necessary to implement IT security safeguards 3 (Prepare an estimate of the costs and effort required), 4 (Determine implementation sequence ...), 5 (Assign responsibilities) and 6 (Measures to accompany implementation)6 are supported by GSTOOL 3.1 in two ways: In the →Modeling module, you can customise each safeguard by adding your own entries. Through the →Reports module, you can then generate the necessary tables. IT BPM, 2.7 IT Baseline Protection Certificate In GSTOOL 3.1, all safeguards are identified according to which of the three certification qualification levels7 they are necessary for. Thanks to an inheritance mechanism, you can tell in →Modeling for each hierarchical level which qualification level has been achieved. 4 See also section 13.3.4 Basic Security Check, page 254ff. 5 See also section 13.3.5 Supplementary security analysis, page 255ff. 6 See also section 13.3.6 Implementation of IT security safeguards, page 256ff. 7 See also section 13.3.7 IT Baseline Protection Certificate, page 257ff. -5- GSTOOL 3.1 - User Manual Introduction In addition, you can enter specific audit information for each set of IT assets in →Structure of target objects. To ensure that you can effectively use the numerous functions that GSTOOL 3.1 offers, you should be thoroughly conversant with the IT Baseline Protection methodology, as explained in detail in Chapter 2 of the IT BPM. A streamlined overview of this methodology is presented in Chapter 13 The IT Baseline Protection methodology, page 247ff. 0.2.4 Further development GSTOOL has been developed to support people working with the IT BPM. Experience with version 3.0 shows that the numerous functions offered, which in some cases go well beyond the IT BPM, have met with a very positive response. Even so GSTOOL 3.1 is subject to a number of additional requests. In order to be able to continue to develop GSTOOL in line with the users’ needs, the BSI is very interested in requests and suggestions and also in criticism from users of the tool. Suggestions, requests and criticism can be sent to the BSI at [email protected]. Every message is gratefully received and is checked to see how far it is possible to incorporate its content into a future version of GSTOOL. 0.3 System requirements GSTOOL 3.1 can run under the • • • • NT 4.0 (service pack 6a) ME 2000 XP Microsoft Windows operating systems, and requires the following resources: • 180MB of free hard disk space -6- GSTOOL 3.1 - User Manual • • • Introduction 96MB RAM (128MB is recommended)8 Internet Explorer (version 5.5 or above) the Wingdings font for the output of some reports 0.4 Warnings – notes – tips 0.4.1 Warnings In cases where the use of a regular function of GSTOOL 3.1 could potentially damage the database, this is brought to the user’s attention by an appropriate warning. Warning 0.4.2 Notes Notes are used to explain exactly how GSTOOL 3.1 behaves in particular circumstances and any necessary conditions of use. Note 0.4.3 Tips Where the use of certain functions within GSTOOL 3.1 could save you work or bring you additional benefit, these are pointed out in the form of tips. Tip 8 This value is designed for stand-alone operation. If a database is tsimultaneously accessed by several users, processing delays can occur. These can be reduced by increasing the amount of RAM. -7- GSTOOL 3.1 - User Manual 0.5 Introduction Naming and format conventions • Menu commands are presented in <italics enclosed in angle brackets>. Example: <File> - <Exit> • Names of screen windows and formats are presented with a blue background. Example: Licensing • Names of tab cards are shown in bold inside | vertical lines |. Example: | Link options | • If the only difference between screen windows, formats and tab cards which otherwise have identical content and functions is in the name, the variable element is presented in italics between /two slanting vertical lines/. Example: New target object: /Target object type/ • Buttons contained in screen formats, the toolbar and the Navigator are presented [in italics inside square brackets]. Example: [Close] • Field and column names in windows and screen formats are presented in SMALL CAPITAL LETTERS. Example: NAME • Keys and key combinations are presented in {curly brackets}. Examples: {Enter}, {Ctrl+N}, {F5} • The different views (→Master data to →Export/import) that can be selected via the Navigator and the <View> menu option are presented in →Italics preceded by an arrow. Example: →Structure of target objects • Path details9, file names and internet addresses are presented in italics and in a different font. Example: Gstool31/program files/BSI/GSTOOL3 0.6 Problem reports Despite extensive testing, the possibility that individual functions are not available in the form intended cannot be excluded. 9 Path details and file names are based on the standard installation of GSTOOL 3.1. -8- GSTOOL 3.1 - User Manual Introduction Before you report such problems to the BSI as bugs, please follow the instructions contained in the Appendix, section 14.4, page 267ff. If this does not solve the problem, Word and PDF versions of a problem report form are provided on the CD under Gstool31/Extras/Fehlermeldung/. Please enter a description of the fault in as much detail as possible on the form and send it by e-mail to: [email protected]. 0.7 E-mail newsletter on GSTOOL 3.1 The BSI offers you an information service for GSTOOL. You can obtain occasional or ad hoc e-mail newsletters on new features, updates etc. relating to GSTOOL 3.1. If you would like to receive regular e-mail information on GSTOOL 3.1, please send an e-mail with “subscribe” in the Subject line to this e-mail address: [email protected]. You can unsubscribe from the mailing list at any time. To do this, send an e-mail with “unsubscribe” in the Subject line to [email protected]. Handling of these e-mails is automated. Any message text contained in the e-mail will be ignored. -9- GSTOOL 3.1 - User Manual 1 Installation – first-time use – deinstallation Installation – first-time use – deinstallation GSTOOL 3.1 can only be installed by a System Administrator (this will normally be the “work admin” for your system). We do not recommend temporarily granting the Administrator rights required to carry out the installation to a user. The software to be installed requires around 180MB of hard disk space. GSTOOL 3.1 itself takes up about 70MB and the system programs about 110MB. The system programs will be automatically copied to the appropriate subdirectory of the active system partition (normally C:\). Network installation, i.e. where the executable files are held on the server and called by the client, is not possible. However, it is possible for several computers to have shared access to a database installed with GSTOOL that is stored on a network. This database can be held separately on an SQL Server 2000 or on a GSTOOL installation. 1.1 Installation Between the installation of GSTOOL 3.1 and Configuring the ‘sa’ password (1.2, page 16ff), unauthorised third parties will be able to gain access to GSTOOL 3.1 and hence to access the entire system by using the default ‘sa’ password of ‘bsi’. If a network exists, you should therefore take the installation computer off the network by pulling out the patch cable or the modem lead prior to starting the installation. The computer should not be reconnected to the network until the ‘sa’ password has been changed. When you insert the original installation CD, setup will automatically execute. If the autostart function for the CD drive has been disabled, setup can also be initiated manually by double-clicking file setup.exe. - 10 - GSTOOL 3.1 - User Manual Installation – first-time use – deinstallation With some system configurations (especially on NT systems) it may be necessary to update the MDAC (Microsoft Data Access Components) before going any further. If this is necessary on your system, the installation program will tell you so and will update the appropriate components. Once these components have been updated, the computer will need to be rebooted. The installation will then resume. • You can choose between German and English versions of the tool. The language chosen here is automatically passed to the language selection dialogue (section 2.3.5 <Tools> <Options> - | Common | - Languages, page 43ff). This language will also be used for all further installation (and deinstallation) screens and also to determine the choice between “liesmich.txt” and “readme.txt”. The language settings can also be changed after installation by selecting menu option sequence <Tools> - <Options> | Common | geändert werden. • Upgrading an installation If a working version of GSTOOL 3.0 is installed on the PC, with the standard database BSIDB_V305_DATA.mdf 10 attached to it, the next window will tell you how to handle the attached databases. 10 This database was automatically created and attached to the tool when GSTOOL 3.0 was installed. - 11 - GSTOOL 3.1 - User Manual Installation – first-time use – deinstallation Some options and also changed path settings (especially the path for storing the Chiasmus key) are not automatically transferred to GSTOOL 3.1. These settings will have to be re-specified once the installation is complete. • User information Enter here the user name and the name of your organisation. You can also choose whether the program should be available to all the users who log on to your system or only to yourself. - 12 - GSTOOL 3.1 - User Manual Installation – first-time use – deinstallation The standard setting (“all users”) normally does not need to be changed. • Complete installation You can choose between the standard installation (COMPLETE) and a user defined (CUSTOM) installation and then continue with [Next >]. • Custom installation If you have chosen CUSTOM, you can change the scope of the installation and also specify a non-standard installation path for the GSTOOL program files (via [Change…]). - 13 - GSTOOL 3.1 - User Manual Installation – first-time use – deinstallation GSTOOL 3.1 may only be installed on a local drive. Although it is theoretically possible to install it on a network drive, this would mean that the database could not be started later on. Only the installation path for the pure GSTOOL files can be changed. The storage location for the system files, especially the SQL components, cannot be changed. The other selection possibilities for a custom installation relate to expert settings, which the normal user should not change. • Installation After you have completed all the settings, click [Install] to start the installation. - 14 - GSTOOL 3.1 - User Manual • Installation – first-time use – deinstallation Completion of installation Once the software has been successfully installed, you can specify by checking the appropriate checkboxes whether you want to start GSTOOL 3.1 right away, view readme.txt11 and/or change the ‘sa’ password. Then click [Finish]. See also section 1.2 Configuring the ‘sa’ password, page 16ff. • Deleting the “BSI GSTOOL 3.0” desktop icon If you are installing GSTOOL 3.1 over an existing version 3.0, the icon for the old version will still be on the desktop. This can be deleted. Like the new “GSTOOL 3.1” icon, this icon is a shortcut to version 3.1 of GSTOOL. Rebooting To ensure that GSTOOL 3.1 works properly, it is recommended that the PC is rebooted following installation. Failure to do this can occasionally result in permanent malfunctioning of GSTOOL. 11 If you want to read readme.txt at a later time, this file can be found in the GSTOOL 3.1 installation path “.../BSI/GSTOOL3/readme.txt”. - 15 - GSTOOL 3.1 - User Manual 1.2 Installation – first-time use – deinstallation Configuring the ‘sa’ password During the installation, a user with ID ‘sa’ and password ‘bsi’ is automatically configured. This is the Tool Administrator, who has full rights within GSTOOL 3.112. To protect the basic and security settings of the tool and the databases against unauthorised changes, we urge you to replace the default password of ‘bsi’ with a different password immediately following installation of GSTOOL 3.1, thus restricting the rights internal to the tool granted to user ‘sa’ to one particular person or group of persons. This password must be secure13 and must only be known to authorised persons. We recommend that at least one other person besides the System Administrator knows the ‘sa’ password and can thus act as Tool Administrator. In this way, any necessary maintenance work on the tool can be carried out without having to call in the System Administrator. The ‘sa’ password is configured on the | Password | tab card in the “Configure database” utility.14 The System Administrator (not the Tool Administrator ‘sa’!) can open the “Configure database” utility (see section 2.4.14, page 70ff) with integrated security and change the Tool Administrator’s password (‘sa’) on the | Password | tab card without having to know it. 1.3 Licensing To make permanent use of GSTOOL 3.1, you need a license key. This will be provided to you by the BSI as part of the GSTOOL 3.1 package delivered, in accordance with the present delivery terms. Further information on the delivery 12 This Tool Administrator naturally does not have the significantly more far-reaching privileges of the System Administrator, who often also has the same user name ‘sa’. 13 On this point, see IT BPM, S 2.11 Provisions governing the use of passwords. 14 See section 2.4.14 Configuring the database - | Password | tab card, page 73ff. - 16 - GSTOOL 3.1 - User Manual Installation – first-time use – deinstallation terms of GSTOOL 3.1 can be found on the internet at http://www.bsi.bund.de/gstool/vertrieb.htm. 1.3.1 Licensed operation The first time you start the GSTOOL 3.1 program, the Licensing window opens. On this window you should enter the 24-character license key in six blocks of four characters. To ensure that entry of the license key produces the desired permanent effect, you must have the same Administrator rights as those required to install GSTOOL 3.1. If the license key is entered by a user account which has only normal user rights, the license key will only be valid for the present user session and will have to be re-entered every time the program is started up. If you would prefer to enter the key later on, click [License later]. Until the license key has been entered, the License window will appear every time the program is started. Further information on how to acquire a license and, with it, a license key can be found on the internet at http://www.bsi.bund.de/gstool/vertrieb.htm. - 17 - GSTOOL 3.1 - User Manual 1.3.2 Installation – first-time use – deinstallation Test operation GSTOOL 3.1 can be used for evaluation purposes with full functionality but without a license for a period of 30 days15. If your version of GSTOOL has not yet been licensed, the number of days remaining will be displayed in the License window. Once the test period has expired, you will no longer be able to save any data within the tool. GSTOOL 3.1 will warn you of this with two messages. Between [License later] and the GSTOOL 3.1 – logon to database window, the following message will be displayed: Click [OK] to start GSTOOL 3.1 as per normal. If an attempt is made, e.g. to create a new target object, after the evaluation period has expired, this will be denied and the following error message will be displayed: The license key can also be entered after the evaluation period has expired. Once the key has been entered, the full functionality of the tool will be available once more. All the information previously stored will be retained. 15 The 30-day test period commences first time that GSTOOL 3.1 is started up, rather than at the time of installation. - 18 - GSTOOL 3.1 - User Manual 1.4 Installation – first-time use – deinstallation Deinstallation You can have the software automatically removed from within Control Panel. When GSTOOL 3.1 is uninstalled, all the databases are automatically detached from the tool. If you want to load a tool-free disk image on the PC partition on which GSTOOL 3.1 is installed, you should previously detach all databases from GSTOOL 3.1 and move them to a different partition. If the databases are not detached, problems could occur downstream when attempts are made to use these databases. Deinstallation under Windows ME / NT 1. Open the Control Panel window by selecting [Start] <Settings> - <Control Panel>. 2. Double-click the “Add/Remove Programs” option. 3. In the Add/Remove Programs Properties window which now opens, select the | Install/Uninstall | tab card. 4. In the list of installed programs, select “GSTOOL 3.1”, then click [Add/Remove...] 5. Follow the instructions on the screen, then click [Yes] to start the deinstallation. 6. Once the software has been uninstalled, you will need to reboot your system for all the changes to take effect. Deinstallation under Windows 2000/XP 1. Open the Add/Remove Programs window by selecting [Start] - <Settings> - <Control Panel> <Add/Remove Programs>. 2. In the list of programs currently installed, click “GSTOOL 3.1” and then [Remove]. 3. Follow the instructions on the screen, then click [Yes] to start the deinstallation. 4. Once the software has been uninstalled, you will need to reboot your system for all the changes to take effect. - 19 - GSTOOL 3.1 - User Manual Installation – first-time use – deinstallation Final stages of deinstallation Some of the files will not have been removed during the automatic deinstallation process, as follows: • • • • existing databases self-created report templates files in the tool directory that do not belong to the original installation of the software information generated while using GSTOOL 3.1 If need be, you will have to delete these files yourself. 1.5 Database server / databases The security concepts worked on with GSTOOL 3.1 are stored in the form of databases. The database server that is necessary for this, MSDE 2000 (see page 21), is automatically installed during the installation of GSTOOL 3.1. Every GSTOOL 3.1 installation creates a separate database server. As a result, certain restrictions apply to the attaching and detaching of databases specifically in relation to the users created in the databases. These are as follows: • When a database is detached and then re-attached, previous user accounts can only continue to be used on the same database server. • In the course of uninstalling and the reinstalling GSTOOL 3.1, a new database server alien to all existing databases will be created. If a database is attached to an alien database server, it will not be possible to use user accounts created in the database any further, nor to recreate them with the same name. When data is imported from GSTOOL 3.0 (see section 2.4.2, page 55ff) all the user accounts are retained! - 20 - GSTOOL 3.1 - User Manual 1.5.1 Installation – first-time use – deinstallation Database server MSDE 2000 MSDE (Microsoft Data Engine) 2000 is a component of Microsoft SQL Server 2000. The functionality of MSDE is essentially the same as that of the related SQL Server 2000. However, MSDE is limited to databases of a maximum of 2GB16 and can only handle a maximum of five connections/users. In this way, up to five people on a network can work simultaneously on a database no larger than 2GB. Every installed GSTOOL 3.1 can provide server functionality to others over and above MSDE. If several copies of GSTOOL have been installed, these can share their local databases for access purposes. Within the framework of the access rights to be defined in each instance of GSTOOL 3.1, all the installed tools can log on to the relevant “server tool” and access its database. This must be taken into account in the data backup concept. If necessary, the database should be manually copied from the local system to a server in the network at regular intervals in order to include the data in an automatic backup system. A PC that is switched off is not available as server to other instances of GSTOOL, and they cannot establish a connection with it. When a PC is switched off, any existing connections are terminated and it is no longer possible to work on a database on that computer. During the installation of GSTOOL 3.1, by default a database called “BSIDB_V310_Data.MDF” is installed. Any existing databases can be detached, renamed, deleted and additionally attached to a tool by the Tool Administrator. 16 This database size will normally be sufficient to capture at least 1,500 target objects, including the associated information. - 21 - GSTOOL 3.1 - User Manual Installation – first-time use – deinstallation Microsoft SQL Server 2000 If your data volume requirements and/or requirements for simultaneous access to the database are higher, Microsoft SQL Server 2000 can be used instead17. This allows you to store and manage the database centrally on that server. The interfaces to a Microsoft SQL Server 2000 are already integrated in GSTOOL 3.1 and can be enabled by an expert SQL Server administrator. 1.5.2 Databases Databases that are attached to one of the two database servers supported (MSDE 2000, see page 21 or Microsoft SQL Server 2000 see page 22) and also to GSTOOL 3.1 can be processed using GSTOOL 3.1. Renaming a database Should it be necessary to rename a database attached to the tool, it must first be detached from the tool and then re-attached after it has been renamed18. This can be done in two different ways: • Variant A Rename the detached database file as if it were normal file, taking care to retain the .MDF suffix. When the renamed database file is re-attached at a later date, if the Browse [...] button is used, the new file name will automatically be passed across as the new database name. • Variant B The detached database file is not renamed, but the desired change is made to the NAME field only during attaching of the unchanged file. The next time the tool is started up, the database will be offered in the login window, DATABASE field, with its altered name along with all the other databases. 17 Microsoft SQL Server 2000 must be purchased and licensed separately. It is not possible to obtain it from the BSI. 18 See section 2.4.14 Configuring the database - | Databases | tab card, page 71ff. - 22 - GSTOOL 3.1 - User Manual Installation – first-time use – deinstallation Creating an additional database In addition to the original database, it is possible as an alternative to work with any other databases. This means that security concepts for different customers can be worked on independently of each other with GSTOOL 3.1. If you are going to work with multiple databases, to avoid confusions or name conflicts, you should give them distinct names at the time of creation. • Make a copy of the blank original database “BSIDB_V310_Data.MDF”19 and give this a meaningful name. The suffix .MDF must be retained. The write protection must be removed. • • Save the database to any directory on your PC. Attach the new database to GSTOOL 3.1. 18 The next time the tool is started up, the new database will be offered in the login window, DATABASE field, like all the other databases. Duplication of a database It is theoretically possible to duplicate a detached database in Explorer (File Manager) through copying, pasting and renaming. However, in this way a genuine clone of the original database is created. A database that has already been attached to the MSDE 2000 that comes with GSTOOL 3.1 or to a Microsoft SQL Server has an unique ID that is also transferred to the clone. Databases that have been cloned in this way are perceived as identical to GSTOOL 3.1, even if they have different names. As exports and imports within identical databases are not permitted in GSTOOL 3.1, cloning of databases can result in problems during imports. The option of cloning databases should therefore be avoided or only be used when you can be certain that you will not need to export or import between cloned databases. If nevertheless a database is duplicated, you should follow this procedure: 19 You will find these empty original databases in directory programm files/BSI/GSTOOL3 on the CD. - 23 - GSTOOL 3.1 - User Manual Installation – first-time use – deinstallation • Perform a complete one-way export20 from the database to be duplicated. • • Create a new database. Import the one-way export into the new database as a oneway import21. Multi-customer capability Because GSTOOL 3.1 allows you to work with multiple databases and to choose the names for these databases, it is possible to work on security concepts for different customers independently of each other. The database of the relevant customer can be selected at the start of the program in the DATABASE field. For the sake of better transparency, it is recommended saving all the customer databases to a separate directory e.g. .../Customers/. 20 See section 9.7 One-way export, page 213ff. 21 See section 9.8 One-way import, page 213ff. - 24 - GSTOOL 3.1 - User Manual 2 General information on working with GSTOOL 3.1 General information on working with GSTOOL 3.1 GSTOOL 3.1 has comprehensive facilities for the administration of rights22. In this way it is possible to tailor your work on and with the tool precisely to your requirements. Depending on how rights for individual users are defined, certain functions explained below are either not available at all or only on a restricted basis. If nevertheless you require such functions for your work, you should contact the GSTOOL 3.1 System Administrator. 2.1 Starting the program There are several ways of starting GSTOOL 3.1. • • • via Start/Programs/BSI/GSTOOL 3.1 via the desktop icon for GSTOOL 3.1 by directly invoking the tool C:\Program files\BSI\GSTOOL3\GSTOOL.EXE If the first screen that appears after you have started the program is the Licensing screen, please refer to section 1.3 Licensing on page 16. The first screen to normally appear after the program has been launched is GSTOOL – login to Database . Here you specify which database on which server you wish to work on. There may also be additional login information to be entered here. 2.1.1 Selecting the server All the servers available on the network are listed in the SERVER NAME field on the | Connection | tab card. It is possible that login rights have not been granted for all the servers shown. In this case, the server concerned may be included in the list, but you will not be able to select it. 22 See section 11 Administration of , page 220ff. - 25 - GSTOOL 3.1 - User Manual General information on working with GSTOOL 3.1 A network broadcast is used to generate this server list. This may be reported by a firewall system installed on the computer. 2.1.2 Selecting the database After you have selected the required server by clicking it23, the databases that run on that server and are locally attached to GSTOOL 3.1 will be listed in the DATABASE field. The “BSIDB_V310_Data” database is the database locally created and attached to the tool during the installation of GSTOOL 3.1. 23 This selection is remembered for the next time you start the program. - 26 - GSTOOL 3.1 - User Manual General information on working with GSTOOL 3.1 The query which generates this list may be reported by an installed firewall system. 23 The required database is selected by clicking it . If you select a database for which you do not have the required access right or which is not a GSTOOL 3.1 database, an error message will be displayed and the program will be terminated. If the list of databases is not complete, you should check whether the missing database has been correctly attached to the tool24. If no database is displayed, please consult section 14.4.2 Database integration on page 268. Server status The traffic lights show the status of the server you have selected, as follows: • • • red light: the server is not active. yellow light: the server is in the process of starting up or closing down. green light: the server is up and running, database access is possible. An active server can be stopped with [Stop]. [Start] A stopped (not active) server will be started. [Stop] The server will be brought to a complete stop and the server application will be shut down. No database access will be possible. [Pause] The server will be paused without the server application closing down completely. No database access will be possible. A paused server can be started up a lot faster after [Continue] than if first [Stop] and then [Start] are used. [Continue] A server currently paused will be reactivated. 24 See section 2.4.14 Configuring the database - | Databases | tab card, page 71ff. - 27 - GSTOOL 3.1 - User Manual 2.1.3 General information on working with GSTOOL 3.1 Registration type The “Registration type” is selected on the | Account | tab card. • If you choose “Apply integrated security”, the login information already input for general PC access will be used for the tool as well. No other data inputs are necessary. • If you choose “Apply database security”, you will have to log in with USER NAME and PASSWORD25 under “SQL Server security”, independently of any existing login procedure on the PC. Click [OK] to open the database most recently selected. If you want to open a different database, you need to select this on the | Connections | tab. 25 If you forget your password, the Tool Administrator can overwrite the old password with a new one, thus enabling you to continue working. - 28 - GSTOOL 3.1 - User Manual General information on working with GSTOOL 3.1 Users can initially only be configured by the Tool Administrator. For further information on how to grant right to create additional users, see section 11.1 Roles, Tab card | Data |, page 224ff. Click [Cancel] to abort GSTOOL 3.1 start-up. Click [OK] to start GSTOOL 3.1. GSTOOL 3.1 always opens with the screen format and settings in use when you last exited it. 2.2 User interface Activation of menu options and buttons To prevent user errors and functional conflicts within the tool, many of the menu options and buttons in GSTOOL 3.1 are right- or context-sensitive. • Right-oriented means that only menu options and buttons for functions that the user currently logged on has right to use are offered. • Context-sensitive means that only menu options and buttons that are relevant to the current context are offered. Right orientation takes precedence over context sensitivity. 2.2.1 Menu bar The menu bar contains seven elements. Each menu option has one or more dropdown menus offering further options. The functions of all the menu options are described in the appropriate context elsewhere in the manual. 2.2.2 Toolbar The toolbar contains 11 buttons, whose functionality will be described elsewhere at the appropriate context in the manual. • New • Open - 29 - GSTOOL 3.1 - User Manual General information on working with GSTOOL 3.1 • Save • Delete • Update • Print26 • Filter • Model • View • Navigator • Window (see section 2.2.6 on page 36) The size, appearance and content of the toolbar can be modified via <View> - <Toolbar>. Here it is possible to specify directly the size of the buttons and to suppress or display the captions. Menu selection <View> - <Toolbar> - <Edit> opens the Customize Toolbar window, in which individual buttons can be enabled or disabled by checking various checkboxes. 2.2.3 Navigator The Navigator can be used to rapidly access the most important tool functions. All the elements contained in it can be accessed via <View>. Eight buttons are provided as follows: • Master data (section 3) • Structure of target objects (section 4) • Modeling (section 5) • Reports (section 6) • BPM user defined (section 7) 26 The function [Print] is not needed in GSTOOL 3.1. All print jobs can be initiated via the browser. For this reason, the default setting is that this button is suppressed in the toolbar. - 30 - GSTOOL 3.1 - User Manual • BPM local (section 8.1) • BPM online (section 8.2) • Export/import (section 9) General information on working with GSTOOL 3.1 The Navigator can be either displayed or hidden by clicking the [Navigator] button in the toolbar or via menu selection <View> - <Display Navigator>. If the Navigator is hidden, there will be more space on the screen. If you reduce the width of the Navigator, your PC system settings will determine how many lines the icon caption takes up. To alter the number of lines that the icon caption takes up, select [Start] - <Settings> - <Control Panel> <Display> - | Appearance | - ITEM - ICON SPACING (HORIZONTAL), and then adjust the value in the SIZE field until you achieve the desired effect. This change will also apply to your PC desktop and possibly to other programs on the PC. 2.2.4 Tree The screens that go with →Structure of target objects, →Modeling and →Reports present the structure of all the target objects in a tree tailored to the current view. Switching between object and layer models In →Modeling, the default setting is for the tree to be presented in the “object model” structure. Within →Modeling, it is possible to switch the tree structure between “object model” and “layer model” as follows: • • • • by clicking [Model] in the toolbar by selecting <View> - <Display> by pressing the key combination {Ctrl+U} by right-clicking and then selecting <View>. - 31 - GSTOOL 3.1 - User Manual General information on working with GSTOOL 3.1 Maximizing and minimizing the tree The tree behaves largely in the normal Windows manner. Branches of the tree are opened and closed by clicking the and icons or, alternately, by double-clicking a particular object in the tree. The <View> option accessed by right-clicking an object in the tree can be used to access both →Modeling and →Reports <Maximize>. The result will be to show all the levels of the tree located below the highlighted object. <Maximize> is not offered in →Structure of target objects. The possibility of linking applications with each other (see section “Link rules”, page 95) can in conjunction with maximising result in very long chains that significantly exceed the maximum number of branches that will fit into the tree display. To open a particular branch, click . “Minimize” is offered in all three views, →Structure of target objects, →Modeling and →Reports. <Minimize> closes all currently open branches of the tree below the highlighted , the branches are actually object. Compared with clicking closed and not just hidden, as is the case when is clicked. The difference will become apfather the next time you . maximize, clicking <Minimize modules> is also offered for →Reports. As a result, all the safeguards that are currently visible are hidden, but the module level is retained. Sorting in the tree In the →Modeling and →Reports views, it is possible to sort selected parts of the tree, as required, by right-clicking. The sorting facilities, and also all the other functions that can be accessed by right-clicking with the mouse button are described in the appropriate context elsewhere in the manual. Icons in the tree For the sake of improved clarity, all the tree elements are preceded by icons. The icons provide information about the target object type, the implementation status of safeguards and the qualification level achieved. The meaning of each of these icons will be explained at the appropriate point in the manual. - 32 - GSTOOL 3.1 - User Manual 2.2.5 General information on working with GSTOOL 3.1 Editing window It is in screens which are adapted to the chosen view and the target object that the data is actually entered27. Optional fields All input fields that are not colour-coded are optional fields28. Here it is left to the discretion of the user whether to enter any information. Mandatory fields Many editing windows and screen formats contain highlighted fields29. These are mandatory fields, in which entries have to be made in order to be able to save the screen content. There are two types of mandatory fields: • • permanently mandatory fields conditionally mandatory fields. In permanently mandatory fields, the user always has to either select or enter something. With conditionally mandatory fields, whether or not the field is mandatory depends on the content of other fields. When these fields are mandatory, they have to be completed as well. If a conditionally mandatory field reverts to being an optional field due to changes in the entries that trigger their mandatory status, the entry is retained, but can be deleted. Comments Many of the editing screens contain an COMMENTS field, in which you can enter additional context-specific information. These fields are not linked in any way within the tool. Text contained in them is ignored during report generation. 27 Additional explanations on the screen formats mentioned here and the fields contained in them will be provided in the manual only as required. 28 The colour used for these fields is determined by the colour settings chosen for text windows in Windows. Normally this is white. 29 The default colour used for mandatory fields is yellow. This field can be changed with menu selection <Tools> <Options> - | Display |. - 33 - GSTOOL 3.1 - User Manual General information on working with GSTOOL 3.1 Notepad Many of the editing screens contain a | Notepad | tab card. Here, information similar to the information in the COMMENTS: field can be entered, the only difference being that here additional functions such as character formatting and saving are offered. Notes are only intended for direct working with the tool. These fields are not linked in any way within the tool. The content of the Notepad • • cannot be output in reports and cannot be used as a filter criterion. The content of the | Notepad | tab card is always context-oriented. This means, for example, that entries made in the | Notepad | tab card when adapting a module in →BPM user defined and →Modeling are independent of each other. This function can be made available for the entire database which the user has just been editing, i.e. the current security concept, by selecting <View> – <Notepad>. The availability of the following functions depends on the context: • URL Here it is possible to reference any HTML document on the internet or intranet and to access it directly via . - 34 - GSTOOL 3.1 - User Manual • General information on working with GSTOOL 3.1 Any text can be entered in a text field, and the following formatting options are available: Font, font style and size (points) can be determined, also . colour • Text field content can be loaded from files and saved in files. *.txt and *.rtf files can be loaded and displayed in text fields. Any existing content of the text field will be overwritten by the file loaded and will be lost, unless it has already been saved. The content of the text field is saved to a user defined file (*.txt or *.rtf). This function is only available in →Notepad. • An additional Notepad window is opened. Tab card | Supplement | At many places in the tool, facilities are provided in tab card | Supplement | for adding any number of pairs of names or values to a target object in a list on a user defined basis. These supplementary attributes can be used to expand the description of a given target object to suit your requirements. If you want to define individual supplementary attributes that apply to all target objects of a particular type, this can be done via 2.3.4 <Tools> - <Target object types ...>, Creating common supplementary attributes (page 42ff). These supplementary attributes are not linked in any way within the tool. However, in →Reportscreating and →Modeling, it is also possible to filter by name and value of the supplementary attributes. • [New] This opens the Supplementary attribute window, in which a new pair of values can be entered for the target object you are currently editing. - 35 - GSTOOL 3.1 - User Manual General information on working with GSTOOL 3.1 A supplementary attribute created with [New] is only added to the list if entries are made in both fields. • [Open] This opens the Supplementary attribute window for a selected pair of values, in which the value can be changed. The name cannot be changed at this point. The window used to edit the value can also be opened by double-clicking the pair of values in the list. • [Delete] Deletes a supplementary attribute. This button is not available in the case of generic supplementary attributes that have been defined for all target objects of a given type. Text length in fields The length of the text that can be entered into individual fields is finite, but has been set sufficiently large to accommodate normal entries. However, the fields, especially the fields allowed for notes and explanations, are not intended to be used to input long documents or graphics. Only a reference to such documents and graphics should be entered. 2.2.6 Changing the window width The size of the three windows for Navigator, tree and editing screen can be adjusted horizontally with the mouse. The default settings for window width can be restored by clicking [Window] in the toolbar. 2.3 Default settings The default settings for the tool can be changed to suit personal preferences in the <Tools> menu. - 36 - GSTOOL 3.1 - User Manual 2.3.1 General information on working with GSTOOL 3.1 <Tools> - <Roles ...> See chapter 11 Administration of , section 11.1.1 Creating and editing roles, page 221ff. 2.3.2 <Tools> - <User ...> See chapter 11 Administration of , section 11.2.1 Creating and editing users, page 230ff. 2.3.3 <Tools> - <Password> If the user has logged on to GSTOOL 3.1 with “Apply database security” and PASSWORD entry30, this option allows him to change his password. 2.3.4 <Tools> - <Target object types ...> This menu allows the user to • expand the list of predefined target object types and subtypes with user defined target object types and subtypes; • • • • rename target object types and subtypes; delete target object types and subtypes; assign target object types to another father; assign generic supplementary attributes that apply to all target objects of a particular type. The Target object types window shows all the existing target object types with their assignments to each other. 30 See section Registration type on page 28. - 37 - GSTOOL 3.1 - User Manual • General information on working with GSTOOL 3.1 | Common | On this tab card it is possible to edit the NAME and FATHER fields for user defined target object types. TYPE This indicates whether the target object type is defined by the IT BPM (“BSI standard”) or “user defined/adapted”. VERSION This indicates the version of the IT BPM from which the target object originates. To find out which version of the IT BPM GSTOOL 3.1 is using, press {Ctrl+I} or select <Help> <About> - METADATA VERSION. No version numbers are maintained for user defined target object types. PROIR / NEW / CHANGED See section 2.4.11 New / Prior / Changed - display, page 67ff. • | Subtypes | This tab card contains all the subtypes of the target object type highlighted in the tree. • [Update] This option refreshes the entire content of the window to reflect the latest values in the database. This is helpful if several users are simultaneously working on the same database on a network and you want to view any changes other people may have made. If you are the only person using the database, the [Update] function has the same effect as [Save]. - 38 - GSTOOL 3.1 - User Manual General information on working with GSTOOL 3.1 Creating user defined target object types [New] is used to release the NAME and FATHER fields on the | Common | tab card for the creation of a user defined target object type. You can choose any name you like. Only existing target object types can be designated as fathers. The new target object type is hierarchically subordinate to the chosen father. After the type has been saved by clicking [Save], this assignment becomes visible in the tree. When you create a user defined target object type, GSTOOL 3.1 automatically creates a target object subtype of the same name in [square brackets]. Only in the case of the father “set of IT assets” is it possible to assign more than one target object type to the same father. In the example on the top right, first new target object type “01” and then “02” have been assigned to the father “set of IT assets”. With all the other target object types, the most recently created target object type is inserted between the selected father and the target object type that immediately follows it. In the example on the top right, first new target object type “01” and then “02” have been assigned to the father “Buildings”. Dummy target object If a user defined target object type is inserted into the structure of the target object types in such a way that it is made the father of existing target objects, the tool automatically creates a target object of this type which will serve as the new father for the existing, linked target objects. Only if the user defined target object type has to serve as the new father for existing target objects is the dummy target object now created. - 39 - GSTOOL 3.1 - User Manual General information on working with GSTOOL 3.1 Example The target object “Record store” (type “ building”). “Building” (type “ room”) is linked to The user defined target object type “ storey” is now created and type “ building” is selected to be its father. The tool automatically creates the dummy target object, “Storey”. The room “Records store” is detached from “Building” in accordance with the new structure and is linked to “Storey”. The dummy target object is equivalent to the original target object in every respect and can be renamed like all the other target objects. When you delete a user defined target object type and all the associated target objects, the original link displaced by the dummy target object is not restored. Creating user defined target object subtypes When a new target object type is created, a target object subtype of the same name is automatically created. On the | Subtypes | tab card, this subtype is initially the only one to have [square brackets] around it. Additional subtypes can be created either now or later by clicking [New]. The target object subtypes created here will be offered later on in the SUBTYPE field whenever you create a target object. Renaming a target object type First of all, select the target object type in the tree that is to be renamed. On the | Common | tab card, enter the new name of - 40 - GSTOOL 3.1 - User Manual General information on working with GSTOOL 3.1 the target object type in the NAME field, then save this change [Save]. The new name will immediately appear in the tree on the editing window. Renaming a target object subtype Select the target object type whose subtype you wish to rename in the tree and then choose tab card | Subtypes |. In the list, select the target object subtype that you want to rename. Choose [Open] to access the Edit subtype window. You will then be able to alter the name of the subtype on the | Common | tab card. Click [Save] to confirm the change and then [OK] to close the window. The new name will appear immediately in the list of target object subtypes. Only user defined target object subtypes can be renamed. Assigning a target object type to another father Only user defined target object types can be assigned to another father. Select the target object type that you wish to assign to another father in the tree. In the FATHER field of the | Common | tab card, now select the new father from the target object types offered and confirm your choice with [Save]. In the tree on the editing screen, the selected target object type will be displayed immediately below its new father. Only target object types that are not themselves fathers can be assigned to another father. It is thus not possible to move an entire family of target object types to a different father. Deleting a target object type Select the target object type that is to be deleted in the tree. Now click [Delete] and confirm this action at the prompt with [OK], and the selected target object time will be deleted. If the target object type deleted was a “father”, its “children” will move - 41 - GSTOOL 3.1 - User Manual General information on working with GSTOOL 3.1 one level up in the tree. This change will be reflected immediately in the tree on the editing window. Only unused user defined target object types can be deleted. If a target object of the user defined type exists, the deletion of this type will be refused, with an appropriate error message. Deleting a target object subtype Select the target object type whose subtype you wish to delete in the tree and then choose tab card | Subtypes |. In the list, select the target object subtype that you want to delete. If no target object of this subtype yet exists, you will be asked to confirm your action. The selected target object subtype will be deleted after you confirm the action with [Yes]. If, however, a target object of the subtype to be deleted does exist, its deletion will be refused with an appropriate message. If you still want to delete the selected subtype, you will have to assign a different subtype to the target objects that have this subtype or else delete them. In this way, you can delete all the target object subtypes of a given target object type. Once you have deleted the target object type, no new target objects of that type can be created, as the specification of subtype is always a mandatory field and only existing subtypes can be selected in that field. Creating common supplementary attributes From the | Supplement | tab card, it is possible to assign a common set of supplementary attributes to all the target objects of the type that you are currently editing. User defined supplementary attributes for individual target objects (page 35) are not displayed here. This tab card shows all the supplementary attributes defined as applying generically to the target object type selected in the tree. - 42 - GSTOOL 3.1 - User Manual General information on working with GSTOOL 3.1 [New] Opens the Supplementary attribute window, in which the name of the supplementary attribute is specified. [Open] Opens a window for the supplementary attribute selected in the list so that you can edit its name. [Delete] Deletes the supplementary attribute selected in the list without the user being prompted to confirm this action. Any “deleted” supplementary attributes for target objects of the type currently being edited that exist at the time of deletion are retained. They can then be edited and deleted there like supplementary attributes that have been defined on an individual basis. 2.3.5 <Tools> - <Options> - | Common | Languages There are two ways of configuring the language within GSTOOL 3.1: • If you disable the checkbox LOCALIZE APPLICATION, then GSTOOL 3.1 will run with a German interface. It will then only be possible to change the language for the metadata. By disabling the checkbox, the amount of memory used by GSTOOL 3.1 is reduced. • If you enable the LOCALISE APPLICATION checkbox, GSTOOL 3.1 will access separate language files. The name and location of these language files can be changed via <Tools> - <Options> - | Path settings | (2.3.11, page 50ff). You are currently able to select the language for five areas. - 43 - GSTOOL 3.1 - User Manual General information on working with GSTOOL 3.1 • APPLICATION Here you can choose the language in which the user interface is presented. This will affect the menu options, the toolbar, the Navigator, the buttons, field captions and table headings. • Help You can select the language in which the online help is displayed. • BPM LOCAL You can choose the language of the Baseline Protection Manual that is accessed via BPM local. • METADATA You can choose the language in which metadata is presented. • Reports You can choose the language in which the reports are presented. This affects the names of reports and also all the report text that does not come from the structured data or which has been entered by the user. Logo • Logo file for program start Here you can specify which logo is displayed when the program first starts up. To revert to the default start-up logo, you need to delete the entry in this field. The graphic should be 520x250 (width x height) pixels big. Graphics of a different size will be distorted to fit these dimensions. This change can only be implemented by the System Administrator31. Tool Administrator (“sa”) rights are not sufficient. 31 The right to make changes in the registry is required to implement this change. - 44 - GSTOOL 3.1 - User Manual General information on working with GSTOOL 3.1 Edit • Save without query If this option is chosen, then in →Structure of target objects and →Modeling, when you change to a different tree element the changes just made will be saved without the user being prompted. During the entry of new target objects (in →Master data and →Structure of target objects), this option allows you to enter several target objects in succession, without interruption to the data entry dialogue. When you click the [New] button, any data previously entered is saved without user being prompted. If this option has not been chosen, then the following user confirmation window is displayed: If you click [Yes], a target object with the information you have just specified will be created. The editing window will remain open, along with all the data, as in the case of save without user confirmation, thus enabling you to create additional target objects. If you click [No], once again the new target object will be created and the editing window will stay open. However, all the content previously entered in the window will be deleted. You can now make new entries. If you click [Cancel], no new target object will be created. The editing window will remain open, along with all its content, enabling you to continue editing. With this option, the change takes immediate effect. • DIRECT EDIT SAFEGUARDS OF REFERENCED MODULES This option disables the block on editing referenced modules. Even safeguards contained in a module that is - 45 - GSTOOL 3.1 - User Manual General information on working with GSTOOL 3.1 referenced can then be directly edited. Changes made in one of the modules linked through referencing are implemented in all of them. The changes made by this option take immediate effect without restarting the tool. • LINK TARGET OBJECTS AFTER CREATION This option allows you to choose whether newly created target objects should be automatically linked, and, if so, how. “Yes” The target object will be automatically linked to the set of IT assets selected on the right. This change will be implemented both in the relevant target object type list for this IT asset set and in the relevant target object type list in the lower section of the tree in →Structure of target objects. “No” No direct linking to an IT asset set will be carried out. The target object will only be implemented in the relevant target object type list in the lower section of the tree in →Structure of target objects. “Query this” Every newly created target object, once confirmed with [OK], will be directly linked to an IT asset set, i.e. it will be implemented in the relevant target object type list for this IT asset set, as described in section 4.2.4 Changing a link, Step 1 - Method B, page 103. If an IT asset set is selected in the window WITH, this will be preselected in the Maintain links to </name/> window, and the link can then be directly established by clicking [OK]. - 46 - GSTOOL 3.1 - User Manual General information on working with GSTOOL 3.1 If no set of IT assets is entered, the selection will have to be made manually in the Maintain links to </name/> window. If noset of IT assets is selected and either [OK] or [Cancel] is directly clicked, the target object just created will not be linked with any IT asset set. With this option, the change takes immediate effect. 2.3.6 <Tools> - <Options> - | Reports | The functions available in this tab card are explained in section 6.9 User defined templates, page 153ff. 2.3.7 <Tools> - <Options> - | Report header | The functions available in this tab card are explained in section 6.9.5 Report header, page 162ff. 2.3.8 <Tools> - <Options> - | Additional options | You can only change the settings on this tab card if you have been assigned the rights of “Application Administrator”32. 32 See section 2.3.1 <Tools> - <Roles ...> , page 37ff. - 47 - GSTOOL 3.1 - User Manual General information on working with GSTOOL 3.1 History Using the slide bar, you can adjust the number of changes (from the default of 0 up to 20) that are tracked. If you choose “0”, tracking of changes will be disabled. Further information on the tracking of changes can be found on page 68. Name of organisation Here you can amend the name of the agency, company or customer. (The default setting is “BSI”.) This name appears in the tree display headings and in the report headers. Protocoll This function is used to help the developers of GSTOOL to isolate any errors relating to program crashes or other software bugs. The logging function should not be activated by the user without an express requirement on the part of Technical Support. 2.3.9 <Tools> - <Options> - | Display | Colour settings To help the users to find their way around the tree, individual processing states or selection areas are colour-coded. As the overall layout of the tool interface is taken from the existing Windows settings, it may be necessary in the interests of improving legibility to change the colour codes used in the tool. This can be done in the first five selection boxes. If you change the colour settings under Windows while GSTOOL is running, occasionally this can cause unwanted colour effects. However, normally these will disappear when you restart GSTOOL 3.1. DISPLAY SAFEGUARD AND MODULE NUMBERS This checkbox enables the display of module and safeguard numbers to be toggled on and off in the tree presentation. (The default option is that they are shown.) - 48 - GSTOOL 3.1 - User Manual General information on working with GSTOOL 3.1 Changes made under this option take effect after clicking [Update] or pressing {F5}. Display outdated number of safeguards This function is only of interest to users who have imported data from GSTOOL 2.0. If user defined safeguards have been imported from GSTOOL 2.0 to GSTOOL 3.1, these safeguards will have been assigned new numbers. When this function is selected, the old safeguard numbers are also displayed in a separate field. (The default option is that they are shown.) With this option, the change takes immediate effect. Display rights column If this option is selected, the Rights column will be displayed in lists. (The default option is that this column is not shown.) This change will only take effect when the tool is next started. Display ID field in lists of target objects Lists of target objects contain an additional column that shows the tool-internal IDs of the target objects. (The default option is that this column is not shown.) This change will only take effect when the tool is next started. The IDs are not necessary in order to work with the tool, but they can be used as an additional differentiating feature. The IDs are generated by the tool and cannot be altered. Display lines to show rows and columns in listviews When this option is selected, the fields in all the tables of the editing window are shown clearly by means of row and column lines. (The default option is that these lines are not shown.) - 49 - GSTOOL 3.1 - User Manual General information on working with GSTOOL 3.1 This change will only take effect when the tool is next started. Display BSI logo on workspace In the displays that go with →Master data, →Structure of target objects and →Modeling, the BSI logo appears at the bottom right in workspace33. (The default option is that the logo is shown.) This change will only take effect when the tool is next started. 2.3.10 <Tools> - <Options> - | Password | To ensure that no other applications can access the GSTOOL 3.1 databases, communications between GSTOOL 3.1 and the relevant databases are protected by a password (the “application password”). Users who have been assigned “system” rights can change the application password. • PRIOR PASSWORD Enter the old password here. The BSI can notify you of the password with which the application was delivered. • NEW PASSWORD REPEAT The new password has to be entered twice. You can choose any password you like, as long as it is different from the old one. Once all the fields have been completed, click [Apply] to activate the new password. 2.3.11 <Tools> - <Options> - | Path settings | This function contains information on where certain files required to run GSTOOL 3.1 are located. Changes made to 33 If the screen resolution is only 800x600 and the BSI logo is shown, some of the fields for the →Modeling screen will not fit in the screen. If this is the case, this option should be disabled or the screen resolution should be increased. - 50 - GSTOOL 3.1 - User Manual General information on working with GSTOOL 3.1 these settings should only be undertaken with great care. It is not possible to reset the file paths automatically to the default values with which the product was delivered. • To specify the paths for the APPLICATION and HELP FILE, you should proceed as follows: Here the system always shows the paths for the language versions that were selected in tab card | Common | under LANGUAGES. If more than one language file is available for the tool, then before making any changes to the path you need to specify the language for which the path should be changed. These changes will take effect for all the users. The language used for navigating the Help screens is determined by the operating system and cannot be specified through GSTOOL 3.1. It is possible to store the files concerned to a different, local directory and to change the file paths accordingly. However, it is imperative that the original paths are not deleted. 2.3.12 <Tools> - <Translate currency> The tool can maintain cost data in both euros (EUR) and US dollars (USD). (The default setting is “EUR”.) This function does not prevent choosing a different currency when processing particular safeguards. You can enter the costs associated with each safeguard in the desired currency and then at the end use this function to convert all your costs to the same currency. This function should not be confused with the currency adjustment carried out in connection with the data mirgation from GSTOOL 2.0 34. 34 See section 2.4.1Currency adjustment, page 54. - 51 - GSTOOL 3.1 - User Manual General information on working with GSTOOL 3.1 • FIRST CURRENCY In this field you should enter the currency that is to be converted. • SECOND CURRENCY In this field you should enter the currency into which the first currency amount is to be converted. • EXCHANGE RATE The exchange rate results from dividing the amount in the first currency by the second currency: For example, if one unit of the first currency is equal to 1.25 units of the second currency, then the exchange rate is: (1 / 1.25) = 0.8. If one unit of the first currency is equal to 0.8 units of the second currency, then the exchange rate is: (1 / 0.8) = 1.25. Up to five decimal places of the exchange rate are taken into consideration. This conversion is carried out for all the safeguards for which the user has write rights. This conversion applies to all the users. 2.4 Basic functions This section runs through all the functions within GSTOOL 3.1 that are largely independent of which screen layout the user is currently working with. 2.4.1 <File> - <Data migration from GSTOOL 2.0> If you have already used GSTOOL 2.0 prior to installing GSTOOL 3.1, facilities are provided that enable you to import any data contained in your old database into GSTOOL 3.1. All the data inputs required for this are made on the Data migration from GSTOOL 2.0 screen. - 52 - GSTOOL 3.1 - User Manual General information on working with GSTOOL 3.1 In order to be able to import the old data, GSTOOL 2.0 must be installed and able to run on the PC on which this import is to be carried out. Access to the GSTOOL 2.0 database To enable access to the GSTOOL 2.0 database, the following entries are required: • ODBC DATA SOURCE The default entry of “borstdb” should be left. • ACCOUNT Normally “sysdba” should be entered here35. • PASSWORD The normal entry here is “masterkey”36. With these details, GSTOOL 3.1 can find the old database and import all the data contained in it. 35 If the default user of GSTOOL 2.0 (“sysdba”) has been changed, then the new user ID should be entered. 36 If the default password of GSTOOL 2.0 (“masterkey”) has been changed, then the new password should be entered. It is not possible to restore a password other than the default password, should this have been forgotten. - 53 - GSTOOL 3.1 - User Manual General information on working with GSTOOL 3.1 The data from GSTOOL 2.0 is imported into GSTOOL 3.1 as far as possible. Further development of the Baseline Protection methodology means that information that was not entered in GSTOOL 2.0 is now necessary in GSTOOL 3.1. It is therefore imperative to supplement the old imported data, if appropriate, and to update the links. Identification of old imported objects The three checkboxes allow you to specify whether the subtypes, modules and safeguards imported from the GSTOOL 2.0 database should be created in GSTOOL 3.1 as “user defined”. • Import with checkbox checked Irrespective of whether the objects contained in the old database also exist in GSTOOL 3.1, the objects will be imported into the existing metadata as user defined. During future Modeling, the system will then refer to these user defined objects. • Import with checkbox not checked Objects of the type “BSI standard” will not be imported into the existing metadata. During future Modeling, the system will then refer to the objects of the same name in GSTOOL 3.1. Objects of the type “user defined” will be imported into the existing metadata and identified as such. During future Modeling, the system will then refer to these imported objects. Currency adjustment In GSTOOL 3.1, cost data can only be maintained in euros (EUR) or US dollars (USD). It is no longer possible to introduce other currencies, as it was in GSTOOL 2.0. To correctly convert costs from the two currencies that could be used in GSTOOL 2.0 to the currency chosen in GSTOOL 3.1, - 54 - GSTOOL 3.1 - User Manual General information on working with GSTOOL 3.1 the following settings are required when importing data from GSTOOL 2.0: This function should not be confused with the currency conversion function described in section 2.3.12, page 51. • IMPORT CURRENCY In this field you should select the GSTOOL 3.1 currency into which the GSTOOL 2.0 cost data is to be converted, i.e. EUR or USD. • EXCHANGE RATE 1 CURRENCY Enter the exchange rate between the two currencies. The exchange rate results from dividing the GSTOOL 2.0 currency by the import currency, as follows: If one unit of the currency used in GSTOOL 2.0 (e.g. 1.00 DM) corresponds to 0.51129 units of the import currency (e.g. €0.51129), then the exchange rate is (1 / 0.51129) = 1.95583). Up to five decimal places of the exchange rate are taken into consideration. • EXCHANGE RATE 2 CURRENCY Here you should proceed as is appropriate for the second currency used in GSTOOL 2.0. If no data was maintained in a second currency in GSTOOL 2.1, then you should enter “1” in this field. It is not possible to convert cost data to two currencies simultaneously in GSTOOL 3.1. To subsequently convert currency data in GSTOOL 3.1 see section 2.3.12 <Tools> - <Translate currency>, page 51ff. 2.4.2 <File> - <Data migration from GSTOOL 3.0> This menu option enables data from version 3.0 to be imported into version 3.1 in its entirety. The data import can only be carried out by a user who has the appropriate rights37. 37 The GSTOOL ‘sa’ or someone in the role of “Import 3.0”. - 55 - GSTOOL 3.1 - User Manual General information on working with GSTOOL 3.1 Import of data from target objects During the installation of GSTOOL 3.1, any existing database “BSIDB_V305_Data.mdb” is automatically attached to the tool. If you have attached any other databases to GSTOOL 3.0 or renamed the “BSIDB_V305_Data.mdb” database, you will have to attach this manually to GSTOOL 3.1 before you can start the data import process38. You should configure the login to the database to be imported in the same way as you did in GSTOOL 3.0. On the | Import | tab card, select the database server (SERVER NAME field) and then the database (DATABASE field) that you wish to import into GSTOOL 3.1. To start the data import process, click [Run]. If you choose the option DATA MIGRATION FROM GSTOOL 3.0 (the default setting), all the data contained in the database currently open will be deleted prior to the data import. The existing data will be permanently deleted! 38 See section 2.4.14 Configuring the database - | Databases | tab card, page 71ff. - 56 - GSTOOL 3.1 - User Manual General information on working with GSTOOL 3.1 If you disable the option DATA IMPORT FROM GSTOOL 3.0, the existing data will be kept and the imported data will be added to it. However, we strongly recommend that you leave the default setting for this option as it is and do not disable it for the following reasons: • If the data import is carried out to its conclusion without cancelling, the insertion of imported data items that are related to date on which already exists will produce results which, although technically correct, are nevertheless confusing. • Termination of the data import before it has finished will cause the import to stop abruptly in the middle of the process. This can result in inconsistencies, the effects of which cannot be known for sure in advance. The progress of the data import will be indicated on the | Progress | tab card. To confirm the success message, click [OK], click [Cancel] to close the window. Your data import is now complete. The “BSIDB_V305_Data.mdb” database will not be changed by the data import process. It now can now be 38 detached from GSTOOL 3.1 and, if appropriate, backed up to CD for archiving purposes. Importing users and roles The following restrictions apply to the import of users and roles from “BSIDB_V305_Data.mdb” to GSTOOL 3.1: • • • All defined roles will be imported. If the import is carried out on the same system on which the users were originally created, then all the users will now be imported too. Where the import is carried out on another system, users with database security will be imported in full. Users with integrated security will be transformed to users with database security. - 57 - GSTOOL 3.1 - User Manual General information on working with GSTOOL 3.1 To avoid loss of data, it is imperative that you ensure that neither the database to be imported nor the target database is in use by another user during the data import operation. 2.4.3 <File> - <Import> - <Update BPM metadata> In order to be able to continue to modify GSTOOL in line with developments in the IT BPM, this menu option allows you to update the metadata. As soon as any revised metadata is available, this will be made available on the BSI’s website for downloading. The metadata has to be updated separately for each database attached to GSTOOL 3.1. For security reasons (maintenance of older database versions), it is not possible to update all the attached databases automatically. Procedure Select menu options <File> - <Import> - <Update BPM metadata>. The following window will now open: • DATA SOURCE In this field you can enter the location of the new metadata directly, or alternatively you can choose the location by clicking the Browse button [...]. To start the update process, click [Update] and confirm your action when prompted. • PROGRESS The progress of the update is indicated in the “Progress” window and the progress bar. - 58 - GSTOOL 3.1 - User Manual General information on working with GSTOOL 3.1 Effects on existing adaptations If any safeguard or module assignments have been changed in →Modeling or in →BPM user defined, the metadata import will have the following effects: • If any safeguards or modules that were linked with a target object otherwise than as linked by the IT BPM were deleted in →Modeling, this will be picked up again in the Modeling proposal as not processed. • For modules which have been adapted through the addition or removal of safeguards or in any other way in →BPM user defined, the BPM metadata update will work like this: An adapted module “kBx.y” will be transformed into a user defined module called “bBx.y”. In addition to this transformed module “bBx.y, the original module “Bx.y”will be supplemented at all the relevant places in accordance with the link specified in the IT BPM. If, prior to a data import from GSTOOL 3.0, the NEW / OLD / Changed display is changed to “Old”, GSTOOL 3.1 will behave in the following non-standard manner for the modules and safeguards concerned: Modules and safeguards adapted in GSTOOL 3.0 are not converted to user defined modules and safeguards, as described above, but continue to be treated as adapted modules and safeguards. Moreover, the latest modules and safeguards are not integrated into the metadata in parallel. In cases of modules, safeguards and target object types, the tool will inform you through an information field at the top right of the screen, whether the associated metadata has been changed by the most recent metadata update or whether it has been added for the first time39. 2.4.4 <File> - <Exit> This option closes GSTOOL 3.1. 39 See section 2.4.11 New / Prior / Changed - display, page 67ff. - 59 - GSTOOL 3.1 - User Manual 2.4.5 General information on working with GSTOOL 3.1 Copying objects GSTOOL 3.1 has its own application clipboard that is independent from the Windows clipboard. This means that in →Modeling you can copy modules and safeguards and, in →Structure of target objects, you can copy target objects. This copying is only possible between objects of the same type, i.e. only between target objects of the same type. To copy a highlighted object (target object, module, safeguard or threat) to the application clipboard, select <Edit> - <Copy object> or press {Ctrl+K}. Only the characteristics of the highlighted object itself are copied. This means that in the case of a module, only the content of the Properties of module allocation screen is copied. The safeguards that belong to a given module are not copied. Similarly, links to target objects are not copied either. During the copying process, only a reference to the object and not the object itself is copied to the application clipboard. When the contents of the clipboard are pasted, the object is inserted in the version current at the time of being pasted. If the object has changed between being added to the application clipboard and being pasted, this means that the version inserted will be the changed one. The target object subtype cannot be copied. Menu selection <Edit> - <Insert object> or key combination {Ctrl+E} will write the contents of the application clipboard to another highlighted object of the same kind. Menu selection <Edit> - <Insert object> and key combination {Ctrl+E} have the effect of overwriting the previous content of the highlighted object, which cannot be restored thereafter. - 60 - GSTOOL 3.1 - User Manual 2.4.6 General information on working with GSTOOL 3.1 <Edit> - <Reports> This menu option is only available in →Reports. The functionality available is described in section 6 Reports view, page 150ff. 2.4.7 <Edit> - <Modeling> This menu option is only available in →Modeling. The functionality available is described in section 5 Modeling view, page 110ff. 2.4.8 <View> - <Notepad> See section 2.2.5 Editing window - Notepad, page 34ff. 2.4.9 <Tools> - <Encryption ...> GSTOOL 3.1 contains a file encryption facility based on the BSI’s Chiasmus algorithm, allowing export files to be protected during transmission over potentially insecure transmission media. The Chiasmus-Encryption window offers the functions encrypt, decrypt and key management on three different tab cards. You can leave the window at any time by clicking [Close]. | Encrypt file | • NON-ENCRYPTED FILE: In this field you need to specify the path and name of the file to be encrypted. • ENCRYPTED FILE In this field you need to specify the path and name of the file generated during encryption. Encrypted files created with GSTOOL 3.1 have the file suffix “*.mdx”. • CHIASMUS KEY From the list of available keys, choose the key you want to be used for the encryption. If the list is empty, you will first have to generate a key. (See | Magnage keys |, page 62ff.) When you have specified the file name and chosen the key, you can now Initiate the encryption process by clicking [Run]. - 61 - GSTOOL 3.1 - User Manual General information on working with GSTOOL 3.1 | Decrypt file | Files that have been encrypted using GSTOOL 3.1 can be decrypted here. They carry the file suffix “*.mdx”. • ENCRYPTED FILE In this field you should enter the path and name of the file to be decrypted or else select it using the Browse [...] button. • UNENCRYPTED FILE In this field you need to specify the path and name of the file generated during decryption. • CHIASMUS KEY From the list of available keys, choose the key you want to be used to decrypt the file. To decrypt a file, you need to use the same key that was also used to encrypt it. If the required key is not contained in the list, it will first have to be imported into the local key store. (See | Magnage keys |, page 62ff.) When you have specified the file name and chosen the key, you can now initiate the decryption process by clicking [Run]. | Magnage keys | On this tab card, you can create, administer and delete keys. Every key is contained in a separate key file that ends with the suffix “*.ckf”. • KEY STORE In this field, enter the directory to which the keys should be saved. It is recommended that all directories created during installation of the tool are retained. • CHIASMUS KEY IN LOCAL KEY STORE This field lists the key files contained in the above directory. • [Update] Reads the list of key files in again. • [Import...] This option enables a key file to be copied from any accessible directory to the local key store, in a similar fashion to the function of the normal Windows Explorer. • [Export...] This option enables a selected key file to be copied to any accessible directory, in a similar fashion to the function of the - 62 - GSTOOL 3.1 - User Manual General information on working with GSTOOL 3.1 normal Windows Explorer. The key file will remain in the local key store. • [New] Creates a new key file and saves this to the local key store • [Delete] Deletes the selected key file after the user has confirmed the action at the prompt. A key file cannot be restored once it has been deleted. Once a key file has been deleted, the data encrypted with that key cannot be restored either. 2.4.10 <Database> - <Data backup and recovery...> Backing up data Before a database can be backed up, the following conditions must be satisfied: • The database to be backed up must currently be attached to GSTOOL 3.1. • The user must possess BACK UP DATABASE right for the database he has opened and which he wants to back up40. If the user does not have the required right for the database currently open, the menu option <Data backup and recovery...> will not be offered. If the user does have backup right for the open database but not for the database that he wishes to back up, the attempt to back up this database will be refused with an error message. To open the Data backup and recovery window, select menu options <Database> - <Data backup and recovery...>. 40 See section 11.1.1 Creating and editing roles - Tab card | Data |, page 224ff. User ‘sa’ always has this permission. - 63 - GSTOOL 3.1 - User Manual • General information on working with GSTOOL 3.1 In the NAME OF DATABASE field, choose the database that you wish to back up. This does not have to be the database that is currently open. In the example above, the database currently open is “Concept 01”, whereas the database to be backed up is “Concept 02”. • After the database to be backed up has been selected, GSTOOL 3.1 automatically suggests a path and name of a backup file. In the example above, this is c:\Concept 02.bak. You can alter the file and path as you wish. To select the file, you can also use the Browse button [...] on the right-hand side next to the input field. A data backup cannot be written directly to a network drive, but must be performed on a local drive. You can then copy or move the backup file manually to a network drive. • To start the backup process, click [Backup]. If you have already selected an existing file in the BACKUP FILE field, you will asked to confirm whether the existing file should be overwritten. If you do not have BACK UP DATABASE right for the selected database, an appropriate error message will be displayed. • The progress of the backup is displayed in the PROGRESS field. The bottom line of the window informs you when the backup has been completed successfully. - 64 - GSTOOL 3.1 - User Manual General information on working with GSTOOL 3.1 Restoring data Before a database can be restored, the following conditions must be satisfied: • Databases have to be restored by the Tool Administrator (‘sa’). • • The backup file must be located on a local drive. A database can only be restored to a database currently attached to the tool (target database). The contents of the target database will be entirely overwritten by the contents of the backup file. If you want or need to avoid this loss of data, you will have to restore the data to an empty database. 41 While a backup is being restored, no other user may access the target database. To ensure that no other users attempt to access the target database, you should block all the user accounts42 or else restore the backup to a database for which no users have yet been created. 41 Section 1.5.2 Databases, Creating an additional database, page 23ff explains how to obtain an empty database. 42 See section 11.2 Users - Tab card | Common |, page 234. - 65 - GSTOOL 3.1 - User Manual General information on working with GSTOOL 3.1 To open the Data backup and recovery window, select menu options <Database> - <Data backup and recovery...> • In the NAME OF DATABASE field, select the target database, i.e. the database to which the contents of the backup file should be written. This does not have to be the one that is currently open. In the example above, the database currently open is “Concept 01”, whereas the target database is “Concept 03”. • In the BACKUP FILE field, regardless of the default automatically supplied, enter the path and name of the backup file whose content is to be written to the target database which you have specified in the NAME OF DATABASE field. In the example above, the contents of “C:\Concept 02.bak” will be written to the database “Concept 03”. You can select any backup file located on a local drive. To select the file, you can also use the Browse button [...] on the right-hand side next to the input field. If you want to restore an existing database to a prior backed up status through a restore operation, select the existing database as the target database. If you do not want any existing databases to be overwritten through the restore operation, you must attach a new database to GSTOOL 3.1 before the restore operation43. 43 See section 1.5.2 Databases - Creating an additional database, page 23ff. - 66 - GSTOOL 3.1 - User Manual • • General information on working with GSTOOL 3.1 To start the restore operation, click [Recover]. The progress of the restore operation is displayed in the PROGRESS field. The bottom line of the window informs you when the restore operation has been completed successfully. Checking user rights Because of the rights structure used within the tool, the following provisions apply to the users of a restored database: • If the target database is on a server to which the users are known, the known users and their rights will be retained as they applied in the backed up database prior to the backup. • If the backup is restored to the original database and additional users have been created since the backup, these will be lost. • If the backup is restored to the original database and any users have been deleted since the backup, those users will not be recreated even though the database has been restored. • If the backup is restored to a database on a server to whom the original users are not known, all the users (apart from ‘sa’) will have to be recreated44. 2.4.11 NEW / PRIOR / CHANGED - display In →BPM user defined, the screen layouts for target object types, target object subtypes, modules and safeguards have a display field at the top right, which can accept the values “NEW”, “PRIOR” and “CHANGED”. This field alerts the user to new metadata records. For every new database (see section 1.5.2 Databases, Creating an additional database, page 23ff), this field is automatically set to “NEW”. The user can expressly indicate to the system that he has taken note of the content of the screen format by removing the checkmark. The next time an item is retrieved, the indicator will then be set to “PRIOR”. 44 See section “[New ...]“, page 231ff. - 67 - GSTOOL 3.1 - User Manual General information on working with GSTOOL 3.1 If you set this display to “Prior”, then should you subsequently perform a data import from GSTOOL 3.045, this will have the following effect on the modules and safeguards concerned: Compared with the normal behaviour of GSTOOL 3.146, in GSTOOL 3.0 adapted modules and safeguards are not converted to user defined modules and safeguards but continue to be treated as if they have already been adapted. Moreover, the latest modules and safeguards are not integrated into the metadata in parallel. When the BPM metadata is updated, the display is set to “NEW” for all new objects that have been added. Only objects that have been changed are marked “CHANGED”. If you have already taken note of all the objects prior to updating of the BPM metadata (i.e. all the associated indicators are set to “PRIOR”), you can tell from the change of status to “NEW” or “CHANGED” that occurs after the metadata important if something has changed. 2.4.12 History For a number of fields whose content can be completed or amended by the user, GSTOOL 3.1 keeps track of the changes that have been made over time. In this way, past changes to data records can be inspected. Number of changes tracked The number of changes tracked is configured via <Tools> <Options> - | Additional options | - History (page 48). If the number of changes carried out for a given field exceeds the upper limit on change tracking, the oldest entries are overwritten. If the number of changes to be tracked is reduced, all entries that exist over and above the new value will be deleted. It will not be possible to restore the lost changes. 45 See section 2.4.2 <File> - <Data migration from GSTOOL 3.0>, page 55ff. 46 See section 2.4.3 <File> - <Import> - <Update BPM metadata> - Effects on existing adaptations page 59ff. - 68 - GSTOOL 3.1 - User Manual General information on working with GSTOOL 3.1 History display The history display is invoked by positioning the cursor in a field and then pressing {F2}. Previous changes to the field content are then listed in the Previous values window, with the most recent change at the top of the list. • The DATE OF CHANGE column contains the date and time of the last change. • The VALUE BEFORE CHANGE column shows the old value of the field immediately prior to the date of the change. • The USER column shows the name of the person who was logged on when the change occurred. Tracking of changes occurs at field level in GSTOOL 3.1. This means that the creation of user defined or adapted objects (modules, safeguards, target object etc.) is not included in the changes tracked. No changes are tracked until the field content has been changed for the first time following new creation or adaptation. If no changes have yet been tracked, this is advised in a message box. Since there is only one subtype for each of the target object types IT asset set, buildings, employee, changes in subtypes cannot be tracked for these target object types. Entries in the history lists can neither be altered nor deleted. Only users in possession of “View history” right can 40 inspect the history . 2.4.13 On-line help GSTOOL 3.1 comes with comprehensive online help. The help can be accessed via menu option <Help>, which provides direct access to a choice of three functions: <Contents ...>, <Index ...> and <Find...>. In addition, you can also access context-sensitive help by placing the cursor in the relevant field and then pressing {F1}. - 69 - GSTOOL 3.1 - User Manual General information on working with GSTOOL 3.1 2.4.14 Configuring the database The function “Configure database”47 can only be used by the GSTOOL 3.1 Tool Administrator (‘sa’). With this function, ‘sa’ can • • • • configure the settings for the GSTOOL 3.1 login type attach and detach databases change the ‘sa’ password and import scripts. | Login | tab card If the user logged on to the PC is also the GSTOOL 3.1 ‘sa’, then WINDOWS INTEGRATED SECURITY will be sufficient for login. If this is not the case, the Tool Administrator will have to log on with DATABASE SECURITY and input a USER NAME and PASSWORD. Using the [Test] function, you can check whether the ‘sa’ password is still ‘bsi’ and has not been changed since the installation or whether it has already been changed and/or whether the password currently used is correct. Enter ‘sa’ in the USER NAME field and ‘bsi’ or the current password in the PASSWORD field, then click [Test]. If the 47 This function is accessed via menu selection <Start> - <Programs> - <BSI> - <Tools> - 70 - GSTOOL 3.1 - User Manual General information on working with GSTOOL 3.1 password entered is correct, then the following message will be displayed: Otherwise, this message will appear: | Databases | tab card • Detaching a database In the DETACH DATABASE table, all the databases currently attached to GSTOOL 3.1 are displayed48. Databases from this list can be locally detached from GSTOOL 3.1. 48 The databases “master”, “model”, “msdb” and “tempdb” are help databases and cannot be detached. The [Detach] button is not available for these four databases. - 71 - GSTOOL 3.1 - User Manual General information on working with GSTOOL 3.1 Select the database you wish to detach and then click [Detach]. The message, “Database <Name> detached.” will now appear, and you should confirm by clicking [OK]. The list may still contain content from a previous access by a user with different rights. To view the list currently valid, click [Refresh]. • Attaching a database In ATTACH DATABASE, you can attach a database to GSTOOL 3.1. Databases must always be attached locally, i.e. they must always be attached on the PC on which GSTOOL 3.1 has been installed and via which the database concerned is to be accessed. In the DATABASE field, enter the database file to be attached, along with the complete path, or else select it using the Browse button [...]. In the NAME field, enter the name of your choice under which the attached database is to be offered when GSTOOL 3.1 is started up in the GSTOOL - logon to database window. If you choose a name that is already in use for another database locally attached to GSTOOL 3.1, attachment of the newly selected database will be terminated with an appropriate error message. If you choose the database file using the Browse button, this name will automatically be created from the file name. - 72 - GSTOOL 3.1 - User Manual General information on working with GSTOOL 3.1 Click [Attach], and the message, “Database </Name/> appended!”, will be displayed. The next time that GSTOOL 3.1 is started up, in the login window you will be able to choose between all the databases thus linked to the tool in the DATABASE field and then to start the tool by clicking [OK]. | Password | tab card On this tab card, the ‘sa’ password can be altered. Once you have successfully logged on on the | Login | tab card as ‘sa’, you will be able to change your ‘sa’ password here at any time. | Script | tab card In certain cases49, it is necessary to make changes to GSTOOL 3.1 databases outside of GSTOOL 3.1 itself. • Create a directory in which to save all the files relating to the script. • Enter its complete path in the DIRECTORY field or else select it using the Browse button. • In the DATABASE field, select the Database to which the script should be loaded. To start the load process, click [Update]. • The progress and results of the operation are displayed in the PROGRESS window. 49 Deletion of users in a database (1.5 Database server / databases on page 20) or changes to the database in the course of software maintenance by the BSI. - 73 - GSTOOL 3.1 - User Manual General information on working with GSTOOL 3.1 - 74 - GSTOOL 3.1 - User Manual 3 Master data view Master data view Master data management is the central application area for • the capture of information on all target objects and target object groups, together with their customised details, and • the amendment of master data50. The overview table contains all the main details for each target object. Immediately after GSTOOL 3.1 has been installed, the first six columns are already completed with default values. In addition, the RIGHTS and ID columns can also be viewed51. FILTER A full description of the filter function can be found in chapter 10 Filter, page 216ff. • Predefined filters As well as (All) and (New...), the following additional predefined filters are offered: (Not linked to an IT asset set) With this filter, only those target objects that have not been 50 Outside of the →Master data, there are opportunities at many other places in the tool to create new master data records and to edit and delete existing ones. These options will be described in the appropriate contexts. 51 See section 2.3.9<Tools> - <Options> - | Display |. - 75 - GSTOOL 3.1 - User Manual Master data view directly linked to any IT asset set up to now and hence are not contained in any asset set in the relevant lists of target object types are displayed. Type: /target object type/ Only target objects of the selected type are displayed. IT asset set: /asset set/ With this filter, only those target objects that have been directly linked to the IT asset set selected and hence are contained in that asset set in the lists of target object types are displayed. • Tab card | Basic filter | Four Basic filter are offered in →Master data: ASSET SET-NAME (SELECTION) Only target objects that belong to the IT asset set selected52 are displayed. TARGET OBJECT-CALCULATED PROTECTION REQUIREMENT Only target objects whose overall protection requirement53 matches the selection in this field are displayed. TARGET OBJECT-TYPE Only target objects of the selected type are displayed. This selection corresponds to the predefined filter, “Type: /target object type/”. The restriction to one target object type is helpful in two cases: 52 • If you want to enter a sequence of target objects of the same type; • In order to obtain a clearer overview of individual target object types, where the master dataset is already very large. Only one set of IT assets can be selected, and the user must have at least read permission for this set of IT assets. 53 The overall protection requirement is the protection requirement calculated from the individual data entries for the three basic parameters (see PROTECTION REQUIREMENT ASCERTAINED field in Properties of target object of type: /target object type/, on the | Protection requirement | tab card). - 76 - GSTOOL 3.1 - User Manual Master data view TARGET OBJECT-SUBTYPE Only target objects of the selected subtype are displayed. 3.1 Determining the target object type To create a new target object it is necessary first of all to determine the target object type to which the new target object is to belong. Accordingly, all routes to creating a new target object entail selecting the target object type first. This can be done in any of the following ways • by selecting menu option sequence <Edit>- <Master data> <New target object>; • • by clicking [New] in the toolbar; by right-clicking with the mouse and then choosing the <New target object> option. Each of these three methods result in display of the same drop-down window containing four menu options. • Clicking [New] in the toolbar This function takes you to the Choose target object type window. From the options offered, select the desired target object type54. Click [OK], and the New target object: /target object type/ window will open with the default values for the target object type you have just chosen. <Import data> This option opens the New target object: /target object type/ window and passes over all the information relating to the target object currently selected in the list. A clone is created. 54 For further information on how to create additional target object types, see section 2.3.4 <Tools> - <Target object types ...>, page 37. - 77 - GSTOOL 3.1 - User Manual Master data view This procedure will be helpful when a series of target objects of the same type, which differ from each other only in minor respects, are to be entered. <Blank target object> Also opens the New target object: /target object type/ window; however, only the target object type which matches the current selection in the list is set. This procedure is recommended when a series of target objects of the same type but which are very different from each other in other respects are to be entered. <Current type> This option is only offered when the list is limited to one particular type as a result of the use of a filter. The results are then the same as for menu option <Blank target object>. <Select type> Has the same effect as 3.2 [New] in the toolbar (see above). Creating a new target object Every newly created target object is linked to an IT asset set in accordance with a hierarchy of links55 held in the tool and the selection made under option “LINK TARGET OBJECTS AFTER CREATION“56. Each of the four routes described in section 3.1 lead to the same window, New target object: /target object type/ PROPERTIES OF TARGET OBJECT OF TYPE: /target object type/ , in which the tab cards offered depend on the target object type. 3.2.1 Tab card | /Target object type/ | The first tab card is offered for all target object types and always bears the name of the target object type in question. For every target object type, there are certain mandatory fields that 55 For further information on this point, see section 4.1.3 Structure rules, Link hierarchy on page 97. 56 See also section 2.3.5 <Tools> - <Options> - | Common |, page 46ff. - 78 - GSTOOL 3.1 - User Manual Master data view have to be completed: NAME, ABBREVIATION, SUBTYPE and NUMBER. • The user is free to enter any text in the NAME and ABBREVIATION fields. Changes can be made in all the fields at a later time. If a target object is created with a name that has already been used for another target object, irrespective of type, a tilda (~) plus a sequential number are automatically added to the name of the newly created target object. In the example to the right, the target objects North ( room), North~2 ( building) and North~3 (also room) have been created. • In the SUBTYPE fields, you should select one subtype from the list of subtypes. Only subtypes that are assigned to a given target object type are offered. The choice of SUBTYPE has a decisive effect on the suggestions offered in →Modeling. For example, if you were to assign the subtype “Server room” to a room that is actually a data media archive, the wrong modules, and hence the wrong safeguards, would be assigned in →Modeling. • The NUMBER field is used to specify the size of a group57 of identical target objects. Grouping of items We highly recommend grouping items together, both because this is recommended in the Baseline Protection methodology57 and also to reduce the number of target objects. If every IT system, every application etc. were to be entered, it would be difficult to see one’s way around GSTOOL 3.1 and the results obtained would be difficult to follow. It would thus actually obstruct, rather than promote, IT security. 57 For further information on the creation of groups, see section 13.3.1 IT Structure Analysis, page 250ff in this manual and Section 2.1 IT Structure Analysis in the IT BPM. - 79 - GSTOOL 3.1 - User Manual Master data view With the following target object types, it is either mandatory or optional to enter additional information: • IT SYSTEM Status can be indicated, also (by checking a checkbox) whether any person-related data is handled on this IT system. • NETWORK By checking the appropriate checkbox, you should indicate which of the five reasons given is the one which makes the network under consideration critical. It is possible to check more than one box. Further information on these categories can be found in section 13.3.2 Assessment of protection requirements on page 252 of this manual and in section 2.2 of the IT BPM under “Assessment of protection requirements for communications links”. • APPLICATION By checking the appropriate checkbox, you can indicate whether this application handles person-related data. The data entered in the PROCESSED INFORMATION field will be output separately in the relevant reports. • EMPLOYEE ROLE is a mandatory field. The roles offered are the various responsible roles specified in the IT BPM for the implementation of safeguards. If none of the roles offered applies, then choose the dash ( - ). The list of roles offered cannot be extended. - 80 - GSTOOL 3.1 - User Manual Master data view This role assignment, in this example “Site technical service”, serves as the basis for the employees offered on Tab card | Responsible | (5.5.4, page 146ff). 3.2.2 Tab card | Specific task | This tab card is only available for target objects of the type application”. In the text field at the top you should explain “ the specific task. When it comes to assessing importance for fulfilment of specific task, four predefined categories are available to choose from. If one of these is chosen, then the GRUNDS field becomes a mandatory field. 3.2.3 Tab card | Protection requirement | This tab card is available for the following target object types: “ application”, “ buildings”, “ IT system”, network” and “ “ room”. - 81 - GSTOOL 3.1 - User Manual Master data view For each of the three basic parameters of CONFIDENTIALITY, INTEGRITY and AVAILABILITY, you can individually specify the protection requirement for the target object that you are currently working on. As soon as one of the three protection requirement levels is selected, the GROUNDS field becomes a mandatory field. In the SUGGESTION field, the assessment of protection requirements that results from the inheritance process (section 12.1, page 240) is displayed for each basic parameter for information purposes. If no links that have inherited a protection requirement yet exist for this target object or if no protection requirement has yet been determined for the bequeathing target objects, then “(no entry)” appears here. In the PROTECTION REQUIREMENT DETERMINED field, the highest of the three protection requirement assessments made here is repeated according to the Maximum Principle. The suggestions regarding protection requirement are ignored for this purpose. In individual cases, there may be reasons for altering the protection requirement ascertained. This is done by selecting one of the options available in the USER DEFINED PROTECTION REQUIREMENT field. As soon as one of the three protection requirement levels is selected, the GROUNDS field becomes a mandatory field. - 82 - GSTOOL 3.1 - User Manual Master data view Further information on the Maximum Principle and on user defined changes of the protection requirement can be found in section 13.3.2 Assessment of protection requirements, page 252 of this manual and also in section 2.2 of the IT BPM under “Assessment of protection requirements for IT systems”. Tab card | Protection requirement | is available for target object type “Network”, but under the Baseline Protection methodology it should not be used. We cannot guarantee that this tab card will continue to exist in the long-term. 3.2.4 Tab card | Audit information | This tab card is only available for target objects of type “set of IT asset”. You can only enter data relating to the Baseline Protection Audit if you have been assigned “APPLICATION ADMINISTRATOR” right. - 83 - GSTOOL 3.1 - User Manual 3.2.5 Master data view Tab card | Links | This tab card is available for all target object types. • The columns ABBREVIATION, NAME and EXPLANATION contain the relevant details for all the target objects to which the target object selected on the | Master data | tab card has already been linked. • The DIRECTION column provides information on the hierarchical relationship between the target objects shown in this table and the target object selected on the | Master data | tab card. 3.2.6 Creating a target object After all the entries for a new target object have been made, the four buttons offer the following options: • [Cancel] Closes the window without creating the target object. All data inputs are discarded. • [OK] Closes the window, creates the target object and passes this to the present view. If this does not happen automatically, then you should update the view [Update] in the toolbar or {F5}). ( • [Save] Creates the new target object and saves the information entered so far, but leaves the editing window open so that you can enter any further data you wish for this target object. • [New] How GSTOOL responds after you have clicked [New] depends on the setting you chose under SAVE WITHOUT QUERY58. 58 See 2.3.5 <Tools> - <Options> - | Common | Edit, page 43. - 84 - GSTOOL 3.1 - User Manual Master data view If SAVE WITHOUT QUERY is allowed, the new target object is created immediately with the data entered up to this point. The editing window will remain open, along with all the data, thus enabling you to create additional target objects. 3.3 Editing a target object There are two possible ways of opening the window for editing a target object: • Select the target object with the mouse somewhere in the line and click [Open...]. • Double-click the target object Checking a box in column 1 will have no effect here. The window that is now opened, Target object: /target object type/ - Properties of target object of type: /target object type/ , is identical in all its functions and input possibilities with the window New target object: /target object type/ - Properties of target object of type: /target object type/ . (See section 3.2 Creating a new target object, page 78ff. As the assignment of subtype to a target object serves as the basis for the correct assignment of modules in the Modeling (see also + note on page 79), when the subtype of a target object is changed, the user is asked in a separate dialogue box to specify how the modules assigned up to this point are to be handled. [Yes] The modules that are no longer valid are deleted from the Modeling. The entries relating to these modules that were made in →Modeling will be irrevocably lost. - 85 - GSTOOL 3.1 - User Manual Master data view Modules which belong both to the old and also to the new subtype will be retained in their entirety. Modules that are relevant to the newly chosen subtype will be supplemented. [No] Modules that are relevant to the newly chosen subtype will be supplemented in →Modeling. All the modules assigned to the target object up to now through the old subtype will be retained. These can be deleted afterwards at any time59. [Cancel] The changes made to the subtype will be discarded. 3.4 Deleting a target object There are two ways of deleting target objects: • • deleting individual target objects deleting several target objects at the same time The deletion of target objects is always irrevocable! Target objects cannot be restored once they have been deleted! 3.4.1 Deleting individual target objects To delete an individual target object, place the mouse pointer somewhere in the line for that target object and click with the left mouse-button. Click [Delete] and a user prompt window will open. Click [OK] to make the deletion final. 3.4.2 Deleting several target objects at the same time To delete several target objects at once, select them one after another by checking the appropriate checkboxes in column 1. Click [Delete] and a user prompt window will open. Click [OK] to make the deletion of all the selected target objects final. Colour coded target objects that are not selected in column 1 will be ignored during this delete operation! 59 See section “Deleting a module“, page 131ff. - 86 - GSTOOL 3.1 - User Manual 4 Structure of target objects view Structure of target objects view In this view, GSTOOL 3.1 presents the structure of a set of IT assets through the selective linking of target objects. It is possible to create new links and also to move or delete existing links. In addition, it is also possible to create new target objects or to delete existing ones in this view, in a fashion that is similar to the functions in →Master data. 4.1 Presentation and structure rules In →Structure of Target objects it is possible to present even complex IT structures in GSTOOL 3.1. Nevertheless, the provision of target object icons and default structures ensures that the tree is manageable and easy to assimilate. This section provides a brief description of this support. Further explanations will be found elsewhere in the appropriate context. 4.1.1 Presentation Target object icons All the target objects that are contained in the database currently selected are included in the tree. The target objects are preceded by icons which indicate their type: • Set of IT asset • Building • Room • IT system • Network • Application • Employee • User defined target object It is not possible in GSTOOL 3.1 to define different icons for different user defined target object types. - 87 - GSTOOL 3.1 - User Manual Structure of target objects view The tree The structure on view in →Structure Target objects is automatically generated by GSTOOL 3.1. Horizontally, a distinction is made content-wise between two areas60: • The upper part ( set of IT asset) contains all the IT asset sets that currently exist. Below each asset set (initially, only BSI set of IT asset”), the target object types that can the “ be linked to an IT asset set are listed. All the target objects linked to the IT asset set are included in these lists. • The lower part of the tree, i.e. (“ building” through to “ employee” and any user defined target objects) contains all the target objects that have been created, sorted by target object type that are eligible for linking. This part also contains target objects that are not currently linked to any IT asset set. Vertically, the uneven columns in the tree contain the target object types, while the even columns contain the existing target objects. This same structure is used both for the upper and lower parts of the tree61. The content of the editing window will depend on which column an object selected in the tree belongs to. • If a target object type in an uneven column is selected, then in the List of target objects editing window all the target objects linked at this point will be displayed. The content of the list is identical to the next column for the selected target object type. Double-clicking a target object in this list has the same result as selecting a target object in the tree. • If a target object in an even column is selected, then the Properties of target object of type: area will be displayed in the editing window. In this window, all the data relating to 60 The red separating line is just here solely for the purposes of clarification. It does not actually appear in GSTOOL 3.1. 61 The coloured shading is used here solely for the purposes of clarification. It does not actually appear in GSTOOL 3.1. - 88 - GSTOOL 3.1 - User Manual Structure of target objects view the target object can be read and amended62. The presentation of the tree follows the standard Windows format63. • • No further elements exist below this tree element. This tree element contains further elements at a lower level. • • • • The level directly below this tree element is displayed. and are used to open and close the next level down. By right-clicking and then selecting <Minimize> from the popup menu, you can close all the levels below a selected tree element at once. By right-clicking and then selecting <Maximize> from the pop-up menu, you can open all the levels below a selected tree element at once. Target objects in the tree Every target object that is created in this view or in →Master data is automatically inserted in the tree in two places by the tool. For example, supposed two target objects have been created64: • • The IT asset set “ The building “ Location 1” Head office” This is presented in the upper part of the tree as follows: • The newly created IT asset set “ Location 1”appears in the same vertical column as the automatically created IT BSI”. Once again, the target object types that asset set “ could potentially be linked to an set of IT assets are listed below. • In the “ object “ BSI” set of IT assets, the newly created target Head office” has been inserted below target 62 See sections 3.2 and 3.3, page 78ff. 63 See also section Maximizing and minimizing the tree on page 32. 64 The sequence in which target objects are created is irrelevant to the results in the tool. - 89 - GSTOOL 3.1 - User Manual object type “ Structure of target objects view building”. The only item listed below this target object is the still empty level for target object type “ room”.65 • In the lower part of the tree, the newly created target object “ Head office” is listed below target object type “ building”. Once again, the still empty level for target 65 object type “ room” has been inserted . Multiple presentation of target objects If, when selecting the “LINK TARGET OBJECTS AFTER CREATION“ option66, a direct link with a selected IT asset set was chosen or a target object has been linked to an IT asset set through selection of “query this” during its creation, then this target object will appear in two places in the tree: • Firstly, it is inserted in the lower part of the tree in the relevant target object type list. • Secondly, every new target object is automatically linked to BSI” according to its type. 67 the IT asset set “ In actual fact, each target object exists only once, but due to the automatic link with IT asset set “ BSI” it immediately appears a second time. If a target object is also linked to other IT asset sets, then it appears the appropriate number of times in the tree. A target object also remains in the lower part of the tree after all its links have been deleted so that it no longer appears in any asset set any more. Displaying higher target objects Normally, all the linked target objects are presented in the tree according to their position in the hierarchy. You can also tell when one target object has been assigned to another one from the fact that one follows the open branch upwards from any point at which the target object occurs in the tree. Since this approach becomes more and more complicated as the 65 The reasons why this is so are explained in section 4.1.2 Filter- Link rules, page 95ff. 66 See section 2.3.5 <Tools> - <Options> - | Common |, page 46ff. 67 See section 3.2 Creating a new target object, page 78. - 90 - GSTOOL 3.1 - User Manual Structure of target objects view complexity of an asset set grows, GSTOOL 3.1 provides facilities enabling you to directly view the elements above a given target object in the hierarchy. This function is activated and deactivated for a given selected object by right-clicking with the mouse and then selecting the option <Display generics>. This function has to be activated / deactivated separately for every point in the tree. The tick next to the option indicates that the function has been activated for this target object. If the only items higher in the hierarchy that are shown in this tree are target object types, with no target objects, this means that the relevant target object is not linked to any other target object. If <Display generics> is activated, then in the tree, below the selected target object in question, the target objects with which the selected target object is either directly or indirectly linked are shown in grey. In the example on the right, there is a direct BSI” asset set link between the data media archive and the “ and an indirect link to the building “ Head office”. Sorting in the tree In →Structure Target objects, sorting is automatically carried out in the tree. This cannot be directly altered by the user. • Target object types This sequence of target object types is predefined: set of IT asset building room IT system network application employee user defined target object User defined target object types are inserted in column 1 in the lower part of the tree in the order in which they were employee”. In column 3 created, below target object type “ in the upper part of the tree, user defined target object types are once again presented in the order in which they were building”. created, but above target object type “ - 91 - GSTOOL 3.1 - User Manual • Structure of target objects view Target objects Target objects are always sorted in ascending alphabetical order. If the name of a target object is changed in Properties of target object of type: , then the new name appears in the tree immediately. To obtain the correct alphabetical order, [Update]. click In the List of target objects of type , when a target object type is selected, the target objects can be sorted in the column concerned in either ascending or descending order by clicking the column title. 4.1.2 Filter A full description of the filter function can be found in chapter 10 Filter, page 216ff. • Predefined filters As well as (All) and (New...), the following additional predefined filters are offered: IT asset set: /asset set/ This line appears separately for each set of IT asset that exists. In the upper part of the tree, only the chosen IT asset set is displayed. In the lower part of the tree, every target object is displayed, irrespective of links. A newly created IT asset set is only added to the list of Basic filter after GSTOOL 3.1 has been restarted. • Tab card | Basic filter | The following six Basic filter are offered in →Master data: ASSET SET-NAME (SELECTION) Only target objects that belong to the selected set of IT asset68 are displayed. TARGET OBJECT–CALCULATED PROTECTION REQUIREMENT Only target objects whose calculated protection 68 Only one asset set can be selected, and the user must have at least read permission for this IT asset set. - 92 - GSTOOL 3.1 - User Manual Structure of target objects view requirement69 matches the selection in this field are displayed. TARGET OBJECT-TYPE Only target objects of the selected type are displayed. TARGET OBJECT-SUBTYPE Only target objects of the selected subtype are displayed. TARGET OBJECT-ADMINISTRATOR In the selection field, all existing target objects of type employee” are offered. Only target objects with which “ the selected employee is linked are displayed. employee” can only be linked to target objects of As “ set of IT asset”, “ IT system” and types “ “ application”, when this field is selected only the aforementioned three target object types can be employee”, which is used as a displayed in the tree. “ filter, cannot therefore be displayed as well. TARGET OBJECT-ASSIGNED TO NETWORK In the selection field, all existing target objects of type employee” are offered. Only target objects that are “ linked to the selected network are displayed. network” can only be linked to an “ set of IT A“ asset” or an “ IT system”. This means that when you select this field, only the two aforementioned target network”, object types can be displayed in the tree. “ which is used as a filter, cannot therefore be displayed as well. 4.1.3 Structure rules The actual IT structure is modeled in GSTOOL 3.1 based on the linking of target objects amongst each other and with IT asset sets. To obtain an accurate representation of the status 69 The overall protection requirement is the protection requirement calculated from the individual data entries for the three basic parameters (see PROTECTION REQUIREMENT ASCERTAINED field in PROPERTIES OF TARGET OBJECT OF TYPE: /target object type/, on the | Protection requirement | tab card). - 93 - GSTOOL 3.1 - User Manual Structure of target objects view quo, it is essential to carry out a structure analysis outside of the tool70. Linking by drag-and-drop Linking of target objects by dragging and dropping in the tree window is particularly easy. It is not possible to delete links by drag-and-drop. To link one target object with another, select the target object in the tree, hold down the left mouse button and drag it over the target object with which you want it to be linked. While the mouse pointer is being dragged, the window indicates whether linking with the target object over which the pointer currently positioned is possible or not. • • The icon indicates that linking is not possible. The icon indicates that linking is possible. Linking via drag-and-drop is possible from any point of the tree at which the target object to be linked is listed. If the rules governing links permit such a link, then releasing the left mouse button produces a context-sensitive user prompt window. • If the target object is to be linked from the lower section of the tree with another target object, after releasing the mouse button over the selected target object, only <Create link> is offered. It is not possible to move a target object out of the lower part of the tree. • If one target object is to be moved from an existing link, i.e. from the upper part of the tree, and then linked to another target object, as soon as the mouse button is released over the selected target object, two options are offered. Select <Move link> to create the new link desired and delete the existing one. Select <Create link> to create the new link parallel to the existing one. 70 See section 13.3.1 IT Structure Analysis, page 250ff. - 94 - GSTOOL 3.1 - User Manual Structure of target objects view If you attempt to recreate a link that already exists, this action will be declined with an appropriate error message. Link rules GSTOOL 3.1 contains a set of rules which determine which links are possible and which are not possible and the manner in which linked target objects are hierarchically arranged. These rules take into account which assignments could be technically and organisationally sensible and also how the protection requirement of one target object can be passed on to another target object. The link rules are anchored in the tool and cannot be changed. • A given target object can only be subordinate to another target object if - it can inherit the protection requirement of that target object or - it is supported, supplied or used by that target object. • With the exception of “Application”, target objects cannot be linked to other target objects of the same type. Applications can be linked to other applications since, in a normal IT processing chain, applications can be dependent on each other so that one application can pass its own protection requirement onto another one or can inherit it from another one. It is possible to link an application with itself. Such a link is not logical, however, and should therefore not be attempted. The table below summarises once again the possible assignments of target objects through links: - 95 - GSTOOL 3.1 - User Manual Structure of target objects view You can establish which target object types a given target object can be linked to as follows: • Place the mouse pointer on the target object and right-click to obtain the <Maintain links> window, which lists the possible link targets together with their status of active, not allowed or inactive. • In the tree display for →Structure Target objects, the target object types to which each existing target object can be linked are shown: Target objects of all types can be subordinated to a target set of IT assets” through linking: object of type “ “ building” “ room” IT system” “ “ network” “ application” employee” “ “ user defined target objects” Only target objects of the following types can be subordinated to a target object of type “ building”: room” “ “ employee”. Only target objects of the following types can be subordinated to a target object of type “ room”: IT system” “ “ employee”. - 96 - GSTOOL 3.1 - User Manual Structure of target objects view Only target objects of the following types can be subordinated to a target object of type “ IT system”: “ network” application” “ “ employee”. Only target objects of the following type can be subordinated to a target object of type “ network”: “ employee”. Only target objects of the following types can be subordinated to a target object of type “ application”: “ application” “ employee”. No further target objects can be subordinated through linking to a target object of type “ employee”. Target objects of user defined types (see section 2.3.4 <Tools> - <Target object types ...>, page 37ff) can always be linked to an IT asset set and, depending on where the type sits in the Structure of target objects, to the defined father and child types as well. Link hierarchy When links are created using drag-and-drop, GSTOOL 3.1 ensures that the link hierarchy is not violated. Thus, it does not make any difference whether, for example, an IT asset set is linked to a building or the building to an IT asset set. The result is the same in both cases: the building is placed in the correct position in the hierarchy, below the desired IT asset set, as required by the link rules. - 97 - GSTOOL 3.1 - User Manual Structure of target objects view Exception: Applications Where links are created between different applications, GSTOOL 3.1 cannot guarantee that the assignment will produce the correct hierarchical structure. Where one application is linked to another, the user decides which application is the father and which the child. If the application is moved using drag-and-drop, it is always placed below the application to which it is dragged. 4.2 Linking of target objects As explained in section 4.1.1 Presentation, Multiple presentation of target objects, page 90, every target object can occur more than once in the tree. In every case, however, it is always the same target object that is being dealt with. The point at which a target object is selected for linking and where the link target is situated in the tree therefore make no difference to the outcome of a link. However, from a practical point of view there are certain differences, which will be explained below. 4.2.1 Direct / indirect linking Set of IT asset have both direct and indirect links. • A target object is directly linked to an IT asset set if it appears directly below a set of IT asset in the list of the six building” to “ employee”) plus any target object types (“ existing user defined target objects. • A target object is indirectly linked to a set of IT asset if it appears below a directly linked target object but is not itself contained in the list of target object types. - 98 - GSTOOL 3.1 - User Manual • Structure of target objects view The example on the right shows the following two links: “ “ Data media archive” is only indirectly (⇐) linked to Head office”. “ Registration PC” is only directly (⇐) linked to the IT asset set “ BSI”. “ In-house network” is directly (⇐) linked to IT asset set “ BSI” while at the same time it is also indirectly (⇐) linked to “ Registration PC”. Only directly linked target objects are considered in →Modeling. It is important for correct Modeling that, in addition to any indirect links by which a target object is hierarchically assigned to another target object, it is always linked directly to a set of IT asset. Example Data media archive” is indirectly (⇐) linked to “ Head “ office” in the set of IT asset “ Location 1”, because it is a room in that building. In addition, however, “ Data media archive” has to also be Location 1” in order to directly (⇐) linked to set of IT asset “ be correctly included as part of that IT asset set in →Modeling. - 99 - GSTOOL 3.1 - User Manual 4.2.2 Structure of target objects view Creating a new link Example: “ Head office” is to be linked to set of IT assets “ Location 1”. There are several ways of creating this link, as follows: Method A By drag-and-drop, Head office”is moved over “ “ “ Location 1” is moved over “ Location 1” or, alternatively, Head office”. In both cases, after the left mouse button is released, a submenu appears, in which the desired link is created by clicking the <Create link> option. Method B First of all, right-click and then choose <Link target object> from the pop-up menu. Now select the target object for a link. Next, select the target object with which the first target object you selected is to be linked, then right-click and select <Create link>. The desired link will now be created. Method C Select menu option sequence <Edit> - <Structure of target objects> - <Update links> or, alternatively, right-click and then select the option <Update links> from the pop-up menu. Both methods cause a new window to open, in which you can choose “IT asset set” and “Room”71 as link targets. If you pick 71 Every target object can be linked to a set of IT assets and a building can always be linked to a room. - 100 - GSTOOL 3.1 - User Manual Structure of target objects view “IT asset set”, another window opens, in which all the existing asset sets are listed. Click the desired asset set, “Location 1”, in column 1, then click [OK] to create the desired link. After a short time, the target Head office”, will appear in the upper section of the object “ tree, now linked to IT asset set “ Location 1”. Method D In IT asset set “ Location 1”, select target object type building”. Click [New] in the toolbar or press {Ctrl+N} to “ open the Maintain links to window, in which all the available Head office” in column buildings are listed. Select building “ 1, and then click [OK] to link it to “ Location 1”. 4.2.3 Linking dependent target objects Linking dependent objects immediately If a target object that is indirectly linked to other target objects is directly linked to an IT asset set, GSTOOL 3.1 asks you whether you would like the dependent (indirectly linked) target objects to automatically be directly linked to the IT asset set. - 101 - GSTOOL 3.1 - User Manual Structure of target objects view This link is established by clicking [Yes]. If several other target objects in a hierarchical arrangement are linked to a target object, it is necessary to determine for each of these target objects separately whether it should be directly linked to the asset set or not. If you answer [No] in the prompt window, only the original target object will be directly linked; the dependent target objects will remain indirectly linked. A direct link can be established later on at any time. Linking dependent target objects later on If you answered [No] at the prompt, or if GSTOOL did not ask you this question during the linking process, you can still link all the target objects that are indirectly linked to one particular target object directly with the IT asset set by a different route. • Select the target object with which the other target objects are at present only indirectly linked. • • Right-click with the mouse button to open the pop-up menu. Now choose the <Linked dependent> option. The next actions offered are the same as for the immediate linking of dependent target objects (see above). - 102 - GSTOOL 3.1 - User Manual 4.2.4 Structure of target objects view Changing a link Example: Suppose that “ Data media archive” is indirectly linked to “ Head office” in IT asset set “ BSI” and directly linked to IT asset set “ BSI”. However, as the data media archive is Outpost 1” and belongs to IT asset set located in “ “ Location 1”, both existing links need to be amended separately. Step 1 First of all, you need to change the indirect link between room and building. There are two ways of doing this: Method A Move “ Data media archive” over “ Outpost 1” by drag- and-drop72. When you release the left mouse button, a pop-up menu appears, in which you should click the <Move link> option. At the prompt, click [OK], and the target object will be BSI” will be deleted. moved. The existing link to IT asset set “ Method B Select menu option sequence <Edit> - <Structure of target objects> - <Update links> or right-click and then choose <Update links>. Both sequences will take you to a sub-menu, in which you select <Buildings>, as you want to change the link to a building. 72 It does not matter whether it is moved from the upper or the lower section of the tree. - 103 - GSTOOL 3.1 - User Manual Structure of target objects view All the existing buildings are now listed in the Maintain links to window. The present link between the data media archive and the “Head office” has a tick in column 1 and is colour coded for emphasis. Selection of target objects in the list results in links according to the following rules: • [All] All the target objects contained in the list are selected. • [None] All the target objects contained in the list are deselected. The [None] option also deletes all the markings that were in place when the window was opened. If you then immediately click [OK], all the original links to the Data media archive”) will be deleted. target object (in this case, “ • [Reverse] Reverses the selection indicated in column 1: all target objects not currently selected will be selected, and all target objects currently selected will be deselected. • [OK] Creates a link between all the target objects selected in the list and the target object selected in the tree (in this case, Data media archive”). Any links that existed originally, “ but which have been deselected in column 1, will be deleted when you click [OK]. • [Cancel] Closes the window without changing the links. Step 2 - 104 - GSTOOL 3.1 - User Manual Structure of target objects view The next step entails directly linking the room to the IT asset set. As a result of changing the indirect link in step 1, “ Data media archive” has now been deleted from the list for Room” under building “ Head office” in IT asset set “ BSI”, and now appears in the corresponding list for building “ “ Outpost 1” of asset set “ Location 1”. Data media As the direct link has not yet been changed, “ archive” is still listed under “ Room” in IT asset set “ BSI”, whereas it is still missing from the corresponding list for IT asset Location 1”. set “ There are several ways to change the direct link: Method A (from the upper part of the tree) • Using drag-and-drop, move “ Data media archive” out of room” list in IT asset set “ BSI” and over IT asset the “ set “ Location 1”. When you release the left mouse button, a pop-up menu appears, in which you should choose the <Move link> option. This has the effect of deleting the BSI”, and after you have existing link to IT asset set “ confirmed your intention at the prompt, a new link to IT asset Location 1” is created. set “ If you now select the <Create link> option, the previous link will remain in place, but a new link to IT asset set “ Location 1” will be automatically created. Method B (from the lower part of the tree) • Using drag-and-drop, move “ Data media archive” out of Room” list in IT asset set “ BSI” and over IT asset the “ set “ Location 1”. When you release the left mouse button, a pop-up menu appears, in which you should choose the <Create link> option73. This has the effect of establishing 73 In Method B, it is not possible for an existing link to be deleted at the same time. Hence, <Move link> is not offered here. - 105 - GSTOOL 3.1 - User Manual Structure of target objects view a link between “ Data media archive” and IT asset set Location 1”. The existing link to IT asset set “ BSI” “ remains unchanged. If you want this to be deleted, then you must do it separately. 4.2.5 Deleting a link Example: Suppose that “ Data media archive” is indirectly linked to building “ Head office” in IT asset set “ BSI” and directly linked to IT asset set “ BSI”. You want to move the data media archive to one of the other buildings, but it is not yet clear BSI”. whether that building needs to remain in IT asset set “ Hence, you only want to delete the indirect link. There are three ways of doing this: Method A (can only be used in the top part of the tree) Under this method, the link is deleted from the target object that is to be detached; this must be selected. • Press {DEL} or select menu option sequence <Edit> <Structure of target objects> - <Delete link> or right-click the target object and select <Delete link> [Delete] in the toolbar. or click You will now be asked to confirm whether you really wish to delete the selected link. Click [OK] and the deletion will go ahead. The target object now disappears from the position marked in the upper part of the tree. Method B (can be used in both the upper and the lower parts of the tree) Under this method, once again the link is deleted from the target object that is to be detached. This has to be selected. • Either select menu option sequence<Edit> - <Structure of target objects> - <Update links> or right-click the target object and then select the <Update links> option from the pop-up menu. Since this time you want to delete the link to a building, you should choose <Buildings>. All the existing buildings are now listed in the Maintain links to window. The present link between the data media archive - 106 - GSTOOL 3.1 - User Manual Structure of target objects view and the “Head office” has a tick in column 1 and is colour coded for emphasis. Data media archive” to To delete the indirect link from “ Head office” without user confirmation, delete the tick in “ column 1 and then click [OK] to close the window. The direct BSI” will be unchanged. link to IT asset set “ Method C (can only be used in the upper part of the tree) Under this method, the link is deleted from the level of the target object type to which the target object in question belongs. Thus, Room”. in this example, the link is deleted from the level of “ This level must be selected. • Select the “ either click Room” level, then [New] in the toolbar or press {Ctrl+N} or right-click the target object and then choose <Update links> - <Room> from the pop-up menu or select menu option sequence <Edit> - <Structure of target objects> - <Update links> - <Room>. In every case, the Maintain links to window now opens. - 107 - GSTOOL 3.1 - User Manual Structure of target objects view This list contains all the existing target objects of the chosen type, in this case, all the rooms. The existing link is identifiable from the fact that column 1 has been checked. If you remove this checkmark with a single mouse click and then click [OK], the indirect link between “Data media archive” and “Head office” will be deleted without any further user confirmation. In all cases, only the link specifically selected is deleted. For example, if a room is both indirectly linked to a building and directly linked to the associated IT asset set, both these links have to be deleted separately. 4.3 Creating a target object There are several ways of creating a new target object from within →Structure of target objects: • A new target object can be created at any point in the tree either by right-clicking and then selecting <New target object> from the pop-up menu or by selecting menu option sequence <Edit> - <Structure of target objects> - <New target object>. After selecting the target object type, you should proceed as described in section 3.2 Creating a new target object, page 78ff. • Once you have selected a target object in the tree, you can also create a new target object either by clicking [New] in the toolbar or by pressing the key combination {Ctrl+N}. You will now be asked to confirm your action. Click [Yes], and all the data for the target object you have selected will then be entered in the new window that now appears. If you choose [No], the new window will open without any default entries. You can now proceed as described in section 3.2 Creating a new target object, page 78ff. - 108 - GSTOOL 3.1 - User Manual 4.4 Structure of target objects view Deleting a target object In →Structure of target objects, a target object can only be deleted when it has been selected in the lower part of the tree. To delete the target object, • • • • press {DEL} or {Ctrl+D}. Alternatively, click [Delete] in the toolbar or right-click and then choose the <Delete target object> option. At the prompt, click [OK], and the target object will be deleted. - 109 - GSTOOL 3.1 - User Manual 5 Modeling view Modeling view Building on the work carried out in →Structure of target objects, both the Modeling (section 13.3.3 Modeling, page 253) and the Basic Security Check (section 13.3.4 Basic Security Check, page 254) are carried out in this view. On the basis of the data entered in →Master data and →Structure of target objects, GSTOOL 3.1 makes suggestions as to how to link target objects, modules and safeguards in →Modeling. Here, the tool follows the requirements laid down in the IT BPM. These requirements cannot be directly altered by the user, i.e. for every new target object, linking suggestions are created in the IT asset set in accordance with these stipulations. However, it is possible and it may even be necessary to modify the suggestions that the tool comes up with in →Modeling to reflect the actual circumstances within your organisation. In every case, the Modeling instructions contained in the IT BPM, section 2.3.1 regarding the five layers must be followed and, if necessary, the default suggestions offered by GSTOOL 3.1 should be modified. Not only are the suggestions for the linking of target objects, modules and safeguards amended in this view, but all the data relating to the implementation status of safeguards is collected in this view as well. This is part of the Basic Security Check. A lot of extra information relating to modules and safeguards can also be entered with GSTOOL 3.1. This information, when contained in reports, for example, may provide information that is valuable when it comes to establishing IT security. 5.1 General To enable individual changes to the linking of target objects and to optimise the clarity of the tree, →Modeling offers some functions which go beyond pure Modeling. In →Modeling, you can create, modify and delete target objects essentially in the same manner as explained for →Master data and →Structure of target objects. - 110 - GSTOOL 3.1 - User Manual 5.1.1 Modeling view Links between target objects and IT asset sets In →Modeling, you can modify existing links between IT asset sets and target objects. Maintenance of links This action is only possible from the IT asset set. Select the IT asset set you wish to modify and then • Click [New] in the toolbar and make the appropriate selection in the Choose target object type window • or press key combination {Ctrl+N} and then make your selection in the Chose target object type window • or select menu option sequence <Edit> - <Modeling> <Maintain links> - </Target object type/> • or right-click and then choose <Maintain links> - </Target object type/> All of these methods will take you to the editing window, Maintain links to . The options offered here are explained in section 4.2 Linking of target objects, page 98ff. Deleting a link This action is only possible from the target object. Select the relevant target object and then • • • • click [Delete] in the toolbar or press key combination {Ctrl+D} or select menu option sequence <Edit> - <Modeling> <Delete link> or right-click and then choose the <Delete link> option. You will now be prompted to confirm that you wish to delete the selected link. If you click [OK], the link will be deleted and the selected target object will disappear from this position in the tree. This function is largely identical to that described in section 4.2.5 Deleting a link, page 106ff. - 111 - GSTOOL 3.1 - User Manual Modeling view Adding linked objects This action is only possible from the target object. Select the relevant target object and then • either select menu option sequence <Edit> - <Modeling> <Link dependent> • or else right-click and then choose the <Link dependent> option. This menu option enables you to link directly to the IT asset set target objects that are indirectly linked to the selected target object but not yet directly linked to the IT asset set. For further information, see section 4.2.3 Linking dependent target objects, page 101ff. 5.1.2 Tree presentation In GSTOOL 3.1, you can view both the layer model and also the object model. Moreover, sorting and filter functions are available to make the tree easier to follow. Icons are provided to help you navigate your way around the tree. Switching to the model view It is possible to switch between the layer model and the object model at any point in the tree. This can be done in several ways: • • by clicking [Model] in the toolbar by right-clicking and then selecting <View> - <Layer model> or <Object model> • by selecting menu option sequence <Edit> - <Modeling> <View> - <Layer model> or <Object model> • by selecting menu option sequence <View> - <Display> <Layer model> or <Object model> Sorting The order in which tree elements are presented can be sorted in various ways in →Modeling. Select menu option sequence <Edit> - <Modeling> or right-click to access three different types of sorting: - 112 - GSTOOL 3.1 - User Manual • Modeling view <Sort alphanumerically> The elements in the next level down in the tree from the selected object in the chosen display are alphanumerically sorted. If your selection is at the level of safeguards, no sorting is carried out. If the numbers of the modules and safeguards are on display74, then the numbers are alphanumerically sorted, i.e. S 2.10 - S 2.2 - S 2.89 - S 2.9 ... • • <Sort modules> - <...> <Sort safeguards> - <...> Sorting of modules and safeguards by these menu options is carried down in accordance with the selection in the following menu and always on the basis of the numbers and sequence laid down in the IT BPM, i.e. S 2.2 - S 2.9 - S 2.10 - S 2.89... This same sequence of modules and safeguards is also generated through sorting when the numbers are not on display. Irrespective of which element of the tree is selected, all sorting is carried out for the entire tree, i.e. for all existing IT asset sets. Maximize / minimize See Maximizing and minimizing the tree on page 32. Icons To help the user of the tool to assimilate the tree display in →Modeling, all the tree elements are preceded by distinctive icons. These have the following meanings: • The first level of the tree always contains the view (“object model” vs. “layer model”), plus the name of the institution. /model view/: /institution/ 74 See section “DISPLAY SAFEGUARD AND MODULE NUMBERS“, page 48ff. - 113 - GSTOOL 3.1 - User Manual Modeling view The qualification icon shows which qualification level has been achieved by that institution. An empty icon means that no qualification level has yet been achieved, otherwise the qualification level is indicated by the letter inside the icon. • The second level shows the IT asset sets in the institution. /asset set/ Once again, the qualification icon uses letters, as described above, to indicate the qualification level achieved for each asset set. • The way that the third level of the tree is presented depends on whether the “layer model” or the “object model” has been chosen. In the “layer model”, the five layers defined in the IT BPM are displayed the same way for each IT asset set: ψ green The icon /name of the layer/ stands for “layer”. The colour bar, in this case “ψgreen”, indicates the implementation status of the modules that belong to the layer. The meaning of the colours and the internal dependencies in this display are explained in section 12.2 Inheritance of implementation status, page 241ff. The third icon, in this case , indicates the qualification level achieved for the layer as a whole. A dash here means that this layer has not yet attained any qualification level. Otherwise, the qualification level is indicated by means of a . The internal dependencies for this display letter are explained in section 12.3 Inheritance of qualification level achieved, page 245ff. In the “object model”, all the target objects linked to the relevant IT asset set are shown: ψ green The icon /target object/ stands for “target object”. The colour bar indicates, as above, the implementation status of the modules associated with the target object. - 114 - GSTOOL 3.1 - User Manual The third icon, in this case Modeling view , indicates the qualification level achieved for the target object as a whole. The meanings correspond to those in the layer model. GSTOOL 3.1 automatically creates the target object “Generic aspects of IT security” for each IT asset set. The link between this target object and the asset set cannot be deleted, unlike all the others. The nature and number of the target objects listed below an asset set depends on the links between target objects and asset sets that have previously been defined. • The fourth level in the tree is the same, whether you are viewing the “layer model” or the “object model”. ψ /name of module/ red The module icon can take either of two forms: means that this module can be directly edited; means that this module references another module, so that it will normally be edited from there. Further information on the Referencing of modules can be found in section 5.4, page 135ff. As above, the colour bar indicates the implementation status and the third icon shows the qualification level achieved for the module. • The fifth level in the tree contains the safeguards that belong to the module. ψ /name of safeguard/ green The icon stands for “safeguard”, the colour bar indicates the implementation status of the safeguard, as above. The third icon indicates the qualification level for which this safeguard needs to be implemented: Implementation of this safeguard is necessary for all three qualification levels. Implementation of this safeguard is necessary for levels B and C. - 115 - GSTOOL 3.1 - User Manual Modeling view Implementation of this safeguard is only necessary for C. This safeguard should be implemented, but it is not essential for the attainment of any qualification level. 5.1.3 Filter A full description of the filter function can be found in chapter 10 Filter, page 216ff. • Predefined filters No additional predefined filters are offered. • Tab card | Basic filter | The following four Basic filter are offered in →Modeling: ASSET SET-NAME (SELECTION) From the existing asset sets, one can be selected as long as the user has at least read right. TARGET OBJECT - CALCULATED PROTECTION REQUIREMENT Only target objects whose overall protection requirement75 matches the selection in this field are displayed. TARGET OBJECT - USER DEFINED PROTECTION REQUIREMENT Only target objects whose user defined protection requirement matches the selection in this field are displayed. SAFEGUARD SEAL LEVEL The selections “A...”, “B...” and “C...” mean that only safeguards that are required from that level are displayed, , or i.e. safeguards which bear the identifying letters . If you select “delete”, then only safeguards that bear the entry “delete” in the REQUIRED AS FROM: field in the Properties of safeguards window will be displayed. If you select “additional”, this means that only safeguards that are not necessary for any of the qualification levels will 75 The overall protection requirement is the protection requirement calculated from the individual data entries for the three basic parameters (see PROTECTION REQUIREMENT ASCERTAINED field in Properties of target object of type: /target object type/, on the | Protection requirement | tab card). - 116 - GSTOOL 3.1 - User Manual Modeling view be displayed. In the REQUIRED AS FROM field in the Properties of safeguards window, these safeguards have the entry “additional” and can be identified in the tree by the . icon SAFEGUARD IMPLEMENTATION Only safeguards whose entries in the IMPLEMENTATION field of the Properties of safeguards window match the selection in this field are displayed. 5.2 Modeling The Modeling performed within GSTOOL 3.1 should expressly be viewed as only a suggestion. This will become particularly clear from the fact that some target objects or target object subtypes will not have any modules assigned to them in the Modeling suggestions. It will therefore be imperative to selectively edit the Modeling results. Again, it is essential that the links between target objects, modules and safeguards are tailored to the actual requirements. For this purpose, it is possible to freely amend • • the links between modules and safeguards and the links between layers and target objects and modules. When safeguards are added to modules or modules to target objects, new empty safeguards and modules are always used. If you want to add any safeguards or modules that have already been adapted, this can be achieved via Modeling by drag-and-drop (section 5.3, page 132ff). 5.2.1 Tree presentation The tree shown in →Modeling contains all the target objects directly linked to an IT asset set. The appearance of the tree differs according to which model you have chosen to see. Target objects that are exclusively indirectly linked are excluded from the Modeling. For some target object types / target object subtypes, no modules are assigned in the Modeling suggestions. These are: - 117 - GSTOOL 3.1 - User Manual • Modeling view user defined target object types and target object subtypes • • • employee network – subtype “Communications links” application – subtype “General application” These target objects are not contained in the layer model. On the other hand, they are included in the object model76 and can icon which precedes the target object. be recognised by the Object model In the object model, all target objects directly below the IT asset set with which they are directly linked are displayed. These are followed by the modules assigned as suggestions by the tool, together with their safeguards. In the example on the right, in accordance with the IT BPM, modules “ M 4.1 Buildings” and “ M 4.2 Cabling” have been assigned to target object “ Head office” of type “ building”. Target object “ generic aspects of IT security” with its modules is automatically created in the object model for every IT asset set on the basis of the IT BPM and irrespective of whether any target objects are linked to an asset set and, if so, which ones. 76 The user should complete any missing module assignments in the Modeling as appropriate. For example, it could be that a user defined module is defined for employees of subtype “System Administrator”, which contains specific safeguards of relevance to a System Administrator. - 118 - GSTOOL 3.1 - User Manual Modeling view Layer model In the layer model, the five layers are presented directly below the IT asset set. Each layer contains the modules which, according to the IT BPM, belong to the target objects that are linked to this asset set. Target object types, i.e. “ building”, “ room” etc., are not shown separately. Head office” and In the example on the right, target objects “ “ Outpost 1” (both of them “ building”) plus “ Data room”) have been assigned to IT asset media archive” (a “ set “ BSI”. According to the IT BPM, the two modules “ M 4.01 Buildings” and “ M 4.02 Cabling” are always Security of the Infrastructure” layer. Hence, assigned in the “ both target objects “ Head office” and “ Outpost 1” appear below modules “ M 4.01 Buildings” and “ M 4.02 Cabling”. Only at this point are the safeguards listed below, as the implementation of safeguards of the same module may not be Head office” as for “ Outpost 1”. the same for “ Hence, module “ to target object “ B 4.03.03 Data media archives” is assigned Data media archive” according to the assignment of subtype “Data Media Archive” (see section Tab card | /Target object type/ |, page 78ff). In this way, this module Security of the Infrastructure” as well. is contained in “ It is not possible in the layer model to view the properties of a selected module. If there are several target objects below the module to which this module is assigned, these could have different properties. Nevertheless, to enable the user to view the properties of the module assignment and also the target object properties, he has a choice of two different areas which can be accessed by selecting a target object and then right-clicking or selecting <View>, followed by either <Properties of modules> or <Properties of target object>. - 119 - GSTOOL 3.1 - User Manual Reduced display of the “ The “ Modeling view generic aspects of IT security” layer generic aspects of IT security” layer is a special case as far as presentation is concerned. Normally, the associated safeguards are shown immediately below modules, without the additional layer of the target objects for which these safeguards have to be implemented. The reason for this is that the modules in this layer are normally assigned directly and exclusively to the asset set, independently of individual target objects. This means that the layer of target objects that is dropped in the reduced presentation would contain nothing other than the asset set. Full display of the “ If a module in the “ generic aspects of IT security” layer generic aspects of IT security” layer is linked to a target object77, the attempt at reduced presentation is given up for the entire layer, so that once again the level of target objects is shown for all the modules, i.e. below each module at least the IT asset set is displayed as linked target object. In the example on the right, module “ M 3.03 Contingency Network 01”. Planning”, is also linked to target object “ Therefore this is contained in the target object level as well as BSI asset set”. “ Again, the reduced presentation is not applied if another module is added to the default group of modules in the “Generic aspects of IT security” layer. If all the links between modules in the “ generic aspects of IT security” layer and target objects are deleted or if extra modules inserted into “Generic aspects of IT security” are deleted, GSTOOL 3.1 automatically78 reverts to the reduced presentation mode. 77 See section 5.2.4 Adding a module, page 124ff. 78 It may be necessary to update the display by clicking - 120 - Update or pressing {F5}. GSTOOL 3.1 - User Manual 5.2.2 Modeling view Adding a safeguard Occasionally it is necessary to add extra safeguards to a module for particular target object which go beyond the safeguards defined in the IT BPM framework. To do this, it is sufficient to open up the tree as far as the level of modules. The addition of a safeguard to a module in →Modeling applies to the target object to which the selected module is linked. Everywhere else in the security concept, the module is kept in its normal, complete condition. If an extra safeguard is to be inserted wherever a given module occurs within the security concept, then this must be done to the module in →BPM user defined as part of the process of adapting the module79. In the object model, the module below the target object underneath which the safeguard is to be added to the module is highlighted. In the layer model, the target object below the module to which a safeguard is to be added for the selected target object is highlighted80. To add the safeguard, • • click [New] in the toolbar (only in the object model) or press key combination {Ctrl+N}. 79 See section 7.3.4 Adapt a module - Tab card | Safeguards |, page 172ff. 80 In the “ generic aspects of IT security” layer, this is only possible when the entire layer is on view (see page 120). - 121 - GSTOOL 3.1 - User Manual Modeling view • Alternatively, select menu option sequence <Edit> <Modeling> - <Link safeguards> • or right-click with the mouse and then choose <Link safeguards>. All of these actions have the effect of opening the Link safeguards window. The list contains all the safeguards which have not yet been linked to the module currently being edited. Hence, in the above list, for example, safeguards S 1.6, S 1.7, S 1.8, S 1.10 and so on are not included. FILTER: A full description of the filter function can be found in chapter 10 Filter, page 216ff. • Predefined filters As well as (All) and (New...), the following additional predefined filters are offered: • (Missing) Only safeguards that belong in the selected module according to the IT BPM but which have been deleted from →Modeling or →BPM user defined are displayed. /Safeguards catalogue/ Only safeguards from the selected catalogue are displayed. • Tab card | Basic filter | - 122 - GSTOOL 3.1 - User Manual Modeling view The same six Basic filter are offered here as those in →BPM user defined - tab card | Safeguards |, section 7.4.1 - tab card | Basic filter |, page 179ff. Safeguard selection To assign one or more safeguards to a given module, check the box in column 1 and then click [OK]. If you click [Revert], the selection is reversed, i.e. the checkmark is deleted from all the safeguards currently checked and inserted for all the other safeguards. If you click [All] and then confirm with [OK], all the safeguards in the list are marked as to be added and then assigned to the module. If you click [None], all the checkmarks currently shown are deleted. All newly added safeguards • are inserted in the tree at the end of the list of safeguards for that module (the sorting functions are described in section “Sorting“, page 112ff); • • are set to “Not processed” in the IMPLEMENTATION field; carry the qualification status identifier of , since in this location within the tree their implementation is not necessary for the attainment of any qualification level. Exception If a “missing” safeguard (see above) has been added, it will bear its original qualification status identifier and its implementation will be necessary for the attainment of the relevant qualification level. 5.2.3 Deleting a safeguard If a safeguard from a given module is to be deleted specifically for one target object81, this safeguard must be selected in the relevant module. To delete the safeguard, 81 This decision should not be confused with the decision to implement safeguards that is made as part of the Basic Security Check (see section 5.5 Basic Security Check, page 140ff. - 123 - GSTOOL 3.1 - User Manual • • • • click Modeling view [Delete] in the toolbar or press key combination {Ctrl+D} or select menu option sequence <Edit> - <Modeling> <Delete link> or right-click and then choose the <Delete link> option. All of these options open the following prompt window: If you click [Yes], the safeguard will be deleted from the module currently being edited and will be immediately removed from that module in the tree82. Click [No] to cancel the delete operation. If a safeguard that is necessary to attain a particular qualification level is removed in →Modeling, then, according to the inheritance rules (section 12.3 Inheritance of qualification level achieved, page 245ff) it will not be possible for the entire asset set to attain this qualification level. The next time that the metadata is updated83, if a safeguard deleted from the module in this way has been changed by the BSI84, then it will be added back to that module with the status “Not processed”. If you still do not want this safeguard in that module, you will have to delete it again, as described. 5.2.4 Adding a module Missing modules can be added one at a time to a target object in two possible ways: 82 Within the →Modeling view, the deletion of one safeguard in a module only affects the module in which it was actually deleted. Everywhere else in the security concept, the module will be kept in its normal, complete condition. 83 See section 2.4.3 <File> - <Import> - <Update BPM metadata>, page 58ff. 84 No distinction is made here between meaningful changes and changes correcting spelling mistakes. - 124 - GSTOOL 3.1 - User Manual • • Modeling view via the menu options or by drag-and-drop Linking via the menu options Under this method, select the target option in the tree to which a module is to be added85. To add a module, • • • • either click [New] in the toolbar or press key combination {Ctrl+N}. Alternatively, select menu option sequence <Edit> <Modeling> - <Link module> or right-click with the mouse and then choose <Link module>. All of these methods open the Link module window. The list contains all the modules which have not yet been linked to the target object currently selected. For illustrative purposes, a module is to be added to a target object of subtype “Data media archive”. Hence, the above list does not contain module M 4.03.03 Data Media Archives. Filter: A full description of the filter function can be found in chapter 10 Filter, page 216ff. 85 If in the layer model the “ Top-level aspects” layer is presented in reduced form (see page 120), then it is not possible to add any modules in this way, since under the reduced presentation, no target objects are displayed in this layer. - 125 - GSTOOL 3.1 - User Manual • Modeling view Predefined filters As well as (All) and (New...), the following additional predefined filters are offered: (Missing) Only modules that belong in the selected target object according to the IT BPM, but which have been deleted from →Modeling or →BPM user defined are displayed. /Layer/ Only safeguards from the selected layer are displayed. • Tab card | Basic filter | The same three Basic filter are offered here as those in →BPM user defined - tab card | Modules |, section 7.3.1 tab card | Basic filter |, page 167ff. Module selection To assign one or more safeguards to a given module, check them in column 1 and then click [OK]. If you click [Revert], the selection is reversed, i.e. the checkmark is deleted from all the safeguards currently checked and inserted for all the other safeguards. If you click [All] and then confirm with [OK], all the safeguards in the list are marked as to be added and then assigned to the module. If you click [None], all the checkmarks currently shown are deleted. Any modules that are added • are inserted in the tree at the end of the list of modules for that target object (the sorting functions are described in section “Sorting“, page 112ff); • • are set to “Not processed” in the IMPLEMENTATION field; • modules of type “BSI standard” or “Adapted” may be relevant to the attainment of qualification levels, depending on the safeguard identifier; modules of type “User defined” are never relevant to the attainment of a qualification level. - 126 - GSTOOL 3.1 - User Manual 5.2.5 Modeling view Editing a module In the editing window, Properties of module allocation , there are four tab cards on which you can enter data relating to the selected module. Tab card | Common | NO./NAME The data in the two fields in the top line follow the stipulations of the IT BPM or, in the case of adapted and user defined safeguards, the entries made by the user. EDITED In this field, there are three options choose from: “yes”, “no” and “dispensible”. • “yes” This module will be directly implemented at this point in the tree or via a reference from another place. Its implementation identifier in the tree follows the implementation of the safeguards in the module in accordance with the inheritance rules (page 241ff). • “dispensible” Implementation of this module is regarded as dispensable86. The security offered by this module is achieved through other safeguards, or else the threat to which the module relates is not relevant. This should be noted in the mandatory field COMMENTS. 86 For further information on the colour coding of unnecessary modules, see 12.2 Inheritance of implementation status, page 241ff. - 127 - GSTOOL 3.1 - User Manual • Modeling view “no” This module should not be implemented87. The threats that the module and its safeguards are intended to counter will continue to exist. Nor will they be covered by other safeguards. In the mandatory field COMMENTS, enter the reasons why you have chosen “no”. You can only choose “dispensible” or “no” if the IN TARGET OBJECT field contains the entry “(not referenced)”. IN TARGET OBJECT If you choose one of the target objects offered in this field instead of “(not referenced)”, a reference will be established, with the module you have just edited becoming the reference target. If you create a reference from one module to another, all the entries already made for the referenced module and its safeguards will be overwritten by the data from the module that belongs to the target object selected in the IN TRGET OBJECT field and its safeguards, without the user being asked to confirm this action. Should you subsequently delete any referencing, you can choose whether you wish to retain the implementation status that existed prior to the referencing or the implementation status created through the referencing. A detailed explanation of Referencing can be found in section 5.4, page 135ff. COMMENTS This field will either be optional or mandatory, depending on your entry in the PROCESSED field. Any entries made while this field is mandatory will be retained should it subsequently 87 For further information on the colour coding of modules that have not been implemented, see 12.2 Inheritance of implementation status, page 241ff. - 128 - GSTOOL 3.1 - User Manual Modeling view become only optional. In this event, they can then be deleted without further consequences. DEFINED ON: In this field you can note the date88 on which the information in the Properties of module allocation format was collected or entered. Tab card | Survey | In the SURVEY DIRECTOR selection field, it is possible to select one person from a list of all the employees created to act as survey manager. To complete the PERSONS SURVEYED: field, click [Add...], and an additional window also containing the list of all employees created will open so that you can make the appropriate selection. 88 On this point, see the description for the TO BE IMPLEMENTED BY: field on tab card | Implementation | in the Safeguard properties area (page 143). - 129 - GSTOOL 3.1 - User Manual Modeling view To effect your choice, check the desired persons in column 1 and then click [OK]. Filter A full description of the filter function can be found in chapter 10 Filter, page 216ff. • Predefined filters No additional predefined filters are offered. • Tab card | Basic filter | The following four Basic filter are offered: EMPLOYEE-ORGANISATIONAL UNIT Here, the entries made under “ employee” in the ORG. field are offered. Only staff for whom the selected entry would be appropriate are displayed. UNIT ROLE The same roles, specified in the IT BPM, are offered as during the creation or editing of target objects of type “ employee”. Only employees in the selected role are displayed. IT SYSTEM-NAME All the IT systems created are offered for selection. The employees then displayed are the ones who are linked to the IT system selected. - 130 - GSTOOL 3.1 - User Manual Modeling view APPLICATION NAME All the applications created are offered for selection. The employees then displayed are the ones who are linked to the application selected. Tab card | Threats | This tab card shows a list of all the threats assigned by the IT BPM to the selected module. This list cannot be altered. First select a threat, then click [View] in the toolbar or else double-click on the threat. A browser window in which the associated text can be read will now open. Tab card | Notepad | See section Notepad on page 34. 5.2.6 Deleting a module In →Modeling, the link between module and target object can be deleted separately for each target object. 89 Mark the module to be deleted in the same way as for the addition of new safeguards in modules90. It does not make any difference whether the model on view is the object model or the layer model. To delete the module, • 89 click [Delete] in the toolbar This should not be confused with the statement regarding the implementation of a module contained in section 5.2.5 Editing a module, page 127ff. 90 See 5.2.2 Adding a safeguard, page 121ff. - 131 - GSTOOL 3.1 - User Manual • • • • Modeling view or press {DEL} or {Ctrl+D} or select menu option sequence <Edit> - <Modeling> <Delete link> or right-click and then choose the <Delete link> option. All of these options open the following prompt window: Click [Yes] to detach the module from the target object and have it immediately deleted from the module in the tree. Click [No] to cancel the delete operation without any action. If the link to a safeguard that contains safeguards necessary for the attainment of a particular qualification level is deleted in →Modeling, then, according to the inheritance rules (section 12.3 Inheritance of qualification level achieved, page 245ff) it will not be possible for the entire asset set to attain this qualification level. The next time that the metadata91 is updated, if a 84 module thus deleted has been changed by the BSI , then it will be added back to the target object with the status “Not processed”. If you still to want a module to be linked to the target object, you will have to delete it again. 5.3 Modeling by drag-and-drop As well as the menu-led version of Modeling described in section 5.2, it is also possible in GSTOOL 3.1 to perform Modeling by drag-and-drop 92. The main difference between Modeling by drag-and-drop and menu-led Modeling is that in the case of drag-and-drop the 91 See 2.4.3 <File> - <Import> - <Update BPM metadata>, page 58. 92 See section 4.1.3 Structure rules - Linking by drag-and-drop, page 93ff. - 132 - GSTOOL 3.1 - User Manual Modeling view content of the safeguards and modules dragged can be taken with them to their new location. By contrast, where Modeling is menu-led, only blank safeguards and modules are inserted in the model. All safeguards and modules that are visible in the tree in →Modeling can be dragged and serve as targets with drag-anddrop. 5.3.1 Dragging safeguard to safeguard After the safeguard being dragged has been released over the target safeguard and the user has clicked [OK] at the prompt, all the tab card content of the target safeguard that can be changed is overwritten by the content of the safeguard that has been dragged here. The description of the target safeguard remains unaltered. 5.3.2 Dragging safeguard to module When the safeguard is released over the target module, a menu appears, as follows: • If you choose <Relocat>, after a user prompt the safeguard is inserted into the module and deleted from its original location. • If you choose <Copy>, after a user prompt the safeguard is inserted into the target module. It will also remain in its original location. If the safeguard you have dragged here is already contained in the target module, the user will be asked to confirm whether the existing safeguard content is to be overwritten. 5.3.3 Dragging module to module After the module being dragged is released over the target module, the following prompt window appears: - 133 - GSTOOL 3.1 - User Manual Modeling view • If you answer with [Yes], the existing safeguards will be overwritten by the safeguards in the module just dragged here and any safeguards that do not yet exist will be inserted. • If you choose [No], the existing safeguards will stay as they are and only the ones that were not already present there will be inserted. • If you choose [Cancel], the drag-and-drop action will be terminated. 5.3.4 Dragging module to target object When the module is released over the target object, a menu appears, as follows: • If you choose <Relocate> and confirm your action at the prompt, the module will be linked to the target object. Any prior module linking will be deleted. • If you choose <Copy> and confirm your action at the prompt, the module will be linked to the target object. Any prior module linking will be retained. If the selected module is not yet linked to the target object, it will also be linked to it. • • If you click <Copy>, any prior module linking will be retained. If you click <Relocate>, any prior module linking will be retained. If no module of the type dragged is yet linked to the target object selected, this will terminate the drag-and-drop action. - 134 - GSTOOL 3.1 - User Manual Modeling view If on the other hand, such a module has already been linked to the selected target object, the safeguards in the module that has been dragged here will be passed across, as described in section 5.3.3 Dragging module to module. 5.4 Referencing Modules are assigned to all target objects during the Modeling on the basis of the Structure of target objects. It is quite possible here that during the Modeling of an institution, target objects of the same type should occur more than once. This means that the safeguards that belong to those target objects also occur more than once in the tree. • In the example on the right, modules “ M 4.01 Buildings” and “ M 4.02 Cabling” occur three times in IT asset set “ BSI” under target objects “ Outpost 01”, Outpost 02”, and “ Outpost 03”. “ The information relating to modules and their safeguards was collected during the Basic Security Check (5.5, page 140ff) separately for each of the four target objects. You can tell this from the different identifiers of the modules as regards the implementation status of their safeguards and the qualification level attained. If the data relating to modules that occur more than once in the tree is the same, regardless of the fact that they belong to different target objects, the facilities for referencing modules offer the possibility of significantly reducing the data entry effort. 5.4.1 Preconditions and possibilities The use of referencing is subject to certain conditions, as follows: • A reference can only ever be created from the reference target. • Several reference targets can refer to the same reference source. • Any existing target object, irrespective of type, to which the same module is assigned can be chosen as reference source. - 135 - GSTOOL 3.1 - User Manual Modeling view • Both (directly and indirectly) linked and unlinked target objects can be chosen as the reference source93. • A target object cannot be both reference source and reference target at the same time. In this way, chains of reference are not allowed. • Any number of references can be created. 5.4.2 Creating a reference In the IN TARGET OBJECT field on tab card | Common |94, all the target objects that are linked to a module of the same type as the one currently being edited (which is to be made the reference target) are offered. When a reference is created, all the entries in the reference target are overwritten by the entries from the reference source. Should you subsequently delete any referencing, you can choose whether you wish to retain the implementation status that existed prior to the referencing or the editing status created through the referencing. Selection of a target object results in the immediate creation of a reference. The user is not asked to confirm this action. The entry in the EDITED field is automatically changed to “yes”. Example 93 If a non-linked target object is referenced, the safeguards can only be edited if DIRECT EDIT SAFEGUARDS OF REFERENCED MODULES 94 has been activated. See section 2.3.5 <Tools> - <Options> - | Common | - Edit, page. 45 See 5.2.5 Editing a module - Tab card | Common |, page 127 ff. - 136 - GSTOOL 3.1 - User Manual Modeling view On the | Common | tab card on the Properties of module allocation area for module “ M 4.01 Buildings” in target object “ Outpost 01”, of the two target objects offered (“ Outpost 02” and “ Outpost 03”), “ Outpost 02” is chosen. This has the effect of making module M 4.01 Buildings” in “ Outpost 01” the reference source “ for the same module for “ Outpost 02”. In the TARGET OBJECT field, only target objects that are eligible for selection as reference source are offered. The following are not offered: • target objects which themselves are already reference targets – chains of references are not allowed; • target objects that are not linked to a module of the same type as the reference target module. A target object cannot reference itself. In the tree, referencing is indicated by a change in the reference M 4.01 Buildings” (reference arrow). The target’s icon to “ original identifiers regarding the implementation status of safeguards in the module and the qualification level attained ) are replaced by those of the reference source ( no colour ( ψred ). The fact that the identifier of target object “Building 1” has changed to ψred is due to the inheritance rules (see section 12, page 240ff). As a result of the referencing, all the information from the reference source, including any changes in the assignment of safeguards that have been carried out in →Modeling, is passed across to the reference target in Properties of module allocation. Hence, the safeguards in the reference target carry the same implementation status identifiers as their reference source. - 137 - GSTOOL 3.1 - User Manual Modeling view Through referencing it is possible to copy the entire content of one module to the same module in another target object with little effort. The creation of a reference, the storage and direct deletion of referencing all have the result that the content of the reference source is transferred to the reference target, where it can be further edited as required. 5.4.3 Editing in the reference target Whether editing is possible in the reference target or not will depend on the tool settings95. • If DIRECT EDIT SAFEGUARDS OF REFERENCED MODULES has not been activated, a reference target cannot be edited directly but only via the reference source. Changes in a reference source affect all the associated reference targets equally. • If DIRECT EDIT SAFEGUARDS OF REFERENCED MODULES has been activated, then the module and its safeguards can be directly edited in the reference target. Changes in a reference target are implemented in the reference source and in all the other dependent reference targets. Changes in the Modeling of reference modules affect all the associated modules! If a safeguard is deleted or added in the reference source, then this is repeated in all the associated reference targets. 5.4.4 Deletion of referencing To delete a reference, set the IN TARGET OBJECT field in the | Common | tab card of the Properties of module allocation area to “(Not referenced)”. 95 See section 2.3.5 <Tools> - <Options> - | Common | - Edit, page 45. - 138 - GSTOOL 3.1 - User Manual Modeling view Referencing can only be deleted from the reference target. If more than one reference targets refer to the same reference source, then each reference must be deleted separately. When deleting referencing, you can choose whether the content created in the reference target as a result of referencing should be retained or whether the reference target should be restored to its original condition prior to the creation of the reference in question. Once the referencing has been deleted, you can resume direct editing of the reference target. 5.4.5 Deletion of a reference source A distinction is made between deletion of the module and deletion of the target object to which the module is attached. Deletion of the module If in →Modeling, a module that serves as reference source is deleted, then all the existing references are deleted. The reference target is restored to its condition prior to creation of the referencing. When the source module is deleted, all the information transferred to the reference target up to that point as a result of the referencing is lost. If you want to retain this information, the reference must be deleted from the reference target first. - 139 - GSTOOL 3.1 - User Manual Modeling view Deletion of target objects If a target object is deleted in →Modeling or in the upper part of the tree in →Structure of target objects96, to which a module that serves as reference source is attached, all the referencing is retained. If “Direct edit safeguards of referenced modules” has been chosen under <Tools> - <Options> - | Common | Edit (page 45), then the reference targets affected can continue to be edited. If this function has not been chosen, then, in order to continue to be able to edit the module and its safeguards, either it must be chosen now or else the referencing must be deleted. If a target object is deleted in →Modeling or in the lower part of the tree, in the first level, in →Structure of target objects or under →Master data97, to which a module that serves as reference source is attached, all the referencing to that target object is deleted. The status attained up to then in the reference targets is retained. If a target object is deleted in the way just described, the editing statuses of the referenced targets prior to the creation of the referencing is irretrievably lost. If you want to retain the old editing status, the referencing must be deleted from the reference targets before the target object is deleted, as described above. 5.5 Basic Security Check After all the required modules and safeguards have been assigned in the Modeling and all those that are not required have been removed, the Basic Security Check is carried out (see page 254ff). In the course of the Basic Security Check, all the relevant information on modules and safeguards is gathered by questioning technical persons. To facilitate any queries that 96 The target object is only deleted from the structure at this point, but is retained as target object (in the lower part of the tree). 97 The target object is actually completely deleted. - 140 - GSTOOL 3.1 - User Manual Modeling view may arise later on, you should note down the person carrying out this survey and the people questioned in the Properties of module allocation area on tab card | Survey |98. When a safeguard has been selected in the editing window, there is a Properties of safeguards area on the right-hand side next to the tree. This has the following tab cards: • • • • • | Implementation | | Cost | | Revision | | Responsible | | Notepad | 5.5.1 Tab card | Implementation | The top three lines of the tab card contain permanent information relating to the safeguard. This data cannot be changed. NO./NAME The data in the two fields in the top line follow the stipulations of the IT BPM or, in the case of adapted and user defined safeguards, the entries made by the user. MODULE The number and title of the module to which the safeguard you have selected belongs are stated here. If a given safeguard is 98 See section “Tab card | Survey |“, page 129ff. - 141 - GSTOOL 3.1 - User Manual Modeling view contained in more than one module, then the module stated is the one you are currently working on. PRIORITY The priority of a safeguard according to the definitions contained in the BPM, section 1.2 “Structure and interpretation of the manual” is shown here as “1”, “2” or “3”. The PRIORITY field is empty if the safeguard was added to the module during Modeling via the automatically generated suggestion. REQUIRED AS FROM: This field shows the qualification level(s) for which this safeguard has to be implemented in the form of text that corresponds to the icons in the tree ( , , , ). In the next three fields, the user enters data relating to the implementation of the safeguard. IMPLEMENTATION This field will by default contain the entry “untreated”. It can also be reset to this status afterwards at any time. The implementation status of a safeguard must be documented by choosing between “yes”, “partially”, “no” or “dispensable” 99. The answer chosen results in the following implementation status identifiers in the tree: Implementation: Implementation identifier dispensable yes no partially untreated 99 ψblue ψgreen ψred ψyellow no colour 154 For an explanation of what each of these terms means, see section 13.3.4 Basic Security Check, page 254ff. - 142 - GSTOOL 3.1 - User Manual Modeling view COMMENTS In the case of “yes”, “no” and “untreated”, it is up to the user to decide whether anything should be entered in this field and, if so, what. In the case of “partially” and “disüesable”, this field becomes a mandatory field. In the case of “partially”, which parts of the safeguard have and have not been implemented and why not should be explained here. In the case of “dispensable”, the reasons why the safeguard is regarded as dispensable must be entered. If a safeguard is regarded as dispensable, it still remains part of the security concept. As far as the passing on of implementation status of safeguards and qualification level attained is concerned, an “dispensable” safeguard is treated as equivalent to one that has been implemented. A safeguard that has been removed during Modeling (because it is dispensable) is treated as the equivalent of a safeguard with implementation status “no” when it comes to the passing on of implementation status etc. For further information, see section 12 The inheritance mechanism, page 240ff. IMPLEMENT BY This field is only available when the implementation status is “partially” or “no”. In this field, you can enter a date that can be used as filter criterion100 in order, for example, to prepare a report that states which safeguards have to be implemented by the specified date. You can set the current date as the deadline by a single click in the box. You can cancel the deadline you have set by clicking the box again. The selection button takes you to a calendar in which any date can be chosen as the deadline. Because it is possible to specify date in the past, you can also put deadlines that have already expired in the security concept. 100 See 10 Filter, page 216ff. - 143 - GSTOOL 3.1 - User Manual 5.5.2 Modeling view Tab card | Costs | Most safeguards cost money to implement. These costs can be entered in such a way that they are split between different categories of costs. PERSONNEL COSTS These are stated in man-days (“MD”). MATERIAL COSTS Non-personnel costs can be stated in either euros (EUR) or US dollars (USD). The default value is “EUR”101. The currency can be changed for each safeguard separately.102 TIME UNIT The period can be set to “day”, “week”, “month”, “Quarter” or Year”. Other periods cannot be displayed. The default value is “Month”. Different periods can be set for personnel and material costs. COST MANAGEMENT... If the costs of safeguards are to be administered outside of GSTOOL in other cost management tools, you can specify the 101 When choosing the currency, both lines are always set to the same currency. It is not possible to maintain fixed and variable non-personnel costs in different currencies. 102 For further information on how to convert the currency of an entire database, see section 2.3.12 <Tools> - <Translate currency>, page 51. - 144 - GSTOOL 3.1 - User Manual Modeling view path and file name for a cost management file in the relevant input field, or alternatively you can locate it using the Browse button [...] to the right of the input field. [Cost management] launches the application assigned to the file type and opens the cost management file entered. The path and file name must be specified separately for each safeguard. 5.5.3 Tab card | Revision | This tab card can be used to support auditing. LAST AUDIT BY: In this field, you should select from the list of staff the person who carried out the most recent audit. The list contains all the employees who have been created, i.e. including people who are not linked to the IT asset set that you are currently editing. If the employee you are looking for is not included in the list, the person can be created in →Master data. LAST AUDIT ON: In this field, you should select the date of the most recent audit103. 103 For further information on how to select the date, see IMPLEMENT BY field on tab card | Implementation | on page 143. - 145 - GSTOOL 3.1 - User Manual Modeling view REMARKS Remarks on the last or next audit. NEXT AUDIT BY: In this field, you should select from the list of staff the person who is supposed to carry out the next audit. This field corresponds to the field LAST AUDIT BY. NEXT AUDIT AT: In this field, you should select the date of the next audit. PROJECT PLANNING... If the audit planning is to be administered using a project planning tool outside of GSTOOL, you can specify the path and file name of the project planning file in the relevant input field, or alternatively you can locate it using the Browse button [...] to the right of the input field. [Project planning] launches the application assigned to the file type and opens the project planning file entered. The path and file name must be specified separately for each safeguard. 5.5.4 Tab card | Responsible | On this tab card you can enter individual persons or groups of persons who are responsible for initiating and implementing the safeguard. - 146 - GSTOOL 3.1 - User Manual Modeling view Initially, this list is empty. GSTOOL 3.1 does not automatically complete any of the fields. The five pushbuttons only relate to the IMPLEMENTATION RESPONSIBILITY table. INITIATION RESPONSIBILITY: A list of all existing employees104 is provided for you to choose from. Only one employee can be selected. IMPLEMENTATION RESPONSIBILITY To access the Choose employees window, choose [Add…]. Filter105 • Predefined filters As well as (All) and (New...), the following additional predefined filters are offered: (In accordance with BPM role assignment) The list contains only employees to whom a role has been assigned which, according to the IT BPM, can be responsible for implementing the safeguard that you are currently editing. 104 See 3 Master data view, page 75ff. 105 A full description of the filter function can be found in chapter 10 Filter, page 216ff. - 147 - GSTOOL 3.1 - User Manual Modeling view If the role envisaged by the IT BPM for implementing the safeguard that you are currently editing has not yet been assigned to any employee, the list will remain empty when you choose this filter. • Tab card | Basic filter | The following four Basic filter are offered: EMPLOYEE-ORGANISATIONAL UNIT The content of the ORG. UNIT field in the Properties of target object of type Employee area106 is offered to choose from. If the list is empty, then no entry has been made for any employee in this field. The list will only contain employees who belong to the selected organisational unit. ROLE The list will only contain employees to whom the selected 106 role has been assigned. IT SYSTEM-NAME The list will contain only employees who are linked to the selected IT system. APPLICATION-NAME The list will contain only employees who are linked to the selected application. 106 See 3.2 Creating a new target object, page 78ff. - 148 - GSTOOL 3.1 - User Manual Modeling view More than one employee can be selected from the list. Further details of how to specify your selection in column 1 and the pushbuttons offered are provided in section 4.2.4, page 104ff. - 149 - GSTOOL 3.1 - User Manual 6 Reports view Reports view In the →Reports view, GSTOOL 3.1 offers facilities for creating and printing out a wide range of reports and also for passing data to other programs outside of GSTOOL 3.1 for further processing. Using the filter function, you can restrict the information that is included in the predefined reports, as you please. If the predefined reports, combined with the filtering facility, still do not meet your requirements, GSTOOL 3.1 also allows you to create your own report templates. 6.1 Tree presentation Sorting Sorting in the tree in the →Reports view works the same way as in →Modeling (see section 5.1.2 Tree presentation - Sorting, page 112ff). Maximize / minimize See Maximizing and minimizing the tree on page 32. 6.2 Filters The filter options and settings are identical to those in the →Modeling view. 6.3 Report scope The elements which are to be included in the report have to be selected in the tree. Target objects that are only indirectly linked to an IT asset set107, are not presented in the tree in →Reports. Target objects that are only indirectly linked can only be included in reports whose templates have been adapted to include such items (“linked” reports). 107 See section 4.2.1 Direct / indirect linking, page 98ff. - 150 - GSTOOL 3.1 - User Manual Reports view There are two possible ways of selecting and deselecting thedependent items below IT asset sets and target objects: • Right-click with the mouse and then select the <Select dependent objects> option from the pop-up menu or else press the key combination {Ctrl+A}. If an IT asset set is selected, all the related target objects will be selected for inclusion in the report along with their modules and safeguards, or if a target object is selected, the related modules and their associated safeguards will be selected. To clear all the selected dependent objects from the selection, right-click and then choose <Deselect dependent objects> from the pop-up menu. • If you keep the {Ctrl} key pressed down, you can select and deselect individual IT asset sets, target objects and modules from those available by then clicking the left mouse button. Objects selected for the report are presented using the chosen Colour settings108. The IT asset set, from which objects have been selected for a report, is also colour coded. 6.4 Choosing a report template Having specified the report scope, the user can now select the required report template from the list of report templates. The list will be modified in line with the selection in the tree. Some reports are available both in a short version and also in a detailed version. Which report is which is indicated by the inclusion of the word “short” or “long” in the title in the relevant report templates. The meaning of (“linked“) is explained within the hint in 6.3 Report scope, page 150ff. 6.5 Creating a report After you have decided what information is to be included in the report and selected a report template, click [Create...] to initiate the process of report generation. Depending on the scope and 108 See section 2.3.9 <Tools> - <Options> - | Display | - Colour settings, page 48ff. - 151 - GSTOOL 3.1 - User Manual Reports view nature of the report, this can take some time. The report will be displayed in a browser window. If the option OPEN REPORT109 has not been enabled in the template for a report, then you will be taken directly to the Save report window, without the report being displayed in the browser window. 6.6 Saving a report To save the report you have just created, click [Save...], and the report will be saved both as an XML file and also as an HTM file in the location you have defined in Save report . The XML file contains only the data content of the report and is primarily used for the further processing of report information outside of GSTOOL 3.1. The HTM file contains all the style information necessary to display it in the browser. 6.7 External processing of a report Reports, once saved, can be further processed outside of GSTOOL 3.1, using suitable programs. GSTOOL will expect the graphic files used in reports (logo and bitmaps) to be in certain directories. The paths in which the files are stored depend on the installation location of the computer on which the reports are created (source computer). The bitmaps are only needed for the “IT asset structure” report. The logo is used for all reports. If the installation files on the source computer are stored in directory “C:\Program files\BSI\GSTOOL3”, then the logo will be expected in “C:\ Program files \BSI\GSTOOL3\Reports\Images” and the bitmaps in “C:\ Program files \BSI\GSTOOL3\Report\Images\ Structure”. If these paths do not exist on the target computer, then it will not be possible to show the logo and bitmaps within reports and these may be included simply as placeholders. 109 See chapter 6.9.3 Tab card | Properties |, section EXTENDED PROPERTIES OPEN REPORT, page 157ff. - 152 - GSTOOL 3.1 - User Manual Reports view To ensure that they are displayed, you will have to create the directory paths specified above and store the relevant files that are in the source computer in those locations. If you have made any entries in file gs31.css in the course of creating a user defined report template, you will also have to make this file available, together with the actual report file, for external processing of the report. Once again, the path contained in the source text of the report will have to be modified, if required, to: “C:\Program files \BSI\GSTOOL3\Reports\gs31.css”. Internet Explorer includes an option [Save As...] that enables you to save all the files that go with a given HTML page (including any graphics) This is a convenient way of ensuring that the entire report is passed on to the next person. 6.8 Printing a report A report, once created, is displayed in a browser window. It can be printed from this window in the standard browser way. When printing from the browser, you may find that some of the default page setup settings (headers, footers, margins etc.) are not what you want. These can be configured within the browser options. 6.9 User defined templates To create a user defined report template, it is essential that you have adequate knowledge of XML. Therefore, in this manual, the description of how to create user defined report templates is confined to the GSTOOL 3.1 aspects. - 153 - GSTOOL 3.1 - User Manual 6.9.1 Reports view Template structure The templates required to create a report have a multi-level structure. Basic report sheets The eleven basic templates (*.xsl files) and the stylesheet file (GS31.css) are contained in the GSTOOL 3.1 installation directory sub-directory ...\GSTOOL3\Reports. If any of these files are deleted, GSTOOL 3.1 will automatically try to recreate them. To do this, it needs the original installation CD. It is not possible in GSTOOL 3.1 to change any of the default templates or to create additional ones. To do this, a suitable editor must be used. Report templates GSTOOL 3.1 includes 46 predefined report templates. These contain information on which default template and which database content should be used to create a report as an *.htm file. This information cannot be changed for predefined report templates. 6.9.2 Overview of report templates All the existing report templates are accessed via menu selection sequence <Tools> - <Options> - | Reports |. - 154 - GSTOOL 3.1 - User Manual • Reports view BASIC REPORT SHEETS (XSL) Here you need to enter the complete directory path that will be accessed when the Browse button [...] next to the DEFAULT TEMPLATE field in Compile report is clicked.110 • REPORT TEMPLATES list This list contains all the existing report templates. For the 46 report templates of the type “BSI”, all you have to do to specify the basic templates is to enter /name/.xsl without any further path details, as these templates can only occur in the installation path. For user defined report templates, the complete path is shown, as their default templates could be stored in a different location. The TYPE column shows whether the template is an original one (“BSI”) or a “user defined” one. If you check the “ONLY DISPLAY USER DEFINED” option, you can reduce the list accordingly. [Edit] opens the Compile report window, which contains the latest definitions of the selected report template. In the case of templates of type “BSI”, the settings are display-only and cannot be altered. User defined templates can be edited in a similar fashion to the editing process during the creation of a new user defined report template. 110 See section TEMPLATE on page 156. - 155 - GSTOOL 3.1 - User Manual Reports view [New] opens the Compile report window with a completely empty form, in which you can enter the definitions for the new user defined report template over four tab cards. 6.9.3 Tab card | Properties | BASIC PROPERTIES • NAME Every new report template has to be given a name. • TEMPLATE Here you should enter the default template that is to be used by the report template (always specify the complete path!) or else you can select it via the Browse button [...]. The Browse button opens the directory that was specified in <Tools> - <Options> - | Reports | - BASIC REPORT SHEETS (XSL).111 111 See BASIC REPORT SHEETS (XSL) on page 155. - 156 - GSTOOL 3.1 - User Manual Reports view EXTENDED PROPERTIES • EXTENSION This field is used to specify the file extension with which a report is to be stored. If no entry is made here, the report will automatically be saved as an HTML file. • OPEN REPORT If this checkbox is checked, the new report will be opened either with Internet Explorer or with the program specified in the OPEN WITH field. If this checkbox is left blank, the report will be saved directly112. • OPEN WITH: This field is used to specify the program with which the report should be opened and displayed. You can only specify a program in the OPEN WITH field or select one using the Browse button if you have checked the OPEN REPORT checkbox. If no entry has been made here, the tool will open the report using Internet Explorer if possible. • PARAMETER In this field you can enter control parameters to be passed to the program specified in OPEN WITH. You can only specify such parameters if you have entered a program in the OPEN WITH field. • REPORT PROPERTIES Here you can enter attributes that will determine various options for the selected default template. As long as you have sufficient knowledge of XSL files, you can tell which attributes of the default template can be interpreted from the default template in question (*.xsl file). 112 See section 6.6 Saving a report, page 152ff. - 157 - GSTOOL 3.1 - User Manual Reports view Every attribute consists of a name and a value. Both fields are alphanumeric. SORTING Sorting of the modules and safeguards in a report will normally be determined by the sorting used in tree in the →Reports view. If you complete the two fields, you can specify a different sorting method for the user defined report template. Further information on this is available in the online help. 6.9.4 Determining the scope of the report On the | Scope | and | Linke with | tab cards, you can determine what database content is to be output in the report using this report template. To keep the time it takes to prepare a report as low as possible, you should not include any more information in the template than is absolutely necessary. The checkboxes determine what information is included in the report template. They are hierarchically arranged. The second, third or fourth levels are only active when the checkbox for the level immediately above a particular group is selected. For further information on how the checkbox selections affect the report, please consult the online help. - 158 - GSTOOL 3.1 - User Manual Reports view Tab card | Scope | On the | Scope | tab card, the objects and information that are directly selected in the tree presentation for the creation of the report are determined. If you are going to integrate information into the report template using this tab card only, you should extend the name of the template to include “(selection)”. - 159 - GSTOOL 3.1 - User Manual Reports view Tab card | Linked with | This tab card is used to specify the objects and information that are to be contained in the report if they are linked to a target object higher up in the hierarchy. Unlike tab card | Scope |, it is not possible here to influence the selection of modules and safeguards that are included in a report. If you choose data for inclusion in the report template on this tab card, you should extend the name of the template to include “(linked)”. - 160 - GSTOOL 3.1 - User Manual Reports view Tab card | Filter | On this tab card you can define filters that will determine which target object types should be considered for the purposes of creating a report. • DIRECT TARGET OBJECT TYPE FILTER This filter controls the way that directly linked target objects are handled. Only target objects of the specified type are considered in the report. If the box on the right is empty, then all target object types will be considered. • INDIRECT TARGET OBJECT TYPE FILTER This filter controls the way that indirectly linked target objects are handled. Only linked target objects of the specified type are considered in the report. This filter is only considered if entries have been made on the | Scope | tab card. The report includes all the target object types that are moved to the box on the right, using the [<] [<<] [>>] [>] buttons. If the box on the right is empty, the filter is disabled and all target object types that occur are included in the report. - 161 - GSTOOL 3.1 - User Manual 6.9.5 Reports view Report header If you want to change the logo contained in every report or to specify a form of words that is to be included on all reports, select menu option sequence <Tools> - <Options> - | Report header |. LOGO In the LOGO field, you can specify the path for any graphics file you want by clicking the Browse button [...]. The files can be in any of the formats *.bmp, *.gif or *.jpg. The image size will not be modified to fit the size of the paper. Graphics that extend into the margins will be clipped when printed out. Comments In the COMMENTS field, you can enter a text that will appear in the report header below the logo in every report. - 162 - GSTOOL 3.1 - User Manual 7 BPM user defined view BPM user defined view This view allows you to access the GSTOOL 3.1 metadata with various editing possibilities. The metadata is sorted over six tab cards. On the first five tab cards, it is possible to reduce the list selectively by activating appropriate filter settings. OBSOLETE column An OBSOLETE column appears on the first five tab cards. If there is a “Yes” in this column, this means that the object no longer exists in the IT BPM on which GSTOOL 3.1 is currently based. Obsolete objects can be deleted, even though they are of TYPE “BSI-standard”. Obsolete modules, safeguards and threats can no longer be adapted, nor can they be edited via [Open]. 7.1 Tab card | Target object types | This tab card contains all the target object types after the FILTER settings have been applied. 7.1.1 Filter A full description of the filter function can be found in chapter 10 Filter, page 216ff. • Predefined filters No additional predefined filters are offered. - 163 - GSTOOL 3.1 - User Manual • BPM user defined view Tab card | Basic filter | The following two Basic filter are offered: METADATA TYPE Through the appropriate selection, you can restrict the list to user defined/adapted or “BSI-standard” target object types. LINKS ALLOWED You can choose here amongst all the existing target object types, including user defined target object types. In the filtered list, only those target object types which can be hierarchically subordinated through linking to the type chosen are displayed113. Example If you choose target object type “bilding” in the filter, then the filtered list will only contain the target object types “room” and “employee”. 7.1.2 List of target object types • The NAME column contains the names of the target object types. • The TYPE column specifies whether this is an original “BSI-standard” type or a “user defined” type114. • The OBSOLETE column If there is a “yes” in this column, then this target object type no longer exists in the IT BPM on which GSTOOL 3.1 is currently based. Obsolete target object types can be deleted, even though they are of TYPE “BSI-standard”. • ENTRIES: The number of entries contained in the displayed list is indicated at the bottom left of the tab card. To edit a target object type, create an additional target object type or delete an existing one, either double-click or else choose [Open], and the Target object types window will open. The options offered there are explained in section 2.3.4 <Tools> - <Target object types ...>, page 37ff. 113 For further information see also the table in section 4.1.3 Structure rules Link rules on page 95. 114 The IT Baseline Protection methodology does not take into account any “adapted” target object types. - 164 - GSTOOL 3.1 - User Manual 7.2 BPM user defined view Tab card | Target object subtypes | This tab card contains all the target object subtypes after the FILTER settings have been applied. 7.2.1 Filter A full description of the filter function can be found in chapter 10 Filter, page 216ff. • Predefined filters On the | Target object subtypes | tab card in →BPM user defined, all the existing target object types are offered as predefined filters too. • Tab card | Basic filter | The following two Basic filter are offered in →Modeling: TARGET OBJECT-TYPE You can choose here amongst all the existing target object types, including user defined target object types. Only the target object subtypes that belong to the selected type are displayed in the filtered list. METADATA TYPE The list content can be confined to one of the two types offered, “BSI-standard” or “user defined/adapted”. 7.2.2 • List of target object subtypes The NAME column contains the names of the target object subtypes. - 165 - GSTOOL 3.1 - User Manual BPM user defined view • The TYPE column specifies whether this is an original “BSI-standard” subtype or a “user defined” subtype115. • The SUPERIOR TYPE column names in each case the target object type to which the subtype belongs. • The OBSOLETE column displays the date since which this target object subtype has been superseded in the IT BPM. • ENTRIES: The number of entries contained in the displayed list is indicated at the bottom left of the tab card. The following functions are available from the list: 7.2.3 Edit target object subtype To edit a target object subtype, double-click the target object subtype or right-click and then choose <Open> from the pop-up menu or click the [Open] button or click [Open] in the toolbar. If the target object subtype is of the “BSI-standard” type, the View subtype window will now open. Here, the only data that can be edited is the content of the | Notepad | tab card. If the target object subtype is a “user defined” one, then you will be taken to the Edit subtype window. Here you can edit all the entries apart from father target object type116. 7.2.4 Create a new target object subtype To create a new target object subtype, press the key combination {Ctrl+N} or right-click and then choose <New> from the pop-up menu or click the [New] button or click [New] in the toolbar117. 115 The IT Baseline Protection methodology does not take into account any “adapted” target object subtypes. 116 See section 2.3.4 <Tools> - <Target object types ...>, page 37ff. 117 See “Creating user defined target object subtypes” on page 40. - 166 - GSTOOL 3.1 - User Manual 7.2.5 BPM user defined view Delete a target object subtype To delete a user defined target object subtype, press {Del} or right-click and then choose <Delete> from the pop-up menu or click the [Delete] button or click [Delete] in the toolbar118. Target object subtypes of the type “BSI-standard” cannot be deleted. 7.2.6 View explanations for a target object subtype For target object subtypes of type “user defined”, right-click the target object subtype in question and then choose <Open link> from the pop-up menu or click [View] in the toolbar, and a browser window will open. Here, under the name of the target object subtype, the text for the EXPLANATIONS field from the editing screen for the target object subtype will be displayed. 7.3 Tab card | Modules | This tab card contains all the modules after the FILTER settings have been applied. 7.3.1 Filter A full description of the filter function can be found in chapter 10 Filter, page 216ff. 118 See “Deleting a target object subtype” on page 42. - 167 - GSTOOL 3.1 - User Manual BPM user defined view • Predefined filters On the | Modules | tab card in →BPM user defined, the five layers defined in the IT BPM are additionally offered as predefined filters. • Tab card | Basic filter | The following three Basic filter are offered in →Modeling: MODULE-LAYER The list will only contain modules which belong to the selected layer. MODULE-TARGET OBJECT Only modules that are linked to the selected target object will be included in the list. METADATA TYPE Only modules of the selected type will be included in the list. 7.3.2 • List of modules The NO. column contains the numbers of the modules, as per the IT BPM. The prefix “u” or “a” indicates whether the module in question is a user defined one or has been adapted. • The NAME column gives the names of the modules. • The TYPE column specifies whether this is an original “BSI-standard” module or a “user defined/adapted” module. The data here correlates with the prefixes “u” and “a” in the NO. column. • LAYER column specifies the layer to which the module belongs, according to the layer model of the IT BPM or as defined by the user119. • The OBSOLETE column displays the date since which this module has been superseded in the IT BPM. • ENTRIES: The number of entries contained in the displayed list is indicated at the bottom left of the tab card. 119 See section 7.3.5 Define a new module, page 175ff. - 168 - GSTOOL 3.1 - User Manual BPM user defined view Right-click and then choose <View> from the pop-up menu or click [View] in the toolbar, and a browser window containing the printed version of the module description from the IT BPM will open. The activities described below can be carried out from the list of modules. 7.3.3 Open a module Depending on the type of module, various actions are possible after opening a module: • Opening a module of type “BSI-standard” Double-click on the module or right-click the module and then choose <Open> from the pop-up menu or click the [Open] button or click [Open] in the toolbar. The Show module window, in which you can view the entries for the selected module over several tab cards, now opens. The entries on the | Notepad | tab card can be altered. • Opening a module of type “user defined/adapted” Double-click the relevant safeguard or right-click and then choose <Open> from the pop-up menu or click the [Open] button or click [Open] in the toolbar. The Edit module window, in which data relating to module can be altered in a fashion similar to that described in section 7.3.4 Adapt a module, now opens. 7.3.4 Adapt a module It is in the nature of things that the description and composition of the safeguards in a given module cannot be an exact match for all IT asset sets that exist in the real world. It may therefore be sensible or even necessary to modify the description or composition of a module in line with actual circumstances on the ground. You should take care here that such modifications do not basically alter the module, and hence affect security, but - 169 - GSTOOL 3.1 - User Manual BPM user defined view they only modify the module. If a module is so unsuitable that it could only be adopted with substantial changes, then this should be implemented in GSTOOL 3.1 by creating a user defined module. A module that is adapted in →BPM user defined will replace the original module at every point in GSTOOL 3.1 and the associated module number will consistently be preceded by the identifier “a”. On the other hand, changes made to a module in the course of →Modeling only affect the place in the tool where the change is made. Everywhere else, a module thus changed will always be available in the “BSIstandard” or in the adapted version. For further information on how adapted modules are treated when the metadata is updated, see “Effects on existing adaptations“ on page 59. Only “BSI-standard” modules can be adapted. “User defined/adapted” modules can be further edited via [Open] (page 169ff). To adapt a module, right-click and then choose <Adapt> from the pop-up menu or click the [Adapt] button. The Adaptation of module /no./ /name/ window, in which you can change any existing data as required over six tab cards, will now open. Tab card | Common | - 170 - GSTOOL 3.1 - User Manual BPM user defined view • LAYER The layer to which a module belongs cannot be changed during adaptation. • PRIOR / NEW / CHANGED See section 2.4.11 New / Prior / Changed - display, page 67ff. • TYPE The module type is automatically changed from “BSIstandard” to “User defined/adapted”. • AUDIT RELEVANT: An adapted module retains its audit relevance. For user defined modules, audit relevance is always set to “No”, in keeping with the BSI’s auditing schema. This cannot be changed by the GSTOOL 3.1 user. • NO. The module number is automatically preceded by a “a” for “adapted”. This cannot be changed during adaptation. • NAME The title of the module can be altered. • VERSION120 Version numbers are not maintained for adapted and user defined modules. • MODULE TEXT The text of the module description can be edited here. | Target object type | tab card This tab card is empty. In the →Modeling, modules are only assigned to target object subtypes. | Target object subtypes | tab card This tab card show the target object subtype for which the relevant module is automatically used in →Modeling. 120 The VERSION field shows which version of the IT BPM the module comes from. To find out which version of the IT BPM GSTOOL 3.1 is currently using, press {Ctrl+I} or select <Help> - <About> -STRUCTURE DATA VERSION. - 171 - GSTOOL 3.1 - User Manual BPM user defined view If the list is empty for a given module, this means that that module is not automatically used in →Modeling. Tab card | Safeguards | This tab card contains all the safeguards that belong to the module. If the module shown on this tab card has not yet been adapted, then the safeguards it contains will be the ones which belong to the module according to the IT BPM. Otherwise, the list will contain the results of earlier adaptation work. If necessary, e.g. with relatively long lists, you can restrict the list to the safeguards in a single catalogue via the CATALOGUE selection field. - 172 - GSTOOL 3.1 - User Manual BPM user defined view Adding new safeguards to the module Click [New] to open the Create assignment to safeguard window. This list contains all the safeguards, i.e. both “BSI-standard” and user defined safeguards. • FILTER selection field By selecting a single layer or setting filters, it is possible to limit the number of modules displayed in the list in a selective manner. For further information on setting filters, see section 10 Filter, page 216ff. • Column 1 The window opens with all the safeguards that are already linked to the module checked in the leftmost column. Additional safeguards can be selected, and safeguards already selected can be deselected. • Columns NO. | NAME | TYPE | CATALOGUE These columns show, respectively, the number, title and type of safeguard and the catalogue to which each safeguard belongs. • The OBSOLETE column displays the date since which this safeguard has been superseded in the IT BPM. • [All] All the safeguards contained in the list are selected. - 173 - GSTOOL 3.1 - User Manual • BPM user defined view [None] All the safeguards contained in the list are deselected. The [None] option also deletes all the checkmarks that were in place when the window was opened. If you click [OK] immediately after [None], all the safeguards originally contained in the module will be immediately deleted. • [Reverse] reverses the selection indicated in column 1: all the safeguards not currently selected will be selected, and all the safeguards currently selected will be deselected. • [OK] has the effect of adding the selected safeguards to the module. Any links that existed originally, but which have been deselected in column 1, will be deleted from the module when you click [OK]. • [Cancel] closes the window without changing the list of safeguards that belong to the module. Deleting safeguards from the module As long as at least one safeguard is checked in column 1, the [Delete] button will be offered in the | Safeguards | tab card. • [Reverse] Reverses the selection indicated in column 1: all the safeguards not currently selected will be selected, and all the safeguards currently selected will be deselected. - 174 - GSTOOL 3.1 - User Manual • BPM user defined view [Delete] clears the selected safeguards from the module. When safeguards are deleted during adaptation of modules in →BPM user defined, the effects of this extend to the entire database. When safeguards are deleted, all the information captured in relation to the safeguards is lost as well. Once deleted, this information cannot be restored again! The deletion of safeguards during the adaptation process does not affect the Inheritance of qualification level achieved (12.3, page 245ff). The inheritance process only takes into account safeguards contained in the adapted module.121 Tab card | Threats | On the | Threats | tab card, it is possible to add threats to a module or to delete existing threats from a module, in a fashion similar to that which applies on the | Safeguards | tab card (page 172ff). Tab card | Notepad | See “Notepad” on page 34. 7.3.5 Define a new module As already explained in connection with the adaptation of a module, the IT BPM modules cannot cover every conceivable IT asset set that might exist in the real world. If the real-life situation departs only slightly from the module description, then the best approach is to adapt a module. If that is not sufficient, GSTOOL 3.1 users can create complete modules which are tailored to their particular requirements. 121 The reason for this is the premise stated at the beginning of this section that adaptation does not affect the security. - 175 - GSTOOL 3.1 - User Manual BPM user defined view To enter all the information for a new module, right-click and then choose <New> from the pop-up menu or click [New] in the toolbar or click the [New] button. The Define new module window will now open. This window contains the same six tab cards that were described above in connection with the adaptation of a module. Tab card | Common | • LAYER From the options offered, select the layer to which the new module is to belong. The default layer offered is the one to which the module belongs, i.e. the one that was picked at the start of the creative process. • PRIOR / NEW / CHANGED See section 2.4.11 New / Prior / Changed - display, page 67ff. - 176 - GSTOOL 3.1 - User Manual BPM user defined view • TYPE The module type is automatically set as “user defined/adapted” and cannot be altered. • AUDIT RELEVANT For user defined modules, this field is always set to “No” and cannot be altered by the user. • NO. The number entered for the new module cannot be the same as any other existing module. Otherwise, GSTOOL 3.1 does not place any restrictions on the module numbers that can be chosen. We recommend that you stick to the conventions established in the IT BPM. (See section 14.2 Conventions for the numbering of modules, page 263. Only the module number is shown in this field, without the “uM” prefix. In all the other lists, screen formats etc., however, a module newly created by the user always has the identifying “u” (for “user defined”) in front of the module number. • NAME Enter the title of the new module here. • VERSION Version numbers are not maintained for user defined modules. • MODULE TEXT This field is used to enter a free text description of the module. All the other tab cards should be completed in accordance with the instructions in section 7.3.4 Adapt a module, page 169ff. In the present case, tab cards | Target object type | and | Target object subtype | are empty. No means are provided in GSTOOL 3.1 for linking user defined modules with target object types and subtypes for the →Modeling. - 177 - GSTOOL 3.1 - User Manual 7.3.6 BPM user defined view Delete a module Only “adapted” or “user defined” modules can be deleted. However, the effects of right-clicking and then choosing <Delete> from the pop-up menu, clicking [Delete] in the toolbar, and clicking the [Delete] button are different for each of the two types. When a module is deleted in →BPM user defined, the results affect the entire database. The information associated with that module cannot be restored once deleted. Deleting an adapted module Adapted modules can be restored to their original state (type “BSI-standard”) by clicking [OK] at the prompt which appears during the deletion operation. For the data gathered during the Basic Security Check (page 140ff) this means: • Data relating to the module itself and to the safeguards which were also included in the module in its original state is retained. • Data relating to safeguards over and above the original scope of the module which were added to the module during the adaptation process is lost. • Safeguards which were deleted from the original scope of the module during adaptation and were restored during the “deletion” operation are returned with the status “not processed”. Deleting a user defined module If the user clicks [OK] at the prompt which appears during the deletion operation, user defined modules are deleted in their entirety, with the following consequences: • The data gathered for the safeguards in a user defined module during the Basic Security Check (page 140ff) is lost. • If the user defined module was a reference source, all references emanating from that module are cancelled. (For - 178 - GSTOOL 3.1 - User Manual BPM user defined view further information, see also “Deletion of a reference source” on page 139) 7.4 Tab card | Safeguards | The | Safeguards | tab card contains all the safeguards after filtering in accordance with any filters that have been selected. 7.4.1 Filter A full description of the filter function can be found in chapter 10 Filter, page 216ff. • Predefined filters The six safeguard catalogues defined in the IT BPM are offered as additional predefined filters. - 179 - GSTOOL 3.1 - User Manual • BPM user defined view Tab card | Basic filter | The following six Basic filter are offered: SAFEGUARDS-CATALOGUE Only safeguards from the selected catalogue are displayed. USED BY MODULE All the existing modules are offered for you to choose from. The safeguards displayed are the ones that are currently assigned to the selected module, i.e. taking into account changes made by the user, irrespective of the assignment laid down in the IT BPM. SAFEGUARD FOR MODULE All the existing modules are offered for you to choose from. The safeguards displayed are the ones assigned to the chosen module according to the IT BPM, irrespective of any changes that the user has selectively made to this assignment. SAFEGUARD-RESPONSIBILITY FOR INITIALIZING The employees offered for the user to choose from are those who have been specified in →Modeling as being responsible for the initiation of at least one safeguard. IMPLEMENTATION BY The employees offered for the user to choose from are those who have been specified in →Modeling as being responsible for the implementation of at least one safeguard. METADATA TYPE Through the appropriate selection, you can restrict the list to user defined or “BSI-standard” safeguards. 7.4.2 • List of safeguards The NO. column contains the numbers of the safeguards, as per the IT BPM. The prefix “u” or “a” indicates whether the safeguard in question is a user defined one or has been adapted. • The NAME column gives the names of the safeguards. • The TYPE column specifies whether this is an original “BSI-standard” safeguard - 180 - GSTOOL 3.1 - User Manual BPM user defined view or a “user defined” or “adapted” safeguard. The data here correlates with the prefixes “u” and “a” in the NO. column. • The CATALOGUE column Specifies the catalogue to which the safeguard in question belongs either according to the IT BPM or as defined by the user122. • The OBSOLETE column displays the date since which this safeguard has been superseded in the IT BPM. • ENTRIES: The number of entries contained in the displayed list is indicated at the bottom left of the tab card. Right-click and then choose <View> from the pop-up menu [View] in the toolbar, or click and a browser window containing the printable version of the safeguard description from the IT BPM will open. The activities described below can be carried out from the list. 7.4.3 Opening a safeguard Depending on the type of safeguard, various actions are possible after opening a safeguard: • Opening a safeguard of type “BSI-standard” Double-click on the safeguard or right-click the safeguard and then choose <Open> from the pop-up menu or click the [Open] button [Open] in the toolbar. or click The Show safeguard window, in which you can view the entries for the selected safeguard over several tab cards, now opens. The entries on the | Notepad | tab card can be altered. • Open a safeguard of type “user defined/adapted”: Double-click the relevant safeguard or right-click and then choose <Open> from the pop-up menu 122 See section 7.4.5 Define a new safeguard, page 187ff. - 181 - GSTOOL 3.1 - User Manual BPM user defined view or click the [Open] button or click [Open] in the toolbar. The Edit safeguard window, in which data relating to the safeguard can be altered in a fashion similar to that described in section 7.4.4 Adapting a safeguard, now opens. 7.4.4 Adapting a safeguard As for the modules and threats, it may also be necessary to modify individual safeguards in line with your particular requirements. Here you should bear in mind that when you adapt a safeguard it is not basically altered but only adapted. If a safeguard in its present form is so unsuitable that extensive changes are required, this should be implemented by creating a user defined safeguard (see section 7.4.5 Define a new safeguard, page 187ff). A safeguard that is adapted in →BPM user defined will replace the original safeguard at every point in GSTOOL 3.1 and the associated safeguard number will consistently be preceded by the identifier “a”. Only “BSI-standard” safeguards can be adapted. “User defined” safeguards can be further edited via [Open] (page 181ff). When a safeguard is adapted, this does not alter the identifier of the modules to which that safeguard belongs. The modules are not transformed into “aM” (i.e. “adapted” modules). To adapt a safeguard, right-click and then choose <Adapt> from the pop-up menu or click the [Adapt] button. The Adaptation of safeguard /no./ /name/ window, in which you can change any existing data as required over four tab cards, will now open. - 182 - GSTOOL 3.1 - User Manual BPM user defined view Tab card | Common | • CATALOGUE The catalogue to which a safeguard belongs cannot be changed during adaptation. • Prior / New / Changed See section 2.4.11 New / Prior / Changed - display, page 67ff. • TYPE The safeguard type is automatically changed from “BSIstandard” to “user defined/adapted”. • NO. The safeguard number is automatically preceded by a “a” for “adapted”. The safeguard number cannot be changed during adaptation. • NAME The title of the safeguard can be altered. • VERSION Version numbers are not maintained for adapted safeguards. • SAFEGUARD TEXT: The text of the safeguard description can be edited here. 120 - 183 - GSTOOL 3.1 - User Manual BPM user defined view Tab card | Roles | On this tab card, all the roles which potentially can initiate or implement this safeguard are listed. If the safeguard shown on this tab card has not yet been adapted, then the roles will be the ones which belong to the safeguard according to the IT BPM. Otherwise, the list will contain the results of earlier adaptation work. Adding a role to a safeguard Click [New] to open the Role allocation window. The list contains all the roles defined in the IT BPM. • Column 1 The window opens with all the roles that are already assigned to the safeguard checked in the leftmost column. Additional roles can be selected, and roles already selected can be deselected. - 184 - GSTOOL 3.1 - User Manual BPM user defined view • NAME column This column shows the role names, as defined in the IT BPM. • PHASE column For roles that have already been assigned to the safeguard, information is provided here on the phase (initiation, implementation or both) for which this role is to be responsible. If an extra checkbox in column 1 is checked, so that an extra role is assigned to the safeguard, the entry “Implementation” is automatically entered in the PHASE column. Right-clicking opens a window, in which the phase can be changed. If a phase is chosen by this means for a role that has not yet been assigned to the safeguard, this role is automatically assigned to the safeguard (checkmark in column 1). • [All] All the roles contained in the list are selected. • [None] All the roles contained in the list are deselected. The [None] option also deletes all the checkmarks that were in place when the window was opened. If you click [OK] immediately after [None], all the original role assignments will be immediately deleted. • [Reverse] Reverses the selection indicated in column 1: all the roles not currently selected will be selected, and all the roles currently selected will be deselected. • [OK] assigns the selected roles to the safeguard. Any roles originally assigned to the safeguard, but which have been deselected in column 1, will be deleted when you click [OK]. • [Cancel] closes the window without changing the list of roles that belong to the safeguard. - 185 - GSTOOL 3.1 - User Manual BPM user defined view De-assigning a role from a safeguard • [Delete] de-assigns the selected roles from the safeguard. The [Delete] button is only enabled when at least one role has been checked in column 1. • [Reverse] reverses the selection indicated in column 1: all the roles not currently selected will be selected, and all the roles currently selected will be deselected. Tab card | Modules | This tab card lists all the modules to which this safeguard belongs. If no change has yet been made to the links to modules for these safeguards123, then the links will be those specified in the IT BPM. Otherwise, the list will contain the results of earlier adaptation work. The buttons [Reverse], [Delete] and [New] operate in a similar way to the functioning described for tab card | Role |. 123 See sections 7.3.4 Adapt a module, page 169ff and 7.3.5 Define a new module, page 175ff. - 186 - GSTOOL 3.1 - User Manual 7.4.5 BPM user defined view Define a new safeguard If the changes that need to be made to a safeguard are too major to be a case of adaptation, GSTOOL 3.1 users can themselves create brand new safeguards that meet their particular requirements. To enter all the information for a new safeguard, right-click and then choose <New> from the pop-up menu or click [New] in the toolbar or click the [New] button. The Define new safeguard window will now open. This window contains the same four tab cards that were described above in connection with the adaptation of a safeguard124. Tab card | Common | • CATALOGUE The default setting for this field is the catalogue to which the safeguard most recently selected on the | Safeguards | tab card belongs. However, any other catalogue can be chosen. • PRIOR / NEW / CHANGED See section 2.4.11 New / Prior / Changed - display, page 2.4.11ff. • TYPE The safeguard type is automatically set as “User defined” and cannot be altered. • NO. The safeguard number is automatically preceded by the letter “u” for “user defined” and cannot be altered. 124 See section 7.4.4 Adapting a safeguard, page 182ff. - 187 - GSTOOL 3.1 - User Manual BPM user defined view • NAME The title of the safeguard has to be entered here. • SAFEGUARD TEXT A description of the safeguard has to be entered here. Tab card | Roles | This tab card is initially always empty for user defined safeguards. As described in connection with the adaptation of safeguards, roles are assigned to and de-assigned from a user defined safeguard here. Tab card | Modules | This tab card is initially always empty for user defined safeguards. User defined safeguards are either assigned to modules or de-assigned from them, in similar fashion to the adaptation of a safeguard that was described above. Tab card | Notepad | See “Notepad” on page 34. 7.4.6 Deleting a safeguard Only “Adapted” or “User defined” safeguards can be deleted. However, the effects of right-clicking and then choosing <Delete> from the pop-up menu, [Delete] in the toolbar, clicking and clicking the [Delete] button are different for each of the two types. Deleting an adapted safeguard Adapted safeguards can be restored to their original state (type “BSI-standard”) by clicking [OK] at the prompt which appears during the deletion operation. All the data collected during the Basic Security Check (page 140ff) is retained. Deleting a user defined safeguard An entire user defined safeguard is deleted from the database currently edited by clicking [OK] at the prompt which appears - 188 - GSTOOL 3.1 - User Manual BPM user defined view during the deletion operation. The data gathered for this safeguard during the Basic Security Check (page 140ff) is lost. 7.5 Tab card | Threats | The | Threats | tab card contains all the threats after filtering in accordance with any filters that have been selected. 7.5.1 Filter A full description of the filter function can be found in chapter 10 Filter, page 216ff. • Predefined filters On the | Threats | tab card in →BPM user defined, the five threat catalogues defined in the IT BPM are additionally offered as predefined filters. • Tab card | Basic filter | The following two Basic filter are offered in →Modeling: THREAT-CATALOGUE The list will only contain threats which belong to the selected catalogue. MODULE-TARGET OBJECT Only threats that apply to the selected target object as a result of the linking of modules in →Modeling will be listed. METADATA TYPE Only threats of the selected type will be included in the list. - 189 - GSTOOL 3.1 - User Manual 7.5.2 • BPM user defined view List of threats The NO. column contains the numbers of the threats, as per the IT BPM. The prefix “u” or “a” indicates whether the threat in question is a user defined one or has been adapted. • The NAME column gives the name of the threat. • The TYPE column specifies whether this is an original “BSI-standard” threat or a “user defined” or “adapted” threat. The data here correlates with the prefixes “u” and “a” in the NO. column. • The CATALOGUE column Specifies the catalogue to which the threat in question belongs either according to the IT BPM or as defined by the user125. • The OBSOLETE column displays the date since which this threat has been superseded in the IT BPM. • ENTRIES: The number of entries contained in the displayed list is indicated at the bottom left of the tab card. Right-click a selected threat and then choose <View> from the pop-up menu [View] in the toolbar, or click and a browser window containing the printed version of the threat description from the IT BPM will open. The activities described below can be carried out from the list. 7.5.3 Open a threat Depending on the type of threat, various actions are possible after opening a threat: • Opening a threat of type “BSI-standard” Double-click on the threat or right-click the threat and then choose <Open> from the pop-up menu 125 See section 7.5.5 Define a new threat, page 193ff. - 190 - GSTOOL 3.1 - User Manual BPM user defined view or click the [Open] button or click [Open] in the toolbar. The Show threat window, in which you can view the entries for the selected threat over several tab cards, now opens. The entries on the | Notepad | tab card can be altered. • Opening a threat of type “User defined/adapted”: Double-click the relevant threat or right-click and then choose <Open> from the pop-up menu or click the [Open] button or click [Open] in the toolbar. The Edit threat window, in which data relating to the threat can be altered in a fashion similar to that described in section 7.5.4 Adapting a threat, now opens. 7.5.4 Adapting a threat As is the case with modules and safeguards, it may also be necessary to modify individual threats in line with your particular requirements. Here you should bear in mind that when you adapt a threat it is not basically altered but only adapted. If a threat in its present form is so unsuitable that extensive changes are required, this should be implemented by creating a user defined threat (see section 7.5.5 Define a new threat, page 193ff). A threat that is adapted in →BPM user defined will replace the original threat at every point in GSTOOL 3.1 and the associated threat number will consistently be preceded by the identifier “a”. Only “BSI-standard” threats can be adapted. “User defined” threats can be further edited via [Open] (page 190ff). When a threat is adapted, this does not alter the identifier of the modules to which that threat belongs. The modules are not transformed into “aM” (i.e. “adapted” modules). - 191 - GSTOOL 3.1 - User Manual BPM user defined view To adapt a threat, right-click and then choose <Adapt> from the pop-up menu or click the [Adapt] button. The Adaptation of threat /no./ /name/ window, in which you can change any existing data as required over three tab cards, will now open. Tab card | Common | • CATALOGUE The catalogue to which a threat belongs cannot be changed during adaptation. • PRIOR / NEW / CHANGED See section 2.4.11 New / Prior / Changed - display, page 67ff. • TYPE The threat type is automatically changed from “BSI-standard” to “User defined”. • NO. The threat number is automatically preceded by a “a” for “adapted”. The threat number cannot be changed during adaptation. • NAME The title of the threat can be altered. • VERSION Version numbers are not maintained for adapted threats. • THREAT TEXT Here the text of the threat description can be edited. - 192 - GSTOOL 3.1 - User Manual BPM user defined view Tab card | Modules | This tab card lists all the modules to which this threat belongs. If no changes in the links to modules have yet been made for this threat126, then the links will be those specified in the IT BPM. Otherwise, the list will contain the results of earlier adaptation work. For further information on the consequences of clicking the [Reverse], [Delete] and [New] buttons, see Deleting safeguards from the module, page 174ff. Tab card | Notepad | See “Notepad” on page 34. 7.5.5 Define a new threat If the changes that need to be made to a threat are too major for simple adaptation, you can create additional threats that meet your particular requirements yourself. To do this, right-click and then choose <New> from the pop-up menu [New] in the toolbar or click or click the [New] button and the Define new threat window will open. This has the same three tab cards that were described above in connection with the adaptation of a threat. 126 See sections 7.3.4 Adapt a module, page 169ff and 7.3.5 Define a new module, page 175ff. - 193 - GSTOOL 3.1 - User Manual BPM user defined view Tab card | Common | • CATALOGUE The default setting for this field is the catalogue to which the threat most recently selected on the | Threats | tab card belongs. However, any other catalogue can be chosen. • PRIOR / NEW / CHANGED See section 2.4.11 New / Prior / Changed - display, page 67ff. • TYPE The threat type is automatically set as “User defined” and cannot be altered. • NO. The threat number is automatically preceded by the letter “u” for “user defined” and cannot be altered. • NAME The title of the threat has to be entered here. • THREAT TEXT A description of the threat has to be entered here. Tab card | Modules | This tab card is initially always empty for user defined threats. User defined threats are either assigned to modules or deassigned from them, in similar fashion to the adaptation of a threat that was described above. Tab card | Notes | See “Notepad” on page 34. - 194 - GSTOOL 3.1 - User Manual 7.5.6 BPM user defined view Deleting a threat Only “Adapted” or “User defined” threats can be deleted. However, the effects of right-clicking and then choosing <Delete> from the pop-up menu, clicking [Delete] in the toolbar, and clicking the [Delete] button are different for each of the two types. Deleting an adapted threat Adapted threats can be restored to their original state (type “BSI-standard”) by clicking [OK] at the prompt which appears during the deletion operation. All the data collected during the Basic Security Check (page 140ff) is retained. Deleting a user defined threat An entire user defined threat is deleted from the database currently edited by clicking [OK] at the prompt which appears during the deletion operation. The data gathered for this threat during the Basic Security Check (page 140ff) is lost. 7.6 Tab card | Protection requirement categories | On the | Protection requirement categories | tab card, the protection requirement definitions for the three categories contained in the EXPLANATION field can be viewed and modified. These explanations apply to the entire security concept. First select a protection requirement category and then either right-click and then choose <View> from the pop-up menu [View] in the toolbar. or click - 195 - GSTOOL 3.1 - User Manual BPM user defined view A browser window containing the explanatory text127 will now open. For a selected protection requirement category, double-click the relevant category or right-click and then choose <Open> from the pop-up menu or click the [Open] button [Open] in the toolbar. or click The Protection requirement definition window, in which you can edit the explanatory text, will now open. It is not possible to create additional protection requirement categories or to rename existing protection requirement categories. 127 In the condition in which GSTOOL 3.1 is supplied, the explanation fields contain the original text from the Baseline Protection Manual. - 196 - GSTOOL 3.1 - User Manual 8 IT Baseline Protection Manual IT Baseline Protection Manual GSTOOL 3.1 offers through →BPM local and →BPM online the possibility of viewing an HTML version of the entire IT Baseline Protection Manual. 8.1 BPM local view In this view, a normal browser window is opened. This enables the local HTML version128 of the IT BPM to be accessed in the familiar way. During the installation of GSTOOL 3.1, this local version is automatically copied to the PC and the necessary path settings are registered accordingly. Should it be necessary to store the local version of the BPM in a different place, the path setting will have to be amended. This is done by selecting menu option sequence <Tools> - <Options> - | Path settings | (page 50ff). 8.2 BPM online view In this view, a normal browser window is opened. This enables the latest HTML version of the IT BPM to be accessed in the familiar way on the BSI website. Internet access is necessary for this function. 128 This is automatically created during the installation of GSTOOL 3.1. - 197 - GSTOOL 3.1 - User Manual 9 Export / Import view Export / Import view Thanks to its networking capability, GSTOOL 3.1 offers the possibility of several networked PCs accessing a shared database. Should it be necessary to edit parts of the database on a PC that is not networked, →Export/Import offers the necessary functionality. Only users whose role gives them the necessary rights can carry out exports or imports. Users can only export target objects in respect of which they have write rights. • “Text file export of target object” This export option prepares target objects in the form of a table suitable for processing outside GSTOOL 3.1. • “Text file import of arget object” This option imports target objects provided in the form of tables into the GSTOOL database from TXT and CSV files. • “Standard export” This option prepares data for processing in another database. The data is loaded into the other database via a “standard import” operation. • “Standard import” This option loads data into a database for temporary editing. The data must have previously been prepared using the “standard export” option. For every “standard import”, a separate import work area is created. • “Re-export” This option prepares data that has been edited following a “standard import” for return to the original source database. • “Re-import” This option re-imports back into the source database data that was originally made available for further processing in another database using a “standard export”. During this process, newly created and amended data is written to the database. - 198 - GSTOOL 3.1 - User Manual Export / Import view The four export and import operations just mentioned together constitute a closed workflow. It is not possible to re-import data immediately after a standard export. Before this can be done, the data must be imported into another database via the standard import and then reexported via the re-export procedure. • “One-way export” This option enables data to be made available for other databases on a one-off basis. The “one-way export” covers target objects and IT asset sets, together with the modules and safeguards that have been assigned to them. • “One-way import” This option loads the data that has been provided through a one-way export into the target database. As they are not a functional part of →Export/import, the following imports are explained elsewhere in the manual: • Old data import See 2.4.1 <File> - <Data migration from GSTOOL 2.0>, page 52ff. • Metadata import See 2.4.3 <File> - <Import> - <Update BPM metadata>, page 58ff. 9.1 Text file export of target object It is not possible to export modules and safeguards in a “text file export of target object”. Should it be necessary to supply information on modules and safeguards for external processing, you should choose the standard export procedure (section 9.3, page 204ff) or a one-way export (section 9.7, page 213ff). For the purposes of the export, line breaks and semicolons in the text fields are replaced by spaces. In the editing window (| Export | tab card), click [New] to open the Prepare export window. You can then define the nature and extent of the export on the three tab cards | Properties |, - 199 - GSTOOL 3.1 - User Manual Export / Import view | IT asset sets | and | Target objects |. The progress of the export operation is indicated on the | Progress | tab card. 9.1.1 Tab card | Properties | EXPORT TYPE From the options available, choose “Text file export of target object”. NAME Every new export has to be given a name. This can be any name you like, including hyphenated names. RETURN BY This field is not applicable for the text file export of target object. 9.1.2 Export scope The scope of the text file export of target objects is specified on the | IT asset sets | and | Target objects | tab cards. Tab card | IT asset sets | Target objects that are linked to the selected asset sets are exported. Indirectly linked target objects are not included in the export if this option is selected. Tab card | Target objects | The selected target objects are exported, regardless of their links. The list can be limited to target objects of one particular type in the selection field TARGET OBJECT TYPE. - 200 - GSTOOL 3.1 - User Manual 9.1.3 Export / Import view Carrying out the export When you have finished defining the export and the target objects to be exported, click [OK] to close the Prepare export window. The newly created export is now included in the list of possible exports. Now select the export that you wish to carry out by checking column 1. Click [Run] to open the Export target objects window. Here you need to specify the directory and FILE NAME to which the export should be sent. The possible file types are: • Text files (*.txt) and CSV files (*.csv) Depending on the chosen option, the export will create either a TXT or a CSV file. • XML files (*.xml) The export of target objects in XML format is intended for further processing of the data using other software tools. • All files (*.*) With this option, an XML file is created. XML files cannot be re-imported into GSTOOL 3.1. To start the export operation, click [Save]. This | Progress | tab card is not applicable for a text file export of target object. 9.2 Target object import from text file This menu allows target objects to be imported into GSTOOL 3.1 Target objects can be imported from either TXT or CSV files. - 201 - GSTOOL 3.1 - User Manual Export / Import view In the editing window (| Import | tab card), click [New] to open the Define import window, which has the two tab cards | Common | and | Progress |. Tab card | Common | IMPORT FILE In this field, you should select the name and path of the file to be imported using the Browse button [...]. GSTOOL 3.1 can automatically recognise from the selected import file what kind of import this will be. Further Information regarding imports from text files (on Format requirements, Processing of import files and Post-processing of imported target objects) can be found starting on page 263 in the Appendix. IMPORT TYPE The type is automatically recognised from the import file chosen. NAME Every new import has to be given a name. This can be any name you like, including hyphenated names. To start the import operation, click [Run]. An information window provides you with information about the export. - 202 - GSTOOL 3.1 - User Manual Export / Import view This tells you how many data records have been successfully imported and how many have not been imported due to errors. Click [OK] to acknowledge this window, and the import just completed is now transferred to the list of imports on the | Import | tab card. If any defective data records are detected during the import operation, GSTOOL 3.1 automatically creates a corresponding error log file. An Explorer window opens, in which you can specify the name and storage location of this file. The default file name is Error.txt. The error log file only contains the defective data records, and at the end of each defective data record the error that occurred is named. The | Progress | tab card shows the progress of the import, line by line, along with the date, time and number of the target object just imported and also the total number of target objects to be imported. A progress bar also shows the progress of the import. The import can be aborted by clicking [Cancel]. The content of the database will then revert to its state prior to the start of the import. 9.2.1 Database size with target object import from text file If a very large number of target objects (3 digits or more) are imported during a “target object import from text file”, the *.MDF and *_log.LDF files in the target database can grow dramatically129. This is necessary for the import function to work properly. 129 File sizes of over 100MB are possible. - 203 - GSTOOL 3.1 - User Manual Export / Import view The size of the *_log.LDF file stays the same, whether the import has finished successfully or has been aborted. Similarly, the *.MDF file remains larger after an import has been aborted than it was at the beginning of the import, even though it does not contain any additional target objects. The size of the *_log.LDF file can be substantially reduced by detaching and then immediately attaching the associated *.MDF file. If you reorganise the *.MDF file130, its size and also the size of the *_log.LDF reduces. 9.3 Standard export Unlike the “text file export of target objects”, the standard export entails the provision of entire sections of the database, including all the information on modules and safeguards (links, implementation etc.) for editing in another GSTOOL database. This export is exclusively generated as an Access database file (*.mdb). The purpose of the standard export is to allow editing for a finite period to be carried out on parts of a (source) database in another (target) database. Until the updated data is returned (via a re-import), editing of the exported target objects is blocked in the source database. Blocking of the exported target objects is enforced as soon as an export is created (see 9.3.1 and 9.3.2), even if the export has not yet been carried out (9.3.3). In the tree, target objects that are blocked by an export are shown in blue131. 130 The reorganisation of a database is not supported by a graphical user interface in the MSDE 2000 database server software supplied and installed with GSTOOL 3.1 In an SQL Server environment, the command “DBCC SHRINKDATABASE” is available. 131 See section 2.3.9 <Tools> - <Options> - | Display | - Colour settings, page 48ff. - 204 - GSTOOL 3.1 - User Manual 9.3.1 Export / Import view Tab card | Properties | EXPORT TYPE From the options available, choose “Standard export”. NAME The export must be given a name. This can be any name you like, including hyphenated names. The chosen name is displayed in the bottom line of the GSTOOL user interface during Processing a standard import (9.4.3, page 208ff). If “Standard” is chosen as the name, then “Standard” is displayed in the bottom line and also in the standard and import work areas. It is then only possible to distinguish between the two work areas in the →Export/import view. RETURN BY In this field, you can enter a date by which the exported data has to be returned to the source database. This date is only entered for information purpose and does not undergo any evaluation within the tool. 9.3.2 Export scope It is necessary to specify which IT assets sets and which target objects are to be exported. Tab card | IT asset sets | The target objects exported are the ones that are directly linked to the IT asset sets selected. Also exported is all the other - 205 - GSTOOL 3.1 - User Manual Export / Import view information that is directly associated with these IT asset sets132 and target objects. Indirectly linked target objects are not included in the export if this option is selected. Tab card | Target objects | The selected target objects and all their related information are exported, regardless of their links. The list can be limited to target objects of one particular type in the selection field TARGET OBJECT TYPE. 9.3.3 Carrying out the export Once the nature and scope of the export have been specified, the new export will appear in the list on the | Export | tab card, ready for execution. To actually implement the export, place a checkmark next to the export in column 1 and click [Run]. Every export that has been created can only be executed once. If you try to run an export that has already been run, the [Run] button will not work. If you want to re-run an export that has already been executed, you will first have to delete it (see 9.9), recreate it and then reexecute it (see 9.3.1 to 9.3.3). 132 e.g. the entire section of “Top-level aspects” that relates to the chosen IT assets. - 206 - GSTOOL 3.1 - User Manual Export / Import view While the export operation is executing, the progress of each individual table in the database will be listed on the | Progress | tab card and graphically presented by a progress bar. Once the export has successfully completed, an appropriate message will be displayed in another window. 9.4 Standard import During a standard import, standard export files are imported into a database so that they can be worked on temporarily. In the editing window (| Import | tab card), click [New] to open the Define import window, which has the two tab cards | Common | and | Progress |. 9.4.1 Tab card | Common | IMPORT FILE Use the Browse button [...] to specify the file that is to be imported. IMPORT TYPE The type is automatically recognised from the import file chosen. NAME The import is automatically given the same name as the underlying export and cannot be changed. 9.4.2 Carrying out the import To start the import operation, click [Run]. The Define import window automatically switches to the | Progress | tab card, on - 207 - GSTOOL 3.1 - User Manual Export / Import view which the progress of the import is shown in list form and also as a progress bar. An appropriate message is displayed once the import has successfully completed. Now close the Define import window by clicking [Cancel]. The import is added to the list shown on the | Import | tab card. 9.4.3 Processing a standard import GSTOOL 3.1 can only be started with a database attached to it. To prevent this database from becoming mixed up with the target objects imported via a standard import, an additional, separate work area is created for every standard import in addition to the work area for the database with which GSTOOL 3.1 was opened. The user can tell which work area is which by their names, which are also shown on the bottom line of the GSTOOL screen. • “Standard” is the work area for the database with which GSTOOL 3.1 was opened. • In this example, “export IT asset BSI” is the work area that has been specially created for this import. To select a work area, place the mouse pointer in the desired work area and click [Activate]. In the work area of a standard import, it is not possible to adapt modules, safeguards or threats, to create user defined modules, safeguards or threats or to edit or delete them. - 208 - GSTOOL 3.1 - User Manual 9.4.4 Export / Import view Standard import without IT asset set In the →Modeling and →Reports views, only target objects that are directly linked to an IT asset set are shown. If a standard import does not contain any IT asset sets, the trees for the two views will necessarily be empty. Only the uppermost node will be displayed. In order notwithstanding to be able to edit the import and generate reports on it, you should proceed as follows: • • A dummy asset set is created133. All the target objects in the import are directly linked to the dummy asset set134. You can now edit the data contained in the import in the work area in the →Modeling view and also create →Reports. To prevent the dummy asset set being passed to the source database during the re-export or re-import operation, either it should be deleted when the person editing it has finished or else it should be excluded by the re-export operation135. 9.5 Re-export During the standard import, information for temporary editing was imported from another (source) database. To return the data, a re-export is carried out in the (target) database. 133 See section 4.3 Creating a target object, page 108ff. 134 See section 4.2.1 Direct / indirect linking, page 98ff. 135 See section 9.5.2 Export scope - Delete the dummy IT asset set, page 210. - 209 - GSTOOL 3.1 - User Manual 9.5.1 Export / Import view Tab card | Properties | EXPORT TYPE From the options available, choose “Re-export”. NAME The export must be given a name. This can be any name you like, including hyphenated names. RETURN BY This field shows the date entered during the creation of the underlying standard export. This date is only entered for information purpose and does not undergo any evaluation within the tool. 9.5.2 Export scope The scope of the re-export is specified on the | IT asset sets | and | Target objects | tab cards. The list can be limited to target objects of one particular type in the selection field TARGET OBJECT TYPE. Each re-export or re-import can only be carried out once. If some of the target objects that were contained in the standard export are not selected for the reexport, it will not be possible to return these to the source database later on in a second re-export / re-import operation. Should this nevertheless be necessary, you will have to carry out a one-way export from the target database to the original source database. Delete the dummy IT asset set If you created a dummy IT asset set in the work area of the underlying standard import and you do not want this to be - 210 - GSTOOL 3.1 - User Manual Export / Import view returned to the source database, you must deselect it on both tab cards when you are defining the scope of the export. 9.5.3 Carrying out the export Once the nature and scope of the export have been specified, the new export will appear in the list on the | Export | tab card, ready for execution, as is the case under the standard export. To now initiate the re-export, place a checkmark in column 1 of the list and click [Execute]136. While the export operation is executing, the progress of each individual table in the database will be listed on the | Progress | tab card and graphically presented by a progress bar. Once the export has successfully completed, an appropriate message will be displayed in another window. 9.6 Re-import The file created through the re-export from the target database is re-imported into the source database during the re-import operation. At the same time, the block on editing in the source database (indicated by the blue colour of the target objects) is lifted. Important A re-import can only be carried out if the associated standard export still exists in the source database. If this has been deleted, the only way to get the objects back is via a one-way export/one-way import. This will mean that the exported objects remain unchanged in the source database. The objects returned via the one-way export/one-way import will be created as additional objects. 136 The same restrictions regarding repeating an export that apply to the standard export also apply to a re-export. - 211 - GSTOOL 3.1 - User Manual 9.6.1 Export / Import view Tab card | Common | IMPORT FILE Use the Browse button [...] to specify the file that is to be imported. IMPORT TYPE The type is automatically determined from the import file chosen. NAME The import is automatically given the same name as the underlying export and cannot be changed. 9.6.2 Carrying out the import To start the import operation, click [Run]. The Define import window automatically switches to the | Progress | tab card, on which the progress of the import is shown in list form and also as a progress bar. An appropriate message is displayed once the import has successfully completed. Now close the Define import window by clicking [Cancel]. The import is added to the list shown on the | Import | tab card. A re-import is fully integrated back into the standard work area of the source database. It is separately listed in the list of imports, but it cannot be activated or deactivated like a standard import137. 137 Cf. 9.4.3 Processing a standard import, page 208ff. - 212 - GSTOOL 3.1 - User Manual 9.7 Export / Import view One-way export The one-way export is used where either an entire database or part of a database is to be permanently edited in a different place. The creation of a one-way export, the definition of the scope of the export and its actual execution are similar to the procedures described for the standard export in section 9.3, page 204ff) The only difference is that the option “One-way export” is selected in the EXPORT TYPE selection field on the | Properties | tab card. Like the standard export, as soon as a one-way export is created, the target objects to be exported are frozen to further editing. Once again, this is indicated by the blue colour of the target objects However, if you want to work on the exported target objects, you can delete a one-way export from the list of exports without any consequences. 9.8 One-way import During a one-way import, one-way export files are imported into a database for further editing. Unlike the standard import, no dedicated work areas are created for one-way imports. The imported objects are integrated into the work area that is currently active. The one-way import is carried out in exactly the same way as described for the standard import. GSTOOL can tell what type of import it is from the file selected and automatically carries out the one-way import. It is not possible to perform a one-way import directly into the source database on a file created through a oneway export. Any attempt to do this will be refused with an appropriate error message. 9.8.1 Data modification during a one-way import As the one-way import is integrated into the work area that is currently active, in some cases automatic changes are made to - 213 - GSTOOL 3.1 - User Manual Export / Import view the imported data so as to protect the data integrity in this area and avoid integrity conflicts. The following rules are applied:138 • An adapted object in the import file is integrated into the target database as a user defined object. • If any object with the same name exists in the target database, to avoid duplication of names, the name of the imported object is extended by a tilda (~) and a serial number139. 9.9 Deleting an export All the exports created to date are listed on the | Export | tab card of the Export/import of database window, with their name, explanation, date of creation and type of export. This list serves to provide information on the exports that have been carried out and the organisation of editing blocks on objects imposed internally within GSTOOL. No exports in the list can be repeated. Both standard and one-way exports block further editing of the exported target objects in the source database. In individual cases, it could be necessary to carry on working with this data.140 Deleting an export lifts any editing blocks imposed by that export. Once an export has been carried out, it is no longer possible to re-import the target objects concerned. To delete an export, place a checkmark next to it in column 1 of the list. Now click [Delete] and confirm your action at the prompt by clicking [OK]. The export will now be deleted from the list. 138 The rules apply equally to modules, safeguards and threats. The term “object” is used to refer to all of these below. 139 See also section 14.3.3 Post-processing of imported target objects - Detection of duplicate names, page 265ff. 140 If, for example, the originally intended re-import cannot be carried out or is not desirable, or if further editing of the data in the source database is required after a one-way export. - 214 - GSTOOL 3.1 - User Manual Export / Import view Important Once a standard export is deleted, the associated reimport is no longer possible! The only way to then fetch back the objects is to perform a one-way export or oneway import. This will mean that the exported objects remain unchanged in the source database. The objects returned via the one-way export/one-way import will be created as additional objects. A one-way export can be deleted without further restrictions. 9.10 Deleting an import All the imports created to date are listed on the | Import | tab card of the Export/import of database window, with their name, explanation, date of creation and type of import. This list is solely there for information purposes. None of the imports contained in the list can be repeated. The procedure involved in deleting the list contents is similar to that for deleting exports (see 9.9) and can be carried out without any impact on your work with GSTOOL 3.1. - 215 - GSTOOL 3.1 - User Manual 10 Filter Filter In many places GSTOOL 3.1 offers the possibility of using filtering selectively to reduce the amount of information shown in lists and the number of elements included in the tree. This chapter explains all the functions of the filters, as used across the system. Where special functions are available for individual filters, these are explained elsewhere, in the relevant context. Filter selection can be activated or deactivated in the three views →Structure of target objects, →Modeling and →Reports, that is, the ones in which a tree is displayed, by selecting menu option sequence <View> - <Show filters> [Filter] in the toolbar or by clicking or by pressing the key combination {Ctrl-F}. In the other screen formats and windows, the Filter menu is integrated permanently. Where a filter is displayed for the first time after the program has started up, the option “(All)” is offered in the Filter main menu. In the selection window, you can choose a filter from the list of options offered. The options “(All)” and “(New...)” are always offered. In addition, the list also includes other filters which depend on the particular view or window currently open. Further information on these filter options and the effect that they have is provided elsewhere, in the relevant context. Click or select the “(New...)” option to open the Define filter window, in which you can define new filters. Every new filter must be given a name. Click to open the Define filter window for the user-created filter displayed in the selection menu. The same options are available here as for the creation of a new filter. This button is not available for predefined filters. The button deletes filters listed in the selection box which you have created yourself. This button is not available for predefined filters. - 216 - GSTOOL 3.1 - User Manual Filter Basic filter and extended filters, when combined, act as if an AND logic operator applied. If both filters are filtering the same criterion but with different values, nothing will be shown in the tree. 10.1 Tab card | Basic filter | To enable the user to create a new filter quickly, the most important properties of the objects within the present view or window are offered here. Further information on these filter options and the effect that they have is provided elsewhere, in the relevant context. 10.2 Tab card | Extended filters | - 217 - GSTOOL 3.1 - User Manual Filter • The SEARCH-FIELD/SORTING field contains all the fields available in the database for you to select from for the purposes of filtering. • Under EITHER and OR, logical functions are available for combining individual filters. • In the next field, content which goes with the entry in SEARCH-FIELD/SORTING is offered in each case. This has to be entered in accordance with the logical function of the filtering. Logical combination of filter criteria An extended filter works within a block of items as if linked by an AND and between blocks as if linked by an OR. In the example shown above, this means: • On the basis of the entries in the first block, only safeguards that are necessary from qualification level “A” and whose fixed non-personnel costs are also over €1,000 are included in the tree. - 218 - GSTOOL 3.1 - User Manual Filter • On the basis of the entries in the second block, only safeguards which are necessary from qualification level “B” and which do not belong to the catalogue infrastructure are included in the tree. • On the basis of the entries in the third block, only safeguards that are just recommended as an optional extra and whose fixed personnel costs are below €500 are included in the tree. - 219 - GSTOOL 3.1 - User Manual 11 Administration of rights Administration of rights GSTOOL 3.1 incorporates extensive facilities for the administration of rights. These are used to control all the rights relating to a database and also the working rights within a database. The rights structure in GSTOOL 3.1 is based on the assignment of roles to users. • Roles (Rights roles141) are basically independent of any particular individuals and merely group together certain rights. • Users are natural persons, groups of persons or fictitious persons who work with GSTOOL 3.1. • When a role is assigned to a user, that person acquires the rights defined for this role. Roles and users are administered separately in GSTOOL 3.1. This means that rights can be handled both flexibly and effectively. • When a role is changed, the rights of all the users who have been assigned this role are immediately changed as well. It is not possible to cancel any rights for a user who is currently logged on to a database. Any reduction of rights does not take effect until the next time that this user logs on to a database. This means that it is possible for a user who is logged on to exercise rights (e.g. for the deletion of target objects) which have actually already been withdrawn during the present session. • When a new user is created or when the rights of a user need to be altered, it is possible to simply select from the roles already created without having to think about individual rights every time. 141 These permissions roles should not be confused with the roles that are assigned to a safeguard for a particular phase. (See section 7.4.4 Adapting a safeguard - Tab card | Roles |, page 184ff.) - 220 - GSTOOL 3.1 - User Manual Administration of rights The creation of users, the definition of roles and the linking of users with roles always apply only to the database currently open. The effect of this is that rights regarding particular databases are not assigned to a user in GSTOOL 3.1; rather, it is a case of authorised users being assigned to a particular database. Rights work in more or less the same fashion in every view of GSTOOL 3.1. Thus, it is not possible, for example, to assign different rights for →Structure of target objects from those assigned for →Modeling. 11.1 Roles Roles, also known as “rights roles”, are used to define the rights of all the users to whom this role has been assigned. Rights can be granted separately for every target object. You can only grant rights in respect of target objects that exist at the point in time when the role was defined. Additional scope for the assignment of rights is possible via Dynamic assignment of permissions (section 11.3, page 236ff). 11.1.1 Creating and editing roles To create a new role or edit or delete an existing one, select menu option sequence <Tools> - <Roles ...>, and the following window will open: - 221 - GSTOOL 3.1 - User Manual Administration of rights In the ROLE TYPE selection window, you can choose between “(All roles)”, “Rights roles” and “User roles”. The list displays all the existing roles consistent with the entry selected in the ROLE TYPE field. [New ...] If you have been assigned the role “System” or your role contains the right ENTER / DELETE USERS AND ROLES, when you click the [New...] button, the Role window will open, where you can create a new role. Irrespective of the chosen role type, the [Open] and [New role...] buttons always open the window in which you can edit the rights roles. It is not possible to create or edit user roles. [Open ...] If you have been assigned the role “System” or your role contains the right ENTER / DELETE USERS AND ROLES, when you click the [Open...] button, the Role window will open, in which you can edit a rights role, delete existing rights and assign new rights. If you do not have the right specified and the “System” role has not been assigned to you either, you can only view the rights included in the role. The “Import 3.0” and “System” roles are predefined and cannot be either amended or deleted. Irrespective of your particular rights, the [Open...] button will only enable you to view a user role. The | Data | tab card does not contain any entries. The | IT asset sets | and | Target objects | tab cards show all the existing target objects. Rights are only shown on the | Target objects | tab card, and then only for the target objects that you yourself have created.142 142 See also section 11.2.2 User roles, page 235 ff. - 222 - GSTOOL 3.1 - User Manual Administration of rights [Delete] If you have been assigned the role “System” or your role contains the right ENTER / DELETE USERS AND ROLES, then you can delete roles. When a role is deleted, users who have been assigned that role lose all the rights regarding assigned databases associated with the deleted role and cannot access those databases any more. [Update] Thanks to the networking capability of GSTOOL 3.1, it is possible in principle for a single role to be edited by more than one person at once. To avoid conflicts, it is sensible to update all the roles to the latest status, via the [Update] button, prior to editing them. Both the [New ...] and [Open ...] buttons take you to this window: ROLE NAME Every role has to be given a name. GSTOOL 3.1 allows different roles to have the same name, but this should be avoided. - 223 - GSTOOL 3.1 - User Manual Administration of rights Tab card | Data | The | Data | tab card offers all the rights for handling data. • MANAGE METADATA This right is required for all work on the metadata: - use of →BPM user defined - editing of target object types and subtypes - updates of metadata • DEFINE IT ASSET SETS This right is required to create new IT asset sets. A user can edit existing IT asset sets even without this right, using the rights granted on the | IT asset sets | tab card. • DEFINE TARGET OBJECTS This right is needed to create new target objects. A user can edit and delete existing IT asset sets even without this right, using the rights granted on the | Target objects | tab card. • ENTER / DELETE USERS AND ROLES A user with this right can create additional users. This right can only be granted to other users by someone possessing the “System” role. ‘sa’ users automatically possess this “System” role. A user whose role includes this right is free to choose all the rights for this role (with the exceptions of CREATE / DELETE USERS AND ROLES and BACK UP DATABASE). Such a user can also assign rights which are not actually assigned to ‘sa’ users to the role. The changes thus made by a user to a role take effect for all users in possession of that role, i.e. for the user himself. If a user’s assigned role confers the right CREATE / DELETE USERS AND ROLES, he cannot pass on this right. • BACK UP DATABASE This right is needed to back up databases143. This right can 143 See section 2.4.10 <Database> - <Data backup and recovery...>, page 63ff. - 224 - GSTOOL 3.1 - User Manual Administration of rights only be granted to other roles by someone possessing the “System” role. Only the Administrator ‘sa’ can restore a database backup. • APPLICATION ADMINISTRATOR With this right, you can make the following changes by selecting menu option sequence <Tools> - <Options>: | General | change the logo displayed when the program starts up | Report header | edit the entire tab card | Additional options | edit the entire tab card | Path settings | edit the entire tab card. In the Properties of target object window, you can edit the | Audit information | tab card for asset sets. • VIEW HISTORY This right is required in order to be able to view the History display of field contents. (See section 2.4.12 History, page 69ff. • EXPORTS & IMPORTS Rights for carrying out the various types of export and import are granted in this area. Even without export / import rights, a user can still delete exports that have been created. However, such action could make it impossible to re-import a standard export144. Tab card | IT asset sets | This tab card displays in a list all the asset sets that exist in the database currently being edited and the rights regarding access to them in the present role. This rights columns cannot be concealed by selecting menu option sequence <Tools> - <Options> - | Display | - RIGHTS COLUMN. 144 See section 9.9 Deleting an export, page 214ff. - 225 - GSTOOL 3.1 - User Manual Administration of rights The owner of the role has the rights entered in the RIGHTS ON GENERIC ASPECTS column in relation to the generic aspects of this IT asset set. The owner of the role has the rights entered in the RIGHTS OF TARGET OBJECTS column in relation to all the target objects directly linked to this IT asset set. To change the rights, select the IT asset set and right-click to open the rights assignment sub-menu. By combining the {×} key with the left mouse button, you can select several IT asset sets en bloc. By combining the {Ctrl} key with the left mouse button, you can select several IT asset sets in succession. The rights for the generic aspects of IT security of an IT asset set are determined by means of the four selection possibilities outlined above. The right entered here is automatically transferred to the IT asset set in the | Target objects | tab card. • NONE The user has no rights in relation to this IT asset set. Such an asset set is not visible to the user in any of the views. Only by looking down the list contained on the | IT asset sets | tab card can users find out about the existence of asset sets in respect of which they have no rights. • READ The user has only read right for this IT asset set. As far as the individual views are concerned, this means: - 226 - GSTOOL 3.1 - User Manual Administration of rights →Master data Data relating to the asset set concerned can only be read. Delete and write functions are deactivated. →Structure of target objects All existing direct links to the asset set are protected against changes. On the other hand, links lower down in the hierarchy can be edited as per normal, i.e. they can also be deleted. Example: North”. The user only has read right for IT asset set “ Building 1” and Linking of the target objects “ Record store” to IT asset set “ North” (highlighted in “ green) is protected by the rights assignment. On the other Record store” and hand, the link between target object “ “ Building 1” (highlighted in red) is not protected and can be edited. If a target object that is linked to an IT asset set in respect of which the user has only read right is deleted in the lower part of the tree, this also has the effect of deleting the link with that IT asset set. The target object is no longer part of the IT asset set. →Modeling In →Modeling, the generic aspects of IT security for the IT asset set concerned are write-protected, along with all the dependent modules down to the properties of the safeguards. All the other target objects can be edited as per normal. • WRITE The user can both read and write to the IT asset set. • AUDITOR The user can edit the | Audit information | tab card in the Properties of target object window for the IT asset set concerned. “Auditor” right can only be granted under licensed operation (section 1.3.1). In test operation (section 1.3.2), this line is inactive. - 227 - GSTOOL 3.1 - User Manual Administration of rights Rights regarding target objects are determined by the last three selection options. The rights determined here apply across the board to all target objects directly linked to the IT asset set both now and in the future145. Target objects can simultaneously be directly linked to more than one IT asset set. Where different rights are granted to IT asset sets, a target object that has more than one direct link will always be treated as having the wider right, irrespective of the actual IT asset set in which the target object is accessed. Tab card | Target objects | • The | Target objects | tab card displays in a list all the target objects that exist in the database currently being edited and the rights regarding access to them in the present role. This Rights columns cannot be concealed by selecting menu option sequence <Tools> - <Options> - | Display | - DISPLAY RIGHTS COLUMN. To make this list easier to assimilate, the FILTERS selection field can be used to restrict the content to target objects of one particular type. By right-clicking on one particular target object, it is possible to separately specify the rights for that target object. The right entered here for an IT asset set is automatically 145 For further information, see section 11.3.2 Rights relating to directly linked target objects, page 236ff. - 228 - GSTOOL 3.1 - User Manual Administration of rights transferred to the IT asset set in the | IT asset sets | tab card. If a different right has been granted to all directly linked target objects on the | IT asset sets | tab card than for a directly linked target object on the | Target objects | tab card, the wider right always applies. The three selection options described above only apply to the target object currently highlighted in the list. The following rules apply here: NONE The user has no permissions in relation to this target object. Such a target object is not visible to the user in any of the views. Only by looking down the list contained on the | Target objects | tab card can users find out about the existence of target objects in respect of which they have no permissions. READ The user has only read permission for this target object. As far as the individual views are concerned, this means: →Master data Data relating to the target object concerned can only be read. Delete and write functions are deactivated. →Structure of target objects Data relating to the target object concerned can only be read. Delete and write functions are deactivated. →Modeling In →Modeling, all the dependent modules for the target object in question are write-protected, right down to the properties of safeguards. All the other target objects can be edited as per normal. WRITE The user can access the target object with both read and write permissions. - 229 - GSTOOL 3.1 - User Manual Administration of rights The last three selection options apply to all the target objects currently contained in the list after filtering in accordance with any filters that have been selected in the FILTERS field, in exactly the same way as for the individual assignment of permissions. 11.2 Users Users are natural persons, groups of persons or fictitious persons who work with GSTOOL 3.1. The entire login procedure used in GSTOOL 3.1 is user-oriented. Users obtain their permissions in GSTOOL 3.1 through the assignment of one or more roles. 11.2.1 Creating and editing users To create a new user or to delete or amend an existing user, select menu option sequence <Tools> - <User ...> to open the All users window, where all the users created by an authorised user are listed. For all users created by ‘sa’ or users with the equivalent permission (SYSTEM ACCOUNT “User”), the USER NAME and ACCOUNT columns contain the content that was entered in the fields with the same names in the User window, tab card | Common | (see page Fehler! Textmarke nicht definiert.). Since under the “Database security” login, there is no entry in the ACCOUNT field, for users with this type of login the ACCOUNT field is empty in the list. The different presentation of users with SYSTEM ACCOUNT “System” is irrelevant to using the tool. - 230 - GSTOOL 3.1 - User Manual Administration of rights [New ...] If you have been assigned the role “System” or your role contains the permission ENTER / DELETE USERS AND ROLES, when you click the [New...] button, the User window will open, so that you can enter the user-specific data. GSTOOL users can only be created from within GSTOOL. It is not possible to create users directly via SQL Server, for example. [Open...] If you have been assigned the role “System” or your role contains the permission ENTER / DELETE USERS AND ROLES, when you click the [Open...] button, the User window will open, so that you can edit an existing user. If you do not have the permission mentioned and the “System” role has not been assigned to you either, you can only view the permissions and roles assigned to the user. [Delete] If you have been assigned the role “System” or your role contains the permission ENTER / DELETE USERS AND ROLES, then you can delete users. Any existing user role will be retained. [Update] Thanks to the networking capability of GSTOOL 3.1, it is possible in principle for a single user to be edited by more than one person at once. To avoid conflicts, it is sensible to update the All Users to the latest status, via the [Update] button, prior to editing it. Both the [New ...] and [Open …] buttons take you to this window: - 231 - GSTOOL 3.1 - User Manual Administration of rights Tab card | Common | The USER ACCOUNT area is used to specify the general permission settings of a user in relation to the database. • USER NAME When a new user is created, it must be assigned a name. This is the user name and not necessarily the same as the person’s natural name. The name assigned here cannot be changed afterwards. If this should be necessary, you will have to first delete the user and then recreate it under another name. • REGISTRATION This field is used to choose between integrated security and database security. If “Integrated security” is chosen, access to the database will then be effected under the access mechanisms with which the user logged on. - 232 - GSTOOL 3.1 - User Manual Administration of rights If possible, “Integrated security” should be chosen as the login type. A user who has successfully logged on to a Windows domain will then be authorised to start GSTOOL and use it within the framework of the role assigned to him. In Windows networks, GSTOOL (or the integrated SQL server) checks users’ permissions in the Windows domain and then decides on the basis of this whether they should be granted access to the database or not and, if so, how. If “Database security” is used, access to the database is independent of any possible existing “normal” user login to the PC or in a Windows network. • ACCOUNT If “Integrated security” has been chosen in the LOGIN field, then the ACCOUNT field is a mandatory field. Here it is necessary to enter “Domain name\User name”146. If “Database security” has been chosen in the LOGIN field, then the ACCOUNT field will be inactive. By analogy to the USER NAME field, the ACCOUNT field is also blocked during editing. • PASSWORD If “Integrated security” was chosen in the REGISTRATION field, then the PASSWORD and REPITATION fields will be deactivated. If “Database security” was chosen in the REGISTRATION field during the creation of a new user, then the PASSWORD field will be a mandatory field, into which the user password must be entered. 146 In the case of integrated security, the name of the user is the name with which the user logged on to the Windows domain. The domain and user names can be found by selecting menu option sequence [Start button] <Settings> - <Control Panel> - <System> - | User Profiles | - NAME column. - 233 - GSTOOL 3.1 - User Manual Administration of rights This password is not subject to any GSTOOL-imposed restrictions, but it should satisfy the rules presented in safeguard “S 2.11 Provisions governing the use of passwords” in the IT BPM. • REPITATION Here, the password entered has to be repeated. • [Change password] Where data relating to an existing user is to be changed, this field allows the password to be amended. • ACCOUNT ACTIVATED If the account created is also to be used, it must be activated here. If a user who has been created but whose account has not yet been activated attempts to access the database, an appropriate error message will be displayed. In the SUPPLEMENTARY INFORMATION area, background information relating to the user can be entered. If you wish to temporarily block access to the database for an existing user, then you should remove the checkmark in this checkbox. This checkbox provides an easy way of implementing a holiday block while a given user is absent on holiday. You can temporarily deny a user access to a database by deactivating the relevant user account. This avoids the need to delete a user and then recreate him later on. Tab card | Roles | This tab card shows you all the existing roles. Roles which are to be assigned to the user currently being created should have their checkboxes in column 1 checked. - 234 - GSTOOL 3.1 - User Manual Administration of rights In the ROLE TYPE selection window, you can choose between “(All roles)”, “Rights roles” and “User roles”. Through appropriate selections in column 1, it is possible to assign roles to an individual user either individually or several at a time (rights roles and user roles). Click [Open...] to view or amend the defined properties of a role. You can also create a new role from this point by clicking [New...]147. A user role can only be opened in display-only mode and cannot be altered. If no role has been selected, then details for the “System” role will be displayed148. 11.2.2 User roles GSTOOL 3.1 automatically creates a user role for every user who has the right DEFINE IT ASSET SETS or DEFINE TARGET OBJECTS through a role that has been assigned to him. The user role contains “Read/write” permission entries for all target objects created by the user concerned. 147 Further information and information specific to the permissions necessary for this can be found in section 11.1.1 Creating and editing roles, page 221ff. 148 For further information, see section 11.1.1 Creating and editing roles - [Open ...], page 222 ff. - 235 - GSTOOL 3.1 - User Manual Administration of rights User roles are subject to the following rules • User roles are automatically created and updated. They cannot be amended manually. • A user role always bears the same name as the user to whom the role with the rights defined above has been assigned. • If a user loses both of the above rights (through cancellation of the role or of the rights incorporated into the role) or if the user is deleted, the user role is transformed into a permissions role. All previous assignments of this user role to other users will be retained for the rights roles thus transformed. 11.3 Dynamic assignment of permissions During the definition of a role, rights can only be granted for target objects that exist at this point in time. To enable one or more users of a database to work effectively with GSTOOL 3.1, rights that regulate access to target objects are dynamically extended at three levels: • • • Rights relating to a user’s own target objects Rights relating to directly linked target objects Rights relating to a user role It is not possible for users to pass on rights to target objects through the inheritance mechanism. It is not possible to grant a user indiscriminate rights to a particular target object type. Thus, for example, it is not possible to create a role which has rights for all the target objects of the type “IT system”, irrespective of by whom and when an IT system is created. 11.3.1 Rights relating to a user’s own target objects A user who creates a new object in GSTOOL 3.1 is automatically granted “Read/write” right for that object. All target - 236 - GSTOOL 3.1 - User Manual Administration of rights objects thus created and the associated rights are incorporated into the user role. Right to access target objects that one has created oneself is a basic function of GSTOOL 3.1 and is not linked to any role definition. This right cannot be altered. 11.3.2 Rights relating to directly linked target objects These rights supplement one’s own rights by the assigned rights in relation to external target objects that are directly linked with a particular IT asset set. It is entirely irrelevant here who created the target object and who created the direct link to the IT asset set. No further rights for other external target objects exist. The decisive factor for this right is the assignment of rights defined for the role. Select <Tools> - <Roles ...>, and then, in the RIGHTS, TARGET OBJECTS column of the | IT asset sets | tab card, specify the required rights variant expressly for every IT asset set149 The right granted in the RIGHTS, GENERIC ASPECTS OF IT SECURITY column affects the use of rights on directly linked target objects. Example: For three IT asset sets, rights for the generic aspects of IT security and the directly linked target objects have been assigned in a role as follows: The user of this role now has the following possibilities: • For “IT asset set 01” the role does not provide any rights. This IT asset set is not therefore shown in the tree. 149 See section 11.1.1 Creating and editing roles - Tab card | IT asset sets |, page 225ff. - 237 - GSTOOL 3.1 - User Manual Administration of rights Target objects that are directly linked with “IT asset set 01” are, however, visible in the lower part of the tree, in keeping with the “read/write” rights, and can be edited there. • For “IT asset set 02” the role confers “read” right. On the Properties of target object ... window, no entries or changes can therefore be made for this IT asset set. Because of the “read” right for this IT asset set, the user can exercise the rights granted vis-à-vis this IT asset set for directly linked target objects. In keeping with the “read/write” right, he can also edit the directly linked target objects in the associated Properties of target object ... window as he pleases. • For “IT asset set 03” the role confers “read/write” right. On the Properties of target object ... window, any entries or changes can therefore be made for this IT asset set. As the role does not confer any rights for target objects directly linked to “IT asset set 03”, target objects that are only directly linked to this IT asset set are not visible. Target objects which are simultaneously directly linked with other IT asset sets for which “read” or “read/write” is entered in the RIGHTS, TARGET OBJECTS column are also displayed in “IT asset set 03” in their link and can also be edited there in accordance with the rights conferred for the other asset sets The wider right is always implemented here. 11.3.3 Rights relating to a user role As well as rights roles, user roles can also be assigned to a user. 150 151 A user to whom a user role has been assigned has the same rights as the user whose name the user role bears. These rights extend the user’s own rights to include the rights conferred for external target objects that have been created by a different user. The rights conferred in the user role are not transferred to other roles assigned to the user. 150 For further information on user roles, see section 11.2.2 User roles, page 235ff. 151 See section 11.2.1 Creating and editing users - Tab card | Roles | , page 234 ff. - 238 - GSTOOL 3.1 - User Manual Administration of rights Example: Sometimes it can be necessary for several different users to all work on a database with the same rights. Within the rights structure used in GSTOOL 3.1, this situation can be enabled by creating a user group. Here, each user in the group is assigned the user roles belonging to all the other members of the group as well as their own role. • • The group has three members, X, Y and Z. • Each group member’s own role grants right to create IT asset sets or target objects. In this way, GSTOOL automatically creates a user role for each member: XU, YU and ZU. • Each user in the group is assigned the user roles of the other two members of the group in addition to their own individual role and their own automatically created and assigned user role. For each group member, an individual role is created: Xi, Yi and Zi. Thus, the three group members are assigned the following roles: User X: the roles Xi, XU plus YU and ZU. User X: the roles Yi, YU plus XU and ZU. User Z: the roles Zi, ZU plus XU and YU. This role assignment has the following effect: In the user role of each group member, “Read/write” right is noted for each target object created by that member. Every other user to whom this user role has been assigned thus has the same “Read/write” right for each of these targets objects as the user who created the target object. Naturally, it is also possible for several users to log on to a database using the same username and the same password. As the history display shows the name of the user who was logged on when the field content was altered, in this case it will not be possible to trace back changes to the individuals who made them. - 239 - GSTOOL 3.1 - User Manual 12 The inheritance mechanism The inheritance mechanism One major advantage in creating an IT BPM-based security concept using GSTOOL 3.1 is the extensive automatic passing on of important information and conditions. The following areas are supported by the inheritance mechanism: • • • inheritance of protection requirements inheritance of the implementation status of safeguards inheritance of the qualification level achieved All the inheritance rules are predefined in GSTOOL 3.1 and cannot be altered by the user. GSTOOL uses these rules to generate suggestions at points where information could be passed on. However, the user can always change such suggestions. 12.1 Inheritance of the protection requirement The protection requirement of IT equipment is basically determined by the information handled in an application. Accordingly, applications’ protection requirements are passed on to target objects higher up in the hierarchy. GSTOOL 3.1 implements this inheritance mechanism in the form of suggestions. Only the express assessment of protection requirements 152 contained in the fields for CONFIDENTIALITY, INTEGRITY and AVAILABILITY is ever passed on and offered in the next higher target object as a suggestion. Suggestions are not passed on. Here, suggestions follow the Maximum Principle153 If more than one application is linked to the same IT system, then the entry that appears in the SUGGESTION field will always be the highest protection requirement for the relevant basic parameter out of all the linked applications. 152 See “Tab card | Specific task |“ on page 81, in section 3.2 Creating a new target object. 153 See also the information on page 252, section 13.3.2 Assessment of protection requirements. - 240 - GSTOOL 3.1 - User Manual 12.2 The inheritance mechanism Inheritance of implementation status Inheritance of safeguard implementation status is based on the entries that are made in the editing windows • • Properties of safeguards , in the IMPLEMENTATION field Properties of module allocation , in the EDITED field It is also applied in similar fashion to all the user defined elements. Inheritance is always effected one step at a time from below to above, i.e. from safeguards to module, from module to layer or to target object etc. The implementation status of safeguards and qualification level achieved are inherited independently of each other. Thus it is possible for a module to simultaneously be assigned the implementation status “ψred” of the safeguards and the qualification level achieved of . For example, this would be the case if all the safeguards necessary to attain qualification level B had been implemented, but other safeguards in the same module had not. 12.2.1 Inheritance from safeguards to module The selection made in the IMPLEMENTATION field in the Properties of safeguards window has the effect of colourcoding the implementation identifiers for the safeguards as follows: Implementation Implementation identifier yes no partially dispensable untreated ψgreen ψred ψyellow ψblue no colour 154 The implementation status that is passed upwards is always the least favourable one as far as IT security is concerned. 154 On some PCs “untreated” implementation status could be presented as a light grey bar. The functioning of inheritance is not affected by this. - 241 - GSTOOL 3.1 - User Manual The inheritance mechanism • If at least one safeguard has been untreated, then, irrespective of the implementation status of all the other safeguards in the module, the module will bear the identifier “ no colour”, i.e. indicating implementation untreated. • If the implementation of at least one safeguard is stated as no and there are no unprocessed safeguards in the module, then, irrespective of the implementation status of all the other safeguards in the module, the module will bear the identifier “ψred”, i.e. indicating implementation no. • If the implementation of at least one safeguard is stated as partially and there are no unprocessed safeguards or safeguards which have not been implemented in the module, then, irrespective of the implementation status of all the other safeguards in the module, the module will bear the identifier “ψyellow”, i.e. indicating implementation partially. • Only if the implementation of all the safeguards in the module is stated as yes or dispensable155 will the module bear the identifier “ψgreen”, i.e. indicating implementation yes. ψgreen ψblue ψyellow ψred no colour : ψ λ λ : ψ λ λ λ : ψ λ λ λ λ : ψ λ ψ λ ψ : Implementation status of the module ψgreen ψblue ψyellow ψred ψ ψ ψ : : Cannot be passed on Implementation of safeguards is passed on to This is presented in tabular form as follows: no colour : : : Key: : - λ Implementation status stated Implementation status not stated Implementation status not relevant to inheritance process 155 Safeguards designated “Unnecessary” are treated in the same way as ones with implementation “Yes” when it comes to the passing on of implementation status to the module. - 242 - GSTOOL 3.1 - User Manual The inheritance mechanism 12.2.2 Inheritance from modules to layer or target object The selection made in the EDITED field in the Properties of module allocation window has the effect of colour-coding the implementation identifiers for the safeguards as follows: EDITED yes The implementation identifier is passed across from the and safeguards in accordance with the inheritance rules. IN TARGET OBJECT (not referenced) EDITED yes The implementation identifier is adopted from the module and referenced. IN TARGET OBJECT /other target object/ EDITED dispensible and IN TARGET OBJECT (not referenced) The implementation identifier is set to “ψblue”, irrespective of the implementation identifiers of the safeguards. The qualification level achieved is stated as . EDITED no and IN TARGET OBJECT (not referenced) The implementation identifier is set to “ψred”, irrespective of the implementation identifiers of the safeguards. The qualification level achieved is stated as . Once again, it is always the implementation status that is least favourable for IT security that is passed from the module to the layer or target object: • If at least one module carries the identifier “ no colour”, i.e. implementation untreated as a result of inheritance from the associated safeguards or because it has been adopted as a result of referencing, then the layer or target object to which the module belongs will bear the identifier “ no colour”, i.e. indicating implementation untreated, irrespective of the implementation status of the other modules that belong to that layer or target object. • If at least one module carries the identifier “ψred” as a result of inheritance from the associated safeguards, because it has been adopted as a result of referencing or because no has been entered in the EDITED field and there is no module in the layer with the identifier “ no colour”, i.e. untreated, then the layer or target object to which the module belongs will also bear the identifier “ψred”, i.e. indicating implementation no, irrespective of the implementation status of the other modules that belong to that layer or target object. • If at least one module carries the identifier “ψyellow”, i.e. partially implemented, as a result of inheritance from the associated safeguards or because it has been adopted as a result of referencing and there is no module in the layer or target object that carries the identifier “ no colour” or “ψred”, then the layer or target object to which the module belongs - 243 - GSTOOL 3.1 - User Manual The inheritance mechanism will bear the identifier “ψyellow”, irrespective of the implementation status of the other modules that belong to that layer or target object. • If all the modules in a layer or target object carry the identifier “ψgreen” as a result of inheritance from the associated safeguards or because it has been adopted as a result of referencing or if they carry the identifier “ψblue”156 because “Dispensable” was entered in the PROCESSED field, then the layer or target object will bear the identifier “ψgreen”. Implementation status of modules ψgreen ψblue ψyellow ψred no colour : ψ λ λ : ψ λ λ λ : ψ λ λ λ λ : ψ λ ψ λ ψ : is passed on to This inheritance process is presented in tabular form as follows: Implementation status of the layer or target object ψgreen ψyellow ψred ψ ψ ψ no colour : : : : : Key: : - λ Implementation status stated Implementation status not stated Implementation status not relevant to inheritance process 12.2.3 Inheritance from layers or target objects to further up in the hierarchy Inheritance from layers or target objects to an asset set and from there to the company or agency in turn follows the same rules, except that there is no identifier “ψblue” for layers, target objects and asset sets. 156 Unnecessary modules are treated for the purposes of inheritance by the layer or target object as if all the safeguards contained in them have been implemented. - 244 - GSTOOL 3.1 - User Manual 12.3 The inheritance mechanism Inheritance of qualification level achieved Inheritance of qualification level achieved is based on the entries that are made in the editing windows • • Properties of safeguards , in the IMPLEMENTATION field Properties of module allocation , in the EDITED field These entries correspond to the qualification requirements of , or . safeguards, which are indicated by the icons Safeguards with the icon are ignored during the inheritance process. • If all the safeguards in a module whose icon contains the letter “A” have been implemented, then the module bears the . identifier • If all the safeguards in a module whose icon contains the letter “B” have been implemented, then the module bears the identifier . • If all the safeguards in a module whose icon contains the letter “C” have been implemented or if the module is shown as dispesable “ψblue” in the IMPLEMENTATION field, then the module bears the identifier . Layers and target objects inherit the qualification level achieved by the associated modules, following the principle that the lowest qualification level achieved in the modules is the one inherited. The same applies for the inheritance of qualification level achieved from layers or target objects to IT asset sets and from IT asset sets to the company/agency in turn. The process by which qualification level achieved is passed on takes into consideration all the safeguards which according to the IT BPM belong to a module or all the modules that belong to a layer or target object. If a safeguard or a module is removed in →Modeling, the qualification layer whose achievement depends on implementation of the safeguard or safeguards in the module cannot be achieved. - 245 - GSTOOL 3.1 - User Manual The inheritance mechanism For further information on the independence between the inheritance of implementation status from safeguards and the inheritance of qualification level achieved, see section 12.2 Inheritance of implementation status, page 241. - 246 - GSTOOL 3.1 - User Manual 13 The IT Baseline Protection methodology The IT Baseline Protection methodology The BSI’s IT Baseline Protection Manual describes an approach for creating, updating and analysing IT security concepts for information technology assets with average protection requirements. It also contains standard security safeguards covering organisational, personnel-related, technical and infrastructural aspects of IT security. These standard safeguards can also be used to achieve a basic level of security for IT components that have high protection requirements. The methodology for using the IT Baseline Protection Manual is summarised briefly below. A more detailed description of the structure and approach can be found in chapters 1 and 2 of the IT Baseline Protection Manual. The latest version of the IT Baseline Protection Manual can also be found on the BSI’s website at http://www.bsi.bund.de/gshb. 13.1 Rationale for adopting this approach Both the hardware and software components and also the architectures and communications structures found in information technology are subject to rapid evolution. Keywords for different generations of architectures and concepts that one could mention include host-based processing, client-server architecture, thin clients and web interfaces. Nevertheless, is noticeable that most installations and solutions are essentially composed out of only a few types of components. Examples of such components are servers, routers, data media and communication lines. Through the use of these typical components, the same kind of threats to IT operations are found on a recurring basis. If there are no special security requirements, these threats are largely independent of the specific application scenario. This leads to two possible approaches: • The threats to IT operations and the probability of damage resulting from these threats can be roughly calculated if certain assumptions are made. It is thus not always necessary to carry out a full risk analysis. - 247 - GSTOOL 3.1 - User Manual • The IT Baseline Protection methodology Packages of standard security safeguards which offer a reasonable and adequate degree of protection against these threats under normal security requirements can be derived. It is thus not always necessary to develop tailored safeguards for every application. With the applications that are standard today, it is not possible to achieve a reasonable level of security by technical mechanisms and functions alone. On the contrary, technical security functions must be accompanied by safeguards covering organisational, staff-related and building-related aspects. Examples of such accompanying safeguards are the appointment of responsible persons, staff training and fireproofing. If this approach is to be cost-effective, it is important that these standard security safeguards can largely be implemented using functions, components or organisational features that already exist, so that they are not unduly expensive. Compared with traditional risk and security analyses, under which security safeguards are identified for each element of an existing IT landscape, this approach offers the following advantages amongst others: • As the standard security safeguards involved are used again and again, they can be described explicitly and in detail in a catalogue. • IT security analyses based on standard security safeguards save work, as they are essentially limited to a target-versusactual comparison. • The resulting IT security concepts are scalable, can be updated and are compact, as they refer to an existing reference source. • The security safeguards to be implemented have been proven in the field and therefore offer good protection against the relevant threats in typical operational scenarios. The concept of IT Baseline Protection is aimed at establishing a level of security for IT solutions which is reasonable and adequate for normal security requirements, through the implementation of building-related, organisational, personnelrelated and technical standard security safeguards. Moreover, the security level achieved by this means can also serve as the - 248 - GSTOOL 3.1 - User Manual The IT Baseline Protection methodology basis for IT applications that have a high protection requirement. 13.2 Structure of the IT Baseline Protection Manual The BSI’s IT Baseline Protection Manual describes an approach for creating and testing IT security concepts on the basis of standard security safeguards. Moreover, it contains packages (“modules”) of standard security safeguards that are suitable for typical IT processes, applications and components. These modules are split over five layers in accordance with their particular focus: • Layer 1 covers all the top-level IT security aspects. Examples here are the “Personnel”, “IT Security Management” and “Data Backup Policy” modules. • Layer 2 is concerned with building-related aspects. Examples here are the “Buildings”, “Server Rooms” and “Working Place at Home (Telecommuting)” modules. • Layer 3 covers the individual IT systems. Examples here are the “UNIX System”, “Laptop PC” and “Telecommunications System (Private Branch Exchange, PBX)” modules. • Layer 4 is concerned with the networking aspects of IT systems. The modules which are relevant here include, for example, “Heterogeneous Networks”, “Network and System Management” and “Firewalls”. • Layer 5 is concerned with the actual IT applications. Examples here are the “E-mail”, “Web Servers” and “Databases” modules. Every module of the IT Baseline Protection Manual contains a brief description of the subject, a list containing references to the relevant threat in question and a list of references to the relevant standard security safeguards in each case. The threats and safeguards are broken down in turn into a series of independent catalogues. - 249 - GSTOOL 3.1 - User Manual The IT Baseline Protection methodology 13.2.1 Threat catalogues T1 Force Majeure ................................ e.g. T 1.13 Storms T2 Organisational Shortcomings ......... e.g. T 2.29 Software testing with production data T3 Human Error.................................. e.g. T 3.24 Inadvertent manipulation of data T4 Technical Failure ............................ e.g. T 4.26 Failure of a database T5 Deliberate Acts ............................... e.g. T 5.24 Replay of messages 13.2.2 Safeguard Catalogues S1 Infrastructure ................................. e.g. S 1.54 Early detection of fires / fire extinguishing technology S2 Organisation .................................. e.g. S 2.25 Documentation of the system configuration S3 Personnel ...................................... e.g. S 3.22 Regulations concerning substitution of telecommuters. S4 Hardware & Software .................... e.g. S 4.95 Minimal operating system S5 Communications............................ e.g. S 5.69 Protection against active content S6 Contingency Planning ................... e.g. S 6.18 Provision of redundant lines Both the modules and also the threats and standard safeguards are updated and expanded at least once a year. These updates are oriented towards the needs of users of the manual. 13.3 How to use the IT BPM in brief Chapter 2 of the IT Baseline Protection Manual defines and describes a methodology for creating or checking IT security concepts on the basis of standard security safeguards for IT solutions. This methodology is outlined below. 13.3.1 IT Structure Analysis This entails gathering information about the IT equipment that supports the area under consideration (“IT asset set”). The starting point here should be a network diagram (e.g. a network topology) which shows the IT systems and their networking links. Experience suggests that these diagrams are frequently not up-to-date, so the first task is to update the network diagram(s). To reduce the complexity, similar objects should then be grouped together to make the IT assets which are the subject of consideration more manageable. This is important, for example, where a department has a number of clients which are very similar as regards configuration, administration, framework conditions and applications. The outcome of this exercise is a - 250 - GSTOOL 3.1 - User Manual The IT Baseline Protection methodology new, streamlined network diagram, in which groups rather than individual objects are shown at many points. Finally, lists of the installed and planned IT systems and IT applications are drawn up. This can be done in the form of a table or with the aid of a suitable tool. The IT systems to be included here are not confined to computers in the narrower sense but also include network components and private branch exchanges. The list of IT systems should include a unique designation together with details of type, function, platform and installation location. The list of IT applications does not have to include every application and every program that is installed or used. It is sufficient to list for each IT system those IT applications which have the highest requirements in terms of confidentiality, integrity or availability. A table showing which IT systems are necessary to run the individual IT applications is prepared. Here it is necessary to consider not only clients and servers but also, for example, network switching elements. At the end of the IT Structure Analysis, the following documents will have been created: • • • a streamlined network diagram a list of IT systems together with the associated information a list of the most important IT applications, including dependencies on IT systems. A detailed description of the IT Structure Analysis is contained in section 2.1 of the IT Baseline Security Manual. 13.3.2 Assessment of protection requirements The aim of the assessment of protection requirements is to ascertain how much effort needs to go into protecting IT applications, IT systems, communication links and rooms against impairment of confidentiality, integrity and availability. For this purpose, the IT Baseline Protection Manual uses three categories: low to moderate, high and very high. First of all it is necessary to define what exactly is understood by each of these three categories in the organisation concerned. This assessment concentrates on the potential damage that is to be expected in the event of damage, - 251 - GSTOOL 3.1 - User Manual The IT Baseline Protection methodology malfunction or a successful attack. The IT Baseline Protection Manual contains suggestions for the definition of the three categories, but in most cases these will need to be tailored to the organisation concerned. The protection requirement of the IT applications that have been noted down during the IT Structure Analysis can then be assessed with reference to damage scenarios. For each IT application, this assessment is carried out separately against each of the three basic parameters of confidentiality, integrity and availability. To assist with this, the IT Baseline Protection Manual contains numerous damage scenarios and appropriate questions that need to be answered for each IT application under consideration. The rationale behind the decisions made for each of the protection requirement categories must be given, so that this can be traced back later on. The protection requirements for IT systems are derived from the protection requirements of the IT applications. The information about the interrelationships between IT systems and IT applications that is needed here will have already been generated during the IT Structure Analysis. Dependencies between individual IT applications also flow into this analysis. Normally the protection requirement of a given IT system is derived from the Maximum Principle, but sometimes the cumulative effect or the distribution effect must also be considered. The protection requirements of the rooms in which IT equipment is used and of the communication links are ascertained in a similar fashion. To reduce the complexity of the analysis, in the case of communication links the classification into the three categories of low to moderate, high and very high is omitted. Instead, the only distinction made is between critical and non-critical links. Critical communication links would include, for example, communication links to the outside world. The critical links can be graphically highlighted in a network diagram. By the end of the assessment of protection requirements, the following overviews will have been prepared: • • Protection requirement of the IT applications Protection requirement of the IT systems - 252 - GSTOOL 3.1 - User Manual The IT Baseline Protection methodology • Protection requirement of rooms in which IT equipment is used • List of the critical communication links For components with a low to moderate protection requirement, the standard security safeguards contained in the IT Baseline Protection Manual will generally be reasonable and adequate. Where the protection requirements are higher, more extensive security mechanisms may be necessary. 13.3.3 Modeling Modeling is central to the methodology set forth in the IT Baseline Protection Manual. During Modeling, the modules in the IT Baseline Protection Manual are assigned to the actual processes and components (“target objects”) that exist. This assignment is definitely not one-to-one. A given module can be assigned to several different target objects (it is “applied” several times) and several modules can be assigned to one particular component (which is “modelled” through several modules). The IT Baseline Protection model for IT assets already in service identifies the standard security safeguards that are relevant through the modules used. It can be used in the form of a test plan for carrying out a target versus actual comparison. By contrast, the IT Baseline Protection model for a planned set of IT assets constitutes a design concept. It specifies via the selected modules which standard security safeguards must be implemented on entry into service of the IT assets. To contain the application fields of the individual modules, the Modeling is broken down into the five layers used in the IT Baseline Protection Manual. Section 2.3 of the IT Baseline Protection Manual explains to which target objects and under what preconditions each module should be applied within these five layers. Here is an example from Layer 4. “Module 7.3 Firewalls must be applied to every external connection to third party IT systems or networks where IT systems in the internal network which have a high protection requirement can be accessed over this external connection. This applies even if no firewall system is in use there yet. - 253 - GSTOOL 3.1 - User Manual The IT Baseline Protection methodology Examples here are internet connections, remote access facilities and links to networks owned by business partners.” These descriptions must be gone through systematically. For each module it is necessary to check the target objects in the IT asset set under consideration to which it needs to be applied. The Modeling thus generated constitutes the IT Baseline Protection security concept for the IT asset set under consideration. 13.3.4 Basic Security Check If the IT Baseline Protection Manual is applied to an existing set of IT assets, the next step is to check which of the standard security safeguards that have been identified as necessary during Modeling have already been implemented and where shortcomings still exist. This entails carrying out interviews and random checks. This stage is known as the Basic Security Check and is described in section 2.4 of the IT Baseline Protection Manual. Before one can start, some preliminary work is necessary, for example, it is necessary to set up a suitable project team, inspect any existing documentation and decide on suitable people to interview and contact persons for each individual module. Since normally several organisational units will be involved, an interview schedule must be agreed. During the actual data collection process, the implementation status is ascertained for every safeguard within the module under consideration. There are four possibilities: “Dispensable” It is not necessary to implement the safeguard in the manner suggested. “Yes” All the recommendations in the safeguard have been implemented effectively and in their entirety. “Partially” Some of the recommendations have been implemented, while others have not yet been implemented or only partially implemented. “No” Most of the recommendations contained in the safeguard have not yet been implemented. - 254 - GSTOOL 3.1 - User Manual The IT Baseline Protection methodology During the interviews, in each case it is necessary to systematically work through all the safeguards for a given module and ascertain the relevant implementation status. In GSTOOL 3.1, the results are entered in the →Modeling component, which is described in this manual in section 5.5 Basic Security Check, page 140ff. Amongst other things, the names of the persons interviewed, the implementation status of each safeguard and any comments or reasons should be documented. The outcome of the Basic Security Check is a detailed summary of which standard security safeguards from the IT Baseline Protection Manual have already been implemented and in which areas further work is required. 13.3.5 Supplementary security analysis During the assessment of protection requirements, for each of the three basic parameters of confidentiality, integrity and availability the IT applications, IT systems, communication links and rooms in which IT equipment is used were separately assigned one of the protection requirement categories of low to moderate, high and very high. The standard security safeguards contained in the IT Baseline Protection Manual should be used for all these targets objects. They provide a basic level of security that is reasonable and adequate for normal security requirements. The IT Baseline Protection Manual also contains recommendations that are relevant to higher protection requirements, although in some cases it may be necessary to supplement them with additional, more extensive IT security safeguards. Supplementary security mechanisms could also be necessary, for example, where special components that are not covered in the IT Baseline Protection Manual are used but which play an important role for the overall security of the IT assets. Section 2.5 of the IT Baseline Protection Manual contains some examples of how to proceed that will help in carrying out a supplementary security analysis. • One procedure is risk analysis. Here, the threats that are relevant to the IT asset set are determined separately. An assessment is then carried out as to the probability that - 255 - GSTOOL 3.1 - User Manual The IT Baseline Protection methodology damage could result from a particular threat. This information forms the basis for selecting the IT security safeguards that are necessary. • During penetration testing, an attempt is made to simulate the aggressive behaviour of an insider or outsider carrying out a deliberate attack. In many cases, it will be clear from the results what countermeasures are necessary. It is important during this procedure to avoid causing unintentional damage. • The differential security analysis is aimed at identifying any IT security safeguards that are still missing or need to be added after the standard security safeguards contained in the IT Baseline Protection Manual have already been implemented. Depending on the particular situation, it may be useful to use a combination of the above procedures or to choose other procedures. At the end of this stage, information will be available on any additional IT security safeguards needed to protect the IT asset set which supplement or replace the IT Baseline Protection safeguards. 13.3.6 Implementation of IT security safeguards The Basic Security Check will have determined which relevant standard security safeguards have already been implemented and the areas which have not yet been adequately addressed. During the supplementary security analysis any necessary more extensive IT security safeguards will have been identified for the IT assets under consideration. The next step is to implement the outstanding safeguards and thus eliminate existing shortcomings. As described in section 2.6 of the IT Baseline Protection Manual, it is necessary here to first of all to review the investigation results and then convert them to a form which is easy to understand. The safeguards that have still not been implemented should now be consolidated. This is especially important if, during the supplementary security analysis, any additional IT security safeguards have been identified which possibly render particular IT Baseline Protection safeguards redundant. An estimate of the costs and effort required can now - 256 - GSTOOL 3.1 - User Manual The IT Baseline Protection methodology be prepared. A distinction should be made here between oneoff and recurring investment and labour costs. On the basis of the estimate of costs and effort required a decision must now be made as regards the budget that will be made available to implement the outstanding IT security safeguards. If the budget is not sufficient to cover all the outstanding safeguards, the resulting residual risk must be made transfather. The next step is to determine the sequence in which these outstanding safeguards are to be implemented. Here it is imperative that any logical or technical dependencies between safeguards are considered. Other criteria which should be considered in determining a sensible sequence are the priorities (1-3) or certification identifiers (A-C, Z) and the wider impact of the IT security safeguards. In addition, for every safeguard to be implemented and for control purposes it is necessary to define responsibilities and the relevant deadlines. To ensure that the organisational and technical IT security safeguards introduced are also accepted by the workforce, they must be given awareness training on possible security problems. Otherwise, there is a danger that security mechanisms could be circumvented either knowingly or unknowingly and thus be rendered ineffective. The outcome of this stage is an implementation plan that documents the decisions that have been made and the plans for every safeguard to be implemented. 13.3.7 IT Baseline Protection Certificate To give companies and agencies the opportunity to make the successful implementation of IT Baseline Protection transfather both within the organisation and to the outside world, the BSI has defined a qualification and certification scheme for IT Baseline Protection. This is recommended, for example, for companies who want to document their efforts in the area of IT security to their customers or business partners. This procedure can also be beneficial in government agencies as a means of raising the confidence of the public in the security of e-government services. - 257 - GSTOOL 3.1 - User Manual The IT Baseline Protection methodology The qualification and certification scheme envisages three levels: • • • the IT Baseline Protection Certificate the self-declared “IT Baseline Protection higher level”. the self-declared “IT Baseline Protection entry level” The IT Baseline Protection Certificate is issued by an accredited certification authority and requires that an audit is carried out on the subject of the investigation by an external IT Baseline Protection auditor licensed by the BSI. On the other hand the two kinds of self-declaration can be accepted without any external audit of the company or agency. They serve as milestones on the path towards gaining the actual IT Baseline Protection Certificate. With a self-declaration, an organisation is documenting the fact that it is currently “in the IT Baseline Protection process”. Further information on the IT Baseline Protection Certificate can be found in section 2.7 of the IT Baseline Protection Manual and also on the BSI’s website at http://www.bsi.bund.de/gshb/zert. 13.3.8 Maintenance of IT security It is a characteristic of processes and components in the information technology world that nothing stands still but changes is constant and rapid. It is therefore not sufficient to prepare and implement an IT security concept for the IT assets on a one-off basis. Instead, the implications of every change must be considered promptly to ensure that secure operations can be maintained. The steps described above in applying the IT Baseline Protection Manual should therefore be repeated at regular intervals, and in each case it is necessary to check where any changes in the use of IT affect the security concept and the implementation of security safeguards. There will always be cases where new IT security mechanisms become necessary, even if the IT landscape employed has not changed. One example here is changes to the protection requirement which result from the fact that a particular IT application has suddenly become a lot more important to the organisation and is hence in need of greater protection. - 258 - GSTOOL 3.1 - User Manual 13.4 The IT Baseline Protection methodology Sources of supply The IT Baseline Protection Manual can be obtained from three distribution channels: • The printed, German language version is distributed by the Bundesanzeiger-Verlag (http://www.bundesanzeiger.de). The document is available as a set of three loose-leaf binders for €148. The ISBN number is 3-88784-915-9. • The BSI CD-ROM contains both German and English language versions of the IT Baseline Protection Manual. This CD-ROM can be obtained from the BSI by sending in a reply-paid envelope. (http://www.bsi.bund.de/produkte/cdrom) • The complete IT Baseline Protection Manual, in both German and English, is available on the BSI’s website at (http://www.bsi.bund.de/gshb). Further information on IT Baseline Protection and the IT Basement Protection Certificate is also provided there. - 259 - GSTOOL 3.1 - User Manual 14 Appendix 14.1 Keyboard commands Appendix In addition to the menu bar, toolbar, Navigator and buttons contained on the various GSTOOL 3.1 screens, many functions can also be controlled directly via the keyboard. • Some keyboard commands can only be used when they are relevant to the screen on which the user is currently working. • Some keyboard commands serve a different function depending on the screen on which the user is currently working. • It is not possible to define new keyboard commands. {F1} Invokes the online help. {F2} Invokes a display of the history of the previous content of the field on which the cursor is currently positioned, provided that a history has been maintained of this field. To view the history of field content, it is necessary to have the appropriate right. {F5} Updates the display. (Has the same effect as {Del} [Update] in the toolbar.) Deletes the selected object. [Delete] in the toolbar.) (Has the same effect as This command is available in the following views: →Modeling →Structure of target objects If {Del} is applied to a selected target object in the upper part of the tree, its link is deleted. If it is applied to a target object in the lower part of the tree, the target object is deleted. →Master data →BPM user defined, with the exception of tab card | Target object types |. If you use {Del} on an adapted object, this object will - 260 - GSTOOL 3.1 - User Manual Appendix revert to its original state. A user defined object will be deleted. {Ctrl+A} The objects that are subordinate to and belong to the object highlighted in the tree in the →Reports view will be included in the scope of a report. (Has the same effect as right-clicking with the mouse and then choosing <Select dependent objects> from the pop-up menu. {Ctrl+B} This command (which has the same effect as [Open] in the toolbar or double-clicking) clicking is available in the following views, the result being slightly different in each case: →Master data →BPM user defined For user defined and adapted objects, {Ctrl+B} opens the editing window, for objects of type “BSI Standard”, the viewing window is opened. {Ctrl+D} This command (which has the same effect as [Delete] in the toolbar) is available in the clicking following views, the result being slightly different in each case: →Modeling Here {Ctrl+D} deletes the existing link between the selected object and another one. The selected object will retain its other links and, if required, it will be possible to recreate the link later on. →Structure of target objects For a selected target object in the upper part of the tree, {Ctrl+D} deletes the target object link at the highlighted point. For a target object selected in the lower part of the tree, {Ctrl+D} has the effect of deleting the target object itself. →Master data Here {Ctrl+D} has the effect of completely deleting the selected object. All existing links are deleted and the object is then no longer available. - 261 - GSTOOL 3.1 - User Manual Appendix →BPM user defined Here {Ctrl+D} has the effect of deleting objects on tab cards | Target object subtype |, | Modules |, | Safeguards | and | Threats | which have the entry “User defined” in the TYPE column. User defined target object types can only be deleted via the <Tools> - <Target object types ...> menu. {Ctrl+E} Inserts the content of the application clipboard into the currently selected object. {Ctrl+F} Toggles the filter selection field on and off [Filter] in the toolbar). (has the same effect as This command is only available in →Structure of target objects, →Modeling and →Reports. {Ctrl+G} Opens an HTML page from the Baseline Protection Manual that is relevant to the data record currently on display. (Has the same effect as [View] in the toolbar.) If there is no information in the BPM, then an empty page is displayed. {Ctrl+I} Opens the GSTOOL 3.1 Information window. {Ctrl+K} Copies the currently selected object to the application clipboard. {Ctrl+N} Has the same effect as [New] in the toolbar, and is available in the following views: →Master data →BPM user defined →Structure of target objects →Modeling →Export/import {Ctrl+P} In →BPM local and →BPM online, {Ctrl+P} initiates the printing of selected text, and in →Reports it initiates the printing of a report. (In →BPM local and →BPM online, it has the same [Print] in the toolbar.) effect as - 262 - GSTOOL 3.1 - User Manual {Ctrl+S} Appendix Saves the selected or adapted object. (Has the same effect as [Save] in the toolbar and [Save] in screen layouts and windows.) {Ctrl+U} 14.2 In →Modeling, it has the effect of toggling between the layer model and object model presentations. [Model] in the toolbar.) (Has the same effect as Conventions for the numbering of modules In the IT BPM, module numbering follows a scheme that takes the subject matter into account, as follows: • • • • • • • M 3.x Management, organisation, concepts, personnel M 4.x Buildings, rooms, technical infrastructure M 5.x Non-networked systems and clients M 6.x Networked systems M 7.x Data transfer M 8.x Telecommunications M 9.x Other modules which do not obviously belong to any of the other areas. Further information on the numbering system can be found in the IT BPM. 14.3 Information regarding imports from text files 14.3.1 Format requirements • Each data record is stored as a single line. Each column entry is separated from the next by a semi-colon. • • All the data for a target object must be contained in one line. • The column names must comply with the requirements which are listed in the online help under key word “Field list”. The first line in the file (header) contains the column names. The column names can be arranged in any order. - 263 - GSTOOL 3.1 - User Manual Appendix Either the term before the bracket or the term contained in brackets can be used. It is important to adhere precisely to the required notation. Example: “Type” or “ZOT_ID” “Subtype” or “ZOS_ID” etc. • As a minimum, the table must contain the columns Name (NAME), Type (ZOT_ID) and Subtype (ZOS_ID). You are free to choose which of the other columns should be included or left out. • In the other lines, the data to be imported is written line-byline, mirroring the column names contained in the first line. • Certain values157 can be specified either as numbers or as text. 157 This applies to: Protection requirement - confidentiality (SBK_ID_VERTR) IT system status (STA_ID) Employee role (ROL_ID) Application urgency (DRG_ID) - 264 - GSTOOL 3.1 - User Manual Appendix Example: “1” or “Low to moderate” etc. The easiest way to learn how to structure a text file correctly for a target object import is to create such a file yourself, following the instructions contained in Text file export of target object (section 9.1, page 199 ff). 14.3.2 Processing of import files In GSTOOL 3.1, import files are processed according to the following rules: • • A new data record is created for each line. • If the character string length for a value exceeds the length defined in the database for the corresponding field, the content is truncated without warning. • The imported target objects have the effect of supplementing the existing list of target objects. Existing target objects with the same name are not overwritten but are retained unchanged. Empty values are imported as null values. A value is deemed to be empty if there are no characters between two semicolons. 14.3.3 Post-processing of imported target objects As the imported data is not checked either for completeness or validity, the following steps have to be performed after the import has been carried out: Detection of duplicate names If a target object is imported with a name that has already been used for another target object, irrespective of type, a tilda (~) plus a sequential number are automatically added to the name of the imported target object. Names thus supplemented can be freely altered. - 265 - GSTOOL 3.1 - User Manual Appendix Missing information It is possible that information relating to target objects which the GSTOOL 3.1 user is normally forced to provide through the use of mandatory fields could be missing. • Example: The import file contains the protection requirement for a target object but omits the necessary rationale. Information like this which is missing has to be completed manually the first time any changes are made to the target object in question in the appropriate screen. Dispensable information It is possible that the data imported could include some information that cannot be represented in GSTOOL 3.1. • Example: In an import file which contains information on target object type “Employees”, there is a column called “Person-related data”. However, in GSTOOL 3.1, the only person-related data that can be stored is for target object type “Application”. Such information is ignored by GSTOOL 3.1. There is no need for the user to delete it. - 266 - GSTOOL 3.1 - User Manual 14.4 Appendix Troubleshooting Due to the high complexity and the large number of possible settings and ways of using GSTOOL 3.1, occasionally it produces unexpected responses. Usually this is not due to a bug but to a problem that can be resolved or circumvented by adopting the appropriate procedure. The problems identified so far are listed below together with details of how to remedy them. Is this information does not help or if you are unable yourself to solve a problem that is not included here, please send us the details, as described in section 0.6 Problem reports. 14.4.1 Installation Problem Cause Solution During the installation, the following error messages appear: These errors typically occur when the registry entry for file scrrun.dll is missing or corrupt. On a command line, enter the following command: Error 429 Object creation using Active-X component not possible. This file is installed by Internet Explorer. Internet Explorer must be installed in order to use GSTOOL. A message advising that the operation has been successful will appear. Error 91 Object variable or With block variable not set The fact that Internet Explorer is working despite this registry entry problem is irrelevant to the problem. - 267 - regsvr32.exe C:\winnt\system32\scrrun.dll GSTOOL 3.1 - User Manual Appendix 14.4.2 Database integration Problem Cause Solution When GSTOOL starts up, the database required is not included in the list of available databases in tab card | Conection | on the GSTOOL 3.1 – logon to databse window. No database has been attached to GSTOOL or Attach the desired database locally to GSTOOL, following the instructions in Configuring the database (section 2.4.14, page 70ff). the database has been installed on a network drive The database must not be on a network drive. It is mandatory that the database to be connected is located on a local drive on your PC or on the local drive of another PC on which GSTOOL is installed and running. The only exception is where the database is held on a machine that is running SQL Server 2000. When GSTOOL starts up, the list of available The system administrator installed GSTOOL for you, logged off and then the system was started up with databases in tab card | Conection | on the GSTOOL 3.1 – logon to databse window is empty. the standard user rights (i.e. your user rights). Following an attempt to attach an additional database to GSTOOL 3.1 using the “Configure database” utility, this error message is displayed: “Create database authorisation denied in master database.” Your system rights do not allow you to attach the database. You do not have the necessary system rights. Ask your System Administrator to create a new user in GSTOOL for your database, with your user name, including the necessary user rights. (See section 11.2.1 Creating and editing users, page 230ff.) Alternatively, you can also log on as ‘sa’ in the “Configure database” utility and attach a database yourself. You then need to log on to GSTOOL again as ‘sa’ with database security and configure yourself as a GSTOOL user. (See section 11.2.1 Creating and editing users, page 230ff.) Once you have completed these actions, you will be able to start up and work on the database as a “normal” user. The alternative procedure is only possible if you know the ‘sa’ password: - 268 - GSTOOL 3.1 - User Manual Appendix Problem Cause Solution After restoring the data with <Database> - <Data backup and recovery...>, users that previously existed have disappeared. Due to the internal rights structure, not all users can be restored. (See section <Database> - <Data backup and recovery...> - “Checking user rights“, page 67ff.) You need to reconfigure the users. (See section<Database> - <Data backup and recovery...> - “Checking user rights“, page 67ff.) Problem Cause Solution Data exported from one database cannot be imported into another database. The following message appears: The database into which data is to be imported was created by cloning from the database from which the present export originates. (See section 1.5.2 Databases - Duplication of a database, page 23ff.) To convert the cloned database to a genuine new database, you should proceed as follows: 14.4.3 Export/import 1. Create a new database. (See section 1.5.2 Databases - Creating an additional database, page 23ff.) 2. Transfer the content of the cloned database to the newly created database, using the one-way export and one-way import procedures. 3. Now carry out the planned import into the newly created database. To avoid future problems, the original, cloned database should be deleted at some point. - 269 - GSTOOL 3.1 - User Manual Appendix 14.4.4 General problems Presentation Problem Cause Solution Although the display of rights has been enabled (section 2.3.9 <Tools> - <Options> - | Display |), the Rights column is not shown in many/any of the lists. The existing columns are so wide that the additional Reduce the size of the existing columns. The Rights Rights column at the far right exceeds the area that it column will then become visible on the right. is possible to display on the screen. Although the display of ID has been enabled (section The existing columns are so wide that the additional 2.3.9 <Tools> - <Options> - | Display |), the ID ID column at the far right exceeds the area that it is column is not shown in many/any of the lists. possible to display on the screen. Reduce the size of the existing columns. The ID column will then become visible on the right. There is apfatherly no way of changing the background colour of the Navigator. The background colour of the Navigator is taken from The background colour can be altered as required via the Windows colour settings for “Application the normal Windows settings in <Control Panel> Background”. <Display>. The labelling of shortcuts is not displayed. Under Windows 2000 it is possible to toggle the display of shortcuts (keyboard navigation indicators) on and off. Only the uppermost line of the tree is visible in →Structure of target objects, otherwise nothing. Possible cause 1: The other tree elements can be restored to view by The tree has been completely minimised by selecting double-clicking the topmost line visible. “Minimise” while the topmost line was highlighted. See Maximizing and minimizing the tree on page 32. In the tree in →Modeling, a target object that is included in the object model does not appear in the layer model. To change the settings for the appearance of Windows 2000, right-click on the desktop, then select <Properties> - tab card “Effects” - uncheck the bottom-most checkbox, or alternatively enable the display of shortcut labels on directly by pressing the [Alt] key once. Possible cause 2: The user is working in the import work area for a standard import that did not contain any IT asset sets, instead of in the standard work area. Follow the instructions contained in section 9.4.4 Standard import without IT asset set, page 209ff. A target object to which no module has been assigned cannot be shown in the layer model. Change over to the object model and create a link between the target object concerned and a module. See section 5.2.4 Adding a module, page 124 or 5.3.4 Dragging module to target object, page 134. - 270 - GSTOOL 3.1 - User Manual Appendix Editing Problem Cause Solution It is not possible to make entries or amendments in the Safeguard properties window. All the text is shown as inactive. The module to which this safeguard belongs is referenced to another one. You can tell that this is Delete the referencing, following the procedure described in section 5.4.4 Deletion of referencing, page 138. You will then be able to edit the modules that were previously reciprocally referenced independently of each other. the case from the little arrow on the module icon (see section 5.4 Referencing, page 135ff). To activate direct editing of referenced modules select menu option sequence 2.3.5 <Tools> <Options> - | Common | - Edit, page 45). The safeguards for reciprocally referenced modules can now be edited in all the affected modules with equal access. The target object in which the safeguard has to be edited has been exported for external processing. You can tell this from the blue colour coding of the safeguard title in the tree and also by the note “This data record has been exported and cannot be edited!” towards the bottom of the tab card. Re-import the exported target objects (section 9.5 Re-export, page 209ff). In →Modeling, no employees are offered in the Properties of safeguards window, tab card | Responsible |, [Add...] for the SELECTION “In accordance with BPM role assignment”. When the employees were created, no roles were assigned to them or at least not the roles that are necessary for certain safeguards in the IT BPM. Modify employee role assignment via Master data administration. In the Properties of module allocation window, tab card | Common | field IN TARGET OBJECT, not all existing target objects of the same type are offered as reference source. A target object that references itself cannot also serve as reference source. Choose the same reference source that has already been chosen for the target object that you really want to be the reference source for the target object that you are currently working on. See also section 5.4 Referencing, page 135ff. - 271 - Now delete the export containing the target objects to be processed (section 9.9 Deleting an export , page 214 ff). GSTOOL 3.1 - User Manual Appendix Problem Cause Solution Individual menu commands or buttons have been deactivated. The activation of menu commands and buttons in GSTOOL 3.1 is determined by rights and context. For further information, see Activation of menu options and buttons on page 29. In →Modeling, has been specified as the qualification level achieved for a module even though all the safeguards contained in the module which are necessary for the relevant qualification level have been implemented. At least one of the safeguards necessary for the You need to reinsert any missing safeguards into desired qualification level was deleted in the module (see 5.2.2 Adding a safeguard, page →Modeling. (See Deleting a safeguard, page 123ff.) 121ff). For this purpose, use the predefined filter “(Missing)”. Deletions Problem Cause Solution An IT asset set cannot be deleted in →Master data. The “BSI” asset set created during the installation of GSTOOL 3.1 cannot be deleted, even if it has been renamed. To determine whether the IT asset concerned was originally called “BSI”, activate display of the ID column via menu selection <Tools> - <Options> | Display | (page 49). The original “BSI” asset has the ID 1. - 272 - GSTOOL 3.1 - User Manual Appendix Reports Problem Cause Solution Although a module is highlighted in the tree, the “Modeling modules” or “Modeling safeguards” report does not contain any data. The report templates “Modeling modules” and “Modeling safeguards” generate reports based on the layer model. If only one module is selected in the tree, then the report will not have any information regarding the higher layers and will therefore be empty. As well as the desired module, you should also select the superordinate asset set or “generic aspects of IT security”. This will have the effect of incorporating all the associated modules and safeguards into the report. Only reports in whose template the option OPEN REPORT has been activated are displayed in the browser window. Activate the OPEN REPORT option in the report template158. Problem Cause Solution During the creation of a new target object, no subtypes are offered for selection in the SUBTYPE field on the first tab card. As this means that the mandatory field cannot be completed, it is not possible to save the target object. It is likely that all the subtypes for the chosen target object type were deleted via menu option sequence <Tools> - <Target object types ...>. Define the subtypes necessary for the chosen target object type (see Creating user defined target object subtypes on page 40) and then go back to creating the new target object. A user defined report is not shown in the browser window, but instead the Save report window is opened directly. Alternatively, you can choose the “IT Baseline Protection survey” report template. This template creates the same report as the two others, but this time in the object model, so that it is no longer necessary to include the generic aspects of IT security or the IT asset set. Creation of new target objects 158 See chapter 6.9.3 Tab card | Properties |, section EXTENDED PROPERTIES - OPEN REPORT, page 157ff. - 273 - GSTOOL 3.1 - User Manual 14.5 Appendix Glossary User As used in the manual, “users” are persons who actually work on a PC with GSTOOL 3.1, and thus enter, view, evaluate and print data etc. The term “user defined” (for modules, safeguards etc.) has a different meaning. It is assumed that user defined elements are not created and named on the basis of personal decisions made by a user, but result from the requirements pertaining to the actual IT assets that exist in the organisation in which GSTOOL is used. IT asset set “IT asset set” refers to all the infrastructural, organisational, personnel-related and technical components which assist with the performance of tasks in a particular area in which information processing is performed. An IT asset set can refer to all the IT assets in an organisation or to individual areas defined in terms of organisational structures (e.g. departmental network) or shared IT applications (e.g. HR information system). Further information on the subject can be found in section 1.3 of the IT BPM. Optional field Optional fields are input fields for which the user can decide whether or not to enter any data. Optional fields are colourcoded according to the colour chosen for the “Window” picture element. The default Windows setting for this is “White”. Tool Administrator As used in this manual, the term Tool Administrator refers to the person or group of persons who log on as user ‘sa’ in the “Configure database” utility, know(s) the associated password and has/have the associated rights in GSTOOL 3.1. Despite having the same username (‘sa’), the Tool Administrator does not have the same rights as a System Administrator. - 274 - GSTOOL 3.1 - User Manual Appendix Metadata The metadata is all the IT Baseline Protection Manual information that is used within GSTOOL to enable a security concept to be prepared. Mandatory field Many editing windows and screen formats contain highlighted fields159. These are mandatory fields, in which entries have to be made in order to be able to save the screen content. There are two types of mandatory fields: • • permanently mandatory fields conditionally mandatory fields In permanently mandatory fields, the user always has to either select or enter something. With conditionally mandatory fields, whether or not the field is mandatory depends on the content of other fields. When these fields are mandatory, they have to be completed as well. If a conditionally mandatory field reverts to being an optional field due to changes in the entries that trigger their mandatory status, the entry is retained, but can be deleted. Referencing To reduce the amount of work necessary to prepare a security concept, it is possible to reference modules and their constituent safeguards with each other in the Basic Security Check. This means that information relating to more than one module can be edited simultaneously. Reference source The reference source is a module that is referenced by another module and whose information content is thus passed to other modules. 159 The default colour used for mandatory fields is yellow. This field can be changed with menu selection <Tools> - <Options> - | Display | (2.3.9, page 48ff). - 275 - GSTOOL 3.1 - User Manual Appendix Reference target The reference target is a module that references another module and whose information content is thus adopted by the first module. Link In this manual, a link refers to the creation of any type of link (with the exception of referencing) between target objects and between safeguards, modules and target objects. Qualification level The IT Baseline Protection methodology defines three qualification levels: • the self-declared “IT Baseline Protection entry-level” - known in GSTOOL 3.1 as level “A” • the self-declared “IT Baseline Protection higher level” known in GSTOOL 3.1 as level “B” • the IT Baseline Protection Certificate - known in GSTOOL 3.1 as level “C” Further information on the IT Baseline Protection qualification scheme can be found in this manual in section 13.3.7 IT Baseline Protection Certificate, page 257ff and in section 2.7 “IT Baseline Protection Certificate” of the IT BPM. Target object Target objects are IT assets that really exist, for which an IT security concept based on the IT BPM is being created with the aid of GSTOOL 3.1. Individual target objects can contain other target objects, and here they can be hierarchically arranged in relation to each other. Thus, for example, the target object “Server room” can be part of the target object “Buildings” but the reverse is not possible. Target object type / target object subtype The assignment of modules in GSTOOL 3.1 is determined by target object type and, in some parts of GSTOOL, by target object subtype. The results of this module assignment are presented to the user in →Modeling as a working suggestion. - 276 - GSTOOL 3.1 - User Manual Appendix Target object types • • • IT asset set Buildings Employee do not contain any other targets object subtypes. Target object types • • • • Room IT system Network Application all contain several target object subtypes to facilitate the precise assignment of modules. - 277 - GSTOOL 3.1 - User Manual 14.6 Appendix Index logging on to ~ .............................................. 25 Microsoft SQL Server 2000 .......................... 22 MSDE 2000 .................................................. 21 renaming....................................................... 22 restoring........................................................ 65 selecting........................................................ 26 A adding modules .......................................................125 safeguards...................................................121 adding linked objects .............................. 103, 113 B basic report sheets ..........................................155 BSIDB_V305_Data............................................11 BSIDB_V310_Data............................................26 buttons activation of ~ ................................................29 deactivated ..................................................276 deinstallation..................................................... 19 deletion of dummy IT asset set ................................ 212 of modules .................................................. 132 of rights ............................................... 224, 225 of roles ........................................................ 225 of safeguards...................................... 124, 189 of target objects .................................... 86, 110 of threats..................................................... 197 of users ....................................................... 234 C detection of duplicate names............ 79, 216, 269 Chiasmus...........................................................61 disk image loading a ~ .................................................... 19 colour settings ...................................................48 complete installation ..........................................13 copying objects..................................................60 cost management ............................................145 CSV files ..........................................................203 currency ~ conversion in GSTOOL 3.1 ........................51 adjustment of ~ during import of GSTOOL 2.0 data..........................................................54 D database reducing size ...............................................205 databases attaching ........................................................72 backing up .....................................................63 cloning ...........................................................23 creating additional ~ ......................................23 detaching .......................................................71 duplication .....................................................23 display IDs ................................................................ 49 lines in lists ................................................... 49 module numbers........................................... 48 objects blocked in tree due to export.......... 206 old outdated numbers from GSTOOL 2.0 .... 49 rights column ................................................ 49 safeguard numbers....................................... 48 documents storing long ~ in the tool ............................... 36 drag-and-drop ................................................... 95 dummy IT asset set ........................................ 211 dummy target object ......................................... 39 E encryption ......................................................... 61 errors during import from text file.................... 205 exchange rate ............................................. 52, 55 - 278 - GSTOOL 3.1 - User Manual Appendix number of changes tracked .................... 48, 68 of a field ........................................................ 68 explanations ......................................................33 exports determining scope of ~ ............... 202, 207, 212 of target objects ...........................................201 one-way export ............................................215 re-export ......................................................211 standard export............................................206 to text file .....................................................201 holiday block ................................................... 237 I icons in the modelling ..................................... 114 ID column toggling ~ on and off ..................................... 49 implementation status inheritance of ~ ........................................... 245 presentation of ~ in the tree........................ 143 F fathers assigning a ~ to a target object .....................39 fields changed / new / prior.....................................67 database........................................................26 mandatory ~ ..........................................33, 279 new / prior / changed.....................................67 optional ~ ...............................................33, 278 prior / new / changed.....................................67 server name...................................................25 server status ..................................................27 text length in ~ ...............................................36 filters basic ~ .........................................................219 defining ........................................................218 deleting ........................................................218 editing ..........................................................218 extended ~...................................................219 G grouping of items .......................................79, 254 groups of users........................................................242 GSTOOL 2.0 database account for ~..................................53 database password for ~ ...............................53 importing data from ~ ....................................53 ODBC data source of ~ .................................53 user ID for ~...................................................53 H history display of ~ ....................................................69 import not possible................................................. 273 import work area ............................................. 200 imports of target objects .......................................... 203 one-way import ........................................... 215 re-import ..................................................... 213 standard import........................................... 209 standard import without IT asset set .......... 211 inheritance of implementation status............................. 245 of protection requirement............................ 244 of qualification level .................................... 249 installation customised.................................................... 13 installation path changing the ~ .............................................. 13 IT Baseline Protection Certificate ................... 261 L language configuring .................................................... 43 layer model ............................... 31, 113, 120, 253 reduced tree display ................................... 120 licensing entering key .................................................. 17 link options........................................................ 25 links changing ..................................................... 104 creating ....................................................... 101 - 279 - GSTOOL 3.1 - User Manual deleting ............................................... 107, 112 maintenance ................................................112 logo changing program start ~ ..............................44 changing report header ...............................163 logon information ...............................................28 M mandatory fields ........................................33, 279 changing colour .............................................48 conditionally ~........................................33, 279 permanently ~........................................33, 279 Appendix P passwords application..................................................... 50 changing the sa password...................... 16, 73 changing user ~ ............................................ 37 for database link ........................................... 50 person related data........................................... 80 project planning .............................................. 147 protection requirement assignment of ~ ............................................ 81 inheritance of ~ ........................................... 244 memory requirements..........................................6 protection requirement categories .................. 197 menu bar............................................................29 Q menu commands activation of ~ ................................................29 deactivated ..................................................276 qualification level ............................................ 280 display of the ~ achieved.................... 115, 249 inheritance of ~ ........................................... 249 safeguard necessary for ~.......................... 116 metadata..........................................................279 updating.........................................................58 module numbers display of ~ ....................................................48 modules adapting.......................................................170 adding..........................................................125 creating new ~ .............................................176 deleting ........................................................132 renaming......................................................172 multi-customer capability ...................................24 N Navigator ...........................................................30 altering background colour of ~...................274 multi-line display in ~ .....................................31 show/hide ......................................................31 Notepad .............................................................34 O object model ..................................... 31, 113, 119 Obsolete ..........................................................164 optional field ....................................................278 optional fields.....................................................33 R readme.txt......................................................... 15 reference sources deleting ....................................................... 140 references creating ....................................................... 137 referencing...................................................... 136 deleting ....................................................... 139 to unlinked target objects............................ 137 removing the software ...................................... 19 report header changing logo ............................................. 163 comments ................................................... 163 report templates.............................................. 155 reports empty ~ on the modelling of modules and safeguards .................................................. 277 external processing of ~ ............................. 153 saving ......................................................... 153 user defined ~ templates ............................ 154 rights ~ column not displayed............................... 274 - 280 - GSTOOL 3.1 - User Manual deleting ............................................... 224, 225 toggling ~ column on and off .........................49 roles (as per IT BPM) assignment to safeguards .................. 185, 189 roles (in GSTOOL) creating........................................................224 deleting ........................................................225 editing ..........................................................224 Import3.0 role ..............................................224 rights roles ...................................................223 role system ..................................................224 updating.......................................................225 user roles.....................................................238 viewing.........................................................224 S safeguard numbers automatic generation.......................... 184, 188 display of ~ ....................................................48 show outdated ~ from GSTOOL 2.0..............49 safeguards adding..........................................................121 assignment to modules .............. 187, 189, 196 cannot be edited ..........................................275 deleting ............................................... 124, 189 non-personnel costs ....................................145 personnel costs ...........................................145 save without query.............................................45 scripts loading ...........................................................73 server selecting ........................................................25 status .............................................................27 shortcuts labels not displayed .........................274 sorting in the tree.....................................................113 of target object types .....................................92 of target objects .............................................93 sub-types assigning .......................................................79 changing ~.....................................................85 supplementary attributes common.........................................................42 Appendix user defined .................................................. 35 system requirements .......................................... 6 T tab card Audit information........................................... 83 Common ....................................................... 38 Common (User) .......................................... 235 Data ............................................................ 226 Employee...................................................... 80 Filters .......................................................... 162 IT asset sets ............................................... 228 Link options................................................... 25 Linked with.................................................. 161 Links ............................................................. 84 Logon information......................................... 28 Modules ...................... 168, 187, 189, 195, 196 Notepad ........................................................ 34 Password ...................................................... 73 Person responsible - no employees offered......................................................... 275 Protection requirement ................................. 81 protection requirement (in networks)............ 83 Protection requirement categories ............. 197 Roles................................................... 189, 237 Roles (as per IT BPM) ................................ 185 Safeguards ................................................. 180 Scope.......................................................... 160 Scripts........................................................... 73 Specialist task............................................... 81 Subtypes....................................................... 38 Supplement common.................................................... 42 user defined.............................................. 35 Target object sub-types .............................. 166 Target object types ..................................... 164 Target objects............................................. 231 Threats........................................................ 191 target object subtype/s assigning............................................... 79, 120 automatically created.................................... 39 creating ......................................................... 40 deleting ......................................................... 42 renaming....................................................... 41 target object type/s - 281 - GSTOOL 3.1 - User Manual Appendix changing father..............................................41 creating..........................................................39 deleting ..........................................................41 determining father..........................................39 renaming........................................................40 several ~ assigned to a single father.............39 sorting............................................................92 target object/s a ~ is not included in the modelling .............274 automatic linking of new ~ .............................46 creating ~.....................................................109 deleting ~ ...............................................86, 110 displaying higher ~ ........................................91 dummy ~........................................................39 exporting......................................................201 importing ~...................................................203 not offered as reference source ..................275 post-processing of imported ~.....................269 sorting............................................................93 sub-types changing ....................................................85 text fields formatting.......................................................35 loading content ..............................................35 saving content ...............................................35 threat numbers automatic generation.......................... 194, 196 threats assignment to modules ...............................195 deleting ........................................................197 toolbar............................................................... 29 tree maximising.................................................... 32 minimising..................................................... 32 reduced display in layer model ................... 120 the ~ is not visible ....................................... 274 TXT files.......................................................... 203 U URL................................................................... 34 user groups..................................................... 242 user roles ........................................................ 238 viewing........................................................ 224 users blocking accounts ....................................... 237 creating ....................................................... 233 deleting ....................................................... 234 editing ......................................................... 234 updating ...................................................... 234 viewing........................................................ 234 W window width changing ....................................................... 36 X XML files cannot be re-imported ................................ 203 Tool Administrator .....................................16, 278 - 282 -