1
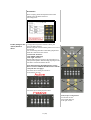
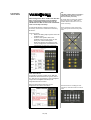
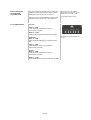
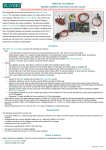
Divine
100.49
User manual
© 2010 XTZ AB , www.xtz.se
Table of contents – XTZ Divine
Page:
Contents
About XTZ
Technical presentation
Preparations
Practice of sound / Installation and placement tips
Mounting /Area of usage
Sound adjustment
Technical specifications
Service & Support
3
3
4
6
7
9
13
15
16
Contents
Contents
Congratulations to your purchase of the
XTZ Divine 100.49
When combined with hifi and audio equipments;
you will experience motion pictures or music
records reproduced very deeply and naturally. Now
when you watch your favourite movies or listen to
your reference music CDs, you will hear and feel
the sound surrounding you in the same way as
originally intended by mastering engineers.
Read the manual before using the product and use
all possibilities carefully.
About XTZ
Philosophy
Our reference and starting point is to recreate a
natural sound, taking into account that acoustics
always is a matter of taste.
XTZ Goal
Our main goal is to provide the best value
for money.
Our concept:
- Cut down the numbers of middlemen
- Put more money on product quality
and less on advertising.
- Manufacture cost-effective in large volume
- Provide perfect technical solutions
Contact
Website: www.xtz.se
E-mail: [email protected]
3 (16)
Technical presentation
Cabinet design
The box design is designed in a special way.
Everything is optimized for it’s reason and only the
best solutions were chosen to obtain the best
possible construction for sound reproduction.
The cabinet wall is built with dual layers of MDF,
using sound repressive glue between the layers. A
convex wall construction is much stronger than a
normal flat one, and this means that the convex
walls can be thinner without loosing strength. Still,
the walls are 28 mm thick. The internal modes are
reduced a great deal if the walls are not flat and
parallel. The result is an extremely silent
construction with no inner resonances. The front
baffle is 38 mm, made using a dual layer technique.
The top of the speaker is made from 30 mm
massive MDF plus internal bars. The cabinet has a
total of 7 internal bars. The integrated
foundation/feet construction is glued in a dual
layer design and is 75 mm thick. The back of the
speaker is a full 90 mm thick and glued together of
two pieces of MDF.
The Midrange has its own separate enclosure.
The internal box of the midrange has a “v” shaped
design to avoid parallel walls and to suppress the
internal resonances to an absolute minimum. The
damping material in the midrange box is a
combination of mineral wool and synthetic
absorbing material. The combination is an optimal
blend of these materials.
Both woofers are placed in the same box, so they
can be fully used in our Room Tuning concept.
The volume and absorbing materials are completely
optimized. We put a lot of effort into obtaining the
best mix of natural and synthetic wool to optimize
resonance reduction.
Tweeter driver
We have chosen an ultra fast ceramic tweeter,
made for reproducing crystal clear sound, even at a
high SPL levels without any distortion.
The tweeter is produced by the German company
Visaton, and is an absolute reference class unit.
It is shielded, with an internally damped cavity and
a ventilated voice coil. The tweeter offers an
extremely flat frequency response and a low
resonance frequency.
4 (16)
Midrange driver
Thiel & Partner, also called Accuton, is one of the
most famous manufactures of loudspeaker drivers.
XTZ Divine 100.49 uses T&P C173N-T6-90, one of
the best (if not the best) midrange driver in the
world and can only be found in extreme High End
loudspeakers.
T&P C173N-T6-90 is a ceramic driver with a light
cone, equipped with a neodymium magnet.
The driver is extremely stiff and at the same time
light, which contributes to the high sensitivity.
The two black dots are far from a design gimmick.
Thiel & Partner has put them there for a reason.
They suppress a resonance from the cone.
The Accuton driver offers the highest quality and
highest resolution; this is the reason that this driver
is put in the best speakers in the world.
Woofer driver
As woofers we selected two aluminium 10” drivers
from the Norwegian company SEAS; which has
been producing drivers the last 60 years. It is with
this knowledge that Seas has built this driver.
The woofer has a cone, made out of pure
aluminium. The moulded metal basket is a "high
flow" type that is acoustically transparent and
offers high precision as the basket is shaped exactly
thanks to the moulding process. This makes sure
that the basket is very stable and efficiently reduces
resonances. The basket is absolutely none
magnetically, which contributes to a higher
efficiency of the driver.
A strong magnet combined with the light cone
yields a high efficiency and a good transient
response. Gold plated terminal reduces contact
resistance and serves as anti-corrosion.
Large windows in the basket both above and below
the spider reduces sound reflection, air flow noise
and cavity resonances.
5 (16)
Crossover/Terminal
When XTZ produced the Divine 100.49 a great deal
of effort was put into the crossover filter. All
passive components are the highest quality to
minimize the influence on the signal. The
crossover is placed in a separate enclosure.
We use an optimal selection of air wound coils
(with low internal resistance) and coils with steel
cores (these accept a high level of magnetic
saturation), MKP capacitors and MOX resistors.
The terminal is divided into two input areas. One
for passive (normal) and one for active drive. All
terminal screws and inputs are gold plated.
The active inputs have direct connection with the
drivers. The thought behind this is that the speaker
can be used fully actively in the future to get the
most out of the system.
When using the bypass jumpers in the middle of
the terminal, the speaker is in “passive mode” and
connected to the passive cross over
It is possible to drive the woofers actively and gain
the possibility to use DSP based room correction.
There are three links/jumpers that can be used to
alter the character of the speaker.
One link/jumper for the tweeter (0 or +3dB)
One link/jumper for the midrange (0 or -2dB)
One link/jumper for the woofers (0 or +3dB)
Preparations
Unpacking
Carefully unpack the speaker, and pay attention so
you don't break anything. If possible, save the
carton box for future transportations. If there
should be damage on the loudspeaker, please
contact your retailer.
Accessories
Bass reflex plugs (4 pcs)
User manual
Links/Jumpers for level adjustment and
active/passive connection (18 pcs)
6 (16)
Practice of sound / Installation and placement tips
This chapter contains general information about
loudspeaker placement and installation.
These are general rules, so there are exceptions in
some cases.
In which room do
you achieve the best
sound?
No matter how good the equipment is, in the wrong
listening environment it will inevitably sound bad.
There are some basic rules concerning a proper
loudspeaker installation:
Reflections
Carpets, curtains and soft furniture absorb mid
range and high frequency sound, and this is
preferable. Big empty area, on the contrary, reflects
it and produces hard reflections that may lead to
blurry dialogue. Apart from colouring the sound,
also the perspective of the sound will deteriorate.
Reflections in the room can roughly be compared to
the reflections that yield ghost pictures on a TV
screen.
Amplification of bass A loudspeaker that is placed near a wall, ceiling or
floor will amplify lower frequencies in a sometimes
frequencies
not desirable way (since it may lead to an indistinct
sound recreation). This amplification becomes even
more obvious if the loudspeaker is placed near a
corner. Thus, for a sound as clear as possible, the
loudspeaker should be placed at least 30 cm (about
12 inch) away from the wall
Some constructions are made to be placed closed to
a wall.
Furniture
Be aware that furniture may vibrate and thus create
bad sound at loud bass.
Room dimension
Quadratic rooms or rooms where the length is
exactly twice as long as the width should be
avoided, since they may create unwanted
resonance.
Placement of the
subwoofer
The placement of the subwoofer in the room
dramatically affects the overall frequency response
and sound level of the system. At low frequencies
the effect of the room is strong. Even a slight
change in the subwoofer's location can make a
significant difference in the frequency balance.
Patience and methodical experimentation is needed
to find an optimal placement. The placement
affects the phase difference between the main
loudspeakers and the subwoofer.
One basic rule is to place the subwoofer together
with or near the front system (especially important
if the front loudspeaker also propagate bass
frequencies) as this will minimize the risk of phase
eliminations in the room.
7 (16)
Cables
Try to keep them as short as possible. By its
electrical parameters, a long conductor will have a
bigger influence on the sound than a short one. It
may also work as an antenna and thus receive
various signals that may become a constant noise in
an active subwoofer.
Make sure that all connections are clean and not
oxidized. All connections should be mechanically
stable, both power, signal and loudspeaker cables.
Signal cables should be separated from other
cables.
Front speakers
To get the best result the front speakers should be
placed symmetrical in front of the listener. The
distance between the front speakers should be
around 80% of the distance to the listener. In other
words, the recommended angle between the front
speakers should be 45°.
Why use 2
Subwoofer
There are more then one benefits of having 2
subwoofers instead of one.
The sound pressure level will be higher.
Less dips and standing waves in the room and a
better frequency response in the room (and on
sweet spot)
The need of power is less, to reach the same SPL as
with one subwoofer
Finally
Please remember that good sound is a matter of
taste, so you have to experiment to obtain your
favourite one.
We wish you best of luck!
8 (16)
Mounting and connecting tips
Mounting
alternatives
XTZ Divine 100.49 can be placed standing by a
wall. The wall behind and beside the loudspeaker
influences both the bass level and the bass
characteristics, so please be patient and try
different distances to the rear and side walls.
To place the speaker with a distance to the wall is
often best, to decrease influence of the wall (room)
Connect using the
correct phase
Always connect using the correct phase, from the
+-pole on the amplifier to the +-pole on the
loudspeaker and corresponding for minus (-).
If you by accident connect the other way,
there is no risk of damage. However, the
sound will not be correct, especially in the
lower frequencies.
Overload
At high load during extensive time periods, there is
always the risk of overloading the driver and
amplifier.
All loudspeakers have a limited handling
capacity for high power, so be careful not
to play extremely loud and not to increase
treble or bass settings to much.
By increasing the bass or treble from 0 to
max you will increase the power by about
16 times.
The initial playing
time
It takes about 50 to 100 hours of initial playing
time, for the drivers to sound optimal. During this
time, the speaker may be used normally.
9 (16)
The terminal is divided in two parts, one for the passive
Connecting
Passive cross-over drive and one for the active drive.
It is important that the connection is done
in a correct way. An incorrect connection
can destroy the drivers.
Passive connection
When using passive drive, the speaker cable should be
connected to “+” and “-“ to the upper part of the
terminal. When the metal plates are connected between
the terminal screws, only one pair of speaker cable is
needed.
N.B!!!
A broken speaker that is caused by a
connected in an incorrect way is
NOT covered by warranty.
Be careful when connecting the speakers
with the amplifier.
Passive drive is connected to the
upper part of the terminal.
Bi-wire or Tri-wire
When using bi-wiring, remove the metal plates between
midrange and woofer terminal screws.
Using Tri-wiring, also remove the metal plates between
midrange and tweeter terminal screws.
Below is a drawing of how to connect the speaker when
using a single wire.
BI-AMPING
When bi-amping, the metal plates between the terminal
screws MUST be removed.
See drawing below
Bi- and Tri-amping is a passive
connection, but each range is powered by
a separate amplifier.
It is important that all amplifiers have the
same output level; else there will be a non
correct frequency response curve.
Make sure that the metal plates are
removed from the terminal screws
when bi- or tri-amping.
See the different between single, bi- and
tri-amping.
10 (16)
TRI-AMPING
When tri-amping, all the metal plates between the
terminal screws should be removed.
See drawing below
Links/Jumpers for To change between passive and active drive, just
remove the links/jumpers.
Active/Passive
When
the jumpers are removed the passive cross over is
drive
disconnected.
Below are drawings that show what links/jumpers that
control the connection to the drivers.
From the left: Woofers.
In the middle: Midrange
To the right: Tweeter
When the link/jumper is in place, the construction is a
normal passive speaker. Disconnecting the jumpers will
allow direct connection with the drivers.
When disconnecting the link/jumpers, active
filters is a must. Without this the tweeter will be
destroyed. See next page!
Picture below shows a setting for active drive.
No links/jumpers are used.
Picture below shows a setting for passive drive.
Links/Jumper configuration:
From the left: Woofers.
In the middle: Midrange
To the right: Tweeter
11 (16)
NB!
A broken speaker that is caused by a
connected in an incorrect way is
NOT covered by warranty.
Connecting
Active drive
When using active drive, make sure that the
active cross over has the correct settings
before connecting to XTZ Divine 100.49
A broken driver due to incorrect connection
is not covered by warranty!
Be careful when connecting the speakers
when using active drive. Make sure to
read the manual of the active cross over
before connecting.
It is important that the connection is done in a
correct way. An incorrect connection can destroy
the drivers.
Active connection is done on the lower
part of the speaker terminal. See picture
below.
Using active drive:
•
Remove all links/jumpers plates above the
terminal screws.
•
Connect each speaker cable to the
terminal screws for each range. To the
lower part of the terminal plate
Make sure that the active filter has the
correct configuration and check that all
connections are done in a correct way.
Semi Active Drive
It is popular to run the woofers active. With the
construction that XTZ divine 100.49 have, this is
easy. This gives an opportunity to use an amplifier
or separate sub amplifier with DSP/room
compensation for the woofers.
Make sure that jumpers have the correct
configuration for a semi active drive.
12 (16)
Picture below shows a setting for semiactive drive, where the woofers are driven
active.
Sound settings
Room Tuning Mechanical
adjustment of the
boundary frequency
By using the supplied bass plugs in the bass reflex
gates, you can alter the lower boundary frequency
of XTZ Divine 100.49
This setting also depends on the size and
shape of the room, and also on your own
taste, so please has patience when trying
out your preferred setting.
The bass level can be adjusted in 3 different
settings in the bass range.
The figure below illustrates three basic settings.
Deep bass
With one bass plugs in one of the two gates you
have the deepest possible bass, which may be
suitable for smaller rooms.
"Quick" bass
Without bass reflex plugs in the gates, you have a
"quick" bass which is especially suitable for large
rooms where the lower frequencies often are
amplified by the room.
Closed box
With two plugs in two gates you have the most flat
frequency response
This schematic picture (which does not shown actual measured curves) elucidates the different sonic characteristics of the bass frequencies.
13 (16)
Basic setting for
neutral bass
reproduction
Since the acoustics is determined by a wide range
of external factors there exists no single neutral
setting that will work properly for all cases.
External factors that have influence on the sound
include the room, the placing, output levels etc.
Level adjustment
Bass level set at mode 2 (0dB)
Midrange level set at mode 2 (0dB)
Treble level set at mode 1 (0dB)
2 bass plugs in the bass ports
Tweeter:
Mode 1/ 0dB
In this mode the sound is neutral with a
flat frequency response.
Mode 2/ +3dB
In this mode the treble level is increase by 3dB.
Midrange:
Mode 1/ -2dB
In this mode the midrange level is decreased by
2dB
Mode 2/ 0dB
In this mode the sound is neutral with a
flat frequency response.
Woofer:
Mode 1/ 0dB
In this mode the sound is neutral with a
flat frequency response.
Mode 2/ +3dB
In this mode the bass level is increase by 3dB
14 (16)
The levels can be adjusted with the
jumpers.
Technical specifications
Construction type
3 -way High End speaker
Bass reflex cabinet that may be set as a closed box,
and a total of three individual bass modes (Room
Tuning).
Bass level, midrange level and tweeter level can be
adjusted in 2 steps.
With the clever speaker terminal, the speaker can
easily be changed into active drive for some or all
drivers.
Dimensions
220 x 1070 x 400 mm (W x H x)
Weight
69 kg /st
Cross over frequency
180Hz/2500Hz
Magnetically
shielded
No
Nom. Impedance
4 ohm
Binding post
Gold plated tri-wiring / Banana plug / Pole screw
Efficiency
89dB
Power
900 W Short term IEC 268-5
450 W Long term IEC 268-5
Tweeter
Visaton ceramic tweeter. Magnetically shielded.
Weight 1kg
Midrange
Thiel & Partner C173N-T6-90, Neodymium magnet
Weight 3kg
Woofer
2pcs 10” SEAS Aluminium cone, aluminium frame,
High flow basket, 3kg magnet. Weight 4kg.
Connections and
settings
• Gold plated tri-wiring. Active/Passive drive
• Bass reflex, can be set to closed box (Room
Tuning)
• The bass can be set to three distinct modes
using the supplied bass plugs
• The bass level is adjustable in 2 different
modes
• The midrange level is adjustable in 2 different
modes.
• The treble level is adjustable in 2 different
modes.
15 (16)
(with foot)
Service & support
Where to send
the product for a
warranty repair
For service we refer to your retailer.
ALWAYS pack the product / part very
carefully.
For questions regarding service, contact us by email
Unfortunately damages during
[email protected]
Web page: www.xtz.se
transportation are very common. If the
package is weak, the transporting
company does not compensate damages.
Save the original carton for futute
transport.
Always enclose a copy of the receipt and a
description of the defect.
Support
Please contact our free of charge support if you
need installation advice, or if any problem occurs
during the installation.
Contact us by e-mail [email protected] and include
your phone number if you wish verbal help, and we
will call you back.
16 (16)