1
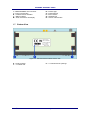
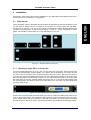
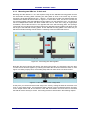
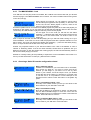
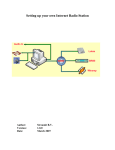
STREAMIT INTERNET RADIO
Streamit Internet Radio
SIR series of devices
User’s manual
ENGLISH
User’s manual
May 2008
Version 1.0
i
Streamit Internet Radio
SIR series of devices
User’s manual
ENGLISH
Version: 1.0
Date: May 2008
STREAMIT INTERNET RADIO
Understanding of Instructions
WARNING: These are instructions which can cause harm to people or damage to the
device if not followed properly. It is important to read and follow these instructions carefully.
IMPORTANT: These instructions are important in order to understand the correct behavior
of the device.
Notices about trademarks
•
•
•
The SIRxxx (SIR family of devices) is a registered trademark of Streamit.
Streamit is a registered trademark.
All other tradenames which are used in this users guide, are owned by their respective
owners.
Copyright ©2008 Streamit
All rights reserved. Under the copyright laws, this manual cannot be reproduced in any form
without the written permission of Streamit. No patent liability is assumed, with respect to the use
of the information contained herein.
Disclaimer
This manual has been validated and reviewed for accuracy. The instructions and descriptions it
contains are accurate for the Streamit Internet Radios at the time of this manual’s production.
However, succeeding Streamit Internet Radios and manuals are subject to change without notice.
Streamit assumes no liability for damages incurred directly or indirectly from errors, omissions or
discrepancies between the internet radio and the manual.
EU Declaration of Conformity
This product carries the CE-Mark in accordance with the related European Directives. CE
marking is the responsibility of Streamit B.V., Flight Forum 3543, 5657 DW Eindhoven,
Netherlands.
This is a class A product. In a domestic environment this product may cause radio
interference in which case the user may be required to take adequate measures.
FCC Compliance Statement
NOTE: This device complies with Part 15 of the FCC limits for Class B digital devices
FOR HOME OR OFFICE USE (“home or office” interference requirements are more stringent
than “outdoor” requirements). Operation of this device is subject to the following conditions: (1)
This device may not cause harmful interference, and (2) this device must accept any interference
received, including interference that may cause undesired operation.
The Streamit Internet Radio device does not contain any user-serviceable parts. Repairs should
be made only by an authorized Streamit service center. Unauthorized repairs or modifications
could result in permanent damage to the equipment, and void your warranty and your authority to
operate the device under Part 15 regulations.
User’s manual
May 2008
Version 1.0
2
STREAMIT INTERNET RADIO
Contents
GETTING STARTED ..........................................................................................................4
1.1
1.2
1.3
1.4
1.5
1.6
1.7
2
FIRST AND FOREMOST…................................................................................................4
SIR SUPPORT ...............................................................................................................4
REFERENCES ...............................................................................................................4
UNPACKING YOUR DEVICE ..............................................................................................5
BACK VIEW ...................................................................................................................5
FRONT VIEW ................................................................................................................5
BOTTOM VIEW ..............................................................................................................6
INSTALLATION..................................................................................................................7
2.1
RACK MOUNT ...............................................................................................................7
2.1.1 Mounting a single SIR in a 19 inch rack ..................................................................7
2.1.2 Mounting two SIRs in a 19 inch rack .......................................................................8
2.2
TABLE MOUNT ..............................................................................................................9
2.3
CONNECTING YOUR SIR ................................................................................................9
2.3.1 Connecting the Protective earth..............................................................................9
2.3.2 Connecting the Power supply .................................................................................9
2.3.3 Connecting the Ethernet cable.............................................................................. 10
2.3.4 Connecting the audio output ................................................................................. 10
2.3.5 Connecting the USB service cable........................................................................ 10
2.4
SWITCHING YOUR SIR FOR THE FIRST TIME .................................................................... 10
2.4.1 The Configuration Wizard ..................................................................................... 11
2.4.2 Playing from a stream........................................................................................... 12
2.4.3 The MMC/SD/SDHC Card ................................................................................... 13
2.4.4 Choosing a Static IP from the configuration wizard ............................................... 13
2.4.5 Choosing to turn the Keylock ON from the configuration wizard ............................ 14
3
SIR CONFIGURATION – SETUP MENU .......................................................................... 16
3.1
CHANGING THE MENU LANGUAGE .................................................................................. 16
3.2
CHANGING THE NETWORK SETTING ............................................................................... 16
3.3
CHANGING VOLUME SETTING ........................................................................................ 17
3.4
CHANGING BASS SETTING ............................................................................................ 18
3.5
CHANGING TREBLE SETTING ......................................................................................... 18
3.6
CHANGING KEYLOCK SETTINGS .................................................................................... 18
3.6.1 Turning Keylock ON ............................................................................................. 19
3.6.2 Turning Keylock OFF............................................................................................ 19
3.6.3 Forcing Keylock OFF ............................................................................................ 20
3.6.4 Changing your Keylock PIN code.......................................................................... 20
4
SERVICE MENU............................................................................................................... 21
User’s manual
May 2008
Version 1.0
3
ENGLISH
1
STREAMIT INTERNET RADIO
1 Getting Started
1.1
First and foremost…
thank you for purchasing the Streamit Internet Radio (SIR). We greet you as a new user of the
Streamit products and hope that your new Internet Radio Device will give you many years of
pleasure. The SIR is a modern device and we strongly recommend you to read this manual
thoroughly before you start installing and using the device for the first time.
The SIR is a fully autonomous working IP-audio receiver, able to tune in to web casts of internet
radio stations and audio distributors. Three different versions, the SIR80, SIR100, SIR120 and
the SIR120PRO each deliver the right set of features for your application.
The SIR can be configured using the Channelservice.fm website, but also with the Streamit
Terminal Program (STP).
<Channelservice.fm profile…>
STP is a user friendly software application for your Windows PC which is meant for advanced
configuring and monitoring your SIR device. This program can be downloaded from our website
free of charge.
Through its unique ID code a SIR can identify itself, so the user is able to get access to closed
user group web casts.
The MMC, SD or SDHC card (optional) can be used as an additional buffer facility. This provides
for adequate fall back in case of network or streaming failures.
For more information on Streamit products and technologies, we invite you to visit our website
http://www.streamit.eu.
Finally, we wish you a lot of pleasure using your Streamit Internet Radio device.
Streamit B.V.
1.2
SIR support
With this manual we have tried to clearly describe the operation your SIR radio. But we can
imagine you have a question or came across an issue which is not covered in this manual. In
such case, you are welcome to visit our website (http://www.streamit.eu) where you will find upto-date documentation and the latest software release(s).
When you have purchased your SIR from one of our local dealers, we recommend you contact
your dealer first.
1.3
References
[1] STP Installation Guide and User’s Manual (STPhelp.chm – The help of Streamit Terminal
Program) – 2008, Streamit B.V.
[2] SIR Internet Radio (Technical Manual) – 2008, Streamit B.V.
User’s manual
May 2008
Version 1.0
4
STREAMIT INTERNET RADIO
1.4
Unpacking your device
Carefully take out of the package the device and the supplied materials. Make sure that all of the
following components are included:
1.5
1x SIR (80, 100, 120 or 120PRO)
1 x 12V-500mA power supply with screw-on connector
1 x USB-AB cable
1 x User manual (this one)
ENGLISH
Back view
Figure 1.1: Streamit Internet Radio back view
A – External Protective Earth connector
B – RJ45 Ethernet connector
C – USB connector
D – Screw power supply connector
E – Left RCA audio (cinch) connector
F – Right RCA audio (cinch) connector
G – Balanced left XLR connector
H – Balanced right XLR connector
The balanced audio output is only available for SIR120PRO devices. For other SIR family
devices the XLR connectors are not present.
1.6
Front View
Figure 1.2: Streamit Internet Radio front view
User’s manual
May 2008
Version 1.0
5
STREAMIT INTERNET RADIO
I – MMC/SD/SDHC card connector
J – Power on/off button
K – Infrared receiver indicator
L – Status indicator
M – 2x16 characters LCD display
1.7
N – Product type
O – Preset buttons
P – menu buttons
Q – Streamit logo
R – Source control button
Bottom View
Figure 1.3: Streamit Internet Radio bottom view
S – Product sticker
T – 4 x rubber feet
User’s manual
U – 4 x chassis mount openings
May 2008
Version 1.0
6
STREAMIT INTERNET RADIO
2
Installation
This section of the manual will cover the installation of your SIR internet radio starting from how to
mount and connect your device, to configuration.
Rack mount
Taking inspiration from the professional audio market, the SIR internet radio was designed to give
you the option to easily mount in conventional 19 inch racks. For rack mounting, the SIR Rackmounting Kit is required. This kit can be ordered from Streamit or official Streamit dealers and
contains 5 mounting plates in total as shown below in Figure 2.1. Using combination of these
plates, it is possible to mount either one or two SIR radios in a 19” rack.
Figure 2.1: Streamit Rack-mounting kit
2.1.1
Mounting a single SIR in a 19 inch rack
To mount a single SIR device in an 19’’ rack, we only make use of the large side mounting plate
and one of the small side mounting plates. If you take a look at the sides of your device you will
see that it has two screws and two small slot-looking openings in each. Start with one sides of
your SIR and remove the Phillips-head screws using an appropriate screwdriver. Place the large
side mounting plate as shown below in Figure 2.2. You will see that the holes of the mount plate
will match them of the SIR. Carefully fasten the screws back on to bound the SIR together with
the mounting plate. The same is done for the other side, but in this case one of the small side
mounting plates is use.
Figure 2.2: One SIR rack mount configuration
At this point you could mount the whole setup in the rack by bolting the sides to the frame of the
rack. In most cases though, we recommend that the device is first connected and then mounted;
for the simple reason that, all connections of the SIR are located in the back and once mounted
the SIR will not be as easy to access. Connecting the device is described in the following chapter.
User’s manual
May 2008
Version 1.0
7
ENGLISH
2.1
STREAMIT INTERNET RADIO
2.1.2
Mounting two SIRs in a 19 inch rack
Mounting two SIR devices in a 19’’ rack requires using the two SIR-SIR mounting plates and the
two small side mounting plates. Mounting the side plates is done in the same way as when
mounting a single SIR (please see § 2.1.1 above). You just have to make sure that the plates are
oriented from outside as shown below in Figure 2.3. Once this is done, we have to connect the
two devices together using the SIR-SIR mounting plates. Turn the first device over. You will see it
has four Phillips-head screws with black rubber feet, two for each side. Using an appropriate
screwdriver, remove the two feet on the opposite side to the side mounting plate. The openings
of the side now form slots with the same width as the SIR-SIR mounting plates and depth of half
the length of the SIR-SIR mounting plates. Fit the SIR-SIR mounting plates in the slots and you
will see its wholes matching with the device’s. Carefully screw the rubber feet back on.
Figure 2.3: Connecting two SIRs together
Now take the second device and remove the rubber feet just like you did with the first one then
connect the two devices together by screwing the rubber feet of the second device back on. See
Figure 2.3. When properly done, the resulting setup will look same as the one shown below.
Figure 2.4: Two SIRs rack mount configuration
At this point you could mount the whole setup in the rack by bolting the sides to the frame of he
rack. In most cases though, we recommend that the device is first connected and then mounted;
for the simple reason that, all connections of the SIR are located in the back and once mounted
the SIR will not be as easy to access. Connecting the device is descried in the following chapter.
User’s manual
May 2008
Version 1.0
8
STREAMIT INTERNET RADIO
2.2
Table Mount
When used in an office environment the SIR could be placed on your office desk, next to your
PC, while in a professional environment your SIR would typically be mounted in a rack.
Connecting your SIR
Despite where you use your SIR and how it is mounted, it is important that you connect it
properly.
2.3.1
Connecting the Protective earth
The SIR features an external Protective Earth (PE) connector. This connection ensures that all
exposed conductive surfaces are at the same electrical potential as the surface of the Earth, to
avoid the risk of electrical shock if a person touches a device in which an insulation fault has
occurred.
In an office environment, you would normally connect the PE to the chassis of you desktop
computer.
Normally all devices mounted in a rack have the PE (when applicable) connected to the frame of
the whole setup. When this scenario applies to you, simply connect the SIR’s PE connector to the
frame of your setup with a conductive wire. The following steps are followed:
- Unscrew the connectors head until you see the complete hole in the
connector.
- Put the stripped part of the conductive wire in the hole.
- Screw the connector head back on. Make sure that the wire is fixed.
- Connect the other side of the wire to the chassis of your computer or
the frame of the rack.
- You could use a DMM (digital multi-meter) to verify that there is indeed
connection between the chassis (rack) and your SIR.
You are not obliged to make this connection. This is an optional connection intended for
extra protection, especially when the device is mounted together with other expensive equipment.
2.3.2
Connecting the Power supply
Plug the power adaptor to the mains outlet (230V~50/60Hz) and then screw the connector to you
SIR radio. In the process we ask that you careful attention to the following instructions:
Never use wet hands when plugging the power adapter in the mains and never remove the
power adapter from the mains with wet hands.
Do not cut or damage the cord of the power adapter; do not place heavy objects on the
cord. This can cause short-circuit, resulting in electrical shocks or even fire.
Pulling the cord can also damage the wire and/or isolation causing electrical shocks or fire.
User’s manual
May 2008
Version 1.0
9
ENGLISH
2.3
STREAMIT INTERNET RADIO
Using power adapters other than the one recommended for your SIR radio, can result in
overheating and damage you device. This can cause fire, electrical shocks and other hazards.
Only use the supplied power adapter.
Applying your SIR to situations with rapid changing temperatures can result in condensation
(small amount of water) on the inner and outer surface of your device. To ensure a long lifetime of
your SIR, this should be prevented. In case of such a scenario, wait until you device is ‘dry’
before you use it again.
2.3.3
Connecting the Ethernet cable
Use the provided Ethernet cable to connect your SIR with your cable modem, ADSL modem or
router. If everything is ok (and the power supply has also been connected) the yellow led of the
Ethernet connector will light-up yellow continuously while being connected. The green led will
blink randomly.
2.3.4
Connecting the audio output
The audio output of your SIR internet radio will be connected to the Line input of a HiFi amplifier
or some audio installation it will be coupled to. No audio cables are included with your SIR. The
type of cable that should be used to connect your SIR will totally depend on which output you will
use (RCA or XLR) and on the type of connector in your audio installation.
2.3.5
Connecting the USB service cable
The USB connection is used for service purposes, which include programming your device,
software update, and monitoring of the communication between the SIR and the internet. The Bconnector of the USB cable is plugged in the device, while the A-connector is intended for
connecting to your Windows PC. Before making this connection we recommend that the Streamit
Terminal Program is first installed. For more information on STP, including installation and user
manual, please see [1].
2.4
Switching your SIR for the first time
The first time you switch your SIR internet radio on, a configuration wizard will start. This wizard
will prepare your device for operation and set up the default configurations. In Figure 2.5 below,
the menu buttons of your SIR are depicted. Appended to the right are the names they are
referred to as in this manual.
1 – OK button
2 – Escape button
3 – Menu-Up button
4 – Menu-Down button
5 – Menu-Left button
6 – Menu-Right button
7 – Alt button
8 – Preset buttons
Figure 2.5: The SIR menu buttons
User’s manual
May 2008
Version 1.0
10
STREAMIT INTERNET RADIO
2.4.1
The Configuration Wizard
Step 2: Network setting
It is possible to set your SIR radio to get its IP address from a
DHCP server or to use a Static IP and manually enter the
network settings. We recommend DHCP is used (when
available) which is also default in the wizard. Press OK for the
[DHCP] option; this will ensure that the IP address of your SIR
is unique. The scenario of using Static IP will be covered later
in §2.4.4 .
Step 3: Volume setting
The output volume level of your SIR radio is represented in
numerical format as 0-31 with a change step of 1. The
numerical value 0 corresponds to the minimum volume level,
while 31 to the maximum. As it will be explained later, it is not
possible to change the volume level of the SIR while it is
playing but only from the setup menu. This is the reason we
recommend to set the volume to the maximum (32), which is
also the default value, while you can control the actual “heard”
volume from the audio equipment the SIR is hooked to. MenuLeft and Menu-Right are used to decrease and increase the
volume respectively. Press button OK when ready.
Step 4: Bass setting
It is also possible to set the bass output level of your SIR
radio, which is numerically represented from values 0-16 with
0 as the minimum and 16 as maximum. We recommend the
default value 8 is used. Menu-Left and Menu-Right are used to
decrease and increase the bass respectively. Press OK button
when ready.
Step 5: Treble setting
Same as for the bass, the treble output level is represented
with numerical values 0-16 and as default is set to 8. MenuLeft and Menu-Right are used to decrease and increase the
treble respectively. Press OK button when ready.
Step 6: Keylock setting
Your SIR radio features a keylock option, which you have
guessed right enables you to protect the settings of your
device from being altered from other individuals. The default
keylock feature is OFF. Press OK button to complete the
wizard. The scenario with keylock turned on is covered below
in §2.4.5.
Congratulations! You have completed the SIR startup wizard.
The device will automatically restart and the wizard settings
will be set up as default. On start up your SIR will connect to
the selected database and load from there an up to date
stations list (and other settings when available).
User’s manual
May 2008
Version 1.0
11
ENGLISH
Step 1: Language setting
As default the wizard will start with [English]. Press OK to
confirm the language preference (in this case [English]). You
could also choose between [Dutch] and [German] by using the
menu up/down buttons.
STREAMIT INTERNET RADIO
If you would like to use your device with a different database rather then the default
Channelservice.fm, you should use the Streamit Terminal Program. See [1] for more information.
In the remainder of this manual it is assumed the SIR is configured to connect to a database
which contain the streams of the stations.
2.4.2
Playing from a stream
After the configuration wizard is completed your SIR will restart and ask which source to use. The
two options are internet and card.
Using Menu-Up/Menu-Down buttons you can browse the two
available choices. OK button will select the desired source. In
case [Internet] is chosen, the SIR will start to look for updates.
The first update check is performed on the software; should a newer version be available from
Streamit’s update server, the SIR will update to this version. You do not need to do anything in
the meanwhile, but wait for the update to finish.
During the loading and programming of the new software (also called firmware update) it is
important that you do not switch off and/or remove the power supply of the SIR device. When you
do this, you take the risk that the SIR won’t function anymore afterwards. In case this happens
once, you can program new software into the SIR using the Streamit Terminal Program. See [1]
for more information. The loading and programming of the new software may take up to about 20
seconds.
The SIR will then restart again and will update the station’s database (from Channelservice).
According to weather your device was already registered in Channelservice, the device will get a
list of stations.
Using Menu-Up/Menu-Down buttons you can browse through
the available stations. Press OK button to select the desired
station.
You will see that the status shown in the LCD will change to ‘Connecting…’, which indicates that
the SIR is trying to connect with the chosen station. When the connection succeeds the status will
change to ‘Buffering…’, indicating that audio data is being streamed to your radio. The connecting
and buffering time take up to about 15-20 seconds.
No audio is sent to the output yet. This is related to the advanced buffering techniques your SIR
uses to ensure that variations in the transfer rate do not affect your audio output.
After few seconds, the SIR will start playing the stream and
you will hear audio coming out of your audio installation. The
station name with a speaker animation in front will be shown
on the lower row of the LCD, while on the upper row metadata
of the audio stream when available.
If a stream is playing and you want to switch to another station, just browse to the desired station
using Menu-Up/Menu-Down and press OK button to connect. When you do not press OK, the
SIR will automatically connect to the station after 10 seconds. If at the last moment you decide
not to change station, just press Escape to return. The preset buttons can be used to jump to any
of the first five stations in the list.
User’s manual
May 2008
Version 1.0
12
STREAMIT INTERNET RADIO
2.4.3
The MMC/SD/SDHC Card
When playing from Internet, you can switch to card by using
the Alt button (the opposite is also possible); on the lower row
of the LCD, the text “Select playlist” is shown, while on the
upper row, the name of the playlist.
Use Menu-Up/Menu-Down to browse the available playlist and press OK to select the playlist you
would like to play (When you do not press OK, the SIR will automatically switch to the card after
10 seconds). The SIR will start to play the first entry of the chosen playlist.
On the upper row of the LCD you will first see the status
“Buffering…” indicating that audio data is being read from the
card and sent to the audio buffer. No audio is sent to the
output yet.
After a couple of seconds, the SIR will start playing and you will hear audio coming out of your
audio installation. In the lower row of the LCD, the playlist name with a speaker animation in front
will be shown. The upper row will first be cleared (was “Buffering…”) when the SIR starts playing,
then in a couple of seconds the title of the entry will be shown.
Another very important feature of your SIR that relates to the card is the fallback in case of
network or streaming failure. Just as the name indicates, should there be problems with your
Ethernet connection or with the stream that is being played, the SIR will automatically switch to
the card and starts playing from there.
Streamit is currently looking at the possibility to expand the card functionalities even further. For
more up-to-date information on this topic, please visit our website.
2.4.4
Choosing a Static IP from the configuration wizard
Step 2: Network settings
If DHCP is not available or you have reason not to use DHCP,
then choose for Static IP. You have to insure that the IP
address you will assign to your SIR is not in use by other
device in your network; it must be unique. Once you decided
to start this step of the wizard you will have to go through with
it, until the end. It is not possible to use the Escape or the
directional menu buttons. Press OK button to the [Static IP]
option.
Step 2.1: IP-address setting – Info
This step of the wizard informs you that you are about to edit
the IP-address of your SIR radio. Press OK.
Step 2.2: IP-address setting
Enter the IP address you would like to assign your SIR radio.
Use the Menu-Left/Menu-Right to move the cursor and the
Menu-Up/Menu-Down to respectively increase or decrease the
values. Press OK button to confirm.
Step 2.3: Network Mask setting – Info
This step of the wizard informs you that you are about to edit
the net-mask of your SIR radio. Press OK button.
User’s manual
May 2008
Version 1.0
13
ENGLISH
Your SIR also can also play audio from a MMC, SD or SDHC card. Fill the card with your favorite
music and plug it in the MMC/SD/SDHC card connector. For more information about storing audio
on the card, see [2].
STREAMIT INTERNET RADIO
Step 2.4: Network Mask setting
Enter the net-mask you would like to assign your SIR radio.
We recommend that the default (255.255.255.255) is used.
Use the Menu-Left/Menu-Right to move the cursor and the
Menu-Up/Menu-Down to respectively increase or decrease the
values. Press OK button to confirm.
Step 2.5: Default Gateway setting – Info
This step of the wizard informs you that you are about to edit
the Default Gateway of your SIR radio. Press OK button.
Step 2.6: Network Mask setting
Enter the default gateway of your network. Use the MenuLeft/Menu-Right to move the cursor and the Menu-Up/MenuDown to respectively increase or decrease the values. Press
OK button to confirm.
Step 2.7: DNS 1 setting – Info
This step of the wizard informs you that you are about to edit
the address of your DNS server. Press OK button.
Step 2.8: DNS 1 setting
Enter the address of your DNS server. Use the MenuLeft/Menu-Right to move the cursor and the Menu-Up/MenuDown to respectively increase or decrease the values. Press
OK button to confirm.
Step 2.9: DNS 2 setting – Info
This step of the wizard informs you that you are about to edit
the address of your second DNS server (if available). Press
OK button.
Step 2.10: DNS 2 setting
When a second DNS server is available you can enter its
address. Use the Menu-Left/Menu-Right to move the cursor
and the Menu-Up/Menu-Down to respectively increase or
decrease the values. Press OK button to confirm. When this is
not applicable, we recommend that the default value
‘255.255.255.255’ is used.
Step 2.11: Network setting ready
At this point you have entered all required network settings
parameters. Press OK button to confirm and continue with
Step 3.
2.4.5
Choosing to turn the Keylock ON from the configuration wizard
Step 6: Keylock setting
To enable the keylock feature choose the [Keylock ON] option
and press OK button to confirm.
Step 6.1: Enter new PIN – Info
This step of the wizard informs you that you are about to enter
a PIN code for locking your device keypad. Press OK button.
User’s manual
May 2008
Version 1.0
14
STREAMIT INTERNET RADIO
Step 6.2: Enter new PIN
To lock your device’s keypad a four digits PIN has to be
entered. Every digit will have the value 1-5 because the preset
buttons are used to enter the pin. After entering you PIN code,
press OK button to confirm.
Congratulations! You have completed the SIR startup wizard.
Press OK to finish. The device will automatically restart and
the wizard settings will be set up as default.
User’s manual
May 2008
Version 1.0
15
ENGLISH
Step 6.3: Keylock is ON
You have successfully locked the keypad of your device with a
PIN code. Press OK to continue with the wizard.
STREAMIT INTERNET RADIO
3
SIR Configuration – Setup menu
It is possible to use your SIR’s setup menu to manually change configurations of your device. The
menu of your SIR is accessed by pressing the OK and Escape buttons together while the device
is in powered off state. The menu includes Setup and Service options.
3.1
Changing the menu language
You can come to the language menu by entering
the SIR Setup. If you are already in [Setup], press
the Menu-Up button until you reach the
[Language] option. Press OK button to access the
[Language] menu. You can use the MenuUp/Menu-Down buttons to browse through the
available languages and use the OK button to
confirm your choice. In this case the chosen
language will be applied and the SIR will return to
the [Language] option.
If you access the [Language] menu, but you
decide not to change the current language of your
SIR, you could press the Escape button, in which
case the SIR will return to the [Language] option
without the language being changed.
3.2
Changing the network setting
Changing the network settings of your SIR radio is done from the Network Setup menu. You can
come to the Network Setup menu by entering the [Setup] and browsing until you find the [Network
Setup] option. Use OK to access this menu. Two options are available, [DHCP] and [Static IP]. In
case you decide not to change the current settings, just press Escape to return.
In case of DHCP, just confirm your choice pressing OK. Your preference will be saved and will be
applied the next time the device will restart (a restart is done when you leave the setup menu).
To assign your device a static IP, choose the [Static IP] option from the [Network Setup] menu
and press OK. A wizard will be started to help you through with the configuration. You can leave
this wizard at anytime by pressing the Escape button. Each section of the wizard (IP address,
Network Mask, Default Gateway, DNS 1, DNS 2) is made of two steps, one step informing you on
what parameter will be changed and the other step is the actual parameter address value. When
editing addresses, the Menu-Right/Menu-Left buttons are used to move the cursor through while
the Menu-Up/Menu-Down are use to respectively increase and decrease the value where the
cursor is placed. When you have entered the desired address, press OK to confirm and follow
with the next section of the wizard. When all of the parameters have been entered, your
preferences are saved and you are given the option to exit the [Network Setup] menu by pressing
OK while Escape will bring you back to the [Network Setup] menu.
User’s manual
May 2008
Version 1.0
16
ENGLISH
STREAMIT INTERNET RADIO
3.3
Changing volume setting
The output volume level of your SIR radio is
represented in numerical format as 0-32. The
numerical value 0 corresponds to the minimum
volume level, while 31 to the maximum. You can
change the volume level from the [Volume] menu.
Enter the [Setup] and browse until you find the
[Volume] option. Press OK to access this menu. The
Menu-Right and Menu-Left buttons are used to
respectively increase and decrease the volume level.
When you have chosen the desired level, press OK
button to confirm your choice and get back to the
[Setup] menu. You can also exit the [Volume] menu
without any changes being applied by pressing
Escape button.
User’s manual
May 2008
Version 1.0
17
STREAMIT INTERNET RADIO
3.4
Changing bass setting
The output bass level of your SIR radio is numerically
represented from values 0-16 with 0 as the minimum
and 16 as maximum bass. You can change the bass
level from the [Bass] menu.
Enter the [Setup] and browse until you find the [Bass]
option. Press OK to access this menu. The MenuRight and Menu-Left buttons are used to respectively
increase and decrease the bass level. When you have
chosen the desired level, press OK button to confirm
your choice and get back to the [Setup] menu. You
can also exit the [Bass] menu without any changes
being applied by pressing Escape button.
3.5
Changing treble setting
The output treble level of your SIR radio is numerically
represented from values 0-16 with 0 as the minimum
and 16 as maximum treble. You can change the treble
level from the [Treble] menu.
Enter the Setup and browse until you find the [Treble]
option. Press OK to access this menu. The MenuRight and Menu-Left buttons are used to respectively
increase and decrease the treble level. When you
have chosen the desired level, press OK button to
confirm your choice and get back to the [Setup] menu.
You can also exit the [Treble] menu without any
changes being applied by pressing Escape button.
3.6
Changing Keylock settings
Your SIR radio features a keylock option which enables you to protect the settings of your device
from being altered from other individuals by locking the keypad. If the keylock is on and you want
to use the keypad of your SIR, you just press any of the buttons. The SIR will ask you to enter the
PIN. Once you have entered the right PIN your keypad is unlocked temporarily so you can make
the desired changes. If no buttons are pressed for 10 seconds, the keypad will automatically lock
again.
User’s manual
May 2008
Version 1.0
18
STREAMIT INTERNET RADIO
3.6.1
Turning Keylock ON
You can turn the Keylock ON from the [Keylock] menu
as follows:
Press OK to the [Keylock ON] option. This will start a
wizard. The first step of the wizard is only to inform
you that you are about to enter a new PIN to your
device. Press OK to continue with the next step of the
wizard, which is the PIN code. Use the Preset buttons
to enter your PIN, which will consist of 4 digits each
having he value 1-5 (resulting in 625 possible
combinations). At this stage the entered code will be
displayed in the LCD as digits. Use Menu-Left/MenuRight to move the cursor and enter new digits will
override the value above the cursor.
Press OK to confirm you PIN code. A screen is
shown to inform you that the Keylock was turned On.
Press OK to confirm and complete the wizard. The
changes are now applied to your device.
You can also exit the Keylock wizard without any
changes being applied by pressing Escape button.
3.6.2
Turning Keylock OFF
The keylock algorithm obeys to a number of rules which means that turning the keylock OFF
would require different steps according to conditions such as entering the right PIN, 10 second
timer expiring etc. In the example below we will only consider the case when the user enters the
right password. Also it is assumed that the user is in the [Setup] menu for less then 10 seconds.
In case the user has not pressed any buttons for 10 seconds in the [Setup] menu, an extra step
would be added; the user would have to enter the PIN one more time.
In case the wrong PIN code is entered at any stage, a ‘Wrong PIN’ warning is shown and the user
is asked to enter the PIN code again. This would loop until the right PIN is entered.
User’s manual
May 2008
Version 1.0
19
ENGLISH
Enter the [Setup] and browse until you find the
[Keylock] option. Press OK to access this menu which
allows you to choose between the two available
options; [Keylock OFF] or [Keylock ON].
STREAMIT INTERNET RADIO
You can turn the Keylock OFF from the [Keylock]
menu as follows.
Enter the [Setup] and browse until you find the
[Keylock] option and press OK. This menu is locked,
so you are asked to enter the PIN code to access this
menu. Once you have entered the right PIN, press OK
button to confirm your entry and unlock the Keylock
menu.
You have now accessed the [Keylock] menu where
you could choose between the two available options;
[Keylock OFF] or [Keylock ON].
Press OK to the [Keylock OFF] option. This will start a
wizard. In the first step of the wizard you are informed
that the old PIN is needed to turn OFF the Keylock.
Press OK to continue with the next step. Enter the old
PIN code and press OK to confirm your entry.
When the entered PIN is correct you will be informed
that the Keylock is now turned OFF. Press OK to
confirm and complete the wizard. The changes are
now applied to your device.
You can also exit the Keylock wizard without any
changes being applied by pressing Escape button.
3.6.3
Forcing Keylock OFF
Should it happen that you forget your PIN code it is not possible to recover it. In case such a
scenario applies the Streamit Terminal Program must be used to force the Keylock OFF. See [1]
for more information.
3.6.4
Changing your Keylock PIN code
There is in fact no direct way to change the Keylock PIN code of your SIR. In case you would like
to change the PIN, you will have to perform two steps.
First turn Keylock OFF. You can do that as explained above in §3.6.2. From this moment the old
password is expired.
Then, turn keylock back ON as explained in §3.6.1 by using the new PIN code.
User’s manual
May 2008
Version 1.0
20
STREAMIT INTERNET RADIO
4
Service Menu
Enter the SIR menu by pressing the OK and Escape buttons
together while the device is in switched off state. From the
options available choose [Service]. Press OK button to confirm
your choice.
Shown first on the screen is the device’s serial number, in this
example ‘A12345’. The serial number of your SIR is unique
and especially important when you want to get access to
closed user group web casts. Through its ID code a SIR can
identify itself and if the administrator has added your SIR in
the list of allowed devices, then access is granted. This
happens automatically and is transparent to the user.
On the next option of the Service menu, the [Network Setup] is
shown. In this example DHCP was used while for static IP it
would be shown Static IP.
For Static IP only: Press OK to view each of the network
components one by one starting with IP address, Network
Mask, Default Gateway, DNS 1 and DNS2. OK button will
show you the next one while Cancel button will bring you back
to the Service Menu.
Your SIR also shows you the version it is running; in this
example version 00.03.04. It is sometimes important for the
technical support people at Streamit to know this information,
in order to help you properly in case help is required.
This [R-Selftest] shows the result of the last selftest you
performed on your SIR, which must be PASS for your device
to operate properly. See below…
The Selftest functionality has been designed to diagnose in no
time if there is hardware malfunction of your SIR.
Press OK to start the selftest. The device will shut down after
a few seconds. If there is no problems with your hardware the
Selftest should return PASS. Enter the [Service] menu again
and look at the result in [R-Selftest].
All SIR devices feature Remote Software Update (See [1, 2]
for more information. The [Update SW] option is used to force
your device to perform an update check. If you press OK
button for this option, the SIR will check for a new software
version and when a new version is available, the will update to
this version. The messages on the LCD will change according
to the update progress.
Do NOT power off the SIR during software updates, as
this can result in not functioning of the SIR anymore.
To load the settings of your device with default values, the
Reset option can be used. This might only be required when in
case of major changes to the SIR’s settings structure. Press
User’s manual
May 2008
Version 1.0
21
ENGLISH
The Service menu of your SIR is used to show you some hardware/software information and
perform small service operations. Let us take a look at all the [Service] menu options and what
each of them does.
STREAMIT INTERNET RADIO
OK for reset to start. On the LCD the text “Resetting…” is
show. The device will then enter the wizard mode.
User’s manual
May 2008
Version 1.0
22