1
8/22/2011
UNIVERSITY OF NEVADA, RENO
USER MANUAL
Introduction to Lego Kit, NXC
and ROS
Nirali Budhecha & Navneet Saggu
Index
Page #
1. INTRODUCTION TO THE LEGO MINDSTORMS EDUCATION KIT
01
a. What‟s in the kit?
01
b. Where to use what?
01
c. Details of Sensors and Multiplexer
02
2. BUILDIG A ROBOT
06
3. INTRODUCTION TO ROS
07
a. Using ROS with NXT
07
b. Issues for using NXT with ROS
07
4. INTRODUCTION TO BRICXCC
a. Starting with Bricx CC
5. INTRODUCTION OF NXC
09
09
11
a. Basic NXC Functions
11
b. Macros
14
c. Sensor Functions
14
d. Multiplexer
17
e. Multi-tasking with NXC
17
6. USEFUL LINKS
19
INTRODUCTION TO THE LEGO MINDSTROMS EDUCATION KIT
What’s in the kit?
The kit contains two pamphlets which provide the details of the parts in the kit. The pamphlet with
the number 4581599 (at the top of the pamphlet), provides a picture of each part, its part number and
quantity of the part in the kit.
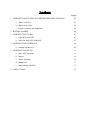
For example: Here the picture represents the part called ½ yellow Bush, 10x means
there are total of 10, ½ yellow Bush in the kit and the number after x is the part
number.
The other side of this pamphlet and the other pamphlet represents the same details as the side that we
just saw but without the part numbers. You will be given other sensors, detail of which is not
included in these pamphlets because those are ordered separately. Details of those parts are given
briefly in the next section and will be discussed throughout the paper. So now that you know what‟s
in the kit, let‟s move on to how to use those parts.
Where to use what?
Most of the connectors, bricks and plates will be used to build the robot. If you need to build a
specific type of robot the step by step instructions will be given in the lab handout. Otherwise, you
can use those parts as you need to meet your assignment details.
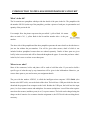
The part with the number 4558295, is called the intelligent micro-computer LEGO Brick (also
known as the NXT brick), acts as the brain of the robot. The brick has a USB port which lets the user
download the programs from computer to the brick. Besides the USB port, the brick has four input
ports (1 to 4) to connect sensors and multiplexer for sensors (multiplexer is used if the robot requires
more than four sensors) and three ports (A to C) to power motors. The brick can be charged using the
charger or the 4 batteries. So no matter what the assignment is, the NXT brick is the one thing that is
necessary.
The other essential part of building robots is the use of motors. Without motors, the robot would not
be able to move. Motors are also useful when you need to rotate certain part of your robot. For
example, if the robot is supposed to collect and hold balls, use motors to open and close a gate.
Now, let‟s learn what each sensor in you kit is helpful for in general manner. Following sensors can
be connected to any of the four ports on the bottom of the NXT brick; to connect a sensor to the brick
use the standard NXT wire provided in the kit.
Details of Sensors and Multiplexer
Touch Sensors:
Touch sensor helps robot avoid obstacles in its way. Furthermore, it helps
detect which way the robot should go, whether the robot is stuck somewhere or
not. The use of two touch sensors would make it easy for the robot to avoid
obstacles, since it would help detect where the obstacles are and what the robot
needs to do in order to avoid them. To connect touch sensor to the NXT brick
use the cables provided in the kit.
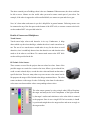
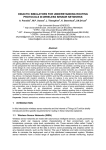
Hi-Technic Color Sensors:
These sensors are used for the projects that are related to colors. Some of the
possible usages are: search for a certain color item, follow a given colored line,
avoid a certain colored object, or read the color value and based on that make a
specific decision. There are many other ways one can use color sensor but for
lab purposes the usage will be limited to the things mentioned above. The color
sensor can detect a wide range of colors. Following is the chart of colors that a
color sensor can detect and the values corresponding to those colors.
The color sensor operates by using a single white LED to illuminate
the target and analyses the color components of the light reflected
by the target‟s surface and calculates a color value which is returned
to the program. Since it uses a single LED for best results, it should
be positioned straight above the target surface and not at an angle to
the target surface.
Sound Sensor:
This sensor is not very useful in noisy area since the sensor is able to measure
noise level frequencies around 3-6 kHz where the human ear is most
sensitive. The sound sensor can measure sound level in dB and dBA. To
trigger the sensor user can clap hands, whistle or snap fingers to create the
sound. Our lab environment is not the best environment for using the sound
sensor but if noise level is kept to minimum it would work as designed.
Light Sensor:
This sensor is used to detect the light intensity. This sensor enables the robot
to distinguish between light and dark, as well as determine the light intensity
in a room or the light intensity of different colors. You will learn about
„Photophilic‟ (attracted to light) and „Photophobic‟ (afraid of light) robots. So
based on the lab requirements your robot will use light sensor to follow or
move away from the light.
Ultrasonic Sensor:
Just like color and light sensor, Ultrasonic sensor is used as a robot‟s eyes.
The sensor can detect the objects and measure its closeness in inches or
centimeters. The maximum distance this sensor can measure is 233 cm
with a precision of 3 centimeters. How it works is that it sends out
ultrasonic sound waves that bounce off an object ahead of it and then back
at it. Then it senses the time it took for that to happen. Based on those two tasks the sensor returns the
signal to the program.
Hi-Technic Compass Sensor:
The Hi-Technic compass sensor is designed to calculate the angle it‟s facing.
The compass sensor has a digital magnetic compass that measures the earth‟s
magnetic field to calculate the angle. The calculated value of the angle is
returned as a number from 0 to 359. Based on our testing, we found that the
sensor is very sensitive and getting precise results requires the robot stay
horizontal, should be mounted at least 6 inches away from the motors and at least 4 inches away from
the NXT brick. So when required to use this sensor the user must be very careful not to ignore the
given details.
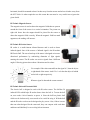
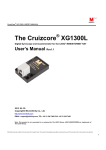
Hi-Technic Magnetic Sensor:
The magnetic sensor is used to detect the magnetic fields that are present
around the front of the sensor in a vertical orientation. The picture on
right side shows how the magnet should be placed for the sensor to
detect the magnetic fields correctly. When the magnetic field has north
uppermost, the reading will increase.
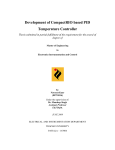
Hi-Technic IR Seeker Sensor:
IR seeker is a multi-element infrared detector and is used to detect
infrared signals. One of the sources of infrared signal is the Hi-technic
IR Electric Ball. The curved end cap of the sensor is designed to increase
directional performance by minimizing distortion of light signals
entering the sensor. The IR seeker can receive signals from 9 different
angles. Following picture shows those 9 directions and its values.
For example if the value returned from the signal is 5, then the object
is right ahead of the sensor. And if it‟s 1 or 9 then the object is behind
and on left or right respectively.
When no signal is detected the sensor returns 0.
Hi-Technic Infrared Electronic Ball:
The electric ball is designed to work with IR seeker sensor. The ball has 20
infrared LEDs which helps IR seeker detect where the ball is. To turn the ball
on, user needs 4 AAA batteries to power it. Since the ball has plastic shell
which can be broken easily, users needs to be careful in using it. With the ball
and the IR seeker a robot can be designed to play soccer. Also, if there is more
than one robot designed for the same task, they can compete with each other
and that would definitely be an exciting lab environment.
Hi-Technic Sesnor Multiplexer:
This is very helpful equipment when a user has
to use more than four sensors. With the sensor
multiplexer, 4 sensors can be connected to one
NXT sensor port. And if needed, more than one
multiplexer can be used as well. Most of the
sensors mentioned above can be used with it but there are a few exceptions. Multiplexer requires
standard 9 volt battery to power each of the attached sensors. It supports wide range of digital and
analog sensors. Most of the sensors mentioned above can be used in any combination with the sensor
multiplexer. Some of the exceptional sensors are: sound sensor and Hi-Technic magnetic sensor.
As mentioned above, these are the main parts which are not included in the kit and are ordered
separately. Also, these are the parts that will be used on regular basis in lab. The limits and
orientations of these parts should be kept in mind while building a robot and writing the program for
it. These parts are sensitive so be careful to not get the sensors scratched otherwise the results might
not be as precise.
Building a robot
Refer to the instruction manual in the CD provided in the kit to build your first robot. After that use
the lab guidelines to build the robot that would meet all the requirements. For further help, use
http://cache.lego.com/downloads/education/9797_LME_UserGuide_US_low.pdf.
Introduction to ROS
ROS is an open source operating system for robots. It provides the basic operating system services
such as hardware abstraction, low-level device control, implementation of commonly-used
functionality, message-passing between processes, and package management. It runs on Unix based
platform. It is implemented in C++, Python, and Lisp. More information about ROS can be found
here: http://www.ros.org/wiki/ROS.
Using ROS with NXT:
ROS provides a NXT software stack that is essential to interface NXT robots with ROS. NXT-ROS
supports NXT touch, RGB color, ultrasonic, accelerometer, gyro, and range sensors. There are some
issues with using NXT-ROS which are explained in the following section.
Issues for using NXT with ROS:
Most of the sensors we are using are Hi-Technic, the reason is that they provide better results
compared to regular sensors. For example, regular color sensor detects only red, green and blue while
Hi-Technic color sensor has wider range and can detect colors all the colors between white and
black. Hi-Technic color sensor can tell a difference between red and light pink, and from solid blue
to light blue. So the main issue with ROS is that it is not compatible with all of the Hi-Technic parts.
Following is the list of issues with ROS:
ROS doesn‟t support Hi-technic color sensor. To use the color sensor with ROS, the user needs
to be using RGB color sensor. And as we know Hi-technic color sensor provides larger spectrum
for the color range compared to the RGB color sensor.
ROS doesn‟t support IR Receiver and IR Seeker sensors which are used with Electronic IR ball.
Compass sensor is another sensor that is not supported by ROS.
Multiplexer is not supported by ROS which is a very important component in lab environment
where more than 4 sensors could be used on regular basis.
With ROS, if one has a question that he/she would like to get a response to then that person needs
to
rely
on
ROS
community
members‟
response.
ROS‟s
support
website
(http://www.ros.org/wiki/Support) says, “If you didn‟t get a response then likely nobody has had
time to answer you. Alternatively, it could be that nobody knows the answer.” So with this way
of support one might get response as soon as in a few seconds or never. ROS has a large
community of users and a lot of questions are asked on regular basis so getting response is not a
big problem but sometimes there are questions which no one has answer to and that is when one
is left on its own to figure things out.
Those were the main problems with using ROS and that is why we chose to work with NXC (Not
Exactly C). NXC works well with all the mentioned sensors and other NXT sensors and parts.
NXC
has
a
great
web
support;
this
website
-
http://bricxcc.sourceforge.net/nbc/nxcdoc/nxcapi/main.html, has the guide to NXC, function list,
examples, library files and other related information to get user started with NXC and is great for
reference use. Also with Google, some of the solutions to NXC related issues can be found. So,
until the ROS becomes compatible with NXT sensors and parts, NXC is the best option. For
more information about NXT-ROS, visit http://www.ros.org/wiki/Robots/NXT.
Introduction to BricxCC
Bricx Command Center also known as BricxCC is an Integrated Development Environment (IDE)
used to program the Lego Mindstorms series. It runs on Windows PCs (XP, Vista and Windows 7).
BricxCC allows one to write programs, download them to the robot, start and stop the programs,
browse the NXT flash memory and much more. Several programming languages can be used to
program the robots in the Lego kit such as Next Byte Codes (NBC), Not Quite C (NQC), and Not
eXactly C (NXC). This tutorial will use BricxCC as the programming environment and NXC as the
programming language to program the robots. BricxCC can be downloaded from here:
http://bricxcc.sourceforge.net/
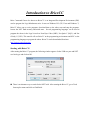
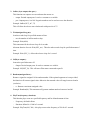
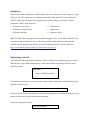
Starting with Bricx CC:
After starting the Bricx CC program, the following window appears. Select USB as a port and NXT
as a brick type and click on OK.
There is an alternate way to search for the NXT brick. After starting the Bricx CC, go to Tools
from top bar menu and click on Find Brick.
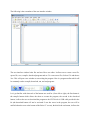
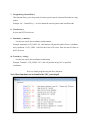
The following is the screenshot of the user interface window:
The user interface window looks like and acts like a text editor. It allows one to create a new file,
open a file, save, compile, download programs and etc. To create a new file, click on File and choose
New. This will open a new window to start writing the program. Here is a program toolbar which will
be constantly used to compile, download, run, and end programs.
Let‟s get familiar with what each of the buttons are used for. (From left to right), the first button is
the compile button which allows the robot to execute the program, the second is the download
button, it allows the user to download the program to the NXT brick via USB cable provided in the
kit (the download button will not be activated if user has errors in the program, the user will be
notified about the error at the bottom of the Bricx CC screen), the third is the run button, it allows the
user to run the program, and the last button in red is the stop button which stops a running program.
User must follow those buttons in given order. First compile the program, then download it to the
NXT Brick, run the program and end the program when needed.
The downloaded programs can be found on the NXT brick. After turning on the brick, go to My
Files, then go to Software files and the program files will be located under the software files. To run a
specific program from the NXT brick itself, go to Run.
NOTE: In case, the user is unable to communicate with the brick, go to Tools, click on Close
Communication, and then click on Find Brick in order to start the communication. Also if the brick
hangs, take out the battery from the brick. This should be done only if other approaches fail.
Introduction to NXC
Not eXactly C (NXC) is a high level, open source programming language, invented by John Hansen.
It is used to program the Lego Mindstorms NXT kit. The NXC Application Programming Interface
describes the built-in functions, constants, and macros that can be used to program a robot. This
document will describe the NXC implementation specifically with BricxCC.
Basic NXC Functions:
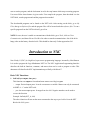
1. OnFwd( byte output, char pwr) :
This function sets output to forward and turns motors on with given pwr.
-
output: Desired output ports. It can be a constant or a variable. Motors can only be connected
in PORT A – C on the NXT brick.
-
pwr: the motor output power. It ranges from 0 to 100. Negative numbers can be used to
reverse the direction.
Example: OnFwd(OUT_A, 100)
The above function will turn on the motor connected to the output port labeled A on the NXT
Brick with 100% power.
2. OnRev( byte output, char pwr) :
This function sets output to reverse and turns the motors on.
-
output: Desired output ports. It can be a constant or a variable.
-
pwr: Output power, 0 to 100. Negative numbers can be used to reverse the direction.
Example: OnRev(OUT_AC, 75)
This will allow the robot to move backwards with power level 75.
3. Wait(unsigned long ms):
It makes a task sleep for specified amount of time.
-
ms: the number of milliseconds to sleep.
Example: Wait(4000)
This statement tells the robot to sleep for 4 seconds.
Alternate function for wait: Wait(SEC_sec): This also makes a task sleep for specified amount of
time.
Example: Wait (SEC_1): Allows the robot to sleep for 1 second.
4. Off(byte outputs):
It turns the specified motors off.
-
Output: Desired output ports. It can be a constant or a variable.
Example: Off(OUT_B) : This will turn off the motor connected to port B.
5. Random(unsigned int n) :
Returns a signed or unsigned 16-bit random number. If the optional argument n is not provided,
the function will return a signed value. Otherwise the returned value will range between 0 and n
(exclusive).
-
n : Returns a maximum unsigned value.
Example: Random(40): This statement will generate random numbers between 0 and 40.
6. PlayTone(frequency, duration):
This function plays a tone at a specified frequency and for allotted amount of time.
-
Frequency: defined in Hertz
-
Duration: defined in 1/1000 of a second.
Example: PlayTone(100, 300) – this plays a tone at the frequency of 300 for 0.3 seconds.
7. Unsigned long CurrentTick( ):
This function allows you to keep track of current system count. It returns milliseconds in a long
integer.
Example: var = CurrentTick( ) – var will contain the current system count in milliseconds.
8. ClearScreen( ):
It clears the NXT brick screen.
9. NumOut(x, y, number):
-
Lets the user specify the coordinates and the number.
Example: NumOut(0, LCD_LINE1, 20) : this function will print the number 20 on x coordinate
and y coordinate 1. LCD_LINE1, is the first line of the LCD screen. There are total of 8 lines on
the LCD screen.
10. TextOut(x, y, string):
-
Lets the user specify the coordinates and the string.
Example: TextOut(1, LCD_LINE6, “Hi”) : this will print the string “Hi” on specified
coordinates.
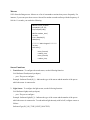
Here is a sample program using the above functions:
Note: More functions can be found in the NXC_tutorial.pdf
Macros:
NXC allows defining macros. Macros are a list of commands or actions that you use frequently. For
instance, if you want your robot to move forward for random seconds and beep with the frequency of
100 for 0.1 seconds, you can do the following:
#define move_forward \
OnFwd(OUT_BC, 75);
PlayTone(100, 100);
#define random_time \
int time;
time = Random(5);
Wait(time);
/******** Main Program*********
int time;
task main( )
{
move_forward;
random_time;
move_forward;
random_time;
}
Sensor Functions:
1. Touch Sensor: To configure the touch sensor, use the following function:
Void SetSensorTouch(const byte &port)
-
port : The port to configure.
Example: SetSensorTouch(IN_1) : Indicate the type of the sensor and the number of the port to
which the sensor is connected to.
2. Light Sensor: To configure the light sensor, use the following function:
Void SetSensorLight(const byte &port)
-
port : The port to configure.
Example: SetSensorLight(IN_2) : Indicates the type of the sensor and the number of the port to
which the sensor is connected to. To read ambient light intensity with led off, configure sensor as
follows:
SetSensorType(IN_2,IN_TYPE_LIGHT_INACTIVE)
SetSensorMode(IN_2,IN_MODE_PCTFULLSCALE)
ResetSensor(IN_2)
3. Sound Sensor: To configure the sound sensor, use the following function:
Void SetSensorTouch(const byte &port)
-
port : The port to configure.
Example: SetSensorSound(IN_3) : Indicate the type of the sensor and the number of the port to
which the sensor is connected to .
4. Ultrasonic Sensor: To configure the ultrasonic sensor, use the following function:
byte SensorUS(const byte &port)
-
port : The port to configure.
Example: SensorUS(IN_1) : Indicate the type of the sensor and the number of the port to which
the sensor is connected to. It returns a value between 0 and 255. Since an ultrasonic sensor is an
I2C digital sensor its value cannot be read using the standard Sensor(n) value. The port must be
configured as a Lowspeed port before using this function. Use the following function to
configure the port as lowspeed:
Void SetSensorLowspeed(const byt &port, bool bIsPowered = true)
-
port: the port to configure
-
bIsPowered: A boolean flag indicating whether to configure the port for powered or
unpowered I2C devices. The default value for this optional parameter is true.
5. Compass Sensor: Read the compass heading value of the HiTechnic Compass sensor on the
specified port. Use the following function:
int SensorHTCompass(const byte &port)
-
port : The port to configure. The port must be configured as a Lowspeed port before using
this function.
Example: SensorHTCompass(IN_2) : Indicates the type of the sensor and the number of the port
to which the sensor is connected to.
6. Color Sensor: Read the compass heading value of the HiTechnic Color sensor on the specified
port. Use the following function:
int SensorHTColorNum(const byte &port)
-
port : The port to configure. The port must be configured as a Lowspeed port before using
this function.
Example: SensorHTColorNum(IN_3) : Indicates the type of the sensor and the number of the
port to which the sensor is connected to.
7. Magnetic Sensor: To configure the sensor on the specified port as a HiTechnic Magnet sensor,
use the following function:
Void SetSensorHTMagnet(const byte & port)
-
Port: The sensor port. Input port constants are used when calling NXC sensor control API
functions.
Example: SetSensorHTMagnet(IN_1) : indicates the type of the sensor and the number of the
port it is connected to.
8. Infrared Seeker Sensor: To read HiTechnic IRSeeker2 AC values, use the following function:
bool ReadSensorHTIRSeeker2AC(const byte port, byte &dir, byte &s1, byte &s3, byte &s5, byte
&s7, byte &9)
-
Port: The sensor port
-
dir: the direction.
-
S1: The signal strength from sensor 1.
-
S3: The signal strength from sensor 3.
-
S5: The signal strength from sensor 5.
-
S7: The signal strength from sensor 7.
-
S9: The signal strength from sensor 9.
Example: byte s1, s3, s5, s7, s9
Bool result = ReadSensorHTIRSeeker2AC(IN_1, dir, s1, s3, s5,s7, s9)
It read direction, and five signal strength values from the HiTechnic IRSeeker2 sensor in AC
mode. Returns a boolean value indicating whether or not the operation completed
successfully. The port must be configured as a Lowspeed port before using this function.
Multiplexer:
The HiTechnic Sensor Multiplexer, (SMUX) allows the user to connect four NXT sensors to a single
NXT port. The NXT sensors can be connected to the SMUX using the NXT wire provided in the
NXT kit. SMUX uses the digital I2C communications protocol and uses a 9v battery. Sensors
supported by SMUX from our kit are:
1. HiTechnic Color Sensor
4. Touch Sensor
2. HiTechnic Compass Sensor
5. Light Sensor
3. HiTechnic IRSeeker
6. Ultrasonic Sensor
Note: The SMUX does not support the sound and the magnet sensor. To use SMUX with NXC, the
user needs to download the NXC driver. The driver provides all the definitions, functions and
variables that are required for the SMUX to work with different sensors. It can be found here:
http://www.hitechnic.com/file.php?f=970-smux-driver-nxc-0.4.zip.
Multitasking with NXC:
NXT and NXC both supports multi-threading, which is an ability of an operating system to execute
different parts of a program simultaneously. A task can be defined using the keyword task in the
following manner:
task name ( )
{
//code for the task goes here
}
To schedule the listed tasks to execute once the current task has completed executing, the following
function would be useful:
Precedes (task task1, task task2, task task3, …, task taskN)
All the tasks will execute simultaneously unless other dependencies prevent them from doing so. Any
number of tasks may be listed in the Precedes statement.
Tasks can be stopped as follows:
stop functionName;
In order to stop all the running tasks concurrently, use the following statement:
StopAllTasks( );
Bricx CC and NXC are the best options because they have all the features that are essential to
program a robot. Since, ROS doesn‟t support many of the sensors; NXC is an appropriate choice for
the class due to its compatibility with all the equipment provided in the NXT kit. NXC is similar to
C, so it makes it easy for the students to learn and use it for the class because they will already be
familiar with C. NXC and the Bricx CC IDE will definitely help the students gain knowledge about
how to program robots to do specific tasks.
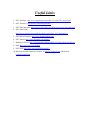
Useful Links
1. NXC Tutorial 1: http://www.engineering.uiowa.edu/~cie/Labs/NXC_tutorial.pdf.
2. NXC Tutorial 2: http://bricxcc.sourceforge.net/nbc/
3. NXC Data Structures: http://bricxcc.sourceforge.net/nbc/nxcdoc/nxcapi/annotated.html
4. NXC Data Fields:
http://bricxcc.sourceforge.net/nbc/nxcdoc/nxcapi/globals_0x72.html#index_r
5. NXT Robot Examples: http://www.legomylegobot.com/
6. NXT Sensors: http://www.hitechnic.com/products
7. Multiplexer Driver: http://www.hitechnic.com/file.php?f=970-smux-driver-nxc-0.4.zip.
8. ROS: http://www.ros.org/wiki/ROS
9. NXT ROS: http://www.ros.org/wiki/Robots/NXT
10. More help needed Contact us: Navneet at [email protected] and Nirali at
[email protected].