1
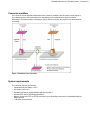
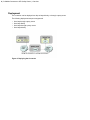
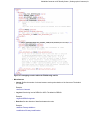
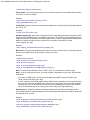
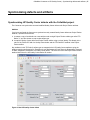
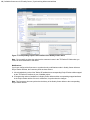
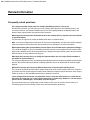
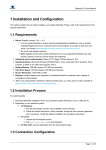
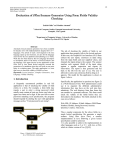
Version 3.4
Manual
Copyright © 2007 CollabNet, Inc. All rights reserved.
CollabNet is a trademark or registered trademark of CollabNet, Inc., in the U.S. and other countries. All other
trademarks, brand names, or product names belong to their respective holders. CollabNet makes no representation
with respect to accuracy or completeness of document, and specifically disclaim any implied warranties for any
purpose and shall in no event be liable for any loss of profit or any other commercial damage, including but not
limited to special, incidental, consequential, or other damages.
Copyright © 1998-2006 The OpenSSL Project. All rights reserved.
This product includes software developed by the OpenSSL Project for use in the OpenSSL Toolkit
(http://www.openssl.org), the license for which can be found in OpenSSL_License.txt in the documentation folder.
Libcurl is licensed under a MIT/X derivate license, the license for which can be found in Libcurl_License.txt in the
documentation folder.
This product includes cryptographic software written by Eric Young ([email protected]). This product includes
software written by Tim Hudson ([email protected]).
8000 Marina Boulevard, Suite 600, Brisbane, California 94005-1865 U.S.A.
Toll free: +1 (888) 778-9793 Voice: +1 (650) 228-2500 Fax: +1 (650) 228-2501
www.collab.net E-mail: [email protected]
CollabNet Connector to HP Quality Center | TOC | 3
Contents
Overview..................................................................................................................4
Connector features...................................................................................................................4
Connector workflow..................................................................................................................5
System requirements...............................................................................................................5
Deployment..............................................................................................................................6
Setting up the Connector.......................................................................................7
Installing the Connector............................................................................................................7
Configuring the Connector.......................................................................................................8
The TD2CNconfig.xml configuration file........................................................................8
The attribute mapping file............................................................................................11
Mapping multiple projects............................................................................................13
Operating the Connector.....................................................................................15
Prerequisites..........................................................................................................................15
Executing the migrator............................................................................................................15
Starting and stopping the Connector......................................................................................16
Executing the Connector........................................................................................................16
Synchronizing defects and artifacts...................................................................17
Synchronizing HP Quality Center defects with the CollabNet project....................................17
Synchronizing Project Tracker artifacts with the HP Quality Center project...........................20
Transition rules for Project Tracker and Quality Center attributes...........................................22
Conflict resolution...................................................................................................................23
Transferring attachments........................................................................................................24
Log management...................................................................................................................25
Error notification.....................................................................................................................25
Related information..............................................................................................26
Frequently asked questions....................................................................................................26
4 | CollabNet Connector to HP Quality Center | Overview
Overview
The CollabNet Enterprise Edition Connector to HP Quality Center synchronizes data between defects in a
HP Quality Center project and Project Tracker artifacts in a CollabNet Enterprise Edition project.
The Connector lets Quality Assurance testers add, view and edit defects or artifacts in either tool, and allows
developers to respond to them using the other tool. All users, therefore, do not need to log into both tools to
track a defect or an artifact.
As the Connector Administrator, you can configure the Connector and decide on the following:
•
•
•
The CollabNet project and HP Quality Center project to link and synchronize
The attribute names and their values in the CollabNet and HP Quality Center projects to map using the
configuration files
The direction for synchronizing the data
•
•
One-way synchronization, where all the data from HP Quality Center synchronizes with CollabNet's
Project Tracker, or vice-versa.
Two-way data flow, where all the data captured through userinputs in either tool flows into the other.
Connector features
Here are some key features of the Connector:
•
•
•
One-way synchronization: You can synchronize only defects in a HP Quality Center project to the
CollabNet project as Project Tracker artifacts (QC2PT), or synchronize only Project Tracker artifacts in a
CollabNet project to the HP Quality Center project as defects (PT2QC).
Two-way synchronization: You can synchronize HP Quality Center defects and Project Tracker artifacts
with each other (Twoway).
Dataflow configuration: You can synchronize addition or modification of defects or artifacts in a specific
direction.
•
•
•
•
•
•
•
•
Addition is a mandatory type of synchronization.
You can synchronize Addition in the QC2PT, PT2QC, or Twoway direction. Refer to Table 1 for a list
of possible combinations.
Conflict Resolution: You can configure the Connector to resolve conflicts that may arise during the
synchronization process. Refer to the section "Conflict resolution" for more information.
Log Management: You can retrieve log information from text files. All transactions and errors, if any, are
captured in these text files.
QC2PT Migration: You can migrate defects that were logged in Quality Center before the Connector was
set up, to Project Tracker.
Multi-project Mapping: You can set up one-to-one mappings between multiple CollabNet projects and
corresponding Quality Center Projects.
Error notification: You can configure the Connector with information about your mail server so that the
specified recipients receive email notifications when the Connector encounters errors.
Attachments: You can configure the Connector to transfer attachments between Project Tracker and
Quality Center.
Note: There are a few limitations with both tools that could halt the process of synchronizing defects and
artifacts between the Quality Center and CollabNet projects. An effective workaround is provided wherever
necessary.
CollabNet Connector to HP Quality Center | Overview | 5
Connector workflow
The Connector checks whether artifacts have been created or modified in the HP Quality Center project or
the CollabNet project, and synchronizes them depending on the configuration set by the Connector
administrator. This allows testers, developers or project owners to monitor the progress of a defect and plan
accordingly.
Figure 1: Workflow of the Connector
System requirements
The Connector requires the following:
•
•
•
•
•
•
CollabNet Enterprise Edition v.4.5.2
HP Quality Center v.9.0
Windows 2003 Server Standard Edition with Service Pack 1
Microsoft SQL Server 2000 Enterprise Edition
Network access over HTTP or HTTPS to connect to your HP Quality Center server or CollabNet Enterprise
Edition domain
1 GB RAM (recommended)
6 | CollabNet Connector to HP Quality Center | Overview
Deployment
The connector can be deployed over http or https directly, or through a proxy server.
The following deployment setups are supported:
•
•
•
•
Over http through a proxy server
Over http directly
Over https through a proxy server
Over https directly
Figure 2: Deploying the Connector
CollabNet Connector to HP Quality Center | Setting up the Connector | 7
Setting up the Connector
Setting up the Connector involves installing it and defining the configuration options.
It is recommended that the Connector be installed and configured only by an administrator who decides on
the CollabNet project and HP Quality Center project to link, and the attributes to map. It is also recommended
that the Connector be installed on the same server that runs Quality Center.
Installing the Connector
To install the connector, you need to extract the contents of a .zip file and then run an .exe file.
1. Extract the contents of the file QC2PT.zip into your local system, for example, under C:\QC2PT\.
Here are the files that you must now have:
•
•
•
•
Collabnet QC2PT Installer.exe
Manual.pdf
Readme.txt
various license files
2. Install the connector by clicking the Collabnet QC2PT Installer.exe file.
3. Decide how you want to configure the flow for synchronizing the Project Tracker and Quality Center data.
Note: This part of the installation is critical as it is a one-time process. Changes to any of the settings will
require the connector to be restarted.
•
•
•
Transfer only defects from the HP Quality Center project to the CollabNet project as Project Tracker
artifacts.
Transfer only Project Tracker artifacts in the CollabNet project to the HP Quality Center project as
defects.
Synchronize HP Quality Center defects and Project Tracker artifacts with each other.
For example, you may want to create a copy of only new defects created in the HP Quality Center project
as Project Tracker artifacts in the CollabNet project, but not synchronize modifications made to these
defects thereafter. Table 1 shows how you can configure the flow of data for various Dataflow options.
Table 1: Configuring the flow of data
Type of
synchronization
(mandatory)
QC2PT (HP
Quality Center
defects to Project
Tracker artifacts)
PT2QC (Project
Tracker artifacts
to HP Quality
Center defects)
Twoway
None
(Synchronizes
defects and
artifacts between
each other)
Addition
Creates copies of
newly created HP
Quality Center
defects as Project
Tracker artifacts in
a CollabNet project.
Creates copies of
newly created
Project Tracker
artifacts as HP
Quality Center
defects.
Creates copies of
newly created
defects in the HP
Quality Center
project in the
CollabNet project
as Project Tracker
artifacts, and
vice-versa.
N/A
8 | CollabNet Connector to HP Quality Center | Setting up the Connector
Type of
synchronization
(mandatory)
QC2PT (HP
Quality Center
defects to Project
Tracker artifacts)
PT2QC (Project
Tracker artifacts
to HP Quality
Center defects)
Twoway
None
(Synchronizes
defects and
artifacts between
each other)
Modification
Synchronizes only
the modifications
made in a Quality
Center defect to the
corresponding
Project Tracker
artifact mapped by
the unique identity.
Synchronizes only
modifications made
in a Project Tracker
artifact to the
corresponding
Quality Center
defect mapped by
the unique identity,
provided the Quality
Center defect has
not been deleted.
Synchronizes only
the modifications
made in Quality
Center defects and
Project Tracker
artifacts between
each other,
provided they are
mapped by the
unique identity and
Quality Center
defects have not
been deleted.
None of the
modifications made
in any one of the
tools are
synchronized.
Now that you have successfully installed the Connector, you can configure its settings.
Configuring the Connector
You need to configure the Connector using two editable configuration files, before executing it to start the
synchronization process.
You can configure various details for the HP Quality Center and the CollabNet project, and map specific
attributes between the two projects using the configuration files.
Note: The Connector supports only a one-to-one mapping between a Quality Center project and a CollabNet
project.
The TD2CNconfig.xml configuration file
In the TD2CNconfig.xml file, provide values for these fields:
•
CollabNet Enterprise Edition project
•
•
•
Project URL and the domain it belongs to
CollabNet username and password for authentication
HP Quality Center project
•
•
•
•
•
Server on which Quality Center is installed and running
Project name and the domain it belongs to
Quality Center username and password for authentication
Quality Center project directory name
Backend: Define the backend database for the Connector within <backend> tags immediately after
the <tdpassword> tags within the <td_project> tags. The options available are ORACLE and MSSQL.
Example:
<backend>MSSQL</backend>
Note: Any value other than ORACLE or MSSQL is ignored, and the backend is assumed to be MSSQL.
CollabNet Connector to HP Quality Center | Setting up the Connector | 9
Figure 3: A <mapping> section within the TD2CNconfig.xml file
•
Miscellaneous
•
Interval: Define the number of minutes between each synchronization of the Connector. The default
is 1 minute.
Example:
<interval>1</interval>
•
Log level: Set the log level to DEBUG or INFO. The default is DEBUG.
Example:
<loglevel>DEBUG</loglevel>
•
Data flow: Set the direction of data flow between the tools.
Example:
<addition>Twoway</addition>
<modification>Twoway</modification>
10 | CollabNet Connector to HP Quality Center | Setting up the Connector
<attachments>Twoway</attachments>
•
Proxy details: If you are using the proxy server to access the internet, fill in the details as given below.
If not, set it to null. For example,
Example:
<proxy_server>192.168.255.30</proxy_server>
<proxy_port>8080</proxy_port>
•
Conflict Rule: Set the Connector to synchronize modifications in a particular way. The possible options
are "TD" or "PT".
Example:
<conflict_rule>TD</conflict_rule>
•
Attribute mapping file: Specify the configuration file that maps attributes between the Quality Center
project and the CollabNet project. The attribute mapping file TD-ALM-ECO.xml is available when you
install the Connector. Depending on the artifact type involved, create an appropriate file based on this
default file. Specify the name that you give this file, for example, defect-map.xml, within
<field_mapping_file> tags.
Example:
<field_mapping_file>defect-map.xml</field_mapping_file>
•
Mail server: To receive email notifications when the Connector runs into errors, you must specify these
details for your SMTP server directly after the <proxy port> tags.
Example:
<mailing>TRUE</mailing>
<smtp_server>server1.collab.net</smtp_server>
<smtp_port>25</smtp_port>
<smtp_from>[email protected]</smtp_from>
<smtp_to>[email protected]; [email protected];</smtp_to>
Note: To enable email notification, enter "TRUE", "True" or "true within" the <mailing> tags.
Note: If you are using a proxy server, you must configure it depending on your setup, to send email
notifications .
•
•
•
If you have an SMTP proxy, enter the proxy IP address and SMTP proxy port details in the
<smtp_server> and <smtp_port> tags.
In some setups the proxy might require that the SMTP ports be opened up, so that machines within
the proxy can connect to the SMTP server. If this is true in your setup, you must enable outbound
connections for port 25 and inbound connections for non-standard ports. Enter the actual SMTP
server IP address and port in the <smtp_server> and <smtp_port> tags respectively.
Attachments: To enable the transfer of attachments between Project Tracker and Quality Center,
specify details about the maximum attachment size, and whether the attachment should be transferred
as a physical file or as a link.
Example:
In the <td_project> section, directly below the <project_directory> tags:
<store_attachments_as>LINKS</store_attachments_as>
In the <cee_project> section, directly below the <password> tags:
<store_attachments_as>FILES</store_attachments_as>
CollabNet Connector to HP Quality Center | Setting up the Connector | 11
<ignore_attachments_above>1000M</ignore_attachments_above>
Note:
•
•
•
•
To ignore attachments, enter "NONE" within the <store_attachments_as> tags.
From Quality Center to Project Tracker, "FILES" and "LINKS" are both valid options. However, if
the physical size of the attachment is greater than the value specified within
<ignore_attachments_above> tags, the Connector transfers the attachment as a file containing a
link.
From Project Tracker to Quality Center, "LINKS" is the only valid option. Attachments will not be
transferred from Project Tracker to Quality Center for any value other than "LINKS".
By default, the attachment size is in bytes. Use K,M or G as a suffix for Kbytes, Mbytes or Gbytes
respectively.
The attribute mapping file
In the attribute mapping file, define and map the attribute names and field values for the Quality Center and
CollabNet projects.
For example, the "Defect ID" attribute in a Quality Center project is mapped to the "TD Defect ID" attribute
in a CollabNet project.
Figure 4: Attribute mapping between the Quality Center and CollabNet projects
Note: Please ensure that the user name in Project Tracker is an exact match of the user display name. This
is mandatory for synchronization.
12 | CollabNet Connector to HP Quality Center | Setting up the Connector
Figure 5: Values of the "Priority" attribute mapped between the Quality Center and CollabNet projects
System attributes
When you run the synchronization, the Connector extracts the relevant information from the TD2CNConfig.xml
file to get the Project Tracker defect’s user details and the details about the artifact type. It then does a
webservices call to extract the metadata information about the specified artifact type in Project Tracker. The
metadata information is written to an XML file. You must specify the name of this metadata file within
<cee_artifact_mapping_file_name> tags. This file contains the display names and internal XML names of
attributes of the artifact type to be synchronized to Quality Center. You do not have to edit this file.
Example:
<cee_artifact_mapping_file_name>defect-complete.xml</cee_artifact_mapping_file_name>
Note: This file contains metadata only on the Project Tracker artifact and its system-defined attributes. It
does not hold any information on user attributes. In earlier versions of the Connector, this file was called
metadata.xml by default. If you configure the connector for multiple project mappings, you will have one file
for each mapping, such as metadata.xml, metadata2.xml, and so on.
User attributes
If you have mapped some user attributes, you must enter this information in a special file and specify its name
within <user_attributes_mapping_file> tags. If you do not define this file, or if you have not mapped the user
CollabNet Connector to HP Quality Center | Setting up the Connector | 13
attributes correctly, the Connector synchronization will still work, but the values entered for the user attributes
will not be transferred.
Example:
<user_attributes_mapping_file>user-attributes.xml</user_attributes_mapping_file>
Note: In earlier versions of the Connector, this file was called fields.xml. A default fields.xml file is available
with this version of the connector as well. Use it as a basis to create your own user attributes file.
Here is an example of how you can map the "Assigned to" attribute in the user attributes mapping file.
1. For the cee_attribute_display_name and the cee_attribute_namespace tags, note the values of the Name
and Namespace fields for the attribute in Project Tracker.
2. To detemine the value for the cee_attribute_name tag, follow these steps:
a. Log into CollabNet Enterprise Edition as a Domain Administrator.
b. In the Administration tab, select Ad hoc database query from the left navigational panel.
c. Run the query "select sa.xml_name, h.title, h.uri from SCARAB_ATTRIBUTE sa, HELM_NAMESPACE
h, SCARAB_R_ISSUETYPE_ATTRIBUTE sita, SCARAB_ISSUE_TYPE sit where
sa.ATTRIBUTE_ID=sita.ATTRIBUTE_ID and sita.ISSUE_TYPE_ID=sit.ISSUE_TYPE_ID and
h.namespace_id=sa.namespace_id and sit.NAME='Defect' and attribute_name='Assigned To';" against
the Project Tracker database.
Note: Here the value "Defect" for sit.NAME is the name of global artifact type and the value "Assigned
To" for attribute_name is the display name of the user attribute.
d. Under Query Results, note the value of XML_NAME.
In the user attribute mapping file, enter the values you noted, like this:
<field_mapping>
<cee_attribute_name>assigned_to</cee_attribute_name>
<cee_attribute_display_name>Assigned to</cee_attribute_display_name>
<cee_attribute_namespace>urn:newsecond</cee_attribute_namespace>
</field_mapping>
Mapping multiple projects
When configuring multiple one-to-one mappings between CollabNet projects and corresponding Quality
Center projects, follow these guidelines:
•
•
•
In the TD2CNconfig.xml file, configure the parameters for each such mapping within <project_mapping>
tags. These include details about the Collabnet Enterprise Edition project and the Quality Center project,
the corresponding usernames and passwords, and other information such as the synchronization interval,
log level, dataflow and proxy server details as described in the section "Configuring the Connector".
For each project that you map, define an attribute mapping file. Depending on the artifact type involved,
create an appropriate file based on the default TD-ALM-ECO.xml file and specify its name within
<field_mapping_file> tags in the TD2CNconfig.xml file.
If you have mapped user attributes, you must enter that information in a file specified within
<user_attributes_mapping_file> tags in the attribute mapping file. In earlier versions of the connector, the
default file which contained the information for user attributes was called fields.xml. Now, you must have
one such file for every one-to-one mapping.
Note: If you have configured the connector for multiple project mappings, and run it once, you must not
change the order of the <project_mapping> tags specified in the TD2CNconfig.xmlfile. For example, if you
had mapped CNproject1-QCproject1 followed by CNproject2-QCproject2, and run the connector, you cannot
14 | CollabNet Connector to HP Quality Center | Setting up the Connector
change the order of mapping. You can, however, modify the content within the <project_mapping> tags. You
can also add such sections for new mappings, such as CNproject3-QCproject3, after the existing sections.
CollabNet Connector to HP Quality Center | Operating the Connector | 15
Operating the Connector
Prerequisites
Before you execute the connector, some things must be in place.
•
•
•
•
Create a CollabNet project with Project Tracker as its tracking component. Make sure that Project Tracker
is running before you start the connector.
Create a HP Quality Center project. Ensure that Quality Center is running before you start the connector.
Set up users with the appropriate permissions in the Quality Center and CollabNet projects for which
defects or artifacts are to be synchronized. Users can include QA testers, developers, project owners,
and so on, in both the defect tracking tools. Permissions may include viewing, adding, editing or deleting
of defects or artifacts. If a defect in a HP Quality Center project is assigned to "User A", you must manually
add this user in the CollabNet project for accurate synchronization, and vice-versa.
Connector users must have the same value for their CollabNet Username and Full Name.
Note: If the Username and Full Name values are different, there could be a loss of data when there is
a conflict during synchroniztation.
•
•
•
•
•
Set up the mapping between the artifact types in Project Tracker and the defect types in Quality Center.
You can map any artifcat type in Project Tracker to a defect type in Quality Center. TD Defect has been
created as a sample.
Map all mandatory fields in Project Tracker to equivalent mandatory fields in Quality Center, and vice
versa. These include the attributes marked "Required" in both tools.
Make sure that a "list" attribute in either tool has the same number of options as the list attribute in the
other tool. For example, if you have mapped the attribute "Priority" with options P1 and P2 in Project
Tracker, then the attribute "Severity" it maps to in Quality Center should have the same number of options,
"High" and "Low". P1 can be mapped to "High" and P2 mapped to "Low".
Enable "History" for all QC fields mapped for synchronization. Please refer to the QC user manual for
information on how to do this.
To transfer attachments between existing Quality Center defects and Project Tracker, you must enable
"History" for the BG_VTS field in Quality Center.
Note: Do not use the usernames configured in CollabNet and Quality Center projects for Connector operations
to log into the respective products.
Executing the migrator
To migrate all artifacts that were created in Quality Center before this Connector was installed, to Project
Tracker, run the QC2PTMigrator.exe file.
Note: You can migrate all artifacts from Quality Center to Project Tracker but not from Project Tracker to
Quality Center.
Before you run the QC2PT Migrator, you must do the following:
•
Configure the TD2CNconfig.xml file under the QC2PTMigrator folder and include the Quality Center and
Project Tracker projects to be synchronized. For more information on configuring the TD2CNconfig.xml
file, refer to the section "Configuring the Connector" in this manual.
Note: For the QC2PT Migrator, the attribute mapping file is TD-ALM-ECO.xml and the user attribute
mapping file is fields.xml. You cannot rename them as is possible for the Connector.
16 | CollabNet Connector to HP Quality Center | Operating the Connector
•
Ensure that the Dependency rule in Project Tracker matches the rule in Quality Center. As an alternative,
you can disable the rule before migrating the artifacts.
Run the QC2PTMigrator.exe file. Enter the range of artifact IDs by specifying the From and To values
for the ID Range. For example, (ID [1 ] to [100])
Example of the command: QC2PTmigrator 1 100
Note: The batch size of the artifacts that you migrate cannot exceed 500 artifacts. If you have a large
number of artifacts, move them in batches of 500 or less.
Note: You can also migrate a single artifact by entering its ID. For example, QC2PTmigrator 3.
Starting and stopping the Connector
•
•
To start synchronizing HP Quality Center defects and CollabNet Project Tracker artifacts, go to Start >
Administrative tools > Services, right click the service name you provided while installing the Connector,
and select Start.
To stop the Connector, go to Start > Administrative tools > Services, right click the service name you
provided while installing the Connector, and select Stop.
Note: Please ensure that HP Quality Center is up and running before attempting to start Services.
Note: The Connector Services and the Migrator cannot both run at the same time. If you intend to use the
Migrator, shut down Services to resume the use of the Migrator.
Executing the Connector
When you run the Connector, defects or artifacts are synchronized between the two defect tracking tools.
The Connector performs one or all of these actions, depending on how it is configured:
•
•
•
•
Creates a copy of a new HP Quality Center defect in your CollabNet project as a Project Tracker artifact,
with a corresponding mapping identity.
Creates a copy of a new Project Tracker artifact in a CollabNet project as a defect in HP Quality Center
project, with a corresponding mapping identity.
Synchronizes defects modified in a HP Quality Center project with the corresponding Project Tracker
artifacts mapped in the CollabNet project.
Synchronizes Project Tracker artifacts modified in a CollabNet project with the corresponding defects
mapped in the HP Quality Center project.
CollabNet Connector to HP Quality Center | Synchronizing defects and artifacts | 17
Synchronizing defects and artifacts
Synchronizing HP Quality Center defects with the CollabNet project
The Connector can synchronize new and modified Quality Center defects with Project Tracker artifacts.
Addition
If you have configured the Connector to synchronize newly created Quality Center defects as Project Tracker
artifacts, it performs these actions:
1. It creates a copy of each defect as a new artifact under a single Project Tracker artifact type called "TD
Defect", if you have chosen to map to that artifact type.
2. It maps the Quality Center defect and Project Tracker artifact using a unique identity. This identity is the
value of the "Defect ID" field of a Quality Center defect and the "TD Defect ID" attribute in the Project
Tracker artifact.
Key attributes in this "TD Defect" artifact type are mapped to the HP Quality Center attributes using the
attribute mapping configuration file. Examples of such attributes are Priority, Severity, Detected By, Detected
on Date, Assigned To, and Status in a Quality Center defect. "TD Defect ID" is the vital Project Tracker artifact
attribute that links to the HP Quality Center defect ID number.
Figure 6: New HP Quality Center defect
18 | CollabNet Connector to HP Quality Center | Synchronizing defects and artifacts
Figure 7: Corresponding Project Tracker artifact of the Quality Center defect
Note: Do not modify or delete the value that the connector inserts in the "TD Defect ID" field unless you
receive an email notification to that effect.
Modifications
If you have configured the Connector to synchronize only modifications made in Quality Center defects to
Project Tracker artifacts, the Connector performs these actions:
1. It checks whether the value of the "Defect ID" attribute has a corresponding Project Tracker artifact mapped
by the "TD Defect ID" attribute in your CollabNet project.
2. It compares the values of attributes of a Quality Center defect and the corresponding mapped attributes
in the Project Tracker artifact. If there is a difference, it synchronizes the changes.
Note: The Connector does not synchronize the history of the Quality Center defect to the corresponding
Project Tracker artifact.
CollabNet Connector to HP Quality Center | Synchronizing defects and artifacts | 19
Figure 8: A Quality Center defect modified
Figure 9: Corresponding Project Tracker artifact modified
20 | CollabNet Connector to HP Quality Center | Synchronizing defects and artifacts
Synchronizing Project Tracker artifacts with the HP Quality Center project
The Connector creates a copy of a new Project Tracker artifact as a defect in a HP Quality Center project.
Although each Project Tracker artifact is uniquely identified by its Artifact Code and Artifact Number (for
example, SC1), the artifact code is not an obstacle during the synchronization process.
Addition
If you have configured the Connector to synchronize newly created Project Tracker artifacts as Quality Center
defects, the Connector performs these actions:
1. It detects the last incremented value of the "Defect ID" attribute in the Quality Center project.
2. It maps the Quality Center defect and Project Tracker artifact using a unique identity. This identity is the
value of the "Defect ID" field of a Quality Center defect and the "TD Defect ID" attribute in the Project
Tracker artifact.
3. It synchronizes other fields that are mapped to the Quality Center project.
Figure 10: A new Project Tracker artifact
CollabNet Connector to HP Quality Center | Synchronizing defects and artifacts | 21
Figure 11: Project Tracker artifact appears as a Quality Center defect
Note: Do not modify or delete the value that the connector inserts in the "TD Defect ID" field unless you
receive an email notification to that effect.
Modifications
If you have configured the Connector to synchronize the values of Project Tracker artifacts modified with the
corresponding mapped Quality Center defects, the Connector performs these actions:
1. It checks whether the Project Tracker artifact has a corresponding Quality Center defect mapped by the
unique identity.
2. It checks the attribute values of the Project Tracker artifact. If an attribute value has been modified in the
Project Tracker artifact, it synchronizes the change with the HP Quality Center defect.
22 | CollabNet Connector to HP Quality Center | Synchronizing defects and artifacts
Figure 12: Project Tracker artifact modified
Figure 13: HP Quality Center defect modified
Transition rules for Project Tracker and Quality Center attributes
With CollabNet’s Project Tracker tool and HP Quality Center, you can set a transition rule for an attribute.
For example, the "Status" attributes in Project Tracker and Quality Center follow a specific transition.
When you create a new Project Tracker artifact, the initial default value of the "Status" attribute is set to
"Submitted", but in Quality Center, the initial default value is set to "New". The attribute mapping configuration
file maps these two values ("Submitted" and "New") and other values in the "Status" attribute of the Project
Tracker artifact and Quality Center. You can change the values the configuration file as required.
However, the Connector cannot control the transition rule defined in both tools for any other attribute that
follows a transition rule. As a Connector Administrator, you must define the transition rules for the "Status"
attribute in both the tools so that the Connector can synchronize exactly. If you try to modify the rule during
the synchronization process, the Connector might encounter a conflict and display an error.
CollabNet Connector to HP Quality Center | Synchronizing defects and artifacts | 23
For example, Table 2 describes the transition rule defined for the "Status" attribute in the Project Tracker
artifact, and the corresponding values of the Quality Center’s "Status" attribute mapped in the attribute mapping
configuration file.
Table 2: Transition rule for the "Status" attribute
Defect tracking tool
CollabNet's Project Tracker
HP Quality Center
Value number
Value name
Matching value name
1
Submitted (the default value, no
other option provided)
New (default value)
2
Started
Open
3
Completed
Fixed
4
Reopened
Reopen
5
Will not complete
Rejected
6
Closed
Closed
A conflict could arise if the transition rules for the "Status" attribute in both the tools do not synchronize. For
example, assume that you have defined a transition rule for the "Status" attribute in Project Tracker, but not
defined a transition rule in Quality Center.
Also assume that "UserA" subsequently changes the value of the "Status" attribute in Project Tracker from
"Submitted" to "Started", and "UserB" changes the value of the "Status" attribute in the corresponding Quality
Center defect from "New" to "Fixed". During the next synchronization, the Connector will check the conflict
resolution rule specified in the attribute configuration mapping file. However, it will ignore the modifications
made by both "UserA" and "UserB" and retain the same values in the Quality Center defect and its
corresponding Project Tracker artifact.
Conflict resolution
The Connector synchronizes only the most recent changes made to Quality Center defects and Project
Tracker artifacts at a scheduled interval. If a Quality Center defect and its corresponding Project Tracker
artifact are modified at the same time, a conflict is bound to arise during the synchronization process. This
could result in data loss.
To resolve conflicts and maintain data integrity, the Connector provides configurable conflict detection rules
and resolution functionality that allow you to simultaneously modify defects or artifacts. These rules are defined
in the TD2CNconfig.xml configuration file.
•
•
TD: This synchronizes the most recent value of the Quality Center’s defect attribute with the corresponding
Project Tracker attribute, even if the Project Tracker artifact is modified after the Quality Center defect is
modified.
PT: This synchronizes the most recent value of the attribute of the Project Tracker artifact with the
corresponding Quality Center defect, even if the Quality Center defect is modified after the Project Tracker
artifact is modified.
For example, assume that you have configured the Connector to synchronize Quality Center defects and
Project Tracker artifacts every 30 minutes, and the last synchronization took place at 15:30:00 hours. You
have modified the values of the "Severity" attribute in a Quality Center defect and its corresponding Project
Tracker artifact.
During the next synchronization scheduled at 16:00:00 hours, the Connector performs these actions (Table
2):
24 | CollabNet Connector to HP Quality Center | Synchronizing defects and artifacts
1. It detects that the value of the "Severity" attribute in the Quality Center defect and Project Tracker artifact
do not match.
2. It checks for the conflict rule defined in the TD2CNconfig.xml configuration file. If one of these values is
specified, the Connector performs these actions:
•
•
TD: The connector checks whether the "Severity" attribute is mapped to a Project Tracker attribute in
the attribute mapping file. If this attribute is mapped, it synchronizes the most recent value of the
attribute of the Quality Center defect with the corresponding Project Tracker artifact. In this case, the
value of Project Tracker's "Severity" attribute is changed to "S2."
PT: The connector checks whether the "Severity" attribute has a corresponding mapping in the attribute
mapping file. If this attribute is mapped, it synchronizes the most recent value of the Project Tracker
artifact with the Quality Center defect. In this case, the value of the Quality Center defect's "Severity"
attribute is "S3."
Table 3: Example of a conflict and its resolution
Timestamp format
Attribute name
(hours:minutes:seconds)
Value of the HP Quality Value of the Project
Center defect
Tracker artifact
15:30:00 (Time of the last Severity
Connector)
synchronization)
S1
S1
15:40:00
Severity
S2
S1
15:50:00
Severity
S2
S3
16:00:00 (Time of the next Severity
scheduled Connector
synchronization - option
is "TD")
S2
S2 (new value post
synchronization)
16:00:00 (Time of the next Severity
scheduled Connector
synchronization - option
is "PT")
S3 (new value post
synchronization)
S3
Transferring attachments
The Connector transfers attachments between Quality Center and Project Tracker one way in either direction,
or both both ways. This depends on how you have configured the <attachments> tags within the <dataflow>
tags in the TD2CNconfig.xml file.
In this version of the Connector, the transfer of attachments is supported as follows:
•
•
•
•
•
An attachment is transferred only on addition. Modification and deletion of an attachment are not supported.
From Quality Center to Project Tracker, an attachment is transferred either as a physical file or as a file
containing a link, depending on how you configure the Connector. If the size of an attachment is greater
than a limit that you specify, the attachment gets transferred as a file containing a link.
From Project Tracker to Quality Center, an attachment is transferred only as a file containing a link.
It is recommended that you have a maximum file size of 5MB for attachments.
The QC2PT Migrator does not support attachments.
CollabNet Connector to HP Quality Center | Synchronizing defects and artifacts | 25
Log management
The CollabNet Enterprise Edition Connector to HP Quality Center synchronizes data between defects in a
HP Quality Center project and Project Tracker artifacts in a CollabNet Enterprise Edition project.
All the transactions and the errors, if any, are captured in the console as well as in a text file. While the
information made available on the console is fleeting, the log information in the text file is retrievable.
This log text file is created the first time you run the connector. Every day a new log file is created at midnight
based on the system time. The log file resides inside a folder created under the folder where the .exe file is
found. This folder goes by the month of the log which is nested under the year folder. The log file itself bears
the name log_<yyyy><mm><dd>.txt.This log file is never overwritten and so troubleshooting can be done
based on the logs at any point in time.
A redirect.txt file is also available under a folder /bin created under the folder where the .exe file is found.
This file holds detailed information on transactions and errors that could help during troubleshooting. In
addition, there is one log file for every connector thread, named redirect.thread_number.txt, for example,
redirect.0.txt.
Note: The log files get cleaned up periodically. It is recommended that you capture the logs as soon as you
encounter a problem, and provide them to CollabNet if you are reporting the error.
Error notification
An email message with the subject prefix [Connector-Notification] is sent to configured recipients when the
Connector encounters an error.
For more information on specifying the mail server or proxy server details for this feature, please see the
section "Configuring the Connector".
Here are some notification messages and the errors that generate them:
Message
Error condition
Unable to update PT Artifact
The Connector fails to synchronize a modification in a Quality
Center defect to Project Tracker
Unable to create PT Artifact
The Connector fails to synchronize an addition in a Quality Center
defect
Unable to create QC Bug
The Connector fails to synchronize an addition in a Project Tracker
artifact to Quality Center
Unable to update QC Bug
The Connector fails to synchronize a modification in a Project
Tracker artifact to Quality Center
Unable to initialize TD/QC connection The Connector is unable to connect to Quality Center
Attachment failed to ship to PT
The Connector encounters a problem when transferring an
attachment from Quality Center to Project Tracker
Attachment failed to ship to QC
The Connector encounters a problem when transferring an
attachment from Project Tracker to Quality Center
26 | CollabNet Connector to HP Quality Center | Related information
Related information
Frequently asked questions
Can I map one Quality Center project to multiple CollabNet projects or vice-versa?
No. With this Connector, you can map only one HP Quality Center project to one CollabNet project, and
vice-versa. However, you can have multiple such one-to-one mappings between CollabNet projects and
Quality Center projects within one instance of the Connector.
What happens if the Connector terminates because of a network failure or system crash in the middle
of synchronization?
For both tools, the log files will record the details when there is a network failure.
Note: If you have configured your mail server to receive error notifications, you will receive email messages
when the Connector encounters errors. See the section "Error notification" for further information.
What happens during the synchronization process if there are inconsistencies in permission settings?
The Connector displays an error if inconsistent permissions are set to users added in the HP Quality Center
project and CollabNet project. We recommend that you assign similar permissions (even if they do not have
identical names) to users added in both projects.
What does the Connector do if you modify the state transition rule of a Project Tracker attribute in
the middle of synchronization?
The Connector displays an error if you modify the state transition rule for an attribute during the synchronization
process. We recommend that you define a matching transition rule for an attribute that is common to both
projects.
Would the Connector work if you set different time zones in the two defect tracking tools?
The Connector would still work because it resides in the same server as the Quality Center tool. So there is
no question of a time lag with respect to Quality Center. When the Connector queries the server where Project
Tracker is running, it uses CollabNet webservices to obtain the local time.
I have configured the Connector and started the service. From the redirect.txt file, it seems like the
Connector is running for one or two cycles, but there are no further logs. However, I can still see the
process in the "Task Manager" screen. Why does this happen?
This could be because your configuration for the Quality Center server is incorrect. Please check your
TD2CNconfig.xml file for the Quality Center server and authentication parameters.