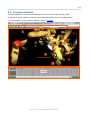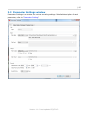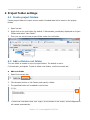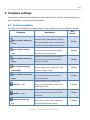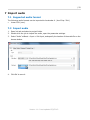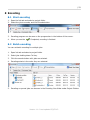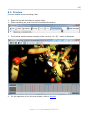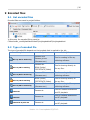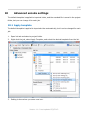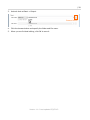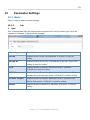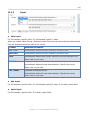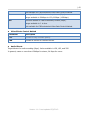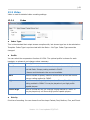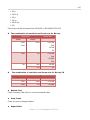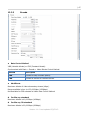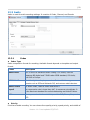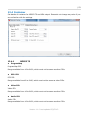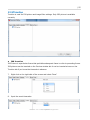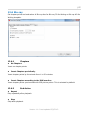
1
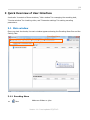
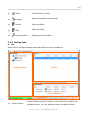
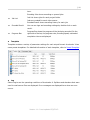
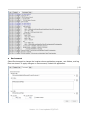
Accelcoder X User Manual |1 Contents 1 Introduction of Accelcoder X ................................................................................ 5 1.1 2 3 1.1.1 Blu-ray Disc Authoring ................................................................................. 5 1.1.2 Dailies and Preview ..................................................................................... 5 1.1.3 Promotion .................................................................................................. 5 1.1.4 IPTV and Online Streaming ........................................................................... 5 Quick Start Guide............................................................................................... 6 2.1 Start Accelcoder X ............................................................................................ 6 2.2 Create a Project Folder ...................................................................................... 6 2.3 Choose template .............................................................................................. 6 2.4 Import video .................................................................................................... 7 2.5 Import audio .................................................................................................... 7 2.6 Start encoding ................................................................................................. 8 2.7 Get Encoded file ............................................................................................... 8 Quick Overview of User Interface ......................................................................... 9 3.1 4 5 6 7 Application of Accelcoder X ................................................................................ 5 Main window .................................................................................................... 9 3.1.1 Encoding Menu ........................................................................................... 9 3.1.2 Setting Tabs ............................................................................................. 10 3.2 Preview windows ............................................................................................ 14 3.3 Parameter Settings window .............................................................................. 15 Project folder settings ....................................................................................... 16 4.1 Create project folders ...................................................................................... 16 4.2 Add or Delete root folder ................................................................................. 16 Template settings ............................................................................................. 18 5.1 Preset templates ............................................................................................ 18 5.2 Select default template.................................................................................... 19 5.3 Customize template ........................................................................................ 19 Import video ................................................................................................... 20 6.1 Supported video format ................................................................................... 20 6.2 Import 2D video ............................................................................................. 20 6.3 Import 3D video ............................................................................................. 21 Import audio ................................................................................................... 22 7.1 Supported audio format ................................................................................... 22 7.2 Import audio .................................................................................................. 22 Version 1.1.0 Last updated 2/3/2012. |2 8 9 Encoding......................................................................................................... 23 8.1 Start encoding ............................................................................................... 23 8.2 Batch encoding .............................................................................................. 23 8.3 Encoding status .............................................................................................. 24 8.4 Preview ......................................................................................................... 25 Encoded files ................................................................................................... 26 9.1 Get encoded files ............................................................................................ 26 9.2 Type of encoded file ........................................................................................ 26 10 Advanced encode settings ................................................................................. 27 10.1 Apply template ............................................................................................... 27 10.2 Separate parameter setting .............................................................................. 28 10.3 Duration setting ............................................................................................. 28 10.4 Output setting ................................................................................................ 28 11 Preview .......................................................................................................... 30 11.1 Preview menu ................................................................................................ 30 11.2 Timeline control.............................................................................................. 33 11.3 Segment re-encoding ...................................................................................... 35 11.3.1 Re-encode selected range........................................................................... 35 11.3.2 Merge re-encoded video ............................................................................. 37 12 Parameter Settings........................................................................................... 39 12.1 Basic ............................................................................................................ 39 12.1.1 Job ......................................................................................................... 39 12.1.2 Input ....................................................................................................... 40 12.1.3 Output..................................................................................................... 41 12.1.4 Encode .................................................................................................... 41 12.2 Video ............................................................................................................ 43 12.2.1 Codec ...................................................................................................... 43 12.2.2 Picture..................................................................................................... 44 12.2.3 Encode .................................................................................................... 47 12.3 Audio ............................................................................................................ 51 12.3.1 Codec ...................................................................................................... 51 12.3.2 Channel ................................................................................................... 52 12.3.3 Encode .................................................................................................... 52 12.4 Container ...................................................................................................... 53 12.4.1 MPEG2 TS ................................................................................................ 53 Version 1.1.0 Last updated 2/3/2012. |3 12.5 Timeline ........................................................................................................ 55 12.6 Blu-ray.......................................................................................................... 57 12.6.1 Chapters .................................................................................................. 57 12.6.2 End Action ............................................................................................... 57 12.7 Log ............................................................................................................... 58 13 Glossary ......................................................................................................... 59 13.1 Basic ............................................................................................................ 59 13.2 Video ............................................................................................................ 61 13.3 Audio ............................................................................................................ 64 13.4 Quantization .................................................................................................. 65 13.5 Timeline ........................................................................................................ 65 Version 1.1.0 Last updated 2/3/2012. |4 © 2011 Fixstars Corporation. All Rights Reserved. This manual, as well as the software described in it, is furnished under license and may only be used or copied in accordance with the terms of such license. The information in this manual is furnished for informational use only, is subject to change without notice, and should not be construed as a commitment by Fixstars. Fixstars assumes no responsibility or liability for any errors or inaccuracies that may appear in this book. Fixstars, the Fixstars logo, and Accelcoder are trademarks or registered trademarks of Fixstars. Fixstars Corporation Gate City Ohsaki West Tower 18F, 1-11-1 Ohsaki, Shinagawa-Ku, Tokyo, Japan 141-0032 http://www.fixstars.com Other company and product names mentioned herein are trademarks of their respective companies. Mention of third-party products is for informational purposes only and constitutes neither an endorsement nor a recommendation. Fixstars assumes no responsibility with regard to the performance or use of these products. Version 1.1.0 Last updated 2/3/2012. |5 1 Introduction of Accelcoder X Thank you for using Accelcoder X for your professional compression needs. Accelcoder X is software for converting source media to Blu-ray and other output formats. Before reading this manual, please read system requirements written on the website, download and install application, and complete the license authentication. 1.1 Application of Accelcoder X 1.1.1 Blu-ray Disc Authoring Accelcoder X provides Blu-ray and Blu-ray 3D support. The optimized encoding engine, which has been developed while receiving feedback from movie production professionals, creates a high-resolution Blu-ray video stream. The work-flow becomes more efficient with features like partial encoding, custom matrix support, and pre-filtering. 1.1.2 Dailies and Preview A high capacity Blu-ray disc can be used as an archive as well as a video medium. For example, a Blu-ray disc is very useful for Dailies and Preview showings because it can be played anywhere using one of many BD players available on the market. In addition, a Blu-ray Disc can be created readily during video encoding by selecting ExpressAuthoring after importing sequential TIFF or DPX files. The ExpressAuthoring function supports 3D as well as 2D. 1.1.3 Promotion It's a waste to use high definition video for movie trailers, commercials and bonuses when you distribute them online or on DVDs! By distributing them on Blu-ray discs you can deliver high quality video to customers without losing the quality of the original video. The ExpressAuthoring feature of Accelcoder X lets you quickly and easily create distribution ready high quality discs without a major investment. 1.1.4 IPTV and Online Streaming With more and more users demanding to watch video on any device at any time, encoder device compatibility is quickly becoming a necessity. On top of Blu-ray, Accelcoder X supports multiple output formats, including MPEG2 TS for IPTV streaming, as well as MP4 and FLV files for PC playback. Version 1.1.0 Last updated 2/3/2012. |6 2 Quick Start Guide This section describes the easiest procedures for encoding source media. 1. Start Accelcoder X 2. Create a project folder 3. Choose template 4. Import video 5. Import audio 6. Start encoding 7. Get encoded file 2.1 Start Accelcoder X Start Accelcoder X from the start menu or short cut on the desktop. When you start Accelcoder for the first time, Email address and license key are required. 2.2 Create a Project Folder Project Folder is where store encoded files are stored. To create a Project Folder, right-click the root folder (C:¥Accelcoder_work¥jobs by default) in the Project Folders, and select New Folder. Then you can see new project folder under root folder. 2.3 Choose template Accelcoder X has several preset templates. Here, you will choose a template for the project. To choose a template, move to the Template tab and double-click on the desired output format from the template list. A green check will appear on the selected template. For more information about the Preset template, refer to ”Preset Template”. Version 1.1.0 Last updated 2/3/2012. |7 If there is no template to use, you can create a customized template by copying preset templates. To create a customized template, refer to “Customize template”. 2.4 Import video A video source will be added as an encoding job. Go back to the Job tab, drag and drop a source file to Job List, and a new job is added to the list. If the source is sequential still image files, drag and drop the folder. If source is 3D, drag and drop the files/folders of both left and right sides. (Applied template has to be for 3D.) 2.5 Import audio To import a separate audio file to the video, double-click the job and open the Parameter Settings window. Choose "Audio" at Basic > Input > Sub Input, and specify the location of the audio file. Click OK to save. Version 1.1.0 Last updated 2/3/2012. |8 2.6 Start encoding Encoding may be started with the Encode button. Encoded video may be checked on the Preview Window during encoding. 2.7 Get Encoded file Encoded files are saved in project folders. In the following case, the encoded file is saved to C¥Accelcoder_work¥jobs¥NewFolder¥FlyingVegetables. Version 1.1.0 Last updated 2/3/2012. |9 3 Quick Overview of User Interface Accelcoder X consists of three windows; “Main window” for managing the encoding task, “Preview window” for checking video, and “Parameter settings” for setting encoding parameters. 3.1 Main window Once you start Accelcoder, the main window appears showing the Encoding Menu Bar and the Setting Tabs. Encoding Menu Setting Tabs 3.1.1 Encoding Menu ■ New Adds new folders or jobs. Version 1.1.0 Last updated 2/3/2012. | 10 ■ Delete Deletes folders or jobs. ■ Property Displays template or job settings. ■ Encode Starts encoding. ■ Stop Stops encoding. ■ PreviewWindow Displays preview window. 3.1.2 Setting Tabs Job Select Job to manage encoding tasks and folders to save encoded files. Project Folders Job List Encoded Results Progress Bar ■ Project Folders Project Folders shows the location of the folder that contains the encoded results. You can add new folders and delete folders Version 1.1.0 Last updated 2/3/2012. | 11 here. Encoding Jobs shows encoding or queued jobs. ■ Job List Job List shows jobs for each project folder. Jobs are created for each video source. Encoded Result shows encoding history for each job. ■ Encoded Result You can see logs and encoding settings by double-click on each result. Progress Bar shows the progress of the job being encoded. On the ■ Progress Bar right side of the bar, the progress rate, encoding speed, estimated completion time are displayed. Template Template contains a variety of parameter settings for each output format. Accelcoder X has some preset templates. For detailed information of each template, refer to Preset Template. Log Select Log to see the operating conditions of Accelcoder X. Splitters and decoders that were used to read source files are displayed. Error messages are displayed here when an error occurs. Version 1.1.0 Last updated 2/3/2012. | 12 Environment Select Environment to change the location where application program, root folders, and log files are stored. To apply changes on Environment, restart the application. Version 1.1.0 Last updated 2/3/2012. | 13 Help Technical support, user manuals, release notes, version information can be found here. Version 1.1.0 Last updated 2/3/2012. | 14 3.2 Preview windows Preview window is a window that displays the source video and encoding video. To display Preview window, click the PreviewWindow button on the Encoding menu. For the operation of the preview window, refer to Preview. Control Buttons Preview Screen Timeline Version 1.1.0 Last updated 2/3/2012. | 15 3.3 Parameter Settings window Parameter Settings is a window for various encoding settings. Detailed description of each parameter, refer to "Parameter Setting". Version 1.1.0 Last updated 2/3/2012. | 16 4 Project folder settings 4.1 Create project folders Create project folders to import source media. Encoded data will be saved in the project folders. 1. Open Job tab. 2. Right click on the root folder (By default, C:¥Accelcoder_work¥jobs) displayed on Project Folders and select “New Folder”. 3. Then you can see the new project folder under the root folder. 4.2 Add or Delete root folder The root folder is located on top of project folders. The default is set to C:¥Accelcoder_work¥jobs. To add or delete root folders, use Environment tab. Add root folder 1. Open Environment tab. 2. Click browser button on Job Folders and specify a folder. 3. The specified folder will be added in the list box. 4. To make the new folder valid, click “Apply” at the bottom of the screen, and the application will restart automatically. Version 1.1.0 Last updated 2/3/2012. | 17 5. Open the Job tab again, and you can see the added folder under Project Folders. Delete root folders 1. Open the Environment tab. 2. Under Job Folders, right-click the folder you want to delete and select Delete. 3. To make the folder to be deleted, click “Apply” in the bottom of the screen,and the application will restart automatically. If you delete the folder here, the actual folder is not deleted. 4. Open the Job tab again, and you can see deleted folder is gone from Project Folders. Version 1.1.0 Last updated 2/3/2012. | 18 5 Template settings The template contains various settings for each output format, and can used by applying it to jobs. Accelcoder X has some preset templates. 5.1 Preset templates The eight Preset templates are shown below. Preset templates cannot be edited or deleted. Templates Description Ave. bitrate Outputs HD quality H.264 elementary Blu-ray 3D for Authoring streams and uncompressed audio for Blu-ray standards. Main and Dependent (.mvc) 50Mbps streams are output separately by default. Outputs BD ISO image file including BD Blu-ray 3D for Writing 3D streams and uncompressed audio 50Mbps that can burn directly on BD. (.iso) Outputs HD quality H.264 elementary Blu-ray HD for Authoring stream and uncompressed audio for 30Mbps Blu-ray standards. (.264) Outputs BD data folder including BD HD Blu-ray HD for Writing streams and uncompressed audio that 30Mbps can burn directly on BD. (data folders) Outputs SD quality H.264 elementary Blu-ray SD for Authoring stream and uncompressed audio for 6.0Mbps Blu-ray standards. (.264) Outputs MPEG-2 TS containing HD IPTV HD (.ts) quality H.264 elementary stream and 6.5Mbps MPEG2 AAC audio. Outputs MPEG-2 TS containing SD quality IPTV SD (.ts) H.264 elementary stream and MPEG2 3.2Mbps AAC audio. Outputs MPEG-2 TS containing HD IPTV Side by Side 3D (.ts) quality side by side H.264 elementary stream and MPEG2 AAC audio. Version 1.1.0 Last updated 2/3/2012. 6.5Mbps | 19 5.2 Select default template The default template is the basis template of the whole application. It will be applied to imported video automatically. Default template can be changed later (Refer to Apply Template). 1. Open the Template tab. 2. Double click an arbitrary template. 3. Setting is done when a green check appears on the icon. 5.3 Customize template If there is no suitable template, you can add a new template for your own settings based on preset templates. 1. Open the Template tab. 2. Select a similar template that you need and copy it. 3. Paste it on the same screen. 4. Right click it and select “Properties”. And Parameter Settings open. 5. Edit parameters and click OK. Refer to Parameter Settings to edit parameters for the added template. Caution when creating a customized template for Blu-ray Preset templates for Blu-ray have been set to be compliant with the Blu-ray standard. If you edit settings, make sure not to violate the Blu-ray standard. Version 1.1.0 Last updated 2/3/2012. | 20 6 Import video 6.1 Supported video format The following video (image) formats can be imported to Accelcoder X. (As of Sep. 2011) QuickTime (.mov, .mp4, m4v, .3gp, .3g2, .amc)*1 Uncompressed AVI (.avi) MPEG-4 AVC/H.264 (.mp4, .mts, .m2ts, .mpg, .ts) TIFF sequential still images (.tiff, .tif)*2 DPX sequential still images (.dpx)*2 YUV4:2:0 8bit planar (.yuv) *1 Only files which can be played with QuickTime Player on the Accelcoder X installed PC *2 Only RGB 6.2 Import 2D video 1. Open the Job tab and select a project folder. 2. Drag and drop source file to Job List, and new job is added on the list. If source is sequential still image files, drag and drop the folder. Version 1.1.0 Last updated 2/3/2012. | 21 6.3 Import 3D video 1. Open the Template tab, and double click on either of the 3D templates to make it default. (Blu-ray 3D for Authoring or Blu-ray 3D for Writing) 2. Open Job tab, and select a project folder. 3. Drag and drop files of both left and right sides on the Job List. File name of the left source will be name of the new job. If the source is sequential still image files, drag and drop the folders of both left and right sides. Version 1.1.0 Last updated 2/3/2012. | 22 7 Import audio 7.1 Supported audio format The following audio formats can be imported to Accelcoder X. (As of Sep. 2011) Linear PCM (.wav) 7.2 Import audio 1. Open Job tab and select a project folder. 2. Double-click the job to import the audio, open the parameter settings. 3. Select “Audio” at Basic > Input > Sub Input, and specify the location of the audio file on the browse button. 4. Click OK to save it. Version 1.1.0 Last updated 2/3/2012. | 23 8 Encoding 8.1 Start encoding 1. Open the Job tab and select a project folder. 2. Select the job to encode, and click Encode button. 3. Encoding progress can be seen on the progress bar in the bottom of the screen. 4. When you see the Completed, encoding is finished. 8.2 Batch encoding You can set batch encoding for multiple jobs. 1. Open Job tab and select a project folder. 2. Select jobs holding down Ctrl key. 3. Click the encode button with jobs are selected. 4. Encodings starts in the order they are selected. 5. Encoding or queued jobs can be seen in the Encoding Jobs folder under Project Folders. Version 1.1.0 Last updated 2/3/2012. | 24 8.3 Encoding status Each status icon means: Encoding Encoding in progress. Completed Encoding completed successfully. Canceled Encoding was stopped by user. Queued Encoding is on the waiting. Unsupported file is imported. Unsupported For main causes and solutions, visit: http://www.fixstars.com/codec/support/guide/errorcodes/ Encoding completed but encoded stream may have problems. Warning Main causes and solutions Error stream was generated Error streams might be generated by a buffer underflow. Streams which contains the error streams may not be played on some BD players. A buffer underflow may be generated if complex scene came out suddenly after quiet scenes. To address a buffer underflow, please try the following methods. Lower average video bitrate with no change in Max bitrate. Raise minimum QP value. If 3D encoding, raise dependent ratio. For other causes and solutions, visit: http://www.fixstars.com/codec/support/guide/errorcodes/ Encoding was stopped by unexpected error. Error For main causes and solutions, visit: http://www.fixstars.com/codec/support/guide/errorcodes/ Version 1.1.0 Last updated 2/3/2012. | 25 8.4 Preview Preview window shows encoding video. 1. Open the Job tab and select a project folder. 2. Select encoding job, and click the PreviewWindow button. 3. The Preview window shows encoding video (source). For 3D, L video is displayed. 4. For the operation of the Preview window, refer to Preview. Version 1.1.0 Last updated 2/3/2012. | 26 9 Encoded files 9.1 Get encoded files Encoded files are saved in project folders. In this case, the encoded file is saved to: C¥Accelcoder_work¥jobs¥NewFolder¥FlyingVegetables¥FlyingVegetables#. 9.2 Type of encoded file The type of encoded file depends on the template that is applied to the job. Template Outputs filename.mvc Blu-ray 3D for Authoring filename_d.mvc (filename.wav) filename.iso Blu-ray 3D for Writing BDMV (folder) CERTIFICATE (folder) Blu-ray HD for Authoring Blu-ray HD for Writing Blu-ray SD for Authoring Description Files for reading in Blu-ray authoring software. Files for burning directly to Blu-ray Disc. filename.264 Files for reading in Blu-ray (filename.wav) authoring software. BDMV (folder) Files for burning directly to CERTIFICATE (folder) Blu-ray Disc. filename.264 Files for reading in Blu-ray (filename.wav) authoring software. IPTV HD filename.ts IPTV SD filename.ts IPTV Side by Side 3D filename.ts Files for network distribution and PC playback. Files for network distribution and PC playback. Files for network distribution and PC playback. Version 1.1.0 Last updated 2/3/2012. | 27 10 Advanced encode settings The default template is applied to imported video, and the encoded file is saved in the project folder, but you can change it for each job. 10.1 Apply template The default template is applied to imported video automatically, but it can be changed for each job. 1. Open Job tab and select a project folder. 2. Right-click the job, select Apply Template, and select the desired template from the list. 3. Setting is done when you see a new icon. Version 1.1.0 Last updated 2/3/2012. | 28 10.2 Separate parameter setting Encoding parameters can be changed separately by editing the settings of the templates that are applied to the job. 1. Open the Job tab and select a project folder. 2. Double-click the job to edit parameters separately, open the Parameter Settings. 3. When you are finished editing, click OK to save it. For a detailed description of each parameter, refer to "Parameter Setting". Caution when creating a customized template for Blu-ray Preset templates for Blu-ray have been set to be compliant with the Blu-ray standard. If you edit settings, make sure not to violate the Blu-ray standard. 10.3 Duration setting If you want to encode only a portion of the source video, you can specify the range to be encoded. 1. Open the Job tab and select a project folder. 2. Edit directly InTime and OutTime of the job. 3. If you want to set the duration while viewing the actual images, refer to Timeline control. 10.4 Output setting Encoded files are saved with the same name as source video in the project folders. If you want to change the file name and location of the encoded data for each job, you need to change the output settings. 1. Open Job tab and select a project folder. 2. Double-click the job to set output settings separately, open the Parameter Settings. Version 1.1.0 Last updated 2/3/2012. | 29 3. Uncheck Auto at Basic > Output. Browse Button 4. Click the browse button and specify the folder and file name. 5. When you are finished editing, click OK to save it. Version 1.1.0 Last updated 2/3/2012. | 30 11 Preview Preview window can be used to control encoding and make advanced stream setting, as well as show video image in a variety of conditions. 11.1 Preview menu Playback control Play, Pause, Frame back, Frame advance. Encoding control Version 1.1.0 Last updated 2/3/2012. | 31 Start encoding Stop encoding Image size Display dot by dot Fit to screen Image Type Display original video Filtered Display encoded video Encoded# Encoded video may be displayed only if template is Blu-ray 3D/HD/SD for Authoring, may not be displayed if it is Blu-ray 3D/HD/SD for Writing or IPTV. Color Mode Full Color Full color Y Luminance U Chrominance Blue V Chrominance Red Interlace Select how to display interlaced video. Split to top and bottom field Top field Version 1.1.0 Last updated 2/3/2012. | 32 Item Select All Display All items Duration Preview or encoding duration IDR IDR insertion point Merge settings Re-encoding section Local Bitrate Bitrate per second Encoded frame size Each frame size (Byte) as line chart QP of each frame as line chart. QP QP is set by macro block in a frame. CPB CPB (Coded Picture Buffer) of each frame as line chart. Version 1.1.0 Last updated 2/3/2012. | 33 11.2 Timeline control The lower part of the preview window is called Timeline. Showing image is a frame indicated by the indicator. Time displayed on the timeline represents a follows: Cursor position In time of source Indicator position In time of selected Out time of source Indicator In time of selected range Duration setting range If you want to encode only a portion of the source video, you can specify the range to be encoded. 1. Select the job and open the Preview window. 2. Point the cursor to the beginning and end bars of the duration timeline (Light gray), and move the indicators to the desired times. Or, right-click on the timeline and select Current Timecode > Set to InTime or Set to OutTime. 3. When you finish specifying the range, start encoding. IDR setting IDR Picture is a particular picture that prohibits subsequent picture (frame) to refer to preceding picture (frame), which is used for chapter points. IDR pictures can be inserted on the timeline. 1. Select the job and open the Preview window. 2. Point the cursor to the time you want to insert IDR picture on the timeline. 3. Right click and select New > IDR. Version 1.1.0 Last updated 2/3/2012. | 34 4. When the blue triangle icon is displayed on the timeline, IDR insertion is done. Version 1.1.0 Last updated 2/3/2012. | 35 11.3 Segment re-encoding Segment re-encoding allows you to select desired scene from encoded video, re-encode with different parameters, and merge it with original video. It is useful for modifying error stream and adjusting bitrate budgets for specific frame sets. Please note that segment re-encoding may be done for encoded video in the Blu-ray 3D/HD/SD for Authoring template. 11.3.1 Re-encode selected range 1. Select an encoded job on main window and open Preview window. 2. Under the Image Type tab, select encoded job which you want to serve as the base file for the re-encoding. The number indicates the order of the encoded file. Larger number means latest encoding result. When encoded video is selected, a line chart which represents Bitrate of each frame is displayed on the timeline. 3. Specify the range that you wish to re-encode according to Duration setting on previous Version 1.1.0 Last updated 2/3/2012. | 36 section. 4. If you need to select range precisely, zoom in the timeline or type the desire times on the appropriate beginning and end fields. 3. Then, double click the job on main window to open Parameter Setting window. Edit parameters that you wish to change like bitrate or QP for example. Please set average bitrate at approximately 70% of the maximum bitrate. Too big difference Version 1.1.0 Last updated 2/3/2012. | 37 between average and maximum may generate error stream. 4. Click Start encoding icon, so the selected range is encoded with changed parameters. 5. After encoding, you can find additional encode result under the Image Type tab. If you have multiple sections to re-encoding, repeat same procedure. 11.3.2 Merge re-encoded video 1. After selected range has been re-encoded, go to Image Type and select base video file from encoded list. 2. Right click on the timeline and select re-encoded video from Merge Result. 3. Re-encoded section appears on the timeline of original video. 4. Click Merge icon next to Start encoding icon. Version 1.1.0 Last updated 2/3/2012. | 38 5. Re-encoded video is merged with base video. Besides, re-encoded line and original line appear on the timeline. 6. Merged video can be displayed by selecting the highest number from the encoded list in the Image type tab. Version 1.1.0 Last updated 2/3/2012. | 39 12 Parameter Settings 12.1 Basic Basic is used for basic encoding settings. 12.1.1 Job Type: This is the standard that the output stream complies with, but the stream type has to be selected on Template. Type cannot be changed. Stream type Description Blu-ray Outputs stream for Blu-ray standards. H.264/AVC is used for coding. Blu-ray 3D Outputs streams for Blu-ray 3D standards. H.264/MVC (multi view coding) is used for coding. IPTV Outputs stream for network distribution and PC playback. H.264/AVC is used for coding. IPTV 3D Outputs Side by Side stream for network distribution and PC playback from left and right source. H.264/AVC is used for coding. IPTV 3D 1-Input Outputs stream for network distribution and PC playback from Side by Side source. H.264/AVC is used for coding. Normal Outputs stream for general PC playback. H.264/AVC is used for coding. Version 1.1.0 Last updated 2/3/2012. | 40 12.1.2 Input Main Input: For 2D template, specify video. For 3D template, specify L video. When you import video, format, resolution and/or frame rate are automatically detected and they are displayed below the path of the source. Formats Detected information AVC / AVI Automatically detects format, resolution and frame rate. QuickTime Automatically detects format, resolution and frame rate. IYUV Automatically detects only format. Specify the correct resolution and frame rate on your own. DPX-RGB Imported as sequential files. Automatically detects format and resolution. Specify the correct frame rate on your own. TIFF (RGB) Imported as sequential files. Automatically detects format and resolution. Specify the correct frame rate on your own. Sub Input: For 2D template, specify audio. For 3D template, specify R video. If no audio, select None. Audio Input: For 3D template, specify audio. If no audio, select None. Version 1.1.0 Last updated 2/3/2012. | 41 12.1.3 Output You can choose output format, but output type has to be selected on Template. If appropriate, keep unchanged. Main Output: Specify output video or container format. If you have checked Auto, the data is stored in the project folder. If you need change the location, refer to Output setting. Formats Detected information H.264-ES Video file for the authoring software. It hardly played on general media player for PC. MPEG2-TS MPEG2-TS container multiplexed video and audio. For Blu-ray/Blu-ray 3D job type, Linear PCM. For other job type, MPEG-2/4 AAC or MPEG1 Audio Layer-2 audio is multiplexed. MVC 3D Split Base and Dependent streams are output separately for 3D. Sub Output: Specify output audio. 12.1.4 Encode Make basic encode setting. Video Bitrate: Set output video bitrate. Parameter Description Max Maximum bitrate of video elementary stream (Kbps). Range available is Ave. to 150,000Kbps (150Mbps). Version 1.1.0 Last updated 2/3/2012. | 42 Not available for CBR selected at Video Rate Control Method. Ave Average bitrate of video elementary stream (Kbps). Range available is 384Kbps to 150,000Kbps (150Mbps). Min Minimum bitrate of video elementary stream (Kbps). Range available is 0. to Ave. Not available for CBR selected at Video Rate Control Method. Video Bitrate Control Method Parameter Description VBR Encode to keep constant quality. CBR Encode all scenes at constant bitrate. Audio Bitrate Target bitrate for audio encoding (Kbps). Value available is 128, 192, and 256. In general, same or more than 128Kbps for stereo, 64 Kbps for mono. Version 1.1.0 Last updated 2/3/2012. | 43 12.2 Video Video is used for detailed video encoding settings. 12.2.1 Codec Codec Type: This is the standard that output stream complies with, but stream type has to be selected on Template. Codec Type is synchronized with the Basic > Job Type. Codec Type cannot be changed. Profile You can select the compression function of H.264. The optimal profile is chosen for each template, so please do not change unless necessary. Profiles Description Baseline Used to encode for low-resolution devices, such as mobile phones and old iPods. Entropy coding method is CAVLC. B frames and interlaced video are not available. Main Used to encode SD quality video for devices such as PSP and iPhone. Entropy coding method is CABAC. High Used to encode HD quality video, such as Blu-ray Disc. Entropy coding method is CABAC. It may be played only on High profile capable players. Stereo High Used to encode Blu-ray 3D. Entropy coding method is CABAC. It may be played only on Stereo High profile capable players. Priority Priorities of encoding. You can choose from five steps: Fastest, Fast, Medium, Fine, and Finest. Version 1.1.0 Last updated 2/3/2012. | 44 12.2.2 Picture Resolution Select resolution of output video. Supported resolutions are listed below. Available resolution depends on the standard of template and resolution of source video. 1920x1080 1440x1080 1280x720 720x576 720x480 640x480 624x352 512x384 512x288 432x240 352x240 320x240 Down conversion is available. Up conversion is available only from 1280x720 to 1920x1080 Letter Box Check to insert black bars above and below video. Pillarboxing (vertical bars at the sides) is not supported. Frame Rate Select frame rate of output video. Supported frame rates are listed below. Available frame rate depends on the standard of template and frame rate of source video. 23.976 p 24 p Version 1.1.0 Last updated 2/3/2012. | 45 25 p 29.97 p 30 p 50 i/p 59.94 i/p 60 i Frame rate can be converted from 60/30/24 to 59.94/29.97/23.976. The combination of resolution and frame rate for Blu-ray Resolution Width Frame rate Height 1920 1080 23.976p 1440 24p 59.94i 50i 1280 720 23.976p 24p 59.94p 50p 720 480 59.94i 576 50i The combination of resolution and frame rate for Blu-ray 3D Resolution Width Frame rate Height 1920 1080 23.976p 1280 720 59.94p Bottom First Check if bottom field is first in source interlaced video. Drop Frame Check if source is dropped frame. Aspect Ratio Version 1.1.0 Last updated 2/3/2012. | 46 DAR (Display Aspect Ratio). Supported aspect ratios are: 4:3 16:9 Display aspect ratio is the aspect ratio of the screen during video playback. Either one can be selected depending on output resolution. Input color Matrix Set color matrix of source video. Color matrix is transformation system between RGB and YUV. Method Description Auto ITU-R Rec. BT.601 is set for 720x576 or smaller source and ITU-R Rec. BT.709 is for 1280x720 or larger. ITU-R Rec. Generally used for SD. For more precisely, select it in accordance BT.601 with video editing equipment. ITU-R Rec. Generally used for HD. For more precisely, select it in accordance BT.709 with video editing equipment. Output color Matrix Add color matrix information for playback in encoded stream. Method is the same as Input color Matrix. Version 1.1.0 Last updated 2/3/2012. | 47 12.2.3 Encode Rate Control Method VBR (Variable bitrate) or CBR (Constant bitrate). Synchronized with Basic > Encode > Video Bitrate Control Method. Method Description VBR Encode to keep constant quality. CBR Encode all scenes at constant bitrate. MaxBitrate Maximum bitrate of video elementary stream (Kbps). Range available is Ave. to 150,000Kbps (150Mbps). Not available for CBR selected at Video Rate Control Method. For Blu-ray standard Maximum bitrate is 40,000Kbps (40Mbps) For Blu-ray 3D standard Maximum bitrate is 60,000Kbps (60Mbps) Version 1.1.0 Last updated 2/3/2012. | 48 AveBitrate Average bitrate of video elementary stream (Kbps). Range available is 384Kbps to 150,000Kbps (150Mbps). MaxBitrate Minimum bitrate of video elementary stream (Kbps). Range available is 0. to Ave. Not available for CBR selected at Video Rate Control Method. Dependent Ratio Dependent Ratio is available only for Blu-ray 3D stream. It defines the ratio of Dependent stream bitrate to Base stream bitrate. Range available is 10 to 100%. Default value is 50% and Dependent stream bitrate will be half of Base. IntialQP QP at start of encoding. Range available is 1 to 51. QP (Quantization Parameter) is the coefficient to control quantization for compression. In general, smaller is higher quality and bigger is lower. MinQP Minimum QP. Range available is 1 to 51. It must not be bigger than Max QP. MinQP Maximum QP. Range available is 1 to 51. It must not be smaller than Min QP. GOP Structure Set GOP (Short for Group of picture), a group of successive pictures within a coded video stream. A GOP always contains more than an I frame. Afterwards several P frames and B Version 1.1.0 Last updated 2/3/2012. | 49 frames follow, in each case with some frames distance. GOP Description Fixed GOP Fixed GOP do not make detected frame I frame and keeps specified GOP structure if it detects scene change. It is available only for CBR. If stream type is IPTV, Fixed GOP is default and locked-in. It is useful if you need to line up IDR picture with another stream for multi angle video. UseOpenGOP In general, Open GOP makes image connection between GOPs smooth and image quality will be improved. All Intra All Intra makes all frames I frame. All Intra is different from AVC Intra. IDRInterval Set interval between IDR pictures. In general, longer IDR interval increases open GOP and quality will be improved. Range available is 2 to 8191 frames and number must be bigger than GOP size. GOP Size Length of output coding stream GOP by frame. In general, Longer GOP reduce I frame and increase P and B frame, so that compression rate will be up, image quality may be down. Range available is 1 to 150 frames. For Blu-ray and Blu-ray 3D standard The number of frames that is equivalent to 1sec. BFrame Number of B frames that is inserted between I and P frames, and P frames. Range available is 0 to 2. In general, more B frames reduce data volume of output video stream, while image quality goes down slightly. Less B frames make it possible to transmit and display in low-latency, while increase the size of output elementary stream. Scene Cut Detection Version 1.1.0 Last updated 2/3/2012. | 50 Scene detection sensitivity. Range available is 0 to 100. Scene detection is a function which detects scene switching automatically and make switching frame I frame. Larger number detects more sensitive switching. Minimum Scene Cut Detection Interval Set detected I frame interval. Range available is 0 to GOP size. Useful for sequential I frames that occurred on flashing scenes. nPassCount Number of encode pass. Range available is 1 to 2. (Only 1 pass is available in this version.) Slice Count Number of screen slice. Defined by standard as 4 for Blu-ray, 6 for Blu-ray 3D. Keep it unchanged if you do not need. Deblocking Filter Deblocking filter is used to reduce noises. Filter can switch it on and off, and filter intensity can be set. Version 1.1.0 Last updated 2/3/2012. | 51 12.3 Audio Audio is used for audio encoding settings. It consists of Codec, Channel, and Encode. 12.3.1 Codec Codec Type Audio compression format for encoding. Available format depends on template and output format. Codec Description MPEG2-AAC AAC is short for Advanced Audio Coding. It is mainly used for Japanese BS-digital and T-DMB under ISDB standard, SD-Audio, and DVD in Europe. MPEG4-AAC Used for digital audio players such as iPod and Walkman, game console such as PSP and Nintendo DSi, and various mobile devices. MPEG1 audio An audio codec, used for MPEG and MPEG-2. layer2 As compression rate is lower than AAC, it consumes extra bitrate. It is the dominant standard for audio broadcasting and VideoCD discs. PCM Uncompressed audio format. Widely used for DVD, Blu-ray Disc, and PS3. Priority Priorities of audio encoding. You can choose from quality priority, speed priority, and middle of Version 1.1.0 Last updated 2/3/2012. | 52 them. 12.3.2 Channel Channel Audio channel may be selected for second audio track. Primary and secondary channels are available. (Only primary channel is available currently.) 12.3.3 Encode Bitrate Output bitrate of audio encoding (Kbps). In general, same or more than 128Kbps for Stereo, Same or more than 64Kbps for Mono. Settable values are 128, 192 or 256. TNS Settings TNS stands for Temporal Noise Shaping. It is used to enhance audio quality by changing noise level caused by encoding to fit sound volume, and make noise volume down at soft sound potion. It is recommended not to use TNS for IPTV format output. Version 1.1.0 Last updated 2/3/2012. | 53 12.4 Container Set details of container for MPEG2 TS and MP4 output. Please do not change any value if you are unfamiliar with the settings. 12.4.1 MPEG2 TS ProgramMap ProgramMap PID. Range available from 16 to 8190, which must not be same as other PIDs. PCR PID PCR PID. Range available from16 to 8190, which must not be same as other PIDs. Video PID Video PID. Range available from 16 to 8190, which must not be same as other PIDs. Audio PID Audio PID. Range available from 16 to 8190, which must not be same as other PIDs. Version 1.1.0 Last updated 2/3/2012. | 54 Program Number Program Number. Range available from 16 to 8190 Video PES stream ID Video PES stream ID. Range available from 224 to 239. Audio PES stream ID Audio PES stream ID. Range available from 192 to 223. PSI Interval Set PSI Interval. Version 1.1.0 Last updated 2/3/2012. | 55 12.5 Timeline Timeline is used for IDR picture and image filter settings. Only IDR picture is available currently. IDR Insertion IDR Picture is a particular frame that prohibits subsequent frame to refer to preceding frame. IDR pictures can be inserted on the Preview window but it can be inserted at once on the Timeline tab if you know the timecode in advance. 7. Right click on the right side of the screen and select “New”. 8. Input the exact timecodes. Version 1.1.0 Last updated 2/3/2012. | 56 9. Alternatively, you can copy the timecode on the spreadsheet and paste it on the screen. 10. Click OK to save the settings. Version 1.1.0 Last updated 2/3/2012. | 57 12.6 Blu-ray Set chapter points and end action of Blu-ray disc for Blu-ray 3D for Writing or Blu-ray HD for Writing template. 12.6.1 Chapters No Chapters Insert no chapter points. Insert Chapters periodically Insert chapter points by the minute from 1 to 30 minutes. Insert Chapters according to the IDR insertion Insert chapter points synchronized with IDR picture points. This is selected by default. 12.6.2 End Action Repeat Play repeatedly after playback. Stop Stop after playback. Version 1.1.0 Last updated 2/3/2012. | 58 12.7 Log Log shows the operating conditions of Accelcoder X. If error occurred during encoding, Log displays error detail and timecode. Version 1.1.0 Last updated 2/3/2012. | 59 13 Glossary 13.1 Basic Keyword H.264 Description An international video compression standard also called MPEG-4 part 10 or AVC (Advanced Video Coding). It is widely used from low bitrate applications included cell phone to high bitrate HDTV as a technology that realizes almost twice compression efficiency of MPEG-2. On the other hand, encoding time remains to be solved because it requires 10 times more computation power than older standard. H.264 MVC is extended standard of H.264 AVC. It was designed to encode multi view video more efficiently and adopted by Blu-ray 3D. It compresses stereo video to 1.5 times of single video data amount by inter-view prediction. Blu-ray The new-generation optical disk standard that uses blue-violet semiconductor laser. Blu-ray Disc Association designs these standards. Accelcoder’sH.264 stream meets the association standards for “Blu-ray”. Blu-ray 3D An extended standard that is added to put 3D video on Blu-ray Disc. H.264 MVC is adopted for its encoding. Side by side A format used for 3D video transmission. Each frame of side-by-side 3D consists of a horizontally scaled combination of the frames for the left and right eye. Horizontal resolution of each frame is half of source video. AVI A Windows standard video format. AVI is supported by a lot of nonlinear editing software with Windows. It stores video and audio encoded by variety of codec. MPEG2 A video compression standard designed by ISO/IEC Moving Picture Experts Group. It is used for wide area included DVD and Digital terrestrial television (DTT). Accelcoder requires appropriate DirectShow filter to read MPEG2 file. YUV An uncompressed video format consists of Luminance, Chrominance Blue, and Chrominance Red. Stored in 4:2:0 8bit planar format. Version 1.1.0 Last updated 2/3/2012. | 60 DPX An image file format for digital film workflow and well used for movie creation. It holds data in RGB and 1 file per 1 screen. Used as serial files in general. MOV A video file for Quicktime developed by Apple. v210 is uncompressed format including 10bit YUV 4:2:2 (UYVY) . H.264 ES H.264 Binary file generated before multiplex. MPEG-2 TS MPEG2-TS container multiplexed video and audio. Accelcoder can multiplex H.264 video and MPEG2/4 AAC into MPEG2 TS. It is well used in broadcasting. MP4 MP4 container multiplexed video and audio. Accelcoder can multiplex H.264 video and MPEG4 AAC into MP4. It is well used for PC and mobile devices. FLV FLV container multiplexed video and audio, also known as F4V. It is well used for video distribution in Adobe Flash. Accelcoder can multiplex H.264 video and MPEG2/4 AAC into FLV. Linear PCM Short for pulse code modulation, a sampling technique for digitizing analog signals, especially audio signals. The term also refers to uncompressed audio format using this technique of encoding. WAV The format for storing sound in files developed jointly by Microsoft and IBM. WAV stores uncompressed PCM, compressed MP3 and WMA. Timecode A digitally encoded signal that is recorded on videotape to identify each frame of video by hour, minute, second and frame number. Professional VTR adopts "SMPTE timecode” that records time in hh:mm:ss:ff (frame). Timecode offset The number of frames to adjust the timecode embedded in the captured video. Set the offset so that the timecode corresponds with the timecode number of the same frame on the source tape. Pre-roll time How much before the In point Accelcoder starts playing the tape before capture. Version 1.1.0 Last updated 2/3/2012. | 61 13.2 Video Keyword Profile Description The standard defines codec capabilities included compression technologies and representations. Either of High, Main, or BaseLine may be selected on Accelcoder X. In general, HD resolution included 1440x1080 and 1920x1080 requires High profile. However High profile may be played only on capable players. If BaseLine profile is selected, B frame and resolution of interlaced video are not available. Frame rate BaseLine profile uses CAVLC for entropy coding. Main/High Profile use CABAC for entropy coding. The number of frames that are displayed per second in displays. The unit of frame rate is fps, frame per second. Progressive (scan) One of two methods used for painting an image on a display, where the lines are drawn in one at a time in sequential order. Progressive is used in computer monitors that displays still images often because it is less susceptible to the flicker commonly associated with interlaced scanning. Interlaced (scan) One of two methods used for painting an image on a display, where two field create a frame. One field contains all the odd lines, the other contains all the even lines of the image. Interlaced scan is used in the analog NTSC television system because it displays moving image smoothly. The digital television system adopts both interlaced and progressive scan. Drop frame A type of timecode designed to match the real time of clocks. Two frames of timecode are dropped every minute, on the minute, except every tenth minute. This corrects for video frames that occur at a rate of 29.97 per second. Field order The order in which the two video fields are displayed for interlaced scan. A system that draws the odd lines before the even lines is called Top-field first; one that draws the even lines before the odd lines is called Bottom-field first. Display aspect The horizontal width of a television or projection screens in relation ratio to it its vertical height. A traditional analog television in NTSC and PAL has a screen aspect ratio of 4x3. HDTV's have an aspect ratio Version 1.1.0 Last updated 2/3/2012. | 62 of 16x9. Color matrix Transformation method of color space for RGB and YUV. In general, ITU-R rec. BT.709 is used for HD video and ITU-R rec. BT.601 is used for SD video. Bitrate The speed with which data can be transmitted from one device to another. Data rates are often measured in bit per second (bps). Indications of video bitrate for each device Rate control IPTV (3 to10Mbps) Blu-ray Disc (20 - 40Mbps) Video delivery to PC (Max 10Mbps) Video delivery to mobile (Max 1Mbps) Bitrate allocation for video encoding. There are two kinds of rate control, CBR and VBR. CBR Short for Constant Bit Rate, a type of encoding that maintains a fixed bit rate throughout a file, so that data is sent in a steady stream. CBR is useful for streaming multimedia content on limited capacity channels. But more complex passages may be encoded with fewer than necessary bits, and relatively simple passages may be encoded with more bits than are necessary, CBR can potentially result in lower-quality. VBR Short for Variable Bit Rate, a type of encoding that maintains image quality throughout file with fewer bits used in less demanding passages and more bits used in difficult-to-encode passages. VBR files vary the amount of output data per time segment, so that encoded file size is unpredictable. QP Short for Quantization Parameter, a coefficient for quantization control in video compression. In general smaller number results in higher quality, bigger number results in lower quality. Accelcoder allows you to specify maximum, minimum, and initial QP. CPB Short for Codec Picture Buffer. A buffer for encoded video frames used in video decoding. I frame A frame type that is also called intraframe coding image. I frames do not require other video frames to decode and encode but are the least compressible. P frame A frame type that is also called interframe coding image. P‑frames Version 1.1.0 Last updated 2/3/2012. | 63 can use data from previous frames decode and encode, and are more compressible than I‑frames. B frame A frame type that is also called interactive coding image. B‑frames can use both previous and forward frames for data reference to get the highest amount of data compression. IDR frame An IDR frame is a special kind of I frame used in H.264 AVC encoding. Frames following an IDR frame may not refer back to frames preceding the IDR frame. GOP Short for Group of picture, a group of successive pictures within a coded video stream. A GOP always contains more than an I frame. Afterwards several P frames and B frames follow, in each case with some frames distance. Scene change A function that insert I frame after detecting major changes in detection video streams automatically. It may change GOP size, so that set it “0” if video player requires fixed GOP. Encode pass The number of passes to encode. The video encoder analyzes the video many times from the beginning to the end before the actual encoding process. 1 pass encoding analyzes and encodes in a single encoding pass. 2 pass encoding analyzes video in the first pass and encodes in second pass. Usually, 2 pass encoding takes longer time than 1 pass, while result in better quality and higher compression rate. Macro block An image compression component that is composed of a square block at 16x16 pixels. In H.264, there is an option to break it down into 7 kinds of smaller blocks from 16x16 to 4x4. Block noise A noise which appears on digital images, the sharp edges which can form between macro blocks. Deblocking filter A filter that blocks H.264 decoded video to improve visual quality and prediction performance by smoothing block noise. Version 1.1.0 Last updated 2/3/2012. | 64 13.3 Audio Keyword Description MPEG1 audio An audio codec, used for MPEG and MPEG-2. layer2 As compression rate is lower than AAC, it consumes extra bitrate. It is the dominant standard for audio broadcasting and VideoCD discs. AAC Short for Advanced Audio Coding was adopted as part of the MPEG-2 and MPEG-4. MPEG-2 AAC is mainly used for Japanese BS-digital and T-DMB under ISDB standard, SD-Audio, and DVD in Europe. MPEG-4 AAC is used for digital audio player as iPod and Walkman, game console as PSP and Nintendo DSi, and various mobile devices. Stereo The reproduction of sound using two or more independent audio channel Mono The reproduction of sound using one channel. TNS Short for Temporal Noise Shaping, a filter to soften quantization noise over time in audio or speech signals. PID Short for Packet ID, information to indicate each table or elementary stream in a transport stream. PSI Short for Program Specific Information, metadata about a program and part of a MPEG transport stream. Version 1.1.0 Last updated 2/3/2012. | 65 13.4 Quantization Keyword Description Quantization A matrix that determines how much data of source image is Matrix discarded. Matrix shows low-frequency components on the upper left corner and high-frequency components on the lower right corner. By editing each number, image quality can be customized according to source or scene. Matrix can be set up each of Intra/Inter, Luma/Chroma. Intra- In picture (frame). Inter- Between picture (frame). Luma The brightness in an image, luminance. Chroma The color information in an image, chrominance. It is usually represented as two color-difference components: U = B' − Y' (blue - luma) and V = R' − Y' (red - luma). Flat16 A preset custom matrix that sets all number 16 regardless of frequency. JVT A preset custom matrix that assigns small number on low-frequency components to reduce quality deterioration and large number on high-frequency components to accept quality deterioration. JVT is available only for High profile. 13.5 Timeline Keyword Description Low pass filter A filter that passes low-frequency signals to grade an image. Smoothing filter A filter that paints edges in neutral color to smooth an image. Debanding filter A filter that reduces color banding to look gradient stripes smooth. Segment Encoding arbitrary scenes again in different setting to built it into re-encode original video. Version 1.1.0 Last updated 2/3/2012.