1
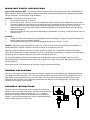
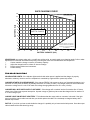
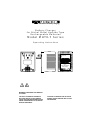
innovations in battery charging
Battery Charger
for Nickel Metal Hydride Type
Rechargeable Batteries
Model MHTX-7 Series
Operating Instructions
READY
CHARGING
Model MHTX-7
Class 2
Nickel Metal Hydride
Battery Charger
WARNING CONCERNING THE REMOVAL
OF COVER:
CAUTION: TO PREVENT THE RISK OF
ELECTRIC SHOCK, DO NOT REMOVE
COVER. NO USER SERVICEABLE PARTS
INSIDE. REFER SERVICE TO QUALIFIED
SERVICE PERSONNEL.
CAUTION: TO PREVENT FIRE OR SHOCK
HAZARD, DO NOT EXPOSE UNIT TO RAIN
OR MOISTURE.
IMPORTANT SAFETY INSTRUCTIONS
SAVE THESE INSTRUCTIONS - This manual contains important safety and operating instructions for Model MHTX-7
Battery Chargers. Before using the battery charger, please read all instructions and cautionary markings on the battery
charger, the battery, and the product using the battery.
CAUTION - To reduce the risk of electric shock:
C
Do not expose unit to rain or moisture.
C
Do not remove cover. There are no user serviceable parts inside. Refer service to qualified service personnel.
C
Connect the battery charger directly to a grounding receptacle. An adaptor should not be used with this unit. This
unit is equipped with a power plug having an equipment grounding conductor (3-prong). The unit must be
plugged into an outlet that has been properly installed and grounded in accordance with all local and national
codes and ordinances.
C
Disconnect charger from AC power before attempting any maintenance or cleaning. Turning off controls may not
reduce this risk.
WARNING C
Charge only nickel metal hydride type rechargeable batteries. Attempting to charge other types of batteries may
result in personal injury and battery damage.
C
The enclosure (metal face) may become hot during the charge cycle - DO NOT TOUCH!
DANGER - Never alter power plug blades or ground pin. If it will not fit the outlet, have a proper outlet installed by a
qualified electrician. Improper connection will result in the risk of an electric shock or fire.
Make sure cords are located so that they will not be stepped on, tripped over, or otherwise subjected to damage or
stress. Do not operate this unit with a damaged cord or plug - replace them immediately. To reduce the risk of damage to
electric plug, pull by unit body rather than output cord when disconnecting unit.
Do not operate charger if it has received a sharp blow, been dropped, or otherwise damaged in any way. Do not
disassemble charger; incorrect reassembly will result in the risk of an electric shock or fire. Refer service to qualified
service personnel.
Allow space around unit and adequate air circulation to reduce internal heat buildup.
GENERAL DESCRIPTION
This unit is a two stage, constant current battery charger for charging nickel metal hydride type rechargeable batteries.
The charge termination is by timer (13 to 15 hours standard) at which time it will switch from the charge current into a
float charge mode at a reduced current. An output cable, 6 feet long, with a barrel plug is provided. There are two
indicators on the front panel. The orange light indicates that the charger is in the charging mode. The green light
indicates that the battery is fully charged.
ASSEMBLY INSTRUCTIONS
Loosen the screws on the charger output terminal strip. Identify the
polarity of the terminal strip ant the output connector; both the charger
housing and the output cable are marked with “+” & “-” symbols.
Attach the two spade terminals to the terminal strip and tighten the
screws. To prevent accidental shorting, cover the exposed terminals
with the molded press-on terminal cover.
OPERATING INSTRUCTIONS
Before using this battery charger, make sure it is compatible with your battery.
Refer to the ratings on the battery charger, the specifications in this manual, and
your battery documentation. Charge only nickel cadmium type rechargeable
batteries. Attempting to charge other types of batteries may result in battery
damage. This unit is provided with a polarized barrel plug connector. Make sure
your battery connector is wired to match the output connector.
CAUTION: This unit is not reverse battery protected except by use of the polarized connector. Make sure your battery
connector is wired to match the charger connector or damage to the battery and charger may result when power is
applied. While in a reversed condition the charger will indicate that it is in the charging mode. However, it will actually be
discharging the battery at the rated charge current until either the battery or charger is damaged.
CAUTION: This unit is not short circuit protected - it will deliver the full rated current into a short. If the short is not
removed, the charger may overheat and be damaged. While in a shorted condition the charger will indicate that it is in
the charging mode. If the charging light is on while not connected to a battery then there is probably a short in the output
cable or connector. Remove the output cable to see if the charge light goes out. If the light stays on without an output
cable connected then there is a problem with the charger.
Plug the battery charger into a properly grounded (3-prong) wall outlet which supplies the correct input power as marked
on the unit. The indicators should be dark until a battery is attached.
Attach the output connector to the battery connector. The charger should now be on and charging the battery. The
orange CHARGING light should be on. If the green READY light is on instead then the battery voltage is probably too
high (too many cells). The battery must be a 1.2 to 14.4 volts (1 to 12 cells) battery.
The orange CHARGING light indicates that the charger is on and in the charging mode. The charger will deliver a
constant current (rated output current) to the battery for 13 to 15 hours. After this time, the unit will switch into the float
charge mode - the orange CHARGING light will darken and the green READY light will come on. At this point the battery
is fully charged. When the charger is in the float charge mode a constant current (1/4 that of the rated output current) is
delivered to the battery to keep it fully charged. Most nickel cadmium batteries may be left connected to the charger in
the READY (float) mode, indefinitely, without a danger of overcharging. However, we recommend you refer to the battery
manufacturers documentation for the suitability of float charging your battery.
CHARGING NOTES AND TIPS
The batteries should be fully discharged before being put onto charge. This has two benefits: the batteries will not be
overcharged and they will be less likely to develop a “memory effect”.
The safe charging curve graph on the next page represents what size batteries can be charged without damaging the
charger (for each battery capacity or charge current). The charger is designed to charge batteries at the C/10 charge rate
(capacity ÷ 10). If your battery capacity is 2.8 AHr (2800 mAHr) then the charger should be rated for 280 mA (2800 ÷10).
Refer to your battery documentation to see if the charger will charge your battery properly.
Example: If your charger is rated for 400 mA then it will recharge 4 AHr batteries between 4.8 to 13.2 volts (4 to 11 cells).
It will safely charge a 14.4 volt (12 cells) battery as long as the charger receives a full 115 volts ac input. If the input
voltage is below 115 volts, at that charge voltage, the maximum current will begin to drop and the battery may not be
fully charged. Attempting to charge 4 AHr batteries between 1.2 to 3.6 volts (1 to 3 cells) will cause the charger to
overheat and possibly be damaged - the batteries will not be damaged. Smaller capacity batteries will be overcharged
and larger capacity batteries will be undercharged.
SAFE CHARGING CURVE
12
UNDERCHARGE @ 105V~
FULL CHARGE @ 115V~
11
10
BATTERY CELLS
9
8
7
SAFE TO CHARGE
6
5
4
3
CAUTION: TRYING TO CHARGE A
BATTERY UNDER THE CHARGING
CURVE WILL CAUSE THE CHARGER
TO OVERHEAT
2
1
0.5
1
1.5
2
2.5
3
3.5
4
4.5
5
BATTERY CAPACITY (AHr)
XENOTRONIX can custom make units, or modify our existing units, to exactly match your charging needs. Call our sales
department for technical information and pricing. Following are some of the modifications we can perform:
•
Custom match the charge current to your battery capacity.
C
Adjust the charge times for a faster or slower recharge.
C
Provide custom cables and connectors.
C
Private labeling.
TROUBLESHOOTING
NO INDICATOR LIGHTS - If the indicator lights are both dark when power is applied and the charger is properly
attached to a battery, check to see if the receptacle is controlled by a light switch or power strip switch.
CHARGER STARTS UP IN READY MODE - If the charger READY light comes on when you first attach the battery (or in
less than 13 hours) then the battery is probably more than 14.4 volts (12 cells). The charger resets into float mode when
it detects a voltage over 21 volts. It will reach this voltage charging batteries over 15.6 volts (13 cells).
CHARGER WILL NOT SWITCH INTO FLOAT MODE - If the charger will not switch into the float mode, after 15 hours,
check to see if there was a power interruption. A power outage or glitch may have reset the charger timer for another 13
to 15 hour charge cycle.
CHARGE LIGHT ON WITHOUT A BATTERY - This indicates that the output cable or connector is shorted. If the light
goes out with the output cable removed then you should replace the cable. Do not attempt to charge a battery with a
shorted output cable.
RATTLE - If you think you hear a rattle inside the charger it is probably only a loose terminal strip screw. Once the output
cable is attached the rattle should go away.
MAINTENANCE INSTRUCTIONS
CLEANING - Unplug the charger before attempting any cleaning. If it becomes necessary to clean the enclosure, wipe
the exterior of the enclosure with a damp cloth and a mild detergent. Do not use an abrasive cleanser. Do not spray
cleaners directly onto the charger or immerse unit in water.
BATTERY CHARGER SPECIFICATIONS
Operating temperature
Storage temperature
Dimensions
Weight
Power Requirements
0 to 40EC (32 to 104EF)
-40 to 80EC (-40 to 176EF)
H 3.8" (9.65 cm) x W 2.8" (7.1 cm) x D 2.8" (7.1 cm)
Less than 1.5 lbs (0.68 kg) with standard output cable
120 V~, 60 Hz, .2 A RMS
OUTPUT RATINGS: @ 20EC
Unit
Charge Amps
Float Amps
Charge Voltage
Reset Voltage
Open Circuit Voltage
Charge Timer
Battery
MHTX-7
C/10 or 0.1C, where C = Battery Capacity
(50 to 500 mA, refer to marking label on unit)
C/40 or 0.025C, where C = Battery Capacity
(Approximately 1/4 of rated output current)
Floats with respect to Battery Voltage
Approximately 21 volts (will switch into float mode)
Approximately 25 volts
14 hours ± 1 hr.
Rechargeable Nickel Metal Hydride, 1.2 to 14.4 Volts (1 to 12 cells)
500 mAHr to 5 AHr
Refer any questions to XENOTRONIX Inc.
Monday-Friday 8:30am to 4:30pm ET
tel. 407-331-4793
fax. 407-331-4708
XENOTRONIX Inc. 8/00
Document MN2-MHTX7