1
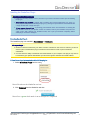
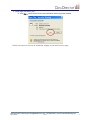
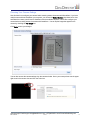
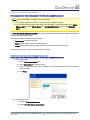
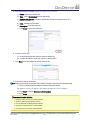
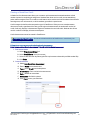
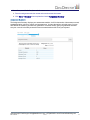
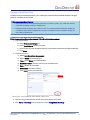
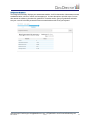
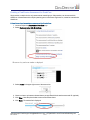
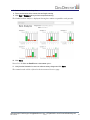
GradeCam for
USER MANUAL
Rev. 10/5/12
V.1.0
1
Contents
What is GradeCam ……………………………………………………………………………….…………………………. 2
Installing the GradeCam Plugin ………………………………………………………………………………………. 3
Choosing Your Camera Settings …………………………………………………………………………………….. 5
Managing grade book Settings ……………………………………………………………………………………… 6
Creating a GradeCam Assessment ………………………………………………………………………………… 7
Save as DataDirector Assessment …………………………………………………………………… 9
Creating a GradeCam Credit …………………………………………………………………………… 10
Creating a GradeCam Score …………………………………………………………………………… 11
Using GradeCam to Enter Scores into an Electronic GradeBook ……………………………….. 14
Enabling a DataDirector Assessment for GradeCam ………………………………………………….. 15
Editing a GradeCam Assessment ……………………………………………………………………………….. 17
Editing an Incorrect Answer ……………………………………………………………………………………… 18
What is GradeCam
What is GradeCam
GradeCam, allows classroom teachers to scan and grade multiple-choice tests and other assignments
instantly to capture student responses. They have the option to transmit results back to DataDirector for
scoring and reporting.
Features
l
l
Create assessments created with GradeCam and saved to DataDirector within DataDirector and use
a web or document camera to immediately capture student responses.
Use GradeCam to copy and paste scores or grades into a third-party grade book.
l
Give students immediate feedback by allowing students to scan their own assignments or
assessments using Student View.
l
Create and print answer forms on plain paper.
l
Create a generic answer document and laminate for use all year long.
Still need help? Email Support: [email protected] • (877)993-2633 • www.RiversidePublishing.com
Rev. 10/5/12
V.1.0
2
Installing the GradeCam Plugin
Recommended Best Practices
l
Install any necessary drivers, connect, and turn on your web or document camera prior to installing
the plug-in.
l
Your camera may not work if multiple tabs, including other camera applications, are open (i.e.
Gmail).If you have problems installing the plug-in, try closing all open browsers and download with
a single browser with a single tab open.
l
If your camera does not load – try clearing your browser's cache. For instructions on clearing the
web browser cache for your specific version or browser, search your browser's Help menu for
"clear cache". After clearing your browser's cache, exit or quit your browser completely before
attempting to access the site again.
Downloading the Plug-in
The GradeCam plug-in is available in Assessments > Downloads.
Before you begin....
n
GradeCam must be enabled for your district and site. If GradeCam has not been enabled, you will not
see the option to download the plug-in and will not see the links to create or print a GradeCam
assessment.
n
You must have the ability to download and install software on your computer. The plug-in may need to
be installed by your system administrator if you don't have rights to download and install software.
Follow these steps to download and install the plug-in:
1. Select GradeCam Plugin from the menu.
You will be taken to the GradeCam web site.
2. Click Download from the GradeCam web site
.
You will see a green check mark ext to each step as it is completed.
Still need help? Email Support: [email protected] • (877)993-2633 • www.RiversidePublishing.com
Rev. 10/5/12
V.1.0
3
3. Install plugin executable (.exe)
A. Click Run - you will receive an on-screen notification that the plug-in has installed,
You have the option to return to the GradeCam webpage to print and scan a test page.
Still need help? Email Support: [email protected] • (877)993-2633 • www.RiversidePublishing.com
Rev. 10/5/12
V.1.0
4
Choosing Your Camera Settings
Use this function to configure your camera before scanning answer documents with GradeCam. If you have
multiple camera drivers installed on your computer, you can use the Select Camera drop-down box to view
and select the camera you will use for GradeCam from the available cameras. You will also configure your
camera before scanning answer documents with GradeCam.. You can flip the image that appears in the
camera by checking the Flip Image box.
Click Save to save your changes.
You can also access the camera settings from the camera window. Hover your mouse pointer over the upperright corner in the camera view and click the Tools icon.
Still need help? Email Support: [email protected] • (877)993-2633 • www.RiversidePublishing.com
Rev. 10/5/12
V.1.0
5
Managing GradeBook Settings
GradeCam scores can be transferred to your electronic gradebook. You may find that you need to adjust some
default settings to match those of your gradebook. The Manage GradeBook Settings link in DataDirector
will allow you to customize GradeCam settings to match your electronic gradebook.
You can configure the following options:
n
The order of the names on the GradeCam scan page must match the order of the names in your
gradebook.
n
You can select a hot key (default is F8) to transfer grades to your gradebook, speed of transfer, return
key to advance to the next line, and options for missing assignments.
n
GradeBook settings are accessed through AdminTools > Exam Management section >Manage
GradeBook Settings.
Note for MAC users: It is important that the function keys on your system are set to operate as normal function
keys. On Mac platforms you may need to check the system settings for the keyboard. Some keyboards may have
a function key lock that introduces special behavior. Be sure to check your function key settings if you have
problems with gradebook entry.
Still need help? Email Support: [email protected] • (877)993-2633 • www.RiversidePublishing.com
Rev. 10/5/12
V.1.0
6
Creating a GradeCam Assessment
Path: Assessments >Create Assessment >New GradeCam Quick Assessment
Note: You must be logged in as a teacher to use GradeCam.
n If you are not logged in as a teacher, you will not see the GradeCam options.
n
If you are both an administrator and a teacher, and are logged in as the administrator, go to Admin >
Change sites and select My Students in the Available Sites/Views column of the Welcome
page.
The New GradeCam Quick Assessment link creates a new answer sheet that can be graded by scanning or
entering the results via GradeCam.
There are three types of GradeCam answer sheets:
n Assessment: Grade assessments
n
Score: Award a range of scores on an assignment.
n
Credit: Quickly award a static number points or check to see who has turned in work.
You will need to print your answer documents prior to scanning.
Follow these steps to Create a GradeCam Assessment:
Path: Assessments >Create Assessment >New GradeCam Quick Assessment
1. Print answer sheets:
A. Select Print Answer Sheet link
B. Select Assessment on the print screen.
C. Select a class from the drop-down (optional- to print answer sheets with pre-filled student
names and IDs)
D. Click Print
2. Create assessment:
A. Return to Create Assessment
B. Select New GradeCam Assessment
Still need help? Email Support: [email protected] • (877)993-2633 • www.RiversidePublishing.com
Rev. 10/5/12
V.1.0
7
3. Enter the Assessment details: (All fields are required except Description.)
A. Name- name of the assessment.
B. Type - Select Assessment from the drop-down.
C. Number of Questions - number of questions to include on the assessment. 10 is
default- up to 100
D. Date - defaults to current date.
E. Description- this field is optional.
F. Click Done to save your selections.
4. Create an Answer Key
A. Scan a blank answer document to create an answer key.
B. You have the option to enter point values for each question.
5. Click Scan to see the student list and the camera view.
6. Scan student answer documents:
TIP: Make sure the entire box (student id and answer choices) is showing in the camera window.
A. Place a completed student answer documents under the camera.
The student's scores will appear in the student list when the scan is complete.
B. Click Next to view the GradeCam Item Analysis
C. Click Done
Notes about Double Bubbles
l
GradeCam will not score any double bubbles
l
GradeCam will not reject double bubbles
l
Item Analysis will not display double bubbles
l
Displays in DataDirector as a double bubble
l
Scoring will be incorret with double bubbles
Still need help? Email Support: [email protected] • (877)993-2633 • www.RiversidePublishing.com
Rev. 10/5/12
V.1.0
8
Save as DataDirector Assessment
After completing the assessment process, you have the option to save the assessment and the results as a
DataDirector assessment. Saving the assessment to DataDirector allows you to view results in DataDirector
Assessment Reports.
DataDirector assessments require additional fields not required to create a GradeCam assessment. You must
add these required fields to the assessment before it can be saved to DataDirector.
Select a Grade, Type/Scope, and Subject from the drop-downs and click Save.
The Assessment Overview page is displayed.
Note: You must complete the entire process and save your assessment to DataDirector for results to be
saved.
Still need help? Email Support: [email protected] • (877)993-2633 • www.RiversidePublishing.com
Rev. 10/5/12
V.1.0
9
Creating a GradeCam Credit
A GradeCam Credit assessment allows you to create a quick assessment that awards students a fixed
number of points for completing an assignment. Students that do not receive credit, are not awarded any
points and are assigned a zero.The credit/no credit feature can be used to track which students have turned in
an assignment, such as homework, or which students get credit for a practice test.
Credit is mapped to the Short Answer question type in DataDirector. When you scan a student answer
document for credit, regardless of the value you have given the assessment, the student will receive full
credit, Credit only displays in Assessment Reports for students who received credit. Students who did not
receive credit will not display in Assessment Reports.
Credit Assessments cannot be created in DataDirector.
Recommended Best Practice : Do not save Credit and Score to DataDirector – enter directly into
your electronic grade book.
Follow these steps to create a GradeCam Credit Assessment:
Path: Assessments >Create Assessment >New GradeCam Quick Assessment
1. Print answer sheets:
A. Select Print Answer Sheet link
B. Select Credit/Score on the print screen.
C. Select a class from the drop-down (optional- to print answer sheets with pre-filled student IDs)
D. Click Print
2. Create assessment:
A. Select New GradeCam Assessment
B. Enter a Name for the assessment.
C. Type - Select Credit from the drop-down
D. Credit Score - Enter a value for the assessment.
E. Date - defaults to current date.
F. Description- this field is optional.
G. Click Done to save your selections.
Still need help? Email Support: [email protected] • (877)993-2633 • www.RiversidePublishing.com
Rev. 10/5/12
V.1.0
10
You will see your GradeCam form and the camera view.
3. Place the assignment under the camera and scan the answer documents.
4. Click Done or Summary when completed to view the Assignment Summary.
Assignment Summary
The Assignment Summary displays your assessment statistics. It will list the number of documents scanned,
standard deviation, minimum, maxium, and average score. You have the option to print this report. You can
also transfer the results to your electronic grade book. To transfer results, open your grade book and make
sure your cursor is in the field you want the first score transfered to and hit F8 on you keyboard.
Still need help? Email Support: [email protected] • (877)993-2633 • www.RiversidePublishing.com
Rev. 10/5/12
V.1.0
11
Creating a GradeCam Score
A GradeCam Score assessment allows you to create a quick assessment that awards students a range of
points for completing an assignment.
Recommended Best Practice
n The points value for Score questions should be five points or greater. Any value less than five
points will not display correctly in DataDirector.
n
GradeCam does not have a max value for score. If your assessment scanned with GradeCam
exceeds the max value in DataDirector, the score in GradeCam will be rounded to display the
max value in DataDirector.
Follow these steps to create a GradeCam score:
Path: Assessments >Create Assessment >New GradeCam Assessment
1. Print answer sheets:
A. Select Print Answer Sheet link
B. Select Credit/Score on the print screen.
C. Select a class from the drop-down (optional- to print answer sheets with pre-filled student IDs)
D. Click Print
2. Create assessment:
A. Select New GradeCam Assessment
B. Enter a Name for the assessment.
C. Type - Select Score from the drop-down
D. Max Score Value - Enter the max score for the assessment.
E. Date - defaults to current date.
F. Description- this field is optional.
G. Click Done to save your selections.
You will see your GradeCam form and the camera view.
3. Place the assignment under the camera and scan the answer documents.
4. Click Done or Summary when completed to view the Assignment Summary.
Still need help? Email Support: [email protected] • (877)993-2633 • www.RiversidePublishing.com
Rev. 10/5/12
V.1.0
12
Assignment Summary
The Assignment Summary displays your assessment statistics. It will list the number of documents scanned,
standard deviation, minimum, maxium, and average score. You have the option to print this report. You can
also transfer the results to your electronic grade book. To transfer results, open your grade book and make
sure your cursor is in the field you want the first score transfered to and hit F8 on you keyboard.
Still need help? Email Support: [email protected] • (877)993-2633 • www.RiversidePublishing.com
Rev. 10/5/12
V.1.0
13
Using GradeCam to Enter Scores into an Electronic Gradebook
GradeCam will transfer scores for the student answer sheets you have scanned into your electronic
gradebook.
Follow these steps to transfer scores from GradeCam to your gradebook:
1. Open your gradebook and create an assignment.
2. Get keyboard focus in your gradebook. Position your cursor at the top of the assignment column in the
cell where you would enter a score for the first student listed in your gradebook.
3. Hit F8
GradeCam will enter scores for the students whose tests you have scanned.
See Admin Tools >Manage GradeBook Settings if you need to change GradeCam's defaults.
Still need help? Email Support: [email protected] • (877)993-2633 • www.RiversidePublishing.com
Rev. 10/5/12
V.1.0
14
Enabling a DataDirector Assessment for GradeCam
Single-section, multiple choice- only assessments containing up to 100 questions, can be scanned with
GradeCam. Assessments with multiple question types or more than a single section, cannot be scanned with
GradeCam.
Follow these steps to enable an assessment for GradeCam:
1. Locate and Open the Assessment Overview page.
2. Select Begin scanning with GradeCam
The answer key and scan window is displayed.
3. Select Forms in the upper-right corner of the answer key.
4. Choose a class to print answer sheets that are pre-populated with the student name and ID. (optional)
5. Click Print. Close the print window to return to the answer sheet.
6. Click Scan. The student list is displayed.
Still need help? Email Support: [email protected] • (877)993-2633 • www.RiversidePublishing.com
Rev. 10/5/12
V.1.0
15
7. Select the class from the drop-down.
8. Place your document in the camera view and begin scanning.
9. Click Next or Summary when you have completed scanning.
The GradeCam Item Analysis is displayed showing how students responded to each question.
10. Click Done
You will see the Save as DataDirector Assessment options.
11. Verify that the information is correct or make necessary changes and click Save.
The scanned results will be reflected in the Assessment Overview page.
Still need help? Email Support: [email protected] • (877)993-2633 • www.RiversidePublishing.com
Rev. 10/5/12
V.1.0
16
Editing a GradeCam Assessment
You can edit an assessment created in GradeCam or that has been enabled for GradeCam. Not all fields can
be edited.
Changes you CAN make:
l
Edit the Assessment Summary
l
Change the Answer Key
l
Change Points values
l
Add Standards
Changes you cannot make:
l Add sections
l
Add questions or change the question type, or label
l
Delete questions
l
Move questions
Follow these steps to edit the assessment:
1. Search for and open the assessment overview.
2. Select Edit Assessment,
The Edit Answer Sheet Assessment page opens.
3. Make the desired changes.
4. Click Save Changes.
The answer key and points values can be edited in GradeCam.
Follow these steps to edit the answer key or points value"
1. Click the Begin scanning with GradeCam link from Assessment Options on the Assessment
Overview page.
The GradeCam answer key is displayed.
2. Click the bubble to deselect the original answer choice.
3. Click the bubble to select the new answer choice.
4. Type in the new points value (if desired).
5. Click Next.
Still need help? Email Support: [email protected] • (877)993-2633 • www.RiversidePublishing.com
Rev. 10/5/12
V.1.0
17
Editing an Incorrect Answer Selection
You can edit an incorrect answer selection after scanning your student responses.
Re-scan the answer document to correct or change incorrect answer(s). The new answer selections will
override the existing answer choices. The raw score and percent correct will also be updated to reflect the rescan. The assessment will be scored based on the answer key and number of points assigned per question.
GradeCam Student View
Selecting Student View allows students to scan their own answer documents. Selecting Student View
collapses DataDirector headers and menus and only displays the student ...
Notes:
l Make sure your sure students don’t click DataDirector navigation.
l
Make sure students scan their sheet and walk away.
Follow these steps to use Student View:
From Scan window-1. Click Student View
2. Have student place document under camera.
3. Wait to hear confirmation that assessment has scanned.
4. Hit the [esc] key to exit student view.
After scanning the answer document, students can view the number of questions they answered
correctly, missed, as well as the percentage correct.
Still need help? Email Support: [email protected] • (877)993-2633 • www.RiversidePublishing.com
Rev. 10/5/12
V.1.0
18