1
Comfort Panels, Runtime Advanced -
1
___________________
Welcome
Advanced Configuration Options
Create decentralized /
2
___________________
distributed system
SIMATIC HMI
WinCC V12
Comfort Panels, Runtime Advanced
- Advanced Configuration Options
Getting Started
3
___________________
Data exchange using HTTP
Remote operation - Remote
4
___________________
control
5
___________________
E-mail communication
Status and diagnostics
6
___________________
pages on the Internet
7
___________________
GMP projects/audit
8
___________________
SIMATIC Logon
9
___________________
Summary
Inside title-info field
05/2013
A5E32311838-AA
Legal information
Warning notice system
This manual contains notices you have to observe in order to ensure your personal safety, as well as to prevent
damage to property. The notices referring to your personal safety are highlighted in the manual by a safety alert
symbol, notices referring only to property damage have no safety alert symbol. These notices shown below are
graded according to the degree of danger.
DANGER
indicates that death or severe personal injury will result if proper precautions are not taken.
WARNING
indicates that death or severe personal injury may result if proper precautions are not taken.
CAUTION
indicates that minor personal injury can result if proper precautions are not taken.
NOTICE
indicates that property damage can result if proper precautions are not taken.
If more than one degree of danger is present, the warning notice representing the highest degree of danger will
be used. A notice warning of injury to persons with a safety alert symbol may also include a warning relating to
property damage.
Qualified Personnel
The product/system described in this documentation may be operated only by personnel qualified for the specific
task in accordance with the relevant documentation, in particular its warning notices and safety instructions.
Qualified personnel are those who, based on their training and experience, are capable of identifying risks and
avoiding potential hazards when working with these products/systems.
Proper use of Siemens products
Note the following:
WARNING
Siemens products may only be used for the applications described in the catalog and in the relevant technical
documentation. If products and components from other manufacturers are used, these must be recommended
or approved by Siemens. Proper transport, storage, installation, assembly, commissioning, operation and
maintenance are required to ensure that the products operate safely and without any problems. The permissible
ambient conditions must be complied with. The information in the relevant documentation must be observed.
Trademarks
All names identified by ® are registered trademarks of Siemens AG. The remaining trademarks in this publication
may be trademarks whose use by third parties for their own purposes could violate the rights of the owner.
Disclaimer of Liability
We have reviewed the contents of this publication to ensure consistency with the hardware and software
described. Since variance cannot be precluded entirely, we cannot guarantee full consistency. However, the
information in this publication is reviewed regularly and any necessary corrections are included in subsequent
editions.
Siemens AG
Industry Sector
Postfach 48 48
90026 NÜRNBERG
GERMANY
A5E32311838-AA
Ⓟ 05/2013 Technical data subject to change
Copyright © Siemens AG 2013.
All rights reserved
Table of contents
1
2
3
4
5
6
7
Welcome.................................................................................................................................................... 5
1.1
Welcome ........................................................................................................................................5
1.2
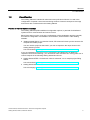
Classification ..................................................................................................................................7
Create decentralized / distributed system .................................................................................................. 9
2.1
Overview ........................................................................................................................................9
2.2
Create network ...........................................................................................................................11
2.3
Setting a HMI connection.............................................................................................................14
Data exchange using HTTP..................................................................................................................... 15
3.1
How is data exchanged using HTTP? .........................................................................................15
3.2
Sample scenario ..........................................................................................................................16
3.3
Configure the station's HMI device as HTTP server....................................................................17
3.4
Establishing a connection to the station on the control-room PC ................................................18
3.5
Query station process data ..........................................................................................................20
Remote operation - Remote control ......................................................................................................... 23
4.1
Introduction ..................................................................................................................................23
4.2
Configuring the HMI device as Sm@rtServer..............................................................................26
4.3
Configuring remote control via Sm@rtClient display ...................................................................27
4.4
Remote control via Microsoft Internet Explorer............................................................................29
4.5
Remote control by means of the Sm@rtClient application ..........................................................31
E-mail communication ............................................................................................................................. 33
5.1
Introduction ..................................................................................................................................33
5.2
Configuring SMTP communication ..............................................................................................35
5.3
Configuring e-mail dispatch .........................................................................................................37
Status and diagnostics pages on the Internet .......................................................................................... 39
6.1
Introduction ..................................................................................................................................39
6.2
Creating your own service pages.................................................................................................42
GMP projects/audit .................................................................................................................................. 47
7.1
Introduction ..................................................................................................................................47
7.2
Extended requirements on user administration ...........................................................................49
7.3
Burden of proof regarding operator actions .................................................................................50
7.4
GMP-compliant configuration.......................................................................................................51
Comfort Panels, Runtime Advanced - Advanced Configuration Options
Getting Started, 05/2013, A5E32311838-AA
3
Table of contents
8
9
7.5
Operating a GMP-compliant project in runtime........................................................................... 56
7.6
Archive audit trails....................................................................................................................... 59
7.7
Evaluating Audit Trails ................................................................................................................ 62
7.8
Evaluate Audit Trails with Audit Viewer ...................................................................................... 63
7.9
Evaluating Audit Trails using DOS program ............................................................................... 67
SIMATIC Logon ....................................................................................................................................... 73
8.1
What is SIMATIC Logon?............................................................................................................ 73
8.2
Activating SIMATIC Logon .......................................................................................................... 76
8.3
Creating users in Windows ......................................................................................................... 78
8.4
Creating user groups in Windows ............................................................................................... 80
Summary ................................................................................................................................................. 83
Comfort Panels, Runtime Advanced - Advanced Configuration Options
4
Getting Started, 05/2013, A5E32311838-AA
1
Welcome
1.1
Welcome
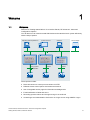
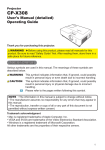
Welcome to "Getting Started WinCC V12 Comfort Panels, RT Advanced - Advanced
Configuration Options".
You will learn how to network several HMI devices and extend the basic system effectively
with the help of options.
2SHUDWLQJGDWDDFTXLVLWLRQ3&
&RQWUROURRP3&
2IILFH3&
6HUYLFHODSWRS
(WKHUQHW7&3,3
&RORU
PL[LQJV\VWHP
&RORUPL[LQJ
V\VWHP
3DOOHWL]LQJ
VWDWLRQ
352),1(7
&RQWUROOHU
&RQWUROOHU
&RQWUROOHU
These options include:
● Plant-wide access to current process values via HTTP
● Different remote control options via Intranet and Internet
● Use of integrated service pages for information and diagnostics
● E-mail notification of faults and errors
● Recording operator actions and changes to tags in an audit trail
● Central logon and administration of all users on a logon server using SIMATIC Logon
Comfort Panels, Runtime Advanced - Advanced Configuration Options
Getting Started, 05/2013, A5E32311838-AA
5
Welcome
1.1 Welcome
Note
This Getting Started is based on "Getting Started WinCC V12 Comfort Panels, RT
Advanced".
Install the sample project of the "Getting Started WinCC V12 Comfort Panels, RT Advanced"
if you want to follow the shown configuration steps yourself. You will find this project in the
SIOS portal.
Necessary components
The following components are required to follow the example:
[+0,GHYLFH
73&RPIRUW
[FRQWUROOHU
&3831
&RQILJXUDWLRQ3&
2SHUDWLQJGDWDDFTXLVLWLRQ3&
&RQWUROURRP3&
2IILFH3&
+0,GHYLFH
73&RPIRUW
0DVWHU&RQWURO6WDWLRQ
3&%7RXFK
6HUYLFHODSWRS
You may also use other HMI devices.
If you are going to use an HMI device with different functionality, the configuration may
deviate from the steps shown. If you do not have any HMI devices at hand, you can also
simulate operation of HMI devices on the configuration computer.
Use SIMATIC WinCC Advanced as engineering system; however, SIMATIC WinCC
Professional can be used also.
Comfort Panels, Runtime Advanced - Advanced Configuration Options
6
Getting Started, 05/2013, A5E32311838-AA
Welcome
1.2 Classification
1.2
Classification
This Getting Started is intended for advanced users proficient in WinCC V12 and in the
configuration of operator control and monitoring solutions. General concepts such as tags
and screens are not discussed in this Getting Started.
Position in the information landscape
This Getting Started explains additional configuration options, in particular for distributed
systems and for communication and remote control.
Basic information on topics such as the configuration of the visualization and the controller,
as well as the integration of visualization and controller, are discussed in other Getting
Starteds.
● "Getting Started WinCC V12 Comfort Panels, RT Advanced" shows you the structure of a
complete executable project.
You can use this project as the basis if you wish to reproduce the steps shown in this
Getting Started yourself.
Link to download (http://support.automation.siemens.com/WW/view/en/72927035)
If you are interested in the topics of PLC programming and diagnostics in addition to
"Operator control and monitoring", you can find out more about the color mixing plant from a
control viewpoint in the following Getting Started documents:
● Getting Started STEP 7 Professional / WinCC Advanced V11 for sample project Filling
Station
Link to download (http://support.automation.siemens.com/WW/view/en/54430386)
● Getting Started SIMATIC S7-1500 and TIA Portal V12
Link to homepage (http://support.automation.siemens.com/WW/view/en/71704272)
Comfort Panels, Runtime Advanced - Advanced Configuration Options
Getting Started, 05/2013, A5E32311838-AA
7
Welcome
1.2 Classification
Comfort Panels, Runtime Advanced - Advanced Configuration Options
8
Getting Started, 05/2013, A5E32311838-AA
2
Create decentralized / distributed system
2.1
Overview
The color mixing system "Color_Mixing_HMI" in the "Getting Started WinCC V12 Comfort
Panels, RT Advanced" only represents one station of the color mixing and filling plant. This is
used for the production of smaller special series.
Containers with greater capacity are filled at another, larger station.
A palletizing system, which packs the containers on pallets for transport, is added as a third
station.
All systems can be monitored and controlled from remote workplaces:
● The shift supervisor can monitor and operate all stations directly at his workplace using
an control room PC.
● The operating data acquisition ensures a complete record of important process data, as
well as its evaluation.
● In the event of a fault, the responsible service technician is informed immediately at his
workplace (service laptop). From there, he can establish the status of all stations and
perform the required service via the Internet.
2SHUDWLQJGDWDDFTXLVLWLRQ3&
&RQWUROURRP3&
2IILFH3&
6HUYLFHODSWRS
(WKHUQHW7&3,3
&RORU
PL[LQJV\VWHP
&RORUPL[LQJ
V\VWHP
3DOOHWL]LQJ
VWDWLRQ
352),1(7
&RQWUROOHU
&RQWUROOHU
&RQWUROOHU
Configuring
Comfort Panels, Runtime Advanced - Advanced Configuration Options
Getting Started, 05/2013, A5E32311838-AA
9
Create decentralized / distributed system
2.1 Overview
In this section, you will learn how to extend the plant in the project on the basis of the sample
project project from the Getting Started "Comfort Panels, RT Advanced". The following steps
are required:
1. Interconnecting physical components of the project.
2. Configuring HMI connections for communication between controllers and HMI devices.
3. Configuring HTTP connections for communication between remote workstations and HMI
devices (Chapter 3).
Comfort Panels, Runtime Advanced - Advanced Configuration Options
10
Getting Started, 05/2013, A5E32311838-AA
Create decentralized / distributed system
2.2 Create network
2.2
Create network
Introduction
The network configuration provides the necessary requirements for communication. To map
the real plant in the project, connect the PCs, HMI devices, and the controllers.
Various configuration options are available. In the Graphic Network view, you have an
overview of the subnets of the entire system in the project.
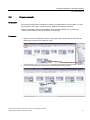
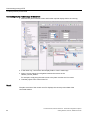
Procedure
1. Open the "Devices & Networks" editor in the project and drag the HMI devices from the
catalog to the work area in "Network" mode.
2. Connect the interfaces of the devices by extending the existing subnet:
Q
Comfort Panels, Runtime Advanced - Advanced Configuration Options
Getting Started, 05/2013, A5E32311838-AA
11
Create decentralized / distributed system
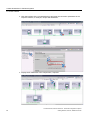
2.2 Create network
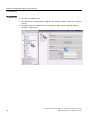
3. Click the interface of the connected devices and enter the connection parameters in the
inspector window, for example, unique Web addresses.
4. Display the IP addresses of the components, if required.
Comfort Panels, Runtime Advanced - Advanced Configuration Options
12
Getting Started, 05/2013, A5E32311838-AA
Create decentralized / distributed system
2.2 Create network
Result
The devices are networked.
Comfort Panels, Runtime Advanced - Advanced Configuration Options
Getting Started, 05/2013, A5E32311838-AA
13
Create decentralized / distributed system
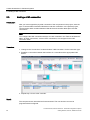
2.3 Setting a HMI connection
2.3
Setting a HMI connection
Introduction
After you have mapped the physical connection of the components in the project, enter the
type of communication between HMI devices and their controllers. In the present project,
communication within a station between HMI device and controller takes place via HMI
connections.
Note
You configure the HMI connections with the S7-1500 controller in the "Devices & Networks"
editor. All other connections, such as HTTP connections, are configured in the HMI
connection editor.
Procedure
1. Change to the "Connections" mode and select "HMI connection" for the connection type.
2. Establish a connection between the interface of a controller and the appropriate HMI
device.
3. Repeat step 2 for the other controller.
Result
The components are networked and interconnected. The new devices can now be
programmed and configured.
Comfort Panels, Runtime Advanced - Advanced Configuration Options
14
Getting Started, 05/2013, A5E32311838-AA
Data exchange using HTTP
3.1
3
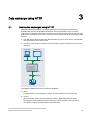
How is data exchanged using HTTP?
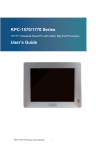
SIMATIC HMI HTTP Protocol is a communication driver and enables data exchange
between HMI devices via the Ethernet interface. This communication driver is used to
implement cost-effective maintenance solutions or access to process data, for example. The
field level is not affected, as access to process data is handled exclusively between the HMI
devices.
● The HMI device which provides the data assumes the role of HTTP server, and the other
one assumes the role of HTTP client.
● The HTTP client sends its request to the HTTP server, which processes it and returns a
response.
+773FOLHQW
+773FOLHQW
(WKHUQHW7&3,3
+773VHUYHU
352),1(7
&RQWUROOHU
The SIMATIC HMI HTTP Protocol offers two standards:
● HTTP
Is implemented in local networks for a fast, uncoded transfer of non-critical data.
● HTTPS
Allows a reliable HTTP connection between devices. Both HMI devices must be
authenticated using certificates at the beginning of communication. The user data is
encrypted in order to guarantee secure communication.
Comfort Panels, Runtime Advanced - Advanced Configuration Options
Getting Started, 05/2013, A5E32311838-AA
15
Data exchange using HTTP
3.2 Sample scenario
3.2
Sample scenario
The following task is solved in the example scenario:
The shift supervisor is informed via a control room PC about the most important operating
data for all stations of the color mixing system. For example, a plant overview provides
display fields for the fill levels of the storage tanks.
Requirements
● The HMI devices are created in the project and networked in the device configuration via
the Ethernet interface.
● To display the process data of the two color mixing systems, a screen with corresponding
output fields is configured on the control room PC.
+773FOLHQW
(WKHUQHW7&3,3
+773VHUYHU
+773VHUYHU
+773VHUYHU
Steps to complete
1. Configure the HMI device at the station as an HTTP server.
2. On the control room PC, the HTTP client, configure a connection to the mixing station's
HMI device.
3. Create tags for the fill levels of the reservoirs on the control room PC. Connect these tags
with the tags of the HMI device of the station and configure them in the display fields
provided.
Comfort Panels, Runtime Advanced - Advanced Configuration Options
16
Getting Started, 05/2013, A5E32311838-AA
Data exchange using HTTP
3.3 Configure the station's HMI device as HTTP server
3.3
Configure the station's HMI device as HTTP server
Introduction
A HTTP server provides data for HTTP clients. In the example scenario, process data of the
stations is displayed on the shift supervisor's control room PC.
Procedure
1. Configure the HMI device of the station "Color_Mixing_HMI_1" as HTTP server.
2. Load the project in the station's HMI device.
3. In the same way, configure the HMI devices of other stations as HTTP server:
"Color_Mixing_HMI_2" and "Packaging_HMI".
Result
If properly configured, other HMI devices can retrieve data from the stations.
Comfort Panels, Runtime Advanced - Advanced Configuration Options
Getting Started, 05/2013, A5E32311838-AA
17
Data exchange using HTTP
3.4 Establishing a connection to the station on the control-room PC
3.4
Establishing a connection to the station on the control-room PC
Introduction
In the example scenario, a connection to the HMI devices of the stations is configured on the
control room PC.
Comfort Panels, Runtime Advanced - Advanced Configuration Options
18
Getting Started, 05/2013, A5E32311838-AA
Data exchange using HTTP
3.4 Establishing a connection to the station on the control-room PC
Procedure
1. For the "Master_Control_Station" as HTTP client, add a connection to the HMI device of
the color mixing system. Assign a name to the connection e.g.
"Connection_color_mixing_1" (①-④). Enter the address under which the web server on
the HMI device will be reached (⑤, ⑥).
Note
For secure communication via HTTPS, certificates to authenticate the communicating
parties must also be installed.
2. In the same way, add connections to the other stations: "Connection_color_mixing_2" and
"Connection_packaging_station".
3. Activate the "Transfer" mode on the control room PC and load the
"Master_Control_Station" project to the control room PC.
Result
When runtime starts, the control room PC automatically establishes connection to the HMI
devices of the stations.
Comfort Panels, Runtime Advanced - Advanced Configuration Options
Getting Started, 05/2013, A5E32311838-AA
19
Data exchange using HTTP
3.5 Query station process data
3.5
Query station process data
Introduction
If a connection to the server is configured, you can connect the tags of the control room PC
to the tags of the HTTP server.
In the example scenario of this Getting Started, the plant overview "Plant Overview" on the
control room PC displays the most important status information and parameters of the
individual stations. These include the current fill levels of the storage tanks, for example.
Comfort Panels, Runtime Advanced - Advanced Configuration Options
20
Getting Started, 05/2013, A5E32311838-AA
Data exchange using HTTP
3.5 Query station process data
Creating tags
Create a tag for each display field of the plant overview.
1. On the "Master_Control_Station", create an HMI tag for the fill level in the cyan color
storage tank (1 - 3).
2. Select the connection to the HMI device of the station "Color_Mixing_HMI_1" (4 - 6).
3. Assign the corresponding tag of the color mixing system "Color_Mixing_HMI_1" to the
new tag of the "Master_Control_Station".
4. In the same way, specify tags for the other display fields.
Comfort Panels, Runtime Advanced - Advanced Configuration Options
Getting Started, 05/2013, A5E32311838-AA
21
Data exchange using HTTP
3.5 Query station process data
Connecting display fields to tags in the screen
1. Switch to the plant overview screen and link the required display field to the new tag.
2. In the same way, connect the other display fields to "their" station tags.
3. Insert a screen change for navigation between the screens of the
"Master_Control_Station".
For example, simply drag the start screen to the plant overview and vice versa.
4. Load the project in the control room PC.
Result
The plant overview of the control room PC displays the current process data of the
connected stations.
Comfort Panels, Runtime Advanced - Advanced Configuration Options
22
Getting Started, 05/2013, A5E32311838-AA
Remote operation - Remote control
4.1
4
Introduction
WinCC allows you to control and monitor plants from a remote PC or HMI device. For the
application, a license of the "WinCC SmartServer" option is required on the HMI device.
Comfort Panels, Runtime Advanced - Advanced Configuration Options
Getting Started, 05/2013, A5E32311838-AA
23
Remote operation - Remote control
4.1 Introduction
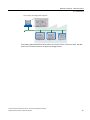
Remote control options
There are several options for intervening directly in the production process of a plant using
remote control:
● The Sm@rtClient display enables the remote control of a station from another HMI
device. The display of the station HMI device is mirrored in the runtime of the other HMI
device. Using the Sm@rtClient display, shift supervisors, for example, can operate the
color mixing system from their control room PC.
&RQWUROURRP3&ZLWK6P#UW&OLHQW
(WKHUQHW7&3,3
6P#UW6HUYHU
6P#UW6HUYHU
6P#UW6HUYHU
● A station's HMI device can be accessed directly with Microsoft Internet Explorer ,
provided the security settings of a plant allow this. In this way, service technicians can
connect remotely to each HMI device that they manage.
6HUYLFHODSWRSZLWK06,QWHUQHW([SORUHU
(WKHUQHW7&3,3
6P#UW6HUYHU
6P#UW6HUYHU
6P#UW6HUYHU
● The Sm@rtClient application allows remote control via the Internet, for example, if
Microsoft Internet Explorer cannot establish a connection to the station's HMI device due
to security restrictions. Using the Sm@rtClient application, the service technician can, for
example, access an HMI device from his service PC.
Comfort Panels, Runtime Advanced - Advanced Configuration Options
24
Getting Started, 05/2013, A5E32311838-AA
Remote operation - Remote control
4.1 Introduction
6HUYLFHODSWRSZLWK6P#UW&OLHQWDSSOLFDWLRQ
(WKHUQHW7&3,3
6P#UW6HUYHU
6P#UW6HUYHU
6P#UW6HUYHU
This Getting Started introduces these options for remote control. In all three cases, the HMI
device to be accessed must be configured as Sm@rt-Server .
Comfort Panels, Runtime Advanced - Advanced Configuration Options
Getting Started, 05/2013, A5E32311838-AA
25
Remote operation - Remote control
4.2 Configuring the HMI device as Sm@rtServer
4.2
Configuring the HMI device as Sm@rtServer
Introduction
An HMI device must be configured as Sm@rtServer for remote operation.
Procedure
1. Configure the station's HMI device as Sm@rtServer, for example, the color mixing system
"Color_Mixing_HMI_1".
2. Transfer the project to the station's HMI device.
Result
The station can be operated by remote HMI devices and PCs.
Comfort Panels, Runtime Advanced - Advanced Configuration Options
26
Getting Started, 05/2013, A5E32311838-AA
Remote operation - Remote control
4.3 Configuring remote control via Sm@rtClient display
4.3
Configuring remote control via Sm@rtClient display
Introduction
The Sm@rtClient display enables the remote control of a Sm@rtServer from another HMI
device, such as a control room PC.
The Sm@rtServer display is mirrored in the runtime of the other HMI device.
At runtime-start, the Sm@rtClient display automatically establishes a connection to the
Sm@rtServer.
In the example scenario of this Getting Started, the shift supervisor operates the color mixing
system "Color_Mixing_HMI_1" from his or her control room PC "Master_Control_Station".
Procedure
1. Add a screen to the HMI device "Master_Control_Station" (1).
2. Insert the "Sm@rtClientView" object (2).
Comfort Panels, Runtime Advanced - Advanced Configuration Options
Getting Started, 05/2013, A5E32311838-AA
27
Remote operation - Remote control
4.3 Configuring remote control via Sm@rtClient display
3. In the inspector window, configure the establishment of a connection with the HMI device
of the color mixing system (3):
– Enter the IP address of the HMI device "Color_Mixing_HMI_1" (4).
– Since the HMI device "Color_Mixing_HMI_1" is protected by a password against
unauthorized access, enter the password (5). The password is configured in the
runtime settings of the "Color_Mixing_HMI_1" and can be changed by the operator
after the first access.
In the runtime settings, the requirements for the password can be defined under "User
administration", e.g. the complexity of the password.
4. Insert a screen change for navigation between the screens of the
"Master_Control_Station".
For example, simply drag the start screen to the plant overview and vice versa.
5. Load the project in the control room PC.
Result
The shift supervisor can operate the color mixing system "Color_Mixing_HMI_1" from his or
her control room PC.
To operate all stations of the plant from the control room PC, configure in the same way one
Sm@rtClient display for the other color mixing system and one for the palletizing station, or
dynamically assign an address to the Sm@rtClient display via an HMI tag .
Comfort Panels, Runtime Advanced - Advanced Configuration Options
28
Getting Started, 05/2013, A5E32311838-AA
Remote operation - Remote control
4.4 Remote control via Microsoft Internet Explorer
4.4
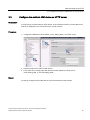
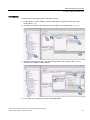
Remote control via Microsoft Internet Explorer
Introduction
The "WinCC SmartServer" option allows access to the HMI device with Microsoft Internet
Explorer. In this way, service technicians, for example, can set up a direct connection to an
HMI device remotely via the Internet.
Note
The HMI device buttons cannot be operated in Microsoft Internet Explorer. For the remote
control of keypad devices use the Sm@rtClient application.
Requirements
● You work on a Windows PC.
● The HMI device is configured as a Sm@rtServer ("Runtime settings > Services > Remote
control").
● The Java applet is installed1). The Java applet accesses the Java Runtime Environment
that is installed on the client.
1)
The Java applet is downloaded and installed automatically when required.
Comfort Panels, Runtime Advanced - Advanced Configuration Options
Getting Started, 05/2013, A5E32311838-AA
29
Remote operation - Remote control
4.4 Remote control via Microsoft Internet Explorer
Procedure
1. Start Microsoft Internet Explorer and enter the address of the remote device.
The address consists of the server name and the HTTP port number that is set on the
server. The default setting is: 5800.
2. Authenticate yourself by entering the name and password.
The user interface of the HMI device is displayed in Microsoft Internet Explorer.
Result
The HMI device can now be operated remotely using mouse and keyboard.
Note
Access to service pages
Siemens provides Siemens standard HTML pages containing service and maintenance
information for each HMI device. These pages also provide the possibility of remote control.
For information on this, refer to "Status and diagnostics pages on the Internet".
Comfort Panels, Runtime Advanced - Advanced Configuration Options
30
Getting Started, 05/2013, A5E32311838-AA
Remote operation - Remote control
4.5 Remote control by means of the Sm@rtClient application
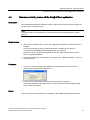
4.5
Remote control by means of the Sm@rtClient application
Introduction
The Sm@rtClient application facilitates remote control via the Internet and even allows the
remote control of keypad devices.
Note
Install client and server certificates to ensure data security during transmissions via the
Internet.
Requirements
● You work on a Windows PC on which the Sm@rtClient application "SmartClient.exe" is
installed.
This is automatically the case if runtime Advanced is installed (in the directory
"C:\Programme\SIEMENS\Automation\[Runtime]", for example).
Otherwise copy the Sm@rtClient application from the WinCC product DVD from the
folder "Support\SmartClient".
● The remote HMI device is configured as a Sm@rtServer, ("Runtime settings > Service >
Remote control").
Procedure
1. On your PC, start the Sm@rtClient application "SmartClient.exe" and enter the IP
address of the desired remote HMI device.
2. To log on to the HMI device, enter the password using your keyboard.
The monitor keyboard of the HMI device is inactive. If desired, hide the keyboard with
"Input > Hide Input Panel".
Result
The user interface of the HMI device is displayed in the Sm@rtClient application window.
Comfort Panels, Runtime Advanced - Advanced Configuration Options
Getting Started, 05/2013, A5E32311838-AA
31
Remote operation - Remote control
4.5 Remote control by means of the Sm@rtClient application
Comfort Panels, Runtime Advanced - Advanced Configuration Options
32
Getting Started, 05/2013, A5E32311838-AA
5
E-mail communication
5.1
Introduction
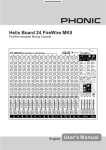
HMI devices can automatically send e-mails for important alarms and events.
The service technicians are then notified immediately at their workplace if an error or
malfunction occurs. Remote access or service pages then enable a first assessment of the
current state of the station that sent the e-mail. Thus, the necessary corrective actions or
troubleshooting can be initiated without delay.
Note
Users themselves can also send e-mails, provided the project was configured
correspondingly using the SendEMail system function.
,QWHUQHW6HUYLFH
3URYLGHU
2SHUDWLQJGDWD
DFTXLVLWLRQ3&
&RQWUROURRP3&
6073VHUYHU
2IILFH3&
6HUYLFHODSWRS
(WKHUQHW7&3,3
&RORUPL[LQJ
V\VWHP
&RORUPL[LQJ
V\VWHP
3DOOHWL]LQJ
VWDWLRQ
352),1(7
&RQWUROOHU
&RQWUROOHU
&RQWUROOHU
Comfort Panels, Runtime Advanced - Advanced Configuration Options
Getting Started, 05/2013, A5E32311838-AA
33
E-mail communication
5.1 Introduction
Note
An SMTP server is required for sending e-mails, which usually takes place over the
corporate network. As an alternative, the connection to the SMTP server can also be
established via a router.
Steps to complete
1. Configure the connection to the e-mail server (SMTP communication)
2. Configuring e-mail dispatch
Comfort Panels, Runtime Advanced - Advanced Configuration Options
34
Getting Started, 05/2013, A5E32311838-AA
E-mail communication
5.2 Configuring SMTP communication
5.2
Configuring SMTP communication
Introduction
SMTP communication can be configured in the runtime settings or also directly on the HMI
device in the ControlPanel under "WinCC Internet Settings > E-mail".
The settings for SMTP communication are provided by the e-mail provider, for example,
whether a secure connection is required.
Requirements
SMTP server that can be accessed via the corporate network or a router.
Comfort Panels, Runtime Advanced - Advanced Configuration Options
Getting Started, 05/2013, A5E32311838-AA
35
E-mail communication
5.2 Configuring SMTP communication
Procedure
1. Configure SMTP communication for the desired HMI device in the runtime settings. You
will need:
– The name of the server on which the messages are to be sent, for example the name
of the corporate mail server
The symbolic name or the IP address can be specified.
– Name of the sender, in this case "Color_Mixing_HMI_1", for example
2. If the SMTP server requires a valid e-mail address or valid user name for authentication,
enter the appropriate information.
You can obtain the user name and password from your service provider.
3. Specify whether the data must be sent over a secure connection (SSL), i.e. encrypted.
Result
The HMI device can establish a connection to the e-mail server.
Comfort Panels, Runtime Advanced - Advanced Configuration Options
36
Getting Started, 05/2013, A5E32311838-AA
E-mail communication
5.3 Configuring e-mail dispatch
5.3
Configuring e-mail dispatch
Introduction
The automation system can inform employees by e-mail about alarms and events.
In the following example, the color mixing system "Color_Mixing_HMI_1" sends error
messages via e-mail to the responsible service technician.
Requirements
SMTP communication is configured in the runtime settings.
Procedure
1. Enter the e-mail address of the service technician for the message class “Error”.
2. Transfer the project to the HMI device.
3. To send an e-mail, initiate an alarm of the above-mentioned alarm class on the HMI
device.
Result
The service technician is informed per e-mail about errors on the station.
Comfort Panels, Runtime Advanced - Advanced Configuration Options
Getting Started, 05/2013, A5E32311838-AA
37
E-mail communication
5.3 Configuring e-mail dispatch
Comfort Panels, Runtime Advanced - Advanced Configuration Options
38
Getting Started, 05/2013, A5E32311838-AA
Status and diagnostics pages on the Internet
6.1
6
Introduction
If the HMI device is configured appropriately, you can quickly check the current status of a
plant on the Internet using the service pages.
Advantages:
● Unplanned downtimes are reduced and the plant productivity is increased.
● The information can be accessed even when remote control is not available because, for
example, specific ports are locked for security reasons.
Fully configured service pages are available for all HMI devices and all controllers with a web
server. These include the S7-1200 and S7-1500 controllers, among others.
You can also create your own service pages if required.
Sample scenario
The service technician has been notified about an error in the plant by an automatically sent
e-mail. The service technician then wants to get information about the state of the plant on
the service pages.
Comfort Panels, Runtime Advanced - Advanced Configuration Options
Getting Started, 05/2013, A5E32311838-AA
39
Status and diagnostics pages on the Internet
6.1 Introduction
Requirements
● You work on a Windows PC.
● The HMI device is configured as a Sm@rtServer ("Runtime settings > Services > Remote
control").
● The diagnostics for the HMI device is configured via HTML pages ("Runtime settings >
Services > Diagnostics").
Comfort Panels, Runtime Advanced - Advanced Configuration Options
40
Getting Started, 05/2013, A5E32311838-AA
Status and diagnostics pages on the Internet
6.1 Introduction
Calling
To access the start page of the device, simply enter its IP address as a URL in Microsoft
Internet Explorer.
For more information on the service pages, refer to the WinCC online help in the TIA Portal.
Comfort Panels, Runtime Advanced - Advanced Configuration Options
Getting Started, 05/2013, A5E32311838-AA
41
Status and diagnostics pages on the Internet
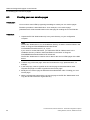
6.2 Creating your own service pages
6.2
Creating your own service pages
Introduction
You must have some HTML programing knowledge to create your own service pages.
The basic procedure is described below. As an example, a new service page
"plantstate.html" will be created based on the start page for reading the current fill levels.
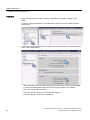
Procedure
1. Unpack the ZIP file "WebContent.zip" in any work directory on your configuration
computer.
Note
The ZIP file "WebContent" is in the installation directory of WinCC Comfort Edition in the
folder "C:\Program Files\SIEMENS\Automation\Portal
V12\Data\Hmi\Transfer\12.0\CP_15_19_22".
If you use a PC as the HMI device, you will find the ZIP file "WebContent" in the
installation directory of WinCC Advanced Edition in the folder "C:\Program
Files\SIEMENS\Automation\WinCC RT Advanced".
The ZIP file "WebContent" contains source data for the service HTML pages of the HMI
device.
2. Create a copy of the start page "start.html" and name the copy "plantstate.html", for
example.
3. In the start page, insert a hyperlink to the service page as described below under
"Expand start page to include a hyperlink to the service page".
4. Modify the new service page as desired as described below under "Creating your own
service page".
5. Add the revised start page and the new service page to the ZIP file "WebContent" and
copy the ZIP file back to the original directory.
Comfort Panels, Runtime Advanced - Advanced Configuration Options
42
Getting Started, 05/2013, A5E32311838-AA
Status and diagnostics pages on the Internet
6.2 Creating your own service pages
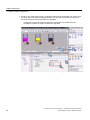
6. Load the project onto the HMI device.
7. Start Microsoft Internet Explorer on the configuration computer, call up the HMI device
start page and go to the new service page.
Expand start page to include a hyperlink to the service page
1. Open the file "start.html" in a text editor, e.g., in Notepad.
2. Add a hyperlink to the "plantstate.html" page on the left-hand navigation bar:
Comfort Panels, Runtime Advanced - Advanced Configuration Options
Getting Started, 05/2013, A5E32311838-AA
43
Status and diagnostics pages on the Internet
6.2 Creating your own service pages
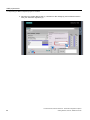
3. Save and close the file "start.html".
The result should look like this in Microsoft Internet Explorer:
Creating your own service page
1. Open the ""plantstate.html" file.
2. Add a hyperlink to the "start.html" page on the left-hand navigation bar.
3. Change the table heading.
Comfort Panels, Runtime Advanced - Advanced Configuration Options
44
Getting Started, 05/2013, A5E32311838-AA
Status and diagnostics pages on the Internet
6.2 Creating your own service pages
4. Replace the table with a new table in which the fill levels of the color storage tanks are
displayed.
Note
For a list of the available tag parameters and other useful information, see the WinCC
online help in the TIA Portal, under "Visualize processes > Options > Sm@rt options >
Display integrated service pages > Create own service pages > Basics".
5. Save and close the file "plantstate.html".
The result should look like this in Microsoft Internet Explorer:
If you refresh the page in Microsoft Internet Explorer, the page reloads and the values are
updated.
Comfort Panels, Runtime Advanced - Advanced Configuration Options
Getting Started, 05/2013, A5E32311838-AA
45
Status and diagnostics pages on the Internet
6.2 Creating your own service pages
Comfort Panels, Runtime Advanced - Advanced Configuration Options
46
Getting Started, 05/2013, A5E32311838-AA
7
GMP projects/audit
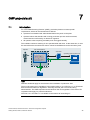
7.1
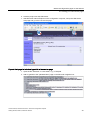
Introduction
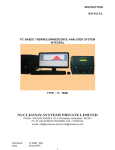
For "Good Manufacturing Practice" (GMP), production plants must meet special
requirements, which can be summarized as follows:
● Operators are identified and authenticated before they work on the plant.
● Operator actions that interfere with running production process are documented,
commented and confirmed by an electronic signature.
● All operator actions requiring traceable proof are logged centrally.
This enables continuous tracking of who operated what and when. At the same time, it must
be ensured that the recorded user actions cannot be falsified and can be read at any time.
2SHUDWRU
8VHUDGPLQLVWUDWLRQ
$XGLW7UDLO
2SHUDWLQJGDWDDFTXLVLWLRQ3&
(WKHUQHW7&3,3
+0,GHYLFH
352),1(7
&RQWUROOHU
Note
Different standards apply for the electronic documentation of production data.
The most important set of regulations is the legal wording in "21 CFR Part 11" on "Electronic
data records and electronic signatures" issued by the FDA, the US Food and Drug
Administration. The GMP requirements are based on the FDA regulations. The various EU
regulations also apply for particular industries.
The FDA's "21 CFR Part 11" is available on the Internet at "www.fda.gov".
Comfort Panels, Runtime Advanced - Advanced Configuration Options
Getting Started, 05/2013, A5E32311838-AA
47
GMP projects/audit
7.1 Introduction
Requirements: WinCC option "WinCC/Audit"
With the user administration, the basic WinCC software offers an effective authorization and
password system. However, the WinCC/Audit option is required to meet further requirements
for the electronic documentation and logging of user actions in Audit Trails.
Planning GMP projects
To set up a project as GMP project, the following questions must be clarified in advance:
● What are the user administration requirements?
● Which user actions (e.g., value changes or actions in recipe management) must be
signed, commented on or logged?
● What special features must be considered when logging?
Sample scenario
In the color mixing system, all user actions related to the recipes are to be recorded
automatically and logged so that the data is secure against manipulation. To this end, the
project is set up as GMP project with the appropriate settings.
Comfort Panels, Runtime Advanced - Advanced Configuration Options
48
Getting Started, 05/2013, A5E32311838-AA
GMP projects/audit
7.2 Extended requirements on user administration
7.2
Extended requirements on user administration
The traceability of operator actions requires that the respective production shift operator can
be clearly identified.
To ensure this, it is not only important for each operator to log on to the system with user
name and password. The FDA imposes additional requirements on user administration.
Extended requirements of the FDA
To fulfill the FDA requirements, user administration must ensure the following:
● Each password is valid for a configurable period of time only. Operators receive a
message in good time informing them that their password is about to expire and
prompting a change of password.
● A previously used password can only be reused after a configurable number of
generations.
Example: With a setting of "3 generations" the password "001" can only be reused after
the third change of password.
● The operator is logged off automatically from the HMI device if no action is performed
within a configurable period.
● After three incorrect password entries, the operator is automatically assigned to the
“unauthorized” group.
Note
With the user administration, WinCC offers an effective authorization and password system.
In "Getting Started WinCC V12 Comfort Panels, RT Advanced", you have already learned to
configure user administration including operators, passwords, and user groups with different
access rights.
The extended requirements are configured in “Runtime settings" under "User administration".
Comfort Panels, Runtime Advanced - Advanced Configuration Options
Getting Started, 05/2013, A5E32311838-AA
49
GMP projects/audit
7.3 Burden of proof regarding operator actions
7.3
Burden of proof regarding operator actions
Recording configuration
To meet the burden-of-proof requirements applicable to your project, you must specify which
user actions need to be traceable in Audit Trail.
● Traceable operator actions: Operator actions that influence running production. These
actions include switching the plant's operating mode from "Automatic" to "Manual" and
changing the mixing ratio of a recipe.
– Burden-of-proof operator actions can be confirmed by a simple acknowledgment or an
electronic signature.
– The operator can also be prompted to add a comment.
● Other operator actions: Operator actions which do not contribute much to the traceability
of the operator activities, e.g. screen changes. Such operator actions may be
documented, but should not distract unnecessarily from important operator actions.
From the list of operator actions with the burden of proof you can deduce which objects need
to be adjusted in the project:
● GMP relevant tags, if value changes by the operator are to be documented.
● GMP relevant recipes, if the following operator actions are to be documented:
– Creating, changing and saving recipe data records
– Transfer of recipe data records to the controller and from the controller
– Changing the setting for the synchronization of the recipe tag values with the controller
("offline" or "online")
Note
Use the system function "RecordUserAction", to document the operation of controls such as
buttons and actions in scripts. This system function is only available if the project is
configured as a GMP project.
Automatic recording
The following operator actions are recorded automatically in Audit Trail:
● Alarms: Acknowledge
● User administration: Logon and logoff of users and import of user administration
● Logs: Starting and stopping a log
Comfort Panels, Runtime Advanced - Advanced Configuration Options
50
Getting Started, 05/2013, A5E32311838-AA
GMP projects/audit
7.4 GMP-compliant configuration
7.4
GMP-compliant configuration
Introduction
Changes to the recipes are stored in an "Audit Trail" in line with FDA requirements in order
to ensure the fully documented traceability of the production process in the color mixing
system.
This can be useful, for example, for the production of food coloring.
Comfort Panels, Runtime Advanced - Advanced Configuration Options
Getting Started, 05/2013, A5E32311838-AA
51
GMP projects/audit
7.4 GMP-compliant configuration
Procedure
1. Set up the HMI device for GMP-compliant configuration in "Runtime settings” under
"GMP".
In the case of several HMI devices, all HMI devices must be set up for GMP-compliant
configuration.
2. Configure the security settings for the validity of the user passwords in "Runtime settings"
under "User administration".
– When the operator logs onto the operating unit for the first time they will be prompted
to change the default logon password once the logon procedure is completed.
– Users can change their logoff time.
– The user is blocked after three incorrect logon attempts.
– Password ageing is enabled and configured.
Comfort Panels, Runtime Advanced - Advanced Configuration Options
52
Getting Started, 05/2013, A5E32311838-AA
GMP projects/audit
7.4 GMP-compliant configuration
3. Configure the recipe "ColorSelection" so that the transfer and storage of recipe data
records from the operator must be confirmed by electronic signature:
4. Enter a file name for the Audit Trail and enter the network path and network name of the
operating data acquisition PC under "Path":
Comfort Panels, Runtime Advanced - Advanced Configuration Options
Getting Started, 05/2013, A5E32311838-AA
53
GMP projects/audit
7.4 GMP-compliant configuration
5. Finally, in the "Plant state" screen, configure a button which the operator can use to move
the Audit Trail to the operating data acquisition PC. The process should be recorded in
the Audit Trail and confirmed by electronic signature.
– Configure the system function that stores the information in the Audit Trail and
prompts the operator to confirm by electronic signature:
Comfort Panels, Runtime Advanced - Advanced Configuration Options
54
Getting Started, 05/2013, A5E32311838-AA
GMP projects/audit
7.4 GMP-compliant configuration
– Configure the system functions to move the Audit Trail on to the operating data
acquisition PC:
Result
It is necessary to close all logs so that the Audit Trail is no longer accessed in runtime. The
Audit Trail is renamed on the HMI device with a time stamp using the format:
Name_Date_Time_HMIdevicename, e.g. "AuditTrail_MixingStation_20070524_122358_MixingStation". Concurrently with the renaming a
new, empty Audit Trail is created so that logging can be continued without interruption.
Note
Messages and their related acknowledgments continue to be saved in separate message
logs. The name of the operator who acknowledged the message is stored in the Audit Trail
together with reference to the action and message number.
Comfort Panels, Runtime Advanced - Advanced Configuration Options
Getting Started, 05/2013, A5E32311838-AA
55
GMP projects/audit
7.5 Operating a GMP-compliant project in runtime
7.5
Operating a GMP-compliant project in runtime
Introduction
Using the example of the color mixing system, you will now be shown how you as an
operator can confirm and comment upon changes to recipe data using an electronic
signature.
Comfort Panels, Runtime Advanced - Advanced Configuration Options
56
Getting Started, 05/2013, A5E32311838-AA
GMP projects/audit
7.5 Operating a GMP-compliant project in runtime
Creating a new recipe data record
1. Log on to the HMI device using your user name and password.
2. Go to the "Recipes" screen and create a new recipe data record.
Comfort Panels, Runtime Advanced - Advanced Configuration Options
Getting Started, 05/2013, A5E32311838-AA
57
GMP projects/audit
7.5 Operating a GMP-compliant project in runtime
3. Save the new recipe data record (1), comment on the change (2) and confirm this action
with your electronic signature (3).
Comfort Panels, Runtime Advanced - Advanced Configuration Options
58
Getting Started, 05/2013, A5E32311838-AA
GMP projects/audit
7.6 Archive audit trails
7.6
Archive audit trails
Introduction
An Audit Trail is an important document that helps you to provide the mandatory proof of
events. For this reason, regular backup is required. The following options are available for
logging:
● Save the Audit Trail on the external storage medium of the HMI device and back it up via
the network to a server at regular intervals.
● Save the Audit Trail on the external storage medium of the HMI device and read it from
the external storage device on a PC.
● Save the Audit Trail via the network directly to a server.
Note
You can only operate a GMP project from the HMI device provided the audit-related user
actions can be saved in the Audit Trail.
Therefore, ensure that there is always sufficient memory space available and the
connection to the server is not interrupted.
Only users with administrator rights can force operation if there is insufficient memory
space.
Moving the Audit Trail to a server
If the configured minimum storage size is exceeded, the "Low storage space" event is
triggered Configure the following functions list in order to transfer the Audit Trail from the
external storage medium of the HMI device to the server.
Comfort Panels, Runtime Advanced - Advanced Configuration Options
Getting Started, 05/2013, A5E32311838-AA
59
GMP projects/audit
7.6 Archive audit trails
Note
The illustrated functions list can be configured, for example, to the "Print" event button. This
will enable the Audit Trail to be saved to the server at any time.
“Low free storage space, critical": This event occurs when there is not enough free disk
space available for the Audit Trail. The value depends on the HMI device.
"Low free storage space": This event occurs in runtime if less free space is available in
runtime for the Audit Trail than is configured in “Minimum amount of free storage space”.
The depicted function list is processed as follows:
1. All open logs are closed.
2. The Audit Trail is renamed on the HMI device with a time stamp using the format:
Name_Date_Time_HMIdevicename, e.g. "AuditTrail_MixingStation_20070524_122358_MixingStation". The Audit Trail is then transferred
to the server. A new Audit Trail is generated.
3. All closed logs are reopened.
You can also use this function list to save the Audit Trail for long-term logging on the server.
In the Scheduled tasks, create a "Backup Audit Trail" task which stores the Audit Trail on the
server at regular intervals.
Comfort Panels, Runtime Advanced - Advanced Configuration Options
60
Getting Started, 05/2013, A5E32311838-AA
GMP projects/audit
7.6 Archive audit trails
Forcing operation
A special case occurs when the connection to the server is disrupted:
As long as the HMI device has sufficient free memory space available, user actions are
recorded in the new Audit Trail. The runtime system will attempt to transfer the renamed
Audit Trail to the server every 300 seconds.
If the Audit Trail cannot be recorded due to lack of memory space, any objects configured as
GMP-relevant, (e.g., tags), can no longer be serviced. To avoid unnecessary downtimes, you
can define that operators in the "Administrators" group have the authorization to “force” an
operation. This means that the shift supervisor, for example, can force operation. This action
interrupts the Audit Trail operating record.
A forced operation is documented in the Audit Trail:
Comfort Panels, Runtime Advanced - Advanced Configuration Options
Getting Started, 05/2013, A5E32311838-AA
61
GMP projects/audit
7.7 Evaluating Audit Trails
7.7
Evaluating Audit Trails
The Audit Trail is stored on the HMI device memory card in read-only CSV format. Each
entry has a separate checksum. This checksum ensures that the entry has not been
modified at any later time.
Evaluation options
There are two possible ways to evaluate the Audit Trail:
● Use the "Audit Viewer":
You can easily evaluate the Audit Viewer for external analysis on an office PC with the
help of the Audit Trail.
Note
Integrity of the contents is ensured in every Audit Trail by application of a checksum. In
"Custom", it is possible to individually evaluate a loaded Audit Trail using SQL
commands.
Note
The Audit Viewer is on the WinCC Advanced Edition product DVD under
"DVD/Support/AuditViewer/AuditViewer_V70_SP3.exe"
● Use the DOS program "HmiCheckLogIntegrity":
The DOS program enables an automated check of the Audit Trail in Batch mode using
the return values.
Comfort Panels, Runtime Advanced - Advanced Configuration Options
62
Getting Started, 05/2013, A5E32311838-AA
GMP projects/audit
7.8 Evaluate Audit Trails with Audit Viewer
7.8
Evaluate Audit Trails with Audit Viewer
The Audit Viewer is used to evaluate the Audit Trail on an office PC.
Procedure
In this section, you will copy the Audit Trail to the configuration computer and display it in the
Audit Viewer.
1. On the HMI device, switch to the "Plant state" screen and copy the Audit Trail from the
HMI device to the configuration computer.
2. Start the Audit Viewer on the control room PC or the configuration computer.
Comfort Panels, Runtime Advanced - Advanced Configuration Options
Getting Started, 05/2013, A5E32311838-AA
63
GMP projects/audit
7.8 Evaluate Audit Trails with Audit Viewer
3. Load the Audit Trail.
"Data Validity" is lit up in green to indicate that the loaded Audit Trail has not been
manipulated.
Each entry in the Audit Trail is time-stamped to allow precise tracking of operator actions.
In addition to system events, such as the import of a password list, the system also
records failed logon attempts:
Comfort Panels, Runtime Advanced - Advanced Configuration Options
64
Getting Started, 05/2013, A5E32311838-AA
GMP projects/audit
7.8 Evaluate Audit Trails with Audit Viewer
Checking the integrity of an Audit Trail
Each Audit Trail is an important document that helps you to provide the mandatory proof of
events. Therefore, it is necessary to ensure that the Audit Trail has not been tampered with.
This means, for example, that there must be no possibility of an operator error being covered
up or of a transmission error occurring during automatic backup.
The Audit Trail can be checked for manipulation using the Audit Viewer.
Comfort Panels, Runtime Advanced - Advanced Configuration Options
Getting Started, 05/2013, A5E32311838-AA
65
GMP projects/audit
7.8 Evaluate Audit Trails with Audit Viewer
1. Create a copy of the Audit Trail on the configuration computer and remove write
protection:
2. Open the Audit Trail in Microsoft Excel and change some entries of your choice.
3. Save the Audit Trail in CSV format and reload the Audit Trail to Audit Viewer.
The "Data Validity" is lit up in red to indicate that the loaded Audit Trail has been
manipulated. The Audit Trail is thus invalid and is no longer accepted.
Comfort Panels, Runtime Advanced - Advanced Configuration Options
66
Getting Started, 05/2013, A5E32311838-AA
GMP projects/audit
7.9 Evaluating Audit Trails using DOS program
7.9
Evaluating Audit Trails using DOS program
Introduction
When you log the Audit Trails on a server for longer term, the Audit Trails can be checked
automatically using a script. To do this, the programmer can integrate the check using the
DOS program "HmiCheckLogIntegrity" into the logging process. ""HmiCheckLogIntegrity"
then provides the following return values:
● < 0: different errors, for example, incorrect file format or no file exists.
● 1: The checked Audit Trail is valid.
● > 0: Number of the line where the checked Audit Trail was manipulated.
Audit Trail logging is only continued if the return value is "1". In both error cases, the
administrator or the shift supervisor can be informed.
Comfort Panels, Runtime Advanced - Advanced Configuration Options
Getting Started, 05/2013, A5E32311838-AA
67
GMP projects/audit
7.9 Evaluating Audit Trails using DOS program
Procedure
You check the integrity of the Audit Trail in the command prompt.
1. On the HMI device, switch to the "Plant state" screen and copy the Audit Trail from the
HMI device to the configuration computer.
2. Open the command prompt on the configuration computer.
Comfort Panels, Runtime Advanced - Advanced Configuration Options
68
Getting Started, 05/2013, A5E32311838-AA
GMP projects/audit
7.9 Evaluating Audit Trails using DOS program
3. Check the integrity of the Audit Trail.
The integrity check has been successfully completed. Now, manipulate the Audit Trail
and check it again afterwards.
Comfort Panels, Runtime Advanced - Advanced Configuration Options
Getting Started, 05/2013, A5E32311838-AA
69
GMP projects/audit
7.9 Evaluating Audit Trails using DOS program
4. Create a copy of the Audit Trail on the configuration computer and remove write
protection.
5. Open the Audit Trail in Microsoft Excel and change some entries of your choice.
6. Save the Audit Trail file in CSV format and repeat the integrity check.
Result
The integrity check does not return "1". The Audit Trail is thus invalid and is no longer
accepted.
Comfort Panels, Runtime Advanced - Advanced Configuration Options
70
Getting Started, 05/2013, A5E32311838-AA
GMP projects/audit
7.9 Evaluating Audit Trails using DOS program
Comfort Panels, Runtime Advanced - Advanced Configuration Options
Getting Started, 05/2013, A5E32311838-AA
71
SIMATIC Logon
8.1
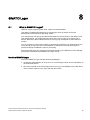
8
What is SIMATIC Logon?
SIMATIC Logon supports system-wide, central user administration.
User data is created and managed on a central logon server by means of the user
administration of the Windows operating system:
You configure the user groups and their authorizations in the usual way in the WinCC local
user administration. You assign identical names to the user groups on the server and in
WinCC. Because of these identical names, the user group is assigned an authorization in
runtime.
You do not have to create users in WinCC, because they are taken over dynamically by the
server during the logon process. The application or HMI device forwards each logon or
password change to SIMATIC Logon for processing.
This means that users can change their password directly on the HMI device. The changed
password is transferred automatically to the logon server.
Benefits of SIMATIC Logon
The use of SIMATIC Logon has the following advantages:
● Central user administration is set up once on a central logon server and not separately on
each individual device.
● New users created on the central logon server can log on immediately to any HMI device
which contains a WinCC user group with the same name.
Comfort Panels, Runtime Advanced - Advanced Configuration Options
Getting Started, 05/2013, A5E32311838-AA
73
SIMATIC Logon
8.1 What is SIMATIC Logon?
● Changes in the user administration can be made without any configuration effort and
without reloading the project.
● User names and passwords are identical on all HMI devices.
&RQWUROURRP3&
*UDQWUHIXVH
DFFHVV
(WKHUQHW7&3,3
/RJRQWRORFDO
RSHUDWRUVWDWLRQ
&RORU
PL[LQJV\VWHP
&RORUPL[LQJ
V\VWHP
3DOOHWL]LQJ
VWDWLRQ
352),1(7
&RQWUROOHU
&RQWUROOHU
&RQWUROOHU
In our example of a color mixing system, the control room PC is used as central logon
server. The user administration is created and managed centrally using the control room PC.
Requirements
To use SIMATIC Logon for the sample project, the following conditions must be met:
● The basic package "SIMATIC Logon Service" is installed and configured on the logon
server.
SIMATIC Logon includes several software components, e.g. role administration and
Eventlog Viewer. This Getting Started describes the only the central administration of
users and user groups.
You can find more information on the installation and configuration of SIMATIC Logon on
the Internet at <http://support.automation.siemens.com>. Enter the ID "34519648" in the
search field and start the search. The "SIMATIC Logon - Electronic Signature" manual is
available to download.
● Each HMI device requires its own SIMATIC Logon license.
The licenses are stored centrally on the logon server.
Comfort Panels, Runtime Advanced - Advanced Configuration Options
74
Getting Started, 05/2013, A5E32311838-AA
SIMATIC Logon
8.1 What is SIMATIC Logon?
Tasks
Activate SIMATIC Logon in WinCC to set up the central user administration using a logon
server.
Then, create identical user groups and users on the logon server in the Windows computer
administration.
You then assign the users to the user groups in accordance with the required authorization.
Response to connection failure
User administration on the HMI devices is reactivated if communication with the logon server
goes down or if the logon server crashes.
User administration on the logon server is automatically reactivated once the logon server is
back online.
Additionally, you create Windows users in the user administration of the HMI devices to
ensure that full access to the HMI device is possible even when there is a connection failure.
Comfort Panels, Runtime Advanced - Advanced Configuration Options
Getting Started, 05/2013, A5E32311838-AA
75
SIMATIC Logon
8.2 Activating SIMATIC Logon
8.2
Activating SIMATIC Logon
Introduction
When SIMATIC Logon Service is installed and configured, enter the connection data to the
logon server in WinCC and activate central user administration.
All other steps are configured on the logon server in Windows.
Procedure
1. Enable SIMATIC Logon for all HMI devices in the project and configure the settings in
such a way that the user data from the control room PC will be used.
Note
Do not change the port number, or contact your administrator.
If you use IP addresses, make sure your SIMATIC Logon Server always has the same IP
address.
Comfort Panels, Runtime Advanced - Advanced Configuration Options
76
Getting Started, 05/2013, A5E32311838-AA
SIMATIC Logon
8.2 Activating SIMATIC Logon
Result
The central user administration is activated for the HMI devices in the project. No more
settings are required on the SIMATIC Logon server.
Comfort Panels, Runtime Advanced - Advanced Configuration Options
Getting Started, 05/2013, A5E32311838-AA
77
SIMATIC Logon
8.3 Creating users in Windows
8.3
Creating users in Windows
Introduction
If you use SIMATIC Logon, you only have to create the desired users in Windows. Each
newly created user is assigned to the "Users" group by default.
The user data is transferred to the HMI devices via SIMATIC Logon. To permit direct logon
to the HMI device, also set up all users on the HMI devices.
Note
Emergency users
If the server cannot be reached, all local users that were created in the WinCC user
administration can also act as emergency users. Emergency users have the rights of the
user group to which they are assigned.
Procedure
1. Open device management on the logon server.
Comfort Panels, Runtime Advanced - Advanced Configuration Options
78
Getting Started, 05/2013, A5E32311838-AA
SIMATIC Logon
8.3 Creating users in Windows
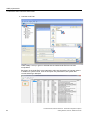
2. Create the user "Meier".
3. Likewise, create the users "Lopez", "Greenwood" and "Peters":
Result
The users on the logon server are identical to those created in the WinCC project. The users
are assigned to the "Users" user group.
Comfort Panels, Runtime Advanced - Advanced Configuration Options
Getting Started, 05/2013, A5E32311838-AA
79
SIMATIC Logon
8.4 Creating user groups in Windows
8.4
Creating user groups in Windows
Introduction
In runtime, the users obtain their authorizations based on the identical names of the user
groups in WinCC and Windows. You therefore create all users groups from the project in
Windows as well.
The "Users" and "Administrators" user groups are created by default in Windows.
Procedure
1. Create all user groups of the WinCC user administration in Windows. Start, for example,
with the "Service" group.
Comfort Panels, Runtime Advanced - Advanced Configuration Options
80
Getting Started, 05/2013, A5E32311838-AA
SIMATIC Logon
8.4 Creating user groups in Windows
2. Open the "Service Properties" window.
3. Assign the user "Lopez" to the "Service" group.
Note
Users of SIMATIC Logon must be direct members of a user group of the operating
system. Members of a subgroup cannot be logged on.
4. Assign the user "Meier" to the "Administrators" group.
The users "Greenwood" and "Peters" were assigned by default to the "Users" group.
Note
Only one group may be created on the HMI device for users who are assigned to several
Windows groups.
5. Open the "Users" group and remove the users "Meier" and "Lopez" from this group.
Comfort Panels, Runtime Advanced - Advanced Configuration Options
Getting Started, 05/2013, A5E32311838-AA
81
SIMATIC Logon
8.4 Creating user groups in Windows
Result
You have now created the same users and groups on the control room PC as in the WinCC
project:
Runtime behavior
Nothing changes for users once you have loaded the updated project to the HMI devices:
The logon window remains unchanged.
The successful logon of a user on the server is always confirmed by a system event in
runtime.
Comfort Panels, Runtime Advanced - Advanced Configuration Options
82
Getting Started, 05/2013, A5E32311838-AA
9
Summary
This Getting Started was an introduction to the extended configuration options of WinCC
V12.
You have configured a multi-user system based on a client/server architecture and set up
time synchronization.
You have been introduced to "WinCC WebNavigator" and "WinCC DataMonitor", two WinCC
options which you can use to operate the plant and evaluate process data via the
Internet/Intranet.
Comfort Panels, Runtime Advanced - Advanced Configuration Options
Getting Started, 05/2013, A5E32311838-AA
83
Summary
Comfort Panels, Runtime Advanced - Advanced Configuration Options
84
Getting Started, 05/2013, A5E32311838-AA