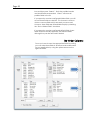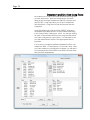
1
GLSU Version 5.0 User Manual Z Option 417 Oakbend Suite 200 Lewisville, Texas 75067 www.zoption.com (877) 653-7215 (972) 315-8800 fax: (972) 315-8804 Page 2 - This page intentionally left blank - Page 3 Table of Contents Table of Contents ....................................................................................................................................... 3 How Does GLSU Work?..................................................................................................................................... 10 Customize Your Spreadsheets ......................................................................................................................... 12 Customize by Department............................................................................................................................... 13 Validate Data Before Posting........................................................................................................................... 14 Definition of Users ............................................................................................................................................. 15 What’s New in GLSU? ....................................................................................................................................... 16 SOX Compliance ............................................................................................................................................. 17 Getting Started ......................................................................................................................................... 20 Getting Started for Premium Users ................................................................................................................... 21 Step 1: Maintaining the GLSU License (Premium Only) .................................................................................. 22 Step 2: Maintaining Premium Users (Premium Only) ...................................................................................... 24 Step 3: Maintaining Standard Users (Premium Only) ..................................................................................... 26 Step 4: Uploading new Add-ins (Premium Only) ............................................................................................ 28 Getting Started for Standard Users .................................................................................................................. 29 Standard Users Step1: Set your GLSU validation choices .............................................................................. 30 Standard Users Step2: Download/Install the GLSU add-in ............................................................................. 31 Standard Users Step3: Create your first GLSU spreadsheet ............................................................................ 32 Other Spreadsheet Features .................................................................................................................... 38 Initialize New Worksheets ................................................................................................................................ 39 Add/Delete Columns ....................................................................................................................................... 40 Re-Order Columns ........................................................................................................................................... 42 Post a Document.............................................................................................................................................. 44 Displaying Posted Document Numbers & Messages ...................................................................................... 46 Document Number Drill-Back ......................................................................................................................... 47 Posting or Parking Documents ......................................................................................................................... 48 Accrual/Deferral – Booking Reversing Documents ........................................................................................ 49 Foreign Currency Adjustments ........................................................................................................................ 50 Master Data Value Lookups ............................................................................................................................ 50 Validate Before Post/Export Option................................................................................................................. 54 Check File Upload History ............................................................................................................................... 55 Auto-Resize Columns ....................................................................................................................................... 56 Auto-Format Colors.......................................................................................................................................... 56 Ignore Columns................................................................................................................................................ 57 Ignore Rows...................................................................................................................................................... 58 Multiple Worksheets ......................................................................................................................................... 58 Multiple Documents on a Single Worksheet ................................................................................................... 60 Multiple SAP Systems ....................................................................................................................................... 62 Pre-Validations ................................................................................................................................................. 63 Validating the Spreadsheet ............................................................................................................................. 64 Show Validation Info ........................................................................................................................................ 65 Correcting Errors in the Spreadsheet............................................................................................................... 66 Retrieve Validation Data.................................................................................................................................. 68 Adding Master Data Texts................................................................................................................................ 69 Inter-Company Transactions ........................................................................................................................... 72 VAT ................................................................................................................................................................... 73 Document and Line Item Long Texts ............................................................................................................... 74 Double-Byte (East Asian Languages) .............................................................................................................. 76 Document Attachments (BDS) ......................................................................................................................... 78 GLSU SAP Features ................................................................................................................................... 84 Setting your GLSU validation choices.............................................................................................................. 85 Processing “Export” Files.................................................................................................................................. 88 Maximum # of Document Line Items............................................................................................................... 89 Page 4 Upload File History ........................................................................................................................................... 90 Spreadsheet Templates ................................................................................................................................... 92 GLSU SAP Side Installation Check (Technical/Project Team Utility) ............................................................... 97 Premium Only – Default and Hidden Field List ................................................................................................ 98 Premium Only - Maintain Technical Options .................................................................................................. 99 Premium Only - Create Off-Line Validation File ............................................................................................ 101 Premium Only – Default User Settings ............................................................................................................ 103 Trouble Shooting..................................................................................................................................... 106 Getting Help from your Premium Users ......................................................................................................... 106 Using the Z Option Ticket System................................................................................................................... 106 Export a Document (2-Step Posting Process)................................................................................................ 108 Technical Installation ..................................................................................................................................... 109 Trademarks SAP is the registered trademark of SAP AG. Microsoft Excel is the registered trademark of Microsoft Corporation. All other trademarks are the property of their respective owners. Copyright 1999-2014 Z Option Incorporated. No part of this User Guide may be reproduced in any form or by any means without the prior written permission of Z Option, Inc. Notice This User Guide, as well as the software described in it, is furnished under license and may only be used or copied in accordance with the terms of such license. Before using this software or reading this user guide, make sure you have read, understood, and agreed to the End User License Agreement signed by your management. SAP Requirements: • SAP System version 4.7 Enterprise or later • Transport install package from Z Option • User authorizations for transactions FB01, FBV1, FBS1, FBB1 (as needed) and others as listed in Section 3 of the Technical Installation (at end of this manual) Minimum PC Requirements: • Windows XP, Vista, 7, or 8 • Microsoft Excel 2007, 2010, or 2013 • SAP GUI (Currently supported version from SAP) • Hardware as required by Windows OS version • GLSU supports double byte character sets (East Asian Languages). • GLSU supports the use of SSO via SAP SNC (Secure Network Communication). If SNC is properly installed on the desktop, no additional setup steps are required in GLSU. • GLSU supports the use of portal and multi-portal login via some native SAP configurations or a custom Java servlet solution. For more information, Page 5 • • please contact Z Option Support. SAP FI interfaces (and therefore GLSU), as of the date of publication, support posting to a leading ledger when parking documents. Posting functionality is supported. SAP note 961805 corrects entries to all available ledgers when parking for manual on-line entries only. PC Application must be installed as an Administrator Manual Version • This is GLSU Manual version 5.0a Page 6 - This page intentionally left blank - Page 7 Page 8 Introduction Have you ever wished for an easier way to get financial data into your SAP system? Chances are, your organization uses many homegrown applications and/or spreadsheets to pre-process your data before entry into SAP. This may require many hours of unproductive data-entry time by your processing departments or IT organization. Maybe you are already using a simple batch input loader but wish you had the flexibility to handle numerous requirements from different departments in your organization. Maybe you wish that you could do batch input with fewer errors in a more timely manner. GLSU by Z Option allows an organization to streamline its financial data entry functions. GLSU provides a flexible and intuitive spreadsheet interface for collecting and posting transactions to SAP. From simple recurring general journal entries to allocations thousands of lines long, GLSU solves many common SAP data entry problems. Post directly to SAP without leaving Excel. Page 9 Far more than a simple batch load program, GLSU uses a combination of configurable spreadsheet interface with a custom ABAP load program. These two items work together to deliver deep functionality such as... 1. Configurable work space. Enter only relevant SAP data items for your specific application. Customize the order of fields. All spreadsheet customization is done through dialog boxes which let you choose and order fields from a picklist. Adding, changing or deleting fields takes seconds. 2. Build data-entry applications. Form input, monthly close packages, complex allocations, rebates, accruals, etc. can all be automated using GLSU. Different spreadsheet "templates" can be created, stored on the SAP server, and distributed to your workforce quickly. 3. Pre-verification of data BEFORE posting. GLSU can check your input data against SAP master data to warn of potential errors before posting occurs. About your User Guide This guide will help you learn how to use GLSU by Z Option. It will also serve as a reference as you attempt more sophisticated techniques. The first chapter describes the high-level concepts about how GLSU works. The second and third chapters explain the detailed functionality of the GLSU spreadsheet and the SAP portions of the product respectively. This guide assumes you are already familiar with basic Windows, and Microsoft Excel concepts – menus, dialogs, mouse operations, such as clicking and dragging. This guide also assumes you are familiar with basic SAP concepts – posting, parking, batch sessions, etc. If you need more information on these subjects, please refer to the appropriate Microsoft manuals or your SAP documentation or administrator. For more information about Z Option and other Z Option products, see our Web site on the internet at: www.zoption.com Page 10 How Does GLSU Work? GLSU is a spreadsheet uploader tool that runs in a two or three-step process. It has both ABAP and Visual Basic Add-in which work together to provide a complete solution. GLSU can post data to your SAP system in two ways 1. Direct Posting 2. Batch Direct Posting allows you to enter SAP data without ever leaving the spreadsheet. Excel dialog boxes tell you if the posting was successful and return the SAP document number and other SAP messages upon a successful post. At the highest level, the GLSU batch posting functionality works in a two step process... 1. User inputs data into the spreadsheet. This is the posting data which will then be posted to SAP. These entries can be as long as you require. You are not limited by any SAP limitations on document posting size and you can post multiple worksheets at a time. 2. Post the export file to SAP. Using the GLSU custom transaction “ZGLSU”, the user will then post the data to SAP using a simple procedure. Installing GLSU the first time is a simple process and is explained in detail in the next chapter Getting Started. Installing GLSU involves activating the GLSU add-in in Excel. The GLSU spreadsheet functionality is provided by an Excel “Add-in”. This add-in is written using Microsoft Visual Basic for Applications. Page 11 Once activated, the Add-in will provide additional GLSU functionality. The functionality is accessed by new items in the Excel Ribbon. These menu options are explained in detail later in the manual. Page 12 Customize Your Spreadsheets Each column in the GLSU spreadsheet represents an SAP data element for posting. There are columns for each header and detail field which could be populated. GLSU allows you to customize which SAP data elements are available on your spreadsheet. Each user or department can use GLSU in a way that is intuitive for them. Adding, changing, or deleting fields on the spreadsheet (even PA characteristics) is configurable and does not require re-coding of the spreadsheet or the ABAP load program. Example: Accountants may not care to validate against customers and the Receivables department may not care about Vendor master data. Page 13 Customize by Department Each of your departments may have a set of fields which are unique to them but are rarely used by other groups (vendors for Payables, customers for Receivables, etc). GLSU lets you tailor the spreadsheet for the needs of these individual departments. These customized spreadsheets can then be stored centrally on your SAP server as Templates. Central storage of these templates enables... Consistency. By having your processing personnel download these centrally stored Templates, you can ensure that your data is being entered in a consistent fashion. Ease of distribution. Central storage of the templates also facilitates the enterprise-wide distribution of these templates. Everyone that has access to SAP can download the templates. (Note: GLSU Templates may also be distributed as Excel (.xls) files via other methods such as email, ftp, etc) Department 1 Account, Customer, Terms, Amount 3 Fields Department 2 Account, Vendor, Amount 4 Fields Page 14 Validate Data Before Posting GLSU lets each user choose SAP master data fields to prevalidate before posting. Company Codes, Posting Keys, Cost Centers, Profit Centers, Customers, Vendors, Field Status Group information and many others are all selectable. This feature ensures that your user’s data-entry is correct before posting to SAP. This will reduce error-correction time and increase productivity. Page 15 Definition of Users There are three types of GLSU users: premium users, standard users, and all other employees or business partners of the customer. These three types of users have different capabilities with GLSU. Licensed GLSU Function Users Premium Standard Everyone Else Yes Yes Yes Export documents from the GLSU spreadsheet to the Yes Yes Yes Post the spreadsheet to SAP Yes Yes No Yes Yes Yes Yes No No Yes No No Posting Functionality Use the GLSU spreadsheet Download GLSU Add-In from the GLSU ABAP to their PC (provided they have SAP access) .ZGL file (off-line users) Yes Yes Yes Template/Spreadsheet Control Functionality Customize GLSU spreadsheets Download spreadsheet templates from SAP to their PC (provided they have SAP access) Manage GLSU templates stored on SAP Yes Yes Yes Help / Support Z Option telephone/ticket system support Page 16 What’s New in GLSU? Z Option is committed to aggressive ongoing development of GLSU and its other software packages. New features in GLSU version 5.0… 1. Load Document enhancement – Facilitates quick creation of a GLSU template with data from existing SAP financial documents 2. Show blocking indicators in pick lists for Cost center, Profit center, and Internal orders 3. Add pick values for Reversal reason, fields with fixed values, and select fields with SAP check tables 4. Pre-validation of accounts which are “Post automatically only” and “Reconciliation accounts” and exclude from F4 pick lists 5. Option to view SAP Message Long Text information in pre-validation 6. GLSU functions available in Excel Ribbon 7. Premium User controlled Default User Settings New features in GLSU version 4.2… 1. Support for Windows 8/Excel 2013 2. Support for Multi-Portal SSO (Single Sign-On) New features in GLSU version 4.1… 1. Pre-validation enhancement for Cost Accounting and Financial Account line items within GGB0 (Sister configuration transactions – OKC7 and OB28 respectively), configured coding block checks usually including PAI exit for customer fields in coding block, asset checks, SD order checks, funds management checks, CO relevant fields, FI relevant fields, MM relevant fields, and joint venture checks 2. Document number drill-back (from Excel to interactive SAP screen) New features in GLSU version 4.0… 1. Attach source spreadsheet documents to the BDS (Business Document Service) in SAP 2. Shows cross-company (intercompany) and split document numbers 3. Double-byte (East Asian Language) Unicode support 4. Windows installer (mainly to aid in Citrix and other Page 17 non end-user involved deployments) 5. GLSU SAP side installation check function New features in GLSU version 3.1… 1. Custom Validations (w/Excel drill-back) 2. Dropped-Header (Multiple Documents on a single sheet) 3. SSO Support (Single Sign-On with SAP Logon Tickets) 4. Configurable Default and Hidden Field List 5. Payment Terms Pre-Validation/Description/Pick Values (Live and Off-line) 6. Personnel Number Pre-Validation/Description/Pick Values (Live and Off-line) 7. Assets Pre-Validation/Description/Pick Values (Live and Off-line) 8. Displays SAP SID/Client on worksheet 9. CO-PA Pick Values (SAP 4.7 and later with a live connection) 10. Search on Choose Fields 11. Pick Date Values 12. Enhanced Pre-Validation Error List Handling SOX Compliance GLSU meets basic data access requirements for SOX (Sarbanes-Oxley Act). GLSU has always restricted access for posting documents by leveraging standard SAP authority objects. The additional checks which are now in place ensure that data, at a company code level, cannot be viewed in the off-line validation file, off-line and live pick list, or off-line and live description functionality unless the user has specific authority to view the data. For specific details on what authority objects are checked, please see Section 3 of the “Technical Installation” section. Page 18 - This page intentionally left blank - Page 19 Page 20 Getting Started This getting started section is broken into three sections…. 1. Technical Installation: This is done by your company’s BASIS team, and is the first step in the process. Technical installation instructions are detailed in the last section of this manual. 2. Unlock the GLSU Licenses: This step is the second in the installation process. It takes place after GLSU has been installed on your development platform. License Unlock procedures are done by your company’s Premium User(s). This is the point where you will configure GLSU with the Premium and Standard Users. 3. Posting your first spreadsheet: After GLSU has been technically installed and unlocked, you will want to post your first simple spreadsheet. This section will explain the steps required to do this by introducing you to the basics of GLSU’s functionality. The following section will explain GLSU’s capabilities in much greater detail. Step 1: Technical Installation Proceed to the last section of this manual. This section contains the sequential steps necessary to install the GLSU transport onto your development system. Instructions for using the GLSU Ticket System are also explained in the Technical Installation section at the end of the manual. Once the GLSU transport has been installed, the logical file path has been configured, and necessary authorization profiles have been edited, then it is time to move to the next section: Getting Started for Premium Users… Page 21 Getting Started for Premium Users Premium users at your site will be responsible for maintaining the specific users who will be using GLSU. After the GLSU software has been properly installed on your SAP system, use transaction ZGLSU to start the GLSU program. Premium user functions are accessed by clicking on the “Premium User Functions” button. To get started, the Premium User(s) need to do the following tasks in order presented. These steps are explained in detail on the next few pages… 1. Maintain the GLSU license. This step tells your copy of GLSU how many seats have been purchased by your company. 2. Maintain the Premium Users. You will need to name at least one premium user before anyone can post using GLSU. 3. Maintain the Standard Users. You can either have GLSU auto-register the standard users or you can name them manually Page 22 Step 1: Maintaining the GLSU License (Premium Only) The first step in getting GLSU running is to setup / maintain the GLSU license. Execute transaction ZGLSU in SAP. Once in the GLSU transaction, type “PREM” in the SAP command box and press enter. Clicking on the “Maintain License” button from the Premium User Function screen displays the following dialog box. (Note: Depending on if any license data already exists [i.e. system copies], you may not need to enter the “PREM” function, the license dialog may display automatically). The “Maintain License” screen shows the number of Premium and Standard users which have been licensed and how many have been used at your company. To change these numbers of licensed users (either the first time you use GLSU or if you add seats later) you will need a “License Unlock Code”. The “License Unlock Code” is supplied by Z Option. 1. Open an Internet Browser and go to the Z Option website at http://www.zoption.com 2. If you have not already done so, each premium user should request a ticket system login ID, by selecting Support Support and Licensing System Request a Ticket System ID. Fill out all of the information. 3. Once your ticket system ID has been confirmed (you will receive an email) you may login to the ticket system on the same support page by clicking “Log onto Ticket System.” Select your company from the drop-down list and enter your user ID and password you created in step 2 (NOTE: user ID’s and passwords ARE case sensitive) 4. After you are logged in, select “Generate License Unlock Codes” “Generate GLSU unlock codes” Page 23 “Get GLSU License unlock codes” 5. Enter the Registration Code from the SAP Maintain License screen and press “Generate GLSU License.” 6. Paste the License Unlock Code from the website into the License Unlock Code Field in SAP and press enter. Your user count is updated and the license is unlocked. Page 24 Step 2: Maintaining Premium Users (Premium Only) Premium users must be individually named on your system. To set up the premium users for your site: Restart the ZGLSU transaction (/NZGLSU in the SAP command box). Once in the GLSU transaction, type “PREM” in the SAP command box and press enter. From the Premium User Function screen click on the “Maintain Premium Users” button. The following dialog box will display: 1. Click the “New” icon at the bottom of the page. 2. To add a Premium User, you will need a Premium User Unlock Code. You will need to type in the Premium User’s SAP user ID into the Username field. 3. Login to the Z Option Ticket System at www.zoption.com (see previous section) 4. After you are logged in, select “Generate License Unlock Codes” “Generate GLSU unlock codes” Page 25 “Generate GLSU Premium User Unlock Codes” 5. Enter the SAP User ID of the premium user you are registering into the website and click “Generate GLSU Premium”. 6. In SAP, paste the premium user unlock code into the field for the unlock code and enter the SAP user ID you are unlocking. Click the “Check” icon. The user is added as a GLSU premium user. 7. Repeat steps 4 – 6 as necessary for all Premium Users. Page 26 Step 3: Maintaining Standard Users (Premium Only) You can register your Standard users in GLSU in 2 different ways. 1. Automatic registration. GLSU will know how many licensed users are available at your site. It will keep track of the different users who have UPLOADED entries using GLSU. When the license limit is reached, no new user names will be allowed to upload entries until one of the two procedures below is performed to free up more seats. 2. Manual registration. If you want specific people to upload entries using GLSU, you should manually add their login names to the GLSU registered user list. There are two ways to get more Standard Users access to upload GLSU entries. 1. Purchase more Standard seats from Z Option. A new “unlock code” will be issued which will allow more unique users to upload entries. 2. Remove existing Users internally registered as Standard users so that new users can be registered automatically by GLSU or manually by a Premium User. Remember that there is a difference between Standard Users and Un-Registered Users. Standard Users are allowed by GLSU to upload entries. Un-Registered Users can use all the GLSU functionality EXCEPT posting. This will allow employees at your company to download the GLSU addin and download the master data. Page 27 To maintain the Standard Users… 1. Click the “Premium User Functions” button in the GLSU “ZGLSU” transaction. 2. Click the “Maintain Standard Users” button. The following screen will display… 3. To have GLSU automatically register users, enable the “Auto-register users” checkbox. 4. To manually add new users, click the “New” icon at the bottom of the screen. 5. Enter the user name and click the “Check” icon. 6. To manually delete users, click the “Delete” icon. 7. Once, your changes are complete, click the “Check” icon to save your changes. Page 28 Step 4: Uploading new Add-ins (Premium Only) GLSU works with two sets of programming code. The ABAP code (transaction ZGLSU on SAP) controls the functionality of posting and user maintenance. The Visual Basic for Applications code controls the functionality of the spreadsheet. This Visual Basic code is stored in an Excel add-in. Typically, the ABAP and the Visual Basic Add-in are upgraded together. However, there may be times when Z Option releases new Visual Basic Add-in separately from the ABAP. New spreadsheet functionality could then be acquired without re-transporting a new version of the GLSU ABAP code. Z Option will provide application (in the form of a SetupGLSU.exe file) to your Premium User(s). Once the VB code has been received, it will need to be uploaded to your SAP server. Note: You MUST perform this upload step for each SAP system/client combination if you wish to deploy the PC components from SAP. The functionality to upload new VB Add-in is under the “Premium User Functions” screen. Click the “Upload Add-in” button then browse to the location of the “SetupGLSU.exe” file on your computer. Select “Open” and then confirm the upload. Your Premium User(s) should then test the new VB code. Once satisfied, they should notify the GLSU users to download the new Add-in. You are now finished with all of the Premium User only steps. Please proceed to the next section, “Getting Started for Standard Users”, to continue the setup process. Page 29 Getting Started for Standard Users The first step to get GLSU on your PC is to download the GLSU Add-in from the GLSU ABAP program. GLSU spreadsheet functionality is provided by an Excel addin. This add-in contains the programming which makes GLSU work on your PC. To get started, you will need to… 1. Set your GLSU validation choices 2. Download/install the GLSU add-in 3. Create your first spreadsheets This section will walk you through the initial steps to post your first GLSU spreadsheets. The following section “Other Spreadsheet Features” will detail the remaining GLSU functionality. Page 30 Standard Users Step1: Set your GLSU validation choices The GLSU ABAP program will allow you to configure the GLSU validations to your requirements. For most installations, the “LIVE” validation settings will make the most sense. This setting causes GLSU to use live data to validate your workbook. GLSU comes pre-configured with this setting. However, should you wish to view or change these settings please see section “Setting Your GLSU Validations Options.” Page 31 Standard Users Step2: Download/Install the GLSU add-in If your desktop admin group has already installed the GLSU add-in, or if you are installing from a network location you can ignore this page of instructions and simply run the SetupGLSU.exe installer. To download and install the GLSU add-in on each PC…. 1. Ensure that the GLSU ABAP program has been transported and properly installed on your SAP system. 2. Start SAP. You must have an SAP logon to download the GLSU Add-in. 3. Execute the GLSU transaction ZGLSU. 4. Make sure you have set your validation options as described in the previous chapter. 5. From the GLSU transaction, choose the “Download Addin” button. 6. A standard Windows dialog box will appear and ask where the installer should be downloaded. You can change this if desired but Z Option recommends that you do not. Click “Save”. 7. Click “Yes” to confirm the download of the installer. 8. Click “Next”. 9. On the destination folder install step, Z Option highly recommends installing to the default installation path. Click “Next” and then “Finish”. 10. Click “ok” through the add-in installer steps until the installation is complete. 11. Start Microsoft Excel and note the new “GLSU” menu in the ribbon. Page 32 Standard Users Step3: Create your first GLSU spreadsheet Once the GLSU Add-in has been downloaded to your PC and activated, you may now begin using GLSU. To proceed, you may either Initialize a new spreadsheet or download an existing template from the SAP server. This section explains how to set up a spreadsheet from scratch. The next section explains how to download a template which has been created and customized by your company’s Premium users. To Initialize a new spreadsheet, perform the following steps… 1. Download and activate the GLSU Add-in. See the previous section for detailed instructions. 2. Choose “GLSU” from the Excel Ribbon (if not already selected) 3. Choose Initialize. 4. In the Initialize Worksheet dialog box, choose “OK”. 5. On the next dialog box, select “Initialize”. Note: There are instructions for the “Initialize from a SAP Document” option later in this manual. Page 33 If you are installing GLSU for the first time, the “System” will say “No Systems Found”. In this case you should select the “Add System” pushbutton, login to your desired SAP system so GLSU can retrieve vital information about that SAP system and subsequently you will be able to post to it. You can perform this function multiple times for multiple SAP system/client combinations you may wish to use. 6. Hit “OK” and the picklist will be displayed… Page 34 7. Configure your spreadsheet by choosing fields in the “Possible” boxes and moving them to the “Selected” boxes. This is explained in more detail later in the manual. Use the “Add >>” and “<< Remove” buttons to edit the fields which are in the selected boxes to the right of the screen. 8. Click the “Accept” button. 9. Type your FI entry data into the spreadsheet. Header information goes at the top of your spreadsheet. Detail information goes in the second section of the spreadsheet. If you need fields which are not on your spreadsheet, re-do the steps explained above which describe how to edit the fields on your spreadsheet. Page 35 10. When you have keyed in your data, you should then validate it before exporting the upload file… Choose “Validate”. 11. Once your spreadsheet is validated, Post the document to SAP. 12. You will be asked to log onto your SAP system to post. This is explained more fully in a later section of the manual. Page 36 - This page intentionally left blank - Page 37 Page 38 Other Spreadsheet Features The following pages will discuss the functionality of the GLSU spreadsheet in greater detail. The Z Option Knowledge Base can also be reached directly from the spreadsheet by clicking on the Z Option logo. Page 39 Initialize New Worksheets GLSU allows you to manage multiple worksheets independently in a spreadsheet. These worksheets can be configured independently of each other. They may also be posted independently. You will also use this functionality to initialize a new spreadsheet for GLSU entry. To set up a new worksheet in an existing spreadsheet... 1. Choose Initialize. 2. In the Initialize Worksheet? Choose “OK”. 3. You can choose from 1 of 2 options. The first will create a new GLSU template with no data, only blank fields you select. The second option allows you to retrieve data from an existing SAP Financial document. 4. In the GLSU Options dialog box, choose a single worksheet or a range. This will initialize the spreadsheet but not format it/them. Page 40 5. (OPTIONAL): If you chose “Initialize from a SAP Document”, you will see the following. Enter an existing SAP document number, Company Code and Fiscal Year and select “Ok”. Note: Only fields selected in GLSU will be populated with data. i.e. if field SGTXT (Line Item Text) has text in the SAP document but field SGTXT is NOT in the GLSU template (or has been suppressed by one of your premium users) GLSU will ignore the values in SAP. Premium Users may want to configure SAP to always ignore certain fields to streamline this process for end users based on your specific SAP configuration. This can be configured by premium users in the Default and Hidden Field List. Note: The Load Document feature is not meant to load parked documents and some other FI documents. In some cases, it will not create a postready document because of other SAP functionality including but not limited to substitutions, custom enhancements, derived values, etc. 6. The picklist will then display. Configure your spreadsheet. It will configure all worksheets in your spreadsheets if you have chosen to initialize more than one. 7. Click the “Accept” button. This will then format all worksheets you have selected. Add/Delete Columns GLSU allows complete control over which fields are available to the user. Any field which is available in your FI configuration may also be posted to via GLSU. As your company’s configuration changes, GLSU automatically updates the Possible Fields listing so that you always have access to the relevant SAP fields. Page 41 Use the arrow buttons to move fields or you can also drag and drop the desired fields. From the GLSU menu… 1. Choose menu item “Choose Fields” 2. The picklist is organized into Header and Detail fields. 3. The picklist is also organized into possible and selected fields. 4. Select fields (use graphical buttons or drag and drop) and re-order them (graphical buttons only) as desired. 5. Click the “Accept” button when satisfied. You can search for specific technical field names and field descriptions by entering your search string into the search Page 42 box and then press “Search”. Both the possible header and detail fields are searched. “Reset” will return all possible fields to the list. If your premium user has configured hidden fields, you will not see these fields as a default. This is meant to reduce clutter or remove fields which are rarely or never used. However, these fields are still available simply by checking the “Show Hidden Fields” checkbox. If your premium user has configured default fields, these fields will automatically appear in the selected fields, although they can be removed if desired. Re-Order Columns Once you have chosen the appropriate fields for posting, you can order these fields in whatever order makes sense for your application by using the spinner arrows on the right-hand side. Page 43 From the GLSU menu... 1. Choose menu item "Choose Fields". 2. In the “Selected Fields” column, choose the field you want to move. 3. Use the up and down arrow buttons on the right side of the screen to change their order. 4. Header and Detail fields work separately. 5. Click the "Accept" button when finished. Page 44 Post a Document GLSU gives you two ways to update your SAP system, either via a direct posting, or by a batch upload process. From the GLSU menu… 1. Choose menu item “Post/Park”. 2. On the SAP Logon screen, choose the appropriate SAP system and select “OK”. 3. On the SAP Logon at SAP screen, enter your SAP user ID and password for this SAP system, and click “OK”. 4. After a short pause, the GLSU system will return a dialog box with the document number (if the posting was successful) and any relevant warnings and error messages. GLSU will prompt you to log into your SAP system the first time you connect for the day (or session). Subsequent postings to SAP will not require that you re-log into SAP. To log out of a GLSU – SAP Page 45 connection choose “Logout.” Logging on with SSO (Single SignOn with SAP logon tickets) If you plan to use SSO with GLSU, there is little which is different than a site which does not use SSO. First, you should login to your SAP Portal as you would normally do before attempting to use GLSU. After successfully logging into your portal, you may open your GLSU workbook and attempt to connect to SAP. Upon logon attempt, you will not see the standard logon dialog as is documented in the previous section. Instead, you will see the logon dialog seen to the left. You must select the SAP system you wish to logon to and enter the client. You will not be required to perform this step on subsequent GLSU operations, unless you attempt to process another workbook which is assigned to another SAP system, you exit out of Excel, or explicitly log out of SAP from Excel. Page 46 Displaying Posted Document Numbers & Messages GLSU will return posted SAP document numbers to the spreadsheet in a popup. You can also have the document numbers returned to a special cell in the spreadsheet. From the GLSU menu… 1. Choose menu item “Choose Fields”. 2. Select field “BELNR” (Document Number). 3. Select “Accept”. Upon a successful posting, all document numbers posted will be displayed in this cell when it is available in the worksheet. If only one company code is posted you will see the document number(s) as show below without a company code. In the example below, the document was split into multiple documents. If cross-company documents are posted, all of the document numbers will be displayed in this field with their corresponding company codes first. In addition to displaying the document numbers, GLSU can also display all of the posting messages from SAP. From the GLSU menu… 1. Choose menu item “Choose Fields”. 2. Select field “ZOPMSGS”. 3. Select “Accept”. Page 47 Intercompany documents will not be populated in this field as only messages which are displayed in the SAP session are shown here. Since SAP does not show cross-company documents in this log, neither does GLSU. Both of these special fields can be dropped using GLSU dropped-header functionality. When the fields are dropped the document numbers and posting messages will be populated in their respective positions for each new dropped-header document that is created. Document Number Drill-Back GLSU is delivered with the capability, if the document number field (BELNR) is present on the sheet and populated with an SAP document number, to drill-back to the document in an interactive SAP GUI session. The document number (and in the case of intercompany entries the corresponding company code) will be displayed in the document number field as an Excel hyperlink. You simply click the link of the document you wish to view and you will be taken to an SAP document overview screen (FB03). You must already be logged into SAP in the appropriate system via the SAP GUI. A non-used SAP GUI session, or a newly created session, or an existing document display session will be used by GLSU. Technical notes: Two pieces of functionality must be enabled for this feature of GLSU. 1) SAP GUI scripting must be “on” in the SAP GUI for each desktop. To enable this functionality, from the SAP GUI menu select Customize Local Layout Options. Select the “Scripting” tab and then select the “Enable Scripting” checkbox. You will need to close all SAP GUI sessions before the setting will take effect. 2) Your technical SAP team will need to configure SAP system profile parameter sapgui/user_scripting to “TRUE”. Page 48 Posting or Parking Documents SAP financial transactions can be processed in different ways. SAP users sometimes choose to "Park" documents instead of immediately posting them. GLSU allows you to park your documents if you choose. These parked documents can then be released and posted later in the normal way. From the GLSU menu... 1. Choose the "Options" menu item. 2. Choose the “Workbook” tab. 3. Choose the appropriate transaction type from the dropdown box. Note: To park a document and trigger SAP workflow, you will need to add technical field “XPRFG” to your spreadsheet and populate it with an “X”. Page 49 Accrual/Deferral – Booking Reversing Documents On SAP systems 4.6x and newer, GLSU will allow you to book accrual/deferral documents as well as normal postings and parked documents. This is equivalent to transaction FBS1 in SAP. You will need to tell GLSU explicitly that you want to book an accrual document as follows… 1. Choose the "Options" menu item. 2. Choose the “Workbook Tab” 3. Choose the Accrual/Deferral option in the Transaction Type drop-down box. You will also have to add two new header fields to your spreadsheet. These fields are only allowed with accrual/deferral spreadsheets. Populating these fields in a normal posting spreadsheet will result in a posting error. 4. Field STODT – Reversal Date 5. Field STGRD – Reversal Reason Page 50 Foreign Currency Adjustments On SAP systems 4.6x and newer, GLSU will allow you to book Foreign Currency Adjustments documents as well as normal postings and parked documents. This is equivalent to transaction FBB1 in SAP. You will need to tell GLSU explicitly that you want to book a Foreign Currency Adjustment document by… 1. Choose the "Options" menu item 2. Choose the “Workbook Tab” 3. Choose the “Post Foreign Currency” option in the Transaction Type dropdown box. 4. When choosing fields for your template, add any additional amount fields such as DMBTR (Local Currency) and/or DMBE2 (Local Currency 2) and/or DMBE3 (Local Currency 3). Master Data Value Lookups GLSU allows you to look up certain master data elements inside the spreadsheet. This functionality works similarly to the way search-helps work inside SAP. To see the lists of master data values…. 1. Put your Excel cursor on a field. 2. Rick-click your mouse from that field 3. Pick “Pick GLSU Values” 4. On the “Choose a value for ….” Dialog, choose the appropriate master data value. Page 51 Any of the columns in the “Choose a value” dialog box may be sorted by clicking on the column header. Subsequent clicks on the header row will sort the fields in ascending or descending order. Note: If you choose a field that you do not have configured for pick values, then the “Choose a value” dialog will not appear. For all date fields, a calendar will be displayed to choose an appropriate date. GLSU handles date formatting differences between Excel and SAP, as long as Excel recognizes the cell as a date. Pick values are available for many CO-PA fields Page 52 (these are fields which start with “RKE”), however, descriptions and validations are not available for these fields. Another way to lookup the SAP master data values is by using the F4 key on your keyboard, since many of our customers already use the F4 key for other functionality, Z Option has made the F4 key optional when using GLSU. To activate the F4 key to toggle the “Choose a value for XXX” screen (see above)…. 1. Choose the “Options” menu item from the spreadsheet. 2. Choose the “General” tab. 3. Switch the “F4=Pick GLSU Values” to the “checked” position Note: un-selecting the “F4=Pick GLSU Values” will not turn off the lookup functionality, it will just not automatically assign the F4 key to the lookup. You will still be able to use Page 53 the lookup functionality by right-clicking on the cell. This functionality was added in the event you encounter a function key conflict with another software package. Page 54 Validate Before Post/Export Option The user will probably want to validate the spreadsheet values each time before posting to SAP. 1. Choose the “Options” menu item from the spreadsheet. 2. Choose the “Workbook” tab. 3. Select the "Validate Before Post/Export?" checkbox. 4. De-select the checkbox if you do not want GLSU to go through the step of validating your data against its master data each time you create a .ZGL file. 5. This option works the same using the Post or Export routine. Each time you either directly post the spreadsheet or export the ZGL file, the validation routine will be executed. Page 55 Check File Upload History GLSU allows you to check the SAP system prior to posting to make sure you haven’t previously uploaded a file twice. It does this check based on the filename of your spreadsheet. 1. Choose the “Options” menu item from the spreadsheet. 2. If the “Check File Upload History?” checkbox is on, and a file with this same filename has been previously uploaded under your user name, you will receive a message box similar to the one below. Page 56 3. You will need to rename and save your file and post again. Auto-Resize Columns GLSU has a feature that re-sizes the spreadsheet column widths each time you adjust the spreadsheet using the "Choose Fields" picklist. This feature was added so that fields of various widths would always be presented properly on the spreadsheet. This feature may be over-ridden at the user's option. Example: If you have down custom formatting to your spreadsheet so that it represents a form, you would probably want to turn this feature off. From the GLSU menu... 1. Choose the “Options” menu item from the spreadsheet. 2. Choose the “Workbook” tab. 3. De-select the "Auto Resize Columns?" checkbox. Auto-Format Colors GLSU will automatically format the colors and appearance of the spreadsheet each time the "Choose Fields" picklist is activated. However, the user may be using GLSU to emulate a specific form for data entry and may not desire to have the spreadsheet reformatted each time a change is made to the columns. The reformatting setting can be disabled at the user's option. Turn this feature off if you are not happy with the gray, blue and white color scheme of the standard Z Option templates. 1. Choose “Options”. 2. Choose the “Workbook” tab. 3. De-select the “Auto Format?” checkbox. Page 57 Ignore Columns You may choose to have columns in your spreadsheet which you do not want to post to SAP. For example, you may need a column for calculations which then feed the amount columns in your spreadsheet. Un-postable or blank columns may be added to your spreadsheet which GLSU will ignore when creating the uploadable .ZGL file. From the GLSU menu... 1. Choose menu item "Choose Fields". 2. Select item "(blank column)" in the picklist. 3. Add as many of these blank columns as are required by your application. 4. Accept the changes. Page 58 Ignore Rows You may also need to have rows in your spreadsheet which do not post line items in your document. These rows could be sub-totals or other items which are used for integrity checks of the document before posting. 1. In the first column of the spreadsheet, type the words "IGNORE", "COMMENT", or "SKIP". (Note for customers using a default language other than English: These values will be in the native language you have installed and translated) 2. GLSU will then ignore these rows when creating the .ZGL file. 3. All other rows with data are posted normally. You can often use native Excel functionality to calculate when a row should be skipped. For example, if the dollar of a calculated amount is 0, in column A of your spreadsheet you could use the formula =IF(D8=0, "Skip", " "). This could then be copied to all subsequent rows to avoid 0 currency warnings at the time of posting. Multiple Worksheets GLSU spreadsheets can have multiple worksheets. When posting, each of these worksheets will create a separate SAP document. Page 59 When posting, you may wish to post one, all, or a range of these worksheets in your spreadsheet. You could use this feature to have GLSU ignore a worksheet which contains all of your calculations which then feeds the posting worksheet(s) via formulas. From the GLSU menu... 1. Choose the "Options" menu item. 2. Adjust worksheet options as required. You can choose to export a single worksheet by choosing option “Export Active Worksheet Only”. Choose a range by selecting option “Export Range of Worksheets” and then typing in the range of worksheets in the two fields below. (see screenshot above). Page 60 Multiple Documents on a Single Worksheet GLSU has the capability to post multiple documents on a single worksheet. This is achieved by the “dropped-header” concept. In short, any number of header fields can be “dropped” (dragged and dropped in the Add/Delete Columns function) to the line items. Most header fields can be dragged from the upper-right box to the lower-right box as shown below. Each time a header field, which is dropped, changes, a new document will be posted. It is important to note that any header field which changes will trigger a new document, whether it is just one dropped-header field, or every dropped-header field. If a dropped-header field is left blank, it will inherit the last non blank value. Page 61 When using dropped-header functionality, the balance cell in GLSU will no longer display “balanced.” Since there are multiple documents on one sheet, this functionality is not feasible in the context of dropped-headers. However, pre-validation will still be performed to ensure each individual document balances. If an out-of-balance situation occurs, a pre-validation message will be issued. If you double-click the error, GLSU will highlight the range of amounts on the worksheet in which the out-of-balance condition occurs. Page 62 Multiple SAP Systems Many SAP users work in an environment where there are multiple productive environments of SAP or development/ testing environments. GLSU gives you the ability to download master data from as many of these environments as required. Each time you download data from a different SAP client, a new and unique file of master data is downloaded to your PC. These files must be refreshed individually. 1. Choose the “Options” menu item from the spreadsheet. 2. Choose the appropriate environment from the dropdown box. This listing is automatically updated each time transaction ZGLSU is run on the client in question. 3. To have more than one choice available in the spreadsheet Options menu, you must run the ZGLSU Page 63 transaction in more than one SAP client. Example: To have both production and testing environment information, you must run the ZGLSU transaction on both the productive and testing boxes. This then downloads two unique files containing master data to your PC. In order to help distinguish between workbooks for different SAP systems, you may use the SAP system and client formula to display this information on the worksheet. Simply add the formula =glsu_sysid() to any cell. If you change systems in the Options of GLSU the system and client will change automatically. Note: It may be necessary to add a skip row to avoid a pre-validation error when adding this formula. Pre-Validations GLSU gives the user the ability to pre-validate many of the values being keyed as well as other key configuration components such as blocked indicators, posting rules, and many other conditions and constraints to ensure they are correct before they are posted to SAP. If errors exist in data during posting, time will be wasted in trying to correct these errors. GLSU lets the user choose the fields to validate against in SAP. The SAP components of GLSU then download these values to the PC, either in an off-line or real-time method depending upon your configuration of GLSU. PreValidation of data and SAP configuration is a large part of GLSU functionality. Note: As of GLSU 4.1, in addition to the validations seen from ZGLSU Validation Options, pre-validations for GGB0 (Cost Accounting and Financial Account Line item validations ) with sister transactions OKC7 and OB28 respectively are now checked. In addition, all configured coding block checks as defined in table TRWPR usually including the following are also Included: PAI exit for customer fields in coding block, asset checks, SD order checks, funds management checks, CO relevant fields, FI relevant fields, MM relevant fields, and joint venture checks. These pre-validations in GLSU will drill-back to the error line or row in Excel. (Technical Configuration Note: OKC7 and OB28 checks will be performed when activation level is set to either a “1” or a “2”). The fields which are validated are chosen in the ABAP program. See the section in the next chapter to learn how to choose which fields to validate against. By default, in a new GLSU installation, all pre-validations are performed (and performed “LIVE”) unless otherwise configured. Page 64 Validating the Spreadsheet After SAP master data values have been downloaded to your PC via the ABAP program, the GLSU spreadsheet can use these values to tell you if you have keyed in erroneous data before posting. The validation can be performed either off-line (against an INI that resides on your PC) or real-time (against live SAP data) or a combination of both methods. To perform a validation... 1. Choose “Validate”. 2. If the document does not have master data errors, you will see the No Errors Found dialog box. Note: if you DO have errors, you fix the errors with the procedure described on the following page… To correct multiple errors... 1. Choose “Show Validation Again”. 2. This will show you the previous listing of errors which were discovered without the overhead of reprocessing the validations. This will shorten the length of time it takes to correct multiple errors on a spreadsheet. Page 65 Show Validation Info Since validation, pick values, and descriptions can be performed either offline (against an INI that resides on your PC) or real-time (against live SAP data) or a combination of both methods, GLSU provides information about the current configuration of these options. If you are a standard user of GLSU, you will not be able to change these settings, this is done by a premium user at your company, but you will be able to see how each of the validated items is configured. To see the configuration of the off-line vs. real-time elements perform the following… 1. Select “Show Validation Info” If the validation info is stored locally on your PC you will see “Stored on PC” along with the number of entries. If the validation info is retrieved in a realtime fashion from SAP you will see “Live from SAP” For non-static entries or entries which have a large number of records, you may want to consider switching to live for better performance. For static entries, you can reduce SAP application server load by configuration the elements to be stored on the PC (INI). Page 66 Correcting Errors in the Spreadsheet If the validation performed in the previous section finds an error, a dialog box will display which shows the errors found. The picture below shows an error involving an incorrect GL account. If multiple errors exist, they will all show in the dialog box shown above. To correct the problem… 1. Select the error in question by clicking on the appropriate line. 2. Once the item is selected, click on the “Go To Error” button at the bottom of the screen. The dialog box will then disappear and your cursor will be placed in the cell containing the error. This is especially useful for long entries. Custom Validation errors, if utilized, are denoted with a “CV-E” in front of the error message, indicating Custom Validation – Error. You can view extended SAP message information (long text) for all messages EXCEPT when “GLSU” or “CustVal” is in the “Source” column. To view the “Source” and other values select “More”. Page 67 For ease of error processing, you may also copy to the clipboard or insert a worksheet of errors from the Validation Errors dialog. To do this simply right click and then select the appropriate option. After insertion of an errors worksheet, you may use the hyperlinks (In Excel 2000 or later) at the left of the newly created worksheet. Please note that these message are only valid until changes are made to the contents of the worksheet or the worksheet name is changed. It is also possible to print a list of errors from this worksheet. Simply use the standard File Print functionality from within Excel. Page 68 Retrieve Validation Data GLSU will allow you to retrieve the SAP master data you have chosen to validate against on a offline or real-time (live) basis. To download the SAP master data into your PC INI file… From the GLSU menu… 1. Choose the “Retrieve Validation Data” menu item. You will only be able to retrieve validation data via this method for datasets which are 5 megabytes or less. For larger offline datasets, you should login to SAP, execute transaction ZGLSU and select “Send Validation Now” or configure more live validations to reduce the PC footprint. The appropriate SAP master data values and texts, along with SAP fields and structures, will be downloaded to your PC. For most GLSU implementations, you will only need to perform this function when you have added a new document type or legal entity (company code). Page 69 Adding Master Data Texts GLSU will allow you to insert SAP master data texts into your spreadsheets for presentation or documentation purposes. You will put the GLSU descriptions into a blank column of your spreadsheet (see the “Ignoring Columns” section on page 37). Master data texts can be added in either the detail or header sections. In the example below, Column D is a blank column. Column D contains an Excel formula =glsu_description(xx). The xx in the formula is a reference to another cell in the spreadsheet that contains a GLSU master data element (in this case, the account value in Column C). The formula in Column D will return the Account master description for the account shown in cell C9. (The cell is shown in yellow for emphasis only.) The =glsu_description(xx) formula will work for any master data element that GLSU pre-validates including GL Accounts, Vendors, Cost Centers, Profit Centers, etc. (except Field Status Groups) - continued on next page - Page 70 Specific steps to include master data texts in your spreadsheets…. 1. Make sure your GLSU INI file contains the master data texts by choosing the “Text” checkbox for all the appropriate fields in the ZGLSU transaction. This option is valid if you are performing the off-line method of retrieving descriptions, if you are retrieving description in a real-time method, this configuration option has no relevance. From the ZGLSU Transaction in SAP, select “Validation Options” 2. Make sure you re-download your INI file after making your text selections 3. Insert a blank column into your spreadsheet where you want the master data text to appear. For an explanation of how to add a blank column, see the section “Ignoring Columns”. 4. Optional: type in a column description into your blank column header. 5. In the blank column, type the formula =glsu_description(xx) where xx equals the cell where the master data element is entered. In the example, the E column is being referenced. Page 71 Using descriptions with a live setting in GLSU… If you are using live descriptions for certain fields in GLSU, you may need to perform a “Refresh Descriptions” after utilizing the GLSU description function. If this is the case, the text “refresh required” will appear in each cell. Upon selecting the “refresh descriptions” options in GLSU, all of descriptions will be updated from SAP. Page 72 Inter-Company Transactions Intercompany transactions are posted using GLSU in the same way they are done through the on-line screens. The user will populate field NEWBK the “New Company Code” field in GLSU if they want the specific line item to go to a different company code than the one listed in the header of the transaction. IMPORTANT: You cannot populate the “NEWBK” field in the first line of a GLSU spreadsheet. The first line of the spreadsheet must be booked to the company code shown in the header of the spreadsheet. This is a requirement of the SAP interface used by GLSU and cannot be changed. GLSU will use the contents (if any) of the NEWBK field when determining if an account or other master data item is relevant to that company code. GLSU will use the clearing configuration already set up for your company. The inter-company clearing process must be properly configured for GLSU to work correctly. Populating the NEWBK field will affect all subsequent line items. Example: You are attempting to post a 5 line document. You use company code 1000 in the header and want the 4th and 5th lines to go to company code 2000. The spreadsheet should be populated as shown below. Both lines shown in yellow will be booked to company code 2000. Page 73 VAT taxes are calculated by your SAP system at the time of posting. VAT taxes are calculated by SAP configuration that is not available to GLSU. While GLSU cannot calculate European VAT taxes inside the spreadsheet, it can allow transaction which contain VAT taxes to be successfully posted. Header Field XMWST is the “Calculate Tax” field. This field can be added to your spreadsheet using Z Option -> Choose Fields. A user can add the field XMWST to their spreadsheet and populate it with an “X” (see below). Once populated, the Calculate Tax field will un-engage the standard GLSU balancing functionality that prevents GLSU from posting entries where debits do not equal credits. Once populated the balancing formula in the line item header will be changed to “ – tax calc –“ (see below). The user is given the responsibility of sending GLSU and SAP an entry which will be properly balanced after VAT taxes are calculated and added to the posting. VAT Page 74 Document and Line Item Long Texts GLSU allows you to input document and line item long texts on each document. These text fields are not the same thing as the document header text (BKTXT) or the line item texts (SGTXT). Long Texts allow you to input multiple line, formatted texts. Long Texts for Park Documents are also supported. Long Text fields begin with the letters “BELEG” and are in the header and detail sections of the possible fields listing in the “Select Fields” dialog box. Note: You will see a listing for each of the Header and Line Item Long Texts fields that you have configured on your system. You will need to ask your SAP Administrator which is the appropriate field to populate. If your want to configure additional Header Line Texts, use transaction FBTA -> Other Objects -> Document Texts. After you have made your configuration changes, you will need to re-download the GLSU INI file to be able to access them from the GLSU spreadsheet. Page 75 Note: Line Item Long Text is called “DOC_ITEM0001” and is available in the Detail Fields section of the “Select Fields” dialog box. A note on formatting long texts… 1. The semi-colon is used as a newline character. If you wish to start a new line, you may either type the semi-colon character or choose Alt-Enter from your keyboard. The semi-colon character will NOT be displayed in the long text. 2. Use the ~ character on either side of a formatting option. The formatting characters available on your system may vary from those shown below. See Example…. Note: The total length of long text lines may not exceed 72 characters; this is an SAP hard limit which cannot be changed by GLSU. Long texts are also limited to non-split documents only but are available for multi-sheet and dropped header. If the posting timeout is reached in GLSU as set in the Premium User Functions Maintain Technical Options Job Wait Time setting, long texts will NOT be updated for the posted worksheets. SAP cannot create a link to the document because no document numbers will be recorded until the SAP job runs. Page 76 Double-Byte (East Asian Languages) GLSU supports the use of double-byte character sets. If you intend to use GLSU with one or more double-byte characters sets you will need to make a couple of changes detailed below. You will need the “Unicode RFC Libraries” on the desktop in the SAP GUI. This can be found in the “Development Tools” section during the SAP GUI installation procedure for 6.40 and earlier. For SAP GUI 7.10 or later this is automatic. If you are unsure what you have installed, please contact the department responsible for SAP GUI deployment. First, open your SAP GUI settings and open the “Code Page” settings. Under Upload/Download Encoding, you will need to select “Unicode (UTF-16LE)” and select “OK”. Repeat this step for each double-byte SAP system you will use with GLSU. Note: If you cannot change these settings, you may need to speak with your desktop administrator group or the group who handles the deployment and maintenance of the SAP GUI. Second, if GLSU is already installed, open Excel and perform the following steps: From the GLSU menu... 1. Choose “Options”. 2. Choose “General” tab. 3. Turn “Unicode File Handling” to “On”. 4. Select “OK”. Page 77 After you have performed the steps necessary to enable support for double-byte character sets, you can ensure GLSU is able to display these sets by performing a “Pick Values” on any supported field. Pick a company code which you know contains double-byte character sets. You will see a display similar to below. In this example, both Korean and English texts are displayed simultaneously. Page 78 Document Attachments (BDS) GLSU supports the attaching of the spreadsheet file to the posted documents in the SAP BDS (Business Document Service) for supplemental documentation and audit purposes. Regular postings, parking, accrual/deferral and posting foreign currency transaction types are all allowed with the document attachment feature. There are several ways this functionality can be configured. Important Note: As a premium and standard user, you must select the “Send Validation Now” option from the ZGLSU transaction for these settings to take effect. From a premium user perspective, you can set the options so certain options are always enforced or can be determined by the end user. From the ZGLSU menu (logged-in as a GLSU premium user) in SAP… 1. Choose “Premium User Functions”. 2. Choose “Maintain Technical Options”. Page 79 If you choose “YES”, the spreadsheet will always be attached to all SAP document numbers. If you choose “NO”, the spreadsheet will never be attached to the SAP document. If you choose “PROMPT”, the user will be prompted whether or not to attach documents. Note: The user will not able to set options in this setting. They will always be prompted what action to take. If you choose “USER”, the options on the end-user desktop will be enabled and the user will be able to set their own options accordingly. You can also configure what description will be used in the BDS for the attached documents. This can be a combination of hardcoded text elements and parameters from both the workbook and the SAP system. For a listing of the available parameters, put your mouse cursor on the description field and select “F1”. The next screen will be shown. Please keep in mind that reserved words must be enclosed in angle brackets ( < > ). If they are not, the literal word will be Page 80 substituted in the description. Note: These selections must be typed in. The display is only to inform you of what options are available. If the “USER” option is selected by the premium user, all of the options available for storing documents will be in the control of the standard user. From the GLSU menu (in Excel)… 1. Choose “Option”. 2. Select the “Attachments” tab. Note: This tab will only appear if the premium user has selected an option other than “NO”. If the posting timeout is reached in GLSU as set in the Premium User Functions Maintain Technical Options Job Wait Time setting, BDS document attachments will NOT be updated for the posted worksheets. SAP cannot create a link to the document because no document numbers will be recorded until the SAP job runs. Page 81 From this options screen, you can select which option suites your needs. If the premium user has selected “forced” options, the option would be displayed here and the other options would be disabled. Attachments with split documents: When a GLSU document splits based on the “Maximum input lines per Doc” as configured in tcode ZGLSU, GLSU will attach the spreadsheet to all of the split documents. Attachments with inter-company documents: When a GLSU document is an inter-company document (denoted by NEWBK in your template. GLSU will attach the spreadsheet to the header document ONLY. A logical link exists in SAP under the intercompany document number. Excel/GLSU functionality when inside the Business Document Navigator: Z Option always recommends extracting the source document from the BDS if you wish to perform additional functions with it rather than using the Excel functionality within the Business Document Navigator. If GLSU descriptions or other GLSU function contains a “#NAME”, select “Reset Links” to re-populate the cells. Page 82 - This page intentionally left blank - Page 83 Page 84 GLSU SAP Features Besides posting your .ZGL file to SAP, the GLSU ABAP program also controls many other options. Standard Users will not see the “Premium User Functions” button show above. Only Premium Users will see this option on the screen. The following pages explain the ABAP functionality in greater detail… Page 85 Setting your GLSU validation choices The GLSU ABAP program will allow you to configure the GLSU validations to your requirements. The GLSU ABAP program can be accessed by typing transaction “ZGLSU” in the box at the top of your SAP GUI. Master data may be downloaded to your PC each time you run the ABAP on an Ad-Hoc basis or in a real-time (live) fashion. You may individually select or de-select certain SAP master data items as you require. For example: if you never post to customers or profit centers, de-select those items, your validation update process will execute faster when in INI mode. Select the button that says “Validation Options” in the ZGLSU transaction. The following explains each of the fields in the Validation Options dialog box… 1. Master data checkboxes: Activate these checkboxes if you wish to download these master data values to your PC. 2. Text checkboxes: Activates these checkboxes to download the text values (labels) for the associated master data value. These default to the OFF position. By turning these on, you can see a “search-help” dialog box in the Excel spreadsheet. See next page. 3. Premium Only - Suppressed/ Required/ Optional radio buttons: If you are a premium-level user, you will have the option to make selected validation fields either Suppressed/ Required or Optional. This is similar to the way SAP Field Status Groups works. By Suppressing or Requiring individual fields, users will not have the option to make their own choices about whether they validate for these fields or not. These radio button selections affect the entire GLSU installation for your SAP system and affect every user. Standard Users will not have the capability to change these selections. These radio buttons also have no relevance when a master data item is selected to be “Live”. 4. Premium Only - Off-line (INI) or Real-time (Live). These radio buttons will tell GLSU the source for pre- Page 86 validations, pick values, and descriptions. If you choose off-line, all pre-validations, pick values and description values will come from the off-line file that is sent to your workstation. If you choose “Live”, all prevalidations, pick values and descriptions will come from SAP in real-time. The more “Live” validations you configure, the smaller the PC footprint. 5. Company Codes to Validate: Choosing a range of company codes will limit all master data values to these ranges of companies (when the validation is set to the INI setting, this is not valid for real-time validations) If there are company codes at your organization which you never use or post entries to, then omit them from your selection here. Those values will not be saved on your PC’s validation file. 6. Sort Fields Radio Button: This radio button controls the sort order of the picklist in the GLSU spreadsheet. 7. Save Changes: You must click on the “Save Changes” button for GLSU to store your selections. Page 87 You can also select ranges of master data to be sent to the INI file. This will allow you to exclude ranges of master data that you do not normally use. For instance, if you do not use all the company codes which have been configured for your organization, you can limit the range of company codes to a specific range or list of individual values. This will work for each of the master data elements that GLSU validates. In short, if you do not use the data, do not send it to the INI file. This will improve the processing performance of GLSU. Page 88 Processing “Export” Files GLSU "remembers" all the settings you used the last time you posted a document through GLSU. Every time you run ZGLSU, the filename, batch log name, etc., will be autopopulated with the values from your last posting. You simply edit these values as necessary then run the program. The following explains each of the fields in the Upload Parameters section… 1. PC Spreadsheet Output File: If you need to search your hard drive, you can click the file dialog button, then use the Standard Windows dialog box to locate the .ZGL file… Execute the transaction by clicking the Execute button…. Page 89 Maximum # of Document Line Items You can have GLSU limit the number of lines which are posted on a given entry. You may want to do this because your entries are longer than 999 lines (SAP’s internal limit) or because you are posting documents with taxes (which book more FI line items than are entered by the accountant). 1. Maximum Input Lines per Doc: This parameter controls how many lines each SAP document will have. When this limit is reached, GLSU will start a new document until the lines are fully posted. 2. Append Counter to Ref Doc?: You have the option to auto-increment each document if more than one document is posted. This sequential counter is placed in the last digit of the reference doc field. 3. Balancing Account Info. Clicking on the “Balancing Account Info” button will display the following dialog. Enter the appropriate posting values for your balancing account and save. Page 90 Upload File History The second section of the ABAP lets you view the files you have previously loaded using GLSU. GLSU can prompt you if you are attempting to load the same file name in consecutive attempts. GLSU can also delete the upload file after processing (if this option is chosen) to prevent the same file from being loaded multiple times erroneously. This is a good option to leave ON. GLSU will also delete all posting history attached to your ID if needed. The following explains each of the fields in the Upload File History section… 1. Check Upload History: Leave this checkbox on if you want GLSU to check its history to potentially detect erroneous double-postings of entries and prompt you if you want to continue. If the checkbox is ON and GLSU does find the file in its internal history, it will stop the posting process. You will need to rename the .ZGL file or turn this checkbox OFF to continue. 2. Delete .ZGL file after upload: Leave this checkbox on if you want the GLSU ABAP to physically delete the .ZGL file from your PC after posting. This will eliminate any chance of an erroneous doubleposting. - continued on next page - Page 91 3. Show Upload History: Clicking on this button will display the dialog box shown above. It shows files which have been posted to SAP under your SAP login ID. It shows file name, date, time and SAP document numbers. 4. Clear Upload History: Clicking on this button will delete ALL history from SAP about what files have been loaded under your ID. 5. The “Print Upload History” option will display an SAP printer-friendly version of the listing (see below). Page 92 Spreadsheet Templates Spreadsheet Templates can be stored on your SAP server. This functionality allows the efficient distribution of templates to your SAP users. It also allows for your users to get a quick head-start when using GLSU for the first time. Standard Users can download the templates. Premium Users can Download, Upload, Rename and Delete the templates which you have stored. The following pages explain the Premium User functionality in greater detail. DOWNLOADING a template from SAP to your PC is an easy process. 1. Click the “Download a spreadsheet template” button from the ABAP program ZGLSU 2. Highlight the appropriate template and click the “Choose” button 3. Use the standard Windows dialog box to choose a file name and directory on your PC to store the file. Click the “Save” button when finished. Page 93 Premium Users will be able to maintain the Spreadsheet Templates that are stored on your SAP system. Premium Users will be able to upload new templates from their PC to SAP. Premium Users will also be able to rename the templates which are stored on the SAP server. If you do not have access to this functionality, you will need to be set up as a Premium User, or have your Company’s Premium User do this for you. Note, templates are not changed on the SAP server. Changes which need to be made to the structure of the template must be done inside Excel. Once saved, the edited spreadsheet file can be uploaded to SAP. To access this functionality… 1. Click the “Premium User Functions” button on the ABAP screen transaction ZGLSU. 2. Click the “Maintain Templates” button 3. Click the add, rename, or delete buttons, see instructions below. The following pages explain how to upload, rename, and delete the GLSU templates which are stored on your SAP server. Page 94 To UPLOAD a new Spreadsheet to the SAP server. 1. Click the Upload Template icon. 2. Locate the spreadsheet on your PC using the standard Windows dialog box shown below. When found, click the “Open” button. 3. Use the following dialog box to name the spreadsheet template on your SAP server. 4. Click the “Check” icon when finished. Page 95 To RENAME a Spreadsheet Template which is already stored on your SAP server, perform the following…. 1. Note, this functionality is only available to Premium Users. 2. Click the “Premium User Functions” button from transaction ZGLSU 3. Click the “Maintain Templates” button. 4. Highlight the appropriate spreadsheet you wish to edit and then click the “Rename” icon at the bottom of the screen shown on the previous page. 5. Type in the new name of the template in the dialog box which then displays 6. When finished, click on the “Check” icon. Page 96 To DELETE a Spreadsheet Template which is already stored on your SAP server, perform the following…. 1. Note, this functionality is only available to Premium Users. 2. Click the “Premium User Functions” button from transaction ZGLSU 3. Click the “Maintain Templates” button. 4. Highlight the appropriate spreadsheet you wish to edit and then click the “Delete” icon at the bottom of the screen shown on the previous page. 5. Click “Yes” in the following dialog box. Page 97 GLSU SAP Side Installation Check (Technical/Project Team Utility) To aid in the diagnosis of installation, configuration, and security role issues, GLSU comes equipped with an installation check utility. This utility can be run by all licensed GLSU users, both premium and standard. It can be used to help internal BASIS personnel or Z Option support staff. Since the utility runs for a particular SAP user ID when diagnosing issues, the utility should always be run under the SAP user ID in question. To run the GLSU installation check, go to transaction ZGLSU in SAP and then type “check” in the SAP command box. List of items GLSU installation checker checks: 1. Transport import of GLSU data transports 2. Open, write, transfer, close, and contents of temporary work files on local and remote SAP application servers. 3. Generation status of SAP standard load programs 4. Authorizations for posting, parking, accruing, batch session management, file system access, immediate job submission, and the various RFC requirements needed to connect from Excel. If an SAP authority object is checked, the authority object and the arguments will be shown. A “sy-subrc = 0” indicates the check was successful for the SAP user ID the check was run under. Any number other than “0” indicates that the check failed and may require attention. Page 98 Premium Only – Default and Hidden Field List As a premium user, you can configure the possible SAP fields which will be displayed and defaulted in Excel. This promotes ease of use and lack of confusion for fields which your company may never use or use infrequently. To configure the list of default and hidden fields perform the following… 1. Start transaction ZGLSU 2. Select “Validation Options” 3. Choose option “Select Hidden and Default Fields” (at the bottom of the screen, you may have to scroll down) 4. Check the appropriate options for fields you wish to Default and fields you wish to suppress from display (Note: Suppression does not cause the field to be unusable in GLSU, it simply does not display the field is the possible fields list as the default). Hidden and Default fields, since they are relatively static, require a “Send Validation Now” operation in order to be updated the next time a spreadsheet is initialized. These settings will be applied each time a GLSU spreadsheet is initialized. The settings are not applied when editing an existing worksheet. Page 99 Premium Only - Maintain Technical Options From the ZGLSU transaction in SAP (logged in as a registered premium user)… 1. Select “Premium User Functions” 2. Select “Maintain Technical Options” Job Wait Time(sec): Allows you to synchronize GLSU with the parameters you have set for batch processing at your company. After the specified number of seconds, GLSU will return a message to the user saying that they need to try their posting again later. Note: When job wait times are reached, neither long texts nor BDS document attachments can be saved because no document numbers will be recorded until the SAP job runs. Doc Retention (days): This option will control the amount of time that GLSU remembers files that are uploaded by each user. GLSU will “forget” filenames loaded by users when they become older than the number of days specified. Disable Load Balancing: When selected, this option will force the background job to run on the Page 100 application server that the user is logged into. When not selected (the default setting), the background job is run in an available batch work process like any other job. Maximum Rows Returned for Live PickLists: The value entered here specifies the maximum number of records that will be retrieved (to avoid long runtimes) for real-time (live) pick values. The default value is 1000 entries. Job Class: This option specifies which job class GLSU background jobs will be submitted as. The possible entries are Class “A” – High Priority, “B” – Medium Priority, or “C” – Low Priority Max SQL Statement Size: This value denotes the maximum size of a database SQL statement. Depending upon your SAP database, this value may need to be adjusted. You should contact your DB administrator before you change the default value. Note: The default 64K value will not need to be adjusted in approximately 95% of GLSU installations. Submit As Non-Unicode: With application of SAP note 723363 and/or certain versions of SAP (4.7 support package SAPKH47023 and ECC 5.0 support package SAPKH50005), an option was added by SAP to the standard load program to submit as non-unicode. For installations which are known to be non-unicode, this setting should be checked initially unless otherwise determined by Z Option support. Custom Validations: GLSU can be configured (along with development) to handle custom validation scenarios. Custom validation development can be done via your internal development resources, or outsourced for a fee to Z Option development staff. Any header or detail fields can be validated, either on a line by line or total document basis. Drill-back to the Excel spreadsheet cell is supported. Errors are denoted in Excel by “CV-E” (Custom Validation Error). Only “errors” are supported at this time. Users must select “Retrieve Validation Data” from the GLSU Utilities menu option OR “Send Validation Now” from the ZGLSU transaction within SAP for the new setting to take effect. Custom validations are only supported with a live connection (i.e. not supported in INI/off-line mode). Full development documentation is provided in the /ZOPTION/GLSU_LIVE_CUSTVAL function module (Transaction: SE37) available on your SAP system after GLSU has been installed. Perform SAP Substitutions: Reserved for future use. Perform SAP Validations: Activate GLSU pre-validations for Financial Accounting line item validations and Cost Accounting line item validations. These are the same SAP validations as configured in OB28 and OKC7 respectively. NEVER Delete BDC Sessions: When this option is checked, GLSU will never delete the sessions contained in transaction SM35, whether they are successful or not. Use Header Company w/split: Activating this option will place the header company of the workbook as the header company on EVERY SAP split document which is created when the number of lines exceeds the “Maximum Input Lines per Doc” value. With the option de-selected, the last “New co.code” (Technical Field: NEWBK) value set will be placed on each respective split document. Attaching Documents: See section Document Attachments (BDS). Note: Only Premium Users will be allowed to maintain these technical options. Z Option recommends that you consult either Z Option and/or your BASIS administrator before changing any of these settings from their default values. Page 101 Premium Only - Create Off-Line Validation File Since GLSU offers two methods to validate, OffLine and Real-Time, it may be a requirement to create a validation file for an external user or business partner (Vendor, etc) independent of the site-wide configuration configured by the Premium User. For example, in your GLSU configuration you might have selected all fields which are available for “Live” validations. This configuration creates the minimal footprint on the PC workstation. This is an optimal configuration for an in-house user with direct access to SAP. However, many customers use GLSU to create spreadsheets which can be used off-line. Since the pre-validation, pick lists, and descriptions are major features which would be lost if the external user was given a local validation file (INI), we provide the “Create Offline Validation File” function available to only premium users. In order to create an off-line validation file perform the following steps… 3. Login to SAP 4. Execute transaction ZGLSU 5. Select “Premium User Functions” 6. Select “Create Offline Validation File” 7. Enter (or select) the offline validation file you want to create (Note: Be certain not to overwrite your personal local file) 8. Enter your selection criteria. Leave a ‘??’ in all fields you do NOT want to be downloaded to the off-line validation file. A blank in the selection criteria will select all values or you can limit the selection based on specific criteria 9. Execute the program Page 102 Page 103 Premium Only – Default User Settings Premium Users can set default values for all “Balancing Account Info” values, “Maximum Input Lines per Document,” and “No Data Character”. This is extremely useful for large implementations where the number of GLSU users may be in the hundreds or thousands of users and you do not want the end users to have to set these values manually one user at a time. In order to set these values, one premium user will change their values to the appropriate values and then simply select the “Save Defaults for All Users” pushbutton. NOTE: All existing GLSU user settings which DO NOT ALREADY HAVE A VALUE SAVED FOR THAT FIELD will be overwritten with the premium user’s settings and values. All newly registered GLSU users settings registered after the premium user performs this action will also be created with these default settings. If a mistake is made, the premium user can reset to factory default settings by selecting the “Reset for All Users” pushbutton. This will remove ALL settings which were created by this feature AND custom settings which were created by end users. Please be cautious when using the “Reset for All Users” function. This functionality does NOT create settings for SAP IDs which are not registered GLSU users. Page 104 - This page intentionally left blank - Page 105 Page 106 Trouble Shooting Getting Help from your Premium Users Standard Users should raise all first level support issues with their premium users per the Software License Agreement signed by your principals. If there is an issue which requires additional support, the premium user may always open a support ticket, but all resolutions and communication must be performed through a premium user. This helps Z Option keep your maintenance costs below industry averages. To see who your premium users are select “Show My Contacts.” Using the Z Option Ticket System Z Option uses a “Ticket System” which allows our users to notify us if there are questions or problems with the software that needs to be resolved. Features of the Ticket System are… 1. Easy creation of trouble tickets 2. Tracking of open tickets via the user “dashboard” 3. Automatic paging of Z Option technical support staff when new tickets are created. This assures a timely response 4. Upload of backup documents. You can attach screenshots of error messages, Excel spreadsheets, INI files, etc. to the ticket to fully inform the Z Option technical support staff of the problem 5. Automatic email notification when resolutions or additional comments are posted 6. Search capabilities of the Ticket System database to quickly answer questions that have arisen from other Z Option customers Premium Users at your company are eligible to receive Ticket System login Ids. If they have not already done so, each premium user should request a ticket system login ID. 1. The Z Option Ticket System is accessible from http://www.zoption.com 2. Select Support Support and Licensing System 3. Request a Ticket System ID. 4. Fill out all of the information. 5. Once your ticket system ID has been confirmed (you will receive an email) you may login to the Page 107 ticket system on the same support page by clicking “Log onto Ticket System.” Page 108 Export a Document (2-Step Posting Process) You may choose to post your document to SAP using a batch posting method. The batch posting method exports an uploadable file onto your PC. Many times this will be used to troubleshoot an issue and may be requested by Z Option Support. From the GLSU menu... 1. Choose menu item "Export". 2. Select "Copy Filename to Clipboard ". 3. Login to SAP via the SAP GUI (if you are not already logged in). 4. Execute transaction ZGLSU 5. Paste (Ctrl-V) the filename from step 2 into the " PC Spreadsheet Output File" field. 6. Press the green execute (F8) button. Note: The file is saved under the same name as your spreadsheet and with a .ZGL extension. See Processing "Export" Files for more detailed information (with screen shots) about manually processing the files in SAP. Page 109 Technical Installation There are 4 main steps that must be completed for Z Option GLSU to run on your productive SAP system. 1. 2. 3. 4. 5. Install the transports and import them into SAP Set up the logical filenames for your system Set up user authorization Transport all of the above to any systems where GLSU will be run Optional – Set profile parameter Each of these steps will be detailed below. UPGRADE NOTE : IF YOU ARE UPGRADING FROM A PRIOR VERSION, you probably have already set up the logical filenames and authorization. Those steps can be skipped for upgrades. ************************************************************ SECTION 1 - INSTALL AND IMPORT THE Z OPTION GLSU TRANSPORTS ************************************************************ 1.1 Copy the all the files from the CD root directory (or ZIP file) into \usr\sap\trans (or its equivalent) on your SAP machine. 1.2 Run the include ZOPUNSAR.BAT file (if you are on a Windows NT operating system). This will expand the compressed file ZOPGLSU41U.SAR. If you are not on Windows NT, run the sapcar commands manually, eg “sapcar –xvf ZOPGLSU41U.SAR”. Note: If you are on SAP version 4.7 or later, you should always install the sar file with the “U” character as the last position of the filename. This version is unicode compliant. Even if your SAP system is not unicode, you should still install this version. The code is compatible and it will save you an upgrade step if you should ever convert your SAP system to unicode. Example : e:\usr\sap\trans>zopunsar sapcar -xvf ZOPGLSU41U.SAR x cofiles/K900193.ZD2 x cofiles/K900197.ZD2 x data/R900193.ZD2 x data/R900197.ZD2 Note: Actual transport numbers may vary The transports for this release are as follows : ZD2K900193 – GLSU MAIN PROGRAM ZD2K900197 – GLSU Authorization objects (Optional) 1.3 Add the transports to the correct import queue. Use Page 110 transaction STMS. Press the "Truck" icon or Overview->Imports. Double-click the queue for the system into which you want to import the transports (usually your development box). When the Import Queue is displayed, select Extras->Other Requests->Add and enter the first transport number. (e.g. ZD2K900193). Confirm that you want to add it to the queue. Do this for each of the two transports. (ZD2K900193 and ZD2K900197). 1.4 Import the transports using Request->Import. You will need to import the AUTH transport into any clients where you want to use GLSU, since it contains client-dependent data. The GLSU MAIN transport is only client-independent objects and should be imported first. If errors, occur, try re-importing the file using more override flags. Some errors in importing are unavoidable. If something fails to generate, try importing it again, and then try manually generating the object. If you get stuck, call us at 1-877-653-7215. 1.5 Make sure to repeat the AUTH import into all clients where Z Option GLSU is to be used. ************************************************************ SECTION 2 - SET UP LOGICAL FILE NAMES ************************************************************ UPGRADE NOTE : IF YOU ARE UPGRADING FROM A PRIOR VERSION, you probably already have the logical filenames set up – those have not changed in the upgrade. If you are in a technical environment that has more than one application server, please read the “Supported Technical Environment Notes” section below before starting this step for important information. 2.1 Determine what path you would like to use to store the Z Option GLSU temporary posting files. These files are usually less than 2-3 megabytes in size, but for some heavy users, they can approach 15 megabytes. The files are deleted as soon as the process completes, so the normal state of this directory is to be empty. During rare circumstances, files can get hung, so if you want to occasionally purge any files over 30 days old, that might be a good idea. You will need to set up a logical file names and logical Page 111 file paths for each system-id where GLSU will be run. The logical file names are in the format "ZOPTION_GLSU_POST_xxx" where "xxx" is replaced by the system id. "ZOPTION_GLSU_POST_ZD1" is provided in the transport as an example. 2.2 Use transaction FILE to create the logical file paths. Acknowledge the client-independent warning, and scroll to the bottom of the list of logical paths. Select ZOPTION_GLSU_POST_ZD1 and press the Copy As... button or use menu option Edit->Copy As.. This will allow you to create a new entry, and shows you the current ZOPTION_GLSU_POST_ZD1 as the default name. Erase the ZD1 and put in your system id. When you have it correct, press enter, and when asked if you want to copy dependent entries, select Copy All. You now need to set the path for this new logical file path definition. Select the new ZOPTION_GLSU_POST_xxx entry and press the second file folder icon up at the top. This will allow you to enter the physical file name for Windows NT. If you are not using Windows NT, please use the New Entries button and put in your correct operating system in the Syntax Group field, along with the correct physical path for this system id. If you want to set up more than one system id, go back to the main "Change View Logical File Paths Overview" screen and press the top file folder icon. Do the Copy As and repeat the instructions in section 2.2. When you are finished creating the logical file paths, press the SAVE button, or choose menu option Table View->Save. It will ask for a transport number - create a new one so you can easily track the logical file names. 2.3 Use transaction FILE to create logical file names. Now that all the logical file paths have been defined and their physical paths defined, we need to assign logical file names that use those paths. While still in transaction FILE, click on the 3rd file folder icon. Scroll to the bottom of the list, and again, we will select the entry called ZOPTION_GLSU_POST_ZD1 and press the Copy As... button or use the menu option Edit->Copy As... This will pop up a screen requesting the logical file information. The only thing that needs to be changed is the logical file and logical path, replacing "ZD1" with your desired system id in both fields. NOTE : If you want to also change the physical file name, you may edit the "Physical file" field. The text "<PARAM_1>" is replaced by the system with Username+Timestamp, so for John Smith, whose userid is JSMITH, running the program at Page 112 8:38 in the morning would have a filename like ZOP_GLSU_JSMITH083371 in the path you defined in step 2.2. Repeat 2.3 as necessary for all your system ids. When you have finished creating the logical file names, press the SAVE button, or choose the menu item Table View->Save. As an alternative configuration method, you can choose to create one logical filename definition as ZOPTION_GLSU_POST and transport it throughout your landscape. It is important to note you must use extreme care when utilizing this method. Use appropriate variables as this path will be used in all systems including production unless you choose to maintain the entries separately in each system. In the case of a mixed logical filename configuration (one that contains both a ZOPTION_GLSU_POST_SID entry and a ZOPTION_GLSU_POST entry), the “SID” entry will be used if one is available and then the entry without a SID. 2.4 Record the transport number as this will have to be transported to all systems where GLSU will be run. ************************************************************ SECTION 3 - SET UP USER AUTHORIZATIONS ************************************************************ UPGRADE NOTE : IF YOU ARE UPGRADING FROM A PRIOR VERSION, most of the prior authorizations will still work – the only addition is RFC access if you want your users to be able to post their documents directly from the Excel spreadsheet via RFC connection. 3.1 The AUTH transport contains a role and a profile containing authorizations necessary for a user to run GLSU. The role and profile are both called Z:GLSU. You only need to use one or the other, not both. If you transport user masters, then you will need to add the Z:GLSU to the users' profiles in the source system and transport. Otherwise you may have to wait until the AUTH transport has been imported into production. The following is a list of authority objects contained in role/profile Z:GLSU for system administrators who wish to add the authority objects themselves instead of using the Z Option delivered role/profile. Authorization Object S_TCODE S_BTCH_JOB S_BDC_MONI S_RFC Field :: Values Transaction code :: FB01, SM35, ZGLSU JobAction :: RELE JobGroup :: * Batch input monitoring activity :: DELE Session name :: FI-GLSU* Activity :: 16 Name of RFC to be protected :: /ZOPTION/GLSU, Page 113 /ZOPTION/COMMON, RFC1, SRFC, SUSO, SYST, RFCH, BATG(message long texts), BDS_BAPI (for attaching documents), 0002 (for document drill-back) Type of RFC object to be protected :: FUGR The following objects will be required to run GLSU but are NOT provided in the security profile that is delivered in the transport. The reason for this is: 1) In many instances, the user role will already have this authority 2) Z Option does not know the file/configuration system setup at each of our clients, nor do we want to give too broad access, compromising client security for situations where you may wish to limit this access. Authorization Object S_PATH S_DATASET F_BKPF_BUK F_BKPF_BLA S_TCODE S_GUI S_BDS_DS S_BDS_D Field :: Values Full Authorization Activity: Full Authorization (Delete authority is needed to cleanup temporary intermediate files) Filename: Path as configured in Section 2 Program: “/ZOPTION/*” and “RFBIBL0*” Company Code: All required Activity: “01” for Posting and Accrual “03” to download master data in the INI or real-time pick lists and description functionality. This is also the activity which was added to adhere to SOX requirements for data access “77” for Park Document All appropriate Transaction Code: “FBS1” for Accrual “FBV1”, “FBV0”, and “FBVB” for Park Document "FBB1” for Post Foreign Currency Adjustment For uploading/downloading files: “60” and “61” for ACTVT (Activity) For attaching documents to the BDS: “BKPF” and “ACCTGDOCMT” for ClassName “BO” (Bravo, Oscar) for ClassType “01” - “05”, and “30” for ACTVT (Activity) Additional activities as required. For attaching documents to the BDS: “01” - “05”, and “30” for ACTVT (Activity) Additional activities as required. “BDS*” for LOIO_CLASS (or as configured) ************************************************************ SECTION 4 - TRANSPORT TO OTHER SYSTEMS ************************************************************ 4.1 Transport all of the above to any systems where GLSU will be run. If necessary, remember to add the Z:GLSU profile to any users that need to run GLSU. ************************************************************ SECTION 5 – OPTIONAL – SET PROFILE PARAMETER Page 114 ************************************************************ 5.1 If users will require document drill-back functionality from Excel, system profile parameter sapgui/user_scripting will need to be set to “TRUE”. Supported Technical Environment Notes: When configuring logical file paths it is important that the file paths specified are either Network File System or Windows Shares, common and writable across all application servers (if the environment has more than one application server). Since GLSU jobs are load balanced, it is possible that jobs will be started on application servers other than the one the user has logged onto. BDC Log files stored at the application server OS level must be configured to be read by all application servers. The default path suggested by SAP is \usr\sap\<SID>\SYS\global. If this directory is not common to all application servers, the financial document number may not be able to be retrieve by the GLSU application since the document number is retrieved from these files. SAP Upgrade Notes: If you are upgrading your SAP system from any 4.0x, 4.5x, 4.6x, or 4.7x version to any of these versions, you do not need a separate transport from Z Option. Although, there are significant differences in the SAP repository components for these SAP versions, all of the objects necessary to run in each of these environments are delivered with one code base. Therefore, an upgrade of the Z Option software is not necessary unless you desire new Z Option functionality in a later release of GLSU. Transport object list for GLSU: R3TR TABU USR12 TABU USR12 020S_BDC_MONIZ:GLSU A TABU USR12 020S_BTCH_ADMS_BTCH_ADM A TABU USR12 020S_RFC Z:GLSU A TABU USR12 020S_TCODE Z:GLSU A R3TR TABU USR13 TABU USR13 020DS_BTCH_ADMS_BTCH_ADM A TABU USR13 020ES_BDC_MONIZ:GLSU A TABU USR13 020ES_BTCH_ADMS_BTCH_ADM A TABU USR13 020ES_RFC Z:GLSU A TABU USR13 020ES_TCODE Z:GLSU A R3TR TABU UST12 TABU UST12 020S_BDC_MONIZ:GLSU A* TABU UST12 020S_BTCH_ADMS_BTCH_ADM A* TABU UST12 020S_RFC Z:GLSU A* TABU UST12 020S_TCODE Z:GLSU A* R3TR TDAT SUSPR TABU USR10 020Z:GLSU A TABU USR11 020EZ:GLSU A TABU UST10S 020Z:GLSU A* R3TR TABU AGR_TIMEB Z:GLSU R3TR ACGR Z:GLSU Page 115 R3TR TABU /ZOPTION/ZDATA R3TR DOMA /ZOPTION/CHAR8000 R3TR DOMA /ZOPTION/CHAR250 R3TR DTEL /ZOPTION/VALKEY R3TR DTEL /ZOPTION/VALLINE R3TR DTEL /ZOPTION/VAL250 R3TR DTEL /ZOPTION/VALMSG R3TR DTEL /ZOPTION/MAXROWS R3TR DTEL /ZOPTION/ROWNUMBER R3TR DTEL /ZOPTION/SHEETNUMBER R3TR DTEL /ZOPTION/SPLITNUMBER R3TR FUGR /ZOPTION/GLSU Contains: /ZOPTION/GLSU_POST /ZOPTION/GLSU_GET_VALIDATION /ZOPTION/GLSU_LIVE_PICK_GET /ZOPTION/GLSU_LIVE_VAL_GET /ZOPTION/GLSU_LIVE_AUTH /ZOPTION/GLSU_LIVE_DESCR_GET /ZOPTION/GLSU_LIVE_CUSTVAL /ZOPTION/GLSU_GET_AUFNR /ZOPTION/GLSU_INSTALL_CHECK /ZOPTION/GLSU_LIVE_COBL_CHECK /ZOPTION/GLSU_LIVE_SETTING_GET /ZOPTION/GLSU_LIVE_SUBST /ZOPTION/GLSU_LIVE_DOCEXTRACT R3TR FUGR /ZOPTION/COMMON Contains: /ZOPTION/PING /ZOPTION/GET_PREMIUM_USERS /ZOPTION/USER R3TR MSAG /ZOPTION/GLSU R3TR PROG /ZOPTION/GLSU R3TR PROG /ZOPTION/GLSU_PRINT_HISTORY R3TR PROG /ZOPTION/GLSU_SEND_CONFIG R3TR PROG /ZOPTION/GLSU_TOP_CONSTANTS R3TR PROG /ZOPTION/GLSU_TOP_TABLES R3TR PROG /ZOPTION/HIDDEN R3TR PROG /ZOPTION/GLSU_SEND_CONFIG_OFFL R3TR TABL /ZOPTION/VAL R3TR TABL /ZOPTION/ZDATA R3TR TABL /ZOPTION/LIVEDES R3TR TABL /ZOPTION/LIVERET R3TR TABL /ZOPTION/LV_IN R3TR TABL /ZOPTION/LV_OUT R3TR TABL /ZOPTION/PICKLIST R3TR TABL /ZOPTION/CUSTMSG R3TR TABL /ZOPTION/FIELD_COLUMNS R3TR TABL /ZOPTION/ZBSEG R3TR TABL /ZOPTION/MSG_LOG_TX R3TR TABL /ZOPTION/ZLOG R3TR TABL /ZOPTION/ZBAPIRETURN1 R3TR TRAN /ZOPTION/GLSU R3TR TRAN ZGLSU Page 116 R3TR VDAT V_FILENACI R3TR VDAT V_FILEPATH R3TR VDAT V_PATH