1
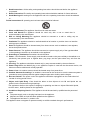
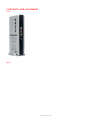
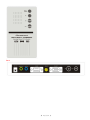
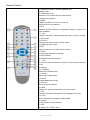
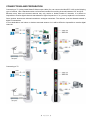
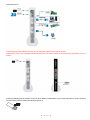
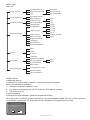
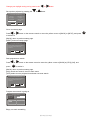
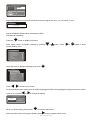
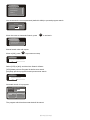
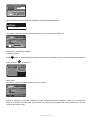
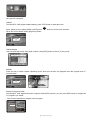
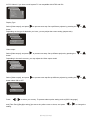
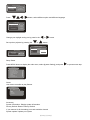
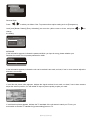
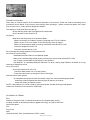
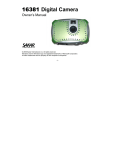
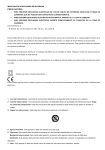
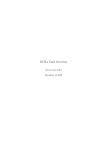
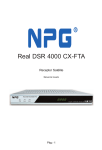
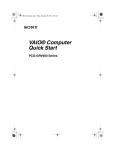
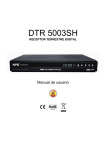
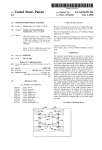
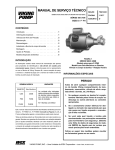
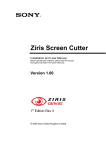
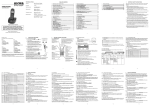
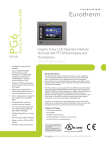
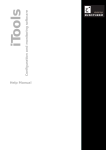
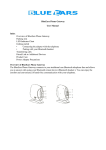
MoniDTV 1200 User’s Manual
IMPORTANT SAFETY INSTRUCTIONS
WARNING
TO PREVENT FIRE OR SHOCK HAZARD, DO NOT USE WITH AN EXTENSION CORD,
RECEPTACLE OR OTHER OUTLET UNLESS THE BLADES CAN BE FULLY INSERTED TO
PRESENT BLADE EXPOSURE.
TO PREVENT FIRE OR SHOCK HAZARD. DO NOT EXPOSE THIS APPLIANCE TO RAIN OR
MOISTURE.
TO PREVENT ELECTRICAL SHOCK, MATCH WIDE BLADE PLUG TO WIDE SLOT FULLY
INSERTED.
CAUTION
RISK OF ELECTRIC SHOCK DO NOT OPEN
This lightning flash with arrowhead symbol, within an equilateral triangle i s intended to alert the user to the
presence of uninsulated Dangerous voltage enclosure that may be of sufficient magnitude to constitute a
risk of electric shock to persons.
Warning: To reduce the risk of electric shock, do not remove cover (or back) no user- Serviceable parts inside.
Refer servicing to qualified service personnel.
The exclamation coin within an equilateral triangle is intended to alert . The user to the presence of important
operating and maintenance (servicing) instruct ons in the literature accompanying the appliance.
This appliance shall not be exposed to dripping or splashing water and that no object filled with liquids such as
vases shall be placed on apparatus.
The symbol for Class II (Double Insulation).
This symbol means that the unit complies with European safety and electrical interference directives.
第 1 页 共 1 页
1. Read Instructions- All the safety and operating instructions should be read before the appliance
is operated.
2. Retain Instructions-The safety and operating instructions should be retained for future reference .
3. Heed Warnings-All warnings on the appliance and in the operating instructions should be adhered
to .
Follow Instructions-All operating and use instructions should be followed .
4. Water and Moisture-The appliance should not be used near water.
5. Carts and Stands-The appliance should be used only with a cart or stand that is
recommended by the manufacturer.
6. Wall or Ceiling Mounting-The appliance should be mounted to a wall or ceiling only as
recommended by the manufacturer.
7. Ventilation-The appliance should be well situated that its location or position does not interfere
with its proper ventilation.
8. Heat-The appliance should be situated away from heat sources such as radiators, heat registers,
stoves that produce heat.
9. Power Sources- The appliance should be connected to a power supply only of the type described
in the operating instructions or as marked on the appliance.
10. Grounding or Polarization-Precautions should be taken.
11. Power - Cord Protection -Power supply cord should be routed so they are not likely to be walked on or
pinched by item placed upon or against them, pay plugs ,and the point where they exit from the
appliance.
12. Cleaning -The appliance should be cleaned only by ways recommended by the manufacturer .
13. Power Plug-Where the MAINS plug or an appliance coupler is used ad the disconnect device, the
disconnect device shall remain readily operable .
14. Power Lines -An outdoor antenna should be located away from power lines .
15. Outdoor Antenna Grounding-If an outside is connected to the receiver be sure the antenna system is
grounded so as to provide protection against voltage surges and to build up static charges.
16. Non-use Periods -The power cord of the appliance should be unplugged from the outlet when left
unused for a long period of time .
17. Object and Liquid Entry -Care should be taken so that objects do not fall and liquids are not
spilled ,into the enclosure through openings .
The apparatus shall not be expose to dripping or splashing and that no objects filled with liquids,
such as vases , shall be placed on the apparatus.
18. Conditions Requiring Service -The Appliance should be serviced by qualified service personnel
when:
The power-supply cord or the plug has been into the appliance.
Objects have fallen or liquid has been spilled into the appliance.
The appliance has been e~ posde to rain .
The appliance does not appear to operate normally or exhibit a marked change in performance.
第 2 页 共 2 页
CONTENTS AND EQUIPMENT
Front
Panel
第 3 页 共 3 页
Back
第 4 页 共 4 页
Remote Control
1. Switches the DVB -T between operation and
standby mode.
2. 0-9(Numeric Keys)
Selects the TV or Radio service channels and
individual menu options.
3. MENU
Displays the Menu on screen or returns to
previous menu from submenu.
4. EPG
Displays the EPG (Electonic Programme Guide) on screen only
when available.
5/7. CH+/Changes channels in viewing mode and moves cursor up or down
in menu mode.
6./18 VOL+/Changes the volume level in viewing mode
and setting in menu mode.
8. EXIT
Returns to the previous menu and the screen
9. AUDIO
Set the output direction for speaker.
10. MULTIVIDEO
SHOW 4/6/9 Channels preview.
11. FAV
To shows favorite channels list. move up or down favorite channels
in the
favorite list.
12. TV/RADIO
Select the TV/Radio mode.
13. VGA/AV
Select Video output mode.
14. MUTE
Enables/disables the audio.
15. RECALL
Moves to the last channel.
16. INFO
Displays the program information box on the screen.
17. OK
Confirms the choices and selection with highlight menu item.
19. TEXT
Shows the teletext contteletext is transmitted.
20. PAUSE
To still picture in current channel.
21. P/N
To select PAL or NTSC, Auto.
第 5 页 共 5 页
CONNECTIONS AND PREPARATION
Connecting to TV (Using Audio/Video/S-Video output cable) You can connect the MoniDTV 1200 to the following
type of antenna, Use a standard outdoor roof antenna intended for receiving channels between VHF and UHF.
Because many older roof-mounted antenna may only receive a limited number of channels, it is difficult or
impossible to receive digital channels transmitted on higher frequencies. If so, you may replace the roof antenna.
Some outdoor antenna are directed towards an analogue transmitter. The antenna, must be directed towards a
digital TV transmitter.
It is not desirable to use indoor or windows mounted antenna. As it will be difficult or impossible to receive digital
channels.
Connecting to TV
第 6 页 共 6 页
Connecting to PC
Connecting the power cable Insert the plug of the power cable into the power socket.
Caution:The unit is only completely disconnected from the mains supply if the power plug is pulled out of the
socket.
Inserting batteries into the remote control To open battery compartment, press catch and remove cover. Observe
correct polarity when inserting the batteries (AAA, 2)
第 7 页 共 7 页
MENU TREE
Menu List
Program List
Program Search
Parental Control
TV Program List
Music Program List
Sort
Automatic Search
Manual Search
Channel Lock
Parental Setting
Change PIN
TV Standard
Display Type
System Setting
Video Output
Antenna Power
Regional Setting
Language
Time Setting
System Schedule
By Name
By Service ID
By Channel No.
YES
NO
PAL
NTSC
AUTO
4:3 PS
4:3 LB
16:9
CVBS+S-Video
VGA
Mine
Tetris
Game
Gomoku
Calendar
System Information
Factory Default
System update
Accessory
NO
YES
Menu Color
Transparency Level
Personal Style
Border Pattern
Entry Animation
INSTALLATION
Installing the antenna
Connect the TV antenna cable to MoniDTV 1200 receiver tuner in connector.
Before you start fist time installation
1. Antenna is connected to MoniDTV 1200.
2. A/V cable is connected the unit and TV. (make sure TV in right AV channel)
3. The power is turn on.
Fist time installation
Process the first time installation. (When the program list missing)
When the power is on MoniDTV 1200 will process the first time installation wizard. And two of reason will cause
the installation unprocessed. You finished the first time installation. The program list is not blank
F irst Time Installation
D o you w ant to start first time
installation w iz ard?
Yes
No
第 8 页 共 8 页
or
Press
button of the remote control to move the yellow cursor the [YES]
activate it.
[YES]: process the first time installation
[NO]: cancel the first time installation.
F irst Time Installation
D o you w ant to start first time
installation w iz ard?
Yes
No
Select Country
Change your country by pressing the
or
button on the remote control.
Set up other projects by pressing the
or
Button
F irst Time Installation(1)
C ountry
England
Lang auage
English
Time Z one
GMT +00:00
Antenna Po wer
OFF
BAC K
N EXT
Select OSD language
Change your OSD language by pressing the
or
Set up other projects by pressing the
Button
or
button on the remote control.
F irst Time Installation(1)
C ountry
Lang uage
England
English
Time Z one
GMT +00:00
Antenna Po wer
OFF
BAC K
N EXT
Select local time zone
Change your local time zone by pressing the
Set up other projects by pressing
the
or
or
button on the remote control.
Button.
F irst Time Installation(1)
C ountry
Lang uage
England
English
Time Z one
GMT +00:00
Antenna Po wer
OFF
BAC K
N EXT
Select Daylight Saving
第 9 页 共 9 页
or
[NO] press
OK
to
Change your daylight saving out by press in the
Set up other projects by pressing the
or
or
Button
Button.
F irst Time Installation(1)
C ountry
England
Lang uage
English
Time Z one
GMT +00:00
Antenna Po wer
OFF
BAC K
N EXT
Go to next setup page
or
Press
button on the remote control to move the yellow cursor to [BACK] or [NEXT], and press
to activate it.
[BACK]: return to previous setup page
[NEXT]: enter next setup page
F irst Time Installation(1)
D o you w ant to start auto search?
Previo us channe l list will be
rep laced.
Yes
BACK
No
Start program auto search
Press
press
or
OK
button on the remote control to move the yellow cursor to [BACK] or [YES], [NO], and
to active it.
[BACK]: return to previous setup page
[NO]: cancel auto search, return to main menu
[YES]: delete current program list and start new auto search.
F irst Time Installation(2)
D o you w ant to start auto search?
Previo us channe l list will be
rep laced.
Yes
BACK
No
Program auto search is going on
Autom atic Se arch
Prog ress
40%
C hannel N o 30
F requen cy 456M Hz
000
Music List: 000
Bingo, we catch something
第 10 页 共 10 页
OK
Autom atic Se arch
Prog ress
62%
C hannel N o 40
F requen cy 730.0M Hz
003
Music List: 000
Done! All programs we found it will be saved as a new program list. then, you can watch TV now
Message
Data Saving
Please Wait
Manual installation Please follow these steps to finish
DVB Manual installation.
Press the
OK
button to display DVB menu
Move yellow cursor to [System Setting] by pressing
or
button, Press
or
OK
button to enter
System Setting menu.
Main Menu
Program List
Program Search
Parental Control
System Setting
Game
Accessory
Personal Style
Move the cursor to [Regional Setting], and press
OK
Main Menu
System setting
TV Standar d
Display Type
Video output
Antenna Power
Regional Setting
Language
Time Setting
System Schedule
Press
/
to select your country.
To process others option setting such as [OSD Language] and [Time Zone] [Daylight saving] just move the yellow
cursor to it, and press
or
to change the setting.
R egiona l Setting
C ountry
Lang uage
Time Z one
England
English
GMT +00:00
When you finish setting, please press
OK
to return to main menu.
Move the yellow cursor to [Program Search], press
to enter program search menu.
第 11 页 共 11 页
Main Menu
Program List
Program Search
Parental Control
System Setting
Game
Accessory
Personal Style
You must enter the correct password (default is 8888) to proceed program search.
Message
****
Enter PIN
OK
Move the cursor to Automatic Search, press
OK
to activate it.
Main Menu
Program Search
Automatic Search
Manual Search
Manual search suits with expert
Move to [OK], press
OK
to process next step.
Warning
Do you want to start Auto Search?
C ance l
OK
Select [YES] or [NO], and then Auto Search will start.
[YES]:delete previous Program list before auto search
[NO]:keep previous program list and process auto search.
Warning
Do you want to erase your
previous channel list?
Yes
No
Automatic search is in progress.
Autom atic Se arch
Prog ress
40%
C hannel N o 30
F requen cy 456M Hz
000
Music List: 000
The program which has been searched will be stored.
第 12 页 共 12 页
Autom atic Se arch
Prog ress
62%
C hannel N o 40
F requen cy 730.0M Hz
003
Music List: 000
When the searching is finished, the program list will be updated and saved.
Message
Data Saving
Please Wait
TV program will be showed on screen directly. Now you can watch high quality TV.
TV
350 Moving Picture
LR
Watching TV and Browse Program
Program Preview
Press
OK
button to enable program preview function Move the yellow cursor up and down to select program to
preview, press
OK
to confirm it.
TV Program List
N o Program List
1 Color Bar
2 Monoscope
3 Moving Picture
Direct input
You still can switch to program direct by enter its number.
350
MoniDTV 1200 has a 9 pictures navigation function, press digest button to enable it. Select one of thumbs can
switch it to dynamic preview mode, press button can confirm your selection and it will be showed on TV from
thumb to full screen mode.
第 13 页 共 13 页
Nine pictures navigation
Teletext.
The MoniDTV 1200 support teletext display, press TEXT button to start this mode.
Move yellow cursor to select [ENG] or [OFF] press
OK
button to confirm your selection.
When the current broad casting program provides
Teletext
ENG
OFF
Teletext display
Use numerical key button enter page number. Press [EXIT] button to return TV play mode.
Subtitle
Press sub key to switch Closed Captioning on/off. Note: this function only appears when the program and TV
provides them.
Teletext
ENG
OFF
Electronic Program Guide
The MoniDTV 1200 support Electronic Program Guide (EPG) function, you can press EPG button to navigate all
TV programs you saved.
* This function depends on program service support.
TV Program List
No Program List
1 Color Bar
2 Monoscope
3 Moving Picture
Moving Picture
11:00-14:00
Moving Picture
14:00-17:00
第 14 页 共 14 页
The TV program information
such as: a program parade. Select on of the programs and press
/
to
browse.
Press EXIT or
to return up level menu, if you want to see more
please press
TV Program List
No Program List
1 Color Bar
2 Monoscope
3 Moving Picture
information about your selected program
button.
2006/04/15 Moving Picture
11:00 Moving Picture
14:00
14:00 Moving Picture
17:00
A description about the program appears. Press EXIT or
t o return up level menu.
THE AMAZING RACE
2006/04/15 13:30-16:30
Desoription:
As teams continue to make their way through
Budapest, infighting among teammates proves to
be more challenging than the tasks they compete
in, while a food task proves to be a major
roadblock for many.
MAIN MENU FUNCTION DESCRIPTION
Program List
Press the MoniDTV 1200 MENU button will show the main menu, use
[Program List] and press
/
to move the yellow cursor to.
to enter Program List Submenu.
Program List submenu include three functions: TV Program List, Music Program List.
Main Menu
Program List
Program Search
Parental Control
System Setting
Game
Accessory
Personal Style
Music program list and TV program list have same operation, So we take TV program list operation as an
example.
Main Menu
Program Search
Automatic Search
Manual Search
Sort
Move the yellow cursor to one of the program, you want to edit and press
第 15 页 共 15 页
OK
button to select it, Press
OK
again will deselect it.
Prog ram ed it tab le
NO
Program Name
1
Color
2
Monoscope
3
Moving Picture
Favor
Move
Del
The unit offer FAV function, you can mark your favorite program with a heart-shaped icon in the
program list.
In TV model press the FAV button on the remote control will enable favorite program function, this time you only
switch the program you are watching between your favorite programs by using
/
button, press FAV
button again Then it will disable this function.
Prog ram ed it tab lbe
NO
Program Name
1
Color
2
Monoscope
3
Moving Picture
Favor
Move
/
using
Del
/
/
button, press
OK
button and display del icon. The delete program will
complete operation.
Prog ram ed it tab le
NO
Program Name
1
Color
2
Monoscope
3
Moving Picture
Favor
Move
Del
First time installation must process program search, to update its program list and keep watching the program
properly.
And if your TV service changes the transfers setting, you also need to do the program search again. Select
[program search] and press
to enter program search submenu.
Main Menu
Program List
Program Search
Parental Control
System Setting
Game
Accessory
Personal Style
There are two selections for your choice.
Automatic search: you can reference first time Installation Manual search: this operation suit with experts, it is
frequency and channel Number
第 16 页 共 16 页
Main Menu
Program Search
Automatic Search
Manual Search
Sort
Move the cursor to [manual search] and press
/
Using
OK
OK
to process next step.
button select the channel number you want to process, finally move the cursor to [OK], and press
button to execute a manual search process. Using
/
button select option
Prog ram ed it tab le
Channel No
06
Frequency
Bandwidth
7
MHz
OK
Strength
46%
Quality
89%
Manual searching, press any key to exit.
Message
Manual Searching
Please Wait
Press Any Key to Exit
Searching finish, the program direct show on TV Screen.
Main Menu
Program Search
Automatic Search
Manual Search
Sort
Press EXIT button to return to the normal play status. The unit will automatically save data.
Message
Data Saving
Please Wait
This function use to block some program which not fit for the Children watching.
Press DVB menu button to display the main menu, select [parental control], and press
Main Menu
Program List
Program Search
Parental Control
System Setting
Game
Accessory
Personal Style
Type the 4 digit number, if the password is valid you can enter further setup menu.
Preset password is 8888.
第 17 页 共 17 页
to process next step.
Message
Enter PIN
****
OK
Select Parental Control Level.
Main Menu
Parental Control
Channel Lock
Parental Setting
Change PIN
Select in different level of parental control (BLOCK ALL, BLOCK PG, BLOCK M, BLOCK MA, BLOCK AV, BLOCK
R&NO BLOCK) by using
/
to choose.
Press OK, to enable the Parental Control Level.
Main Menu
Parental Control
Channel Lock
CLOCK
Change new P/N you must enter the old pin. Before you change the new PIN.
Finished by OK return to normal play status.
Change Parental PIN
Old PIN
New PIN
Config New PIN
Main Menu
System setting
Message
****
Enter PIN
OK
OK
Setup TV Standard
Press MENU button to display the main menu, select [system Setting], and press
to process next step.
Main Menu
Program List
Program Search
Parental Control
System Setting
Game
Accessory
Personal Style
TV Standard
To set various color system signal for the video output.
PAL: The TV broadcast system used in UK, Australia, Germany and other countries; it will be output to you TV
when you select
NTSC: The TV broadcast system used in Korea, Japan, USA, Canada and other countries.
第 18 页 共 18 页
AUTO: Select it if you have a multi system TV set compatible with NTSC and PAL.
Main Menu
System setting
TV Standar d
Display Type
Video output
Antenna Power
Regional Setting
Language
Time Setting
System Schedule
Display Type
Select [Video output], and press
to process next step. Set up different projects by pressing the
or
button.
Depending on the type of television you have, you may adjust the screen setting (aspect ratio).
Main Menu
System setting
Display Type
4:3PS
4:3LB
16:9
Video output
Select [Video output], and press
to process next step. Set up different projects by pressing the
or
button.
Depending in the real’s connect, you may adjust the Video output model.
Main Menu
System setting
Video output
CVBS+S-Video
VGA
Select [Video output], and press
to process next step.Set up different projects by pressing the
or
button select ON or OFF.
Main Menu
System setting
Antenna Power
ON
OFF
Press
/
to select your country. To process others option setting such as [OSD Language]
and [Time Zone] [Daylight saving] just move the yellow cursor to there, and press
setting.
第 19 页 共 19 页
or
to change the
R egiona l Setting
C ountry
England
Lang uage
English
Time Z one
Press
GMT +00:00
/
/
/
button, select different option and different language.
Language
OSD Language
English
1st Audio Language
English
2nd Audio Language
English
DVB Subtitle
English
Change your daylight saving out by press in the
Set up other projects by pressing the
or
or
button
button.
System update
Status
Initialing
Transmission 000%
Time Setting
Burn
GMT usage
ON
Time Zone
GMT+00:00
000%
Press Any Key to Exit
Setup Game
Press MENU button to display the main menu, select [system Setting], and press
Main Menu
Program List
Program Search
Parental Control
System Setting
Game
Accessory
Personal Style
Game
Use remote controller to play Games.
Main Menu
Game
Mine
Tetris
Gomoku
Calendar
Accessory
System Information: Display system information.
Factory Default: Restore Factory Default.
If you restored it, all the setting you made would be cleared.
System update: Update your system
第 20 页 共 20 页
to process next step.
Main Menu
Accessory
System Information
Factory Default
System update
Personal Style
Press
/
to select your Menu Color. To process others option setting such as [Transparency
Level] and [Border Pattern] [Entry Animation] just move the yellow cursor to there, and press
or
to
change
the setting.
Personal Style
Menu Color
Blue
Transparency Level
6
Border Pattern
Round
Entry Animation
Right
MESSAGE
If this information appears, indicate the password Which you input is wrong ,please whether your
Password is correct The unit preset password is :8888.
Message
PIN Code Error
Ok
If this information appears, indicate the unit can't received is too weak, too bad, if use in -door antenna adjust the
antenna is connected.
Message
Warning
PIN Code Error
No Signal
Ok
if such like this picture often appears ,indicate the signal received is too weak, too bad ,if use in-door antenna
adjust the antenna position ,if it still unable To improve picture quality, maybe you need .
If such like this picture appears, indicate the TV standard of the unit doesn't match your TV set ,you
must switch to another TV standard in [system setting] menu or TV .
第 21 页 共 21 页
TROUBLE SHOOTING
There may be various reasons for the abnormal operation of the receiver. Check the receiver according to the
procedures shown below. If the receiver work properly after checking it , please contact the dealer. Don't open
your receiver cover .It may cause a dangerous situation .
The display on front panel does not light up
Check that the power cord is plugged into the wall outlet .
Check whether Power Switch is on .
No picture
Make sure that the product is in Operation Mode.
Make sure that the AV Cable is correctly connected to the TV AV Channel
Make sure the TV is in AV mode, for this Set Top Box uses AV output .
Make sure that antenna cable is correctly connected to the MoniDTV 1200.
Check the brightness level of TV.
Check the channel that is on air.
No or bad signal message appears Check other device
Poor Picture & sound quality
Install antenna where there is not obstacle ahead.
Make sure to avoid putting mobile phone or microwave oven around the MoniDTV 1200.
Use 75 Ohm coaxial cable to connecting TV and antenna.
The MoniDTV is a Standard Definition Receiver ,so when viewing High Definition channels on it may
cause poor image and sound.
No or poor sound
Check the volume level of the TV .
Check the Mute status of the TV and product .
Press the Audio button to change the Sound Track type .
Remote control does operate
To manipulate the equipment with the remote control ,the control's emitting part should
be directly pointing towards the receiving part (IR Sensor) of receiver.
Check the battery of Remote control.
NOTE: If the problem can not be solved by going through this Trouble Shooting Guide please
contact Our Customer Care Centre for further help.
GLOSSARY OF TERMS
EPG
Electronic Program Guide. A software that viewers to navigate easily among
the large number of channels provided by digital technology, in order to select the
service the desire.
FTA
Free To Air
GMT
Greenwich Mean Time. (Australia time is GMT +10:00)
第 22 页 共 22 页
PIN Number
Personal ldentification Number. A four-digit code that is used for locking/unlocking,
e.g with the parental control feature.
OSD
On Screen Display
Rs232
Serial data port For use PC to upgrade software.
S-Video
Y/C output for a S-VHS or Hi-Fi Video Recorder
VBI
Vertical Blanking Interval
SPECIFICATIONS
Terrestrial
Tuner/Demodulator
VHF:174MHz to 230MHz
UHF:470MHz to 862MHz
DVB-T (ETSI 300 744)
6MHz, 7MHz, 8MHz
2k/8k-carrier hierarchical
QPSK, 16QAM, 64QAM
1/32, 1/16, 1/8, 1/4, active symbol duration
1/2, 2/3, 3/4,5/6, 7/8
Input Frequency
Standard
Channel Bandwidth
OFDM Spectrum
Modulation Mode
Guard Interval Modes
FEC Modes Rate
System
Video
CPU
Transpor
Flash Memory
SDRAM
Standard
Field/Frame Rate
Output mode supported
Aspect Ratio
Audio
interface
Standard
MPEG-1 ISO/IEC 11172-3 layers 1 and 2
MPEG-2 ISO/IEC 13818-3
Sampling Frequency
Digital Audio Out Format
RF input / Loop through Output
CVBS/Stereo Output
Y/C Output
VGA Output
VGA Input
32, 44., 48kHz
IEC-60958/IEC-61937
IEC Type 75 Ohm
1 set of RCA Connectors (3 RCA)
S-VHS
DB15 PIN
MINI8 PIN
5 Keypads, With 4x7 Segment LED
Firmware Upgrade over RS232C
User Interface
Software upgrade
Power
Geniatech GT8600
DVB Demultiplexer
8MB
4X16M
MPEG-1 ISO/IEC 13818 and
MPEG-2 MP@ML
50/25Hz
720x576i
4:3, 16:9 with letter box and Full Screen
supported
input voltage
Operating Frequency
100-240VAC
50/60Hz
第 23 页 共 23 页
Out voltage
7.5V~12V/DC 1A~750mA
第 24 页 共 24 页