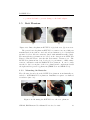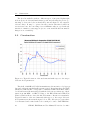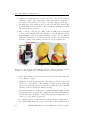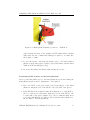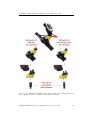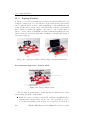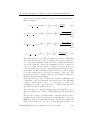
1
EM-Phantom User Manual V 4.4 Schmid & Partner Engineering AG October 2015 2 SPEAG, EM-Phantom User Manual V 4.4, October 2015 Contents 1 POPEYE V5.x 1.1 Introduction . . . . . . . . . . . . . . . . . . 1.2 Cautions and Warnings . . . . . . . . . . . 1.3 Torso Phantom . . . . . . . . . . . . . . . . 1.3.1 Introduction . . . . . . . . . . . . . 1.3.2 Construction . . . . . . . . . . . . . 1.3.3 Dimensions . . . . . . . . . . . . . . 1.3.4 Operation . . . . . . . . . . . . . . . 1.4 Arm Phantom . . . . . . . . . . . . . . . . 1.4.1 Mounting the Arm . . . . . . . . . . 1.4.2 Mounting the Hand . . . . . . . . . 1.5 Butt Phantom . . . . . . . . . . . . . . . . 1.5.1 Mounting the Buttocks . . . . . . . 1.6 Leg Phantom . . . . . . . . . . . . . . . . . 1.6.1 Mounting the Leg . . . . . . . . . . 1.7 Foot Phantom . . . . . . . . . . . . . . . . . 1.7.1 Mounting the Foot . . . . . . . . . . 1.8 Stand for Whole-Body Phantom w/ Wheels 1.8.1 Operation . . . . . . . . . . . . . . . 1.9 Positioning POPEYE V5.x . . . . . . . . . 1.10 Key Dimensions . . . . . . . . . . . . . . . . 2 SAM-V4.5BS Head Phantom (CTIA 2.1 Introduction . . . . . . . . . . . . . . 2.2 Construction . . . . . . . . . . . . . 2.3 Dimensions . . . . . . . . . . . . . . 2.4 Operation . . . . . . . . . . . . . . . 2.5 Summary of Technical Specifications 3.x) . . . . . . . . . . . . . . . . . . . . . . . . . . . . . . . . . . . . . . . . . . . . . . . . . . . . . . . . . . . . . . . . . . . . . . . . . . . . . . . . . . . . . . . . . . . . . . . . . . . . . . . . . . . . . . . . . . . . . . . . . . . . . . . . . . . . . . . . . . . . . . . . . . . . . . . . . . . . . . . . . . . . . . . . . . . . . . . . . . . . . . . . . . . . . . . . . . . . . . . . . . . . . . . . . . . . . . . . . . . . . . . . . . . . . . . . . . . . . . . . . . . . . . . . . . . . . . . . . . . . . . . . . 1 2 2 3 3 3 4 4 9 9 11 13 13 15 15 18 19 19 20 23 25 . . . . . 27 27 28 29 30 30 3 SAM-V4.5BSE Head Phantom 33 3.1 Introduction . . . . . . . . . . . . . . . . . . . . . . . . . . . . 33 3.2 Construction . . . . . . . . . . . . . . . . . . . . . . . . . . . 34 3.3 Dimensions . . . . . . . . . . . . . . . . . . . . . . . . . . . . 34 i 3.4 3.5 Operation . . . . . . . . . . . . . . . . . . . . . . . . . . . . . Technical Specifications . . . . . . . . . . . . . . . . . . . . . 35 35 4 SAM Hand OTA Phantom SHO-V2/3 RB, 4.1 Introduction . . . . . . . . . . . . . . . . . . 4.2 Construction . . . . . . . . . . . . . . . . . 4.3 Dimensions of Hand Phantom and Spacer . 4.4 Hand Phantom Fixture/Positioner . . . . . 4.5 Alignment Tool B . . . . . . . . . . . . . . 4.6 Recommended Operation . . . . . . . . . . SHO-V2/3 LB 37 . . . . . . . . . . 37 . . . . . . . . . . 37 . . . . . . . . . . 38 . . . . . . . . . . 39 . . . . . . . . . . 39 . . . . . . . . . . 40 5 SAM Hand OTA Phantom SHO-V2/3 RC, 5.1 Introduction . . . . . . . . . . . . . . . . . . 5.2 Construction . . . . . . . . . . . . . . . . . 5.3 Dimensions of Hand Phantom and Spacer . 5.4 Hand Phantom Fixture/Positioner . . . . . 5.5 Alignment Tool C . . . . . . . . . . . . . . 5.6 Recommended Operation . . . . . . . . . . SHO-V2/3 LC 45 . . . . . . . . . . 45 . . . . . . . . . . 45 . . . . . . . . . . 46 . . . . . . . . . . 46 . . . . . . . . . . 48 . . . . . . . . . . 48 6 SAM Hand OTA Phantom SHO-V2/3 RP, SHO-V2/3 LP 52 6.1 Introduction . . . . . . . . . . . . . . . . . . . . . . . . . . . . 52 6.2 Construction . . . . . . . . . . . . . . . . . . . . . . . . . . . 52 6.3 Dimensions of Hand Phantom and Spacer . . . . . . . . . . . 53 6.4 Talk Mode . . . . . . . . . . . . . . . . . . . . . . . . . . . . . 54 6.4.1 Hand Phantom Fixture/Positioner – Talk Mode . . . 54 6.4.2 Recommended Operation – Talk Mode . . . . . . . . . 54 6.5 Data Mode . . . . . . . . . . . . . . . . . . . . . . . . . . . . 60 6.5.1 Hand Phantom Fixture/Positioner – Data Mode . . . 60 6.5.2 Recommended Operation – Data Mode . . . . . . . . 60 7 SAM Hand OTA Phantom SHO-V2/3 RW, SHO-V2/3 LW 7.1 Introduction . . . . . . . . . . . . . . . . . . . . . . . . . . . . 7.2 Construction . . . . . . . . . . . . . . . . . . . . . . . . . . . 7.3 Dimensions of Hand Phantom and Spacer . . . . . . . . . . . 7.4 Talk Mode . . . . . . . . . . . . . . . . . . . . . . . . . . . . . 7.4.1 Hand Phantom Fixture/Positioner – Talk Mode . . . 7.4.2 Recommended Operation – Talk Mode . . . . . . . . . 7.5 Data Mode . . . . . . . . . . . . . . . . . . . . . . . . . . . . 7.5.1 Hand Phantom Fixture/Positioner – Data Mode . . . 7.5.2 Recommended Operation – Data Mode . . . . . . . . ii 64 64 64 65 66 66 67 71 71 71 SPEAG, EM-Phantom User Manual V 4.4, October 2015 Contents 8 SAM Hand OTA Phantom SHO-V2/3 RD, SHO-V2/3 LD 8.1 Introduction . . . . . . . . . . . . . . . . . . . . . . . . . . . . 8.2 Construction . . . . . . . . . . . . . . . . . . . . . . . . . . . 8.3 Dimensions of Hand Phantom and Spacer . . . . . . . . . . . 8.4 Hand Phantom Fixture/Positioner – Data Mode . . . . . . . 8.5 Alignment Tool B . . . . . . . . . . . . . . . . . . . . . . . . 8.6 Recommended Operation – Data Mode . . . . . . . . . . . . . 74 74 74 75 76 76 77 9 SAM Hand OTA Phantom SHO-V2/3 RTAB/LTAB 9.1 Introduction . . . . . . . . . . . . . . . . . . . . . . . . 9.2 Construction . . . . . . . . . . . . . . . . . . . . . . . 9.3 Dimensions of Hand Phantom and Spacer . . . . . . . 9.4 Hand Phantom Fixture/Positioner – Testing Mode . . 9.5 Recommended Operation – Testing Mode . . . . . . . . . . . . 81 81 81 82 83 83 . . . . . 89 89 89 90 90 92 . . . . . 97 97 98 98 99 102 . . . . . 10 SAM Hand OTA Phantom SHO-V2/3 RTHG/LTHG 10.1 Introduction . . . . . . . . . . . . . . . . . . . . . . . . . 10.2 Construction . . . . . . . . . . . . . . . . . . . . . . . . 10.3 Dimensions of Hand Phantom and Spacer . . . . . . . . 10.4 Hand Phantom Fixture/Positioner – Testing Mode . . . 10.5 Recommended Operation – Testing Mode . . . . . . . . 11 SAM Hand OTA Phantom SHO-V2/3 RLAP/LLAP 11.1 Introduction . . . . . . . . . . . . . . . . . . . . . . . . . 11.2 Construction . . . . . . . . . . . . . . . . . . . . . . . . 11.3 Dimensions of Hand Phantom and Spacer . . . . . . . . 11.4 Hand Phantom – Operating Mode . . . . . . . . . . . . 11.5 Laptop Fixture . . . . . . . . . . . . . . . . . . . . . . . . . . . . . . . . . . . . . . . . . . . . . . . . . . . . . 12 Travel Case/Car Torso (TCCT) and Transportation Box 12.1 Travel Case / Car Torso (TCCT) . . . . . . . . . . . . . . . 12.1.1 Introduction . . . . . . . . . . . . . . . . . . . . . . 12.1.2 Dimensions . . . . . . . . . . . . . . . . . . . . . . . 12.1.3 Construction . . . . . . . . . . . . . . . . . . . . . . 12.1.4 Operation Travel Case . . . . . . . . . . . . . . . . 12.1.5 Operation Car Torso . . . . . . . . . . . . . . . . . . 12.2 TCCT Transportation Box (TCCT TB) . . . . . . . . . . . 12.2.1 Introduction and Operation . . . . . . . . . . . . . . 12.2.2 Dimensions . . . . . . . . . . . . . . . . . . . . . . . 12.2.3 Construction . . . . . . . . . . . . . . . . . . . . . . SPEAG, EM-Phantom User Manual V 4.4, October 2015 107 . 107 . 107 . 107 . 107 . 108 . 108 . 109 . 109 . 109 . 110 iii A Uncertainty Assessment of SAM-V4.5 Head and SHO Hand Phantoms 111 A.1 Introduction . . . . . . . . . . . . . . . . . . . . . . . . . . . . 111 A.2 Concept of Phantoms and Positioning Uncertainties . . . . . 111 A.3 Head Phantom Uncertainty . . . . . . . . . . . . . . . . . . . 112 A.4 Hand Phantom Uncertainty . . . . . . . . . . . . . . . . . . . 114 A.5 Hand Phantom Fixture Uncertainty . . . . . . . . . . . . . . 117 A.5.1 Simulation Software . . . . . . . . . . . . . . . . . . . 117 A.5.2 Numerical Evaluation of Hand Phantom Fixtures Uncertainty . . . . . . . . . . . . . . . . . . . . . . . . . . 118 A.5.3 Computation of the Uncertainty . . . . . . . . . . . . 119 A.6 Example of Uncertainty Assessment . . . . . . . . . . . . . . 119 B SHO Mounting Equipment (SHO-ME) 121 B.1 Introduction . . . . . . . . . . . . . . . . . . . . . . . . . . . . 121 B.2 Tools Required . . . . . . . . . . . . . . . . . . . . . . . . . . 121 B.3 Procedure . . . . . . . . . . . . . . . . . . . . . . . . . . . . . 122 B.3.1 SAR measurement with hand phantom using DASY system and Twin SAM Phantom . . . . . . . . . . . . 122 B.3.2 Installing the Hand Phantom on the DASY Device Holder . . . . . . . . . . . . . . . . . . . . . . . . . . 122 B.3.3 Exchanging Hand Phantom Types . . . . . . . . . . . 123 B.3.4 Placing the DUT in the Grip of the Hand Phantom . 125 B.3.5 Angle Adjustment of Hand Phantom for Phone Alignment against Twin SAM Phantom Ear . . . . . . . . . 126 iv SPEAG, EM-Phantom User Manual V 4.4, October 2015 Chapter 1 POPEYE V5.x Figure 1.1: Posable phantom POPEYE V5.x 1 1.1. Introduction 1.1 Introduction The POsable Phantom for Electromagnetic sYstems Evaluations (POPEYE V5.x) is an anatomically correct phantom with posable arms, hands, and legs. It has been designed to meet the requirements for test configurations for which the effects of the body on the electromagnetic (EM) performance cannot be neglected, such as for body wearable transmitters and operating tablet and laptop computers. With a simple adjustment (one tightening screw), the arms, hands, and legs can be positioned accordingly for conducting simulations of any usage or operation (standing, sitting, arms raised, talking position, etc...). The dimensions have been chosen to meet the requirements for conservative testing. The Whole-Body EM Phantom POPEYE V5.x consists of: Torso phantom TORSO-X-V5.x Posable right arm ARMR-V5.x Posable left arm ARML-V5.x Posable right leg LEGR-V5.x Posable left leg LEGL-V5.x Buttocks phantom BUTT-V5.x Right foot JIAOR-V5.x Left foot JIAOL-V5.x Right hand SHO-V2R/X Left hand SHO-V2L/X Please read the following cautions and warnings before continue with the individual whole-body EM phantoms description. 1.2 Cautions and Warnings Caution: The complete Whole-Body EM Phantom POPEYE V5.x weight > 80kg. Appropriate procedures for sage lifting should be followed (see Section 1.9). Warning: The knobs used to adjust the arms and legs should never be removed. Warning: Pose the joints only when the knob is loosen (but not removed), and never force a pose. Especially critical parts are the hand adapters, see Section 1.4.2. 2 SPEAG, EM-Phantom User Manual V 4.4, October 2015 POPEYE V5.x 1.3 1.3.1 Torso Phantom Introduction The torso phantom TORSO-X-V5.x is an anthropomorphically shaped shell phantom that has been developed for EM evaluations for which the effects of the body cannot be neglected, such as hand-held devices and on- or inbody mounted transmitters. The solid bottom plate has grip handles for easy positioning and handling. Figure 1.2: Torso phantom TORSO-X-V5.x with left arm phantom and left PDA hand phantom The torso phantom TORSO-X-V5.x can be upgraded with additional phantom body parts such as arms, hands, legs, and feet (e.g., Figure 1.2). 1.3.2 Construction The high-precision shell of the torso is manufactured from a vinylesterreinforced fiberglass structure. The torso phantom TORSO-X-V5.x can be filled with a broadband tissue simulating gel that complies with the dielectric target parameters of CTIA Test Plan for Wireless Device Over-the-Air Performance, Revision 3.x over a wide frequency range. The parameters of the gel or tissue simulating liquids are verified at 22.0°C. The torso shall be stored at room temperature around 22°C. It must not be exposed to temperatures >30°C or <2°C or to direct sunlight radiation (heating). We have demonstrated the stability of the gel filling over a minimum of three years when the phantom is kept sealed and under the stated temperature conditions (22 +/- 5 C). SPEAG, EM-Phantom User Manual V 4.4, October 2015 3 1.3. Torso Phantom Figure 1.3: Torso phantom TORSO-X-V5.x parts 1.3.3 Dimensions The head of the torso phantom TORSO-X-V5.x is compliant with the geometric data as defined by IEEE SCC34 and 3GPP TR25.914. The dimensions of the torso have been chosen to meet the requirements for conservative testing [1]. 1.3.4 Operation Torso phantom TORSO-X-V5.x can be used self-supported on the solid bottom plate. The solid bottom plate has grip handles for easy handling and positioning on a turntable or any positioner that can support a weight > 40 kg. Note: For safe transport of torso phantom TORSO-X-V5.x, it is strongly recommended the torso phantom be packed in the same packing material in which it was delivered. 1.3.4.1 Torso Phantom - Filled with Tissue Simulating Gel The torso phantom filled with tissue simulating gel is ready to use. The bottom plate (see Figure 1.3) must not be removed from the torso to prevent alteration or contamination of the filling gel material. 1.3.4.2 Empty Torso Phantom and Filling Procedure The empty torso phantom can be filled with tissue simulation liquids as described below. The bottom plate (see Figure 1.3) must not be removed from the torso since the plate is sealed to prevent leakage. The torso phantom is 4 SPEAG, EM-Phantom User Manual V 4.4, October 2015 POPEYE V5.x filled by way of the apertures on the bottom plate. When the torso is not in use, it is recommended to empty it as described below, rinse with hot water and keep the apertures open for drying to prevent contamination. The following describes how to fill and empty the torso. Both procedures require a foam base to position the torso upside down, pliers, and a funnel to fill the liquid (all delivered with the torso). Filling the Torso 1. Place the foam base on the floor and position the torso upside down into the foam base. Please make sure that it remains stable as shown in Figure 1.4. Use additional supports if necessary. (a) (b) Figure 1.4: (a) Foam base with cavity, (b) torso positioned upside down 2. The bottom plate is fixed with 12 screws that follow the contour of the torso (Figure 1.5). Do not remove these 12 screws. Within this contour there are two screws that seal the filling and air release apertures (Figure 1.5(b)). Remove both screws with the pliers as shown in Figure 1.5. The more recent version of the Torso comes with a rectangular plate attached to bottom plate (Figure 1.5(e)). Remove this plate first by removing the 4 visible screws in the center. The bottom plate has a slightly modified design (Figure 1.5(f)). All the instructions also apply to the this new design. 3. The aperture on the right side (see Figure 1.6 (a)) is for air release. Insert the funnel into the left aperture as shown in Figure 1.6 and fill the torso through the funnel. 4. After torso is completely filled, close both apertures by re-inserting the screws, and tighten them with the pliers as shown in Figure 1.7. The torso is ready to be mounted according your requirements. SPEAG, EM-Phantom User Manual V 4.4, October 2015 5 1.3. Torso Phantom (a) (b) (c) (d) (e) (f) Figure 1.5: (a) The outer and (b) inner surfaces of the bottom plate, (c)-(d) removing both screws using pliers, (e) holder plate for new Torso designs (d) bottom plate for new Torso designs 6 SPEAG, EM-Phantom User Manual V 4.4, October 2015 POPEYE V5.x (a) (b) Figure 1.6: Inserting the funnel into the corresponding aperture SPEAG, EM-Phantom User Manual V 4.4, October 2015 7 1.3. Torso Phantom (a) (b) Figure 1.7: Closing the openings and tightening the screws with the pliers Emptying the Torso 1. Ensure that you have the appropriate environment, i.e., a container in which to empty 28 liters of tissue simulating liquid. Prepare a container to store the liquid or follow appropriate procedures to dispose the liquid (refer to the safety sheet of the liquid in use). (a) (b) Figure 1.8: Emptying the torso phantom liquid 2. Position the torso as shown in Figure 1.4 (a) and open two screws (see Figure 1.5 (a)) as shown in Figure 1.5 (c) and (d). 3. Position the torso as shown in Figure 1.8 (a) so that the liquid can drain into the prepared sink. 8 SPEAG, EM-Phantom User Manual V 4.4, October 2015 POPEYE V5.x 4. Clean the inside of the torso with hot water and let it dry by leaving both the filling and air apertures open and exposed to air circulation. 1.4 Arm Phantom The posable right and left arms ARMR-V5.x (ARM Right) and ARMLV5.x (ARM Left) are generic right and left arm phantoms consisting of an outer bulk part manufactured from a silicone- and carbon-based mixture (with material target parameters given in CTIA Test Plan for Wireless Device Over-the-Air Performance, Revision 3.x and an inner low-loss dielectric structure with joints. With this architecture, the arm phantoms are suitable for EM evaluations above 500 MHz. The arm phantoms can be easily attached to the torso phantom TORSO-X-V5.x, and every SPEAG hand phantom can be attached to the arm with adapters that allow realistic human arm postures to be mimicked. Figure 1.3 shows an overview of torso and arm V5.1 parts. 1.4.1 Mounting the Arm The following describes how the arm is mechanically attached to the torso. Once attached, the arm can be positioned in any posture. Installation requires two metric wrenches with sizes of 20 and 30 mm. 1. Ensure that the left and right arms are being attached to the correct sides of the torso. 2. The arm is attached while in a straightened position. Place the arm on a table and loosen the locking knob on the elbow. Extend the arm to a straight position and tighten the locking knob (Figure 1.9). (a) (b) Figure 1.9: (a) Loosening the locking knob on the elbow and (b) posing the arm into a straight position SPEAG, EM-Phantom User Manual V 4.4, October 2015 9 1.4. Arm Phantom 3. The 30 mm wrench is used to loosen the black screw on the left and/or right side of the torso as shown in Figure 1.10. Remove the screw completely. Proceed to step 4 quickly to minimise exposure time of the filling gel to the air through the bolt hole. (a) (b) (c) Figure 1.10: Removing the black screw using 30 mm wrench 4. Mount the arm to the torso by screwing it manually into the bolt hole. Then, use the 20 mm wrench to securely fasten it as shown in Figure 1.11. (a) (b) Figure 1.11: Mounting the arm into the torso manually and then tightening with a 20 mm wrench 5. The lower half of the arm should always be supported when the locking knob on the elbow is loosened, which allows all three joints (shoulder, elbow, and wrist) to be freely rotated. Position the arm to your desired posture and tighten the locking knob. 6. Figure 1.12 shows how to mount the wrist to the arm. The wrist can 10 SPEAG, EM-Phantom User Manual V 4.4, October 2015 POPEYE V5.x be simply screwed to the tip of the arm and tightened manually. (a) (b) (c) Figure 1.12: Mounting the wrist to the tip of the arm 1.4.2 Mounting the Hand Every SPEAG hand phantom can be attached to the arm phantoms V5.x (ARMR-V5.x/ARML-V5.x) with the corresponding adapters. The adapter is first mounted on the arm phantom, and subsequently the hand phantom is mounted to the adapter. The following describes how a PDA hand is mechanically mounted to the arm. Installation requires one flathead screwdriver. Please follow the same procedure for all other hand phantoms. Mounting the PDA Hand Phantom to the Arm Phantom 1. Insert the PDA hand adapter into the wrist as shown in Figure 1.13 (a) and (b). Fix it with the 20 mm screw provided as shown in Figure 1.13 (c) and (d). 2. There are four holes in the PDA hand. Insert the hand adapter into the outermost holes of the hand as shown in Figure 1.14. 3. Insert 61 mm screws into the remaining holes and tighten them to mount the hand to the arm (Figure 1.15). 4. The lower half of the arm should always be supported when the locking knob on the elbow is loosened, which allows all three joints (shoulder, SPEAG, EM-Phantom User Manual V 4.4, October 2015 11 1.4. Arm Phantom (a) (b) (c) (d) Figure 1.13: Mounting PDA adapter to the wrist using 20 mm long screw (a) (b) Figure 1.14: Mounting PDA hand phantom to PDA hand adapter (a) (b) Figure 1.15: Fixing the PDA hand phantom by tightening 61 mm screws elbow and wrist) to be freely rotated. Position the arm and hand to the desired posture and tighten the locking knob. Please use the wrist 12 SPEAG, EM-Phantom User Manual V 4.4, October 2015 POPEYE V5.x to position the hand to prevent damage to the hand adapter. 1.5 Butt Phantom (a) (b) Figure 1.16: Buttocks phantom BUTT V5.1 (a) back view, (b) front view The generic buttocks phantom BUTT-V5.x consists of an outer bulk part manufactured from a silicone- and carbon-based mixture (color: black) with an inner low-loss dielectric structure (fixed with minimal metallic parts). The material target parameters are based on the data given in CTIA Test Plan for Wireless Device Over-the-Air Performance, Revision 3.x. The BUTT-V5.x phantom has been developed for performance of EM evaluations in combination with theTORSO-X-V5.x phantom. It can be easily attached to the bottom plate of the torso phantom and complemented with the right and left generic leg phantoms (LEGR-V5.x and LEGL-V5.x). 1.5.1 Mounting the Buttocks The following describes how the BUTT-V5.x phantom is mechanically attached to theTORSO-X-V5.x phantom. Installation requires one flathead screwdriver (size one). (a) (b) Figure 1.17: Mounting the BUTT-V5.x to the torso phantom SPEAG, EM-Phantom User Manual V 4.4, October 2015 13 1.5. Butt Phantom 1. Place the torso and the buttocks phantoms in a horizontal position on a table. On the bottom plate of the torso phantom you will find four holes that align with holes on the buttocks phantom (see Figure 1.17 (a)); push the phantoms together such that the holes on the torso phantom overlap with those for the buttocks phantom. Please be sure to align the two phantoms with front sides both facing front. 2. Use four the 8 mm long screws provided (two on each side) to attach the buttocks phantom to the torso phantom as demonstrated in Figure 1.17 (b). The BUTT-V5.x phantom can sit self-supported on any flat surface. However, it is recommended to use the whole-body stand (STAND-V5.x) to support the phantom. The following describes the handling of the bottom extended torso phantom together with the stand. (a) (b) (c) Figure 1.18: (a) Recommended grip to lift the phantom on the socle (red circle (b)) of the stand to support the phantom (c) 1. Two persons are needed to lift the phantom. Be aware that the torso together with the butt extension weighs ca. 50 kg. Figure 1.18 (a) shows the recommended grip: Lift the phantom by holding it on the silicone of the back part of the buttocks phantom. Use your second hand to support the torso at the shoulder. 2. The stand is equipped with a socle (see Figure 1.18 (b)) that perfectly fits the recess on the bottom of the buttocks phantom. Place the torso on the socle and ensure that it is fully engaged. The phantom is now completely supported by the stand (Figure 1.18 (c)). 14 SPEAG, EM-Phantom User Manual V 4.4, October 2015 POPEYE V5.x Figure 1.19: Tightening the safety belt around the phantoms neck 3. Please always tighten the safety belt around the neck of the phantom as shown in Figure 1.19. 1.6 Leg Phantom The posable right and left legs LEGR-V5.x (LEG Right) and LEGL-V5.x (LEG Left) are posable generic thigh and shank phantoms consisting of an inner low-loss dielectric structure with knee joints. Both thigh and shank are covered with a bulk part manufactured from a silicone- and carbonbased mixture according material target parameters given in CTIA Test Plan for Wireless Device Over-the-Air Performance, Revision 3.x. With this architecture, the LEGR/L-V5.x is suitable for EM evaluations above 500 MHz. The LEGR/L-V5.x can be easily attached via the BUTT-V5.x phantom to the TORSO-X-V5.x phantom. With a foot phantom (JIAOR/L V5.x) attached at the ankle joint, a complete leg is formed. 1.6.1 Mounting the Leg The following describes how the right and left leg phantoms are mechanically attached to the buttocks phantom. Installation requires one allen wrench 8 mm in size. 1. Before you start to mount the legs to the buttocks, we strongly recommend that the torso is pre-assembled with the buttocks phantom and SPEAG, EM-Phantom User Manual V 4.4, October 2015 15 1.6. Leg Phantom (a) (b) (c) Figure 1.20: Locations of mounting holes and fixing screw to attach the legs to the buttocks phantom mounted on the stand support (STAND-V5.x) as described earlier in Section 1.5.1. 2. In Figure 1.20, the locations of the mounting holes for the left and right legs and the fixing screw position are shown. Ensure that the left and right legs are being attached to the correct sides of the buttocks phantom. 3. The legs should be attached in a straight configuration (if the legs are bent, loosen the knob (Figure1.21) and straighten them). It is important that the left leg (LEGL-V5.x) is mounted first. Figure 1.21: The knob on the knee to adjust the leg position 16 SPEAG, EM-Phantom User Manual V 4.4, October 2015 POPEYE V5.x Figure 1.22: Attaching the leg to the buttocks phantom. IMPORTANT: Left leg mounted first (a) (b) (c) Figure 1.23: (a) Pushing the legs from both sides, (b) and (c) inserting and tightening plastic screw to fix the legs to the buttocks SPEAG, EM-Phantom User Manual V 4.4, October 2015 17 1.7. Foot Phantom 4. Insert the joint of the left leg into the corresponding mounting hole in the BUTT-V5.x phantom (Figure 1.22 top). Then insert the joint of the right leg into the right mounting hole (Figure 1.22 bottom). Note that the right joint is recessed in the joint of the left leg. 5. When both legs are in their corresponding mounting holes, push them from both sides simultaneously as shown in Figure 1.23 (a) until they click. 6. Insert the 60 mm plastic screw into the screw hole to fix the legs. Tighten the screw only hand-tight. 1.7 Foot Phantom The right and left foot phantoms JIAOR-V5.x and JIAOL-V5.x are homogeneous anthropomorphically shaped foot phantoms manufactured from a silicone- and carbon-based mixture (color: black) and a low-loss dielectric insert at the heel. The material target parameters are based on the data given in CTIA Test Plan for Wireless Device Over-the-Air Performance, Revision 3.x. The JIAOR/L-V5.x phantom has been developed for EM evaluations and can be easily attached to the leg phantom (LEGR/L-V5.x) ankle joint to complete a posable human leg. Figure 1.24: Mounting foot phantom 18 SPEAG, EM-Phantom User Manual V 4.4, October 2015 POPEYE V5.x 1.7.1 Mounting the Foot The installation of the JIAOR/L V5.x foot phantom does not require any special tools. 1. Ensure that the left and right feet are attached to the corresponding legs. 2. Attach the foot to the tip of the ankle as shown in Figure 1.24 and screw it in clockwise direction until it is tight. 1.8 Stand for Whole-Body Phantom w/ Wheels The STAND-V5.x has been developed for the support and transport of the Whole-Body EM Phantom POPEYE V.5x. It consists of a wooden base with a detachable metallic transporter and a vertical support structure composed of white polyoxymethylene (POM), white glass-fiber-reinforced poles, and black glass-fiber-reinforced PA66 engineering plastic. The metallic transporter can be removed for EM evaluations. (a) (b) Figure 1.25: STAND-V5.x parts SPEAG, EM-Phantom User Manual V 4.4, October 2015 19 1.8. Stand for Whole-Body Phantom w/ Wheels 1.8.1 Operation Support The following describes how the STAND-V5.x is used in the support mode. (a) (b) (c) Figure 1.26: Removing the metallic transporter for EM evaluations 1. Loosen all four screws on the bottom of the stand (Figure 1.26 (a) and (b)) and remove them. 2. Remove the entire metallic transporter from the stand as shown in Figure 1.26 (c). The stand is now completely metal free. 3. Pull out the two pins on each side as shown in Figure 1.27 (a). 4. Pull out the bar on each side and fix the position with the pin in one of the predetermined fixing holes (Figure 1.27 (b)). 5. Loose the screws to adjust the stand feet on the floor, then tighten again (Figure 1.27 (c) and (d)). 20 SPEAG, EM-Phantom User Manual V 4.4, October 2015 POPEYE V5.x (a) (b) (c) (d) Figure 1.27: Stabilising the stand Transport The stand can also serve as a dolly for transporting the whole-body phantom (see Figure 1.28). 1. Stand behind the dolly (STAND-V5.x) and put your left (or right) foot on the wheel axle. Step back a foot or two with your right foot to lean the stand back to engage the wheels. Push and steer the stand with the whole-body phantom to your desired destination. 2. If you need to overcome an obstacle during transport ask a colleague to push and lift while you pull and steer the wheels of the dolly in the right direction. SPEAG, EM-Phantom User Manual V 4.4, October 2015 21 1.8. Stand for Whole-Body Phantom w/ Wheels Figure 1.28: STAND-V5.x used as a dolly to transport the whole-body phantom 22 SPEAG, EM-Phantom User Manual V 4.4, October 2015 POPEYE V5.x 1.9 Positioning POPEYE V5.x The Whole-Body EM Phantom POPEYE V5.x can be positioned in any realistic human pose. Please follow the procedures recommended below for lifting the whole-body phantom documented (see Figure 1.29). Note that at least three people are needed to lift the whole phantom. It is strongly recommended to ensure that the carrying path of the wholebody phantom is as short as possible. 1. Loosen the knobs on both legs. 2. Two people, one on each side of the phantom, hold the bottom grip with one hand and use the other hand to support the torso at the shoulder (see Figure 1.29 top). The third person lifts both legs simultaneously by holding them above and behind the knee joints. 3. Lift the whole-body phantom just high enough to remove it from the socle and carry it to the desired location (e.g., POPEYE V5.x sitting on a chair, Figure 1.29 bottom). 4. Pose the phantom by adjusting all joints, then tighten all knobs to fix. SPEAG, EM-Phantom User Manual V 4.4, October 2015 23 1.9. Positioning POPEYE V5.x Figure 1.29: Recommended procedure to lift the whole-body phantom. Bottom right: Position with laptop on a chair 24 SPEAG, EM-Phantom User Manual V 4.4, October 2015 POPEYE V5.x 1.10 Key Dimensions Weight TORSO-OTA-V5.x: ARMR-V5.x and ARML-V5.x: LEGR-V5.x and LEGL-V5.x : BUTT-V5.x: JIAOR-V5.x and JIAOL-V5.x: SHO-V2Rx and Lx (incl. adapter): 41.4 kg 7.2 kg 27.2 kg 5.3 kg 2.8 kg 1.4 kg TOTAL: 85.3 kg TORSO-X-V5.x empty: STAND-V5.x: 12.4 kg 46.5 kg Dimensions Figure 1.30: Dimensions of the Whole-Body EM Phantom POPEYE V5.x in mm SPEAG, EM-Phantom User Manual V 4.4, October 2015 25 1.10. Key Dimensions 26 SPEAG, EM-Phantom User Manual V 4.4, October 2015 Chapter 2 SAM-V4.5BS Head Phantom (CTIA 3.x) 2.1 Introduction SAM Head V4.5BS (Broadband Solid) has been designed for assessment of the radiation pattern or total radiated power. Its geometry complies with the SAM data as defined by IEEE SCC34 and 3GPP TR25.914 “Measurements of Radio Performances for UMTS Terminals in Speech Mode” Release 6, CTIA Test Plan for Wireless Device Over-the-Air Performance, Revision 3.x High precision casting ensures accurate shape, thickness and tolerances in the relevant areas. (a) (b) Figure 2.1: SAM Head V4.5BS (a) with device holder and (b) with hand fixture/positioner and hand phantoms 27 2.2. Construction The head is available with two different types of integrated lightweight holders (device holder and hand fixture/positioner) allowing the precise positioning of devices in both touch and tilt positions, aligned to the engraved reference lines. It may be operated in any position when fixed with four screws at its base; the base flange serves simultaneously as a pedestal and interface for fixation on any support (a torso version and shoulder mountable flanges are not available). 2.2 Construction Figure 2.2: Typical deviation of the used material with respect to the target dielectric head parameters The shell of SAM Head V4.5BS is manufactured from reinforced polypropylene and each head is individually pressure tested. Regarding shape and shell thickness, SAM-V4.5BS corresponds to SAM-V4.5CTIA but is filled with a broadband semi-solid material (gel) with the dielectric specifications of head tissue from 300 MHz – 6 GHz according to the IEC 62209 and CTIA Test Plan for Wireless Device Over-the-Air Performance, Revision 3.x standards. Typical deviation of the used material with respect to the target dielectric head parameters is shown in the figure below. The dielectric properties have been measured and verified with both coaxial probe and coaxial TEM line. 28 SPEAG, EM-Phantom User Manual V 4.4, October 2015 SAM-V4.5BS Head Phantom (CTIA 3.x) The semi-solid (gel) material does not leak and reduces the weight of SAMV4.5BS by more than 30% compared to the liquid sugar water solution (e.g., SAM-V4.5CTIA). The parameters of the gel are verified at 22.0°C. The head shall be stored at normal room temperature around 22°C. It must not be exposed to temperatures >30°C or <2°C or to direct sunlight radiation (heating up). We have demonstrated the stability of the gel filling over a min of three years when the head phantom is kept sealed and under the stated temperature conditions (22 +/- 5 C). It is not possible to verify the gel parameters without exposing the gel to the environment. Any opening will lead to inclusion of air into the sealed volume and degrade the homogeneity of the product. Only a complete re-fill of the gel under manufacturing conditions will guarantee the full performance. During this process, gel samples are generated and individually tested for conformity to the standard requirements. We recommend such a re-fill on a three-year basis. If used according to these instructions the head phantoms are compliant with CTIA OTA Test Plan V3.2-3.5 for a minimum of three years, i.e., the measurement data given in the corresponding certificates shall be used as the basis for the uncertainty assessments. 2.3 Dimensions Figure 2.3: Dimensions of the head with hand fixture/positioner and hand phantoms (mm) SPEAG, EM-Phantom User Manual V 4.4, October 2015 29 2.4. Operation 2.4 Operation SAM Head V4.5BS can be used self-supported on its feet. Operation on a turntable or positioner is possible in any position, using the fixation at the four 8 mm through holes in the bottom flange with appropriate spacers. It is strongly recommended not to remove the cap and/or ears because the shape of the head and the stability of the gel material may be altered. Note: For safe transport of SAM-V4.5BS Head, it is strongly recommended to pack the head phantom in TCCT in an additional box with foam filling, e.g. in the TCCT Transportation Box as shown in Chapter 12. 2.5 Summary of Technical Specifications SAM-V4.5BS Anthropomorphic Head Model Shape according to IEEE SCC34 and compatible to 3GPP and CTIA Parameters of filling gel compatible (typ. ±20%) with head simulating media as defined by IEEE/IEC and CTIA standards over the entire frequency range (300MHz – 6GHz) Gel filling stable for a mininum of 3 years if kept sealed and in temperature range 22 ±5 ◦ C Reduced weight by more than 30% compared to the sugar-water solution (e.g., SAM-V4.5CTIA) Easy and reproducible test device positioning for both touch and tilt positions Compatible with SPEAG device holders and hand fixture/positioners Construction High precision injection molded PP Shell thickness 2 ±0.2 mm (6 mm at ear point) Integrated positioning lines Sealed top cap for use with 17 mm hexagonal key Filled with approximately 5.9 liters broadband solid material (gel like) Application Assessment of radiation pattern or of total radiated power. 30 SPEAG, EM-Phantom User Manual V 4.4, October 2015 SAM-V4.5BS Head Phantom (CTIA 3.x) Dimensions Total height: Gel height: Width (head only): Width with device holder: Width with hand fixture: Depth: Base plate (l x b): Fixation raster: 394 mm 292 mm 250 mm 310 mm 351 mm 269 mm 250 x 210 mm 210 x 174 mm The base plate has 4 through holes for 8 mm fixation screws. The phantom is delivered with spacers and screws for self-supported operation on a table. It may be fixed to a positioner or turntable for operation in any position. Weight 7.2 kg (excluding device holder and hand fixture) i.e. 30% lighter than phantoms filled with sugar based liquids. Device Holder Integrated lightweight holder, accurate and easy to operate. Enables precise positioning in both touch and 15◦ tilted positions. 2 rows of 4 fingers are moved symmetrically to the ear-mouth line; this symmetrical positioning is retained during width adaptation. The fingers have lengths ranging from 26 – 31 mm. 2 sets of exchangeable sleeves are included for the fingers, with outer diameters of 12 mm and 18 mm. Tilting of the fixed device is possible within a range of ±20◦ (controllable by marks with 1◦ resolution at the outside of the holder). The maximum supported device width is 78 mm. The maximum distance between the first and last fixation points is 92 mm. Hand Fixture/Positioner Integrated lightweight holder, accurate and easy to operate. Enables precise positioning of left or right hand phantom with device in a tilted position on the head phantom SPEAG, EM-Phantom User Manual V 4.4, October 2015 31 2.5. Summary of Technical Specifications Enables horizontal and vertical adjustments of the mounted hand phantom Tilting of the mounted hand phantom is possible within a range of ±11◦ (controllable by marks with 1◦ resolution) 32 SPEAG, EM-Phantom User Manual V 4.4, October 2015 Chapter 3 SAM-V4.5BSE Head Phantom 3.1 Introduction SAM-V4.5BSE (Ear) is a homogeneous anthropomorphically shaped head phantom with anatomically correct lossy ears with ear canal. It has been designed for assessment of the radiation pattern or total radiated power of devices such as hearing aids, wireless headphones and Bluetooth devices. Its geometry complies with the SAM data as defined by “Measurements of Radio Performances for UMTS Terminals in Speech Mode” Release 6 and CTIA Test Plan for Wireless Device Over-the-Air Performance, Revision 3.x. High precision casting ensures accurate shape, thickness and tolerances in the relevant areas. Figure 3.1: SAM-V4.5BSE Head Phantom with anatomically correct lossy Ears with ear canal 33 3.2. Construction The head may be operated in any position when fixed with four screws at its base; the base flange serves simultaneously as a pedestal and interface for fixation on any support (a torso version and shoulder mountable flanges are not available). 3.2 Construction For the construction of the Head Phantom please refer to Chapter 2.2 on page 28. The generic ears of the original SAM-V4.5BS head are replaced by the anatomically correct ear phantoms (left/right). The ear phantoms are manufactured from a silicon- and carbon-based mixture (color: black) with target parameters based on the hand data given in [1] to simulate cartilage composed tissues. The dielectric properties have been measured and verified with an open ended coaxial probe. The parameters of the gel are verified at 22.0°C. The head shall be stored at room temperature around 22°C. It must not be exposed to temperatures >30°C or <2°C or to direct sunlight radiation (heating up). We have demonstrated the stability of the gel filling over a min of three years when the head phantom is kept sealed and under the stated temperature conditions (22 +/5 C). Any opening will lead to inclusion of air into the sealed volume and degrade the homogeneity of the product. Only a complete re-fill of the gel under manufacturing conditions will guarantee the full performance. During this process, gel samples are generated and individually tested for conformity to the standard requirements. We recommend such a re-fill on a three-year basis. If used according to these instructions the head phantoms are compliant with CTIA OTA Test Plan V3.x standards for three years, i.e., the measurement data given in the corresponding certificates shall be used as the basis for the uncertainty assessments. 3.3 Dimensions For the dimensions of the Head Phantom please refer to Chapter 2.3 on page 29. Ear Phantom The geometrical dimensions and orientation of the ear phantoms are illustrated in Figure 3.2 and listed in the table below together with the mechanical changes due to the ear integration. The ear phantom consists of a pinna, an ear canal and an inner part of the ear represented by a solid sphere (see Figure 3.2 (b)). 34 SPEAG, EM-Phantom User Manual V 4.4, October 2015 SAM-V4.5BSE Head Phantom (a) (b) Figure 3.2: Position of the ear on the head (left) and ear dimensions (right) in mm Width (head with ears): Pinna height: Inner sphere diameter: Ear canal length: Ear canal diameter: Weight (head with ears): 3.4 281 mm 66 mm 49.5 mm 25 mm 7.8 mm 7.5 kg Operation SAM-V4.5BSE Head Phantom can be used self-supported on its feet. Operation on a turntable or positioner is possible in any position, using the fixation at the four 8 mm through holes in the bottom flange with appropriate spacers. It is strongly recommended not to remove the cap and/or ears because the shape of the head and the stability of the gel material may be altered. Note: For safe transport of SAM-V4.5BSE Head Phantom, it is strongly recommended to pack the head phantom in TCCT in an additional box with foam filling, e.g. in the TCCT Transportation Box as shown in Chapter 12. 3.5 Technical Specifications Head shape according to IEEE SCC34 and compatible to 3GPP and CTIA except area where ear phantoms are integrated Parameters of filling gel compatible (typ. ±20%) with head simulating SPEAG, EM-Phantom User Manual V 4.4, October 2015 35 3.5. Technical Specifications media as defined by IEEE/IEC and CTIA standards over the entire frequency range (300MHz – 6GHz) Gel filling stable for a minimum of 3 years if used according the instructions described above Dielectric parameters of the ear based on hand data parameters in [3]; relative permittivity and conductivity: within ±15% and ±20% of target parameters for 500 MHz – 3 GHz respectively 36 SPEAG, EM-Phantom User Manual V 4.4, October 2015 Chapter 4 SAM Hand OTA Phantom SHO-V2/3 RB SHO-V2/3 LB (for Brick-shaped Phones) 4.1 Introduction The SHO-V2/3 RB and SHO-V2/3 LB (right and left hand phantoms) are homogeneous anthropomorphically shaped hand phantoms for SPEAG SAM Head V4.5/BS. They provide accurate radiation pattern or total radiated power testing of brick-shaped mobile phones. Thoroughly designed fixture/positioners, spacers and measurement tools are available to enable precise and repeatable positioning of the device in the hand. The hand phantoms, spacers and other accessories are compliant with the CTIA Test Plan for Wireless Device Over-the-Air Performance, Revision 3.x. 4.2 Construction The SHO-V2/3 hand phantoms are manufactured from a silicon- and carbonbased mixture (color: black). The hand target parameters based on real hand measurements and parameters are compliant with CTIA Test Plan for Wireless Device Over-the-Air Performance, Revision 3.x. The hand is sufficiently flexible to grip the range of device sizes and sufficiently stiff to remain in consistent grip. The spacer is manufactured from a low loss and RF transparent hollow material with a wall thickness less than 2 mm. The measurement scale on the spacer is made of a low volume, low loss solid material. The newly designed SHO-V3 hand phantoms have a click-in mechanism 37 4.3. Dimensions of Hand Phantom and Spacer (a) (b) (c) Figure 4.1: (a) SHO-V2/3 RB, (b) SHO-V2/3 LB and (b) SAM-V4.5BS with hand phantom and positioner at the wrist for a more robust attachment to data-mode wrists, the forearm and POPEYE phantoms. The lossy Silicone part of the SHO-V3 hand phantoms is exactly the same as the V2 hands produced using the same high precision CAD based mold. This click-in mechanism results is higher stability and repeatability during data-mode measurements. 4.3 Dimensions of Hand Phantom and Spacer Geometry Grip and dimensions are according to human factor studies and hand anthropometric research. They are compliant with CTIA Test Plan for Wireless Device Over-the-Air Performance, Revision 3.x. 38 SPEAG, EM-Phantom User Manual V 4.4, October 2015 SAM Hand OTA Phantom SHO-V2/3 RB, SHO-V2/3 LB Hand Height Wrist width Hand width 205 mm 61 mm 97 mm Spacer Height Width 120 mm 48 mm (a) (b) Figure 4.2: (a) SHO-V2/3 RB Hand phantom and (b) its spacer 4.4 Hand Phantom Fixture/Positioner SHO-V2/3 is available with an integrated lightweight high precision fixture/positioner which is fully compatible with the SAM-V4.5/BS. It enables precise positioning of a left or right hand phantom with the device in a tilted position on either sides of the head phantom with high repeatability. The fixture/positioner consists of three parts which allow the user to perform rotation and movements of the hand with DUT (Device Under Test) (Figure 4.3). Tilting of the mounted hand phantom is possible within a range of ±11◦ (controllable by marks with 1◦ resolution). The DUT and hand positioning procedure is defined below. 4.5 Alignment Tool B The alignment tool is used to measure the reference position of the bottom of the DUT with arbitrary chin curvature so that the user can align the ring fingertip with the bottom of the DUT consistently. SPEAG, EM-Phantom User Manual V 4.4, October 2015 39 4.6. Recommended Operation Figure 4.3: Hand phantom fixture/positioner The tool consists of a flat slab with a raised guiding strip along one side. The guiding strip has a 60◦ angled corner at the bottom which enables to obtain the desired amount of contact according to human factor studies. The scale on the tool agrees with the scale on the hand phantom spacer. Figure 4.4: Alignment tool B 4.6 Recommended Operation The DUT positioning is performed in two steps. The recommended procedure is to first place the DUT into the grip of the hand phantom, and then to position this assembly against the SAM-V4.5/BS head phantom. 40 SPEAG, EM-Phantom User Manual V 4.4, October 2015 SAM Hand OTA Phantom SHO-V2/3 RB, SHO-V2/3 LB Positioning DUT relative to the hand phantom Device positioning with respect to the hand phantom is performed using the hand phantom spacer and the alignment tool B. 1. Place the DUT on the alignment tool B and fit it into the corner between the slab and the guiding strip. Slide the DUT down until it reaches the angled corner. 2. Record the chin length from the scale on the alignment tool (Figure 4.5(a)). If the DUT length measured using the side ruler is more than 120 mm then the additional length beyond 120 mm should be added to the chin length recorded. 3. Place the DUT on the spacer and between the fingers of the hand phantom. The bottom of the DUT should align with the chin length recorded in step 2 (Figure 4.5(b)). The vertical centerline of the DUT should be centered with the spacer. 4. While keeping the DUT in the position defined in the previous steps, make sure that the index finger is in good contact with the DUT (Figure 4.5(c)). We recommend using short (∼1.5 cm) “3M Dual-Lock” strip provided with the hand phantom to fix the DUT to the hand phantom. (a) (b) (c) Figure 4.5: Positioning DUT relative to the hand phantom Positioning DUT and hand phantom relative to the head phantom Once the DUT is positioned on the hand phantom, the DUT and the hand phantom (DUT/Hand) will be placed in a tilted position (cheek + 6◦ ) on the head phantom. SPEAG, EM-Phantom User Manual V 4.4, October 2015 41 4.6. Recommended Operation 1. Define two imaginary lines on the front side of the DUT as shown in Figure 4.6(a). The vertical line passes through the midpoint of the width of the DUT at the level of acoustic output (point A) to the midpoint of the width at the bottom of the DUT (point B). The horizontal line is perpendicular to the vertical line and intersects with the vertical line at point A. 2. The locations of the left ear (LE), right ear (RE) and mouth (M) points on the SAM-V4.5/BS head phantom are shown in Figure 4.6(b). Mount Mask6 on the head phantom (Figure 4.6(c)). We recommend using two small pieces of double-sided tape at the center and at the mouth locations of the mask to mount it to the head phantom. (a) (b) (c) Figure 4.6: (a) Vertical and horizontal reference lines, (b) mouth and ear locations on head phantom, (c) Mask6 mounted on head phantom 3. Place DUT/Hand on the fixture/positioner and fix them using the screw (Figure 4.7(a)). 4. Using the vertical movement part of the fixture/positioner, move the DUT close to the surface of the SAM head phantom such that point A is on the (virtual) extension of the line passing through points RE and LE on the head phantom (Figure 4.8(a)). 5. Use the horizontal movement part to translate the DUT/Hand towards the head phantom along the line passing through RE and LE until the DUT touches the ear (Figure 4.8(b)). Fix upper parts using the screw at the top of the fixture/positioner. 6. Loosen the screw below the fixture/positioner (Figure 4.7(b)) and rotate DUT/Hand until any point on the DUT or hand phantom is in 42 SPEAG, EM-Phantom User Manual V 4.4, October 2015 SAM Hand OTA Phantom SHO-V2/3 RB, SHO-V2/3 LB contact with the SAM-V4.5/BS or SAM Mask6 spacer at a point below the ear (Figure 4.8(c)). (a) (b) Figure 4.7: (a) Mounting the hand on the fixture/positioner using the screw at top; (b) loosening the screw at the bottom to rotate it SPEAG, EM-Phantom User Manual V 4.4, October 2015 43 4.6. Recommended Operation (a) (b) (c) Figure 4.8: Positioning hand phantom with DUT relative to head phantom 44 SPEAG, EM-Phantom User Manual V 4.4, October 2015 Chapter 5 SAM Hand OTA Phantom SHO-V2/3 RC SHO-V2/3 LC (for Clam-shell Phones) 5.1 Introduction The SHO-V2/3 RC and SHO-V2/3 LC (right and left hand phantoms) are homogeneous anthropomorphically shaped hand phantoms for SPEAG SAM Head V4.5/BS. They provide accurate radiation pattern or total radiated power testing of clam-shell (fold) mobile phones. Thoroughly designed fixture/positioners, spacers and measurement tools are available to enable precise and repeatable positioning of the device in the hand. The hand phantoms, spacers and other accessories are compliant with the CTIA Test Plan for Wireless Device Over-the-Air Performance, Revision 3.x. 5.2 Construction The SHO-V2/3 hand phantoms are manufactured from a silicon- and carbonbased mixture (color: black). The hand target parameters based on real hand measurements and parameters are compliant CTIA Test Plan for Wireless Device Over-the-Air Performance, Revision 3.x. The hand is sufficiently flexible to grip the range of device sizes and sufficiently stiff to remain in consistent grip. The spacer is manufactured from a low loss and RF transparent hollow material with a wall thickness less than 2 mm. The measurement scale on the spacer is made of a low volume, low loss solid material. The newly designed SHO-V3 hand phantoms have a click-in mechanism at the wrist for a more robust attachment to data-mode wrists, the fore45 5.3. Dimensions of Hand Phantom and Spacer (a) (b) Figure 5.1: (a) SHO-V2/3 RC and (b) SHO-V2/3 LC arm and POPEYE phantoms. The lossy Silicone part of the SHO-V3 hand phantoms is exactly the same as the V2 hands produced using the same high precision CAD based mold. This click-in mechanism results is higher stability and repeatability during data-mode measurements. 5.3 Dimensions of Hand Phantom and Spacer Geometry Grip and dimensions are according to human factor studies and hand anthropometric research. They are compliant with CTIA Test Plan for Wireless Device Over-the-Air Performance, Revision 3.x. Hand Height Wrist width Hand width 188 mm 61 mm 97 mm Spacer Height Width 5.4 104 mm 44 mm Hand Phantom Fixture/Positioner SHO-V2/3 is available with an integrated lightweight high precision fixture /positioner which is fully compatible with the SAM-V4.5/BS. It enables precise positioning of a left or right hand phantom with the device in a tilted position on either sides of the head phantom with high repeatability. 46 SPEAG, EM-Phantom User Manual V 4.4, October 2015 SAM Hand OTA Phantom SHO-V2/3 RC, SHO-V2/3 LC (a) (b) Figure 5.2: (a) SHO-V2/3 RC Hand phantom and (b) its spacer The fixture/positioner consists of four parts which allow the user to perform two different rotations and movements of the hand with DUT (Device Under Test) (Figure 5.3 - top part integrated to hand phantom is not shown in the figure). Tilting of the mounted hand phantom is possible within a range of ±11◦ (controllable by marks with 1◦ resolution). The DUT and hand positioning procedure is defined below. Figure 5.3: Hand phantom fixture/positioner SPEAG, EM-Phantom User Manual V 4.4, October 2015 47 5.5. Alignment Tool C 5.5 Alignment Tool C The alignment tool is used to measure the reference position of the bottom of the DUT so that the user can achieve consistent and repeatable positioning of the DUT in the hand. Alignment Tool C has two rounded humps which represents the index fingertip of the hand and the palm spacer on which the DUT is placed. It allows the user to make sure that the index finger remains in contact with the flip of any DUT geometry. The line marking along its side wall helps aligning the DUT hinge axis of rotation. The scale for measuring the bottom of the DUT is split up in order to minimize parallax discrepancies when measuring the DUT (see below). The scale on the tool agrees with the scale on the hand phantom spacer. Figure 5.4: Alignment tool C 5.6 Recommended Operation The DUT positioning is performed in two steps. The recommended procedure is to first place the DUT into the grip of the hand phantom, and then to position this assembly against the SAM-V4.5/BS head phantom. Positioning DUT relative to the hand phantom Device positioning with respect to the hand phantom is performed using the hand phantom spacer and the alignment tool C. 1. Open the DUT and place it face-up on the alignment tool C as shown in Figure 5.5(a). The side of the DUT should be aligned against the side wall of the tool. 2. There is a line engraved on the tool. The axis of the hinge of the DUT should be lined up to this marking on the tool. When this is done, the chin ruler on the tool will give the correct longitudinal position 48 SPEAG, EM-Phantom User Manual V 4.4, October 2015 SAM Hand OTA Phantom SHO-V2/3 RC, SHO-V2/3 LC for placing the fold DUT into the hand phantom, with respect to the chin ruler on the palm spacer. The index finger must contact the flip of the DUT. Measure and record the bottom of the DUT by reading off the bottom ruler of the tool. Visually align the two halves of the split-level ruler to minimize parallax reading error. (a) If the fold DUT has an obstruction near the back of its hinge that prevents the index finger from contacting the flip when the hinge is aligned to the engraved marking on the tool, then the index finger contact will be given higher priority. The DUT should be positioned in the tool so that the hinge is as close as possible to the marking, without raising the flip off of the rounded protrusion. The chin reading in this position will then be used to place the DUT in the hand phantom. (b) If the DUT is an open slider or rotator then slide the DUT longitudinally until the base part of the DUT touches the narrow hump of the tool 3. Place the DUT on the index fingertip and palm spacer and between the fingers of the hand phantom. The bottom of the DUT should align with the chin length reading determined from step 2 on the spacer. Note that when reading the scale on the palm spacer and the alignment tool C, rulings on both sides of the step must be visually aligned to avoid parallax reading errors. 4. Move the DUT horizontally to align vertical centerline of the DUT with the center line of the spacer. 5. While keeping the DUT in the position defined in the previous steps, make sure that the index finger is in good contact with the DUT. We recommend using short (∼1.5 cm) “3M Dual-Lock” strip provided with the hand phantom to fix the DUT to the hand phantom. Positioning DUT and hand phantom relative to the head phantom Once the DUT is positioned on the hand phantom, the DUT and the hand phantom (DUT/Hand) will be placed in a tilted position (cheek + 6◦ ) on the head phantom. 1. Define two imaginary lines on the front side of the DUT as shown in Figure 5.6(a). The vertical line passes through the midpoint of the width of the DUT at the level of acoustic output (point A) to the midpoint of the width at the bottom of the DUT (point B). The horizontal line is perpendicular to the vertical line and intersects with the vertical line at point A. SPEAG, EM-Phantom User Manual V 4.4, October 2015 49 5.6. Recommended Operation (a) (b) Figure 5.5: Positioning DUT relative to the hand phantom 2. The locations of the left ear (LE), right ear (RE) and mouth (M) points on the SAM-V4.5/BS head phantom are shown in Figure 5.6(b). Mount Mask6 on the head phantom (Figure 5.6(c)). We recommend using two small pieces of double-sided tape at the center and at the mouth locations of the mask to mount it to the head phantom. (a) (b) (c) Figure 5.6: (a) Vertical and horizontal reference lines, (b) mouth and ear locations on head phantom, (c) Mask6 mounted on head phantom 3. Place DUT/Hand on the fixture/positioner and fix them using the screws (Figure 5.7(a)). 4. Using the fixture/positioner, move the DUT/Hand towards the head phantom along the line passing through RE and LE until the DUT (point A) touches the ear (point RE). Fix upper parts using the screws at the top of the fixture/positioner. 50 SPEAG, EM-Phantom User Manual V 4.4, October 2015 SAM Hand OTA Phantom SHO-V2/3 RC, SHO-V2/3 LC 5. Loosen the screw below the fixture/positioner (Figure 5.7(b)) and rotate DUT/ Hand until any point on the DUT or hand phantom is in contact with the SAM-V4.5/BS or SAM Mask6 spacer at a point below the ear. Fix the screw. (a) (b) Figure 5.7: (a) Mounting the hand on the fixture/positioner using the screw at top; (b) loosening the screw at the bottom to rotate it (a) (b) (c) Figure 5.8: Positioning hand phantom with DUT relative to head phantom SPEAG, EM-Phantom User Manual V 4.4, October 2015 51 Chapter 6 SAM Hand OTA Phantom SHO-V2/3 RP SHO-V2/3 LP (for PDA (Wide) Phones) 6.1 Introduction The SHO-V2/3 RP and SHO-V2/3 LP (right and left hand phantoms) are homogeneous anthropomorphically shaped hand phantoms suitable for use with PDA (Personal Digital Assistant – Wide) mobile phones for head and hand (talk mode) testing or hand only (data mode) testing. They provide accurate radiation pattern or total radiated power testing of PDA mobile phones. Thoroughly designed fixture/positioners and spacers are available to enable precise and repeatable positioning of the device in the hand. The hand phantoms, spacers and other accessories are compliant with the CTIA Test Plan for Wireless Device Over-the-Air Performance, Revision 3.x. 6.2 Construction The SHO-V2/3 hand phantoms are manufactured from a silicon- and carbonbased mixture (color: black). The hand target parameters based on real hand measurements and parameters are compliant with CTIA Test Plan for Wireless Device Over-the-Air Performance, Revision 3.x. The hand is sufficiently flexible to grip the range of device sizes and sufficiently stiff to remain in consistent grip. The spacer is manufactured from a low loss and RF transparent hollow material with a wall thickness less than 2 mm. The white cover on the spacer is made of a low volume, low loss solid material. The newly designed SHO-V3 hand phantoms have a click-in mechanism 52 SAM Hand OTA Phantom SHO-V2/3 RP, SHO-V2/3 LP (a) (b) Figure 6.1: (a) SHO-V2/3RP and (b) SHO-V2/3LP at the wrist for a more robust attachment to data-mode wrists, the forearm and POPEYE phantoms. The lossy Silicone part of the SHO-V3 hand phantoms is exactly the same as the V2 hands produced using the same high precision CAD based mold. This click-in mechanism results is higher stability and repeatability during data-mode measurements. 6.3 Dimensions of Hand Phantom and Spacer Geometry Grip and dimensions are according to human factor studies and hand anthropometric research. They are compliant with CTIA Test Plan for Wireless Device Over-the-Air Performance, Revision 3.x. Hand Height Wrist width Hand width 180 mm 61 mm 97 mm Spacer Height Width 135 mm 56 mm SPEAG, EM-Phantom User Manual V 4.4, October 2015 53 6.4. Talk Mode (a) (b) Figure 6.2: (a) SHO-V2/3 RP Hand phantom and (b) its spacer 6.4 6.4.1 Talk Mode Hand Phantom Fixture/Positioner – Talk Mode SHO- hand phantoms are available with an integrated lightweight high precision fixture/ positioner which is fully compatible with the SAM-V4.5/BS. It enables precise positioning of a left or right hand phantom with the device in a tilted position on either side of the head phantom with high repeatability. The fixture/positioner consists of three parts which allow the user to perform rotation and movement of the hand with DUT (Device Under Test) (Figure 6.3). Tilting of the mounted hand phantom is possible within a range of ±11◦ (controllable by marks with 1◦ resolution). The DUT and hand positioning procedure is defined below. 6.4.2 Recommended Operation – Talk Mode The DUT positioning is performed in two steps. The recommended procedure is to first place the DUT into the grip of the hand phantom, and then to position this assembly against the SAM-V4.5/BS head phantom. Adjusting hand phantom height The position of the hand phantom on the horizontal movement part of the fixture should be adjusted in order to align the vertical line of the DUT to the line passing through points RE and M on the head phantom (Figure 6.6). 1. Measure width (w) of the DUT in mm. The required height adjustment is calculated with: h = (72 − w) /2 2. Choose a combination of spacer plates provided with the hand phantom (Figure 6.4(a): 1 mm, 2x2 mm, 4 mm) to achieve the required h 54 SPEAG, EM-Phantom User Manual V 4.4, October 2015 SAM Hand OTA Phantom SHO-V2/3 RP, SHO-V2/3 LP Figure 6.3: Hand phantom fixture/positioner – Talk Mode value calculated in Step 1. For example, a DUT with a width of 66 mm will require the use of 1 mm and 2 mm spacer plates to accommodate the h value of 3 mm. 3. Loosen the screws connecting the fixture part to the hand cushion (Figure 6.4(b)). Insert spacer plates between the fixture and the hand cushion as shown in Figure 6.4(c). 4. Re-secure the fixture and hand cushion using the screws. Positioning DUT relative to the hand phantom Device positioning with respect to the hand phantom is performed using the hand phantom spacer and no alignment tool is required. 1. Place the DUT on the spacer and between the fingers of the hand phantom. Align the side of the DUT to the side wall of the spacer. 2. If the DUT is shorter than 135 mm, then align the top of the DUT to the top of the spacer. Otherwise, align the bottom of the DUT to the bottom wall of the spacer (Figure 6.5). We recommend using short (∼1.5 cm) “3M Dual-Lock” strip provided with the hand phantom to fix the DUT to the hand phantom. SPEAG, EM-Phantom User Manual V 4.4, October 2015 55 6.4. Talk Mode (a) (b) (c) Figure 6.4: Adjusting hand phantom height: (a) set of spacer plates, (b),(c) inserting spacer plates Positioning DUT and hand phantom relative to the head phantom Once the DUT is positioned on the hand phantom, the DUT and the hand phantom (DUT/Hand) will be placed in a tilted position (cheek + 6◦ ) on the head phantom 1. Define two imaginary lines on the front side of the DUT as shown in Figure 6.6(a). The vertical line passes through the midpoint of the width of the DUT at the level of acoustic output (point A) to the midpoint of the width at the bottom of the DUT (point B). The horizontal line is perpendicular to the vertical line and intersects with the vertical line at point A. 2. The locations of the left ear (LE), right ear (RE) and mouth (M) points on the SAM-V4.5/BS head phantom are shown in Figure 6.6(b). Mount Mask6 on the head phantom (Figure 6.6(c)). We recommend using two small pieces of double-sided tape at the center and at the mouth locations of the mask to mount it to the head phantom. 3. Place DUT/Hand on the fixture/positioner and fix them using the screw (Figure 6.7(a)). 4. Using the vertical movement part of the fixture/positioner, move the DUT close to the surface of the SAM head phantom such that point A is on the (virtual) extension of the line passing through points RE and LE on the head phantom (Figure 6.8(a)). 5. Use the horizontal movement part to translate the DUT/Hand towards the head phantom along the line passing through RE and LE until the 56 SPEAG, EM-Phantom User Manual V 4.4, October 2015 SAM Hand OTA Phantom SHO-V2/3 RP, SHO-V2/3 LP Figure 6.5: Positioning DUT relative to the hand phantom (source: CTIA OTA Test Plan V3.1 [January 2011]) DUT touches the ear (Figure 6.8(b)). Fix upper parts using the screw at the top of the fixture/positioner. 6. Loosen the screw below the fixture/positioner (Figure 6.7(b)) and rotate DUT/Hand until any point on the DUT or hand phantom is in contact with the SAM-V4.5/BS or SAM Mask6 spacer at a point below the ear (Figure 6.8(c)). SPEAG, EM-Phantom User Manual V 4.4, October 2015 57 6.4. Talk Mode (a) (b) (c) Figure 6.6: (a) Vertical and horizontal reference lines, (b) mouth and ear locations on head phantom, (c) Mask6 mounted on head phantom (a) (b) Figure 6.7: (a) Mounting the hand on the fixture/positioner using the screw at top; (b) loosening the screw at the bottom to rotate it 58 SPEAG, EM-Phantom User Manual V 4.4, October 2015 SAM Hand OTA Phantom SHO-V2/3 RP, SHO-V2/3 LP (a) (b) (c) Figure 6.8: Positioning hand phantom with DUT relative to head phantom SPEAG, EM-Phantom User Manual V 4.4, October 2015 59 6.5. Data Mode 6.5 6.5.1 Data Mode Hand Phantom Fixture/Positioner – Data Mode In data mode testing, DUT shall be mounted on the SHO-V2/3 RP/LP and oriented such that the DUT’s main display is tilted 45◦ from vertical. For that purpose, a data mode hand phantom fixture and a wrist extension for SHO-V2/3 RP/LP has been designed. The wrist extension material is a low loss and RF transparent foam material. The other parts of the fixture are made of a low volume, low loss solid material. The fixture/positioner allows the user to perform rotation and movement of the hand with DUT (Figure 6.5.1). Tilting of the mounted hand phantom is possible within a range of ±90◦ . A triangular shaped alignment tool has also been designed to help the user to achieve consistent and repeatable tilting of the DUT in the hand. Note that the tool has to be removed after the DUT and the hand phantom is accurately positioned using the procedure defined below. Figure 6.9: Data Mode Testing Fixture V2 SHO-RP/LP-FDMV2 with Wrist 6.5.2 Recommended Operation – Data Mode The DUT positioning is performed in three steps. The recommended procedure is to first place the DUT into the grip of the hand phantom, and then to mount this assembly to the data mode fixture using the wrist extension. Finally, the DUT in the hand phantom is positioned such that the DUT’s main display is tilted 45◦ from vertical. 60 SPEAG, EM-Phantom User Manual V 4.4, October 2015 SAM Hand OTA Phantom SHO-V2/3 RP, SHO-V2/3 LP Figure 6.10: SHO-RP/LP-DWV4 data-mode wrists with exchangeable pins are compatible with both SHO-V2 and SHO-V3 hands SPEAG, EM-Phantom User Manual V 4.4, October 2015 61 6.5. Data Mode (a) (b) Figure 6.11: (a) Inserting pegs into the wrist holes (b) mounting DUT and the hand phantom to the data fixture using the turning knob Positioning DUT relative to the hand phantom Device positioning in SHO-V2/3 RP/LP hand phantom for data mode is identical to that for talk mode and is already described in Section 6.4.2. Mounting DUT and the hand phantom to the data fixture Once the DUT is positioned on the hand phantom, the DUT and the hand phantom (DUT/Hand) will be mounted to the data fixture using the wrist extension. The new SHO-RP/LP-WDV4 wrist extensions are compatible with both SHO-V2 and SHO-V3 hands. V4 wrist extensions come with two sets of pegs for attachment to V2 and V3 hands. The pegs can be unscrewed and exchanged as shown on Figure 6.10. 1. Insert pegs of the wrist extension into the holes in the hand phantom wrist (Figure 6.11(a)). 2. Tighten the turning knob as shown in Figure 6.11(b) to mount the hand with the wrist extension to the data fixture. Positioning DUT relative to the hand phantom Finally, the DUT and the hand phantom are oriented such that the DUT’s main display is tilted 45◦ from vertical. 1. Loosen the turning knob (Figure 6.12(a)) and rotate the DUT/Hand until the plane of DUT’s main display is aligned with the hypotenuse (the longest side of the right triangle) of the alignment tool (Figure 6.12(a)). Tighten the turning knob to fix DUT/Hand position. 62 SPEAG, EM-Phantom User Manual V 4.4, October 2015 SAM Hand OTA Phantom SHO-V2/3 RP, SHO-V2/3 LP (a) (b) (c) Figure 6.12: (a) Loosening the turning knob, (b) rotating DUT/Hand until the plane of the DUT’s main display is aligned with the hypotenuse of the alignment tool. (c) After loosening the screws, the assembly can be moved in a horizontal direction until the center of the display (red crosshair) is on top of the center of rotation. 2. If necessary, loosen the screws shown in Figure 6.12(a) to move DUT/Hand and the slider assembly along the rail in a horizontal direction. Fix the assembly by tightening the screws. SPEAG, EM-Phantom User Manual V 4.4, October 2015 63 Chapter 7 SAM Hand OTA Phantom SHO-V2/3 RW SHO-V2/3 LW (for PDA (Ultra Wide) Phones) 7.1 Introduction The SHO-V2/3 RW and SHO-V2/3 LW (right and left hand phantoms) are homogeneous anthropomorphically shaped hand phantoms suitable for use with ultra wide PDA (Personal Digital Assistant – Wide) mobile phones for head and hand (talk mode) testing or hand only (data mode) testing. They provide accurate radiation pattern or total radiated power testing of ultra wide PDA mobile phones. Thoroughly designed fixture/positioners and spacers are available to enable precise and repeatable positioning of the device in the hand. The dimensions and material of the hand phantoms, material of the spacers and other accessories are compliant with the CTIA Test Plan for Wireless Device Over-the-Air Performance, Revision 3.x. 7.2 Construction The SHO-V2/3 hand phantoms are manufactured from a silicon- and carbonbased mixture (color: black). The hand target parameters based on real hand measurements and parameters are compliant with CTIA Test Plan for Wireless Device Over-the-Air Performance, Revision V3.x. The hand is sufficiently flexible to grip the range of device sizes and sufficiently stiff to remain in consistent grip. The spacer is manufactured from a low loss and 64 SAM Hand OTA Phantom SHO-V2/3 RW, SHO-V2/3 LW (a) (b) Figure 7.1: (a) SHO-V2/3 RW and (b) SHO-V2/3 LW RF transparent hollow material with a wall thickness less than 2 mm. The white cover on the spacer is made of a low volume, low loss solid material. The newly designed SHO-V3 hand phantoms have a click-in mechanism at the wrist for a more robust attachment to data-mode wrists, the forearm and POPEYE phantoms. The lossy Silicone part of the SHO-V3 hand phantoms is exactly the same as the V2 hands produced using the same high precision CAD based mold. This click-in mechanism results is higher stability and repeatability during data-mode measurements. 7.3 Dimensions of Hand Phantom and Spacer Geometry Grip is according to human factor study and the dimensions of the hand are compliant with CTIA Test Plan for Wireless Device Over-the-Air Performance, Revision V3.x. Hand Height Wrist width Hand width 180 mm 61 mm 120 mm Spacer Height Width 135 mm 70 mm SPEAG, EM-Phantom User Manual V 4.4, October 2015 65 7.4. Talk Mode (a) (b) Figure 7.2: (a) SHO-V2/3 RW Hand phantom and (b) its spacer 7.4 7.4.1 Talk Mode Hand Phantom Fixture/Positioner – Talk Mode SHO-V2/3 is available with an integrated lightweight high precision fixture/ positioner which is fully compatible with the SAM-V4.5/BS. It enables precise positioning of a left or right hand phantom with the device in a tilted position on either sides of the head phantom with high repeatability. The fixture/positioner consists of three parts which allow the user to perform rotation and movement of the hand with DUT (Device Under Test) (Figure 7.3). Tilting of the mounted hand phantom is possible within a range of ±11◦ (controllable by marks with 1◦ resolution). Figure 7.3: Hand phantom fixture/positioner – Talk Mode 66 SPEAG, EM-Phantom User Manual V 4.4, October 2015 SAM Hand OTA Phantom SHO-V2/3 RW, SHO-V2/3 LW 7.4.2 Recommended Operation – Talk Mode The DUT positioning is performed in two steps. The recommended procedure is to first place the DUT into the grip of the hand phantom, and then to position this assembly against the SAM-V4.5/BS head phantom. Adjusting hand phantom height The position of the hand phantom on the horizontal movement part of the fixture should be adjusted in order to align the vertical line of the DUT to the line passing through points RE and M on the head phantom (Figure 7.5). 1. Measure width (w) of the DUT in mm. The required height adjustment is calculated with: h = (92 − w) /2 2. Choose a combination of spacer plates provided with the hand phantom (Figure 7.4(a): 1 mm, 2x2 mm, 4 mm) to achieve the required h value calculated in Step 1. For example, a DUT with a width of 84 mm will require the use of one 4 mm spacer plates to accommodate the h value. 3. Loosen the screws connecting the fixture part to the hand cushion (Figure 7.4(b)). Insert spacer plates between the fixture and the hand cushion as shown in Figure 7.4(c). 4. Re-secure the fixture and hand cushion using the screws. (a) (b) (c) Figure 7.4: Adjusting hand phantom height: (a) set of spacer plates, (b),(c) inserting spacer plates SPEAG, EM-Phantom User Manual V 4.4, October 2015 67 7.4. Talk Mode Positioning DUT relative to the hand phantom Device positioning with respect to the SHO-V2/3 RW hand phantom is equal to the PDA hand, which is described in Chapter 6.4.2 on page 55. Positioning DUT and hand phantom relative to the head phantom Once the DUT is positioned on the hand phantom, the DUT and the hand phantom (DUT/Hand) will be placed in a tilted position (cheek + 6◦ ) on the head phantom. 1. Define two imaginary lines on the front side of the DUT as shown in Figure 7.5(a). The vertical line passes through the midpoint of the width of the DUT at the level of acoustic output (point A) to the midpoint of the width at the bottom of the DUT (point B). The horizontal line is perpendicular to the vertical line and intersects with the vertical line at point A. 2. The locations of the left ear (LE), right ear (RE) and mouth (M) points on the SAM-V4.5/BS head phantom are shown in Figure 7.5(b). Mount Mask6 on the head phantom (Figure 7.5(c)). We recommend using two small pieces of double-sided tape at the center and at the mouth locations of the mask to mount it to the head phantom. 3. Place DUT/Hand on the fixture/positioner and fix them using the screw (Figure 7.6(a)). (a) (b) (c) Figure 7.5: (a) Vertical and horizontal reference lines, (b) mouth and ear locations on head phantom, (c) Mask6 mounted on head phantom 4. Using the vertical movement part of the fixture/positioner, move the DUT close to the surface of the SAM head phantom such that point 68 SPEAG, EM-Phantom User Manual V 4.4, October 2015 SAM Hand OTA Phantom SHO-V2/3 RW, SHO-V2/3 LW (a) (b) Figure 7.6: (a) Mounting the hand on the fixture/positioner using the screw at top; (b) loosening the screw at the bottom to rotate it A is on the (virtual) extension of the line passing through points RE and LE on the head phantom (Figure 7.7(a)). 5. Use the horizontal movement part to translate the DUT/Hand towards the head phantom along the line passing through RE and LE until the DUT touches the ear (Figure 7.7(b)). Fix upper parts using the screw at the top of the fixture/positioner. 6. Loosen the screw below the fixture/positioner (Figure 7.6(b)) and rotate DUT/Hand until any point on the DUT or hand phantom is in contact with the SAM-V4.5/BS or SAM Mask6 spacer at a point below the ear (Figure 7.7(c)). SPEAG, EM-Phantom User Manual V 4.4, October 2015 69 7.4. Talk Mode (a) (b) (c) Figure 7.7: Positioning hand phantom with DUT relative to head phantom 70 SPEAG, EM-Phantom User Manual V 4.4, October 2015 SAM Hand OTA Phantom SHO-V2/3 RW, SHO-V2/3 LW 7.5 7.5.1 Data Mode Hand Phantom Fixture/Positioner – Data Mode In data mode testing, DUT shall be mounted on the SHO-V2/3 RW/LW and oriented such that the DUT’s main display is tilted 45◦ from vertical. For that purpose, a data mode hand phantom fixture and a wrist extension for SHO-V2/3 RW/LW has been designed. The wrist extension material is a low loss and RF transparent foam material. The other parts of the fixture are made of a low volume, low loss solid material. The fixture/positioner allows the user to perform rotation and movement of the hand with DUT (Device Under Test) (Figure 7.8). Tilting of the mounted hand phantom is possible within a range of ±90◦ . A triangular shaped alignment tool has also been designed to help the user to achieve consistent and repeatable tilting of the DUT in the hand. Note that the tool has to be removed after the DUT and the hand phantom is accurately positioned using the procedure defined below. Figure 7.8: Fixture V2 for Data Mode Testing SHO-RW/LW-FDMV2 with Wrist V2 SHO-RW/LW-DWV2, which brings the DUT’s main display center (red crosshair) close to the rotation center 7.5.2 Recommended Operation – Data Mode The DUT positioning is performed in three steps. The recommended procedure is to first place the DUT into the grip of the hand phantom, and then to mount this assembly to the data mode fixture using the wrist extension. Finally, the DUT in the hand phantom is positioned such that the DUT’s main display is tilted 45◦ from vertical. SPEAG, EM-Phantom User Manual V 4.4, October 2015 71 7.5. Data Mode Positioning DUT relative to the hand phantom Device positioning in SHO-V2/3 RW/LW hand phantom for data mode is identical to that for talk mode and is already described in Section 7.4.2 (or Section 6.5.2 respectively). Mounting DUT and the hand phantom to the data fixture Once the DUT is positioned on the hand phantom, the DUT and the hand phantom (DUT/Hand) will be mounted to the data fixture using the wrist extension. The new SHO-RW/LW-WDV4 wrist extensions are compatible with both SHO-V2 and SHO-V3 hands. V4 wrist extensions come with two sets of pegs for attachment to V2 and V3 hands. The pegs can be unscrewed and exchanged (please refer to Figure 6.10 for detailed instructions on exchanging the pins). 1. Insert pegs of the wrist extension into the holes in the hand phantom wrist (Figure 7.9(a)). 2. Tighten the turning knob as shown in Figure 7.9(b) to mount the hand with the wrist extension to the data fixture. (a) (b) Figure 7.9: (a) Inserting pegs into the wrist holes (b) mounting DUT and the hand phantom to the data fixture using the turning knob Positioning DUT relative to the hand phantom Finally, the DUT and the hand phantom are oriented such that the DUT’s main display is tilted 45◦ from vertical. 1. Loosen the turning knob (Figure 7.10(a)) and rotate the DUT/Hand until the plane of DUT’s main display is aligned with the hypotenuse 72 SPEAG, EM-Phantom User Manual V 4.4, October 2015 SAM Hand OTA Phantom SHO-V2/3 RW, SHO-V2/3 LW (the longest side of the right triangle) of the alignment tool (Figure 7.10(a)). Tighten the turning knob to fix DUT/Hand position. 2. If necessary, loosen the screws shown in Figure 7.10(a) to move DUT/Hand and the slider assembly along the rail in a horizontal direction. Fix the assembly by tightening the screws. (a) (b) (c) Figure 7.10: a) Loosening the turning knob, (b) rotating DUT/Hand until the plane of the DUT’s main display is aligned with the hypotenuse of the alignment tool. (c) After loosening the screws, the assembly can be moved in a horizontal direction until the center of the display (red crosshair) is on top of the center of rotation. SPEAG, EM-Phantom User Manual V 4.4, October 2015 73 Chapter 8 SAM Hand OTA Phantom SHO-V2/3 RD SHO-V2/3 LD (Data Mode-Narrow Phones) 8.1 Introduction The SHO-V2/3 RD and SHO-V2/3 LD (right and left hand phantoms) are homogeneous anthropomorphically shaped hand phantoms suitable for use with narrow mobile phones (widths between 40 mm and 56 mm) for hand only (data mode) testing. They provide accurate radiation pattern or total radiated power testing of narrow mobile phones in data mode. Thoroughly designed fixture/positioners and spacers are available to enable precise and repeatable positioning of the device in the hand. The hand phantoms, spacers and other accessories are compliant with the CTIA Test Plan for Wireless Device Over-the-Air Performance, Revision 3.x. 8.2 Construction The SHO-V2/3 hand phantoms are manufactured from a silicon- and carbonbased mixture (color: black). The hand target parameters based on real hand measurements and parameters are compliant with CTIA Test Plan for Wireless Device Over-the-Air Performance, Revision 3.x. The hand is sufficiently flexible to grip the range of device sizes and sufficiently stiff to remain in consistent grip. The spacer is manufactured from a low loss and RF transparent hollow material with a wall thickness less than 2 mm. The 74 SAM Hand OTA Phantom SHO-V2/3 RD, SHO-V2/3 LD (a) (b) Figure 8.1: (a) SHO-V2/3 RD and (b) SHO-V2/3 LD measurement scale on the spacer is made of a low volume, low loss solid material. The newly designed SHO-V3 hand phantoms have a click-in mechanism at the wrist for a more robust attachment to data-mode wrists, the forearm and POPEYE phantoms. The lossy Silicone part of the SHO-V3 hand phantoms is exactly the same as the V2 hands produced using the same high precision CAD based mold. This click-in mechanism results is higher stability and repeatability during data-mode measurements. 8.3 Dimensions of Hand Phantom and Spacer Geometry Grip and dimensions are according to human factor studies and hand anthropometric research. They are compliant with CTIA Test Plan for Wireless Device Over-the-Air Performance, Revision 3.x. Hand Height Wrist width Hand width 168 mm 61 mm 97 mm Spacer Height Width 128 mm 54 mm SPEAG, EM-Phantom User Manual V 4.4, October 2015 75 8.4. Hand Phantom Fixture/Positioner – Data Mode (a) (b) Figure 8.2: (a) SHO-V2/3 RD Hand phantom and (b) its spacer 8.4 Hand Phantom Fixture/Positioner – Data Mode In data mode testing, DUT shall be mounted on the SHO-V2/3 RD/LD and oriented such that the DUT’s main display is tilted 45◦ from vertical. For that purpose, a data mode hand phantom fixture and wrist extensions for SHO-V2/3 RD/LD has been designed. The wrist extension material is a low loss and RF transparent foam material. The other parts of the fixture are made of a low volume, low loss solid material. The fixture/positioner allows the user to perform rotation and movement of the hand with DUT (Device Under Test) (Figure 8.3). Tilting of the mounted hand phantom is possible within a range of ±90◦ . A triangular shaped alignment tool has also been designed to help the user to achieve consistent and repeatable tilting of the DUT in the hand. Note that the tool has to be removed after the DUT and the hand phantom is accurately positioned using the procedure defined below. 8.5 Alignment Tool B The alignment tool is used to measure the reference position of the bottom of the DUT with arbitrary chin curvature so that the user can align the ring fingertip with the bottom of the DUT consistently. The tool consists of a flat slab with a raised guiding strip along one side. The guiding strip has a 60◦ angled corner at the bottom which enables to obtain the desired amount of contact according to human factor studies. The scale on the tool agrees with the scale on the hand phantom spacer. 76 SPEAG, EM-Phantom User Manual V 4.4, October 2015 SAM Hand OTA Phantom SHO-V2/3 RD, SHO-V2/3 LD (a) (b) Figure 8.3: Data Mode Testing (a) Fixture V1 SHO-RD/LD-FDMV1 with Wrist V1 and (b) Fixture V2 SHO-RD/LD-FDMV2 with Wrist V2, which brings the DUT’s main display center (red crosshair) closer to the rotation center 8.6 Recommended Operation – Data Mode The DUT positioning is performed in three steps. The recommended procedure is to first place the DUT into the grip of the hand phantom, and then to mount this assembly to the data mode fixture using the wrist extension. Finally, the DUT in the hand phantom is positioned such that the DUT’s main display is tilted 45◦ from vertical. Positioning DUT relative to the hand phantom Device positioning with respect to the hand phantom is performed using the hand phantom spacer and the alignment tool B. 1. Place the DUT on the alignment tool B and fit it into the corner between the slab and the guiding strip. Slide the DUT down until it reaches the angled corner. 2. Record the chin length from the scale at the bottom of the alignment tool B (‘chin length’ in Figure 8.5(a)). 3. Record the location of the navigation key (or the ‘2’ key, if no navigation key is present) on the side ruler of the alignment tool B (‘nav key length’ Figure 8.5(a)). Use the key’s center as the reference. SPEAG, EM-Phantom User Manual V 4.4, October 2015 77 8.6. Recommended Operation – Data Mode Figure 8.4: Alignment tool B 4. Add two readings from Step 2 and 3 together. If the sum is less than 30 mm, then use 30 mm instead. 5. Place the DUT on the spacer and between the fingers of the hand phantom. Align the side of the DUT with the side wall of the spacer. The bottom edge of the DUT should be placed on the spacer at the ruling corresponding to the value obtained in Step 4 (Figure 8.5(a)). We recommend using short (∼1.5 cm) “3M Dual-Lock” strip provided with the hand phantom to fix the DUT to the hand phantom. (a) (b) Figure 8.5: Positioning DUT relative to the hand phantom 78 SPEAG, EM-Phantom User Manual V 4.4, October 2015 SAM Hand OTA Phantom SHO-V2/3 RD, SHO-V2/3 LD Mounting DUT and the hand phantom to the data fixture Once the DUT is positioned on the hand phantom, the DUT and the hand phantom (DUT/Hand) will be mounted to the data fixture using the wrist extension. The new SHO-RP/LP-WDV4 wrist extensions are compatible with both SHO-V2 and SHO-V3 hands. V4 wrist extensions come with two sets of pegs for attachment to V2 and V3 hands. The pegs can be unscrewed and exchanged as shown on Figure 6.10. 1. Insert pegs of the wrist extension into the holes in the hand phantom wrist (Figure 8.6(a)). 2. Tighten the turning knob as shown in Figure 8.6(b) to mount the hand with the wrist extension to the data fixture. (a) (b) Figure 8.6: (a) Inserting pegs into the wrist holes (b) mounting DUT and the hand phantom to the data fixture using the turning knob Positioning DUT relative to the hand phantom Finally, the DUT and hand phantom are oriented such that the DUT’s main display is tilted 45◦ from vertical. 1. Loosen the turning knob (Figure 8.7(a)) and rotate the DUT/Hand until the plane of the DUTs main display is aligned with the hypotenuse (the longest side of the right triangle) of the alignment tool (Figure 8.7(b)). Tighten the turning knob to fix DUT/Hand position. 2. If necessary, loosen the screws shown in Figure 8.7(c) to move the DUT/Hand and the slider assembly along the rail in a horizontal direction. Fix the assembly by tightening the screws. SPEAG, EM-Phantom User Manual V 4.4, October 2015 79 8.6. Recommended Operation – Data Mode (a) (b) (c) Figure 8.7: (a) Loosening the turning knob, (b) rotating DUT/Hand until the plane of the DUT’s main display is aligned with the hypotenuse of the alignment tool. (c) After loosening the screws, the assembly can be moved in a horizontal direction until the center of the display is on top of the center of rotation. 80 SPEAG, EM-Phantom User Manual V 4.4, October 2015 Chapter 9 SAM Hand OTA Phantom SHO-V2/3RTAB SHO-V2/3LTAB (for Tablets) 9.1 Introduction The SHO-V2/3RTAB and SHO-V2/3LTAB (SHO V2/3 Right and Left TABlet hand phantoms) are homogeneous anthropomorphically shaped hand phantoms suitable for use with tablets for hand only (data mode) testing. They enable accurate measurement of radiation patterns and total radiated power of tablet devices. The thoroughly designed fixture and spacers are available to facilitate precise and repeatable positioning of the device in the hand. The dimensions and material of the hand phantoms and the material of the spacers and other accessories are compliant with the CTIA Test Plan for Wireless Device Over-the-Air Performance, Revision 3.x. 9.2 Construction The SHO V2/3 hand phantoms are manufactured from a silicone- and carbon-based mixture (color: black). The hand target parameters based on real hand measurements are compliant with the CTIA Test Plan for Wireless Device Over-the-Air Performance, Revision 3.x. The hand is sufficiently flexible to grip a range of device thicknesses and sufficiently stiff to maintain a consistent grip. The spacer is manufactured from a low-loss and RF transparent hollow material with a wall thickness less than 2 mm. The white cover on the spacer is made of a low volume, low-loss solid material. The newly designed SHO-V3 hand phantoms have a click-in mechanism 81 9.3. Dimensions of Hand Phantom and Spacer (a) (b) Figure 9.1: (a) SHO-V2/3LTAB and (b) SHO-V2/3RTAB at the wrist for a more robust attachment to data-mode wrists, the forearm and POPEYE phantoms. The lossy Silicone part of the SHO-V3 hand phantoms is exactly the same as the V2 hands produced using the same high precision CAD based mold. This click-in mechanism results is higher stability and repeatability during data-mode measurements. 9.3 Dimensions of Hand Phantom and Spacer Geometry The grip is according to a human factor study, and the dimensions of the hand phantoms are compliant with the CTIA Test Plan for Wireless Device Over-the-Air Performance, Revision 3.x. Hand Height Wrist width Hand width 175 mm 61 mm 90 mm Spacer Height Width 82 150 mm 63 mm SPEAG, EM-Phantom User Manual V 4.4, October 2015 SAM Hand OTA Phantom SHO-V2/3 RTAB/LTAB (a) (b) Figure 9.2: (a) SHO-V2/3LTAB Hand phantom and (b) its spacer 9.4 Hand Phantom Fixture/Positioner – Testing Mode In testing mode, the DUT is mounted between the right and the left hand phantoms (SHO-V2/3RTAB and SHO-V2/3LTAB) and oriented such that the DUT’s main display is tilted 45◦ from vertical. For that purpose, a fixture and wrist extensions for both right and left hand phantoms have been designed with a fixed mounting angle. The wrist extensions are made of a hollow low-loss and RF transparent material. The other parts of the fixture are made of a low volume, low-loss solid material. The fixture allows the user to perform axial translation movements of the hands for a tight grip of various device widths (Figure 9.4). The maximum device width accomodated by the fixture is 28cm. 9.5 Recommended Operation – Testing Mode The DUT positioning is performed in three steps. The recommended procedure is to first mount both hand phantoms, right and left, to the corresponding wrist extensions, then mount this assembly to the fixture. Finally, the DUT is positioned between the two hand phantoms and aligned on the spacer. Mounting the hand phantom to the fixture For all following steps, be sure to not mix up right and left parts. 1. For SHO-V2RTAB/LTAB hands, insert the pegs of the wrist extension into the holes in the hand phantom wrist (Figure 9.5(a)). Fix SPEAG, EM-Phantom User Manual V 4.4, October 2015 83 9.5. Recommended Operation – Testing Mode Figure 9.3: SHO-FX-HOTV4 - SHO Fixture X for Hand-Only-Testing V4 with right and left wrists (SHO-RTAB/LTAB-DWV4), hands, and DUT the hand phantom to the wrist extension with the two screws provided (Figure 9.5(b) and 9.5(c)). For SHO-V3RTAB/LTAB hands, the screw is not necessary. Simply attach the hand to the wrist using the click-in mechanism in place for V3 hands. 2. Mount the assembly on the fixture by sliding the sledge in towards the center from the side (right hand assembly from the right side, left hand assembly from the left side). When sliding the assembly, the fixing knob should be loosened (Figure 9.6). Positioning the DUT to the hand phantom and the fixture Once the hands are mounted to the sledge and the sledge is placed on the fixture slider, the DUT can be easily positioned between the right and left hand phantoms. We recommend that the center of the display be aligned with the rotation center. 1. Place the cross hair over the DUT’s display to indicate rotation center. We recommend that the display center be lined with the rotation center (see Figure 9.4). 2. Align the display center line with the zero-point marker on the spacer (Figure 9.7(a)). Place the DUT under the thumb to the hand (Figure 9.7(b)). We recommend using the short (∼1.5 cm) “3M DualLock” strip provided with the hand phantom to fix the DUT to the hand phantom spacer. 84 SPEAG, EM-Phantom User Manual V 4.4, October 2015 SAM Hand OTA Phantom SHO-V2/3 RTAB/LTAB Figure 9.4: Fixture SHO-FX-HOTV4 parts. 3. Shift the sledge together with the wrist, the hand, and the DUT such that the center of the display overlaps the center of the red cross of the fixture (rotation center), as indicated in Figure 9.8(a). Tighten the fixing knob (Figure 9.8(b)). If necessary, support the other side of the DUT to prevent it from falling. 4. Read the position on the ruler and shift the left hand to the same mark on the left hand side (Figure 9.9). Tighten the fixing knob. 5. Place the DUT under the left thumb and on the left spacer. Align the red mark on the DUT with the zero-point on the spacer ruler as before for the right hand. Mounting the wrist to the sledge Unscrew the three screws according Figure 9.10. Replace the corresponding wrist and tighten the screws again. SPEAG, EM-Phantom User Manual V 4.4, October 2015 85 9.5. Recommended Operation – Testing Mode (a) (b) (c) Figure 9.5: (a) Inserting the pegs into the hand’s wrist, (b) placing the screws (for V2 hands only), and (c) tightening them. (a) (b) Figure 9.6: (a) Mounting the right hand to the fixture and (b) fixing the knob. 86 SPEAG, EM-Phantom User Manual V 4.4, October 2015 SAM Hand OTA Phantom SHO-V2/3 RTAB/LTAB (a) (b) Figure 9.7: (a) Aligning the display center line with the zero-point marker and (b) pushing the DUT under the thumb. (a) (b) Figure 9.8: (a) Aligning the display center line with the rotation center and (b) tightening the knob. (a) (b) Figure 9.9: Aligning the DUT with the rotation center. SPEAG, EM-Phantom User Manual V 4.4, October 2015 87 9.5. Recommended Operation – Testing Mode (a) (b) Figure 9.10: (a) Removing the screws from the sledge and (b) mounting the wrist. 88 SPEAG, EM-Phantom User Manual V 4.4, October 2015 Chapter 10 SAM Hand OTA Phantom SHO-V2/3RTHG SHO-V2/3LTHG (for Two-Hand-Grip) 10.1 Introduction The SHO-V2/3RTHG and SHO-V2/3LTHG (SHOV2/3 Right and Left Two Hand Grip phantoms) are homogeneous anthropomorphically shaped hand phantoms suitable for use with brick phones for hand only (data mode) testing. They enable accurate measurement of radiation patterns and total radiated power of brick shaped devices used in, e.g., gaming mode. The thoroughly designed fixture and spacers are available to facilitate precise and repeatable positioning of the device in the hand. The dimensions and material of the hand phantoms, material of the spacers and other accessories are compliant with the CTIA Test Plan for Wireless Device Over-the-Air Performance, Revision 3.x. 10.2 Construction The SHO V2/3 hand phantoms are manufactured from a silicone- and carbon-based mixture (color: black). The hand target parameters based on real hand measurements are compliant with the CTIA Test Plan for Wireless Device Over-the-Air Performance, Revision 3.x. The hand is sufficiently flexible to grip a range of devices and sufficiently stiff to maintain a consistent grip. The spacer is manufactured from a low-loss and RF transparent hollow material with a wall thickness less than 2 mm. The white cover on the spacer is made of a low volume, low-loss solid material. 89 10.3. Dimensions of Hand Phantom and Spacer (a) (b) Figure 10.1: (a) SHO-V2/3LTHG and (b) SHO-V2/3RTHG The newly designed SHO-V3 hand phantoms have a click-in mechanism at the wrist for a more robust attachment to data-mode wrists, the forearm and POPEYE phantoms. The lossy Silicone part of the SHO-V3 hand phantoms is exactly the same as the V2 hands produced using the same high precision CAD based mold. This click-in mechanism results is higher stability and repeatability during data-mode measurements. 10.3 Dimensions of Hand Phantom and Spacer Geometry The dimensions of the hand phantoms are compliant with the CTIA Test Plan for Wireless Device Over-the-Air Performance, Revision 3.x. Hand Height Wrist width Hand width 155 mm 61 mm 100 mm Spacer Height Width 10.4 74 mm 56 mm Hand Phantom Fixture/Positioner – Testing Mode In testing mode, the DUT is mounted between the right and the left hand phantoms (SHO-V2/3RTHG and SHO-V2/3LTHG) and oriented such that 90 SPEAG, EM-Phantom User Manual V 4.4, October 2015 SAM Hand OTA Phantom SHO-V2/3 RTHG/LTHG (a) (b) Figure 10.2: (a) SHO-V2/3RTHG Hand phantom and (b) its spacer the DUT’s main display is tilted 45◦ from vertical. For that purpose, a fixture, and wrist extensions for both right and left hand phantoms have been designed with a fixed mounting angle. The wrist extensions are made of a hollow low-loss and RF transparent material. The other parts of the fixture are made of a low volume, low-loss solid material. The fixture allows the user to perform axial translation movements of the hands for a tight grip of various device widths (Figure 10.4). The maximum device width accomodated by the fixture is 28cm. Figure 10.3: SHO-FX-HOTV4 - SHO Fixture X for Hand-Only-Testing V4 with right and left wrists (SHO-RTHG/LTHG-DWV4), hands, and DUT SPEAG, EM-Phantom User Manual V 4.4, October 2015 91 10.5. Recommended Operation – Testing Mode 10.5 Recommended Operation – Testing Mode The DUT positioning is performed in three steps. The recommended procedure is to first mount both hand phantoms, right and left, to the corresponding wrist extensions, then mount this assembly to the fixture. Finally, the DUT is positioned between the two hand phantoms and aligned on the spacer. Figure 10.4: Fixture SHO-FX-HOTV4 parts. Mounting the hand phantom to the fixture For all following steps, be sure to not mix up right and left parts. 1. For V2 hand phantoms, insert the pegs of the wrist extension into the holes in the hand phantom wrist (Figure 10.5(a)). Fix the hand phantom to the wrist extension with the two screws provided (Figure 10.5(b) and 10.5(c)). For V3 hand phantoms the screws are not necessary. Simply attach the hand to the wrist using the click-in mechanism that is in place for V3 hands. 2. Mount the assembly to the fixture by sliding the sledge in from the side (right hand assembly from the right side, left hand assembly from the left side). When sliding in, the fixing knob should be loosened (Figure 10.6). Positioning the DUT relative to the hand phantom and the fixture Once the hands are mounted to the sledge and the sledge is placed on the fixture slider, the DUT can be easily positioned between the right and left 92 SPEAG, EM-Phantom User Manual V 4.4, October 2015 SAM Hand OTA Phantom SHO-V2/3 RTHG/LTHG (a) (b) (c) Figure 10.5: (a) Inserting pegs into the hand’s wrist (b) placing the screws (for V2 hands only), and (c) tightening them. hand phantoms. We recommend that the center of the display be aligned with the rotation center. 1. Place the cross hair over the DUT’s display to indicate the rotation center. In the vertical, we recommend drawing the cross hair line through the center and in the horizontal at 30 mm below the upper edge (Figure 10.7). 2. Place the DUT first under the right hand’s thumb and on the spacer (Figure 10.8(a)). Align the cross hair mark on the DUT with the indicator on the spacer (the indicator is only a recommended position). Note that the index finger tip should press against the upper edge of the device (Figure 10.8(b)). Then place the DUT on the hand. We recommend using the short (∼1.5 cm) “3M Dual-Lock” strip provided with the hand phantom or double sided tape to fix the DUT to the hand phantom spacer. 3. Shift the sledge together with the wrist, the hand, and the DUT such that the cross hair overlaps the center of the red cross of the fixture (rotation center), as indicated in Figure 10.9(a). Tighten the fixing SPEAG, EM-Phantom User Manual V 4.4, October 2015 93 10.5. Recommended Operation – Testing Mode (a) (b) Figure 10.6: (a) Mounting the right hand to the fixture and (b) fixing the knob. Figure 10.7: Marking the DUT: vertical line through display center, horizontal line 30 mm below the upper edge. knob (Figure 10.9(b)). If necessary, support the other side of the DUT to prevent it from falling. 4. Read the position on the ruler and shift the left hand to the same mark on the left hand side (Figure 10.10). Tighten the fixing knob. 5. Place the DUT under the left thumb and on the left spacer. Align the cross hair line on the DUT with the indicator on the spacer as before for the right hand. Mounting the wrist to the sledge Unscrew the three screws according Figure 9.10. Replace the corresponding wrist and tighten the screws again. 94 SPEAG, EM-Phantom User Manual V 4.4, October 2015 SAM Hand OTA Phantom SHO-V2/3 RTHG/LTHG (a) (b) Figure 10.8: (a) Aligning the display center line with the spacer marker (b) index finger presses on the upper edge of the device. (a) (b) Figure 10.9: (a) Aligning the cross hair with the rotation center and (b) tightening the knob. (a) (b) Figure 10.10: Aligning the DUT with the rotation center. SPEAG, EM-Phantom User Manual V 4.4, October 2015 95 10.5. Recommended Operation – Testing Mode (a) (b) Figure 10.11: (a) Removing the screws from the sledge and (b) mounting the wrist. 96 SPEAG, EM-Phantom User Manual V 4.4, October 2015 Chapter 11 SAM Hand OTA Phantom SHO-V2/3RLAP, SHO-V2/3LLAP 11.1 Introduction The SHO-V2/3RLAP and SHO-V2/3LLAP (SHO Right and Left LAPtop hands) are a pair of homogeneous anthropomorphically shaped hand phantom designed to test the effect of the users hands on the over-the-air wireless performance of laptops, notebooks, and wireless keyboards. The hand size and material correspond to those defined by CTIA and 3GPP and represent average hand size. (a) (b) Figure 11.1: (a) SHO-V2/3LLAP and (b) SHO-V2/3RLAP The hand posture represents the average resting position of the hand on the English keyboard, i.e., the thumbs on/close to the space-bar, the right index finger on/close to the J-key and the left index finger on/close to the F-key. To allow accurate and repeatable positioning of the hands on 97 11.2. Construction the device, supporting low-loss spacers have been integrated into the hands. The hands are mounted on the DUT with Velcro tape (glued to the spacers). A laptop fixture that allows to adapt various sizes of laptops, notebooks, and keyboards to be adapted to a turn table with its rotation axis aligned to the center of the DUT is currently under development. SPEAGs laptop fixture is recommended but not required for the test. 11.2 Construction The SHO-V2/3 hand phantoms are manufactured from a silicone- and carbonbased mixture (color: black). The hand target parameters, based on real hand measurements, are compliant with CTIA Test Plan for Wireless Device Over-the-Air Performance, Revision V3.x. The hand has a certain elasticity such that the fingers adapt to key-height variations. The spacer is manufactured from low-loss hollow plastic with a wall thickness of less than 2 mm. The newly designed SHO-V3 hand phantoms have a click-in mechanism at the wrist for a more robust attachment to data-mode wrists, the forearm and POPEYE phantoms. The lossy Silicone part of the SHO-V3 hand phantoms is exactly the same as the V2 hands produced using the same high precision CAD based mold. This click-in mechanism results is higher stability and repeatability during data-mode measurements. 11.3 Dimensions of Hand Phantom and Spacer (a) (b) Figure 11.2: (a) SHO-V2/3RLAP hand phantom and (b) spacer. 98 SPEAG, EM-Phantom User Manual V 4.4, October 2015 SAM Hand OTA Phantom SHO-V2/3 RLAP/LLAP Geometry Dimensions of the hand phantoms are compliant with CTIA Test Plan for Wireless Device Over-the-Air Performance, Revision V3.x. Hand Height Wrist width Hand width 190 mm 61 mm 115 mm Spacer Height Width 11.4 105 mm 90 mm Hand Phantom – Operating Mode In operating mode, both hand phantoms are mounted on the keyboard of the DUT. The recommended procedure is to first define the orientation of the hands on the keyboard and then attach the hands to the DUT. Spacers and Velcro tape enable repeatable and easy positioning. Figure 11.3: SHO-V2/3LLAP and SHO-V2/3RLAP hand phantoms positioned on a laptop device. Mounting the hand phantom to the DUT 1. We recommend that the hands be placed symmetrically on the keyboard in the basic position for typing, with the thumbs positioned on the space-bar, the right index finger close to the J-bar and the left SPEAG, EM-Phantom User Manual V 4.4, October 2015 99 11.4. Hand Phantom – Operating Mode index finger close to the F-key (see Figure 11.4). Mark or memorise the hand position on the DUT. Figure 11.4: Defining position of the fingers on the DUT. 2. We recommend the use of the short (∼1.5 cm) “3M Dual-Lock” Velcro tape provided with the hand phantom to fix the hand phantoms to the DUT. Cut the tape such that it fits in the corresponding cutout of the spacer (Figure 11.5(a)). Attach the Velcro to the spacer (Figure 11.5(b)). (a) (b) Figure 11.5: (a) Cutting the Velcro tape and (b) attaching to the spacer. 3. Remove the protective foil from the Velcro tape (Figure 11.8(a)) and mount the hand at the required position (Figure 11.8(b)) . 4. Should the hands become loose during vertical rotation, we recommend the use of an additional piece of flexible tape to fix the hands to the DUT (Figure 11.9). 100 SPEAG, EM-Phantom User Manual V 4.4, October 2015 SAM Hand OTA Phantom SHO-V2/3 RLAP/LLAP (a) (b) Figure 11.6: (a) Removing the protective foil from the Velcro tape and (b) mounting the hand at the required position. Figure 11.7: Fixing hands to the DUT for vertical rotation. SPEAG, EM-Phantom User Manual V 4.4, October 2015 101 11.5. Laptop Fixture 11.5 Laptop Fixture A fixture to provide horizontal and vertical rotational stability has been designed for laptops, notebooks, and keyboards of various sizes. The fixture can be easily mounted on most common turntables to allow alignment of its rotation axis to the rotation center of the DUT. The back side of the fixture has a feature for fixing the display of the laptop to an opening angle of 110 ± 5◦ , in accordance with CTIA test plan requirements (Chapter L.9.1). On the front is a detachable platform to facilitate positioning the hands on very narrow laptops. (a) (b) Figure 11.8: (a) Laptop fixture with (b) laptop and hand phantoms. Recommended Operation - Testing Mode Figure 11.9: Laptop fixture parts. The following steps will guide you through the recommended procedure for mounting the DUT on the fixture. Define the center of rotation of the DUT, which is normallly the three dimensional geometric center. In the case of an open laptop or notebook, this is typically a point in space above the keyboard in front of 102 SPEAG, EM-Phantom User Manual V 4.4, October 2015 SAM Hand OTA Phantom SHO-V2/3 RLAP/LLAP the display. Mark the location of this point on the DUT as shown in the example in Figure 11.10(a). Open the DUT and place it on the fixture with the center marks aligned (see Figure 11.10(b)). (a) (b) Figure 11.10: (a) Marking the edges of the geometric center on the DUT and (b) aligning with the fixture. Loosen the clamp screw to adjust to the height of the laptop (see Figure 11.11(a) and 11.11(b)). First, fix the two clamp screws on the front; then, if needed for stability, also fix the two clamp screws on the back (see Figure 11.11(c)). Note: To avoid damaging the laptop case, do not over tighten the screws. To adjust the angle of the display, loosen both screws of the displayangle adjuster on the back and align it with the open display (see Figure 11.12(a) and 11.12(b)). The predefined angle is 110◦ . Tighten the screws on both sides and fix the safety band around the display (see Figure 11.12(c) and 11.12(d)). Attach the hand phantoms to the Velcro strip (if the position is not yet defined, please follow the recommended procedure described in Section 11.4). Fix the hands to the laptop with the safety band (see Figure 11.13). For very small laptops, an extra platform may be needed to provide support for the hand phantoms. In this case, use the white spacers to adjust the height and fix the spacers to the spacer platform with the four red screws (see Figure 11.14). SPEAG, EM-Phantom User Manual V 4.4, October 2015 103 11.5. Laptop Fixture (a) (b) (c) Figure 11.11: (a) Loosening the clamp screw, (b) adjusting the height and position of the fixing point, and (c) tightening the clamp screw. 104 SPEAG, EM-Phantom User Manual V 4.4, October 2015 SAM Hand OTA Phantom SHO-V2/3 RLAP/LLAP (a) (b) (c) (d) Figure 11.12: (a) Loosening the clamp screw of the display-angle adjuster, (b) aligning with the display, and (c) tightening the clamp screw. (d) Fixing display with the safety band. SPEAG, EM-Phantom User Manual V 4.4, October 2015 105 11.5. Laptop Fixture (a) (b) (c) Figure 11.13: (a) and (b) Attaching the hand phantoms to the Velcro strip, and (c) fixing with the safety band. (a) (b) Figure 11.14: (a) Spacer platform with (b) holes to fix the spacers with four red screws. 106 SPEAG, EM-Phantom User Manual V 4.4, October 2015 Chapter 12 Travel Case/Car Torso (TCCT) and Transportation Box 12.1 Travel Case / Car Torso (TCCT) 12.1.1 Introduction The TCCT combines two functionalities. It enables the safe transport of all SPEAG SAM Heads (e.g. SAMV4.5/BS) and also provides a means to securely mount the SAM Head on a car seat to test communication performance under actual network conditions (see Operation Car Torso). Note: For safe transport of SAM V4.5 Head Phantoms, it is strongly recommended to remove the liquid from the head phantom and then pack it in TCCT in an additional box with foam filling, e.g. in the TCCT Transportation Box as shown in Section 12.2. 12.1.2 Length Width Height Weight 12.1.3 Dimensions 425 mm 324 mm 446 mm 8.6 kg Construction Material: MDF (Medium Density Fiber Board) 107 12.1. Travel Case / Car Torso (TCCT) Figure 12.1: TCCT 12.1.4 Operation Travel Case The TCCT provides everything to safely transport all SPEAG SAM Heads (e.g. SAMV4.5/BS). A rigid foamed form adapted to the SAM Head is installed in the base and in the top-cover of the case. This form keeps the SAM Head in a fixed position during transport (except air-transport). Note: For safe transport of SAM V4.5 Head Phantoms, it is strongly recommended to remove the liquid from the head phantom and then pack it in TCCT in an additional box with foam filling, e.g. in the TCCT Transportation Box as shown in Section 12.2. 12.1.5 Operation Car Torso On two sides, the TCCT has a set of four integrated nuts that are compatible with the four 8mm holes in the bottom flange of the SAM Head in dimension and positioning. Operation of the SAM Head on the TCCT is possible in 2 positions depending on the preferred height of the passenger head. Six slots in the opening of the TCCT ensure a simple and secure mounting of the torso on the car seat using the seat belt. Note: In case of a need for long distance transportation (e.g. by airplane), it is strongly recommended to pack the TCCT 108 SPEAG, EM-Phantom User Manual V 4.4, October 2015 Travel Case/Car Torso (TCCT) and Transportation Box Figure 12.2: Operation Travel Case in an additional box with foam filling, e.g. Transportation Box as shown below. in the TCCT 12.2 TCCT Transportation Box (TCCT TB) 12.2.1 Introduction and Operation The TCCT TB is a strong watertight, crush- and dust-proof packing device for safe transportation of the TCCT including SAM Head on airplanes. The box comes with four removable wheels for ease of movement and large, fold-down handles for two person lift. It is recommended to remove the wheels at airport check-in to avoid damage of the wheels and/or the TCCT TB. Note: For safe transport of SAM V4.5 Head Phantoms, it is strongly recommended to remove the liquid from the head phantom and then pack it in TCCTTB. 12.2.2 Dimensions Length Width Height Weight TB only Weight TB incl. TCCT 571 mm 569 mm 540 mm 14.5 kg 22.1 kg SPEAG, EM-Phantom User Manual V 4.4, October 2015 109 12.2. TCCT Transportation Box (TCCT TB) Figure 12.3: Operation Car Torso Figure 12.4: TCCT TB: outside view (left) and inside view (right) 12.2.3 Construction Shell Material: polypropylene Shell Color: black Filling Material: custom made foam (polyurethane) 110 SPEAG, EM-Phantom User Manual V 4.4, October 2015 Appendix A Uncertainty Assessment of SAM-V4.5 BS Head and SHO Hand Phantoms A.1 Introduction The objective of this chapter is to document the general concept and the evaluation techniques of head and hand phantoms uncertainty evaluations according to CTIA Test Plan for Wireless Device Overthe-Air Performance, Revision 3.x [3]. The analysis is consistent with Appendix G and Appendix I of this Test Plan. A.2 Concept of Phantoms and Positioning Uncertainties These uncertainty components arise from: – The tolerance of head shape, shell thickness and dielectric parameters and mounting construction – The tolerance of hand shape and mounting fixture – Positioning the phone in the hand and the hand with the phone at the head with respect to the definitions provided in CTIA OTA Test Plan Appendix A [3] The combined uncertainty of head, hand and EUT positioning in the hand and against the head phantoms is determined as shown in Table A.1. 111 A.3. Head Phantom Uncertainty Table A.1: Standard uncertainties for the head, hand and EUT positioning in the hand and against the head phantoms Description of uncertainty contributions Head Phantom Uncertainty Hand Phantom Uncertainty Head Phantom Fixture Uncertainty Hand Phantom Fixture Uncertainty Phone Positioning Uncertainty Combined Standard Uncertainty (RSS) Standard Uncertainty, dB The uncertainty components represent the maximum uncertainty for the determination of TRP and TIS. The measurement uncertainty estimate includes the 700-900 MHz, the 1500-2200 MHz and the 23002800 MHz bands and will be conducted for the following endpoints: – Total Radiated Power (TRP) – Power radiated over ±45 ◦ / ± 30 ◦ degrees near the Horizon (NHPRP ±45 ◦ / ± 30 ◦ ) – Upper Hemisphere Radiated Power (UHRP) – Partial GPS Radiated Power (PGRP) The selected devices used in the evaluation enable extrapolation of uncertainty to the entire phone population. Since the evaluation effort per device can be significant, the total number of devices used in the evaluation is limited for practical reasons. According to CTIA OTA Test Plan [3], the number of devices should be at least six and include at least two mono-block devices (fixed or sliders), two fold devices, two with antennas at the top, and two with antennas at the bottom. A.3 Head Phantom Uncertainty The head phantom uncertainty is the effect of the tolerances of the inner and outer surface shape, the dielectric parameters and the shell thickness, as well as the supporting materials except the head phantom fixture. The transformations of these tolerances to uncertainties for end points defined in Section A.2 have been studied in literature [4]. The following approximations defined in CTIA OTA Test Plan [3] are used to determine the head uncertainty for both orientations, i.e., 112 SPEAG, EM-Phantom User Manual V 4.4, October 2015 Uncertainty Assessment of SAM-V4.5 Head and SHO Hand Phantoms vertical and horizontal orientation, where a rectangular distribution shall be assumed: ∆d uhead phantom shell [dB] = c1 · 10 · log10 1 + d " uhead phantom permittivity [dB] = c2 · 10 · log10 " uhead phantom conductivity [dB] = c3 · 10 · log10 (A.1) p !# ∆ε2 + ∆ε2 unc 1+ ε (A.2) p !# ∆σ 2 + ∆σ 2 unc 1+ σ (A.3) ∆shape uhead phantom shape [dB] = c4 · 10 · log10 1 + shape (A.4) The sensitivity factor c1 = 0.10 as determined according to CTIA OTA Test Plan Appendix I [3] and documented in the paper mentioned above. ∆d is the maximum deviation from the nominal shell thickness d from the CAD file, whereas the maximum tolerable deviation is ± 0.2 mm. This tolerance must be verified for an area as wide as ± 50 mm symmetric to the line connecting the Ear Reference Point to the Mouth Point (line extending from the ear reference point to 20 mm below the mouth point as well as for the surface of the ear). The measurements can be conducted with a properly calibrated inductive thickness measurement instrument. ∆ε and ∆σ are the tolerances from the target relative permittivity and conductivity of the head material, respectively, where the maximum tolerable tolerance shall be 20%. c2 = 0.39 and c3 = 0.065 were determined according to the methodology of CTIA OTA Test Plan Appendix I [3] and documented in [4]. ∆εunc and ∆σunc are expanded measurement uncertainties (k = 2) of dielectric parameters according to CTIA OTA Test Plan Appendix G [3]. ∆shape is the tolerance of the inner surface of the shell. If the tolerance is within 2% from that specified in the SAM CAD file provided in IEEE 1528-2002 [5] and maintained in this boundary range during the entire measurement cycle, the effect of the head phantom shape can SPEAG, EM-Phantom User Manual V 4.4, October 2015 113 A.4. Hand Phantom Uncertainty be neglected, i.e., c4 = 0. If the tolerance is larger, a numerical study as outlined in Appendix I must be conducted to determine ∆shape. The SPEAG head phantom SAM-V4.5BS, is based on an alternative head phantom described in the CTIA OTA Test Plan section C [3] which extends below the neck region. An additional uncertainty of 0.25 dB (k=2) shall be added [4] for this head phantom. Table A.2: SPEAG Head Phantom Uncertainty Head Phantom ∆d Shell Thickness Uncertainty Component Filling/Liquid Dielectric Constant Filling/Liquid Conductivity Geometry/Shape d a 0.2 2 0.41 ∆ε/ε ∆εunc /ε a 0.06 0.03 0.28 ∆σ/σ ∆σunc /σ a 0.06 0.05 0.33 Reference Equation A.1 Reference Equation A.2 Reference Equation A.3 a 0.25 Table A.2 shows an example of the calculation of the head phantom uncertainty values, based on table G-4 of the CTIA OTA test plan [3]. The values ∆ε and ∆σ are specific to individual head phantoms, and are provided by SPEAG in the document ”Certificate of Conformity / Material Test” that is included with every delivered phantom. These values are frequency dependent, and should be calculated for the middle channel of all frequency bands specified in section A.2. The values for ∆εunc and ∆σunc are reported in the document ”Certificate of OTA Material Test Uncertainty” under ”Expanded Uncertainty (K=2)”, provided by SPEAG with every delivered phantom. A.4 Hand Phantom Uncertainty The hand phantom uncertainty is the effect of the tolerance of the shape of the molded hand phantom including the spacer and the tolerance of the dielectric parameters [6]. The material properties of the 114 SPEAG, EM-Phantom User Manual V 4.4, October 2015 Uncertainty Assessment of SAM-V4.5 Head and SHO Hand Phantoms hand material are evaluated with the following protocol: 1. The hands must be produced together with a cube with side lengths of greater than 40 mm. Each hand must be associated with a reference cube produced from the same material mixture. 2. Slices of at least 3 mm thickness shall be cut on three orthogonal sides of the cube. The other three orthogonal sides remain untreated. 3. Relative permittivity and conductivity shall be measured at ten specified points on the hand exterior surface and on each of the three cut sides of the cube. Exterior and interior averages and standard deviations are calculated according to [3]. The total averages shall then be calculated as the average of exterior and interior values. 4. The hands are acceptable, i.e., meeting the minimal requirements, if: – The overall average is within 15% for permittivity target and 25% for conductivity, – The standard deviation over all measurements is within 20% for permittivity and 40% for conductivity. – The average of each cut surface is within 10% of the overall average for permittivity and 20% for conductivity. – The average of the hand surface is within 20% of the overall average for permittivity and 30% for conductivity. The transformation of these tolerances to uncertainties for the end points defined in Section A.2 must be determined according to CTIA OTA Test Plan Appendix I [3]. The following approximations shall be used to determine the hand uncertainty where a rectangular distribution is assumed: q ∆ε2 + ε2 + (a ε )2 1 std avg unc uhand phantom permittivity [dB] = c1 ·10 · log10 1 + ε (A.5) q ∆σ 2 + σ 2 + (a σ )2 1 std avg unc uhand phantom conductivity [dB] = c2 ·10 · log10 1 + σ (A.6) SPEAG, EM-Phantom User Manual V 4.4, October 2015 115 A.4. Hand Phantom Uncertainty ∆shape uhand phantom shape [dB] = c3 · 10 · log10 1 + shape (A.7) ∆εavg , ∆σavg , εstd , σstd are the values determined as defined above and εunc and σunc are expanded measurement uncertainties (k = 2) of the dielectric parameters according to CTIA OTA Test Plan Appendix G [3] determined for homogeneous materials. c1 = 0.78 and c2 = 0.39 and a1 = 0.5 were determined according to the methodology of CTIA OTA Test Plan Appendix I [3]. ∆shape is the uncertainty on the end points defined in Section A.2, resulting from the tolerance of the hand phantom shape. Since the hands are usually manufactured within models, the tolerance is 2% and therefore the effect is negligible, i.e., c3 = 0. If the tolerance is larger, a numerical study as outlined in CTIA OTA Test Plan Appendix I [3] must be conducted to determine ∆shape. Table A.3: SPEAG Hand Phantom Uncertainty Hand Phantom ∆εavg /ε Material Dielectric 0.01 Constant ∆σavg /σ Material 0.12 Conductivity εunc /ε εstd /ε 0.06 0.03 a1 a 0.5 0.26 σunc /σ σstd /σ a1 a 0.08 0.5 0.65 0.15 Reference Equation A.5 Reference Equation A.6 Table A.3 shows an example of the calculation of the hand phantom uncertainty values, based on table G-4 of the CTIA OTA test plan [3]. The values ∆εavg , εstd , ∆σavg and σstd are specific to individual hand phantoms, and are provided by SPEAG in the document ”Certificate of Material Test” that is included with every delivered phantom. These values are frequency dependent, and should be calculated for the middle channel of all frequency bands specified in section A.2. The values for εunc and σunc are reported in the document ”Certificate of OTA Material Test Uncertainty” under ”Expanded Uncertainty (K=2)”, provided by SPEAG with every delivered phantom. 116 SPEAG, EM-Phantom User Manual V 4.4, October 2015 Uncertainty Assessment of SAM-V4.5 Head and SHO Hand Phantoms A.5 Hand Phantom Fixture Uncertainty The hand phantom mounting fixtures uncertainty is the effect of the hand phantom fixtures on the end points defined in Section A.2 compared to the standard configuration with an ideally RF transparent fixture. The effect of the fixture is frequency dependent and is evaluated at the middle channel of the LTE 41, PCS and Cell bands in order to estimate the uncertainty of the 2300-2800 MHz, 1500-2200 MHz, and the 700-900 MHz bands, respectively. Numerical technique is used to obtain an uncertainty estimate of hand phantom fixture uncertainty. The study is conducted according to CTIA OTA Test Plan Appendix I [3] by comparing the differences between the end points with and without fixtures. 10 devices were used in the study of the fixture uncertainty contribution. These devices include 4 mono-block, 2 fold, and 4 PDA devices. Antenna positions include top, bottom, extended at the top, and embedded in the back of the device. A.5.1 Simulation Software The evaluation was conducted using the electromagnetic simulation tool SEMCAD X and Sim4Life which satisfy the basic requirements mentioned in CTIA OTA Test Plan [3]: – Import of mobile phone CAD data (typically, >500 parts) as well as head/hand phantoms and fixture data – Accurate simulation of mobile phones with homogeneous head and hand phantoms including effect on impedance, efficiency, and performance – Position of mobile phone and phantoms with high precision – Evaluation of end points specified in Appendix G – Scripting abilities The simulation software has been validated by the manufacturer in different studies [7] - [10]. In addition, it is further validated by checking the correct evaluation of the end points of dipoles and computation of the benchmark examples referred to in CTIA OTA Test Plan Appendix I [3]. SPEAG, EM-Phantom User Manual V 4.4, October 2015 117 A.5. Hand Phantom Fixture Uncertainty A.5.2 Numerical Evaluation of Hand Phantom Fixtures Uncertainty The numerical evaluation compares the differences between the end points specified in CTIA OTA Test Plan Appendix G [3] with and without fixtures. The following procedure is applied for Hand Phantom Talk Mode fixture uncertainty evaluation: 1. Import models of the head and hand phantoms into the device model space and set material parameters according to CTIA OTA Test Plan Appendix C [3]. Note that the appropriate hand phantom is chosen by the device width, its usage mode and its form factor (Appendix A of CTIA OTA Test Plan). 2. Position the phone with respect to the head and hand phantoms according to the procedure defined in CTIA OTA Test Plan Appendix A [3]. 3. Import model of hand phantom talk mode fixture into the same model space. 4. Position them to operate as fixture and set material parameters. 5. Perform the initial simulation for each frequency band and evaluate the end points specified in CTIA OTA Test Plan Appendix G [3]. 6. Without changing any simulation settings and discretization, repeat step 5 without fixture. The following procedure is applied for Hand Phantom Data Mode fixture uncertainty evaluation: 1. Import model of the hand phantom into the device model space and set material parameters according to CTIA OTA Test Plan Appendix C [3]. Note that the appropriate hand phantom is chosen by the device width, its usage mode and its form factor (Appendix A of CTIA OTA Test Plan). 2. Position the phone with respect to the hand phantom according to the procedure defined in CTIA OTA Test Plan Appendix A [3]. 3. Import model of hand phantom data mode fixture into the same model space. 4. Position them to operate as fixture and set material parameters. 118 SPEAG, EM-Phantom User Manual V 4.4, October 2015 Uncertainty Assessment of SAM-V4.5 Head and SHO Hand Phantoms 5. Perform the initial simulation for each frequency band and evaluate the end points specified in CTIA OTA Test Plan Appendix G [3]. 6. Without changing any simulation settings and discretization, repeat step 5 without fixture. A.5.3 Computation of the Uncertainty Each device is simulated with and without the mounting structures. The first column in table A.4 shows the maximum difference, among the three frequency bands, determined at the end points specified in CTIA OTA Test Plan Appendix G [3] for the Talk and Data Mode fixtures. These values are used to determine the fixture uncertainty contribution (ui values in table A.4), and are converted to a standard uncertainty assuming a rectangular distribution. Table A.4: Fixture Uncertainty Assessment Uncertainty Component Fixtures Hand Phantom Fixture Data Mode Fixture V1/2 Data Mode Fixture V3/4 A.6 a Tol. (± dB) Prob. dist. < 0.35 < 0.16 < 0.24 R R R b Div. c ci ui Std. unc. (± dB) vi √ √3 √3 3 1.00 1.00 1.00 < 0.20 < 0.09 < 0.14 ∞ ∞ ∞ Example of Uncertainty Assessment Table A.5 shows an example of the total uncertainty calculation, as shown in table G-4 of the CTIA OTA test plan [3]. The values in the column labeled a are the results of calculations shown in the examples of tables A.2, A.3 and A.4 for the head, hand and fixtures respectively. As explained in the previous sections, these values should be calculated in the middle channel of the three frequency bands mentioned in section A.2, and the maximum of the three calculated values should be used in talble A.5 for the calculation of the total uncertainty. SPEAG, EM-Phantom User Manual V 4.4, October 2015 119 A.6. Example of Uncertainty Assessment Table A.5: Example of uncertainty assessment for the head, hand and EUT positioning in the hand and against the head a Uncertainty Tol. Prob. Component (± dB) dist. Head Phantom Shell Thickness 0.41 R Filling/Liquid Dielectric Contstant 0.28 R Filling/Liquid Conductivity 0.33 R Geometry/Shape 0.25 N Supporting Structure Uncertainty 0.00 R Combined Head Phantom Uncertainty Hand Phantom Material Dielectric Contstant 0.26 R Material Conductivity 0.65 R Geometry/Shape (incl. spacer) 0.00 R Combined Hand Phantom Uncertainty Fixtures Head Phantom Fixture R Hand Phantom Fixture 0.35 R Data Mode Fixture 0.16 R EUT Related EUT Positioning 0.58 R (see G.10.5 of [3]) Combined Standard Uncertainty (Head+Hand+Fixture) Combined Standard Uncertainty (Hand+Fixture) 120 b c Div. ci √ ui = (a/b) × (c) Std. unc. (± dB) vi 3 0.10 0.02 ∞ 3 0.39 0.06 ∞ 3 2 0.065 1 0.01 0.13 ∞ ∞ 1 0.00 ∞ 0.14 ∞ 0.78 0.39 0.12 0.15 ∞ ∞ 1 0.00 ∞ 0.19 ∞ 1.00 1.00 0.20 0.09 ∞ ∞ ∞ 1.00 0.33 √ √ √ 3 √ √3 3 √ 3 √ √3 3 √ 3 0.46 ∞ 0.21 ∞ SPEAG, EM-Phantom User Manual V 4.4, October 2015 Appendix B SHO Mounting Equipment (SHO-ME) B.1 Introduction SHO Mounting Equipment (SHO-ME) is an add-on to the Mounting Device for Transmitters. It enables SAR assessments with SHO hand phantoms using the DASY system and Twin SAM phantom. With SHO-ME, users can evaluate the influence of the hand on the SAR results of a device under test. Accurate and repeatable positioning of the transmitter is possible using high precision positioning equipment. Positioning of the transmitter in the SHO hand phantom is performed in the same way as described in the SHO user manual according to the procedure standardized in CTIA Test Plan for Wireless Device Over-the-Air Performance, Revision 3.x. The instructions given below describe how to mount the hand phantom on the DASY device holder, to place the mobile phone in the hand phantom, and to position the mobile phone against the Twin SAM Phantom head. The instructions below are applicable to brick (candybar) type phones. Similar instructions can be followed for clamshell or PDA type phones. Please consult the OTA user manual for more information. B.2 Tools Required None 121 B.3. Procedure B.3 Procedure B.3.1 SAR measurement with hand phantom using DASY system and Twin SAM Phantom 1. Mount the hand phantom on the DASY device holder following the procedure described in Section B.3.2. Exchange hand phantom types as described in Section B.3.3. 2. Place the mobile phone (DUT) into the grip of the hand phantom, following the instructions ofSection B.3.4. 3. Position the DUT against the Twin SAM Phantom in accordance with [11] and [12]. 4. Follow Section B.3.5 to ensure that the device is in good contact with the ear of the Twin SAM Phantom. 5. Check that the final position of the DUT looks as shown in Fig. B.1. It should not be as shown in Fig. B.2 or Fig. B.3. Figure B.1: Correct positioning. The DUT is in the cheek position and the back of the DUT is in good contact with the hand phantom spacer B.3.2 Installing the Hand Phantom on the DASY Device Holder 1. Loosen the black screw as shown in Fig. B.4(a). 2. Remove the device holder top from the two white poles as shown in Fig. B.4(b). 3. Install the hand phantom adapter onto the two white poles as shown in Fig. B.5. 122 SPEAG, EM-Phantom User Manual V 4.4, October 2015 SHO Mounting Equipment (SHO-ME) Figure B.2: Incorrect positioning. The back of the DUT does not make good contact with the hand phantom spacer. Figure B.3: Incorrect positioning. The DUT is not in the correct cheek position. For thin phones, the thumb of the hand phantom will make contact with the Twin SAM phantom before the DUT is in the cheek position. Hand phantom fingers are flexible and should be moved slightly to obtain correct cheek position. B.3.3 Exchanging Hand Phantom Types 1. Loosen the black screw as shown in Fig. B.6(a). 2. Remove and exchange the hand phantom and re install the black screw carefully. SPEAG, EM-Phantom User Manual V 4.4, October 2015 123 B.3. Procedure (a) (b) Figure B.4: (a) Loosening the black screw, (b) Device holder removed. Figure B.5: Installing the hand phantom adapter. (a) (b) Figure B.6: (a) Removing the black screw, (b) Exchange the hand phantom type. 124 SPEAG, EM-Phantom User Manual V 4.4, October 2015 SHO Mounting Equipment (SHO-ME) B.3.4 tom Placing the DUT in the Grip of the Hand Phan- 1. Place the DUT on the alignment tool B and fit it into the corner between the slab and the guiding strip. Slide the DUT down until it reaches the angled corner, as shown in Fig. B.7(a). 2. Record the chin length from the scale on the alignment tool (Fig. B.7(a)). 3. Place the DUT on the hand phantom spacer and between the fingers of the hand phantom. The bottom of the DUT should align with the chin length recorded in step 2, as shown in Fig. B.7(b)). (a) (b) Figure B.7: Positioning DUT relative to the hand phantom. 4. While keeping the DUT in the position defined in the previous step, ensure that the vertical centerline of the DUT is oriented along the length of the hand phantom spacer, as shown in Fig. B.7(b). The horizontal alignment of the device should be according to Fig. B.9. 5. While keeping the DUT in the position defined in the previous steps, make sure that the index finger is in good contact with the DUT (Fig. B.8(c)). It is recommended to use the 3M dual lock Velcro strip provided with the hand phantom to fix the DUT to the hand phantom. SPEAG, EM-Phantom User Manual V 4.4, October 2015 125 B.3. Procedure (a) incorrect rotation (b) correct rotation (c) correct position Figure B.8: (Positioning DUT relative to the hand phantom. (a) misaligned (b) correct alignment Figure B.9: Horizontal alignment of the DUT relative to the hand phantom. (a) incorrect alignment (note that the vertical centerline of the DUT in green is not aligned with the red line representing the centerline of the hand phantom spacer), (b) correct alignment. B.3.5 Angle Adjustment of Hand Phantom for Phone Alignment against Twin SAM Phantom Ear For adherence to the device positioning procedures of [11] and [12], the DUT must be in good contact with the ear on the Twin SAM phantom. This means that the horizontal line on the DUT (see Fig. B.8) and the 126 SPEAG, EM-Phantom User Manual V 4.4, October 2015 SHO Mounting Equipment (SHO-ME) edge of the ear along the N-F line must be parallel. To ensure this, angle adjustment of the hand phantom is necessary. Important: the back of the device must be in good contact with the hand phantom spacer. Do not rotate the DUT in the hand phantom. Before rotating the hand phantom, ensure that the vertical centerline of the DUT is aligned with the green M-B line on the Twin SAM phantom. The hand phantom can be shifted to the left or right by loosening the wing screw shown in Fig. B.10. The way to rotate the hand phantom is to use the wedge shown in Fig. B.10. The hand phantom is hinged on the hand phantom fixture. Movement of the wedge to the left or right rotates the hand. This is done by rotating the wedge screw. Figure B.10: Wedge of the hand phantom fixture. SPEAG, EM-Phantom User Manual V 4.4, October 2015 127 Bibliography [1] M.C. Gosselin et al, Estimation Formulas for the Specific Absorption Rate in Humans Exposed to Base Station Antennas, 2011. [2] C.C. Gordon et al, Anthropometric survey of U.S. Army personnel: summary statistics interim report, 1989. [3] CTIA Test Plan for Wireless Device Over-the-Air Performance, Revision 3.4 (December 2014) [4] Ofli E., Chavannes N., and Kuster N., The Uncertainties and Repeatability Limitations of Transmitter and Receiver Performance Assessments Posed by Head Phantoms, Proc. IEEE International Workshop on Antenna Technology (IWAT06), pp. 349-352, New York, 2006. [5] IEEE, 1528-2002 SCC34 Draft Standard: Recommended Practice for Determining the Peak Spatial-Average Specific Absorption Rate (SAR) in the Human Body Due to Wireless Communications Devices: Experimental Techniques, April 2002. [6] Li C-H., Ofli E., Chavannes N., and Kuster N., The Effects of Hand Phantom on Mobile Phone Antenna OTA Performance, Proc. Second European Conference on Antennas and Propagation, EuCAP 2007, Edinburgh, UK, November 11 - 16, 2007. [7] N. Chavannes, R. Tay, N. Nikoloski, and N. Kuster, Suitability of FDTD-based TCAD tools RF design of mobile phones, IEEE Antennas and Propagation Magazine, vol.45, no.6, pp.52-66, 2003. [8] N. Chavannes, R. Tay, F. Nunez, E. Ofli and N. Kuster, Virtual Prototyping and Failure Mode and Effect Analysis (FMEA) in Industrial Design Processes on the Basis of Mobile Device Terminals, The Second European Conference on Antennas and Propagation, EuCAP 2007, pp.1-5, Nov. 2007. [9] P. Futter, N. Chavannes, R. Tay, M. Meili, A. Kingenbock, K. Pokovic and N. Kuster, Reliable Prediction of Mobile Phone Performance for Realistic in-use Conditions using the FDTD Method, Antennas and Propagation Magazine, IEEE, vol.50, no.1, pp.8796, Feb. 2008. 128 BIBLIOGRAPHY [10] Li C-H., Ofli E., Chavannes N., and Kuster N., Effects of hand phantom on mobile phone antenna performance, IEEE Transactions on Antennas and Propagation, vol. 57, pp. 27632770, 2009. [11] IEEE Recommended Practice for Determining the Peak SpatialAverage Specific Absorption Rate (SAR) in the Human Head from Wireless Communication Devices: Measurement Techniques, IEEE Standard 1528-2003. [12] Human Exposure to Radio Frequency Fields from Hand-Held and Body-Mounted Wireless Communication DevicesHuman Models, Instrumentation, and ProceduresPart 1: Procedure to Determine the Specific Absorption Rate (SAR) for Hand-Held Devices Used in Close Proximity to the Ear (Frequency Range of 300 MHz to 3 GHz), IEC Standard 62209, Feb. 2005. SPEAG, EM-Phantom User Manual V 4.4, October 2015 129