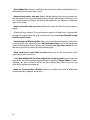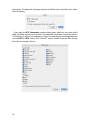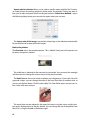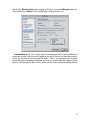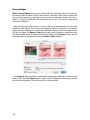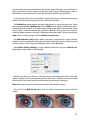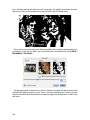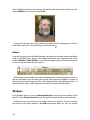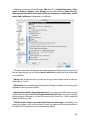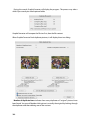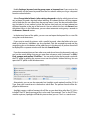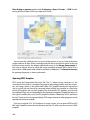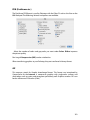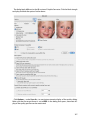
1
User’s Manual
GraphicConverter 6.6
Programmed by Thorsten Lemke
Manual by Hagen Henke
Sales:
Lemke Software GmbH
PF 6034
D-31215 Peine
Tel: +49-5171-72200
Fax:+49-5171-72201
E-mail: [email protected]
In the PDF version of this manual,
you can click the page numbers in the
contents and index to jump to that particular page.
© 2001-2009 Elbsand Publishers, Hagen Henke. All rights reserved.
www.elbsand.de
Sales: Lemke Software GmbH, PF 6034, D-31215 Peine
www.lemkesoft.com
This book including all parts is protected by copyright. It may not be reproduced in any
form outside of copyright laws without permission from the author. This applies in particular to photocopying, translation, copying onto microfilm and storage and processing
on electronic systems.
All due care was taken during the compilation of this book. However, errors cannot be
completely ruled out. The author and distributors therefore accept no responsibility for
any program or documentation errors or their consequences.
This manual was written on a Mac using Adobe FrameMaker 6.
Almost all software, hardware and other products or company names mentioned in this
manual are registered trademarks and should be respected as such. The following list is
not necessarily complete.
Apple, the Apple logo, and Macintosh are trademarks of Apple Computer, Inc., registered
in the United States and other countries. Mac and the Mac OS logo are trademarks of
Apple Computer, Inc.
Photo CD mark licensed from Kodak. Mercutio MDEF copyright Ramon M. Felciano 19921998
Copyright for all pictures in manual and on cover: Hagen Henke except for page 95 example picture Tayfun Bayram and others from www.photocase.de; page 404 PCD example
picture © AMUG Arizona Mac Users Group Inc. Reginald Muhl and ECW and mrSID example pictures.
New editions of this book may contain some paragraphs translated by the author in
rough English. These paragraphs will be replaced with a professional translation as soon
as possible.
Typesetting: Hagen Henke
Version 4.4, Lorenzkirch 2009
Contents
Introduction
Welcome to GraphicConverter . . . . . . . . . . . . . . . . . . . . . . . . . . . . . . . . . . . . . . . . . . . . . . . . . . . . . . . .6
System Requirements . . . . . . . . . . . . . . . . . . . . . . . . . . . . . . . . . . . . . . . . . . . . . . . . . . . . . . . . . . . . . . . .6
Installation . . . . . . . . . . . . . . . . . . . . . . . . . . . . . . . . . . . . . . . . . . . . . . . . . . . . . . . . . . . . . . . . . . . . . . . . . . .6
Update . . . . . . . . . . . . . . . . . . . . . . . . . . . . . . . . . . . . . . . . . . . . . . . . . . . . . . . . . . . . . . . . . . . . . . . . . . . . . 12
License Key and Registration . . . . . . . . . . . . . . . . . . . . . . . . . . . . . . . . . . . . . . . . . . . . . . . . . . . . . . . . 13
Support . . . . . . . . . . . . . . . . . . . . . . . . . . . . . . . . . . . . . . . . . . . . . . . . . . . . . . . . . . . . . . . . . . . . . . . . . . . . 15
This Manual . . . . . . . . . . . . . . . . . . . . . . . . . . . . . . . . . . . . . . . . . . . . . . . . . . . . . . . . . . . . . . . . . . . . . . . . 16
Starting the Program and Opening a Picture . . . . . . . . . . . . . . . . . . . . . . . . . . . . . . . . . . . . . . . . . 16
Converting a Picture with Save as... . . . . . . . . . . . . . . . . . . . . . . . . . . . . . . . . . . . . . . . . . . . . . . . . . . 24
Saving and Closing . . . . . . . . . . . . . . . . . . . . . . . . . . . . . . . . . . . . . . . . . . . . . . . . . . . . . . . . . . . . . . . . . 30
Save a Copy as... . . . . . . . . . . . . . . . . . . . . . . . . . . . . . . . . . . . . . . . . . . . . . . . . . . . . . . . . . . . . . . . . . . . . 30
Convert & Modify . . . . . . . . . . . . . . . . . . . . . . . . . . . . . . . . . . . . . . . . . . . . . . . . . . . . . . . . . . . . . . . . . . . 30
Work Environment . . . . . . . . . . . . . . . . . . . . . . . . . . . . . . . . . . . . . . . . . . . . . . . . . . . . . . . . . . . . . . . . . 53
Internet
Preparing Pictures for the Internet . . . . . . . . . . . . . . . . . . . . . . . . . . . . . . . . . . . . . . . . . . . . . . . . . .
Save for web . . . . . . . . . . . . . . . . . . . . . . . . . . . . . . . . . . . . . . . . . . . . . . . . . . . . . . . . . . . . . . . . . . . . . . . .
Comparing Pictures . . . . . . . . . . . . . . . . . . . . . . . . . . . . . . . . . . . . . . . . . . . . . . . . . . . . . . . . . . . . . . . .
Pictures in E-mails . . . . . . . . . . . . . . . . . . . . . . . . . . . . . . . . . . . . . . . . . . . . . . . . . . . . . . . . . . . . . . . . . .
Pictures in mobile phones . . . . . . . . . . . . . . . . . . . . . . . . . . . . . . . . . . . . . . . . . . . . . . . . . . . . . . . . . . .
Slices . . . . . . . . . . . . . . . . . . . . . . . . . . . . . . . . . . . . . . . . . . . . . . . . . . . . . . . . . . . . . . . . . . . . . . . . . . . . . . .
Optimizing Filenames for the Internet . . . . . . . . . . . . . . . . . . . . . . . . . . . . . . . . . . . . . . . . . . . . . . .
Photo Albums on the Internet (Catalog) . . . . . . . . . . . . . . . . . . . . . . . . . . . . . . . . . . . . . . . . . . . . .
Uploading and Downloading Documents . . . . . . . . . . . . . . . . . . . . . . . . . . . . . . . . . . . . . . . . . . .
65
69
70
71
78
78
80
80
90
On Paper
Paper Format . . . . . . . . . . . . . . . . . . . . . . . . . . . . . . . . . . . . . . . . . . . . . . . . . . . . . . . . . . . . . . . . . . . . . . .
Printing . . . . . . . . . . . . . . . . . . . . . . . . . . . . . . . . . . . . . . . . . . . . . . . . . . . . . . . . . . . . . . . . . . . . . . . . . . . .
Print Catalog . . . . . . . . . . . . . . . . . . . . . . . . . . . . . . . . . . . . . . . . . . . . . . . . . . . . . . . . . . . . . . . . . . . . . . .
Print Folder . . . . . . . . . . . . . . . . . . . . . . . . . . . . . . . . . . . . . . . . . . . . . . . . . . . . . . . . . . . . . . . . . . . . . . . . .
Cropping for Photo Prints . . . . . . . . . . . . . . . . . . . . . . . . . . . . . . . . . . . . . . . . . . . . . . . . . . . . . . . . . . .
92
92
95
99
99
Processing Pictures
Picture Size . . . . . . . . . . . . . . . . . . . . . . . . . . . . . . . . . . . . . . . . . . . . . . . . . . . . . . . . . . . . . . . . . . . . . . . . 103
Scanning with GraphicConverter . . . . . . . . . . . . . . . . . . . . . . . . . . . . . . . . . . . . . . . . . . . . . . . . . . . 108
Using the Stamp for Touching Up . . . . . . . . . . . . . . . . . . . . . . . . . . . . . . . . . . . . . . . . . . . . . . . . . . 113
Export . . . . . . . . . . . . . . . . . . . . . . . . . . . . . . . . . . . . . . . . . . . . . . . . . . . . . . . . . . . . . . . . . . . . . . . . . . . . . 114
Importing Pictures from Digital Cameras . . . . . . . . . . . . . . . . . . . . . . . . . . . . . . . . . . . . . . . . . . . 114
Trimming . . . . . . . . . . . . . . . . . . . . . . . . . . . . . . . . . . . . . . . . . . . . . . . . . . . . . . . . . . . . . . . . . . . . . . . . . 117
Rotate . . . . . . . . . . . . . . . . . . . . . . . . . . . . . . . . . . . . . . . . . . . . . . . . . . . . . . . . . . . . . . . . . . . . . . . . . . . . . 119
3
Unsharp Mask and Sharpen Edges . . . . . . . . . . . . . . . . . . . . . . . . . . . . . . . . . . . . . . . . . . . . . . . . . . 124
Enhance local Contrast . . . . . . . . . . . . . . . . . . . . . . . . . . . . . . . . . . . . . . . . . . . . . . . . . . . . . . . . . . . . . 127
Brightness and Contrast . . . . . . . . . . . . . . . . . . . . . . . . . . . . . . . . . . . . . . . . . . . . . . . . . . . . . . . . . . . 128
Color Correction . . . . . . . . . . . . . . . . . . . . . . . . . . . . . . . . . . . . . . . . . . . . . . . . . . . . . . . . . . . . . . . . . . . 132
Color Profile with ColorSync . . . . . . . . . . . . . . . . . . . . . . . . . . . . . . . . . . . . . . . . . . . . . . . . . . . . . . . . 135
Selection . . . . . . . . . . . . . . . . . . . . . . . . . . . . . . . . . . . . . . . . . . . . . . . . . . . . . . . . . . . . . . . . . . . . . . . . . . 139
Removing Red Eyes . . . . . . . . . . . . . . . . . . . . . . . . . . . . . . . . . . . . . . . . . . . . . . . . . . . . . . . . . . . . . . . . 149
Undo . . . . . . . . . . . . . . . . . . . . . . . . . . . . . . . . . . . . . . . . . . . . . . . . . . . . . . . . . . . . . . . . . . . . . . . . . . . . . . 152
RGB and CMYK . . . . . . . . . . . . . . . . . . . . . . . . . . . . . . . . . . . . . . . . . . . . . . . . . . . . . . . . . . . . . . . . . . . . 152
Transparent . . . . . . . . . . . . . . . . . . . . . . . . . . . . . . . . . . . . . . . . . . . . . . . . . . . . . . . . . . . . . . . . . . . . . . . 154
Zoom . . . . . . . . . . . . . . . . . . . . . . . . . . . . . . . . . . . . . . . . . . . . . . . . . . . . . . . . . . . . . . . . . . . . . . . . . . . . . 157
Levels . . . . . . . . . . . . . . . . . . . . . . . . . . . . . . . . . . . . . . . . . . . . . . . . . . . . . . . . . . . . . . . . . . . . . . . . . . . . . 160
Colors, Modes and Colorize . . . . . . . . . . . . . . . . . . . . . . . . . . . . . . . . . . . . . . . . . . . . . . . . . . . . . . . . 161
Invert . . . . . . . . . . . . . . . . . . . . . . . . . . . . . . . . . . . . . . . . . . . . . . . . . . . . . . . . . . . . . . . . . . . . . . . . . . . . . 175
Mirroring . . . . . . . . . . . . . . . . . . . . . . . . . . . . . . . . . . . . . . . . . . . . . . . . . . . . . . . . . . . . . . . . . . . . . . . . . . 175
Unskew . . . . . . . . . . . . . . . . . . . . . . . . . . . . . . . . . . . . . . . . . . . . . . . . . . . . . . . . . . . . . . . . . . . . . . . . . . . 178
White Correction. . . . . . . . . . . . . . . . . . . . . . . . . . . . . . . . . . . . . . . . . . . . . . . . . . . . . . . . . . . . . . . . . . . 184
QuickTime Effects . . . . . . . . . . . . . . . . . . . . . . . . . . . . . . . . . . . . . . . . . . . . . . . . . . . . . . . . . . . . . . . . . . 181
Core Image Filter. . . . . . . . . . . . . . . . . . . . . . . . . . . . . . . . . . . . . . . . . . . . . . . . . . . . . . . . . . . . . . . . . . . 183
Date and Time Stamp . . . . . . . . . . . . . . . . . . . . . . . . . . . . . . . . . . . . . . . . . . . . . . . . . . . . . . . . . . . . . . 184
Median . . . . . . . . . . . . . . . . . . . . . . . . . . . . . . . . . . . . . . . . . . . . . . . . . . . . . . . . . . . . . . . . . . . . . . . . . . . . 185
Picture Information . . . . . . . . . . . . . . . . . . . . . . . . . . . . . . . . . . . . . . . . . . . . . . . . . . . . . . . . . . . . . . . . 186
Histogram . . . . . . . . . . . . . . . . . . . . . . . . . . . . . . . . . . . . . . . . . . . . . . . . . . . . . . . . . . . . . . . . . . . . . . . . . 187
Full Screen . . . . . . . . . . . . . . . . . . . . . . . . . . . . . . . . . . . . . . . . . . . . . . . . . . . . . . . . . . . . . . . . . . . . . . . . 187
Play . . . . . . . . . . . . . . . . . . . . . . . . . . . . . . . . . . . . . . . . . . . . . . . . . . . . . . . . . . . . . . . . . . . . . . . . . . . . . . . 188
Put Picture on Desktop . . . . . . . . . . . . . . . . . . . . . . . . . . . . . . . . . . . . . . . . . . . . . . . . . . . . . . . . . . . . 188
Creating a GIF-Animation . . . . . . . . . . . . . . . . . . . . . . . . . . . . . . . . . . . . . . . . . . . . . . . . . . . . . . . . . . 189
Storyboard . . . . . . . . . . . . . . . . . . . . . . . . . . . . . . . . . . . . . . . . . . . . . . . . . . . . . . . . . . . . . . . . . . . . . . . . 194
Gamma Correction . . . . . . . . . . . . . . . . . . . . . . . . . . . . . . . . . . . . . . . . . . . . . . . . . . . . . . . . . . . . . . . . 195
Plug-In Filters . . . . . . . . . . . . . . . . . . . . . . . . . . . . . . . . . . . . . . . . . . . . . . . . . . . . . . . . . . . . . . . . . . . . . 197
User-defined Filters . . . . . . . . . . . . . . . . . . . . . . . . . . . . . . . . . . . . . . . . . . . . . . . . . . . . . . . . . . . . . . . . 199
Color Permutations . . . . . . . . . . . . . . . . . . . . . . . . . . . . . . . . . . . . . . . . . . . . . . . . . . . . . . . . . . . . . . . . 199
Vectorize . . . . . . . . . . . . . . . . . . . . . . . . . . . . . . . . . . . . . . . . . . . . . . . . . . . . . . . . . . . . . . . . . . . . . . . . . . 205
Alpha Channels . . . . . . . . . . . . . . . . . . . . . . . . . . . . . . . . . . . . . . . . . . . . . . . . . . . . . . . . . . . . . . . . . . . 206
Video Pictures . . . . . . . . . . . . . . . . . . . . . . . . . . . . . . . . . . . . . . . . . . . . . . . . . . . . . . . . . . . . . . . . . . . . . 209
Layout . . . . . . . . . . . . . . . . . . . . . . . . . . . . . . . . . . . . . . . . . . . . . . . . . . . . . . . . . . . . . . . . . . . . . . . . . . . . 211
List . . . . . . . . . . . . . . . . . . . . . . . . . . . . . . . . . . . . . . . . . . . . . . . . . . . . . . . . . . . . . . . . . . . . . . . . . . . . . . . . 214
Copy File into Resource . . . . . . . . . . . . . . . . . . . . . . . . . . . . . . . . . . . . . . . . . . . . . . . . . . . . . . . . . . . . 215
Invert Black & White GIFs . . . . . . . . . . . . . . . . . . . . . . . . . . . . . . . . . . . . . . . . . . . . . . . . . . . . . . . . . . 215
Copy, Cut, Paste, Clear . . . . . . . . . . . . . . . . . . . . . . . . . . . . . . . . . . . . . . . . . . . . . . . . . . . . . . . . . . . . . 216
Text in Pictures . . . . . . . . . . . . . . . . . . . . . . . . . . . . . . . . . . . . . . . . . . . . . . . . . . . . . . . . . . . . . . . . . . . . 221
4
Painting with GraphicConverter . . . . . . . . . . . . . . . . . . . . . . . . . . . . . . . . . . . . . . . . . . . . . . . . . . . . 224
Windows . . . . . . . . . . . . . . . . . . . . . . . . . . . . . . . . . . . . . . . . . . . . . . . . . . . . . . . . . . . . . . . . . . . . . . . . . . 234
Viewing & Sorting
The Browser . . . . . . . . . . . . . . . . . . . . . . . . . . . . . . . . . . . . . . . . . . . . . . . . . . . . . . . . . . . . . . . . . . . . . . . 235
Pictures on your iPod . . . . . . . . . . . . . . . . . . . . . . . . . . . . . . . . . . . . . . . . . . . . . . . . . . . . . . . . . . . . . . 281
Slide show . . . . . . . . . . . . . . . . . . . . . . . . . . . . . . . . . . . . . . . . . . . . . . . . . . . . . . . . . . . . . . . . . . . . . . . . 282
Find duplicate files . . . . . . . . . . . . . . . . . . . . . . . . . . . . . . . . . . . . . . . . . . . . . . . . . . . . . . . . . . . . . . . . . 299
Special
Batch Function . . . . . . . . . . . . . . . . . . . . . . . . . . . . . . . . . . . . . . . . . . . . . . . . . . . . . . . . . . . . . . . . . . . . 302
IPTC Document Information . . . . . . . . . . . . . . . . . . . . . . . . . . . . . . . . . . . . . . . . . . . . . . . . . . . . . . . 314
Geo Coordinates . . . . . . . . . . . . . . . . . . . . . . . . . . . . . . . . . . . . . . . . . . . . . . . . . . . . . . . . . . . . . . . . . . 322
Set or export GPS data . . . . . . . . . . . . . . . . . . . . . . . . . . . . . . . . . . . . . . . . . . . . . . . . . . . . . . . . . . . . . 324
DRIMaker instead of HDR. . . . . . . . . . . . . . . . . . . . . . . . . . . . . . . . . . . . . . . . . . . . . . . . . . . . . . . . . . . 325
Recording Points for Determining Measurements . . . . . . . . . . . . . . . . . . . . . . . . . . . . . . . . . . . 326
Viewing or Exporting iPhoto Images . . . . . . . . . . . . . . . . . . . . . . . . . . . . . . . . . . . . . . . . . . . . . . . . 328
Apple Touch Icon for iPhone and iPod Touch . . . . . . . . . . . . . . . . . . . . . . . . . . . . . . . . . . . . . . . 327
Using GraphicConverter as an external editor for iPhoto. . . . . . . . . . . . . . . . . . . . . . . . . . . . . 328
External Editors . . . . . . . . . . . . . . . . . . . . . . . . . . . . . . . . . . . . . . . . . . . . . . . . . . . . . . . . . . . . . . . . . . . . 328
Center Brightness Correction . . . . . . . . . . . . . . . . . . . . . . . . . . . . . . . . . . . . . . . . . . . . . . . . . . . . . . . 331
Edges and Frames. . . . . . . . . . . . . . . . . . . . . . . . . . . . . . . . . . . . . . . . . . . . . . . . . . . . . . . . . . . . . . . . . . 333
Repeat. . . . . . . . . . . . . . . . . . . . . . . . . . . . . . . . . . . . . . . . . . . . . . . . . . . . . . . . . . . . . . . . . . . . . . . . . . . . . . . . .
Moving Picture Content . . . . . . . . . . . . . . . . . . . . . . . . . . . . . . . . . . . . . . . . . . . . . . . . . . . . . . . . . . . 336
Merge all Frames in new Window. . . . . . . . . . . . . . . . . . . . . . . . . . . . . . . . . . . . . . . . . . . . . . . . . . . 337
Combining Pictures . . . . . . . . . . . . . . . . . . . . . . . . . . . . . . . . . . . . . . . . . . . . . . . . . . . . . . . . . . . . . . . . 338
Image Calculator . . . . . . . . . . . . . . . . . . . . . . . . . . . . . . . . . . . . . . . . . . . . . . . . . . . . . . . . . . . . . . . . . . 338
Video Monitor . . . . . . . . . . . . . . . . . . . . . . . . . . . . . . . . . . . . . . . . . . . . . . . . . . . . . . . . . . . . . . . . . . . . . 339
Remove bad Pixels . . . . . . . . . . . . . . . . . . . . . . . . . . . . . . . . . . . . . . . . . . . . . . . . . . . . . . . . . . . . . . . . 341
Color Blindness . . . . . . . . . . . . . . . . . . . . . . . . . . . . . . . . . . . . . . . . . . . . . . . . . . . . . . . . . . . . . . . . . . . . 341
Color Usage . . . . . . . . . . . . . . . . . . . . . . . . . . . . . . . . . . . . . . . . . . . . . . . . . . . . . . . . . . . . . . . . . . . . . . . 342
List from STR# Resource . . . . . . . . . . . . . . . . . . . . . . . . . . . . . . . . . . . . . . . . . . . . . . . . . . . . . . . . . . . 342
Important Formats . . . . . . . . . . . . . . . . . . . . . . . . . . . . . . . . . . . . . . . . . . . . . . . . . . . . . . . . . . . . . . . . 343
Preferences . . . . . . . . . . . . . . . . . . . . . . . . . . . . . . . . . . . . . . . . . . . . . . . . . . . . . . . . . . . . . . . . . . . . . . . 371
AppleScript . . . . . . . . . . . . . . . . . . . . . . . . . . . . . . . . . . . . . . . . . . . . . . . . . . . . . . . . . . . . . . . . . . . . . . . 418
Automator. . . . . . . . . . . . . . . . . . . . . . . . . . . . . . . . . . . . . . . . . . . . . . . . . . . . . . . . . . . . . . . . . . . . . . . . . 421
Quit . . . . . . . . . . . . . . . . . . . . . . . . . . . . . . . . . . . . . . . . . . . . . . . . . . . . . . . . . . . . . . . . . . . . . . . . . . . . . . . 421
Troubleshooting . . . . . . . . . . . . . . . . . . . . . . . . . . . . . . . . . . . . . . . . . . . . . . . . . . . . . . . . . . . . . . . . . . 421
Shortcuts . . . . . . . . . . . . . . . . . . . . . . . . . . . . . . . . . . . . . . . . . . . . . . . . . . . . . . . . . . . . . . . . . . . . . . . . . . 423
Supported Formats . . . . . . . . . . . . . . . . . . . . . . . . . . . . . . . . . . . . . . . . . . . . . . . . . . . . . . . . . . . . . . . . 425
Index . . . . . . . . . . . . . . . . . . . . . . . . . . . . . . . . . . . . . . . . . . . . . . . . . . . . . . . . . . . . . . . . . . . . . . . . . . . . . . 449
5
Introduction
After dealing with installation of the program, the first section of this manual looks at the
most important functions for everyday use.
Welcome to GraphicConverter
GraphicConverter converts pictures into other picture formats allowing you to use graphics files from other computer systems, for example. The most important functions are:
– Converting the most frequent Atari, Amiga, UNIX, Organizer and IBM graphics formats
to and from Macintosh formats. Numerous format-related parameters can be
configured (page 24).
– Multiple conversion (page 30)
– Importing Pictures from Digital Cameras (page 114)
– Browser for quick viewing of all pictures contained in a folder (page 235)
– slide show (page 282)
– Automatic creation of Internet pages with picture indices for download (page 80)
– Picture processing including dithering (e.g. from page 128 and from page 161)
– Remove red eyes (page 149)
– The layout function allows you to print several pictures on one sheet (page 211)
– Simple text conversion (page 36)
– Print pictures indices (page 95)
– Creating lists with information on all pictures in a directory (page 214)
We wish you all the best in your work with GraphicConverter.
System Requirements
The current version of GraphicConverter runs on any Power PC and Mac OS 8 and above
as well as ColorSync 2 and above and requires 8 MB RAM. GraphicConverter takes up
around 16 MB hard drive space without add-ons such as your scanner software. To process pictures it is, however, better to use as fast a computer as possible, for example, any
Apple computer with a G3, G4 or G5 processor. You will need to use the Universal Binary
Version for the Intel Macs available from 2006.
Installation
Summary: Copy the GraphicConverter folder onto your hard drive and start the GraphicConverter program. From version 5.1, GraphicConverter is a multi-language program
that starts in the language set in the International section of the System Preferences.
6
This manual is stored inside the GraphicConverter program file that is a so-called
package. Packages can be opened by selecting Show Package Contents from the context menu in the Finder. They then work in the same way as folders. All documentation for
GraphicConverter is under the path Contents / Documentation. If you want to install a
newer version of the documentation, simply overwrite the old file with the new one. You
may not change the names.
Classic Mac OS: You will only need to use the Install TWAIN Support 1.7 program to
install TWAIN data and then restart your computer if you want to use GraphicConverter in
the Classic Mac OS to scan via the TWAIN interface (see page 11). Alternatively a scanner
plug-in can be copied into the Plug-Ins folder or installed with the scanner software. In
this case you will only need to close and restart GraphicConverter, if it was already running, instead of the computer.
If you are using the carbon version of GraphicConverter in the Classic Mac OS from Mac
OS 8.5 with the respective latest version of Carbon Lib, the plug-ins should be in the System Folder / Application Support / GraphicConverter / Plug-Ins folder.
In Mac OS X, plug-ins are copied to the Library / Application Support / GraphicConverter / Plug-ins folder. User plug-ins are copied to the Users / ˜ / Library / Application
Support / GraphicConverter / Plug-ins folder. The tilde character ˜ stands for the name
of the respective user. User plug-ins are only available to the respective users. One very
easy way to install plug-ins is to drag them onto the GraphicConverter program icon. After a query, they will be automatically copied into the correct folder.
Step By Step Installation
You may have downloaded GraphicConverter from the Internet or received it on a CD or
GraphicConverter may already have been installed on your computer. Please read the paragraph that applies to you below.
Possibility 1: You downloaded GraphicConverter from the Internet: Double-click
the file, which has been downloaded, if a window with a volume image does not open
automatically.
A volume image is a volume, which can be used like a normal volume, even though it
only exists in the RAM. The following volume image appears on the desktop:
7
Double-click the volume image to open it.
In Mac OS X, drag the GraphicConverter folder into the Applications folder on your
hard drive. Installation is not complete. To delete the volume image from the RAM, click it
and, in Classic Mac OS, press Command-Y or, in Mac OS X, Command-E (Eject).
Open the Programs folder on your hard drive and start the GraphicConverter program
by double-clicking. To make opening GraphicConverter easy, we recommend dragging
the program file into the dock. Alternatively you can drag the file to the Desktop while
holding down the Command and Option keys to create an alias via which you can start
the program.
Mac OS Classic only: If the data is not automatically unpacked by your browser, you
can decompress it with the latest version of the StuffIt Expander freeware program. You
can download StuffIt Expander at
http://www.allume.com/expander. If the decompressed file has a crack in its icon, try
again or under Mac OS 9 refresh your computer’s desktop file by holding down the Command and Option keys during restart.
After unpacking, the GraphicConverter program appears. You can drag this folder into
your program folder, for example. If a file with the extension .dmg appears, proceed as
described above under Mac OS X.
Possibility 2: You received GraphicConverter on CD: Double-click the CD to open it.
A window will open where other software is available in addition to GraphicConverter.
CADintosh is a program for professional technical drawings, which you can test and
license separately. FontBook shows all installed fonts in tables. If you decide to use these
8
programs on a regular basis, you will need to pay a license fee to the respective software
producer. You may find further products from Lemke Software GmbH on the CD.
Open the GraphicConverter folder and then the folder for your Mac OS. The following
window opens if you are using Mac OS X:
If you have a Macintosh with Intel processor, you need to double-click the GraphicConverter Universal Binary.dmg file to install the volume image. Please read on above
under Possibility 1. If your computer has a PowerPC processor, double-click the GraphicConverter X.dmg file.
Mac OS Classic only: If you have a Macintosh with PowerPC processor and Classic Mac
OS, open the GraphicConverter Classic folder and copy the program folder with the required language into your Applications folder. Macs with PowerPC processors normally
have the word Power somewhere on the front, or G3, G4 or G5 on the side. On iMacs etc.,
you can display which processor (CPU type) is fitted using the pre-installed System Profiler program in the Hardware section.
9
Possibility 3: GraphicConverter was already installed on your computer and you
want to update it.
Download and install the latest version of GraphicConverter and order an upgrade for
GraphicConverter costing $ 19.95 through www.lemkesoft.com to obtain a serial number. Updates up to version 5.9.5 are free and can be downloaded at http://www.lemkesoft.com/en/gc_oem.htm.
GraphicConverter context menu or service extension
Up to Mac OS 10.5: After starting GraphicConverter for the first time, you are asked
whether the GraphicConverter context menu extension should be installed. If you install
this extension, you can open files or folders from the Finder using the context menu in
GraphicConverter, display them in a browser, view them in a slide show or edit them with
a batch.
You can also install the context menu extension later on via Preferences / General /
Plug-Ins using the Install GraphicConverter Contextual Menu Item Plugin button in
the Users / ˜ / Library / Contextual Menu Items folder. The file is named “GraphicConverterCMI.plugin”. To use the extension, you will have to restart your computer or log off
and on again. For more information see p 20.
From Mac OS 10.6 – Services: Apple has dropped the context menu extensions in Mac
OS 10.6 Snow Leopard because the related crashes could also cause the Finder to crash.
Services can now be used instead of the context menu extensions. Under Mac OS 10.6 or
newer, you can therefore install the service extension with the first start dialog after a
new installation or later via Preferences / General / Plug-Ins. After restarting or logging
in again, you can use the GraphicConverter service options in the Finder by right- or Control-clicking an image file or a folder. Open the Services submenu at the bottom of the
context menu.
The GraphicConverter.service service extension is installed under the path Library /
Services. The GraphicConverter program needs to be started before you can use the services.
Installing Plug-Ins
The Carbon version of GraphicConverter only supports Carbon plug-ins. The Classic version of GraphicConverter only supports Classic plug-ins.
If you want to scan with GraphicConverter using a plug-in, in Classic Mac OS copy the
plug-in into the Plug-Ins folder in the GraphicConverter folder and restart GraphicConverter if it was already running.
In Mac OS X, copy plug-ins into the Library / Application Support / GraphicConverter / Plug-Ins folder and restart GraphicConverter if it was already running. The plug-ins
10
need to be carbonized, i.e. suitable for Mac OS X. Carbon plug-ins are currently only
available for some scanners. Plug-ins, which should only be available to one user, are copied to the Users / ˜ / Library / Application Support / GraphicConverter / Plug-ins folder. The tilde character stands for the name of the respective user. You can check your
user name in the System Preferences in the Login section of the Login dialog tab. It’s in
the Name box. User plug-ins are only available to the respective users.
Please see Scanning with GraphicConverter from page 108 for further information.
If you want to scan with GraphicConverter via the TWAIN interface, please note the installation instructions in the Installing TWAIN section.
If you want to receive faxes with an e-mail program or the AOL software, please note
the installation instructions in the section Receiving Faxes under Classic Mac OS.
Installing TWAIN
Classic Mac OS: If you want to use the PPC version of GraphicConverter under Classic
Mac OS to scan via the TWAIN interface, you will need to take the following installation
steps: Open the TWAIN-Support folder and start the Install TWAIN Support 1.7 (or newer) installation program. The mouse cursor will not turn into the animated watch cursor
during installation. A dialog informs you that installation has been successfully completed.
Now restart your Macintosh to enable the system extension and start GraphicConverter.
To scan via the TWAIN interface with Acquire / Import, a TWAIN module needs to be installed with your scanner software. Please note the instructions from page 108.
If you are using the Carbon version of GraphicConverter under Classic Mac OS, the instructions in the following paragraph apply to Mac OS X.
Mac OS X: The TWAIN driver is integrated in GraphicConverter. Simply install the TWAIN
module for your scanner software (see page 108), which you open in GraphicConverter
via File / Acquire. If there is not a TWAIN module for your scanner, you can try to use the
TWAIN SANE Interface for MacOS X that can be downloaded at: http://www.ellert.se/
twain-sane/
Intel Macs: If a Twain scanner does not work with the universal binary version of GraphicConverter, i.e. a driver does not appear in the scanner selection window, the Twain
driver is still configured for PowerPCs and will therefore run under Rosetta, the PowerPC
emulator. It can then be controlled only from the normal X version of GraphicConverter.
Alternatively you can select “Start the program under Rosetta” in the Info window in the
Finder.
If you have a multi-function device that copies, faxes and scans, the scanner may in
some cases not be recognized. In this case, download the latest drivers from the manufacturer’s Web site and install them. Then restart. Open the printer services program that
11
you will find in the Utilities folder in the Applications folder. Click Add and select an entry
corresponding with your printer. If there are several variants, you may have to try each of
them out. For example, if you have an Epson CX3200, you should select the entry CX3200
(USB).
Receiving Faxes under Classic Mac OS
You should only follow these installation instructions if you want to receive faxes with an
e-mail program or the AOL software. This is because faxes are received in TIFF or GIF format and are automatically converted by some add-ons, for example, MacLink Plus (for
more information on faxes, see also page 12). If the fax files are converted to PICT format,
all pages after the first page are deleted. The installation method depends on the operating system used. If you are using Mac OS 8.5 or above, follow the installation instructions
in the next paragraph. If a Mac OS before System 8.5 is installed on your computer, please
follow the instructions in the next section but one.
Under Mac OS 8.5 or later
Select Control Panels from the Apple menu and open the File Exchange control panel.
Click the File Translation tab and disable the Convert Documents Automatically option.
Any faxes received will now no longer be converted automatically and can be opened
with GraphicConverter and saved in a different format.
Under Mac OS versions before System 8.5
Select Control Panels from the Apple menu and open the Mac OS Easy Open control
panel. Disable the Convert Documents Automatically option.
Any faxes received will no longer be converted automatically. Now you can open them
with GraphicConverter and save them in a different format.
To help display any multiple-page faxes you receive on your computer, you can use the
Next Page, Previous Page and Goto Page options in the Edit / Navigation menu. To
read the fonts more easily, you should enable the Use high quality zoom (anti-aliasing)
option under Edit (Mac OS X: GraphicConverter) / Preferences / General / Display Content (see page 12).
Update
GraphicConverter is constantly being revised. You can quickly check whether the version
on your CD is the latest at:
www.lemkesoft.com. We recommend that you always use the latest version. Download
the latest GraphicConverter on a regular basis. The file size is about 8 MB and downloading takes just over 10 minutes with modern hardware. All updates are free with a few
12
exceptions. Your registration and settings will be kept because they are saved in the GraphicConverter preference file.
Under Mac OS X, if you have selected licensing of all users on your computer, the serial
number will be entered in the GraphicConverter program file, however. In this case, you
will need to enter the serial number again after an update. If you want to avoid this, we
recommend entering the serial number individually for each user.
Under Classic Mac OS
If you work with plug-ins, open the Plug-Ins folder in your old GraphicConverter folder
and copy the contents into the Plug-Ins folder in the new GraphicConverter folder.
If you have scripts, open the GraphicConverter Scripts folder in your old GraphicConverter folder and copy the contents into the GraphicConverter Scripts folder in the new
GraphicConverter folder. Make a backup of your old GraphicConverter folder, for example, on a Zip diskette or CD-R and then delete it from your hard drive. Drag the GraphicConverter folder into the Applications folder.
Under Mac OS X
Make a backup of your old GraphicConverter folder. If, for example, you have saved data
in your GraphicConverter folder using the Catalog option, you will have to move it to a
different location first. Delete the GraphicConverter folder afterwards.
Drag the GraphicConverter folder into the Applications folder of your hard drive. The
update has been fully installed.
Sources for Updates
You cannot order updates through the mail. Please download the latest version from our
Web site www.lemkesoft.com or install it from the CD-ROM supplied with a recent issue
of Macworld magazine, for example.
The latest browsers, such as Safari expand the downloaded files automatically. If the
data is not automatically unpacked, you can decompress it with the latest version of the
StuffIt Expander freeware program. You can download StuffIt Expander at http://
www.allume.com/expander.
License Key and Registration
GraphicConverter saves the serial number in the preferences file. You therefore do not
have to enter the serial number again for updates. The registration for all users of a computer under Mac OS X is different, however. The serial number is written in the program
13
file in this case. After an update, you therefore have to enter the serial number again.
Please read the paragraph which applies to you below.
Possibility 1: If you a have purchased a license for GraphicConverter from Lemke Software
GmbH together with this book ...
... you will receive your license key by e-mail. If you ordered the GraphicConverter CDROM, you will find your license key on the CD-ROM packaging. It will only work with your
name. Install GraphicConverter (see p 6) and start the program. Click Enter Code... and
enter your name and license key. Enter your name first writing it exactly as you told us.
Possibility 2: If you have already registered GraphicConverter ...
... then you may have to purchase an update serial number. You will find more information at www.lemkesoft.de. If you already have the latest update serial number, you do not
need to register and enter the license key for the update since your serial number is stored in the preference file in the Preferences folder in the system folder. Copy just the GraphicConverter folder on your hard drive and, under Classic Mac OS, copy any plug-ins, for
example, your scanner software, and place them in the Plug-Ins folder of the update. Also
copy any old scripts into the Scripts folder of the update.
Under Mac OS X, the path for the Plug-Ins and Scripts folders is: Library / Application
Support / GraphicConverter. This why you can swap the GraphicConverter folder when
you carry out an update, unless you have saved your own files there.
Under Classic Mac OS, the license key is saved in the GraphicConverter Preferences
preference file in the Preferences folder in the System Folder.
Under Mac OS X, the com.lemkesoft.graphicconverter.plist preference file has the
following path: Users / ˜ / Library / Preferences . The tilde character ˜ stands for the
name of the respective user. If you are using the universal binary version of GraphicConverter on a PowerPC Mac with Motorola processor, the preference file will be called:
com.lemkesoft.graphicconverter.powerpc.plist.
If you install additional Codecs for QuickTime for example to be able to view special videos QuickTime may save additional preference files named for example:
com.lemkesoft.graphicconverter.intel.videow.plist.
Note down the serial number(s) in a safe place and make backups of the preference file
on a regular basis. In this way, you will not have to enter all of your preferences again if
you lose data or reinstall the operating system.
Since the Preference file can be damaged if your computer crashes, you should save at
least one environment using the Environment option from the GraphicConverter menu
(Classic: Apple menu). If problems occur with GraphicConverter, close the program and
delete the Preference file. Open GraphicConverter and select the saved environment.
GraphicConverter will then write a new Preference file with your settings and any problems will have been rectified.
14
Possibility 3: If you bought this manual without a license, downloaded GraphicConverter
from the Internet or obtained it from another source and use the program regularly but are
not yet registered ...
...you can get the full version by registering with us. In the unregistered version, you
cannot use the batches from the Convert & Modify dialog. GraphicConverter is shareware, please feel free to test the program thoroughly. If you use the program frequently,
you will need to register. Click Order Now... in the start dialog and select one of the registration options.
Our address:
Lemke Software GmbH
PF 6034
31215 Peine
Germany
Tel: +49 5171 72200 from the USA dial: 011 49 5171-72200
Fax:+49 5171 72201 from the USA dial: 011 49 5171-72201
E-mail:
[email protected]
When you receive your license key, click Enter Code... in the start dialog and enter the
license information you received. Start with the name, writing it in exactly the same way
as in your license information.
If you want to translate this manual, please contact us
([email protected]).
Support
If you have questions on GraphicConverter or have problems (see also page 421), it is
best to contact us by e-mail:
[email protected]
If, in your country, support is available in your language through a distribution partner,
a corresponding entry will appear in the Help menu so you can send an e-mail.
You can solve most problems by deleting the preference file (see p 421). Please limit
your attachments to 100 kB as we receive a very large number of e-mails. If you want to
attach a larger sample file, please ask us first. Please remember that problems can often
be indicated with a small section of a picture.
We are always glad to hear about any problems and new formats. We would like to
thank all users who have helped in the further development of GraphicConverter by sending us information and bug reports.
15
We prefer e-mails as a support medium because of the time factor.
Thorsten Lemke and Lemke Software GmbH accept no liability for damages and consequential damages (hardware, loss of data etc.) resulting from the use of the GraphicConverter program.
This Manual
The best way to work with the PDF version of this manual is if you display the file with the
Apple Preview software under Mac OS X. A search box is then provided in the drawer on
the right-hand edge of the window allowing you to quickly search for terms that are not
listed in the index. Click one of the hits to access the corresponding page. The search
term appears on the page with a colored background. You will find “Preview” in the program folder.
In the PDF version of this manual, you can click the page numbers in the index and the
contents as well as any cross references to jump to the corresponding page.
We have organized this manual so that you can read it from start to finish and get to
know GraphicConverter and its capabilities. We have put conversion and important topics like the Internet at the start after Installation and Support. Chapters on the functions
that are most frequently needed follow: Scanning a picture, sharpening, optimizing
brightness and contrast etc. Please use the extensive index on the last pages to find specific sections. You can use the contents to reach a specific page by clicking the page number in the PDF version of this manual.
If you bought this book as a hard copy, the PDF file is included. Please register by sending an e-mail to [email protected]. Type in your full mailing address and the password: Angel. We will e-mail you the download link for the PDF file (18 MB).
Starting the Program and Opening a Picture
Double-click the program icon to start GraphicConverter. A splash screen will appear.
Click it to close it immediately. If you do not click the splash screen, it will disappear after
a few seconds. If you do not want to see the splash screen in the future, you can disable it
in the Preferences under General / Misc.
16
When the program is started for the first time, a dialog with installation options will open.
Install GraphicConverter Contextual Menu Item Plugin allows you to make basic
GraphicConverter functions like the slide show available in the Finder context menu.
From Mac OS 10.5, you can install the context menu extension for the Finder as a submenu. Apple has dropped the context menu extensions in Mac OS 10.6 Snow Leopard
because the related crashes could also cause the Finder to crash. Services can now be
used instead of the context menu extensions, see p 10.
Install GraphicConverter Automator actions is only important if you want to use the
Automator software to automate work procedures.
Install RCWebColorPicker installs an additional tab in the MacOS color selection dialog with which the hexadecimal values of colors can be displayed for Internet use. The
color selection can be limited to the old technology of Web-safe colors. This has, however, not been necessary for a while thanks to modern monitors.
Install SmartCrashReporter installs an extension that sends error descriptions to us
after crashes to help us further develop GraphicConverter.
17
Click Continue to move onto the next dialog.
Display kind of the graphical file browser allows you to choose between the standard mode and the photographer mode with dark background. Photographers prefer a
dark gray background. You can change the colors later on under Preferences / Browser /
Display General.
Browser preview kind with two connected monitors allows you to show the preview
image fullscreen on the second monitor or normal in one window. Use last/default settings uses the last settings or the default settings.
Check the Internet weekly for new version will automatically inform you about GraphicConverter updates.
Change file type and creator upon opening files changes the file type to that of GraphicConverter when opening the file and not when saving it. Select this setting if you
want to open all graphics that you open with GraphicConverter next time by double-clicking.
Show first steps dialog opens the following dialog for selecting a function.
18
Next the first steps dialog for choosing a function is displayed.
The first three features open the file selector allowing you to select an image to open or
a folder to browse or display as a slide show. Do a batch conversion opens the Convert
& Modify dialog. Do something else will close the dialog without opening any function.
You can access the options listed in this dialog at any time via the File menu. Choose
Open an image... and click OK. Alternatively you can select Don’t show this again and
click OK. You can then access the file selection dialog with File / Open....
If you disable the info dialog and the first steps dialog, next time you start GraphicConverter you will be able to use the menus as soon as the splash screen appears. You can
start work with GraphicConverter even faster if you disable the splash screen as well.
The file selection dialog opens. It may be different to the one shown depending on your
Mac OS version (the screenshot is taken from Max OS X 10.2).
19
Alternatively you can use the browser option to open files if the small preview icons in
the list are too small. Select the folder containing the picture you want to open with File /
Browse Folder. A browser window opens where a larger preview of all the pictures can
be displayed. Open a picture in GraphicConverter by double-clicking one of the preview
pictures. For further information, see the chapter Browser on page 235.
Tip: You can use File / Reopen to reopen All Recent Windows, All Files or All Browser
Folders that were open last time GraphicConverter was exited.
The program Default Folder from www.stclairsoft.com is a useful enhancement for the
file selection dialog as it shows an enlarged preview under the file selection dialog in all
programs.
Use the All available filter to display all files and folders. If you select a format from the
Filter pop-up menu, only pictures with this format are displayed.
Classic Mac OS only: The preview can be switched off with Hide Preview. The preview
can be switched on again with this button if it is hidden. The button then has the text
Show Preview. The document icon is displayed (double the size if required) if no preview
is available. The message Not available appears in the window if this is also not available.
The technical document information for the selected picture is displayed below the
preview picture. The documentation information is shown and hidden together with the
preview picture.
If a picture does not contain a preview, you can create one with Create Preview.
Enlarge Preview enlarges a small preview picture, if possible.
The options in the upper part of the file selection dialog are used for quicker navigation
and are part of the Mac OS. You will find instructions in the documentation for your computer or your Mac OS package.
Only up to Mac OS 10.5: If you have installed the context menu extension for GraphicConverter, you can open one or more selected pictures via the Finder context menu, display them in the Browser, view them in a slide show, create an icon or a preview, re-
20
move metadata or edit them with a batch. The submenu for the batches lists all batches
that you defined using the Convert dialog or the pop-up menu in the browser (see p 302).
If all of the options do not appear in the context menu, you will have to re-install the
context menu extension. Select Preferences / General / Plug-Ins and click the Install
GraphicConverter Contextual Menu Item Plugin button. You will need to log off and
on again or restart your computer before you can use the context menu extension.
Show Invisible Files displays invisible files that have been made invisible because you
will probably never need to access them.
Mac OS X only: If you want to open a certain format, for example, all TIFF pictures, in
GraphicConverter (even if the pictures were created with another program) when you
double-click the files in the finder, you can configure this using the information dialog in
the finder. Click a TIFF picture and press Command-I to open the information dialog. Click
the triangle next to Open with. Select the current version of GraphicConverter from the
21
pop-up menu. Click the Change All button to open TIFF pictures with GraphicConverter
in future by double-clicking.
Repeat this procedure for each file format that you want to open with GraphicConverter
by double-clicking. Simply click an image file with the corresponding format in the Finder
and repeat the process. This replaces the Preview program that would otherwise be started for pictures without a creator.
Classic Mac OS only: If you want to open very large picture files that require 30 or 40
MB, set the virtual memory of your computer to a large value of around 200 MB in the
Memory control panel to avoid problems when opening files.
22
An open image is shown in a window. In the context menu, which you open by Ctrl-clicking the image, you will find different options that are explained in more detail in the
respective chapters.
You can modify the filename with Rename this file.... The change immediately affects
the file on the hard drive and in the RAM.
In the General / Display Windows section of the Preferences, you can display rulers.
You can set the ruler units to cm, for example, at the top right with a pop-up menu and
on the General tab of the Information palette with the pop-up menu at the end of the
Size of pixel line.
Please note that the values in cm, mm etc. depend on the resolution. Therefore change
the resolution beforehand to 300 dpi for offset printing or to 180 dpi for printing on inkjet
printers via the Picture / Resolution... dialog.
23
Converting a picture with Save as...
Summary: Select File / Open, then the target format in the File / Save as... dialog and save.
1. Open the picture to be converted with File / Open. If pictures have already been
opened using this option, they can be opened again quickly from the File / Open
Recent submenu.
2. Select File / Save as... to convert the picture. The file selection dialog may appear
different in older Mac OS versions. The necessary options are also available in the old
file selection dialog, however.
3. Select the required target format in the Format pop-up menu. If you need an unusual
format, select Show All and open the pop-up menu again. Now all export formats will
be shown. If you have a small monitor, you may need to scroll to reach the upper or
lower entries as the list is very long. To scroll, position the cursor without clicking the
24
black triangles at the very top or bottom in this pop-up menu. The further the arrow is
positioned over the end of the list, the faster it scrolls.
In the Preferences in the Save / File Formats section, you can choose the formats to
show on this pop-up.
Professional tip: If you are using Mac OS 8.5 or newer, you can enable the Set Format
from Extension option in the file selection and simply add the format extension when
writing the filename. For example, .tif. Make sure there is a period in front of the
format extension. GraphicConverter then saves in the required format without the
format having to be selected from the pop-up menu.
The format extension is automatically attached to the filenames according to the
preference. You can change the extensions and switch between uppercase and
lowercase letters under: Edit (Mac OS X: GraphicConverter) / Preferences in the
Save / Settings section.
4. Save the picture under the required name. The file is then converted to the selected
format.
With Save as..., the folder containing the source file is selected. If you would rather be
offered the folder last used, disable the Suggest as save position source option in the
Preferences under Save / General.
There are other options available in the Save as... file selection dialog. The Options...
button is particularly powerful as the corresponding parameters can be selected with this
option for the selected format. A completely different dialog appears depending on the
25
format. The options are explained in more detail in the chapter Important Formats from
page 343 and from page 371.
The Options... button allows you to select any compression rate for JPEG pictures and
other pictures. This is necessary if you disabled automatic display of the options dialog
for pictures with freely selectable compression at the bottom of the dialog.
26
The dialog looks different in the UB version of GraphicConverter. Click the black triangle
to display and hide the options further down.
Split... is only available for larger pictures and makes several pictures from one picture
that each contain part of the larger picture. If you click the split button in the file selection, a dialog opens where you can set the segments according to size or number.
27
For example, if you want to split a picture with a width of 960 pixels into three parts
widthways, enter 320 pixels as the width for the segments.
If you select the Set segments with Number of parts option, you can enter the number of segments for the long side and the short side.
The individual files are automatically given a numbered name. The scheme for the automatically created name is shown in the Naming box. The “n” stands for the file name of
the source file and should not be changed. The letter “c” stands for column and “r” stands
for row. You can then determine the position of each individual picture using the filenames. The “x” at the end of the name is automatically replaced by the respective format
extension.
You can also specify in the file selection dialog whether just the current selection
should be saved. The two additional Save only selection and Save picture with selection options are only available in the file selection dialog if you have made a selection.
Save only selection saves a picture containing just the selection.
28
If the selection is not rectangular, a picture is created in which the selection fits. Save
picture without selection saves the picture as if there were no selection. A selection that
is simply an outline without content cannot be saved.
Compress with StuffIt is only available when StuffIt or DropStuff is installed and the
StuffIt Engine is therefore installed as a system extension. The picture file is automatically
compressed with StuffIt when this option is selected. The compression rate can be selected in the pop-up menu.
If the Create LOWSRC option is selected, a GIF picture with 16 colors is created in addition to the picture file. This GIF picture can be used for Internet applications with the
LOWSRC HTML command.
From Mac OS 8.5, Set Format from Extension allows you to set the format by entering
the extension with the filename and not by selecting it from the pop-up menu. For example, if you write Rose.tiff, the file is automatically saved in TIFF format.
Save web ready (without resource) saves pictures without a resource. This keeps the
file size small and is particularly useful if the picture is going to be put on a Web site. The
resource contains the overview that is shown when you open files in the file selection dialog.
You should enable Merge color profile into image (for web usage) when you save
pictures with profiles for the Web as Web browsers do not evaluate profile information.
Save all pages of multipage files should be enabled if you want to save all pages in
multipage files. Disable this option to save just the first page.
Under Classic Mac OS, this option is only available if you use the Navigation Services
from Mac OS 8.5.
If you want to view pictures for the Internet with the GraphicConverter browser, we recommend just creating a temporary preview so that the resource is not written in the files
again. Select Edit (under Mac OS X: GraphicConverter) Preferences / Browser / Miscellaneous and then select the Preview / Always temporary option. You can delete any
29
unwanted previews from the picture files by selecting the regarding files in the browser
and choose Remove Resource Fork from the context menu. This function is also available in File / Convert & Modify dialog.
Saving and Closing
The current picture is saved with File / Save.
From Mac OS X 10.1, you can give filenames extensions that are not displayed in the
Finder, such as .tiff. Enable the Hide Extension option in the Save / Settings section of
the Preferences. The corresponding flag is then also set in the file if you work with Mac OS
9 but only appears when the file is displayed under Mac OS X 10.1 or newer.
You can also save to UFS partitions under Mac OS X.
The current window is closed with File / Close. Close All closes all windows and Save
All saves all windows. Force Save All saves all windows with the settings that you selected for the first picture. This option is useful, for example, when you have scanned in a
large number of individual pictures and want to save them.
Save a Copy as...
Save a Copy as... allows you to save a copy of the picture in a different format while you
are still editing it. The format of the open picture is not changed, only the saved file has
another format.
Convert & Modify
Summary: You can use File / Convert... to convert and modify several pictures at the
same time. Simple text conversions (Mac <-> PC) are also possible. Batch actions, such as
changing the resolution to 72 dpi, that are run on all pictures in a directory, can also be
defined using Edit Batches... in the Convert dialog (see page 282). Enable Use Batches
to use the Batches.
WWW-Ready saves the files without a resource. This is useful if they are to be published
on the Web.
If you need to convert a number of pictures at the same time, the File menu contains a
useful option called Convert... that saves you having to open and save each picture individually. Select one or more files or a folder whose content should be converted by clicking in the list on the left-hand side of the Convert dialog. Files in subfolders are also
30
converted. You can use the shortcuts Command-D and Shift-Command-H to go to the
Desktop or your Home directory.
In the list on the right, open a target directory where the converted files should be saved. Use the pop-up menus above the lists or drag and drop the required folders from the
Finder to the list sections to select the directories. Click the arrow above the buttons to
set the source path as the target path. This is useful when the target folder is a subfolder
of the source folder. In this case, you only have to open the target folder. The desktop
should not be selected as the target.
If you hold down the Option key, you can swap the source and target folder. The button
has a double-ended arrow. If you press the Command key, the direction of the arrow will
change and turn the target folder into the source folder.
From version 5.9.2 of GraphicConverter, more than 32766 files per folder can be edited.
Only the Mac OS limits the maximum number to around 4 million. If you want to convert
a large number of files, you should make sure that your hard drive has enough space for
the files being written. In addition, approximately 3 gigabytes space should be left for the
operating system files to be on safe side. If more space is needed than available, the file
system on your hard drive can become damaged meaning all files are unreadable.
31
Data rescue programs like DiskWarrior or Data Rescue can make the data readable
again in some cases. To avoid loss of data, you should therefore always make a backup,
for example, on an external hard drive and make sure that you have sufficient hard drive
space. We recommend FoldersSynchronizer as a good low-cost solution for backups, the
upcoming TimeMachine from Mac OS 10.5 and, as a professional solution Retrospect
from www.emcinsignia.com (previously Danz). We recommend managing large image
stocks on external hard drives. If you define the target folder on a different drive to the
source drive during conversion, the speed increases as the write/read heads do not constantly have to change position.
If you move files or folders in the Finder, you will need to refresh the lists in the Convert
dialog by clicking the circular arrow in the upper left corner.
The dialog can be enlarged by dragging the lower right corner to display long filenames in full.
If you select a folder as the source, GraphicConverter creates a file with the name of the
source folder in the target directory and, if necessary, saves the converted files in subfolders. A new folder is not created in the target folder if one or more files are selected as the
source. In this case, the converted files are saved straight to the target directory.
Select the format you require for the conversion under Dest. Format. Start the multiple
conversion by clicking Go.
In the pop-up menu between the lists, you can choose further functions:
Auto Convert (Watch folder mode) specifies a folder in the selection list on the left
that should be constantly monitored. Click Go to enable this function. All pictures that
are copied to this folder, for example, by other users over a network, are automatically
converted by GraphicConverter to the selected format. Any batch that has been defined
is also applied. You can specify a waiting time by selecting Convert / Errors/Time. The
files will only be converted after this waiting time.
An additional batch could, for example, involve the change of the resolution to 300 dpi.
The source picture is then overwritten in the source folder. Never select the source folder
as the target folder. Select any other folder. Nothing will be changed in this folder.
If you select a file format in the Filter pop-up menu, only pictures with this format are
displayed. All files are only displayed when you select All Available.
Different settings, for example, compression, can be made for each target format using
Options.... Note the information from page 343 and from page 371.
32
Prefs… calls up the Convert / Miscellaneous dialog with preferences for multiple conversion where you can carry out settings.
Subfolders also includes the subfolders of a selected source folder in the multiple conversion. The source folder is recreated in the target directory together with its subfolders.
Change extension replaces an old format extension, which may be included in the filename of the newly created files, for example, .tiff, with the extension for the new format.
The source files are not changed.
DOS filenames shortens the filenames of the files created in the target directory to 8
characters followed by a period and three other characters chosen as intelligently as possible so that the files can also be read under DOS. DOS is an old operating system for IBMcompatible computers.
You should only select Don’t alert before overwrite if you are sure that pictures or text
will not be lost with this option. The last characters of a long filename may be replaced by
the file ending when carrying out a conversion. If two source files differ by the last three
to five letters only, they are identical after the change of name. In this not so unlikely case,
the second file would overwrite the first file in the target directory. We recommend clearing this option.
Keep original date after conversion leaves the original date after the file conversion.
33
Show hidden files displays invisible files that have been made invisible because you
will probably never need to access them.
Remove batch actions after quit deletes defined batches after they have been run.
The advantage of this is that you cannot forget to delete a defined action. However, it also
has a disadvantage: the batches will need to be redefined if you happen to need them
again at some time.
Delete source files after conversion deletes the source files after the conversion procedure.
All pictures from a photo CD are converted or copied to a folder that is automatically
created and is named after the serial number of the CD with Convert PhotoCD images
to folder with CD serial.
Separate layers of Photoshop files allows you to open Photoshop pictures that contain several levels with separate pictures. Add background layer inserts the background
layer of the Photoshop picture in each picture created. Use layer name for file sets the
document name to the name of the corresponding layer.
Allow conversion to same folder as source allows you to save the new files in the
source folder upon conversion.
Enable Watch Mode will not delete original but change the label to ensure that the
original files are not overwritten during automatic conversion (Watch Folder). GraphicConverter sets the first label for all files that have already been edited so you can see
which files have been converted yet.
Name for “Converted files subfolder” allows you to define the name for folders that
are automatically created for conversions.
34
Back to the Convert & Modify dialog:
Convert CRW to 48 Bit PSD file... converts CRW images into 48 Bit Photoshop files.
CRW is the RAW format of some Canon Cameras.
Copy copies the source data into the destination directory without changes. You can,
for example, use this option to create back ups before performing a multiple conversion.
Overview pictures are created with Catalog (selected destination format)..., i.e. several catalog pictures are obtained that have small previews and the names of the selected
pictures in the selection list on the left. The format selected at the bottom right of the dialog is used. When you click this button, a dialog opens where you can select settings
such as size, color depth, color, font, etc. for the catalog.
Catalog (HTML for WWW usage)... is explained in detail in the chapter Photo Albums
on the Internet from page 80. You can put pictures on the Internet as a download album
with a few mouse clicks using the Catalog option.
Alternatively, you can create and print catalogs with File / Print Catalog... (see
page 95).
35
Several picture files can be put together to make a large picture file with Concat.... Select the files to be put together in the selection area on the left and click Concat.... A dialog opens where you can specify how many pictures should be put together next to each
other in the first “line” of the new picture and how many lines the new picture should have.
Only Horizontal joins the pictures together horizontally, i.e. next to each other. Only
Vertical joins the pictures together vertically, i.e. one below the other.
For example, with six source pictures, you can set two pictures in each line resulting in
three columns. The first picture is the master picture and determines the size of the cells.
It is best to put pictures of the same size together. If there are spaces left over, they will be
set to white. The values for images per row and column must fit to the number of images
chosen. If you choose 10 rows and 5 columns for only 6 images a huge image is produced
of which most is white.
GraphicConverter cannot create virtual-reality panoramas in QuickTime format. Use
programs like DoubleTake from www.http://echoone.com or the more professional
PTMac from www.kekus.com.
Split splits large pictures into several small pictures, see p 27.
Convert text starts the text conversion that only works with ASCII texts and not, for example, Word texts. All text files selected in the source directory are converted using the
converter selected under Edit (Mac OS X: GraphicConverter) / Preferences in the Convert / Convert Text section, for example, all CRs are replaced by CR and LF when conver-
36
ting from Macintosh to MS-DOS. Special characters such as foreign characters are also
converted.
Specify the format of the source text under Source and the required destination format
under Destination.
You can use Convert Line Endings to convert just the ends of the lines. A dialog where
you can select the target format opens.
Export IPTC... exports the IPTC information from the pictures selected on the left to a
text file created in the destination folder. This text file is called metadata.txt. The source
pictures are not modified. If you want to create a text file for each image file, you can select it under Preferences / Convert / Text Conversion. When you click Go, a dialog
opens where you can specify that the Comments should be exported instead of the IPTC
37
information. The option for creating a separate text file for each source file is also available in this dialog.
If you select the IPTC information, another dialog opens where you can select which
fields should be exported and whether the created file should be a normal text file or a
CSV file that you can use in a database or in Excel. The encoding can be changed from the
normal ASCII to UTF8. Select UTF8 if the IPTC entries contain characters from foreign
fonts like, for example, Chinese.
38
When you click Go, Remove Metadata from JPEGs... opens a dialog where you can
choose the metadata to be removed.
XMP is an area in which other programs, for example, Photoshop CS, write metadata
like the IPTC information in XML format. This additional information can cause faults
when further processed in other programs such as Photoshop 7. You can therefore delete
it using this dialog. If you have problems with metadata, you should disable the XMP option in the Open / XMP of the Preferences. The files are saved to the folder selected in
the right hand list.
The XMP area can also contain one or several additional images. Open the basic image
and control or right click the image to open the context menu where you select Show
XMP-Thumbnail in new Window to open the contained image(s).
APP14 is a marker, in which some applications write data even though this marker
should be kept empty.
The JFIF Header contains information on the resolution and possibly a preview. Deleting this header makes the file about 10 bytes smaller. This is worthwhile with large file
sizes if you are preparing pictures for the Internet. First check a few sample images to see
if they can still be displayed on the Internet.
All other APP markers are not normally written as they are not needed. Some programs also write their names or copyright information in these markers.
39
Merge Files... opens a dialog as soon as you click Go where you can specify how many
pictures should be used to create a new one by merging.
Alternatively you can use the File / Merge Folder into One Image... option to overlap
all images in a folder.
Calculate Mean creates a text file in which the mean values for the color channels RGB
are listed. This function is useful for agencies whenever large numbers of pictures have to
be viewed and sorted out if they are too bright or too dark.
Repair TIFF... allows you to replace a faulty directory with an intact one. This is practical
if you have pictures from a digital camera that have an identical directory. If you can still
open one of the pictures, use it as a master.
On the left-hand side of the Convert & Modify dialog, select the corrupt pictures and select the Repair TIFF... option. Click Go and select the master file in the file selection dialog that opens. Once you click OK, the directory from the master file will be written to the
corrupt pictures that you should then be able to open again. Only use a picture file that is
identical with the corrupt file as the master. If in doubt, create a backup of the image files
beforehand.
Split JPEG data stream into single JPEGs... creates a single image from each picture in
a JPEG stream file. The individual pictures are saved in the folder selected in the list on the
left-hand side. If you select a Word file as the source file, all pictures contained will be
written to the destination folder as files.
Extract EXIF JPEG previews allows the EXIF preview to be extracted from files and saved as an image. This is useful if you want to at least see which pictures you have lost
when image files become damaged. Before you delete the data on the memory card, you
should try to rescue it using a free recovery program like “Exif Untrasher” that you can
download at: http://www.bluem.net/downloads/. We were able to save approximately
90% of the lost pictures in our tests.
Transfer IPTC records can be used when, for example, you have low resolution pictures
with IPTC information and want to transfer this information to the high resolution versions of the pictures. The files need to be in different folders and have the same name. Select the pictures that contain the IPTC information on the left and the folder with the pictures to which the IPTC information should be transferred from the right-hand list.
Convert Win to Mac IPTC converts all special characters in the IPTC section, for example, ä, so that they are displayed correctly your Mac. This option will allow your Mac to read
the IPTC information in images from the world of Windows.
40
Convert Mac to Win IPTC converts all special characters in the IPTC area, for example, ä,
so that they are displayed correctly under Windows. This option allows Windows users to
read the IPTC information in the images.
Convert Mac IPTC to UTF8 IPTC converts all special characters in the IPTC area, for example, ä, so that they are displayed correctly by programs that support Unicode.
Sort by EXIF Camera Model sorts the pictures according to camera model into subfolders named after the camera.
You can use Export EXIF Text if, for example, you want to transfer EXIF information to a
FileMaker database. A text file with the same name and the extension .txt is created for
each image file listing the field name and value separated by tabs.
JPEG lossless cropping... allows you to cut a section out of pictures without a loss in
quality as GraphicConverter does not need to compress the images again if the values for
the top left corner of the selection rectangle as well as the width and height are a factor
of 16. With some JPEGs, it is enough if the values are a factor of 8. We recommend, however, selecting values that are a factor of 16 since lossless trimming will then always work.
You can also enter zero as a value. You can use this option if, for example, you want to trim
the edges on a series of pictures.
Convert (vector) PICT to (vector) PDF... converts PICT images with vector content into
vector PDFs without dithering them.
You can use Convert Photo RAW to 16 Bit TIFF respectively Convert Photo RAW to
EXR to convert RAW files from Canon cameras in CR2 format to 16 bit TIFF or Open EXR
files used in movie industries to achieve high dynamic range (HDR) effects. The converted
files contain the unchanged RAW data without gamma correction or white ballance as recorded by the sensor. These features are available in the UB version of GraphicConverter
only.
Image files in Photo-Raw format may also contain a JPEG version of the image that you
can export with Extract JPG from Photo-Raw (PhotoRAW only).
Convert to Photostrip compiles all pictures in a horizontal strip.
41
Multiscale allows you to scale images to different sizes by clicking them. This is a useful
tool for product photos that appear in online shops.
Using as many lines as you require, define the target size, a sharpening value and a
name extension. You can specify whether the name extension should be added at the
end of the name or in front of a specific character defined in the input box.
We recommend using Bicubic (QuickTime 6 or newer) as a Scale Algorithm.
Convert to sRGB needs to be enabled if you are creating pictures for the Internet.
You can specify whether only JPGs will be created with Use JPG for all sizes or whether
to Use GIF for first size and JPG for all others.
Modify
The following features of Convert modify the selected files without creating new ones to
be saved in the destination folder. You can therefore ignore the right hand part of the dialog. The selected destination format is not valid. The destination folder should not be
the same as the source folder. The content of the destination folder will not be changed.
The Insert IPTC option adds different or the same IPTC information from a text file in all
the selected pictures. This is exported from a database or can be created with an editor
such as BBEdit Light. You can only insert an IPTC in JPG and TIFF images. Do not use the
ASCII export for word processing. You can also create this text file by exporting the IPTC
information from one or more pictures (see p 37).
When you are working with smaller quantities of pictures, it is easier to select the pictures in the browser and modify the IPTC info via the IPTC dialog, which you can call up
with Command-I. Alternatively, you can copy all of the IPTC information with Edit / Copy
/ Copy IPTC and paste it into one or more pictures with Edit / Paste / Paste IPTC.
42
The Convert dialog, however, allows you to quickly enter different information in large
amounts of pictures. If the same text has to be entered over and over again, organize the
text file accordingly with several lines of the same content. The text file should have the
following structure:
Filename<tab>Caption<tab>Caption Writer<tab>Headline<tab>
Special Instructions<tab>By Line<tab>By Line Title<tab>Credit<tab>
Source<tab>Object Name<tab>Date Created<tab>City<tab>State<tab>
Country<tab>Reference<tab>Category<tab>Sub Category<tab>
Urgency<tab>Keywords<tab>Copyright<return>
The Date Created box should have the following format: yyyymmdd (year month day).
The Sub Category and Keywords boxes can contain several words separated by space
characters. If another separator is needed, you can enter it in the input box next to Separator of IPTC keywords in the Convert / Convert Text/IPTC dialog box.
There should be a number in the Urgency box.
All entries in the text file should be in a line separated by a tab. Line breaks are not allowed.
All source pictures and the text file should be in the same directory. Select the text file
and click Go.
Further details about IPTC information can be found from page 314.
Rename
Files can be systematically renamed with Rename.... For example, this option is useful if
you want to use pictures that were individually saved using video software for another
program. Filenames such as “DSCN5120.jpg” consist of three parts. The numbering is
named the Index. The first part is called Name and everything after the period is called
Extension.
Select the files you want to rename in the list on the left and click Go. A dialog opens in
which the OK button cannot initially be selected as one of the options needs to be enabled first.
Index
Select Change Index on the Index tab to change an existing index. In our example, we
want to raise the index by 1 so 9395 becomes 9396 and so on. Add before name on the
43
Name tab allows you to extend the name by inserting the word “Celebration_”, for example.
In the lower left-hand corner of the dialog, the filenames before and after are displayed
with the current settings.
If you prefer working with the keyboard instead of the mouse, you can switch between
the tabs using Command-Ctrl-Tab or switch to a specific tab with Command-1 (Index) to
Command-8 (Replace).
The Uncheck all button allows you to clear all check boxes on all tabs if, for example,
you want to start over again.
Another example: Select Add Index if your files still have no index and you want to add
one. If the first picture is to be given number 0001, enter 1 as the Offset and a 4 after Digits. Select whether the index should be before or after the filename or whether it should
be added as an extension.
Use Subtract Index from Offset to subtract the value entered for Offset from the index. Furthermore the index is decreased by one with each file when 1 is entered as Step.
Remove existing Index deletes the index from the specified position in the filename.
Before Name places the index in front of the name if it previously came after the name or
44
in the extension. After Name places the index after the name. As Extension moves the
index to the extension behind the period.
Insert separator allows you to insert one or more separators in front of or after the
index. You can select the separator yourself. Special characters cannot be used if you have
selected the UNIX and thereby Web-compatible option under Charset. In this case,
they will automatically be replaced by an underscore character.
Remove additional digits deletes all places in the index above the number specified
under digits starting from the left. Use this option to shorten extremely long indices like,
for example, 00001234.
Reset Index on Date / Time / Folder Change allows an index to be started over again
when the date or time in the image files is changed.
The index numbering of files can also be carried out at the same time as a conversion.
Note the instructions from page 51.
Name
The Change Name option replaces the names of all files with the new text you enter in
the adjacent box. Don’t forget to enable the option with the check box beforehand. Simply writing the text in the box will not work.
If you want to insert the name of the parent folder in the filename, enter “&parent” in
the respective box without the inverted commas.
Like in word-processing programs, Find and Replace allows you search for spaces and
replace them with underscore characters to make the filenames suitable for use on the
Internet.
Make first char of filenames uppercase changes the first letter of the filename to uppercase. Make first char of each word uppercase capitalizes the first letter of each word.
Date
Add Date is often useful for photos taken with digital cameras. Enter a date or use the
Document Creation Date or the EXIF Date in the filename. Select whether the date
should be placed before or after the name or whether it should be added as an extension. Add Space adds a space character between the date and the name.
You can select the date format in the box on the right. For example, if you do not want
to add the time, delete the HH.NN.SS characters in the date format box.
Charset
Make filenames UNIX/WWW-, Mac OS 8/9-compatible or Make filenames Windows
compatible modifies the filenames so that they can be used under UNIX, on the Internet,
under Mac OS 8/9 or Windows without any problems. You can choose between only
lowercase and lower- and uppercase for UNIX/WWW.
45
Make filenames uppercase changes the filename to uppercase only. Make filenames
lowercase changes the filename to lowercase only. Make first char of filenames uppercase capitalizes the first letter of the filename and writes the rest in lowercase. Make first
char of each word uppercase capitalizes the first letter of each word in the filename.
Removal
Remove Text removes the text entered in the input box from the selected filenames.
Remove char range at beginning deletes the fifth to seventh character of a filename if
you enter 5 for X and 7 for Y, for example.
Remove char range at end deletes the last and last but one character of a filename if
you enter 0 for X and 1 for Y, for example. The file extension is not part of the name.
Extension
In the same way, Change Extension adds a new extension to the files as entered in the
corresponding box.
Depending on image file format always takes the actual format of the file as the extension. This is useful for folders that may contain pictures with the wrong extension.
Specials
Add timecode after (DPX only) reads the timecode from DPX pictures taken from professional videos and adds it to the filename. The DPX metadata is displayed in the Information palette on the Comment tab.
At the top of the dialog, you will see a pop-up menu that allows you to save the current
settings in the dialog and reload them later on. Click Save and enter a suitable name in
the dialog that opens. After clicking OK, the saved settings will appear in the pop-up
menu and are then available for selection. The Save button next to the pop-up menu allows you to save the current settings in the selected set of settings that you have modified. Delete current settings... deletes a set of settings.
Rename with EXIF content allows you to transfer EXIF information content to the filename. Enter the corresponding Hexcode preceded by an &. You can insert further parts of
the filename as plain text. For example, enter Mountains &A001&name.&extension” to
keep the original filename with the extension, insert the name of the camera model
according to the EXIF code A001 and place the word “Mountains” in front. The EXIF hexcodes are always four-digit, for example, A001. You will find a complete list of the EXIF
hexcodes on page 60 onwards in the PDF file “Exif2-2.pdf”, which you can download here:
http://www.exif.org/specifications.html. A zero needs to be added to the front of threedigit GPS codes.
46
Back to the options in the pop-up menu for the Convert dialog:
The Create Icon/Preview option creates an icon and an overview for all selected files in
the source directory. Conversely Remove Resource Fork deletes an existing resource for
all selected files. This is useful for saving memory space for Internet usage or if you want
to send pictures to PC users as they may have problems with the resource.
Under Convert / Icon/Preview in the Preferences, you can specify that an icon and a
preview are created Only if one doesn’t exist. This option saves a lot of time when you
convert a number of files.
Calculate Superpalette calculates an optimum color palette with 256 colors for all selected pictures. This color table is saved as a file in the target directory and can then be
used for manual color reduction or color reduction using Batch....
Set a saved palette for a picture by selecting Picture / Colors and select Edit Color Table... from the submenu. The color table can be edited directly in the dialog which opens
and a saved table can be opened and set for the picture with Open.
Lowercase changes all uppercase letters to lowercase letters for the files selected. Press
the Command key and the Lowercase button becomes Uppercase. Uppercase changes
all lowercase letters to uppercase letters for the files selected.
Insert Black Frame into Series... creates an additional black image and saves it behind
the source images. In order to recognize a series you must enter how many characters of
the filenames should be compared in the preferences under slide show / Effects.
If, for example, you wanted to separate blocks of images from different photographers
in a slide show you can create a black separating image using the Series detection. This
47
requires that the filenames within the blocks have different characters at the beginning
of the filenames. If the blocks are like this:
Source
Result
IMG00001.jpg
IMG00001.jpg
IMG00002.jpg
IMG00002.jpg
IMG00003.jpg
IMG00003.jpg
IMGZZ.jpg
and
and
DMA00001.jpg
DMA00001.jpg
DMA00002.jpg
DMA00002.jpg
DMA00003.jpg
DMA00003.jpg
DMAZZ.jpg
The new images are given the first three characters of the source files as their name and
“ZZ” is added so the new images are sorted alphabetically according to the source
images. The new images are all black. Three characters need to be defined in the preferences under slide show / Effects for detection to work.
You can change the creator with Change File Creator. The Creator is used under Mac
OS 9 to assign files to a program with which they are opened when you double-click
them. GKON is the creator for GraphicConverter.
You can use Move to Destination if not an Image File to remove all files that are not
images or damaged images from a source folder. Enable the Delete source files after
conversion option in the Convert / Misc section of the preferences if you want to keep
just the intact image files in the source folder.
Add TIFF Preview to EPSF allows you to attach a preview in TIFF format to EPFS documents. Some programs can only display a preview of an EPSF file in this way.
Change TIFF directory offset... can repair faulty TIFF files that will no longer open.
Add XMP file as ANPA resource writes the IPTC data from a separate XMP file to the
ANPA resource of the corresponding image file. Additional XMP files are written by Photoshop CS2 if an image is saved in a format like DNG or RAW that does not support meta-
48
data. The XMP files have the same name as the image file, but have the extension .xmp.
As they are split into two files, the image file will be easier to read in other operating systems under which there is not an ANPA resource.
However, many programs, in the Macintosh field, in particular, cannot read the IPTC
data from a separate XMP file. This is why GraphicConverter can write the IPTC data from
the separate file in the ANPA resource. In the list on the left of the Convert dialog, select
all images and XMP files and convert them to a format that supports IPTC data, like TIFF
and JPEG, for example.
One advantage of the XMP data is that all content is encoded with Unicode, which is
useful, for example, for languages like Japanese.
GraphicConverter can read the XMP data from the resource fork of PNG files that were
written by Photoshop CS 3 or newer.
The following diagram shows how image files are built on a Mac:
When you copy image files from a Mac to Windows the resource fork appears as a file of
its own beginning with a ._ as name.
When you copy image files from a Macintosh to Windows, the resource fork appears as
a separate file that starts with ._ .
Delete source raw file if no jpg exists in dest folder. In professional workflows, RAW
images are often imported from the camera and converted into JPG format. Unusable
49
JPG images are deleted immediately. This option allows you to delete all RAW files automatically if there is no longer a JPG file with the same name — except for the extension.
In the left-hand list, select the folder with the RAW images and the folder with the remaining JPG images in the right-hand list.
Add XMP record if only IPTC/NAA record exists also writes the IPTC data in the XMP
section. This option is useful if you have already indexed your pictures and also need the
IPTC data in the XMP section because the person you are sending the pictures can only
read the XMP section with his/her software.
You can use Set XMP label depending on Finder file label if the label will only be set
as a Finder label and should be recognized in other operating systems. This requires that
the software used under other operating systems evaluates the XMP data. GraphicConverter automatically sets the label in the XMP section too. If you set the label for several
files at the same time, this will take a while because each file has to be opened internally.
In order to work faster, this option can be disabled in the Preferences under the Browser
/ Function section. Then only the Finder label will be set. Use Set XMP label depending
on Finder file label to assign an XMP label to pictures that only have a Finder label.
The Transfer RAW exif date to JPEG option is intended for images from digital cameras
that save a RAW and a JPEG file simultaneously. If the JPEG files do not contain EXIF data,
you can transfer the date from the RAW files to the JPEG file using this option. Transfer
RAW exif record to JPEG allows you to transfer all EXIF data.
You can use Combine Folders to a single PDF to convert several image files into a PDF
file. The source files can have different formats and are deleted when the PDF file is created. All other file types, like for example, those from movies or Internet pages, are not modified and not converted. The folder name is used as the file name for the PDF file with
the extension .PDF. The preferences for the target format and the target folder are ignored by this option. This option is useful if you want to assign patient numbers to image
files, for example, as a patient number will then only need to be assigned once to the PDF
file.
Fix Lumix FZ20 2GB TIFs repairs TIFF image files that were written incorrectly by the
Panasonic camera model Lumix FZ20.
Further Settings for Convert & Modify
GraphicConverter issues an error message if Errors occur during the multiple conversion.
Multiple conversion only continues once you close the error message. To avoid this, an al-
50
ternative can be selected in the preferences under Convert / Errors so that a log file is
created on the desktop where all error messages are written.
Enable Copy files that can’t be converted if the source folder also contains HTML files,
for example, that are to be copied into the target folder. For automatic conversion, see
p 32
The filenames for multiple conversion or copying can generally be changed with the Index options that can be selected in the preferences under Convert / Index. You can also
51
use the Rename option for this. You can convert files at the same time more easily if you
change the index in the filename using the Index Settings in the Preferences.
This is useful when pictures that may have been saved as individual pictures from a video using a grabber program are the source material. These pictures may have unsuitable filenames for further editing. For example, Name_001.jpg or similar. Name stands for
any part of the filename. The number is increased by one for each of the subsequent pictures. For example, Name_002.jpg etc.
The numbering should, for example, be at the start of the filename if these pictures are
to be put together for a movie with Adobe Premiere.
Enable Index conversion to automatically move the numbering to the start of the filename. Specify how many digits the numbering should have with Min. digits. If you specify five digits, the first picture has the number 00001.
For example, if you specify three digits and the source pictures have a five digit numbering, GraphicConverter will then delete the first two digits.
The Index sorting option ensures that the numbering is read logically and not alphabetically. This is important if the filenames start with a number that does not have any
preceding zeros. For example, 1_Name.jpg, 2_Name.jpg, etc. Without this option, the
10_Name.jpg picture would directly follow the 1_Name.jpg picture.
52
The name within the files can be changed to a name that is entered with Use name. The
numbering within the filename remains unchanged unless you have enabled one of the
other options. For example, if you enter “Berlin” in the box after Use name:, filenames
such as 001_Funkturm.jpg and 002_Funkturm.jpg are renamed 001_Berlin.jpg and
002_Berlin.jpg. The source pictures may also have a different name or may have just a
number as the name. In our example 001.jpg would become 001_Berlin.jpg.
The Start index option attaches a consecutive index to all the files. For example, 001.
The value for the first picture can be freely selected. Specify how large the step to the
next index value should be with Step. A step size of 10 and a start index of 0 will give you
the series 001, 010, 020, etc.
Work Environment
When a picture is open, GraphicConverter provides information and options in palettes
that can be opened under Window. You can hide and display the palettes with the Tab
key.
Palettes are always placed in front of windows and also in front of the current window.
Open the palettes required for your work and create the ideal work environment for your
needs.
53
The Position palette that displays the X and Y positions of the mouse can be opened
using the title bar of the picture window so that certain positions in the picture can be
found.
This palette can be moved in the gray area on the left by clicking and holding down the
mouse button. Click anywhere in the Position palette and then on the required position
in the picture to set the zero point to a position other than the upper left corner. Negative
values are obtained further to the left and above the upper left corner.
While you drag open a selection, the palette will be enlarged and also show the length
of the diagonals, the area and the aspect ratio of the selection. The 1 represents a square
and 0.66 is about 2:3. The red background in the boxes for the width and height indicates
that the pixels in the selection are not sufficient for a proper 10x15 cm photo print. There
will be just enough pixels once the color changes to yellow as you enlarge the selection.
It is better to enlarge the selection so that the color changes to green.
You can select the zoom level at the bottom left of the window. On the right, you can
switch to the next zoom level down or up using the minus or plus magnifying glass. The
zoom level is shown on the left and can be overwritten with a different value. Single-clicking the triangle opens a pop-up menu where you can select a specific zoom level. If
your mouse has a scroll wheel, you can hold down the option key and zoom with the
wheel. If you want to center the point under the mouse cursor during zooming, select the
Set focus of scroll wheel zoom to mouse position option in the General / Edit section
of the Preferences.
If a picture contains several pages, you can switch to the other pages with the 1/1 popup menu. The i button opens the information pallet and the circle with four colors indicates whether ColorSync is enabled. Simply click this button to enable and disable ColorSync. This option is also available via File / Edit Color Profile.... Enable and disable Use
ColorSync color matching in the dialog that opens to display pictures with or without a
color profile.
54
Directly to the right of the picture is the most important palette, the Toolbox, where
tools, colors and patterns can be selected.
All the other palettes can be shown and hidden with the Tab key. The small red triangle
at the bottom left of most of the tools indicates that you can double-click the tool to
open a dialog with settings. These dialogs are explained in the chapters referred to at the
end of most of the following paragraphs.
You can switch between the individual tools using the keyboard. For example, pressing
V selects the transparency tool. You can disable this option in the Preferences under General / Edit. You can check which letter is assigned to which tool in the tips that appear if
you hold the mouse cursor over a tool for a moment (providing you have enabled this option in the Help menu).
The Pointer serves for pinpointing picture features during presentations and for shifting selected contents in layers, see page 223.
Select the Hand tool to move the picture section if the image does not fit completely in
the window. Alternatively, while you are working with a different tool, you can hold down
the spacebar to switch to the Hand tool.
55
You can use the Lasso to select an object with an irregular shape, for example, a flower.
As soon as you release the mouse button, a line is drawn from the current position to the
starting position enclosing the selection. For more details, see page 146.
Selection allows you to define a square selection. If you need a specific aspect ratio,
you can select one at the bottom of the toolbox using the None pop-up menu. For more
details, see page 139.
Elliptic Selection allows you to make an elliptic selection, for example, around the pupil of an eye if want to use the Effect / Red Eye option. Holding down the shift key at the
same time creates a circular selection. For more details, see page 139.
The Magic Pen creates a selection that encloses all neighboring picture sections with
the same color as the pixel you clicked. The tolerance normally has to be set to a value
around 60 as seemingly even color areas in photos also have different color values. Double-click the magic pen to change the tolerance. For more details, see page 147.
Polygon Selection allows you to copy a contour with a series of mouse clicks to create
a selection. Close the selection by clicking the first point or by pressing return regardless
of the mouse cursor position. For more details, see page 148.
Select Lossless JPEG cropping (if possible) if you want to trim JPEG images without
losses. Lossless cropping is only possible with pictures that have not been modified in
any other way. For more details, see p 144 onwards.
The Eraser deletes parts of the picture. The current background color is always set. For
more details, see page 229.
The Pen allows you to draw a line or an arrow with a thickness set further down using
Pen Size. The current foreground color is used for the color. For more details, see
page 227.
The Eyedropper allows you to change the current foreground color by clicking a picture. The color at the point you click is more or less picked up. Hold down the Alt key to
switch to the eyedropper when you are using another tool. Double-clicking the tool
opens a dialog where you can select the size of the eyedropper. If you set a value greater
than 1, the average of the color values is displayed.
The Fill tool sets the current color for the pixel you clicked and all neighboring pixels
with the same color. To fill a larger area, the tolerance normally needs to be set to a value
around 60. For more details, see page 227.
56
You can draw lines with Line. Select the color with the foreground color and the line
thickness further down in the toolbox using Pen Size. Holding down the Shift key allows
you to draw only vertical or horizontal lines. For more details, see page 227.
Click a picture with the Zoom tool to switch to the next zoom level up. When you hold
down the Alt key, you switch to the next zoom level down. For more details, see page 159.
The Filled Rectangle, Filled rounded Rectangle and Filled Circle tools allow you to
draw the respectively shaped areas onto the picture in the foreground color. For more details, see page 227 or page 224.
Rectangle, Rounded Rectangle and Circle allow you to draw the respectively shaped
frame in the picture. Select the line thickness further down in the toolbox. The foreground color is used for the color. For more details, see page 227 or page 224.
Click the Text tool to insert text in a picture. First select zoom level 100% and doubleclick the text tool. Select a larger size of 36 points for the font. You can enter greater values in the input box.
Click the image. A text box is added and you can start entering the text. As there is normally not enough space, you will need to enlarge this text box by dragging it out at the
corners with the mouse. Finish editing in the text frame by clicking another tool in the
toolbox. You can then no longer modify the text. For more details, see page 221.
If you click a picture with the Transparency tool, the color of the pixel you click will be
set to transparent. Neighboring pixels with the same color will also be set to transparent.
For more details, see page 154.
The Stamp copies the content of an area that you Alt-click to any position in the picture. This option is useful, for example, for removing scratches when you are touching
pictures up.
The caliper rule allows you to make different measurements in an image. Click the tool
to open a pop-up menu.
First select Calibrate Length and Unit to specify whether you want to measure in
pixels or in a measuring unit like centimeters or inches. The mouse cursor will turn into a
crosshair with which you can draw a line across the picture. If you hold down the Shift
key, you can drag the line perfectly horizontal or vertical. If your picture originates from a
microscope and contains a scale, drag a line across the scale at zoom level 100%. As soon
as you let go of the mouse button, a dialog giving you the length of the line in pixels will
open. Overwrite the value, for example, with a 1 and select the required measuring unit
to specify for subsequent measurements that the number of pixels originally displayed
57
should represent one millimeter, for example. If you want to measure in pixels, leave the
displayed value and select Pixel as the unit if it is not already set.
After calibrating, you can immediately start measuring distances with a line. The result
is shown on the Information palette on the Comment tab. There you can copy the
values to use them in a word processor or in an Excel table, for example. The values are
also shown on the Coordinates palette.
In addition to the option for measuring lines, you can also measure the area of rectangles with Measure Rectangle and circles with Measure Circle. Select the corresponding
options from the pop-up menu for this. Measure Min, Max and Mean in a Rectangle
allows you to measure the brightness value of the darkest and lightest pixel. The mean
value is also displayed. This option is useful if, for example, you want to determine on pictures of bacteria cultures whether the whole area is affected, how badly the darkest area
is affected and what is the average occurrence. The measured value 255 represents white
and 0 represents black. The coordinates of the rectangle are also given.
Measure Angle with two Lines allows you to measure the angle between two helper
lines that are inserted at the top left of the picture after you select the option. You can
position both lines anywhere on the picture using the handles and, after each change,
the current angle is displayed in the comment box of the Information palette that opens
automatically. You can copy values from the palette to edit them in other programs. The
helper lines are hidden as soon as you switch to a different tool.
The Smudge Tool allows you to smudge parts of pictures, for example, to smooth the
edges in collages. Double-clicking the tool allows you to set the size. Hold down the
mouse button and drag across the picture to smudge crease lines in scanned photos or
documents, for example.
Another example for use would be smudging license plates that you do not want to
show when publishing photographs of your car. Smudging with the water drop is more
subtle than coarsening with large pixels as is done when you select Filter / Stilize (CI) /
Pixelate(see p 183 onwards).
The Slice tool defines several areas for a picture that will have different links on the Internet. For more details, see page 78.
58
The Red Eye tool allows fast correction of red and other colored eyes, for example, that
occur on animals that were photographed with a flash.
Click the eyes with the tool to color them black. You can adapt the size of the tool with a
slider on the lower edge of the window. If you have not installed system extensions like
USB overdrive, you can change the size of the tool with Shift and the scroll wheel.
To retain reflections on the pupil when removing red eyes, you should use the Effect /
Red Eye option instead of this tool, see p 149 onwards. This option cannot, however, be
used for different colored eyes on animals since it searches for red tones to be colored
dark gray.
The White Point tool allows you to re-apply the white point of an image if the image
has a color cast. Using the White Point tool, click the lightest area of the image that
should actually be white. The colors will then be corrected. If there is no area in the image
that should actually be white, the correction will not work in most cases.
In critical situations, we therefore recommend taking the picture with an unobtrusive
piece of white paper somewhere in the shot. We have provided a short video to demonstrate this tool on the Internet at http://www.lemkesoft.com/content/213/videos.html
Fill Pattern allows you to select a fill pattern. For more details, see page 234.
Switch to black and white sets black and white as the foreground and background
colors.
Swap foreground and background color swaps the colors over.
Copy-Mode allows you to select another copy mode. For more details, see page 225.
59
Aspect ratio for selection allows you to select a specific aspect ratio like 10x15 to chose a ideal section for printing photos on photo paper, for example. Clicking the area allows you to select an aspect ratio from the pop-up menu. Define User-defined... opens
the following dialog where you can enter the aspect ratios you use most.
The aspect ratio of the image is particularly interesting as the selection automatically
has portrait format for portrait-format images.
Back to the palettes:
The Overview shows the complete picture. This is helpful if only part of the picture can
be seen in the picture window.
The visible part is indicated in the overview by a rectangle. You can move this rectangle
with the mouse to change the section shown in the picture window.
The Detail palette shows the section marked as an enlargement. If you work a lot with
grayscale images, you can change the color of the lines from black to another color so
you can see the lines better. Click the color table. The Color Picker opens and you can select a color with more contrast.
The zoom factor can be selected in the upper left corner using the minus and plus buttons and is displayed next to the plus button. You can change the size of the palette from
Mac OS 8.5 using the handle at the bottom right.
60
Keywords
GraphicConverter supports certain Keywords entered on the Comment tab in the Information window. Some programs use these keywords to sort pictures or to search for pictures. The keywords should be entered in the Comment box as in the following example:
OWNER: Thorsten Lemke
COPYRIGHT: 1998
DESCRIPTION: Row of houses on canal bank
The following table shows how the keywords should be entered in the GraphicConverter Comment box and their counterparts in TIFF and VPB formats.
GraphicConverter Keyword
TIFF
VPB
TITLE
Not available
Title
OWNER
Artist (315)
Owner
CATEGORY
Not available
Category
DATE
Date (306)
Date
TIME
Not available
Time
DESCRIPTION
Description (270)
Description
COPYRIGHT
Copyright (0x8298)
Not available
HOST
Host (316)
Not available
SCANNER
Scanner (272)
Not available
SCANNERMAKER
Scanner Make (271)
Not available
SOFTWARE
Software (305)
Not available
The numbers are the tag IDs in TIFF format. A complete comment is always saved in the
GIF, JPEG and TGA formats.
The meta data may not be disabled in the format options that can be opened in the file
selection dialog when you use Save As.
In addition, the contents of the comments window are saved in the text section of the
file resource if creation of the resource fork has been enabled in the preferences.
Further comments can be contained in the IPTC Documentation Information... that
you can open via the File menu (see p 314).
The Information palette displays all technical data for the picture. You can quickly
check the output size, resolution, color depth, number of pictures contained (for animation), memory requirements in RAM, format, document size on disk, degree of compressi-
61
on, time for opening and comments such as information on compression (for example,
LZW).
You will find the EXIF information for pictures taken with digital cameras on the EXIF
tab. The EXIF information contains the exposure time as well as the time and date when
the picture was taken. It also indicates whether a flash was used in addition to other details.
GraphicConverter displays any information that can be found in the Comments tab if a
manufacturer does not adhere to the standard for EXIF information.
The EXIF information can be copied to the clipboard with Copy EXIF as Text in the Edit
/ Copy submenu (see p 219).
On the EXIFTool tab, the EXIF data is displayed in the same way as it is exported by Phil
HarveysEXIFTool.BoxesthatdonotbelongtotheofficialEXIFstandardandareonlyusedbyapar
ticularcameramanufacturerarealsoshown.Thiscould,PNGandTIFFimageformats.Whenyou
usetheJP2andPNGformats,themostimportantEXIFinformationiswrittenintheXMPsectionif
thefilecontainsEXIFinformation.'
62
When opening images, GraphicConverter evaluates the XMP data if the IPTC information is not readable as the XMP data also contains the IPTC information among other
things. When saving pictures, the XMP data is also used to write the correct IPTC information if it cannot be read upon opening. You can disable this option in the Preferences under Open / XMP.
The comments contained in the picture are displayed in the Comment-tab. For example, the program and the version number of the program that was used to save the picture
are also included here.
You can modify the comments by clicking the text box on the palette and editing the
text in the same way as you would in a word processing program. You cannot, however,
select the complete text with Command-A.
In the tab GPS a world map is displayed. If the selected image has geo data the position
is shown by a small red cross. Click somewhere on the map to show the positon in Google
Earth.
Settings for the individual pictures (frames), for example, for an animation, can be made
in the GIF Animation palette (see p 191).
63
Specify which palettes are to be displayed when opening a new picture under Edit
(Mac OS X: GraphicConverter) / Preferences... in the General / Display Windows section.
The zoom factor can be selected for the Detail and Resize window after scale/zoom
can be disabled. The base for the positions can be set to 0. This is preferred by professionals. Non-professionals prefer it when the first pixel has the position 1/1. The picture is
not changed by this.
The Position of tool windows can be set to follow the picture. The window then automatically appears around the picture window. Fixed positions sets the palettes to a fixed
position.
Auto-arrange opens the picture window in a logical layout. Open only one window
keeps the desktop tidy as only one picture window can be opened. Show path in title
displays the complete path of the picture in the title. Show tool tips displays the names
of the tools in a yellow bubble when you hold the mouse cursor over the tool for a moment.
Show additional information in bottom of window displays the mouse position coordinates, the red, green and blue color values and the format.
64
Show rulers displays rulers on the left-hand side and at the top of the image windows.
The unit can be changed from pixels to cm, for example, on the Image tab in the Information palette using the pop-up menu for size.
Metal Look activates the metal look as used in programs like iTunes and iMovie.
Internet
The following section looks at formats, file sizes and filenames for pictures that are to be
published on the Internet. Sending pictures can often be problematic. We will therefore
cover this in a separate chapter entitled Tips for Sending with Different E-mail Programs.
Preparing Pictures for the Internet
When preparing pictures for the Internet, you need to select the appropriate picture format, minimize the file size and optimize the filename.
Selecting the Appropriate Picture Format
Only pictures in PNG, GIF, LWF and JPEG formats are used on the World Wide Web. Pictures in the LuraWave format (LWF) can only be displayed if a plug-in has been installed in
your browser. This is why this format is not used much. The plug-in can be downloaded
free of charge from: http://www.luratech.com
All four formats are heavily compressed so that the Internet pages are displayed quickly
to the viewer. Pictures in JPEG format can either have 16.7 million colors or 256 grayscales. JPEG format is therefore particularly suitable for photos. GIF format can only display 2
to 256 colors and is specialized in achieving higher compression rates for pictures such as
pictograms, symbols and all pictures with sharp edges, for example, comics.
When preparing pictures for the Internet, you should leave ColorSync enabled. Please
remember though to enable the Merge color profile into image (for web usage option
when saving with the file selection dialog. Internet browsers display images without profiles therefore you have to merge the profile corrections into the image.
Display Picture from Top to Bottom
There are different types of JPEG format as there are with GIF and PNG formats that you
can select in the Save as... dialog with Options....
All three formats provide the option for pictures to be opened progressively from top to
bottom in the browser with the final resolution. Alternatively the display can be selected
from unsharp to sharp with the complete picture being shown straightaway.
65
Set the Row Order to normal for picture build-up from top to bottom independent of
the format versions 87a and 89a for GIF format. The Progressive option must be
disabled for JPEG format. The No Row Order option needs to be selected for PNG pictures.
Display Content from Low to High Resolution
Surfers normally prefer pictures to appear complete as soon as sufficient data has been
transferred and appear initially at a low resolution. The pictures gradually become finer as
the data is transferred.
Most Web designers prefer this method as an overall impression quickly emerges after
you open a page and the constantly refined pictures have the effect of an animation to a
certain extent. Note that there are limitations when the Web site uses tables, as tables are
usually only displayed when they have been completely transferred. Save your pictures
for this display type
– in JPEG format and enable the Progressive option in the Save as... dialog under
Options... or
– in GIF format and switch the Row Order option to Interlaced in the Save as... dialog
under Options…, or
– in PNG format and enable the Adam 7 option in the Save as... dialog.
Note that not all WYSIWYG HTML editors can process every variant when you are creating Web sites.
Minimizing the File Size
The size of a file can be affected by different factors.
– File format and compression rate
– Scope of the color palette
– Picture size
The picture size is dealt with in the chapter on page 80.
66
File Format and Compression Rate
You can achieve particularly high compression rates with LuraWave (LWF) format (see
p 359). However, you cannot use this in the same way as JPEG format on the Internet as
not many of the latest browsers support LWF format. Use JPEG, GIF or PNG formats for the
Internet and select the Save web ready (without resource) option in the file selection
option. This option is only available if you use the Navigation Services from Mac OS 8.5.
The resource contains, for example, the preview picture that is displayed by the Mac OS
but does not have a function on the Internet. Files without a resource are approximately
40 kB smaller than the same file with a resource. When you are working with small pictures about 40 kB, for example, saving with a resource would double the size of the file. If
you check the file size in the Finder, it may often show the old value from before editing
because the Finder even tends to be very slow on the fastest computers. One trick to update a Finder window is switching back and forth between the list and the icon display.
The freeware “FinderSync” also allows you to refresh the content of a Finder window.
Do not forget to disable this option during the next save procedure if you are working
on pictures for other purposes.
Make filename ready for the web changes the current filename upon saving so that it
can be used on Internet servers without problems: Spaces are changed to the underscore
character, special characters are replaced and all letters are written in lowercase. For example, “Next Field.jpg“ becomes “next_field.jpg”. You cannot see the changes in the file selection dialog because the text in the entry box cannot be changed. The saved file will
have the modified name, however.
Minimizing JPEG Pictures
You can set a quality level when you save pictures in JPEG format. Select File / Save as...
in the file selection option, set JPEG/JFIF as the format and click Options.... The lower
the quality, the smaller the file. Data reduction is used in addition to data compression
particularly for low quality levels. The dialog for selecting the quality opens automatically
after you click Save unless you disabled this under Edit (Mac OS X: GraphicConverter) /
Preferences in the Open / JPEG section.
67
The compression rate of JPEG format is also very large at the highest quality level. This is
why this level or a value over 80 is recommended. Try out the lower quality levels if you
require small files. The loss of quality is clearly visible below the medium level (50).
The preview, which you can enable by clicking the check box if necessary, allows you to
judge the loss of quality. The section can be moved with the mouse. Creating the preview
and calculating the file size may take longer on slower computers.
If the quality slider cannot be moved, your computer does not have sufficient processor
power. In this case disable Preview and Calculate File Size and then enable them again after you have selected the quality level.
After saving, the picture will not be displayed in its window at the actual quality level.
You need to close and reopen the picture to see the effects of the compression on the
complete picture.
Leave No subsampling disabled as it minimizes the picture faults caused by compression, but makes the file larger.
68
Save for web
You can also save images with File / Save for Web. A dialog where you can select the
Quality opens. ..Progresive makes images display from rough to fine the more data is received when the internet connection is slow. Without this option pictures are displayed
growing from the top to the bottom..
The preview picture is always displayed at zoom level 100% and can be moved with the
mouse. The options for incorporating IPTC/XMP and EXIF are under the preview. Leave
IPTC/XMP selected if the IPTC information along with details like the keywords or other
XMP information should be available to users after they have loaded the image onto their
own drive. The EXIF information contains the exposure time as well as the time and date
when the picture was taken.
When you want to put pictures on the Internet just to display them, you should select
Merge color profile into image as they will otherwise be displayed too light and pale by
most web browsers. Safari 3.1 suports color profiles. If your web pages will be viewed
with Safari 3.1 or newer exclsively you do not have to merge color profile into image.
Embed EXIF but has to be enabled. In FireFox 3 you can enable color profile support. Here
you can find a how to:
http://www.fotohacker.com/2007/12/04/modify-firefox-3-to-support-color-management/#high_3
If you want to put pictures on the Internet for others to download, you should leave
Embed EXIF enabled. The pictures can then be exposed correctly by a photo developing
service because the color model (mostly sRGB) is given in the EXIF information. The
Merge color profile into image option should disabled as the pictures will otherwise
have double profiles. These pictures will be displayed too light and pale in Internet browsers, however.
69
Reduce to 72 ppi changes the resolution entry in the file head and should always be
selected.
..Scale longest side to allows you to enter a value for the pixel size of the file you save.
The value is for width when the image is landscape and for hight when the image is portrait. Sharpen should always be enabled when you scale down. The preview shows the
effect of sharpen and can be moved with the mouse..
Make filename ready for the web changes German umlaut characters like ä to ae and
replaces spaces with underline characters.
Comparing Pictures
You can visualize the loss of quality in a JPEG compression, for example, with Edit / Find,
compare and replace / Compare Pictures.... Open a source picture, save it as a JPEG
with a different name at medium quality, for example, and open the JPEG file created.
Now select Edit / Find, compare and replace / Compare Pictures....
All open pictures are listed in the lower section of the dialog. Click the pictures to be
compared. The setting is automatically matched when only two pictures are opened. The
higher the value you select for Intensity of difference, the clearer the differences are displayed. Clicking OK creates a new picture where everything that is identical in both pictures is displayed in black. Differences are displayed with lighter colors. You can also use
this option as an effect filter.
It is best to assess the loss of quality by opening the normal view of the compressed picture and, for example, positioning it next to the opened source picture.
With GIF and PNG pictures, we recommend deleting unnecessary colors from the color
table to save memory space by selecting Picture / Colors and then Minimize Color Table (see page 172). The file size of JPEG pictures does not decrease when you minimize
the color table.
You should always create a master file of your picture in a format, such as TIFF format, that
has not had data reduced when working with JPEG pictures. Data reduction is carried out
again every time a JPEG picture is saved and the loss of quality is increased repeatedly.
Therefore all changes such as the basic settings for brightness should only be made in the
master file. This master file remains in TIFF format in all editing stages and versions while
70
you keep on saving new “derivatives” for your Web sites in JPEG format. You should only
open a JPEG picture to check its quality. A JPEG picture should not be edited and saved.
If a picture is sent to you in JPEG format, open it and then save it in TIFF format. This kind
of a file is the best possible master in this situation.
Minimizing GIF Pictures
The file size can be decreased for GIF pictures by reducing the color table.
You can Optimize Colors under Options in the Save as... dialog. The color table is then
reduced to the minimum without a loss of quality. The optimum color table would be 128
colors for 91 used colors.
It is possible to reduce the color table further using Picture / Colors / Change bit
depth dynamically if a greater degree of quality can be sacrificed. The picture quality is
always reduced by this option. It should therefore only be used if you want to reduce the
file size greatly. Try a low quality JPEG format instead.
We recommend deleting unnecessary colors from the color table to save memory space
again under Picture / Colors with Minimize Color Table (see page 172).
Pictures in E-mails
If you want to send a picture as an e-mail attachment to a Windows user, limit the file extension to three characters (for example, name.jpg). Select the Save web ready (without
resource) option provided in the modern file selection dialog in Mac OS 8.5 and above
when saving. Resource saving can be disabled under Edit (Mac OS X: GraphicConverter)
/ Preferences in the Save / General section. The file is then saved without resource as
this can cause problems under Windows. Files without resource do not have a thumbnail
in their icon.
71
If you receive an e-mail from a Windows user that has a compressed file named “Winmail.dat” attached, you will be able to open this file with GraphicConverter. All readable
images it contains will be opened in a multiple-page document.
You should compress images in CMYK mode before sending by e-mail as e-mail programs cannot show CMYK-mode images correctly. The file is transferred correctly, but
appears completely black or with the wrong colors in the e-mail program preview. If the
recipient opens this kind of file in GraphicConverter or another program that supports
CMYK mode, the colors will be displayed correctly again. Alternatively, you can convert
the pictures into RGB mode before sending by e-mail.
The picture data needs to be encoded when you send pictures as e-mail attachments since only “normal” letters and numbers are allowed in e-mails (7 bit). A series of normal letters and numbers should be used for all other characters. Different standards have established themselves here and are not compatible with each other.
Luckily you do not usually have to worry about this with modern e-mail software as the
programs rectify the problem. Drag and drop your picture files into the e-mail window or
use the option for adding attachments. Folders are then only allowed if they have been
compressed, for example, with StuffIt.
From a browser window you can transfer images to an e-mail program and shrink them
automatically. Use the context menu or the e-mail button to send images to an e-mail
program (see p 243).
If your e-mail program does not automatically decode the pictures you receive, GraphicConverter can still open it as long as it is encoded using one of the following standards: Mac Binary, Mime, UUencode, yEND or Binhex (HQX). If a Mime file contains several
images, GraphicConverter will save these files in a temporary folder and show them in a
new browser window. Move or copy the files to a normal folder if you want to save the
images permanently.
You should reset the encoding to the corresponding mode in your e-mail program if
the recipient cannot open the pictures, for example, because he uses an older e-mail program or another operating system such as UNIX. The following paragraphs describe the
procedures for Microsoft Outlook Express 4.5 and 5, Netscape, Eudora and AOL.
You can set the Attachment encoding in Outlook Express 4.5 under Edit / Options in
the Outlook Express / Create Mail section. Select AppleDouble when sending to Mac-
72
intosh users, Base64 (mime) when sending to Windows users and UUEncode when sending to UNIX users. BinHex is also suitable when sending to Mac users.
In Outlook Express 5, you can only select the encoding for each e-mail individually in
the e-mail window. Click the small triangle to the left of the box for the current attachments. An overview of the attached files opens. There is an area below the overview
where the current encoding is specified. This area is a button although it does not look
like one. Click the area to open a menu where you can select another encoding method
73
(see above). A proper button for this option would be a useful new feature in the next
version of Outlook.
In Eudora 5, when you send attachments to Windows users , click the BINHEX button
in the e-mail window and select AppleDouble (mime) from the pop-up menu.
74
In Claris E-Mailer, select Base64 from the pop-up menu for Encoding in the e-mail window.
You cannot select this encoding type if you use AOL software. Make sure you save the
picture file in GraphicConverter without resource and send the file. You will find this option in the file selection dialog when saving. If this does not work, you can dial up using
another provider that does not require registration. Then, for example, use one of the email programs mentioned.
Pictures for your mobile phone
If you want to copy images onto your mobile phone so you can look at them and show
them to friends at any time, you should reduce them to the size that the camera in your
phone creates. The size of the pictures should be listed in the phone manual. Otherwise
you can take a picture with your phone, import it into your computer and then determine
the size in pixels by selecting Picture / Size.
There are two ways to transfer an image file from your phone to your computer. You can
transfer the picture via Bluetooth or, if your phone has a memory card, remove it and ac-
75
cess it with your computer via a card reader. The structure of the Memory Stick Duo for
the Sony Ericsson S700i is as follows:
To transfer a picture from a mobile phone with Bluetooth, select it in the phone and
send it using the option for sending via Bluetooth. Activate the Bluebooth option on your
Bluetooth-compatible Mac. In a Sony Ericsson S700I, you select More / Send / Via
Bluetooth. After a security query, the message that a picture is being received will then
appear in the Finder. The picture will be saved in your document folder.
76
The aspect ratio of images being transferred to the phone should correspond with the
display aspect ratio as much as possible. You may have to trim the image. Enter the size of
the phone picture in the dialog for the aspect ratio. On the S700I, it is 1280 x 960.
Open a picture from your hard drive, which you took with a digital reflex camera, for example. Select a section with the selection tool and crop it by double-clicking inside the
rectangle or by pressing Return.
Now reduce the picture to 1280 x 960 with Picture / Size by entering one of the values.
The other value will be calculated automatically if Keep Proportions is enabled. If this value is smaller than required due to rounded edges, enter another value. If the other value
is slightly higher, you can trim off the extra pixels in the next step with Picture / Size /
Add/Remove Margins.
If you reduce the pictures to the size of the display, diagonal lines become too jagged
and the whole picture seems too blurred. The S700i display size is 320 x 240 pixels. Pictures with such a small size can mostly not be sharpened properly. Therefore it is better to
use the size of the photo images from your mobile phone. If a picture with the large size
appears too sharp on the phone, you can use a smaller version. On the S700i, the small
versions have the advantage that a mini preview is displayed in the overview.
Turn the landscape format pictures with Picture / Rotate / Rotate 90° Counterclockwise to use the display optimally.
Save the picture in JPEG format in a subfolder, for example. In the file selection dialog,
select the Save web ready (without resource) and Merge color profile into image (for
web usage) options. In the options, disable IPTC, ICC profile and EXIF. Transfer the picture to your mobile phone by copying it to your memory card using the Finder or transfer
it via Bluetooth. Select Send File... from the Bluetooth menu in the Finder. A file selection
window opens where you can select the picture file. You can also select several files. After
77
the file selection dialog, a dialog appears where you can select the receiving device. The
data will be transferred after you click Send.
When a Bluetooth icon does not appear in the menu bar, you can set this under System
Preferences / Bluetooth. On the Sony Ericsson S700i, you will find the pictures in the File
Manager section and can display them from there.
Slices
On the Internet, pictures can contain several links. Rectangular picture sections that are
assigned a link can be defined with the slice tool from the toolbox (Window / Show Toolbox). Draw a rectangle over the corresponding picture sections with the slice tool. The
rectangle can be moved with the mouse and the size adjusted with the handles. To enter
78
a link, Control-click the required slice to open the context menu and select Edit Slice
URL....
A dialog opens where you can enter the URL (Uniform Resource Locator; the Internet
address). HREF is the technical name for a slice link.
The address can be short, for example, http://www.heidelberg.com, or long. It is easiest
to enter long addresses using the clipboard.
Custom Name allows you to select a name for the file that is created for the slice. If you
leave the box empty, GraphicConverter will automatically assign a name.
Delete Slice deletes a clicked slice. Delete All Slices deletes all slices in a picture. Save
Slices as... creates a file that should not be copied to the web server. The file contains information about the slices and the links and is used to save slices and, for example, allows
you to import them later for use in a similar picture.
Open Slice… opens a slice file and displays the slices it contains.
79
Optimizing Filenames for the Internet
No special characters, for example, commas or foreign characters, should be used in filenames when you prepare pictures for the Web. Numbers are allowed.
We recommend enabling the DOS filenames option for multiple conversion when uploading your data to an older server that cannot manage long filenames. All filenames are
then automatically shortened to 8+3 characters as logically as possible. Numbers at the
start are not changed, but are not always allowed there.
You may not have problems with filenames when you test them on your computer.
However, uppercase names etc. will not be recognized once you copy your data to a server on the Internet. UNIX servers differentiate between uppercase and lowercase letters.
Note that for UNIX servers the filenames “House on Canal Bank.jpg” and “house on canal
bank.jpg” are considered to be different files. Links to files are always case sensitive.
A server may be able to handle a special character, but a certain browser cannot when
displaying data from the Web.
Proceed as follows:
Preferences... / Convert / Misc / DOS filenames
Photo Albums on the Internet (Catalog)
You should consider offering your pictures for download on the Internet if you do not
want to deal with repeat orders of photos. GraphicConverter automatically creates the required pages and pictures for this with just a few clicks of the mouse. Collect all source
pictures in a folder that you show as a small preview on the Internet and want to offer for
download, for example, in larger printable versions. Pictures that have been downloaded
80
can be forwarded to photo labs who will print your pictures on photographic paper and
send them to you.
You can create Internet pages that show the pictures as a small preview using the browser and the Catalog... option. The picture name appears under each picture. Click it and a
larger version of the picture will be displayed on its own page at 300 dpi, for example. You
can download the picture by Ctrl-clicking it and selecting the save option in the context
menu. Windows users can access this option by right-clicking.
Downloaded pictures can be printed using the GraphicConverter print option and
many other programs.
Make sure the image filenames do not contain any special characters such as commas
or foreign characters. Only letters, numbers, space characters, periods and underscores
are allowed in the names of the source files. All source pictures are copied to a new folder
and renamed so that they can be read on UNIX Internet servers when you create Internet
pages. Space characters are replaced by underscores. Uppercase characters are changed
to lowercase characters. Special characters lead to error messages. This is why they
should be replaced beforehand.
In the first step, you need to select the pictures for your Internet photo album. If you
have already collected the pictures in a folder, skip the next paragraph.
If you want to use pictures from different folders in your album, you first need to copy
them into a new folder. We recommend using the GraphicConverter browser. To create a
new folder, Ctrl-click a folder on the left-hand side of the browser and the context menu
81
allowing you to create a new folder will open. Now hold down the Alt key and drag the
pictures you require from any other folders to the new folder to copy them there.
Display the content of your picture folder in the browser and click a picture. Select all
pictures with Command-A. If you only want to use a few of the pictures in your album, select the ones you want while holding down the Shift key.
Alternatively you can also make the selection in the left-hand area of the File / Convert
& Modify dialog. In this case, you should create and open the target folder for the Internet data on the right-hand side. If you are using this method, start automatic creation of
the Internet data by clicking the Catalog... button between the selection areas. You will
find information on the other settings in the following sections.
Back to simple selection in the browser: Once you have selected the pictures, click
the Catalog-Icon in the browser or open the Internet menu by clicking the globe on the
far right of the GraphicConverter menu bar. Select HTML Catalog... in this menu. No matter which way you go the following dialog opens:
Enter a filename with the extension .html. For photos we recommend selecting the Always JPEG option under Thumbnail file format. If you have comic strips mixed up with
photos, select GIF and JPEG depending on color depth. Always PNG makes sense only
if you want to work with the larger PNG-Files. The advantage of PNG files is the flexible
Gamma value that makes the brightness of the pictures under Windows and Mac systems always the same.
82
Set the quality of preview pictures with Set JPEG Quality.... The higher the quality, the
larger the file. Specify the settings for PNG format pictures with Set PNG Quality... see
p 364.
Image file format allows you to set the format of the linked large images. You can leave JPG,
GIF, PNG or TIF (depending on source) enabled if, for example, the source images are in TIF
format and you want to put the large pictures online in TIF format. Select Always JPG if the
source images are in a different format to JPG format and if the large images should be created in JPG format.
You can also incorporate QuickTime movies in a catalog. These movies can be played on
the Web site. The format of movies is not changed.
Select which creator should be entered for the HTML file with Creator. If you select
Macromedia Dreamweaver as the creator, for example, the created files will be opened directly in Dreamweaver for editing when you double-click them. You can select a program
file, for example, Dreamweaver, by clicking Set from program file.... GraphicConverter
exports the creator and sets it for the HTML files to be created.
Several Internet pages are created if all the pictures do not fit on one page. The filenames are then always numbered except for the first: denmark.html, denmark2.html etc.
The first file contains no number so you can create a standard index file ”index.html”.
Click the General tab. Select how many pictures should appear in each row or each column of the Web page with Pictures per Row and Pictures per Col.
83
Select the background color of the Internet pages to be created with Color. Click the
color sample to change the color. You will find information about the color models on
page 230. For the Internet, we recommend selecting a color from the HTML model as this
is displayed in the Internet exactly as in the picture editor program.
Cellspacing allows you to define a value for the spacing between images or text and
the table cell lines.
Set the size of the preview pictures and the linked images in the middle section with
Width and Height. All landscape format preview pictures are calculated with the set
width, for example, 150 pixels. The height value is not taken into account as it specifies
the height of the portrait pictures. All portrait pictures get a preview with this height. We
therefore recommend to always select the same sized values. The pictures will not be the
same size when the values are different.
The Relative Width allows you to specify a percentage for the width that the linked picture should be scaled to by the browser. 100% will scale it to the width of the browser
window. The file size remains the same. Select Absolute Width to display the linked
images in their actual size. Large pictures may, however, be larger than the visible area of
the browser window.
First find out how large the preview pictures should be with a few test files. You should
be able to see what is in the picture. Simply drag the created HTML file to your Web browser for an idea of how it will look on the Internet.
Then select the font for the filenames. This is only valid for PICT catalogs that you can
create alternatively. On the File tab, select PICT from the Format pop-up menu to create
a catalog page as a PICT picture instead of an HTML file. You can use this option, for example, to put together larger pictures in overviews. We recommend using the File / Print
Catalog... option for printing catalogs, (see p 95). Avoid using more than 10 pixels for the
Size of the font as otherwise too much space will be required for longer filenames.
The font Color should be selected so that it is visible on the background. A black font is
not visible on a black background.
Display Name can be disabled. In this case, just the picture itself is a link. In addition,
you can select whether the extension, path, IPTC caption, dimensions and file size
should be outputted. Display text below or above image allows you to specify where
the text should appear.
Background Image allows you to set a background image for the Web page you create. Click Select... to select an image as the background image.
Specify whether pictures such as framed slides should be displayed in a square that is
always the same size with Make Square on the right-hand side of the dialog. The color
can be selected for these “slide frames” with Fill free Area with Color. Click the color
sample to change the color. You can find information on color selection on page 230.
84
You can draw a frame around the picture with Frame and set its color with Color. Sharpen should always be enabled so that the preview pictures are sharp enough.
The filenames of landscape format pictures do not appear at the same height as the filenames of portrait format pictures when the Make Square option is disabled:
The filenames of landscape format and portrait format pictures always appear at the
same height only when the Make Square option is enabled:
85
Switch to the HTML Basic section by clicking the tab and enter a folder name for
Thumbnail Path. You can also leave it as the default name thumbnails.
A folder with this name is created in the destination directory. The preview pictures are
saved in this folder.
Next to Picture Path enter a folder name or leave the default name images. A folder
with this name is created in the selected destination directory. The source pictures are copied to this folder so that they remain unchanged at their original location.
HLINK specifies the color for links that have not yet been clicked. If you produce Web
sites for older browsers you should use the older HTML tag LINK. VLINK specifies the color for links that have already been clicked. Click the boxes to the right of the options to
change the colors (see p 224).
Title specifies the title of the HTML page that is shown in the window frame and appears as a bookmark when users create a bookmark (a favorite) for the page.
Create link from thumbnails to images creates links from the preview pictures to the
large pictures. This should always be enabled as it never causes any harm and allows for
intuitive operation of your Web site.
Open images with navigation creates pages with the large picture and links to the
previous or following pages with large pictures. Another link called “Index” takes you
back to the overview.
86
Open pictures without navigation creates pages with a direct link to the large picture.
This is then displayed in the browser window without links to other pages. In this case,
surfers can return to the overview using their browser’s Back option.
Open Images in a new window creates links that display the large picture in a new
browser window. Leave the target-”_blank” entry in the entry box below it. Only HTML
experts should enter other commands here.
Set new window bounds to image bounds ensures that the new browser windows
displaying the large pictures are the same size as the picture.
Addition to the body tag allows other information to be entered for search engines.
Determine how thick the border should be drawn around the preview pictures with
Border. This border shows that the picture is a link. Normally Web designers do without
this edge, particularly as the color can be altered by the surfer’s browser settings.
Add Tabs to HTML does not change the appearance of the HTML page, but makes it
clearer for editing the source text in HTML editors than the disabled <TD>...</TD> in
one row option. The options are intended to keep the HTML files as small as possible.
Disable Add Tabs to HTML and enable <TD>...</TD> in one row to minimize the file
size of the HTML page created. The effect is only slight, however.
Enable Add Tabs to HTML and disable <TD>...</TD> in one row to create HTML files
that are clearly formatted so that they can be easily edited in the source text mode using
an HTML editor. If you only edit the pages with, for example, Dreamweaver in preview
mode, you will not need to format the source text tidily. In this case, select the smaller
files by disabling Add Tabs to HTML and enabling <TD>...</TD> in one row.
Choose whether the originals should be copied into a new folder in the destination directory with Create “images” folder. These copies are intended as an administrational
aid, but do not have to be created. You can also use the original folder for uploading to Internet servers.
All uppercase letters in filenames are changed to lowercase letters with Make filenames lowercase. This may be required for UNIX servers on the Internet.
The Correct extension option changes the file extension to the correct extension. If a
JPEG picture has the incorrect .tif extension, this is changed to .jpg.
Use Macintosh line ends and Use UNIX line ends set the different characters at the
end of the line. Use UNIX line ends if you want to edit the created HTML files under UNIX.
Web browsers can display both versions correctly.
The three options Align Thumbnails TOP, MIDDLE and BOTTOM set the position of
the preview pictures. This option is only useful when you have different sized preview
pictures or to distinguish between portrait and landscape format. If you have portrait and
landscape format pictures in your catalogue, we recommend using the Middle setting so
87
that the landscape-format pictures appear in the middle of the neighboring portrait-format pictures when in vertical position.
Charset allows you to choose a different standard for the type set when you design a
Web page in a foreign language.
The Navigation pop-up menu allows you to insert different-colored arrows into the
HTML pages instead of Textlinks.
Click on image moves to the next only works when a single image is displayed.
On the HTML Text tab, you can insert additional text in various areas of the HTML page.
Addition to the body tag allows you to enter additional HTML tags for the body. Text
after <body...> allows you to enter additional HTML tags after the body. Text before </
body...> allows you to enter additional HTML tags before the body. Addition to the
head tag allows you to enter further HTML tags for the head section.
88
You can enter so-called Meta tags on the HTML Meta tab if you want your pages to be
found by search engines and displayed for corresponding search names.
First enable the Allow Search Site to build an index option. Enter an Author and describe your page in the Description box. An abbreviation for the language is already
entered. GraphicConverter selects this according to the language set for your Mac.
We recommend entering terms that you think might be entered as search strings by Internet surfers as Keywords.
You can save your settings with the Save... button at the bottom left and then use them
again by clicking the Open button later on.
On the Batch tab, you can also select a batch for the large images and the smaller
preview pictures that you defined using the Convert dialog or via the pop-up menu
89
on the browser toolbar. This is useful, for example, if you want to add a watermark only
to the large pictures.
Click OK to create the Internet pages and pictures.
GraphicConverter now creates one or more HTML pages and two folders for the preview pictures and the originals. If several overview pages are created, GraphicConverter
inserts links at the bottom of the pages so you can switch to the next or previous page.
Copy the files and folders created on your Web server and set, for example, a link to the
first catalog page of your homepage. An example can be found at http://www.hochzich.de
Uploading and Downloading Documents
You will also find the Upload File(s)... option in the Internet menu accessed via the globe
on the far right of the menu bar that allows you to copy files onto a Web server using the
ftp protocol. First select the files in the browser. If you also want to upload HTML files, you
90
first need to remove the file types HTML and HTM from the list of files to ignore under
Preferences / Open with so that they are displayed in the browser.
Connect to the Internet, then enter a URL, your user name, password and, if necessary,
the path. Click Upload to copy the files onto the Web server.
If you want to download a picture from the Internet onto your computer, you can start
the download with a Ctrl-click or a held click on the picture depending on your Internet
browser. The picture is saved to the desktop on your computer or to your download folder. You can open it in GraphicConverter from there.
If you know the path to a picture, you can also enter it directly in GraphicConverter to
save the picture to the desktop and open it in GraphicConverter. Select File / New and
then Image from URL from the submenu. The following dialog opens:
91
Enter the URL and click OK. The picture is automatically downloaded to the desktop
and opened in GraphicConverter. You can, for example, easily copy the path to a picture
by Control-clicking the picture in the Internet Explorer to open the context menu and selecting Copy Shortcut
On Paper
Digital pictures can be printed relatively cheaply on color printers. GraphicConverter offers a series of options to help you print pictures.
Paper Format
File / Paper format opens the standard dialog for the printer selected in the Apple menu.
Select the inserted paper format so that GraphicConverter receives the correct information about the area to be printed. If your printer can print certain formats without margins,
you need to select a special paper format for borderless printing.
In our example, we are using a Canon i550. For borderless printing, select US Letter
(borderless) or another format without margins. In the Print Options dialog that is described below, you need to click the Use printer’s minimum button to allow borderless
printing.
Printing
An opened picture can be printed with File / Print. If you have defined a selection in the
picture, only the selection will be printed. File / Print Selection... will then appear in the
menu. The dialogs for printing are displayed by the Mac OS and look different depending
on your version of the Mac OS.
92
Classic Mac OS
If the following dialog is not displayed, select the GraphicConverter entry from the second pop-up menu down.
Mac OS X
The following dialog opens with a preview that takes the picture profile into consideration.
Mac OS classic and X
The following instructions apply to both Mac OS versions.
93
Area specifies whether the whole picture (All) or only the visible Content of window
should be printed.
Select whether the picture should be printed in the original size, enlarged/reduced to
fit the paper format or resized to 200%, for example, next to Size. Enter the value in a dialog that opens after selecting in the pop-up menu and can also be opened several times
in this way.
Print display information prints the display information at the top of the page that is
also in the information palette. The date is also printed. Print only name and comment
limits the display information to these two items. Font and Size of Header allows you to
select a font in a specific size for the additional information.
Behavior for printing images that are larger allows you to scale the image automatically to the page size, to trim it, print on more pages or to use the Ask always option to
determine which option should be used each time.
Smart Trim before printing deletes single-color picture margins in the background
color before printing, (see p 118).
Smart print orientation is only available in the Carbon version of GraphicConverter
and should always be enabled when you print larger pictures as the paper format is automatically set to landscape format for landscape-format pictures. Likewise, the paper format is switched to portrait format for portrait-format pictures.
You can disable Show preview to speed up your work. Normally it is useful to display
the preview, however.
The page margins are displayed under Margins. Click Use printers minimum before
printing to export the minimum printer margins from the printer driver and apply them
to the printout. If you have selected a paper format without margins, four times zero
should appear here as the value.
The area of the page that the picture should be printed on can be selected in the print dialog with Position.
In the Printer pop-up menu, select the printer profile for the printer you are using. The
selection only has priority over the setting in the File / Color Profile dialog for this print
job. On simple printers, the setting None may produce better results than the profiles installed with the printer driver as the profiles often do not match the paper used.
Force 32 bit printing means that grayscale and bitmap images are printed as RGB
images too. Use this option if you have problems printing grayscale and bitmap images
with older printer drivers.
When you print a list, for example, only the regular print dialog will appear.
94
Tip: If manufacturer of your printer cannot supply a driver for your Mac OS version, you
can try using a free driver from Gutenprint: http://gimp-print.sourceforge.net/MacOSX.php
Print Catalog
Print Catalog... in the File menu allows you to print a catalog of all pictures contained in
a folder.
Any subfolders contained are taken into account when the Include Subfolders option
at the very bottom of the dialog is enabled. Select a folder with the file selection dialog.
The print dialog opens. Under Classic Mac OS, select GraphicConverter in the second
pop-up menu from the top. Under Mac OS X, select GraphicConverter in the third pop-up
menu from the top and click GraphicConverter Options....
95
In both cases, a dialog opens with options for printing the catalog such as the number
of copies of each page.
GraphicConverter creates the pages to be printed and prints them directly on the printer.
Settings for the page margins, the font for the file information and the title can be
made in the extended print dialog.
You can define a maximum of two top lines and one footer line by entering text or
variables in the boxes. Entries in the left-hand box will be printed left-aligned. Content
entered in the other boxes will accordingly be centered or right-aligned. &deltapath
allows you to print the path from the selected folder without the selected folder itself.
This is useful if you do not want parent folders to be shown.
Define Details which should be printed... opens a dialog, where you can choose
which details should be printed under each image when Print with description is en-
96
abled. Click the desired details under Available Texts and click Add. To remove a detail
from Selected Texts, click it and click Remove.
You can also Arrange Pictures depending on Resolution. GraphicConverter reads the
resolution from the pictures. The resolution is stored in the file for most formats. If you
specify that you want to print at 300 dpi, for example, GraphicConverter converts the pictures correspondingly. This conversion results in the print size. A picture that has 600 dpi
would be greatly enlarged for this setting as the pixels are more or less enlarged with
double the width and height. If information about the print size in the picture is in units
such as cm, this will be ignored. The other way around, pictures with 72 dpi are reduced
by about a quarter for this setting.
You can specify the number of pictures to be placed in each row and column using Arrange Pictures with fixed Number. The size is matched to this number accordingly. This
mode is very practical. The size and form of the cells in which the pictures are printed arise from the number of horizontal and vertical pictures. Portrait format pictures are not reduced more than landscape format pictures if the cells are almost square. The default of
two columns and three rows allows this when you print on standard paper.
Arrange Pictures with fixed Size specifies that all landscape format pictures are printed with the Horizontal Width entered and all portrait format pictures with the Vertical
Width entered. The same horizontal and vertical width values must be entered if portrait
and landscape pictures are to be reduced to the same degree.
Shrink images a bit to avoid printing directly next each other can be disabled to
print the images without spacing. This will save on expensive printer paper.
Reduce Resolution to Printer Resolution ensures fast printing when, for example, 600
dpi pictures are printed on a printer with only 300 dpi.
97
Include subfolders also prints the pictures that are located in subdirectories of the selected folder.
Sort folders separately prints the pictures from subfolders separately.
Print each folder on a new page ensures that a new page is started for each new folder.
Rotate image for optimal paper usage turns portrait-format pictures crossways and
vice versa to make best possible use of the paper.
Show this dialog before printing always displays this dialog before printing so you do
not have to call it up via the print dialog.
Use only default printer resolution (normally 72 ppi) allows fast printing in low quality.
Frame Thumbnails prints a thin one-pixel line around the pictures so the image area
can be seen even if there are light areas. Text/Frame color allows you to select a color for
the text and frame. Background color allows you to select a background color for the
whole page.
Print all pages from multipage files prints all pages of images that have multiple
pages.
Several pages are printed accordingly if all the pictures do not fit on one page. During
the calculation of the pages to be printed, GraphicConverter shows how much space is
required on the hard disk, how many files are already edited, which page is being created
and how many pictures are printed.
In some cases, large amounts of data need to be stored temporarily on the hard disk for
the print out. These temporary files are automatically deleted after printing. If your hard
disk does not have enough space for this, you can select a so-called Scratch folder,
which is located on an external hard disk, for example, in the Preferences under General /
Memory. You can also select the hard disk directly. Click the Scratch folder button and select a volume or a folder with the file selection dialog.
If a picture cannot be opened, for example, because it is corrupt or has an unknown format, the preview will be used for printing. This may result in a loss of quality.
98
Print Folder
To print all the pictures in a folder individually, select File / Print Folder.... Each picture is
printed on one page.
Processing Pictures
Editing is normally worthwhile whether you scan a picture or, under Mac OS X, import
one from a digital camera using File / Acquire / Download images from connected camera…. In this section we will show you how to scale, scan, sharpen and your pictures
and much more. You will often want to try out a sequence of effects first. Use Picture /
Duplicate... to create a copy of the picture in a new window so you can try out a few effects. In this way, you will not modify the original and you can always compare the results
with the first version.
Cropping for Photo Prints
If you want to order prints from your digital photos, you will face the problem that most
digital cameras produce pictures with an aspect ratio of 4:3 like most monitors and televisions. Photo paper in 4x6-inch format, for example, has an aspect ratio of 3:2. If you reduce the digital photo so it fits the photo paper at the top and bottom, you will get white
edges on the left and right.
Some photo services offer the option of prints with white edges and in some cases you
can order the prints with the edges already cut off.
99
If you enlarge the digital photo so the photo paper is filled completely, part of the
image will be cut off at the top and bottom. The following picture shows how a photo
service would trim the image.
If you decide on this method, you may want to position the selection yourself and trim
off parts of the picture that are not so important. In our example, it would be nice to see
the whole of the boy’s hand, while the upper part of the picture is less important.
GraphicConverter has an excellent option for cropping pictures to an aspect ratio of
your choice. Open the desired folder in a browser window and select the pictures you
wish to crop with Shift or Command-click. Choose Export / Crop for Photo Service from
the context menu. A dialog opens where you can enter the aspect ratio of your photo
paper. This is always 3:2 for 4x6 inches and other standard sizes. Alternatively you can also
enter 4:6 or other aspect ratios.
100
Auto trim allows you to define the size of the selection rectangle. Enter 2%, for example, to trim the edges slightly. Enter 0% to disable this option.
You should enable Crop JPEGs lossless (will round selection) since further JPEG compression, which causes a loss in quality, is not required despite the cropping. When you
scale the selection, it will move in steps of 8 pixels as this is the only way to crop without
losses.
The cropped pictures are saved in JPEG format or in the original format. If GraphicConverter can open the original format, but cannot save that format, the picture will be saved
as a JPEG. If you want to crop these types of pictures and save them in a lossless format,
you should first convert them into a format such as TIFF using the convert option (see
p 30).
A JPEG quality of 95% allows both very good quality and a manageable file size. The
files are saved web ready without a preview or resource if Remove all metadata is enabled to maximize compatibility. This is why you should not display these files in the
browser with automatic preview creation enabled. If you want to take a look at the cropped pictures, you should first go to Preferences / Browser / General and choose Always
temporary for the Previews.
Change resolution value to allows you to change the resolution. This is not normally
necessary.
Include images in subfolders causes the pictures in subfolders to also be opened for
trimming.
Select Copy unknown files if your picture folder also contains text files, for example,
that should be copied into the target folder.
Select Save to subfolder to save the images in a subfolder, which is created automatically, or Save to user-defined folder to select a specific folder with Choose....
Once you click OK, a full-screen dialog opens displaying the selected pictures one after
the other. There is a selection rectangle over the picture that you can move with the mou-
101
se. Click inside the rectangle to move it to the required position. The edges are displayed
brighter.
Click OK & Next to go to the next picture. You can also apply the trim by double-clicking the selection. The cropped picture is saved into a folder named “Cropped Images”
that is generated automatically. This folder is created in the folder where the images are
located. The source images are not modified. OK & Again carries out the cropping and
the new file is written. The starting image remains in the dialog, however, allowing you to
crop further versions which will be saved with an index in the filename.
Click Ignore to go to the next picture without cropping the current one. Cancel will
end the crop function.
Choose OK for All to apply the current settings to all pictures selected.
You can see how many pictures have been cropped so far and how many you selected
to the right of the OK for All button. Toggle rotates the selection rectangle for portraitformat pictures. Change Ratio allows you to select the aspect ratio again.
If you also want to crop the picture on the left and right edges, click one of the corners
of the selection rectangle. The aspect ratio will not change. You can switch the selection
rectangle from landscape to portrait format, for example, by clicking the top right-hand
corner and dragging it to the left without moving downwards.
102
The size of the rectangle is shown in pixels next to the corner. A high quality 4x6 inch
sized print requires at least 1200 pixels. For normal quality, you will need 800 pixels. If you
have a portrait picture, take these values for the height. When the selection rectangle has
been reduced in size, you can move it in any direction over the picture.
You can send the pictures saved in the “Cropped Images” folder to your Photo Service
via the Internet or on a CD. If the photolab offers you the option of white edges or trimming, it will not matter what you decide in most cases as their machines will recognize
the aspect ratio of your pictures. The images will be positioned correctly so they fill the
photo paper. If in doubt, you can call the photo service hotline.
Picture Size
The picture size can be displayed and changed using Picture / Size / Scale. You can set
the picture size very accurately in pixels in the top section of the Scale dialog. You can
also make the setting using a percentage value.
In the bottom section of the dialog, you can also change the size of the picture using
the Width and Height boxes.
When you enter a new value, the second value is automatically recalculated.
You can change the picture resolution to 72 dpi, for example, using the X- and Y-Resolution, see p 104.
103
Enlarging adds pixels. Reducing lowers the number of pixels. The picture is recalculated
as best as possible in both cases. The picture quality is reduced especially if you make excessive adjustments. We therefore recommend scanning pictures as close as possible to
the required size.
If the Keep Proportions is option is disabled, pictures can be distorted to create special
effects when you change a single value.
Scale Picture recalculates the picture instead of just changing the value for the output
size. Reducing with this option lowers the number of pixels. If you disable Scale Picture
when reducing, a note is simply made in the file that the picture should be outputted accordingly smaller.
Scale complete Movie does not only scale a picture from a film or animation in the display, but all pictures from the film.
Select the Quickdraw/Quartz algorithm to obtain the optimum image quality for normal applications. A range of other algorithms are available for special tasks.
Dither (only for standard QuickDraw scaling) increases the quality of pictures with
256 colors, except for line graphics. This option will not interfere in your work with images
that have a greater color depth and can therefore be left enabled.
Picture size – an example
If you cut a person’s head out of a picture and want to “glue” it onto another person’s
body in another picture, the head will often be too big or too small in the new picture.
Display both images at 100% zoom level and reduce the larger picture with the scale
function Picture / Size / Scale by entering 80% as the width, for example (see above).
If the new size does not fit, return to the initial version with Ctrl-Z and reduce again with
a more suitable percentage. As soon as the size of the head fits the body in the other picture, select the head with the lasso and copy it. Using Command-V, paste the head into
the other picture. You can position it freely there.
Resolution
Each picture file is made up of pixels and information on the size of the picture. The pixels
are square (rectangular in a few formats). To help explain this, imagine a picture that is
300 pixels wide and tall. The file also contains the information that the picture has a width
and height of one inch. One inch is 2.54 cm.
Our picture therefore has 300 pixels placed horizontally next to each other and also vertically one below the other. At this density, the picture resolution is 300 dpi. This abbrevi-
104
ation stands for dots per inch. Sometimes the abbreviation ppi (points per inch) is used.
This is exactly the same.
Pictures normally have the same horizontal and vertical resolution. The option of setting different values for horizontal&vertical can be used, for example, to convert pictures
with different resolutions to a standard X- and Y-Resolution.
Basic rule: The higher the resolution, the better the picture quality. Pictures used for
printing magazines, for example, Macworld, are normally at least 300 dpi. For line drawings, however, a resolution of 1200 or better 2400 dpi is recommended as the lines will
otherwise not be sharp enough.
If our example picture was printed out double size, you would be able to simply separate the pixels. The pixels are in fact enlarged as there are no gaps between them.
Convert picture should be enabled if you want the picture to also contain more pixels
when the resolution is increased or fewer pixels when the resolution is decreased.
Pictures from digital cameras are normally 72 dpi and have an enormous output size.
To change these pictures to approximately 10x15 cm with 300 dpi, clear Scale Picture
and enter 300 dpi as the resolution. You can use the Batch option to convert several pictures in one go (see p 302). This is, however, normally not necessary as layout programs or
photo services ignore the resolution given in the file head and only use the number of pixels for the required output size.
Canvas Size
Picture / Picture Size / Canvas Size allows you to enlarge the picture by adding margins
that are more or less like a work area. You can use this option, for example, if you want to
add something to the right-hand picture edge to make the picture wider. Enter the new
values for the Width and the Height in a selectable unit. You can select the position of
the previous image on the new larger work area with the radio buttons. Color of added
105
area specifies the color of the added margin. If the picture contains an alpha channel, it
will be set to transparent in the area being added.
Enable Remember previous values so that the values are available when you next call
up the dialog.
You can also use the Add/Remove Margins option. It makes adding or removing a specific value on two or more sides more easy.
Add Remove/Margins
You can use Picture / Size / Add/Remove Margins to change the size of a picture by adding or deleting margins. This function is useful, for example, when you need more space
for other picture parts in picture montages.
106
If the picture should be enlarged on the right-hand side, for example, enter the corresponding value in the box to the right of the gray square. At the same time, you can add
a margin on one side and delete the margin on another. To delete, enter negative values,
for example, -30. The unit is pixels.
Scale with last Values
If you want to scale several pictures with the same values, this option saves you having to
repeat entries. Select Picture / Size / Scale with last Values... to display the last values
used in the Scale dialog and enter new values there or use them without changes.
Burn In
Using Picture / Size / Burn in, you can create a file from a picture as displayed on the
screen enlarged or reduced. If the current zoom level for display is 50%, for example, this
option reduces the picture to half size. The display is then set to 100% since the picture is
then always displayed unzoomed. This function is particularly useful if you want to quickly reduce a picture to 50%, for example. You can only preview at print size before and after you use Burn in if the pictures have a resolution of 72 dpi and a zoom level of 100%
before reduction. The standard resolution also needs to be set for your monitor (see
p 158).
We recommend using the Picture / Size / Scale option for pictures with different resolutions, for example, 300 dpi. The print size is displayed in the Scale dialog and the scaling
can be easily entered in percent. This is the only way to avoid an irritating screen display
that differs from the print size.
Scale to main desktop size
This option scales the current picture to the size of the desktop. After scaling, you should
improve the sharpness slightly with Effect / Sharpen Edges. Picture / Put Picture on
Desktop places the picture on your desktop. This option also scales the picture to the required size if necessary. Scale to main desktop size is therefore intended for creating
desktop pictures for other users or for use later on.
107
Scale to pixel count
If you know how many Pixels your picture should have in total, you can enter the total
number of pixels in the dialog for this option.
Not all numbers are possible as the picture is scaled proportionally. After scaling, open
the dialog again to display the number of pixels used to scale your picture.
Algorithm allows you to specify which subprogram (algorithm) should be used for scaling.
Aspect ratio
Crop to 3x5, like the other aspect ratios, immediately trims centered to the selected aspect ratio. The aspect ratio 1:Ð2 is the aspect ratio of DIN paper sizes like DIN A4 or DIN
A5. If you want to specify the section yourself, you can use the Export / Crop for Photo
Service... option from the browser context menu. You will find a detailed guide in the
chapter “Cropping for Photo Prints” from page 99.
Scanning with GraphicConverter
Summary: You can call up your installed scanner software via File / Acquire /TWAIN Acquire.... If a scanner plug-in has been installed, will be available in the File / Acquire submenu. The picture is available in GraphicConverter after scanning.
GraphicConverter supports TWAIN technology and can use alternative plug-ins. There
are now several scanner plug-ins for Mac OS X.
Version 5.1 of the professional scanning software SilverFast from Lasersoft can also be
used as a plug-in with Photoshop (http://www.lasersoft-imaging.com). You can only use
SilverFast via the TWAIN interface with GraphicConverter.
If you install a scanner plug-in, the scanning program will only be available to the program for which it was installed. This system is highly recommended since scanner software installed for the TWAIN interface is available to all programs that support the TWAIN
interface. If, however, your computer crashes when you scan via the TWAIN interface
even after you have reinstalled the TWAIN and scanner software, we recommend scanning with a plug-in.
108
Plug-Ins
Under Classic Mac OS, scanner plug-ins need to be installed in or copied to the Plug-Ins
folder inside the GraphicConverter folder. If, however, you are using the Carbon version of
GraphicConverter in Mac OS 9.x with Carbon Lib installed, copy the plug-ins to the following path: System Folder/Application Support/Plug-Ins.
Under Mac OS X, the Plug-Ins folder is in the Application Support folder, which is in
the Library folder. Plug-Ins, which should only be available to one user, should have the
following path: Users / ~ / Library / Application Support. The tilde character ˜ stands for
the name of the user.
You can only set a different folder for the plug-ins under Classic Mac OS via Edit (Mac
OS X: GraphicConverter) / Preferences in the General section by clicking Plug-Ins. In
this dialog, you can disable the Acquire again option. Acquire again means that the
scanning software starts again immediately after a scanning process. This option also
needs to be available in the scanning software and enabled (often in the preferences).
This option should be disabled in the scanning software before the last picture is scanned, however, as the scanning software will be started again for nothing at the end and
has to be quit (normally with Command-Q).
All acquire plug-ins, which have been installed and are located in the GraphicConverter
Plug-Ins folder, are displayed in the File / Acquire submenu. Acquire plug-ins for importing pictures are supplied with scanners and digital cameras. GraphicConverter supports
most Photoshop 3.0-compatible acquire plug-ins. Command-T calls up the first scanner
plug-in.
If you cannot find the installation software for your scanner, you can copy the plug-in
required from the Plug-Ins folder of another graphics program into the GraphicConverter
Plug-Ins folder. In some versions of Adobe Photoshop, the scanner plug-ins are located
in the Plug-Ins folder by default.
If you update your operating system on a regular basis, we recommend downloading
the latest version of your scanner software from the manufacturer’s Web site.
TWAIN
With the TWAIN system, the scanning software for your scanner only needs to be installed once and can be started from different programs. Under Classic Mac OS, GraphicConverter needs a system extension and a TWAIN folder. The word TWAIN is not an abbreviation and has no real meaning. “TWAIN is TWAIN,” say the inventors.
Under Mac OS X, you do not need to install any extra TWAIN software since the code is
integrated in GraphicConverter. You only need to install the TWAIN driver for your scanner.
109
Mac OS Classic: Please note the installation instructions for these components in the
chapter Installing TWAIN on page 11. The TWAIN software may have already been installed by another program. If the TWAIN software supplied with GraphicConverter is
more recent, you can replace the installed TWAIN components. Make a backup of the old
versions, however. You can tell the version of programs and extensions from the version
number displayed in the About dialog or from the file date. Click the file and call up the
information on operating system level by pressing Command-I.
Install the software for your scanner. If you can install just the TWAIN driver for your model instead of the drivers for several models in a simplified installation, make sure you do
so as this will avoid problems.
Mac OS Classic only: During installation, make sure that the scanning software for the
TWAIN interface is installed. The TWAIN folder is located in the Preferences folder in the
System Folder. Most installation programs for scanner software also automatically install
the scanning program for the TWAIN interface. The TWAIN software is often installed simultaneously.
Before you scan for the first time, you will need to select the required TWAIN software
via File / Acquire / TWAIN Open Source… if several scanners or other TWAIN devices are
connected. There is no need to do this if only one TWAIN device is connected. Single-click
the black triangle for information on the currently clicked and thus selected TWAIN module and the TWAIN version.
Due to a bug in Mac OS X 10.5 the information which TWAIN-Source was chosen cannot
be saved. Therefore you should select Ask for TWAIN source before aquire (10.5 or
later only) in the Preferences General / Plug-ins to get the dialog for selecting the
source before every scan.
110
Once the installation has been completed and you have selected the TWAIN source, you
can start the scanner software with File / Acquire / TWAIN Acquire... and scan a picture.
The following dialog will look different depending on your scanner.
Please refer to the documentation that came with your scanner software for information on operation. The picture will be available in GraphicConverter after scanning and can
be edited and saved.
If scanning via the TWAIN interface ever happens not to work, use the corresponding
scanner plug-in or install the TWAIN software again.
Editing pictures is worthwhile even with good scanners. Please refer to the chapters on
sharpness, brightness and contrast.
Note: Older versions of GraphicConverter do not support TWAIN. Please always use the
latest version of GraphicConverter, which you can download from www.lemkesoft.com.
111
If you want to start the next scan procedure immediately after scanning in an image,
you can specify this in the preferences in the General / Plug-Ins section with Ask for
scanning a new page after end of scan.
Using Your Scanner as a Photocopier
If you want to use your scanner as a simple photocopier, select File / Acquire and then
TWAIN Acquire & Print from the submenu. Your scanner software will open allowing
you to scan the picture in a size that fits on the selected paper format. We recommend a
value between 200 and 300 dpi for the resolution. After scanning, printing will be started
immediately with the current print settings.
If you scan a picture that is larger than the current paper format, we recommend using
the setting Scale image to fit page. You can select this setting by opening the print dia-
112
log with File / Print..., selecting GraphicConverter from the pop-up menu and then clicking the GraphicConverter Options... button.
However, if you want to copy documents like letters, the setting Trim image will be better as most documents do not have text around the margins.
Before you start copying, you should click Use printer’s minimum under Margins in
the print options dialog so that GraphicConverter reads the print margins from your printer.
Using the Stamp for Touching Up
Scanned pictures often have small marks caused by dust. You can see these faults easiest
if you display the picture at a zoom level of 100%. Select Stamp in the toolbox and, holding down the Alt key, click an area in the picture with the same color or the same structure as the fault area. Click the area to be stamped without holding down any other keys
and move the mouse over the whole of the area to be touched up.
113
The mouse cursor will turn into a double circle. Everything inside the inner circle will be
stamped. The edge of the stamp is softened: The effect of the stamp gets weaker towards
the second circle. You can set the size and smoothness of the stamp by double-clicking
the stamp tool. The following dialog opens:
Like in Photoshop, Always use unstamped picture as master allows you to specify
that not the picture already stamped in the same action, but the picture underneath that
has not been stamped should be used as the source.
The source for the stamp can also be another open picture. For example, you can even
paste a face from a passport photo into a group picture. Hold down the Alt key, click the
picture with the stamp and switch to the group picture. Holding down the key, move the
mouse over the area where the face is to appear. You may have to enlarge or reduce the
source picture to adjust the size (see p 103).
Export
All export plug-ins that have been installed in the GraphicConverter Plug-Ins folder are
listed in the File / Export submenu. GraphicConverter supports most Photoshop 3.0compatible export plug-ins.
Importing Pictures from Digital Cameras
You can only use GraphicConverter to import pictures straight from a digital camera under Mac OS X. Connect the digital camera so that it appears as a volume on the desktop.
From Mac OS 10.1.5, GraphicConverter displays the import dialog automatically. If your
camera is not supported by Mac OS X directly, you can use the program Image Capture
that is a part of Mac OS X, or you can connect a card reader into which you insert the memory card from your camera.
114
Select File / Acquire if the import dialog has still not opened automatically and then
Download Images from Connected Camera... in the submenu that opens. A dialog
with import options opens.
Select the Download all images into the selected folder option at the bottom of the
selection dialog if you want to load all pictures into a folder. Download into 30.11.2005.
Film 1 creates a folder with the date and a film number into which the pictures are loaded. The date is always the date of the import. Sort images into subfolders depending
on date creates a subfolder in your picture folder with the structure year, month, day, i.e.
for example:
If, for example, you require folder names without month names and a preceding zero
for the month number when further processing in a php environment, disable the With
leading digits and Add month names options.
Sort images into subfolders depending on extension is helpful if your camera writes
a RAW- and a JPG-file on every shot. GraphicConverter creates a Folder for every format in
the destination folder.
In the file selection dialog, select your picture folder where the year, month and day folder is to be created or already exists. The pictures will be imported into the day folder according to the creation date.
If you want to copy pictures from several days into a folder, we recommend using “0307 Mayers”, for example, as the name. Select the pictures, enable the Download all
images into the selected folder option and click Download. A file selection dialog
opens where you should create the destination folder called “03-07 Mayers” New Folder.
115
Add file icon and preview to images creates the high-quality preview pictures that
appear in the browser when the pictures are loaded.
You can select Delete images in camera after download to delete the pictures once
they have been imported.
If Enter IPTC is selected, the IPTC dialog where you can enter IPTC data like the keywords, for example, will open after you click Download. This data is set for all pictures during import. We recommend using this function if you have a general term for all of the
pictures like, for example, “Christmas 2005”. You can assign more pictures later on in the
browser.
You can enable Embed Color Profile by clicking Select Profile... to select a color profile. The selected profile will be attached to all images upon import as many cameras do
not include the profile with the pictures to make the files smaller. You do not need to embed the sRGB profile as GraphicConverter automatically uses the corresponding profile
when ColorSync (File / Edit Color Profile) is enabled if it is included in the EXIF information of the image file as a color model.
You should only embed the profile if you want to use the image with a program that
does not take the profile information from the EXIF information or if you are not sure
about this point.
Apply rename action allows you to rename the images upon import. All of the sets
that you saved in the rename dialog are available. You can open the rename dialog by
Control-clicking a preview in the browser or from the Convert dialog. (see p 43)
Back to the process of importing: A file selection window opens where you can select
a folder for the pictures or create one. Click Select (Mac OS 10.2) or Open (Mac OS 10.3)
to import the pictures and display them in a new browser window. If the pictures contain
orientation information in the EXIF information, portrait format pictures will be rotated
without losses upon importing. If the file date is not the same as the date in the EXIF information the date from the EXIF information is used for the file in the computer. During
import, a dialog shows you how many pictures are on the camera memory card and how
many have already been transferred.
If you want to download single images from your camera, select Choose images to be
downloaded from connected camera…. It may take a moment now as GraphicConverter checks the images and creates larger previews. A dialog opens in which you select the
116
images for download by command clicks. A shift click will select all images from the selected one up to the one you click. Command-A selects all pictures. Options... opens the
dialog described above containing options for downloading. Click Download to import
the images. Choose a folder in the opening file selector for the images to be loaded into.
After the download the images will be displayed in a new browser window.
Download Images from Folder... allows you, for example, to select a folder on a hard
drive whose content will be imported like the content of a memory card. This is useful if,
for example, you want to use your settings for renaming during import.
Trimming
In most scanner programs the picture being scanned is displayed so poorly in preview
mode that it is worthwhile making the selection rectangle for the area you want to scan
slightly larger. The edges of the picture will then need to be trimmed. In GraphicConverter, it is best to use the selection tool at the top right of the toolbox. If you cannot see the
toolbox, you can call it up by selecting Window / Show Toolbox from the menu.
Use the selection tool to place a rectangle as accurately as possible around the section
of the picture that should be left after trimming. The pixels behind the line also belong to
the selected area. Use the handles on the selection lines to adjust the rectangle. You can
adjust the rectangle very accurately by using the center handles between the corners as
they only move one edge.
117
You can work most precisely when the picture is zoomed to at least 100%. Finally trim
the selected area by selecting Edit / Trim Selection (Command-Y). The parts of the picture not enclosed in the selection rectangle will be cut away. The picture will be displayed
in a correspondingly minimized window.
You can delete a selection by pressing Escape or selecting Edit / Unselect (CommandShift-A) from the menu.
The Edit menu also contains the Smart Trim command. This trims any single-color
margins leaving you with the actual picture. If the scanned picture has a white margin,
you can use this option to easily cut off the scanned edges without having to set a selection rectangle.
Click the center of the picture section, which is to be kept. Note that GraphicConverter
searches for the color set as the background color as the edge. If you want to delete a
white edge, white needs to be set as the background color and black accordingly if the
edge is black. The foreground and background colors can be set by clicking the color areas and using the eyedropper . You will find detailed information on this in the chapter
Foreground and Background Color on page 224.
If a picture contains an alpha channel, it will be used for trimming. If a single-color margin is then left over, it will also be trimmed away if it corresponds with the trim color.
By selecting Edit / Trim Options..., you can specify under Sides whether all four edges
of the picture should be trimmed. If, for example, you leave the bottom edge out, the typical scanner edge will remain there.
If the scanned edge is not quite one color, you can increase the Tolerance. The larger
the entered value, the “more lenient” GraphicConverter will be about patches in the scanner edges, for example. The correct value will have to be determined a few times by trial
and error. However, before you spend a long time doing this, just use a selection rectangle.
118
When you use different colors in the edges, two Additional trim colors can be defined
for the current background color. This option is only available for pictures with millions of
colors.
Rotate
You can rotate pictures in 90 or 180-degree steps without quality losses. You will usually
need this option when you scan a particularly large image and have turned it fit on the
scanner. Picture / Rotate opens a submenu where you can selected a series of options
for rotating. The rotated “A” indicates the position of the picture or a selected part of the
picture after it has been rotated.
If a picture is leaning slightly, you should turn it in the scanner and scan it again to obtain the best possible quality. If you no longer have the photograph or the picture was taken with a digital camera, you can rotate it with the options at the bottom. Other Value
with Line changes the mouse cursor to a cross. You can then drag a helper line along a
line in the picture that is supposed to be “straight”.
Zoom into the section of the picture where you want to drag the line using the magnifying glass. Drag the helper line from top to bottom, for example, starting at the corner of a house. At the end of the helper line, an arrow shows the direction in which the
picture is turned. The picture will be rotated as soon as you release the mouse. The closest alignment is always selected when rotating. The helper line does not stay in the picture.
Other Value with live Rotation is immediately shown rotated in a rough preview. A
grid made up of helper lines will be displayed for easier orientation. Select Live Rotation
Options... from the same submenu to remove the grid or to change the Color and Distance of the lines.
119
Click and drag a vertical line moving the mouse to the left and right until the edge of
the house is straight and then let go of the mouse.
The houses in the following example are leaning to the left.
Choose a long vertical house wall. Make sure it is as close to the center as possible because lines near the edges of the picture tend to be distorted by simple lenses and zoom
lenses. This effect is increased when you take pictures from above or below the subject.
120
The mouse cursor turns into a cross with a hole in the center. Through this you can see
whether your line is running along the edge from the brightness of the pixels. Use this
hole at the start and end of the helper line to rotate the picture as accurately as possible.
All angles on the helper line that deviate less than plus or minus 45° from vertical will be
aligned vertically. All angles that deviate less than plus or minus 45° from horizontal are
aligned horizontally. You can therefore also choose a line in the picture that should actually be horizontal.
The edges of the picture may need to be cropped after rotation as the corners will now
stick out over the original frame.
GraphicConverter enlarges the picture automatically so that the white borders can be
added. You can freely select the color for the borders with the background color. Use the
selection lines to mark out the picture area to be trimmed and double-click inside the
rectangle or press Return. Selecting File / Trim Selection (see Trimming page 117) also
has the same results.
Trimming loses parts of the picture. This cannot be avoided. Select the area to be trimmed carefully so that you do not cut out any important parts of the picture.
121
This is our finished rotated and trimmed picture.
Please note that horizontal lines only really need to be horizontal if they have been
photographed head on. Objects are usually depicted at an angle from the side. In our example picture, the front roofline of the houses and the edge of the quay are on a line that
should not be rotated to horizontal. Therefore you should use mainly vertical lines as orientation points.
Furthermore, when using the Rotate option, note that picture quality and sharpness is
lost on angles that are not 90° or a multiple of 90°. You should only rotate low resolution
pictures by 90° or 180° if possible. It is therefore a good idea to sharpen the picture again
after rotating (see p 124). If the angle is not a multiple of 90°, an even better way would
be to scan the picture again, placing it at the corresponding angle in the scanner. Do not
rotate the picture several times. Return to the original version by selecting Edit / Undo
and try again.
The Other Value with Line… and Other Value with live Rotation... options do not
open a dialog at present. Drag the helper line across a line in the picture that should be
122
vertical or horizontal. A dialog where you can check or modify the angle and the algorithm opens.
GraphicConverter’s own algorithm is a lot slower, but provides better results than
QuickTime. Enabling Error Correction allows it to be further optimized. If you select
Add Alpha Channel, an alpha channel with the picture is created without the corners added by the rotate action. This alpha channel can be used in DTP programs to hide the corners, against a colored background, for example.
Auto crop white margins (for small angles) trims the picture automatically after small
rotate procedures.
You can use Other Value... to enter an angle by which the picture should be rotated.
The same dialog as for Other Value with Line… opens (see above).
Since positive values are used to indicate counterclockwise rotation in mathematics,
GraphicConverter also follows this principle. Negative values, for example –0.7, will therefore rotate the picture clockwise. It is only worth rotating by an angle if you know the angle. Otherwise use the Other Value with Line option (see above).
The picture quality is not affected if rotated 90°, 180° or 270°. Larger pictures require
longer processing times as new coordinates have to be calculated for each pixel. You can
only rotate JPEG pictures, which you do not want to convert and edit, without losses
using the context menu browser: Select File / Browse Folder..., click the small picture
preview and then Control-click (hold down the Control key and click) the small picture
preview. The picture width needs to be a multiple of 16. This is normal, however, with pictures made using a digital camera.
The width and height of pictures are swapped in the EXIF information upon rotation.
This is only important if the pictures are transferred back to a digital camera and then displayed on a television, for example.
The loss of quality with JPEG pictures does not come from the rotation, but from opening and saving again as a JPEG because the file has to be recompressed each time it is
saved. The compression process causes a loss in quality. Therefore it is always best to save
123
JPEGs in TIFF format after editing and then only edit that file. If necessary, you should
only create a JPEG version once you have finished editing the file.
Two further options are available for pictures with 16.7 million colors when you rotate
using Other Value: Error Correction and Add Alpha Channel. The Error Correction option should always be selected because each pixel is calculated on the basis of the exact
color content of the source pixel. This improves the picture quality especially around the
edges.
The Add Alpha Channel option can be used to create an additional alpha channel.
This contains just the picture without the white borders that were added during rotation
as a kind of template. Once an alpha channel has been created, you cannot create another one. GraphicConverter updates the alpha channel after any further rotate processes.
An alpha channel is a further invisible level of the picture containing information on
picture areas and outlines. In professional DTP programs such as QuarkXPress 4 or
InDesign 1.5, this alpha channel can also be used to hide the white borders.
Unsharp Mask and Sharpen Edges
If you are using a budget scanner or unfocused pictures, it is always necessary to sharpen
the scanned pictures. In the Effect menu GraphicConverter has the Unsharp Mask and
Sharpen Edges... options. The Sharpen Edges option has been available in GraphicConverter for a long time and results in slightly more defined lines than the newer Unsharp
Mask option. We recommend that you always use the Unsharp Mask option first and
only use Sharpen Edges if you are not happy with the results of Unsharp Mask. Always
select zoom level 100% when you are using Sharpen Edges as you can often not see problems at lower zoom levels.
Sharpening always converts the pictures to 32-bit pictures because considerably better
results are obtained in this way. The only exceptions are black and white and grayscale
pictures. If you want a different color depth, you can select 16 bit, for example, with Picture / Colors.
124
Unsharp Mask
Select Effect / Unsharp Mask... and try the value 60 first. Switch to full-picture preview to
obtain a better impression of the result. One good practical tip is to move the dialog to
the lower right-hand corner of the screen so you can see more of the picture.
Select 1 as the standard value for the Radius and 0 for the Threshold. Some pictures require a high level of sharpening. At a value of 160, there are normally no problems with
unedited scanned pictures. Just increase the value until you cannot see any more faults.
Sharpening involves increasing the contrast of neighboring pixels. If you increase the
Radius, more pixels will be incorporated in the process giving coarser results. You should
therefore leave the radius at 1 in most cases.
If you increase the Threshold, the sharpness is reduced because the contrast of neighboring pixels is only increased if they are more different than those at the edges. Therefore keep the standard value of 0 for normal pictures.
On slow computers we recommend deactivating the Full Screen Preview while you
adjust the slider for the value.
The Before / After display helps you find the best sharpening value. The After window
shows the effect of the current setting. In the Picture window, you can change the picture section displayed in the Before / After windows.
The function has been given a name from traditional printing, which may not seem appropriate. The sharpness is optimized using a mask, which more or less masks off the unsharpness.
125
Sharpen Edges
Effect / Sharpen Edges allows you to set the extent of sharpening with a percentage value. Select a value at which you think the picture is sufficiently sharp without spoiling the
picture. If the sharpening is too high, lines are formed on the edges of color areas, for example. Try a high value like 90% first and then a low one like 15% and then keep trying
until you find the best.
Keep the character of the picture in mind so that the sharpened picture is not totally
different to the original. This rule does not apply to unfocussed pictures. If the photograph is blurred, sharpen it as much as possible. You will rarely need to sharpen pictures
by 200% or higher. The Before / After display helps you find the best sharpening value.
The After window shows the effect of the current setting. In the Picture window, you can
change the picture section displayed in the Before / After windows.
The Diagonal option provides an alternative sharpening method that sometimes has
better results than the Normal option. Higher values for diagonal sharpening can often
cause a distancing effect. This can be used as a stylization filter.
126
Enhance Local Contrast
Effect / Enhance Local Contrast... allows you to increase the contrast of suitable pictures
without the contrast becoming too harsh. A dialog where you can enter the values for the
radius and the value opens.
The basic technique here involves an extremely unsharp copy of the image being created that is used as a mask to compare the original and a version with greatly increased
contrast with each other. Normal values for Amount are 130-200% and 0.5-1.0 pixels for
the Radius. You will find further information at:
http://www.cambridgeincolour.com/tutorials/local-contrast-enhancement.htm
127
Brightness and Contrast
The brightness and contrast need to be adjusted for almost every picture. Select Picture /
Brightness/ Contrast... to open a dialog where you can quickly access these functions.
Unless you want to correct individual colors, select the Link Sliders option. This links
each set of three sliders for brightness, contrast and hue. When you move one of them,
the other two will move as well. In this way, you can adjust the brightness of all three primary colors at the same time.
A reduced version of the dialog is available under Picture / Simple Brightness/Contrast... for use with small monitors. You can also fine tune the sliders in other dialogs
using the left and right arrow keys once you position the mouse cursor somewhere over
the slider.
With dark pictures, you could try increasing the brightness by about 7-30%, for example, and select higher or lower values if necessary. Your eye is the best judge. Make sure,
however, that the picture does not lose its basic character and no faults such as patterns
128
appear in colored areas. Bright areas should not become white as can easily happen with
portraits. You should also avoid making a picture seem flat after brightening.
The left-hand picture window shows the whole picture with the selection rectangle.
The center picture window shows the section selected with the rectangle enlarged. The
zoom level can be infinitely adjusted with the slider underneath. The right-hand picture
window shows the picture section with the set brightness, contrast and color values.
Click OK to display the whole picture with the new values.
Practice often shows that you can only determine the best values by trial and error. It is
helpful here if you can repeat this step for another picture once you have changed the
brightness, contrast or color. Click Set Last Values to set all sliders in the dialog to the
same position as in the last process.
In some cases, you may have to make a picture darker. Make sure here that dark picture
areas do not become totally black unless you want to use this as stylistic effect.
If you want to keep an eye on the original image while changing the brightness, you
can open a copy of the image in a new window with Picture / Duplicate before opening
the brightness dialog . If you arrange the windows next to each other, you can compare
them more easily.
You can use Saturation… to intensify or tone down the colors. If you want to make a
picture postcard, you can make the sky as blue as you want with this option. Increasing
the saturation is normally worthwhile with scanners which produce pictures with little
color. If your scanner software has an automatic color correction option, you should enable it. As a rule your eye is the best judge.
Full Screen Preview allows you to display a preview of the whole picture if you have a
fast computer.
Black and white pictures, which are printed using the offset method, should be set
slightly brighter as the printing ink soaks into the paper and spreads widthways. As a result, the pixels become larger and the picture darker. To avoid this effect, set the brightness about 4-7% higher than the best screen display. The value depends on the dot gain
of the paper used and should be discussed with the printer’s shop. The dot gain also
needs to be taken into consideration with color pictures. Black and white pictures are
“more sensitive”, however, and even professionals sometimes make them too dark or too
light.
129
Operator
It is fastest to edit images with the operator. Click the oval button at the top right of the
window when a picture is open to display the operator.
If you want to process several pictures in a folder one after the other, correct the image
with the sliders and click Save & Next. You can use the left and right arrow keys to fine
tune a slider once you place the mouse cursor over that particular slider.
You can use Last values or the space bar to call up the values from the last picture
again quickly if a picture needs a similar correction to the previous picture. The image can
be saved with File / Save or Save as.... On large monitors, a slider for the gamma value is
also displayed. Many pictures taken with digital cameras appear better if the gamma value is reduced to 0.97 or 0.93. Delete & Continue deletes the current picture and goes to
the next one. Label shows the current label and allows you to select another label.
130
Before you work with the operator, you should select the settings by clicking Options....
Select current image in browser helps you find the image you last edited in the browser if you have been working on several pictures.
You can use Change label after save to to recognize edited pictures more easily.
Back and Forward save image if modified allows you to save and scroll to the next
picture even if you are moving backwards through a folder. You can also use Save & Next
to save and switch to the next picture. Select the Format and whether you want to save
to the source folder.
If the target format is this same as the source format, the source image will be overwritten. Saving to a sub-folder avoids overwriting originals.
Save to source folder and copy original into sub-folder first copies the original into a
subfolder named “Original Files” and then saves the edited version in the source folder.
Save onto desktop saves the files on the desktop.
Disable Show grid during rotation to hide the grid while rotating images.
Crop white areas of rotation before saving trims the image to a centered rectangle
before saving. The cropped version is not displayed. If you would rather crop by hand,
you can rotate the picture with one of the rotate options under Picture / Rotate and then
crop it. The rotate options under Picture / Rotate allow you to rotate images more than
10 degrees.
131
Resize window upon show/hide of operator enlarges the bottom of the window by
the height of the operator when you display it. The window is made correspondingly
smaller when it is hidden.
To quickly access the edited versions of your pictures via the left-hand column of the
browser, we recommend copying the originals into a subfolder before editing and then
overwriting the files in the parent folder. It is worthwhile keeping the originals as, even if
you are experienced, you may occasionally increase the contrast and saturation etc. too
much. In such cases, it is best if you open the original and save it in the parent folder after
editing it again.
You can use File / Save or Save As... to save the preferences from the Operator. The picture is not saved here for technical reasons. If you close the window, you will need to click
Don’t Save in the subsequent warning message. The picture will have been saved, however.
Color Correction
Picture / Curves allows you to correct the colors and contrast of an image.
132
The following example picture has a blue cast.
133
In the pop-up menu, select the curve for blue, click the centre and drag the centre to
the right slightly down towards the lower right corner. Select the curve for green and also
reduce the green level slightly. The result looks warmer and more realistic.
If you select All, you can set the contrast of the image. Add further points to the curve
as necessary by clicking to create, for example, an s-shaped curve. Deviations from the
diagonal starting line towards the right reduce the intensity while deviations to the left
intensify the brightness or color. The gray shading on the edge of the grid shows that the
lower or left-hand sections of the curve are responsible for the dark areas of the image
and the upper or right-hand sections of the curve for the light areas of the image.
Open... allows you to use PhotoShop-compatible ready-made curves or to open curves
that you yourself have saved.
You can also correct the colors in the Picture / Brightness/Contrast... dialog. Either set
the Saturation higher or lower or adjust the color balance with the individual sliders for
the Hue. To remove a color cast, you normally have to clear the Link Sliders option.
Try setting the slides to various different positions. There is no single ideal mixture. A picture with too much red can sometimes be “rescued” best using the sliders for green and
blue depending on the character of the picture. Small values less than plus or minus 10 nor-
134
mally suffice. For a better overall impression, try the function a few times. If you do not like
the results, you can reverse the change with Edit / Undo.
Color Profile with ColorSync
The ColorSync program, which needs to be installed as a system extension under Classic
Mac OS, is responsible for the correct reproduction of colors on screen and on print-outs.
ColorSync is part of the system in Mac OS X.
Color profiles change the colors so that they are displayed and printed correctly. The
data of the image files is not changed. Most digital cameras use the sRGB color model.
This color model is entered in the EXIF data of the images. Even if a profile file is not attached to the picture, GraphicConverter recognizes the color model and displays the image
automatically with the sRGB profile. The ColorSync profiles only of TIFF, JPEG, PNG and
PSD format pictures are evaluated upon opening.
You should enable the Use ColorSync color matching option under File / Edit Color
Profile.... You can also enable and disable ColorSync in the lower frame of image windows by clicking the circle with the four colors.
135
If an image does not contain a profile nor EXIF information or if the EXIF information is
Uncalibrated or does not have a standardized entry, you need to decide yourself how GraphicConverter should proceed. Select one of the three options in the large pop-up menu
at the bottom of the dialog:
1. Ask if the image has no profile
With this method, GraphicConverter shows the following dialog when an image is
opened:
This method is recommended if you open very different images. If you know that the
image is from a digital camera, it was accidentally saved without EXIF information and
the profile was not incorporated, select the sRGB profile as the Source in the pop-up
menu. If you know for sure that the Adobe RGB color model was used for pictures taken
with the digital camera, select Adobe RGB. You will find further information on Adobe
RGB further below.
If you know that the image was scanned in, for example, and a profile was not added by
the scanner software, click the Assign no Profile button. If your scanner is calibrated,
select the individual scanner profile.
If you are working with pictures from the Internet or screenshots and other unprofiled
images, click the Assign no Profile button.
2. Assign the default profile if the image has no profile
If you always have the same work situations, you can set the Assign the default profile if
the image has no profile option from the pop-up menu. If an image contains Uncalibrated as the EXIF information or another entry that does not correspond with the standard
like Adobe RGB, for example, the profile defined for EXIF uncalibrated will be used. Click
Change... to select a different profile.
The color profiles are located in the User / ˜ / Library / Application Support / GraphicConverter / Profiles folder. The tilde stands for the name of the user. After installing GraphicConverter, only the AdobeRGB1998.icc, CMYK.icc and sRGB.icc profiles are available
at first. When you open an image with a color profile that GraphicConverter does not
know yet, it will be saved automatically in this folder. You can use this option specifically
136
to save a profile from an image. If possible, select all existing profile files beforehand in
the Finder to recognize the new profile file immediately. If a profile is only available in
another program, you can add it to a test image there, save it and open it in GraphicConverter. Then delete the test image as it will probably be displayed with the wrong colors
because of the profile.
The profile defined for RGB is selected for RGB images without profile. Accordingly, the
profile defined for CMYK is selected for CMYK images without profile.
3. Do nothing if the image has no profile
Only select this option if you are sure that color profiles should not be assigned to any
images without profiles. When this option is enabled, there is no query and all images are
displayed without profiles. Images from a digital camera with Adobe RGB, for example,
are displayed in the wrong colors with this setting.
Image appears black
If an image appears black, this is normally caused by a faulty color profile. Click the circle
with the four colors at the bottom of the picture frame to disable ColorSync. Now the
faulty color profile is no longer applied and the image should be displayed correctly. In
this case, delete the faulty color profile file and, if necessary, correct the settings in the
File / Edit Color Profile... dialog. You will find the color profile file in the folder: User / ˜ /
Library / Application Support / GraphicConverter / Profiles. The tilde stands for the
name of the user. If you cannot replace the deleted profile file with a backup, open an
image that contains the profile. GraphicConverter automatically saves the profile in the
Profiles folder.
Pictures for the Internet
Whenever you are preparing pictures for the Internet, you can leave ColorSync enabled if
you enable the Merge color profile into image (for web usage) option when saving
with the file selection dialog. Internet browsers display images without profiles therefore
you have to merge the profile corrections into the image.
How color profiles work
It is easiest to understand how color profiles work if you imagine that a scanner makes
the red hues too weak among other things. A scanner profile will increase or change the
red hues and all other hues that have been altered accordingly. The result is a corrected
picture. You need to attach the scanner profile to the scanned picture by selecting it via
the Source pop-up menu while the picture is open. Some scanning programs attach the
profile automatically. The profile will not need to be assigned manually in this case.
137
There are also differences in the way various monitors display colors. Color hues that are
not displayed correctly can also be corrected with a profile. A simple monitor profile can
be created under Mac OS X in the Monitors section of the System Preferences.
Monitor profiles can be improved considerably if you connect a color analyzer to your
monitor and create the profile using the special software provided. You will not have to
worry about the monitor profile after that. GraphicConverter shows it in the color profile
dialog to help you. The monitor profile is not saved together with the image file. It corrects the monitor display in the background.
If you want to work professionally, you should ensure that the lighting in your office always has the same brightness. Black out the windows and use fluorescent tubes with D50
rating. Paint the walls white or gray and lay white or gray carpet or flooring.
Adobe RGB
If you selected the technically better color model Adobe RGB on your camera when taking the pictures, Uncalibrated will be entered as the color model in the EXIF information
by most cameras as the Adobe RGB EXIF standard is not supported. If, however, Adobe
RGB was entered as the color model in the EXIF information by another program such as
the software that came with your camera, this is not standard and GraphicConverter will
treat it as if Uncalibrated was entered.
In order to display pictures with Adobe RGB correctly, select File / Edit Color Profile...
from the menu. In the dialog that opens, click the button next to EXIF uncalibrated and
select the Adobe RGB profile. If you work with the basic setting Ask if the image has no
profile, select the Adobe RGB profile from the pop-up menu in the dialog that opens. If
you use a different color model to process pictures with Uncalibrated entered as the color
model in the EXIF information, you need to select the corresponding profile.
Printers and Scanners
Select the printer or output device from the Printer pop-up menu. If your printer prints
the green hues too weakly, they will be amplified by the profile. When you install the software for your printer, the profile will also be installed automatically and be available in
the Printer pop-up menu.
If you are using a modern professional scanner, you should create a separate profile and
assign it to the scanned images via this dialog. You need to scan a special color sample
template for this and calculate a profile with a special program. The supplied scanner profiles often do not match up and make the results worse.
We recommend using the ScanPrint program from Calibr8 (www.calibr8.com), which
comes with a color sample template, to calibrate scanners and printers. Create your own
printer profile for each paper type. We advise only using original ink cartridges. If you use
inks from other manufacturers, you will have to create separate profiles for them in addi-
138
tion. Enter the name of the printer, ink and the paper in the filename of the profile. Do not
use paper with chemical bleaches as the colors will be perceived by the human eye differently to a scanner. The scanner is involved in the creation of the printer profile as it has to
scan in a printout of a second color sample template. The ScanPrint AUTOPILOT program
then calculates the profiles using the two scans.
ScanPrint is a professional product, with which you can also calibrate low-cost equipment. If you are having problems with the color differences between the scan template,
ScanPrint is the right program for you. ScanPrint is not exactly cheap, but it is among the
best basic programs for color profiles and is easy to use.
Under Classic Mac OS, select the profile for the monitor in the ColorSync control panel
and, under Mac OS X, in the ColorSync section of the System Preferences, which you
can reach via the Apple menu.
Select the profile from your print shop as the standard profile for CMYK, see p 152 onwards. This profile is not simply assigned to the images, instead it defines the color model
to which the image is converted. This is the only way to minimize light and bright colors
becoming pale when you switch the mode to CMYK. The profile is attached to the pictures automatically upon saving.
The profile selected here is also used for CMYK images that do not have a profile. If another profile belongs to the picture, the colors will be displayed incorrectly. We therefore
recommend the setting Ask if the image has no profile. If in doubt, ask which profile
should be used with the image and select it in the Assign Color Profile dialog.
You should only change the Priority if you are familiar with special color management
issues.
Mac OS 9: The Edit Color Profile... is only available if you are using ColorSync 2.6.1 or
newer under Classic Mac OS. You will find the latest version of ColorSync on the Mac OS 9
system CD. If you only want to install ColorSync and not the whole of System 9, you do
not have to boot from the system CD as is necessary for full installation. Instead open the
Software Installation folder, then the ColorSync folder and start the ColorSync installer.
You will find the Software Installation folder in the bottom section of the CD window by
scrolling down. Please see the ColorSync documentation for further information on working with ColorSync.
Selection
Modifications are often only applied to part of a picture. In these cases, you need to define a selection. You can cancel a selection with the Escape key. You can select using the
lasso, one or more selection rectangles, selection ellipse or the Magic Pen. Click exactly
on the borderline of a selection to move the selection frame without the contents.
139
If you would prefer to click the selection to move the selection frame instead of having
to aim for the frame, you can enable this in the Preferences under General / Edit using
the Swap move selection with / without content shortcuts option.
You can make several selections by holding down the Shift key. If selected areas overlap, they are joined in a larger selection, which can then be “L” shaped. All combinations
are possible even with regular and irregular shapes. The pixels under the borderlines belong to the selection.
Use Command-A or Edit / Select all to select the whole picture. With Hi or True Color
pictures, only the selected picture sections will be edited. Adjustments to the brightness
and contrast always affect the whole picture if it has 256 or fewer colors because the
number of colors would otherwise increase.
If you want to copy part of a picture and paste it into another one, select the required
area and copy it with Command-C. Now switch to the destination picture and paste the
selection with Command-V. The selection is pasted at the mouse cursor and you can
adjust its size at the corners by holding down the Command key. If you hold down the
Shift key at the same time, the proportion will be maintained. You can move the selection
to the desired position with the mouse and the arrow keys.
Select Picture Content selects just the actual picture without any single color margin.
This kind of margin is often created when the rectangle used in the scanner software to
select the area to be scanned is made larger. If the picture has a different structure than a
picture with a typical black margin, for example, an error message will be issued. The
background color is used as the search color for the margin.
In the context menu, you can use Count Pixels of Selection... to display the number of
pixels in a selection.
Selection Tool
Rectangular selections can be made with the selection tool at the top right of the toolbox. If you cannot see the toolbox, you can call it up by selecting Window / Show Toolbox from the menu. Hold down the mouse button and drag the cursor to form a rectangle. Older computers or slower graphics cards will need a short time to draw the rectangle. If necessary, wait a moment at the target position. An elliptic selection can be made
with the Elliptic Selection tool, which is under the lasso. Holding down the shift key at
the same time creates a circular selection.
The size and thus indirectly the position of a rectangular selection can be changed
using the handles. Hold down the Command key to scale the contents of the selection. If
you hold down the Shift key at the same time, the selection will be scaled proportionally.
Selections that were scaled out of proportion are then set proportionally again.
140
You can edit the contents of the selection, for example, with the Brightness and Sharpen Edges options or cut, copy, delete or move the selection. In the Edit menu, you can
choose whether one of the colors should be transparent.
You will normally want to select a section of a picture and overwrite existing picture
content when you move it to its destination, as if you were fixing a sticker there. The selection will appear semi-transparent (translucent) while you move it to help you find the
position. This function can be disabled via Edit (Mac OS X: GraphicConverter) / Preferences in the General / Edit section. The selection is then displayed as a frame while you
move it.
If you want to copy the selection as you move it, click the contents and only then press
and hold down the Option key.
Prior selection of an aspect ratio for the selected area is intended for editing of pictures
from digital cameras in particular. You can set a specific aspect ratio at the bottom of the
toolbox using the None pop-up menu.
Pictures taken with digital cameras normally have the same aspect ratio as a monitor,
i.e. about 3:4. Prints from photo labs, like the ones you can order on the Internet, have the
standard aspect ratio of 2:3 as with postcard-format photos, for example, 10x15 cm.
Some labs therefore offer you the choice of having the picture trimmed at the top and
bottom or leaving the whole picture with white margins on the left and right.
You should decide for each individual picture. Once you have chosen a trimming method, it is a good idea to specify where the trim should be made. Select the corresponding aspect ratio from the None pop-up menu. Drag a rectangle across the picture and
position it with the mouse, if necessary, by clicking the line between the handles.
Define User-defined... allows you to define an aspect ratio yourself.
Select User-defined... from the same pop-up menu to use your self-defined aspect ratio. Refer to the chapter Cropping for Photo Prints from p. 99.
For a 10x15 print your selection should be at least 1800 pixels wide, portrait pictures
should be 1800 pixels tall. 1200 pixels will also do, however. The Position palette shows
you whether the pixels are sufficient with the colors green, yellow and red. Yel-
141
indicates that the pixels are just about sufficient for the selected
low
format. When red
appears, you should make the selection bigger and
when green
appears, you’ve got it and you can trim the selection by
double-clicking the selection or pressing Return.
In some cases, you may want to set a color in the selection to transparent at its destination instead of fixing it like a sticker. If, for example, you copy a red “Z”, which is on a white
background, the white can be defined as a transparent color. As a result, as soon as you
start moving it, the white background around the “Z” in the selection becomes transparent and you can see the picture behind it. Even after pasting in the required position
only the red “Z” remains. The white background is no longer there.
To achieve this effect, open the following dialog in the target image by double-clicking
the selection tool in the toolbox. Select the Transparency tab and enable the Copy Selection Transparent option.
You can call up a similar dialog by double-clicking the elliptic selection tool.
Use Transparent Color to select the color, which should be set to transparent when
you move and paste the selection. Click the color box to pick the color with the color selector or click outside the dialog on a picture section with the color. The mouse cursor will
automatically turn into the eyedropper. With pallet pictures, the color can be selected in
the displayed pallet.
If the color set to transparent should also apply to the subsequent move process or subsequent paste of a picture part, Save to Preferences needs to be enabled. If the current
background color is to be the transparent color, click Set Back Color.
In the following example picture, the “Z” against the white background was created in a
separate picture. The whole picture content was selected with Command-A and copied
142
with Command-C. In the target picture with the bridge, the clipboard contents have been
pasted with Command-V and placed in the top left-hand corner. The Copy Selection
Transparent option was disabled this time.
The selection was cleared with the Escape key (esc). The Copy Selection Transparent
option was enabled again and the “Z” pasted from the clipboard again. White was selected as the transparent color. With this setting, the white background of the letter “Z”
turns transparent and, our example, you can see the blue sky around the “Z”.
As long as a moved selection is not yet placed at its destination, this effect can still be
enabled or disabled using Copy Selection Transparent. Only the Copy Selection Transparent setting is decisive when you insert part of a picture from another picture.
If you want the insert also to be transparent so you can position it accurately with the
cursor keys, you need to enable the Copy with other Opacity option in the selection tool
dialog and enter a value around 50%.
143
No matter what you set for transparent copying at the bottom of the same dialog on
the Selection tab, you have the option of defining a selection more precisely than with
the mouse.
Enter the top left corner and the width and height of the selection. Alternatively you
can enter the distance of the right-hand edge of the selection from the left edge or the
distance of the lower edge of the selection from the top edge with Right and Bottom instead of the width and height.
You can drag and drop from one picture to another. If you select the Drag into top left
of new window option in the General / Edit section of the Preferences, the selected picture section will always be pasted in the top left corner of the target picture, no matter
where you let go of the selection over the target picture. This is useful, for example, if you
want to add a copyright note to several pictures.
Lossless JPEG cropping
If you just trim a JPG image without editing it and then save it again in JPG format, you
will lose a slight amount of picture quality as the picture is compressed again. You can
avoid this loss in quality by selecting the selection tool for lossless trimming of JPEGs at
the bottom right of the toolbar.
Now if you drag open a selection, it will include all 8 pixels in the width and height. You
cannot change the size or position of this selection. This is necessary to fulfill the definition for a JPEG image with optimum compression. If you want to drag open the selection
again, you will have to close the picture and open it again.
144
Do not trim the image as usual with return or by double-clicking the selection, instead
select File / Save As.... The Save only selection will already be enabled at the bottom of
the file selection dialog that opens.
Click Options.... The following dialog opens:
If you select Copy all existing metadata, there will be incorrect size specifications in
the EXIF information and the EXIF preview will not be updated. We therefore recommend
selecting Rebuild metadata. In the area below, you can enable and disable individual
areas of the metadata. Disabled areas will not be written in the new file. Click OK and
Save in the file selection dialog to save the trimmed JPG file without losses.
145
Double-clicking this tool opens the dialog with the options for lossless trimming.
Instead of dragging open a selection with the mouse, you can enter the size and position directly here. The values you enter will be rounded up to values that are divisible by 8.
Lasso
If, for example, a person’s face is only partly in the sun, this area will almost always be too
light. If you do not have another photo, you can make things easier by clicking the Lasso
at the top left of the toolbox (you may need to select Window / Show Toolbox first) and
drawing around the area while holding down the mouse button. Only closed shapes can
be defined with the lasso. If you release the mouse button before you have returned to
the starting point, a straight line will be drawn to the starting point. This effect can be
used whenever you do need a straight line. You’ll need a steady hand for work with the
lasso. Small deviations in the surrounding dark area can be tolerated. Now use Picture /
Brightness/Contrast to darken the area of the picture which is too light (see page 128).
It is a lot easier to draw around areas if you set the zoom level as high as possible and
use a professional mouse that has a click-lock function enabled in a control panel. With
this function you only need to click once, let go of the button and then you can work as if
you were holding down the button.
146
When you move a selection made with the lasso, one color can defined as transparent.
You can reach the corresponding settings dialog by double-clicking the lasso in the toolbox.
You will find detailed information on this in the chapter on transparent copying and
pasting with a rectangular selection from page 140, as this works in exactly the same way.
Magic Pen
The magic pen is the second down in the right-hand column of the toolbox (you may
need to select Window / Show Toolbox). If you click this tool, you can select all adjoining
picture sections that have the same color with a single click. To also select parts of the
picture that are not joined, use Shift-click.
A tolerance value can be defined for the Magic Pen. All pixels that do not differ from the
clicked pixel more than the set tolerance value are selected.
In practice, you will need to try a few times to find the right value. If an even blue sky is
to be selected, a low tolerance of about 10 will be enough. If a creased white shirt is to be
selected, the tolerance needs to be set a lot higher to about 70. This technique does have
its limits, however, and you will not always manage to select a reasonably single-colored
area properly with the Magic Pen. Don’t give up too soon though. Once you’ve mastered
the Magic Pen, you can definitely work faster than with the Lasso.
147
Polygon
If you want to define a selection exactly around an object, you can work with the Polygon
tool. Hide the Operator by clicking the oval button at the top right of the window if it is
displayed. Zoom as close as possible into the image and click along the outline of the object at short intervals to produce a line.
The smaller the intervals the more accurate the selection will be. You will not see a point
after the first click. It will only become visible with the line and the second point after the
second click.
Close the polygon by placing the mouse cursor over the first point and moving the
mouse slightly until the cursor changes to a crosshair. Now press Return on the keyboard
to close the polygon. As soon as the polygon is closed, it will behave like a selection
whose content can be trimmed, copied or moved. The position of the individual points
can now be moved with the mouse. Move the mouse over the point until a point appears
next to the mouse cursor and then move the point. You can also move individual points
before you close the polygon. You cannot add or delete any points later on.
Invert Selection and Fill Selection with Foreground Color
If you want to select everything except for one part of the picture, first use one of the selection tools to select the area and then select Edit / Invert Selection. The selection then
remains visible, but a further selection borderline can be seen on the outer picture edges.
Now everything between the outer and inner selection line will be selected. You can
make this clearer by highlighting the selection with Edit / Fill selection with foreground
Color.
Clearing and Recalling a Selection
You can delete a selection by pressing Escape (esc), selecting Edit / Unselect from the
menu or by clicking next to the selection with a selection tool. Use Shift-Control-click to
recall a cleared selection at the mouse cursor. If the mouse is near the edge of the window, the selection will be reduced so that it fits in the picture. To obtain exactly the same
148
selection as before the delete action, you should therefore place the mouse as close to
the center of the picture as possible. You cannot call-up a deleted selection automatically
at the same position.
Removing Red Eyes
The so-called red eye effect often occurs when you take snapshots with automatic cameras. You see the red retina in the eye instead of a black pupil because the flash shined directly into the eye.
You can use Effect / Red Eye to set the pupils to their normal black.
Often the pupil is very wide due to the dark environment and looks odd because the
rest of the picture has been illuminated by the flash. In this case, it is a good idea to use
the Effect / Red Eye Pro option that will be explained after the normal Red Eye option.
In the UB version of GraphicConverter, there is also a tool at the bottom of the toolbox
that you can use to simply paint over red eyes. However, when you use this tool, you may
paint over any reflections on the eye. This tool is particularly suited to painting over red,
white or other eye colors on animals as the other options in GraphicConverter only recognize red eyes. You can adjust the size of the tool with the slider on the bottom edge of the
image window or by pressing Shift and using the scroll wheel. Click the red or other-colored eye to make it black. If you have installed the USB Overdrive system extension, you
cannot change the size of the tool with Shift and the scroll wheel as this function is blocked by USB Overdrive.
149
Using the regular Red Eye option: Click the elliptic selection tool, which is second from
top in the left-hand column. Just select the red pupil with the slightly red pixels at the
edge and then select Red Eye.
GraphicConverter blackens the pupils with soft edges and keeps the reflection. You can
set the Darken Level selecting Effect / Red Eye Settings. For brighter red tones you
should choose a far higher value.
Repeat this for all other red eyes. Removal of red eyes is only available for pictures with
a color depth of 32 bit. You change the color depth to 32 bit if your pictures have a lower
color depth using Picture / Colors. If you want the pupils to remain light gray, use the option again. If the person is depicted from the side, it may be easier to define the selection
with the lasso. You will find the lasso at the top left of the toolbox.
The pupils of the people in the photograph are wide open because the room is dark.
Once you have removed the red eye, the results may still not be very satisfactory. We therefore recommend avoiding this problem when you take the picture. It is easiest to use a
flash that is as far away from the camera as possible. The flash will then illuminate a diffe-
150
rent part of the retina than picked up by the camera. Heavy flash guns ensure the best results, but because of their weight are not even used by press photographers today. A
flash fitted on top of the camera is normally enough to avoid the red-eye effect.
As the red-eye effect occurs more often at greater tele ranges, we recommend setting
the flash indirect by pointing the front part of the flash upwards.
The Red Eye Pro option darkens the pupil and reduces its size at the same time. Select
the red pupil and choose Red Eye Pro from the Effect menu. Nothing will happen at first.
GraphicConverter switches to a special mode similar to the elliptic selection tool. Select
the iris. The iris is the area around the pupil that is blue, brown or green. Once you have
made the elliptic selection, the pupil is darkened and made smaller. You can specify how
dark and how small the pupil should be (Reduce Level for Pro).
The Red Detection Level decides when a red tone is recognized as a pupil and blackened. It may be worthwhile setting the threshold value high in pictures with a lot of red
so that any parts of skin that you accidentally select are not darkened.
Select Effect / Red Eye Settings... and try different values out. You can use Red Eye Color to define a color to be set for the pupil.
If black is too dark, try a dark gray. Click the color box and change the color in the color
selector. If black was the starting color and the color circle is selected as the color model
at the top left, you simply need to push the slider upward to get a dark gray.
Reset allows you to reset the values and the color to the default settings.
The result of the Red Eye Pro effect may have faults that you can remove with the
stamp.
151
Stamp over the line from the outside to the center. Set the source point over and over
again by Alt-clicking the area around the line you want to stamp. The result will normally
not look so nice at high zoom levels. Once you switch back to a normal zoom level
though, the eye should look good.
Undo
If you are not happy with a change to a picture, you can reverse it with Edit / Undo. The
option you used last appears next to Undo, for example, Undo: Paint. You can also use
this menu item to check which option you used last. Edit / Redo allows you to reverse the
undo action. If you want to undo more than 40 steps, you have no choice but to reload
the last saved version of the picture by selecting File / Revert to Saved. The current version will then be closed without saving. To avoid mistakes, GraphicConverter will ask you if
you really want to discard the current version.
RGB and CMYK
Pictures cannot only exist in different file formats (for example, TIFF or GIF), but also in different modes. Scanners in the lower price segment normally return pictures in RGB mode, made up of the colors Red, Green and Blue. This mode is ideal for printing out on laser
or inkjet printers.
Effect / Channels / Split allows you to display a picture so that only the red part of the
picture is displayed. Scroll horizontally to the right to display the green part and blue part
or select a lower zoom level to display all three areas at the same time. Effect / Channels
/ Join reverts the effect.
Effect / Channels / Split into new windows allows you to split RGB or CMYK images
into several pictures each containing one channel. This is particularly useful with CMYK
pictures if the pictures are being prepared or checked for offset print. The individual
channels are opened in separate image windows that show the content of the channel as
a grayscale picture. You can join these single images from the color channels to make a
color image again by selecting Effect / Channels / Join.
152
Effect / Channels / Swap Red and Green sets all red pixels green and all green pixels
red. This is sometimes needed for infrared photo processing. Effect / Channels / Swap
Red and Blue and Effect / Channels / Swap Blue and Green swap the colors accordingly.
Effect / Channels / Optimize Blue Channel can improve the colors of some imported
RAW pictures.
However, if color pictures are to be printed by a printing shop, for example, using an offset machine, they need to be available separated in CMYK mode (Cyan, Magenta, Yellow,
Key). Key means black. Key was chosen instead of black to avoid confusion with blue. In
this mode the picture contains information on how much of each of the four printing colors is printed at what point. GraphicConverter can open and save pictures in CMYK mode.
If you want to separate an RGB picture, select the required profile under File / Edit Color Profile... with the CMYK Select Change... button.
The profile file takes the equipment used in the print shop into consideration and, above all, the paper used. You can obtain the profile file from your print shop. Copy the profile file into the folder: User / ˜ / Library / Application Support / GraphicConverter /
Profiles. The tilde stands for the name of the user.
153
Separate the picture file with Picture / Mode / CMYK Color. The selected profile file is
attached to the image file. The mode is displayed in brackets in the title bar of the picture
window. You can now save the file and use it in a program like QuarkXPress or InDesign or
forward it to a print shop. CMYK mode is only supported by the JPG, JPEG2000, TIFF and
Photoshop PSD formats. The TIFF format with the extension .tif (just one f ) without LZW
compression is used as the standard. Separating is also available as an action.
For professional work, you need to darken your work room and illuminate it with a standardized ceiling lamp. Your monitor and scanner need to be calibrated with a special tool
or special method. Repeat the monitor calibration on a regular basis and wait half an
hour before editing pictures on tube monitors so that the monitor becomes warm and
the colors are displayed correctly.
3D Effect
You can achieve a simple 3D effect for viewing with red/green glasses by opening a suitable picture selecting everything with Command-A and copying the pictures to the clipboard with Command-C. Cancel the selection with Escape. Then click Effect / Channels
and Move image as Grays into Red Channel in the submenu that opens. The picture
will now look red.
Select Edit / Paste and Paste into Green Channel from the submenu that opens. The
picture will now look yellow. If you look at it with red/green 3D glasses, it will look three
dimensional. You can check the success with Effect / Channels / Split. Select a lower
zoom level to display all three channels next to each other. The third blue channel remains empty and therefore appears black.
Transparent
For the Internet and also for printing, you may need pictures with transparent areas
through which something in the background is visible. The transparency can be achieved
using two different techniques: A transparent color can be selected for images to be used
on the Web and a mask is normally added to the image in an alpha channel for printing.
In both cases, first select the transparent area. The transparency tool is at the top of the
right-hand column of the toolbox (you may need to select Picture / Show Toolbox). If
154
you click a pixel with the transparency tool, all other pixels with the same color will be set
to transparent and displayed with a chessboard pattern. The picture areas do not have to
be connected to be set to transparent. By double-clicking the icon in the toolbox, you can
make transparency settings. If the display of the transparent color causes a problem, during your further work with a picture you can clear the Display chessboard pattern for
transparency option. The transparent areas will then be displayed as they appeared before.
Single-click Set Back Color to set the current background color to transparent. You can
click the picture to set another color to transparent while the dialog is open. The color
you select then appears in the Selected Color box in the dialog. All parts of the picture
with this color are selected.
Edit / Make Selection Transparent allows you to also make a normal selection transparent. For example, drag open a rectangular selection and select Edit / Make Selection
Transparent to make the area transparent.
Transparency for the Internet: The transparency is more or less a color, although a color that you cannot see. For example, if you generate an oval button in a normal rectangular picture against a white background, you can set the white background to transparent so the background of your Web page can be seen.
Pictures, in which one color is set to transparent, can only be saved in GIF89a or PNG
format. To save in GIF89a format, select Save as... and select GIF from the format list.
155
Now click Options... and select GIF89a. The other options in this dialog are freely selectable and not related to transparency.
There is also a dialog with parameters for PNG format behind Options..., but these are
not important for transparency.
Transparency for printing: You can create an alpha channel from a transparent area by
selecting Effect / Create Alpha/Mask Channel from Transparency. Pictures with an
alpha channel are normally saved in TIFF format. Layout programs like QuarkXPress and
InDesign recognize the alpha channel so that the corresponding areas appear transparent.
There is no tolerance setting for the transparency tool. If, for example, you want to set a
white background area with colored shadows to transparent, you can do so with the fill
tool at first or also set white later. Select white as the foreground colour and open the settings dialog by double-clicking the fill tool. Enter a value between 30 and 60, for example,
as the tolerance and click the areas of the image that are not completely white to set
them to white. Click the white area again with the transparency tool. The whole white
area will now be set to transparent. If you have already set pure white as a transparent
color, the area you set to white with the fill tool will immediately be displayed transparent.
The Mac OS clipboard does not support transparency. The transparent area is lost when
you paste into another picture. If a transparent area was created by an alpha channel, you
can use the clipboard or drag & drop between two windows.
If for example you want to copy a face from one image to another select the face with
the lasso and copy it to the clipboard to paste it with Command-V into the other image.
No transparency will be added. If you use drag & drop between two windows you need to
156
hold the shift key if you have selected Swap move selection with / without content
shortcuts.
Zoom
You can use the Zoom function to display pictures enlarged or reduced on the screen.
The output size of the picture is not changed by this. The window size is adapted to the
picture upon zooming if possible. This function can be disabled with Resize window after scale/zoom in Edit (Mac OS X: GraphicConverter) / Preferences / General / Display
Windows.
You can select the zoom level using Zoom in the Picture menu. It is faster in most cases
if you select the zoom level at the bottom left of the picture frame.
There are various possibilities here. You can select the number and overwrite it with the
required zoom level. You don’t have to enter the percentage sign. Press Return to complete your entry.
Single-clicking the black triangle next to the zoom level opens a pop-up menu where
you can select zoom levels. This menu is exactly the same as the one under Picture /
157
Zoom and can also be called up by clicking the picture while holding down the Control
and Option keys.
Some of the zoom levels have decimal places because the picture quality is particularly
good on the screen with these values. Most other values have to be rounded up. This is
why there can be unsharpness and step effects especially along diagonal lines. This problem only affects the screen display and does not have an effect on the picture. You get
the best picture display with zoom level 100%.
You can zoom very quickly by pressing Command key and + (plus) or Command key
and - (minus). If you want keep your right hand on the mouse, you can zoom into the picture by holding down the Command key and spacebar and then clicking it. You can then
zoom out by clicking it while holding down the Option key and spacebar.
The View at Original Size option in the Zoom menu enlarges or reduces the picture so
that it appears on the screen the same size as when printed out except for slight differences. However, your monitor needs to be set to the respective standard resolution.
On a 15-inch monitor that would be 640x480, on a 17-inch 800x600 and on a 20-inch
1024x768 pixels.
To enlarge a picture to fill the screen, select Picture / Zoom / View at Maximum Size. The
Picture / Full Screen option is similar, except that it hides everything but the picture. The
picture appears at the current zoom level on a black background. You can quit this mode
by clicking or pressing a key.
158
The View as Proportional... option opens a dialog where you can enter the required
zoom level.
You can use View as Non Proportional... to display a picture distorted by just changing one of the two values, for example. You can use this function to try out distortion effects. The distortion is only saved when you select Picture / Size and then Burn In and
then save the picture.
The Zoom Selection option is only available if a selection has been defined and zooms
the picture so that the displayed picture section is about as big as the current selection.
The top left-hand part is displayed, not the selection area. If necessary, scroll with the sliders or move the picture section with the mouse while you hold down the spacebar.
There are two icons in the window frame to the right of the zoom level, depicting a
magnification glass with a plus respectively a minus.
Clicking the small mountains switches to the next zoom level down and, accordingly,
clicking the large mountains switches to the next zoom level up.
You can use the magnifying glass to zoom in two ways. Click the magnifying glass in the
toolbox (you may need to select Window / Show Toolbox). If you click the picture with
the magnifying glass, it will be zoomed to the next level up. If there is not enough space
for the picture on the screen, the section of the picture that you clicked will be displayed
as centered as possible. If, for example, you want to enlarge a person’s face, click the face
until it is displayed large enough. To reduce, hold down the Option key and click the picture.
You can also drag a rectangle across the area, which is to be enlarged. The zoom level is
selected so that the rectangle content fills the window. The rectangle therefore automatically has the same proportions as the window.
If you select very high zoom levels such as 1000% to edit individual pictures, it may become difficult to see the individual pixels in single-color areas. You can therefore select
the Show pixel bounds options in the General / Edit section of the Preferences to display a thin black line around the edges of the pixels. These lines are not part of the picture
and are not saved in the picture file. The maximum zoom is 5000%.
159
Levels
Summary: By selecting Picture / Levels..., you can modify the levels for white, black and
midtones. Picture / Auto Levels has the same effect as clicking Both in the Levels dialog.
Each normal photograph contains lighter and darker areas. The levels form the path
between the lightest and darkest points. The further these points are apart, the better the
picture looks. Which brightness levels occur how frequently in the picture is shown in a
diagram in the Levels dialog under Input Levels.
The black point is at the left-hand end of the diagram. The white point is at the opposite, right-hand end. A purely black picture would have a maximum peak on the left-hand
side and would otherwise have a flat diagram. You can use the Auto: White, Both, Black
to optimize the level of a picture that, for example, is too flat. Automatic level adjustments do not normally produce the required result. Adjusting the Tolerance value allows
you to suppress undesired noise faults.
If the results in the preview are not satisfactory, you can undo all settings in this dialog
by clicking Reset. You can select a section of the picture for the Before and After windows using the rectangle in the Picture window. Move the selection rectangle with the
mouse and zoom to an appropriate zoom level. If you use the dialog frequently, you can
select the respective last value with the spacebar.
Select Apply to all frames if all pictures in a GIF animation should be optimized at the
same time.
160
If you are not an expert, it is easier to correct a flat picture with the Picture / Brightness/Contrast... option (see page 128). Increase the saturation and the contrast particularly for flat colors.
Colors, Mode and Colorize
Summary: Under Picture / Colors you can change the color depth of a picture to save
memory space, convert color pictures into black and white pictures or to create effects.
You can select the most important modes directly under Picture / Mode.
Sepia allows you to color an image as was common at the start of the 20th century.
Colorize... opens the Color Picker where you can select a color to color the picture after
you click OK.
To make a black and white picture out of a color picture, select Picture / Colors /
Grayscale. If the picture is a True Color picture (32 bit), the grayscale menu will lead to a
submenu where you can select the number of grays. You will only obtain a result without
losing quality with 256 Grays.
You can obtain the best number of grays for good quality by selecting Picture / Mode /
Grayscale.
If you want to convert just part of a picture to grayscale, select it with one of the selection tools and open the context menu. Select Convert Selection into Grayscale. If you
161
want to leave just specific parts in color, you can select them and then select Invert
Selection from the Edit menu. You thus create an effect like with partly colored in black
and white pictures. You can select several parts of a picture by holding down the Shift key
and dragging open other selections. For further information on selecting see p 139
onwards.
Enable the Dither option in the Picture / Colors submenu before converting to black
and white to improve the picture quality. After selecting Dither, open the menu a second
time and then you will see the Dither option indicated as enabled by a check. Now select
the required number of grays. Pictures with 16 or 4 grays use less memory, but are poorer
quality.
If you reduce the color depth from 32 to 16 bit, you will cut the file size considerably and
normally only lose a slight amount of quality. This reduction is only, worthwhile if the picture format supports 16 bit. PICT format supports 16-bit mode. In the next step from 16
to 8 bit, you will see a small or extreme loss in quality depending on the picture.
What is color depth?
Pictures can have different color depth levels. Black and white pictures without grayscales, for example, an engraving, have the shallowest color depth. Only one piece of information needs to be stored for each pixel: dot or no dot. Areas with dots are black, areas
without dots are white. The computer requires two characters, i.e. one and zero, to display black or white. Only a single-digit number is needed for each pixel, either one or zero. This single point is called a bit. Black and white pictures without grayscales therefore
have a data depth of one bit.
162
Color depth and the maximum number of different colors are related in the following
way:
Depth in
bits
Colors
1
2 (B&W)
2
4
4
16
8
256
16
32768
32
16.7 million
The number of colors is not the calculable maximum value because Macintosh computers only use 15 bit for 16 bit and 24 bit for 32 bit.
Dither
Even normal color or grayscale pictures can be converted into pictures with a color depth
of one bit. This technique is worthwhile when you want to create an effect or if the picture is to be reproduced using a photocopier. Some photocopiers have a photo button. In
this mode, originals are dithered during copying. This has a similarly good result as dithering and printing with GraphicConverter beforehand. Unfortunately the whole page is
dithered and thus also any writing that then becomes very unfocussed at the edges. Therefore, we recommend printing dithered pictures and then copying them. A lot of DTP
programs like QuarkXPress as well as printer drivers dither pictures automatically upon
printing. In this case a picture does not need to be dithered with GraphicConverter and
can be inserted in a document as a color or grayscale picture.
If you want to create an effect or dither a picture with a specific dither variant, convert
the color depth by selecting Picture / Colors and then Change to B/W (1 Bit). If the
Dither option is disabled under Picture / Colors / Options, with a threshold value of
50%, each lighter color is set to white, while all colors that are darker than 50% are set to
black. Always view 1-bit pictures with a zoom level of 100 % if you want to judge the qua-
163
lity as all other zoom levels hide the results too greatly. This applies in particular for reduced pictures. Here is an example of a conversion with a 50% threshold value.
The result is more of an interesting distancing effect, than a realistic photographic representation. If you like this effect, you can find the best threshold value using Effect /
Black&White / Threshold....
The dialog provides an overview, in which a selection rectangle can be set and moved
to display the before and after results. Zoom is for the example section. Please note that
the best threshold value should take the important light parts of the picture as well as the
dark areas.
164
To optimize the quality, we recommend enabling dither under Picture / Colors / Options. A standard dither pattern is now created according to special rules that suggests
grayscales as with a good color cast.
Alternatively you can use other dither patterns. The Floyd Steinberg dithering creates
particularly balanced pictures in which you can hardly see the structure. You can access
this option by selecting Effect / Black&White / Floyd-Steinberg. It does not matter
whether dithering is enabled in the Picture menu, or not. In our example picture, you will
notice the lines of dots in the almost white areas, while with standard dither the dots are
distributed evenly. The dither functions in the Effect menu return the results in a new
window. You can quickly switch back to the original picture if you are not happy with the
results and want to try a different dither option.
Atkinson dithering is even better with most pictures.
With Picture / Mode / Bitmap you create a 1-bit picture with standard dithering.
165
Ordered-Dither in the Effect / Black&White menu forms a pattern made up of
squares. You need to select the size of the squares in pixels from a submenu. Here is an
example of squares with 2x2 pixels.
If you select 4x4 pixels, the pattern will become accordingly coarser:
166
With 6x6 pixels, the squares are so large that their structure enters the foreground greatly. This impression only goes away when you look at the picture from a great distance.
You can dither a picture “correctly” with the Effect / Black&White / Dither... option. Various dither options are available. As the dither types have a different effect on each picture, you should try out several variations if you are not sure.
Each pixel in the source picture is displayed by a field made up of 4x4 black or white
dots, for example. The size of the field can be selected in the bottom part of the dialog.
The more pixels you select for the matrix, the larger the resolution of the picture in dpi.
The different possibilities for the field can be set in the dialog using Darken Linear and
Triangle to display the different lightness values of the pixels from the source picture as
best possible. The box on the top left has a black dot at the bottom left. Four of these dots
fit next to each other and above each other to fill the box. This box is used for a white or
almost white source pixel. White areas therefore have a slight grid pattern. The edges of
the picture are quadrupled as 4x4 dots are placed for each source pixel.
167
A totally black source pixel will be represented by a square made from 4x4 black dots in
our example. In-between values are assigned the closed field. As a comparison here is a
greatly enlarged section from a source picture showing an eye ...
followed by a 8x8 dithered version of this section using the Triangle option:
Dithering makes pictures larger as several dots are set in place of each source pixel. The
edges are four times as long with a matrix of 4x4. The size of the matrix indicates the enlargement factor. To avoid this, you can reduce the picture before dithering. After dithering, pictures can only be scaled with considerable quality losses.
168
Here is our example picture dithered with Darken Linear, a matrix of 4x4 and reduced
to quarter size beforehand:
So you don’t lose any picture information after reduction, multiply the resolution by the
same factor as you reduce. In our example, the original resolution was 300 dpi. Multiplied
by 4, this gives you 1200 dpi. You should enter this first in the Picture / Size / Scale dialog. Then enter a quarter of the picture height or picture width.
The Random Matrix normally creates relatively balanced results with less prominent
structures. This option is preset with a matrix size of 4x4 pixels. Here is an example with a
random matrix and 4x4 pixels:
169
Grayscale Pictures
As soon as you set 2 bit as the data depth for a picture you can display four different colors. Two digits need to be saved for each pixel. As only the numbers 0 and 1 are available
in the computer, 00, 01, 10 and 11 can be displayed. Each value stands for one of the four
colors that can also be grayscales. Black and white pictures of landscapes, for example,
are grayscale pictures. In terms of color depth, color pictures are not technically different
to grayscale pictures.
256 grays are required to display a normal black and white picture. Using Pictures / Colors / Grayscale, you can, for example, reduce or increase the number of grays for effects
or pictures with a low number of grayscales. Increasing does not change the picture noticeably, it can now display more grayscales after further changes, however.
Reducing the grayscales makes the picture file smaller. Greater reduction can save a
considerable amount.
Color Pictures
Color pictures look best with a color depth of 32 bit. In future, 48-bit pictures should be
used more. With 32 bit, 32 ones and zeros are written for each pixel. 16.7 million colors
can be distinguished. If you reduce the color depth to 16 bit, only 32768 colors can be distinguished. Please note that a difference between 16.7 million colors and 32768 colors
can only be displayed on your monitor if this is allowed by your computer.
The number of colors can be set in the Monitors & Sound control panel. If 32768
(thousands) colors or 256 colors is the highest setting available, your computer does not
have enough video memory. In this case, select a lower screen resolution to free video
RAM for more colors.
Photos can also be displayed more or less realistically with 8 bit and 256 colors.
Changing Bit Depth Dynamically for Palette Pictures
Pictures with 256 or fewer colors are called palette pictures as the pictures occurring in
the picture are similar to a palette when displayed next to each other in boxes. If you reduce the number of colors on the palette, the memory space required will be reduced
again substantially. You can reduce the color depth even more for palette pictures using
170
Picture / Colors / Change bit depth dynamically. If a picture has not been saved as a palette picture, this option will convert it into a picture with a maximum of 256 colors.
The dialog shows the whole picture with a rectangle that you can move around to select the area for the Before and After windows. You can enlarge and reduce the section
with the Zoom slider. The Maximum number of colors slider allows you reduce the color
palette until you see an obvious loss in quality.
When you reduce the number of colors, Reserve current foreground and background color will keep these two colors. You can use this option to keep the most important colors of the image that, for example, are used for lettering or in a large area. Set the
foreground and background color accordingly with the eyedropper. You can switch to
the pipette by holding down the Option key or via the toolbar. Click a corresponding
point in the image. Swap the foreground and background colors by clicking the rightangled double arrow next to the color samples in the toolbar.
As calculating the preview for the After window is a very complex process, the slider
may seem to get stuck on slower computers. In this case, continue moving the mouse
cursor up to the required position on the slider track and wait until the slider catches up.
It may be easier to enter the number of colors using the input box. The current color palette is shown in the lower section of the dialog.
The Dither option can always be enabled for changing the color depth to grayscale in
the Picture / Colors submenu. Dither optimizes the picture with a special dither algorithm. Click Dither in the menu to enable the option. The option will be marked as enabled next time you open the menu. If necessary, you can disable dithering again, by clicking Dither.
171
Reducing the color depth is above all useful when you are creating GIF pictures for use
on the Internet as the GIF standard allows saving with 2, 4, 8, 16, 32, 64, 128 and 256 colors.
Palette pictures are a relic from the early days of color pictures since memory space was
still precious back then. Today almost all Macs and PCs can cope with 32768 or 16.7 million colors.
Picture / Mode / Indexed Color allows you to quickly create a palette picture with 256
colors.
If your computer is set to 256 colors in the Monitors color panel, higher resolution pictures cannot be displayed in their actual quality. If a picture appears to be very grainy,
check the settings in the Monitors control panel and make sure that at least 32768
(thousand) colors are selected. Games sometimes change the monitor settings.
If display of 256 colors is selected in the Monitors control panel, the system color table
needs to be replaced with the picture index to display a picture with 256 colors. The colors in the backgrounds of dialogs will therefore change. The control elements and other
pictures will return to their normal colors as soon as you close the picture again.
Minimize Color Table
Using Minimize Palette you can minimize the palette automatically so that the quality is
not reduced as only the colors that are not required are deleted from the palette. This
function should therefore always be used when you are preparing pictures for the Internet (see page 64).
Always remember that it is not worthwhile saving storage space if the quality of the picture is reduced noticeably. Instead use possibilities such as reducing the picture or saving
in JPEG format with reduced quality, for example (Save as... / Options…) or cut off unimportant parts of the picture at the edges.
172
Options for Color Reduction
You make color reduction settings using Picture / Colors / Options....
Apple Computers have their own system color tables that return better results than
the optimum palette when reducing from 2 or 4 bit. In all other cases, use the Optimize
Color Table option (see below).
If you want to work with your own color table, for example, to create effects, you can
load it with Open....
When you are creating pictures for the Internet, you can select the color table with Use
Netscape 216 Colors so that the pictures are displayed the exactly same in Netscape as
in GraphicConverter.
The Use Windows 265 Colors or Use Palm 256 Colors options set the color table to
the 256 colors of these systems.
We recommend using the Optimize Color Table option to avoid losing picture quality
unnecessarily. You have the choice of reserving colors. Reserved colors cannot be deleted
and can be useful for later picture processing as colors can still be changed. Clicking Reserve Color at the Start sets the reserved colors at the start of the color table. Dither is
enabled by default because it optimizes the picture when the colors are reduced.
When the color depth is reduced, an algorithm is used to determine the best color table
and dither the colors.
Click Store to store the settings without applying them to the current picture. Apply
carries out the color reduction.
173
Swap Colors
Select Picture / Colors and then Swap Colors from the submenu to call up a dialog for
swapping colors. This option is only useful for certain file formats.
KISS CEL format defines, for example, the color with index 0 as transparent. In this case,
you can swap color 0 with your transparent color if it is not in position 0 in the color table.
Click the color example for color 1 or color 2 and select the color in the table displayed
for palette pictures in the bottom section of the dialog. Note the further instructions for
searching and replacing in the next chapter.
Find and Replace
In pictures with single-color areas, it can be worthwhile replacing one color with another.
You can define a Search Color and a Replace Color by selecting Edit / Find, compare
and replace / Find and Replace Colors.... Position the dialog next to the picture and
click the part of the picture containing the search or replace color using the eyedropper
cursor.
174
A bold frame indicates the color you are selecting. Click the color box to switch
between the Search color and Replace color. The colors can also be selected by clicking
the example field and using the Color Picker. For palette pictures, use the color table that
is displayed at the bottom of the dialog. Tolerance is used to specify how far the found
color may deviate from the selected search color. The greater the value, the more hues
are recognized.
In normal photos, you can also create effects using this option that are similar to solarisation. As a Search Color select a skin color from somebody’s face and use a pastel color
as the Replace Color.
If you want to swap two specific colors for each other, select Picture / Colors and then
Swap Colors from the submenu. Please refer to the previous chapter for information on
this option.
Invert
You can use Picture / Invert / Normal to invert the grays in a picture to negative or from
negative to positive. Use this function to convert scanned negatives into normal pictures
or as an effect.
There are three different curves for color negative films. This is why GraphicConverter
offers three Variants in the submenu. Simply try them out to find out which one provides
the best results.
If you want to reverse the order of the pictures in a movie, select Picture / Invert and
then Order of Frames from the submenu.
You can use Picture / Invert / Color Table to invert the color table of palette pictures if
you want a 1:1 inversion to negative.
Mirror
Imagine that the picture on the screen is a slide that you can turn around. If the top is
then still at the top, you will have mirrored it horizontally. If the top is at the bottom after
turning, you will have mirrored it vertically. It is exactly the same in GraphicConverter
with the horizontal and vertical mirror options. If you can’t remember that, it doesn’t matter. You can just try it out and, if necessary, undo the change. The small icons in the Picture / Mirror. submenu help, however.
The white rectangle is the slide before you turn it. The line is the mirror axis that acts like
a hinge and the gray rectangle is the slide after turning.
175
Normally you do not need to mirror pictures unless a slide or negative was accidentally
scanned the wrong way round. Sometimes it is good to mirror a picture horizontally to
optimize it for design purposes. You should remember, however, the realism of photos is
affected, possibly with negative results.
If you define a selection, only the selection will be mirrored.
Effect / Glass Blocks... allows you to mirror an image in strips. This can be used as an effect or as a simple copy protection. The follow dialog opens where you can specify
whether the strips should be vertical or horizontal. The Size of the strips is the key to reversing the effect at any time by using the option again. If you are using this option as a
simple copy protection for pictures that you want to pass on for demonstration purposes,
you will need to protect the size of the strips like a password. The recipient can work out
the strip size him or herself by simply measuring them, however.
This is the result with an example picture:
176
Shadow
Effect / Shadow... allows you to add a shadow around the right and bottom of an image.
First a dialog will open where you can choose how large the shadow should be.
After inserting the shadow, you may have to drag open the window slightly to see it. In
our example, the area around the image that is normally gray is yellow. You can choose
any color from the context menu for this area. You can select the color behind the shadow using the background color. This is white in our example.
177
Unskew
Often the perspective of houses or other rectangular objects appears distorted on photos. The following example picture was taken from above to minimize the reflection of
the flash.
To unskew the picture choose Effect / Unskew.... Four blue lines appear over the image
with handles at the junctions. Drag these handles to the four corner points of the object
that is to be unskewed and press Return to start unskewing. You can also move the handles with the arrow keys. Place the mouse cursor next to the required handle to move it
178
with the arrow keys. You can stop the procedure with Escape. A brief guide is shown at
the top left of the picture.
A dialog opens where you should select Auto-Fit to obtain the approximate size. If you
require a specific target size, you can select it with Manually. Enable Try to unskew complete image to obtain the edges.
179
Unskewing the picture may take a moment. The result is an unskewed picture. Trim the
image as required to remove any unwanted edges.
It is a good idea to sharpen a little after unskewing.
White Correction
Select Effect / White Correction if you want to remove a color cast from a picture. It does
not matter whether the color cast was caused by a camera error during automatic white
correction or whether the light was colored when the picture was taken. In our example
picture, the light was yellow because of a sunshade. There must be a point in the picture
180
that should actually be white. Click this point. The white point will then be moved accordingly. If the colors are not improved, try with another point.
QuickTime Effects
Effect / Apply QuickTime Effect provides you with all QuickTime effects for pictures in
one dialog. The effects that appear in this dialog depend on your QuickTime version and
whether you have installed additional third-party filters for QuickTime. We can therefore
not guarantee that all of the following QuickTime effects are available on your computer.
181
Some effects like brightness are also available in GraphicConverter. Filters like Emboss
with which you can convert an image to a metallic-looking stamp are interesting, however.
Filters / Edge Detection tries to find contrast edges and reduce the image to them. The
results are often too dark or totally black.
Filters / General Convolution is the same as the user-defined filter in GraphicConverter.
Adjustments / Alpha-Gain We do not know what to use this filter for. If you know,
please send a mail to: [email protected]
Adjustments / Brightness and Contrast allows you to change the brightness and contrast. This is faster using the Picture / Brightness/Contrast option, however.
Adjustments / ColorSync allows you to change the color profile.
Adjustments / Balance (HLS) (RGB) allows you to correct the colors according to the
respective model.
Special Effects / Lens Flare adds reflections as caused by counter-light in the lens if a
lens hood is not fitted. Set the angle by specifying from where and to where the reflection should go in the small preview picture on the right-hand side. You can also click the
white area around the picture.
Special Effects / Color Tint allows coloring with a sepia effect or with your own colors
using Tint Type: Other….
182
Special Effects / Color Style is in fact the popular solarization effect that has very interesting results if you increase the brightness and contrast by about 80-90 afterwards:
Special Effects / Film Noise changes the colors in the image and adds scratches or
dust. This filter is more suited to films with television resolution.
Blur / Blur reduces the sharpness of the image.
Core Image Filter
The Core Image Filter from Mac OS X 10.4 is available in the Filter menu if you are using
that version of the Mac OS or above. You can recognize the filter from the (CI) added to
the name.
183
One example: If you need to make a face unrecognisable for legal reasons, you can
select the face with the lasso and disguise it with Filter / Stylize / Pixellierung.
Date and Time Stamp
If you have taken pictures using a digital camera that uses EXIF information, you can add
a date/time stamp via the context menu by Control-clicking the open picture and selecting Insert Date/Time. First select Insert Date/Time Options....
184
This stamp inserts the date or date and time from the EXIF information in one of the
four corners of the picture. Offset is the spacing from the edge of the picture.
The result will look like a picture from an analog camera with a data back. Select the options you want and then click OK. Open the context menu again and select Insert Date/
Time.
If you cannot see the date or time, you have probably set the font too small. The text
will appear in the current foreground color selected in the toolbox.
The date and time stamp is only available for pictures with EXIF information.
Median
Faults can be removed using the median filter under Picture / Median.... The extent can
be selected using the radius between 1 and 5. If the radius is set to 2, the color of each pixel is calculated from the surrounding pixels that are within a radius of 2 pixels.
Faults in the picture could be, for example, the film grain in enlarged pictures or the
dither in a printed picture. Always use the corresponding option in your scanner software
185
to remove the dither as more picture information is available during scanning than during further processing even with programs like Photoshop.
Unfortunately the median filter reduces the sharpness. Therefore select a smaller value.
Slight sharpening afterwards increases the suppressed faults again, but can sometimes
improve pictures.
The dialog shows an overview of the picture and an enlarged detail that can be zoomed
before and after the filter is applied. Use Reset to return the sliders to their original positions. On slow computers, the Radius slider may seem difficult to move because the preview picture has to be recalculated. In this case, simply enter the new value using the keyboard.
Picture Information
Picture / Pixmap Information displays the technical picture information – size, resolution, color depth, colors used and memory requirement.
186
If you define a selection, the details will only refer to the selection. You can also call up
this dialog using the Help key.
Histogram
Picture / Histogram... displays the histogram for the current picture.
The frequency of the color black in the picture is indicated by the height of the peak at
the left-hand end of the diagram. The color white is at the right-hand end. All other color
values or grays are in-between. If the histogram is very unbalanced for a normal photo,
this indicates poor quality.
To read the exact values, move the mouse cursor over the diagram. The number of pixels is displayed next to Count. The value next to Level is a simplified representation of
the number as smaller values are easier to read. You can use the Red, Green and Blue
tabs to display the histogram for this color channel. The histogram cannot be modified in
this dialog. You need to use the Picture / Levels option for this (see page 160).
Full Screen
Picture / Full Screen enlarges the picture to the full height or width of the screen. All programs are hidden and the background is set to black. The display parameters are taken
from the settings for the slide show (Edit (Mac OS X: GraphicConverter) / Preferences /
Slide Show). As soon as you move the mouse, the cursor will appear as a small mouse
icon on the screen. This means that you can switch back to normal mode by single-clicking. You can also press any key to return to the normal display.
187
The Full Screen mode is particularly suitable if you want to obtain an overall impression of the current picture without the distraction of controls and the program user interface.
Play
This option under Picture allows you play an animation or a film that has been opened.
The background turns black while it is playing. End playback with Command-. (period).
The following film formats can be opened and played:
–
–
–
–
–
–
–
–
–
MOV files in QuickTime format.
ANI files (Animated NeoChrome) from the NeoChrome program
FLI/FLC/FLH files from the Autodesk Animator program
DL files (normally X-Rated)
Animated GIF files
ANIM files (animated IFFs)
PICS files (animated PICTs)
BioRad animations
You can play back many other formats if you install the free Perian plug-in (perian.org).
Films from the Autodesk Animator program may run considerably slower than on an
IBM depending on your computer as direct access to the screen is not permitted on Macintoshes. Therefore each picture has to be copied to the window. Saving a FLI/FLC picture as a QuickTime film (Moov) will help here.
Put Picture on Desktop
If you want to spend the day clicking your sweetheart’s nose, you can place a photo of
him/her on your computer’s desktop. The easiest way to do this is to open the picture and
in the Picture menu select Put Picture on Desktop. This will not trim any of the picture
away. Only the menu bar will cover the top of the picture slightly. This may take a while as
the picture needs to be converted to 72 dpi and adapted. GraphicConverter transfers the
picture to the Desktop Picture or Appearance control panel depending on your Mac OS
version.
This is not possible with versions before Mac OS 8.5. In this case you can use the Décor
system extension. If Décor is installed, Décor will have been added to the Picture menu.
This transfers the current picture to Décor. For further information, please refer to the Décor documentation.
Back to the Put Picture on Desktop option: The picture is enlarged disproportionally
and is therefore distorted to adjust the picture to the screen format. You can minimize
this effect by changing the format of the picture to roughly the monitor format. Cut off
unimportant edges with the selection rectangle and the Trim option (see page 139 and
page 117) or use a different picture if you want. For better orientation, it is easier if you
188
maximize the picture window to the size of the whole screen and then drag the selection
rectangle slightly larger but not right up to the left-hand edge of the window because it
is narrower on the left than on the other sides. Now trim the picture and select Picture /
Put Picture on Desktop.
If you want to remove the picture from the desktop, from Mac OS 8 you can delete it in
the Appearance control panel in the Desktop section with the Remove Picture option.
You only use the Desktop control panel in earlier versions of the Mac OS.
You also can create a desktop picture by hand to the exact pixel if you are prepared to
go to the trouble. Determine your screen resolution under Classic Mac OS with the Monitors and Sound or with Monitors in the Mac OS X System Preferences. Set the resolution
to 72 dpi for the required picture with Picture / Size / Scale.... If the picture is in landscape format, set the height to the size of the vertical screen resolution. If your screen resolution is 1024 by 768, for example, set the height to 768 pixels in the second step of the
dialog. Percent or pixels can be used as the unit.
The Proportions should be kept. Enable this option at the bottom of the dialog if it was
not already enabled. Call up this dialog a third time and note down the width of the picture in pixels. Now subtract the horizontal screen resolution from this number. The result
is the value that you need to trim off the left and right sides as required with Picture /
Size / Add/Remove Margins.... Enter a minus sign in front of the value otherwise a margin will be added. Save the picture in TIFF format without compression. It can now be set
as the desktop background under Classic Mac OS via the Appearance control panel, with
Place Picture... in the Desktop section. Under Mac OS X, use Desktop in the System Preferences and select Choose Folder from the Collection pop-up menu to select the picture from the set folder.
Practical tip: Perhaps you can just opt for the quick method and trim off the left and
right-hand sides of landscape format picture with the selection rectangle and Edit / Trim
Selection to roughly obtain the monitor format and then select Picture / Put Picture on
Desktop.
Creating a GIF Animation
A lot of companies use banners to advertise on the Internet. These banners are normally
GIF animations.
The fade-in effects between the individual pictures give you the impression you are
watching a small film or a slide show. This is why this kind of advertisement is so effective.
The animated banner always catches your eye. The constant change awakes your curiosity. Banners normally contain a link to the company’s page. The link can be set up in an
HTML editor as with any other picture.
189
You can use GraphicConverter to create, open and edit GIF animations. The fade-in effects can be displayed, but not created. Use GifBuilder by Yves Piguet for this. You can
download it from www.versiontracker.com.
You can create a GIF animation with GraphicConverter using Convert & Modify or Storyboard. Select the files to be combined on the left-hand side of the Convert & Modify dialog by pressing the Command key and clicking. Shift-click selects all files between the
one you previously selected and the one you click. If you haven’t selected a file, you can
pick out a group of files by holding down the Shift key.
The files do not have to be listed one after the other in the dialog. However, you do
need to select the filenames from top to bottom in the order that they will be played in
the animation. In the right-hand part of the dialog, select a target folder and set the destination format to GIF.
190
Click Options... to open the following dialog:
Select the Create Movie option and select a reasonable delay for picture switches. This
will apply to all pictures. It is better to wait and set the other options for each individual
picture later on. You can, however, enable the Loop option at this stage as the banners
should always run repeatedly and not just once. Endless makes the animation run infinitely. All other GIF format options are supported by GIF animations.
Close the dialog with OK. Start the multiple conversion with Convert. A single picture is
now created from the selected original pictures that has the same name as the first source picture. You should rename the new picture to avoid confusion. If all pictures appear
individually in the target directory instead of a single file, you have forgotten to enable
the Create Movie option in the Options dialog.
Playing and Editing GIF Animations
If you open a GIF animation or a playable film in GraphicConverter, a “Play button” will appear at the bottom left of the window frame, like on a CD player.
Click this button to start and stop the animation or film. The buttons to the right are
used to jump to the next or previous picture. These also work during playback. The number of the current picture in the sequence of pictures is displayed in the next box. The
number after the slash is the total number of pictures contained in the animation.
You can call up the palette for further settings by selecting Window / Show GIF Animation. When you open a QuickTime movie, it will be converted into a GIF animation after a
security query by opening the palette. This palette is constantly updated while the ani191
mation is running to show the settings for the current picture. The animation may then
run slowly on less powerful computers as this process is relatively complex. Stop the animation to change the settings.
You can move individual frames in this palette. You can enter the time a picture is displayed in the box next to Delay in seconds with up to three decimal places. The value for
all pictures can be set to the value displayed with Apply to all.
All pictures are normally the same size. If you want to add pictures of different sizes to a
GIF animation, the largest image needs to come first.
You can use Global Color Table to save memory space for an animation as the Local
Color Table for the individual pictures normally also contain colors that are not even
used in the picture and use up memory unnecessarily. Furthermore each color table takes
up 768 bytes. This soon adds up as even 5-picture animations created with Yves Piguet’s
GIF Builder often have around 25 pictures due to the intermediate pictures for the fade-in
effect.
Each picture is called a frame as in film technology. Click the plus button to add another picture after the current picture. This option is only available if there is a picture in
the clipboard. Click the trash bin to delete the current frame.
Options... allows you make further settings for the selected frame.
The No disposal and Do not dispose options are identical for historical reasons. Each
picture is drawn over the preceding one during playback. This mode is more or less normal: the pictures in the animation are displayed one after the other.
Restore to background shows the background. This is the desktop background during
editing with GraphicConverter. On the Internet, it’s the Web site. This option allows you to
192
make the animation more active without requiring more memory space as quickly
flashing the background makes the animation seem more lively.
It is even better to allow the previous picture to shine through with Restore to previous as this creates fade-in effects with just a few pictures. The GIF Builder program sets
this mode automatically if you select fading.
To obtain an exact impression of a GIF animation, you should open it in a browser. Drag
the file onto the Browser icon.
User input expected stops the animation at the frame for which this option is set. The
animation continues when you click the picture. This is useful if the picture shows a button that gives you the impression you can trigger a function. In fact, you only restart the
animation. Remember that if you have also set up a link for the picture, it will be triggered
at the same time. You can avoid this by placing a permanently visible Go button with the
link next to the animation and not adding the link to the animation.
Disable transparency in all frames simplifies removing the transparency from all frames.
Use Transparent in the Movie Options palette and the transparency tool (see
page 154) to define a color from the color table as transparent with all GIF pictures from
version 89a. If you select a color with the transparency tool, the Transparent tool is enabled automatically and you are asked whether the transparency should be set for the
current picture and all pictures in the animation.
The background can be seen through the transparent areas in the finished animation.
During editing, a chess board pattern is shown unless it has been disabled in the dialog
that opens when you double-click the transparency tool. You can define the transparent
color for the whole movie, if all of the individual pictures use the same color table. You
should always use the same color table for all pictures in a GIF animation so that the result is as small as possible (each color table for 256 colors has 768 bytes).
Loop indicates how often an animation is played. This information is not evaluated by
some browsers. The animation will be played infinitely as long as the value is greater than
1. Enter the required number for browsers that do evaluate this information. The animation will be played infinitely if you select the Endless option.
If you enable Apply changes to all Frames, you can, for example, use the Brightness
option to change all frames at the same time.
If you want to reverse the order of the pictures, select Picture / Invert and then Order
of Frames from the submenu.
193
Speed
For technical reasons, on slow computers an animation may be played too fast for a few
seconds after GraphicConverter has been in the background. After this, the animation
will run again at the correct speed.
Storyboard
Storyboard in the File / New submenu opens a window where you can sort files from an
animation, for example, and then save them as a movie or GIF animation with a new index. Pick out files in the Storyboard dialog using the drag and drop technique. Drag files
from the operating system to the required position in the storyboard or move the files in
the storyboard around with the mouse. Under Classic Mac OS, if the operating system file
window is not displayed while GraphicConverter is running, you need to enable the
Show Desktop when in background option in the General Controls control panel.
To save the inserted files as a GIF animation or movie, press the Control key and click
one of the entries. A context menu opens where you can save the inserted files as a GIF
animation or movie with the Save all Items as... option. In the dialog that opens, select
GIF for a GIF animation and click Options..., to enable Create Movie. If necessary enable
Loop, so the animation is repeated and enter the required number of times. Endless
makes the movie run infinitely.
To save the storyboard list, select File / Save. The file created does not contain the storyboard pictures, just the information on which pictures are where in the storyboard. Use
this option to save your storyboards for editing later on. You can open a previously saved
storyboard with File / Open.
Selecting
Select an entry by clicking it. You can select several entries by holding down the Shift key
and then clicking them. To select a group of consecutive entries, hold down the Command key and click the first and then the last entry.
194
Duplicating Filenames
Click the bottom right of a cell and drag a frame open. All cells inside the frame are given
the document name.
Duplicating with the Keyboard
Select one or more files with the mouse. Now press the Command key and F2 to F10. The
selected cells will be duplicated according to the number on the function key. All other
cells will be moved accordingly.
Further options are available in the context menu (“ctrl” key and click).
Show all Items in slide show displays all entries from the first column in a slide show.
Save all Items as... allows you to save all items from the first column possibly with a new
name from the index option, in the required location and in the required format.
Save all Items in Source Format as... allows you to save all items from the first column in
the required location in the source format with a new name from the index option if you
wish.
Invert Direction reverses the order of the selected files.
Insert Row inserts a row above the selected row.
Delete Row deletes the selected row.
Index Options... calls up the preferences with the index options for the menu items Save
all Items as... and Save all Items in Source Format as.... You can take a look at the animation created here at: http://www.foto-service-links.de
Gamma Correction
The Gamma Correction can be used to set a different gamma value for pictures. The gamma value is responsible for the contrast and therefore indirectly for the brightness of pictures. It would be a technical detail that is managed by the operating system alone were
it not for there being Windows in addition to the Mac OS and both systems working with
195
a different gamma value. All versions of the Mac OS presume the target gamma is 1.8,
Windows 2.2. Pictures optimized on a Mac without gamma correction therefore appear
to be high contrast and too dark under Windows. Pictures from the Windows world,
however, appear slightly too flat on Macs.
If pictures edited under the Mac OS are to be published on the Internet or on CD-ROM,
for example, they may be viewed on a Windows PC and appear too dark. Therefore change the gamma value accordingly under Effect / Gamma Correction... either to the universal mean value of 2.0 or 2.2. for Windows PCs.
A zoomable preview will help you with the settings even when you use the standard
values. You can move the section in the left-hand window.
If you set the picture to the Windows gamma value 2.2, it will appear darker on your
Mac, as in the preview. It will be correct under Windows, however, since pictures with a
gamma value of 2.2 are normal there. You more or less need to use your imagination with
the preview.
To set all pictures to a gamma value other than the Mac OS standard value, enter a value
other than 1.8 in the lower input box. If, for example, you are exclusively creating pictures
for the Internet, the mean value of 2.0 would be a worthwhile alternative. Remember to
change the value back if you edit pictures for further processing and printing on Macintosh computers.
PNG format solves this problem as it displays the pictures automatically in a way that all
users see the picture correctly no matter what operating system they are using and what
original operating system was used to create the picture. The display software does need
to read the gamma information, however. PNG format can be used on the Internet. Optimize your pictures as usual for PNG format without correcting the gamma at all and select PNG format from the Format pop-up menu under File / Save as....
196
Gamma correction is also suitable for optimizing scanned pictures as some scanners do
not use linear scanning. Refer to your scanner documentation.
Plug-In Filters
Summary: Any Photoshop-compatible plug-in filters installed in the plug-ins folder will
appear at the bottom of the Effect menu after you restart GraphicConverter. If a plug-in
requires that Photoshop is on your computer, you will not be able to install it. Any filters
self-defined using a text file will appear under Effect / Plug-In Filter.
GraphicConverter supports Photoshop plug-ins. Plug-ins are small auxiliary programs
that provide additional functions for main programs. They appear as options in the menu
as if they were part of the main program. Plug-ins are also sometimes called add-ons. You
can also use plug-in filters like Kai’s Power Tools, which were actually developed for Photoshop, with GraphicConverter. The plug-ins need to be compatible with Photoshop 2.5
and should not access Photoshop options. You can copy plug-ins from your Photoshop
folder into the GraphicConverter plug-in folder.
Under Classic Mac OS: Copy your plug-ins to the Plug-Ins folder in the GraphicConverter folder and check whether the path for the plug-ins is set to the right folder under Edit
(Mac OS X: GraphicConverter) / Preferences… / General / Plug-Ins. GraphicConverter
recognizes all plug-ins that are found up to one folder level down in the Plug-Ins folder.
Therefore if you copy a folder containing a plug-in into the Plug-In folder, the plug-in
needs to be located in that folder and not in a further subfolder.
Under Mac OS X: Plug-ins are copied to the Library / Application Support / GraphicConverter / Plug-ins folder. User plug-ins are copied to the Users / ˜ / Library / Application Support / GraphicConverter / Plug-ins folder. The tilde character stands for the
name of the respective user. User plug-ins are only available to the respective users. One
very easy way to install plug-ins is to drag them onto the GraphicConverter program icon.
After a query, they will be automatically copied into the correct folder.
Close and restart GraphicConverter after installing new plug-ins. The plug-ins will then
be available in the respective menu. Import or export plug-ins, for example, scanner programs are located under File / Acquire or Export. Photoshop plug-ins appear in the Filter menu. This menu only appears next to the Effect menu when plug-in filters have
been installed.
If you are using the carbon version of GraphicConverter in the Classic Mac OS from Mac
OS 8.5 with the respective latest version of Carbon Lib, the plug-ins should be in the System Folder / Application Support / GraphicConverter / Plug-Ins folder.
Copyright of Plug-Ins
Under Classic Mac OS, some plug-ins have a copyright message with a version number in
the Apple menu.
197
In addition to your license key, you can enter the license key for LuraWave format by
selecting GraphicConverter / License... under Mac OS X. You will find detailed information on LuraWave on page 359.
You can display a copyright message for some plug-ins by holding down the Command
key and clicking the filter.
The filters permanently integrated in GraphicConverter are Laplace (3x3) and Unsharp
(3x3). They do not appear in the Plug-Ins folder, but under Effect / Plug-In Filter. Experts
and those of you who like experimenting can define your own filters up to a matrix of
64x64 using a text editor like SimpleText. Enter a space or a tab between the values. An
extremely unsharp filter could consist of a matrix made up of 9x9 ones, for example:
111111111
111111111
111111111
111111111
111111111
111111111
111111111
111111111
111111111
When you use the filter, the matrix checks each pixel and multiplies all surrounding pixels by the specified values. 1 changes the pixels. 0 leaves the pixels as they are.
198
User-defined Filters
You can define your own filters using User Defined Filter... in the Effect menu.
This filter can unsharpen pictures or create other effects depending on the entries. You
can enter values between -255 and 255 in the boxes. If all outer fields are set to 0 and the
center ones contain a 1, the filter will have no effect. If you set all boxes to 255, the filter
will have maximum unsharpening.
A preview will appear in the After window a few seconds after the last entry. Use the
zoom function and move the selection triangle in the Picture window to a representative
position.
It is very difficult to find the correct value between too soft and too sharp. Define several examples until you achieve the required unsharp effect. Taking a look at pictures by
David Hamilton, for example, that use unsharp filters will help (http://www.hamilton-archives.com/newsite/index.html).
Color Permutations
The six color permutation filter changes the colors of a picture on the basis of certain
rules. The HSV color model is used, in which the colors are arranged in a circle. If a picture
with at least 16-bit color depth (see Picture / Colors) is open, you can open the Color Picker by clicking the foreground or background color in the toolbox (you may need to select Window / Show Toolbox).
The color changes with the angle. If you imagine a clock face on top of the color circle,
the red hues are from 0° to 3 o’clock. You can find the other primary colors by moving the
199
“fingers” on the imaginary clock. The Saturation of the color is defined by the distance
from the center point. The brightness (Value) can be set with the slider under the color
circle. The color permutations only change the color, not the saturation and brightness.
Chromatic Involution
Chromatic Involution changes the colors in a picture in the same way as you transpose a
piece of music from C major to F major on the basis of certain rules. First of all, here’s a
Malaysian beach as it was originally photographed:
200
And after chromatic involution:
The contrast intervals and the “color harmony” are thus maintained. The contrast intervals are related to:
– Brightness differences of colors
– Angle differences of colors on color circle
– Saturation differences of colors
The chromatic involution is particularly interesting for artists, art experts and perception
psychologists. You will find more information on the Internet at: http://math1.uibk.ac.at/
~liedl/
201
Color Rotation by 15 Degrees Clockwise
All colors are moved 15 degrees clockwise in this color permutation.
The change compared with the original can hardly be seen, but the effect is increased
when you apply the filter several times. Applying it five times results in a total rotation of
75 degrees and the changes become more noticeable:
Centric Involution
Centric involution replaces all colors with their complementary colors. As the values for S
and V are not changed, this is not the same as invert, which would create a color negative.
202
Complete inversion is available in the Picture menu. Centric involution corresponds with
a color rotation of 180 degrees.
Cold-Warm Involution
Cold-Warm involution swaps all cold colors for warm colors and vice versa. Yellow-green
and purple colors are unchanged.
the results are similar to chromatic involution. The involution axis is turned clockwise
slightly, but starting from yellow-violet unlike chromatic involution.
203
Isothermal Involution
Isothermal involution keeps cold colors cold and warm colors warm.
Orange-red and turquoise-blue colors (the sea) are not changed. Yellow-green colors
are replaced with violet hues, however.
Involution around the Red-Green Axis
Involution around the red-green axis swaps the yellow and violet colors.
Red and turquoise colors are not changed in this involution.
204
Color Rotation... allows you to define your own angle for involution.
Vectorize
Summary: Special / Vectorize allows black and white pictures to be vectorized.
Pixel pictures lose quality when enlarged. The loss in quality is particularly noticeable
with lines as they seem to fray at the edges when you enlarge pictures greatly. They look
stepped. To prevent this effect, create graphics that are needed in various sizes as vector
graphics, for example, with Freehand. Vector graphics are made up of lines and surfaces
that are described with mathematical formulas. These mathematical formulas are vectors.
When enlarged, the graphics are recalculated using the formulas and always appear in
best possible quality with sharp edges when displayed on screen or printed. Logos, technical drawings and comics are prime examples of these kind of graphics.
You can vectorize black and white pictures in GraphicConverter using Special / Vectorize.... The file selection dialog opens where you can enter a name for the new file. Vectorization starts after you click OK. This may take some time. GraphicConverter’s vectorization function is not sufficient to meet top requirements, particularly with problematic
pictures. We recommend a program like Adobe Streamline for professional work.
You can either save vectorized pictures in PICT format or in HPGL format. When you select the Vectorize option, GraphicConverter automatically opens the file selection dialog
where you cannot select the format. Enter the name for the picture file and click Save. A
dialog where you can select the format then opens.
Vectorization only starts after you select the format. This may take a while. If the picture
is very complex, close other programs or other pictures beforehand.
Vector pictures can only be opened with GraphicConverter with loss of vector information. The source picture is only displayed after vectorization. If the vector information is
lost as in this case, the picture will become just a normal pixel picture. Vector pictures can,
however, be converted from HPGL into PICT format without losing vector information
using File / Convert.
In word processing programs and DTP programs that can process vector graphics, the
vector pictures can be scaled as required without losses (this is excellent in the papyrus
word processor by rom-logicware(.de) that is unfortunately only available for Windows
95, Atari and OS/2 — Mac developers get in touch!).
205
Pictures made up exclusively of lines and surfaces, for example, scanned logos are most
suitable for vectorization. Lines and surfaces should be continuously black for vectorization in GraphicConverter. Programs that are specially designed for vectorization can also
vectorize color pictures.
A “broken” line, on which the paper structure and the pen have left gaps in the black
area, will not be represented by a single line after vectorizing, but by several small ones
that imitate the “grayscale” of the broken line. Here is a greatly enlarged section from this
kind of line.
This large number of lines, called paths, slows down work with these kinds of graphics.
Even just a few lines in the source drawing lead to ten thousand paths.
Logos often have to be reproduced for business stationary as the orderer cannot provide the required data. To reduce the work, you can try to scan the logo from a letterhead,
for example, and then vectorize it so it can be printed with sharp edges and be enlarged if
necessary. Unfortunately the result of vectorization with scanned pictures is often useless
even with programs specializing in vectorization. To solve this problem, we recommend
only using the scan or insufficiently vectorized version as a basis and redrawing the logo
on a higher level in Freehand.
Alpha Channels
Summary: An alpha channel can be displayed, deleted, made for the current picture and
created from a transparency or selection under Picture. A selection cannot be made from
an alpha channel.
Information on a picture that should not be visible can be saved in alpha channels. An
alpha channel is an additional channel to the red, green and blue channels that contain
the primary colors in RGB pictures and are mixed to create the colors in the picture. Pictures can also contain several alpha channels. GraphicConverter shows just the first and
informs you if further alpha channels are contained in the picture. Alpha channels can
only be used in pictures with a color depth of 32 bit and with Photoshop, PNG, TGA, BMP
and PICT formats.
Some picture editing programs allow you to save selected areas in an alpha channel.
These areas are also called masks and are used, for example, to make a picture area lighter
206
or appear transparent in a layout program. Alpha channels are also used for other purposes.
To check what information is contained in an alpha channel, select Picture / Show Alpha/Mask Channel. Any mask contained is shown as a white area against a black background. In the following example, a mask was defined for the pullover in Photoshop so
that it could be excluded when the picture that was previously too dark was brightened.
In GraphicConverter, you can define a selection with the lasso and then use Edit / Invert Selection to select everything but the pullover shirt and make it brighter.
The content of the alpha channel can be deleted under Picture / Remove Alpha Channel. If a picture contains transparent areas or a selection, you can create an alpha channel
by selecting Picture / Create Alpha/Mask Channel from Transparency respectively Picture / Create Alpha/Mask Channel from Selection.
Convert premultiplied to non-premultiplied and Convert non-premultiplied to
premultiplied both swap the premultiplied mode of an image. Images in premultiplied
mode can have advantages in particular if you are working with videos because the
images can be mapped more quickly.
Flatten Alpha Channel overwrites the picture content with the content of the alpha
channel to make it visible. A transparency like an alpha channel can optionally be used.
If you delete parts of the picture with the eraser tool, deleting is also carried out in the
alpha channel.
207
If you want to document the contents of the alpha channel, you can use Picture / Alpha/Mask Channel to Picture to make the alpha channel part of the picture. The “normal” picture information is then lost. Save the picture beforehand, if you have edited it,
and then save the new picture immediately afterwards with a new name so you do not
accidentally overwrite the source picture. The second example picture with the white
pullover area was created with this function.
The Picture / Add Alpha Channel option can be used to create an additional alpha
channel. This can then be displayed with Picture / Show Alpha/Mask Channel. You can
add copied picture parts to this, for example. While an alpha channel is displayed, you
can switch back to the picture by selecting Picture / Hide Alpha Channel from the same
position in the menu. Once an alpha channel has been created, you cannot add another
one with GraphicConverter.
If you receive an image to which you want to add an alpha channel that is saved in another image, you can copy the alpha channel into the target picture via the clipboard.
Open the source image, select everything with Command-A and copy the contents with
Command-C. Next switch to the target image and insert the alpha channel with Edit /
Paste / Paste into Alpha Channel.
If you open a picture with an alpha channel, but do not achieve the desired effect, this
could be because the alpha channel needs to be inverted first. Select Picture / Alpha
Channel / Invert Alpha Channel or Picture / Invert / Alpha Channel.
If a picture contains a path created with Photoshop, it will be displayed with its name at
the bottom of the submenu under Picture / Alpha Channel. Select this path to convert it
into an alpha channel.
If you draw a line, a circle or a rectangle in a picture, it is also drawn in the alpha channel. Disable the Draw in alpha channel, too option if you do not want to draw in the
alpha channel. Open the options dialog by double-clicking one of the tools. The preferences apply to all drawing tools.
208
Video Pictures
Summary: Individual pictures from videos can be reduced to their Even Field or Odd
Field using the Effect when the content of the two fields differs greatly. To use effect filters from other programs for backwards videos, select Swap Fields.
Videos contain individual pictures like Super 8 film or 35 mm cinema film. These individual pictures are made up of 512 lines (incl. videotext) that are divided into two fields.
The first field contains the odd picture lines 1, 3, 5 etc. and the second field the remaining
picture lines (2, 4, 6 etc.). This mode is called “interlaced”.
Very fast moving objects, like cars passing by in the foreground often cause the two
fields in a video picture to have very different content because the object moved further
while the first half picture was constructed. If you take individual pictures from a video
camcorder, this problem will not occur very often due to the high video quality. More often, a moving object can be seen twice in pictures from a running television program.
Effect / Even Field replaces the uneven field with the even field by replacing each odd
line with the subsequent even line. With Effect / Odd Field, it’s exactly the other way
around. The lines from the even field are replaced with the odd lines above them. This
also increases the sharpness slightly, but a line structure is formed that is normally even
more annoying.
You can see this effect better when the picture is enlarged. In our example, the source
picture is at the top and the same section after reduction to the even field is below.
The Effect / Swap Fields option is useful if you want to add professional effects to a
backwards running digitized video sequence, for example, in Adobe Premiere.
209
Video pictures are normally relatively unfocussed as the objects or the camera are moving. You should therefore use the Effect / Sharpen Edges and Picture / Brightness /
Contrast... options to improve the picture quality.
Video Tips
Even before the arrival of digital camcorders and fast G3 computers with FireWire interfaces you could save individual pictures from videos as picture files using video-in cards.
As these pictures are relatively small and only have a resolution of 72 dpi even with the latest technology, they are not really suitable for printing, but can be published on the Internet or on CD-ROM.
Otherwise why don’t you show your video and other digital pictures in a slide show at a
party. Refer to the chapter Slide Show from page 282 for information on how to display
pictures on your hard drive one after the other against a black background in a slide
show.
Normal video camcorders can more or less be used as cheap digital cameras using video-in solutions. The advantage is that you can select the best moment to press the
shutter release later on using your computer. The downside, however, is that the picture
quality is considerably poorer than with a digital still camera. If you leave the picture in its
original size, the 72 dpi will not provide sufficient sharpness. If you reduce the picture so
that the resolution is 300 dpi, it will be too small.
The people who defined the video standard didn’t think about the needs of future generations. Here is a section from an example picture with 72 dpi and the whole picture at
300 dpi below it:
210
If you want to make the most of all advantages, use a digital camera that can take fast
picture series with around 3 pictures per second. You can then select the best shot from
the pictures with the optimum picture quality.
Some digital cameras also have a video function. However, this only produces a video in
normal video quality. Digital cameras with around 3 mega pixels supply printed pictures
in 10x15 cm format (4x6 inches).
Layout
Summary: In the submenu under File / New you can create a layout page with Layout on
which pictures can be positioned and scaled freely for print out.
To print large numbers of pictures, use the File / Print Catalog or Print Folder options
(see p 95).
You can choose between Content and Only frame under Special / Layout Options...
to display the pictures on screen and print them out. Displaying just the frames allows
211
you to work faster. Save a layout with File / Save or Save as... so you can call it up again
with File / Open. Layouts can only cover one page.
The picture files are also found again if they are moved on the hard drive, but may not
already be open when a layout containing pictures is opened.
To insert a picture, you first need to open it as normal in GraphicConverter. You can insert open pictures in a layout using the context menu. Click the white area of the layout
to open the context menu. If you hold down the Control key and click a picture that has
already been inserted, the context menu will be different in some cases.
The context menu contains all open pictures. Click the corresponding entry to insert a
picture. Options... opens the dialog with the basic settings for the layout described below like the Build image from layout option.
You can move pictures anywhere in a layout with the mouse or with the cursor keys.
The size of pictures in a layout can be changed using the handle at the bottom right-hand
side. Click the picture frame and move the small black square as required. While you scale
the picture, the size and zoom value in percent appear next to the handle. If you want to
keep the proportions, hold down the Shift key while scaling. To set a non-proportional
scaled picture back to proportional, Control-click the picture and select Resize Picture
proportional from the context menu. You can also use this menu to Remove Pictures or
to set the layout to a specific zoom level.
If pictures are partly overlapped, it is sometimes preferable to change the order in which
the pictures are layered. Bring Image to the front allows you to move a picture to the
front. Send Image behind all others sorts a picture to the back.
212
You can use Build image from layout... if, for example, you want to save a layout as a JPG
image to send it by e-mail. The whole page is saved as an image.
There are further Options... at the bottom of the context menu and under Special /
Layout Options....
If large numbers of pictures are to be printed as a catalog, it is practical to print the filenames automatically under the pictures. The font settings in the Layout dialog are related
to the filenames that appear under the pictures. The Typeface, size and style can be selected. A preview at the bottom right shows how the text will look. If you do not want to
print the picture name, clear the Show picture name option.
You can also display just the picture frames instead of the pictures. Select Only Frame
or Content under Display accordingly. On slow computers it is useful just to display the
frames. The picture is always printed.
213
Under Misc you can place a Print Mark in the middle of the left-hand margin to help
you punch holes if your printer supports this.
List
Summary: Under File / New you can create a list of all files in a folder with file details
using List from Files....
First a file selection dialog opens containing options for display of the file size.
If you are not interested in technical details, such as the Datafork Size and the exact
number of Bytes, simply leave the settings as Show total size and Show Size in KB.
In the file selection dialog, click the folder whose contents are to be listed. The folder
must contain pictures. Now click Choose to create the list.
Lists can cover several pages. Use the plus and minus buttons at the bottom left of the
window to navigate from page to page. Lists can be saved. This creates a text file that you
214
can open in text programs like SimpleText, TextEdit and BBEdit Light. The width and
height of the pictures is also given in mm in saved lists.
You can make settings for the appearance of the list under Special / List Options. Special / Open List Window reopens a previously opened and closed list window.
The dotted black frame shows the printable area and the dotted red frame the set margins.
Copy File into Resource
This option allows you to copy a file that contains only a data fork, to be copied into the
resource fork of another with a particular type. First select the source file and then the target file with the file selection dialog. Then enter the resource type (4 characters) in a dialog. The index is selected automatically as you can change it with ResEdit.
Invert Black & White GIFs
This option inverts all black and white GIFs in a directory that you select with the file selection dialog. This option is useful as black and white pictures created in Windows using
older programs are sometimes inverted.
215
Copy, Cut, Paste, Clear
Macintosh computers have a clipboard that is used to copy data. In the same way as text
can be copied and cut in word processing programs, pictures or parts of picture can be
copied with Command-C and cut with Command-X in GraphicConverter (Edit / Copy or
Cut). The picture ends up in the clipboard in both cases and remains there until it is deleted by another copy or cut action. You can select the entry straight from the menu. You
do not need to use the submenu, which contains further commands described on
page 217.
The clipboard contents can be displayed in a special window opened with Edit / Show
Clipboard. This menu item changes to Hide Clipboard while the clipboard window is
open.
If you define a selection, only the content of the selection is copied or cut.
A picture can be pasted from the clipboard onto the currently selected picture window
with Command-V or Edit / Paste. If you want to create a new window for the picture on
the clipboard, select File / New and then Image with Clipboard from the submenu. The
picture from the clipboard will be copied into a new window. If picture parameters are to
be changed during this process, select File / New and then Picture with Clipboard...
from the submenu. You can then change the Resolution, for example. This process is recommended in particular if the picture contains vector information as this information on
pictures from the clipboard is only evaluated with this option and can cause a notable increase in a quality when the size is changed, for example. Note that PICT pictures can also
contain vector information.
The source data is shown in the top part of the dialog for orientation. If, for example,
you are preparing pictures for a Web site, you can check here whether the source picture
in the clipboard has the correct resolution and, if necessary, set the target resolution to 72
dpi at the bottom left. The Size and the Color depth or the Palette can be changed
when you paste a picture from the clipboard.
216
The current selection can be deleted with either Edit / Clear or the Backspace or Delete
keys. The deleted picture parts are replaced with the current background color.
Professional Options for Copy, Cut, Paste and Clear
There are further professional options available in the Copy, Paste and Clear submenus.
In addition to the normal Copy, you can select Copy as HTML. This option copies the
HTML code required to add the picture to an Internet page to the clipboard. This function
is only useful if you program HTML pages “by hand”, i.e. without a WYSIWYG editor that
immediately shows the page as it will appear on the Web (for example, Dreamweaver
from Macromedia). Copy as HTML Options... allows you to enter parameters for the
HTML code created:
217
For the Path, enter the relative path of the picture, i.e. the name of the folder where it
will be located on the server. This entry will also be suggested by default after you restart
GraphicConverter. Select the Alignment for the position on the Internet page from the
pop-up menu. You can define a Border with various widths. Pictures on the Internet do
not normally have a border. VSpace and HSpace allow you to set the vertical and horizontal position.
If you require the picture from the clipboard in a specific format, with a different size or
resolution, use Copy as... and enter the required values in the dialog that opens. The size
of the current selection is shown on the left of the dialog. Under Priority, select whether
you want modify the Size, the Scale or the Resolution. Size allows the picture to be modified disproportionally by setting one of the values for the width or height to the required target value. You can enter a scaling value in percent with scale. If Priority is set to
resolution, you can change the resolution.
Use QuickTime compression allows the format selected under Options to be converted. If QuickTime is not installed on your computer, you can download it free of charge at
http://www.apple.com. Apple software may not be published on magazine CD-ROMs any
more.
The scale can be set first of all to 200%, for example, and then you can still change the
proportions using the size. In the second step, select Size for Priority as only the value selected in the Priority box can be adjusted. If you change the resolution using this function, the size will also be changed.
If you want to obtain the output size, you need to proceed differently: Copy the selection as normal with Command-C and select File / New and then Image with Clipboard
from the submenu. The copied selection is now a normal picture and can be modified
with Picture / Size / Scale... and Picture / Resolution…. If the resolution is changed with
this option, the output size is kept.
Use this option to place a scaled selection on the clipboard using the Scale option
without losing resolution.
218
Copy EXIF as Text in the Edit / Copy submenu copies the technical details of a picture
to the clipboard. Digital cameras write the exposure time, for example, in pictures as EXIF
information.
Once you have used this option for a picture with EXIF information, you can open the
clipboard under the Edit menu to view the EXIF information. The EXIF information can be
pasted into a text editor and then printed or archived. You can change the size of the clipboard window using the handle at the bottom right.
UNIX users often add an X-Face to e-mail texts. This X-Face is a small portrait of themselves or a picture of their pet cat, for example, as a “pen name”. This picture has a special
format: X-Face format. You can create this by selecting Edit / Copy and then Copy as XFace from the submenu. The picture created is placed on the clipboard and can then be
pasted into your e-mail text with Command-V. Even version 5 of Microsoft’s Outlook Express is not compatible with this system.
Copy Path (Mac) copies the file path of the current image in Mac format into the clipboard. Colons are used as separators between the folder levels. Copy Path (UNIX) uses a
slash instead of the colon.
The IPTC information can be copied with Copy IPTC and pasted into another picture
with Edit / Paste / Paste IPTC. You do not have to open the pictures. You just need to
click the required picture in the browser.
Copy EXIF for paste copies the EXIF information so you can paste it into another picture.
Paste inserts the clipboard contents at the mouse position centered. You can move the
pasted picture section around. In the Preferences under General / Edit you can specify
whether the pasted section should be translucent while it is being moved. If you want the
inserted section also to be transparent so you can position it accurately with the cursor
219
keys, you should enable the Copy with other Opacity option in the selection tool dialog
and enter a value around 50%. Double-click the selection tool in the toolbox to open the
dialog.
The Edit / Paste submenu contains the Paste at Position option that inserts the clipboard contents at a specific position.
X-Position indicates the distance from the left-hand edge in pixels, Y-Position the distance from the top edge. Suggest copy offset allows you to transfer the values from the
copy procedure. This is particularly useful when the pictures have the same size. In the
Preferences under General / Display Windows you can specify whether the first pixel in
the top left-hand corner should have the values 0/0 or 1/1. The two versions are not different technically. Experts prefer 0/0, non-experts 1/1.
Paste centered pastes the clipboard contents centered instead of at the mouse cursor.
You can choose where it should be pasted with Paste top centered etc.
Paste into Green Channel – see p 154.
Paste Frame in the Edit / Paste submenu inserts the clipboard contents as a frame after the current frame in films and animations. You can place a suitable picture on the clipboard with the normal copy function (for example, Command-A, Command-C).
220
Clear deletes the current selection. In addition to the regular Clear option, Clear Frame
is available in the Edit / Clear submenu. This deletes the current frame in animations (see
p 191).
Remember you can set a color in the picture being pasted to transparent when pasting.
Open the corresponding dialog by double-clicking the selection rectangle in the toolbox
and follow the instructions from page 140.
Text in Pictures
Click a picture with the text tool
that you can write in will appear.
from the toolbox (Picture / Toolbox) and a rectangle
Click on the picture and enter the text. If the font is too small, you can select the font
size, font and different styles while the text frame is active. Double-click the text tool in
the toolbox and the following dialog will open.
In the UB version of GraphicConverter, you select the font from the Text pull-down
menu in the menu bar at the top edge of the screen that only appears while you are editing text. In older versions, you select the font in the Text dialog.
From version 5.3.1 of GraphicConverter, the functions Alignment and Anti-alias are
only available under Mac OS X if Unicode text input is disabled. If you enable Unicode,
you can use all Unicode font characters. Unicode text input can only be enabled if there
are no active text objects in the picture. If, for example, you have set your OS X to Czech
or Chinese, you can normally find the character using the keyboard. To find a single cha-
221
racter, we recommend the program PopChar (http://www.ergonis.com/products/popcharx/). Disable the Unicode option if you are using very old fonts that cause problems.
You can use Erase background to insert a color bar behind the text so it is easier to
read. You can select the color using the current foreground color.
If your computer crashes after you double-click the text tool, you have a corrupt font in
your system.
If you should crash after this double-click you have installed a bad font in your system.
Turn off the WYSIWYG font menus in the Preferences in General / Misc.
The settings always apply to all text in the current text frame. To use a different font in a
new line, you need to create a new text object.
The font size gets adapted to the resolution of the picture as the default behaviour of
GraphicConverter so a 12 point text appears in a size you expect in a 300 dpi picture as
well. If you switch on the function Use absolute value a 12 point text would appear
much smaller in a 300 dpi picture. In a 72 dpi picture the letters of a 12 point text are
about 12 pixels high if the function use absolute value is active.
The Anti-alias option allows you to smoothen the edges of the font. This is only useful
when you are preparing pictures for onscreen use, for example, for CD-ROMs or Web
sites.
The text can be deleted with Backspace and the color of the text can also be selected
later on. There is a cursor for correcting typing errors, but selection is not possible.
222
Changes to the font always change the whole text object. The cursor keys move the text
frame, you can also use the mouse.
You can start a new line with Return. Enlarge the text frame by dragging it at one corner. Delete an active text object with Escape. To deselect a finished text object, select a
different tool, for example, the selection rectangle. Once the text object has been deselected, the font is inserted on a separate layer of the image and can be positioned anywhere with the Pointer tool. You do not need to click the text here. You can click anywhere on the picture.
Layers
The layers can be displayed in a palette with Window / Show Layer. Imagine layers as
plates of glass that are placed on top of each other and can have different content. A separate layer is added for each new text object if the Automatically create layers for new
text option is selected in the preferences under General / Edit. The images need to be in
223
RGB or CMYK mode. If you want to edit the text, select the text tool and click the required
text. You do not need to select the corresponding layer in the layer palette in this case.
The original image is always on the Background layer that is the only one that cannot
be deleted via the pop-up menu opened by clicking the black triangle.
Flatten Layers with Alpha allows you turn a layered image back into a normal image.
The text contained can then no longer be edited, however, as it is incorporated in the
image. The text remains in an alpha channel that can, for example, be used by layout programs. Select Flatten Layers without Alpha if want to create a normal image.
Click the red ball on the left of the Layer palette to hide and display the respective layer.
The layers can currently not be displayed. You therefore need to finish your work on the
picture and then save it without layers.
Painting with GraphicConverter
It is particularly useful to paint with GraphicConverter using a graphics tablet. You can
paint in new empty pictures or in existing pictures.
Foreground and Background Color
All paint functions, such as the line drawer or fill option use the foreground color. The eraser uses the background color. The foreground and background colors are displayed at
224
the bottom of the toolbox in two overlapping rectangles. The partly hidden rectangle is
the background color. The rectangle on top shows the foreground color.
You can select the foreground and background colors in different color pickers by clicking the color sample in the toolbox. There are only the colors black and white available
for black and white pictures. In this case, the color picker will not appear, instead you
switch between black and white.
Each picture will have its own foreground and background color if you clear the Use selected colors for all open images option in the Preferences under General / Edit. If you
select Use selected colors for all open images, it will only affect pictures that are already open when you change the foreground or background color of a picture. You will find
detailed information on the color pickers from page 230.
The double arrow under the foreground color or the x key swaps the foreground and
background colors. Clicking the small black and white icon above the background color
resets the foreground and background colors to black/white.
Copy
Copy or a different mode is listed at the bottom of the toolbox. If you click Copy, a popup menu will open where you can select a drawing mode.
The effect of the drawing modes on new picture elements can be seen best in a picture
in which a sample, a line and a font from the various models have been inserted.
225
Copy overwrites everything under new pictures elements such as a line, in this case the
red background.
Or only draws over the red background with the blue foreground. The bricks in the pattern are not filled with the yellow background color, but are transparent so the picture’s
red background can be seen.
XOr is the area of the sample that would be filled with the background color in copy
mode, also more or less transparent, and the background red can be seen through it.
In Bic mode, the area of the sample that would be filled with the background color in
copy mode is also more or less transparent and the background red can be seen through
it. The lines that are drawn with the foreground color in Copy mode are drawn with the
background color in this mode.
The four modes can be inverted with a preceding Not and are then more or less reversed.
New Picture
You can open a new picture by selecting File / New and then Image.... First decide how
large the picture is to be in the dialog that opens and the Resolution, Depth and Palette
you require. A resolution of 300 dpi is recommended for pictures that are to be printed.
The background cannot be transparent.
You can use Transparent Background to open a new picture with a transparent background. This is often useful for Web sites.
226
Painting
You can paint in the picture using the paint tools from the toolbox (Window / Show
Toolbox). Use the Pen , for example, you can select its line thickness in the pop-up
menu immediately above the Pattern picker. If you have not installed interfering programs like, for example, USB Overdrive, you can change the line thickness or size of the
selected tool by holding down the Shift key and adjusting the scroll wheel on your mouse. Left-handers can adapt the pen to their needs by double-clicking the tool in the toolbox. The pen will then appear as if held by someone left-handed. The following dialog
appears.
The line thickness also applies to the line tool that draws any kind of line, but only
draws vertical or horizontal lines when you hold down the Shift key. Double-clicking the
line drawer opens a dialog where you can specify whether the lines should have normal
or arrow ends. You can enter the size in pixels for the arrow points. You can also draw in
the alpha channel with Draw in alpha channel, too.
The fill tool
allows you to fill connected single-color areas with the current foreground color or even with a selected pattern by clicking part of the area. The area needs
to have the same color throughout. The tolerance of the extent GraphicConverter also recognizes pixels with colors slightly different to this area can be set by double-clicking the
fill tool icon.
The greater the value, the greater colors may deviate and be considered part of the
area. To find the right value to color a white pullover with shadows green, for example,
you will have to make several attempts.
and rectangles with rounded corners
Drag open unfilled ellipses , rectangles
with the corresponding tool from the toolbox. Holding down the Shift key with the el-
227
lipse tool gives you a circle and with the rectangle tools a square. The current line thickness (see p 227) and foreground color are used for the outlines.
Drag open ellipses , rectangles and rectangles with rounded corners that are filled with the foreground color using the corresponding tool from the toolbox. Holding
down the Shift key with the ellipse tool gives you a circle and with the rectangle tools a
square. The shapes are filled with the foreground color.
You can choose further settings for most tools in a dialog by double-clicking the icons.
You can specify for the empty and filled rectangle and the ellipse variants whether the
shape should be formed from the center and the edges should be softened with the
Anti-alias option. Both options apply to all tools once enabled and can be disabled again
via most tools.
Use the Anti-alias option only if you are creating pictures for onscreen publishing (for
example, Internet or CD-ROM) and the normal variant results in stepped edges. Anti-aliasing does remove the steps along the line, but these areas are then very unsharp. The
anti-alias option also smoothens colored areas.
You can set the corner shape and size for rectangles with rounded corners. Double-click
one of the corresponding icons in the toolbox and the following dialog will open.
If both values are equal, the rounded corners will have an even shape. The curve becomes larger as you increase the value. If the values are different, each corner will be split
into two parts in the middle. X-Radius defines the shape of the half attached to a horizontal line, Y-Radius defines the shape of the half attached to a vertical line.
In the following example picture the top rectangle has an X-Radius of 100 and a Y-Radius of 50. This is why the curve of the top left corner is long and flat in the upper part and
the lower part is short and curved more. Imagine a circle with a large or small radius (=
228
half diameter) is placed on the inside of the respective curve. The crossover point is marked with a red line.
The maximum value for the X and Y-radius is 100.
Eraser
Any part of a picture can be deleted with the eraser
.
The eraser basically paints over the background color. Set the background color to
white to erase with white. This procedure is particularly simple if you click the small black
and white icon in the toolbar above the background color. You can choose the shape and
size of the eraser in a dialog. In addition to various rectangles, you can also select oval
shapes.
229
Grid
Edit / Grid Options... allows you to define the square size for a grid, onto which lines, rectangles and ellipses snap as you drag them open whenever the grid is activated with Edit
/ Enable Grid.
While the option is enabled, Disable Grid will appear in its place in the menu allowing
you to deactivate the grid. The grid is useful for placing squares exactly next to each
other, for example. Enable Display grid with color to make the grid visible. You can select the color of the lines by clicking the sample color.
The grid can be added to the picture with Effect / Overlay Grid.... The lines can then
not be removed. They are saved and appear on printouts. You can select the spacing, line
thickness and color in the dialog.
Selecting Colors
If the foreground and background color is to be set to black and white, click the small
icon above the background color. The bent double arrow under the foreground color
swaps the foreground and background colors. To select a different color, click the foreground or background color.
If the color depth is 16 bit or more, the Color Picker will open allowing you to define a
color using various color models. The HSV model is particularly clear, just like the crayons that are very useful for painting in particular. The pallet is part of the Mac OS and will
230
therefore look different depending on which Mac OS version you are using. You can enlarge the pallet in Mac OS X 10.3 and above.
If you need a specific CMYK color, you can define it using the mixing sliders in the
CMYK section. The color bar shows the respective color. GraphicConverter can open and
save pictures in CMYK mode.
You can also define HTML Colors for the Internet and RGB Colors for screen publishing,
for example. The color bar shows the respective color.
If you select a Web Safe Colors, you can be sure that this color will also be displayed on
the Internet even on very old computers in the same way as on your own computer. All
other colors can only be displayed on very old computers by mixing and dithering and
231
may therefore seem slightly wrong. However, as these computers will hardly be in use
anymore, you can also use other colors today.
If you need the HTML code of a color that is not in the list of Web-safe colors, you can
read the code via the context menu over a picture. Open a picture containing the color
and Control-click the part of the picture where the required color occurs. It does not matter which tool is selected. Select Copy current color as HTML. The HTML code for the respective color is now in the clipboard and can inserted into the HTML code of a Web site
with Command-V. If, for example, you have defined the color as the foreground color with
the eyedropper, you can select Copy current foreground color as HTML.
The first version of the HTML standard could already display all colors. The limitation to
213 colors was simply a recommendation as a large number of computers that could only
display 256 colors were still in use. The remaining 43 colors were reserved for Microsoft
Windows.
The RGB Model uses the so-called additive colors red, green and blue. When these
three colors are added together, the result is white. Monitors display all colors according
to the RGB system. Use this model to produce pictures for a multimedia CD-ROM, for example.
A color palette from which you can select a color opens for pictures with 8 bit color
depth or less. The color palette for the foreground color is a tear-off menu. If you move
the mouse cursor away from the toolbox while the palette is open, the palette is separated and can be left open for easy access.
232
The current foreground color is framed with a white line (bottom right in our
screenshot). The color number is displayed under the mouse cursor when you run over it
with the mouse. Click the required color to select it.
Eyedropper
If you want to select a color from a picture, click the corresponding point in the picture
with the eyedropper from the toolbox. The color of the pixel under the tip of the eyedropper becomes the foreground color and can be used to paint, fill or for shapes like the
rectangle. Hold down the Alt key to switch to the eyedropper when you are using another tool.
Framing a Picture
Selecting a color from a picture with the eyedropper (see above) can produce great effects if you use the color to design other elements like text or a frame. To create a frame
around a picture, hold down the mouse button and run the eyedropper across the picture. As soon as a suitable color for the foreground appears in the toolbox, let go of the
mouse button. Select Edit / Add Border.... The following dialog opens:
Inside draws the border on the margin over the picture so that the image does not become larger. Outside adds the border around the outside of the picture. Straddling
233
draws half of the border over the picture and add the other half on the outside. Enter the
required Width for your border and click OK.
If you do not like the color, simply select a new color with the eyedropper or with the
Color Picker and “pour” it into the margin with the fill tool .
Pattern
Areas that you create with the filled rectangle, rectangle with rounded corners and ellipse
circle can be filled with a pattern. The colored area above the foreground color in the
toolbox (Window / Show Toolbox). A tear-off menu opens where you release the mouse
cursor over the required pattern to select it.
Pull the mouse cursor further away to tear-off the palette. To select a pattern, click it on
the torn-off palette. The close box at the top left closes the torn-off palette. The lines in
the pattern have the foreground color. The background has the background color. To
clear the pattern again, select the pattern-free box at the top left of the palette.
Windows
In the Window menu, you can use Minimize Window to send the current window to the
Mac OS X Dock. Bring all to front brings all GraphicConverter windows out of the dock.
Furthermore you can choose how to arrange the picture windows. The icons indicate
the position of the open windows. The tiled arrangement helps you “tidy up” quickly
234
when picture windows start to become disorganized. A proper arrangement provides
you with a quick overview of all open pictures.
Arrange left to right is particularly suitable for portrait-format pictures. Accordingly,
Arrange top to bottom is particularly suited to landscape-format pictures. Arrange
staggered allows you to find the pictures buried under other windows.
Window / Cycle Windows brings the next picture to the front as the current picture in a
circuit so to speak.
The names of all open documents are listed under the Cycle Windows menu item. Click
one of the entries to activate the corresponding window. Pictures that are in the dock are
indicated by a hash sign (¨) in front of the filename.
Viewing & Sorting
It is easy to lose your overview even when there are only several pictures open. GraphicConverter helps you to view and sort these graphics with the browser and the slide show.
This way you can maintain your overview and achieve your goals.
The Browser
Summary: GraphicConverter has a powerful browser function that allows you to oversee,
manage, sort and edit larger numbers of graphics and movies. You can also send your
images to an e-mail program so you can mail them to a friend.
To open a Browser window, click File / Browse Folder.... Then select a folder that contains pictures from the file selection dialog that opens and click Select. You can also drag
235
a folder to the GraphicConverter icon in the operating system. In the Browser window
that opens, small previews of the pictures in the folder are displayed.
If there is not yet a preview of the pictures, GraphicConverter creates one automatically
or you can Control-click and then select Create Preview in the context menu. For graphics for the Web, create a temporary preview so that no unnecessary data is written into
the files making them larger. Select Edit (Mac OS X: GraphicConverter) / Preferences/
Browser / Preview and from there click Temporary if ppi value is equal or less than 72
or Always temporary.
Click the picture to display a larger version of it in the right section. You can also select
several pictures. A histogram is displayed above the enlarged picture. This is only interesting for professional users. A detailed view is displayed under the picture. Move the red
rectangle on the picture to select the section. You can close the histogram and the detailed view by clicking the small white cross in the top left-hand corner. You can display the
histogram and the detailed view via the context menu.
To select several pictures, use Shift- and Command-click, for example, to move them to
a different folder on the left or to the displayed folder in another Browser window. You
can expand a selection with Shift-cursor left and Shift-cursor right.
Tip: You can use the Shift Lock key to select pictures as if the Command key was
pressed. This trick is useful if you want to select a number of pictures from a large stock of
images as you do not have to hold down the Command key the whole time.
236
If you drag files or folders to a browser window from the finder or from another browser
window, you can move or copy the pictures to the displayed folder or its subfolders. As
soon as you move the mouse over a folder, a gray circle appears at the top left of the folder. The files will only be moved to the folder once you move the mouse over the circle.
To copy the files, hold down the Alt key.
The options from the context menu affect all selected pictures.
If you move a graphic from the browser to the desktop or another folder on the left-hand
side of the browser with the Command and Option keys, an alias is created.
If you open a picture as normal, you can open a browser window showing the content
of the folder where the open picture in stored by pressing Command-Up arrow key.
Use this option to sort larger numbers of pictures. Select the next picture with the cursor key and use Command-1 to Command-0 to move the pictures to the folders that you
define in the Preferences under Slide Show / Move Folder. Using the key combinations
with the Control or Option key, you can select a further 20 destination folders that you
can select under Move Folder 2 and 3.
Using the Tab key, you can switch between the left-hand area with the file tree and the
preview area. The cursor key functions then change accordingly. The respective area is
displayed briefly with a blue frame. While the preview area is active, the cursor down key
selects the next picture down. If you switch to the left-hand area with the Tab key, the
cursor down key will take you to the next folder down.
In the preview area, you can also enter the name of a file to find it quickly. While you are
typing, do not stop as the system will immediately jump to the matching file. Your entry is
displayed at the bottom in the window frame.
If only two pictures are selected, both are displayed at the same time on the right-hand
side so that you can compare them if they are similar.
237
The picture details, such as the file size and the format, are displayed under the picture
on the right-hand side. If you open the context menu by Ctrl-clicking the right-hand side
below the preview, you can copy the whole text to the clipboard with Copy Text allowing
you, for example, to paste it in a word processing or spreadsheet program.
Double-click a preview image in the middle or right-hand section to open this picture
in GraphicConverter. If several pictures are selected, all of them are opened. In this case,
the Shift key may not be pressed down when you double-click.
Folders that are in the selected folder are displayed as folders. Only after you doubleclick the subfolder are the contents displayed in a new Browser window. To display the
contents of a different folder in the current Browser window, single-click the corresponding folder in the left section or select Open folders in same browser under Preferences / Browser / Misc.
Aliases are indicated by a bent arrow in the bottom left-hand corner so they do not accidentally overwrite the original file with the alias when copied.
You can copy selected files in the browser with Command-C and paste them into another folder with Command-V. Files copied in the Finder cannot be pasted. For security reasons, it is not possible to copy files with Command-X and delete them at the same time.
The Favorites area is underneath the file tree. There you can add frequently used folders
to access them quickly.
Tool buttons are provided at the top for the most important options. You will also find
these and other options in the context menu that opens when you Ctrl-click a picture.
You can hide the toolbar by clicking the oval button at the top right of the window frame
or in the Browser / Display section of the Preferences with Show tools.
238
You can choose yourself which tools are displayed in the Browser / Toolbar section of
the Preferences.
Click the required tools in the left-hand list and select Add or remove a tool by clicking
it in the right-hand list and clicking Remove. Disable Show conversion option to hide
the pop-up menus on the right next to the tools. The Back and Forward arrows that
page back and forth as in web browsers are particularly useful. The shortcuts CommandOption-5 and Command-Option-6 are also available for this purpose and can be checked
in the Edit / Navigation submenu at any time.
If you want to make the tool icons smaller, hold down the Ctrl key and click the browser
toolbar. Then select Show small icons without Text from the pop-up menu. This is particularly useful with small monitors, for example, on laptops.
The Up icon opens the parent folder in a new browser window. IPTC... opens the dialog
for document information that you can open with Command-I. The IPTC information allows you to use the GraphicConverter browser like a database for indexing and searching.
You will find detailed information on this in the chapter “IPTC Document Information”
from page 314.
Crop... starts the Crop for Photo Service for several pictures in sequence. You can also
call up this option via the context menu / Export. Make Preview... or Option-Escape
recreates the preview. This option is called Create Preview in the context menu.
In the Browser / Display General section, Redirect Open button to “Open with…” allows you to specify that the Open button opens files in the default “Open with” application that you set in the Browser / Open with section.
239
The Redirect Open button to “Open with…” setting allows you to specify that the
Open button opens in the default “Open with” application that you set in the Browser
/ Misc section. If you select Photoshop as the default “Open with” application, the
Open button will open the selected pictures in Photoshop. Default is open in GraphicConverter. The Open with... icon has the same function. You can also open pictures in
the “Open with” application with Alt-double-click. The other icons have self-explanatory
names.
The icons for the slide show and for scanning have a small triangle that you can click to
select a variant of the option. If you click the icon, the setting that was last selected in the
pop-up menu will be used.
Using the pop-up menus to the right of the icons, you can convert the selected pictures
and save them to a subfolder. The pictures are saved in the format selected in the Format
pop-up menu. You can select the options for the respective format by clicking the Options... button in the dialog that opens. Whether the pictures are saved web ready
(without resource) depends on the setting in the Save As dialog. Click the Start button to
start the conversion.
In the Batch pop-up menu, you can also define a batch and specify where the converted pictures should be saved.
Convert to subfolder automatically creates a subfolder called Converted Files in the
source directory where the converted pictures are saved.
Convert to same folder (maybe overwrite original) overwrites the source files if they
have the standard ending and if the source format is selected as the format. If the source
images are in JPG format and are being saved in TIF format, the source files are kept along
with the converted files.
Convert to same folder and format (will overwrite original) always overwrites the
source files. The format selected in the Format pop-up menu is not valid.
240
Convert to other folder allows you to specify your own destination folder.
Define Batch is available at the bottom of the Batch pop-up menu. The same dialog as
in Convert & Modify opens. In the chapter Batch from page 302, you will find all details
on how to use this dialog and use the individual batches.
Important: The batch needs to be saved before it can be used.
Edit selected Batch... is only available when a batch has been selected in the top section of the pop-up menu and also opens the dialog for the batches. All changes are saved
immediately once you close the dialog with OK.
If only the format of the selected pictures should be changed during conversion, select
No Batch at the top of the pop-up menu. Remember to switch back to No Batch after
using a batch so that you do not accidentally run a batch when converting files.
The two pop-up menus feature almost all of the options from the Convert & Modify dialog. The basic advantage of working with the browser window is that it is easier to select
individual images for a batch or conversion from a large number of files and you can always see the images in a preview.
Under Mac OS X 10.4 Tiger, you can start a spotlight search with the search box. Enter a
search term to display all pictures containing the keyword.
The browser can also display movies and play the selected movie in the right-hand section. Four images from each film are shown in a preview in the center of the browser to
241
give you a quick overview of the content of the movie. This is particularly helpful for movies that start with a black picture.
If you would prefer to display just the starting picture, you can specify this in the Preferences, in the Browser / Display Thumbnails section.
Movie files that are displayed without a picture in the middle section are normally
sound files that can also be played on the right-hand side.
Some digital still cameras can create movies that consist of two files. A .THM file with
the same name is saved containing the information on date and camera type in addition
to the actual movie file in AVI format. GraphicConverter reads the THM file automatically
and displays the information. If you rename AVI or CRW files with the Rename option, the
THM files are also renamed automatically.
MP2 files can only be displayed if you purchase the MP2 add-on for QuickTime from
www.apple.com.
Turn left and Turn right rotate the image counterclockwise or clockwise.
slide show displays the selected images as a slide show. Command-G shows all of the
images from the current browser window in a slide show. You do not have to select the
pictures. Folders will be ignored. If you select images and folders, only they will be displayed in the slide show.
242
The Print button allows you to print one or more selected pictures. If you print just one
picture and want to display a preview in the print dialog, open the picture by double-clicking and select File / Print....
Catalog opens a pop-up menu where you can select HTML... to create Internet pages
on which your pictures are displayed as a catalog (see p 80). Select Picture... to create
image files with the catalog pictures (see p 35).
E-Mail opens a dialog that lets you forward the selected images to an e-mail program
to mail them as an attachment. If you want to send the image via a webmail provider like
Hotmail, you can select the Folder on Desktop option from the Send pop-up menu to
save the file in an automatically created folder that you can then use for your webmail account.
It is best to leave the Recipient, Subject and Message input boxes empty. Fill in this information in the next step in your e-mail program. If you use the Mailsmith e-mail program, it may be necessary to enter a recipient to avoid an error message. Select Size: Original Size (full quality), Large or Larger if the recipient wants to print the image. The
sizes Medium and Small are good enough for viewing on a monitor. Smaller images are
sent and received much faster than large ones. The smaller versions of the images are
kept as invisible temporary files on your hard drive until they are sent. If the extension
.jpg is missing, GraphicConverter will add it automatically.
Select a JPG quality level for the pictures with Quality (for scaled images).
243
Delete all Metadata from JPEGs deletes the preview and the EXIF information along
with all other metadata. As the preview causes problems with some programs in Windows, we recommend this setting to increase compatibility.
Add Filename to Image adds a white area to the bottom of the image where the document name is inserted. You can select a font and size for the document name.
Mark images with a red cross adds a red cross to the pictures as copy protection so
that they can only be used for demonstration purposes. Use this option if you want to
show your customers pictures that they can buy from you or you can license for them.
The source file is not changed.
Apply batch allows you to edit the images before export using a batch that you previously defined in the browser or in the Convert dialog. You can add a copyright note, for
example.
Choose your e-mail program from the pop-up menu E-Mail with and click E-Mail to
send the images at the chosen size to your e-mail program. If you choose a different size
to Original, temporary files will be created from the scaled images and automatically deleted later on. To avoid problems when the recipient wants to print pictures, they will be
automatically changed to a standard resolution of 72 dpi.
Other opens the context menu for the main section of the browser. There is a separate
context menu for the left section that opens with a Ctrl-click.
In the lower left-hand corner of the window frame, there are a number of options
available on a toolbar. To save space, the toolbar can be hidden under Preferences... /
244
Browser / Display. If you hold the mouse cursor over the icons, the name of the option
will appear in a small bubble.
On the far left of the toolbar, you can select the size of the small previews. In this popup menu, you can also specify which details you want to display beneath the images.
Click Sort: to select criteria such as Name, creation date, modification date and size
for the middle section. If you select By Label & Name (Creation Date), the pictures will
be sorted according to your label. Sorting is carried out according to name (Creation Date) among the pictures with the same label. Also By Extension & Name sorts the files according to extension and according to name among the files with the same extension.
Select By Rating and Name if you have evaluated your images with 1-5 stars and want to
sort them accordingly. To switch the sort order from bottom to top, click the blue triangle
on the right.
By Name starting at Position ignores the first characters of the files, which can contain
a street name, for example, that is followed by the actual count. You can enter how many
places should be ignored in the Browser / Misc section of the Preferences next to Position. You can use By Hex in Name starting at Position if the hexadecimal system is used
for counting.
The icon to the right of the blue triangle indicates whether folders are always displayed
ahead of files in the middle section or whether the files and folders are displayed in alphabetical order regardless of type.
The open lock indicates that the folder displayed in the browser window is not read-only.
If the left section does not display the directory structure or if you want to hide it, click
the Folder icon with the two small folders to the right of the lock.
The Favorites area is underneath the file tree. There you can add frequently used folders
to access them quickly. Click the folder to be added in the file tree and open the context
menu via the Favorites area. Select Add current folder to favorites.
Click the icon with the magnifying glass to switch the large preview on the right on and
off. In a third mode, you can click the icon again to also display the large preview image in
a separate window that you can position anywhere. You can use the Option-Tab keyboard shortcut to switch between the modes. The preview window can also be displayed
and hidden via the Window menu. This is very useful on systems with two monitors. The
preview window can be sized using the bottom right-hand corner.
If you display the preview window on a second monitor, you can maximize the preview
window using the context menu so that it fills the whole screen. The title bar will no longer be visible. Open the context menu by Ctrl-clicking the preview window and selecting
Palettes / Window / Fullscreen preview window on second screen. To return to the
245
normal preview window, select Zoom preview window to normal state from the same
submenu.
The icon with the arrow displays and hides the drop area to which you can drag pictures
from different folders to show them as a slide show or to rename them. The pictures are
labeled with a number in the red circle so you can see which pictures you have already selected. The images in the drop area can be sorted again with the mouse. Selected images
can be removed from the drop area using the context menu or Backspace.
All options, which can be selected for the pictures in the drop area, need to be selected
from the context menu in the drop area. The slide show is available in addition to rename.
When you hide and display the drop area again, the selection will be cancelled.
The number of files in the current folder is displayed to the right of the last icon. If you
have made a selection, the number of pictures or objects selected is indicated to the right
of the number of pictures.
Type the first letter of the filename to find the image more quickly. The text you entered
is displayed instead of the number of the files, and the corresponding graphic is selected
in the middle section of the browser.
246
Tip: If the right section with the large preview image is completely minimized in the
bottom right-hand corner, you can reopen it by clicking the icon with the magnifying
glass at the bottom of the window frame.
In the directory structure, only folders that contain other folders have a triangle for
opening folders. All other folders do not have to be opened per se but are “opened” with
a click. The graphics they contain are displayed in the middle section.
The size of the middle section with the smaller images can be changed by clicking the
scrollbar on the right border of the middle section and then moving it to change the size
of the overall image. Because the small previews are sorted in a grid, the window also displays this format when the previews are larger or smaller in size.
The width of the left section can also be changed by moving the scrollbar. This is necessary for deeply layered directory structures. You can change the size of the right section
with the handle in the bottom right-hand corner of the window frame (sizer). The size of
the large preview in the right section depends on the image itself and the width of the
section. After you change the width of the section, the image automatically adjusts to the
new size.
The filename, size and date are displayed below each image. Click a picture to select it
and then click the name to edit it. You can use all characters from the Unicode standard.
Unicode is a standard that allows a large number of characters in a font. End the entry
with Return or by clicking another picture.
Click a graphic to open a large preview in the right section. The size of the preview depends on the width of the right column but cannot be any larger than the standard display at 100%. Detailed graphic information is displayed below the preview. Switch to the
other images using the arrow keys or the Tab key and Shift-Tab. Click the right arrow key
to jump from the last image of one row to the first image of the next. You can cancel a selection with Escape.
If there is no preview for a picture in the graphic file, it will be automatically created. If
this does not occur, you can create a preview in the context menu. To open the context
menu, Control-click the picture you want and then select Create Preview. This very long
context menu has been split into two parts placed next to
247
each other so it fits on the page.
248
Note the shortcuts indicated in the context menu, for example, Command-R for rotate
clockwise. They will help speed up your work. If this context menu is too big for you, you
can hide individual options in the Preferences under Browser / Context Menu .
Context menu options
Help opens this manual.
Click Refresh to update the list for the current browser window. This is useful when you
have modified files and folders in other programs because GraphicConverter does not
automatically recognize changes at the operating system level.
Resort sorts the preview pictures to correspond with the currently selected sort criterion that you can select at the bottom left of the browser window from a pop-up menu.
Select All selects all files in the current browser window. This is useful when, for example, moving these files to another folder or browser by drag and drop. Move the graphics
from the middle of the preview section to the target folder on the left or to another browser window. If you don’t want to select all of the graphics, select the ones you want while
holding down the Shift key. Deselect unselects all selected items.
Create Preview creates a preview for graphics that do not yet have one. You can also
use this option to create a larger preview.
249
Add Image as Folder Icon sets the selected image as a folder icon so that the folder in
the Finder shows the selected image.
Click Label to assign a label to graphics. These are operating system labels used to identify, for example, project files by color. The label is also written to the XMP metadata so
that it can be displayed by Adobe Bridge under other operating systems.
If you are creating a book, for example, you can assign a label to all files you already
used. You can do this particularly fast with the spacebar that assigns the label “Orange”.
Press the spacebar again to remove the label. You cannot assign a different label using
the keyboard. This function helps you quickly select the best pictures when working with
large numbers of images.
The label is displayed over the picture in the browser and the background of the picture
shows the color of the label. In the lower left-hand corner of the browser window, you
can choose Sort: By Label & Name to group the labeled pictures on the screen. This allows you to quickly see which pictures you have already used in your book.
Even if you can not display or assign labels under Mac OS X.1 and X.2, you can display
and assign labels in GraphicConverter under these systems as files can contain labels in
Mac OS X.1 and X.2 too. In Mac OS X.3 Panther, the labels can be displayed and assigned
in the Finder again.
250
Rating allows you to assign 0–5 stars to images in JPEG or TIF format. This information
is written in the XMP section of the files. It is easiest to assign the stars to rate pictures by
selecting the images and setting the stars with Ctrl-0–5. You can also use these keyboard
shortcuts to assign stars during a slide show. In the Browser / Function section of the
Preferences, you can change the key assignments so that keys 1-5 assign the rating
without an additional key.
If you disable XMP in the format options for JPG or TIFF pictures, any ratings that have
been set will not be saved with the file when you save it again and will therefore be deleted. Therefore make sure that XMP is kept enabled in the format options when you work
with ratings.
Lock Files/Folders makes files and folders read-only. Select Unlock Files/Folders to
disable this option. This does not affect Mac OS X rights. A lock is shown above the preview when documents and folders are protected.
251
Change Type and/or Creator opens a dialog where you can change the document
type and creator.
Enable the required option and enter the type or creator you want to set. Clicking Use
values of first file inserts the values shown below from the first selected file in the browser window in the boxes.
Reveal in Finder shows the selected files in the Finder.
Edit filename selects the filename of the selected file so that you can change it. You
can also click the filename to edit it or simply press Return.
Rename opens a dialog where you can rename files systematically (see p 43). You can
also open the rename dialog by selecting Edit / Find, compare, replace, rename / Rename selected Files....
If all or several graphics are selected at the same time, you can deselect them by pressing any button other than the control keys (Command key, etc.).
View Item(s) in slide show launches a slide show of the selected graphics against a
black background. To exit the slide show, click the square Stop button in the lower left of
the screen or press Command-. (period). For more detailed information, see the chapter
on slide shows on page 282.
The Edit File Info (IPTC)... option can be opened directly, for example, to enter copyright information (see p 314). Only the content of the boxes where the check box has
been selected is modified. You can therefore use this option to enter yourself as the copyright owner for several pictures at the same time without changing any different keywords for the individual pictures. If you select a folder, the changes will also be made to
all pictures it contains. The URL box is not part of the official IPTC standard and is not sup-
252
ported by all programs. Therefore it is better to enter your URL in the Copyright box. You
enter the copyright symbol with Alt-G.
The Edit Comment option allows you to enter or modify a comment for JPEG/JFIF graphics or for graphics you want to save. If the option for creating resource forks is enabled
under Preferences/ Save / General, this information is written to the resource fork. Comments in the resource fork are supported in the following formats: JPEG, GIF, TIFF and
PNG.
Open with... allows you to open graphics in the program that you select in a submenu.
The submenu contains a list of all programs currently open.
If you have selected, for example, Photoshop under Browser / Misc with the Select default "Open with" application button, when you click Open with..., Open with Adobe
Photoshop also appears as an entry in the context menu.
Rotate / Mirror opens a submenu with the options for lossless rotating and mirroring:
Rotate 90° clockwise, Rotate 90° counterclockwise and Rotate 180° rotate the image
in the respective directions. You can rotate counterclockwise by pressing Command-R on
the keyboard. Command-Shift-R rotates 90° clockwise.
You can also rotate just the preview with Rotate thumbnail 90° clockwise (counterclockwise). This useful for RAW files as they can be opened with GraphicConverter, but not
saved.
To freely rotate the image by entering an angle, click Other Value… in the Picture/ Rotate submenu after opening the graphic as you usually do.
Mirror Horizontal mirrors the image on a horizontal axis without any quality loss. Mirror Vertical mirrors the image on a vertical axis without any quality loss.
253
Metadata (EXIF, IPTC, ...) opens a submenu with the following functions:
All options can be used for JPG files. All options, where (JPGs only) is specified, can be
used for the formats CR2, CRW, EPS, EPSF, GIF, NEF, NRW, PDF, PNG, PS, PSD, THM, TIF, TIFF,
PNG, PDF and other formats that are indicated with R/W at: http://
www.sno.phy.queensu.ca/~phil/exiftool/ in the Support column of the Supported File
Types table.
--- EXIF --Set Creation and Modification Date depending on EXIF overwrites the creation and
modification date with the date that is entered in the EXIF information for the file. Some
digital cameras generate an incorrect creation and modification date, but set the correct
photo date in the file. Use Set Creation Date depending on EXIF if only the creation
date should be set to leave the correct modification date unchanged. This option also allows you, for example, using Command-A, to set the creation date and, if necessary, the
modification date for several selected graphics to the only photo date that makes sense.
254
Incorrect file dates can also be corrected if this option is selected in the settings under
Browser / General.
Set EXIF Date to File Creation Date sets the EXIF date to the date when the document
was created.
Shift the EXIF timestamp... opens a dialog where you can change time and date from
the EXIF information. This makes sense if you forgot to change the time in the camera or if
the clock battery was low while you were traveling. To raise the value for year, month etc.
enter positive numbers. To decrease the values enter negative numbers like -5.
Use Set EXIF Date if you want to set the date and time directly.
Rotate depending on EXIF rotates the selected pictures as specified in the file EXIF information if this data is provided. Some digital cameras have an internal position sensor
and note when the camera is held sideways to take a picture. The orientation is written in
the EXIF information. This option allows to you to select all pictures after importing new
shots and automatically rotate the portrait pictures. If you import the picture with GraphicConverter using the File / Acquire / Download images from connected camera...
option, the portrait format pictures containing the corresponding information will be rotated immediately and without losses.
You should use Remove double orientation tags and reset them if you receive an error message about orientation tags when you open images. Images should only contain
255
one orientation tag. Some pictures from iPhoto have this problem due to a bug in QuickTime. Updating QuickTime can solve the problem for iPhoto.
Change orientation value... allows you, for example, to change an orientation that has
been set incorrectly by the scan program. If you want to rotate an image normally, use
the Rotate option from the context menu.
Rebuild EXIF preview creates a high-quality preview with 200x200 pixels as an EXIF
preview. If you forward data to PC users, you can use this option to add a high-quality
preview to all pictures in a browser window and delete the resource using the Convert &
Modify dialog. The files can then be read by all programs in Windows or other operating
systems without any problems. You can also use the option, if the EXIF preview is too
poor or if it was not rotated for portrait pictures.
Remove EXIF Preview deletes the EXIF preview which is no longer necessary after GraphicConverter has created a normal preview with a better quality.
Edit or add EXIF data... allows you to change the EXIF data for the manufacturer of
the camera, the model, the software or the date.
You can use Delete Host&Software, correct File Date... to delete useless data in JPEG
images that were written in the files by other programs. Other programs sometimes set
their name in the EXIF data. When you import images using the program Image Capture,
the file date is set to the date of the import. It is more useful, however, to use the date
when the picture was taken. As this does not appear at any other point in the EXIF data,
GraphicConverter can correct the date. If you have imported images with the program
Image Capture, you should also use the Rotate depending on EXIF option from the
same submenu so that portrait pictures are not only displayed correctly in GraphicConverter, but also in screensavers etc.
Export EXIF data into text file creates a text file in the same folder that lists the EXIF
data. You can use these files for imports into databases.
Delete EXIF tags... opens a dialog where you can enter the Hex code of the EXIF fields
that you want to delete if, for example, you do not want to pass on the information about
the white balance.
256
Remove Maker Note and Comment deletes the maker note and the comment.
Add or edit GPS values opens a dialog in which GPS values can be entered or edited
when for example you have written down a position from a car navigation device.
Copy EXIF to XMP copies the IPTC data to the XMP section without saving the image
again. It is a good idea to copy the EXIF data to the XMP section if, for example, you will
be continuing work on the images in a program that can only read the XMP section.
You should use Copy XMP IPTC to other IPTC records if your images are to be further
processed in other programs that cannot yet read the IPTC data from the XMP section. In
JPG files, the IPTC data can be found in four areas of the image files:
•
•
•
•
In the XMP section – this entry is used as the master
Adobe Photoshop IPTC record
The EXIF section can also contain IPTC
In the resource fork in the ANPA record
--- IPTC --The Copy Comment to IPTC Caption and Copy IPTC Caption to Comment options
copy the comment or the IPTC description into the other respective area. This is useful if
you want to continue work with the data in another program that can only display one of
the areas.
Copy file name to object name is recommended when you have files with descriptive
filenames, for example, “Forest.jpg”, and want to copy the filename to the IPTC object description. The file extensions are left out. You can also use this option for several selected
files and for complete folders. Copy file name to caption copies the document name to
the IPTC description.
Copy EXIF date to IPTC date simplifies your work if you want to transfer the EXIF date to
the IPTC data.
You can use Copy Windows EXIF Tags to IPTC if you receive pictures that have been
indexed by the Microsoft Windows Explorer. Windows Explorer enters the keywords in a
non-standard EXIF section. GraphicConverter recognizes these entries and moves them to
the corresponding fields in the IPTC section with this option.
257
Copy Spotlight comment to IPTC caption copies the spotlight comment to the IPTC
caption. In the same way, Copy Spotlight comment to IPTC keywords copies the spotlight comment to the IPTC keywords. We do not recommend working with spotlight comments since they are not included when you send a file by e-mail, for example.
--- General --Change Resolution Value lossless lets you change the resolution, for example, from
72 dpi to 300 dpi, without saving the picture again. There is then no loss in quality.
You can rotate JPEGs in the browser without any quality loss using the context menu if
the graphic width can be divided by 16. This means that you cannot open the graphic as
you normally would. Digital cameras create pictures whose width can be divided by 16 so
that the automatic JPEG compression is optimized. A message appears if the picture
width cannot be divided by 16.
If a JPEG is modified and then saved as, for example, a TIFF, the normal rotate option can
be used because the file suffers no additional quality loss when saved. The comment can
be edited without losses using Edit Comment... the context menu in the browser.
Image files in Photo-Raw format may also contain a JPEG version of the image that you
can export with Extract JPG from Photo-Raw (PhotoRAW only).
Fix file length of recovered JPEGs is useful when you restore JPEG files with rescue
programs like, for example, Techtool after file system crashes. They often end up being
100 MB instead of 20 MB. In some cases, Techtool cannot establish the actual size of the
file and therefore creates a file that is too big. You can reduce it to the actual size with this
option.
258
Remove Metadata... opens a dialog that lets you choose the metadata you want to remove from the picture.
Rebuild and repair Metadata reads all metadata from an image file that does not correspond with the standards and can still be restored. When you save the file, the metadata is saved according to the standards.
Insert DESCRIPT.ION file content into IPTC caption only appears in this menu when a
Descript.ion file is selected. These files are generated by the Windows software ACDsee
and contain the IPTC data. Please do not ask us why ACDsee writes this data in a separate
file, instead of writing it in the image files as is the standard. Use this option to write IPTC
data from the Descript.ion file in the image files whenever necessary. You will then no
longer need the Descript.ion file and can delete it.
Back to main context menu:
The following options are available under Date: Set Creation to Modification Date is
useful when you are editing files that, for example, have been given an incorrect creation
date like 1904 by your scanning software since the modification date is set by the operating system and is therefore often correct. Set Modification Date to Creation Date allows you to transfer the date in the other direction.
259
Set File Date opens a dialog where you can edit the creation date and the modification
date.
You can use Set always to mod date to change the creation date to the modification
date. Set always to creation date allows you to change the modification date to the creation date.
Add offset to each file allows you to select an offset which sets the time as 1 second later for all files to be modified, for example. The sort order is kept for the sort method according to date in the browser.
Make Aliases creates an alias of the image file in the same folder from where you can
then move the alias to another location, for example.
Copy files to... allows you select a folder where a copy of the selected images is saved.
Move files to... allows you select a folder where the selected images are moved to.
Save copy as... allows you to save a copy of the graphic file with a different name. Enter
the new name in the file selection dialog in the same way as when you are saving a picture.
Move file to... saves the file with a different path and deletes the original.
Sort files into subfolders / Name creates a subfolder and sorts the files according to
name in this folder. If, for example, you select five pictures whose name starts with “Wall”
and five others starting with “Grill”, the first five will be copied to a folder named “Wall”
and the others to a folder named “Grill”. If a filename occurs only once, the file will not be
moved and not renamed.
If you select Date instead of Name, the selected images will be moved to subfolders
that are named after the date of the respective image file and are placed in automatically
created month and year folders. This option is also available immediately upon import
and is useful if you used the Finder to import pictures from a digital camera. Flat creates
folders that also contain the name of the month after the day date so there is one folder
level less. This option is particularly useful if you take pictures only once in a while. Extension sorts the files into folders according to their extension.
In the Browser / Function section of the Preferences, you can select how many Digits
for Index the source data has as this will be deleted from the name for the folder name.
260
The Minimum file count specifies from what number of files a subfolder with the same
name beginning should be created.
Duplicate creates a duplicate of the selected file with “Copy” added to the name.
Set GPS from current Google Earth position adds the GPS data to the EXIF data of
the selected image files, see p 322 onwards.
Open GPX file... allows you to set the GPS data from a GPX file for selected pictures, see
p 324 onwards.
Move to Folder opens a submenu listing all folders that have been defined as move folders for the slide show. You can set these folders under Preferences / Slide Show / Move
Folder. You need to select at least one of these folders under Preferences / Slide Show /
Move Folder for this option to appear in the context menu.
The following options are available in the Export submenu:
Crop for Photo Service... opens a dialog where you can crop the selected pictures one
after the other as with a specified aspect ratio. Photo services use photo paper with an aspect ratio of 2:3. There is a separate chapter on this function. Please see page 99.
DCF compatible file system... allows you to export to the memory card of a digital camera, for example. If your DVD player has slots for memory cards, you can then show your
261
pictures on a television. The export function automatically converts the pictures to JPG
format and saves them in a compatible form.
E-Mail file(s) as attachment... lets you forward the selected images to an e-mail program to e-mail them as attachments (see p 243).
Toast or iDVD allows you to transfer the files selected in the browser to Toast or iDVD.
Toast adds the data exported to its list of files to burn. The files are not moved on your
hard drive.
The pictures transferred to iDVD are inserted as a slide show. The preview mode should
not be selected in iDVD in this case. The pictures transferred to iDVD are inserted as a
slide show. The preview mode should not be selected in iDVD in this case. Unfortunately
iDVD does not evaluate the profile information from image files and therefore displays
profiled images, for example, like those from digital cameras, too pale. Therefore you
should always use the iDVD with merged Color Profile (Slide Show) option for images
with profiles. The iDVD (Slide Show) option is only suitable for pictures without profile.
Images without profiles are, for example, scanned pictures if no scanner profile was attached or pictures from digital cameras that were saved with the Merge color profile into
image (for web usage) option. This option is available in the file selection dialog that
opens when you select Save As....
If you select iDVD with merged Color Profile (Slide Show), the images with calculated
profiles are saved in the Documents / GraphicConverter iDVD Export folder that is created automatically in your document folders. Delete these pictures as soon as you have
completed the current DVD project.
As televisions normally have a brighter picture than computer monitors, we recommend darkening the images slightly with a batch before export. We recommend also
increasing the contrast slightly at the same time so that the pictures do not look flat.
disclabel is a program that helps you print inlays for a wide range of CD and DVD
boxes. You can also print blank CDs and DVDs. disclabel provides numerous samples so
that you can achieve interesting results with just a few mouse clicks. You can download a
demo from www.smileonmymac.com.
IPTC... opens a dialog where you can select which fields should be saved with which
separators in a single file or in several files.
JAlbum... saves images and text files with the IPTC data for use in the program JAlbum
that you can use to create Web catalogs.
Prepare for Picture Frame device... allows you to optimise the size and aspect ratio of
images for digital photo frames. First select a target folder. Then the following dialog
262
opens where you can enter the resolution of your photo frame. You will find the resolution in the documentation for your photo frame or on the packaging.
If your pictures have the aspect ratio 4:3 and your photo frame 16:9, a lot will have been
trimmed off the image with the Crop option. In this case, it is better to select Letterbox to
add black margins on the right and left of the image. You can also specify the crop
method yourself before you use this option by selecting Export / Crop for Photo Service.
Remember that some picture frames make a collage from several pictures or add margins so it is not absolutely necessary to edit images beforehand. We recommend choosing picture frames with a high resolution of approx. 90 ppi and testing them beforehand
at a store. Only buy a frame with an aspect ratio of 16:9 if you are using a camera that can
be set to this aspect ratio.
Upload file(s) opens a dialog via which you can copy the selected files onto a Web server, (see p 90).
Find duplicate files... opens a dialog for finding and deleting duplicate files (see
p 299).
Insert profile into selected JPEGs / TIFFs... will apply a profile to the selected images.
Select the profile file with the file selector. Only set this profile file if it belongs to the
images as the colors will otherwise be displayed incorrectly.
New Folder creates a new folder.
263
Create Sort Folder creates a new folder called “Sort Folder”. If you drag image files to a
sort folder, a rising index number will be added to the front of the name. “Dog” becomes
“0001 Dog”. This allows you, for example, to reorganize pictures from different cameras.
Flat Folder View opens a new browser window — like for a search — in which all
images from the folder selected on the left-hand side of the browser are displayed. All
subfolders are taken into consideration. You can, for example, display all pictures from a
month or year folder if you sort your pictures chronologically. If you open the File menu
while holding down the Control key, the Browse Folder in Flat View... option will appear
instead of Browse Folder....
Move Item(s) into Trash allows you to recover files until you empty the Trash.
Remove Resource Fork... allows you to delete the resource in images to make them
smaller for Internet use or compatible for editing in Windows. The resource fork contains
previews in various sizes among other things.
The following options are available in the View Options submenu:
Hide Tools hides the top toolbar. Hide Footer hides the toolbar at the bottom of the window frame. As long as the toolbar is hidden, Show Footer appears as an entry in the context menu so that you can display it again.
Show Preview Window opens a window that displays the selected image with the EXIF
information.
Show Preview Pane opens a third column in the browser window in which the selected image with the EXIF information is displayed.
Show IPTC Window opens a window displaying all entries from the IPTC information
for JPG and TIF images under the mouse cursor in the browser window. You do not have
264
to click the pictures. Simply place the mouse cursor over the picture to display the IPTC
information.
Show Drop Area inserts a drop area at the bottom of the browser where you can drag
pictures from different folders so you can send them from there by e-mail using the context menu, for example.
Hide Favorites hides the favorites area at the bottom left.
Fullscreen preview window on second screen can only be selected if a second monitor is connected to your computer. The fullscreen preview is shown on the second monitor.
Preferences... opens the preferences under Browser / General where you can select
the sorting criteria, the sorting direction and the Font for displaying the file information.
Using Sort folders separately you can select whether the folders are displayed first and
265
then the files as is standard in the Mac OS or whether folders and files are displayed as
equals based on the selected criteria. Sort Top Down reverses the sort method.
Automatic refresh allows you to select a time after which the browser re-reads the
content of the current browser window. If you want the display to be updated constantly,
we recommend a value of approximately 3 seconds. The hard drive is accessed more frequently with shorter times.
You should enable Automatic resort if you always want to update the sort list after a
specific time. For example, this is recommended if you are working with labels and have
selected By Label & Name as the sort method.
Correct bad file dates with EXIF before year corrects the file date if it is right in the
EXIF information. Only those files are changed whose file date is before the date you
entered.
You should only disable Ignore aliases in folder list if you want to display the aliases of
folders in the folder list.
Don’t open packages prevents you accidentally displaying and modifying the contents of a package in the browser. Packages are normally programs that can be damaged
if modified.
266
The Create log option creates a log each time you move or copy files with the browser.
Extended log also logs which image causes GraphicConverter to crash when it attempts
to create a preview. If this occurs, send the picture to [email protected].
Back to the context menu: If you have installed the context menu extension for GraphicConverter, you can use GraphicConverter to open one or more selected images,
display them in the browser, view them in a slide show or edit them with a batch. The
submenu for the batches lists all batches that you defined using the Convert dialog or the
pop-up menu in the browser. This option is only useful in the Finder as you have direct
access to the options via the icons.
From Mac OS 10.4, you can create a workflow in the Automator via the Automator
menu using Create Workflow....
Additional settings can be made under Edit (Mac OS X: GraphicConverter) / Preferences in Browser / Preview:
You can use the Preview Create automatically option to switch this option off and on.
A preview is added to the file if Add to file is selected. You can create the preview as a
temporary file with the Temporary for locked files option because this is not possible
for read-only files. You should enable As EXIF preview for JPEGs if you want your images
to be compatible with Photoshop in Windows too. This option will not write the preview
in the Mac resource, but in the EXIF data at high quality with 200 x 200 pixels.
If you are creating graphics for the Web, we recommend that you enable the Always
temporary option because a preview increases the size of the file and is not useful for
267
the Web. The Scan files up to option allows you to set an upper file size limit in MB up to
which a preview is created for graphics. This option is useful because it can take a long
time to create a preview for large graphics.
Don’t create if EXIF preview available can be enabled if the previews from the EXIF information are sufficient for your work.
You should leave Don’t create in memory cards enabled because this allows the content of a memory card in a digital camera to be displayed without modifying the files on
the card.
Temporary if ppi value is equal or less than is the best setting if you are working alternately with pictures that are prepared for the Internet or for printing. A resource of approximately 40 kB is then not created for pictures destined for the Internet as it could
double the file size.
Use quick existing preview check allows you to speed up the preview in the browser
considerably as GraphicConverter only checks whether a resource is present and does
not need to open the file. If, for example, you display a folder with 5000 images, the previews will appear almost immediately when this option is enabled. This can take around
three minutes if the option is disabled.
However, if you have selected, for example, 400x400 pixels for the previews and the files
only contain small previews, they may appear pixelated since they are scaled in this case.
If you re-create the previews using the context menu, they will be displayed normally
again.
The Enlarge small ones option enlarges a small preview. If 200x200 is set as the size for
the browser display in the middle, a preview with, for example, 100x100 is scaled to
200x200. We do not recommend using this option as the image quality of the preview is
not ideal. It is better if you create larger previews with Create Preview via the context
menu.
If you save the preview in the cache using the Cache in memory option, the preview is
displayed slightly faster when the browser window is reopened, for example, from the
background.
Create THM for RAWs accelerates the display in the browser with RAW images, for
which a THM file with preview has not yet been created. The THM files are not shown in
the browser.
Enter the extensions of the file formats for which you do not want previews to be created under Ignore extensions for automatically preview creation.
Videos are often displayed in the browser with a black preview. This is because the first
frame is used for the preview and this is dark or black due to a fade-in. In order to set a
suitable picture for the preview, enter, for example, frame 30 for the preview of a movie
next to Frame offset for movie preview.
268
Additional settings can be made under Edit (Mac OS X: GraphicConverter) / Preferences in Browser / Display. Under Display, you can select whether Name, file size /
with separate fork details, with count of files (in directories), creation date, modification date / with time are displayed in the preview.
The color of the label is displayed in the whole background of the preview. If you do not
like this large display, you can select Label as little oval to display the color of the label
as a small point.
Rating hides and displays the stars that you assign via the context menu and the key
combinations Ctrl.-0-5.
GPS position shows a globe above the image if GPS data is available. The setting is only
applied next time you open a folder.
Digital camera details (slows the browsing!) lists the aperture and the exposure time
with the focal length. Enable Focal length calculated to 35 mm if you want to display
the focal length calculated as a value for a camera with 35 mm film. A flash symbol will
appear if a flash was used.
TIFF/JPG mode, compression and profile (slows the browsing!) is intended for the
preprinting stage so you can find pictures that are not separated, do not have profiles or
for which the LZW compression was accidentally enabled.
269
Show hidden files and folders shows hidden files and folders.
Treat files with “%” at beginning as hidden is useful if you receive files from other
operating systems where the percentage sign at the beginning of the file name means
hidden.
Treat files with “-” at the end as hidden is already enabled so that the respective files
from other operating systems are not displayed.
Frame preview puts a frame around the previews if custom colors are defined.
You should enable Show long filenames as help tags if you are working with long
filenames. If Show tooltips is enabled via the Help menu, long filenames will be shown
in a bubble.
Multi frame preview for movies shows four pictures from the movie instead of the
first picture as a preview, which helps organization and is particularly helpful if the first
picture is black. It can take a moment to create the multi-frame preview.
Use shadows creates a shadow below and to the right of the preview pictures. This simply improves the appearance in the browser.
270
Further options are available in the Browser: Display General section: If you want to
hide the operating tools at the bottom of the window frame disable Show footer.
Show label/rating inside large preview allows you to select whether the rating and
label should be shown in the right-hand column of the browser or not.
Show preview info hides and displays the text below the large preview. Click Define...
next to Custom List to specify which IPTC and EXIF details should be displayed under the
271
larger preview picture on the right-hand side of the browser in the next dialog. You can
add details to the list by clicking Add or by double-clicking them.
Use custom colors for Text and Background allows you to change the appearance of
the browser.
The Redirect Open button to “Open with…” setting allows you to specify that the
Open button opens in the default “Open with” application that you set in the Browser
/ Misc section.
Disable Show tools to hide the tools in the top of the browser window.
Enable Overlap one line during page up / down to prevent the last line of pictures
being displayed again when you scroll in the browser.
Show visible dividers for areas displays silver bars next to and below the left-hand
column with the folders. These make it easier to change the width and height of this area.
Show folders on desktop in left pane shows all folders that are on the desktop.
Maximum preview count in preview area specifies the maximum number of previews that are displayed on the right-hand side of the browser or enlarged in the freely
positioned preview window if you have selected several pictures. The right-hand area or
the preview window can be displayed by clicking the icon with the magnifying glass at
the bottom of the window or via the context menu with View Options / Show Preview
Pane.
Show iPhoto albums in left pane displays albums of iPhoto from iLife 08 or newer for
direct access (UB version of GraphicConverter or newer needed).
272
The Default button resets all settings to the standard defaults. Click the Undo option to
reset all settings back to where they were the last time this dialog was open.
Under Misc browser preferences, you can use the Select default “Open with” application to select a program such as Photoshop that appears in the context menu for browser
graphics using the Open with... entry. Select the corresponding program file in the file
selection dialog that opens. This program also applies for the Open with icon in the toolbar that you can display in the Browser / Toolbar section.
If the Redirect doubleclick to Finder option is enabled, each graphic is opened as if it
were double-clicked in the operating system. Graphics saved in Photoshop are now
opened in Photoshop and graphics saved with GraphicConverter are opened in GraphicConverter.
For a better overview, it is useful to display the path in the window title bar.
The Open folders in same browser option allows you to open folders in the middle
section of the same browser window by double-clicking them. You can only create new
browser windows when this option is enabled by clicking Open File / Browse Folder ....
If you select Drag & Drop handling Act as the Finder, files are moved as long as the
target destination is in the same volume. If the destination is in another volume, the files
are copied. This means that they remain in their original location and are copied to the
target destination.
273
Select Move by default and copy with option key to apply the same logic to copying
and moving to another volume as to working within a single volume: When files are moved, the original files are deleted. If the Option key is held down, the file is copied to the
target destination and the source file remains in the original location.
Enable Add complete image to drag if you want to insert pictures in a program like
FileMaker by dragging and dropping as the picture data will otherwise not be transferred.
Limit Finder Drag&Drop to 500 items prevents you accidentally copying too many
items from a browser window to the Finder.
Enter all filename extensions in the Ignore extensions box that you want to ignore.
Files with these extensions are not displayed in the browser. This option is useful for folders that contain Web pages or text in addition to graphics. The excluded file types are
also ignored when you search for double documents (context menu: Find duplicate
files...).
Allow extensions — leave empty to ignore this list (separated by a space) allows
you to just enter JPG JPEG TIF TIFF, for example, so that only files with one of these extensions are displayed. Use a space as the separator. As soon as you enter one extension, the
ignore list will no longer count. You therefore do not have to change the ignore list.
Only Mac OS X adds Folder Actions to the bottom of the context menu. This is only
useful for AppleScripts. You can assign an AppleScript to a folder that is run when you
drag files onto the folder.
274
In the Browser / Function section, you can choose the settings for the sort folder, see
p 264.
Use lossless JPEG rotation/mirror ensures that there is no quality loss when rotating
and mirroring JPEGs.
Disable Don’t modify EXIF Data if you want transfer pictures back to a camera, for example, to show them on a television using the camera. This setting has the disadvantage
that the EXIF preview cannot be rotated.
You should only disable Keep original file date if the date is to be set to the change
date.
You should disable Write labels in XMP metadata if the labels do not have to be compatible with Photoshop CS2 as the labels can be set considerably faster in this way.
Don’t alert suppresses the warning message that appears when a picture has a width
that is not a multiple of 16 as a loss of quality will result when the picture is rotated.
Space bar toggles between label none and label 1 allows you to quickly select pictures with the label orange. You can disable Tab key toggles between lists if you would
prefer to switch to the next picture with the Tab key. Disable Cursor keys loop selection
at list bounds if you do not want to jump from the last to the first picture in a browser
275
window with the Cursor right key and from the first to the last picture with the Cursor left
key.
The Rating and Label pop-up menu allows you to choose whether the keys 0..7 set the
labels and Control 1-5 assign the rating stars or whether you want to assign stars with 1-5
and assign some of the labels with 6-9. A third option is to specify that files are moved or
copied to the folders defined under Slide Show / Move Folders with the keys 0-9. The
same keys and shortcuts work during the slide show.
Return/Enter opens a pop-up menu where you can specify which option should be
assigned to the Return and the Enter key. When you select an image in the browser, Enter
or Return can either select the name for editing or open the document or folder.
Select Keep original file date after IPTC change if the document date should not be
changed after IPTC information has been entered.
You should disable Write labels in XMP metadata if the labels do not have to be compatible with Photoshop CS2 as the labels can be set considerably faster in this way.
Enable Write IPTC data into NEF files if you want to write the IPTC metadata in your
NEF files. This can be useful if you want to pass on NEF files and, if the recipient, cannot
read the XMP file with the metadata. An XMP file is always created if you enter IPTC data.
In the Browser / Open section, you can specify whether the last browser or a specific
browser defined with Select... should appear when GraphicConverter is opened.
276
If you scroll down when you are working in the preview area of the browser, switch to a
different folder and return to the first folder, it is often useful if the area further below that
was last displayed is shown. Enable Remember position in folders for this. If you would
prefer to display the upper area each time you switch folders, disable this option.
Use an alternative iPhoto library allows you to use an iPhoto library that is not in the
default path. The iPhoto albums are shown in the browser under the file tree.
Back to the context menu:
GraphicConverter makes the same basic functions of the GraphicConverter available as
in the context menu of the Finder.
Automator allows you to create or call up a work procedure in Automator, see p 421 onwards.
Disable Folder Actions and Configure Folder Actions... are added to the context menu
by the MacOS and are a predecessor of Automator technology. Instead of the folder actions it is better to use Automator as a wider range of functions are available, see p 421
onwards.
Back to the browser window:
Command-F or Edit / Find, compare and replace / Find Files... allows you to open a find
dialog that allows you to search the metadata. The current browser window is searched.
Enable Search sub folders to also search the subfolders. Ignore Resource Forks should
always be enabled as it speeds up the search. You should also disable Ignore invisible
files since invisible files do not normally contain relevant information for the search.
Show results in a new browser opens a new window with the search results.
Include extension in filename search can be enabled if extensions like, for example,
.tif should be seen as part of the name.
Match if all criteria are met results in a smaller search result because when there are
several search criteria they all have to be met. Match if any criteria are met results in a
larger search result because all files are found that meet at least one of the criteria.
277
In the left-hand pop-up menu, select the area which you want to search. If you enter
keywords yourself, we recommend always saving them with File / Edit File Info (IPTC) in
the Keywords section.
You can use the + button on the right of the dialog to add further criteria that have to
be fulfilled at the same time to find a file. The search results are shown in the browser
window. To return to the normal start folder view, click it on the left-hand side of the
browser.
Hold down the Ctrl key and click a folder on the left-hand side of the browser to open
the following context menu:
Refresh and Collapse updates the folders and shows new folders that have been created in the Finder since it was opened, for example. New Folder creates a new folder and
lets you move selected items from the middle section of the browser into the new folder.
In the browser, if you select several pictures whose names start in the same way, the identical part will be suggested as a name for the folder.
278
Rename opens a dialog where you can rename the folder clicked in the left-hand section of the browser.
Open Folder in New Browser opens the folder selected in the left-hand column in a
new browser window.
Print Catalog prints all pictures from the clicked folders together with the subfolders as
a catalog. Print Folder prints all pictures from the clicked folder as a catalog.
Open folder in Convert opens the Convert dialog in which the content of the clicked
folder is displayed in the left-hand list.
View Items in slide show shows all pictures from the clicked folders as a slide show.
Reveal in Finder opens a window containing the folder in the Finder. Hide Footer
hides the footer. Preferences... opens the Preferences dialog.
Hide Tools hides the top toolbar. Hide Footer hides the footer.
279
Show Preview Window opens a window with the preview as an alternative to the
right-hand column. You can make this window a lot bigger with the bottom right corner.
The EXIF information is displayed under the picture.
Show Preview Pane displays a column on the right-hand side of the browser window
with a preview of the selected picture. The height of the lower section can be modified by
clicking and moving the separating line. The size of the preview picture can be changed
to 50% or 100% via the context menu.
Show IPTC Window opens a window displaying the IPTC information for the image under the mouse cursor. You do not have to click the picture (see p 264).
280
Pictures on your iPod
You cannot export pictures on an iPod with photo functions like the iPod Touch directly
from GraphicConverter. Select the iPod in iTunes and click the Photos tab.
In the Synchronize photos from pop-up menu, you can select a folder for synchronizing with Choose Folder.... Select your picture folder or a folder with selected pictures.
Aliases cannot be used. All photos copies all photos from the selected folder on the iPod.
Subfolders appear as albums on the iPod.
The pop-up menu All is only available if you synchronise from iPhoto or Aperture.
Selected folders allows you to select which subfolders are to be synchronised. If you add
or rename folders in the Finder or in GraphicConverter, you can update the list by clicking
Apply at the bottom right of the iTunes window or by switching to another tab and back.
To sync new pictures on your iPod, we recommend adding the picture folder selected in
iTunes as a favorite at the bottom left in the GraphicConverter browser. Display the required folder in the browser and open the context menu by Ctrl-clicking the Favorites
area. Select Add current folder to favorites. Hold down the option key and drag the
new photos for your iPod to this folder to create a copy. Now start the synchronization in
iTunes.
Click Apply and Sync to copy the selected pictures to the iPod. The images are then reduced. If your iPod can be used as a volume like the iPod Nano G3, the option Include
full-resolution photos will also appear. You can use this function to copy the photos to
281
another computer. The image files will be copied to the path: iPodname/Photos/Full Resolution/Year/Month/Day. If the photos were taken on several different days, we recommend using a USB stick to which you can copy the images via the Finder.
Slide show
Click File / Slide Show... to show a slide show on the screen. A file selection window
opens where you can select a folder. The graphics contained in this folder and its subfolders are displayed on the screen against a black or other colored background for a set
amount of time.
You can start a slide show from the browser easily by selecting the required pictures
and clicking the slide show icon or pressing Command-G. If you have not selected a picture, Command-G will start the slide show and include all subfolders.
To compile pictures from different folders in a slide show, you can drag the pictures to
the drop area at the bottom of the browser. Display the drop area by clicking the icon
with the arrow in the browser footer. Start the slide show using the context menu that
you open by Control-clicking the drop area. For more details, see p 246 onwards.
If the context menu extension for GraphicConverter has been installed, you can also
display a folder in a slide show using the context menu in the Finder.
Graphics that are larger than the main screen are displayed proportionally smaller in
size. You can zoom into the pictures with the scroll wheel or scroll ball on your mouse and
back out again. The position under the mouse cursor is centered. If you do not want to
move the mouse cursor over the image, you can position the mouse in the center of the
282
lower edge of the screen to zoom into the center of the image. During the slide show, the
Mac OS energy saving option and screensaver are disabled.
In the file selection dialog, you can specify whether the first graphic or a further one
from the selected folder is the first in the slide show or whether you want to begin with
the selected graphic. If so, you have to open the folder where the graphic you want to select is located. It is not possible to display the graphics in random order. If, during a slide
show in random order, you see a picture that is part of a series of similar pictures, which
you want to show together, you can switch to the normal sort method with the Page Up
/ Down or arrow up / down keys and show the subsequent or preceding pictures.
When you click Options..., the Preferences dialog opens that you can also open by selecting Edit (Mac OS X: GraphicConverter) / Preferences / Slide Show / General (see
below).
The name of the graphic (with or without path) is shown in the top left of the screen during the slide show. To display the filename, make the appropriate setting under Preferences. In the bottom left-hand corner of the screen, there are several options available
on a toolbar. These options can also be accessed with the keyboard (see below). The toolbar can be hidden and inserted again with the tab key.
Click the left double arrow to jump to the previous graphic and the right one to go to
the next graphic. You can also use the left and right arrow keys as well as Space and ShiftSpace to page forwards and backwards in the slide show. And command+option+5/6 can
be used for back/forward in the browser and slideshow if not defined as move folders in
Preferences / Slide Show / Move Folders 3.
To launch the slide show, click the triangle, which is the play button. Click the double
line to start and stop a pause during which you are viewing the current graphic a bit longer. Click the square button or Command-. (period) to end the slide show. Click File /
Continue Slide show to continue a slide show at the place you left off.
The Trash moves the current graphic file to the Mac OS trash. This is why the slide show
is useful for cleaning up large numbers of graphics that you need to see in full screen
mode before you can sort them out.
The icon to the right of the trash creates an alias from the current graphic file in the folder selected with Alias folder under Edit (Mac OS X: GraphicConverter) / Preferences /
Slide Show / General. This makes it easy to collect your favorites to use at a later time
283
without actually moving the files. GraphicConverter also displays a slide show if a folder
with alias files is selected.
The next icon to the right allows you to change the filename via the dialog below.
The icon to the left of the bent arrow opens a file list that displays a list of the graphic filenames in the current window. You can scroll through the list and click the graphic you
want to continue the slide show with.
Pressing the G key during a slide show opens a dialog that allows you to pick a picture
to continue the slide show with.
The bent arrow button on the left rotates the picture 90 degrees in a counterclockwise
direction (Command-Z). The button on the right rotates it 90 degrees in a clockwise direction (Command-U). Rotating in this way does not modify the file. Hold down the Alt key
to rotate the image also in the file or use Alt-Z and Alt-U instead of the buttons. JPEGs are
rotated without any loss of quality. In the Slide Show / Misc section of the Preferences,
you can specify with Toggle rotate shortcuts (permanent/not permanent) that the
icons and Command-Z and -U rotate images permanently while Alt-Z and -U only rotate
the image while it is displayed.
The button to the right of the arrow opens the picture in GraphicConverter which interrupts the slide show. You can also press the O button (without any other buttons). Select
File / Continue Slide show to continue the slide show where you left off.
Click the printer icon to print the current picture.
284
A click on the IPTC button opens the IPTC dialog in which you can enter data such as
Caption and Copyright. The slide show continues when you quit the dialog.
The button with the four colored spots opens a pop-up menu that lets you apply a Mac
OS label to the picture. You can also use the labels under Mac OS 10.2 or lower even
though they are not shown in the Finder. From Mac OS X 10.3, the labels are displayed in
the finder. GraphicConverter can display the labels in the browser under any Mac OS.
You can rate JPEG and TIF images displayed in the browser during the slide show with
0–5 stars using Ctrl-0-5.
If there are one or more move folders defined under Preferences and they are enabled
for display, the first ten move folders appear as icons to the right of the control bar. Click
the number of the move folder to move the graphic file currently being displayed to this
folder. A description of how this target folder is defined can be found later in this section.
If there are more than ten target folders defined, you can go to these folders using the
keyboard shortcut displayed in the Preferences when defining the target folder.
285
You can click the left-hand end of the toolbar and place it, for example, on an extra monitor screen.
During the slide show, you can zoom the picture to 200% by holding down the Option
key, clicking the picture and holding down the mouse button. While you hold down the
mouse button, the slide show will stay on the same picture. If you also hold the shift key,
the picture will be zoomed to 100%. The original zoom level will be applied again as soon
as you release the mouse button.
You can also zoom with the + and - (minus) keys while moving the cut section with the
clicked mouse. It is normally better to pause the slide show first.
In presentations, you can darken the current picture with the B key to draw attention to
you the speaker when questions are posed. First click the Pause button so that the slide
show does not continue. Press B again to cancel the darkening and continue the slide
show by clicking the Play button.
Tip: You can show all opened and saved Pictures as a slide show at any time. Choose
View all saved windows as slide show from the context menu that opens when you
control click one of the opened pictures.
Select File / Slide Show with Find to display all pictures with, for example, the word
“Berlin”.
This option may not seem useful at first, but when you try it out you usually discover
pictures that you forgot about. You can search a volume or a folder and its subfolders. If
you know the Type and/or Creator of the graphics you are looking for, you can enter the
appropriate abbreviation in the lower boxes.
286
Instead of writing file extensions, traditional Mac programs write the file type in all of
the files it creates so that other programs can recognize that the file is, for example, a text
or graphic file. The abbreviation of the program that created the file is entered under Creator. The abbreviation for GraphicConverter is Creator: GKON. The Type is dependent on
the graphic format.
If you select a Label, only pictures that have been assigned this label will be found.
Start with file allows you to start the slide show with a different file to the first one from
the list of found files. Random order shows the pictures found in a random order.
Exporting Slide Shows as Films
If you want to create a movie in QuickTime format from your slide show, select File / Export Slide Show to Movie. The file selection dialog will open where you can select the
pictures for the slide show or a picture folder. The file selection dialog will then open
287
again. Now enter a name for the movie file and click OK. A dialog for other settings will
open:
Only select Make a movie from each source picture/movie if need the pictures or
films as a QuickTime film for compatibility reasons. Select Make one movie from all
source pictures if you want to create a film from all pictures.
You can specify the size of the film with Width and Height. If you use a landscape format like 320 X 240, portrait-format pictures will be reduced to fit the height of the film. If
all pictures are to be the same size, you can enter the same value for the width and
height. Landscape-format pictures will then have black bars at the top and bottom,
however.
If the film file is to be kept small, enter small values like 320 x 320. If the size of the file is
not important, you can enable Use dimension of first image.
Reducing the Depth will reduce the size of the file. The picture quality will decrease,
however.
288
Show names allows you to display the image names with a definable Size, Font and
Text color at one of four possible Positions. Antialias text (only Mac OS X) smoothens
the edges of the text. The Back Color is for the bars next to pictures that do not quite fill
the selected format.
Use transition effects allows you to select QuickTime fading like Cross Fade via the
Select Effect... button.
Compression... allows you to call up the QuickTime settings to select a higher quality
level.
Flatten Movie creates movies without resource fork so they can be loaded onto Web
servers and are better suited to data exchange with other operating systems. Dither allows you to increase the quality when the pictures are reduced.
You can use Ignore every ( ) image after the ( ) image in multiimage if there are extra images in a regular sequence that should not be included in the film. For example, you
can leave out the odd frames from video picture sequences.
Background sound allows you select background music.
Enter how long each picture should be displayed in Show images for.
Add every ( ) image (enter 1 to add all) allows you, for example, to export only every
third image from the source folder.
289
Settings for Slide Show:
There are many parameters that can be set for the slide show. Select Edit (Mac OS X:
GraphicConverter) / Preferences / Slide Show / General.
Under General, you can choose whether the slide show should use Fullscreen Display
and whether additional monitors should also be darkened with Darken all screens.
When Fullscreen Display is disabled, the slide show is displayed in a separate window. In
Mac OS X, Ctrl-clicking this window opens a context menu where you can select a transparency level in percent. The window will then be more or less transparent.
Show next image on second is useful if, for example, you want to see the next picture
on your laptop Mac during a presentation using a beamer. You then know which picture
is coming next and can build up the tension by, for example, saying: “And you can see the
result in the next picture.” Then you change the picture. Note that you can only select on
which monitor the main GraphicConverter window is displayed after connecting a beamer or a second monitor in the General / Monitor section of the Preferences.
The display of the Name at the top left of the screen with the label and optionally the
path can be enabled and disabled.
Under Scale, you can specify if pictures should be scaled and, if so, how. If you clear the
Index option, you will no longer be informed which picture out of how many is currently
being displayed. Erase text background improves the legibility of the text as a white
290
block is placed behind the text. Shadow text creates a shadow below the text that also
improves the legibility.
Original size displays images at 100% or, if they are larger than the screen, appropriately reduced in size
Enlarge small pictures scales pictures that are smaller than the screen proportional to
the width and height of the screen for portrait pictures. You can limit the increase or decrease in size to Factor 2 so that the image quality does not suffer too much. Use allows
you to set a fixed scaling percentage for all pictures.
You can use the Justify pop-up menu to select whether the slides are centered with borders at the top and bottom or right and left or pushed to one of the sides.
Stretch to fullscreen stretches the pictures so that they fill the whole screen. You can
avoid the distortion by selecting Crop to fullscreen. If the pictures do not fit in the aspect
ratio of the monitor, the left and right or top and bottom will be trimmed slightly for display. The source files are not changed.
Select Information... opens a dialog where you can select whether the comment, the
IPTC information or other details should be displayed during the slide show. You can
change the order of the details with the mouse in the right-hand area.
Enable Ignore alpha channel if you display images with alpha channels and they interfere with the slide show.
You should leave Use QuickTime for scaling enabled as QuickTime guarantees fast and
good quality scaling of the images.
291
The Tile pictures option places the current picture in the top left, just like tiles, which
are lined up next to and beneath each other until the screen is full. The picture in the bottom row in the far right column is usually cut off.
The Show errors option displays an error message when a defective file is displayed.
Enable this option to be informed of faults or problems.
You should leave Ignore incomplete JPEGs enabled so that faulty JPEG files do not
appear during the slide show. JPEG files can, for example, be corrupted when sent as email attachments.
Write protocol creates a text file on the desktop which lists when which image was
shown.
The Navigation Services (the file selection dialog), which are available from Mac OS 8.5,
do not let you sort files by date. If you want to see the pictures in a slide show in chronological order, under Sort documents by , select Date and, otherwise, sort by Name. It
can take a long time to sort large folders by date such as the ones on graphic CDs. The
Sort folder separately option sorts folders in their own block instead of in a list of files.
Subfolders are included when Subfolders is enabled. You can enter how many subfolders to include in Depth.
292
Select Show tool icons to show or hide the toolbar. With move folders, the first ten
move folders that can be defined under Edit (Mac OS X: GraphicConverter) / Preferences / Slide Show / Move Folder, are displayed under the toolbar as icons.
You can also move items manually using the keyboard. Pictures can be moved to the
target folder with Command-1 or Command-2. In this case, 0 stands for 10. The target folders set under Move Folder 2 or 3 can be accessed by pressing Command-Ctrl-1 to 0 or
Command-Option-1 to 0 on the keyboard.
Copy files will leave the source files in their position and create a copy of the file in the
Move Folder. Create alias creates an alias in the Move folder. The icon in the toolbar also
creates an alias that is created in the special Alias folder (see below).
Move files, press option key to copy them also allows you to make copies of the files
by pressing the Option key.
Automatically rename if the file exists adds a number to the filename, for example,
“_1” or “_2”, if the name already exists in the move folder.
You should leave Open files reduced (faster but no zoom) enabled as it speeds up
opening without affecting the quality.
The Set Alias folder... option lets you specify which folder to put the aliases in that you
create with the toolbar see p 283. Select the folder you want and then click Select.
293
Save Slide Show Settings... allows you to save all settings for the slide show so you can
use them again later on with Open Slide Show Settings.... This makes various settings
quickly accessible, for example, for presentations or for sorting.
There are several options available under Edit (Mac OS X: GraphicConverter) / Preferences / Slide Show / Effects to make the slide show visually more interesting.
The following options are available in older versions of GraphicConverter: All effects,
Vertical to the middle, Puzzle, Horizontal to the middle and Delay. For all options, the
display must be set to 16.7 million colors (see the Monitor control panel).
As a result of compatibility issues with Mac OS 9 and X, these effects have been replaced by QuickTime effects in newer versions of GraphicConverter. Fade creates a nice
effect. The number of Steps for the effect specifies the length and the quality of the effects. Select No effects to display the pictures in your slide show sequentially with no effects.
294
Click Select… next to Userdefined QuickTime effect to select a QuickTime effect.
For more contrast between the pictures, you can set the screen to black for a defined
time with Add black frame between images.
Series detection will show images as a series. You can choose how many characters of
the filename shall be compared.
Overlay logo lets you display a PICT picture of your choice as a watermark over the pictures of the slide show. Choose a low value for Opacy to make it hardly visible in one of
the four corners. The watermark does not stay in the picture.
Background sound allows you to select an audio file to be played during the slide
show. Click Select sound file... to select an audio file in a format such as MP3 or AIFF that
can be played by QuickTime.
Under Edit (Mac OS X: GraphicConverter) / Preferences / Slide Show / Misc /, select
Change picture to set how long each picture is displayed. This time can be exceeded if
decompression takes longer, for example, for LZW compressed TIFF graphics. Or, you can
enable after mouse click to display the picture until you click the mouse. Click Background color to select a different background color in the color selector. The font and
the size of the displayed file path and name can be selected in the top section. Enable
loop slide show and the slide show starts again from the beginning after the last picture
is displayed until you end the slide show by pressing the Stop button or Command-. (period). This option is useful for presentations in store windows, for example. If further pictures are copied into the slide show folder via a network, for example, the current content
of the folder can be imported with Reload file list before loop. When the slide show is
run through again, all pictures are displayed that were in the slide show folder when it
was started.
295
If you copy pictures into the folder with the displayed pictures during the slide show,
we recommend using the Reload the list after each image and jump to changes
option so that the added pictures are also shown.
Show time since start of slide show displays the time that has passed to help you, for
example, keep track of the time when giving presentations.
Search for sound file with same name as the image during the slide show to find audio files that have the same name as the displayed image file, but a different ending. In
this case, GraphicConverter only plays WAV files as created by some digital cameras that
record sound when taking pictures. Playback stops once the next picture is displayed. We
therefore recommend selecting the After mouse click setting for the Change Picture.
Enable Cursor up pause the slide show if you are working with a Kensington Pocket
Presenter or would like to assign pause to the cursor up key for any other reason. The
Kensington Pocket Presenter is a wireless remote control and only has the four cursor
keys that are also available on the keyboard. It does not have its own pause button with
which you can display a picture for a longer period. When the Cursor up pause the slide
show option is selected, you can use the cursor up key as a pause button.
Toggle rotate shortcuts (permanent/not permanent) swaps the functions of Command-U and Alt-U so that Command-U rotates permanently and Alt-U only rotates for the
time the image is displayed in the slide show. The functions of Command-Z and Alt-Z are
swapped in the same way.
296
You can enable Go to next image after change of label or rating if you want a slide
show to move onto the next picture after a label or a rating has been added. This setting
is particularly useful if, during the slide show, you switch to the next picture using a
mouse click or the space bar and not after a set time.
Under Slide Show / Files, you can enter file extensions you want to ignore in the lower
section. The HTML extension appears in the list as it does not make sense to display HTML
files as pictures. Click the list to modify it. The Default button returns all the settings to
their defaults. The Undo button resets the settings to what they were the last time you
opened this dialog.
Leave Show content of Thumbs folders disabled if you do not want to display the
images from this iPhoto Library folder in the slide show.
Key shortcuts for the slide show
Key Combination
Result
Command-G
Shows the selected pictures in the browser as a
slide show. If nothing is selected, subfolders are
included.
TAB or Ctrl or Command-I
Hide or display control
297
Key Combination
Result
Press cursor left or Shift-click
image
Previous picture or start previous film
Press cursor right or Enter key or
Space or click image
Next picture or start next film
Cursor key up / down
Previous / next picture — the last picture is
followed by the first one and vice versa.
The pause option can be assigned to the Cursor up
key in the Slide Show / Misc section of the
preferences, for example, if you are using the
Kensington Pocket Presenter.
Backspace
Places the current picture in the Trash.
Command-M
Creates an alias in a specific folder you define under
Preferences / Slide Show / General.
Command-R
Rename the current picture
Command-G
Jump to a specific picture
Alt-Z
Turn constantly counterclockwise
Command-Z
Only turn counterclockwise while displayed
Alt-U
Turn clockwise constantly
Command-U
Only turn clockwise while displayed
Command-O
Opens the current picture in GraphicConverter
Command-P
Prints the current picture
Command-H
Hides GraphicConverter. The slide show continues.
Hold down Shift Alt and click
picture
Zoom picture to 100%. The cut section can be
moved with the mouse.
Hold down Alt and click picture
Zoom picture to 200%. The cut section can be
moved with the mouse.
+ and -
Enlarges and reduces the picture. The cut section
can be moved with the mouse.
B
Darkens the screen (while you answer a question
during a presentation). Click the pause button
beforehand.
PageUp
Next image (useful for remote control)
PageDown
Previous image (useful for remote control)
Control-. (period) or ESC
End slide show
The following key combinations can be changed in the Browser / Function section of
the preferences.
298
Key Combination
Result
Command 0...9 (0 is 10)
Moves the picture to defined folders 1 to 10
Ctrl.-Command 0...9 (0 is 10)
Moves the picture to defined folders 11 to 20
Alt-Command 0...9 (0 is 10)
Moves the picture to defined folders 21 to 30
1-5 or Ctrl.-1-5 (depending on
the preferences in the Browser /
Function section)
Set 1–5 stars to rate JPEG and TIF images.
You can also call up this table via the GraphicConverter Help menu.
Similar to a slide show, when a picture is opened in the normal way with Edit / Navigation, you can switch to the next or previous picture in the folder where the opened
picture is saved using Next / Previous Image in folder in the submenu. The current picture is closed and the next or previous picture is opened. The keyboard shortcuts Command PageUp or PageDown are very useful here.
Find duplicate files
If a browser window is open, you can use Edit / Find, compare and replace / Find duplicate files... to search for duplicates in the folder currently displayed including all subfolders. You can then delete any files you do not need. A dialog opens where you can specify
whether only completely identical files should be found or whether similar files should
also be displayed as identical. If you decide to search for similar files, you can use the slide
to specify how tolerant GraphicConverter should be. Select the more tolerant setting to
display versions that differ more greatly as duplicates.
299
During the search, GraphicConverter will display the progress. The process may take a
while if you search your whole picture folder.
GraphicConverter will compare the file size first, then the file content.
When GraphicConverter finds duplicate pictures, it will display them in a dialog.
Number of duplicate items indicates how many duplicates of “original” pictures have
been found. You yourself decide which picture is actually the original by looking through
the duplicates and then deleting one of the versions.
300
Current item indicates the number of the “original” displayed. Number of duplicates
of this file indicates how many versions of the displayed picture there are in total. If there
is a 2 here, you can decide which one of the displayed pictures you want to delete. You
can also keep both versions and continue to the next “original” with Do not delete any
and continue.
If more than 2 versions are found, you can display the other pictures with Go Forward.
The newly added version is displayed on the right. The picture that was previously shown
on the right is moved to the left and the previous left-hand image is no longer displayed.
Imagine a film strip is being pushed from left to right through the dialog. Go Back therefore moves the strip to the right.
When you are sure that you want to delete a picture, click Delete this one under the
picture.
Enable Read dimensions for info so you can quickly see whether the picture is a version for printing or for the Web.
If you disable Move into trash instead delete (if possible), the files will be immediately deleted and cannot be recovered.
Automatic mode for all items... allows you to automatically delete all duplicates and
just keep the “originals”. It is possible that the version that is in the folder where you want
to keep the picture is deleted. Therefore only use the automatic mode if all pictures are in
a folder or you know exactly what you are doing.
You can choose whether the smaller, the larger or the newer document should always
be deleted.
During the search, GraphicConverter will ignore all files whose extensions are listed under Preferences / Browser / Misc. If files from the iPhoto folder are found, a warning
message will appear.
301
If you have difficulties reading the small font, you may want to enlarge this area of the
screen. To do this, open the System Preferences via the Apple menu and click Universal
Access. Then click Seeing. Select the On button under Zoom. When zoom is turned on,
you use keyboard shortcuts to enlarge and reduce the screen image:
– Command-Option-equal (=) makes the screen image appear larger (zooms in).
– Command-Option-hyphen (-) makes the screen image appear smaller (zooms out).
You can use this for any part of the screen in all programs.
Special
In this section, options are described that are only used in special work situations. In addition to the IPTC information, their functions are also described.
Batch Function
To automatically perform one or more processing steps such as, cropping the picture
margin or changing the resolution, for several pictures at the same time, go to File/Convert. Click Batch... in the lower left. The following dialog opens:
Batch functions can be selected in the left selection window. Select the batch function
you want and then click Add. Or, you can double-click the function. This batch function
now appears in the right selection window. You can delete it again by pressing Delete.
Once you select a function in the right selection window, the corresponding settings are
displayed in the lower section of the dialog. The actions can be moved in the selection
window to change their order.
To reuse a batch function at a later time, click Save... and Open... You can add saved actions from the current action list with Open and Append....
In addition to batch functions that actually change the picture, there are also functions
that create conditions. You can add an If which means that the function that follows is
only performed if this condition is fulfilled, for example, that a picture has a specific color
302
depth, width, height or is a portrait or landscape picture. There can be several batch functions defined for the pictures that fulfill the condition. Continue should always come after these batch functions. The Else option allows you to specify what happens to pictures
that do not fulfill this condition. Cancel cancels a batch function which is useful when the
condition does not apply to a picture.
Batches remain activated until they are deleted. If you quit and then relaunch GraphicConverter, any defined batches are still activated.
If you have defined and saved a batch, you can send us an e-mail which describes the
function it performs. We publish batches that could be useful to other users at http://
www.lemkesoft.com/content/166/scripts.html.
Example: If you want to put a slide show on the Web, you can save the pictures as a GIF
animation and then put the GIF on a Web site just like any other GIF. To perform the same
function for several pictures at the same time, we recommend using a batch function.
Let’s assume that not all pictures in the planned slide show have the same format. Some
pictures are in portrait format. For GIF animations, you usually see the pictures behind the
ones in the front if they are smaller than the ones in the back. As a result, all pictures used
in our slide show that are smaller than the largest picture should be given a border with a
uniform color so that they are just as big as the largest picture. This border should be the
same color as the background color of the Web site so that it is “not visible”. Because surfaces with uniform colors can be tightly compressed, these additions do not pose any
problems with respect to file size.
First, you have to decide which format the slide show pictures should have. The bigger
the pictures, the longer it takes to display the next picture. With GIF animations, however,
you have the advantage that the first picture is already displayed when the others are still
being loaded. As a result, you can select a slightly larger format. Ultimately, the goal of a
slide show is the uninterrupted viewing of the pictures. You can assume that most computer monitors are set to a resolution of 800x600 pixels. Select the appropriate format for
your slide show (up to a maximum of 700x500 pixels, width and height) because the
browser elements also require space. One way to get a quick overview is to open an average size picture, then using Picture / Picture size, set the resolution to 72 dpi (Scale picture enabled). Then, with the zoom set to 100%, display the picture on your monitor. If
you switch the screen resolution back and forth between the default resolutions for 15"
and 17" monitors in the Monitor (and Sound) control panel, you can see the difference in
size for the viewer depending on his or her resolution and screen size.
Copy all the graphics that are part of the slide show to a single folder so that you have a
good overview. To copy instead of move graphic files in the operating system that are in
the same volume (drive) as the target folder, hold down the Option key when you move
the mouse. Create a target folder where you can save the modified pictures before performing the function. Then, in a final step, you can add the modified pictures to the GIF
animation.
303
In the File menu, select Convert & Modify and then click Batch. If there is already a
batch function defined, delete it first by selecting the entries in the right section and then
clicking Delete.
1. Select Bring to size in the left section and click Add. Enter the target size you want in
the lower section of the dialog. The example below displays 300x300 points which means
that for smaller, portrait pictures, a border is added to the left and right so that they are
300 pixels wide. For landscape pictures, a border is added to the top and bottom so that
they are 300 pixels high. If pictures are not 300 pixels wide or high, a border is added to all
sides. We recommend black as the background color for the slide show because it allows
pictures to be seen most clearly. Select Center for Width and Height.
This setting adds half of the border on the right and half on the left or half on the top
and half on the bottom. This batch function only modifies those pictures that are smaller
than the target size you entered.
Smaller pictures can also be enlarged with the Scale function. However, we do not recommend this batch function as it results in very poor quality.
2. All landscape pictures that are wider than 300 pixels should be reduced in size to this
width. All portrait pictures that are higher than 300 pixels should be reduced in size to
304
this height. In the left section, select the If function to define a condition under which the
Scale batch function is performed.
In the lower section, select Process Picture only if Width and Process Picture only if
Height and enter a value between 301 and 100,000 because a picture is only larger than
the target size of 300 pixels starting at 301. 100,000 just stands for an infinite number and
does not quite fit in the entry box.
3. Select Scale in the left section and click Add. This batch function is only performed
for those pictures that fulfill the conditions defined by the previous If.
305
Select Size and enter 300 for the width and the height. Enable the Proportional option. We recommend QuickDraw/Quartz as a process. Under Mac OS 9, you can try to increase the quality with one of the variants of Bicubic.
4. Finally, insert the Continue function using the left section because each If must be
completed with a Continue even if an Else is defined for other cases.
5. The next function you need to define is the one that converts the resolution to 72 dpi.
The reason is that all graphics on the Web have a screen resolution of 72 dpi. Select Resolution in the left section and click Add. Enter 72 dpi for the horizontal and vertical resolution in the lower section. The Convert picture option must be disabled.
6. The sharpness is generally improved after the resolution is decreased. In the left section, click Sharpen Edges and select a lower value of approximately 15-30% for the Normal setting because pictures with 72 dpi and 256 colors easily become grainy. Graphics
are converted to 256 colors when saved as GIFs as the GIF format supports a maximum of
256 colors.
306
This batch function is now complete and should be saved by clicking Save... to be on
the safe side. Under Mac OS X 10.3, the standard folder is User / ~ / Library / Application
Support / GraphicConverter / Actions — the tilde character stands for the name of the
respective user.
Click OK and select the GIF format in the right section.
Select all files to be processed in the left section, for example, by clicking on any file and
pressing Command-A. You can also select a folder. In the Function pop-up menu at the
top left, select Convert and click Start. Use Batches needs to be enabled. The files converted with this batch function are saved in the target directory. Create a GIF animation
from these GIF files as described starting on page 189 or page 194.
The Individual Batch Functions
Add text to filename allows you to identify the converted files with a name extension
upon conversion. This is useful if, for example, you reduce images for the Internet and
want to save them in the same folder. In this case add “_thumbnail_1” to the end, for example. The command Do not export if name can then be used to edit all source files
again in a second run-through, for example, to create an even smaller “_thumbnail_2”
version without editing the files even though they are selected in the left-hand list.
Add/delete margin adds a margin with a selected color for positive values. Margins are
deleted for negative values (see p 106).
307
Assign Slice File allows you to assign a file with slice information.
Auto level has the same effect as Picture / Auto Levels, (see p 160).
Brightness/Contrast changes the brightness, the contrast, the color hue and the color
saturation to match the entered values that you determined using an example with the
Picture/Brightness/Contrast dialog, (see p 128).
Bring to size adds borders with an adjustable color to pictures that are smaller than the
target size you entered so that all pictures are uniform in size. You can select how large
the picture should be. Left, Center and Right allow you to specify where the original picture is placed in the new picture. If you select Left, a strip is added to the right side only. If
you select Center, a strip the same size is added to both sides.
Top, Center and Bottom allow you to specify where the original picture is placed in the
new picture after it is inserted. If you select Top, a strip is added to the top only. If you select Center, a strip is added to both the top and bottom if the original picture is smaller
than the entered size.
Canvas Size allows you to enlarge the work area (see p 105).
Change Color Mode allows you to switch to another mode, for example, from RGB to
CMYK. However, the profile selected under File / Edit Color Profile... is set for CMYK.
Change Color Profile allows you to assign a different color profile.
Change Format allows you to save the files in another format that you can select from a
pop-up menu.
Colors offers numerous options for setting the color. Detailed information and an introduction can be found in the Color chapter on page 161.
Combine creates one picture out of two pictures, from which the source picture needs
to contain an alpha channel. The source picture can, for example, be a cut-out person,
who will be set against a color pattern from another picture as a background. Enter the
name of the background under Name of the image with the complete path.
If you want to combine several source pictures with different background images in the
following way:
Source pictures/Picture A.jpg with background pictures/Picture A.jpg
Source pictures/Picture B.jpg with background pictures/Picture B.jpg
Source pictures/Picture C.jpg with background pictures/Picture C.jpg
you can use the character # in the path for the background picture instead of the filename. If the Background pictures folder is in the Source pictures folder, you can use the
character $ as a placeholder in front of the Background pictures folder name instead of
the path.
308
Copy Spotlight comment to IPTC caption copies the spotlight comment to the IPTC
caption. In the same way, Copy Spotlight comment to IPTC keywords copies the spotlight comment to the IPTC keywords. We do not recommend working with spotlight comments since they are not included when you send a file by e-mail, for example.
Comment inserts a comment into pictures. The GIF, JPEG, PNG and TIFF formats all directly support comments. For all other formats, the comments are written to the resource
fork. To do this, the option for creating a resource must be enabled under Preferences /
Save / General.
You can modify the comments for JPEGs without negatively affecting the quality of the
picture when opening and then resaving the graphic by displaying the picture in the
browser and then selecting Modify Comment... in the context menu (Control-click the
preview). The picture quality is also not negatively affected when inserting a comment
with a batch function.
Continue can be used as a logical link and usually comes after the If functions (see example above in this section).
The Crop function crops the picture’s margins until the set picture size is reached. Both
the right and lower margins are cropped.
If all margin edges or margin edges other than the right and lower ones should be cropped, use the Crop region function (see below).
Crop region allows you to crop a little bit on all sides of a picture. Enter the width of the
area you want to crop from each side (positive value).
Delete Original deletes the source file after the edited file has been saved. Be careful
when using this batch.
Dither allows dithering in a B/W image like under Effect / Black&White / Dither... (see
p 167).
Do not export prevents you from saving in specific cases that can be defined using the
functions If, Else, (Continue, Stop).
Do not export if name, see p 307.
Else can be used as a logical link after the functions of an If condition (see example later
in this section).
Filled Rectangle inserts a rectangle in a color of your choice allowing you, for example,
to cover a logo that appears in several pictures. Left and Top sets the top left-hand corner of the rectangle and Right and Bottom, the bottom right-hand corner. Together they
therefore define the size of the rectangle. Click the color box to change the color. If you
are editing several pictures with different pixel sizes, you should select them relatively
309
and enter the spacing in percent so that the rectangle appears in the same place in all
pictures.
Filter allows you to define filters or select existing ones. For more information, see the
chapter on user-defined filters on page 199.
Flatten Alpha Channel overwrites the picture content with the content of the alpha
channel to make it visible. A transparency like an alpha channel can optionally be used. If
necessary, make copies of the pictures to be edited before you use this batch.
The Gamma function specifies a gamma value. For more information, see page 195.
Use the GIF Transparent function to define a color that can be made transparent (see
p 154).
Grayscale converts a picture into the selected grayscale mode where dithering can
take place. For more information, see page 161.
If lets you define conditions that must be fulfilled before the task can be performed.
You can, for example, make it a condition that the source picture has to be available in
portrait format to perform optional processing steps such as rotating the picture by 90
degrees or adding a margin. Functions that come after If are always followed by a Continue.
Ignore even pages saves multi-page image documents without the even number
pages.
Use Insert PICT to insert a PICT graphic. This function is useful if you want to put, for example, a visible copyright symbol in the picture. Select the alignment from the list in the
left section of the dialog. In addition to the selected alignment, you can also enter an offset. For example, if you select Top Left and enter an offset of x=100 and y=200, the picture is inserted 100 pixels to the right of the left picture edge and 200 pixels underneath
the upper edge of the picture.
If the picture you want to insert contains an alpha channel for softer edges, it will be
taken into account. The alpha channel contains a grayscale picture, whose pixels could
have 256 brightness levels. These brightness values are used to prevent the edge pixels of
a logo, for example, being covered by sharp edges. The result is an anti-alias effect, which
makes the edges look softer. This is particularly useful with low resolutions and diagonal
edges.
Use Insert Text if you want to insert Text in a corner or in the center of an image such as
Creation date or a note on copyright. Enter the distance from the edge with Offset. Instead of the File name or the Creation date you can enter a text of your own or insert
meta data. Relative Size for the font allows you to adapt the font size to the image size. If,
for example, your picture is 1000 pixels high, the font will be 100 pixels high at a value of
1%. Use the Absolute Size if you want to insert text with a certain font size.
310
Fill background allows you to place a Rectangle or Rounded rectangle behind the
text and select a Color and Transparent for it. This makes the text easier to read.
Invert inverts the colors of a picture from positive to negative or vice-versa. Use this
function to convert scanned negatives into normal pictures or as an effect.
Invert Alphachannel makes transparent areas non-transparent and vice versa.
Levels lets you modify the levels for white, black and midtones (see p 160).
Make Square is available with the Crop to shortest side option. The shorter side is
taken as the side length for the square that is cut from the picture centered. Crop to largest side adds black strips to the picture that are large enough to make it square.
Max Size reduces the size of the picture to the size entered in pixels. Smaller pictures
are not changed. The Achieve value(s) function scales the picture so that the target size
is always achieved even when it has to be enlarged. Disable the Proportional option
only if you want to distort the pictures.
Invert dimensions for vertical images should always be enabled. Portrait pictures
take the same value as used for the width of landscape format pictures. The value entered
for the maximum height is not taken into consideration.
Minimize Color Table is used to keep file size to a minimum when you are preparing
color table graphics for the Web.
Mirror mirrors pictures along the x-axis or along the y-axis (see p 175).
Copy with transparency makes it possible for you to define a color for the picture that
should be made transparent when the picture is inserted (see p 140).
The Copy with opacity option allows you to enter a percentage that determines the
opacity of the inserted picture. If the opacity is 50%, only half of the background is visible
after the picture is inserted.
If you click Choose Picture..., a file selection dialog appears where you can select the
picture you want to insert. The selected picture is displayed after Name:.
Plug-In makes all installed plug-in filters for processing pictures available in a pop-up
menu (see p 197).
Remove Alpha Channel deletes the Alpha Channel.
Replace Color Table allows you to load a color table and set it for all pictures that are
modified by the batch.
311
Resolution changes the resolution of a graphic. The unit is ppi (points per inch) which
is the same as dpi (dots per inch). Convert picture must be enabled if the graphic is to
maintain the same output size(see p 104).
Rotate enables you to rotate pictures either along the three most common axes or any
way you want. The Error Correction option should be enabled to achieve optimal results
(see p 119).
Use Scale to enlarge pictures by, for example, a factor of 2, to create a picture that is twice as large. If a specific size is to be reached, enter the appropriate height and width. If the
proportions should remain the same, select Proportional and then enter the target width
or the target height (see p 103).
Scale to Pixel Count – If you know how many Pixels your picture should have in total,
you can enter the total number of pixels (see p 108).
Set Creator for Saving allows you to set the creator so you can open files in a specific
program by double-clicking them.
Shadow adds a shadow to the right-hand and bottom edges of the picture. You can
select the color behind the shadow using the background color. You can select the color
behind the shadow using color.
Sharpen Edges sharpens the picture. For more information, see page 124.
Show Alpha Channel adds an alpha channel in which, for example, surfaces can be inserted(see p 206).
Smart Trim cuts single-color margins off (see p 118).
Sort Color Table makes it possible to sort the color table normally or in the reverse order.
Stop batch cancels the function which is useful if a picture does not fulfill an If criterion
and the function cannot be performed.
Threshold converts the picture to a black/white 1-bit picture with the selected
threshold value see p 163.
Trim crops margins with a specific color. You can select whether all margins or only specific ones are cropped. You can set the color of the margin. To set a specific color, switch
to the picture, click the eyedropper on the appropriate place in the picture to put this color in the foreground. Click the foreground color in the toolbox and make a note of the
value of the color so that you can enter it in the function dialog by clicking it in the example.
312
If you want color hues to be recognized that are similar to those of the color surface,
enter a higher tolerance such as 10 or 20. The exact value must be determined based on
the picture (see p 117).
Sound checks the value of the incoming audio and changes it based on your entry under Output (see p 160).
Unsharp Mask provides an alternative to the Sharpen Edges option.
Video lets you leave the straight or non-straight frames from video images on screen or
to replace the Frames, (see p 209).
White Point allows you to set the white point again. Enter the required values for the
red, green and blue (RGB) color channels. To calculate these values, you can set the white
point with the white point tool on a suitable sample picture by clicking an area of the
image that should actually be white. If you are happy with the result, undo the correction
with Command-Z and calculate the color value at this point with the eyedropper. Open
the Detail palette to display the values or double-click the foreground color in the toolbox to display the values for R, G and B on the RGB tab in the Color Picker.
313
IPTC Document Information
In the dialog for IPTC document information (International Press Telecommunications
Council), professional graphic creators can enter their names as authors and copyright
owners (File / Edit File Info (IPTC).
There are input boxes that correspond to the IPTC standards in six different areas. This
information is also used for quick searches in databases at large publishing houses. Click
the individual tabs to open the different sections. Caption / Event and Keywords / People are fields that were added later on and do not belong to the official IPTC standard.
They are, however, used by the iView picture database.
If you select one image or several images in the browser and edit the IPTC information,
the images will not be saved again. There are therefore no losses in quality with JPEG
images, for example.
The IPTC keywords allow you to use GraphicConverter like a picture database. You can
assign keywords as in a picture database. GraphicConverter does not create a database
file, but instead writes the keywords in the IPTC information of the respective image file.
314
The fastest way to assign keywords is using the keyword window that is displayed by
selecting Window / Show Keyword Window. A browser window has to be open for this.
In the left-hand column, select a keyword and, if necessary, a sub-keyword and drag the
keywords to the required picture in the browser window to enter them in the IPTC information. You can also select several pictures in the browser to set the keywords for all of
them. In this case, drag the keywords onto one of the selected pictures.
The second column shows the sub-keywords that were entered for the selected keyword in the first column. To add keywords to one of the columns, click the plus sign (+) at
the bottom of the window. You can delete the selected keyword with the minus (-) sign.
You can rename a keyword by double-clicking it. GraphicConverter supports Unicode
which means that you can use Asian fonts, for example.
If you would prefer to use a double-click to assign keywords, you can specify this in the
Browser / Keywords section of the Preferences by selecting Double click on keywords
applies the keyword to all selected item(s).
315
Enable Setting a keyword sets the group name as keyword, too if you want to also
automatically set the parent keyword from the first column when you assign a keyword
from the second column.
Select Change label of item(s) after setting a keyword to display which pictures have
not yet been assigned a keyword when indexing. All indexed pictures will then appear
with a label that you can select from the pop-up menu. It may also be worthwhile selecting the label as a sort method so that the pictures that have not yet been indexed are
displayed together at the top of the browser. You can refresh the sort with Resort from
the context menu. In the Preferences, you can select automatic sorting every x seconds in
the Browser / General section.
In the bottom frame of the pallet, you can save and open the keyword list as a text file
using the two diskette icons.
If you want to search for pictures with a specific keyword, select the folder to be searched in the browser. Subfolders are also searched. Click the required keyword and the
magnifying glass at the bottom of the pallet frame. In the browser, all pictures found will
be displayed in a separate window with the title Search Results.
If you have received pictures from other users and do not know the keywords used, you
can use the search dialog that you can open from a browser with Command-F or Edit /
Find, compare and replace / Find Files.... You can easily display the keywords used with
the IPTC pallet by placing the mouse cursor over the pictures without clicking. You can
open the IPTC pallet via the Window menu.
Alternatively, you can use the extremely fast Spotlight search option from Mac OS 10.4
Tiger. Enter your search term in the browser search box. The pictures found will be displayed in the browser.
Spotlight creates a table of contents for all files on your hard drive after Mac OS 10.4 is
installed. The IPTC data from image files is also used. If you entered “Tom” as the IPTC keyword for a picture, Spotlight will find this picture when you use “Tom” as a search term.
316
If you open the dialog in the browser using the context menu or the Other… button,
the IPTC dialog will appear but with a few differences.
Click the individual tabs to open the different sections. Enable Remove XMP to delete
the XMP information (see p 63). OK & Previous / Next allows you to edit a series of pictures. In the browser, the selected picture will be displayed with a frame.
Display font sets the character set for the IPTC entries. This is useful if you need special
characters for foreign languages. However, you can also use this function if you prefer a
different font to the default Geneva.
The options Save... and Open... allow you to save IPTC data and, for example, replace
information for various graphics or set basic settings quickly and easily for new graphics.
The JPEG, TIFF and Photoshop formats support the IPTC document information.
You can enter or edit keywords separated by semicolons on the Keywords and Categories tabs. You can also copy the list from a word processing program.
You can also copy the IPTC information of a picture clicked or opened in the browser
using Edit / Copy / Copy IPTC to the clipboard to assign it to all pictures selected in the
browser or an open picture with Edit / Paste / Paste IPTC.
317
To automatically enter the same or different IPTC document information in several graphics at once, for example, from a database, use the Insert IPTC... option in the Convert
dialog ( File / Convert & Modify ). For a detailed introduction and information on extracting IPTC information from several graphic files, see page 42.
In the browser, you can quickly display the IPTC information by selecting Window /
Show IPTC Information. The IPTC information for the picture under the mouse cursor is
always displayed. You do not have to click the picture.
If you have to optimize the IPTC information for further processing in large picture databases, we recommend using the program SnapsCleaner, which is also available from
Lemke Software GmbH. You can download a trial version at www.lemkesoft.de. Like GraphicConverter, SnapsCleaner can delete metadata in a batch run and also correct IPTC
entries in JPEGs by checking the record length, for example, and correcting it if necessary.
SnapsCleaner can also remove any Photoshop metadata from the IPTC information.
As the Photoshop metadata no longer corresponds with the official IPTC standard, it is
worthwhile removing it before you pass the pictures onto publishers who will manage
the pictures in a large picture database. Some publishers require that the pictures correspond with the official IPTC standard because the database could otherwise be damaged. Depending on the contract, the suppliers could be held liable for these damages.
Using the Convert dialog, you can transfer the IPTC information from one file to another
with the same name. This is useful if you have indexed low-resolution versions of pictures
and want to transfer the IPTC information to the high resolution versions. For more information, see page 40.
318
If you want to change part of the IPTC information for several pictures or for a large collection of pictures, select them in the browser, click Edit / Find, compare and replace and
then Find and Replace IPTC Data... in the submenu. You can also select a folder, for example, the picture folder, on the left-hand side. All pictures in that folder and its subfolders
will then be processed.
Therefore you can, for example, search for “Agency X” after your company name has
changed and replace it with the new name “Picture agency Y”.
319
A text conversion can be selected in the Preferences under Open or Save / IPTC for saving and opening pictures with IPTC information. Here are the options for saving pictures
with IPTC information:
If the IPTC information contains special characters like the German umlauts äöü and
you want it to be readable on a PC, we recommend leaving the setting Unicode (UTF8)
enabled. If a program you are using for further processing on a Mac or a Windows PC
does not show the special characters correctly, select Apple (MacRoman) or Windows
accordingly. You can convert files that have already been saved by enabling the required
option, opening the files and saving them again.
Always add IPTC as XMP also writes the IPTC data in the XMP section. This allows the
data to be read by programs that only search the XMP section for IPTC data. If you want to
copy the IPTC data to the XMP section without saving the picture again, select Copy EXIF
to XMP from the browser context menu.
If you require special characters from Unicode fonts, for example, for Japanese texts,
you need to write the IPTC in the XMP section as the normal IPTC standard does not support these characters.
You should enable Keep EXIF maker note and user comment if you want to keep the
maker note and the user comment. Some cameras do not write standardized information
in these sections of the EXIF information. This sometimes leads to problems when you
320
open files with other programs. GraphicConverter therefore deletes this information
when saving if the setting is left disabled.
If you receive files from a PC, you should enable Windows to Mac under Open / IPTC to
display all special characters correctly in the IPTC information.
If you receive image files in which the IPTC information was written incorrectly by other
programs or also written in the resource instead of in the data fork, you may not be able
to display the version of the IPTC information that was updated the other editor. In this
case, enable Resource overwrites Datafork record and open the file again. If you enable
Ask if double entries contain different data, you will be informed about any double
entries upon opening the file. Select Overwrite automatically if you want to suppress
the security query. Never Overwrite uses the first IPTC entry found in a file. There are the
following possibilities:
In the data fork:
- EXIF with IPTC
- XMP with IPTC
- Standard IPTC record
In the resource fork:
- IPTC
321
Ignore standard length limitation allows you to enter longer pieces of text in the IPTC
boxes. As the length limitation is also ignored by other programs, you can leave the
option enabled.
If you open the File menu while holding down the Alt key, the Edit File Comment...
option will appear instead of Edit File Info (IPTC).
Geo Coordinates
Images can contain geo data for the location where the picture was taken in the EXIF information. This is useful if you travel a lot and do not want to or cannot note the location
for each image. Geo data can also be interesting when you pass on images because the
recipient can easily see where the picture was taken. Geo data can be provided by GPS receivers or transferred later on from Google Earth.
Google Earth is a free program that displays satellite pictures of the earth. You can
download Google Earth at: http://earth.google.com/ The earth appears when you start
the program.
322
At the top left, enter the name of a place like “Lorenzkirch, Germany” and press Return.
The globe then starts to turn and the camera zooms closer to the surface until you see
the entered location.
You can move the picture section with the mouse or zoom in further using the plus sign
at the top right. The GPS coordinates of the mouse cursor are shown at the bottom left.
Back to GraphicConverter: If you want to enter the GPS coordinates of the photo location in the EXIF information of images, select the images in the browser, show the respective location in Google Earth and select Set GPS from current Google Earth position
from the Geo menu in the GraphicConverter menu bar. You will recognize this menu
from the standard red geo icon . In the X-Version of GraphicConverter and also in older
versions, you will find the GPS options in the context menu. The GPS coordinates are
transferred to the EXIF information and shown in the information palette. This sets the
coordinates from the center of the image in Google Earth.
If you want to set the values precisely, you should first zoom into the Google Earth
image and then set a placemark with Add / Placemark.... The placemark will then be displayed around the middle of the left-hand column. Double-click the placemark and wait
until the image in Google Earth stops moving. Now transfer the GPS data to GraphicConverter as usual.
Images with GPS data are displayed at the top right of the browser with a globe icon.
323
Click the icon to automatically display the marked location in Google Earth. Alternatively
you can use Show Position in Google Earth from the Geo menu . The flight speed can
be selected in the Preferences under Browser / Context Menu.
Add or edit GPS values opens the following dialog where you can enter and edit the
GPS values.
Set or export GPS data (UB only)
Not many cameras have a built-in GPS receiver that allows your exact position to be written to the EXIF data of the image file when you take a photograph. There are additional
devices for some camera models that can be connected to the camera and add this function.
GPS trackers provide a good alternative and are often no bigger than a USB stick. They
write your current position at a selectable time interval to a file without a connection to
the camera. At the end of a vacation, you then transfer this file to the computer and apply
the position data to the image files. Select the image files in the browser and open the
Geo menu from the menu bar.
Select the GPX, CSV, or NMEA file using Open GPX/NMEA file.... Show GPX/NMEA
data... displays the data in a list so that you can check it. Some GPS trackers write a new
file in a folder every hour. In this case, open the folder with Ordner mit GPX/NMEA-Logs
öffnen....
Use Apply GPX/NMEA file to selected images to set the GPS data from the GPX file
suitably for the selected images. GraphicConverter sets the matching GPS data from the
GPX file for the selected images. A dialog opens allowing you to select the time zone of
the location where you took the photograph if you adjusted the clock in your camera to
the local time.
324
In the GPX/NMEA files, the UTC time (Universal Time Coordinated) of the satelites is
used that was previously known as Greenwich Mean Time. If, for example, you forgot to
adjust your camera clock to the local time while on a trip, select the time zone in which
you normally take photographs and which was set in your camera. If it was summer time
at your destination and this was set in the camera, you will need to compensate this by
selecting the local time minus one hour, i.e. for example, UTC + 6 instead of UTC + 7.
GraphicConverter reads the photograph time from the EXIF data of the image file and
searches for the best matching entry from the GPX file to transfer the position data. This
function is only available in the UB version of GraphicConverter.
The first versions of the iPhone 3G software had an error in the GPS data for photos
from the built-in camera. The longitude and latitude were switched. If you have images
with this error, use the Add or edit GPS values option to swap the values over. You can
delete GPS data in images with Delete GPS data in selected files.... Use Show Position
in Google Earth to show the position where the picture was taken in Google Earth.
Tips: The free program GPSPhotoLinker shows the nearest town on the basis of the
coordinates.
You can use your iPhone 3G or newer as a GPS tracker with the Trails program from the
iTunes App Store. The recorded GPX file can be sent to your home computer from Trails
by e-mail and imported into GraphicConverter.
If your pictures already contain GPS data, you can export it with Create KML files for
selection so you can edit them in other programs. The KML files are saved in the picture
folder. Double-clicking a KML file in the Finder opens the position in Google Earth, for
example. Further use is processing in scientific GIS programs that can, for example, indicate where a power line crosses a river. You will find more information at www.wikipedia.com or en.giswiki.org
Links to topic of GPS and Geo Tagging
These Web sites can convert GPS files:
http://gpsvisualizer.com/gpsbabel/
and gpsies.com
GPS tracks, for example, for cyclists and hikers or distant countries can be obtained (for
a fee in some case) at addresses like: www.tracegps.com, magnalox.net, www.gps-tour.info and tracks4africa.com
DRIMaker instead of HDR
If one part of a photograph is considerably lighter than the rest, this area will often appear bright white or light yellow while the darker area will appear too dark. With subjects
325
that are not moving, you can solve this problem by using a series of exposures. Take a picture of the subject using a tripod with three or more different exposure levels that each
show one area of the whole picture correctly. Open the images in GraphicConverter and
select Effect / DRIMaker... to make fine adjustments in the dialog that opens.
If you are using a digital reflex camera, we recommend folding away the mirror with the
corresponding settings a while before taking the picture so that the mirror system cannot
shake the image at all.
DRIMaker is aimed at compensating the technical weaknesses of cameras and is not
intended to create artistic effects as is sometimes the case with HDR programs. You will
find further information and examples at the developer Jasper Grahl’s website: drimaker.com
Recording Points for Determining Measurements
If you need the exact coordinates of the points in the graphics, Ctrl-click to open the context menu and then select Record mouse clicks. Now GraphicConverter records the coordinates of each mouse click you make, for example, on the contours of a finding from
an archeological dig. Open the context menu again and select Stop recording to stop recording if you, for example, want to continue editing the picture before you further process the recorded points. Or, you can select Copy recorded mouse clicks to clipboard.
In the clipboard, the X coordinate, the Y coordinate with top left zero point and the Y
coordinate with bottom left zero point are given for each point in a line. The coordinates
962 700 200 mean that the point is 962 points from the left margin, 700 points from the
top margin and 200 points from the bottom margin. Make sure that, in the Preferences
326
under General / Window Display, 0 can be selected instead of 1 as the basis for the
coordinates. If 0 is the setting, it would be the 961st point from the left margin, the 699th
point from the top and the 199th point from the bottom.
If a picture contains geo data, the corresponding data will be added to the recorded data.
The points in the clipboard can be inserted in a word processing program or an Excel
spreadsheet for further processing.
Click Clear recorded points to delete the recorded mouse clicks if you have to correct
them. Insert recorded points into the image inserts the points afterwards into the picture with the current foreground color. Each point is only one pixel large which is why you
can only see these points well starting at a zoom level of 200%.
Apple Touch Icon for iPhone and iPod Touch (UB)
Using Safari for web browsing on an iPhone or iPod Touch you can create bookmarks as
icons onto yor home screen. That is handy as you can open web pages with a single tap.
To create the icon bookmark tap the plus sign in the bottom section of the screen. A selection opens in which you tap Add to Home Screen.
If you are creator of a website and whish to avoide a standard icon with a screenshot of
the webpage beeing created you can upload to the root path of your webserver an
image file with the standard name apple-touch-icon.png. This file should have 57x57
pixels or 129x129 pixels the size used by Apple likely for future devices and scaled down
by devices like the iPhone automatically. This feature is available in the UB-Version of GraphicConverter only.
GraphicConverter scales down any image automatically when saving to 57x57 pixels. If
you want to use the size of 129x129 pixels you can select this in the formats options in the
Save as dialog.
To save an own icon select Apple Touch Icon from the format list. If this format is not
displayed you can add it in the Extended Preferences in the section Save / Formats. The
mirror effect on the icon and the rounded corners will be added by the iPhone automatically. Cut for example your logo in a way the image is square and save as Apple Touch
Icon. To create a square selection you can select the aspect ratio Square from the bottom
of the tools palette.
327
Viewing or Exporting iPhoto Images
From iLife 08 or newer images from iPhoto can be displayed in the browser of GraphicConverter (UB version or newer). The iPhoto albums appear in the folder list of the browser under the folders led by an own icon. Select an album to access the images directly. If
you do not want to display the albums disable the option Show iPhoto albums in left
pane in the Preferences part Browser / Display General.
If you want to export all pictures from your iPhoto library, select Make Copy of iPhoto
Library Content... from the Script menu. You will need at least version 6 of iPhoto. The
file selection dialog opens where you select the folder or, from iPhoto 08, the “iPhoto Library” package file that is in the picture folder. Alternatively you can also create aliases instead of copies with Create Aliases to iPhoto Library Content.... GrapicConverter will
write any existing keywords in the IPTC information of the copied files. Albums from iPhoto are transferred. Pictures that are in more than one album will be copied several times.
Using GraphicConverter
as an external editor for iPhoto
In iPhoto, you can select a different program like, for example, GraphicConverter for editing photos if the image editing options of iPhoto are not sufficient. If you then doubleclick an image in iPhoto, it will be opened in GraphicConverter. Edit and save the image.
The changes will automatically be accepted by iPhoto.
In iPhoto, select Preferences / General and click Select Application.... Select GraphicConverter from the program folder in the file selection dialog that opens. In iPhoto ’08,
you select the entry In Program... from the Edit Photo pop-up menu on the same tab.
External editors
Many Photoshop plug-ins are also offered as normal programs. A good example is LensFix that you can obtain from www.kekus.com. LensFix allows you to, for example, correct
image distortions caused by the lens or reduce the vignetting. Install LensFix in you programs folder and open General / External Editors in the Preferences. Click Set... and se-
328
lect the required program in the file selection dialog that opens, in our example, this is
LensFix.
329
As soon as you have selected at least one program, the App entry also appears in the
menu bar as an abbreviation for application (program). You can transfer an open image
to the external editor via this menu.
Please note that the demo version of LensFix adds a watermark to your image and
overwrites the original. Therefore only work with copies of your image files while you are
using the demo.
330
Center Brightness Correction
Effect / Center Brightness Correction... allows you to correct the brightness of 360-degree photographs, which normally decreases towards the edges.
The following dialog opens where you can define a curve. The X-axis is the distance
from the centerpoint and the Y-axis is the extent of brightening.
You can click and move existing points in the curve. Set new points by clicking the required position. Make sure that the curve does not start rising too far to the left as this
will also brighten the center of the picture. Hold down the Option key when moving or
inserting a point so you can move the whole curve vertically. Save your curve so that you
331
can use it for other pictures. In the following picture, you will see the effect and a white
cross that was inserted as a helper for the next step:
We recommend marking the image with a round selection as the corners will otherwise
be given an unsightly gray shading. Select the elliptic selection tool and start dragging
open a circular selection roughly around the point in the picture marked with a white
cross. If you do not hit the right starting position, the circle will be slightly outside the picture. In this case, try to get the size right and move the round selection to the right position by clicking just outside the line. Trim the selection by double-clicking it.
You can change the color of the white background by Shift-clicking the corners with
the Magic Pen. If this does not work, increase the tolerance of the Magic Pen by doubleclicking the tool. Select the required color as the foreground color. Once you have se-
332
lected all four corners, add the foreground color to the corners with Edit / Fill Selection
with Foreground Color.
Edges and Frames
Effect / Edges and Frames... allows you to add a frame to an open picture.
333
Select a template on the left-hand side and move the frame in the main area so that it
fits perfectly. The frame can be made smaller using the handles on the corners. Fill invisible parts with white allows you to color the completely black areas of the frame white.
Click OK to calculate the frame in the picture.
Feathering
Feathering... in the Effect menu allows you soften the outside edges of images. The following dialog opens:
Select how wide the soft edge should be and leave the default setting Add alpha channel. The value depends on the size of the image. 50 is a good value for an image with 12
mega pixels.
So that the background behind the edge can be seen in a print layout or on a website, a
transparent area is placed behind the edge. Save pictures with soft feathered edges for
334
printing in a format like TIF that supports alpha channels. You can also use the formats:
Photoshop, PNG, TGA, BMP and PICT.
If you save pictures with feathered edges for the web, you need to select PNG format,
which is supported by all current browsers. Unfortunately the files are then considerably
larger than JPG images.
If you also want to make the pictures compatible for older browsers, select Fill with
background color. Instead of the transparency, a soft edge running into the background
color is now created. You therefore need to determine the background color of the website where the images are to appear beforehand. If you cannot find the color code in the
HTML code for the page, you can also take a screenshot with Command-Option-4, open
the image in GraphicConverter and then determine the color with the pipette. In the next
step, select this color as the background color in GraphicConverter before you use the
feathering option. Save these images in JPG format.
Repeat
Use Effect / Repeat... to copy an image several times besides and amoung each other so
a pattern like tiles is generated. Enter at least 2 in the dialog to get two images besides
and amoung each other.
335
The result could look like that:
Moving Picture Content
Picture / Shift allows you to move the picture content pixel by pixel to the left, to the
right, up or down via the submenu or the shortcuts listed there. The part of the picture
pushed out over the edge of the picture is inserted again on the opposite side. This option is mainly needed for creating icons.
336
Merge all Frames in new Window
Effect / Channels/Frames / Merge all Frames in new Window... allows you to display
the individual images of a film next to each other. If, for example, you open a GIF animation or a medical image in analyze format, the file will be displayed like a film.
If you select Effect / Channels/Frames / Merge all Frames in new Window..., a dialog
opens where you can select the number of images per line.
337
The result with our example is as follows:
Combining Pictures
If two pictures are open with an alpha channel, the Combine option appears in the context menu. You can use this option to create a picture that only consists of pixels that occur in both alpha channels. This option is also available for batch conversion functions.
To blend images into one another like multiple exposed images from a camera use File
/ Merge Folder into one Image.... Select a folder in the opening file selector. All images
of this folder are merged and displayed as one image you can save in a format of your
choice.
The Image Calculator option allows you to fade pictures into each other with a formula
(see p 338).
Image Calculator
Effect / Image Calculator... allows you to calculate pictures using a definable formula.
This is used to calculate errors from telescope or microscope pictures caused by interference. In this case, first take a picture with the lens covered. This picture should be totally black. Faults or similar may cause some pixels not to be black. Compare the black picture with your actual picture to remove the faults.
338
It is simpler if you open both of the pictures. Select the required order of the pictures
with the two pop-up menus, an operator like plus in the left-hand pop-up menu, a factor
like 1.0 and, if necessary, an additional value in the box next to the plus sign.
You can also use this option to create effects. So the results are not too light, in this case,
we recommend setting the factor to 0.5 in the top box.
Video Monitor
GraphicConverter can display videos created by video hardware, for example, a web cam,
in a monitor window, record videos and save them as QuickTime videos. Videos from
camcorders cannot be displayed and saved because the additional hardware has to be
connected via QuickTime.
Open a monitor window by clicking File / New and then Video Grab Window. If there
is a video signal, it is displayed right away. A captured file of the current picture can be saved onto the desktop by pressing the space bar. The default name will be „grab“. The file
will be saved to the desktop in PICT format with the name grab.
Ctrl-click the video window to open the context menu.
339
You can change the name with the Grab to desktop options... and select the number
of digits for counting further pictures. The files can then, for example, be called „messages 001“ etc.
Record to Disk... starts recording after you create a destination file in the file selection
dialog that opens. Disable Preview during record if your computer is too slow for this.
Full Size, Half Size and Quarter Size increase and decrease the size of the video window.
Open the following dialog with the Video Settings...:
Select Contrast, Brightness, Saturation and, if possible, Color. Select Channel in the
lowest pop-up menu. The way this dialog looks depends on your hardware.
340
Use Sound Settings to select the audio source and adjust the volume.
Remove bad Pixels
Digital Cameras can suffer from single bad pixels on the chip. These dead pixels produce
tiny white spots in the picture. GraphicConverter can remove these bad pixels automatically by calculating the average color of the surrounding pixels and setting it for the dead
pixel. Take a picture with a short exposure time in the dark and with the lens cap fitted.
Open this black image in GraphicConverter and choose Special / Learn bad Pixels. GraphicConverter can learn up to 200,000 faulty pixels.
GraphicConverter memorizes the coordinates of the bad pixels that are not black as
they should be. Open a normal picture with bad pixels and select Special / Remove bad
Pixels to repair them. You can use Save Bad Pixels Definition and Open Bad Pixels Definition to save learned bad pixels in a file, for example, so you can open them later and
use them for several cameras.
Color Blindness
Around 10% of men suffer from color blindness, often without realizing it. Those affected
are unable to read text in specific colors against certain colored backgrounds, as is often
the case on Internet pages. To make sure that your Web pages and other documents can
also be read by color-blind people, you can test the pages with GraphicConverter. For example, save one of your pages as an image using a screenshot program and open the
image in GraphicConverter. The Mac OS Finder also has a snapshot option using Command-Shift-3. The picture will be saved on the desktop.
Select Effect / Color Blindness and then the color-blindness type Protan from the submenu. The picture will then be displayed as seen by a color-blind person. If you can still
read the text, people with protan color blindness will be able to read the text. Select Edit
/ Undo and set the picture to the Deutan color blindness using the same submenu. The
text should be still be readable again.
341
The following picture shows a Web site as normal and then as protan and deutan color
blind people would see it. In this case, the white font is clearly visible against the red
background.
You can avoid problems from the start by not using yellow fonts on green backgrounds
or green on yellow.
Color Usage
With expensive special colors, printing shops sometimes need to know how much of the
color is used in a picture. Open the context menu on an open picture and then select Calculate Color usage…. The eyedropper is automatically selected as the tool. Click one
point in the picture where the color can be seen. A dialog opens where the size of the
area using the selected color is shown in percent.
List from STR# Resource
Under File / New select List from STR# Resource... to create a list of the contents of an
STR# Resource. When printing, ResEdit only prints the window contents of this resource
and not all strings.
First select the file in the file selection dialog. GraphicConverter checks whether this file
contains STR# resources. If there are none, an error message appears. In the next dialog,
select the STR# resource from which to create a list.
342
Important Formats
A list of all formats that GraphicConverter can read and write can be found on page 425.
In this chapter, we provide information on the most important formats and their features.
To save a picture in a specific format, select File /Save as... and then select the target
format you want from the pop-up menu (see p 24).
To select the format-specific options, click Options... in the file selection dialog.
The wide selection of formats is a result of constantly changing graphic format requirements and technical advances. Inadequate long-term planning and the pressure of competition have also led to the creation of new formats. This is slightly reminiscent of the
language confusion that occurred at the Tower of Babel (Moses 1, Chapter 11).
Problems with Opening and Converting Files
We won’t leave you out in the cold. GraphicConverter opens or converts almost every
graphic. If it doesn’t work, please contact us (contact information can be found on
page 15). We can adapt GraphicConverter as long as it is technically feasible and conforms to licensing requirements. It has usually been possible to implement a new format
within 24 hours. Often the cause is a problematic graphic that is in a format that GraphicConverter can actually open. The file cannot be opened because a different manufacturer
created a new variation of the format for whatever reason. Please describe your problem
to us before you send us an example graphic. We can often give you advice on how to solve the problem. Send us an example graphic only if we request one. We will analyze your
example graphic and, if necessary, add it to the types of formats. We will then provide you
with a free update either per e-mail or via download.
In the following section, the most important formats and their options are described in
alphabetical order. Formats with no special features are described in a table starting on
page 425.
ASCII
This acronym stands for the American Standard Code of Information Interchange, the exchange format for text without formatting information originating from the early days of
343
word processing. Graphics in ASCII format contain only characters from the ASCII table
just like ASCII text and have, for example, no foreign characters.
Under Header, you can specify that the width, height and number of colors inserted in
the file as numbers.
When saving color graphics with color tables, four files are also created for the actual
graphic which contain the graphic information of the red, green and blue color channels
and the color table. Select an extension for these files under File. The dot that separates
the file extension is inserted automatically.
BMP
BMP is the standard Windows bitmap format. It is implemented directly in the operating
system and supports 1, 4, 8, 16 and 24/32-bit. For 4 and 8-bit, Run Length compression
(RLE) can be used. Use the BMP format to create graphics for Windows users or for users
who do not own conversion software. BMPs can always be opened in Windows. Uncompressed bitmaps can use a lot of memory.
Under Version, you can set whether you want to save the bitmap for Windows or OS/2.
Under Compression, you can enable compression of 4 and 8-bit graphics. This type of
compression is only supported by some Windows programs.
344
Deltavision
In the Deltavision preferences dialog, you can specify that a dialog for selecting the minimum and maximum values for the red, green and blue color channels opens when you
open an image in Deltavision format.
These values are used to calculate the normal RGB valves with 8-bit per channel. The dialog also opens once before the first picture when you perform multiple conversion with
batches so that the same values are used for all pictures. All pictures will then have the
same brightness after conversion. The old values in the files will be overwritten with the
values that you enter or confirm in the dialog.
ECW
ECW format compresses files using the Wavelet method and can therefore compress very
large files to an acceptable size without much loss in quality. If you have enabled the
345
Show dialog on opening option under Preferences / Open / Formats... / ECW, the following dialog will appear when you open an ECW file.
You can open the whole picture or just part of the picture so you just have to deal with
smaller amounts of data. Select a rectangle with the mouse or enter the values for the top
left-hand corner and for the bottom right-hand corner as the Range. Downsample allows you to select a factor by which the image should be reduced. With a factor of 8, a
picture that is 8000 pixels wide would be reduced to 1000 pixels. The Required memory
for opening the picture is shown underneath.
Opening EPSF Graphics
EPSF stands for Encapsulated Postscript File. The F is often missing. However, it is the
same format. PostScript is a computer language for outputting graphics and texts to printers and image setters in the professional realm. EPS graphics contain this information
and, as a result, do not have to be converted when printing, for example, to a PostScript
printer. EPS graphics are not pixel graphics like, for example, TIFF graphics, and can only
be modified if they can be interpreted by the appropriate module. GraphicConverter has
this type of module that is only for EPS graphics created in Photoshop (ASCII and binary
format). These can thus be opened directly. EPS images created in other programs can be
opened with external modules.
If you are using Mac OS X 10.3 Panther or a newer version, you can open all EPS and PS
files with GraphicConverter directly because the Mac OS takes care of conversion (UNIX
pstopdf ).
346
If you try to open an EPSF graphic not saved in Photoshop with GraphicConverter that
does not have the correct, registered module installed on your computer, the following
message appears:
You should first decide which module you want to download from the Internet and use.
Here is an overview to begin with:
– UNIX gs (Ghostscript) is a free library that is only available for Mac OS X.
– The Ghostscript program is free and only available for Classic Mac OS. Under Mac
OS X, the module can be run in the Classic environment while GraphicConverter is
run in Mac OS X.
– EPStoPICT is a commercial program just for classic Mac OS and costs US$24.95.
Under Mac OS X, the module can be run in the Classic environment while
GraphicConverter is run in Mac OS X.
– macps2pdf is a subroutine from the MacGhostView package that costs US$20 and
can only be used under Mac OS X.
After installing the selected module, you need to specify which module should be used
in the preferences. You also need to selected the program file with Select Application
unless you are using the UNIX version of Ghostscript.
The options used to open files in the different programs vary and can be decisive in
choosing a particular program.
Take a look at the options in the Edit (Mac OS X: GraphicConverter) /Preferences dialog under Open/ EPSF Settings. Resolution allows you to set the resolution of the graphic after it is opened. The ppi unit is the same as the dpi unit. If you want to print the pic-
347
ture, you should select 300 dpi or a greater value. Use Bit depth to select the bit depth of
the graphic after it is opened. Detailed information on other preferences can be found in
the corresponding program documentation.
If you are using Mac OS X 10.3 or newer, you should select UNIX pstopdf as this allows
you to open EPS images without having to install another program. You will need to load
and install UNIX gx or Ghostscript for older versions of the Mac OS. The URLs are given in
the dialog. If you select Try to decode Photoshop EPSF files without helper app, GraphicConverter will try to open the image with its own routines for Photoshop format.
If you click Options..., the following dialog appears:
Add “showpage“ command completes EPSF files at the end with the “showpage“
command which is necessary for correct rendering. If problems occur use the function
Add only if no “showpage“.
348
Choose Let gs crop depending on BoundingBox if the cropping of the edges is not
working fine. EPSF pictures all have got edges which must be cropped.
You should only enable Add “-q” command if you are not able to open EPSF files.
Installing UNIX gs (Ghostscript) (Mac OS X)
UNIX gs (Ghostscript) is free and only available for Mac OS X. Once it has been installed,
other programs can also access the library. Installation is no problem with a standard installer. Store a copy of the installer in a safe place as you will have to reinstall the library if
you ever have to reinstall your system. Download the file espgs-7.05.5-0.ppc.dmg from
http://gimp-print.sourceforge.net/MacOSX.php3 and double-click the file. A volume
image is installed. Open the volume image and start the installer. You do not need to restart.
Select the Use UNIX gs at option in the Open / EPSF section of the preferences. You
can change the path if UNIX gs was installed by another program. In this case you do not
have to install UNIX gs again. Enter the path of the installed UNIX gs in the entry box. The
path should be available in the documentation of the program that installed UNIX gs. You
can open the UNIX gs folder for checking with the Terminal only. You can not open the
folder in Mac OS X.
You only need the path if you want to check via the Terminal if the library has already
been installed. You cannot reach this folder via the Finder.
Installing Ghostscript as a Program (Classic Mac OS)
Open the page ftp://mirror.cs.wisc.edu/pub/mirrors/ghost/aladdin/mac/ in your Web
browser. For old Macs without a PowerPC processor, download the file macgs-55068k.sit.bin. For Power PC Macs, the file macgs-550-ppc.sit.bin. The macgs-550-installer.bin
file contains a FAT version that runs on 68k and PPC processors. Unpack the file with the
StuffIt Expander freeware program. A folder called MacGS-550 ƒ is created where you
can find Ghostscript 5.5 under the name MacGS FAT.
Select Preferences / Open / EPSF and then click Select Application after Ghostscript.
Then select the MacGS FAT program file in the file selection dialog that opens by doubleclicking. Now open an EPSF graphic. It can take a long time to open the file because interpreting PostScript information is very intensive.
If a different module has been set to open EPSF graphics, you can change this setting to
Ghostscript in the same dialog.
349
Installing EPStoPICT
Load the EPStoPICT program from the Web site http://www.artage.com to your computer. On the homepage of the manufacturer, Art Age, click Products and then download
on the next page by EPStoPICT. Start your computer with the Classic Mac OS or start the
Classic environment and install EPStoPICT. Please note that EPStoPICT costs US$ 24.95 if
you want to continue using it after the 30 day trial period. After installation, you can use
EPStoPICT to open EPSF graphics in GraphicConverter by opening an EPSF graphic and
then selecting the EPStoPICT program file in Find... in the Select dialog that opens.
If a different program has already been set as the module for opening EPSF graphics,
you can change this under Edit (Mac OS X: GraphicConverter) / Preferences in the Open
/ EPSF section with EPStoPICT.
Installing macps2pdf
Download macps2pdf from http://www.kiffe.com/macghostview.html and double-click
the file to unpack it. Move the new folder MacGhostView Folder to your program folder.
Select macps2pdf in the Preferences / Open / EPSF Settings dialog as the module for
EPSF pictures and click Select Application. Select the macps2pdf program with the file
selection dialog.
Saving EPSF Graphics
It is not necessary to use an additional module to save a graphic in EPSF format. Click File
/ Save as... to open the file selection dialog and select EPSF as the format in the Format
pop-up. If you click Options..., the following message appears:
Under Compression select None, RLE or JPEG for the type of compression to use. The
quality level can be selected for JPEG compression. Low or minimum quality results in
“artifacts”. Artifacts are slightly noticeable errors in the picture, for example, the creation
of single-color surfaces in sections that used to contain different levels.
350
RLE compression is only useful for graphics that contain larger, single-color sections.
You can specify under Preview whether a 72dpi preview of the graphic is created in
the resource fork of an EPSF file. The preview option allows other programs such as
Microsoft Word to display EPSF files because the PostScript format can only be interpreted by a few programs
The EPSI option saves a preview in the EPS dataflow. It can be interpreted and displayed in all operating systems if the software used supports it. The PICT preview is located in
the resource fork and is only available on Macintosh computers. There is also a TIFF preview in the resource fork and can be used under any operating system.
In the Line ending section, you can choose for which operating system the line endings should be compatible.
Finder Picture
Mac OS Classic only: After you open a CD by double-clicking, a window opens which displays the folders and files on the CD. If As Icons is selected for display, a graphic which is
larger than a single file symbol can also be shown. File symbols are also called icons. To
display a larger graphic, several unnamed icons are placed next to each other. Each icon
contains part of the graphic.
To save you the trouble of separating and positioning the pictures, the Finder Picture
format is available in GraphicConverter. GraphicConverter automatically separates the
open graphic into small 32x32 pixel sections and saves it as an unnamed icon in the correct location. This process was also used for the Lemke Software GmbH CD.
351
Make sure that the source graphic is available in 72 dpi so that the size is correct. Archive the source file carefully. If the icon positioning is damaged accidentally, for example, when using cleanup options on the Mac OS, you can repair the damage quickly by resaving the graphic as a Finder Picture.
In the Options dialog, you can specify whether 4 Bit Icons should be created in addition
to the basic 8-bit icons with 256 colors that are created. The 4-bit icons are necessary if
you want to display the graphic correctly on computers with only 16 colors. More space is
required for additional icons. This does not usually, however, affect CDs.
Select Create 32 Bit Icons to save a photo as a graphic and display a high-quality version of it on a Mac OS or higher. This option dramatically increases the file size of the icon.
This is generally not important because the Finder Picture is primarily used for CDs.
If the source graphic contains white surfaces, a file symbol generally does not have to
be created for these surfaces. Normally a gap is left. If you still want to save white icons,
enable the Create White Icons option. Due to the visual effects of the Mac OS X, it can be
useful to save the white icons because otherwise a different color background can show
through.
Using X Offset in Finder you can specify how far the existing graphic (made up of the
individual icons) is away from the left window edge in the horizontal direction. Using Y
Offset in Finder you can specify the same distance from the top of the window. The values should not be less than 10 pixels to avoid having display problems.
352
PDB (FireViewer etc.)
The FireViewer PDB format is used by Palmtops with the Palm OS such as the Visor or the
IBM Workpad. The following Variants and options are available:
Select the number of colors and grayscales you want under Colors. Dither improves
the picture quality.
Run Length Compression (RLE) can be switched on.
When transferring graphics to your Palmtop, they are transferred in binary format.
GIF
This acronym stands for Graphic Interchange Format. This format was introduced by
CompuServe for the Internet. It compresses graphics with single-color surfaces and
sharp edges such as comics and pictograms particularly well. Graphics saved as GIFs can
have a maximum of 256 colors (8-bit).
353
Both options allow you to select which version of the GIF format is created. 87a is the
first version of the GIF format. This version can be imported by all programs that can process GIFs.
It does not support comments or a transparency mode. This means that it doesn’t make
sense to further process the graphic in a program that cannot import the newer GIF version, 89a, which does support comments and a transparency mode.
If the Row Order is set to Interlaced, the GIF is first created over the entire surface and
is relatively out of focus but it gradually becomes sharper. For Standard row order, the
GIF is created from top to bottom, increasing to the final quality level (see p 65).
Color ordering of B&W images can be used to select the usual mode for Macs with
MacOS. Windows sets the standard Windows mode. Any good software should be able
to recognize both without any problems, however. Therefore it does not matter which
mode you select. If you have problems opening a file, select the other mode when saving.
Use Optimize to automatically reduce the bit depth under Colors if this is possible. The
graphic that, for example, uses 28 colors is saved with 5-bit color depth (maximum of 32
colors) instead of with 8-bit color depth. This option makes the graphic files somewhat
smaller. This option is particularly helpful for use on the Internet.
354
IFF
IFF graphics can be saved uncompressed.
Uncompressed IFF graphics can, however, be processed by only a few programs. We recommend using RLE compression for this reason. RLE stands for Run Length.
IMG
The IMG format is the standard Atari format. A graphic with 16.7 million colors can be saved as 24 individual planes or as a single plane.
The selection is possible because Atari programs have implemented this format in different ways which means that the format is different depending on the program.
JPEG
After GIF format, JPEG format is the most common graphic format used on the Web because it achieves very high compression rates. The quality of JPEGs decreases slightly
each time you save them due to compression. This means that you should save a master
file for each JPEG graphic, for example, as a TIFF, which you then process instead. After
you have made your modifications, save a new version of the JPEG graphic, for example,
for the Web.
The further development of the JPEG format is called JPEG 2000. However, it has not
been able to establish itself as the increasing speed of Internet connections means smaller files are no longer needed. In scientific applications, however, JPEG 2000 format is
used for pictures of Mars, for example, which have a size of approximately 400 MB, but require 5 GB in the RAM. In this case, GraphicConverter will inform you that the file is displayed so greatly reduced that the data will use the full available RAM.
355
The higher the compression level is, the lower the quality. To find a satisfactory quality
level, a section of the graphic is displayed in the Options dialog as a before and after picture. Try several quality levels using the slider. If you can’t move the slider, it is because
your computer is too slow. In this case, switch off Calculate File Size and Show Preview.
The quality slider can also the moved using the plus and minus keys.
Because the quality level is very important, this dialog appears automatically when saving a JPEG unless this option is disabled in this dialog.
356
The dialog looks different in the UB version of GraphicConverter. Click the black triangle
to display and hide the options further down.
Click Options... under Save As... to reactivate automatic display of the quality dialog.
Make sure that the target format is set to JPEG. In the dialog that opens, automatic display of the quality preview can be reactivated.
357
The QuickTime Library or the JPEG Library can be used for JPEGs. If the JPEG Library
is used, the Progressive option can be selected. When Progressive is selected, JPEG graphics displayed in an Internet browser start off covering the total surface of the screen
and gradually become sharper.
You should only select Lossless if you are sure that recipients of the picture can open
this variant of the JPEG format because a large number of programs cannot open images
in lossless JPEG format. Save your pictures in TIFF format if you want to save without
losses as almost all programs can open TIFF format.
In the Subsampling pop-up menu, you should select 4:4:4 if you want to avoid picture
faults (artifacts) caused by the compression. The high compression rate is achieved in
JPEG images by saving one instead of four Y-values for blocks of four pixels. Use this option if you want to save an image with sharp-edged subjects, for example, lettering in JPG
format, without serious picture faults. The file size will increase, however. The settings
4:2:0 and 4:1:1 are mean values.
On slower computers, it is particularly helpful to switch off Calculate File Size for larger
graphics so that the before and after pictures can be displayed more quickly.
You can disable Write JFIF header to reduce the file size slightly more. The JFIF header
contains the resolution which is why you should only disable the JFIF header if this information is not needed.
Enable Store JFIF after EXIF if you want to use images in a PHP environment where
normal pictures are not recognized. This option also ensures that all graphics transferred
back to digital cameras can be displayed correctly. Some models can otherwise not display graphics.
Embed (if available) inserts the IPTC document information, the Comments, the EXIF
information and the ICC profile if this data is available in the image file and the option is
enabled. The sRGB profile is only embedded if you clear the check box. If you leave ICC
profile and Don’t embed sRGB profile enabled, the profile will never be embedded for
sRGB images from digital cameras because it is sufficient when the color model information is included in the EXIF information. The files will then be smaller. By using this setting,
you will never forget to attach profiles to other pictures, for example, pictures from scanners with profiles.
With the EXIF data, you can specify whether the EXIF preview, the Maker Note and the
User Comment are also saved. The EXIF preview has the advantage that it can be displayed in all operating systems. The Maker Note and the User Comment may contain
your name and the serial number that you may not want to forward with the picture file.
Disable these elements if necessary therefore.
You should enable iPhoto compatible EXIF if you want to transfer pictures to iPhoto.
The pictures will then be saved without EXIF Maker Note and EXIF User Comment.
358
The EXIF preview can be saved in the file and is created again for this. The advantage is
that this preview can also be displayed in other operating systems. Unlike EXIF previews
of pictures from a digital camera, newly created EXIF previews have a higher quality.
Resize to reach filesize allows you to set a target file size for the image being saved.
Only the Scale option is used for this. The JPEG quality remains as set above. It is more
worthwhile to carry out this kind of optimization with Convert & Modify and the batches
as the pictures can still be resharpened with a further batch as is always necessary after
scaling (see p 302).
Reduce quality to reach filesize allows you to specify a target file size for the image
you are saving. The quality is reduced accordingly to achieve this.
GraphicConverter can also open Medical JPEGs at 12/16 bit. A color depth of 8 bit is normal.
LuraWave (LWF)
The LuraWave plug-in is integrated in GraphicConverter. It can be used to open graphics
in LuraWave format (.LWF). This format achieves a considerably higher compression level
for very good quality graphics than JPEG format by using Wavelet technology. All LuraWave format graphics can usually be opened and saved in another format.
The registered version of GraphicConverter limits you to a maximum graphic size of
800x600 pixels when saving in LuraWave format. You can only save larger graphics after
you have paid the licensing fee to LuraTech GmbH. To do this under Mac OS 9, open
License in the Apple menu. Under Mac OS X, select GraphicConverter / License.
A dialog opens where you can launch your Internet browser directly with the correct
URL to purchase a license for saving larger LuraWave graphics. After you have paid the
licensing fee, you get an invoice via e-mail which contains your license number. Enter the
license number and your name in this dialog to completely activate the LuraWave format.
The licensing fee costs US$12.00 (as of April 2005).
359
As for JPEGs, the quality level can be set for LuraWave format. However, unlike JPEGs,
files can be saved without a quality loss.
When compressing with A bit lossy, you can enter a quality level, a maximum file size
or a compression rate.
The Scan mode can be switched between Embedded and Baseline.
The Password protection prevents a graphic with standard quality from being used if,
for example, the licensing fee has not yet been paid. To use this option, select it and enter
a password. The Quality without password indicates the quality to display for a graphic
when it is opened without entering a password.
Create backward compatible LWF file creates a file that is more compatible.
MooV - QuickTime Movie
When saving in QuickTime movie format, the appropriate compression can be selected
from a pop-up menu. The quality can be adjusted with a slider. The higher the quality, the
360
larger the file size. The settings for movies are in the lower section. You can set how many
graphics are created per second and how often the base graphic should be displayed.
For movies, you can enter a maximum data rate in kB per second. This is helpful when
streaming videos, for example, to the Internet. You can adjust the amount of data so that
it corresponds to the transfer speeds to the viewer.
mrSID
You can only open mrSID pictures if you have installed the corresponding PlugIn. You can
download it for free from the PlugIn section of www.lemkesoft.com. As with ECW format,
361
a dialog appears when you open a picture allowing you to select a section and a reduction factor.
You can open the whole picture or just part of the picture so you just have to deal with
smaller amounts of data. Select a rectangle with the mouse or enter the values for the top
left-hand corner and for the bottom right-hand corner as the Range. Downsample allows you to select a factor by which the image should be reduced. With a factor of 8, a
picture that is 8000 pixels wide would be reduced to 1000 pixels. The Required memory
for opening the picture is shown underneath.
GraphicConverter can also open pictures in mrSID format if they are in CMYK mode.
PDB (see FireViewer PDB)
362
PICT
The PICT format is one of the original Mac formats developed over a long period of time.
It is a bitmap format which can also contain vector information. There are various options
available when saving:
If you select Standard (RLE) compression, the graphic can be opened on any Macintosh with Color QuickDraw. There is no loss of quality when compressing.
If you select QuickTime compression, you can set the quality and type of compression
by clicking Options...
If the Dither option is enabled when you save a PICT, the “ditherCopy” command is
used. The result is that the PICT is, for example, dithered in color in Word, when displayed
reduced in size. The disadvantage is that it takes longer to open and display the PICT.
The Spool option is useful if you want to work with a very large PICT which can no longer be saved using the available space. In this case, don’t try to generate the PICT completely in the memory with GraphicConverter. For small PICTs, the disadvantage of this
option is that saving takes longer.
PICT format can contain ICC color profiles.
363
PICT Resource/Graphic Clip
For this file format, a PICT graphic is saved in the resource fork of the file. The following
options are available for the PICT resource format:
The Compression options and the options all the way at the bottom under General are
described in the previous chapter in the PICT format section.
With Document creator, you can specify the file creator which is then written to the resource fork when saving a PICT. This option is, for example, useful if you want to open the
file by double-clicking from ResEdit. The creator is a standard abbreviation made up of
four characters that is invisible to the user. It identifies the program used to create a file so
that the file is opened by the correct program when double-clicked. GraphicConverter
uses the creator GKON. The type depends on the graphic format.
A Resource can be added to a PICT file. Instead of using the original index, you can also
use a defined start index or an index that is created based on the original name. The part
of the filename not included in the index can be entered after Name.
PNG
PNG format is one of the formats used on the Internet. It can contain a gamma value that
optimizes the brightness and contrast of graphics created on the Mac, but displayed in
Windows, if the program used to display the graphic can interpret this information (see
p 196). PNG format has other advantages: Compression is lossless with most large files
compared with JPG files with a quality of approximately 80. All color depths are possible
and alpha channels are supported.
364
Graphics in PNG format can be saved with None under Interlaced so that they are displayed gradually from top to bottom on the Web. If you click Adam 7, the overall graphic
is out of focus at first but becomes increasingly sharper. This code, however, makes the
file somewhat larger.
If you prefilter the graphics so that there is no quality loss, they can generally be compressed better. This results in smaller files. Select one of the possible prefilters under Filter. The Automatic option creates the smallest possible PNG files. Compression can take
between 10 and 1000 times longer with the Automatic setting than with a specific filter
because all filters are tested. Store Gamma Value should be enabled if the gamma value
should be written in the file. Store software name writes the name of the creation program in the file comment box, i.e. “GraphicConverter” in our case.
PSD Photoshop
Photoshop, the well-known graphics program, has its own file format.
If you save graphics in Photoshop 2.5 format, you can choose between None and the
RLE run length compression.
365
RAW
Unfortunately there is no standard RAW format meaning that some variants may not be
opened by GraphicConverter. Each camera manufacturer uses its own RAW format that,
in some cases, differs from camera model to camera model. The colors in RAW images can
only be displayed correctly if you have the color curves of the camera manufacturers.
These color curves are not published by the manufacturers, however.
GraphicConverter therefore uses the color curves provided by the Mac OS X, which is
why it may display the colors slightly differently to the software supplied with the
camera. If the Mac OS does not support a RAW format, the curves from dcraw by Dave
Coffin will be used. If you want to use dcraw exclusively, you can disable the Use toolbox
(10.4 or later) if possible option in the Preferences under Open / Formats / Photo RAW.
RAW files contain the raw, unprocessed data from the camera sensor. If you select JPG
format in your camera, the camera processor will apply the color curves and other techniques like automatic white balance to the image files and then save the data in a JPG
image file.
RAW format is recommended for professionals who want to perform manual white
balance and therefore take sample pictures of white or gray cards with the same exposure. You obtain slightly better results with RAW format even when you make exposure
corrections afterwards. RAW images mostly need some sharpening, but show fuller and
more natural colors. As the files are at least twice the size, we recommend RAW format
just for professional use.
Metadata in RAW files: RAW files except for NEF files may not contain any metadata
apart from the EXIF data. All other metadata (IPTC, Rating, Label, XMP) is therefore written
to a file with same name and the extension .xmp that is automatically copied and renamed by GraphicConverter like any THM file. Photoshop CS also uses this technology,
which is why RAW files with IPTC information in XMP files are fully compatible with Photoshop CS.
NEF files may also contain IPTC data. If you enter IPTC data for a NEF file, it will be written in the NEF file. NEF is Nikon’s RAW format.
The XMP file is only created if metadata apart from the EXIF is available. If, for example,
you add a rating in the browser using the context menu, an XMP file is created and displayed in the browser immediately. If you do not want these files to be displayed, add the
extension XMP to the list of extensions to be ignored in the Browser / Open with section
of the preferences. You can set this list to the default setting by clicking the Default button.
To speed up the display of RAW images in the browser, GraphicConverter creates THM
files containing previews for each image file. You can disable this option in the Preferences under Browser / Preview. Some cameras create the THM files automatically. The
THM files are not shown in the browser.
366
RAW format offers the following options:
You can use the Header settings to specify whether Width, Height and Depth are saved and, if so, how. Word saves as a 16-bit integer and Long Word as a 32-bit integer.
When Motorola format is enabled, the high byte is saved first and then the low byte.
When Intel format is selected, the exact opposite happens. Color Table saves a color table in the graphics file.
Under True Color, you can specify how graphics with 16.7 million colors should be saved. If you save with Pad Byte, a blank byte is saved in front of each data triple. For this
option, each point takes up exactly 32-bit. An alpha channel can replace a pad byte. Use
RGB and BGR to specify the order of the color pixels.
When you open a RAW file that contains a movie, you can choose the method for importing the pictures in the dialog that opens. Set RAW as the import filter in the file selection dialog when you open the file.
Use Save as... to save a RAW-Movie as a movie. Click Options in the file selector box
and choose the corresponding option.
SGI
SGI format offers the following options:
367
– If you select B/W Verbatim, the graphic is saved uncompressed with 8-bit grayscale.
Verbatim means "literally".
– If you select B/W RLE, the graphic is compressed with Run Length compression and
saved with 8-bit grayscale.
– If you select RGB Verbatim, the graphic is saved uncompressed with 24-bit grayscale.
– If you select RGB RLE, the graphic is compressed with Run Length compression and
saved with 24-bit color depth.
StartupScreen (classic Mac OS only)
For a StartupScreen file, there is a PICT in the file’s resource fork. If the StartupScreen is in
the system folder and has the exact name “StartupScreen”, it is displayed when you start
your Macintosh.
StartupScreen format offers the following options:
A black border appears around the graphic if it is smaller than the specified width and
height and if the Add Border option is enabled.
The StartupScreen is a PICT which is why the “ditherCopy” command is usually used.
The result is that the PICT is, for example, dithered in color in Word, when displayed reduced in size. The disadvantage is that it takes longer to open and display the PICT.
TGA
If you save graphics in TGA format, you can choose either None or RLE for compression.
368
TIFF
TIFF format is the standard format in the publishing industry. Because image setters can
sometimes not handle LZW compression, we recommend asking your service center first
before printing. LZW compression can be disabled in the file selection dialog under- File /
Save as... using Options.... Both the GIF and the TIFF-LZW formats use LZW compression.
The following options are available for TIFF format:
If compression is set to None, the uncompressed graphic is saved. This type of TIFF can
generally be opened by any program that imports TIFF graphics. The disadvantage,
however, is the file size.
PackBits compression (RLE) is particularly good with respect to file size for black and
white graphics. In addition, it compresses and decompresses graphics quickly.
For LZW, graphic data are compressed with the LZW process. Depending on the content, LZW compression reduces graphic files by about half. Graphics with colors that run
or with pixels not often repeated can also be compressed to be considerably larger than
the original. It takes about four times longer to open the uncompressed version because
decompression is relatively intensive.
For LZW with Prediction, the graphic files are compared before the actual compression. This results in even better compression rates via the LZW algorithm. The disadvantage of this process is that graphics created this way can only be opened by a few programs.
When CCITT 3 is selected, graphic files are compressed in accordance with the CCITT 3
Standard (FAX). This option is only available for 1-bit graphics.
369
If you select CCITT 4, the graphic files are compressed in accordance with the CCITT 4
Standard. This option is only available for 1-bit graphics. The CCITT 4 process achieves
very high compression rates.
The Fill Order option is used to determine the placement of the bits for CCITT 3 and 4.
Some TIFF readers can only interpret one option.
Clear Stripe Stream if TIFFs cannot be opened correctly by the recipient.
Embed Metadata (if available) allows you to not save individual parts of the metadata
by clearing the corresponding check box.
The Format option allows you to specify whether the values within a TIFF file should be
saved in Big Endian Motorola or Little Endian Intel format. You should select Intel if you
frequently exchange files with DOS users because some DOS programs can only read Intel TIFFs. You can use both variants for Intel Macs.
Select 1 = Black is Zero (standard on PCs) under Photometric Interpretation of
B&W images if a TIFF does not display correctly on another computer.
Export 16 bit gray if possible is useful if, for example, an FITS file is converted into TIFF
to optimize the quality.
If want to convert multi-page Tiff files in one process with single-page Tiff files to change the compression, for example, you need to select File Kind Same as Original in the
options for the Convert dialog. Single-page documents will then remain single-page and
multiple-page documents will keep all their pages.
370
The Single Page File option makes several single-page documents out of multiplepage documents. The Multi Page File option makes a multi-page document out of several single-page documents. You can use this function via the Convert dialog or more simply via the browser by selecting TIFF as the target format and enabling Multi Page File in
the Options. Select several files and click Start. The first filename of the source files is
used as the filename. PDF format also supports multi-page files. If you want to create
multi-page PDF files, first save them in TIFF format and then convert them into PDF format. If you only select one source image, GraphicConverter will create a normal document.
You can use New file after folder change to create a new, if necessary, multi-page file
in the source area after each folder change. This setting is useful for multi-page faxes that
you receive as a compressed file by e-mail if the fax is in the form of several files in a folder
after unpacking.
WMF
If you save graphics in WMF format, you can choose either None or RLE for compression
of 4 and 8-bit graphics.
This type of compression is only supported by some Windows programs.
XBM
For XBM format, you can specify whether to save as version X10 or version X11.
Preferences...
The majority of the preferences dialogs are discussed in the manual where the corresponding option is described. The following list includes all preferences dialogs. For those already mentioned, a reference to the corresponding page is provided.
371
You can open a selection of the most important preferences with GraphicConverter /
Preferences / Basic Preferences.... We recommend this dialog if you prefer a simpler version. Settings made in the Basic Preferences are transferred to the Extended Preferences dialog.
You can save the current preferences with GraphicConverter / Environment / Save
current settings as.... A normal preferences file is then saved under the path: Username /
Library / Application Support / GraphicConverter / Environment
372
You can enter your own filename. Use the Save current settings to active environment option from the same submenu to save the current preferences. Delete active
environment deletes the current environment file. The preferences are kept, however,
and are saved to the preferences file when the program is closed. You can use this function to save different preferences for different types of work or for different users.
General / Clipboard
When transferring a PICT graphic to the clipboard, select Dither to use the “ditherCopy” command. The result is that the PICT is, for example, dithered in color in Word to improve the display quality when a smaller version is displayed. The disadvantage is that it
takes longer to display the PICT.
Add color profile (ICC) adds the corresponding color profile to the picture in the clipboard. This option is disabled at first as there can be problems with the program that
receives the data. If you leave this option disabled, the picture will be copied to the clipboard without a profile.
Add mask region adds a mask to the image in the clipboard so an oval selection in the
image is kept in the target program if it supports masks.
Put image as PICT and TIFF into clipboard (MacOS X only) will enable other Programs to use the image from the clipboard if they can read only one of the two formats.
373
Put and get RECTs and REGIONs to/from the clipboard is only required by some programs under MacOS X and ensures that oval selections remain oval on the clipboard.
General / Digital Camera
Check for connected digital camera during startup will display the dialog you get with
File / Acquire / Download images from connected camera...
Download *.JPG files leaves all pictures and other files in other formats like TIFF or
RAW on the camera if only this option is enabled. You should enable Download *.AVI
files if you want to also download AVI movies.
Select Download all other files, too if you want to download all files from the camera.
You should only use Use Toolbox download under Mac OS X 10.4 and higher. This is
because part of the Mac OS is used to import from digital cameras with this method and
it erroneously imported the EXIF data twice in previous versions. This bug was corrected
in Mac OS X 10.4. Importing via the toolbox has the advantage that the import is not cancelled before the last picture is imported.
Enable logfile (debug mode) allows you to create a log file called “capture_log.txt” in
which problems during import are documented. The file is saved in the GraphicConverter
program folder. Please e-mail us this file if you have problems importing from your digital
camera.
374
Rotate depending on EXIF rotates pictures from digital cameras upon import if the camera is equipped with a position sensor and has written the orientation in the EXIF data.
Rotate Thumbnail (will rewrite EXIF data) should be left enabled so that the preview is
also rotated. The following information is only interesting for pictures taken using (expensive) cameras with position sensors.
When images are rotated automatically according to the EXIF data, they are calculated
so that the top line of the image is also the top line in the file. Therefore this kind of rotation is called physical rotation.
If you import a portrait format image from the camera using the Finder, it will not be
rotated physically by the Finder.
Logical rotation is the opposite. The image data is not modified in this method. GraphicConverter recognizes the orientation of an image that has not yet been rotated physically
using the EXIF information and displays the picture correctly in the browser and when it
is opened. However, if you use this kind of picture in another program that does not evaluate the EXIF information, it will be displayed incorrectly in landscape format.
To avoid this, you should rotate all portrait-format images physically. The easiest way to
do this is to always use GraphicConverter when importing. The Rotate depending on
EXIF setting needs to be enabled.
If you are working with images that have been imported in a different way, you can
rotate them physically later on. This has the advantage that other programs will display
the pictures correctly in portrait format. Select the pictures in the browser and select
JPEG / Rotate depending on EXIF from the context menu.
You can recognize images that have not been rotated physically by opening one and
checking the orientation in the Information palette in the EXIF section. If the image is
displayed correctly in portrait format and has a value other than one for the orientation, it
has not yet been rotated physically. GraphicConverter sets the value for the orientation to
1 after physical rotation. This value indicates that the first line in the visible image is at the
top and the first column is on the left. As usual in the technical field, the first line or
column is zero.
The following list of EXIF tags for orientation is only intended for readers who are interested in the technical side. Normal users will not need this list. Images with EXIF orientation 8 need to be rotated 90º counterclockwise, for example.
The image orientation viewed in terms of rows and columns.
Tag = 274 (112.H)
Type = SHORT
Count = 1
Default = 1
1 = The 0th row is at the visual top of the image, and the 0th column is the
visual left-hand side.
2 = The 0th row is at the visual top of the image, and the 0th column is the
375
visual right-hand side.
3 = The 0th row is at the visual bottom of the image, and the 0th column is
the visual right-hand side.
4 = The 0th row is at the visual bottom of the image, and the 0th column is
the visual left-hand side.
5 = The 0th row is the visual left-hand side of the image, and the 0th
column is the visual top.
6 = The 0th row is the visual right-hand side of the image, and the 0th
column is the visual top.
7 = The 0th row is the visual right-hand side of the image, and the 0th
column is the visual bottom.
8 = The 0th row is the visual left-hand side of the image, and the 0th
column is the visual bottom.
Other = reserved
Back to the settings: If you want to always display pictures as they are physically without
evaluating the EXIF information, you can disable the Rotate image depending on EXIF
orientation option in the Open section of the Preferences by clicking Formats... and
EXIF in the list that opens. This rotation method is only related to the display on the
screen. The image is not rotated physically upon saving and the EXIF orientation also remains unchanged.
Add offset to index allows the index number in the filename to be increased. This is
useful if the counter in your camera has already run through once or several times. If your
camera starts with picture 0001 again after picture 9999, you should enter 9999 as the
offset before importing the 10000th picture.
376
General / Display Content
WYSI/WYG, use ppi/dpi of image displays graphics on the screen (except for small differences) with the same size as they are when printed. WYSIWYG stands for What You
See Is What You Get. However, the default resolution must be set for your screen. For a 15”
Monitor, the default resolution is 640x480 pixels, for a 17”, 800x600 pixels and for a 20”,
1024x768 pixels. You can achieve this display setting for graphics that are already open
using the zoom setting Print size (Picture/ Zoom).
Always use 100%, scroll large images always displays graphics at 100% when
opened.
Shrink to fit screen displays pictures in landscape format so that they take up the entire width of the screen. Portrait pictures take up the entire screen height.
User-defined zoom allows you to select the zoom level at which graphics are displayed
when opened.
Fill screen, shrink or expand to fit zooms pictures so that landscape images take up
the entire width of the screen. Portrait pictures take up the entire screen height.
Shrink to fit, constrain zoom-ratio to select the highest possible zoom level at which
the quality is very high and the entire graphic fits on the screen.
377
With frame of adds a frame around the picture within its window. Enter a value for the
size of the frame in the pixel box. This is practical if you have to focus on the picture or
you want to see the exact dark border pixels. Otherwise the window border has a distracting effect.
Fit to window after resizing selects the zoom level so that the picture fits in the window after the size has been changed.
Display image with alpha channel/mask displays the alpha channel with a mask that
might be in it.
Use high quality zoom (anti-Aliasing) is particularly useful when displaying faxes as
the text is more legible. Otherwise this setting improves the picture quality of the screen
display for zoom levels under 100% because the graphics are dithered in color. The
screen display is considerably slower, however, on old 68k-computers. The Best Quality
(bicubic) settings improves the display of pictures at high zoom levels.
If you want to see each individual pixel to edit them precisely, you need to set the display quality to Standard as otherwise some pixels will not be displayed in their true color.
The printout quality of the picture is not affected by this option.
Display tiled displays open pictures in a tiled arrangement. If necessary, drag the window open slightly larger to see the tiled display. This option helps you check the joins at
the edges of the tiles if you want to make a pattern out of an image. The tiled effect is not
saved. To save a tiled version, create the required number of duplicates in the browser via
the context menu: Save multiple copies as... Open the Convert dialog by selecting File /
Convert and select the folder with the image files on the left-hand side. Join the files
together with Concat....
General / Display Windows
see p 64.
378
General / Edit
Additional margin after “Select existing” allows you to define a margin in points that
is selected in addition to the existing one. The existing margin is the core of a picture
without a single-color border that often appears after scanning.
Copy selection only from image copies a selection when it is moved with the mouse.
Erase selection from image deletes a selection from the original location when it is moved with the mouse. Press the Command key to use the option that is not selected.
Disable Show anchor boxes if you want to use the selection without handles. You can
also change the size of the selection without handles at the corners and in the middle.
Disable Show selection frame if, for example, you need to position inserted picture
sections to the exact pixel and the selection line is in the way.
Move image parts up after erasing selection. If you select and delete part of a picture, the part underneath is moved upwards. You will probably only need this option
when the selection stretches across the whole width of the picture.
Reposition windows after change moves the window, for example, after changing the
zoom level to the top left-hand corner of the screen. This can be useful if the larger picture window does not otherwise fit on the screen.
379
Drag using translucent selections displays the content of a selection as translucent as
it is being moved. For this option, you must have a PowerPC with Mac OS 7.5.3 or higher.
It can take too long to move selections on slower computers which is why this option can
be disabled.
Drag into top left of new window puts a section picture inserted by drag and drop in
the upper left-hand corner of the target picture in the exact position where you release it.
Use selected colors for all open images makes the foreground and background colors
for all open pictures the same. If you enable this option while you are working, the foreground or background color is only applied to all open pictures after the corresponding
color is changed.
Remember last selected tool for new windows ensures that the tool selected from
the tool palette is also selected in the tool palette for new pictures.
Remember last settings for new windows ensures that the toolbox settings like, for
example, the pen thickness and color also apply for new windows after the last window
has been closed.
Show pixel bounds displays a thin line around each pixel so that the borders can be
clearly seen at higher zoom levels and for pixels of the same color.
Swap rotate 90° clockwise/counterclockwise shortcuts swaps the Command-R keyboard shortcut for rotating counterclockwise with the Shift-Command-R keyboard shortcut for rotating clockwise. Select this option if you have to rotate images mainly clockwise and want to use the more simple Command-R keyboard shortcut.
You should use Disable toolbox shortcuts if you do not want to change the tool using
the keyboard. This could, for example, be useful if you occasionally press V instead of
Command-V and do not want to select the transparency tool.
Enable Swap move selection with/without content shortcuts if you want to click
inside a selection without its content and without the Shift key to move it. If you enable
this option, you can move the contents of a selection, for example, after inserting, by holding down the Shift key.
You can enable Set focus of scroll wheel zoom to mouse position if you want to center the point under the mouse cursor when zooming with the scroll wheel. If you select a
pixel that is closer to the edge, it may only be possible to center it at higher zoom levels.
You need to move the mouse cursor again over the centering point after each zoom step.
You should select Disable double click for cropping selection if you want to avoid
accidentally cropping a picture by double-clicking a selection.
You can disable Automatically create layers for new text if you want to insert text
directly into the picture. The text can then no longer be edited after you switch to another tool.
380
General / Memory
If you disable the Undo available option, you can no longer undo the last step. However, this frees up more memory and disk space. Disable this option if there is not enough
memory available. In this case, save your individual steps in several files.
As data is also written to the hard drive for the undo function, GraphicConverter will display an error message if the hard drive is full. We recommend not disabling this message and making space on the hard drive if it appears. Mac OS X always needs a reserve of
free hard drive space on the start volume in order to write cache files. We therefore recommend selecting a folder on a different hard drive, in which the temporary files for the
undo option and for catalog printing can be written, using Set Scratch Folder.
381
General / Misc
Under Units for various dialogs, you can select Metric, i.e. meters or centimeters, or Inches.
Reset all Notification Dialogs reactivates all messages that you disabled.
You can skip display of the splash-screen in the registered version of GraphicConverter
so that you can begin your work more quickly.
Disable all notifications switches all messages off. This setting is useful if you call up
GraphicConverter options with an AppleScript as the messages will then not interrupt
the script process.
Allow display of invisible files will display invisible files in the file selection dialog.
Use Zoom Effects enables the zoom effects that open pictures like the unfolding petals
of a flower.
Use File Exchange/Internet Config configures File Exchange so that graphic files can
be automatically opened with GraphicConverter from diskettes. If you click the Configure File Exchange button, another dialog opens where you can select whether to overwrite or add to the File Exchange settings.
382
You can disable Use Smart Crash Reporter to notify developer upon crash if you do
not want to send messages from the Smart Crash Reporter to Lemke Software.
You can disable Use sound effects if you do not want to hear sound effects, for example, when deleting files.
Under User interface, you can select Standard or Less complex. Less complex versions of graphics can no longer be modified and the magnifying glass is automatically enabled. This option is useful if you only want to use GraphicConverter for viewing graphics.
Save available allows you to save the user interface settings with a password. If this option is saved, it can only be changed from Less Complex to Standard by entering the
password. Click Password to enable the block by entering a password a second time. This
block can be lifted again by clicking Password and entering the password once.
Fast sorting (only Roman font) accelerates sorting in the browser, for a slide show and
when performing a batch conversion. Use this option if you are not working with other
font systems, such as Japanese or Arabic, because sorting speed will increase considerably for the various options. If there are several thousand files, the sorting speed can be reduced from 60 seconds to one second.
Choose a font from the pop-up menu Standard as your Default List font. Small lets you
choose a font for lists displayed with a small font. Use WYSIWYG font menus to display
the fonts as they look in all font pop-up menus.
If you enable Check for newer versions every week, GraphicConverter will check for a
new version one per week and inform you about any updates.
Clear Always resolve aliases completely if you want to avoid long waiting times when
searching for the source file. If moved source files have to be searched for in a network, it
may take a while. Leave the option enabled if you want to ensure that, for example, the
source files and not the aliases are used when you drag files to a burning program like
Toast.
Clear Show script menu (change requires restart) if you do not want to display the
script menu and restart your computer. The script menu appears to the left of the Help
menu as an S-shaped scroll in the menu bar. It is worthwhile disabling the script menu if
383
you use a cross-system script menu that you can display with the “AppleScript services
program”. Enable the Show Script Menu in menu bar option for this.
General / Monitor
This option is only available when there are two or more monitors connected to your
Macintosh. In this dialog, you can specify which monitor you want to display the picture
384
on and which monitor you want to display additional information on during a slide show.
The slide show will always be displayed as a main window.
385
General / Plug-Ins
Under Acquire plug-ins settings, you can select whether Acquire again is supported.
If this option is selected in your scanning software, the scanning software is immediately
relaunched after a picture is scanned.
Scan multipage documents into one document is useful for scanners with an automatic paper feed. The scanned images or documents are scanned into one multipage file.
Save this file as a TIFF, GIF or PDF as only these formats support multipage images.
If you want to combine several pictures in a multi-page image file, open the Convert &
Modify dialog, select the Convert option, select the pictures in the left-hand selection
list, select a destination folder and TIFF as the format. Click Options... and select the option Multi Page File in the dialog that opens. Click Go to create the multi page file.
If you are having problems with TWAIN scanning, select Close TWAIN Source after end
of scan.
Enable Support old Plug-Ins (requires more memory) if you want to use older plugins that would otherwise not work.
Disable Ask TWAIN driver for color table if scanned images are displaying the wrong
color tables.
386
Select Invert 1 Bit TWAIN Images to display inverted 1-bit images via the TWAIN interface after scanning.
Due to a bug in Mac OS X 10.5 the information which TWAIN-Source was chosen cannot
be saved. Therefore you should select Ask for TWAIN source before aquire (10.5 or
later only) in the Preferences General / Plug-ins to get the dialog for selecting the
source before every scan.
The GraphicConverter Version 1.7.9 and higher allows integration of plug-ins so that
you can use additional import and export filters. Each user can use these plug-ins to program special graphic formats and then integrate them into GraphicConverter. An example plug-in with its source code can be found at http://www.lemkesoft.com. Version 2.3
and higher of GraphicConverter also supports Photoshop filters that are compatible with
Photoshop 2.5.
Support Menu Sharing (Frontier) (classic only) enable this option if you are using the
Menu Sharing program.
Ask for scanning a new page after end of scan is useful if you scan several pictures
one after the other as you do not have to start the scan program manually over and over
again.
If you scan several pictures one after the other, they will be given numbered names. The
Reset scan counter upon launch option restarts the picture count each time GraphicConverter is started.
You can select Disable menu shortcut if you want to avoid the scanning program
being started if you accidentally press the key combination. This is useful if your scanning
program crashes when the scanner is not connected.
387
General / Print
The entries under Margins determine how large the margins should be on the printout.
These values apply to all printing options: individual pictures, layouts and catalogs. Show
print dialog during Finder printing interrupts a multiple print job after each picture
and displays the print dialog where you can, for example, change the number of copies.
Print time stamp prints the date and time on PostScript printers.
The Ignore extensions list contains all formats that should be ignored when catalogs
are printed. If there are also documents with the .doc extension in your picture collection,
they will be ignored when you print a catalog.
388
Open / General
Verify color table integrity: The wrong color table is often used for black and white
graphics created in DOS programs. As a result, you may have problems printing these
graphics. Select this option to eliminate the problem because the color table is checked
and, if necessary, corrected each time the graphic is opened.
The Notify loss of information option generates a warning when you want to open a
graphic with vector data that would be lost upon opening. The graphic is converted to a
standard pixel image without vectors.
Detect only clear formats prevents you from accidentally opening, for example, a text
file as a graphic. If you cannot open a graphic, but you are sure that the file is a graphic,
you can switch this option off and try again. To be on the safe side, save all open documents because your computer may crash.
Remember 10 recent items lists the graphic most recently open under File / Open Recent in the submenu so that you can open them more quickly this way.
If you open a graphic that is already open, GraphicConverter notifies you and suggests
opening the graphic with the name Unknown. To use this option, Show alert before
opening files with same name needs to be enabled. If the graphics are different but
coincidentally have the same name and were saved in different places, you should consider renaming one of them in the Mac OS.
Disable Show alert before opening more than 10 files if you do not want to see a
warning message when opening more than 10 documents at the same time.
389
Ignore extensions (separated by a space) allows you to list file types that should not
be modified by the settings in this dialog.
Open / Correct & Change
VGA (256 Colors) displays VGA images with, for example, 320x200 points with 320x240
points so that the proportions remain the same because the pixels in the source image
are not square.
EGA (16 Colors) displays EGA images with, for example, 640x350 points with 640x480
points so that the proportions remain the same because the pixels in the source image
are not square.
Atari (4 Colors) displays Atari images with, for example, 640x200 points with 640x400
points so that the proportions remain the same because the pixels in the source image
are not square.
Correct aspect ratio Graphics are automatically scaled with this option directly after
being imported if the horizontal and vertical resolution are different. This option is useful
if you are converting a fax TIFF to a GIF because the GIF format does not support resolution information. Interpolating is always to the higher resolution.
Set resolution to 72 ppi opens all pictures in 72 ppi. This setting is useful when you are
editing pictures for the Internet.
390
Calculate best color table applies the current profile to each picture when opened.
The picture is modified.
Merge color profile into image data applies the current color profile to every image
when it is opened. This changes the image.
Remove transparent color(s) will remove the transparent color(s) on opening a file.
Change file type/creator changes the file type to that of GraphicConverter when opening the file and not when saving it. Select this setting if you want to open all graphics
that you open with GraphicConverter next time by double-clicking. You should enable
Correct movie type / creator if you want the creator of movies to be changed to QuickTime.
Open / IPTC see p 321 onwards
Open / Formats... displays the formats for which settings can be made.
Open / Formats... / BMP
BMP format was created by Microsoft, but has never been standardized. For this reason
there are 15 and 16-bit pictures. If you have problems opening the files, select 15 bit and,
391
if there are still problems, select 16 bit. 15 or 16 bit depending on file settings tries to
find the information on the data depth.
Open / DICOM
Most DICOM images provide 65,000 grays. Mac OS can display only up to 256 grays.
Choose whether you want to use file values for default window (if available) or
whether you would prefer to calculate default window with minimum/maximum
check.
392
Open / ECW
Show dialog on opening calls up a dialog where you can select the desired part of the
image when an ECW file is opened.
Open / EPSF Settings
See from page 346.
393
Open / EXIF
Keep native EXIF block for savings should always be enabled so that the EXIF information is kept upon saving. You need to save the picture in JPEG format.
Copy EXIF into empty comment field allows you to transfer the EXIF information to
the comment box when a picture is saved in a format that does not support the EXIF information. The EXIF information can then be viewed and edited in the comment box.
TIFF format supports the EXIF information. You can therefore import JPG pictures from
a digital camera, edit them and then save them in TIFF format without losing EXIF information. The EXIF information is then also kept when you save the pictures in JPG format
again. In addition to the EXIF information, the IPTC data, an ICC color profile and the comment can be saved in the TIFF file. This feature needs to be disabled in the Options dialog
394
for TIFF format for it to work. You can open this dialog in the file selection dialog with the
Options button when you save a picture with Save As....
Assign ICC profile depending on the “Color Mode” tag should only be disabled if you
edit JPEG pictures and save them for the Internet as this makes the file even smaller.
When Recognize thumbnail for display is enabled, GraphicConverter first shows the
preview from the EXIF information, which is particularly fast. Due to the low quality of
these previews, GraphicConverter will make its own previews as fast as possible. While
the preview from the EXIF information is displayed, GraphicConverter displays the text
“EXIF” in the browser next to the preview.
Rotate image depending on EXIF orientation rotates pictures from digital cameras
when a preview is opened and created if the camera has a position sensor and has recorded whether the picture was taken in landscape or portrait format in the EXIF information. Only very expensive cameras have an orientation sensor.
395
Open / FITS
In this section, you can specify the Scaling of grayscale data for an FITS file. Scaling is necessary because the Macintosh can only display 256 (8-bit) grayscale. An FITS file can contain, however, between 8 and 64-bit grayscale information. Use probability for scale generally provides better results.
Show dialog for manual range will display a dialog for choosing the range when opening an FITS file.
396
Open / GIF
To open graphics that were saved with the ItsAGif program, select Treat GIF animations with zero loops as ItsAGif.
Select Enlarge animated GIFs with frames outside the image to open graphics that
would otherwise cause problems.
Open / HPGL
HPGL graphics contain lines as vectors whose thickness and color can be specified for
when the file is opened. There are eight Pens that can be used for creating eight different
types of lines. Enter the standard thickness you want and then select a standard color.
397
Under Resolution / Unit specify the resolution of the HPGL image. The default unit is
0.25 mm. If you select a coarser resolution, the resulting image is smaller. Pixmap allows
you to select the resolution of the open graphic in ppi (=dpi).
Under Font, you can specify the font to use for displaying HPGL texts (Command LB).
The Scaling factor option corrects the size of the font. This is necessary because most
Mac fonts are smaller than HPGL fonts when converted to mm.
Using the Default rotation options, the entire graphic can be rotated by the angle you
selected when it is opened.
If you select HPGL/2 scaling Use IP and SC, the scaling instructions within an HPGL file
are analyzed if necessary. Scaling can be performed using parameters. P1x and P1y indicate the top left-hand corner of the paper format, P2x and P2y the lower right-hand corner.
398
Open / JPEG
JPEGs can either be opened with QuickTime or JPEG 6.0. QuickTime is slightly faster but
it cannot decompress all JPEGs. You can still set the preference to open with QuickTime
because the GraphicConverter automatically uses JPEG 6.0 if there is an error using
QuickTime decompression.
Open from file is slightly slower than Open from memory but it is more compatible
with problematic graphics.
Display content of unknown tags displays the content of additional tags in the comment window. This option is useful when debugging (repairing) graphic files.
After clicking Save in the file selection dialog, Always display compression settings
when saving opens the Options dialog where you can select the compression level and
hence, the picture quality.
Show Notification for incomplete JPEGs displays an error message when an incomplete JPEG is opened.
399
Open / Lotus-PIC
In this dialog, you can specify the colors of the 16 pens of a Lotus PIC file if it is to be imported as a color image. Click in a color field and the default dialog for selecting colors
appears.
Use colors creates a color image. The specifications for the Lotus PIC format do not indicate whether it is a color image or a black and white image. To keep the file size of black
and white images small, disable Use colors. If the file size is not important, this option
can always stay enabled.
400
Open / Metafile
Use Font number to identify and change the characters contained in GEM-Metafiles.
You can assign several character sets one after the other and save them so they can be
opened at a later time
Maximum width and Maximum height set limits that may not be exceeded when
opening files. Larger images are proportionally reduced in size.
Calculate minimum size calculates the area taken up by the graphic when it is opened.
This option helps save memory.
The Font scale option scales character sets when they are imported from WMF files.
WMF is the Windows Meta File Format.
The Treat CGM coordinates without VDC tag as Integer or Real option allows you to
open graphics saved incorrectly that would otherwise cause problems.
401
Open / Movie
The type of color information for FLH files is not saved in the file. Modify the type here if
the FLH files cannot be opened correctly.
Biorad is a format for microscope pictures. Unfortunately, the format specification is
problematic because it is not clear whether the three images contained in the single graphic file are three sequential images or whether they are the red, the green and the blue
parts of a single image. If you select Biorad conversion / Import three frames or less as
RGB, the three images (frames) are combined into a single RGB graphic when imported. If
you select Import always as movie, images are always interpreted as three sequential
images in a movie.
402
Open / Multipage
Open multipage files with page pop-up menu adds a menu at the bottom left of the
window frame for multipage images, for example, faxes, so you can display the other
pages.
Open only first/middle/last page of multipage files specifies that only the respective
page is displayed with multipage images.
Open only the following page of multipage files allows you to specify a page to be
displayed when a multipage image is opened.
Open always best icon of Windows ICO family makes sure that the preview is optimized by using the icon with the highest resolution and greatest depth.
403
Open / PCD
Select a default resolution from the seven provided to be used when opening PCD
files. Select Show dialog on opening to display a dialog where you can select the resolution of the PCD file and, if necessary, a section, when opening a PCD file.
If you define margins in the input boxes, the framed section is displayed as a preview.
Click Full to display the whole picture again.
404
Open / PDF
Open with resolution of x ppi lets you choose a resolution for PDF files when opened.
Open with bit depth of allows you to select 1 bit (B&W), 8 bit (grayscale) or 32 bit (color).
PDF files and PDF pictures can be opened under Mac OS X only.
Show dialog on opening allows you to select the resolution and color depth each time
you open an image in PDF format.
405
Open / Photo Raw
When you import photo RAW images, you can select a separate value for Gamma,
Brightness. It is also possible to choose a Red and Blue Scale. Try different values if the
results are what you expected.
Enable Open always JPEG from RAF (CRW) files if you prefer to always open the JPEG
image contained in RAF (CRW) documents. RAW files normally also contain the picture as
a JPG image at half resolution. Opening becomes unbelievably fast making this option
very useful for slide shows. The quality of the images is reduced, however.
Apply automatic white balance is the standard setting as the data for the white balance are normally contained in the file. If the results are not satisfactory, select the option:
Apply white balance depending on camera type and file settings. This option performs the white balance on the basis of default camera-related data that is saved in GraphicConverter. The camera type is determined automatically from the EXIF information.
You should try Interpolate RGBG as four colors if the results do not turn out as you expected. RGBG stands for Red Green Blue Green as the camera chips store these colors.
You should leave Rescale to EXIF width and height enabled so that the size of the
image is defined. Disable this function if your camera does not supply the image size you
expect.
Don’t scan files for previews in the browser thumbnail pane speeds up browsing
because the search for previews is not carried out.
406
Don’t show preview dialog suppresses the following dialog where you can also make
settings for RAW images. The dialog will appear when you open RAW images.
Open / PICT
Big color test: Please enable this option if you want to open PICT graphics with vector
information without colors. (Caution: if you do this, PICT graphics compressed as JPEGs
are considerably larger when opened.) The color test identifies how many colors the
image has. Use this option to open graphics that otherwise cause problems.
If you select Change scaling, an additional dialog appears when opening graphics in
PICT format. This dialog allows you to change the PICT graphic scaling.
407
Click Scan bitmaps for resolution to open graphics that otherwise cause problems.
Open / PSD
If you select Ask for layers, you can choose which layers of a PSD graphic are imported.
Import only background imports only the background layer. Import active layer
ignores deactivated levels.
Import with QuickTime opens with QuickTime. In this case, the picture is always converted into the sRGB color model, which can lead to display problems, for example, supersaturated colors, with some images. If this occurs, select the Import active layers option as all three other options use the GraphicConverter import routines so that the original color model is kept.
408
Open / QuickTime
GraphicConverter has its own initial routine for opening graphics. If this doesn’t work,
GraphicConverter calls up QuickTime for help because QuickTime can open many graphic formats. The graphic then opens normally in GraphicConverter once QuickTime has
opened the graphic unseen in the background. Because QuickTime sometimes crashes
when trying to open faulty graphics files which then causes the entire Mac OS (up to Version 9.x) to crash, this option can be switched off.
Limit width prevents QuickTime from crashing when graphics are opened that are wider than 4000 pixels (known cause of crashes). Use file settings reads the resolution
from the image file. The 72 dpi import is useful if you want to display a quick overview of
the graphic’s content without actually modifying the graphics. Use allows you to select a
resolution yourself for the pictures that are opened with QuickTime.
409
Open / TIFF
Select Ignore interpretation value to open TIFF graphics that are damaged. The graphic is then displayed inverted. Click Picture / Invert to remove the inversion.
Display content of unknown tags displays all text information from the table of contents in the TIFF file that cannot be interpreted in the comments table.
The Import 8 bits starting at bit x from 16 bit grayscale files allows you to specify at
which bit to start for 16-bit grayscale graphics. Enter the starting bit in the input box.
410
Open / Formats / UNIX
The UNIX formats XCF from Gimp, FIG and SVG can be opened with helper programs. If
you install these additional programs with the Fink package, the preset paths will be correct. If you have installed the helper programs in a different location, you can enter the
paths here.
411
Open / WMF
If you select Ignore black&white outlines, no outlines are shown on, for example, polygon surfaces when opened but instead the entire surface is filled. This is necessary for
faulty files.
You should enable Use Window Ext and Org tags if there are problems when you
open WMF images.
Open / Formats / XMP see p 63
412
Save / Custom Icon
Add black border creates a black border around the icons that are displayed by the operating system. Icon with dog-ear creates a dog-ear on the icon.
Create standard icon suite ensures that, when saving, the icons created meet the
icI8,icl4,ICN# standard and can be displayed on a Mac OS 7.0 or higher. The Create new
icon suite (icns) for MacOS 8.5 or later option creates additional icons that meet the
new standard for display on a Mac OS 8.5 or higher. The new icon also contains a version
with 16.7 million colors and, as a result, looks very good.
Add huge icons (48x48 pixel) always creates icons with 48x48 pixels for optimum display, for example, in the dock of Mac OS X.
Add thumbnail icon (128x128 pixel) creates preview icons with 128x128 pixels as used
in the icon display of the Finder.
Add larger icon (256x256 pixel) for 10.4.x or later creates preview icons with 256x256
pixels for Cover Flow. These large icons are not compatible with Mac OS 10.1 and 10.2.
Therefore disable this option if your files should be compatible with these versions of the
Mac OS.
Add very large icon (512x512 pixel) for CoverFlow in 10.5.x or later creates preview
icons with 256x256 pixels for Cover Flow. These large icons are not compatible with Mac
413
OS 10.1 and 10.2. Therefore disable this option if your files should be compatible with
these versions of the Mac OS.
Ignore transparency creates icons without transparency.
A resource fork may not be written to NTSC volumes, which is why no previews can be
created. Volumes from other operating systems can also cause problems.
Save / General
Add resource fork adds a resource fork to each graphic when saving. This resource fork
can contain very different types of information. Click Create custom icon to create an
icon that is displayed by the operating system. If you select Create preview, a preview
can be displayed in the file selection dialog and, for example, in the GraphicConverter
browser. The preview is a miniature of the graphic just like the icon. The icon is smaller
than the preview and is therefore also less sharp.
A graphic with a preview and an icon contains itself, so to speak, four times: the original
and the three smaller versions. Usually there are even more as the icons should be available in special versions for the various color depths because different screen displays can
be selected in the Mac OS: in black and white, in black and white with mask for the selected status, with 16 colors, with 256 colors and in True Color. And, finally, the whole
image must exist in the new standard and in two old standards and, for each of these several times in different sizes: 16x16, 32x32, 48x48 and 128x128 pixels, for example, for the
dock in Mac OS X.
For the preview, you can select if it should be displayed as Full size, if it should be created with QuickTime or if it should have a fixed Size. A fixed size always describes a square
which provides the width for landscape pictures and the height for portrait pictures
414
which is why the width is the same as the height. The maximum preview size when using
QuickTime is 80x80 pixels. The preview has a color depth of 16-bit (327668 colors).
If you are creating graphics exclusively for the Web in one step or, for other reasons, you
have to create the smallest possible files, you can disable the option which saves the resource fork. This is also possible in the file selection dialog if you are using the Navigation
Services from Mac OS 8.5 or higher.
A preview takes up a lot of RAM and can, as a result, be created with the option Compress as JPEG. This has, however, the disadvantage, that graphics with this type of preview can only be displayed gradually in the browser because the preview must first be
decompressed. It takes an unusually long time even on fast computers. We recommend
clearing this option. The quality level can be selected for JPEG compression.
The Sharpen preview option sharpens the quality of the preview using an average value when saving as this is usually necessary.
The pnot resource defines the preview of a file. This resource should be completed with
a nil indicator in accordance with NIM. However, some programs will not be able to recognize the preview. As a result, this option can be switched on and off with pnot with
nil.
If the Info string option is enabled, the text “GraphicConverter” is written to the graphic’s resource fork. If this is the case, the Finder generates a message when GraphicConverter is not available and the graphic cannot be opened with it.
Select the FLI/FLC/FLH to movie option if your FLI and FLC graphics should begin with
the first picture after the last one is shown. If you do not enable this option, you may have
problems when converting these files into an animation.
The Format of picture option can be selected if you want to preset the picture format
or if the Last format saved should be set for Save as….
For animation and presentation programs, the optimal Color table can be saved in the
resource fork in addition to the file. You can choose either Add pltt resource or Add clut
Resource.
Enable Always recompress JPEGs if you work with the selection rectangle for lossless
trimming or the Crop for Photo Service option with lossless trimming enabled and still
want the JPEG quality dialog to be displayed upon saving. Trimming will then be lossless.
If, for example, a database has written additional information into the resource fork, this
information is retained when modifying and resaving with GraphicConverter if the Copy
original resources option is enabled.
415
Save / Settings
File creator lets you select whether saved files are assigned to GraphicConverter. If the
graphics are assigned to GraphicConverter, they are opened in GraphicConverter when
you double-click them. Use original (only save) leaves the original file type when performing a Save. When you save with File / Save as... the GraphicConverter file type is generally used (Creator: GKON).
Use default creator (“????”) inserts 4 question marks as the creator which is useful on
Mac OS X if graphics are to be opened with the default graphic program by double-clicking.
If you select Use you can enter a creator in the input box that is then used when saving.
The files created are opened by the program assigned to the selected creator when double-clicked in the operating system.
Select Don’t Set Type/Creator (File Name Extension, only) if you do not want to save
a type and creator. This prevents a ds.store file being created. The Finder may, however,
create a ds.store file for other reasons.
Save/Saves as with original date leaves the file date unchanged. This is useful if you
need the original date to sort files.
416
Delete original file after save as deletes the source file after the edited file has been
saved with Save as… using the same name but with a different extension. The path for
the new file can be freely selected.
Allow save for unmodified files is useful when, for example, you want to change the
Creator to GraphicConverter with a save procedure.
Secure save on external disks always saves a file as a temporary file on the start volume of your computer first and then copies it to the external drive whenever you save files
to an external drive. Use this option to avoid the problems that can occur when writing to
remote network drives.
Hide Extension (active with Mac OS X 10.1 or later) hides the file extension.
Slide Show / Effects
See p 294
Slide Show / General
See p 290
Slide Show / Misc
See p 295
Slide Show / Move Folders (2, 3)
See p 293
Convert / Convert Text / IPTC
See p 36
Convert / Errors/ Time
See p 51
Convert / Icon / Preview
See p 47
Convert / Index
See p 51
Convert / Misc
See p 33
417
Browser / Display
See p 269
Browser / General
See p 265
Browser / Misc
(see p 273)
AppleScript
Using AppleScript, you can automate tasks on your Macintosh by writing small programs
called AppleScripts. GraphicConverter supports AppleScript. You can access all of the
GraphicConverter options with an AppleScript.
On our Web site (http://www.lemkesoft.com/content/166/scripts.html), you can make
your AppleScript available to other GraphicConverter users.
We recommend disabling all GraphicConverter messages in the Preferences in the
section General / Misc Settings so that any message dialogs do not interrupt script processes.
If you want to work with a system-wide AppleScript menu, you will find instructions on
page 383 about how to install this and disable the AppleScript menu in GraphicConverter.
Under Mac OS 9 copy your AppleScripts to the folder GraphicConverter Scripts in the
GraphicConverter folder and, if there is an update, make sure to copy the contents of this
folder to the corresponding folder under the new GraphicConverter folder just like the
plug-in folder.
Under Mac OS X, you copy your scripts into the folder Library/Application Support/GraphicConverter/Scripts or, if scripts should only be available to one user, into the folder
User/˜/Library/Application Support/GraphicConverter/Scripts. You can open the folder
with the scripts in the Finder with Open (User) Scripts Folder from the script menu.
418
Open AppleScripts using the menu that displays a piece of paper as an "S". This menu
contains all the AppleScripts that were in the Scripts folder when the program was launched.
If you want to see which options can be used with an AppleScript, open the Script Editor program that you will find in the directory Applications / AppleScript. Select File /
Open Dictionary.... After a brief wait, a list of all programs is displayed. Select GraphicConverter to display all options that can be called up via an AppleScript.
Hotfolder
A hotfolder is a good example for the use of AppleScript. This type of folder is in the Finder and an AppleScript is run as soon as one or more files are moved to it. You can therefore use a hotfolder if you frequently have to convert images from different formats to a
specific format, for example, JPG format. Drag the source pictures to the hotfolder to convert and place them in a destination folder. The hotfolder can therefore be used like a
droplet. Droplets are small programs that are run when you drag files onto them.
First, you need to create an AppleScript. We have already prepared it for you. Open the
program ScriptEditor, which is located in the Applications / AppleScript folder. Insert
419
the following text or download the script from our website and open it with the ScriptEditor.
on adding folder items to this_folder after receiving these_items
tell application "GraphicConverter"
repeat with i from 1 to number of items in these_items
set this_item to item i of these_items
convert file this_item using batch "Merlin:my batch" to folder "Merlin:destination"
end repeat
end tell
end adding folder items to
On your desktop, create one folder called Start Batch and another called Batch Destination.
Enter the path of the batch you want to use in place of “Merlin:my batch”. You can drag
the batch file to the script from the Finder to insert the path, but you will then need to
replace the slashes with colons. In our case, Merlin is the name of the hard drive.
Enter the path of your destination folder in place of “Merlin:destination”. Save the script
using a name like, for example, “Batch Script” to the folder: Startvolume / Library /
Scripts / Folder Action Scripts.
Open the program Configure Folder Actions, which is also located in the AppleScript
folder. Select the Enable Folder Actions option and click the plus button at the bottom
left. Now select the folder that should start the batch. We recommend a name like Start
Batch. You will then be asked to select a batch. In our case, this will be the script Batch
Script.scpt. The extension .scpt is added automatically when a script is saved.
420
Now you can drag picture files to the Start Batch folder to automatically process them
with the selected batch and save them in the destination folder.
Automator
From Mac OS X 10.4, you can use the program Automator to automate repeated actions
in GraphicConverter like with an AppleScript. You do not need any programming knowledge for this.
Start Automator and select GraphicConverter in the Library. The available actions are
shown in the Action column. The number of available actions will be increased. If you
require a specific action, please send us an e-mail. You will find information on using
Automator in the Help function of Automator.
Quit
This option in the File menu allows you to quit GraphicConverter. Any changes you made
to preferences are automatically saved. You are prompted to save the contents of any
open windows that are not yet saved.
Troubleshooting
If you have problems with GraphicConverter, we recommend closing GraphicConverter
and:
421
under Classic Mac OS moving the GraphicConverter preference file from the Preferences
folder, which is located in the system folder.
Under Mac OS X (from version 10.2) the preference file is called:
com.lemkesoft.graphicconverter.plist and has the path:
Users / ˜ / Library / Preferences. The tilde character ˜ stands for the name of the respective
user.
Do not delete the preference file as if your problem is not solved with this method, you
can copy it back to save you making all the settings again.
As problems with the preference file occur frequently when an update of GraphicConverter is installed, you should create a back-up of the preference file before updating unless
you already make regular backups.
The next time you launch GraphicConverter, you must re-enter your license key and preferences. If your problem persists, please contact our support by e-mail: [email protected] (see p 15).
You can also enter yourself in our mailing list at www.lemkesoft.com to receive help from
other users.
422
Shortcuts
The shortcuts for the slide show are in the chapter for the slide show (see p 297).
General Shortcuts
Key Combinations
Result
Ctrl with mouse click
Opens the context menu. The contents are
dependent on the window that is open.
Option key with mouse click in
the middle of the window title
bar
A pop-up menu appears in which the titles of all
open windows are listed. If you select the title, this
window is brought to the foreground.
Tab key
Closes all open color tables and reopens them
when pressed again.
Shortcuts in Picture Windows
Key Combinations
Result
Ctrl and Option key with mouse click the
picture surface
A pop-up menu appears where you can
select the zoom level.
Command key and + or - (minus)
Zooms to the next higher or next lower
level.
Shift and Ctrl on the picture surface with
the mouse
The visible window contents can be
moved with the mouse in the window.
The file is not changed, rather you are
only scrolling through the contents.
Option key on the picture surface
The current tool is changed to the
eyedropper when you hold down the
Option key. You have to press the mouse
button to change the foreground color to
the color under the mouse.
Arrow keys
If a rectangular selection is defined, this is
moved on a point by point basis.
If no selection is defined, the window
contents are scrolled in the
corresponding direction.
Shift-Arrow keys
If a rectangular selection is defined, it is
reduced in size or enlarged horizontally
on the right margin using the left and
right arrow keys or vertically on the lower
margin with the up and down arrow keys.
423
Key Combinations
Result
Command-Up arrow key
A browser window opens displaying the
folder containing the current picture.
Shift-Control-Arrow keys
Moves the selection boundary.
Option-Arrow keys
Shifts the complete image. The part that is
pushed out of the image is inserted at the
other side.
PgUp, PgDown (on most keyboards these
are slanted arrows)
The contents of the window are scrolled
either up or down by a full page.
Home, End (on many keyboards these are
represented as arrows with two lines
through them)
The contents of the window are scrolled
all the way to the top or the bottom.
Esc
Removes a defined selection. If a picture
section is inserted, this can no longer be
moved.
Space bar with mouse click
Allows you to move the content of the
window if the image is only partly visible.
Backspace or Delete
The contents of a selection are deleted by
being overwritten with the current
background color.
Return
Initiates the Trim selection option if a
selection is defined.
Help or Info
Displays the picture information
F1
Undo
F2
Crop
F3
Copy
F4
Paste
424
Shortcuts in Layout Windows
Key Combinations
Result
Ctrl with a mouse click in the layout when
there is no picture under the mouse.
A context menu appears that you can use
to insert one of the open images in the
layout.
Ctrl with a mouse click in the layout when
there is an image under the mouse.
A context menu appears that you can use
to change the size of the image under the
mouse in the layout.
Supported Formats
Format
Import
Export
Comment
.D
•
320x200 pixel for 1-bit
8BIM
•
Old Photoshop 2.0 format
Supports 1, 8 and 24-bit per pixel
Acorn Sprite
•
Contains sprites from Acorn computers
AFP
•
Variation of the TIFF format for 1-bit graphics
ALIAS
•
Alias Pix Format
Supports 256 grayscale or 24-bit
AMBER ARR
•
Used by microscopes
Supports 256 grayscale
AMC
•
Analyze
•
Format from medical technology that is made
up of two files: .hdr contains the header and .img
contains the image data.
ANI
•
NeoChrome program animations
animated
windows cursor
(ANI)
•
ANPA
•
Apple File Icon
Format with IPTC information
•
These files only contain the file icon. By pressing
Command-I in the operating system, you can
click and copy it in the dialog that opens before
setting it for another file with Command-V.
Apple Preferred
•
Apple Iigs graphic format
ART
•
First Publisher program format
Supports 1-bit per pixel
ARW
•
425
Format
Import
Export
ASCII
•
•
b3d
•
3D format
Bio
•
Bio-Formats of medical devices and microscopes
(Glencoe SDK)
BioRad
•
BioRad file format, supports 256 grayscale
BLD
•
•
Mega Paint format
BMP
•
•
Standard Windows format, supports1, 4, 8, 15
and 24-bit per pixel
BSB
•
BSP
•
BUF
•
BUM
•
Byte-Array
Header File (.H)
Comment
Allows you to import and export graphics that
contain only ASCII characters
Format for maps
Supports 32-bit
•
Variation of the BMP or PICT format
•
Image is converted to C source code, e.g. for
games console developers
CALS
•
CCITT 4 compressed black and white graphics
CAM
•
Casio QV-10/100 format, a variation of the JPEG
format
CEL
•
CGM
•
Chyron
•
cicn
CINEON
•
CISCOIpPhoneI
mages
•
CLP
•
cri
•
CRW
•
csource
•
CT
•
CUR
•
CVG
•
426
•
CEL format
Internationally standardized file format for
exchanging vector and bitmap graphics
•
The export option only covers the basic
elements.
•
Icons
•
Windows clipboard format
Canon cameras raw format
•
Graphics as C source code
Scitex color graphics
•
Cursor format
Calamus vector format
Format
Import
Export
Comment
CWK
•
Apple Works document format. All images
contained are imported.
DCS
•
.C, .M, .Y, .K documents are combined in a
complete CMYK image
DCX
•
Contains several PCX files
DDS
•
DeltaVision
•
DESR VFF
•
DICOM
•
Direct icns
•
•
Discus YUV
•
•
DJ1000
•
Camera format
DL
•
Animation format with 320x200 pixels for 8-bit
Normally contains x-rated elements
DNG
•
Digital Negative
Doodle
•
DPX
•
Dr. Halo
•
Dr. Halo program format with 256 colors
DrawIt PDB
•
DrawIt (Palm OS)
Duotone PSD
•
Import as grayscale
ECW
•
•
Only in Carbon Version of GraphicConverter
Electronic
Image
•
•
Electric Image Format, can contain animations
EPSF
•(*)
•
Encapsulated Postscript Format. (*)
GraphicConverter requires a plug-in to open all
EPSF files other than Photoshop EPS files (see
p 349 onwards).
ESM
•
Facesaver
•
•
Format of some graphic cards
Graphic format used in medical technology
Format from television production
ESM format
427
Format
Import
Export
Favicon ICO
•
•
FAX
•
CCITT 3 coded fax file
FaxSTF
•
FaxSTF program format
fep
•
fig
•
First Publisher
art
•
FITS
•
FLH/FLI/FLC
•
Animation from the Autodesk Animator
program
FLI supports 8-bit for 320 x 200 pixels
FLC supports 8-bit for 640 x 480 pixels
FLH supports High Color
FPX
• (*)
FlashPix file format. (*) QuickTime 4 or higher is
required for opening these files.
Freehand 10
preview
•
The browser can display a preview of a Freehand
file. This preview can be opened as a picture, but
not as a Freehand file.
FUJI
•
GATAN
•
Microscope format
Supports 256 grayscale
GEM
•
Vector graphics (GEM metafile) created by the
GEMDraw program
GFX
•
Xgrabber program format
GIF
•
GRP
•
Uses 1 or 4-bit per pixel
HAM
•
Interchange File Format (IFF)
428
Comment
Format for pictures with 16x16 pixels that are
displayed in the address bar in front of the URL.
Windows ICONS is used as the file format. Adapt
and insert the following HTML code in your Web
site and copy the favicon.ico image to your
server.
<link rel="shortcut icon" href="http://
www.lemkesoft.de/favicon.ico">
<link rel="icon" href="http://www.lemkesoft.de/
favicon.ico" type="image/ico">
With installed xfig fink package on X
•
•
Flexible Image Transport System Format
Supports 1 to 8-bit per pixel
This format was introduced by CompuServe Inc
Format
Import
Export
Comment
HD Photo (wdp)
•
HP-GL/2
•
HGT
•
IBL
•
IBM - PIC
•
Supports 16-bit per pixel
IC - Imagic
•
Atari Imagic program format; Supports the Atari
three color modes
lcd5
•
RAW format of some iPod games
ICO/ICN
•
•
Format of Windows file icons; Windows XP icons
are supported.
IFF/LBM
•
•
Default file format of Amigas.
Supports all color depths
•
Places an image in a folder where a Custom File
Icon was created, very useful when creating CDROMs
Image -> Finder
GraphicConverter can only open this Microsoft
format in the UB version.
•
This vector graphic format is usually used by
plotters
•
ImageLab /
PrintTechnic
•
Format with 256 grayscale
IMG/XIMG
•
IMQ
•
IPLab
•
ithmb
•
ISS
•
j6i
•
Variation of the JPEG format
JBI
•
Variation of the TIFF format
JEDMICS C4
•
Used by NASA
JIF
•
JNG
•
JPEG/JFIF
•
•
GEM-Draw file format. Supports 1 to 8-bit per
pixel. The specifications of the 24-bit per pixel
variation were never officially published.
Satellite image format
iPod Photo format
•
New format based on the TIFF format
•
Supports 24-bit per pixel or 256 grayscale.
Compression results in a loss of image quality.
Supports EXIF document information, for
example, from digital cameras. Medical JPEGs
with 12/16 bit per channel can only be opened.
429
Format
Import
Export
JPEG2000
(.jp2 and .j2c)
•
•
JPEG 2000 creates smaller files than JPG, but has
not established itself. j2c is a variant of JPEG2000
format.
JPF
•
•
Like gif but with zlib compression
jpx
•
JPEG variant
KDC
• (*)
Kodak digital camera format. (*) You can only
open these types of files on modern Macs with
Power PC processors or later. You can also open
these files with the X and UB version from
GraphicConverter 6.
Keynote PICT
•
Variant of the PICT format created by Keynote.
KISS CEL
•
Koala
•
Kodak DCS
•
KONTRON
•
LDF
•
Liberty IM
•
LOGO
•
Lotus-PIC
•
Lotus vector format
LuraDocument
•
Document management format
LWF (LuraWave)
•
MacDraw
•
MacPaint
•
MAG
•
MAKIchan graphic format
MAYA-IFF
•
Variation of the IFF format
430
Comment
•
C64 Format
Kontron microscope format
Contains graphics with 256 grayscale
•
LuraDokument Format. In the UB version of
GraphicConverter, LDF documents cannot be
imported and exported as no SDKs are available.
If necessary, use the X version of
GraphicConverter under Rosetta.
•
Nokia telephone logos
•
LuraWave Wavelet compression technology
When saving, the graphics size is limited to
800x600 pixels. You can only save larger
graphics after you have paid the licensing fee
(see p 359 onwards). In the UB version of
GraphicConverter, LWF images cannot be
imported and exported as no SDKs are available.
If necessary, use the X version of
GraphicConverter under Rosetta.
•
Black and white format with 576 x 720 pixels
Format
Import
Export
MBM (Psion 5)
•
•
MDC
•
Meteosat 5
•
MHT archive
•
MonkeyCard
•
•
Telephone logo format
MonkeyLogo
•
•
Telephone logo format
•
QuickTime animation
Moov
Comment
Graphics of the PSION 5 series
Meteosat satellite format
MOS
•
RAW format
MP2
•
MP2 files can only be displayed if you purchase
the MP2 add-on for QuickTime from
www.apple.com.
MPO
•
MRC
•
mrSID
•
Mac OS X only with a plug-in you can download
from http://www.lemkesoft.com/en/
plugins.htm
MSP
•
1-bit graphics from Microsoft Paint (Windows
2.0)
MSX - MSX2
MSX+ - MSX2+
•
NAA/IPTC
•
NASA Raster
Metafile
•
Format with or without several frames of the
NASA missions
NEO
•
Format of the Atari NeoChrome program
Supports 320 x 200 pixels for16 colors
NGG/NCG
•
NIF
•
NIST PCT
•
Nokia .pict
•
Nokia cellphone format
•
•
Export via the .logo format
NOL
•
•
Nokia cellphone format
NV12
•
Format for single images of a Microsoft video
format
ODF
•
Format for multipage documents
ONCOR
•
Supports 256 grayscale
ORF
•
431
Format
Import
Export
OTA
•
•
PAC - STAD
•
Palette
Comment
Black and white graphics with 640 x 400 pixels of
the Atari STAD program
•
Color table
Palm image
stream
•
Format of the Palm organizer (.stream)
PAM
•
Open Source Format
Paperport .max
•
Format of scanners with automatic feed
PBM - PGM
PPM
•
PCD
•
PCX
•
•
PC Paintbrush file format.
Supports 1, 4 and 8-bit per pixel. The new
version also supports 24-bit per pixel.
PDB FireViewer
•
•
Palm Pilot format. In the UB version of
GraphicConverter, PDB FireViewer images with
type 2 compression cannot be imported and
exported as no SDKs are available. If necessary,
use the X version of GraphicConverter under
Rosetta.
PDF
•
•
Import and Export only in Carbon Version (Mac
OS X)
PDS3
•
*.IMQ files with MOC compression
PEF
•
RAW format of Pentax cameras
PFM
•
Open Source Format
PGC/PGF
•
PGPF
•
Photostudio
•
Photo PDB
•
PIC
•
B/W Atari file format (640x400 pixels)
PIC
•
PC Paint file format
PIC
•
432
•
Standard UNIX file format for easy exchange of
graphics.
Supports 1, 8 or 24-bit per pixel.
The file can be coded as binary or ASCII.
Kodak PhotoCD format
•
Sony Clie Format
Format used under Mac OS 9
•
•
(JPEG)
Psion format
Supports 1 or 2-bit per pixel
Format
Import
Export
Comment
PIC (32K)
•
Black and white Atari format with 640 x 400
pixels
PICS
•
•
Animation
PICT
•
•
Standard Mac OS graphic format.
Contains vector and/or bitmap graphics. The
PICT images created by Keynote are also
recognized.
PICT resource
•
•
PICT graphic that was read into or out of a
resource fork
PIX
•
Modified BMP format used by some iPod games
PM
•
UNIX xv format
PNG
•
PORST
•
Photo on disk format
Variation of the JPEG format
PowerPoint
•
Only the pictures contained are shown in a
multiple-page document.
Ppat
•
•
PSD
•
•
PSF
•
Can contain several JPGs
PSP
•
PaintShop Pro format
PTG
•
ArtRage
PWP
•
Format of a developing service
Pxx - Degas
•
Atari Degas program format
320 x 200 pixels, 16 colors (*.PI1, *.PC1)
640 x 200 pixels, 4 colors (*.PI2, *.PC2)
640 x 400 pixels, 2 colors (*.PI3, *.PC3)
QDV
•
Giffer format
Supports 1, 4 and 8-bit per pixel
QNT
•
QTIF
• (*)
•
New file format for the Internet.
Supports 1, 2, 4, 8 and 24-bit per pixel and a
gamma value. The Apple Touch Icon for
bookmarks on the iPhone and iPod Touch is
saved in PNG format.
Photoshop format for Version 3.0 or higher.
Supports 1, 8, 16 and 24-bit per pixel.
QuickTime graphic format
(*) QuickTime 3 or higher is required for opening
these files.
433
Format
Import
Export
QTL
•
•
RAF
•
RAW
•
RIFF
•
RLA
•
RLE
•
RSB
•
RTF
Comment
Can contain JPEG
•
You can use the Raw filter to import "raw data"
data types. You must specify the width, height
and color depth when importing or saving.
There are many types of RAW files not
documented by the manufacturers of digital
cameras. That is why GraphicConverter cannot
open some RAW files. Sony dsc f828 and bayer
rggb are supported among others.
Format of the Painter program
Contains color and black and white graphics
"Utah Raster toolkits" graphics
•
•
Rich Text Format
RW2
•
SCR
•
SCR
•
ScreenShot
Hack PDB
•
Palm OS ScreenShots; support for Handera and
Sony CLIE (V1.5)
SCX
•
ColoRIX format
Supports 8-bit per pixel
SFF
•
Fax format from Fritz!
SFW
•
Seattle Filmworks photo on disk format
Variation of the JPEG format
SGI
•
Silicon Graphics Image format
Supports 256 grayscale or 24-bit
SHP
•
Lighting Press or Printmaster graphic archive
format
Supports 1-bit per pixel
SHS
•
434
Sinclair screenshots. Please note that the file
extension SCR is also used by the Capture Tool in
Word for DOS.
•
Graphics created by Capture Tools from Word for
DOS This format is identical to the PCX format.
Please note that the file extension SCR is also
used by Sinclair screenshots.
Format
Import
Export
Comment
SIGMA SD10
raw
•
RAW-Format of the camera Sigma SD 10
Sinclair QL
•
Sinclair QL format
SIXEL
•
VAX world terminal format
SKETCH
•
Variation of the MBM format
smv
•
Used by microscopes
SNX
•
Variation of the JPEG format
Softimage
•
SPC
•
Spectrum graphic format
Supports 320 x 200 pixels for 512 colors
SR2
•
Sony Raw
ST - X - SBIG
•
Supports 256 grayscale
Startup Screen
•
SUN
•
SUN Raster file format
Supports 8 or 24-bit per pixel
Super-Hi-Res
3200
•
Apple Iigs graphics with 32000 colors
SVG
•
•
Import with Mac OS X only with ImageMagick as
helper http://www.imagemagick.org/
SWF
•
•
Using QuickTime (Macromedia Flash)
•
Clipboard format when copying or moving data
on System 7 or higher
System 7 clip
TBCPlus
•
TCL
•
TealPaint PDB
•
TEX
•
TGA
•
•
•
Softimage format
Supports 32-bit per image
Used by video programs
Graphics in this file format are displayed when
your Mac is started if they are in the system
folder.
TCL format
•
TealPaint (Palm OS). Save for PDB. Select the
format using the Options button.
Texture
•
Truevision Targa format
435
Format
Import
Export
Comment
TIFF
•
•
TIM PSX
•
TN
•
TRS-80
•
VBM
•
VFF
•
Uses 4-bit per pixel
VGS-8
•
Used by microscopes
VITRONIC
•
Vitronic Format
Supports 256 grayscale
VOXEL
•
Format with 512 x 512 pixels for 256 grayscale
VPB
•
VPM
•
WBIN
MacWavelet 2d
Complex format for all color depths
The GraphicConverter can import and export
the following types of compression:
uncompressed, packpits, lzw, ccitt3, ccitt4, fax3,
fax4. 32 bit IEEE TIFFs are supported.
ATARI TINY format
•
TRS-80 format
•
Quantel Videosystems format
•
•
MacWavelet 2d format
WBMP
•
•
Format of the new WAP technology
wbz
•
Five variants are recognized
wdb
•(*)
HD photo format from Microsoft. (*) Can only be
imported with the UB version of
GraphicConverter.
WinFax fxm
•
Winmail.dat
•
WMF
•
WPG
•
X-Face
•
X11
•
Bitmap format
X3F
•
Format of the Sigma digital camera
436
All readable images it contains will be opened in
a multiple-page document.
•
Windows Meta File
Contains vector and bitmap graphics
Word Perfect graphic format
Can contain vector and bitmap graphics
•
Supports 48 x 48 pixels for1-bit
Used for small photos in newsgroups
Format
Import
Export
Comment
XCF
•
Non documented Gimp format. Can be opened
with GraphicConverter if ImageMagick (Fink
package) is installed.
XBM
•
•
Black and white format coded in C
XPM
•
•
ASCII Bitmap
XWD
•
•
Dump from X-Windows
YUV
•
If the width and height cannot be determined
automatically, a dialog opens where you enter
the values.
Z04, Z08, Z16,
Z24, Z32
•
z3d format
New features in GraphicConverter 5.8.2
• Label support within XMP metadata added so that labels are also displayed correctly
in Adobe Bridge, see p 250.
• Optional color profile selection dialog when opening images without profile, see
p 135 onwards.
• Sorting into date folders added to browser context menu, see p 260.
• Option for converting XMP metadata into an ANPA resource added to Convert dialog.
Photoshop CS2 only writes the IPTC data in the XMP section. However, other programs
need the IPTC data in the ANPA resource that is the standard section for IPTC data, see
p 48.
• Option for deleting RAWs for which there is no JPG added to Convert dialog: Delete
source raw file if no jpg exists in dest folder, see p 49.
Improvements
• Option-click support added to scroll box in browser. Press the Option key and click the
scroll box to jump straight to a point.
• The label is kept upon saving. In older versions, the label was deleted when you saved
a file again.
• Text for document name batch function improved. The text that is added to the
filename can now either be placed before or after the name.
• The maximum number of large previews can be defined in the range 1-10 in the
settings: Preferences / Browser / Display General.
• Many other improvements and corrections.
437
New features in GraphicConverter 5.9
• Color profiles from PNG files are supported.
• In the Save / IPTC section of the Preferences, you can use Always add IPTC as XMP
to also write the IPTC data in the XMP section. This allows programs that only search
for IPTC data in the XMP section to read the data.
• The pop-up menu in the Convert dialog contains the new Add XMP record if only
IPTC/NAA record exists option. This option writes the IPTC data also in the XMP
section. This is useful if your pictures have already been indexed and also need the
IPTC data in the XMP section because the person you are sending the pictures to can
only read the XMP section with his/her software.
• You can select the Composite Operation Core Image Filter from the Filter menu. Two
pictures need to be open when you use this.
• New formats: .tex (Texture) and Sony RAW can be imported.
• The pen color and thickness can be remembered for a new window: Preferences /
General / Edit: Remember last settings for new windows.
• In the browser, the Rename dialog can also be used via the context menu for a single
file.
• If the browser context menu is too big for you, you can hide individual options in the
Preferences under Browser / Context Menu.
• In the HTML Catalog, the filenames can optionally be shown above the images.
• Individual frames can be moved in the Movie Options palette.
• In Rename dialog: The index number in filename can be reduced to a selectable
number of digits (if the index is very long like, for example, 00001234).
• In the Convert dialog, Function / IPTC Export...: When IPTC data is exported to a text
file, the fields can be selected individually. CSV format is also available for databases in
addition to ASCII format.
• Many other improvements and corrections.
New features in GraphicConverter 5.9.1
• The preferences can be saved for different types of work, see p 372.
• Picture / Invert / Color Table allows you to invert the color table 1:1 for palette
pictures.
• Batches can be called up with an AppleScript allowing the use of hotfolders, see p 419.
• Remove all metadata... and Create Icon and Preview are now also available in the
Finder context menu. If necessary, you can re-install the context menu extension with
Preferences / General / Plug-Ins.
438
• The preview is displayed with profile and printer profile in the print dialog.
• You can disable the option for also writing labels in the XMP section so that you can
set labels faster: Preferences / Browser / Function.
• The position under the mouse cursor can be centered when you zoom with the scroll
wheel: Preferences / General / Edit.
• The transparency for all frames in a GIF animation can be disabled in the new film
palette.
New features in GraphicConverter 5.9.2
• The new Edges and Frames... option allows you to add a frame to an open picture,
see p 333.
• When creating HTML catalogues for the Internet, you can insert colored arrows for
navigation on the HTML Basic tab in the Catalog dialog.
• GraphicConverter can be called up with a command line (UB version).
• Automatic preview creation runs as background thread (UB version).
• New option for adding an EXIF preview instead of the resource preview (browser)
• In the browser context menu, you can Rebuild EXIF preview in the JPEG submenu,
see p 256.
• In the browser context menu, you can Set Creation Date depending on EXIF in the
JPEG submenu, see p 256.
• New context menu option for counting pixels in a selection.
• The rating can be selected as a sort criteria in the browser.
• The Convert dialog now supports over 32766 documents per folder under Mac OS X.
• Rename can insert the name of the parent folder in the Name tab.
• IPTC export supports the Event, People and Location special boxes.
New features in GraphicConverter 5.9.3
• New context menu item for converting a layout into an image.
• New context menu item for renaming open documents.
• Browser preview can show four images from movies (Preferences / Browser / Display
Thumbnails).
• The AppleScript menu can be disabled in the Preferences if, for example, a systemwide AppleScript menu is used, see p 418.
439
• The operator supports the new option Save to source folder and copy original into
sub-folder.
• Pictures can be sorted according to rating and date in the browser.
• The slide show and browser now use a standard shortcut for rating and label.
• New Esc+Option key shortcut rebuilds the preview in the browser.
• The slide show with search can also take the label into consideration.
New features in GraphicConverter 5.9.4
• In the text tool dialog that you open by double-clicking the text tool, you can activate
a background color for the text to improve the legibility of the text.
• You can convert a selection to grayscale using the context menu.
• Individual EXIF tags can be deleted via the browser context menu if, for example, you
do not want to pass on details about the white balance.
• If RAW files contain metadata like, for example, IPTC data, a file with the same name
and the extension .xmp will be created that enables other programs like Photoshop
CS2 to access the metadata.
• Feathering... in the Effect menu allows you soften the outside edges of images.
• Several copies of a file can be made at once via the browser context menu.
• The ithmb format from the iPod Photo can be opened.
• EXIF data can be saved in a text file via the context menu for import into databases.
• Preview pictures are created faster in the browser (only UB version).
• The name of the folder for converted documents can be edited in the Convert / Misc
section of the preferences.
• If your mouse has a scroll wheel or scroll ball, you can use it to enlarge and reduce the
image during the slide show.
• In the Preferences under Browser / Function, you can specify that metadata is
written to NEF files.
• The histogram that is displayed with Picture / Histogram... shows the proportion of
each color in percent.
New features in GraphicConverter 5.9.5
• Images can be exported in dcf format via the export submenu in the browser context
menu for memory cards and playback on DVD players with card readers.
• If you open a PowerPoint file with GraphicConverter, the images contained will be
440
displayed in a multi-page document.
• In the Picture / Size menu, images can be trimmed centered to a specific aspect ratio.
• With very large JPEG 2000 files, a smaller version is opened if necessary that is as large
as the available RAM.
• Winmail.dat files can be opened. All readable images they contain will be opened in a
multiple-page document.
• A transparency can also be used instead of an alpha channel with Flatten Alpha
Channel.
• When you search for duplicate documents, the smaller, larger, newer or older file can
be automatically deleted.
• When you send pictures as an e-mail attachment, you can save to an automatically
created folder on the desktop. These files can be used for Web mail accounts like
Hotmail.
New features in GraphicConverter 5.9.6
• In the browser, you can sort the files By Name starting at Position. This is useful if, for
example, different street names are given in the first eight characters. In the
Preferences, specify how many places should be ignored at the start of the filename
in the Browser / Misc section. If you use hexadecimal counting, select By Hex in
Name starting at Position.
• Edit / Paste / Paste into Alpha Channel allows you to copy a mask into the alpha
channel, for example, that you previously copied from another image.
• Effect / Enhance Local Contrast allows you to use an alternative method for
increasing the contrast gently.
• Images can be displayed in a tile arrangement. This is useful as a preview if you want to
create a pattern. Enable the tiled display with Preferences / General / Display
Content and drag the window further open if necessary. The image is saved as normal.
• In the browser, you can copy files with Command-C and paste them into another
folder or into another browser window with Command-V. You cannot copy and paste
files from the Finder. Files cannot be cut out.
•
In the browser context menu, JPEG / Copy Windows EXIF Tags to IPTC allows you to
move indexes that were added by Windows Explorer from the EXIF section to the IPTC
section.
New features in GraphicConverter 6.0
• Lossless trimming is also available as a batch.
441
• You can select small icons at the top of the browser via the context menu.
• The formats j2c, HD Photo and kdc are supported during import.
• The crash report for Lemke Software can be disabled.
• File / Save for Web added.
• Polygon selection tool added (see p 148).
• Simple layer function for text added (see p 223).
• GPS data from Google Earth can be inserted and flown to (see p 322).
• Rulers can be displayed via Preferences / General / Display Windows.
• Additional frames under Effect / Edges and Frames...
• Additional measuring functions for caliper rule: Line, rectangle, circle, mean value (see
p 58).
• All variants of subsampling are available in the JPEG format options.
• The background can be set to transparent for a new image.
• In the slideshow, images can optionally be displayed justified to the left or top etc.
(Preferences / Slideshow / General Settings).
• The sound effects, for example, when you delete a file, can be disabled (Preferences /
General / Misc).
New features in GraphicConverter 6.0.1
• Option for slide show to ignore the Originals and Thumbs folders from the iPhoto
Library: Preferences / Slide Show / Files.
• JPEG option not to write JFIF head or copy to EXIF.
• Swap foreground and background color with x key.
• Additional simplified preferences dialog showing just some of the preferences.
New features in GraphicConverter 6.0.2
• complete UNICODE support for IPTC metadata added
• function to export complete iPhoto database added (see p 328)
• import of ArtRage (.PTG) added
• import of Sinclair screenshots (.scr) added
• HyperDither (Atkinson) function added
• red eye tool added (UB only)
442
• ODF import added
• YUV import with dialog for different frame sizes added
• remove resource fork option added to context menu
• text font selection improved (via menu in the menu bar, UB)
• unskew works now with grayscale images
• option to export only each second, third... image to a movie added
• speed of import with cardreader improved (UB)
• line, rectangle and ellipse tool uses now Quartz (UB)
• button to go from basic prefs to extended prefs added
• support for multipage ps files added
New features in GraphicConverter 6.0.3
• BSP import added
• Browser can optionally hide files that begin with “%” or end with “˜” (tilde): Preferences
/ Browser / Display Thumbnails
New features in GraphicConverter 6.0.4
• sff import added (format of Fritzbox fax files)
• Single color channesl can be joined (Effect / Channels/Frames / Join).
• Browser creates thm files to speed up viewing of raw previews.
• An image can be set as a folder icon via the context menu.
• Slide show can create a protocol noting when which images was shown (Preferences
/ Slide show / General).
• IPTC information is written as Unicode for better compatibility with PC-Systems. This
can be set to Mac or Windows standard in the Preferences / Save / IPTC/EXIF.
New features in GraphicConverter 6.1
• Icons of 256x256 and 512x512 Pixels are possible but not supportet by Mac OS 10.1
and 10.2
• External editor support added (UB)
• Slideshow can display next image on second monitor (as an option, UB)
443
• Geotagging with gpx files added (UB)
• JP2 export with alpha added
• Updated features
• Option for label display in browser added (UB)
• Import from folder
• Option for destination format during html catalog creation added
• Core image filters can be applied to selections (UB)
• Save for web shortcut added
• Move folder option added
• Crop ratio of image added
• Option + tab key toggles preview mode in the browser (UB)
• Trim option for alpha channel added
• Catalog printing enhanced (more header and footer options)
• Pipette can calculate a median color for a region (double click on the pipette tool icon)
• Context menu can be installed flat or as submenu (UB on 10.5.x or later)
New features in GraphicConverter 6.1.1
• E-mail attachments in Mime format can also contain several images.
• Labels can be assigned in the operator and the current image can be deleted.
• Pictures can be sorted according to label and date in the browser.
• There is an option for also drawing in the alpha channel (double-click rectangle tool).
• When calibrating the slide rule, you can make the line perfectly horizontal or vertical
by pressing the Shift key.
• Subfolders can be printed separately when you print catalogs.
New features in GraphicConverter 6.2
• Geo menu
added (only UB version)
• Content of GPX files with geo data can be displayed via the Geo menu.
• QuickTime extensions like Perian are supported by the UB version.
• DRIMaker allows HDR-like images with a high contrast via the Effect menu.
• "and" and "or" links added to search option
444
• Stamp edge pattern can be selected
• All pages of multi-page documents can be printed when you print catalogs.
New features in GraphicConverter 6.2.1
• curves added (UB only)
• kml geo data export added (UB only)
• delete GPS function added (UB only)
• RW2 import added
• JAlbum export added (UB only)
• Rename option to make first char of each sentence or each word uppercase
New features in GraphicConverter 6.3
• Export for digital picture frames via browser context menu: Export / Prepare for Picture
Frame device...
• The EXIF data is exported by Phil HarveysEXIFToolallowingmoredetailstobedisplayed.'
• You can now also measure an angle between two helper lines with the slide rule tool.
Click the tool and hold down the button to select the option.
• The Format pop-up menu is shortened when you save. Select Show All to display all
formats and open the pop-up menu again.
•
You can copy the EXIF function to the XMP section by selecting Copy EXIF to XMP
from the browser context menu.
• Import JNG files.
• In the Convert dialog, you can combine several pictures in a photostrip.
• You can select the background color in the shadow batch.
• The bounds can be ignored during WMF import
• There is also 800 x 600 size for export for e-mails.
• A different batch can be selected for the preview pictures in HTML catalogs.
• You can select the time zone of the photo location when setting GPS data from a GPX
file.
• You can enter the size of the stamp tool as a numerical value.
445
New in GraphicConverter 6.4
• Albums from iPhoto 7 or newer are displayed in the left section of the browser (UB
version only).
• GPS tab in the palette Information
• Pictures from XMP can be opened via the context menu of an opened image.
• Effect / Repeat produces a pattern of the image like tiles.
• SHS-Format can be imported
• OK & Again in Crop for Photo Service... applies an index to the file name if more than
one image is cropped.
New in GraphicConverter 6.4.1
• Bio formats are supported via an SDK from Glencoe.
• Meta data can be used also in formats like CR2, CRW, EPS, EPSF, GIF, NEF, NRW, PDF,
PNG, PS, PSD, THM, TIF, TIFF, PNG, PDF and other formats that are labeled with R/W at:
http://www.sno.phy.queensu.ca/~phil/exiftool/ in the Support column of the
Supported File Types table.
• When printing catalogs, the delta path with just subfolders can be shown instead of
the whole path.
• In the preferences, you can select the path for an alternative iPhoto library under
Browser / Open.
• New import formats: NV12 and CWK
New in GraphicConverter 6.4.2
• GPS tagging supports NMEA data files as input (in addition to GPX) (UB)
• GPS tagging supports multiple log files from a folder (UB)
• Combine folder into one PDF added to Convert & Modify (UB)
• Import of Photostudio format added (UB)
• Line drawing supports now arrows at both ends
• Concat supports now multiple files (UB)
• E-mail image function supports batch actions for manipulation before e-mail (UB)
• Levels dialog and find and replace supports change of all frames (UB)
• JPEG save as options dialog improved (UB)
446
• back and forward in slideshow remembers the last file for random slideshow (UB)
• lsm import improved (UB)
• detail window supports now 50% and 25% (UB)
• support for a special bmp variant added (UB)
New in GraphicConverter 6.5
• spotlight comment to iptc caption command added (UB)
• conversion of premultiplied alpha to non-premultiplied alpha and vice versa added
(UB)
• PAM and PFM open source formats import added (UB)
• function to convert corrupted fz20 raw files in convert&modify dialog (UB)
• canvas changes adds a transparent margin for images with alpha channel (UB)
• support for import of PGM/PBM with 16 and 32 bit per channel added (UB)
• support for DPX files with little endian byte order added (UB)
• support for geotagging from CSV and NMEA files added (UB)
• Unskew points can be moved with the cursor keys when mouse is near point. (UB)
• random slideshow can go forward/backward in normal order with the page up/down
and arrow up/down keys (UB)
New in GraphicConverter 6.5.2 (all UB only)
• invert alpha channel command added for single image and batch (Picture / Alpha
Channel / Invert Alpha Channel)
• open browser in flat view added (File menu with control key)
• import of MPO added
• creation of alpha channel from stored Photoshop path added (Alpha Channel /
Create Alpha from Path „Name“)
• vpb save as dialog can be disabled
• multiscale dialog in Convert & Modify dialog supports GIF format and scale algorithm
selection
• command+option+5/6 can now be used for back/forward in the browser and
slideshow if not defined as move folder in Preferences / Slide Show / Move Folders 3.
447
New in GraphicConverter 6.6 (all UB only)
• split function added to convert & modify
• support for import and export of JPEGs with lossless compression added
• support for import of JPEGs with 12/16 bit added - medical JPEGs
• support for import of a lot of JPEG2000 variants added
• batch white correction added
• iptc Mac -> UTF8 batch function added
• continue slideshow checks the file list for removed files
• GraphicConverter will go back into watch folder mode if you quit the app in that mode
• you can define the frame of a movie that should be used for preview creation
• set desktop image stores the image now as png
448
Index
A
Acquire 109
Acquire again 109
Add (Batch Function) 302
Add Alpha Channel (Rotate) 124
Add Alpha/Mask Channel 208
Add Remove/Margins 106
Add XMP file... 48
Add XMP record 50
Add/delete margin (Batch Function) 307
address 15
Adobe Bridge 250
allowing search engines to find your site 89
alpha channels 206
Alpha/Mask Channel to Picture 208
Amiga formats 6
Anti-alias 222, 228
AOL 75
AppleScript 418
Arrange left to right 235
Arrange Pictures depending on Resolution
97
Arrange Pictures with fixed Size 97
Arrange top to bottom 235
ASCII format 343
attachments (e-mails) 71
Auto Convert 32
Auto Levels 160
Auto-arrange (window) 64
automatic color correction 129
Automator 267, 421
B
background color 155, 224
Batch Function 302
BMP format 344
brightness and contrast 128
Brightness/Contrast (Batch Function) 308
Bring To Size (Batch Function) 308
Browse Folder 20
Browser 235
Burn In 107, 159
C
Calculate Mean 40
Calculate Mean Values 40
Cancel (Batch Function) 303
Catalog 81
Catalog (HTML for WWW usage) 35
Centric Involution 202
Change bit depth dynamically 71, 170, 174
Change extension 33
Change picture 295
Change to B/W (1 Bit) 163
changing filenames to lowercase
characters 87
Chromatic Involution 200
circle 228
Claris E-Mailer 75
Clear 216
Clear Frame 221
Clipboard 216
Close 30
CMYK 152
CMYK colors 231
Cold-Warm Involution 203
color (HSV model) 199
color blindness 341
color correction 132
color depth 161
color palette 232
color permutations 199
color pictures 170
color profile with ColorSync 135
Color Rotation by 15 Degrees Clockwise
202
Color Usage 342
Colors 161
Colors (Batch Function) 308
ColorSync 135
Comment 63
Comment (Function) 309
Compare Pictures 70
compressing with StuffIt 29
Content (of pictures in Layout dialog) 211
Continue (Batch Function) 309
Continue Slide show 283
Control-click 123
Convert (Batch Function) 312
Convert & Modify 30
converting 24
Converting a Picture with Save as... 24
Copy 216, 225
449
Copy (files) 35
Copy as HTML 217
Copy EXIF as Text 219
Copy File into Resource 215
Copy with opacity 311
Copy with transparency 311
Core Image Filter 183
Create LOWSRC 29
Create Preview (in the browser) 247
creating an alpha channel from
transparency 156, 207
Creator 286
Crop (Batch Function) 309
Crop region (Batch Function) 309
Cut 216
Cycle Windows 235
D
Darken Linear 167
Datafork Size 214
date and time stamp 184
Date Created 43
Default 297
Delete (Batch Function) 302
Delete All Slices 79
Delete Row (in Storyboard) 195
Delete Slice 79
desktop background 188
Destination 37
destination format 32
Detail 60
deutan (color blindness) 341
Diagonal (Sharpen Edges) 126
digital cameras 105, 114
directory structure 245
Disable Grid 230
disclabel 262
Display Content 377
Display Content from Low to High
Resolution 66
Display Name 84
Display Picture from Top to Bottom 65
Display Windows 378
dither 163, 167, 171
Do not export (Batch Function) 309
Don’t alert before overwrite 33
DOS filenames 33
dot gain 129
450
Drag & Drop handling Act as the Finder
273
DRIMaker 325
drop area 246
Duplicate 129
duplicating files name (in Storyboard) 195
duplicating with the keyboard (in
Storyboard) 195
E
Edit 379
Edit Comment 253
Edit Slice URL 79
Effects (Slide Show) 294
ellipses 227
Else (Batch Function) 303, 309
e-mail 15
E-Mail (send image to e-mail program) 243
Enable Grid 230
Endless 193
Enlarge small ones 268
Environment (Save current settings as...)
372
EPSF format 346
Eraser 229
Error Correction (Batch Function) 312
Error Correction (Rotate) 124
Escape 118
Eudora 5 74
Even Field 209
EXIF – Shift /Set the EXIF timestamp 255
EXIF information 62
Export 114
Eyedropper 233
F
faxes 12
File Exchange 12
file format and compression rate 67
file selection dialog 19
File Translation 12
Fill Selection with foreground Color 148
fill tool 227
Filter (Batch Function) 310
Filter (display files) 20
Find and Replace 174
Find duplicate files 299
Finder Picture format 351
fixed tool windows 64
Floyd-Steinberg 165
Folder Actions 274
foreground color 224
Format 24
frame 192
framing a picture 233
Full Screen 158, 187
full screen 158
G
Gamma (Batch Function) 310
Gamma Correction 195
General / Memory 381
General / Misc Settings 382
General / Plug-Ins 386
General Shortcuts 423
GIF format 353
GIF Transparent (Batch Function) 310
GIF98a (transparency) 155
GifBuilder 190
Global Color Table (in Movie Options) 192
GPS coordinates 323
GraphicConverter preferences 14
grayscale 161
Grayscale (Batch Function) 310
grayscale pictures 170
Grid 230
Grid Options 230
H
Hide Alpha/Mask Channel 208
Hide Preview 20
histogram 187
horizontal 175
HREF 79
HSpace 218
HSV model 230
HTML Basic 86
HTML Colors 231
HTML Meta 89
hue 134
I
IBM formats 6
Icon/Preview 47
iDVD 262
If (Batch Function) 302, 310
IFF format 355
Ignore extensions (Browser) 274
Image Calculator 338
IMG format 355
Important Formats 343
Index Options (in Storyboard) 195
Information 61
Input Levels 160
Insert Row (in Storyboard) 195
Install TWAIN Support 7
Installation 6
Installing EPStoPICT 350
Installing Ghostscript 349
Intel Mac 6
Intel-Mac 370
Intensity of difference 70
Invert 175
Invert (Batch Function) 311
Invert Black and White GIFs 215
Invert Direction (in Storyboard) 195
Invert Selection 148
Involution around the Red-Green Axis 204
iPod – Pictures on iPod 281
IPTC Document Information 314
IPTC window 264
Isothermal Involution 204
J
JPEG format 355
K
Key shortcut for the slide show 297
Keywords 43, 89
L
Label 250
Laplace (3x3) 198
lasso 146
layers 223
layout 211
left-handers 227
Levels 160
license key and registration 13
Line Drawer 227
line thickness 227
Link Sliders 128
list 214
List from Files 214
451
List from STR# Resource 342
List Options 215
Local Color Table 192
Loop slide show 295
Lossless JPEG cropping 144
LuraWave format 359
LWF format 359
LZW 369
M
Magic Pen 147
manual 16
Max Size (Batch Function) 311
measuring 58
Median 185
Memory (Preferences) 381
Merge Folder into one Image 338
Minimize Color Table 70, 172
Minimize Color Table (Batch Function) 311
minimizing file size 66
minimizing GIF pictures 71
Mirror 175
Mirror (Batch Function) 311
Misc Settings (Preferences) 382
Monitor 384
MooV - QuickTime Movie 360
Move by default and copy with Option key
(Browser) 274
Move Folders 2 and 3 293
Multi-function devices 11
Multi-language 6
Multi-page file (creating) 371
N
Navigation Services 292
new picture 226
None (aspect ratio selection) 141
Normal (Sharpen Edges) 126
Not available 20
O
Odd Field 209
Only Frame (in Layout dialog) 211
Open / EPSF Settings (Preferences) 393
Open / FITS (Preferences) 404
Open / General (Preferences) 397
Open / GIF (Preferences) 397
Open / HPGL (Preferences) 397
452
Open / JPEG (Preferences) 399
Open / Lotus-PIC (Preferences) 400
Open / Metafile (Preferences) 401
Open / PCD (Preferences) 404
Open / Photo Raw 406
Open / PICT (Preferences) 407
Open / PSD (Preferences) 408
Open / QuickTime (Preferences) 409
Open / TIFF (Preferences) 410
Open / WMF (Preferences) 412
Open /Film (Preferences) 402
Open folders in same browser 273
Open only one window 64
Open Recent 24
Open Slice 79
Open with 253
opening pictures 16
Optimize Color Table 173
optimizing filenames for the Internet 80
Options 25
Options for Color Reduction 173
Ordered-Dither 166
Organizer formats 6
Other Value (rotating a picture) 123
Other Value with Line 119
Outlook Express 4.5 72
Outlook Express 5 73
Overview 60
P
painting 227
Painting with GraphicConverter 224
Palette 47
Paper Format 92
Paste 216
Paste at Position 220
Paste Frame 220
Pattern 234
pattern selection 227
PDF open 405
perspective unskew 178
Photoshop plug-ins 197
PICT (Batch Function) 310
PICT format 363
PICT Resource/Graphic Clip 364
picture size 103, 159
Picture with Clipboard 216
pictures in e-mails 71
Play 188
playing and editing GIF animations 191
Plug-in (Batch Function) 311
plug-in filters 197
plug-ins 109
Plug-Ins (Preferences) 386
PNG (transparency) 155
PNG format 364
Position 54
position of tool windows 64
preference file 13, 14
Preferences 371
Prefs 33
preparing pictures for the Internet 65
preview (enlarged in the browser) 247
Preview Create automatically 267
Print (Preferences) 388
Print Catalog 92, 95
Print Folder 99
Print Mark (in Layout dialog) 214
Priority 218
Problems with Opening and Converting
Files 343
Professional Options for Copy, Cut, Paste
and Clear 217
protan (color blindness) 341
PSD Photoshop format 365
Put Picture on Desktop 188
Q
Quit 421
R
Radius (median filter) 186
Random Matrix 169
Rating 251
RAW 406
RAW format 366
rectangles 227
registration 13
Remove Alpha Channel 207
Remove batch actions after quit 34
Remove Picture (from layout) 212
removing red eyes 149
Rename 252
Rename (several files) 43
Replace Color 174
replacing a color 174
Reserve Color at the Start 173
Reset (Median dialog settings) 186
Resize window after scale/zoom 64
resolution 104
Resolution (Batch Function) 312
Reveal in Finder 252
Revert 152
RGB 152
RGB Colors 231
Rotate (a picture) 119
Rotate (Batch Function) 312
Ruler 65
ruler 23
S
saturation 129, 134
Saturation (HSV model) 200
Save / Custom Icon (Preferences) 413
Save / General (Preferences) 414
Save / Settings (Preferences) 416
Save a Copy as 30
Save all Items as (in Storyboard) 194, 195
Save as 24
Save for web 69
Save only selection 28
Save Slices as 79
Save web ready (without resource) 67
save without selection 28
saving 30
saving a picture without a selection 28
saving a selection 28
Saving EPSF Graphics 350
Saving multi-page file as individual images
371
Scale (Batch Function) 312
Scale with last Values 107
scaling 103, 104
scaling picture size 103, 104
scanning with GraphicConverter 108
Search Color 174
Select all 140
Select All (in the browser) 249
selecting appropriate picture format 65
Selecting Colors 230
selection 139
selection tool 140
Set Alias folder 293
Set Format from Extension 25, 29
453
Set Last Values 129
SGI format 367
Sharpen Edges 124
Sharpen Edges (Batch Function) 312
Shift 336
Shortcuts 423
Shortcuts in Layout Windows 425
Shortcuts in Picture Windows 423
Show all Items in Slide Show (in
Storyboard) 195
Show Alpha Channel (Batch Function) 312
Show Alpha/Mask Channel 207, 208
Show errors 292
Show hidden files 34
Show Invisible Files 21
Show Movie Options 191
Show path in title 64
Show path in window title (Browser) 273
Show picture name (in Layout dialog) 213
Show Preview 20
Show Size in KB 214
Show total Size 214
Sides 118
slices 71, 78
Slide show 282
Slide Show with Find 286
SnapsCleaner 318
solarisation 175
Sort Color Table (Batch Function) 312
sorting (in the browser) 245
Sound (Batch Function) 313
Source 37
Split JPEG data stream into single JPEGs 40
splitting 27
Spotlight 316
square 84, 228
Stamp 113
starting the program 16
StartupScreen format 368
Stop batch 312
Storyboard 194
StuffIt Expander 8, 13
Sub Category 43
subfolders 33
support 15
Swap Colors 174
Swap Fields 209
system color table 173
454
System Requirements 6
T
Temporary (Preview) 236
Text below the large preview 271
text conversion 36
Text in Pictures 221
text tool 221
TGA format 368
THM file 242
threshold 164
Threshold (Batch Function) 312
TIFF format 369
tiled 234
Toast 262
Tolerance (replacing a color) 175
Tolerance (when trimming) 118
Toolbox 55
transparent 154
Triangle 167
triangle for opening folders 247
Trim (Batch Function) 312
Trim Options 118
Trim Selection 118
trimming 117
TWAIN 7, 109
TWAIN Acquire 108
TWAIN folder 110
TWAIN Open Source 110
Type 286
U
UFS partitions 30
Undo 122, 152
Unicode 247
UNIX formats 6
Unselect 118, 139, 148
Unsharp (3x3) 198
Unskew 178
update 12
Urgency 43
Use Netscape 216 Colors 173
Use Windows 256 Colors 173
user-defined filters 199
using QuickTime 218
V
Value (HSV model) 200
Vectorize 205
vertical 175
Video (Batch Function) 313
Video Grab Window 339
video pictures 209
Video Tips 210
View as Non Proportional 159
View as Proportional 159
View at Original Size 158
View Item(s) in Slide Show 252
Vignetting 328
VSpace 218
W
What is color depth? 162
White Correction 180
windows 234
WMF format 371
Word file (export images) 40
work environment 53
www.lemkesoft.com 12
X
XBM format 371
X-Face 219
XMP 39
X-Position 220
X-Resolution 105
Y
Y-Position 220
Y-Resolution 105
Z
zoom 157
455