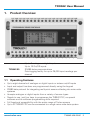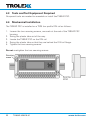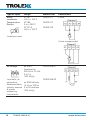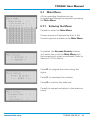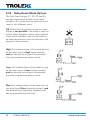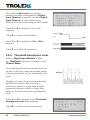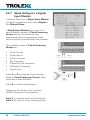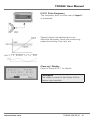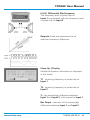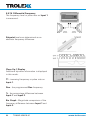
1
TX9042 User Manual
TX9042 Programmable Sensor Controller (PSC)
Contents
1.
Product Overview
5
3.4
Conditions or Restrictions for
1.1
Operating Features
5
use in SIL Applications
18
1.2Application
6
3.5
Proof Test
19
1.3
7
3.6
System Configuration
Product Options
1.3.1 TX9042 PSC Input Module
Drawing
20
Types
7
4.Installation
21
1.4Dimensions
8
4.1Precautions
21
1.5
Technical Information
8
4.2Labelling
21
1.6
Electrical Details
10
4.3
Tools and Test
2.Certification
11
Equipment Required
22
2.1
11
4.4
Mechanical Installation
22
Europe (ATEX)
2.1.1 Special Conditions for
Safe Use
4.5Connections
23
11
4.6
2.1.2 General Conditions of Use
12
4.6.1 Analogue Input Modules
26
2.2
12
4.6.2 Digital Input Modules
31
2.2.1 General Conditions of Use
12
4.6.3 Display of Connection Details33
2.3
13
4.6.4 Replacing an Input Module
Russia (GOST-R)
South Africa (MASC)
2.3.1 Special Conditions for
Safe Use
Input Channel Configuration 25
33
4.6.5 Cable Distance Calculation
13
2.3.2 General Conditions of Use
14
Sensors
2.4
Australia (ANZEx)
14
4.6.6 Cable Distance for Voltage
2.4.1 Conditions of Safe Use
14
2.5
15
4.6.7 Dual Input Signals
2.5.1 Conditions of Use
15
(Differential)
34
3.
Functional Safety
16
5.
Setup and Calibration
35
3.1
Overview of Safety Integrity
5.1
Controls and Indicators
35
USA (MSHA)
for Loop Powered 4 to 20 mA
Inputs (0.4 to 2 V)
33
34
Level
16
5.2Power-up
37
3.2
SIL Suitability
16
5.3
Signal Display
37
3.3
Summary of the Verified
5.4
Reviewing the Input Module
Functional Safety Data
www.trolex.com
17
Configuration
38
TX9042-UM-EN-01 3
5.5
Close-up Information Display 38
5.5.1 Close-up 1 Information
Display
39
5.5.2 Close-up 2 Information
5.9.2 Scale and Display Settings
60
5.9.3 Setpoint Characteristics
79
5.9.4 Fault Signal Alarm
Assignation
85
Display
42
5.9.5 Threshold Acceptance Level 86
5.6
44
5.9.6 Keycode Security for Each
44
Menu of Function
5.6.1 Default Values
5.6.2 Programming the Operating
Channel - 1 to 8
87
5.9.7 Mode Setting for a Digital
Values
44
5.7
45
5.9.8 Setting a Digital Failsafe
5.7.1 Entering the Main Menu
45
5.7.2Escape/Return
46
5.9.9 Channel Display Mode
99
5.7.3 Communication Setup
47
5.10Datacommunications
100
5.7.4Clock
49
5.10.1RS485
100
5.7.5 Keycode Security
49
6.Maintenance
102
Main Menu
Input Module
88
Input Module
96
5.7.6 Interval Period of the Datalog50
6.1
TX9042 PSC Planned
5.7.7 Data Display Review of the
Preventative Maintenance 102
Datalog
6.1.1Introduction
102
5.7.8 Clear the Data in the Datalog51
6.1.2 TX9042 PSC - Check
102
5.7.9 Relay Reset Mode Options 52
6.1.3 TX9042 PSC Battery
5.7.10 Relay Voting
53
5.7.11 Relay Operation
55
6.1.4 TX9042 PSC - Proof Test
104
5.7.12 Software Version
55
6.2
TX9042 PSC - Repair
107
5.7.13 Self Test
55
6.3
Maintenance Records
107
5.7.14 Display Cycling
56
6.4
Maintenance Log
108
5.8
Contrast Control
56
7.Disposal
5.9
Channel Function and
Calibration
50
4
TX9042-UM-EN-01
104
109
Disclaimers110
57
5.9.1 Power On Delay (POD)
Period
- Replace
58
Trademarks110
Document History
110
Contact Details
110
www.trolex.com
TX9042 User Manual
1. Product Overview
TX9042.55
Up to 8 analogue or digital inputs.
Up to 16 On/Off inputs
RS485 data communications
Data logging facility for up to 26,000 input readings per
channel
1.1 Operating Features
• Up to eight channels of analogue or digital inputs or sixteen on/off inputs
• Input and output functions are programmed directly using the keypad
• RS485 data protocol for integrating multi-point sensor collecting into mine wide
systems
• Accepts analogue or digital inputs from a variety of source types
• Simple to use, just four keys to programme the TX9042 PSC, no special
software and no software programming skills required
• Full functional compatibility with the entire range of Trolex sensors
• Up to 32 TX9042 PSC can be connected to a single mine wide data system
www.trolex.com
TX9042-UM-EN-01 5
1.2Application
The TX9042 Programmable Sensor Controller (PSC) is for sensor management and
data communications in arduous industrial environments and hazardous areas. It is
suitable for use in SIL 1 and SIL 2 applications, in accordance with any conditions or
restrictions.
The uses of the TX9042 PSC include:
• Underground machinery protection
• Environmental monitoring using a combination of gas sensors and flow sensors
• Gas detection systems
• Conveyor control
• Pump and compressor monitoring
• Machine condition monitoring
• Fan vibration monitoring
• ITP monitoring
• On-board underground machinery monitoring
• Plant protection
• Data collection from groups of diverse sensors
• Area network sensor collection and monitoring
The data logging facility can be used to record operational trends and to analyse
periods where serious incidents may have occurred. All data acquired can also be
transmitted over a communication link to a remote point. The system can also be
used for collecting sensor information from several distributed monitoring stations
on a mine wide sensor network. Up to 32 sensor collectors can be networked on
a data link and communicated to a central control and monitoring computer via the
data link.
Intrinsically Safe:
TX9042.55
6
TX9042-UM-EN-01
Supply Voltage:
12 V dc from an approved intrinsically
safe power source
www.trolex.com
TX9042 User Manual
1.3 Product Options
TX9042 PSC
General Purpose
Mining Ex ia
12 V dc
-
TX9042.55
1.3.1 TX9042 PSC Input Module Types
Input Module Description
Current - 0 to 20 mA
Current - 4 to 20 mA
Mining Ex ia Order Code
P5423.516
P5423.508
Voltage - 0 to 2 V
Voltage - 0.4 to 2 V
Voltage - 0 to 10 V
P5423.514
P5423.509
P5423.515
Flow TX6023 - not lo limited
Flow TX6023 - lo limited
Flow TX6023 - 4 to 20 mA lo limited
P5423.552
P5423.553
P5423.556
Thermocouple - K type
Thermocouple - I/R -50 to +400°C
P5423.539
P5423.527
PT100 - -50 to +200°C
PT100 - -50 to +400°C
P5423.510
P5423.513
KTY21 - -50 to +150°C
KTY81 - -50 to +150°C
KTY84 - 0 to +300°C
P5423.519
P5423.511
P5423.512
Flow TX6022 - Flow
Flow TX6022 - Pressure
P5423.528
P5423.518
ac RMS - 500 Hz to 10 kHz - TX5630
ac RMS - 15 to 100 Hz - TX5630
www.trolex.com
P5423.506.01
P5423.506.02
TX9042-UM-EN-01 7
1.4Dimensions
1.5 Technical Information
Display accuracy
+/-0.25% (analogue channels)
Setpoint accuracy
+/-0.5%
Ambient temperature limits
-10 to +50°C
Electrical connections
4 mm barrier/clamp terminals
Housing material
ABS
Nett weight
800 g
Environmental protection
Must be housed in a protective metal enclosure
to comply with Intrinsically Safe requirements
Information display
LCD screen
20 characters x 4 lines
6 mm high characters
Mounting
DIN rail
Microprocessor
Microprocessor controlled menu operation, with
non-volatile data retention and 10 bit analogue to
digital conversion (analogue channels)
Setpoints
2 per channel plus Fault signal
8
TX9042-UM-EN-01
www.trolex.com
TX9042 User Manual
Output relays
4 encapsulated reed relays with function
programming
Relay contact rating
200 V
0.25 A
3 W absolute maximum
Checkpoint
Circuits switched by the contacts of the
output relays MUST emanate from a certified
Intrinsically Safe power source and the circuit
parameters must be within Intrinsically Safe
requirements.
Setpoint adjustment
0 to 99% of full scale
Hysteresis adjustment
0 to 99%
Power on delay adjustment
0 to 255 seconds for each channel
Output delay adjustment
0 to 18 hours for each setpoint in one second
steps
Input update period
adjustment
0 to 60 seconds for each channel in 0.05 second
steps
Engineering units menu
V, mV, mA, °C, °F, °K, g, kg, mbar, bar, Pa, kPa,
PSI, %, ppm, %RH, mm, m, mm/s, m3/s, rpm,
pps, Hz, kHz, secs, m:s, h:m, m/s, m3/H, m3/m,
A, l/m, g/m, l/s, g/s, l/h and g/h
Fault signal
Open or short circuit signal line or sensor fault,
will generate a fault signal, the fault will be
identified and displayed on the LCD screen
Data communications
RS485 Modbus
Data logging
Up to 26,000 readings with on-demand down
loading
www.trolex.com
TX9042-UM-EN-01 9
1.6 Electrical Details
TX9042.55 - Programmable Sensor Controller (PSC)
Supply voltage:
12 V dc +20%/-2.5% at 125 mA
Output:
Modbus protocol
Type of sensor:
Flammable
Supply current:
125 mA at 12 V
Relay:
200 V
0.25 A
3 W absolute maximum
Checkpoint
Circuits switched by the contacts of the output relays
MUST emanate from a certified Intrinsically Safe
power source and the circuit parameters must be
within Intrinsically Safe requirements.
10
TX9042-UM-EN-01
www.trolex.com
TX9042 User Manual
2.Certification
2.1 Europe (ATEX)
Ex Certificate number:
Baseefa 03ATEX0292X
Ex Certification code:
I M1 Ex ia I Ma
2.1.1 Special Conditions for Safe Use
1. The TX9042 Programmable Sensor Controller (PSC) must be mounted in a
secondary enclosure as shown on drawing P5423.02 or in an alternative metal
enclosure (not light alloys) which is appropriately certified as providing a degree
of protection of IP54.
2. Up to 11 RS485 Communications Modules (in separate TX9042 Programmable
Sensor Controllers (PSC)) may be daisy-chained together (ie. terminals B1 all
linked together, terminals B2 all linked together and terminals B3 all linked
together). Provided that the number of daisy-chained TX9042 PSCs is reduced
to 10, these communications lines may be connected to unspecified safe area
equipment via an appropriately certified shunt zener diode safety barrier (dual
channel ac), whose output parameters do not exceed the following per channel:
Uo = 9 V, Io = 100 mA, Po = 225 mW
OR
Uo = 12 V, Io = 80 mA, Po = 240 mW
eg. suitably certified MTL761, MTL766 to BAS01ATEX7202 or MTL7761ac,
MTL7766ac to BAS01ATEX7217.
For the purposes of this certificate, these shunt safety barriers may be
considered equivalent to Category I (M1) equipment.
The cable parameters shall not exceed the following:
Cc = 2.8 µF
Lc/Rc = 222 µH/ohm
www.trolex.com
TX9042-UM-EN-01 11
3. For the purpose of this certificate, a P+F inductive sensor to PTB00ATEX2048X
to Category II 1G EEx ia IIC T6 connected to terminals T1 to T4 of a Digital Input
Module may be considered equivalent to Category I M1. In this instance, the
power supply selected to power the TX9042 PSC must have an output voltage
not exceeding 16 V.
2.1.2 General Conditions of Use
Prior to installation, it is essential that user refers to the above certificate to
ensure that the termination and cable parameters are fully complied with and are
compatible with the application. Copies of certificates are available from Trolex.
ATEX Directive (94/9/EC)
EMC Directive (2004/108/EC)
2.2 Russia (GOST-R)
Ex Certificate number:
POCC GB.ME92.B02874
Ex Certification code:
PO Ex ia I X
2.2.1 General Conditions of Use
Prior to installation, it is essential that user refers to the above certificate for any
special conditions for safe use. The user must ensure that the termination and
cable parameters are fully complied with and are compatible with the application.
Copies of certificates are available from Trolex.
12
TX9042-UM-EN-01
www.trolex.com
TX9042 User Manual
2.3 South Africa (MASC)
Ex Certificate number:
MASC M/11-359X
Ex Certification code:
Ex ia I
2.3.1 Special Conditions for Safe Use
1. The TX9042 Programmable Sensor Controller (PSC) must be mounted in a
secondary enclosure as shown on drawing P5423.02 or in an alternative metal
enclosure (not light alloys) which is appropriately certified as providing a degree
of protection of IP54.
2. Up to 11 RS485 Communications Modules (in separate TX9042 Programmable
Sensor Controllers) may be daisy-chained together (ie. terminals B1 all linked
together, terminals B2 all linked together and terminals B3 all linked together).
Provided that the number of daisy-chained TX9042 PSCs is reduced to 10, these
communications lines may be connected to unspecified safe area equipment
via an appropriately certified shunt zener diode safety barrier (dual channel ac),
whose output parameters do not exceed the following per channel:
Uo = 9 V, Io = 100 mA, Po = 225 mW
OR
Uo = 12 V, Io = 80 mA, Po = 240 mW
eg. suitably certified MTL761, MTL766 to BAS01ATEX7202 or MTL7761ac,
MTL7766ac to BAS01ATEX7217.
For the purposes of this certificate, these shunt safety barriers may be
considered equivalent to Category I (M1) equipment.
The cable parameters shall not exceed the following:
Cc = 2.8 µF
Lc/Rc = 222 µH/ohm
www.trolex.com
TX9042-UM-EN-01 13
3. For the purpose of this certificate, a P+F inductive sensor to PTB00ATEX2048X
to Category II 1G EEx ia IIC T6 connected to terminals T1 to T4 of a Digital Input
Module may be considered equivalent to Category I M1. In this instance, the
power supply selected to power the TX9042 PSC must have an output voltage
not exceeding 16 V.
2.3.2 General Conditions of Use
Prior to installation, it is essential that user refers to the above certificate to
ensure that the termination and cable parameters are fully complied with and are
compatible with the application. Copies of certificates are available from Trolex.
2.4 Australia (ANZEx)
Ex Certificate number:
ANZEx 06.3057X
Ex Certification code:
Ex ia I
2.4.1 Conditions of Safe Use
1. Prior to installation, it is essential that user refers to the above certificate to
ensure that the termination and cable parameters are fully complied with and
are compatible with the application. Copies of certificates are available from
Trolex.
2. Up to 6 RS485 Communications Modules (in separate TX9042 Programmable
Sensor Controllers (PSC)) may be daisy-chained together (ie. terminals B1 all
linked together, terminals B2 all linked together and terminals B3 all linked
together). Provided that the number of daisy-chained TX9042 PSCs is reduced
to 5, these communications lines may be connected to unspecified safe area
equipment via an appropriately certified shunt zener diode safety barrier (dual
channel ac), whose output parameters do not exceed the following per channel:
Uo = 9 V, Io = 100 mA, Po = 225 mW
OR
Uo = 12 V, Io = 80 mA, Po = 240 mW
eg. suitably certified MTL761, MTL766 to BAS01ATEX7202 or MTL7761ac,
MTL7766ac to BAS01ATEX7217.
14
TX9042-UM-EN-01
www.trolex.com
TX9042 User Manual
The cable parameters shall not exceed the following:
Cc = 2.8 µF
Lc/Rc = 222 µH/ohm
2.5 USA (MSHA)
MSHA IS Evaluation number:
IA-17501-0
2.5.1 Conditions of Use
Prior to installation, it is essential that user refers to the above document for any
specific conditions of use. The user must ensure that the termination and cable
parameters are fully complied with and are compatible with the application. Copies
of certificates are available from Trolex.
www.trolex.com
TX9042-UM-EN-01 15
3. Functional Safety
3.1 Overview of Safety Integrity Level
The following instructions are applicable when the TX9042 Programmable Sensor
Controller (PSC) is used as an element in a safety instrumented function that is
specified to achieve a Safety Integrity Level (SIL), eg. SIL 1, 2, etc.
The reliability of the TX9042 Programmable Sensor Controller (PSC) has been
independently assessed in accordance with IEC 61508 for use in SIL applications.
The compliance with IEC 61508 includes hardware reliability (probabilistic type
failures) and measures to address systematic type failures.
The information that follows forms the ‘Safety Manual’ required by IEC 61508-2
and is intended to allow correct product selection, system integration, installation,
operation and maintenance to enable the SIL specified for the safety instrumented
function to be achieved and maintained, as far as the TX9042 Programmable Sensor
Controller (PSC) is concerned.
The actual SIL will depend on many system considerations that are outside the
scope of the TX9042 Programmable Sensor Controller (PSC) and will rely on
personnel who are competent in the functional safety aspects of the various
lifecycle activities mentioned above.
3.2 SIL Suitability
The versions and configurations of the TX9042 Programmable Sensor Controller
(PSC) identified in Table 1 in Section 3.3 below and are suitable for use in safety
functions that have a specified Safety Integrity Level (SIL) in accordance with IEC
61508 or IEC 61511 up to and including:
SIL 2 - when used in a ‘Low Demand’ safety function [1]
with proof test interval of 3 months
SIL 1 - when used in a ‘Low Demand’ safety function [1]
with proof test interval of 12 months
SIL 1 - when used in a ‘High Demand’ safety function [1]
The functional safety data in Tables 1 and 2 in Section 3.3 must be taken into
account by integrators and end-users, including compliance with the restrictions in
use (Section 3.4) and all other provisions and conditions in this User Manual.
16
TX9042-UM-EN-01
www.trolex.com
TX9042 User Manual
System integrators and end users responsible for other lifecycle phases (system
specification, integration, installation, commissioning, operation, maintenance, etc)
need to perform assessments on the complete scope of their activities to ensure a
target SIL for the safety function is and continues to be met.
[1]
Low Demand and High Demand modes of operation are defined in IEC 61508-4, 3.5.16
3.3 Summary of the Verified Functional Safety Data
The product, configuration and Safety Manual that have been assessed are shown
in Table 1.
Product Information
Details
Product identification
TX9042.55 Programmable Sensor Controller
Product specification
See Section 1.5 of this User Manual
4 to 20 mA input conditioning modules fitted
OR
0.4 to 2 V input conditioning modules fitted
Product configuration
To achieve SIL the TX9042 with 4 to 20 mA or
0.4 to 2 V input conditioning modules fitted, must be
configured to de-energise an output channel relay if
either the input signal transitions a pre-determined
alarm threshold or an internal fault is indicated.
Neither the display nor the RS-485 data link are part
of the specified safety function.
System configuration
Monitoring of signals from devices configured as
2/3-wire current loop devices, 4-wire current inputs
with separate power connection, or voltage inputs.
Element safety function
To de-energise an output channel relay (open relay
contacts) if either the input signal transitions a predetermined alarm threshold or an internal fault is
indicated.
Safety Manual
See Section 3 of this User Manual
Table 1 Basic Element Information
www.trolex.com
TX9042-UM-EN-01 17
The hardware failure data for the TX9042 element safety function based on an
extensive analysis of field failure data with a 90% single sided confidence limit is
shown in Table 2.
Parameter
Dangerous failure rate (λD)
Value
2.3E-06
Safe failure rate (λs)
N/R [1]
Safe failure fraction (SFF)
N/R [1]
Element type
Type B
Hardware fault tolerance (internal architecture)
0
Diagnostic coverage (DC)
60%
Diagnostic test interval
N/A [2]
Probability of Failure on Demand (PFDAVG) [12 month proof test; 24hr MTTR]
1.0E-02 [2]
Probability of Failure on Demand (PFDAVG) [3 month proof test; 24hr MTTR]
2.6E-03 [2]
Probability of dangerous Failure per Hour (PFH)
2.3E-06
Table 2 Hardware Failure Data
[1]
[2]
Not required by Route 2H
To be conservative, no credit has been taken for the diagnostics
3.4 Conditions or Restrictions for use in SIL Applications
The sections of this User Manual shall be strictly complied with to ensure validity of
the failure data and systematic safety integrity. The following additional restrictions
and conditions apply when the unit is used in SIL applications:
1. The TX9042 must be repaired within the MTTR assumed in the PFD
calculations shown in the table above if an internal fault is detected in the unit.
2. If the MTTR or the proof test interval (T1) is different from those assumed in
this User Manual, then the PFDAVG must be re-calculated and the SIL capability
re-verified accordingly (refer to the Safety Manual in Section 3.5 of this User
Manual).
18
TX9042-UM-EN-01
www.trolex.com
TX9042 User Manual
3. The display is for indication only and is not part of the safety function; likewise
the RS485 communications are not part of the safety function.
4. The environmental limits are restricted to:
• +20 to +40°C
• relative humidity <90%
5. IEC 61508-2, 7.4.4.3.1c limits use to SIL 1 in high or continuous mode of
operation when used in a non-redundant configuration.
3.5 Proof Test
Periodic Proof Tests of the element safety function must be carried out to identify
any dormant failures, particularly when used in ‘low demand’ safety functions
– refer to Section 6.1.4 of this User Manual, for the Proof Test procedure. Faults
identified by this Proof Test must be repaired within the MTTR and the unit returned
to full working order.
A suitable Proof Test interval (T1) should be used in order to achieve the required
average probability of failure on demand (PFDAVG). A nominal interval of 8,760 hrs
(1 year) and Mean Time To Repair (MTTR) of 24 hours has been used in the
derivation of PFDAVG for illustration purposes. If different values are used, the PFDAVG
for a non-redundant arrangement (i.e., where the safety function relies on a single
element) can be re-calculated as follows:
PFDAVG = (λDU + λDD) tCE
Where tCE (the channel equivalent down time) = (λDU/λD) (T1/2 + MTTR) + (λDD/λD) MTTR
For redundant arrangements refer to IEC 61508-6 for the equations.
Checkpoint
Those responsible for specifying proof testing of safety functions should refer to
IEC 61508-6:2010 clause B.3.2.5 for considerations of the effect of non-perfect
proof tests.
www.trolex.com
TX9042-UM-EN-01 19
3.6 System Configuration Drawing
The illustration below shows how the TX9042 is to be used with other system
elements.
20
TX9042-UM-EN-01
www.trolex.com
TX9042 User Manual
4.Installation
4.1Precautions
Do not disassemble the TX9042 PSC whilst in the hazardous area or use a TX9042
PSC that has a damaged housing in the hazardous area.
The TX9042 PSC must be installed within a metal protective enclosure to ensure
compliance with certification requirements. It is permissible for the enclosure to
incorporate a polycarbonate window to allow visibility of the TX9042 PSC LCD
screen. However, window area may be no greater than 100 cm2.
4.2Labelling
When the TX9042 PSC is supplied fitted into a standard Trolex TX9204 metal
enclosure, two channel identification labels will be fitted to the enclosure near
to the connecting terminals. Connection details can also be viewed on the LCD
screen, refer to Section 5.9.2.21 for details.
If a TX9042 PSC is supplied to be fitted into a customer supplied metal enclosure,
the two channel identification labels will be provided loose and must be fitted
adjacent to the connecting terminals in a visible position in order to comply with
certification requirements.
Before installation check for the correct channel functions and supply voltage on the
channel identification label on the rear of the TX9042 PSC housing.
www.trolex.com
TX9042-UM-EN-01 21
4.3 Tools and Test Equipment Required
No special tools are needed to assemble or install the TX9042 PSC.
4.4 Mechanical Installation
The TX9042 PSC is installed on a TS35 low profile DIN rail as follows:
1. Loosen the two securing screws, one each at the end of the TX9042 PSC
housing.
2. Swing the plastic tabs out of the way.
3. Locate the TX9042 PSC on the DIN rail.
4. Swing the plastic tabs so that they are behind the DIN rail flange.
5. Tighten the two securing screws.
Do not overtighten the two securing screws.
22
TX9042-UM-EN-01
www.trolex.com
TX9042 User Manual
4.5Connections
The terminals are divided on two horizontal planes. The lower level is used for
all input connections and the upper level is used for output signals and data
connections.
Each of the input channels has four connecting terminals available, and these
are utilised in accordance with the type of input module that is fitted (refer to the
diagram on the following page).
The sensor signal enters on terminals A2 and A3 and if a power supply is required
to feed the sensor, then this is available at terminals A1 and A4. The input signal is
fully floating and differential, giving high immunity to electrical interference.
www.trolex.com
TX9042-UM-EN-01 23
Terminal A35 is used to control the Power On Delay function, see Section 5.9.1 for
details, and the External Override facility. Terminal A36 is used to Reset any Latched
relays, see Section 5.7.9 for details.
Circuits switched by the contacts of the output relays must emanate from a
certified Intrinsically Safe power source and the circuit parameters must be within
Intrinsically Safe requirements. The unit must be mounted in a protective metal
enclosure to comply with Intrinsically Safe requirements.
Once input channels have been connected to the TX9042 PSC the channel
identification labels MUST be completed. Any changes to the input channels MUST
be recorded on the channel identification labels.
24
TX9042-UM-EN-01
www.trolex.com
TX9042 User Manual
4.6 Input Channel Configuration
The duty of each of the eight input channels is determined by an interchangeable
input conditioning module carried on the main I/O control card.
Each input conditioning module has calibration and functionality information stored
in a non-volatile, EPROM. On power-up, the main processor reads this information
and sets-up the channel accordingly. The eight input channels of the TX9042 PSC
are configured during manufacture for the operational duty required. This is marked
on the identification label on the rear of the housing, refer to Section 4.2 for details.
Input conditioning modules can be changed if required, refer to Section 4.6.4 for
details. There are two categories of input module type:
•
•
Analogue
Digital
In total there are eleven possible input conditioning modules options for each
channel:
Analogue
• Current
• Voltage
• Resistance Temperature Device
• Semi-conductor Temperature Device
• ac Voltage
• Strain Gauge
• Flow Module for TX6023/4
• Flow Module for TX6022
• Digital Pulse Processing
Digital
• Failsafe - digital
• Vortex Airflow Sensor - digital
www.trolex.com
TX9042-UM-EN-01 25
4.6.1 Analogue Input Modules
Type of Input
Range
Module Ref
Connections
Current
0 to 20 mA
4 to 20 mA
P5423.516
P5423.508
2 wire loop powered
Impedance 110 R
3 wire control powered
2 wire remote powered
26
TX9042-UM-EN-01
www.trolex.com
TX9042 User Manual
Type of Input
Range
Module Ref
Voltage
0 to 2 V
0.4 to 2 V
0 to 10 V
P5423.514
P5423.509
P5423.515
Connections
Impedance 100 K
Resistance
Temperature
Device
Standardised to
DIN43760 and
BS 1904
www.trolex.com
PT100
-50 to +200°C
-50 to +400°C
2 wire
P5423.510
P5423.513
4 wire compensated
TX9042-UM-EN-01 27
Type of Input
Range
Module Ref
Connections
Semiconductor
Temperature
Device
KTY81
-50 to +150°C
KTY84
0 to +300°C
KTY21-6
-50 to +150°C
P5423.511
2 wire
P5423.512
P5423.519
Linearised input
4 wire compensated
ac Voltage
Load cells, ac
generators,
accelerometers,
velocity sensors
& power
measuring
instruments
28
ac RMS
Acceleration
500 Hz to 10 kHz
0 to 7g
(100 mV/g)
ac RMS Velocity
15 Hz to 100 Hz
0 to 30 mm/sec
(100 mV/g)
TX9042-UM-EN-01
P5423.506.01
P5423.506.02
www.trolex.com
TX9042 User Manual
Type of Input
Range
Module Ref
Strain Gauge
2 mV/V
(10 mV FS)
3 mV/V
(15 mV FS)
10 mV/V
(50 mV FS)
50 mV/V
(250 mV FS)
100 mV/V
(500 mV FS)
P5423.520.01
Load cells,
pressure
sensors, bridge
circuits
P5423.520.02
P5423.520.03
P5423.520.04
P5423.520.05
For use with:
TX6023 +
P5546.18
P5423.552
TX6023
P5423.553
Gas sensors,
load cells
TX6024
P5423.554
Flow Module
for TX6022
0.5 to 4.5 V
and
4 to 20 mA
P5423.5528
Flow Module
for TX6023/4
Connections
Differential
pressure
sensors, line
pressure
www.trolex.com
TX9042-UM-EN-01 29
Type of Input
Range
Digital
Pulse
processing
from proximity
sensors,
photosensors,
contacts
and pulse
generating
devices.
Dual Input
NAMUR input
DIN 19234
Module Ref
Connections
2 proximity sensors
P5423.523
12 V version
2 voltage free contacts
On/Off switches
30
TX9042-UM-EN-01
www.trolex.com
TX9042 User Manual
4.6.2 Digital Input Modules
Digital input conditioning modules can be individually programmed into seven
distinct operating modes:
Pulse CounterPulse Interval
Pulse FrequencySlip Frequency
Differential SlipDifferential
FrequencyFrequency
Digital Level
(On/Off)
Refer to Section 5.9.7 for details of Mode Setting for a Digital Input Module.
www.trolex.com
TX9042-UM-EN-01 31
Type of Input
Range
Digital Voltage free
Failsafe
contacts with
On/Off switches series diode
connected in
series with a
diode to give
combined open
circuit/short
circuit sensor
connection
protection
Digital (Vortex +5 V output
airflow sensor)
TTL input
TX5925 Vortex
Airflow Sensor
32
TX9042-UM-EN-01
Module Ref
Connections
P5423.522
2 voltage free contacts
P5423.524
www.trolex.com
TX9042 User Manual
4.6.3 Display of Connection
Details
For convenience, input terminal connection
details for any channel can be displayed on
the LCD screen.
Refer to Section 5.9.2.21 for details.
4.6.4 Replacing an Input Module
The individual channel input conditioning
modules are plug-in and can easily be
replaced if required, by removing the rear
panel of the housing.
The main processor will automatically be
re-programmed for the new function of the
replacement module.
Checkpoint
Channel input conditioning modules MUST
NOT be replaced underground.
4.6.5 Cable Distance Calculation
for Loop Powered
4 to 20 mA Sensors
Maximum cable distance:
Vs - Vms
0.02 x R cable (km)
Vs =
Vms =
R cable =
www.trolex.com
Supply Voltage
Minimum Acceptable Sensor
Voltage (eg. 16 V)
Total Resistance of
Connecting Cable
in ohms/km
TX9042-UM-EN-01 33
4.6.6 Cable Distance for Voltage
Inputs (0.4 to 2 V)
The input impedance of the input is very
high, so cable distance is usually not a
problem.
Voltage drop in the power supply line is the
critical factor, particularly on a three wire
system where the 0 V of the power supply
line is common with the signal line. Use a 4
wire system on distances above 100 m.
4.6.7 Dual Input Signals
(Differential)
The differential input stage of a voltage input
module also enables it to monitor two input
signals simultaneously and respond to the
difference between the two. This technique
is frequently used to monitor differential
temperature, differential pressure and
differential speed.
Checkpoint
It is important that the two sensors or
input signals are calibrated to the same
operating parameters.
34
TX9042-UM-EN-01
www.trolex.com
TX9042 User Manual
5. Setup and Calibration
5.1 Controls and Indicators
The programming and setting routines for the TX9042 Programmable Sensor
Controller (PSC), have been designed for utmost simplicity and the programming
system is completely menu driven. There is no special software programme or data
input terminal, a PC is not necessary and no computer programming knowledge is
required.
www.trolex.com
TX9042-UM-EN-01 35
There are just 4 keys (the keypad) for controlling the complete operation and the
LCD screen provides instructions throughout the programming process. All entries
are verified on the LCD screen and incorrect or invalid entries are immediately
brought to the attention of the user.
Each data entry on the keypad is acknowledged by a short bleep. Hold down the
Scroll keys (U or D) for two seconds for rapid self keying.
To use the TX9042 Programmable Sensor Controller (PSC) software and navigate
between menus you must press the keypad keys:
Escape is the Left key - L
Confirm is the Right key - R
Scroll Up is the top key - U
Scroll Down is the bottom key - D
The use of these keys is abbreviated to L, R, U and D throughout this User Manual.
Checkpoint
The TX9042 PSC data memory is permanent. All settings are retained even in the
event of power failure.
36
TX9042-UM-EN-01
www.trolex.com
TX9042 User Manual
5.2Power-up
When first switched on, the processor will
initialise all the default values unless new
values have previously been programmed.
The LCD screen will display the version
number of the software currently installed.
5.3 Signal Display
After ten seconds, the screen will switch
to the Signal Display mode, displaying the
status of all eight channels of input signal
simultaneously.
Indicates that a set point has been exceeded
on that channel. Refer to Section 5.9.3 for
details.
Indicates that a channel input module has not
been fitted. Refer to Section 5.4 for details.
Indicates an input signal Error or system
Fault on that channel. Refer to Sections 5.4
and 5.9.4 for details.
The flashing cursor frame over the channel
identification number indicates that the
particular channel is available for individual
Close-up examination. Refer to Section 5.5
for details.
Any channels with Power On Delay (POD)
programmed will initially show the length of
delay in seconds. Refer to Section 5.9.1 for
details. The displayed time will countdown
until the POD period is complete, then the
screen will revert to the appropriate input
signal value in each case.
www.trolex.com
TX9042-UM-EN-01 37
5.4 Reviewing the Input Module
Configuration
The format of the operating data presented
on each channel will be automatically
determined by whichever input module is
fitted.
The input module configuration and the
operating mode of each channel can be
reviewed from the Signal Display.
Press U and D to review the input module
configuration.
Refer to Section 4.6 for details.
5.5 Close-up Information Display
Close-up 1 and Close-up 2 will show
more detailed information about a selected
individual channel.
Press U or D to navigate the cursor to the
selected channel.
Press R to confirm Close-up 1 - (only
possible if an input module is fitted on that
channel).
Press R again for Close-up 2.
38
TX9042-UM-EN-01
www.trolex.com
TX9042 User Manual
5.5.1 Close-up 1 Information
Display
5.5.1.1 Close-up 1 Display for an
Analogue Input Module
A: Channel identification - 1 to 8.
B: Type of input module (PT100) - this
changes to indicate that a channel
Setpoint has been exceeded, SP1
and/or SP2.
C: User text entry for channel duty
identification and other data such as
Full Scale calibration (eg. tank 400°C).
D: Input signal value with appropriate
engineering units.
E: Input signal tendency arrows
= Steady unchanging input signal
Rising tendency input signal
Falling tendency input signal
Slowly changing sensor signals
under suspicion may be assessed
F:
Input signal bar graph with limit
markers, giving a magnitude
comparison of the analogue signal
level
Press L to escape and return to the Signal
Display.
www.trolex.com
TX9042-UM-EN-01 39
On an Analogue channel, Close-Up 1 will
also display information about any input
signal Error condition that has occurred.
A signal that transgresses beyond its normal
operating boundaries (ie. above
20 mA or below 4 mA on a 4 to 20 mA
input) will initiate warnings at preset levels
of discrepancy and trigger exclusive Error
signals. Refer to Section 5.9.4 for details.
+5%
Signal exceptionally High (ie. 21 mA)
Scale
Signal Over normal scale value (ie. 20.01 mA)
Normal
Normal operating range (ie. 0.4 to 2 V)
Minimum
Signal Under normal minimum value (ie.
3.99 mA) (applies to Signals with offset zero
only)
40
TX9042-UM-EN-01
www.trolex.com
TX9042 User Manual
-5%
Signal exceptionally Low (ie. 3.8 mA).
Checkpoint
Digital signals are, by their nature, self
monitoring, so this facility does not appear
on digital channels.
5.5.1.2 Close-up 1 Display for an
Digital Input Module
A:
Channel identification (1 to 8).
B:
Programmed mode of the digital input
module (Pcount). This changes to
indicate that a channel setpoint has
been exceeded (ie. SP1 and/or SP2).
C:
User text entry for channel duty
identification. (Used to display dynamic
function information in some digital
modes).
D:
Count or frequency to 10 digits
(±9999999999).
E:
Bar-graph of count or frequency with limit
markers giving a magnitude comparison
of the count or frequency level.
F:
Last count sense indication.
= Reset or steady input signal
Rising count or frequency.
Falling count or frequency.
Slowly changing sensor signals under
suspicion may be assessed.
Press R to return to the Signal Display.
www.trolex.com
TX9042-UM-EN-01 41
5.5.2 Close-up 2 Information
Display
Close-up 2 will show information about the
setpoint values and historical recorded data
relating to the input signal.
From Close-up 1 press L to display
Close-up 2.
5.5.2.1 Close-up 2 Display for an
Analogue Input Channel
A:
Channel identification (1 to 8).
B:
Type of input module (PT100).
This changes to indicate that a channel
setpoint has been exceeded (ie. SP1
and/or SP2).
C:
Input signal Level.
D:
The previous Peak signal value
recorded since last reset.
E:
The previous Lowest signal value
recorded since last reset.
F:
The value of Setpoint 2.
G:
The value of Setpoint 1.
H:
24 hour clock.
Press R to return to Close-up 1.
Press L to escape and return to the Signal
Display.
42
TX9042-UM-EN-01
www.trolex.com
TX9042 User Manual
5.5.2.2 Close-up 2 Display for a
Digital Input Channel
Checkpoint
Not applicable for the Digital level mode.
A:
Channel identification (1 to 8).
B:
Programmed mode of the digital input
module (Pcount). This changes to
indicate that a channel setpoint has
been exceeded (ie. SP1 and/or SP2).
C:
Count or frequency Level.
D:
The previous Peak count or frequency
recorded since last reset.
E:
The previous Lowest count or
frequency recorded since last reset.
F:
The value of Setpoint 2.
G:
The value of Setpoint 1.
H:
24 hour clock.
Press R to return to Close-up 1.
Press L to escape and return to the Signal
Display.
www.trolex.com
TX9042-UM-EN-01 43
5.6 Menu of Functions
5.6.1 Default Values
Initial default values are registered into the
Menu of Functions during manufacture.
The standard values are shown in the bottom
right hand corner of each menu function box.
These values are entered during manufacture
via the data communications link by a special
PC based software routine.
Non-standard default listings can also be
entered. This facility can be used to quickly
and conveniently programme specific
custom operating functions into single or
multiple units.
5.6.2 Programming the Operating
Values
Normally, the operating values of the various
functions in the menu are programmed by
the user through the keypad to enter specific
calibrations and selections to individual
requirements.
If the Programmable Sensor Controller is
being used as part of a SCADA system,
the same adjustments can be made from
the keypad of the base station via the data
communications link.
The special software required for this
purpose is included as part of the
SCADA graphic package provided.
User programmed operating values are
permanently retained.
44
TX9042-UM-EN-01
www.trolex.com
TX9042 User Manual
5.7 Main Menu
All the operating functions can be
programmed through the keypad by entering
the Main Menu.
5.7.1 Entering the Menu
Press L to enter the Main Menu.
Cursor arrows will indicate the first of the
function options available in the Main Menu.
If enabled, the Keycode Security lockout
will inhibit entry into the Main Menu until
the correct entry code is confirmed. Refer to
Section 5.7.5 for details.
Press D to navigate the cursor along the
digits.
Press U to increment the number.
Press R to confirm the selection.
Press L to escape and return to the previous
menu.
www.trolex.com
TX9042-UM-EN-01 45
Press U or D to navigate up and down the
menu to the preferred menu.
Press R to confirm the selection. (Previously
programmed settings will be displayed
alongside each item in a menu).
Function changes can now be programmed
as described in the following sections.
Data Saved will flash briefly on the screen
whenever a new value is entered during
function programming.
Not Saved will flash briefly on the screen
if a value is not entered during function
programming.
Checkpoint
The screen will automatically return to the
Menu being used after a value or selection
has been entered.
5.7.2 Escape/Return
Press L to escape and return to the previous
menu from any position in the Menu
sequence.
Each press of L will revert the screen one
step back until the Main Menu is reached.
The screen will progressively step back at 5
second intervals if no keys are pressed.
46
TX9042-UM-EN-01
www.trolex.com
TX9042 User Manual
5.7.3 Communications Setup
The characteristics required for the data
communications output port can be entered.
Datacomms output is RS485. Refer to
Section 5.10 for details.
The selections available in some items of
this menu list are dependent upon whichever
protocol function is selected.
Press U or D to navigate up or down the
menu to the preferred menu.
Press R to confirm the selection you have
navigated to.
Press U or D to set the value or mode.
Press R to confirm the value or mode.
TxOn - this is the delay between the TX9042
PSC enabling the transmission line and
sending data.
TxOff - this is the delay between the end of
the received data and disabling of the receive
buffer.
RxTO - this is the delay between receipt of
last message and reset of the receive buffer.
www.trolex.com
TX9042-UM-EN-01 47
Data Protocol
Modbus
(Binary)
Modbus
(ASCII)
Notify
N/A
N/A
Format
Binary
ASCII
Databits
8
7/8
Stopbits
1 to 2
Parity
None/Odd/Even/Mark/Space
Baud Rate
300/600/1200/2400/4800/9600/14400/
19200/28800/57600/115000
Verify
CRC16
Chksum
Address
1 to 65535
DSR
Norm / TX High / TX Low
TX On
0 to 99 ms
Rx TO
0 to 99 ms
TX Off
0 to 99 ms
Duplex
Half/Full
Comm Monitor
Scrolling display of incoming data stream. Data stream
can be stopped and started for closer analysis.
Press U to Stop data stream
Press D to Start data stream
Checkpoint
Communication data protocol information and additional application data is
available from the Trolex Technical Department.
48
TX9042-UM-EN-01
www.trolex.com
TX9042 User Manual
5.7.4 Clock
Date and time information is used when
readings are entered into the Data Log.
Press U or D to navigate to Date or Time.
Press R to confirm the selected function.
Press D to navigate the cursor across the digits.
Press U to change the value of the digit with
the cursor underneath.
Press R to confirm the Date or Time.
5.7.5 Keycode Security
Access to menus can be prevented by
enabling the Keycode Security function.
It is a selectable function, and the Keycode
can be changed as and when required.
Press D to navigate the cursor across the digits.
Press U to change the value of the digit with
the cursor underneath.
Press R to confirm the Keycode.
Checkpoint
If more than five invalid entries are
attempted, access to the Main Menu will
be denied for 30 mins. If you require this
feature to be disabled, contact your local
Trolex service agent or the Trolex Product
Support Department: [email protected]
www.trolex.com
TX9042-UM-EN-01 49
5.7.6 Interval Period of the
Datalog
Each channel of the TX9042 PSC contains
a 26,000 point data logging system. This
can record the channel number and the
Time and Date that an event occurs. The
rate or time interval of recording data can
be programmed and data is recorded on a
first-in/first-out rolling log. Rapid logging is
possible to closely capture critical shutdown
routines or a catastrophic plant failure.
The Interval or frequency at which data is
recorded in the log can be programmed in
hours/minutes/seconds.
Press D to navigate the cursor along the
digits.
Press U to change the value of the digit with
the cursor underneath.
Press R to confirm the Interval.
5.7.7 Data Display Review of the
Datalog
The data recorded in the log can be reviewed
on the screen for individual channels.
Press U or D to navigate up or down the
Channel List to the required Channel.
Press R to confirm the selected Channel.
Press U or D to navigate up or down the Log
to the required information.
50
TX9042-UM-EN-01
www.trolex.com
TX9042 User Manual
Press R to return to the Channel List.
Supplementary information is displayed
momentarily where appropriate:
5.7.8 Clear the Data in the
Datalog
Press R to confirm the instruction to clear
the Data in the Datalog.
www.trolex.com
TX9042-UM-EN-01 51
5.7.9 Relay Reset Mode Options
The four output relays, R1, R2, R3 and R4,
can be programmed to latch in the alarm
condition. Any relays that are latched can be
reset in four different ways:
Off: Reset from an external contact or pushbutton is not possible. This mode is used on
critical safety systems, where relays latched
in the alarm condition, can only be reset by
an authorised person who has access to the
keypad of the controller.
High: Any latched relays will be reset as long
as the reset input is High (open contact),
and the channel input signal has receded
from the programmed setpoint level.
Low: Any latched relays will be reset as long
as the reset input is Low (closed contact),
and the channel input signal has receded
from the programmed setpoint level.
Rise: Any latched relays will be reset only as
the reset input Rises (opening contact), and
the channel input signal has receded from
the programmed setpoint level.
52
TX9042-UM-EN-01
www.trolex.com
TX9042 User Manual
Fall: Any latched relays will be reset only as
the reset input Falls (closing contact), and
the channel input signal has receded from
the programmed setpoint level.
Press U or D to navigate to the mode of
reset.
Press R to confirm the mode of reset.
Press L and R to reset any latched relays in
all four modes.
Checkpoint
The relay reset input does not affect
display counts accumulated on a Pulse
Counting channel.
5.7.10 Relay Voting
Each channel of the TX9042 PSC has two
adjustable setpoint signals. Any, or all, of
these can be matrix programmed to operate
any, or all, of the four output relays, R1, R2,
R3 and R4.
A Voting system can be superimposed on to
this facility, whereby a selectable number of
the setpoint signals must be present before
the selected output relay will be operated.
www.trolex.com
TX9042-UM-EN-01 53
Take the example of an environmental
monitoring system which must protect
against the catastrophic consequences of a
flammable gas explosion.
Flammable gas sensors can be installed
to detect the presence of the gas and the
signals from the sensor can be arranged
to trigger setpoint alarm levels in the
Programmable Sensor Controller and initiate
power shutdown. However, due to the highly
complex nature of the process, there are
conflicting requirements.
On one hand, for safety reasons, the
presence of the gas must be swiftly and
unequivocally detected so, triple gas sensors
can be fitted in each critical area to achieve
this. Conversely, the impact of a false plant
shutdown would be financially disastrous and
must also be protected against.
In this case, if a Two out of Three
voting system is programmed into the
Programmable Sensor Controller, the
selected output relay will only respond
when two or more alarm setpoints are
activated together. This ensures that there
is at least dual gas monitoring integrity on
the plant (and normally, triple monitoring).
On the other hand, plant shutdown will only
occur when at least two gas sensors are in
agreement, so indicating genuine danger.
The programming of this function is
completely flexible. Any number of the
setpoint signals can be matrixed to a single
relay, enabling the selection of the Voting
function from any two setpoint signals up to
sixteen setpoint signals.
54
TX9042-UM-EN-01
www.trolex.com
TX9042 User Manual
Press U or D to select the Vote Number.
Press R to confirm.
5.7.11 Relay Operation
When relays are not allocated to a setpoint,
Relay Operation allows the relays to be left
in the de-energised or energised state.
Low = De-energised
High = Energised
5.7.12 Software Version
Product identification information is
presented on the LCD screen, this includes
the product reference, software version
number, serial number, log data memory and
input board type.
5.7.13 Self Test
This enables all the internal functions of the
TX9042 PSC to be tested.
www.trolex.com
TX9042-UM-EN-01 55
5.7.14 Display Cycling
If the user requires more information on each
of the inputs, the screen can be set to toggle
between screens showing 4 inputs. The rate
of toggle can be defined if this is set to zero,
logging is disabled.
5.8 Contrast Control
The contrast of the LCD screen can be varied
to compensate for the effect of local ambient
light conditions.
Press U and D to increase or decrease the
Contrast setting.
Press R to confirm the selected setting.
Checkpoint
1 is the minimum contrast setting and 15 is
the maximum contrast setting.
56
TX9042-UM-EN-01
www.trolex.com
TX9042 User Manual
5.9 Channel Function and
Calibration
The operating characteristics of each channel
can be individually programmed.
The menu procedure is the same for all eight
channels but the contents of the menu will
be different for Analogue input modules and
Digital input modules.
Checkpoint
If enabled, the Keycode Security will
prevent access into individual channels
until the correct Keycode is entered.
Press U or D to navigate to the mode of
Reset required.
Press R to confirm the mode of Reset.
Checkpoint
Terminology in the menu will vary slightly
where a digital input module is selected
into the Digital Level mode.
This mode is used for simple On/Off inputs
such as thermostats, limit switches or
NAMUR proximity sensors.
See the Menu of Functions for individual
menu listings. Refer to Section 5.6 for
details.
www.trolex.com
TX9042-UM-EN-01 57
5.9.1 Power On Delay (POD)
Period
The setpoint alarm signals SP1 and SP2 can
be inhibited for an adjustable time period,
after the power is switched on. Each channel
can be independently set.
This feature is useful for an initial start-up
override when a machine is running up to
speed or a process is stabilising.
Checkpoint
The range of configurable values is 0 to
255 seconds.
Press U or D to navigate through the digits to
the required POD Period value.
Press R to confirm the POD Period value.
In a situation where the alarm signals need
to be inhibited until after an operation has
occurred, the Ext POD feature can be used.
A signal on terminal A35 prevents the
internal POD timer from operating, at power
on, until it is removed.
58
TX9042-UM-EN-01
www.trolex.com
TX9042 User Manual
Once the unit is powered up, a signal on
terminal A35 can be used to inhibit SP1 and
SP2. On release of the signal, SP1 and SP2
are further inhibited by the channel POD
period.
External POD can be selected as Off, High
or Low.
Off = Disabled
High = Connect to + V to operate
Low = Connect to 0 V to operate
External override can be selected as Off,
High Low, Rise or Full.
Off = Disabled
High = Connect to + V to operate
Low = Connect to 0 V to operate
Rise = Positive signal causes internal POD
Fall =Negative signal causes internal POD
www.trolex.com
TX9042-UM-EN-01 59
5.9.2 Scale and Display Settings
The various characteristics of the signal scale
and display can be determined.
The contents of the menu will vary
depending upon which type of input module
is fitted on the channel being programmed.
Press U or D to navigate to the value
required.
Press R to confirm the value selected.
The contents of the menu for a digital input
module will vary in relation to which of the
sensor operating modes it is set into.
See the Menu of Functions for individual
menu listings. Refer to Section 5.6 for
details.
60
TX9042-UM-EN-01
www.trolex.com
TX9042 User Manual
5.9.2.1 Reset Peak
The previous maximum value (Peak) and
minimum value (Low) that the signal has
reached since the last occasion that it was
reset.
Dangerously High or Low sensor conditions
may have occurred previously and this
feature enables historic trends to be
examined.
Stored values of previous Peak and Low
(max/min) can be deleted.
Press R to select Reset.
Press R to confirm Reset.
5.9.2.2Constant
When a Digital Input module is selected
into the Pulse Counter mode, an additional
item called Constant will appear in the menu
choice.
When counting pulses or batch counting,
a fixed Constant can be added into the
counting register to provide a displaced or
elevated starting point as in the case of a
tare value or correction factor. This can be
a positive or negative quantity and can be
applied to all three modes of counting.
It is permanent until re-programmed.
www.trolex.com
TX9042-UM-EN-01 61
Upcount Mode
The count will start at the Constant and
count up.
Downcount Mode
The count will start at the Constant and
count down.
Bi-directional Count Mode
The count will start at the Constant and
count up and/or down from it.
Press D to navigate the cursor across the digits.
Press U to change the value of the digit with
the cursor underneath.
Press R to confirm the Constant.
5.9.2.3 IPF 1 and IPF 2
Some modules of a Digital input module will
show IPF 1 (Input Pre-scale Factor no.1) in
the menu.
The modes that use two input counting
devices will also show IPF 2 relating to the
second input.
62
TX9042-UM-EN-01
www.trolex.com
TX9042 User Manual
Incoming pulses can be multiplied by a
selectable pre-scale factor. This is useful for
converting pulse rates from target wheels,
flow sensors and measuring devices to the
required scale factor, or for conversion to the
appropriate engineering units.
Press D to navigate the cursor across the digits.
Press U to change the value of the digit with
the cursor underneath.
Press R to confirm the Input Pre-scale
Factor.
5.9.2.4Update
The channel input signal is sampled at a predetermined interval.
The value of an Analogue signal is averaged
and updated at periodic intervals and the
update period is adjustable. A low setting
will give rapid reaction to the input signal
and higher settings may be entered where
damping of a fluctuating input is necessary,
or simply as a means of applying a delay to
the input. This is particularly appropriate in
electrically noisy environments.
In the case of a Pulse/Frequency input, the
microprocessor determines the frequency by
counting or Sampling the number of pulses
that occur during a timed period.
www.trolex.com
TX9042-UM-EN-01 63
The longer this sample time is, the more
accurate will be the resulting calculation, but
there are constraints on this: If the sampling
time is too long, the reaction time of the
system may be unacceptable.
With frequency inputs, long sampling times
on high pulse rates are not necessary to
maintain accuracy, so a short sampling
time can be used, bringing with it, a
corresponding improvement in system
reaction time. The sampling time is
adjustable, making it possible for the user
to set the optimum value for the application
with the best accuracy. There is an added
advantage:
If an input frequency is fluctuating rapidly,
causing instability in the system, the sample
time can be adjusted to provide some
measure of damping or suppression.
For maximum accuracy, sampling takes place
at the front end, prior to pre-scaling.
Press U or D to navigate to the value
required.
Press R to confirm the value selected.
Checkpoint
Analogue levels are averaged between
samples. Pulse frequencies are averaged
between samples.
64
TX9042-UM-EN-01
www.trolex.com
TX9042 User Manual
5.9.2.5Units
A menu of more than 35 standard
engineering units is available for adding on
to the signal value display to represent the
actual parameter being measured, ie. bar,
mA, m/sec, °C, etc.
Checkpoint
Where a temperature input module is
fitted, the choice will be limited to °C, °F or
°K.
Press U or D to navigate to the units
required.
Press R to confirm the units selected.
5.9.2.6 Decimal Point
Once the numerical value of the Upper and
Lower limits of the display have been set,
the decimal point can be navigated to any
desired position within the number.
Press U or D to navigate the decimal point to
the required position within the number.
Press R to confirm the location selected.
www.trolex.com
TX9042-UM-EN-01 65
5.9.2.7Sequence
When a digital input module is selected into
the Pulse Counter mode, an additional item
called Sequence will appear in the menu
choice.
The counting sequence of pulse counting
can be determined.
Single - the counter will count indefinitely
until reset, continuing to count beyond any
programmed setpoints.
Cycle - the counter will count to a
pre-programmed batch setpoint, then
automatically reset and re-start the count
cycle continuously.
Checkpoint
It is recommended that the relay operation
should not be set for Autoreset in the
Cycle mode because the resulting output
signal would be too short for any practical
use. The other modes available, Latch,
Toggle and Pulse may be utilised to suit
the control function.
Press U or D to navigate to Single or Cycle
as required.
Press R to confirm the selection.
66
TX9042-UM-EN-01
www.trolex.com
TX9042 User Manual
Checkpoint
The Count display can be reset by an
impulse on input 2 or through the keypad.
Checkpoint
Any relays that are programmed to Latch
can be reset by an impulse on input
Terminal 36 or through the keypad.
5.9.2.8Direction
When a Digital input module is selected
into the Pulse Counter mode, an additional
item called Direction will appear in the menu
choice.
The Direction of pulse counting can be
determined.
Press U or D to navigate to Up, Down or
Bidi as required.
Press R to confirm the selection.
Up - count-up the pulses on Input 1 from
zero, or from a Constant that has been
entered. The display will show the number of
pulses Counted.
Down - count-down the pulses on Input 1
to zero, or from a Constant that has been
entered. The display will show the number of
counts Remaining.
www.trolex.com
TX9042-UM-EN-01 67
Bidi - bidirectional counting uses both inputs;
Input 1 to count the pulses from a toothed
wheel or similar target, and Input 2 as the
pulse steering input. The proximity sensors
or similar should be positioned around the
wheel to give a resultant signal overlap of
about 90° of tooth angle. The counter of the
sensor controller will be instructed to count
up or down, dependent upon the state of
Input 2 at the point of count transition.
Alternatively, a remote signal or contact
can be used for pulse steering, such as
auxiliary contacts on a forward/reverse motor
contactor. The count will add or subtract
pulses on Input 1, starting from zero, or
from a Constant offset that has been
programmed.
The display will show the resultant Up/Down
counts in either the positive or negative
sense.
To reset the Count Display:
Upcount
Downcount
Bidirectional
Pulse on
Input 2
Yes
Yes
No
Keypad
Yes
Yes
Yes
Checkpoint
If the count value to be reset has
exceeded, and so activated, a programmed
Setpoint value, the setpoint output will
reset at the same time. Refer to Section
5.9.3.6 for details.
68
TX9042-UM-EN-01
www.trolex.com
TX9042 User Manual
Checkpoint
Any relays that are programmed to Latch
will not be reset. Refer to Relay Reset
Mode Options in Section 5.7.9 for details.
5.9.2.9Lower
5.9.2.10 Upper
Independently adjustable, these two items
are closely inter-related. They set the desired
Lower limit and Upper limit of the display
reading for a given input signal. This can be
any numeric value through to any positive
value. The indicating range from zero to full
scale of the display can be programmed
to show true unit values incorporating
multiplication factors or zero offset values.
Press D to navigate the cursor along the
digits to the required digit.
Press U to increment the digit to the
required value.
Press R to confirm the value selected.
The signal response between Lower and
Upper will be assumed to be linear and
signals from non conforming devices such
as thermocouples will be automatically
linearised to the appropriate standard.
Non linear relationships such as square
law signals from differential pressure
sensors and the polynominals can also
be incorporated in software to specific
requirements.
www.trolex.com
TX9042-UM-EN-01 69
It is also possible to interrelate the signals
between two separate channels to apply
signal differential comparison, correction
factors and compensation.
5.9.2.11 Calibrate (Temperature Input
Module)
This function only appears in the menu when
a temperature input module is fitted.
P5423.72/94
P5423.74
P5423.76
P5423.253
Platinum Resistance
Device - PT100
Semiconductor Temperature
Device - KTY81
Semiconductor Temperature
Device - KTY84
Semiconductor Temperature
Device - KTY21-6
It sometimes occurs that the temperature/
output signal relationship of the temperature
sensing device being used is not known, or
as in the case of a semiconductor sensor,
the output is not precisely standardised from
one device to the next. Cable length and
size of conductor cores can also affect the
calibration of the system.
The display can be calibrated, after
installation, to concur with a known
temperature applied to the sensor being
used.
70
TX9042-UM-EN-01
www.trolex.com
TX9042 User Manual
Press R to confirm the calibration mode.
The screen will show the apparent
temperature being measured by the sensor.
Press U or D to increment the value
displayed to concur with the temperature
measured at the sensor.
Press R to confirm the value selected.
The linearity response of the input module
will be automatically corrected, based
around the new calibration point entered and
the correction factor will be appropriate to
whichever type of temperature input module
is fitted.
A simple way to apply a known temperature
to an installed sensor is to place it in a small
cup of ice and calibrate the display to 0°C as
described.
5.9.2.12 Pressure Full Scale (Flow Input
Module for TX6022 only)
This function only appears in the menu
when a flow input module is fitted for use
with a TX6022 Liquid Flow Sensor. The full
scale pressure of the line pressure sensor is
entered here to allow the flow readings to be
pressure compensated.
Press R to enter Pressure Full Scale mode.
Press D to navigate the cursor along the
digits to the required digit.
www.trolex.com
TX9042-UM-EN-01 71
Press U to increment the digits to the
required value.
Press R to confirm the values selected.
5.9.2.13 Pressure Constant (Flow Input
Module for TX6022 only)
This function only appears in the menu when
a flow input module is fitted for use with a
TX6022 Liquid Flow Sensor. The TX6022
Liquid Flow Sensor will be supplied with this
calibration constant, which is then entered
into the TX9042 PSC.
Press R to enter Pressure Constant mode.
Press D to navigate the cursor along the
digits to the required digit.
Press U to increment the digits to the
required value.
Press R to confirm the values selected.
5.9.2.14 Differential Pressure (Flow Input
Module)
This function only appears in the menu when
a flow input module is fitted for use with a
TX6022/3 Liquid Flow Sensor. The TX6022/3
Liquid Flow Sensor will be supplied with this
calibration constant, which is then entered
into the Programmable Sensor Controller.
Press R to enter Pressure Constant mode.
Press D to navigate the cursor along the
digits to the required digit.
72
TX9042-UM-EN-01
www.trolex.com
TX9042 User Manual
Press U to increment the digits to the
required value.
Press R to confirm the values selected.
5.9.2.15 Flow Constant (Flow Input
Module)
This function only appears in the menu when
a flow input module is fitted for use with a
TX6022/3 Liquid Flow Sensor. The TX6022/3
Liquid Flow Sensor will be supplied with this
calibration constant, which is then entered
into the Programmable Sensor Controller.
Press R to enter Flow Constant mode.
Press D to navigate the cursor along the
digits to the required digit.
Press U to increment the digits to the
required value.
Press R to confirm the values selected.
5.9.2.16 Zero Mask (Flow Input Module)
This function only appears in the menu
when a flow input module is fitted for use
with a TX6022/3 Liquid Flow Sensor. The
sensing principle employed by the TX6022/3
Liquid Flow Sensor, means that a low flow
reading may be indicated when in fact, no
flow is present. This is usually caused by the
weight of fluid on one side of the Differential
Pressure sensor. This function allows the
Programmable Sensor Controller to display
zero flow until the flow exceeds the value
entered in the zero mask register.
www.trolex.com
TX9042-UM-EN-01 73
Press R to enter Zero Mask mode.
Press D to navigate the cursor along the
digits to the required digit.
Press U to increment the digits to the
required value.
Press R to confirm the values selected.
5.9.2.17 Zero (Straingauge and STET
Modules)
This function only appears in the menu when
a straingauge module or PSU/Bridge module
is fitted.
Press R to enter Zero mode.
Press U or D to increment the displayed
value to a value that matches the zero
reading on the straingauge.
Press R to confirm the value selected.
Checkpoint
This function can also be used to offset the
reading from zero, to compensate for any
system errors.
74
TX9042-UM-EN-01
www.trolex.com
TX9042 User Manual
5.9.2.18 Span (PSU/Straingauge Module)
This function only appears in the menu when
a PSU/Straingauge module is fitted.
Press R to enter Span mode.
Press U or D to increment the displayed
value to a value that matches the measured
reading on the straingauge.
Press R to confirm the value selected.
Checkpoint
When the module is used to monitor
methane from a Pellistor head, the display
will latch at >5% methane and turn the
power supply off. The screen will read:
5.9.2.19 Sensitivity (Straingauge Mode)
This function only appears in the menu when
a Straingauge module is fitted.
Press R to enter Sensitivity mode.
Press U or D to increment the displayed
value to a value that matches the sensitivity
of the straingauge being used.
Press R to confirm the value selected.
www.trolex.com
TX9042-UM-EN-01 75
5.9.2.20 Identification
Channel identification text can be entered to
denote the input duty, the location or the tag
reference of the input device.
Up to 11 digits of text can be entered into
the display and there is a menu of letters,
numbers and symbols to choose from, thus
enabling channel identification or location
data to be entered.
Checkpoint
User specified text may have been entered
during manufacture.
Press D to navigate the cursor along the
digits to the required digit.
Press U to increment the digits to the
required value.
Press R to confirm the values selected.
5.9.2.21 Connections
Terminal identification details are listed on
the display for a particular channel input
electrical connections.
Press U or D to navigate through the data.
76
TX9042-UM-EN-01
www.trolex.com
TX9042 User Manual
5.9.2.22 Run Speed
When a digital input is set to Slip Frequency
mode, an additional menu item called Run
Speed will be available.
The Slip Frequency mode is most often
used for monitoring the rotational speed of
a machine shaft or speed measuring device
by determining the pulse rate from a toothed
wheel attached to the shaft.
Overspeed or underspeed can be detected
and is assessed as a percentage or Slip
related to the Normal running speed, eg.
-5% Slip Frequency or 5% Underspeed. It
is not always possible to know or measure
the normal running speed of a machine, or it
may be difficult to establish the speed/pulse
relationship, particularly where gearing or
belts are being used.
At this position in the menu, the screen
will show the pulse frequency that is
coming in from the shaft or sensor being
monitored. This value can be stored and then
automatically used as the Normal Speed
reference when setting the Slip setpoint
levels.
Press R to confirm the incoming pulse
frequency.
The entered value of the Pulse Frequency
can also be subsequently adjusted if
required, to allow for loading factors or safety
margins on the machine.
www.trolex.com
TX9042-UM-EN-01 77
Press D to navigate the cursor along the
digits to the required digit.
Press U to increment the digits to the
required value.
Press R to confirm the values selected.
Checkpoint
The configurable range of Pulse Frequency
is 0 to 9999999.
5.9.2.23 Count Reset
When a digital input module is set to Pulse
Count mode, an additional item called Count
Reset will be available in the menu.
Any counts accumulated in the register of a
Pulse Counting channel can be individually
reset to zero, or reset to a Constant that has
been previously entered.
Press R to select Reset.
Press R to confirm Reset.
When Upcounting or Downcounting, the
count can also be reset by an impulse on
Input 2.
If the count value to be reset has exceeded,
and therefore activated a programmed
Setpoint value, SP1 and/or SP2, the
Setpoint Output will reset at the same
time. Refer to Section 5.9.3.6 for details.
78
TX9042-UM-EN-01
www.trolex.com
TX9042 User Manual
Any relays that are programmed to latch will
not be reset. Refer to Relay Reset Mode
Options in Section 5.7.9 for details.
5.9.3 Setpoint Characteristics
Each of the eight channels has two Setpoint
signals or alarm points, SP1 and SP2.
The various operating characteristics of each
Setpoint can be individually determined.
Setpoint signals are High in the normal
condition and switch to Low when activated,
as a Setpoint is exceeded.
The Setpoints do not directly control the
four output relays, R1, R2, R3 and R4, but
can be matrix programmed to selectively
initiate the four relays.
Press U or D to navigate to the menu
required.
Press R to confirm the menu selected.
Checkpoint
The contents of the menu for a digital input
module will vary slightly depending upon
which of the seven operating modes it is
set in. Refer to Section 5.9.7 for details.
www.trolex.com
TX9042-UM-EN-01 79
5.9.3.1 Level
The operating level of the setpoint signal
can be programmed. This can be set for
any numerical value and the polarity can be
positive or negative as required.
Press D to navigate the cursor along the
digits to the required digit.
Press U to increment the digits to the
required value.
Press R to confirm the Setpoint level.
5.9.3.2 Hysteresis
Hysteresis is the deadband between the
setpoint switching On and switching Off as
the input signal rises and falls. This can be
set as a percentage of the Set Point Level.
Press U or D to increment the hysteresis
value.
Press R to confirm the Hysteresis value.
A low value of hysteresis, say 5%, is often
used to override fluctuating signal levels and
to prevent hunting in closed loop control
systems.
A high value of hysteresis can also be used
as a control function when controlling the
operation of pumps. The pump will start at
high level (SP1) and continue pumping until
low level is reached at the bottom of the
hysteresis band.
80
TX9042-UM-EN-01
www.trolex.com
TX9042 User Manual
5.9.3.3 Alarm (Rising/Falling)
The setpoint signals can be arranged to
occur on a rising input signal or a falling input
signal. For example, when monitoring excess
vibration or high gas concentration, the
setpoint signals can be set to activate on a
rising signal to give a failsafe alarm function.
Conversely, when monitoring flow failure or
low pressure, the setpoint signal can be set
to activate on a falling signal.
Press U or D to navigate to rising or falling as
required.
Press R to confirm the selection.
5.9.3.4 Setpoint On Delay
The operation of the Setpoint signal can be
delayed by an adjustable time period, T1.
This is useful for alarm verification, to apply
time delay in a process control action, or to
override a spurious fluctuation of the input
signal.
If the input signal falls below the setpoint
before the programme time has elapsed, the
timer will reset to zero, ready to start again.
Press U or D to navigate to the Setpoint On
Delay value required.
Press R to confirm the value selected.
www.trolex.com
TX9042-UM-EN-01 81
5.9.3.5 Setpoint Off Delay
The resetting of the Setpoint signal can also
be delayed by an adjustable time period, T2.
If the input signal exceeds the Setpoint
before the programme time has elapsed, the
timer will reset to zero, ready to start again.
Press U or D to navigate to the Setpoint Off
Delay value required.
Press R to confirm the value selected.
Checkpoint
Both the Setpoint On Delay and the
Setpoint Off Delay can be combined,
if required, and are independently
programmable. Refer to Sections 5.9.3.4
and 5.9.3.5 for details.
5.9.3.6 Operation
A set point signal can be set to function in
four different ways.
Auto Reset - the Setpoint signal will go
Low when the input signal exceeds the
Setpoint value and will reset when the
input signal recedes. T1/T2 = any Setpoint
On Delay and/or Setpoint Off Delay that is
programmed. Refer to Sections 5.9.3.4 and
5.9.3.5 for details.
Checkpoint
The reset point will also be influenced by
any hysteresis value that is programmed.
Refer to Section 5.9.3.2 for details.
82
TX9042-UM-EN-01
www.trolex.com
TX9042 User Manual
Latch Until Reset - the Setpoint signal will
go Low when the input signal exceeds the
Setpoint value and latch until reset. T1 =
any Setpoint On Delay that is programmed.
Refer to Section 5.9.3.4 for details.
Refer to Section 5.7.9 for details of Relay
Reset Mode Options.
Toggle - the setpoint signal will go Low/
High alternately each time the setpoint
value is exceeded. T1/T2 = any Setpoint
On Delay and/or Setpoint Off Delay that is
programmed.
Pulse - the setpoint signal will give an
impulse equal to the T1 time each time the
setpoint value is exceeded.
Press U or D to navigate to the required
function.
Press R to confirm the function selected.
www.trolex.com
TX9042-UM-EN-01 83
5.9.3.7 Relays
The TX9042 PSC has four common output
relays, R1, R2, R3 and R4.
Any setpoint signal can be assigned to
operate any one or all of the relays by
selecting Yes or No in each case.
This enables alarm status groupings,
selective shutdown routines and logic
elementary functions to be created.
Press U or D to navigate to Yes or No as
required.
Press R to confirm the selection.
Checkpoint
Any or all of the sixteen setpoint signals
can be programmed for Voting operation
with the output relays. Refer to Section
5.7.10 for details.
84
TX9042-UM-EN-01
www.trolex.com
TX9042 User Manual
5.9.4 Fault Signal Alarm
Assignation
Each of the 8 channels on the TX9042 PSC
has a Fault Output Signal which triggers
when a system fault is detected by the
processor. Refer to Section 5.5 for details.
The fault types are:
•
•
•
Sensor Failure
Input Signal Faults
Loss of Signal
The Fault signal from each channel can be
cross matrix programmed in the same way
as the Set Point signals, to interface with
any or all of the four output relays, R1, R2,
R3 and R4.
This way, it is possible to identify the
character of the alarm without causing
unnecessary shutdown, or giving a false
alert.
www.trolex.com
TX9042-UM-EN-01 85
This function does not work where a
channel has been configured as a Digital
Input Channel, except for a failsafe Digital
Input Channel, as most digital input
functions are self monitoring by their nature.
Press U or D to navigate to the relay
required.
Press R to confirm the selection.
Press U or D to navigate to Yes or No as
required.
Press R to confirm the selection.
5.9.5 Threshold Acceptance Level
When a Digital Input Module is fitted,
the Threshold selection will appear in the
Channel Menu.
The input signal threshold voltage level can
be set so that only pulse amplitudes above
a preset magnitude will be accepted by the
input.
Background noise or spurious interference
can be eliminated in this way. This is
particularly useful in a high speed, pulse
processing system where a simple time
delay on the pulse would be unacceptably
slow.
Press U or D to navigate to the Threshold
Acceptance Level value required.
Press R to confirm the value selected.
86
TX9042-UM-EN-01
www.trolex.com
TX9042 User Manual
5.9.6 Keycode Security for Each
Channel - 1 to 8
The same Keycode number previously
entered in the Main Menu can also be
used to prevent unauthorised access to any
individual channel function programming
or to prevent disclosure of programmed
parameters.
Each channel can be selectively inhibited
so an operator can still have access to
adjust other channels where this would be
appropriate. Refer to Section 5.7.5 for details.
Press U or D to navigate to On or Off as
required.
Press R to confirm the selection.
Checkpoint
Off Programming available
On Programming inhibited
R/O Programming read only - parameters
are displayed but cannot be changed
Checkpoint
If more than three invalid entries are
attempted, access to the channel function
programming will be denied for 30 mins.
If you require this feature to be disabled,
contact the Trolex Product Support
Department: [email protected]
www.trolex.com
TX9042-UM-EN-01 87
5.9.7 Mode Setting for a Digital
Input Module
A channel fitted with a Digital Input Module
will show an additional item called Digital in
the Channel Menu.
A Digital Input Module can be set into
seven different modes of Pulse Processing
Format and one of these must be
determined before programming of the
various function characteristics can proceed.
The available modes of Pulse Processing
Format are:
•
•
•
•
•
•
•
Pulse Counter
Pulse Interval
Pulse Frequency
Slip Frequency
Differential Slip Frequency
Differential Frequency
Digital Level
Press U or D to navigate to the required
mode of Pulse Processing Format, there
are seven modes available.
Press R to confirm the selection.
Pulses can be counted from contacts,
NAMUR sensors or photosensors.
Input 1 is normally used for counting and
Input 2 for reset or count steering control.
88
TX9042-UM-EN-01
www.trolex.com
TX9042 User Manual
5.9.7.1 Pulse Counter
Pulses entering on Input 1 will be totalled.
Setpoint count values can be programmed.
Counting can be Upcount, Downcount or
Bidirectional. Refer to Section 5.9.2.8 for
details.
Close-up 1 Display
Refer to Section 5.5.1 for details.
5.9.7.2 Pulse Interval
This mode measures the time interval
between successive pulses on Input 1
against a programmable target time.
If the interval time between pulses exceeds
the programmed target time, the setpoint
will be triggered.
This is useful for monitoring slow moving
targets or rotating pans and drums or simply
as a long delay time.
www.trolex.com
TX9042-UM-EN-01 89
Close-up 1 Display
Additional dynamic function information is
displayed in this mode. Refer to Section 5.5.1
for details.
T - Elapsed time from the last reset pulse on
Input 1.
SP1 - Setpoint 1 or target time (Setpoint 2
can also be programmed as a second target
time but is not displayed).
Time - Duration of the previous time interval
in seconds (32.7 seconds).
Bar Graph - Progressive overview of the
length of the time interval between each
successive reset pulse on Input 1.
The bottom end of the bar graph (the
estimated minimum interval period) is
programmed by the Lower setup.
The top end of the bar graph (the estimated
maximum interval period) is programmed by
the Upper setup.
90
TX9042-UM-EN-01
www.trolex.com
TX9042 User Manual
5.9.7.3 Pulse Frequency
The frequency level or pulse rate on Input 1
is measured.
Setpoint levels are determined as an
Absolute frequency. Feed rate monitoring,
speed monitoring, flow rate, etc.
Close-up 1 Display
Refer to Section 5.5.1 for details.
Checkpoint
This mode is used for the Vortex Airflow
Sensor input module.
www.trolex.com
TX9042-UM-EN-01 91
5.9.7.4 Slip Frequency
The frequency level or pulse rate on Input 1
is measured.
Setpoint levels are determined as a
percentage of a programmed frequency
setpoint, for example, the underspeed or
overspeed of a machine can be expressed as
a percentage of the normal running speed.
Close-Up 1 Display
Additional dynamic information is displayed
in this mode.
T1 - incoming frequency or pulse rate on
Input 1.
Run - the programmed Run frequency.
% - the percentage difference between
Input 1 and Run.
Bar Graph - also gives magnitude
comparison of the percentage difference
between Input and Run.
92
TX9042-UM-EN-01
www.trolex.com
TX9042 User Manual
5.9.7.5 Differential Slip Frequency
The frequency level or pulse rate on
Input 1 is compared with the frequency level
or pulse rate on Input 2.
Setpoint levels are determined as an
absolute frequency difference.
Close-Up 1 Display
Additional dynamic information is displayed
in this mode.
T1 - incoming frequency or pulse rate on
Input 1.
T2 - incoming frequency or pulse rate on
Input 2.
% - the percentage difference between
Input 1 and Input 2, with respect to Input 1.
Bar Graph - overview of the percentage
difference between Input 1 and Input 2.
www.trolex.com
TX9042-UM-EN-01 93
5.9.7.6 Differential Frequency
The frequency level or pulse rate on Input 1
is measured.
Setpoint levels are determined as an
absolute frequency difference.
Close-Up 1 Display
Additional dynamic information is displayed
in this mode.
T1 - incoming frequency or pulse rate on
Input 1.
Run - the programmed Run frequency.
% - the percentage difference between
Input 1 and Input 2.
Bar Graph - Magnitude comparison of the
frequency difference between Input 1 and
Input 2.
94
TX9042-UM-EN-01
www.trolex.com
TX9042 User Manual
5.9.7.7 Digital Level
Inputs from simple On/Off switches, voltage
free contacts, thermostats, pressure
switches, limit switches and NAMUR
proximity switches.
Each digital input module will accept two
input switches, one on Input 1 and one
on Input 2, each of these inputs can be
programmed independently for most of the
standard functions.
Update time - input delay. Refer to Section
5.9.3.5 for details.
Identification text. Refer to Section 5.9.2.20
for details.
Terminal connections display. Refer to
Section 5.9.2.21 for details.
Alarm on high/low input - rising/falling
alarm. Refer to Section 5.9.3.3 for details.
Setpoint delay - output delay. Refer to
Section 5.9.3.4 for details.
Operation - auto reset/latch/toggle/pulse.
Refer to Section 5.9.3.6 for details.
Relay output assignation. Refer to Section
5.9.3.7 for details.
www.trolex.com
TX9042-UM-EN-01 95
Signal Display
Input 1
Input 2
Close-Up 1 Display
The state of Input 1 and Input 2 is displayed
as Low (L) or High (H).
5.9.8 Setting a Digital Failsafe
Input Module
A channel fitted with Digital Failsafe input
module will show an additional item called
Resistor in the channel menu.
The module will accept inputs from simple
On/Off switches, voltage free contacts such
as thermostats, pressure switches and limit
switches, also providing a failsafe capability.
Each digital input module will accept two
input switches, one on Input 1, the other
on Input 2 and each of these inputs can be
programmed independently for most of the
standard functions.
96
TX9042-UM-EN-01
www.trolex.com
TX9042 User Manual
Identification text. Refer to Section 5.9.2.20
for details.
Terminal connections display. Refer to
Section 5.9.2.21 for details.
Alarm on high/low input - rising/falling
alarm. Refer to Section 5.9.3.3 for details.
Setpoint delay - output delay. Refer to
Section 5.9.3.4 for details.
Operation - auto reset/latch/toggle/pulse.
Refer to Section 5.9.3.6 for details.
Relay output assignation. Refer to Section
5.9.3.7 for details.
Short Circuit Detection
A diode connected in series with input
contacts at the remote point will enable
the TX9042 PSC to detect and identify an
open short circuit connection in the sensor
connecting cable.
An open circuit cable connection such as a
severed cable will appear as an open input
contact, signifying an alarm in the normal
way. A short circuit connection such as a
crushed cable will short the diode that is
connected in series with the remote input
contact, initiating a Fault (F) indication and a
Fault channel signal.
www.trolex.com
TX9042-UM-EN-01 97
Signal Display
Input 1 - Input 2
Refer to Section 5.3 for details.
Input contact - Open: OP
Input contact - Closed: CL
Short circuit connection: Fault (*F)
Open circuit connection: Fault (*F)
Close-Up 1 Display
Refer to Section 5.5.1 for details.
Short Circuit and Open Circuit Detection
The module can be programmed to
individually identify both short circuit and
open circuit conditions. If a resistor is
also incorporated into the remote contact
connection, the TX9042 PSC will be able to
exclusively identify both failure modes of the
connecting cable conditions.
Signal Display
Input 1 - Input 2
Refer to Section 5.3 for details.
Input contact - Open: OP
Input contact - Closed: CL
Short circuit connection: Fault (*F)
Open circuit connection: Fault (*F)
98
TX9042-UM-EN-01
www.trolex.com
TX9042 User Manual
Close-Up 1 Display
Refer to Section 5.5.1 for details.
Press U or D to select the resistor state of
Yes or No as required.
Press R to confirm the selection.
5.9.9 Channel Display Mode
Where a channel is out of operation or a
system Fault has been diagnosed, the
channel can be de-activated. This will be
denoted on the Signal Display by Ch OFF.
Press U or D to navigate the Channel
Display Mode to On or Off as required.
Press R to confirm the selection.
Checkpoint
The channel input will now have no effect
on the two related set points SP1 and SP2
or the channel Fault signals.
www.trolex.com
TX9042-UM-EN-01 99
5.10Datacommunications
The TX9042 Programmable Sensor
Controller (PSC) is equipped with RS485
datacommunications.
5.10.1 RS485
The RS485 communications module can
be used for point to point or multidrop
data communications up to 2 km operating
distance.
Maximum total
cable length
2 km
Maximum no. of
TX9042 PSC
per System
11
End of Line
Resistance
120 ohm
(between B2 & B3)
1.5 mm2 with overall
screen 1.5 mm2 up to
2 km
Recommended
Cable Parameters
Sensor Controller
Datacomms
Module
•
1 twisted pair for
data
•
0V
•
Overall screen
RS485 (55) TX9042
Data Protocol - the communications format
setup can be individually programmed
through the keypad for PC system
compatibility and data protocol information
is available from the Trolex Technical
Department. Refer to Section 5.7.3 for
details.
100
TX9042-UM-EN-01
www.trolex.com
TX9042 User Manual
Checkpoint
When the data transmission system
extends into a safe area, it must be used
with an approved safety barrier to comply
with intrinsic safety regulations.
Please contact the Trolex Sales Team for
further information and advice on suitable
safety barriers. [email protected]
Up to 11 RS485 Communications Modules
may be daisy-chained together, terminals
B1 all linked together, terminals B2 all linked
together and terminals B3 all linked together.
These communications lines may be
connected to unspecified safe area
equipment via a suitable shunt zener diode
safety barrier. The cable parameters shall not
exceed the following:
C = 2.8 μF
L/R = 222 μH/ohm
Please contact the Trolex Sales Team for
further information and advice on suitable
shunt zener diode safety barriers.
[email protected]
www.trolex.com
TX9042-UM-EN-01 101
6.Maintenance
6.1 TX9042 PSC Planned
Preventative Maintenance
6.1.1 Introduction
To keep your TX9042 PSC in the best
possible condition and fully working, Trolex
strongly recommends that you carry out
regular planned preventative maintenance
and keep records of the maintenance carried
out.
The planned preventative maintenance for
the TX9042 PSC consists of tasks carried out
at regular intervals. The tasks are listed in the
maintenance schedule below:
Equipment Name
TX9042 PSC
TX9042 PSC Battery
TX9042 PSC - only to be carried out if
the TX9042 is installed in a SIL rated
system.
Task Type
Task
Number
Interval
Check
6.1.2
6 months
Replace
6.1.3
5 years
6.1.4
3 months
OR
12 months
Proof Test
6.1.2 TX9042 PSC - Check
Checkpoint
This maintenance task CAN be carried out
underground.
1. Check the TX9042 PSC enclosure is
securely attached. If the enclosure
is not securely attached, resecure as
necessary.
102
TX9042-UM-EN-01
www.trolex.com
TX9042 User Manual
2. Check the TX9042 PSC enclosure for
cracks, penetration, water ingress, signs
of having been struck or other damage.
Repair or replace the enclosure as
necessary.
3. Check that the TX9042 PSC is securely
attached to its enclosure. If the TX9042
PSC is not securely attached, resecure
as necessary.
4. Check the exterior of the TX9042 PSC for
cracks, penetration, water ingress, signs
of having been struck or other damage.
5. Check the LCD screen is clear, can be
easily read and is free from damage or
defect.
6. Check the LCD screen shows no short
circuit or open circuit conditions on any
of the 8 channels.
7. Check that the Keypad L, R, U and D
keys are free from damage or defect.
8. Check that the two terminal identification
labels are securely attached, legible and
free from damage or defect. Repair or
replace the two labels as necessary.
9. Check all wires connected to the
TX9042 PSC are secure within the
terminals. Tighten any loose terminals as
necessary.
10. If any part of the TX9042 PSC shows any
signs of damage, defect, deformation
or missing parts, immediately remove
it from service and replace it with
a working TX9042 PSC. Return the
defective TX9042 PSC to your local Trolex
service agent for repair and testing.
11. After the completion of all maintenance,
update the maintenance records.
www.trolex.com
TX9042-UM-EN-01 103
6.1.3 TX9042 PSC Battery
- Replace
Checkpoint
This maintenance task CANNOT be carried
out underground.
1. Remove the TX9042 PSC from service
and replace it with a working TX9042
PSC.
2. Return the TX9042 PSC to your local
Trolex service agent for battery
replacement and testing.
3. After the completion of all maintenance,
update the maintenance records.
6.1.4 TX9042 PSC - Proof Test
Checkpoint
This maintenance task CAN be carried out
underground.
Checkpoint
A Proof Test must be carried out at regular
intervals if the TX9042 PSC is being used
in a SIL rated system. The interval of 3
months or 12 months depends upon the
SIL rating and whether the safety function
is defined as Low or High Demand. See
Section 3 for further information.
1. Open the IP rated enclosure housing the
TX9042 PSC.
2. Establish which input channels have a
4 to 20 mA or 0.4 to 2 V input AND
are configured to de-energise an output
channel relay, and which output channel
relay it is. These are the input channels to
be proof tested.
104
TX9042-UM-EN-01
www.trolex.com
TX9042 User Manual
3. On one of the input channel(s) identified
in the previous step, connect an
Intrinsically Safe meter across the output
channel relay terminals. See section 4.5
for details of relay terminal locations.
Each relay has three terminals.
Relay shown de-energised
Checkpoint
Relay R1 - B7 common, B8 & B9
Relay R2 - B10 common, B11 & B12
Relay R3 - B13 common, B14 & B15
Relay R4 - B16 common, B17 & B18
4. The IS meter should be connected to
the common terminal and the higher
numbered terminal for the output
channel relay being tested.
Relay R1 - B7 and B9
Relay R2 - B10 and B12
Relay R3 - B13 and B15
Relay R4 - B16 and B18
5. On the first input channel to be proof
tested, apply a load or stimulus to the
sensor or detector. The load or stimulus
should be sufficient that it exceeds the
programmed setpoint level for that input
channel.
Checkpoint
How load or stimulus is applied to the
sensor or detector, is the responsibility
of the person responsible for SIL in the
location where the TX9042 is installed.
The determination of the correct load or
stimulus, and how this is applied to the
sensor or detector is beyond the scope of
this User Manual.
www.trolex.com
TX9042-UM-EN-01 105
6. As the load or stimulus exceeds the
alarm threshold, observe that the reading
on the IS meter fluctuates as the output
channel relay de-energises.
7. If the IS meter reading fails to fluctuate,
immediately remove the TX9042
PSC from service and replace it with
a working TX9042 PSC. Return the
defective TX9042 PSC to Trolex for repair
and testing.
8. Remove the load or stimulus from the
sensor or detector.
9. Reset the output channel relay.
10. Remove the IS meter connection from
the higher numbered terminal and
connect it to the middle numbered
terminal of the output channel relay
being tested.
Relay R1 - B8
Relay R2 - B11
Relay R3 - B14
Relay R4 - B17
11. Apply a load or stimulus to the sensor
or detector. The load or stimulus
should be sufficient that it exceeds the
programmed setpoint level for that input
channel.
12. As the load or stimulus exceeds the
programmed setpoint level observe that
the reading on the IS meter fluctuates as
the output channel relay de-energises.
13. Remove the load or stimulus from the
sensor or detector.
14. Reset the output channel relay.
15. Remove the IS meter connections from
the output channel relay terminals.
106
TX9042-UM-EN-01
Relay shown de-energised
www.trolex.com
TX9042 User Manual
16. Repeat the test for each input channel
that has a 4 to 20 mA or 0.4 to 2 V input
AND is configured to operate an output
channel relay.
17. If the IS meter reading fails to fluctuate
for any of the output channel relay
tests, immediately remove the TX9042
PSC from service and replace it with
a working TX9042 PSC. Return the
defective TX9042 PSC to Trolex for repair
and testing.
18. After the completion of all maintenance,
update the maintenance records.
6.2 TX9042 PSC - Repair
Should your TX9042 PSC become damaged
and require repair, immediately remove
it from service, replace it with a working
TX9042 PSC and contact your local Trolex
service agent to arrange repair.
Checkpoint
If your TX9042 PSC is used in a SIL rated
system it can only be repaired by Trolex.
6.3 Maintenance Records
Implement a planned preventative
maintenance process and keep good
maintenance records.
Consult your local Trolex service agent or
the Trolex Product Support Department:
[email protected] for help in
implementing a planned preventative
maintenance process. The Maintenance Log
gives an example of a typical maintenance
record system.
www.trolex.com
TX9042-UM-EN-01 107
6.4 Maintenance Log
Order Reference: TX9042 Programmable Sensor Controller
Serial Number:
Date Purchased:
Channel 1:
Channel 2:
Channel 3:
Channel 4:
Channel 5:
Channel 6:
Channel 7:
Channel 8:
Location:
Date
108
Maint
Task No.
Fault
TX9042-UM-EN-01
Action
Return
to Trolex
Comments
www.trolex.com
TX9042 User Manual
7.Disposal
Part of the ethos of Trolex is sustainable
design. TX9042 PSC contains materials that
can be recovered, recycled and reused.
At the end of its useful life ensure that the
TX9042 PSC is recycled in accordance with
local laws and bylaws for the geographic area
where it is located. The end of its useful life
is to be determined by the owner/operator of
the equipment and not Trolex.
Ensure that the TX9042 PSC is recycled
by a licenced waste handling organisation
with the appropriate licences for handling
electronic waste in the geographic area
where the TX9042 PSC is located.
Checkpoint
Consult your local Trolex service agent or
the Trolex Product Support Department if
you require assistance:
[email protected]
www.trolex.com
TX9042-UM-EN-01 109
Disclaimers
The information provided in this document contains general descriptions and
technical characteristics of the performance of the product. It is not intended as
a substitute for and is not to be used for determining suitability or reliability of
this product for specific user applications. It is the duty of any user or installer to
perform the appropriate and complete risk analysis, evaluation and testing of the
products with respect to the relevant specific application or use. Trolex shall not be
responsible or liable for misuse of the information contained herein. If you have any
suggestions for improvements or amendments, or find errors in this publication,
please notify us at [email protected].
No part of this document may be reproduced in any form or by any means,
electronic or mechanical, including photocopying, without express written
permission of Trolex.
All pertinent state, regional, and local safety regulations must be observed
when installing and using this product. For reasons of safety and to help ensure
compliance with documented system data, only Trolex or its affiliates should
perform repairs to components.
When devices are used for applications with technical safety requirements, the
relevant instructions must be followed.
Trademarks
© 2014 Trolex® Limited.
Trolex is a registered trademark of Trolex Limited. The use of all trademarks in this
document is acknowledged.
Document History
Issue 01 17 October 2014
Original publication of this document
Contact Details
Trolex Ltd, Newby Road, Hazel Grove, Stockport, Cheshire, SK7 5DY, UK
+44 (0) 161 483 1435 [email protected]
110
TX9042-UM-EN-01
www.trolex.com