1
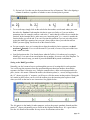
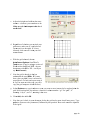
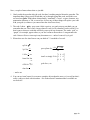
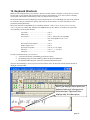
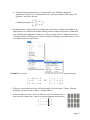
ADVANCED TECHNIQUES FOR USING EQUATION EDITOR AND MATHTYPE Presented by: Bob Mathews Director of Training Design Science, Inc. E-mail: [email protected] Phone: 830-990-9699 Welcomee to Advanceed Techniques for Usingg Equation Editor E and MathType. M This sesssion is design ned to help you y get the most m out of Equation E Edditor and MatthType – thee professioonal version of the Equattion Editor inncluded in Microsoft M Offfice. Ratherr than a compplete tutorial or o full trainin ng session, we w will use thhe allotted tiime to demoonstrate how to create mathemaatical expressions with thhese productts and how too best insertt them into Microsoft M Woord documennts, PowerPo oint presentaations and Web W pages. I hope many m of your needs will be b addressedd in this sessiion but if you need help in the futuree, the followingg sources aree available: 9 E Equation Ed ditor Tips & Tricks – The MathTyppe web site: www.dessci w .com, includdes E Equation Ediitor Tips & Tricks T to helpp get the moost out of thee junior versiion of MathT Type. A Although these were creaated with Equuation Editoor users in mind, m there arre tips approppriate foor the MathT Type user as well. Your email addresss will be yoour passwordd to access thhe page im mmediately. Visit as ofteen as you likke, as we addd more from time to timee. 9 Help H File – Both B productts have extennsive help filles. 9 U User Manual – MathTyppe comes witth a comprehhensive Useer Manual, annd many quuestions can n be answereed by referrinng to this maanual. Chaptter 4 of the MathType M U User m manual includ des 18 step-bby-step tutorrials to get you y started. 9 Tutorials T – There T are addditional tutorrials on our web site at www.dessci. w .com/tutoriaals. 9 H Handouts – Whenever W I present a sesssion like thhis one at a conference, I post my handout on ou ur web site for f a year. You Y can access this handoout and otheers at w www.dessci.c com/handou uts. 9 T Technical Su upport – Wee provide life fetime techniical support for MathTyppe. For technnical suupport: ¾ Phonee: 562-432-22920 ¾ Emaill: support@ @dessci.com ¾ Web: www.desscii.com (click one of the Support S linkss). A collection of “suppport noticees” at the sitee covers mosst topics for both Equation Editor annd MathTypee. Bob Matthews Director of Training [email protected] th Design Scieence, Inc. • 140 Pine P Avenue 4 Floor F • Long Beacch • California • 90802 • USA • 562.432.2920 5 • 56 62.432.2857 (fax x) • [email protected] • www.desscci.com With Equation Editor open, these menus are Equation Editor menus, not Word menus. 1. Setting Font Styles in Equation Editor (see p. 6 for MathType) Setting font styles & sizes in Equation Editor is a simple process. Follow these steps: 1. Open Equation Editor. 2. In the Style menu, click Define. 3. Set the styles to the desired font by using the drop-down lists. The styles Text, Function, Variable, Matrix-Vector, and Number may be set to whatever font you want. Normally these 5 styles are the same as each other, and the same as what you’re using in Word. CAUTION: These 3 styles must always be set to Symbol font: L.C. Greek, U.C. Greek, and Symbol. Failure to do this will cause unpredictable results. 2. Setting Font Sizes in Equation Editor Don’t change these styles! 1. Open Equation Editor. 2. In the Size menu, click Define. 3. Set the Full size to the same size as your text in Word. Use “pt” to denote points. Suggestion: Set the Full size in points, and the other sizes in percent. That way when you change the full size setting, you don’t need to change the others. They will retain the proper proportion. Use these percentage values as a guide; revise as desired: page 3 3. The e MathTy ype Toolbar (in Word) The MathhType toolbar contains 9 icons. The descriptionss below shouuld help youu decide wheen to use each of the iconss. Notice thhere are fourr Greek letterr Sigmas on the toolbar. Each of the Sigmas willl open MathhType and allow w you to inseert an equation into yourr document. The differennce between the Sigmas is in the placeement of the equation and its relationnship to the surrounding s text. – “Insert Inline Equation” E – Inserts I an eqquation inlinee with your text. t An inlinne equation beccomes part of o your paraggraph, and moves m with thhe text whenn you add or delete text. This 2 2 is an a example of o an inline equation: e a + b = c2 . – “Insert Display y Equation” – Inserts an equation e bellow the curreent line of teext, like this one: ( x, y ) ⎛ x + x2 y1 + y2 ⎞ =⎜ 1 , ⎟ 2 ⎠ ⎝ 2 Whhen MathTyp pe inserts a display d equaation, it centeers the equattion on the liine, and placces the cursor on th he line below w the equatioon, so that when w you close MathType, you’re reaady to continue c typiing. – “Insert Numbered N D Display Equaation” – Actss exactly like the previouus icon, exceept and w of thee two placces an equattion number either at thee left or rightt margin, deppending on which iconns you selecct. Here is a “Right-Num “ mbered Display Equationn”: y = 32 ssin ( x − 2π 3 )+2 (0.1) Whhen inserting g equation nuumbers, you can format them t howevver you wantt – with or witthout section n or chapter numbers, n wiith any kind of separatorr between thee numbers (ee.g., 1.1, 1-1, 1_1, ettc.), and with or withoutt any kind off brackets yoou choose. The nextt four icons on o the MathT Type toolbarr all have to do with equuation numbeers. Note thaat these are not problem m numbers, as a in a test orr quiz. Theyy are equation numbers liike you mayy see in a textbbook or in a journal j articcle when the author needds to refer to a particular equation number in i the text off the article. There are veery few timees when a priimary or seccondary schoool math teaccher would need n to num mber equationns. – “Insert Equatio on Number” – Inserts an equation nuumber at the current posittion of the currsor. This ico on is most offten used to add a an equattion numberr to a displayy equation thhat’s alreeady in yourr document. – “Insert Equatio on Referencee” – Inserts a reference inn the text of the document, and linkss the p equuation numbber. For exam mple, I may say somethinng like this: “In refeerence to a particular equuation (0.1) above, a the nuumber 2 indicates a vertical shift of 2 units up.” If I were to deccide I needed d a new num mbered equation above thhe current eqquation (1.1), the new equuation would d become (1..1), and the current c equaation would be b re-numbeered (1.2). Siince the reference I wrote w abovee is linked too this equatioon, it also chhanges to (1.22). page 4 – “Insert Chapter/Section Break” – Chapter and section numbers are not required when you’re numbering your MathType equations, but if you do use them, you’ll need to change the chapter or section number when you move to the next chapter or section. – “Update Equation Numbers” – This icon isn’t needed very often, because when you add an equation prior to an existing numbered equation, the equation numbers and references that follow the new equation are automatically updated, as I described above. When you remove an equation though, the numbers aren’t updated. (They may update when you save or print the document, depending on how you have your Word options set up.) Selecting this icon will update the equation numbers immediately. The last icon on the MathType toolbar doesn’t have anything to do with inserting equations or equation numbers; this icon affects the entire document. – “Export to MathPage” – This will transform the entire Word document into a nice-looking web page. For more information on exactly what happens when you click this icon, refer to Tutorial 14 in Chapter 4 of the MathType manual, as well as Chapter 6. page 5 4. Settting MatthType Fonts F & Sizes (tthe Style e and Siize menus) nt your equattions to matcch the text inn your docum ment, PowerP Point You mosst likely wan presentattion, or web page, so youu need to know how to change c the foonts & font sizes s in MathTyppe. The Stylee Menu – seetting the fonnts. You’lll see several style namees listed on thhe MathType Style menuu, but thhe one you’lll use most offten is calledd “Math”. Acctually, Matth isn’t a style of its own; it’s a combination c n of other styyles. MathTyype is smartt enough, forr example, too know that when w you’ree typing π sin ( 2 x ) , you proobably want the variablee and the low wer-case Greek letter to be italicizzed, but not the functionn name or thee number. Thhus, Type switchhes between Function, F Variable, Greeek-Symbol, and MathT Numbber styles as appropriate. (“Number”” isn’t a stylee you see onn the menuu, but it is a separate s stylee of its own,, as we’ll seee in a minutee.) To set alll this up, select “Define””, at the bottom of the menu. m When yoou select Deffine, you’ll see s another “dialog “ box””. (A “dialogg box”, or simply “ddialog”, is a window likee the one shown too the right wh here you cann select options and a settings.)) In the Deefine Styles dialog, d you’ll see a couple off “radio butttons” labeledd Simple and Advaanced. We’lll go over eacch of these. “Simple” is thee one you’ll use most ofteen. fo you chooose will be the font MathhType will use u In the sellection labeled “Primaryy font”, the font for text, function f nam mes, variablees, vector annd matrix nam mes, and num mbers. Norm mally you’ll want all of theese to be the same font, but b we’ll seee in a minute how to makke them diffeerent. You’lll probablyy want the Prrimary font to t be the sam me font you’rre using in your y documeent. MathTyppe doesn’t know k what fo ont you’re using u in yourr document, so it’s imporrtant to set itt here. The selecction labeled d “Greek andd math fonts” isn’t norm mally changedd. You’ll seee you have only o two optioons there any yway – “Sym mbol and MT T Extra” andd “Euclid Syymbol and Euuclid Extra””. You likelly won’t seee much differrence betweeen these twoo choices, soo leave it set as you see above. Notice thhe checkbox is already chhecked nextt to “Italic vaariables” andd “Italic lower-case Greeek”. That’s beecause in “sttandard” matthematics tyypesetting, thhat’s how theese items aree printed. It’s up to you thhough, so if you y want to uncheck u onee of these booxes, go for it. i At the low wer right off this dialog is i a final cheeckbox, labeled “Use forr new equations”. This iss checked by default, and a if you leave it checkked, all subseequent equattions you creeate will use page 6 me font settin ngs until youu change theem again. If you’re y just wanting w the next n equatioon to these sam have a ceertain speciaal look, but want w the rest of the equattions to lookk like the equuations beforre the one you’re y workiing on, uncheck this boxx. c After eveerything’s seet the way yoou want it, click OK andd the dialog closes. Define againn, and this Now clicck on Style/D time seleect Advanced d. You’ll seee the dialog that’s picctured to the right. This is i where youu would make m special settings, s likee if you wanted all a the numbeers in Arial and a the rest of the equuation in Tim mes New Rooman, for some reaason. Notice also the boxxes labeled Bold andd Italic. Checck or unchecck as desiredd. (By the way, w “L.C. Greek” G is low wer-case Greek. Guess G what “U U.C. Greek”” is?) User 1 annd User 2 sttyles are not normally used, butt when you need n them, thhey’re quite handy. One O example where you may m want too use a “Usser” style is if you’re disscussing the effect of a variable’s coefficient on o a graph w the stud dent to do soo), so you (or you want choose too have the vaariables in Times T New Roman R italic, but the coeefficient in Times T New Roman bold b italic. For F example,, I could say, “Describe the t effect onn the graph of o the functioon when thee value of a increases: i y = ax 2 + bx + c .” In this example, I used u User 2 style for thee coefficiennt a. The Sizee Menu – settting the sizees. Just likee MathType automaticallly changes thhe style depeending on thhe types off items contaained in yourr equation, itt also changees sizes. Forr most of your equatioons, you’ll juust leave thee size specifiication set too W you tyype an exponnent, MathTyype knows you y want it to t be “Full”. When smaller than the base, so it switcches to “Subbscript” size. Likewise, if s and want w to enter a summatioon you’re teeaching sequuences and series, templatee, MathTypee knows to crreate the Siggma symbol larger than the t surroundding variablees and numbbers, so it sw witches to “Symbol” sizee. Even thoough this sw witching is auutomatic, yoou still have control c overr what sizzes MathTyppe uses whenn it selects thhese special sizes. To speecify these sizzes, select “D Define” at thhe bottom off the Size meenu. page 7 The “Define Sizes” dialog is quite different from the Define Styles dialog. One of the major differences is the presence of a “preview window”. The preview window doesn’t show you the actual equation you may be working on, but it does give you an indication of what exactly will change if you change the setting that’s highlighted to the left of the preview window. For example, in the picture above, the only thing that will change in that sample equation when I change the “Full” size setting (notice the “12” is highlighted) is the X. In MathType, the size setting called “Full” is the setting that you want to be identical to the text size in your document. If you’re typing a test, and you’re using 11-pt type size, make sure the MathType “Full” size is set to 11-pt. Notice the rest of the sizes (except “Smaller/Larger Increment”) are specified as a percent. Percent of what? These are percentages of the “Full” size. The beauty of leaving these set as percentages is that once you set them, you never have to change them! If you change the Full size from 10-pt (like you may use in a quiz) to 32-pt (like you may use in PowerPoint or on an overhead transparency), you don’t have to change the other sizes because they’re still proportionally correct. If you want to set these other sizes as point sizes, you have that option, but chances are you won’t want to. (Notice there’s a User 1 and User 2 size. Use these similarly to the way you’d use a User 1 or User 2 style.) So, what’s a “Smaller/Larger Increment”? Notice back up on the MathType Size menu (pictured at the bottom of the previous page), two items near the bottom are labeled “Smaller” and “Larger”. If you want to make an item or items in your equation smaller or larger than the surrounding items in the equation, you can select them, and repeatedly select Smaller or Larger from the Size menu until you get the size you want. How much smaller or larger MathType makes them is determined by the “Smaller/Larger Increment” on the Define Sizes dialog. BEWARE – It’s generally not a good idea to highlight an entire equation and select Smaller or Larger, because the results will almost certainly not be what you wanted! (see below) If you want to increase or decrease the size of an entire equation, the best way to do it is by changing the Full size specification. You may want to deselect the “Use for new equations” checkbox. Example: 10-pt: x 2 ; 18-pt: x 2 ; 10-pt plus 8 “larger” applications: x2 Notice that the 18-pt expression is proportionally correct, but the 10-pt equation that was converted to 18-pt by repetitively clicking “larger” on the size menu has an exponent that is too large. That’s because both the base and the exponent are increased by 1-pt each time you click on “larger”. page 8 5. MathType Preference Files You naturally want your equations to match the text of your document, but you probably don’t always use the same font or same size font. MathType gives you a convenient way to change between fonts & sizes by letting you save these settings into a “preference file”. Let’s say you want to create your 7th Grade Math tests in 12-pt Times New Roman font, but you want to use 10-pt Arial for your 8th Grade Pre-AP Algebra tests. The first thing to do is to save “12-pt Times New Roman” as a “Preference File”. Those are the default settings when you install MathType, so chances are, that’s what’s set now. To save it, click on Preferences in the MathType menu bar. Now point to Equation Preferences, and another menu expands. In this menu, click on “Save to File…” In the next dialog, you’ll get a chance to name the preference file. Since it’s only a file like any other file, you can name it like any other file. Notice how the others are named though. They are named with the name and size of the font. That’s a good idea, because it helps you know what to expect when you select that particular preference file. After you type in a file name, click Save. Now that we have a preference file saved for 12-pt Times New Roman, change your style to Arial. (Remember, you do this in the Style menu by selecting the Define option at the bottom of the menu. Also recall that it’s easier if you select the “Simple” option.) Now change the “Full” size setting to 10. (This is in the Size menu, under Define.) Don’t change any of the other sizes. Now save the preference file and name it “Arial-10”, or another name of your choosing. (You don’t need to type in “eqp” after the file name; MathType will add that for you after you click Save.) So, what’s saved in a preference file? We’ve already seen two of the three categories of data that are saved in a preference file, but there is one more – spacing. Let’s say you’re looking at your superscripted numbers and variables, and you think the exponent needs to be a little closer to the base, and the numerator in your fractions is a little too close to the fraction bar. By exploring the menus, you stumble across something in the Format menu labeled “Define Spacing”. In this menu, you discover how to change your superscripts and fractions to look more like the examples below: to You change x 2 ⎯⎯ → x2 and 2 2 to ⎯⎯ → . 2 2 Any adjustments you make in the Define Spacing dialog are also saved to the preference file. page 9 6. Creating a blank grid for student graphing One of the most common questions we get is “Does MathType make graphs?” I always give a “qualified” answer to that question – No, MathType won’t graph a function, but you can make a blank grid for students to do the graphing. Note: There is a more detailed procedure for graphs and number lines on our web site. You can access this tutorial at www.dessci.com/en/support/mathtype/tutorials/mt_charts/tutorial.htm (This will be done using Equation Editor. If you are using MathType, the steps are similar.) a. In a Microsoft Word (the procedure may be adapted for other software), open Equation Editor From the Insert menu, and select Object. From the list, choose “Microsoft Equation”, and click OK. b. On the Matrix templates palette, select Variable-size matrix or table. You can look at the “Status Bar” – the very bottom of the Word or MathType window – to see what it is you’re pointing to: c. In the Matrix dialog, specify the size you want. You probably want a larger one than 6×6, but we’ll use this size as an example. The maximum size is 30×30, so if your axes will be in the center, that’s ±15 on both axes. Notice the comment at the bottom of the dialog: “Click between elements to add/change partition lines.” d. There are 4 types of lines: no line (the default), solid line, dashed line, and dotted line. You select the type of line by continuing to click in the same location (twice for dashed, etc.). If you put solid axes in the center of the grid, and dotted lines everywhere else, the screenshot to the left is what the dialog would look like when you’re through. Below is what the grid looks like in your finished test, quiz, or whatever (these are dotted lines except the axes). In MathType, the column and row specifications are in a different place, and there is a “Clear all lines” button, which is handy. You can also save the grid on the MathType toolbar, which you can’t do in Equation Editor. page 10 7. Changing Word defaults for menus & drawings (Windows) A couple of aggravating features of Word 2002 + (Office XP +) are related to the Word menus and creating drawings with the drawing toolbar. 1. The default is for Word’s menus to show only basic commands after you first install Office. As you work, the menus adjust to show only the items you’ve used most recently. If you wait a couple of seconds, the full menu appears. If you don’t want to wait, you can click the double chevron at the bottom of the menu. 2. To change this behavior to always show the full menus, click on Tools > Customize. On the Options tab, check the box next to “Always show full menus”. 3. The default for using the “AutoShapes” on the Drawing toolbar is for Word to create a “Drawing Canvas”, into which you’ll insert your drawings. If you don’t want the Drawing Canvas, you can change the default. 4. Click on Tolls > Options, and click on the General tab. Near the bottom of the tab, uncheck the box labeled “Automatically create drawing canvas when inserting AutoShapes”. 8. Nudging and the MathType Customizable Toolbars Nudging is a technique that can be accomplished in both Equation Editor and MathType, and is very useful in achieving perfect positioning for your equations. 1. For example, let’s say you’d like more space between an integral symbol and the limits of integration. We’ll add more space by nudging the limits to the right. 2. Select the upper limit. The most common method to select items is to drag the mouse across the item. For small items though, such as limits, subscripts, etc., it’s easier to use the Shift and arrow keys. With the cursor to either the left or right of the item you want to select, hold down the Shift key as you press the either the left or right arrow key, as appropriate. Release the Shift key after you’ve completed the selection. 3. Hold down the Ctrl key. Use the arrows on the keyboard to move the selected item(s) in the desired direction. ∞ ∞ ∫ f (x )dx ∫ f (x )dx before nudging after nudging 0 0 Note that not all printers will print the limits as tightly-spaced as the ones in the “before” example. You may have to experiment with nudging a bit in order to find the proper amount. page 11 If you’re using MathType, you can save the newly-nudged expression or equation to the toolbar. That way you don’t have to nudge it every time you use it: 9. Aligning items within an equation There are all sorts of things to align within an equation – the work shown below a dividend in a long division problem, equations in a system of equations, items in a pictogram, responses in a multiple-choice question, etc. We will look at two of these: systems and multiple-choice. Note: Even if you don’t teach the level of math requiring systems of equations, and even if you never create multiple-choice tests, the techniques learned here will still be useful to you. 9a. Systems of equations and inequalities a. There is no right or wrong way to “align” the equations in a system; it’s basically a matter of choice, and a matter of what your students can read the best. (For simplicity, we won’t specifically mention systems of inequalities, but these exact steps will work for those as well.) Here are 4 different scenarios: ⎧5x − 3 y = 6 ⎨ ⎩2 x + 7 y = 2 ⎧ 3x + 4 y + z = 17 ⎪ ⎨ 2 x + 3 y + 2 z = 15 ⎪ x+ y+ = 4 ⎩ =3 ⎧ x ⎪ =3 ⎨2 x + y ⎪ 3x + 2 y + z = 3 ⎩ ⎧x = 3 ⎪ ⎨2 x + y = 3 ⎪3 x + 2 y + z = 3 ⎩ 1 2 3 4 b. Systems 2 and 3 above present the greatest challenge, so let’s deal with system 2. c. In this system, we want to align the variables, the operation symbols (+, −, or =), and the sums so that they are vertically aligned with similar elements in the previous equation, and right-justified within each column (for example, z & 2z and 15 & 4 in system 2 above). d. There are many ways to align a system, but let’s just cut to the chase and say that using a matrix is the best way to do it. So, that established, what size? The obvious number of rows is a number equal to the number of equations. There are several choices for the number of columns, but the best balance between utility and ease of use is a number of columns equal to the number of equations plus one. So our matrix for system 2 above will be a 3×4. page 12 e. The first step is to insert the Left brace from the Fences palette on the Equation Editor or MathType toolbar. The icon you’re looking for on the Fences palette is this one: . (It’s in column 1, 4th from the bottom.) f. Next insert a 3×4 matrix by selecting “Variable-size matrix” from the Matrix templates palette, making sure to select Column align: Right in the Matrix dialog. g. Now you’re ready to insert the equations into the matrix, but how you do it is critical! Enter 3x + in the first cell, press Tab to go to the next cell, enter 4y +, press Tab, enter z =, press Tab, and enter 17 in the last cell. Pressing Tab once more gets you z = 17 down to the next row to begin entering the second equation. Enter ⎧⎪ 3x + 4 y + the next 2 equations similarly. This is how it should look when ⎨2 x + 3 y + 2 z = 15 ⎪ x+ you’re done (doesn’t look very pretty, does it?): y+ = 4 ⎩ So, how do you get the right amount of space where the “+” should be? In Equation Editor, your only choice is to add spaces. Problem is, 3 isn’t enough and 4 is too many. In MathType, there’s a more elegant (and more exact) way: insert a +, then color it white ! h. One more step, then we’re done. There’s a simple adjustment that lets us move the columns of the matrix closer together. On the Format menu, select Define Spacing. The third item from the top is what you want to adjust: Matrix column spacing. The normal setting is 100%. Since we want to decrease the spacing, we want a number smaller than 100%. (If the dialog is in the way and you can’t see your equations, place the mouse pointer on the title bar of the Spacing dialog and drag it away from your matrix so that you can see your entire system.) Try a spacing value of 50%, but don’t click OK yet. Watch your system of equations as you click Apply. If you like the results, click OK; if you need to decrease the spacing further, try a smaller number. (It’s easy to see how valuable the Apply button is. It’s a real time saver when compared to repetitively clicking OK each time, because once you click OK the dialog disappears. Also, it’s important that the percent symbol is selected in the dropdown box. You sure don’t want a spacing of 50 points or 50 inches!) i. After you settle on a value (my personal opinion is that 25% works best), either click in your document to close the Equation Editor window and go back to Word, or if you’re using MathType, simply close the MathType window (click the × in the upper right-hand corner). j. In MathType, you have two attractive options you don’t have in Equation Editor: ¾ You can save the matrix spacing to a preference file. This is a good idea, because you won’t want to use this tight matrix column spacing in a “regular” matrix, and this will give you an easy way to change back to your “systems of equations” settings. A MathType preference file holds information on fonts, sizes, and spacing. To save the preference file, go to the Preferences menu, scroll down to Equation Preferences, then choose Save to File. You can name the file anything you want, but here are some suggestions: Systems (if you always use the same font and size for your tests & quizzes); Systems-TNR, Systems-A, etc. (for tests written in Times New Roman, Arial, etc. font); Systems-A-10, Systems-A-12, etc. (for tests written in Arial 10pt, Arial 12pt, etc.). You get the picture. page 13 ¾ You can save a blank template for a 2-equation system, one for a 3-equation system, etc. to your MathType toolbar. The easiest way to do this is to delete everything out of the cells of the matrix in the system you just created, then highlight everything and drag it up to the toolbar: 9b. Multiple-choice responses a. There are many ways to type multiple choice responses for a test or quiz. You may create each choice as a separate equation (remember, we use the word “equation” to denote anything created with Equation Editor or MathType, regardless of whether or not it contains an equal symbol), or you could include all the responses in a single equation and arrange them in various ways. Two common ways to arrange the responses are to place them all on the same line of text or to put two responses on one line and two on another line. We’ll deal with the first option here. b. For this example, we’ll create the responses for this question: 1. Find the quotient: 1 32 ÷ 1 21 a. 2 35 b. 2 21 c. 1 91 d. 2 c. One option would be to type the question and all the responses as a single equation, but we’ll type the question text in Word and the division expression and responses in Equation Editor or MathType. We’ll type all 4 responses as one object. d. Assuming you’ve already typed the question, let’s work on the responses. Open Equation Editor as you normally would, either from the Insert menu or by clicking the icon on your page 14 Word toolbar. (This will be specifically Equation Editor. These steps will work, of course, in MathType as well, but there will be separate steps for MathType later.) e. We’re using Arial font and 11pt size, so adjust your Style and Size accordingly. If you don’t know how to do that, see the Equation Editor Help file, and look under “Applying Styles and Fonts in an equation | Change an Equation Editor style” and “Changing Mathematical Element Sizes in Equations | Change the definition of a mathematical element size in an equation”. Notice especially the Tip at the bottom of the discussion on size. The Tip doesn’t suggest what sizes to use, but I recommend 75% for Subscript/Superscript, and 50%, 150%, and 100% for the next 3. f. We want to space the responses uniformly, and the best way to do that is to use a matrix. This will be a 1-row, 4-column matrix, so go ahead and insert one of those in your document. g. Change to Text style, then type the letter a followed by two spaces. (Notice the space bar works just fine in Text style.) Change to Math style, then type 2 35 . When you type the fraction, be sure to use the Reduced-size vertical fraction, which is the one in the upper-right of the Fraction and radical templates palette. h. An easy way to keep from switching from Text to Math four times is to copy what you just typed (i.e., select the contents of the first cell with your mouse, then press Ctrl+C to copy). Now press Tab to go to the next cell, and paste the contents into that cell (Ctrl+V is the shortcut). Do the same with the remaining 2 cells, then edit the contents so that it looks similar to the above example. We’ll adjust the spacing in the next step. i. Since this is a matrix, and you already know how to adjust the column spacing in a matrix, go ahead and adjust it to see what looks best. (I think somewhere in the range of 300-400% looks best, but that’s just my opinion. Use whatever setting you like.) j. In MathType, you have another tool that makes it even easier to create multiple-choice responses, and easier to keep the spacing uniform from one question to the other. If you’re using MathType, click on the View menu and make sure there’s a checkmark by Ruler. k. Notice above the ruler there are 5 arrows. These arrows represent 5 types of tabs that are available in MathType. From left to right, these are: 1) Left-justified tab. This is the one selected in the screenshot below, and is the default. When you use a left-justified tab, the left edge of the text will be aligned at the tab. 2) Center-justified tab. The center of the text is aligned at the tab stop. 3) Right-justified tab. The right edge of the text is aligned at the tab stop. 4) Relational tab. Use this tab only with more than one line of characters within your equation. This will align equations or inequalities at any relational operator, such as ≠, ≥, ≡ , ∝ , and of course =. (Basically, it will align on the equal, greater than, or less than signs from the keyboard, plus anything on the Relational symbols palette.) page 15 5) Decimal tab. Use this one also for more than one line of characters. This is for aligning a column of numbers, regardless of whether or not a decimal point is present. l. To set a tab stop, simply click on the ruler below the number or tick-mark where you want the tab to be. Caution: Each template slot has its own set of tabs, so if you are inside a numerator slot (for example), and set a tab at the 1” mark, that tab will not be set outside the fraction! In the example above, make sure your “insertion point” (i.e., cursor) is outside the fraction before you set the tab. You won’t run into this problem if you set your tabs prior to typing the MathType equation, but you won’t always know where you want the tabs set before you start typing. Just be aware of this feature of tabs. m. For our example, since we’re using tabs to align the multiple-choice responses, we don’t need our 1×4 matrix. You can use the matrix if you want, of course, but you wouldn’t use both a matrix and tabs. n. One final point on tabs. You already know what the Tab key’s for when you’re typing in MathType; it’s to move from one template slot to another, or to move out of the template. To move to the next tab stop, you need to press the Ctrl+Tab keystroke combination. Saving to the MathType toolbar: Naturally you don’t want to have to go through the process of creating this for each question. You could copy the responses from one question and paste them into another, then edit the responses, but there’s an easier way. Using the example above, delete each response and in its place, insert a 1x1 matrix. Without the matrix, the insertion point (i.e., cursor) will appear after the “d.”, then to type the “a” response, you’d have to click the mouse in that position. Having the 1x1 matrix in place before you save it to the toolbar gives the insertion point a place to land when you click on the item to use it next time. See graphic below: The 1x1 matrix is also handy for other purposes, such as the generic quadratic formula and the generic 2nd degree polynomial you see saved on the Algebra toolbar above. It’s a good idea to save the 1x1 matrix to the toolbar for easy access for situations such as this. page 16 10. Using Word’s AutoCorrect Feature Some things you create with Equation Editor or MathType are repetitive – the grid discussed earlier, for example. If you’re creating a worksheet on graphing linear functions, you’ll quite likely have 10 or 20 of these, so it’s very useful to be able to insert a grid with just a few keystrokes – and without even opening up MathType! Note: There is a more detailed tutorial on our web site for using Word’s AutoCorrect and AutoText features. You can access this tutorial at www.dessci.com/en/support/mathtype/tutorials/autocorrect/tutorial.htm (This will be done using Equation Editor. If you are using MathType, the steps are similar. Since most of what we’ve done in this session has been done with Equation Editor, you may wonder what’s so much better about MathType? There’s a page later in the handout that discusses this.) Setting up AutoCorrect to Insert Equation Objects a. For the purpose of this mini-tutorial, we’ll use the grid created earlier. Insert the 6by-6 grid into your document: b. If it doesn’t appear to be perfectly square, you can make it square by clicking on it with your right mouse button, then selecting Format Object from the menu. If Format Object doesn’t appear on the right-click menu, select Object from Word’s Format menu. page 17 t the same c. Adjust the heightt and width to ver you wantt them to be. numbber – whatev Makee sure the Lo ock aspect ratio box iss unch hecked! d. Regaardless of wh hether you ree-sized your grid or o not, makee sure it’s stilll selected (as thhe one is to the t right). If it’s not selectted, click on nce on it withh your left mousse button. e. With the grid seleected, choosse Auto oCorrect Op ptions from Word’s W Tools s menu. (If you’re y usingg a version of Wordd earlier than n Word 20022 – the one that comes c with Office O XP – it will just say AutoCorrect A t.) f. Note the grid is already a in thee box w With:. If I it’s not underrneath the word there, then you diidn’t have it selected in step d above. Go back and repeat steps d & e. (You ( must do d it this wayy; you can’t copy the grid and d paste it intoo the box.) w codde you want to enter in Word W to be replaced r withh the g. In thee Replace box, type in whatever grid. More on thiis later, but I chose a shoortcut I couldd remember: “gr” for “grrid”, “6” m it haas axes. meanning “6-by-6”, and “a”, meaning h. Clickk Add, then click c OK. i. Now that you’re back in yourr document, delete the grid and try your y AutoCoorrect entry. Type gr6a (or whateveer code you entered, e folloowed by thee spacebar. Your Y code shhould be repllaced with a grid! page 18 Now, a couple of notes about what we just did: 1. I had you hit the spacebar after the code, but there’s nothing magical about the spacebar. The important thing is that you tell Word that you’re through typing that word, and in this case, our word was gr6a. Think about what normally “terminates” a word – a space character, any punctuation character, a Tab, or a new line. In fact, any of these things will replace your code with your grid (or whatever you entered into the AutoCorrect box). 2. The code I chose – gr6a – may seem a little cryptic to you, and you may not think you can remember that one. That’s fine; choose whatever code you’ll remember, but be careful! You don’t want to choose a word that will likely come up in any document. The words “grid” or “graph”, for example, appear often, so you don’t want to choose these. I can guarantee the code I chose will never come up in any document ever – unless I want a 6-by-6 grid. 3. What other uses for AutoCorrect can you think of ? I can think of several: sq2 for 2 2p/3 for 23π 1/8 for 18 , etc. limx0 for lim x→0 u238 for 238 92 U −b ± b 2 − 4ac qu or qform for 2a ⎡1 0 0 ⎤ imat3 or simply i3 for ⎢⎢0 1 0 ⎥⎥ ⎢⎣0 0 1 ⎥⎦ gr-th for θ , etc. xbar for x …and so on. 4. You can use AutoCorrect for even more complex objects than the ones we’ve used, but that’s really a subject to deal with elsewhere – like in the tutorial I mentioned that’s available on our web site! page 19 11. Template Replacement Sometimes you may finish typing an expression, then decide it would look better with a different template. Here are a couple of examples: 1. You’re working with quadratic equations, and type this equation: y= 1 2 3 2 x + x+ 2 2 3 You realize the equation would look better with smaller fractions. Rather than re-type it all, you should use template replacement. Here are the steps for template replacement: a. Select the first fraction: . b. While holding down the Ctrl key on the keyboard (Alt key for Equation Editor, Option key on the Macintosh), select the Reduced-size fraction template from the Fraction and radical templates palette, as shown to the right. c. Repeat for the remaining 2 fractions. y = 12 x 2 + 32 x + 32 2. You create an integral, and realize you should have specified an expanding integral: 1 ∫ 1 + x 2 dx = tan −1 x+c You remember reading in the MathType User Manual that if you hold down the Shift key while you select an integral template, it creates an expanding integral symbol. You also remember that holding down the Ctrl key allows you to replace one template with another. Holding down both the Ctrl and Shift keys (Macintosh, Option + Shift) lets you replace the integral with an expanding integral. NOTE: For template replacement, it’s important to select the entire template, but only the template (and the template contents) you wish to replace. page 20 12. Keyboard Shortcuts MathType was designed with a “point and click” interface. Find the symbol or template you need, click on it, and it becomes part of your equation. The program also has many keyboard shortcuts, so you can access the commonlyused symbols and templates without having to take your fingers off the keyboard. The keyboard shortcuts built in to MathType are listed in the Help file. You’ll find though, that most of the shortcuts are so intuitive that you can learn them quickly, and be able to use the software even more efficiently to create professional-looking documents. Many of the shortcuts used in MathType are “standard” shortcuts – such as CTRL+S for save, CTRL+C for copy, CTRL+V for paste, etc. (On the Mac, substitute the COMMAND key for the CTRL key.) Listed here are some of the most commonly-used keyboard shortcuts: Text mode ..................................................... CTRL+E Math mode .................................................... CTRL+= Greek letters .................................................. CTRL+G, followed by corresponding ...................................................................... letter of the alphabet (a for α, etc.) “Expanding” parentheses .............................. CTRL+9 Full-sized fraction template........................... CTRL+F Radical (square root) ..................................... CTRL+R Superscript (exponent) .................................. CTRL+H (“h” for “high”) Subscript ....................................................... CTRL+L (“ ” for “low”) Thin space ..................................................... CTRL+SPACE For more keyboard shortcuts, you can refer to • “Customize Keyboard” in the MathType Preferences menu • The MathType Help file under “MathType Reference/Keyboard Shortcuts.” • The Equation Editor Help file: “Reference Information/Keyboard Guide.” Also note that in MathType, when you point to an item with the mouse, the description and keyboard shortcut are displayed in the Status Bar: MathType displays description and keyboard shortcut information in the status bar. Equation Editor displays only the description. page 21 13. Making Changes to a Matrix Sometimes you may wish to modify an existing matrix. This may happen for any one of several reasons – you need to change the matrix dimensions, you need to change the column alignment, you need to add or remove partition lines, etc. We’ll first look at changing a matrix in Equation Editor, then see the additional matrix features in MathType. Example 1. You have this problem on a test: ⎡7 5⎤ ⎡1 2⎤ 4. Add the matrices: ⎢ ⎥=? ⎥+⎢ ⎣3 1⎦ ⎣3 4⎦ You’d like to make problem #5 a matrix multiplication problem, a 3x2 matrix multiplied by a 2x3 matrix. You decide to use the matrices from problem #4, and adjust the dimensions. Here’s what you need to do: 1. Copy the matrices from problem #4 and paste them into problem #5: ⎡7 5⎤ ⎡1 2⎤ 5. Multiply the matrices: ⎢ ⎥+⎢ ⎥=? ⎣3 1⎦ ⎣3 4⎦ 2. Now let’s change from addition to multiplication, and add a new row 3 to matrix 1 and a new column 3 to matrix 2. a. Double-click the matrices to open the problem in Equation Editor: b. Click inside matrix 1 so that the insertion point is flashing inside one of the matrix cells: Correct Incorrect! c. In the Format menu, click on Matrix: page 22 d. Change the matrix dimensions to 2 columns and 3 rows. Similarly, change the dimensions of matrix 2 to 3 columns and 2 rows. Insert the contents of the empty cells. Question 5 now looks like this: ⎡7 5 ⎤ ⎢ ⎥ ⎡1 2 5⎤ 5. Multiply the matrices: ⎢3 1⎥ ⎢ ⎥=? 3 4 6⎦ ⎢⎣2 4⎥⎦ ⎣ 3. Re-dimensioning a matrix in this way will always result in new columns being added to the right and new rows added to the bottom. Making a matrix smaller will remove columns and rows from the right and bottom, respectively. This is the only way to re-dimension a matrix in Equation Editor. MathType gives you more utility by allowing you to add or remove a row or a column anywhere in the matrix: Example 2. You need to add a partition line to a 3x4 matrix to make it an augmented matrix: ⎧ x − 2 y + 2z = 9 ⎪ ⎨− x + 3 y + = −4 ⎪ 2 x − 5 y + z = 10 ⎩ ⇒ ⎡ 1 −1 1 9 ⎤ ⎢ −1 3 0 −4 ⎥ ⎢ ⎥ ⎢⎣ 2 −5 1 10 ⎥⎦ 1. With your cursor inside one of the cells in the matrix, click on Format > Matrix. (If using MathType, click on Format > Matrix > Change Matrix.) 2. Click once between rows 3 & 4 for a solid line, twice for a dashed line, or three times for a dotted line: (Hint: use decimal alignment in the matrix.) ⎡ 1 −1 1 9 ⎤ ⎢ −1 3 0 −4 ⎥ ⎢ ⎥ ⎢⎣ 2 −5 1 10 ⎥⎦ page 23 If you have MathType, see if you can duplicate the equations below. If you don’t have MathType, this would be a good opportunity to download the evaluation version from the Design Science web site. Other uses of MathType that go “beyond the basics”… 1. Systems of equations. ⎧ 3 x + 4 y + z = 17 ⎪ ⎨2 x + 3 y + 2 z = 15 ⎪ x+ y+ = 4 ⎩ ⎧5x − 3 y = 6 ⎨ ⎩2 x + 7 y = 2 =3 ⎧ x ⎪ =3 ⎨2 x + y ⎪ 3x + 2 y + z = 3 ⎩ ⎧x = 3 ⎪ ⎨2 x + y = 3 ⎪3 x + 2 y + z = 3 ⎩ 2. Dimensional analysis. 1 min 30 mi 5280 ft 1 h ⋅ ⋅ ⋅ h 1 mi 60 min 60 sec = 44 ft sec V= or 1 min 30 mi 5280 ft 1 h ⋅ ⋅ ⋅ h 1 mi 60 min 60 sec = 44 ft sec V= 3. Step-by-step examples with comments. T f = Tr + (T0 − Tr ) e − rt T f = 160; Tr = 68°; T0 = 212°; and r = 0.21 160 = 68 + ( 212 − 68 ) e −0.21t 92 = 144e −.021t 92 = e −0.21t 212 ln 92 − ln144 = −0.21t ln 92 − ln144 =t −0.21 t = 2.13345106 Isolate the exponential expression. Take the natural logarithm of both sides. Calculation - ready form This is a good use of User 1 and User 2 styles and sizes (MathType only). This lets you use your normal font & size for the problem & solution, and a separate font & size for the notes. 4. Equations for Web pages. 5. Animated graphics for PowerPoint presentations or Web pages. 6. Chemistry notation. Ba(NO3 ) 2 (aq) + 2 NH 4 IO3 (aq) → Ba(IO3 ) 2 (s) + 2 NH 4 NO3 (aq) Solution Solution Pr ecipitate Solution Atomic orbitals 2p 2s ↑↓ ↑↓ ↑↓ ↑ ii :F i ii 1s + iH 2p 2s ↓ ⎯⎯ → ↑↓ Bonding orbital ↑↓ ↑↓ ↑↓ ii :F H ii page 24 What else can I do with MathType that I can’t do with Equation Editor? 1. MathType includes over 200 symbols and templates that are not included in Equation Editor. Some of these are shown here. (Many of these are currently available only in the Windows ∼ ≈ † version.) Examples: In addition, MathType 5 includes the ability to include a tilde, hat, arc, or harpoon (vector barb) over more than one character. It also includes cross-out templates for showing cancellation. Examples: AB inches 2. Color. MathType 5 lets you color all or part of an equation, or use multiple colors in a single equation. This is great for making captivating PowerPoint presentations or for printing color transparencies on an ink jet printer. Example: 1 5 2 1 5 2 5 7 = ⋅ + = + = Find the LCD: + x 2x 2 x 2x 2 x 2 x 2x Denominators in red. 3. Web publishing. MathType lets you save your equations as GIFs to use in your web documents. MathType 5 can also generate MathML – an XML application that is the W3C standard for publishing mathematics on the web. 4. Equation numbering. Not everyone needs to number equations or include references to equations in the text of a document. If you are a textbook author or write manuscripts for journal publication, you will appreciate the fact that MathType can number and reference your equations automatically when used with Microsoft Word. 2 6 5. Precise formatting ruler. You get a sophisticated word processor-like ruler for 3 12 ⋅ 22 = 3 42 precise formatting. Align columns at operators, decimal points; or set tab stops to make formatting easier and to give your documents a more professional look. This − 34 − 34 example cannot be duplicated exactly in Equation Editor for two reasons: cross-out templates, and ruler formatting (fractions aligned at right edge with a right2 34 justified tab). 6. New spacing adjustments possible: • Radical “check mark” width adjustment: • • • Subscript and superscript horizontal gap: x x x Slash and diagonal fraction gap: 1 2 12 1 2 Horizontal gap between fence templates (parentheses, brackets, braces, etc.) and their contents: ( x 2 − 4 ) ( x 2 − 4) ( x 2 − 4 ) • Stroke thickness for box lines, strike-throughs, radical signs, etc: 1 2 1 2 1 2 ⋅ ⋅ ⋅ 2 2 2 2 2 2 2 2 2 2 2 2 2 2 2 page 25