1
Linux
IBM Installation Toolkit User Manual
Linux
IBM Installation Toolkit User Manual
Note
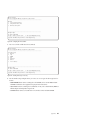
Before using this information and the product it supports, read the information in “Notices” on page 211.
First Edition (December 2010)
© Copyright IBM Corporation 2009, 2010.
US Government Users Restricted Rights – Use, duplication or disclosure restricted by GSA ADP Schedule Contract
with IBM Corp.
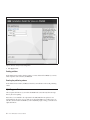
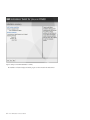
Contents
About this guide . . . . . . . . . . . v
Part 1. Installing Linux with the IBM
Installation Toolkit . . . . . . . . . 1
Chapter 1. Introducing IBM Installation
Toolkit, v4.2 . . . . . . . . . . . . . 3
Supported Linux distributions . .
Hardware and software requirements
IBMIT running modes . . . . .
IBMIT media contents . . . . .
.
.
.
.
.
.
.
.
.
.
.
.
.
.
.
.
.
.
.
.
.
.
.
.
3
3
4
5
Chapter 2. Obtaining and running the
IBMIT . . . . . . . . . . . . . . . . 7
Running IBMIT on a live system. . . . . . . . 7
Running IBMIT on an installed system . . . . . 9
Starting and accessing the Welcome Center . . . 10
Starting and accessing System tools . . . . . 10
Chapter 3. Actions available on a live
system. . . . . . . . . . . . . . . 13
Install a Linux distro . . . . .
Manually partitioning your disks .
Updating your firmware . . . .
Configuring the network . . . .
Using the IBMIT recovery console .
.
.
.
.
.
.
.
.
.
.
.
.
.
.
.
.
.
.
.
.
.
.
.
.
.
.
.
.
.
.
15
28
32
38
40
Chapter 4. Actions available on an
installed system: Welcome Center . . . 43
Installing IBM packages on the system .
Install or uninstall PowerVM Lx86 on the
Installing PowerVM Lx86. . . . .
Uninstalling PowerVM Lx86 . . . .
Manage repositories used by the system .
. . .
system.
. . .
. . .
. . .
.
.
.
.
.
46
54
59
66
69
Chapter 5. Actions available on an
installed system: System tools . . . . 75
Server Management tools . . . . . . . . .
Configure the boot server for IBM Installation
Toolkit . . . . . . . . . . . . . .
© Copyright IBM Corp. 2009, 2010
. 75
Manage client systems for the boot server . . . 82
Manage Linux installation repositories available
on the server . . . . . . . . . . . . . 95
IBM Server Consolidation tool. . . . . . . . 104
Server Consolidation tool environment . . . . 104
Performing a migration . . . . . . . . . 105
Chapter 6. Actions available on both
systems. . . . . . . . . . . . . . 127
Create an IBM Installation
key . . . . . . . .
Browsing documentation
Registering at IBM . .
Monitor tasks . . . .
Toolkit bootable USB
. . . . . . . .
. . . . . . . .
. . . . . . . .
. . . . . . . .
.
.
.
.
127
131
137
139
Chapter 7. Known issues and
workarounds . . . . . . . . . . . 145
Chapter 8. Troubleshooting . . . . . 147
Error, information, and warning messages .
.
.
. 147
Part 2. Appendixes . . . . . . . . 191
Appendixes . . . . . . . . . . . . 193
Tips on using IBMIT text mode user interface . .
How to get help from IBMIT community . . . .
Creating an assigning virtual CD/DVD devices to
an LPAR . . . . . . . . . . . . . . .
Associating an ISO image to a virtual CD/DVD
device of an LPAR. . . . . . . . . . . .
Configuring the boot method to be used by the
system . . . . . . . . . . . . . . .
Manually configuring the boot server for IBM
Installation Toolkit. . . . . . . . . . . .
Manually configuring a client machine for the
IBMIT boot server . . . . . . . . . . . .
Manually creating a network installation repository
193
193
194
196
203
207
208
208
Notices . . . . . . . . . . . . . . 211
Trademarks .
.
.
.
.
.
.
.
.
.
.
.
.
. 212
. 76
iii
iv
Linux: IBM Installation Toolkit User Manual
About this guide
This manual is intended for system/network administrators of POWER® systems who would like to
install Linux, update firmware, or execute diagnostics/recovery tools on their machines. This edition
applies to version 4.2 of the IBM® Installation Toolkit for Linux (formerly IBM Installation Toolkit for
Linux on POWER) and to all subsequent releases and modifications until otherwise indicated in new
editions.
Note: This manual does not reflect all of the technical changes for IBM Installation Toolkit for Linux
version 4.2. The final documentation will be delivered online at http://www14.software.ibm.com/
webapp/set2/sas/f/lopdiags/installtools/home.html.
Release Notes
IBM Installation Toolkit release notes can be found on the root directory of the DVD and at
http://www14.software.ibm.com/webapp/set2/sas/f/lopdiags/installtools/home.html
Support
You can find support information at: http://www-128.ibm.com/developerworks/forums/
dw_forum.jsp?forum=937&cat=72
Conventions
In this manual, IBM Installation Toolkit and IBMIT is an abbreviation of IBM Installation Toolkit for Linux.
Whenever this manual refers to a command, a system file, or directory, it is displayed with monospaced
font. Whenever a word or term requires special emphasis, it is displayed in italic.
© Copyright IBM Corp. 2009, 2010
v
vi
Linux: IBM Installation Toolkit User Manual
Part 1. Installing Linux with the IBM Installation Toolkit
The IBM Installation Toolkit for Linux (IBMIT) provides a set of tools and functions that simplifies the
installation of Linux on IBM Power Systems™.
© Copyright IBM Corp. 2009, 2010
1
2
Linux: IBM Installation Toolkit User Manual
Chapter 1. Introducing IBM Installation Toolkit, v4.2
The IBM Installation Toolkit for Linux provides a set of tools that simplifies the installation of Linux. The
toolkit gives you access to the IBM value-added software necessary to fully use the capabilities of the
Power platform.
Note: This manual does not reflect all of the technical changes for IBM Installation Toolkit for Linux
version 4.2. The final documentation will be delivered online at http://www14.software.ibm.com/
webapp/set2/sas/f/lopdiags/installtools/home.html.
The toolkit can also be used as a bootable rescue DVD to run diagnostic tools and repair previously
installed operating systems. You can also access IBM documentation for configuring and managing Linux.
The toolkit is provided as a bootable ISO image that can be burned on a DVD (boot servers from DVD
drive) or stored on a network boot server (boot servers from network).
After booting the server, you will be prompted to run the Welcome Center, the toolkit's main application.
This application provides a centralized interface that allows you to update firmware, run diagnostics and
recovery tools, prepare the server for Linux installation, and have access to Linux documentation.
You can use the toolkit for the following:
v Install and configure Linux on a non-virtualized Power server and with IBM RAS Tools
v Install and configure Linux on servers with previously configured Logical Partitions (virtualized
servers) and with IBM RAS Tools
v
v
v
v
v
v
Install IBM RAS Tools on a previously installed Linux system
Upgrade system firmware level on POWER machines
Perform diagnostics or maintenance operations on previously installed systems
Browse and search Linux documentation included on the Toolkit ISO
Migrate a LAMP server (software stack and application data) from a System x® to a System p® server
Install PowerVM™ Lx86 for Linux
Supported Linux distributions
Use this information to determine which Linux distributions are supported by the IBM Installation
Toolkit for Linux.
IBM Installation Toolkit supports installation of the following Linux distributions:
v
v
v
v
v
Red Hat Enterprise Linux 4 Update 7 and 8
Red Hat Enterprise Linux 5 Update 4 and 5
Red Hat Enterprise Linux 6 (GA)
SuSE Linux Enterprise Server 10 SP2 and SP3
SuSE Linux Enterprise Server 11 (GA) and SP1
Hardware and software requirements
Before you install the IBM Installation toolkit for Linux, verify that you have the necessary hardware and
software.
v Hardware requirements to use the IBM Installation Toolkit
– Supported system families
© Copyright IBM Corp. 2009, 2010
3
- OpenPower®
- POWER processor-based blade servers (IBM BladeCenter® JS12, JS20, JS21, JS22, JS23, and JS43
Express®)
- Power System servers
- Intellistation POWER 185 (ATX)
– Supported processor families
-
PPC 970
POWER5™
POWER5+™
POWER6®
POWER6+™
- POWER7®
– CD or DVD-ROM reader, for CD or DVD-based installations
– Network card, for installations over the network
– Minimum of 1 GB of RAM
– Additionally, refer to Red Hat Enterprise Linux or SLES documentation for their minimum hardware
requirements
v Requirements to install Linux using the toolkit
– Red Hat Enterprise Linux 4 or Red Hat Enterprise Linux 5 installation media if installing Red Hat
Enterprise Linux
– SLES 10 or SLES 11 installation media if installing SLES
v Requirements to run IBM Installation Toolkit's Welcome Center on a previously installed Linux system
– wui, wui-core, PAM-authenticate RPM packages, provided from the toolkit
– pam-devel RPM package, provided from the installation media of the selected Linux distribution
– SLES11 systems require the python-pam RPM package, provided from the installation media of the
distribution
– a graphical (Firefox) or text-mode (w3m or elinks) Web browser
Note:
v IBM Installation Toolkit does not support Qlogic FiberChannel cards on Power Architecture® blades
v IBM Installation Toolkit v4.1 does not support Multipath, LVM, or NPIV configurations.
IBMIT running modes
The IBM Installation Toolkit can run on two different environments: the live system and the installed
system. These two modes are explained in detail below.
Live System
The Live System is the IBMIT native environment that is used for tasks such as Linux installation, system
recovery, firmware update. The live system can be booted from a DVD-ROM, ISO image (for LPARs with
virtual DVD devices), network, or USB key. For information about how to run the live system, refer to
“Running IBMIT on a live system” on page 7.
Installed System
The Installed System is a running Linux system (that was either installed with IBMIT or previously
installed) with the IBMIT package(s) installed. For information about how to run IBMIT on an installed
system, refer to “Running IBMIT on an installed system” on page 9.
4
Linux: IBM Installation Toolkit User Manual
IBMIT media contents
The IBM Installation Toolkit media contains documentation, firmware images, and value-added IBM
packages.
The list of packages available in the media includes the following:
v csm.client and csm.core: The CSM packages provide for the exchange of host-based authentication
security keys. These tools also set up distributed RMC features on the Hardware Management Console
(HMC).
v devices.chrp.base.ServiceRM: Service Resource Manager is a Reliable, Scalable, Cluster Technology (RSCT)
resource manager that creates the Serviceable Events from the output of the Error Log Analysis tool
(diagela). ServiceRM then sends these events to the Service Focal Point™ on the Hardware Management
Console (HMC).
v diagela: The Error Log Analysis tool provides automatic analysis and notification of errors reported by
the platform firmware on IBM eServer™ pSeries® systems.
v DynamicRM: Dynamic Resource Manager is a Reliable, Scalable, Cluster Technology (RSCT) resource
manager that allows a Hardware Management Console (HMC) to do tasks such as dynamically add or
remove processors or I/O slots from a running partition, concurrently update system firmware, and
perform certain shutdown operations on a partition.
v IBMinvscout: The Inventory Scout tool surveys one or more systems for hardware and software
information. The gathered data can be used by Web services such as the Microcode Discovery Service,
which generates a report indicating if installed microcode needs to be updated.
v ibm-java2-ppc64-sdk: IBM 64-bit SDK for Linux on iSeries® and pSeries, Java 2 Technology Edition,
Version 5.0.
v ibm-java2-ppc-sdk: IBM 32-bit SDK for Linux on iSeries and pSeries, Java 2 Technology Edition, Version
5.0.
v ibm-java-ppc64-sdk: IBM 64-bit SDK for Linux on pSeries architecture, Java Technology Edition, Version
6.
v ibm-java-ppc-sdk: IBM 32-bit SDK for Linux on pSeries architecture, Java (TM) Technology Edition,
Version 6.
v iSeries Access: IBM i Access for Linux allows you to access the DB2® for i using its ODBC Driver and to
establish a 5250 session to an IBM i from a Linux client.
v JTOpen: Open source Version of the IBM toolbox for Java. The IBM toolbox for Java is a library of Java
classes supporting the client/server and Internet programming models to an iSeries or AS/400®
system.
v JTOpen-doc: Documentation for JTOpen package
v librtas: The librtas package contains a library that allows applications to access certain functionality
provided by platform firmware. This functionality is required by many of the other higher-level service
and productivity tools.
v libservicelog: A library that provides the API by which Servicelog stores, retrieves, and modifies system
event and error notification details.
v libvpd: The libvpd package contains the classes that are used to access a vpd database created by
vpdupdate in the lsvpd package.
v lop-docs: This package contains all of the Redbooks®, Whitebooks and other Linux on Power Systems
Servers documentation from IBM.
v lsvpd: The lsvpd package contains the lsvpd, lscfg, and lsmcode commands. These commands, along
with a boot-time scanning script called update-lsvpd-db, constitute a hardware inventory system.
v nmon: Performance Analyzer for Linux on Power Systems Servers.
v openmpi / openmpi-sles10 / openmpi-sles11: Open MPI is a project combining technologies and resources
from several other projects (FT-MPI, LA-MPI, LAM/MPI, and PACX-MPI) in order to build the best
MPI library available.
Chapter 1. Introducing IBM Installation Toolkit, v4.2
5
v PAM-authenticate: Check authentication using PAM (Pluggable Authentication Modules) for
WelcomeCenter and SystemTools.
v powerpc-utils-sles10-addons: Additional utilities for maintaining and servicing PowerPC® systems on
SLES10.
v ppc64-diag: The Error Log Analysis tool provides automatic analysis and notification of errors reported
by the platform firmware on IBM eServer pSeries systems.
v pseries-energy: pSeries Energy Management daemon automatically manages Linux OS settings based on
system power modes.
v rsct.core and rsct.core.utils: The RSC packages provide the Resource Monitoring and Control (RMC)
functions and infrastructure needed to monitor and manage one or more Linux systems.
v sct-pexpect: Custom Python Expect module used by Server Consolidation tool
v sct-post: Server Consolidation tool Post-Install scripts
v servicelog: The Service Log package creates a database to store system-generated events that may
require service. The package includes tools for querying the database.
v sg3_utils-devel: This package contains the static sg3_utils library and its header files.
v src: SRC is a facility for managing daemons on a system. It provides a standard command interface for
defining, undefining, starting, stopping, querying status and controlling trace for daemons.
v systools: SystemTools provides a set of utilities for configuring a network boot server for the IBM
Installation Toolkit, managing distros and IBM Packages repositories, and managing clients registered
for booting the IBMIT live system.
v wui: This package provides the IBM Installation Toolkit Welcome Center.
v wui_core: The core package is used by both the Welcome Center and System tools. It provides the
necessary files for these two packages to run.
v xconfig: This package is used to configure the X System when SuSE boots for the first time.
6
Linux: IBM Installation Toolkit User Manual
Chapter 2. Obtaining and running the IBMIT
This section explains all of the steps needed to have IBM Installation Toolkit (IBMIT) up and running so
that you can start using it.
IBM Installation Toolkit is available for download from IBM's Web site at http://
www14.software.ibm.com/webapp/set2/sas/f/lopdiags/installtools/.
Running IBMIT on a live system
This section explains how to get IBMIT live system up and running.
In order to run the live system, download the IBMIT media and boot a machine with it. Various boot
methods can be used: CD/DVD-ROM boot, IBMIT ISO image directly, network-based boot or USB device
boot. After the boot process is completed, choose if you want to use the IBMIT live system user interface
or the recovery console.
To learn more about the steps described above, consult these sections:
v “Configure the boot server for IBM Installation Toolkit” on page 76
v “Manage client systems for the boot server” on page 82
v “Create an IBM Installation Toolkit bootable USB key” on page 127
v “Configuring the boot method to be used by the system” on page 203
v “Creating an assigning virtual CD/DVD devices to an LPAR” on page 194
v “Associating an ISO image to a virtual CD/DVD device of an LPAR” on page 196
Booting from CD/DVD-ROM
To
1.
2.
3.
boot from a DVD disk, follow these steps:
Burn the IBMIT ISO image onto a DVD disk
Ensure the IBMIT DVD disk is in the CD/DVD-ROM drive of the machine you want to boot
Restart the system or power it on
4. Configure the system to boot from the CD/DVD-ROM drive and proceed
Booting from the ISO image directly
This type of boot is possible only with LPARs that can have virtual CD/DVD devices assigned to it.
To
1.
2.
3.
4.
boot directly from the IBMIT ISO image, follow these steps:
Create a new CD/DVD virtual device and assign it to the LPAR you want to boot with IBMIT
Associate the IBMIT ISO image with that CD/DVD virtual device
Restart the LPAR or power it on
Configure the LPAR to boot from the CD/DVD virtual device and proceed
Booting from the network
To boot IBMIT from the network, follow these steps:
1. Configure a network boot server for IBMIT
2. Configure the boot server for the machine to boot from it
© Copyright IBM Corp. 2009, 2010
7
3. Restart the system or power it on
4. Configure the system to boot from the network interface and proceed
Booting from USB
To
1.
2.
3.
boot IBMIT from a USB key, follow these steps:
Create an IBM Installation Toolkit bootable USB key
Restart the system or power it on
Configure the system to boot from the USB device and proceed
Choosing what to do on the live system
After the live system is booted, choose if you want to use the IBMIT live system user interface or the
recovery console. A screen with a menu will be presented. Choose what you want by pressing the
number corresponding to one of the options and press Enter.
The following options are available:
1. Wizard mode (performs the installation): Choose this option to use the live system user interface. It
will be presented in the console (text mode) and you will be able to perform a Linux installation or
any of the other tasks described in Chapter 3, “Actions available on a live system,” on page 13.
2. Wizard mode graphical (using X): Choose this option to use the live system user interface. This
interface is the same as the previous, but in graphical mode. This option is only available on systems
that have a graphical card.
3. Rescue mode (initiates a terminal): Choose this option to use the recovery console. You will have
access to a Linux console to perform recovery tasks, as described in “Using the IBMIT recovery
console” on page 40.
******* WELCOME TO IBM INSTALLATION TOOLKIT *******
** Machine IP address is: 192.168.1.54 **
If you want to connect to Welcome Center froma remote browser, you **must** sta
rt the Wizard mode first. Web-based applications will be displayed in your remot
e browser, but all non web-based applications will be displayed in the text-mode
display.
Please choose one of the options below:
1 - Wizard mode (performs installation)
2 - Wizard mode graphical (using X)
3 - Rescue mode (goes to terminal)
Option:
Accessing the user interface in text mode
If you choose to use the live system user interface in text mode, the text mode client will be opened and
you will be asked to accept a self-signed SSL certificate. The following messages will be shown:
self signed certificate: accept? (y/n)
Bad cert ident 143.106.167.133 from localhost: accept? (y/n)
Press y to accept each of them and proceed to the user interface
Accessing the user interface in graphical mode
If you choose to use the live system user interface in graphical mode, Mozilla Firefox will be opened and
you may be asked to accept a self-signed SSL certificate. You need to accept it to proceed.
8
Linux: IBM Installation Toolkit User Manual
Remotely accessing the user interface
If you choose to use the live system user interface, in text or graphical mode, you will also be able to
remotely access it. In order to do that, open Mozilla Firefox in any machine of your network and point it
to https://<machine IP>/. Replace <machine IP> by the machine IP address shown in the screen Live
system start menu. Mozilla Firefox may ask you to accept a self-signed SSL certificate. You need to accept
it to proceed.
Running IBMIT on an installed system
This section explains how to run IBMIT on a running Linux system.
If you are running a system which was installed without the IBM Installation Toolkit, first you must
install the necessary packages. For a system installed using the IBM Installation Toolkit, the packages are
already available and you can skip the instructions in the next section.
Note: On a system installed using the IBM Installation Toolkit, you may have not chosen to install the
systools package during the wizard process. If so and you intend to use it, use the tool “Installing IBM
packages on the system” on page 46 from Welcome Center to install the package.
For the following instructions, these conventions apply:
1. <isofile> is the IBMIT ISO image file
2. <mountdir> is the directory where the IBMIT ISO image or DVD will be mounted
Install IBMIT on Red Hat Enterprise Linux 4 system
1. Ensure that you have the text-mode browser Elinks installed.
2. Install the pam-devel (ppc version only, ppc64 not needed) package that is provided by the distro.
3. Install IBMIT by running the following commands:
$ mount -o loop -t iso9660 <isofile> <mountdir>
$ rpm -ivh <mountdir>/RedHat/RPMS/wui-4.1-1.noarch.rpm \
<mountdir>/RedHat/RPMS/wui_core-4.1-1.noarch.rpm \
<mountdir>/RedHat/RPMS/PAM-authenticate-2.0-2.ppc64.rpm \
<mountdir>/RedHat/RPMS/systools-4.1-1.noarch.rpm \
<mountdir>/RedHat/RPMS/sct-pexpect-2.1-1.noarch.rpm
$ umount <mountdir>
Install IBMIT on Red Hat Enterprise Linux 5 system
1. Ensure that you have the text-mode browser Elinks installed.
2. Install the pam-devel (ppc version only, ppc64 not needed) and yum-utils packages that are provided by
the distro.
3. Install IBMIT by running the following commands:
$ mount -o loop -t iso9660 <isofile> <mountdir>
$ rpm -ivh <mountdir>/RedHat/RPMS/wui-4.1-1.noarch.rpm \
<mountdir>/RedHat/RPMS/wui_core-4.1-1.noarch.rpm \
<mountdir>/RedHat/RPMS/PAM-authenticate-2.0-2.ppc64.rpm \
<mountdir>/RedHat/RPMS/systools-4.1-1.noarch.rpm \
<mountdir>/RedHat/RPMS/sct-pexpect-2.1-1.noarch.rpm
$ umount <mountdir>
Install IBMIT on SLES10 system
1. Ensure that you have the text-mode browser w3m installed.
2. Install the pam-devel, python-openssl, and python-xml packages that are provided by the distro.
Chapter 2. Obtaining and running the IBMIT
9
3. Install IBMIT by running the following commands:
$ mount -o loop -t iso9660 <isofile> <mountdir>
$ rpm -ivh <mountdir>/suse/noarch/wui-4.1-1.noarch.rpm \
<mountdir>/suse/noarch/wui_core-4.1-1.noarch.rpm \
<mountdir>/suse/ppc64/PAM-authenticate-2.0-2.ppc64.rpm \
<mountdir>/suse/noarch/systools-4.1-1.noarch.rpm \
<mountdir>/suse/noarch/sct-pexpect-2.1-1.noarch.rpm
$ umount <mountdir>
Install IBMIT on SLES11 system
1. Ensure that you have the text-mode browser w3m installed.
2. Install the python-pam and python-xml packages that are provided by the distro.
3. Install IBMIT by running the following commands:
$ mount -o loop -t iso9660 <isofile> <mountdir>
$ rpm -ivh <mountdir>/suse/noarch/wui-4.1-1.noarch.rpm \
<mountdir>/suse/noarch/wui_core-4.1-1.noarch.rpm \
<mountdir>/suse/ppc64/PAM-authenticate-2.0-2.ppc64.rpm \
<mountdir>/suse/noarch/systools-4.1-1.noarch.rpm \
<mountdir>/suse/noarch/sct-pexpect-2.1-1.noarch.rpm
$ umount <mountdir>
Starting and accessing the Welcome Center
After the packages are installed, the next step is to start the IBMIT Welcome Center.
If the system was installed with support for the X Window System, then you can access the Welcome
Center by clicking on the desktop icon or using system's menu. Otherwise, you will always be able to
run the Welcome Center in the shell by issuing the following command:
$ welcomecenter
The Welcome Center is started along with a text mode browser. Then, you are asked to accept a
self-signed certificate. Click 'y'. At this point, you can choose either to access the Welcome Center using
the text mode already opened or using the graphical mode. In order to use the graphical mode, open a
Mozilla Firefox browser in your machine and point it to the address https://<machine IP>:4234, where
<machine IP> is the IP address or host name of the server where the Welcome Center was started. The
first time you use Firefox, you will be asked to accept the self-signed certificate. Remember to accept it to
proceed.
For information about how to use the Welcome Center on an installed system, refer to Chapter 4,
“Actions available on an installed system: Welcome Center,” on page 43.
Starting and accessing System tools
After you have installed the necessary packages, you can start and access the System tools.
To start System tools, type the following command in the shell:
> systemtools
System tools function is then started and differently from Welcome Center, there is only the graphical
mode available. In order to access it, open a Mozilla Firefox browser in your machine and point it to the
address https://<machine IP>:8080, where <machine IP> is the IP address or host name of the server
where System tools was started. The first time you use Firefox, you will be asked to accept the self-signed
certificate. Accept it to proceed.
10
Linux: IBM Installation Toolkit User Manual
For information about using System tools, refer to Chapter 5, “Actions available on an installed system:
System tools,” on page 75.
Chapter 2. Obtaining and running the IBMIT
11
12
Linux: IBM Installation Toolkit User Manual
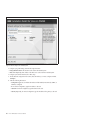
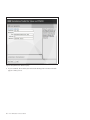
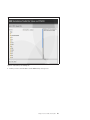
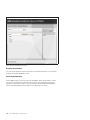
Chapter 3. Actions available on a live system
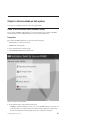
After booting your machine with IBMIT, you can work with the IBMIT Live System.
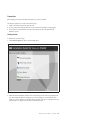
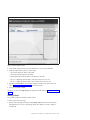
After you access the IBMIT Live System, you will be presented to a menu similar to this window:
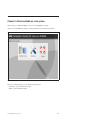
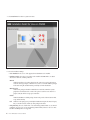
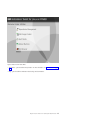
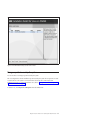
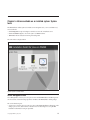
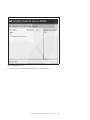
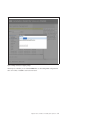
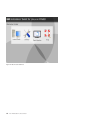
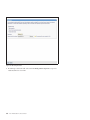
Figure 1. Live system main menu
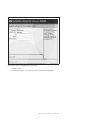
On the Live system main menu, you can select the following options:
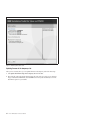
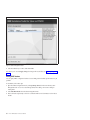
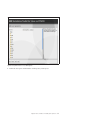
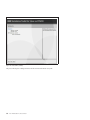
v Install Linux - opens the Install Linux function
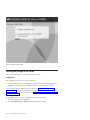
v Utilities - opens the Utilities submenu:
© Copyright IBM Corp. 2009, 2010
13
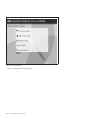
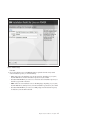
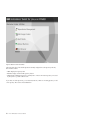
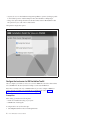
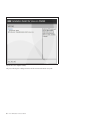
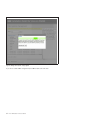
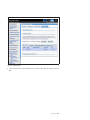
Figure 2. Live system utilities menu
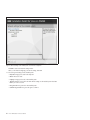
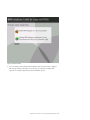
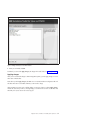
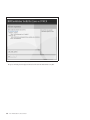
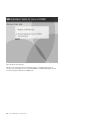
v Help - opens the help and documentation submenu:
14
Linux: IBM Installation Toolkit User Manual
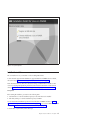
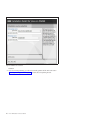
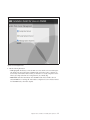
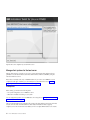
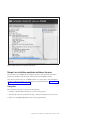
Figure 3. Live system help menu
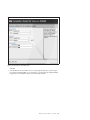
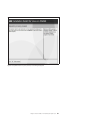
Install a Linux distro
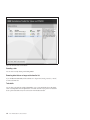
This tool installs Linux on your machine as well as installing IBM software.
To learn about the supported Linux distributions, supported hardware and IBMIT software available,
refer to the section Chapter 1, “Introducing IBM Installation Toolkit, v4.2,” on page 3.
Note: This manual does not reflect all of the technical changes for IBM Installation Toolkit for Linux
version 4.2, including LVM partitioning and Driver disks. The final documentation will be delivered
online at http://www14.software.ibm.com/webapp/set2/sas/f/lopdiags/installtools/home.html.
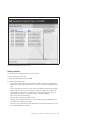
Prerequisites
Before starting the installation, you must have the following items:
1. CD/DVD disks or a network installation repository for the Linux distro to be installed
2. DVD disk, USB key, or a network installation repository for IBMIT
You can create network installation repositories for both the distro and IBMIT with the tool “Manage
Linux installation repositories available on the server” on page 95. You can create an IBMIT USB key with
the function “Create an IBM Installation Toolkit bootable USB key” on page 127.
To install Linux on your machine, follow these steps:
Chapter 3. Actions available on a live system
15
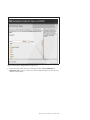
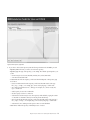
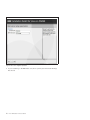
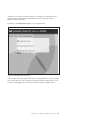
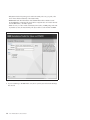
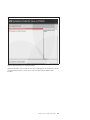
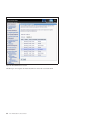
1. Select Install Linux from the Live system main menu.
Figure 4. Live system main menu
2. Choose the installation settings:
v Linux distribution: Choose one of the supported Linux distributions to be installed.
v Installation Profile: Choose the set of packages to be installed. Click More info to see details
about each of them. The available profiles are:
Minimal
Installs the smallest set of packages that allows the system to boot and to perform basic
tasks. The disk usage is kept to a minimum. You can choose to install additional packages
in the future using the standard method provided by each Linux distribution.
Minimal with X
Installs all the packages included in Minimal but also installs the X Window System, a
graphical environment that runs on Linux. This option is useful for servers that have a
graphics card, but still have storage space restrictions.
Default
Installs the distribution's default package selection and provides a balance between disk
usage and functionality.
Installs all of the package sets provided by the distribution. Requires the most disk space,
but you should not need to install any other package in the future.
v Disk partitioning: Choose to install Linux on an automatically partitioned disk or to use manual
partitioning. If you choose to use an automatically partitioned disk, all data in it will be lost. Note
that NPIV and Multipath are not supported.
Full
16
Linux: IBM Installation Toolkit User Manual
Figure 5. Installation settings
Click Next.
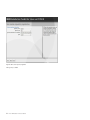
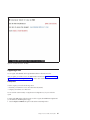
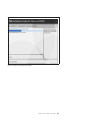
3. Choose the installation sources. Click Refresh sources to update the list with a newly-created
network installation repository or an inserted USB key.
v Distro source: Choose the installation source for the Linux distro. Depending on your system,
CD/DVD-ROM devices and network installation repositories may be available.
v Use custom network URL: If you want to use a Linux distro network installation repository not
listed above, type its URL in this field.
v IBMIT source: Choose the installation source for the IBM packages. Depending on your system,
CD/DVD-ROM devices, USB key devices, and network installation repositories may be available.
v Use custom network URL: If you want to use an IBM packages network installation repository
not listed above, enter the URL in this field.
Chapter 3. Actions available on a live system
17
Figure 6. Installation sources selection
Click Next.
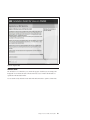
4. If you chose manual partitioning, you will need to manually partition the disk. Refer to the section
“Manually partitioning your disks” on page 28 for details about accomplishing this task.
18
Linux: IBM Installation Toolkit User Manual
Figure 7. Manual disk partitioning
Click Next.
5. Configure the network for the installed system. You will need to configure global network settings as
well as a network interface.
Chapter 3. Actions available on a live system
19
Figure 8. Network settings for the installed system
To configure your global settings, enter the following information:
v Fully qualified hostname: The hostname to be used in the installed system.
v DNS server: Optionally, the IP address of the DNS server to be used in the installed system.
To configure your network interface, follow these steps:
a. On the Network configuration main screen, select the interface you want to configure and click
Configure.
b. Enter the following information:
v Configuration type: Choose whether the interface will be Disabled, Automatic-ally (DHCP) or
Manual-ly configured.
v IP: For manual configuration, type the IP address to be used.
v Netmask: For manual configuration, type the netmask to be used.
v Gateway: Optionally, for manual configuration, type the IP address of the gateway to be used.
20
Linux: IBM Installation Toolkit User Manual
Figure 9. Network settings for the installed system: configure interface
c. Click Save to finish.
You can check the configuration of a network interface by selecting it and clicking Details.
Chapter 3. Actions available on a live system
21
Figure 10. Network settings for the installed system: check interface configuration
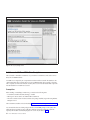
Click OK to return to the Network setting window.
When you are finished configuring your network settings, click Next.
6. Choose the general settings for the installed system:
v Keyboard: Language to be used for the keyboard.
v Mouse: Mouse to be used.
v Language: Language to be used on the installed system.
v Timezone: Timezone to be used for the time and date settings on the installed system. Check Use
UTC if you want to use UTC.
v Root password: Root password for the installed system.
v Confirm root password: Root password again to confirm it.
22
Linux: IBM Installation Toolkit User Manual
Figure 11. General settings for the installed system
Click Next.
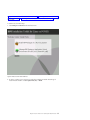
7. Select the IBM software to be installed. You can see the packages that belong to a specific category
by selecting it and clicking Apply. You can see details for a specific package by clicking See details.
Packages that are unavailable for selection will be automatically installed.
Chapter 3. Actions available on a live system
23
Figure 12. IBM packages to be installed
Click Next.
8. Accept the licenses for the IBM software to be installed by checking I accept all the licenses above.
You cannot proceed without accepting all of them. For each license, click Read license to learn more
about it.
24
Linux: IBM Installation Toolkit User Manual
Figure 13. IBM packages licenses
Click Next.
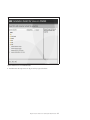
9. Confirm the chosen Linux installation settings, the IBM software to be installed, and the partitions to
be deleted and formatted. If you are sure this action is what you want, click Next to start the
installation process.
Chapter 3. Actions available on a live system
25
Figure 14. Summary
10. If you chose to install the Linux distro from CD/DVD-ROM, you will be asked to insert the first
disk to proceed.
26
Linux: IBM Installation Toolkit User Manual
Figure 15. Insert CD/DVD media
The beginning of the installation process will be shown until the system reboots. After that, you can
watch the terminal of the system to see the installation progress.
Chapter 3. Actions available on a live system
27
Figure 16. Installation progress
Manually partitioning your disks
This topic explains how to manually partition your disks to have Linux installed on them.
Note:
v This version of IBMIT does not support partitions under LVM.
v All of your LVM partitions will be erased in a SLES installation
v NPIV and Multipath are not supported.
v You can use RAID by manually configuring it in the IBMIT recovery console, before running the Linux
installation tool. You can use iprutils, namely iprconfig, iprdbg, iprdump, iprinit, and iprupdate. Refer to
the section “Using the IBMIT recovery console” on page 40 to learn how to use the IBMIT recovery
console.
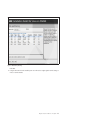
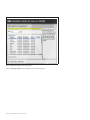
If there is more than one disk, the partitioner main screen will show them in the Current disk field. In
order to see the partitions of a disk, select it and click Change. If there is only one disk, it will be used by
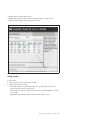
default. For each disk, its partitions are listed. For each partition, there are columns as follows:
v Name: The partition name. Previously existing partitions have names that start with sd. New partitions
start with new. Blank space slots start with blk.
v Type: The partition type. It indicates if the partition is Pri-mary, Log-ical or Ext-ended.
v Size: The partition size.
v Free: How much free space the partition has.
28
Linux: IBM Installation Toolkit User Manual
v F.System: The file system the partition will use.
v M.Point: Where the partition will be mounted in the installed system, for example / or /boot.
v Format: Whether the partition will be formatted and lose all data.
Figure 17. Partitioner: main screen
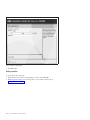
Adding a partition
To add a partition:
1. Select an empty space in the current disk and click Add.
2. Enter the following partition settings:
v File system: Specify the file system that the partition will use. If this partition will be the first
partition of the disk, the file system must be prep.
v Size: Enter the size in MB, GB or TB that the partition will have. Check All available to use all the
space available.
v Mount point: Specify where the partition will be mounted, for example / or /boot.
Chapter 3. Actions available on a live system
29
Figure 18. Partitioner: add a partition
3. Click Add to finish.
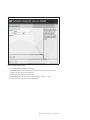
Editing a partition
To edit a partition, follow these steps:
1. On the Partitioner main window, select the partition you want to edit and click Edit.
2. Modify the partition settings you want. If this partition is a new partition, follow the steps in
“Adding a partition” on page 29.
30
Linux: IBM Installation Toolkit User Manual
Figure 19. Partitioner: edit a new partition
For an existing partition, edit the following settings:
v File system: Specify the file system that the partition will use. If this partition will be the first
partition of the disk, the file system must be prep.
v Format: Specify if the partition will be formatted.
v Mount point: Specify where the partition will be mounted, for example / or /boot.
Note that you cannot change the size of an existing partition.
Chapter 3. Actions available on a live system
31
Figure 20. Partitioner: edit a previously existing partition
3. Click Apply to finish.
Deleting partitions
On the Partitioner main window, select the partition you want to delete and click Delete. If you want to
delete all partitions at the same time, click Delete all.
Reseting the partitioning scheme
On the Partitioner main window, click Reset to discard all your modifications and reset the partitioning
scheme.
Updating your firmware
This tool updates the firmware of your machine. The IBMIT media comes with many firmware images
that may be used for updating.
Note: This tool is not intended to be a replacement for the IVM/HMC firmware update tools. It is
instead intended to be used as a recovery utility in cases where IVM/HMC is not working, but you are
still able to boot the machine with IBMIT. If you have IVM/HMC properly working, you should use it to
update the firmware.
32
Linux: IBM Installation Toolkit User Manual
Prerequisites
Before starting, you must have the firmware image file you want to be installed.
The firmware update process consists of the following steps:
1. Install a new firmware image in the temporary side
2. Try to boot the machine using this firmware version and check if everything is working properly
3. If it worked well, commit the firmware image from the temporary side to the permanent side.
Otherwise, reject it.
Starting the tool
To start the tool, follow these steps:
1. Select Firmware Update from the Live system Utilities menu.
Figure 21. Live system utilities menu
2. Check the machine architecture, the firmware level in the temporary side, and on the permanent side.
Also check whether the firmware currently in use is from the temporary or permanent side. Then,
decide if you want to update a new firmware image in the temporary side, to commit firmware to the
permanent side or to reject the firmware that is in the temporary side.
Chapter 3. Actions available on a live system
33
Figure 22. Firmware update: main screen
Updating firmware in the temporary side
After you have accessed, the tool, you can update firmware in the temporary side. Follow these steps:
1. Select Update the firmware image in the temporary side and click Next.
2. Browse the file system and select the firmware image file to be used. If you prefer to use a firmware
image contained in the IBMIT DVD, click Load DVD to allow the system automatically look for the
best firmware option for your machine.
34
Linux: IBM Installation Toolkit User Manual
Figure 23. Firmware update - updating firmware in the temporary side
3. Confirm the list and start the operation by clicking Yes, I am sure - UPDATE FIRMWARE IN
TEMPORARY SIDE. Do not try to restart or turn off the machine during the process. This action may
render the system inoperable.
Chapter 3. Actions available on a live system
35
Figure 24. Firmware update: updating firmware in the temporary side
Committing firmware to the permanent side
After you have successfully rebooted your machine with the firmware update on the temporary side, you
can commit the firmware to the permanent side.
1. Select Commit firmware to permanent side from the main and click Next.
2. You are warned that this operation cannot be undone. To proceed, click Yes, I am sure - COMMIT
FIRMWARE TO PERMANENT SIDE.
36
Linux: IBM Installation Toolkit User Manual
Figure 25. Firmware update - committing to the permanent side
Rejecting the firmware in the temporary side
If the firmware was unsuccessful in the temporary side, you can reject it.
1. Select Reject the firmware in the temporary side from the Firmware window.
2. You are warned that this operation cannot be undone. To proceed, click Yes, I am sure - REJECT
FIRMWARE IN THE TEMPORARY SIDE.
Chapter 3. Actions available on a live system
37
Figure 26. Firmware update - rejecting a firmware on the temporary side
Configuring the network
When you select the Configure Network option in the Welcome Center's Utilities window, you can set up
your network configuration either automatically (through DHCP) or manually. It configures the network
for the live DVD session environment, not for the target system's environment. This option is unavailable
on the installed system.
To configure your network, select the network interface to be configured from the Network interfaces
table and select the type of configuration you want (automatic or manual) from Configuration Type.
Then click [Next].
38
Linux: IBM Installation Toolkit User Manual
Figure 27. Configure network (graphical mode)
Configuring network automatically
If you selected the automatic configuration, a confirmation window is displayed. Verify that your
selection is correct and click [Next] to proceed.
Configuring network manually
If you select manual configuration, a new window displays. On that window, you must provide the
following information:
v IP address: IP address number to be used by the machine
v Network mask: Network mask of the IP address entered
v Gateway: IP address number of the machine used as a gateway to access the external networks. This
field is optional.
v DNS server: DNS server to be used to resolve names. This field is optional.
When you are finished entering the information requested, click [Next] to continue. Read the summary
window and, if the values are correct, click [Next] again to apply the configuration.
Chapter 3. Actions available on a live system
39
Figure 28. Configure network manually
Note: Remember that if you do not provide a valid gateway you will not be able to access the external
networks, such as the Internet.
Using the IBMIT recovery console
In order to access the IBMIT recovery console, you must boot the live system.
For details about accessing the console from the live system, refer to “Choosing what to do on the live
system” on page 8.
The IBM Installation Toolkit bootable image loads a minimal Linux system in order to run Linux install,
firmware update, diagnostic and recovery tools, and other applications.
As a common Linux System, this minimal Linux system comes with a wide-range of applications that
allow you to perform system diagnostic and recovery tools. Besides sysdiag and many IBM RAS tools
(lsvpd, ofpathname, bootlist, and so on), you can use 1000+ Linux applications. These applications
include system shells (bash, sh), line editing utilities (sed, awk), text editors, Linux partitioners (fdisk,
sfdisk), mount/umount applications, chroot, archivers (tar, gzip/gunzip), and a python interpreter. For a
complete list of applications available, you can either type TAB key twice on system shell or check the
following directories on a system booted with the Toolkit:
v /sbin
v /usr/sbin
v /usr/local/sbin
v /root/bin
40
Linux: IBM Installation Toolkit User Manual
v
v
v
v
/usr/local/bin
/usr/bin
/usr/X11R6/bin
/bin
All of these applications have their own documentation. They can be found at the Web site
http://www.linuxmanpages.com/. Most of these applications have a built-in help which serves as a
quick reference for common-used options. In general, this built-in help can be accessed by giving a "help"
argument to any command (for example: mount -help), but this action may vary from application to
application.
Note: While running the recovery console, you can access the Welcome Center at any time by typing
welcomecenter. If you want to leave the Welcome Center and return to the console, type 'q'.
Chapter 3. Actions available on a live system
41
42
Linux: IBM Installation Toolkit User Manual
Chapter 4. Actions available on an installed system: Welcome
Center
On an installed system, you can perform a number of actions from the Welcome Center.
After running the Welcome Center and accessing it, you will be presented to a menu similar to this one:
Figure 29. Welcome Center main menu
On the installed system main menu, you can select the following options:
v Install Tools - opens the submenu with tools related to installation tasks:
© Copyright IBM Corp. 2009, 2010
43
Figure 30. Install Tools window (graphical mode)
v Utilities - opens a submenu with utilities:
44
Linux: IBM Installation Toolkit User Manual
Figure 31. Welcome Center menu Utilities
v Task Monitor - opens the Task monitory function. For more information, see “Monitor tasks” on page
139.
v Help - opens the submenu with items related to help and documentation:
Chapter 4. Actions available on an installed system: Welcome Center
45
Figure 32. Welcome Center menu Help
Installing IBM packages on the system
This tool installs IBM Packages on a previously installed Linux system.
Prerequisites
Before starting this task, you must have the following items:
v A software installation repository for IBM packages configured, unless on Red Hat Enterprise Linux 4
v An IBMIT DVD, ISO image, or network installation repository, if on Red Hat Enterprise Linux 4
You can configure software installation repositories with the tool “Manage repositories used by the
system” on page 69 or you can use the package manager of your distro to do it manually. You can create
an IBMIT network installation repository with the tool “Manage Linux installation repositories available
on the server” on page 95.
To install IBM Packages on a previously installed Linux system, follow these steps:
1. From the Welcome Center, select Install Tools.
2. Select Install IBM Packages in a Running System from the Install tools menu.
46
Linux: IBM Installation Toolkit User Manual
Figure 33. Install Tools window
3. If you are running a system other than Red Hat Enterprise Linux 4, the first window is displayed
with a message warning you that before you use the tool, you must make sure that the distro
repositories are correctly configured on the system. Click Next to proceed.
Chapter 4. Actions available on an installed system: Welcome Center
47
Figure 34. Choose your package servers
4. If you are running an Red Hat Enterprise Linux 4 system, you must select the packages location:
CD/DVD media or Network repository.
48
Linux: IBM Installation Toolkit User Manual
Figure 35. Installing packages: source of installation selection
Click Next.
5. If you selected Network repository, enter the server URL. For example, http://192.168.1.54/myrepo.
The supported protocols are HTTP, FTP, and NFS.
Chapter 4. Actions available on an installed system: Welcome Center
49
Figure 36. Choose your package servers
When you are finished, click Next.
6. Choose the IBM packages to be installed. You can see the packages that belong to a specific category
by selecting it and clicking Apply. You can see details for a specific package by clicking See details.
For each package, a column with status is displayed:
v I: Indicates the package is already installed. This field editable and you cannot uninstall the
package.
v N: Indicates the package is not yet installed and can be installed by selecting the it.
v D: Indicates the package is not yet installed but cannot be installed due to unresolved dependencies
problems. In order to see which dependencies must be installed for a given package, click See
details. After the needed dependencies are installed, the package will be available for installation.
50
Linux: IBM Installation Toolkit User Manual
Figure 37. Installing packages: Packages selection
7. Accept the licenses of the packages you selected. If you do not accept the licenses, the installation will
not proceed. For each license, click Read license to read it.
Chapter 4. Actions available on an installed system: Welcome Center
51
Figure 38. Installing packages: Licenses Agreement
8. Confirm the packages to be installed and click Next to start the installation process.
52
Linux: IBM Installation Toolkit User Manual
Figure 39. Installing packages: Summary
9. The installation progress is displayed. Click OK when the installation is finished.
Chapter 4. Actions available on an installed system: Welcome Center
53
Figure 40. Choose your package servers
Install or uninstall PowerVM Lx86 on the system
This tool installs or uninstalls PowerVM Lx86 on your machine. PowerVM Lx86 can be used to run x86
binary files on POWER machines.
PowerVM Lx86 is composed by two components: the translator and the x86 World. The translator is the
virtual machine that allows x86 binary files to be run on POWER machines. The x86 World is a directory
with a complete x86 Linux distro where the x86 binary files to be run must be installed. Both components
must be installed for PowerVM Lx86 to be used.
Prerequisites
Before installing or uninstalling PowerVM Lx86, you must have the following items:
v PowerVM Lx86 installer CD/DVD, ISO image, or tarball
v ISO images for the x86 distro to be installed with PowerVM Lx86
v The advance-toolchain-runtime and advance-toolchain-devel packages installed, except when using Red Hat
Enterprise Linux 4.
The PowerVM Lx86 installer can be downloaded at http://www.ibm.com/developerworks/linux/lx86/.
You can install the advance-toolchain packages with the tool Install IBM packages on the system, after
adding the advance-toolchain repository with the tool Manage repositories used by the system. The
repository URL should be automatically displayed. In case it is not, the URL is ftp://
54
Linux: IBM Installation Toolkit User Manual
linuxpatch.ncsa.uiuc.edu/toolchain/at/at05/redhat/RHEL5/, ftp://linuxpatch.ncsa.uiuc.edu/toolchain/
at/at05/suse/SLES_10/ or ftp://linuxpatch.ncsa.uiuc.edu/toolchain/at/at05/suse/SLES_11/, depending
on your distro.
To start the tool, follow these steps:
1. Select Manage PowerVM Lx86 in the Install tools menu.
Figure 41. Welcome Center menu Install Tools
2. In order to use this tool, it is necessary to provide the PowerVM Lx86 installer. Select the type of
media where the installer is available: Optical Disk, ISO, or Tarball.
Chapter 4. Actions available on an installed system: Welcome Center
55
Figure 42. Media type selection for PowerVM Lx86 Installer
Click Next.
3. If you selected ISO or Tarball on the previous step, then browse through your files and click the
PowerVM installer. If you selected Optical Disk, then choose the optical device where the installer is.
56
Linux: IBM Installation Toolkit User Manual
Figure 43. Media browser for PowerVM Lx86 Installer
4. Read the license and accept it. You can only proceed if you agree to the license.
Chapter 4. Actions available on an installed system: Welcome Center
57
Figure 44. License for PowerVM Lx86 Installer
5. If you do not have any component of PowerVM Lx86 installed, you will be directly moved to the
PowerVM Lx86 installation procedure. If you have all the components installed, you will be directly
moved to the PowerVM Lx86 uninstallation procedure. If you have at least one, but not all
components installed, you will be asked which action you want to take. Choose one and proceed.
58
Linux: IBM Installation Toolkit User Manual
Figure 45. Action selection for PowerVM Lx86 Installer
Click Next or Quit.
Installing PowerVM Lx86
If you do not have any components already installed, or if you explicitly chose so, you will be directed to
install PowerVM Lx86. Use these instructions to install.
To install PowerVM Lx86 and x86 World, follow these instructions:
1. Follow the instruction in “Install or uninstall PowerVM Lx86 on the system” on page 54 to provide
IBM Installation Toolkit with the PowerVM Lx86 installer.
2. Choose the Linux distribution, installation directory, and a temporary directory for the RPM files. The
default setting is to use the home directory of the POWER installed system as the x86World home
directory.
v Installation directory: Directory where the translator will be installed.
v Log files directory: Directory where the translator will place its log files.
v Linux distribution: Linux distro to be installed in x86 World. Note that only x86 Linux distros
whose version is minor or equal than the Linux on Power Systems Servers distro you are running
are available. For example, for a POWER system running Red Hat Enterprise Linux 5 Update 2, the
x86 Linux distro can be one of Red Hat Enterprise Linux 5 GA, Update 1 or Update 2, but not Red
Hat Enterprise Linux 5 Update 3. Consult the PowerVM Lx86 manual for more details.
v Installation directory: Directory where the x86 World Linux distro will be installed.
v Home directory: Home directory to be used in the x86 World Linux distro. The default is to use the
same home directory as the Linux on Power Systems Servers distro you are running. Leave it blank
if you want to have a home directory created inside the x86 World.
Chapter 4. Actions available on an installed system: Welcome Center
59
v RPM files temporary directory: Temporary directory to hold the x86 World Linux distro installation
files.
Figure 46. Settings for PowerVM Lx86 Installation
Click Next.
3. Select Installation profile, Media source, and Media type for the x86 World installation.
The following options are available:
v Installation profile: Full or Minimal installation
v Media source: Optical device or ISO image
v Media type: CD or DVD
60
Linux: IBM Installation Toolkit User Manual
Figure 47. Settings for PowerVM Lx86 Installation - x86 World
4. If you selected ISO images, then browse through your files, select the ISO image files required to
install the x86 World Linux distro. If you selected Optical disks, then select which optical device you
want to use.
Chapter 4. Actions available on an installed system: Welcome Center
61
Figure 48. Settings for PowerVM Lx86 Installation - x86 World media location
Click Next.
5. Fill out the registration form. All the fields that are marked with (*) must be filled before proceeding.
62
Linux: IBM Installation Toolkit User Manual
Figure 49. Settings for PowerVM Lx86 Installation - Registration
Click Next.
6. Review the summary of your configuration and click Next.
Chapter 4. Actions available on an installed system: Welcome Center
63
Figure 50. Settings for PowerVM Lx86 Installation - Summary
The installation will start in background and the progress can be monitored in the Task Monitor.
64
Linux: IBM Installation Toolkit User Manual
Figure 51. PowerVM Lx86 installation process task monitor
Chapter 4. Actions available on an installed system: Welcome Center
65
Figure 52. PowerVM Lx86 installation process task monitor details screen
Uninstalling PowerVM Lx86
If you have all components already installed, or if you explicitly chose so, you will be directed to the
PowerVM Lx86 uninstall function. Use these instructions to uninstall.
To uninstall PowerVM Lx86, follow these instructions:
1. Follow the instruction in “Install or uninstall PowerVM Lx86 on the system” on page 54 to provide
IBM Installation Toolkit with the PowerVM Lx86 installer.
2. Select the components that you want to uninstall. Only the components that are currently installed
will be available for selection.
66
Linux: IBM Installation Toolkit User Manual
Figure 53. PowerVM Lx86 translator and x86World uninstall window
3. Confirm the uninstallation options and click Next.
Chapter 4. Actions available on an installed system: Welcome Center
67
Figure 54. PowerVM Lx86 uninstall summary
The process will take place on background and can be followed in the Task Monitor at any time.
68
Linux: IBM Installation Toolkit User Manual
Figure 55. PowerVM Lx86 uninstall process task monitor window
Manage repositories used by the system
You can use this tool to manage repositories used by the system.
This tool configures the software installation repositories used by the system. Those repositories are used
to install software on the system. For more information about using the tool that creates Linux
installation repositories on a network installation server, refer to “Manage Linux installation repositories
available on the server” on page 95.
To start the tool, select Repositories Management from the Utilities menu.
Chapter 4. Actions available on an installed system: Welcome Center
69
Figure 56. Welcome Center menu Utilities
The main screen shows a list with the repositories currently configured. For each repository in the list,
there are three columns:
v Name: Displays the repository name
v Resource: Displays a URL with the repository location
v State: Indicates whether the repository is currently active or inactive. An inactive repository is not used
by the system as a possible software source.
If you select one of the repositories, you can Activate, Inactivate, or Remove an existing repository or add
a new repository. Those actions are described below.
70
Linux: IBM Installation Toolkit User Manual
Figure 57. Repository management main screen
Activating or inactivating a repository
If you want to activate or inactivate a repository, select it from the list and click Activate/Inactivate.
Removing a repository
If you want to remove a currently configured repository, select it from the list and click Remove.
Adding a repository
If you want to add an existing repository or a new custom repository, follow these steps:
1. After clicking Add in the main screen, the IBMIT looks for external repositories in the Internet. If you
do not want to wait for this to load, click Skip and move directly to the New custom repository
registration screen.
Chapter 4. Actions available on an installed system: Welcome Center
71
Figure 58. Repositories Management: looking for external repositories
2. If you did not skip the previous step, a list with the external repositories available will be shown. To
add any of those repositories, select it and click Add. To add a custom repository, click Add custom.
72
Linux: IBM Installation Toolkit User Manual
Figure 59. New repository registration
3. If you chose to add a custom repository enter the following information and click Add to proceed:
v Repository name: The name you want to use for the new repository.
v Repository type: The type of the repository you are adding. The available options depend on your
system:
– Red Hat Enterprise Linux: baseurl, metalink, mirrorlist, NFS, and CD/DVD media
– SLES: URL and CD/DVD media
v Location: Indicates where the repository can be found. This field depends on the repository type
chosen above:
– baseurl: Provide the URL where the repository can be found. The URL must be of the type
file://, ftp://, or http://. For example, ftp://192.168.1.54/my/ftp/repo/ could be used.
– NFS: Similar to baseurl but uses nfs:// URL type. For example, nfs://192.168.1.54/my/nfs/
repo/ could be used.
– metalink: Specify a location for a metalink file.
– mirrorlist: Specify a location for a mirror list.
– CD/DVD media (Red Hat Enterprise Linux): The repository will be added by copying the content
of a CD/DVD to a destination directory. Provide the path for that directory.
– URL: Provide the URL where the repository can be found. The URL must be of the type ftp://,
nfs://, http:// or https://. For example, http://192.168.1.54/my/http/repo/ could be used.
– CD/DVD media (SLES): Nothing must be copied on SLES. Leave the field blank.
v State: Defines whether the repository will initially be active or inactive.
Chapter 4. Actions available on an installed system: Welcome Center
73
Figure 60. New custom repository registration
The repository is added.
74
Linux: IBM Installation Toolkit User Manual
Chapter 5. Actions available on an installed system: System
tools
The IBM Installation Toolkit System tools includes server management tools, a server consolidation tool,
and a task monitor.
v Server management: Set up and configure a network boot server and an installation server.
v Server consolidation: Migrate a server from System x to POWER machines.
v Task monitor: Monitor tasks that are running in the background.
The main window is displayed below:
Figure 61. System tools main window
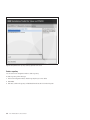
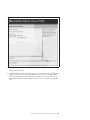
Server Management tools
Server Management tools allow you to set up a boot server with the IBM Installation Toolkit images and
can also be used to create and manage repositories with distros and IBM Installation Toolkit packages.
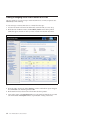
This tool has three basic parts:
v Setup Boot Server: Use this option to set up a boot server with the IBM Installation Toolkit images. After
setting up a boot server, other machines on the network can use these images to boot-up the IBM
Installation Toolkit instead of using an optical disk.
© Copyright IBM Corp. 2009, 2010
75
v Setup Network Server: Provides distribution management capabilities to System tools, making it possible
to add or delete repositories of Red Hat Enterprise Linux/SLES distributions or IBM packages.
v Manage Client Systems: Manages clients that use the Network Boot feature of IBM Installation Toolkit.
This option allows you to add or remove client machines.
The figure below displays these options:
Figure 62. Server Management Main menu window
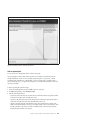
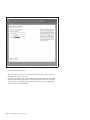
Configure the boot server for IBM Installation Toolkit
This tool configures your machine to work as a boot server for IBMIT. This action allows client machines
to boot the IBMIT from the network, instead of needing to use the CD/DVD-ROM for it.
Note: This tool currently works only on POWER machines. If you want to configure an IBMIT boot
server in other type of machine, you can manually do it as described in the section “Manually
configuring the boot server for IBM Installation Toolkit” on page 207.
Prerequisites
Before starting, you must have the following items:
v A TFTP server installed and working on your system
v An IBMIT DVD or ISO image file
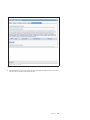
To configure the boot server, follow these steps:
1. Select Setup Boot Server from the Server Management menu.
76
Linux: IBM Installation Toolkit User Manual
Figure 63. Server management menu
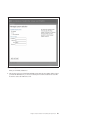
2. Enter the following information:
v TFTP export path: This directory is where the TFTP server hosts the files to be accessed through it.
Files related to the network boot feature of IBMIT will be copied to this location, so that they can
be accessed by client machines. Make sure that your TFTP server is correctly configured to use this
directory by looking at the TFTP server configuration file (/etc/xinetd.d/tftp).
v IBMIT media source: This field indicates where the IBMIT media will be available to be read:
CD/DVD-ROM drive or ISO image file. Files needed to configure the boot server must be retrieved
from the IBMIT media, so this field is required.
Chapter 5. Actions available on an installed system: System tools
77
Figure 64. Boot server configuration parameters
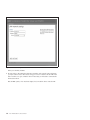
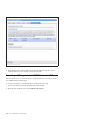
3. If you chose ISO image as the IBMIT media source, browse your file system and select the ISO image
file to be used.
78
Linux: IBM Installation Toolkit User Manual
Figure 65. IBMIT ISO image selection
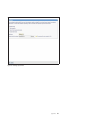
4. Confirm your choices and click Next to start the boot server configuration process.
Chapter 5. Actions available on an installed system: System tools
79
Figure 66. Boot server configuration summary
The process will take place in background and can be followed in the Task Monitor at any time.
80
Linux: IBM Installation Toolkit User Manual
Figure 67. Boot server configuration process running in background
Chapter 5. Actions available on an installed system: System tools
81
Figure 68. Boot server configuration process task monitor screen
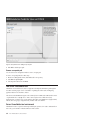
Manage client systems for the boot server
Manage client systems tool provides an easy way to register and unregister client machines that are
permitted to use the Network Boot feature. These client machines can then boot IBMIT by using the
network from this boot server.
Note: This tool currently works only on POWER machines. If you want to use an IBMIT boot server
configured in other type of machine, you can manually do it as described in the section “Manually
configuring the boot server for IBM Installation Toolkit” on page 207.
Prerequisites
Before starting, you must have the following items:
v Your system configured to act as an IBMIT boot server
v DHCP server installed and working on your system
You can configure the system to act as an IBMIT boot server using the tool “Configure the boot server for
IBM Installation Toolkit” on page 76.
This tool reads the DHCP server configuration file to retrieve the client machines present in it and writes
it back to have the clients and subnets that have been added and modified in the tool properly
configured, to erase the ones that have been deleted, as well as to update DHCP headers. It also restarts
82
Linux: IBM Installation Toolkit User Manual
the DHCP server for changes to take effect and performs some configurations in the TFTP boot server.
Note that the DHCP configuration file will be updated only if actions are performed in the tool.
Otherwise, it will remain untouched.
To start the tool, click Manage Clients Systems on Server management menu.
Figure 69. Server Management Main menu window
If there are clients in the DHCP configuration file that are not yet registered in the tool, they will be listed
and you will be asked if you want to import and automatically register them. Select the clients you want
to import and select Import. If you do not want any client to be imported, select Skip to ignore it.
Chapter 5. Actions available on an installed system: System tools
83
Figure 70. Manage Clients System: import unregistered DHCP clients
The main screen will be displayed and you can see all the currently registered clients. You can see only
the clients that belong to a given subnet by selecting it and clicking Filter. You can also add, edit, and
delete clients. Finally, you can manage subnets. After performing any actions, you must click Apply
changes for them to take effect.
84
Linux: IBM Installation Toolkit User Manual
Figure 71. Manage Clients System: main screen
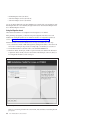
Adding a client
You can add a client from the Manage client systems window.
To add a client, follow these steps:
1. On the Client Systems Management window, select Add.
2. Enter the following client parameters:
v Hostname: The client machine host name, an identifier used to create this machine entry into the
dhcpd.conf file. Note that this name is an arbitrary name, and not an Internet hostname, such as
somename.ibm.com.
v Subnet: Select the subnet of the new client. To manage the available subnets, select Manage subnets.
Refer to Managing subnets for details.
v IP address: The IP address that is assigned to the MAC (hardware) address of this machine. This
address is fixed and will be assigned to this machine every time it connects to the local network.
v MAC address: The client machine MAC address of the network device being used to boot through
network.
v Comments: Additional comments used to identify this client machine. This field is optional.
Chapter 5. Actions available on an installed system: System tools
85
Figure 72. Manage Clients System: add new client
3. When you are finished entering the information, click Add.
Note that if you do not click Apply changes, the changes will not take effect. See “Applying changes” on
page 91.
Editing a client
You can edit a client from the Manage client systems window.
To edit a client, follow these steps:
1. On the Client Systems Management window, select the client that you want to edit and click Edit.
2. Modify the client parameters that you want to change.
v Hostname: The client machine host name, an identifier used to create this machine entry into the
dhcpd.conf file. Note that this name is an arbitrary name, and not an Internet hostname, such as
somename.ibm.com.
v Subnet: Select the subnet of the new client. To manage the available subnets, select Manage subnets.
Refer to Managing subnets for details.
v IP address: The IP address that is assigned to the MAC (hardware) address of this machine. This
address is fixed and will be assigned to this machine every time it connects to the local network.
v MAC address: The client machine MAC address of the network device being used to boot through
network.
v Comments: Additional comments used to identify this client machine. This field is optional.
3. When you are finished, click OK.
86
Linux: IBM Installation Toolkit User Manual
Note that if you do not click Apply changes, the changes will not take effect. See “Applying changes” on
page 91.
Deleting a client
You can delete a client from the Manage client systems window.
To delete a client, follow these steps:
1. On the Client Systems Management window, select the client that you want to delete.
2. Select Delete.
Note that if you do not click Apply changes, the changes will not take effect. See “Applying changes” on
page 91.
Adding a subnet
You can add a subnet from the Manage subnets window.
To add a subnet, follow these steps:
1. Open the Subnets management menu by selecting Manage subnets from the main Client Systems
Management menu. You can also select Manage subnets when adding a new client or editing an
existing client.
Figure 73. Subnet management window
2. Select Add.
3. Enter the following subnet parameters:
v Subnet address: Enter the IP address of the subnet.
Chapter 5. Actions available on an installed system: System tools
87
v
v
v
v
Network mask: Enter the netmask for the subnet.
Gateway: Optionally, enter the IP address for the gateway of the subnet.
DNS server 1: Optionally, enter the address of the primary DNS server to be used.
DNS server 2: Optionally, enter the address of the secondary DNS server to be used.
Figure 74. Manage Clients System: add new subnet
4. Optionally, click Edit headers to specify DHCP configuration headers for the subnet. Refer to the
section “Editing DHCP headers” on page 90 to learn about this topic.
5. Click Add to finish.
Note that if you do not click Apply changes, the changes will not take effect. See“Applying changes” on
page 91.
Editing a subnet
You can edit a subnet from the Manage subnets window.
To edit a subnet, follow these steps:
1. Open the Subnets management menu by selecting Manage subnets from the main Client Systems
Management menu. You can also select Manage subnets when adding a new client or editing an
existing client.
88
Linux: IBM Installation Toolkit User Manual
Figure 75. Subnet management window
2. On the Subnets management menu, select the subnet that you want to edit and click Edit.
3. Modify the subnet parameters that you want to change.
v Subnet address: Enter the IP address of the subnet.
v Network mask: Enter the netmask for the subnet.
v Gateway: Optionally, enter the IP address for the gateway of the subnet.
v DNS server 1: Optionally, enter the address of the primary DNS server to be used.
v DNS server 2: Optionally, enter the address of the secondary DNS server to be used.
4. Optionally, click Edit headers to specify DHCP configuration headers for the subnet. Refer to the
section “Editing DHCP headers” on page 90 to learn about this topic.
5. When you are finished, click OK.
Note that if you do not click Apply changes, the changes will not take effect. See “Applying changes” on
page 91.
Deleting a subnet
You can delete a subnet from the Manage subnets window.
To delete a subnet, follow these steps:
1. Open the Subnets management menu by selecting Manage subnets from the main Client Systems
Management menu. You can also select Manage subnets when adding a new client or editing an
existing client.
Chapter 5. Actions available on an installed system: System tools
89
Figure 76. Subnet management window
2. Select the subnet that you want to delete click Delete.
Note that if you do not click Apply changes, the changes will not take effect. See “Applying changes” on
page 91.
Editing DHCP headers
You can specify DHCP configuration headers to be used. Both global and subnet specific headers may be
specified.
To edit headers, follow these steps:
1. Open the Subnets management menu by selecting Manage subnets from the main Client Systems
Management menu. You can also select Manage subnets when adding a new client or editing an
existing client.
2. Select Edit DHCP headers from the Subnet management menu.
3. Enter each header separated by a semicolon. Consult the DHCP server documentation to learn about
headers.
90
Linux: IBM Installation Toolkit User Manual
Figure 77. Manage Clients System: edit DHCP headers
4. When you are finished, click OK.
Note that if you do not click Apply changes, the changes will not take effect. See “Applying changes.”
Applying changes
After you have made all the changes to Client management systems, you must apply changes or none of
these actions will take effect.
Note: When you click Apply changes, the DHCP server is restarted and the new configuration file will
take effect. This action is unavailable until after you have made a change.
After performing any actions, such as adding, editing, or removing a client or a subnet, Apply changes
will become active and you will see a message telling you to click it for those actions to take effect. Note
that until you do it, those actions will not have any effect.
Chapter 5. Actions available on an installed system: System tools
91
Figure 78. Manage Clients System: need to apply changes
When clicking Apply changes, the process begins and you can track its progress.
92
Linux: IBM Installation Toolkit User Manual
Figure 79. Manage Clients System: applying changes
After the process is finished, you can click View DHCP file to see the resulting DHCP configuration file
that is now in effect or click OK to return to the main screen.
Chapter 5. Actions available on an installed system: System tools
93
Figure 80. Manage Clients System: changes applied
If you chose to read the DHCP configuration file, click OK to return to the main screen.
94
Linux: IBM Installation Toolkit User Manual
Figure 81. Manage Clients System: view DHCP configuration file
Manage Linux installation repositories available on the server
This tool creates Linux and IBMIT network installation repositories. Those repositories can be used to
perform Linux installations from the network, rather than from CD/DVD-ROM or USB key.
Note: This tool currently works only on POWER machines. If you want to create a network installation
repository in other type of machine, you can manually do it as described in the topic “Manually creating
a network installation repository” on page 208.
Prerequisites
Before creating any repository, you must have the following items:
v ISO images or CD/DVD disks for the distros you want to create repositories
v AN HTTP, FTP, or NFS server installed and working, so that the created repositories can be accessed
To start the tool, click Setup Network Server on the Server management menu.
Chapter 5. Actions available on an installed system: System tools
95
Figure 82. Server Management Module window
The main screen shows a list of the repositories currently available on the server. You can Add and Delete
repositories. Repositories are accessible in the network through exported paths. You can also add and
remove exported paths.
96
Linux: IBM Installation Toolkit User Manual
Figure 83. Server Management menu: main screen
Adding a repository
You can use the Server management window to add a repository.
To add a repository, follow these steps:
1. On the Server Management window, click Add.
2. Enter the following information:
v Exported Path: Location where the repository will be accessible in the network. To understand in
details what an exported path is and to learn how to add a new one, refer to Adding an exported
path.
v Directory Name: Repository name. It is also the name of the subdirectory, inside the exported path
directory, where the repository will be created. For example, if you type myrepo and choose the
exported path at /srv/repositories/, accessible at http://192.168.1.54/repositories/, then your
repository will be created at /srv/repositories/myrepo/ and will be accessible at
http://192.168.1.54/repositories/myrepo/.
v Distro: The distro whose repository will be created.
v Media Type: Type of media that will be used as source to create the repository. Depending on the
chosen distro, CD or DVD may be available.
v Media Source: Source where the files will be retrieved and copied to the repository. The source can
be a CD/DVD-ROM device or ISO files.
Chapter 5. Actions available on an installed system: System tools
97
Figure 84. Setup Network Server: Add new repository
3. If you chose ISO files, browse the file system and select the ISO image files for the distro and media
type (CD or DVD) you chose.
98
Linux: IBM Installation Toolkit User Manual
Figure 85. Setup Network Server: choose ISO image files
4. Confirm the chosen options and click Next to start the repository creation process.
Chapter 5. Actions available on an installed system: System tools
99
Figure 86. Setup Network Server: confirm repository creation
The process will take place in background and can be followed in the Task Monitor at any time.
100
Linux: IBM Installation Toolkit User Manual
Figure 87. Setup Network Server: repository creation process running in background
Chapter 5. Actions available on an installed system: System tools
101
Figure 88. Setup Network Server: repository creation progress task monitor screen
Delete a repository
You can use the Server management window to delete a repository.
To delete a repository, follow these steps:
1. In the Server management window, select the repository that you want to delete
2. Click Delete.
3. Click Yes to confirm. The repository will be deleted from the list and also from the file system.
102
Linux: IBM Installation Toolkit User Manual
Figure 89. Setup Network Server: confirm repository deletion
Add an exported path
You can use the Server management window to add an export path.
An exported path is a directory that contains repositories in it and that is accessible in the network
through an HTTP, FTP, or NFS server. For example, the exported path /srv/repositories/ could be
accessible through an HTTP server at the URL http://192.168.1.54/repositories/ and might contain a
SLES 10 SP3 the repository /srv/repositories/sles10sp3/ in it, accessible at the URL http://192.168.1.54/
repositories/sles10sp3/.
To add an exported path, follow these steps:
1. On the Server Management window, click Add to add a new repository.
2. On Add a new repository, select Add Exported Path.
3. Enter the following information:
v Protocol: Choose the network protocol used by the server that will make the export path accessible
in the network. Possible values are HTTP, NFS, or FTP.
v Path: Choose the directory that will contain the repositories created at the exported path and that
will be made accessible in the network by the HTTP, FTP, or NFS server.
v URL path: Specify the path part of the URL that points to the exported path. For example, if the
HTTP server makes the directory chosen above accessible at http://192.168.1.54/repositories/, then
the URL path will be /repositories. If it made it available at http://192.168.1.54/my/url/path/,
then the URL path would be /my/url/path.
Chapter 5. Actions available on an installed system: System tools
103
Figure 90. Setup Network Server: adding an exported path
4. Click Add to add the export path.
Remove an exported path
You can use the Server management window to remove an export path.
To remove an exported path, follow these steps:
1. On the Server Management window, click Add to add a new repository.
2. Select Remove exported paths.
3. Select the path in the list and click Delete.
IBM Server Consolidation tool
The IBM Server Consolidation tool (SCT) is an application that helps the administrator get through the
most time-consuming aspect of server consolidation - replicating the software stack and migrating
application data from one machine to another.
The software stack that IBM SCT migrates is the commonly known LAMP Stack. LAMP stands for Linux
+ Apache HTTP Server + MySQL Server + PHP or Perl or Python. The tool finds the necessary
information from a System X server (source machine) and installs a new POWER server (target machine)
with the same users, groups, configuration files, and data of the source machine.
Server Consolidation tool environment
The IBM SCT works in a special environment provided by the System tools. In order to understand how
SCT works, you should know what the elements are in the solution.
104
Linux: IBM Installation Toolkit User Manual
The Server Consolidation tool includes three important elements:
v Source machine: The x86 (32 bits or 64 bits) machine that will be migrated. The SCT can migrate only
x86 Linux machines, with or without Apache, MySQL, PHP, Perl and Python applications.
v Target machine: The new server machine (System p or System i®), that will be installed using the IBM
Installation Toolkit for Linux and receive all the data and configuration files from the source machine.
v Network Server machine: The net boot server machine running the IBM Installation Toolkit System tools.
This machine will orchestrate all the migration steps between the source machine and the target
machine.
To perform a migration, you must connect remotely using a web browser to the Network Server machine
using the same System tools port. This machine retrieves the information from the source target, creates a
source profile with them, and uses it to replicate the LAMP Stack. After that, it performs a network
installation of Linux, customizes the LAMP Stack, and copies data files from the source to the target
machine.
The source and target machines must have network connectivity to migrate data such as files in /home,
HTML, CGI scripts, MySQL databases, and so on. Network connectivity is not required between the
source and target machines if the transfer of these files is not wanted (that is, if you have not selected the
options to migrate LAMP data and User data). In that case, the tool provides a clean installation of the
LAMP stack. At a minimum, both the source and target machines must have network connectivity to the
Network Server machine.
Performing a migration
Before starting a migration, you should understand some special characteristics of the tool.
v The IBM SCT assumes that there is only one single disk in the target machine that fits the entire file
system to be migrated from source.
v If the sum of x86 partitions size is bigger than the available disk on POWER machine, the migration
will fail.
v The IBM SCT cannot migrate x86 LVM and RAID partitions. If the source system has an LVM, the
migrator creates a physical partition on target system with the size of the LVM.
v The IBM SCT migrates only official packages from the Linux distributions of the source machine. If
there is any application that was installed manually, or not the official version of the application, the
IBM SCT either does not migrate the application or installs the version distributed in the distro.
v The IBM SCT does not migrate users passwords.
v The root password of the target machine is passw0rd (note the zero, instead of o). After the first access,
you should change this password.
v The IBM SCT only migrates the "DocumentRoot" data specified in the Apache configuration files;
"Alias" data directories are not migrated by default.
Supported Linux distributions for migration
Use this information to determine which Linux distributions are supported by the Server Consolidation
tool.
The IBM SCT supports the following Linux distributions:
v i386 and x86_64:
– Red Hat Enterprise Linux 4 (GA, U1, U2, U3, U4, U5, U6, U7, and U8)
– Red Hat Enterprise Linux 5 (GA, U1, U2, U3, and U4)
– SuSE Linux Enterprise Server 10 (GA, SP1, SP2, and SP3)
– SuSE Linux Enterprise Server 11
v PPC:
– Red Hat Enterprise Linux 4 (U7, and U8)
Chapter 5. Actions available on an installed system: System tools
105
– Red Hat Enterprise Linux 5 (U4 and U5)
– SuSE Linux Enterprise Server 10 (SP2 and SP3)
– SuSE Linux Enterprise Server 11 (GA and SP1)
You can only migrate between the same Linux distribution. For example, if the source machine has a Red
Hat Enterprise Linux 5U1 version installed, the target machine can be versions Red Hat Enterprise Linux
5U3 or Red Hat Enterprise Linux 5U4.
Using the Migration wizard
These instructions describe how to use Migration wizard to migrate to a new machine.
Before performing any migration, you first must set up and configure the network boot server and
installation server using the System tools. For instructions about how to configure these System tools
services, see “Manage Linux installation repositories available on the server” on page 95.
When the network boot server and installation server are set up and available, follow these steps:
1. Use your browser to initiate a LAMP stack migration by entering the IP address or host name of the
network server machine plus the port 8080 (for example, http://9.8.234.4:8080), to access the tool.
2. From the IBM Installation Toolkit main window, click Server Consolidation Tool.
3. Enter the IP address, the SSH port, and the root password for the source machine. This information
is required in order to remotely access the source machine. The default port of SSH is 22, but if you
have changed this information, use the correct port.
Figure 91. Getting information about the source machine
Note: If you are running a firewall in the source machine, make sure that it is not blocking the SSH
port you set.
106
Linux: IBM Installation Toolkit User Manual
After entering all the necessary information, click Next >>.
4. The system attempts to get a source profile with all system information needed to perform the
migration. You can see the progress of the operation. After it is completed, click Next to go on. If
any error happens, you can click Prev to go back to the source machine connection parameters
screen and try again.
Figure 92. Getting the source profile
5. Verify the system type of the source machine and select the system type of the target machine to be
installed from a list of options provided.
Chapter 5. Actions available on an installed system: System tools
107
Figure 93. Selecting the target machine type
The available system type options for the target machine are:
v POWER5 520/550/570/590/595, POWER5 processor-based blades
v POWER6 520/550/570/575, POWER6 processor-based blades
v System i (iSeries)
Click Next >>.
6. Select the specific target machine (previously registered client) and the Linux distribution to install
the target system. The options available for Linux distribution depend on the system type chosen in
the previous step. One option is always selected by default, and is equal to the source machine
Linux distribution.
The target machines list is retrieved from the Client System Management step of the Server
Management module. To be sure that your target machine is in this list, you need to register the
machine using the Client System Management module. To register the machine, see “Manage client
systems for the boot server” on page 82.
108
Linux: IBM Installation Toolkit User Manual
Figure 94. Selecting the target machine and target's Linux distribution
You can also choose to create an LPAR to be used as target machine. Click Create LPAR and follow
the steps in “Creating an LPAR” on page 116.
When you are finished, click Next >>.
7. Select the Network Install Server (distribution repository) and the IBM/Additional Packages Server
(IBM Installation Toolkit repository). If there are not any repositories configured in the Network
Server, you can enter a custom URL for another Server in the network.
Chapter 5. Actions available on an installed system: System tools
109
Figure 95. Repository servers information
Click Next >>.
8. (Optional) Select server profile options to install in the target system.
The available options are:
v Web server (Apache)
v File server (Samba)
v
v
v
v
v
v
v
Print server (Cups)
Database server (PostgreSQL)
Database server (MySQL)
Directory server (Open LDAP)
Mail server (Sendmail)
Mail server (Postfix)
DHCP and BOOTP server
Note: If the source machine already has Apache and MySQL installed, these two options are
unavailable in the list. They are migrated by default to the target machine.
110
Linux: IBM Installation Toolkit User Manual
Figure 96. Software profiles to be installed
When you are finished, click Next.
9. (Optional) Select the options to migrate all users and groups, the home directories, and the LAMP
data from the source machine to the target one.
The LAMP option is displayed only if there is the Apache or MySQL server applications on the
source machine. If you select it, you must fill the field which asks for the MySQL root password if it
is required by the source system.
Also, you can specify some additional data to be migrated along with LAMP stack. To add a new
file/directory, type the complete name in the Path field and click Add.
The new chosen path is displayed in the Additional directories to be migrated box. For instance, in
the figure below, /tmp directory was added for migration. You can remove directories from the list
by selecting them (one or more) and clicking Remove selected.
You cannot migrate the following paths:
v /
v /bin
v /dev
v /lib
v
v
v
v
v
v
/sbin
/proc
/usr
/boot
/etc
initrd
Chapter 5. Actions available on an installed system: System tools
111
v /opt
v /selinux
v /sys
v /var
Note:
v To migrate the LAMP data the tool needs the root user's password of the MySQL server, and not
the root password of the system itself.
v Be sure that the MySQL Server is running or can be started in the source machine before starting
the migration, otherwise MySQL data cannot be migrated.
v The IBM SCT will not analyze or modify the LAMP configuration files during or after the
migration.
Figure 97. Data to be migrated
When you are finished, click Next >>.
10. 1.At this point, all the necessary information for migrating has been gathered. Verify the information
in the Summary step before proceeding.
112
Linux: IBM Installation Toolkit User Manual
Figure 98. Summary
If you are satisfied, click Next in order to start the migration.
11. The migration is ready to run. You must boot the target machine from the network in order for the
installation to run.
Note: You should record the task ID displayed so that you can easily monitor the progress.
Chapter 5. Actions available on an installed system: System tools
113
Figure 99. Migration started
If you want to monitor the migration progress, click Go to task monitor. Then select the task ID that you
recorded previously and click Details. After the first boot of the installed system, all the data is migrated
from the source to the target machine and you will receive at that window messages reporting the
progress of the migration.
114
Linux: IBM Installation Toolkit User Manual
Figure 100. Monitor your tasks window
Chapter 5. Actions available on an installed system: System tools
115
Figure 101. Status window: migration finished
Creating an LPAR
Creating an LPAR The LPAR creator feature allows you to create an LPAR when migrating the LAMP
stack from an x Series server to a POWER machine.
When choosing a target machine for the migration, you can use an already existent system, previously
configured in System tools, or create a new LPAR on some POWER machine.
To create an LPAR, follow these steps:
1. When selecting the target Linux distribution and machine, in the Migration wizard, click Create
LPAR.
116
Linux: IBM Installation Toolkit User Manual
Figure 102. Selecting the target Linux distribution and machine
The New LPAR window opens.
2. Enter the POWER management system information. If you are using an IVM system, provide the IVM
IP address, user name, and password (usually, padmin is the user name). If you are using an HMC
system, provide the HMC IP, user name, and password (usually, hscroot is the user name). If your
IVM or HMC system uses an SSH port other than 22, then you can also set it here to the appropriate
value.
Chapter 5. Actions available on an installed system: System tools
117
Figure 103. POWER management system access info
When you are finished, click Next >>.
Note: If you are running a firewall on the management system machine, make sure that it is not
blocking the SSH port you just provided.
3. If you are using an HMC system, select the Managed System to hold the new LPAR and enter the
information of the Managed System VIOS. You must type the VIOS IP address, SSH port number,
user name, and password (usually, padmin is the user name). If you are using an IVM-managed
system, this step is automatically skipped.
118
Linux: IBM Installation Toolkit User Manual
Figure 104. Managed system selection and VIOS access info
When you are finished, click Next >>.
4. The next steps are the same for both IVM and HMC systems. Enter the new LPAR IP address (contact
your Network Administrator if you are not sure about it), the host name and subnet to be used. The
host name is used as the LPAR name as well.
Chapter 5. Actions available on an installed system: System tools
119
Figure 105. LPAR network configuration
When you are finished, click Next.
5. The next window is the LPAR Disk Configuration. Depending on the managed system configuration
you may be asked to select to either create a storage pool or use an existent one for the LPAR virtual
disk. In case there is no space available for the new virtual disk, you will be able to continue but the
LPAR creation will fail.
Note: On HMC systems, a free virtual SCSI adapter (vhost) is needed in order to create the LPAR.
120
Linux: IBM Installation Toolkit User Manual
Figure 106. LPAR Disk Configuration
Click Next to proceed.
6. The LPAR creator wizard displays information about the new LPAR and may display some warnings
if your management system cannot provide the same amount of resources as the source being
migrated.
The first figure displays an LPAR Memory warning.
Chapter 5. Actions available on an installed system: System tools
121
Figure 107. LPAR Memory warning
If you agree with the warning message displayed, click Next.
The second figure displays a processor warning.
122
Linux: IBM Installation Toolkit User Manual
Figure 108. LPAR processor summary
Note: By default each virtual processor in the created LPAR uses one processor unit. This value can
be changed later through HMC or IVM directly.
If you agree with the warning message displayed, click Next >>.
7. Verify all the settings and click Next to create your LPAR.
Chapter 5. Actions available on an installed system: System tools
123
Figure 109. LPAR creator summary
8. Your LPAR has been created. Click OK to close the window.
124
Linux: IBM Installation Toolkit User Manual
Figure 110. LPAR created
At this point, you are redirected back to the migration window and will be able to use the newly created
LPAR as your migration target.
Chapter 5. Actions available on an installed system: System tools
125
126
Linux: IBM Installation Toolkit User Manual
Chapter 6. Actions available on both systems
Some actions are available both in the live and in the installed systems
Create an IBM Installation Toolkit bootable USB key
This tool creates an IBMIT bootable USB key. You can use the USB key to boot a machine with IBMIT
from the USB device and as an IBMIT installation source in the Linux installation tool.
Prerequisites
Before creating an IBMIT bootable USB, you must have the following items:
v a blank USB key (or one that can be erased)
v an IBMIT DVD or ISO image file
To create a bootable USB key, follow these steps:
1. Select USB Image Creator from the Utilities menu.
Figure 111. Welcome Center menu Utilities
2. On the Creation window, enter the following information:
v USB device: Select the USB device you want to use to create the IBMIT USB key. If you want to use
a USB device that is not in the list, insert it in the machine and press Refresh to see it there. Note
that the chosen USB device will be formatted and any data contained in it will be lost.
© Copyright IBM Corp. 2009, 2010
127
v File system: Select the file system type to be used in the USB key. Choose any you prefer, as this
choice will not affect the functionality of the created USB key.
v IBMIT media source: This field indicates where the IBMIT media will be available to be read:
CD/DVD-ROM drive or ISO image file. Files needed to configure the boot server must be retrieved
from the IBMIT media, so this field is required.
v Extras: Choose if you want to include documentation, firmware files, and IBM packages in the USB
key. Without any extras, the created USB key will only be useful to boot the machine with IBMIT.
Figure 112. Create USB key
3. If you chose ISO image as the IBMIT media source, browse your file system and select the ISO image
file to be used.
128
Linux: IBM Installation Toolkit User Manual
Figure 113. Create USB key: select ISO image file
4. Confirm your choices and click Next to start the IBMIT USB key creation process.
Chapter 6. Actions available on both systems
129
Figure 114. Create USB key: summary
The process will take place in background and can be followed in the Task Monitor at any time.
130
Linux: IBM Installation Toolkit User Manual
Figure 115. Create USB key process running in background
Browsing documentation
You can use the Browse Additional Linux on POWER Documentation function to read additional Linux
on Power Systems Servers documentation that is shipped with IBMIT.
Prerequisites
Before starting, you must have one of the following:
v Linux on Power Systems Servers documentation package installed or
v An IBMIT DVD or ISO image to directly access the documentation
You can install the Linux on Power Systems Servers documentation package with the tool “Installing IBM
packages on the system” on page 46, if you are in the installed system. If you are in the live system, the
documentation must be accessed directly from the IBMIT media.
To access documentation, select Help from the Welcome Center menu. Then select Browse Additional
Linux on POWER Documentation.
Chapter 6. Actions available on both systems
131
Figure 116. Welcome Center menu Help
If the Linux on Power Systems Servers documentation package is not installed in the system, the
following screen will be displayed. You can click Load from CD or Load from ISO image to load and
access the documentation directly from an IBMIT media.
132
Linux: IBM Installation Toolkit User Manual
Figure 117. Browse documentation: no documentation installed
After the documentation can be accessed, the main screen will be displayed. You can then browse the file
system to find the document you want to read or enter search terms and select Search to find a
document.
Chapter 6. Actions available on both systems
133
Figure 118. Browse documentation main screen
Browsing documentation
You can browse the directories in the main screen until you find the document that you want. Select the
document and click View Document to read it.
Searching documentation
Use the Search for text box on the main screen and click Search to find documents related to it. When
you use search, the documents are returned in order of relevance to the typed terms. The results are
displayed in a screen like the one below. Select a document from the list and click View Document to
read it or click New Search to go back to the main screen and perform a new search.
134
Linux: IBM Installation Toolkit User Manual
Figure 119. Browse documentation search results
Reading a document
After selecting a document and clicking View Document, the document is displayed and you can read it.
Click Close Document when you are finished reading. Note that if the document is a PDF and your
browser does not have a plug-in to display it, then the system will download the PDF and place it where
you choose in the file system. You can then use any PDF viewer to read it.
Chapter 6. Actions available on both systems
135
Figure 120. Document View Window
When using text mode, a link to the document will be displayed. You can click it to access the document.
PDF documents will be downloaded, as in graphical mode, and you can use any PDF viewer to read it.
HTML documents will be displayed inside the text-mode web-browser, but will completely replace the
IBMIT user interface. In order to go back to the IBMIT user interface after reading the document, you
must repeatedly move to the previous screen of the browser by pressing Shift+B until get back to the
IBMIT screen.
136
Linux: IBM Installation Toolkit User Manual
Figure 121. Document View Screen - Text Mode
Registering at IBM
You can register at the IBM Web site through the IBM Installation Toolkit Welcome Center.
After you register, you will have access to the IBM Installation Toolkit forum (http://www.ibm.com/
developerworks/forums/forum.jspa?forumID=937) as well as other content available at the IBM Web site.
Prerequisites
In order to register, you must do the following actions:
v Ensure that your machine has access to the external network (Internet)
v Configure your machine to use a DNS server
You can do all this actions manually or using the network configuration tool, if you are in the live
system.
To register at the IBM Web site, follow these steps: In order to register, select Click here to register and
you are redirected to the IBM registration page.
1. Select the Register at IBM Web site option in the Welcome Center Help window.
Chapter 6. Actions available on both systems
137
Figure 122. Welcome Center menu Help
2. Select Click here to register. You will be redirected to the IBM registration page. Follow the
instructions on that page.
138
Linux: IBM Installation Toolkit User Manual
Figure 123. Register at IBM
Monitor tasks
The Task monitor is a tool that allows you to monitor the progress of tasks that you are running in the
background. You can monitor the state of all tasks in the Tasks overview window and the details of a
specific task in the Task details window.
You can start the tool by click Task monitor either in the Welcome Center or System tools main menu.
Chapter 6. Actions available on both systems
139
Figure 124. Welcome Center main menu
140
Linux: IBM Installation Toolkit User Manual
Figure 125. System tools main window
For each task in the list, there are four columns: Name, Description, State, and Duration.
Name Displays the unique identifier for the task. You can use these identifiers to refer to the task
whenever you need.
Description
Displays a short description for the task.
State
Displays the current state for that task. Possible states include:
v Running: The task is running.
v Interactive: The task is stopped waiting for user interaction. You should move to the Task
details window in order to find out what the task is requesting and do it.
v Paused: The task is in paused state.
v Canceled: The task has been canceled.
v Error: The task has finished with error. You should move to the Task details window in order
to find out what happened.
v Completed: The task has finished with success.
v N/A: The task state in unavailable.
Duration
Displays the length of time that the task has been running.
For example, if a task to set up a repository called Red Hat Enterprise Linux 4_7 has been started by the
Setup Network Server, it will be added to the task monitor and will be shown like this window:
Chapter 6. Actions available on both systems
141
Figure 126. Task monitor tasks overview window
Canceling a task
You can cancel a task by selecting it and clicking Cancel.
Removing tasks that are no longer active from the list
If you click Clear not active tasks, all the tasks that are no longer active (Running, Interactive, or Paused)
are removed from the list.
Task details
You can select a task in the list and then click Details to view a screen with details about it. The details
screen is task-dependent: Each task implements its own details screen the way it prefers. For instructions
about a specific task details screen, refer to the section which describes that task.
142
Linux: IBM Installation Toolkit User Manual
Figure 127. Task monitor tasks details window (sample)
Chapter 6. Actions available on both systems
143
144
Linux: IBM Installation Toolkit User Manual
Chapter 7. Known issues and workarounds
The following list includes known issues and workarounds for installing and using the IBM Installation
Toolkit for Linux.
v Firefox is the only supported web browser for graphical installations.
v Matrox cards are the only fully supported graphics cards for starting in graphical mode.
v Sysdiag might not display correct inventory information about some system models.
v QLogic Fibre Channel cards are not supported on Power Architecture blades.
v Remote installations using Windows HyperTerminal, Internet Explorer, and Web System Management
PC Client are not fully supported and might cause navigation issues, such as Home/End keys not
working.
v Mangled Linux startup messages can be safely ignored.
v If a second instance of Welcome Center is started, the first one is closed, and the terminal is reset. As
HMC and IVM virtual terminals cannot be reset, you must manually restart them.
v When using manual partitioning, depending upon the partitions you decide to keep, and the former
partition scheme of your disks, the SLES installer (autoyast) decides what partitions to create in order
to optimize the SLES installation, based on the partition table that you defined. These decisions mean
that autoyast can change slightly the partition scheme that you have defined in the Toolkit.
v The root file system of the Live DVD is loopback-mounted on /mnt/image. So, if you unmount it or
mount some other file system on it or any of its children directories, your system will fail and you will
need to reboot it.
v When using the Welcome Center on an installed Red Hat Enterprise Linux system in text mode, elinks
prompts for a login and password. If you select Cancel to quit this operation, you must press Ctrl + C
to return to the console.
v After a SLES installation through network, Yast might warn you that it cannot connect to the packages
repository during system boot. You can safely click OK to try this operation again.
v Serial terminal or serial-like terminals might not be the best for use as the terminal window refresh
behavior is not adequate for this application. You might experience some window refresh problems
when using it. Consider using SSH sessions instead.
v When installing Red Hat Enterprise Linux 4 with the packages for graphics environments, GDM might
not use the special RedHat theme, and warn you about the non-existence of a configuration file for
itself. It uses the default configuration, though. Use Red Hat Enterprise Linux configuration center to
correct this warning.
v When rebooting for the first time, Red Hat Enterprise Linux yaboot might not work automatically. You
may need to press Enter at the prompt "boot:".
v When doing a SLES 10 installation, if automatic configuration was chosen for the network interfaces
and the network repositories reside in different networks than the one of the systems being installed,
then during first boot Yast might present a warning box saying that it was unable to access the
repositories. This warning box can be safely skipped, so the installation process can continue.
v If the migration of a user data fails when performing a System X to System P LAMP stack migration,
the tool reports an error stating mysql-server migration failed.
v The System x to System p migration wizard only automatically migrates data under the
"DocumentRoot" of the web server. Custom directories with data that also need to be migrated must be
manually migrated through the manual data migration functionality of this tool. Directories such as
users custom web server directories must be manually included into a migration plan.
v The supported System i systems can be booted only from the DVD drive if it has been virtualized
(virtual DVD devices over the VSCSI interface). For more information about this topic, visit
© Copyright IBM Corp. 2009, 2010
145
http://www-128.ibm.com/developerworks/forums/thread.jspa?threadID=200253. The online forum
has a sticky thread on this topic as well: http://www.ibm.com/developerworks/forums/
forum.jspa?forumID=937.
v Only virtual hardware is supported when creating LPARs, during LAMP stack migration, using the
Server Consolidation tool. Make sure the VIOS is configured to provide virtual disks and virtual
Ethernet.
v When performing manual partitioning on SLES installations, if the disk contains all the four primary
partitions (one of them being extended) and 5 or more logical partitions, Auto YaST might fail and
cancel the installation.
v When installing SLES11 (GA or Service Pack 1) from DVD using some specific DVD drives, the SLES
installer might not recognize that the DVD installation media is inside the drive right away, and
because of that situation, ask you to insert it in the drive. If that happens, wait a few seconds for the
DVD to be recognized and hit the keys "1" and "Enter" to proceed.
v Red Hat Enterprise Linux 6 users should not manually install the powerpc-utils package from the IBM
Installation Toolkit for Linux. Installing the Red Hat Enterprise Linux 6 package installs the version of
the powerpc-utils package that is compatible with the distribution.
146
Linux: IBM Installation Toolkit User Manual
Chapter 8. Troubleshooting
This section provides information about all the warning and error messages that may be displayed when
running the IBM Installation Toolkit.
Error, information, and warning messages
The message codes are presented in alphabetic order to make it easy to find.. Warning messages are used
to inform you of errors that could potentially compromise the system functioning or security. Error
messages inform you of errors that could potentially compromise the system's functioning or security.
Information messages provide more information about items that could potentially cause problems.
These messages represent recoverable situations, allowing you to diagnose and correct the problem.
BRLAU0001E: Authentication failure
The credentials entered were not accepted. Try to enter a different user or password.
BRLAU0002E: No password provided
A password must be entered in the corresponding field.
BRLAU0003E: No user provided
A user must be entered in the corresponding field.
BRLAU0004E: Internal error
An internal error occurred. Try to verify if the PAM installation is correctly working.
BRLAU0005E: Not a valid user
The user entered is invalid. Try to enter a different user.
BRLAU0006E: No PAM module available to perform authentication
Verify if your system has the python PAM module available and working. For SLES11 systems, make sure
to have the python-pam package installed.
BRLAU0007E: Not able to identify Linux distribution installed
The tool could not determine which Linux distribution is installed. Verify if your file /etc/redhat-release
(on Red Hat Enterprise Linux systems) or /etc/SuSE-release (on SLES systems) is in the correct format.
BRLAU0008E: The package pam-devel is not installed. Install it to perform
authentication
Depending on the Linux distribution, the IBMIT needs the package pam-devel installed on the system to
work properly. Install the package pam-devel provided by the distro in order to fix this problem. For Red
Hat Enterprise Linux systems, make sure to install the ppc version of the package.
© Copyright IBM Corp. 2009, 2010
147
BRLBE0001W: Unknown unit: %s
The memory detector failed because an unrecognized memory size unit was found in /proc/meminfo.
BRLBE0003W: You need a system with a working /sys!
The disk detector failed because a /sys file system does not exist.
BRLBE0004W: No manual partitions provided!
The installer could not find the manual partitioning scheme to be used. The installation process cannot
continue.
BRLBE0005W: Cannot add files to a frozen %s
The documentation search database is locked and can no longer have documents added to it.
BRLBE0006W: No levels specified for the Search System
The number of indexing levels for the documentation search database has not been specified. Specify it.
BRLBE0007W: No file specified for the Search System's index
No documents have been specified to be added to the documentation search database. Specify at last one.
BRLBE0008I: Indexing: '%s'...
The documentation search database is having the specified document added to it.
BRLBE0009I: Search time: %0.3fs
The documentation search database has had one document added to it in the specified number of
seconds.
BRLBE0010I: Indexed %s documents in %0.3fs
The documentation search database has been created in the specified number of seconds.
BRLBE0011I: Saved base: %s
The documentation search database has been created and writen at the specified file.
BRLBE0012E: No deleted partitions file found
The installer could not find a configuration file needed by the partitioner. This may cause problems
during the installation process.
BRLBE0013E: Could not create the deleted partitions file.
The installer could not write a configuration file needed by the partitioner. This may cause problems
during the installation process.
BRLBE0014E: Could not find a suitable installer for the distro provided - %s
There is no installer associated with the distro. The installation process cannot start.
148
Linux: IBM Installation Toolkit User Manual
BRLBE0015E: Error adding alien repository: %s
An external repository could not be added to the system. Check if your network connection is configured
and working.
BRLCS0001E: No hostname specified
The hostname field was left blank. You have to provide the hostname of the client.
BRLCS0002E: Invalid hostname
The hostname entered is invalid. You must specify a valid hostname for the client information.
BRLCS0003E: No IP address specified
The IP address field was left blank. You have to provide the IP address for the client information.
BRLCS0004E: Invalid IP address
The provided IP is either incomplete or in an invalid format. The IP address must follow the format
[0-255].[0-255].[0-255].[0-255]. Examples of valid addresses are 10.2.0.1, 192.168.3.20. Invalid addresses are
455.303.100.20 or 10.0.0. If you do not know this information, contact your network administrator.
BRLCS0005E: No MAC address specified
The MAC address field was left blank. You have to provide the MAC address for the client information.
BRLCS0006E: Invalid MAC address
The provided MAC address is either incomplete or in an invalid format. The MAC address must follow
the format [??]:[??]:[??]:[??]:[??:[??], where ? should be an integer from 0 to 9 or upper case characters
from A to F. Examples of valid addresses are 00:15:58:0B:5A:5F, 12:29:80:00:30:03 and 22:4C:90:00:30:03. If
you do not know this information, contact your network administrator.
BRLCS0007E: No netmask specified
The Network mask field was left blank. You have to provide the network mask for the client information.
BRLCS0008E: Invalid netmask
The provided network mask is either incomplete or in an invalid format. The network mask must follow
the format [0-255].[0-255].[0-255].[0-255]. Examples of valid netmasks are 255.255.255.0, 255.255.255.128.
BRLCS0009E: Invalid gateway
The provided gateway is either incomplete or in an invalid format. The gateway must follow the format
[0-255].[0-255].[0-255].[0-255]. Examples of valid addresses are 10.0.0.1 192.168.3.1.
BRLCS0010E: Invalid DNS server address
The provided DNS server address is either incomplete or in an invalid format. The DNS server address
must follow the format [0-255].[0-255].[0-255].[0-255]. Examples of valid addresses are 10.0.0.5 192.168.5.3.
BRLCS0011E: IP address already in use
The IP address entered is already in use by another device. Choose a different address and try again.
Chapter 8. Troubleshooting
149
BRLCS0012E: There is already a subnet using the same physical interface. No two
subnets using the same physical network interface are allowed.
You tried to configure a new subnet on a network interface which already has a subnet configured. The
DHCP server configuration requires that in such cases the subnets are enclosed in a shared-network
declaration. The tool currently does not support adding such statement, but you can do it manually and
run the tool afterwards. Check the dhcpd.conf man page for further details on adding shared-network
statements.
BRLCS0013E: DHCP configuration file not available
The wizard could not find the DHCP configuration file while trying to perform the operation. Check the
file availability and try again.
BRLCS0014E: Could not write DHCP file %s. Check the log for details.
An unexpected error occurred while trying to write the DHCP configuration file to the filesystem. Check
the application log for further details.
BRLCS0015E: Could not apply changes: error restarting the DHCP service, check
the logs for details.
The DHCP service failed to restart. Check the application log to see the DHCP error message.
BRLCS0016E: Could not apply changes: error performing backup of original DHCP
file, check the log for details.
An unexpected error occurred when the tool tried to make a backup copy of the DHCP configuration file.
Check the filesystem permissions and try again.
BRLCS0017E: Could not apply changes: error writing the System Tools clients file,
check the log for details.
An unexpected error occurred when the tool tried to make a backup copy of the DHCP configuration file.
Check the filesystem permissions and try again.
BRLCS0018W: Invalid client(s) found in DHCP configuration file
The tool encountered one or more hosts in the subnet that do not have a valid configuration, which
means they are missing a valid 'fixed-address' or 'hardware' header. You can manually edit the DHCP
configuration file to fix the problem.
BRLCS0019E: No client selected. Choose at least one or click [Skip] to continue
If you choose to import clients, you have to select at least one of them. Otherwise, click [Skip] to continue
without importing any clients.
BRLCS0020E: Hostname already in use
The hostname entered is already in use. Try a different hostname.
BRLCS0021E: MAC address already in use
The MAC address entered is already in use. It probably means the machine you are trying to add is
already registered.
150
Linux: IBM Installation Toolkit User Manual
BRLCS0022E: Could not read DHCP configuration file. Error at line %s, column %s
The DHCP configuration has a syntax error at the indicated location and the tool cannot read it. Check
the file correctness and try again.
BRLCS0023I: No clients registered
No clients are currently registered in the tool.
BRLCS0024E: No client selected
No client was selected to perform the operation. You have to select a client for an action to be performed.
BRLCS0025E: Not able to find DHCP service template
The DHCP service template file /etc/init.d/dhcpd, which probably means the DHCP server is not
installed in the system. Verify if the DHCP server is properly installed and then run the tool again.
BRLCS0026E: Error when trying to read DHCP configuration file, check the log for
details
System Tools was not able to read the system's DHCP configuration file due to an unexpected error. In
order to fix this, consider creating a new empty file and then run the tool again.
BRLCS0027E: Invalid headers entered
The configuration headers entered are in an invalid format. Check the syntax and try again.
BRLCS0028E: Invalid headers entered: error at line %s, column %s
The configuration header entered at the specified location are in an invalid format. Check the syntax and
try again.
BRLCS0029I: Debug: %s
This is a generic message used for debugging purposes only.
BRLCS0030W: DHCP configuration file not found
System Tools was not able to find the system's DHCP configuration file. If you proceed, the tool will
create a new file at the standard location /etc/dhcpd.conf.
BRLCS0031E: Could not apply changes: error performing backup of original
System Tools file, check the log for details.
An unexpected error occurred when the tool tried to make a backup copy of the System Tools
configuration file. Check the filesystem permissions and try again.
BRLCS0033W: Configuration has been changed; when you are done, remember to
click [Apply changes] to save your changes
This warning is a reminder so that you don't forget to click the [Apply changes] button to save your
changes before leaving the tool. If you quit the tool before clicking the button, all changes are lost.
Chapter 8. Troubleshooting
151
BRLCS0034E: Unable to remove yaboot.conf file for the following clients: %s
The tool could not remove the yaboot files that became unused for the hosts listed. Try to remove them
manually.
BRLCS0035E: Unable to create yaboot.conf file for the following clients: %s
The tool could not create the yaboot files for the hosts listed. Try to create them manually.
BRLCS0036E: No subnet selected
A subnet must be selected in order to proceed.
BRLCS0037E: Subnet entry not found
The subnet entry was not found by the tool. This may indicate an internal error, try to restart the tool to
fix the problem.
BRLCS0038W: Configuration has been changed; remember to click [Apply
changes] at the main window to save your changes
When the configuration is changed it is not immediately saved, so you have to click [Apply changes] at
the tool's main window to save the changes to the system.
BRLCS0039I: No subnets registered
No subnets are currently registered in the tool.
BRLCS0040E: Could not write System Tools file %s. Check the log for details.
An error occurred and the configuration file could not be saved. You can verify the application log for
details on what may have caused the problem.
BRLCS0041I: No subnets registered. Add one to proceed.
The tool detected that there are no subnets registered. In order to continue using the tool, you have to
register a new subnet.
BRLDB0001I: DEBUG ---> %s
This is a generic message used for debugging purposes only.
BRLDB0002I: DEBUG %s ---> %s
This is a generic message used for debugging purposes only.
BRLDB0003E: error when calling %s%s: %s, at %s, line %d
This is a generic message used for debugging purposes only.
BRLDP0001E: No partition selected
Select a partition from the list presented.
152
Linux: IBM Installation Toolkit User Manual
BRLDP0002E: Invalid Partition Size
Type an integer number greater than zero in the field 'Size' to create the partition requested.
BRLDP0005E: There is not enough space to create a new partition
The creation of the new partition will not be completed because there is not enough available space on
the disk. Enter a partition size for the new partition that does not exceed the available free space on disk.
BRLDP0008E: Cannot edit a prep boot partition
You can not edit a prep boot partition. You can only create a prep boot partition by clicking the "Create
PReP'' button.
BRLDP0011E: No disks selected
If there are two or more disks in the system, to create or delete partitions you must choose one disk from
the list in order to proceed.
BRLDP0021W: At least one disk must have a PReP as its first partition
A PReP partition is missing and the disk partitioning will not finish without one. Create a PReP partition
to complete the partition plan.
BRLDP0028E: No blank space selected
A new partition cannot be created where another partition already exists. In order to add a new partition,
you have to select a blank space.
BRLDP0029E: Cannot edit a blank space
A blank space cannot be edited. You can only add new partitions using a blank space.
BRLDP0030E: Cannot edit an extended partition
An extended partition cannot be edited, only deleted.
BRLDP0031E: Cannot delete a blank space
Blank spaces cannot be deleted, you can only use them to add new partitions.
BRLDP0032E: The chosen distro cannot format a partition as %s
The filesystem type selected is not supported by the distro. Choose a different filesystem to format the
partition as.
BRLDP0033E: The file system of a %s partition cannot be %s
The filesystem type selected is not compatible with the partition's mountpoint. Choose another filesystem
or enter a different mountpoint.
BRLDP0035E: The chosen distro cannot have a %s partition
The partition's mountpoint is invalid for the distro selected. Enter a different mountpoint.
Chapter 8. Troubleshooting
153
BRLDP0036E: The size of a %s partition must be exactly %d MB
For the partition type entered you have to enter exactly the size given by the error message.
BRLDP0037E: The size of a %s partition must be at least %d MB
The size for the partition type entered must be at least the same as given by the error message.
BRLDP0038E: The size of a %s partition must be at most %d MB
The size for the partition type entered must be at most the same as given by the error message.
BRLDP0039E: The size of a %s partition must be between %d MB and %d MB
The partition type entered must have its size in the range given by the error message
BRLDP0040W: A /boot mount point has not been found in any partition
The distro you selected for installation requires a /boot partition in the partitioning scheme. Make sure to
add one before proceeding.
BRLDP0041E: Conflict found on partition %s when trying to fix %s. Please choose
distinct partitions for each fix to be performed.
The same partition was selected for two or more fixes to be performed. Choose a different partition for
each fix.
BRLDP0042E: No fix selected. Please choose at least one fix.
No fix was selected. You have to select at least one fix to be performed.
BRLDP0043E: Partition size must be an integer
The size entered for the partition is invalid. Make sure to enter an integer number in the corresponding
field.
BRLDP0044E: Partition size not passed
No size was entered for the partition. You have to enter a size for the partition in the corresponding field.
BRLDP0045E: Mount point must be a path
The mountpoint entered is invalid. Make sure to enter a path as the partition's mountpoint.
BRLDP0046E: A partition set to be formatted needs a mount point
For Red Hat Enterprise Linux installations, when you choose to format a partition of type other than
swap you also need to specify a mount point for it.
BRLDP0047E: Primary partition %s must have a valid filesystem set
For Red Hat Enterprise Linux installations, all primary partitions need to be configured with a valid
filesystem.
154
Linux: IBM Installation Toolkit User Manual
BRLDP0048E: Partition must have a mount point
For Red Hat Enterprise Linux installations, when creating a new partition of type other than swap or
PReP you need to specify a mount point for it.
BRLDP0049E: Create a msdos partition table in order to use the disk
The disk does not contain a valid msdos partition table. In order to use it, you have to create a msdos
partition table first.
BRLDP0050W: Any data contained in the disk /dev/%s will be LOST! Are you sure
you want to proceed?
In order to create a msdos partition table, you have to confirm the operation. Be careful when doing this
operation as all data in the disk being edited will be lost.
BRLDP0051E: Swap or prep partitions cannot have a mountpoint
Partitions of type swap and prep do not use mountpoints. Leave the corresponding field blank.
BRLDS0001E: Could not find search database
There is no documentation database installed. You must install the documentation to proceed, you can
load it from DVD or from an ISO image.
BRLDS0002E: Select a file to view it
No file was selected. You must select a file to view it.
BRLDS0003E: %s: Could not mount CD/DVD drive.
It was not possible to mount any drive. Insert a media and try again.
BRLDS0004E: Invalid media. Please insert an IBMIT media.
The media is not an IBMIT media. Insert an IBMIT media and try again.
BRLDS0005E: Media doesn't have documents.
The media does not have documents. Insert a IBMIT media with documents and try again.
BRLDS0006E: %s: Incorrect invocation or permissions.
A mount error code 2 happened. Consult the mount manual for more information.
BRLDS0007E: %s: System error (out of memory, cannot fork, no more loop
devices).
The was a system error. Consult mount manual for error code 2 for more information.
BRLDS0008E: %s: Internal mount bug or missing NFS support in mount.
Internal mount bug or missing NFS support. Verify if you have NFS properly installed.
Chapter 8. Troubleshooting
155
BRLDS0009E: %s: User interrupt.
The user must have interrupted mount. Try it again.
BRLDS0010E: %s: Problems writing or locking /etc/mtab.
It was not possible to write or lock /etc/mtab. Verify /etc/mtab permissions and if you are in a
read-only file system.
BRLDS0011E: %s: Some mount succeeded.
A mount error code 64 happened. Consult the mount manual for more information.
BRLEM0001E: Only root can eject media
You have to be root to be able to eject medias.
BRLEM0002E: Media could not be ejected for unknown reason
The media could not be ejected for unknown reason.
BRLEM0003E: The following processes are using the media: %s
The media could not be ejected because the given processes are currently using it.
BRLFS0036I: Fast Start Executer information: %s
Generic information about fast start has been logged.
BRLFS0040W: System didn't boot from the network
The system must have been booted from the network for fast start to work. Fast start installation will not
be started.
BRLFS0041W: No FastStart file found for this system
A fast start file has not been found. Fast start installation will not be started.
BRLFS0042E: Import Error - Could not use FastStart File. Aborting FastStart
process
A fast start file has been found but cannot be used due to errors when loading it. Fast start installation
will not be started.
BRLFS0043E: Syntax Error - Could not use FastStart File. Aborting FastStart
process
A fast start file has been found but cannot be used due to syntax errors in it. Fast start installation will
not be started.
BRLFS0044E: Linux distribution from FastStart file is not supported
A fast start file has been found but has a not supported Linux distribution specified in it. Fast start
installation will not be started.
156
Linux: IBM Installation Toolkit User Manual
BRLFS0045E: Wrong data in FastStart file. MAC address in FastStart profile does
not exist
A fast start file has been found but does not have a MAC address specified in it. Fast start installation
will not be started.
BRLFS0046E: Network repository given in FastStart File is not valid
A fast start file has been found but has an invalid network installation repository specified in it. Fast start
installation will not be started.
BRLFS0047E: Disk info in FastStart file does not match target resources, or there
isn't enough space for an installation
A fast start file has been found but either contains invalid disk info in it or there is not enough disk space
to be used. Fast start installation will not be started.
BRLHD0001I: Machine Type: %s
You machine type has been detected as %s.
BRLHD0002I: LPAR Number: %s
Your machine has been detected as an LPAR and its number is %s.
BRLHD0003I: LPAR not detected.
Your machine has not been detected as an LPAR.
BRLHD0004I: Video Card: %s
Your machine has a video card and it was detected as %s.
BRLHD0005I: Net Device(s): %s
Your machine has network devices and they have been detected as %s.
BRLHS0001E: Unknown Content-Type: %s
The HTTP server has received a bad request: data was sent in a unrecognized format.
BRLHS0002E: 501 - Can only POST to CGI scripts.
The HTTP server has received a POST request to get a static file. POST requests should only be made to
invoke plugins.
BRLHS0004E: 503 - Script failed.
The HTTP server detected that the execution of some script within IBM Installation Toolkit failed. Report
this problem in the IBM Installation Toolkit Support Forum (http://www-128.ibm.com/developerworks/
forums/dw_forum.jsp?forum=937&cat=72) for the development team to fix the problem.
BRLHS0005E: Exception while executing %s(%s): %s
The HTTP server detected that an error happened inside a plugin and was not properly handled by it.
Chapter 8. Troubleshooting
157
BRLHS0006E: Tried to access data outside root ('%s'): '%s'
The HTTP server detected an attempt to access a file in a not allowed directory.
BRLHS0007E: No default specified for URL '%s'
The HTTP server received a request for which no handler exists and a default handler has not been
found to treat it.
BRLHS0008I: Server interrupted by keyboard, quit.
The HTTP server has terminated because the user pressed CTRL+C.
BRLHS0010I: Starting watcher thread for Taskrunner %s.
The HTTP server has started a watcher thread to look for a taskrunner instance.
BRLHS0011W: Taskrunner %s is down.
The HTTP server has not detected a working taskrunner instance.
BRLHS0012W: Watcher thread did not find taskrunner PID
The HTTP server watcher thread did not find a taskrunner instance.
BRLIN0001E: ERROR SETTING LOCALE - %s
This is a generic message used for debugging purposes only.
BRLIN0002E: When setting locale %s (%s)
This is a generic message used for debugging purposes only.
BRLIS0001E: No TFTP Path specified
The TFTP export directory field of the "Network Server Setup/Update" wizard was left blank. Specify the
protocol export directory in order for the IBM Installation Toolkit to be able to copy all necessary files to
setup the TFTP service.
BRLIS0003E: No ISO image file specified
The IBM Toolkit source field of the "Network Server Setup/Update'' wizard was left blank. Specify the
complete path with the ISO files in order for the IBM Installation Toolkit to be able to copy all necessary
files to the repository directories.
BRLIS0005E: Invalid TFTP Path
The specified TFTP export directory is invalid. Specify a valid destination directory. The directory entry
must start with a forward slash (/) and should not contain any empty spaces.
BRLIS0007E: Invalid DVD disc or ISO image file
The specified IBM Toolkit source information is invalid. Specify a valid destination directory. The
directory entry must start with a forward slash (/) and should not contain any empty spaces. This
information must include the ISO file name.
158
Linux: IBM Installation Toolkit User Manual
BRLIW0013W: You should not try install a new system within your real system.
The IBM Installation Toolkit must be used to reinstall a Linux system. Trying to install a Linux system
above an already existing installation would destroy all of the current data. You cannot proceed with this
option.
BRLIW0017E: No IP address specified
The IP address field was left blank. You must specify an IP address for the network card being
configured.
BRLIW0022E: License terms must be accepted in order to proceed
In order to enter Welcome Center, you must accept the license terms. If you do not agree with the terms
of the licenses, reject the license. Note that rejecting the license will make it impossible to use Welcome
Center
BRLIW0030E: No netmask specified
The netmask field was left blank. You must specify a network mask for the network card being
configured.
BRLIW0032E: Invalid netmask
The netmask entered is invalid. You must specify a valid network mask for the network card being
configured.
BRLIW0033E: Invalid gateway
The gateway entered is invalid. You must specify a valid gateway for the network card being configured.
BRLIW0034E: Invalid IP address
The IP address entered is invalid. You must specify a valid IP address for the network card being
configured.
BRLIW0043E: Fingerprint check failed on Packages Server
The Welcome Center could not check the fingerprint on the Packages Server repository. This means that
either the information to contact the server is incorrect or that the specified repository was not set up
with the System Tools. Contact the server administrator for more information.
BRLIW0044E: Fingerprint check failed on Install Server
The Welcome Center could not check the fingerprint on the Install Server repository. This means that
either the information to contact the server is incorrect or that the specified repository was not set up
with the System Tools. Contact the server administrator for more information.
BRLIW0047E: No disks found on current machine
No disks were found on current machine. In order to proceed with Linux installation, you must have one
installed disk device on you machine.
BRLIW0051E: Invalid DNS address
The DNS address entered is invalid. You must specify a valid DNS address for the network configuration.
Chapter 8. Troubleshooting
159
BRLIW0054E: Invalid hostname
The hostname entered is invalid. You must specify a valid hostname for the network configuration.
BRLIW0055E: No hostname specified
The hostname field was left blank. You must specify a valid hostname for the network configuration.
BRLIW0056E: Could not determine route to Install Server. Check the network setup
The Wizard could not determine which network interface is being used to connect to the Install Server.
You may check if the system's network is properly configured and try again.
BRLIW0057E: Could not mount CD/DVD drive
The filesystem may have been changed and it was not possible to create the directory used for mounting
the CD/DVD media. Try to reboot the IBMIT live system or perform a network based install.
BRLIW0058E: No valid Linux distribution CD/DVD found
No CD/DVD media containing a suitable Linux distribution was found. Make sure you inserted the
correct media and that it is not corrupted.
BRLIW0059I: Packages on external repositories are not accessible due to
connectivity issues
It was not possible to connect to external repositories. This may be caused by a firewall or a
misconfigured network. Check your network configuration to make sure the machine is able to connect to
external sites.
BRLIW0060E: USB device does not contain a valid IBMIT media
The USB device does not contain a valid IBMIT image. The device content may have been changed or the
IBMIT image was not generated correctly. During image generation, make sure to choose to include the
IBM packages.
BRLIW0061E: USB media cannot be used: not able to retrieve UUID
Could not retrieve partition UUID information from USB device. Try to generate a new IBMIT image for
the device.
BRLIW1001I: No configured network interface
The system's network is not configured, which means you will not be able to perform network based
installations. Either configure the network or choose another installation type.
BRLIW1002I: No CD/DVD drive found
The system does not have a CD/DVD-ROM drive available, which means you will not be able to
perform CD/DVD based installations.
BRLIW1003E: There is no available install media
The IBM Installation Toolkit could not find any CD/DVD-ROM drive or network connection available on
the system. At least one of these medias are required in order to allow the Toolkit to install.
160
Linux: IBM Installation Toolkit User Manual
BRLIW1004E: No disks found on current machine
The IBM Installation Toolkit could not find any disks available on the system. The system must have a
disk in order to proceed with the installation.
BRLIW1005E: License terms must be accepted
The IBM Installation Toolkit will not allow to proceed until the license terms are accepted.
BRLIW1006E: Root password does not match
The root password and the confirmation entered are not the same. Make sure to type the same password
on the root password and confirmation fields and try again.
BRLIW1007E: Root password must be set
The root password field was left blank. A root password must be entered in order to continue the
installation process.
BRLIW1100E: Invalid Driver Update Disk for the selected distro or driver already
loaded
The optical media does not contain a valid Driver Update Disk for the selected distro or the driver was
already loaded.
BRLIW1101E: More than one source selected for Driver Update Disk
You cannot select more than one source for Driver Update Disk at a time.
BRLIW1102E: You must select at least one valid Driver Update Disk
No Driver Update Disk was selected. You must select one to proceed.
BRLLC0001E: Error creating storage pool
During the LPAR creation process an error occurred when trying to create the storage pool. Check the log
at /var/log/wui for details and verify if the HMC or IVM management system is properly configured.
BRLLC0002E: There is no MAC address information set up.
A MAC address has not been passed to the DHCP module.
BRLLC0003E: There is no IP address information set up.
An IP address has not been passed to the DHCP module.
BRLLC0004E: There is no hostname information set up.
A hostname has not been passed to the DHCP module.
BRLLC0005E: There is a entry with same hostname in DHCP configuration file.
The passed hostname is already used for another machine in the DHCP configuration file.
Chapter 8. Troubleshooting
161
BRLLC0006E: There is a entry with same MAC address in DHCP configuration file.
The passed MAC address is already used for another machine in the DHCP configuration file.
BRLLC0007E: Error while adding the new host to DHCP configuration file.
There was a problem when trying to add a new host to DHCP configuration file.
BRLLC0008E: Error while updating or restarting DHCPD.
There was an error when restarting the DHCP server. Check if it is installed and properly configured.
BRLLC0010E: Unable to list available storage pools.
The storage pools on the VIOS could not be listed. Check the log at /var/log/wui for details and verify
if the HMC or IVM management system is properly configured.
BRLLC0011E: Target contains no Management System.
The information provided does not refer to a management system. Verify the information entered to
make sure it refers to a HMC or IVM management system.
BRLLC0014E: Error creating virtual disk.
An error occurred during the LPAR creation process when trying to create the virtual disk. Check the log
file at /var/log/wui for details and verify if the HMC or IVM management system is properly
configured.
BRLLC0015E: This IP is already configured to another machine.
The IP address specified to be assigned to the LPAR is already assigned to another host in the DHCP
configuration file. Specify another IP address. Consult your network administrator for available IP
addresses.
BRLLC0016E: Not able to find available SCSI slots. Please create one and try
again.
It has not been possible to find available SCSI slots in HMC. An LPAR cannot be created without a SCSI
slot. Create one in HMC to proceed.
BRLLC0017E: LPAR name already in use. Please choose a different one.
The name provided for the new LPAR is already in use by another LPAR in the HMC or IVM
management system. Choose another name for the new LPAR.
BRLLC0018E: No source system IP address specified
An IP address has not been specified to access the source system. Specify one to proceed.
BRLLC0019E: Source system IP address is not valid
An invalid IP address has been specified to access the source system. Specify one to proceed. A valid IP
address could be 192.168.1.54, for example.
162
Linux: IBM Installation Toolkit User Manual
BRLLC0020E: No source system port number specified
An port number has not been specified to access the source system. Specify one to proceed.
BRLLC0021E: Source system port number is not valid
An invalid port number has been specified to access the source system. Specify one to proceed. A valid
port number is an integer between 0 and 65535.
BRLLC0022E: Source system root password not specified
A root password has not been specified to access the source system. Specify one to proceed.
BRLLC0023E: No management system IP address specified
An IP address has not been specified to access HMC or IVM management system. Specify one to proceed.
BRLLC0024E: Management system IP address is not valid
An invalid IP address has been specified to access the HMC or IVM management system. Specify one to
proceed. A valid IP address could be 192.168.1.54, for example.
BRLLC0025E: No management system port number specified
A port number has not been specified to access the HMC or IVM management system. Specify one to
proceed.
BRLLC0026E: Management system port number is not valid
An invalid port number has been specified to access the HMC or IVM management system. Specify one
to proceed. A valid port number is an integer between 0 and 65535.
BRLLC0027E: Management system user not specified
A username has not been specified to access the HMC or IVM management system. Specify one to
proceed.
BRLLC0028E: Management system password not specified
A password has not been specified to access the HMC or IVM management system. Specify one to
proceed.
BRLLC0029E: No LPAR IP address specified
No IP address has been specified to be assigned to the LPAR. Specify one to proceed.
BRLLC0030E: LPAR IP address is not valid
An invalid IP address has been specified to be assigned to the LPAR. Specify a valid one to proceed. A
valid IP address could be 192.168.1.54, for example.
BRLLC0032W: A source machine was passed but no profile could be retrieved
from it
It was not possible to retrieve required information about the source machine. The LPAR creation process
cannot continue.
Chapter 8. Troubleshooting
163
BRLLC0033E: There is no storage resources (disk) enough to be used
No storage pools with space enough to perform an installation like the one present in the source machine
could be found to be assigned to the LPAR. The LPAR creation process cannot continue.
BRLLC0034E: Needed space could not be calculated
The disk space needed to perform an installation like the one present in the source machine could not be
determined. The LPAR creation process cannot continue.
BRLLC0035E: The passed hostname is already configured to another machine
The passed hostname is already used for another machine in the DHCP configuration file. Choose
another hostname to proceed.
BRLLC0036E: No subnets have been found
No subnets have been found in the DHCP configuration file. Add one to proceed. You can do it manually
or using the tool "Manage Client Systems".
BRLLC0037E: No subnet specified
No subnet has been specified for the LPAR. Specify one to proceed.
BRLMT0001E: No IP Address specified
It is necessary an IP address to proceed. This message could occurs when the Source or Target IP address
is missing to execute some process. Inform a correct IP address to proceed.
BRLMT0002E: IP address is not valid
The IP address given is not valid. The IP address must follow the format [0-255].[0-255].[0-255].[0-255].
Examples of valid addresses are 10.2.0.1 and 192.168.3.20. Invalid addresses are 455.303.100.20 or 10.0.0.
BRLMT0003E: No port number specified
The SSH port number of the Source machine was not specified. The port number is necessary to upload
the IBM Server Consolidation Tool public key to the source machine. Inform the correct SSH port of the
machine. If the user doesn't know this information, contact the machine's administrator.
BRLMT0004E: Port number is not valid
The given port number is not valid. It must be an integer value in the range 0-65535.
BRLMT0005E: Root password not specified
The root password of the Source machine was not specified. This information is necessary to upload the
IBM Server Consolidation Tool public key to the source machine, to execute all scripts to fetch the system
information, and realize the migration of LAMP data from Source to Target machine. Inform the correct
password. If you don't know this information, contact the machine's administrator.
BRLMT0011E: Client Sender Error Msg: %s
Some error happened while starting the client consolidation application that fetches the source profile.
See the error message for more details.
164
Linux: IBM Installation Toolkit User Manual
BRLMT0012I: Sending the client consolidation application to %s
Status message. Sending the client consolidation application to the given host.
BRLMT0013I: Transfer completed. [OK]
Status message. File transfer completed with success.
BRLMT0014I: Client decompressed!
Status message. Client consolidation application was decompressed successfully.
BRLMT0015I: Client consolidation application started. [OK]
Status message. Client consolidation application is running. No problems reported.
BRLMT0016E: ERROR: The client consolidation applicantion didn't start.
Some error happened while starting the client consolidation application. Check the logs for more
information.
BRLMT0017E: ERROR: The upload of the client consolidation application to %s
has failed.
Some error happened while sending the client consolidation application to the given host. Check the logs
for more information.
BRLMT0018E: Invalid IP address for Install Server
The provided IP for the installation server is either incomplete or in an invalid format. The IP address
must follow the format [0-255].[0-255].[0-255].[0-255]. Examples of valid addresses are 10.2.0.1,
192.168.3.20. Invalid addresses are 455.303.100.20 or 10.0.0.
BRLMT0019W: Could not connect to Install Server
The system tried to contact the installation server at the specified IP address using the specified protocol
but did not obtain any reply. This is probably caused by incorrect network configurations (incorrect IP
address, incompatible protocol between the client and the server) or a temporary failure on the server.
Check the network configuration and make sure that the IP and network protocol used to access the
server is correct. If the settings are correct, the server might be having problems. In this case, try again
later or contact the server's administrator for more information.
BRLMT0020E: The inserted install server directory is not valid
The specified directory for the installation server is not in a valid format. The directory entry must start
with a slash ("/") and should not contain any empty spaces in it.
BRLMT0021E: Invalid IP address for Packages Server
The provided IP for the packages server is either incomplete or in an invalid format. The IP address must
follow the format [0-255].[0-255].[0-255].[0-255]. Examples of valid addresses are 10.2.0.1, 192.168.3.20.
Invalid addresses are 455.303.100.20 or 10.0.0.
Chapter 8. Troubleshooting
165
BRLMT0022E: Could not connect to the Packages Server
The connection between the Server Consolidation Tool machine and the Packages Server is not working.
It is recommended that you verify the IP address and protocol chosen for the packages server
communication. Most likely the IP address is not correct for the packages server IP, or the server is not
set to work with the protocol chosen.
BRLMT0023E: Invalid directory for Packages Server
The specified directory for the packages server is not in a valid format. The directory entry must start
with a forward slash (/) and should not contain any empty spaces.
BRLMT0024E: Fingerprint check failed on Packages Server
The IBM Server Consolidation Tool could not check the fingerprint on the Packages Server repository.
This means that either the information to contact the server is incorrect or that the specified repository
was not set up with the System Tools. Contact the server administrator for more information.
BRLMT0025E: Fingerprint check failed on Install Server
The IBM Server Consolidation Tool could not check the fingerprint on the Install Server repository. This
means that either the information to contact the server is incorrect or that the specified repository was not
set up with the System Tools. Contact the server administrator for more information.
BRLMT0026E: No protocol specified for Install Server
The protocol for the Install Server was left blank. Specify the protocol in order for the IBM Installation
Toolkit to be able to retrieve the required packages. The available options are HTTP, FTP or NFS.
BRLMT0027E: No IP address specified for Install Server
The IP address field for the Install Server was left blank. The user needs to specify this information in
order for the IBM Installation Toolkit to be able to retrieve the required packages for the Linux
distributions.
BRLMT0028E: No directory specified for Install Server
The directory field for the Install Server was left blank. Specify the directory in order for the IBM
Installation Toolkit to be able to retrieve the required packages.
BRLMT0029E: No protocol specified for Packages Server
The protocol for the IBM Packages Server was left blank. Specify a protocol in order for the IBM
Installation Toolkit to be able to retrieve those packages.
BRLMT0030E: No IP address specified for Packages Server
The IP address field for the Packages Server was left blank. Specify the IP address in order for the IBM
Installation Toolkit to be able to retrieve the required packages.
BRLMT0031E: No directory specified for the Packages Server
The directory field for the IBM Packages Server was left blank. Specify the IBM packages server in order
for the IBM Installation Toolkit to be able to retrieve those packages.
166
Linux: IBM Installation Toolkit User Manual
BRLMT0032E: ERROR: Dependency error in client:
There is no some dependency of the Server Consolidation Client application. Install the dependency and
try again.
BRLMT0033E: Source architecture not supported
The architecture of the Source machine is not supported by the Server Consolidation Tool. The Source
architectures supported are: x86 (i386, i486, i586 and i686) and x86_64.
BRLMT0034E: Source distro not supported
The distribution of the Source machine is not supported by the Server Consolidation Tool. The Source
distributions supported are: Red Hat Enterprise Linux 4 (and its updates 1, 2, 3, 4, 5 and 6), Red Hat
Enterprise Linux 5 (and its updates 1, 2 and 3), SLES 9 (and its service packs 1, 2, 3 and 4) and SLES 10
(and its service packs 1 , 1U1 and 2).
BRLMT0035E: There's no possible target distro to the current source
The Server Consolidation Tool could not translate the Source distribution information to a Target
distribution value. Check if the Source distribution is one of the supported distros and try again.
BRLMT0036E: No hosts defined in System Tools. You need to first define hosts in
Server Management in the main menu
There is no Target machine candidate to migrate. The user need to add, at least one, Target candidate to
complete a migration. To add a machine as a Target candidate, use the Server Management Manage
Client Systems of the System Tools' main menu.
BRLMT0037E: Target architecture not supported
The architecture of the Target machine is not supported by the Server Consolidation Tool. The Source
architecture supported is: PPC.
BRLMT0038E: Target distro not supported
The distribution of the Target machine is not supported by the Server Consolidation Tool. The Source
distributions supported are: Red Hat Enterprise Linux 4 (and its updates 1, 2, 3, 4, 5 and 6), Red Hat
Enterprise Linux 5 (and its updates 1, 2 and 3), SLES 9 (and its service packs 1, 2, 3 and 4) and SLES 10
(and its service packs 1 , 1U1 and 2).
BRLMT0039E: Invalid MAC address to the target system
The MAC address of the Target machine is wrong or doesn't exist. Check the correct MAC address in the
Server Management Manage Client Systems icon of the System Tools' main menu. The MAC address
must follow the format [??]:[??]:[??]:[??]:[??:[??], where ? should be an integer from 0 to 9 or upper case
characters from A to F. Examples of valid addresses are 00:15:58:0B:5A:5F, 12:29:80:00:30:03 and
22:4C:90:00:30:03. If you do not know this information, contact your network administrator.
BRLMT0040E: Error trying to set Target system
Some problem happened while the Server Consolidation Tool tried to set up the Target system
informations. Please, restart the migration process.
Chapter 8. Troubleshooting
167
BRLMT0041I: Starting the migration process of the file %s
Status message. The given file is being migrated from the Source to the Target machine.
BRLMT0042E: ERROR: Could not connect to the RPC server %s:%s
Can't connect to the client consolidation application via RPC. Check the error message for more details.
BRLMT0043E: ERROR: Could not migrate the file %s
Problems trying to migrate the given file from Source to Target machine. Check the log files for more
information.
BRLMT0044E: Not able to load config file: "%s"
Cannot load configuration file. Check the configuration file content.
BRLMT0045I: Loaded "%s" from "%s"
Status message. Loaded client consolidation application module.
BRLMT0046E: Not able to load "%s" from module "%s"
Error loading client consolidation application module.
BRLMT0047E: Not suitable interpreter for "%s"
Couldn't find a valid interpreter for the given rule.
BRLMT0048E: Error returned from code: -- START OF CODE -- %s -- EOF CODE -Error returned while trying to fetch information from the Source machine. Check the error message for
mode details.
BRLMT0049I: Opening port "%s" on the firewall
Status message. Opening the required ports in the firewall so the server consolidation tool can run
properly.
BRLMT0050I: Closing port "%s" on the firewall
Status message. Closing the server consolidation tool and cleaning firewall rules.
BRLMT0051E: Program aborted by signal "%s"
Client consolidation application aborted unexpectedly. Check the error message for details on the cause.
BRLMT0052I: Starting RPC Server on port "%s"
Status message. Starting the client consolidation application RPC Server.
BRLMT0053E: Config file not found. Aborting...
Config file not found.
168
Linux: IBM Installation Toolkit User Manual
BRLMT0054I: Creating RPC connection: %s:%s
Status message. Creating RPC connection to the client consolidation application
BRLMT0056E: ERROR: Could not create the Fast-Start file. Please, accept the
license before.
You must accept the IBM Installation Toolkit license before being able to create a Fast-Start file.
BRLMT0058E: You need to migrate users and groups if you want to migrate home
directories
In order to be able to migrate the home directories from the Source machine to the Target machine, you
must also perform the migration the users and groups.
BRLMT0059E: ERROR: Could not create the MySQL dump in client machine.
Could not dump the MySQL databases in the Source machine. Make sure you used the correct password
and that your MySQL server is running in the client machine.
BRLMT0061E: MySQL ERROR: %s - %s
Error accessing the MySQL server in the Source machine. Check the error message for more details.
BRLMT0062E: Not able to pickle profile
Could not serialize the given object to transfer via RPC.
BRLMT0064W: Can't translate from Null source
Couldn't find a valid Source profile for translation. Check the log files for more information.
BRLMT0065W: Can't translate to Null target
Couldn't translate the Source profile to a Null target machine. Some problem happened while defining
the target machine.
BRLMT0066W: Error trying to run %s.translate()
An Error happened while translating the Source profile to the target machine.
BRLMT0067E: Error translating from source to target machine
An Error happened while translating the Source profile to the target machine.
BRLMT0068E: Error writing installation file
Error writing the installation file. Make sure your disk is not full.
BRLMT0069E: Error migrating group %s - %s
Could not migrate the given group from the Source to the Target machine.
Chapter 8. Troubleshooting
169
BRLMT0070E: Can't migrate users, error while dumping GroupsInfo
Error while migrating the users from Source to Target system. Couldn't interpret user's group
information.
BRLMT0071E: Error migrating user %s - %s
Couldn't migrate the given user. Check the error message for mode details.
BRLMT0072E: No hostname specified
The hostname of the Target machine is wrong or doesn't exist. Check the correct hostname in the Server
Management Manage Client Systems icon of the System Tools' main menu.
BRLMT0073E: Process already running with pid %s. Use --force to override
There's already a running process with the same pid. You must use the --force switch to kill the old
process and open a new one.
BRLMT0074E: Killing zombie process %s not present in /var/run/xmm.pid
Killing zombie client consolidation application process.
BRLMT0075E: The given path does not exist in the source system
The path of the additional data doesn't exists in the Source machine. Check the correct path and try
again.
BRLMT0076E: Error while connecting to source to validate the given path
The IBM Server Consolidation Tool could not connect to the Source machine to verify if the path of an
additional file exists or not. Please, check if the network of the Source machine is up and running and try
again.
BRLMT0077E: Migrating the given path would probably break the target system
The path of the additional file inserted is not a valid path to migrate. The following paths are considered
not valid to migrate as additional file: /, /bin, /dev, /lib, /sbin, /proc, /usr, /boot, /etc, initrd, /opt,
/selinux, /sys and /var.
BRLMT0078E: Caught exception: %s
Caught unexpected exception. Check error message for more details.
BRLMT0079E: Error getting remote system info
Couldn't create the Source machine profile. Unable to grab Source's information.
BRLMT0080E: Not able to unpickle profile
Unable to serialize the profile from Source machine.
BRLMT0081E: SSH login failed
The IBM Server Consolidation Tool could not connect to a remote machine using SSH. Check if the SSH
server is up and running in the remote machine and try again.
170
Linux: IBM Installation Toolkit User Manual
BRLMT0082E: There's no /root/.ssh dir in the client machine
The IBM Server Consolidation Tools could find two possible problems. First, there is no /root/.ssh
directory in the Source machine. Please, create it and try again. Second, the Source machine public key
has changed and the Network Server machine (System Tools machine) doesn't recognize it any more.
Please, delete the old Source machine public key information from the root known_hosts file and try
again.
BRLMT0083E: Can't migrate to Null source
Couldn't get Source machine information. Unable to migrate data from a Null Source.
BRLMT0084E: Can't migrate to Null target
Couldn't get Target machine information. Unable to migrate data a to Null Target
BRLMT0085E: Target's RPC server finalized!
Successfully closed the RPC connection with Target.
BRLMT0086E: Sources' RPC server finalized!
Successfully closed the RPC connection with Source.
BRLMT0088E: Can't validate distro repository. Null distro.
The Install Server could not be validated. Please, check if there is a compatible Install directory
(repository) with the Target distribution value.
BRLMT0089E: Can't validate distro repository. No Repository info.
The Install Server could not be validated. Please check if the Install directory (repository) is accessible via
network.
BRLMT0090E: Protocol is not supported
The protocol chosen to install the distribution is not supported. The supported protocols are: HTTP, FTP
and NFS.
BRLMT0091E: Can't validate PowerPack repository. Null Repository info.
The IBM Packages Server could not be validated. Please, check if the Packages directory (repository) is
accessible via network.
BRLMT0092E: Registering '%s interpreter' for '%s' on '%s'[%s]
Registered the given interpreter in the client consolidation application.
BRLMT0093E: Error while creating symbolic links.
The IBM Server Consolidation Tool could not create the necessary symbolic links to run the client
application. Check if you are running the System Tools as root and if the /etc directory has the correct
permissions to execute the job.
Chapter 8. Troubleshooting
171
BRLMT0094I: Public key transfer completed.
Successfully transfered the Server Consolidation Tool's public key (SSH) to the Source machine.
BRLMT0095E: Error while transfering public key.
The IBM Server Consolidation Tool public key could not be transferred to the Source machine. Check if
the SSH is up and running in the Source machine, or if the SSH port of the Source machine is open in the
Source's firewall.
BRLMT0096E: Error while adding public key into authorized_keys file.
The IBM Server Consolidation Tool public key could not be inserted in the file that gives remote
authorization to the Source machine. Check if the /root/.ssh/authorized_keys files exists and/or if its
permissions are correct (root needs to write in it).
BRLMT0097E: Not able to load rule (%s), please check XML syntax.
Not able to load the given rule inside the client consolidation application.
BRLMT0098E: Not able to load configurations on (%s), aborting...
Not able to load configurations for the client consolidation application.
BRLMT0099E: Please, select only one Mail profile
The IBM Server Consolidation Tool only allows to select one Mail profile (for example Sendmail or
Postfix) at the same time. Choose one of them to proceed.
BRLMT0113E: Not able to fetch drc_name for: %s
The Tool could not retrieve the drc_name for the device during the LPAR creation process. Check the log
at /var/log/wui for details and verify if the HMC/IVM system is properly configured.
BRLMT0114E: Error mapping vhost to physical devices
An error occurred during the LPAR creation process. Check the log at /var/log/wui for details and
verify if the HMC/IVM system is properly configured.
BRLMT0117E: Not able to create LPAR: %s
Error while creating new LPAR during the migration process. Check the error message for more details.
BRLMT0118E: Not able to bind LPAR '%s' to storage '%s'
During the LPAR creation process the Tool could not bind the LPAR to the virtual disk. Check the log at
/var/log/wui for details and verify if the HMC/IVM system is properly configured.
BRLMT0119E: Not able setup DHCP Server for the new LPAR
The Tool could not register the new LPAR in the DHCP server. Check the log at /var/log/wui for details
on the cause of the error.
172
Linux: IBM Installation Toolkit User Manual
BRLMT0120E: Not able to create virtual ethernet adapter
During the creation process the Tool could not create a virtual Ethernet adapter for the new LPAR. Check
the log at /var/log/wui for details and verify if the HMC/IVM system is properly configured.
BRLMT0122E: Can't fetch MAC address for virtual network interface
The Tool could not retrieve the MAC address of the LPAR network interface when registering it on the
DHCP server. Check the log at /var/log/wui for details and verify if the HMC/IVM system is properly
configured.
BRLMT0123E: Can't remove LPAR
During the LPAR creation process an error occurred and the Tool failed to issue a command to remove
the LPAR. Check the log at /var/log/wui for details and verify if the HMC/IVM system is properly
configured.
BRLMT0124E: The MySQL root password entered is invalid. Please try again.
The MySQL root password supplied to the Tool is invalid. A valid password is needed in order to access
the MySQL server on the source machine. Check the password and try again.
BRLMT0125E: There is a problem with the MySQL installation on the source
machine. Please check before proceeding.
The Tool was not able to start the MySQL server on the source machine. Verify if the Mysql server is
correctly configured and can be started.
BRLMT0126E: Error: could not migrate path %s - code: %s - %s
Error while migrating additional data from Source to Target machine.
BRLMT0127E: A valid path must be passed
The given path is not valid. Make sure it exists in the Source machine and can be accessed by the root
user.
BRLMT0128E: A valid URL must be passed for distro packages repository
The URL provided as distro packages repository is invalid. Enter a valid URL to proceed.
BRLMT0129E: A valid URL must be passed for IBM packages repository
The URL provided as IBMIT packages repository is invalid. Enter a valid URL to proceed.
BRLMT0130E: No target machine selected
You have to select a target machine to proceed with this operation.
BRLMT0131E: No source machine selected
You have to select a source machine to proceed with this operation.
Chapter 8. Troubleshooting
173
BRLMU0001W: Firmware update disabled
The Firmware update is disabled when the context does not permit this feature to be used. This could
happen while trying to update the firmware of an unsupported architecture.
BRLMU0002W: Could not determine system's architecture
The architecture of the machine running the IBM Installation Toolkit could not be automatically
determined. This probably means that you are running the system using an HMC machine. If this is your
case, you should use the HMC's interface to perform the action.
BRLMU0003E: Error fetching firmware information
The wizard was not able to determine the system's firmware data. This may be caused by a missing or
incorrectly installed lsvpd package. Try verifying if the package is correctly running on the system.
BRLMU0004E: Permanent firmware running
Firmware updates cannot be performed while the system is running with the firmware from the
permanent side. Reboot the system with the firmware from the temporary side and try again.
BRLMU0005E: Could not mount CD/DVD
The wizard was not able to create the mount point directory in order to mount the IBM Installation
Toolkit media. Verify if the filesystem permissions are correctly set to allow the creation of the directory
mount point specified in the wizard's error message and try again.
BRLMU0006E: IBM Installation Toolkit media not found
The wizard could not find the IBM Installation Toolkit media in any of the optical devices. Check the
media inserted and try again.
BRLMU0007E: No firmware available
The IBM Installation Toolkit media does not contain any suitable firmware image for the machine.
Consider downloading a firmware image file and select it at the filesystem menu in the wizard.
BRLMU0008I: No CD/DVD drive found
No CD/DVD drive was found in your system. Because of that, no option is available to load firmware
images from the IBMIT DVD. If you have a CD/DVD drive, it may not be working.
BRLMU0009E: Could not validate file type; IBM Installation Toolkit media not found
A problem occurred while trying to access the media in the drive. Verify if the media is inserted in the
drive and it is correctly working.
BRLMU0010E: The file %s is not a valid firmware image
The firmware file selected is not a valid RPM package or raw data file. Verify the file provided and try
again.
BRLMU0011E: No firmware image file chosen
You have to select a firmware image file in order to proceed.
174
Linux: IBM Installation Toolkit User Manual
BRLMU0012E: Error installing firmware RPM package
An error occurred while installing the RPM package provided. Verify if the package file is valid.
BRLMU0013E: Error creating temporary directory /tmp/fwupdate
The wizard was not able to create the directory /tmp/fwupdate. Verify if the filesystem permissions
allow the creation of this directory and try again.
BRLMU0014E: Error copying image file to temporary directory /tmp/fwupdate
The firmware file could not be copied to the directory /tmp/fwupdate. Verify if the filesystem
permissions are correctly set to allow file copies to this directory and try again.
BRLNC0001E: No network card selected
You have to select a network card to be configured from the network interfaces list.
BRLNC0002W: The interface link is currently down
This message warns you that the network interface selected has no link (no cable connected). You may
continue configuring it but it will not work until the link is up.
BRLNC0003E: Invalid IP address entered
The IP address inserted is not a valid address. Specify a valid IP address in order for the IBM Installation
Toolkit to be able to set the IP address for the selected network interface. If you do not know this
information, contact your network administrator.
BRLNC0004E: No IP address specified
The IP address field was left blank. Specify an IP address in order for the IBM Installation Toolkit to be
able to set the IP address for the selected network interface.
BRLNC0005E: Invalid network mask entered
The network mask inserted is not a valid mask. Specify a valid network mask in order for the IBM
Installation Toolkit to be able to set the selected network interface. If you do not know this information,
contact your network administrator.
BRLNC0006E: No network mask specified
The network mask field was left blank. Specify a network mask in order for the IBM Installation Toolkit
to be able to set the network interface correctly.
BRLNC0007E: Invalid gateway entered
The gateway address entered is not a valid gateway. Specify a valid gateway address in order for the IBM
Installation Toolkit to be able to configure the selected network interface or you may leave it blank.
BRLNC0008E: Invalid DNS server entered
The DNS server address entered is not valid. Specify a valid DNS address in order for the IBM
Installation Toolkit to be able to configure the selected network interface or you may leave it blank.
Chapter 8. Troubleshooting
175
BRLPV0008E: It has not been possible to complete the operation due to an error
in the PowerVM Lx86 installer
An error occurred while running the PowerVM Lx86 installer. Check the log file at /var/log/wui for
details on what may have caused the problem.
BRLPV0017E: PowerVM Lx86 does not support the current installed distro
The Linux distribution current installed on the system is not supported by PowerVM Lx86. In order to
install the PowerVM, the machine has to be running a distribution supported by the program.
BRLPV0018E: Invalid path: "%s". [%s]
The directory could not be created. Follow the error message and verify if the permissions are correctly
set so that the path can be created by the Toolkit.
BRLPV0019E: Can't use "%s" because it already exists.
The provided path cannot be used because it already exists on the system. Enter a new path name that
either is an empty directory or does not exist on the system.
BRLPV0020E: Unsupported distro selected
The Linux distribution selected for installation is not supported. Try selecting a different one.
BRLPV0021E: Invalid field: "%s"
The information entered for the field is incorrect. Verify the information provided and try again.
BRLPV0023E: Error creating the autorun file
An error occurred while creating the autorun file for the PowerVM Lx86 installer. Check the log file at
/var/log/wui for details on what may have caused the problem.
BRLPV0028E: Could not locate the PowerVM Lx86 rpm
The Toolkit could not find a rpm file in the PowerVM provided media. Verify if the media is not
corrupted.
BRLPV0030E: Can't use "%s" because it's a non empty directory.
The provided directory cannot be used because it is not empty. Enter a new path name that either is an
empty directory or does not exist on the system.
BRLPV0031E: Can't use "%s" as a path.
The provided directory cannot be used because it is a system reserved directory. Enter a new path name
that either is an empty directory or does not exist on the system.
BRLPV0032E: "%s" points to a file
The provided path cannot be used because it already exists on the system. Enter a new path name that
either is an empty directory or does not exist on the system.
176
Linux: IBM Installation Toolkit User Manual
BRLPV0033E: Home directory must exist ("%s")
The home directory entered does not exist on the system. Make sure to provide a home directory that is
available on the system.
BRLPV0034E: Missing medias or incorrect labeling
You have selected a number of ISOs which is less than the quantity needed. Select a number of ISOs that
corresponds to the distro and media type chosen.
BRLPV0035E: Error accessing the PowerVM Lx86 media
An error occurred when accessing the PowerVM Lx86 media. Make sure the media selected is correct and
it is not corrupted.
BRLPV0036E: Error calling the script for retrieving PowerVM Lx86 media
An internal error occurred when calling the script for retrieving the PowerVM Lx86 media. Try to start
the operation over from the beginning.
BRLPV0037E: Not a valid PowerVM Lx86 media
The PowerVM Lx86 media provided is not valid. Make sure you selected the correct media and it is not
corrupted.
BRLPV0038E: The field "%s" cannot be empty
The given field cannot be empty. Make sure to fill it to proceed.
BRLPV0039E: The field "%s" is not valid
The information entered in the given field is in an invalid format. Make sure to enter a valid information.
BRLPV0040I: Error registering the %s field "%s"
This is a generic message used for debugging purposes only.
BRLPV0041E: Error registering the product
An error occurred when saving the registering information. Try to fill the register fields again.
BRLPV0042E: PowerVM Lx86 does not support this machine
The PowerVM Lx86 does not support this machine.
BRLPV0043E: Install the required packages in order to proceed
The given packages are required by the PowerVM Lx86 but are not installed. Install them to proceed.
BRLPV0044E: Copy task canceled
The copy task has been canceled.
BRLPV0045E: The passed distro is not supported by the backend
The distro chosen is not supported by the tool's backend.
Chapter 8. Troubleshooting
177
BRLPV0046E: The passed media source is not supported by the backend
The media source type is not supported by the tool's backend.
BRLPV0047E: Media has not been found
Provided media has not been found. Verify if it is correct.
BRLPV0048E: The media type has not been passed to the backend
An internal error occurred and the media type could not be provided to the tool's backend. Try to start
the operation over from the beginning.
BRLPV0049E: Only root can perform this operation
You have to be root in order to perform this operation.
BRLPV0050E: The destination directory could not be created by the backend
The destination directory could not be created by the tool's backend. Try to start the operation over from
the beginning.
BRLPV0051E: The environment could not be set by the backend
The tool's backend was not able to set its environment. Try to start the operation over from the
beginning.
BRLPV0052E: Verification error
The tool's backend returned a verification error.
BRLPV0053I: The ISO image for %s could not be found. Please, enter its path and
press [OK].
The given ISO image could not be found. Enter the correct path for the image in order to proceed with
the operation.
BRLPV0054I: Please insert the disc %s and press [OK]
Insert the given disc in order to proceed with the operation.
BRLPV0055I: A disc could not be found in drive. Please, ensure there is a disc in it
and press [Retry] after the drive light stops blinking.
No disc could be found in drive. Make sure there is a disc inserted and that it is not corrupted.
BRLRG0001E: Network not configured
The network is not properly configured. Configure the network in order for the IBM Installation Toolkit
to be able to direct you to the IBM registration web site.
BRLRK0001E: Invalid or missing task
The application could not be launched because it was not specified or is invalid.
178
Linux: IBM Installation Toolkit User Manual
BRLRK0002E: Missing previous URL
The application could not be launched because the previous URL argument was not specified.
BRLRK0003E: Missing previous Name
The application could not be launched because the previous name argument was not specified.
BRLRK0004E: Communication error with launcher: %s
The given error occurred when communicating with the TaskRunner.
BRLRK0005I: Run task at: %s cmd: %s args: %s
The given application was launched at the specified location with the described arguments.
BRLRK0006E: Could not launch external application: %s
The given error occurred when launching the application.
BRLRK0007I: Finished. Relaunch elinks now!
The application finished and the ELinks browser was relaunched.
BRLRK0008I: Finished. Relaunch w3m now!
The application finished and the w3m browser was relaunched.
BRLRK0009E: Could not launch w3m
The application finished and the w3m browser was not relaunched.
BRLRM0001E: Not able to identify Linux distribution installed
Could not determine the running Linux distribution. This may be caused by a missing /etc/SuSE-release
or /etc/redhat-release file on the system. Check the file availability and run the wizard again.
BRLRM0002E: Error trying to fetch information from system's repository manager,
check the logs for details
It was not possible fetch information from system's repository manager. Make sure your package
manager is working properly.
BRLRM0003I: No repositories are available in the system
There are no repository available in the system. You can add a new repository by clicking on 'Add
Custom' button.
BRLRM0004E: The wizard cannot activate NFS repositories
The NFS repository can not be activated manually in Red Hat Enterprise Linux systems. Choose another
repository to activate.
BRLRM0005E: No repository was selected
No repository was selected. Select a repository and try again.
Chapter 8. Troubleshooting
179
BRLRM0006E: No repository name specified
The repository name field was left in blank. You must specify a repository name.
BRLRM0007E: No location specified
The location field was left in blank. You must specify a location to the repository.
BRLRM0008E: Invalid location entered
The location entered is invalid. You must specify a valid location according to the chosen resource type
BRLRM0009E: No destination directory specified
The destination directory field was left in blank. You must specify a destination directory.
BRLRM0010E: Invalid directory entered, cannot use a system directory
The directory location is invalid. The location can not be a system directory. Specify a new one.
BRLRM0011E: No media found, please try again
No media was found in any drive. Insert a media and try again.
BRLRM0012E: Error loading yum related libraries
The wizard failed to load a yum related library needed to run properly. Make sure you have YUM and its
dependencies correctly installed in the system and try again. Check the logs for details.
BRLRM0013E: Debug: %s
This is a generic message used for debugging purposes only.
BRLRM0014E: Error loading wizard's repository manager
The wizard failed to load its repository manager and cannot proceed. Check the logs for details.
BRLRM0015E: Path already exists, please enter a new directory
The directory entered already exists. You must specify a new directory.
BRLRM0016E: Directory name cannot contain spaces
The directory name entered contains spaces. You must specify a name without spaces.
BRLRM0017E: Linux distribution not supported
This tool does not support Red Hat Enterprise Linux 4 systems due to their lack of repository
management support. If you still want to use it, consider installing a newer version of the distribution.
BRLRM0018E: Repository name %s already exists, choose another one
The repository name entered already exists. Choose another name.
180
Linux: IBM Installation Toolkit User Manual
BRLRM0019E: Repository URL %s already installed, choose another one
The repository location already exists. Choose another one.
BRLRT0001E: IBM RAS Tools cannot continue
The IBM RAS Tools wizard is disabled when the context does not permit this feature to be used. This
happens when trying to use the RAS Tools wizard from the IBM Installation Toolkit Live CD.
BRLRT0002E: Not able to identify Linux distribution installed
The tool could not determine which Linux distribution is installed. Verify if your file /etc/redhat-release
(on Red Hat Enterprise Linux systems) or /etc/SuSE-release (on SLES systems) is in the correct format.
BRLRT0003I: No configured network interface
The system does not have any network interfaces configured, which means you won't be able to use the
network as a source to retrieve packages.
BRLRT0004I: No CD/DVD drive found
The system does not have a CD/DVD-ROM drive available, which means you won't be able to use a
CD/DVD media as a source to retrieve packages.
BRLRT0005E: No installation source available
The system does not have neither a DVD-ROM drive nor network available for retrieving packages. At
least one of them must be available in order to use the tool.
BRLRT0006E: Fingerprint check failed on repository server
The packages server provided is not valid. The server must be a previously configured IBM Installation
Toolkit repository.
BRLRT0007E: Package(s) license(s) must be accepted
In order to proceed with the IBM RAS Tools packages installation process, you must accept the license
terms. If the licenses are not accepted the tool cannot continue the packages installation.
BRLRT0008E: No packages selected for installation
You selected no IBM RAS Tools packages for installation. In order to continue with the IBM RAS Tools
packages installation, select at least one package for installation.
BRLRT0009W: There is another task already running. Please wait until it is
finished and try again
Two installation tasks cannot run at the same time. If an installation process is running and a new
installation is attempted, the new installation will not start and the output of the currently running
installation will be displayed.
BRLRT0010E: Error initializing repository management subsystem. Check the log
for details.
The tool failed to initialize the system's package manager (zypper on SLES or yum on Red Hat Enterprise
Linux). Check the application log for further details on what may have caused the problem.
Chapter 8. Troubleshooting
181
BRLRT0011E: Debug: %s
This is a generic message used for debugging purposes only.
BRLRT0012W: At least one external package cannot be displayed because its
repository is not installed on system.
A package is available for installation however its repository is not installed in the system. Use the
Repositories Management tool to add the external repositories available and try again.
BRLRT0013W: IBM packages cannot be displayed. Add an IBM repository in order
to display them.
The IBM packages cannot be installed if its repository is not installed in the system. Use the Repositories
Management tool to add an IBMIT repository to the system and try again.
BRLRT0014E: No packages can be displayed. Add repositories in order to display
them.
The tool could not find any suitable repositories installed. Use the Repositories Management tool to add
the IBMIT and external repositories and try again.
BRLSN0001E: Add an exported path to proceed
At least one exported path must be available in order to add a new repository. Add a new exported path
to proceed.
BRLSN0002E: Specify a valid directory name to proceed
The directory name entered is invalid. You have to specify a valid directory name to proceed.
BRLSN0003E: Specify a directory not existent in the specified export path to
proceed
The directory specified must not exist. Enter a directory name which does not exist in the filesystem to
proceed.
BRLSN0004E: Specify a directory to proceed
A directory name must be specified in order to continue.
BRLSN0005E: The distro does not support the selected media
The media type selected is not supported by the distro. Choose an approppriate media type and try
again.
BRLSN0008E: Not all required ISOs were provided
You have selected a number of ISOs which is less than the quantity needed. Select a number of ISOs that
corresponds to the distro and media type chosen.
BRLSN0010E: Free the required disk space to proceed
The required space to create to repository is not available on the disk. Free the necessary disk space
before proceeding.
182
Linux: IBM Installation Toolkit User Manual
BRLSN0011W: Ensure other tasks do not consume all required free space before
proceeding
The tool detected other tasks running that may consume the disk space available. Make sure they do not
consume all required free space before proceeding.
BRLSN0100E: Specify a path to proceed
You have to specify a path in order to proceed with this operation.
BRLSN0101E: Specify an export URL path to proceed
You have to specify an export URL path to proceed with this operation.
BRLSN0102E: Specify an existing path to proceed
The path specified does not exist. You have to specify an existing path to proceed with this operation.
BRLSN0103E: Specify a path not yet exported on the protocol to proceed
The path specified is already exported for the chosen protocol. You have to specify a path not yet
exported for the protocol to proceed.
BRLSN0104W: The export path to be deleted contains repositories
The export path to be deleted contains repositories, which means they won't be available anymore if you
proceed with the operation.
BRLSN1000E: Repository creation canceled
The repository creation task has been canceled.
BRLSN1001E: The passed distro is not supported by the backend
The distro chosen for repository creation is not supported by the tool's backend.
BRLSN1002E: The passed media source is not supported by the backend
The media source type is not supported by the tool's backend.
BRLSN1003E: Media has not been found
Provided media has not been found. Verify if it is correct.
BRLSN1004E: The media type has not been passed to the backend
An internal error occurred and the media type could not be provided to the tool's backend. You may
check the log at /tmp/log for details.
BRLSN1005E: Only root can create a repository
You have to be root in order to create repositories.
Chapter 8. Troubleshooting
183
BRLSN1006E: The destination directory could not be created by the backend
The destination directory could not be created by the tool's backend. You may check the log at /tmp/log
for details.
BRLSN1007E: The environment could not be set by the backend
The tool's backend was not able to set its environment. You may check the log at /tmp/log for details.
BRLSN1008E: Verification error
The tool's backend returned a verification error. You may check the log at /tmp/log for details
BRLSN1009I: The ISO image for %s could not be found. Please, enter its path and
press [OK].
The given ISO image could not be found. Enter the correct path for the image in order to proceed with
the operation.
BRLSN1010I: Please insert the disc %s and press [OK]
Insert the given disc in order to proceed with the operation.
BRLSN1011I: A disc could not be found in drive. Please, ensure there is a disc in it
and press [Retry] after the drive light stops blinking.
No disc could be found in drive. Make sure there is a disc inserted and that it is not corrupted.
BRLSN1012I: There was an error when copying this media
An error occurred while copying the given media. You can try again or replace the media which may be
corrupted.
BRLTM0001E: No task has been selected
No task has been chosen. A task must be selected prior to accessing its details.
BRLTM0004E: The task is finished and cannot be canceled
Once a task is finished, it cannot be canceled anymore.
BRLTP0001E: BRLTP0001E: Template error - '%s' uses invalid key - %s
An internal error occurred caused by an invalid key used on a mapping or sequence.
BRLTP0002E: BRLTP0002E: Template Error - '%s', unknown exception - %s
An unknown internal error occurred.
BRLTP0003E: BRLTP0002E: Invalid key was required %s
An internal error occurred caused by an invalid key used on a mapping or sequence.
BRLTP0004E: BRLTP0004E: Unknown error %r
An unknown internal error occurred.
184
Linux: IBM Installation Toolkit User Manual
BRLTP0005E: Template ERROR: %s %s
An error occurred when building the HTML content from the template.
BRLTR0001E: Problem while sending data %s to server.
An error occurred when sending data to the server.
BRLTR0002E: Problem packing data to send (%s).
An error occurred when packing data to send to the server.
BRLTR0003E: Problem to receiving data %s from server.
An error occurred when receiving data from the server.
BRLTR0004E: Problem unpacking received data (%s).
An error occurred when unpacking the data received from the server.
BRLTR0005E: Could not connect to server (%s).
An error occurred when trying to connect to the TaskRunner server.
BRLTR0006E: Problem closing connection (%s).
An error occurred when trying to close a socket.
BRLTR0007E: OS Error %s
This is a generic message used for debugging purposes only.
BRLTR0008E: Invalid request: %s.
The TaskRunner received the invalid request described.
BRLTR0009E: Socket Error %s.
An error occurred when trying to create a socket.
BRLTR0010I: Run %s with %s arguments
The given application has been started with the described arguments.
BRLTR0011E: OS Error %s
An error occurred when trying to kill a running application.
BRLTR0012I: Key interruption or stop interation occurred.
The application has been stopped, possibly by a key interruption.
BRLTR0013E: Unsupported state: %d
This is a generic message used for debugging purposes only.
Chapter 8. Troubleshooting
185
BRLTR0014I: Run %s with args %s
This is a generic message used for debugging purposes only.
BRLTR0015I: Run %s command.
This is a generic message used for debugging purposes only.
BRLTR0016I: Run %s with args %s
This is a generic message used for debugging purposes only.
BRLTR0017I: TaskRunner: Begin to listen for requisitions.
The TaskRunner is listening for requisitions.
BRLTR0018W: Incorrect lock usage: %s.
This is a generic message used for debugging purposes only.
BRLUC0001E: No USB key devices available
No USB key devices available. Make sure you have a USB device.
BRLUC0002E: No filesystems supported
No filesystems supported. Install ext3 or ext2 filesystems support.
BRLUC0003E: An image file must be selected
No image file was selected. You must select an image file.
BRLUC1000E: USB image creation canceled
USB creation was canceled.
BRLUC1001E: An internal error occurred, the task cannot proceed
There was an internal error: libraries could not be loaded. Check the logs in /var/log/wui/
create_usb_image.log for details.
BRLUC1002E: Error loading libraries, the task cannot proceed
There was an internal error: libraries could not be loaded. Check the logs in /var/log/wui/
create_usb_image.log for details.
BRLUC1003E: Provided media has not been found
Provided media has not been found. Check if the media was properly provided.
BRLUC1004E: The media type is not defined, the task cannot proceed
The media type is not defined. Check the logs in /var/log/wui/create_usb_image.log for details.
186
Linux: IBM Installation Toolkit User Manual
BRLUC1005E: Only root can perform this operation
Only root can perform this operation. Make sure you have root access.
BRLUC1006E: Destination directory could not be created
There was an internal error: destination directory could not be created. Check the logs in
/var/log/wui/create_usb_image.log for details.
BRLUC1007E: Environment could not be set
There was an internal error: environment could not be set. Check the logs in /var/log/wui/
create_usb_image.log for details.
BRLUC1008E: Task verification failed
There was an internal error: task verification failed. Check the logs in /var/log/wui/
create_usb_image.log for details.
BRLUC1009E: Unexpected error mounting destination partition
There was an internal error: could not mount destination partition. Check the logs in
/var/log/wui/create_usb_image.log for details.
BRLUC1010E: USB device not provided
USB device was not provided. Provide a USB device.
BRLUC1011E: Provided device is not a block device
USB device file is not valid. Insert another USB device and try again.
BRLUC1012E: Provided device is not a USB storage device
USB device is not valid. Insert another USB device and try again.
BRLUC1013E: Insufficient space available on USB device
Insufficient space available on USB device. Insert a USB device with more space.
BRLUC1014E: Unexpected exit code from sfdisk, cannot continue. Make sure the
USB device provided is not mounted or in use by any other process.
Unexpected exit code from sfdisk, cannot continue. Make sure the USB device provided is not mounted
or in use by any other process.
BRLUC1015E: Unexpected exit code from mkfs utility, cannot continue
There was an internal error: unexpected exit code from mkfs utility. Check the logs in
/var/log/wui/create_usb_image.log for details.
BRLUC1016E: Yaboot binary not available in source media
Could not find yaboot binary in source media. Verify if the source media has the yaboot installed
Chapter 8. Troubleshooting
187
BRLUC1017E: Unexpected error installing yaboot binary
There was an internal error: unexpected error installing yaboot binary. Check the logs in
/var/log/wui/create_usb_image.log for details.
BRLUC1018E: Error passing parameters to backend
There was an internal error: error passing parameters to backend . Check the logs in
/var/log/wui/create_usb_image.log for details.
BRLUC1019E: Error passing USB device parameter to backend
There was an internal error: error passing USB device parameter to backend. Check the logs in
/var/log/wui/create_usb_image.log for details.
BRLUC1020E: Error passing image source parameter to backend
There was an internal error: error passing image source parameter to backend. Check the logs in
/var/log/wui/create_usb_image.log for details.
BRLUC1021E: sfdisk not available on system
The sfdisk utility is not available in the system. Make sure sfdisk is properly installed.
BRLUC1022E: Filesystem chosen is not supported
Filesystem chosen is not supported. Choose another filesystem.
BRLUC1023E: Filesystem chosen is not supported, MKFS utility not available on
system
Filesystem is not supported, mkfs utility is not available on the system. Choose another filesystem.
BRLUC1024E: Provided image source is neither a block device nor a regular file
Provided image is neither a block device nor a regular file. Check the logs in /var/log/wui/
create_usb_image.log for details.
BRLUC1025I: The ISO image provided is not valid. Please, enter the path for a
valid %s ISO and click [OK].
The ISO provided is not valid. Verify if you selected an ISO file and try again.
BRLUC1026I: Please insert the %s media in the drive and click [OK].
Insert the requested media in the drive.
BRLUC1027I: No media could be found in the drive. Please, make sure to insert it
in the drive and click [OK].
No media was found in the drive. Insert a media and try again.
BRLWH0001E: BRLWH0001E: Inexistent wizard '%s'
This is a generic message used for debugging purposes only.
188
Linux: IBM Installation Toolkit User Manual
BRLWH0002E: BRLWH0002E: Empty referer, Could not process its data.
The data from the request could not be processed because it does not contain a valid referer.
BRLWH0003E: BRLWH0003E: Wizard %s (%s) have template error - %s
The webserver encountered an error when setting the page template.
BRLWU0001I: Invalid port number
The port number specified is invalid.
BRLWU0002I: SystemExit: unrecognized option "%s"
The given option was not recognized by the webserver.
BRLWU0003I: Server listening on %s:%d
The server is running at the given port.
BRLWW0016I: Help text requested (Idx: %s)
This is a generic message used for debugging purposes only.
BRLWW0017I: Redirecting to: %s
This is a generic message used for debugging purposes only.
Chapter 8. Troubleshooting
189
190
Linux: IBM Installation Toolkit User Manual
Part 2. Appendixes
© Copyright IBM Corp. 2009, 2010
191
192
Linux: IBM Installation Toolkit User Manual
Appendixes
Tips on using IBMIT text mode user interface
You can access the Welcome center using two modes: Graphical and Text; The text mode uses the
installed text-mode web-browser on the system to access an equivalent interface of the graphical mode.
Although equivalent, the text mode presents slight changes in order to handle all the graphical features
in the restricted area of the terminal. This section will cover these changes and general instructions to use
the text mode.
Currently the IBM Installation Toolkit for Power supports two text browsers: w3m and eLinks. The w3m
is the browser available on SuSE installed systems and on the IBM Installation Toolkit Live-DVD. The
eLinks is the browser available on Red Hat Enterprise Linux installed systems. In order to behave in a
similar way, both are customized by the IBM Installation Toolkit.
Navigating on text mode
After you start the Welcome center, it opens in the available text browser. In order to navigate, you can
use the UP, DOWN, LEFT, and RIGHT keys on the keyboard. The navigation keys on eLinks jump
between the links and fields. On w3m, the navigation keys control the cursor and you must put the
cursor over a link or a field.
When the cursor is over a link you can press ENTER to go to its destination. If the cursor is over a field
you can press ENTER to change its status or edit.
At any moment, if you want to close the text mode press Q.
Note: If you run the Welcome Center in text mode in a target system running Red Hat, you must quit
the browser with the Exit Browser option in the Utilities subwindow. q and Q cannot be used as
shortcuts with ELinks.
Text mode differences
Some steps of the wizards have instructions on the left side on graphical mode. However in text mode,
due space limitations, the instructions are folded. You must select [Show Instructions] to view. After you
complete the view, select [Hide Instructions].
How to get help from IBMIT community
You can get help from the IBMIT community.
The IBM Installation Toolkit for Linux latest ISO image, user's guide, and everything else related to it
may be found at: http://www14.software.ibm.com/webapp/set2/sas/f/lopdiags/installtools/home.html
The IBM Installation Toolkit for Linux is provided as-is only. Customers are not entitled to IBM Software
Support. However, they may submit questions and review technical information regarding the Toolkit at
the following web forum:
http://www.ibm.com/developerworks/forums/dw_forum.jsp?forum=937&cat=72&
© Copyright IBM Corp. 2009, 2010
193
Creating an assigning virtual CD/DVD devices to an LPAR
This topic explains how to create and assign a virtual CD/DVD device to an LPAR, as required to boot
IBMIT directly from the ISO image.
To create and assign a virtual CD/DVD device to an LPAR, follow these steps:
1. Access the web interface of the IVM of the machine that contains the LPAR you want to set up.
2. On the left menu of IVM main window, click View/Modify Partitions and in table of partitions
(LPARs) that appears, select the one where you want to create the new CD/DVD virtual device.
Figure 128. IVM main screen
3. Ensure the LPAR is shut down by clicking Shutdown. A window with shutdown options will appear.
Choose Immediate as the shutdown type and click OK.
4. On the IVM main window, select the name of the LPAR in the table of partitions.
5. A new window appears. Select Optical/Tape Devices to see the optical (CD/DVD) devices associated
to the LPAR and then Virtual Optical Devices to expand the table of existing virtual devices.
194
Linux: IBM Installation Toolkit User Manual
Figure 129. Optical devices associated to the LPAR
6. Select Create Device. A new virtual device will appear in the table. Click OK to create it. The window
will close and you will return to the IVM main screen.
Appendixes
195
Figure 130. New virtual optical device
7. On the IVM main screen, select the LPAR in the table and click Activate to reactivate it. The new
virtual CD/DVD device is now created and can be used at the LPAR.
Associating an ISO image to a virtual CD/DVD device of an LPAR
This topic explains how to associate an ISO image to a virtual CD/DVD device of an LPAR, as required
to boot IBMIT directly from the ISO image.
To associate an ISO image to a virtual CD/DVD device of an LPAR, follow these steps:
1. Access the web interface of the IVM of the machine that contains the LPAR
2. On the left menu of IVM main screen, click View/Modify Virtual Storage.
196
Linux: IBM Installation Toolkit User Manual
Figure 131. IVM main screen
3. On the tabs bar of the screen that appears, click Optical/Tape to see the table of ISO images available
to be assigned. Click Add Media to add the ISO image to be assigned.
Appendixes
197
Figure 132. Available ISO images table
4. A new window appears. Either click Upload media to upload the ISO image file, or click Add
existing file to use a file previously sent (by FTP, scp, etc.) to the IVM machine. Click OK to have the
ISO actually added. The window will be closed and you will return to the previous window.
198
Linux: IBM Installation Toolkit User Manual
Figure 133. ISO image upload window
Appendixes
199
Figure 134. Add existing file window
5. The ISO image is added to the table. Select it and click Modify partition assignment to assign it to a
virtual CD/DVD device of an LPAR.
200
Linux: IBM Installation Toolkit User Manual
Figure 135. ISO image added
6. Select the LPAR with the virtual CD/DVD device you want the ISO image to be assigned to and click
OK
Appendixes
201
Figure 136. Virtual CD/DVD devices to be used
The ISO image is now assigned to the virtual CD/DVD device and can be accessed at the LPAR.
202
Linux: IBM Installation Toolkit User Manual
Figure 137. ISO image assigned to the virtual CD/DVD device
Configuring the boot method to be used by the system
This topic explains how to configure the boot method to be used by the machine, as required to boot the
IBMIT live system.
To configure the boot method to be used by the machine, follow these steps:
1. Ensure that you have access to the terminal of the system, then power it on or restart it
2. After the initial hardware tests, the SMS window opens. At this window, enter 1.
Appendixes
203
IBM
IBM
IBM
IBM
IBM
IBM
IBM
IBM
IBM
IBM
IBM
IBM
IBM
IBM
IBM
IBM
IBM
IBM
IBM
IBM
IBM
IBM
IBM
IBM
IBM
IBM
IBM
IBM
IBM
IBM
IBM
IBM
IBM
IBM
IBM
IBM
IBM
IBM
IBM
IBM
IBM
IBM
IBM
IBM
IBM
IBM
IBM
IBM
IBM
IBM
IBM
IBM
IBM
IBM
IBM
IBM
IBM
IBM
IBM
IBM
IBM
IBM
IBM
IBM
IBM
IBM
IBM
IBM
IBM
IBM
IBM
IBM
IBM
IBM
IBM
IBM
IBM
IBM
IBM
IBM
IBM
IBM
IBM
IBM
IBM
IBM
IBM
IBM
IBM
IBM
IBM
IBM
IBM
IBM
IBM
IBM
IBM
IBM
IBM
IBM
IBM
IBM
IBM
IBM
IBM
IBM
IBM
IBM
IBM
IBM
IBM
IBM
IBM
IBM
IBM
IBM
IBM
IBM
IBM
IBM
IBM
IBM
IBM
IBM
IBM
IBM
IBM
IBM
IBM
IBM
IBM
IBM
IBM
IBM
IBM
IBM
IBM
IBM
IBM
IBM
IBM
IBM
IBM
IBM
IBM
IBM
IBM
IBM
IBM
IBM
IBM
IBM
IBM
IBM
IBM
IBM
IBM
IBM
IBM
IBM
IBM
IBM
IBM
IBM
IBM
IBM
IBM
IBM
IBM
IBM
IBM
IBM
IBM
IBM
IBM
IBM
IBM
IBM
IBM
IBM
IBM
IBM
IBM
IBM
IBM
IBM
IBM
IBM
IBM
IBM
IBM
IBM
IBM
IBM
IBM
IBM
IBM
IBM
IBM
IBM
IBM
IBM
IBM
IBM
IBM
IBM
IBM
IBM
IBM
IBM
IBM
IBM
IBM
IBM
IBM
IBM
1 = SMS MENU
8 = Open Firmware Prompt
Memory
Keyboard
Network
IBM
IBM
IBM
IBM
IBM
IBM
IBM
IBM
IBM
IBM
IBM
IBM
IBM
IBM
IBM
IBM
IBM
IBM
IBM
IBM
IBM
IBM
IBM
IBM
IBM
IBM
IBM
IBM
IBM
IBM
IBM
IBM
IBM
IBM
IBM
IBM
IBM
IBM
IBM
IBM
IBM
IBM
IBM
IBM
IBM
IBM
IBM
IBM
IBM
IBM
IBM
IBM
IBM
IBM
IBM
IBM
IBM
IBM
IBM
IBM
IBM
IBM
IBM
IBM
IBM
IBM
IBM
IBM
IBM
IBM
IBM
IBM
IBM
IBM
IBM
IBM
IBM
IBM
IBM
IBM
IBM
IBM
IBM
IBM
IBM
IBM
IBM
IBM
IBM
IBM
IBM
IBM
IBM
IBM
IBM
IBM
IBM
IBM
IBM
IBM
IBM
IBM
IBM
IBM
IBM
IBM
IBM
IBM
IBM
IBM
IBM
IBM
IBM
IBM
IBM
IBM
IBM
IBM
IBM
IBM
IBM
IBM
IBM
IBM
IBM
IBM
5 = Default Boot List
6 = Stored Boot List
SCSI
Speaker
Figure 138. Entering SMS window
3. The first SMS configuration window is displayed. Select the Select Boot Options entry by pressing 5.
Version SF240_358
SMS 1.6 (c) Copyright IBM Corp. 2000,2005 All rights reserved.
..............................................................................
Main Menu
1.
Select Language
2.
Setup Remote IPL (Initial Program Load)
3.
Change SCSI Settings
4.
Select Console
5.
Select Boot Options
.............................................................................
Navigation Keys:
x = eXit System Management Services
.............................................................................
Type menu item number and press Enter or select Navigation key:
Figure 139. Changing Boot Options
4. Press 1 to access the boot device type (method) selection menu
204
Linux: IBM Installation Toolkit User Manual
Version SF240_358
SMS 1.6 (c) Copyright IBM Corp. 2000,2005 All rights reserved.
..............................................................................
Multiboot
1.
Select Install/Boot Device
2.
Configure Boot Device Order
3.
Multiboot Startup <OFF>
.............................................................................
Navigation Keys:
M = return to Main Menu
ESC key = return to previous screen
x = eXit System Management Services
.............................................................................
Type menu item number and press Enter or select Navigation key:
Figure 140. Configuring Boot Device Order
5. Press 7 to see all the available boot devices (methods)
Version SF240_358
SMS 1.6 (c) Copyright IBM Corp. 2000,2005 All rights reserved.
..............................................................................
Select Device Type
1.
Diskette
2.
Tape
3.
CD/DVD
4.
IDE
5.
Hard Drive
6.
Network
7.
List All Devices
.............................................................................
Navigation Keys:
M = return to Main Menu
ESC key = return to previous screen
x = eXit System Management Services
.............................................................................
Type menu item number and press Enter or select Navigation key:
Figure 141. Selecting Device Type for booting
6. Press the number corresponding the device you want to use. You can guess the device type based on
its name:
v CD/DVD-ROM devices: Names containing the word CD-ROM, such as SCSI CD-ROM and USB
CD-ROM. Note that this choice applies both for physical and virtual devices.
v Network devices: Names containing the word Ethernet or LAN, such as Virtual Ethernet, IBM Host
Ethernet Adapter and Interpartition Logical LAN.
v USB disk devices: Names such as USB Disk. Do not mix these names with USB CD-ROM.
Appendixes
205
Version SF240_358
SMS 1.6 (c) Copyright IBM Corp. 2000,2005 All rights reserved.
..............................................................................
Select Device
Device Current Device
Number Position Name
1.
PORT - 1 IBM Host Ethernet Adapter
( loc=U78A5.001.WIH15A5-P1_t6
)
2.
Virtual Ethernet
( loc=U9113.550.06D28EB-V3-C4-T1 )
3.
Interpartition Logical LAN
( loc=U7998.60X.1019C1A-V4-C4-T1 )
4.
SCSI CD-ROM
( loc=U9113.550.06D28EB-V3-C2-T1-W8200000000000000-L0 )
5.
1
SCSI 10737 MB Harddisk, part=1 ()
( loc=U9113.550.06D28EB-V3-C2-T1-W8200000000000000-L0 )
6.
USB Disk, part-1 ()
( loc-U78A5.001.WIH15A5-P1-T1-L1-L2-L1-L0-L0 )
.............................................................................
Navigation Keys:
M = return to Main Menu
ESC key = return to previous screen
x = eXit System Management Services
.............................................................................
Type menu item number and press Enter or select Navigation key:
Figure 142. SMS available boot devices menu
7. The next screen displays the device you have chosen. Press 2 to confirm and use it to boot the
machine in normal mode.
Version SF240_358
SMS 1.6 (c) Copyright IBM Corp. 2000,2005 All rights reserved.
..............................................................................
Select Task
Virtual Ethernet
( loc=U9113.550.06D28EB-V3-C4-T1 )
1.
2.
3.
Information
Normal Mode Boot
Service Mode Boot
.............................................................................
Navigation Keys:
M = return to Main Menu
ESC key = return to previous screen
x = eXit System Management Services
.............................................................................
Type menu item number and press Enter or select Navigation key:
Figure 143. Setting the chosen device as the 1st boot device
8. Press 1 and then Enter to leave the SMS menu and start the boot process with the chosen device
206
Linux: IBM Installation Toolkit User Manual
Version SF240_358
SMS 1.6 (c) Copyright IBM Corp. 2000,2005 All rights reserved.
..............................................................................
Are you sure you want to exit System Management Services?
1.
Yes
2.
No
.............................................................................
Navigation Keys:
x = eXit System Management Services
.............................................................................
Type menu item number and press Enter or select Navigation key:
Figure 144. SMS exit confirmation menu
Manually configuring the boot server for IBM Installation Toolkit
This topic explains how to manually configure your machine to work as a boot server for IBMIT. This
action allows client machines to boot the IBMIT from the network, instead of needing the CD/DVD-ROM
for it.
If you prefer to do it automatically, use the function “Configure the boot server for IBM Installation
Toolkit” on page 76.
Prerequisites
Before starting to manually configure the boot server, you must have the following items:
v a TFTP server installed and working on your system
v an IBMIT DVD or ISO image file
Note: For these instructions, the following conventions apply:
v <tftpdir> is the TFTP server chroot directory, usually /tftpboot
v <mountdir> is the directory where the IBMIT ISO image or DVD will be mounted
v <isofile> is the IBMIT ISO image file
To manually configure the boot server for IBMIT, follow these steps:
1. Mount the IBMIT ISO image file (or the DVD if you prefer):
$ mount -o loop -t iso9660 <isofile> <mountdir>
2. Copy the IBMIT boot images to the TFTP server:
$
$
$
$
$
mkdir -p <tftpdir>/ppc/
cp <mountdir>/boot/img1 <tftpdir>/ppc/
cp <mountdir>/boot/img2a <tftpdir>/ppc/
cp <mountdir>/boot/img3a <tftpdir>/ppc/
cp <mountdir>/boot/img4a <tftpdir>/ppc/
3. Copy the boot loader configuration files to the TFTP server:
$ cp <mountdir>/etc/yaboot_net.conf <tftpdir>/etc/yaboot.conf
$ cp <mountdir>/etc/hardware.txt <tftpdir>/etc/hardware.txt
4. Umount the IBMIT media and you are finished:
$ umount <mountdir>
Appendixes
207
Manually configuring a client machine for the IBMIT boot server
This topic explains how to manually configure the IBMIT boot server to have a client machine booting
from it.
If you prefer to do it automatically, use the tool “Manage client systems for the boot server” on page 82.
Prerequisites
Before starting, you must have the following items:
v Your system configured to act as an IBMIT boot server
v DHCP server installed and working on your system
v Basic knowledge on DHCP server configuration files syntax
v The MAC address of the client machine
You must configure the system to act as an IBMIT boot server as explained in “Manually configuring the
boot server for IBM Installation Toolkit” on page 207.
The network boot process works as follows. The client machine broadcasts a boot request to the network.
The IBMIT boot server receives the request. If the DHCP server in it is configured to answer boot
requests made by that client, it does so by sending to the client a file name. This file name is the boot
image file the client must download. The client receives that file name and downloads it from the TFTP
server located at the boot server machine. Finally, the client loads the boot image in memory, runs it and
the boot process starts. During the process, the client downloads other boot images from the TFTP server
as needed.
Note: For these instructions, the following conventions apply:
v <tftpdir> is the TFTP server chroot directory, usually /tftpboot
v <dhcpfile> is the DHCP server configuration file, usually /etc/dhcpd.conf
v <machinename> is an arbitrary name to identify the client machine in <dhcpfile>
v <macaddress> is the MAC address of the client machine. The letters must be in lower case and
components separated by hyphen. For example: ae-b3-c0-00-20-04.
v <ipaddress> is the IP address to be assigned to the client machine
v <initscript> is the script that starts the DHCP server, usually /etc/init.d/dhcpd
To configure the IBMIT boot server to have a client machine booting from it, follow these steps:
1. Set the boot loader configuration file for the client machine:
$ ln -sf etc/yaboot.conf <tftpdir>/yaboot.conf-<macaddress>
2. Configure the DHCP server to answer boot requests made by the client machine, by adding the
following entry to <dhcpfile>:
host <machinename> {
filename "ppc/img1";
hardware ethernet <macaddress>;
fixed-address <ipaddress>;
}
3. Restart the DHCP server for the configuration to take effect:
$ <initscript> restart
Manually creating a network installation repository
This topic explains how to manually create a Linux or IBMIT network installation repository. It can then
be used to perform Linux installations from the network, rather than from CD/DVD-ROM or USB key.
208
Linux: IBM Installation Toolkit User Manual
If you prefer to automatically create a network installation repository, use the tool “Manage Linux
installation repositories available on the server” on page 95.
A network installation repository is just a directory made accessible to the network through an HTTP,
FTP, or NFS server. That directory must contain all the files required to perform an installation. A trivial
way to achieve that is to copy all the files of a distro DVD to that directory. In order to be accessible, that
directory must be placed somewhere the server makes accessible to the network. After the repository is
created, it will be accessible at an URL that will depend on the configuration of your server. For example:
http://192.168.1.54/myrepo.
Prerequisites
Before starting this task, you must have the following items:
v DVD ISO image for the distro you want to create a repository
v HTTP, FTP, or NFS server installed and working, so that the created repository can be accessed through
it
Note: For these instructions, the following conventions apply:
v <isofile> is the DVD ISO image file for the distro or IBMIT
v <mountdir> is the directory where the ISO image will be mounted
v <rootdir> is a directory whose content is accessible through the HTTP, FTP, or NFS server
v <reponame> is the name of the subdirectory of <rootdir> that will contain the repository
To create a Linux or IBMIT network installation repository, follow these steps:
1. Mount the ISO image file (or disk if you prefer) for the distro DVD:
$ mount -o loop -t iso9660 <isofile> <mountdir>
2. Copy all the files to the repository directory:
$ rm -rf <rootdir>/<reponame>
$ cp -a <mountdir> <rootdir>/<reponame>
3. Unmount the ISO image:
$ umount <mountdir>
Alternate method
You can also use this alternative method:
Instead of copying files to the disk, you could directly mount the DVD media at a directory made
accessible by the server:
1. Create a mount point at a location made accessible by the server:
$ mkdir -p <rootdir>/<reponame>
2. Mount at it the ISO image file (or disk if you prefer) for the distro DVD:
$ mount -o loop -t iso9660 <isofile> <rootdir>/<reponame>
3. After you are finished using the repository, umount it:
$ umount <rootdir>/<reponame>
Appendixes
209
210
Linux: IBM Installation Toolkit User Manual
Notices
This information was developed for products and services offered in the U.S.A.
IBM may not offer the products, services, or features discussed in this document in other countries.
Consult your local IBM representative for information on the products and services currently available in
your area. Any reference to an IBM product, program, or service is not intended to state or imply that
only that IBM product, program, or service may be used. Any functionally equivalent product, program,
or service that does not infringe any IBM intellectual property right may be used instead. However, it is
the user's responsibility to evaluate and verify the operation of any non-IBM product, program, or
service.
IBM may have patents or pending patent applications covering subject matter described in this
document. The furnishing of this document does not grant you any license to these patents. You can send
license inquiries, in writing, to:
IBM Director of Licensing
IBM Corporation
North Castle Drive
Armonk, NY 10504-1785
U.S.A.
The following paragraph does not apply to the United Kingdom or any other country where such
provisions are inconsistent with local law: INTERNATIONAL BUSINESS MACHINES CORPORATION
PROVIDES THIS PUBLICATION "AS IS" WITHOUT WARRANTY OF ANY KIND, EITHER EXPRESS OR
IMPLIED, INCLUDING, BUT NOT LIMITED TO, THE IMPLIED WARRANTIES OF
NON-INFRINGEMENT, MERCHANTABILITY OR FITNESS FOR A PARTICULAR PURPOSE. Some
states do not allow disclaimer of express or implied warranties in certain transactions, therefore, this
statement may not apply to you.
This information could include technical inaccuracies or typographical errors. Changes are periodically
made to the information herein; these changes will be incorporated in new editions of the publication.
IBM may make improvements and/or changes in the product(s) and/or the program(s) described in this
publication at any time without notice.
Licensees of this program who wish to have information about it for the purpose of enabling: (i) the
exchange of information between independently created programs and other programs (including this
one) and (ii) the mutual use of the information which has been exchanged, should contact:
IBM Corporation
Dept. LRAS/Bldg. 903
11501 Burnet Road
Austin, TX 78758-3400
U.S.A.
Such information may be available, subject to appropriate terms and conditions, including in some cases,
payment of a fee.
The licensed program described in this document and all licensed material available for it are provided
by IBM under terms of the IBM Customer Agreement, IBM International Program License Agreement or
any equivalent agreement between us.
© Copyright IBM Corp. 2009, 2010
211
For license inquiries regarding double-byte (DBCS) information, contact the IBM Intellectual Property
Department in your country or send inquiries, in writing, to:
IBM World Trade Asia Corporation
Licensing
2-31 Roppongi 3-chome, Minato-ku
Tokyo 106-0032, Japan
IBM may use or distribute any of the information you supply in any way it believes appropriate without
incurring any obligation to you.
Information concerning non-IBM products was obtained from the suppliers of those products, their
published announcements or other publicly available sources. IBM has not tested those products and
cannot confirm the accuracy of performance, compatibility or any other claims related to non-IBM
products. Questions on the capabilities of non-IBM products should be addressed to the suppliers of
those products.
Any references in this information to non-IBM Web sites are provided for convenience only and do not in
any manner serve as an endorsement of those Web sites. The materials at those Web sites are not part of
the materials for this IBM product and use of those Web sites is at your own risk.
This information contains examples of data and reports used in daily business operations. To illustrate
them as completely as possible, the examples include the names of individuals, companies, brands, and
products. All of these names are fictitious and any similarity to the names and addresses used by an
actual business enterprise is entirely coincidental.
Trademarks
IBM, the IBM logo, and ibm.com® are trademarks or registered trademarks of International Business
Machines Corporation in the United States, other countries, or both. If these and other IBM trademarked
terms are marked on their first occurrence in this information with a trademark symbol (® and ™), these
symbols indicate U.S. registered or common law trademarks owned by IBM at the time this information
was published. Such trademarks may also be registered or common law trademarks in other countries. A
current list of IBM trademarks is available on the Web at Copyright and trademark information at
www.ibm.com/legal/copytrade.shtml
Adobe, the Adobe logo, PostScript, and the PostScript logo are either registered trademarks or trademarks
of Adobe Systems Incorporated in the United States, and/or other countries.
Java and all Java-based trademarks and logos are registered trademarks of Sun Microsystems, Inc. in the
United States, other countries, or both.
Linux is a trademark of Linus Torvalds in the United States, other countries, or both.
UNIX is a registered trademark of The Open Group in the United States and other countries.
Other company, product, or service names may be trademarks or service marks of others.
212
Linux: IBM Installation Toolkit User Manual
Printed in USA