1
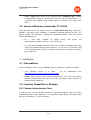
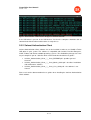
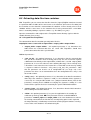
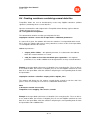
TempelPlus User Manual
Version 1.2.0
TempelPlus User Manual
Software version: 1.2.0
Date: 28.01.2013
Sertifitseerimiskeskus AS
2013
1 / 31
TempelPlus User Manual
Version 1.2.0
Table of contents
1
Introduction ....................................................................................................................... 4
2
Version information ........................................................................................................... 5
3
2.1
Version 1.2.0, January 2013...................................................................................... 5
2.2
Version 1.1.1, October 2012...................................................................................... 6
2.3
Version 1.1.0, summer 2012 ..................................................................................... 6
2.4
Version 1.0.0, release date 31.08.2011 .................................................................... 7
2.5
Version 0.99 (beta), release date 27.12.2010 ........................................................... 8
Installation ......................................................................................................................... 8
3.1
Preconditions ............................................................................................................. 8
3.2
Installing TempelPlus in Windows ............................................................................. 8
3.2.1
Safenet Authentication Client ............................................................................. 8
3.2.2
Downloading and unzipping ............................................................................... 9
3.2.3
PKCS11Wrapper ................................................................................................ 9
3.2.4
Setup .................................................................................................................. 9
3.3
Installing TempelPlus in Linux ................................................................................... 9
3.3.1
Initial installation activities .................................................................................. 9
3.3.2
Safenet Authentication Client ........................................................................... 10
3.3.3
Downloading and unzipping ............................................................................. 11
3.3.4
Setup ................................................................................................................ 11
4
Uninstallation .................................................................................................................. 12
5
Help ................................................................................................................................. 12
6
Setup............................................................................................................................... 13
6.1
JDigiDoc settings ..................................................................................................... 13
2 / 31
TempelPlus User Manual
Version 1.2.0
6.2
TempelPlus settings ................................................................................................ 13
6.3
Setup for HSM device.............................................................................................. 16
6.4
Setup for using test certificates ............................................................................... 16
7
Using TempelPlus with test Digital stamp certificate ...................................................... 17
8
Using the software – by use cases ................................................................................. 17
8.1
Using software help ................................................................................................. 17
8.2
Signing ..................................................................................................................... 18
8.3
Signature verification ............................................................................................... 21
8.4
Signature removal ................................................................................................... 22
8.5
Extracting data files from container ......................................................................... 24
8.6
Creating containers containing several data files .................................................... 26
8.7
Encryption ................................................................................................................ 28
8.8
Decryption................................................................................................................ 29
3 / 31
TempelPlus User Manual
Version 1.2.0
1 Introduction
The TempelPlus software is designed for signing of large quantities of files (i.e. mass
signing) with the Digital stamps of the institution (http://www.sk.ee/en/services/Digitalstamp), for instance for signing of invoices, payment orders etc. The TempelPlus software is
convenient when there are many files to be signed and a separate signed container (.ddoc
file) must be created for each file. The Digital stamp of the institution can also be used with
the DigiDoc Client and DigiDoc3 Client software applications but that solution is suitable only
for creating one signed container at a time. The advantage of the TempelPlus software is
that the PIN must only be entered once for multiple signatures.
Besides signing, TempelPlus also performs mass encryption and decryption, verification of
large quantities of .ddoc files and so on.
4 / 31
TempelPlus User Manual
Version 1.2.0
2 Version information
2.1 Version 1.2.0, January 2013
Detailed list of changes and new functionality added to the previous version of TempelPlus:
•
TempelPlus uses a newer version of JDigiDoc library (3.7.0.381)
•
The “verify” command has been improved, see chap. 8.3. Parameter “-cn” (Subject
Common Name) has been added, enabling to check that the signature has been
created by a particular individual/institution (in addition to verifying the validity of the
signature). The parameter can be used as “-cn <cn>”.
•
The “extract” command has been improved, see chap. 8.3. The following
functionality has been added:
o
New optional parameter “-verify” can now be used with the command. If the
parameter is set then the source container’s extraction is performed only if
the container signature’s verification succeeds (i.e. the signature is correct
and valid).
o
It is also possible to add “<cn>” (Subject Common Name) value to
the „-verify“ parameter. If the “cn” value is specified then in addition
to verifying the signature’s validity, it is also checked that the
signature has been created by the particular individual/institution.
It is now possible to execute the “extract” command in “follow” mode
(standby mode). In case of an error situation in follow mode, the file that was
currently being processed is saved to output directory’s subdirectory named
“error”.
•
The principles of using subfolders when writing output files to disk have been
changed. If a specific output_folder has been determined in the command then the
same subfolders’ hierarchy as exists in the input folder is also created to the output
folder – the extracted files are written to the subfolders according to their placement
in the original input folder’s hierarchy. If output_folder is not determined then the
extracted files are written to the input directory (the working directory) and the
existing subfolders that it contains. This functionality has been added to the following
TempelPlus commands: sign – signing, extract – extraction of data files, remove –
removing signature(s), crypt – encryption, decrypt – decryption.
•
Three TempelPlus commands have been improved so that when a file is being
written to an output folder which already contains a file with the same name then the
new file is saved by adding sequence number “(n+1)” to the end of its name. For
example: contract.ddoc, contract(1).ddoc and contract(3).ddoc. (Previously, the
program stopped if a new file was being written to an output folder which already
contained a file with the same name). The commands which were improved with this
5 / 31
TempelPlus User Manual
Version 1.2.0
functionality: extract – extracting data file(s), remove – removing signature(s), crypt
– encryption.
2.2 Version 1.1.1, October 2012
Detailed list of changes and new functionality added to the previous version of TempelPlus:
•
The principles of saving the decrypted output files have been changed: if previously
the data files in an encrypted container named contract.cdoc would have been
decrypted to a folder named contract/ then now the output folder is created as
contract.cdoc/ (with the .cdoc extension). If there already exists a file or directory
with this particular name then a sequence number is added to the name:
“<container_name>(<seq_no>)”.
•
The principles of saving data files extracted from a container have been changed:
previously the data files extracted from a container could not be saved to the output
directory if there was already an existing file or subdirectory with the same name.
Now, if such a situation occurs, a new file name is created by adding a sequence
number to the initial container name: “<container_name>(<seq_no>)”.
•
It is now possible to use command line and configuration file parameter
“cmn_ext_dir” which, if set, determines that the data files received during a
container’s extraction or decryption are written directly to the output directory and not
to separate subdirectories (see also chap. 6.2, 8.5, 8.8).
•
TempelPlus now enables using HSM device in addition to USB token for all the use
cases. Setting up HSM support is described in chapter 6.3. New command line
parameters -slot and -label to be used with HSM have been added (see chap. 8.2,
8.8).
Note: HSM support in TempelPlus is experimental and requires the user to have
advanced knowledge of the certificates and the accompanying private keys stored
on the device. For regular users, it is recommended to use USB token.
2.3 Version 1.1.0, summer 2012
Detailed list of changes, new functionality and bug-fixes that were made to the previous
version of TempelPlus:
•
TempelPlus software is now supported also in Linux environment
•
TempelPlus enables inserting PIN code also from configuration file and as a
command line parameter (see chap. 6.2, 8.2, 8.8)
•
TempelPlus uses a newer version of JDigiDoc library (3.6.1.1)
•
TempelPlus can be used with new test Digital stamp certificates (issued since April
2012 by “TEST of KLASS3-SK 2010”)
6 / 31
TempelPlus User Manual
Version 1.2.0
•
Licence information has been added (licence.txt/licence_linux.txt in the program’s
home directory) which also includes licences of other software components that are
used by TempelPlus – JDigiDoc library and IAIK PKCS#11 Wrapper
•
Logging of TempelPlus program’s activities and error situations has been improved
•
The principles of decryption operation have been changed: if previously the data
files in an encrypted container named contract.cdoc would have been decrypted to a
folder named contract.ddoc/ then now the output folder is created as contract/
(without the .ddoc extension).
•
The principle of using –recipient parameter during decryption has been changed,
see chap. 8.8
•
TempelPlus has been improved so that, for instance, if there are three files in the
input directory named contract.docx, contract.rtf and contract.pdf then the signing
process produces three signed containers that are named as contract.ddoc,
contract(1).ddoc and contract(2).ddoc. (Previously, the program stopped if a new file
was being written to an output folder which already contained a file with the same
name).
•
The reliability of TempelPlus’s performance in “follow” mode has been improved. In
case of an error situation, the file that was being signed is saved to the output
directory’s subdirectory named error/ and the program continues running.
Information about the cause of the error situation is also written to log file.
•
A defect which caused TempelPlus to incorrectly process data files smaller that 1KB
was fixed.
•
A defect of TempelPlus not being able to decrypt files that had previously been
encrypted with DigiDoc3 Crypto application was fixed.
•
A defect that allowed an inappropriate certificate to be used when encrypting with
TempelPlus was fixed.
•
Defect that caused TempelPlus to exit with and error code if PIN insertion dialog box
was closed without entering PIN value was fixed.
2.4 Version 1.0.0, release date 31.08.2011
Tested in Windows 7 using a Digital stamp on the SafeNet Aladdin eToken Pro USB token
(with 1024 and 2048 bit keys) and Digital stamp on smart card (1024 bit keys). This software
version is a command line-only utility for use in Windows operating systems.
•
Improved: command line utility help information
•
Improved: working with TempelPlus command line utility in Windows no longer
requires administrator rights
7 / 31
TempelPlus User Manual
Version 1.2.0
•
Added: –signer_cn parameter for the signing function (tempelplus sign), enabling
selection during signing of a particular key from those on the signing token – i.e.
TempelPlus now supports using multiple signature certificates on a single token
device.
2.5 Version 0.99 (beta), release date 27.12.2010
First public beta version. This software version is a command line-only utility, tested in the
Windows 7 operating system. Available as a Windows installation package (.msi file). The
primary functions of TempelPlus – signing and encryption/decryption – have been tested
with the following tokens:
•
On a smart card, institution ID (Digital stamp),
authentication/encryption certificates, 1024 (1K) bit keys
with
signing
and
•
On a USB token (Aladdin (SafeNet) eToken Pro), institution ID (Digital stamp), with
signing and authentication/encryption certificates, 1K and 2 K keys, with only 1 PIN
(i.e. the USB token does not have secondary authentication passwords for using the
keys saved there).
3 Installation
3.1 Preconditions
Before TempelPlus can be used, the following software components need to be installed:
•
Java JDK/JRE version 6 or above - can
http://www.oracle.com/technetwork/java/index.html.
be
downloaded
from
•
Aladdin eToken software (Safenet Authentication Client) – you receive the software
from AS Sertifitseerimiskeskus when you order your Digital stamp certificate on
Aladdin eToken USB device.
3.2 Installing TempelPlus in Windows
3.2.1 Safenet Authentication Client
In order to make sure that Aladdin USB token is functioning properly, open the Safenet
Authentication Client Tools application. The application should display information about
data on the USB token, e.g. list of certificates.
8 / 31
TempelPlus User Manual
Version 1.2.0
3.2.2 Downloading and unzipping
TempelPlus
software
distribution
package
can
be
downloaded
from
http://www.sk.ee/en/services/Digital-stamp/tempelplus-software/. The file should be unzipped
to a convenient location in file system.
3.2.3 PKCS11Wrapper
TempelPlus distribution package contains subdirectories \pkcs11wrapper\32\ and
\pkcswrapper\64\ with a file named pkcs11wrapper.dll. The file pkcs11wrapper.dll should be
copied from either of these subdirectories (depending on whether you are running the
software on 32bit or 64bit system) to Windows system directory (e.g. C:\Windows\Sytem32\)
or to another location that is accessible to Java.
3.2.4 Setup
After finishing installation, some additional configuration settings need to be applied before
TempelPlus can be run. Chapter 6 gives detailed description on the configuration setup of
TempelPlus software and the underlying JDigiDoc Java library. After applying the required
configuration settings, TempelPlus is ready for use - instructions for running the software can
be found from chapter 8.
3.3 Installing TempelPlus in Linux
3.3.1 Initial installation activities
At first, it should be made sure that the USB identity token is visible and accessible to
system. It can be determined by using the terminal as follows:
•
•
•
Open the console window
1
Execute command “lsusb” .)
Check that the USB token is listed among the devices. For example, Aladdin devices
should be named as: “ID ****:**** Aladdin Knowledge Systems”.
1
In Fedora/Redhat environment, the command might have to be executed as “/sbin/lsusb”. If
the command doesn’t function properly then an appropriate “usbutils” package needs to be
installed to the computer (by default, it is included in the newer Linux distributions).
9 / 31
TempelPlus User Manual
Version 1.2.0
Figure 1 – lsusb command – eToken device in the figure has model ID 0529:0620
If the USB token is present in the USB devices’ list then the computer should be able to
communicate with the token and the token is ready for use.
3.3.2 Safenet Authentication Client
Safenet Authentication Client software has to be installed in order to use Aladdin eToken
USB token in your system. The software is compatible with CentOS, Red Hat Enterprise,
SUSE, Fedora and Ubuntu 32/64bit operating systems. The distribution packages for Linux
are pre-compiled *.rpm or *.deb files which also include three detailed user guides:
•
•
•
SafeNet_Authentication_Client_*_*_Linux_README.pdf – provides general
overview
SafeNet_Authentication_Client_*_*_Linux_Admin_Guide.pdf – describes installation
and maintenance activities
SafeNet_Authentication_Client_*_*_Linux_User_Guide.pdf – the software’s user
manual
Please refer to the abovementioned user guides when installing the Safenet Authentication
Client software.
10 / 31
TempelPlus User Manual
Version 1.2.0
Figure 2 - SafeNet Authentication Client Tool’s graphical user interface
In addition to the Safenet Authentication Client graphical user interface application that can
be used to configure USB token settings, the software installation also sets up PKCS#11
module that enables other software applications (including TempelPlus) to communicate with
Aladdin USB tokens.
3.3.3 Downloading and unzipping
TempelPlus
distribution
package
can
be
downloaded
from
http://www.sk.ee/en/services/Digital-stamp/tempelplus-software/. Choose the tar.gz package
appropriate for Linux environment and unzip it to a convenient location in your file system.
3.3.4 Setup
After finishing installation, some additional configuration settings need to be applied before
TempelPlus can be run. Chapter 6 gives detailed description about the configuration setup of
TempelPlus software and the underlying JDigiDoc Java library. After applying the required
configuration settings, TempelPlus is ready for use - instructions on running the software can
be found from chapter 8.
11 / 31
TempelPlus User Manual
Version 1.2.0
4 Uninstallation
In order to uninstall TempelPlus, delete the TempelPlus installation directory and its contents
from you system.
5 Help
Feel free to ask questions and submit TempelPlus software improvement suggestions to SK
customer support: [email protected].
12 / 31
TempelPlus User Manual
Version 1.2.0
6 Setup
The TempelPlus software is based on the JDigiDoc library/utility (see
http://www.id.ee/index.php?id=35783). TempelPlus therefore contains both its own settings
and JDigiDoc library’s settings which need to be adjusted prior to using the software. The
following subchapters describe how these settings should be configured.
Note: the configuration files’ character encoding should be set according to the system’s
encoding scheme. Otherwise there may be errors when configuration values are parsed by
TempelPlus.
6.1 JDigiDoc settings
The most important settings of the JDigiDoc library/utility are located in the following files:
•
<TempelPlus home directory>\JDigiDoc\jdigidoc.bat, primary parameters, set
during TempelPlus installation.
•
<TempelPlus home directory>\JDigiDoc\log4j.properties
o
Parameter log4j.appender.file.file – set the value to <TempelPlus home
directory>\\logs\\tempelplus.log (in Linux environment, use / slash instead of
\\). NB! the file path used as the value of the current parameter should also
be used in case of Tempelplus.conf file’s log_file parameter (see the next
subchapter for more information). NB! the TempelPlus program has to have
permission to write to the “logs” directory!
More information about the JDigiDoc library/utility, including its configuration, is available in
the JDigiDoc documentation: <TempelPlus home directory>\JDigiDoc\doc\
6.2 TempelPlus settings
The most important TempelPlus settings are located in the files listed below. NB! in case of
Linux environment, replace the separator \\ with / in the file path settings.
•
<TempelPlus home directory>\TempelPlus.bat (in Windows environment)
o
•
Parameter JAVA – full path to the location of java.exe in file system. For
example "C:\\Program Files\\Java\\jre6\\bin\\java.exe"
<TempelPlus home directory>\TempelPlus32.sh or Tempelplus64.sh (in Linux
environment)
o
Parameter JAVA_HOME – full path to Java binary files in file system. For
example "/usr/lib/jvm/java-6-openjdk/jre/bin/java".
13 / 31
TempelPlus User Manual
Version 1.2.0
•
<TempelPlus home directory>\TempelPlus.conf
o
o
Parameters related to signing, encryption
role, country, state, city, postcode – the parameters determining
the signer role, location
format – the format of the created signed containers, the sole
currently valid option is: ddoc
crypt – the file extension of the encrypted container, the default
value is: cdoc
pin_enter – the PIN query manner: graphic (a dialog window is
opened for PIN insertion), command line or configuration file, the
corresponding options are: graphic, console, config
pin – if the value of parameter pin_enter is set to “config” then the
current parameter is used to provide the PIN code’s value
DIGIDOC_OCSP_RESPONDER_URL – the Online Certificate
Status Protocol (OCSP) service address. Live service URL:
http://ocsp.sk.ee; test service URL: http://www.openxades.org/cgibin/ocsp.cgi
SIGN_OCSP_REQUESTS – whether the Online Certificate Status
Protocol (OCSP) service queries are signed (in case of access
token (a PKCS#12 container)) or not (in case of IP address-based
access), these are the possible options: true, false
DIGIDOC_PKCS12_CONTAINER – the access token file path,
used with parameters SIGN_OCSP_REQUESTS=true and
DIGIDOC_PKCS12_PASSWD
DIGIDOC_PKCS12_PASSWD – the access token password, used
with
parameters
SIGN_OCSP_REQUESTS=true
and
DIGIDOC_PKCS12_CONTAINER
Other settings – files, directories
jddoc_location – the JDigiDoc library’s location, <Tempelplus
home directory>\\JDigiDoc
log_file – the log file location. Set the value to <Tempelplus home
directory>\\logs\\tempelplus.log (in case of Linux environment, use
the / separator instead of \\). NB! the same file path should be used
here as is used for parameter log4j.appender.file.file in
<Tempelplus home directory>\\JDigiDoc\\log4j.properties file (see
14 / 31
TempelPlus User Manual
Version 1.2.0
also the previous subchapter for more information). NB! TempelPlus
has to have permission to write to the “logs” directory!
work_directory – the TempelPlus work directory, for temporary
files, <Tempelplus home directory>\\temp. TempelPlus has to have
permission to write to the directory!
cmn_ext_dir – the parameter enables to determine whether the
data files that are received as a result of extraction of a .ddoc
container or decryption of a .cdoc container are written to a
subdirectory (which will be named according to the original .ddoc or
.cdoc file) or saved directly to the output directory (the directory
determined with -output_folder parameter or, in case of its absence,
the source file’s directory). Possible values are: true (data files of all
the containers are saved to a common directory) or false (data files
are saved into subdirectories). If there already exists a file with the
same name then the current file is created with a new name by
adding
a
sequence
number
in
brackets:
“<file_name>(<seq_no>).<file_extension>”. If data files are saved to
a subdirectory and there already exists a directory with the same
name then a sequence number is added to the original name:
“<original_container’s_name>(<seq_no>)“.
Note: the parameter can also be determined in command line. If
there is a value set in command line then the configuration file’s
value is not taken into account.
DIGIDOC_LOG4J_CONFIG – log4j.properties file’s
<Tempelplus home directory>\\JDigiDoc\\log4j.properties
DIGIDOC_DF_CACHE_DIR – the JDigiDoc library’s directory for
temporary files, <Tempelplus home directory>\\JDigiDoc\\temp,
TempelPlus has to have permission to write to the directory!
bc_prov=bcprov-jdk15on-147.jar – this pre-set parameter should
not be changed
DIGIDOC_MAX_DATAFILE_CACHED=1000
parameter should not be changed
DIGIDOC_SIGN_PKCS11_DRIVER – PKCS#11 driver’s location in
the file system. The driver is installed along with Aladdin eToken
software (SafeNet Authentication Client) and is located at:
-
this
location,
pre-set
•
in Windows: C:\\windows\\system32\\eTPKCS11.dll or
C:\\Windows\\SysWOW64\\eTPKCS11.dll
•
in Linux: usr/lib/libeTPkcs11.so
15 / 31
TempelPlus User Manual
Version 1.2.0
o
Other settings – application behaviour
control_question – whether the user is asked control questions to
confirm actions, the options are: yes/no
date_format – the date display format, the default value is:
dd.MM.yyyy HH:mm:ss
6.3 Setup for HSM device
•
DIGIDOC_SIGN_PKCS11_DRIVER – the parameter’s value should be set
according to the HSM device’s PKCS#11 driver file’s location in file system. The
file’s location should also be added to the system’s environment variables.
•
Command line parameters –slot and –label have been added for signature creation
and decryption with HSM device (see also chap. 8.2, 8.8).
6.4 Setup for using test certificates
In order to use Estonian test certificates with TempelPlus software, the certificates need to
be installed separately. Test certificates’ package can be downloaded from
https://installer.id.ee/media/esteidtestcerts.jar, the esteidtestcerts.jar file should be placed to
directory <TempelPlus home directory>\JDigiDoc\lib\.
16 / 31
TempelPlus User Manual
Version 1.2.0
7 Using TempelPlus with test Digital stamp certificate
It is possible to try out TempelPlus software with test certificates, e.g. to give test signatures
before deploying the software to live environment. In order to do that, you need to order a
test Digital stamp certificate on an USB token from AS Sertifitseerimiskeskus
(http://www.sk.ee/en/services/testcard/). The test Digital stamp certificate has to be
registered in test-OCSP service (http://www.openxades.org/upload_cert.php) with an
appropriate status. Additionally, TempelPlus configuration file (Tempelplus.conf) has to be
changed as follows:
•
DIGIDOC_OCSP_RESPONDER_URL=http://www.openxades.org/cgi-bin/ocsp.cgi
•
SIGN_OCSP_REQUESTS=false
•
Parameters DIGIDOC_PKCS12_CONTAINER and DIGIDOC_PKCS12_PASSWD
should be commented out by adding the # character in front of the parameters.
When creating a digital signature after applying the described configuration, the signer’s
certificate revocation status information is taken from test-OCSP service and the created
signatures will be valid test signatures (test digital stamps).
8 Using the software – by use cases
8.1 Using software help
Open the command line and navigate to the TempelPlus home directory (replace with the
suitable directory if necessary):
cd “c:\Program Files\TempelPlus”
General help about using TempelPlus is accessible with this command:
tempelplus –help or
tempelplus -?
Help about a particular command, for instance signing, is accessible with this command:
tempelplus sign –help or
tempelplus sign -?
17 / 31
TempelPlus User Manual
Version 1.2.0
8.2 Signing
You can sign one file or a whole directory (folder) of files simultaneously. The files created
after signing can be saved in the same folder as the source files or you can choose another
folder (the latter option is recommended). The source files that are being signed can be
deleted during the signing process. It is also possible to leave the application running in the
background (“follow” mode): after the source files are signed, the application will remain
open and wait for new files to appear for signing in the input folder. If the file to be signed is
already a DigiDoc container, one new signature will be added to it during the process. If the
file to be signed is not a DigiDoc container, the software will create the corresponding
DigiDoc container with one signature. If the signed file is written to an output directory which
already contains an existing file with the same name then the name of the new file is
changed by adding a sequence number: “<file_name>(<seq_no>).ddoc”.
NB! When signing files in TempelPlus, connect the Digital stamp to your computer. If
the Digital stamp is on a smart card, just insert it in the card reader. If the Digital
stamp is on a USB token, plug it into your computer’s USB port.
Open the command line and navigate to the TempelPlus home directory (replace with the
suitable directory if necessary):
cd “c:\Program Files\TempelPlus”
The signing command generally looks like this:
tempelplus sign <filer or folder to be signed> <additional parameters>
Additional parameters:
•
-pin „<pin code>“ – this optional parameter, if set, determines the PIN code value.
Other PIN code setting options are described in chapter 6.2.
•
-output_folder <folder> – this optional parameter, if set, determines the folder
where the signed files are saved. NB! TempelPlus should have permission to write
files to the specific folder.
•
-remove_input – this optional parameter, if set, results in deletion of the source files
(that are being signed)
•
-follow – this optional parameter, if set, puts the application in the standby (or
continuously running) mode. NB! This parameter must be used with additional
parameters –remove_input and –output_folder. If an error situation occurs when a
file is being signed then the file is copied to the output directory’s subdirectory
named error/ and the program continues running. Cause of the error situation is also
written to log file.
•
-signer_cn “<CN>“ – this optional parameter, if set, determines the key to be used
for signing. If the parameter is not used, the first signing key on signing token is
selected. The parameter value, if set, must be the value of the Subject CN (Common
Name) field of the certificate associated with the signing key.
18 / 31
TempelPlus User Manual
Version 1.2.0
•
-role “<role>” – this optional parameter, if set, enables adding the signer’s role to
the signed container. If the signer role is also set in the TempelPlus.conf
configuration file, the preference is given to the command line parameter
•
-country “<country>” – this optional parameter, if set, enables addition of the
signer location information to the signed container. If the country parameter is also
set in the TempelPlus.conf configuration file, the preference is given to the command
line parameter
•
-state “<state/county>” – this optional parameter, if set, enables addition of the
signer location information to the signed container. If the state parameter is also set
in the TempelPlus.conf configuration file, the preference is given to the command
line parameter
•
-city “<city>” – this optional parameter, if set, enables addition of the signer
location information to the signed container. If the city parameter is also set in the
TempelPlus.conf configuration file, the preference is given to the command line
parameter
•
-postcode “<postcode>” – this optional parameter, if set, enables addition of the
signer location information to the signed container. If the postcode parameter is
also set in the TempelPlus.conf configuration file, the preference is given to the
command line parameter
Additional parameters to be used with HSM device:
•
-slot <slot_ID> - determines the HSM device’s slot which contains the certificate
2
that is being used for signature creation. The slot ID , value has to be provided in
decimal format. The –slot parameter must be used along with –label parameter.
•
-label „<label_name>“ – determines the label name of the certificate and the
accompanying private key that are used for signature creation. If there are space
characters in the label’s name then the value should be put between quotation
marks. The –label parameter must be used along with –slot parameter.
Note: in order to use HSM device, the signature certificate and accompanying private
key have to be stored in the same slot and must have matching label names. If the
parameters –slot and –label are set in command line then parameter –signer_cn, even if
present, is not taken into account.
Example: Signature creation by setting folder containing source files (for instance: C:\input\)
and output folder (C:\output\). One signed DigiDoc container is created in the output folder
for each file in the input folder:
2
If there are more than one HSM devices connected to the computer then slot ID values
should be determined with pkcs11-tool.exe utility program (slot’s ID is shown in output as a
hexadecimal number).
19 / 31
TempelPlus User Manual
Version 1.2.0
tempelplus sign c:\input -output_folder c:\output
The software will display in real time the file number that being currently signed and if the
process ends successfully, the user will see a notification similar to this:
Done
7 documents signed successfully
TempelPlus v1.2.0 stopping. Time used: 18 seconds
Note: If an incorrect USB token’s PIN code is entered during signature creation or
communication with the device fails for another reason then the token may become unusable
during the current session. In order to continue using the USB token, remove it from the USB
port and insert again.
20 / 31
TempelPlus User Manual
Version 1.2.0
8.3 Signature verification
The TempelPlus software allows the user to verify signature validity of a whole folder of
signed files. The folder can contain both DigiDoc containers and ordinary data files.
Open the command line and navigate to the TempelPlus home directory (replace with the
suitable directory if necessary):
cd "c:\Program Files\TempelPlus"
The signature verification command generally looks like this:
tempelplus verify <file or folder to be verified>
Example: verification of the signatures in the signed containers in one folder (for instance:
C:\digidoc_files\):
tempelplus verify c:\digidoc_files\
Additional parameters:
•
-cn <cn> - optional parameter, determines the “Subject CN” value. If set, then it is
verified if the particular institution/individual is the signer of the document.
Example: tempelplus verify c:\digidoc_files\ -cn „MÄNNIK,MARI-LIIS,47101010033“
The software will display the file number currently being processed in real time, it will also
display information about the found signature – signer, date, validity – and if the process
ends successfully, the user will see a notification similar to this:
Done
7 documents verified successfully
TempelPlus found 14 valid (or matching) signatures and 0 invalid (or not matching)
signatures
TempelPlus v1.2.0 stopping. Time used: 2 seconds
21 / 31
TempelPlus User Manual
Version 1.2.0
8.4 Signature removal
TempelPlus enables simultaneous removal of signatures from many files in two ways: either
all signatures are removed from all signed files in the selected folder or only a particular
person’s signatures are removed from those signed files. The result will be in the form of
DigiDoc files with one or all signatures removed.
Open the command line and navigate to the TempelPlus home directory (replace with the
suitable directory if necessary):
cd “c:\Program Files\TempelPlus”
The signature removal command generally looks like this:
tempelplus remove <signature identifier> <source file or input folder> -output_folder
<output folder>
These are the possible signature identifiers:
•
ALL – to remove all signatures in the signed file
•
“<CN>“ – to remove from the signed file only a signature added there by a particular
individual/institution. The person is set by the value of the Subject CN (Common
Name) field of the signing certificate associated with the Digital stamp or that
person’s ID card. In case of signatures given by ID card, it will look like this:
“Surname,First name,Personal identification code”
Example 1: the user wants to remove all signatures from all signed containers in one folder
(for instance: C:\digidoc_files\) and save the DigiDoc containers stripped of the signatures in
another folder (for instance: C:\digidoc_files2\):
tempelplus remove ALL c:\digidoc_files\ -output_folder c:\digidoc_files2\
The software will display the file number currently being processed in real time, it will also
display signer information for the found signatures and if the process ends successfully, the
user will see a notification similar to this:
Done
7 documents were handled successfully. 14 signatures removed
TempelPlus v1.2.0 stopping. Time used: 4 seconds
Example 2: the user wants to remove from all signed containers in one folder (for instance:
C:\digidoc_files\) the signatures of one particular person (MARI-LIIS MÄNNIK,
47101010033) and save the DigiDoc containers without these signatures in another folder
(for instance: C:\digidoc_files2\):
tempelplus remove “MÄNNIK,MARI-LIIS,47101010033” c:\digidoc_files\ -output_folder
c:\digidoc_files2\
22 / 31
TempelPlus User Manual
Version 1.2.0
The software will display the file number currently being processed in real time, it will also
display signer information for the found signatures and if the process ends successfully, the
user will see a notification similar to this:
Done
7 documents were handled successfully. 2 signatures removed
TempelPlus v1.2.0 stopping. Time used: 2 seconds
23 / 31
TempelPlus User Manual
Version 1.2.0
8.5 Extracting data files from container
With TempelPlus you can extract the data files from the (signed) DigiDoc containers located
in a particular folder. A folder of the same name as the container (for instance: file1.ddoc) will
be created to save the data files extracted from the container. If there already exists a file or
subfolder with the same name as the container that is being extracted then a new folder
name is created by adding a sequence number, e.g. “file1.ddoc(<seq_no>)”.
Open the command line and navigate to the TempelPlus home directory (replace with the
suitable directory if necessary):
cd “c:\Program Files\TempelPlus”
The command for data file extraction generally looks like this:
tempelplus extract <source file or input folder> -output_folder <output folder>
•
-output_folder <output folder> – this optional parameter, if set, determines the
folder where the extracted data files are saved. NB! TempelPlus should have
permission to write files to the specific folder.
Additional parameters:
•
-cmn_ext_dir – this optional parameter, if set, determines that the extracted data
files (of all the containers that are being processed) are not saved into separate
subdirectories but directly to the output folder (a folder that is set with –output_folder
parameter or, in case of its absence, to the working directory). If there already exists
a file with the same name then the current file is created with a new name by adding
a sequence number in brackets: “<file_name>(<seq_no>).<file_extension>”. Note
that the parameter can also be set in configuration file (see chap. 6.2). If the
parameter has been set on command line then the configuration file’s entry is not
taken into account.
•
-verify (<cn>) – this optional parameter, if set, determines that data file extraction is
done only if the container’s signature is valid (i.e. the verification of the signature is
successful). It is also possible to add “<cn>” (Subject Common Name) value to this
parameter, meaning that in addition to verifying the signature’s validity, it is also
checked if the signature has been created by the specific individual/institution.
•
-remove_input – this optional parameter, if set, determines that the initial containers
that are being extracted are deleted.
•
-follow – this optional parameter, if set, puts the application in the standby (or
continuously running) mode. NB! This parameter must be used with additional
parameters –remove_input and –output_folder. If an error situation occurs when a
file is being extracted then the file that was currently being processed is copied to
the output directory’s subdirectory named error/ and the program continues running.
Cause of the error situation is also written to log file.
24 / 31
TempelPlus User Manual
Version 1.2.0
Example 1: the user wishes to extract all data files from all signed containers in one folder
(for instance: C:\digidoc_files\) and use another folder (for instance: C:\digidoc_files2\) to
create subfolders named after the corresponding DigiDoc containers, with each subfolder
containing the data files from a particular container:
tempelplus extract c:\digidoc_files\ -output_folder c:\digidoc_files2\
The software will display the file number currently being processed in real time and if the
process ends successfully, the user will see a notification similar to this:
Done
2 documents where handled successfully. 3 files extracted
TempelPlus v1.2.0 stopping. Time used: 2 seconds
25 / 31
TempelPlus User Manual
Version 1.2.0
8.6 Creating containers containing several data files
TempelPlus allows the user to simultaneously create many DigiDoc containers (without
signatures) containing one or several data files.
Open the command line and navigate to the TempelPlus home directory (replace with the
suitable directory if necessary):
cd “c:\Program Files\TempelPlus”
The command for container creation generally looks like this:
tempelplus container <source file or input folder> <additional parameters>
If a source file is given, the software will create one container. If an input folder with several
files is given, the software will create as many containers as there are files in the input folder,
i.e. one DigiDoc container for each file.
Additional parameters:
•
-output_folder <folder> – this optional parameter, if set, determines the folder to
which the created containers are saved
•
-add_file <folder or list of files with blank space separation> – this optional
parameter, if set, enables addition of the designated files to every created container
Example 1: the input folder (for instance: C:\datafiles\) has many data files. The user wishes
to use another folder (for instance: C:\digidoc_files) to save one DigiDoc container for each
data file in the input folder, with that container comprising the corresponding data file from
the input folder:
tempelplus container c:\datafiles\ -output_folder c:\digidoc_files\
The software will display the file number currently being created in real time and if the
process ends successfully, the user will see a notification similar to this:
Done
7 documents created successfully.
TempelPlus v1.2.0 stopping. Time used: 1 seconds
Example 2: the input folder (for instance: C:\datafiles\) has many data files. The user wishes
to use another folder (for instance: C:\digidoc_files) to save one DigiDoc container for each
data file in the input folder, with that container comprising the corresponding data file from
the input folder and 2 additional files:
26 / 31
TempelPlus User Manual
Version 1.2.0
tempelplus container c:\datafiles\ -output_folder c:\digidoc_files\ -add_file c:\file1.txt
c:\file2.dat
The software will display the file number currently being created in real time and if the
process ends successfully, the user will see a notification similar to this:
Done
7 documents created successfully.
TempelPlus v1.2.0 stopping. Time used: 1 seconds
Example 3: the input folder (for instance: C:\datafiles\) has many data files. The user wishes
to use another folder (for instance: C:\digidoc_files) to save one DigiDoc container for each
data file in the input folder, with that container comprising the corresponding data file from
the input folder and all files from the folder C:\datafiles2:
tempelplus container c:\datafiles\ -output_folder c:\digidoc_files\ -add_file
c:\datafiles2
The software will display the file number currently being created in real time and if the
process ends successfully, the user will see a notification similar to this:
Done
7 documents created successfully.
TempelPlus v1.2.0 stopping. Time used: 1 seconds
27 / 31
TempelPlus User Manual
Version 1.2.0
8.7 Encryption
With TempelPlus you can encrypt a whole folder of files for one or several recipients, i.e. an
individual or institution that can then decrypt the encrypted files using their ID card or Digital
stamp.
Open the command line and navigate to the TempelPlus home directory (replace with the
suitable directory if necessary):
cd “c:\Program Files\TempelPlus”
The encryption command generally looks like this:
tempelplus encrypt <source file or input folder> -cert <one or several certificate files>
-output_folder <output folder>
If the encryption output is for several recipients, the certificate files must have blank space
separation. –output_folder is an optional parameter.
Example: the input folder (for instance: C:\datafiles\) has many data files. The user wishes
to encrypt the files for two individuals/institutions (on the condition that the user has the
certificate files for the corresponding ID card/Digital stamp authentication (encryption)) and
save the encrypted containers in a particular output folder (for instance: C:\encrypted_files):
tempelplus encrypt c:\datafiles\ -cert c:\certs\person1_auth.cer
c:\certs\institution2_crypt.cer -output_folder c:\encrypted_files\
The software will display the file number currently being created in real time and if the
process ends successfully, the user will see a notification similar to this:
Done
7 files encrypted successfully!
TempelPlus v1.2.0 stopping. Time used: 5 seconds
28 / 31
TempelPlus User Manual
Version 1.2.0
8.8 Decryption
TempelPlus allows the user to decrypt a whole folder of encrypted files on the condition that
the recipient of the encrypted files is the owner of the Digital stamp that must be used for
decryption. So for the user to be able to decrypt the received files with the Digital stamp, the
files must have been encrypted using the authentication (encryption) certificate of the same
Digital stamp.
For each encrypted container a folder named after the encrypted file is created during the
decryption process and in that folder are saved all data files from the container. If there
already exists a file or subfolder with the same name as the container that is being decrypted
then a new folder name is created by adding a sequence number, e.g.
“file1.cdoc(<seq_no>)”.
NB! When decrypting files in TempelPlus, connect the Digital stamp to your computer.
If the Digital stamp is on a smart card, just insert it in the card reader. If the Digital
stamp is on a USB token, plug it into your computer’s USB port.
Open the command line and navigate to the TempelPlus home directory (replace with the
suitable directory if necessary):
cd “c:\Program Files\TempelPlus”
The decryption command generally looks like this:
tempelplus decrypt <source file or input folder> -recipient <CN> <additional
parameters>
•
recipient “<CN>“ – this optional parameter, if set, determines the decryption
recipient. The recipient is set by the value of the Subject CN (Common Name) field
of the authentication (encryption) certificate associated with the Digital stamp or that
person’s ID card. If the parameter is not set in command line then the encrypted
document recipient’s decryption key is taken from the USB token, if the key exists on
the token.
Additional parameters:
•
-pin „<pin code>“ – this optional parameter, if set, determines the PIN code value.
Other PIN code setting options are described in chapter 6.2.
•
-output_folder <folder> – this optional parameter, if set, determines the folder
where the decrypted files are saved
•
-remove_input – this optional parameter, if set, results in deletion of the (encrypted)
source files
•
-follow – this optional parameter, if set, puts the application in the standby (or
continuously running) mode. NB! This parameter must be used with additional
parameters –remove_input and –output_folder.
29 / 31
TempelPlus User Manual
Version 1.2.0
•
-cmn_ext_dir – this optional parameter, if set, determines that the decrypted data
files (of all the encrypted containers that are being processed) are not saved into
separate subdirectories but directly to the output folder (a folder that is set with –
output_folder parameter or, in case of its absence, to the working directory). If there
already exists a file with the same name then the current file is created with a new
name
by
adding
a
sequence
number
in
brackets:
“<file_name>(<seq_no>).<file_extension>”. Note that the parameter can also be set
in configuration file (see chap. 6.2). If the parameter has been set on command line
then the configuration file’s entry is not taken into account.
Additional parameters to be used with HSM device:
•
-slot <slot_ID> - determines the HSM device’s slot which contains the certificate
3
that is being used for decryption. The slot ID , value has to be provided in decimal
format. The –slot parameter must be used along with –label parameter.
•
-label „<label_name>“ – determines the label name of the certificate and the
accompanying private key that are used for decryption. If there are space characters
in the label’s name then the value should be put between quotation marks. The –
label parameter must be used along with –slot parameter.
Note: in order to use HSM device, the decryption certificate and accompanying private
key have to be stored in the same slot and must have matching label names. If the
parameters –slot and –label are set in command line then parameter –recipient, even if
present, is not taken into account.
Example: the input folder (for instance: C:\encrypted_files\) has many encrypted files. The
decryption process will be performed using the Digital stamp where the authentication
(encryption) certificate has the following CN field value: “InstitutionX: approval of contracts”.
The contents of the encrypted files are saved in the output folder (for instance:
C:\decrypted_files):
tempelplus decrypt c:\encrypted_files\ -output_folder c:\decrypted_files\ -recipient
“InstitutionX: approval of contracts”
The program will display the file number currently being processed in real time and if the
process ends successfully, the user will see a notification similar to this:
Done
7 files decrypted successfully! 7 files created.
TempelPlus v1.2.0 stopping. Time used: 19 seconds
3
If there are more than one HSM devices connected to the computer then slot ID values
should be determined with pkcs11-tool.exe utility program (slot’s ID is shown in output as a
hexadecimal number).
30 / 31
TempelPlus User Manual
Version 1.2.0
Note: If an incorrect USB token’s PIN code is entered during decryption or communication
with the device fails for another reason then the token may become unusable during the
current session. In order to continue using the USB token, remove it from the USB port and
insert again.
31 / 31