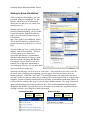
1
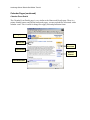
Site Builder Tutorial
Anchorage School District
Information Technology Department
August 28, 2001
Table of Contents
Welcome to Site Builder! ............................................................................................................................1
What is Site Builder? ..............................................................................................................................1
How do I use it?.......................................................................................................................................2
Preview a completed site............................................................................................................................3
Homepage................................................................................................................................................3
Class Pages .............................................................................................................................................4
Class Home Page .................................................................................................................................4
Homework Pages..................................................................................................................................5
Homework List..................................................................................................................................5
Homework Details ............................................................................................................................6
Calendar Pages ....................................................................................................................................7
Class Calendar .................................................................................................................................7
Calendar Event Details.....................................................................................................................8
Links Page ............................................................................................................................................9
Using Site Builder......................................................................................................................................10
Register for Site Builder.......................................................................................................................10
Choosing Your Password ...................................................................................................................10
Step 1 – Personal Information ............................................................................................................11
Step 2 – Staff Agreement ...................................................................................................................11
Step 3 – Select Templates..................................................................................................................12
Finishing Your Registration.................................................................................................................12
Getting to Know Site Builder ...............................................................................................................13
Building Your Web Site ........................................................................................................................15
Homepage ..........................................................................................................................................15
Class Schedule ...................................................................................................................................16
Class Pages........................................................................................................................................17
Class News.....................................................................................................................................17
Calendar .........................................................................................................................................17
Homework ......................................................................................................................................19
Links ...............................................................................................................................................20
FTP Access............................................................................................................................................21
Transferring an old site .......................................................................................................................21
Welcome to Site Builder!
What is Site Builder?
Site Builder is a tool that will allow you to publish information to the District’s public web site
from the District’s internal web site (intranet) using standard web forms and some templates.
This means that you won’t have to learn HTML or take a web page class just to post some class
information on the web. As long as you can use a web browser and fill out forms online, you can
use the Site Builder.
Right now, the system is in place only for teachers. Over the next few months, we’ll be
expanding it to include schools, ASD departments, and other staff members. The templates that
we have created for teachers include home pages, class pages, homework pages, links pages, and
class calendar pages. We will add more templates in the future, but we don’t currently know
what those templates will be.
This system will have several advantages for everybody involved. Teachers and other staff
members will be able to update pages quickly and easily. Students and parents will be able to
find teachers’ pages easily, whether or not they know the teacher’s full name. Additionally,
parents will be able to build a “My ASD” page where they can collect links to all the teachers of
all their kids, for even easier access.
All teacher (and eventually other staff) pages will be reachable through two methods.
1. All staff pages will have a URL (web address) in the following format:
http://www.asdk12.org/staff/lastname_firstname/
2. All schools and ASD departments will have a complete staff listing. Any teacher or staff
member who has created a web site using the District Site Builder will have link to his or
her site.
Anchorage School District Site Builder Tutorial
2
How do I use it?
There are a few steps to using Site Builder. First, you need to be a registered user on the District
Connection (ASD’s intranet – http://home.asdk12.org/ ). After you have registered and
logged in to the District Connection, you register for access to Site Builder. Once that process is
done, you’ll be guided through the initial set-up process and you can start building pages! You
must be inside the District firewall to register for and use the District Connection and Site
Builder. You currently cannot use them from home.
Here’s the basic idea
https://home.asdk12.org
District firewall
Step 1
You enter your class
information (homework,
calendar events, etc.) into
forms from any District
computer with network
access and a web browser.
Step 2
Templates are applied
to your information by
the District intranet
server and posted to
the District’s public
web site.
http://www.asdk12.org/staff/lname fname/
Step 3
Your web site is available on
the District’s public web
server for all the world to see!
Any time you need to add or
edit information, all you have
to do is log into the intranet!
First, we’ll walk through a completed site so that you’ll see what you can build with the Site
Builder and how useful it can be.
Anchorage School District Site Builder Tutorial
3
Preview a completed site
If you choose to use all the currently available templates, your site will have the following pages:
•
Your home page. This is the starting point for your site. You’ll have the option of adding
a photo, contact information, and a personalized welcome message. Any of that
information can be changed at any time.
•
A set of pages for each class that you choose to add. This set of pages will include a class
page with class news, a class calendar, a place to post homework assignments, and a links
page. (Note that class news, calendar events, and homework assignments can all be
posted to multiple classes.)
Homepage
Name
Subjects
Homeroom,
Phone and Email
(all optional)
Picture
(optional)
Menu of
Classes
Additional
Pages Link
Welcome Message
As you can see, you can put quite a bit of information on the homepage. Even if you decide not
to post homework or use the calendar right away, the homepage is an easy way for people to get
in touch with you.
The only information that will show up by default is your name and your class menu. Everything
else on this page is optional. If you choose not to list your subjects, your class menu will still
build. If you choose not to post a picture, your contact info, or a welcome message, those areas
will be left empty.
Note: If you already have a web site, you can link to it from your home page. Also see the FTP
Access section of this tutorial.
Anchorage School District Site Builder Tutorial
4
Class Pages
The “Class” pages can be used for primary homerooms or secondary courses. For consistency
and brevity, we refer to both of these groups generically as “classes”. Every class that you set up
on your site will have its own set of pages: class page (with class news), homework, calendar,
and links.
Class Home Page
Looking at the example here, you can see that there are two menus on this page. The top one is
the menu for this class. Each class will have its own menu for moving between its pages. The
bottom menu is the same menu that was on your home page; all the classes that you have set up
on your site. This makes it easy for users to switch between classes.
Below the ASD banner and above the class name, you’ll notice a smaller menu. This will always
lead the user up one level from wherever he or she is, all the way back to your homepage.
Class Name
Class Description
Menu for
this Class
Menu of
Classes
Class News
The Class News will display the three most recent entries. Anything older than that will be
available in an archive (linked at the bottom of the page). Each item will link to a details page,
similar to the District News on the District home page.
Anchorage School District Site Builder Tutorial
5
Homework Pages
Homework List
Each class will have a page that lists homework by due date. Up to ten assignments will display
per page; older assignments will still be available in an archive of assignments. Each assignment
will have a details page where you may give any instructions necessary for the assignment and
post any documents that the students will need to download to complete the assignment.
List of Current
Homework, with
Links to Details
Menu for
this Class
Menu of
Classes
Legend for
Homework
List Icons
myASD
Subscription
Box
The assignments will be flagged with icons for three reasons. Anything due on the current day
will have a red exclamation point. Anything posted or assigned on the current day will have a
blue star. The reason that we flag both is because it is possible to post an assignment after its
actual assignment date. So if you assign some homework on Monday, but you don’t have time to
update your homework page, you can still post the assignment to the homework page on Tuesday
and still make sure it gets someone’s attention.
Anchorage School District Site Builder Tutorial
6
Homework Pages (continued)
Homework Details
Printing Options
Homework Title
Menu for
this Class
Homework Details
Menu of
Classes
Homework
Downloads
All homework details pages will have two printing options. The first will simply turn the page
into a text-only file that will print without all the banners and menus. The second option will
actually generate a PDF of the homework assignment details and a list of downloads for that
assignment. You may post as many downloads per assignment as you want. We’ll go over that in
more detail later in the tutorial.
Anchorage School District Site Builder Tutorial
7
Calendar Pages
Class Calendar
Each class will have its own calendar. This will be a place to list class events, such as field trips
or parties. Additionally, all homework assignments will show up on the calendars on the
appropriate due date. Each event on the calendar will be linked to a details page similar to the
homework details page.
Month/Year
Selector
Back/Forward
One Month
Menu for
this Class
Menu of
Classes
Current Day is
Highlighted in
Orange
Homework
Displays on
Due Date
Like the homework pages, you may upload files associated with a calendar event. This is useful
for things like supply lists and permission forms.
Anchorage School District Site Builder Tutorial
8
Calendar Pages (continued)
Calendar Event Details
The Calendar Event Details page is very similar to the Homework Details page. There is a
printer-friendly button, and like the homework pages, you may upload files associated with a
calendar event. This is useful for things like supply lists and permission forms.
Printing Options
Event Title
Menu for
this Class
Event Details
Menu of
Classes
Event Downloads
Anchorage School District Site Builder Tutorial
9
Links Page
Each class will have a page where you can simply post links. If you have links that are specific to
a calendar event or homework assignment, you can put links on the details page, but you might
want to make it generally available as well.
Menu for
this Class
Link Description
Menu of
Classes
Linked URLs
Anchorage School District Site Builder Tutorial
10
Using Site Builder
Register for Site Builder
Because Site Builder is a personalized for you, it
requires one more level of security. This helps
prevent other people from editing your web site. On
the District Connection homepage, you’ll see a
section called “Secure Applications” with a link that
says “Register for Secure Applications.” If you are a
member of AEA, you will also see links to “Site
Builder” and “Student Information”. Click on the
“Site Builder” link, and you will be taken to the “Application Security” page.
If you have already registered for another secure application, such as Student Extracts, you can
log in with that password.
If you have never registered for a secure application, then you don’t have a password and a
temporary password will be mailed to your District email account. (If you are on Exchange mail,
your password will arrive almost instantly. If you are on Quarterdeck mail, you may have to wait
up to twenty minutes.) After you receive your temporary password, enter that into the
Application Security page, and you will be prompted to change it.
Choosing Your Password
It is important that you choose your password carefully, and that you protect it. Currently, the
only requirement for secure application passwords is a minimum length of 6 characters. Here
are some ways to help prevent people from guessing your password and making unauthorized
changes to your web site.
Don’t
•
•
•
•
Do
•
•
•
use a word that can be found in the dictionary
use a pet’s name or a child’s name
write your password on a sticky note and put up on your computer
share your password with anyone
use at least one or two numbers in your password
use a symbol, like “@” or “*”
make your password as long as you can without making it too difficult to remember or
type (10 characters is a good length)
For example, use a combination of three people’s initials and two numbers. Or your favorite
brand of car spelled backwards, with one letter replaced by a symbol or number. This may seem
like a lot of bother about nothing, but the integrity of your web site, and therefore the District’s
site is only as good as the security that protects it. If a malevolent soul gained access to your Site
Builder account, he or she could delete all your homework or calendar archives, or even worse,
deface your web site. Please take your password seriously.
Anchorage School District Site Builder Tutorial
Step 1 – Personal Information
You’ll now be looking at a page that asks
you to verify that the following information
is correct: your name, your District email
address, your physical work location, and
your department. It is critical that this
information is correct! The Site Builder
automatically makes all your pages
available from your school’s page, but it
must have the appropriate information to
do this.
If any of the information on is wrong:
Click on the button that says “No” and you
will be given instructions for getting the
information corrected. After you have
completed the necessary steps to get that
information corrected, use your browser’s
“Back” button to return to Step 1 of the
Site Builder registration process, and click
“Yes” and proceed to Step 2.
Later in this tutorial, we will explain how
to make sure your site shows up under the correct school until the information is corrected.
If all the information is correct:
Click “Yes” and you’ll be taken to Step 2, the District’s Internet User Agreement.
Step 2 – Staff Agreement
This step merely verifies that you have signed
the IUA (you had to sign it to get your email
account). To go to the last step of your
registration, review the agreement, select
“Yes” at the bottom of the page, and click the
“Proceed” button. If you select “No”, you will
not be able to finish the registration. (Note:
The page is shortened in this illustration.)
11
Anchorage School District Site Builder Tutorial
12
Step 3 – Select Templates
The last step of Site Builder registration is
selecting which templates you want to use.
You can add or remove these templates and
the pages created by them at any time, so
don’t worry too much about it right now.
Everyone gets a homepage by default. Your
other template options are:
•
Calendar
This creates a calendar and calendar
archive for each class that you have.
You can cross-post calendar events to
multiple classes, but each class will
have its own calendar.
•
Homework
This creates a list of homework and homework archive for each class. As with the
calendar template, you may cross-post homework assignments to multiple classes, but
each class will have its own homework page.
•
Links
This creates a list of links for each class. As with the calendar and homework templates,
you may cross-post links to multiple classes, but each class will have its own links page.
You’ll find more information about each of these templates later on in this guide. For now, select
the ones you think you’ll use. After you’re done registering you can add and drop templates at
any time. Over the next few months, we’ll be creating additional templates and we’ll notify you
as they become available.
Finishing Your Registration
After you’ve selected your templates,
click the “Finish Registration” button.
You’ll be taken to a registration summary
page that will verify all your options and
give you a link to the Site Builder.
Anchorage School District Site Builder Tutorial
13
Getting to Know Site Builder
After you log in to Site Builder, you’ll be
presented with your “dashboard” for Site
Builder, which has a lot of information
about your site and gives you control over
most aspects of it.
Starting at the top of the page (below the
District Connection banner), you’ll see that
it says Site Builder. Right below that is a
link to your site on the external server. It
will look like
http://www.asdk12.org/staff/lname_fname.
This is the URL that you can hand out to
people who want to go directly to your web
page.
Just below that you’ll see a yellow alert box
entitled “Notices From Admin.” This box
will only show up at certain times;
specifically when there is a maintenance
task that needs attention or if there is some
new information concerning Site Builder.
For example, on your first visit, the box
reminds you to add some information to
your homepage. The box will stay there until
you have taken care of the alert.
Next down on the page, you’ll see a set of “task boxes.” These task boxes are where you’ll do
the actual work of setting up and updating your web pages. All of the task boxes have two
buttons at the top: “show/hide” and “help.” The show/hide button will collapse the task box if
you don’t need to see that one while you’re working. This can be helpful if you’re using an older
computer, because collapsing unused task boxes will help your dashboard load more quickly. It
is also useful for creating some space if you are using a smaller monitor. The “help” button will
open a help document specifically for that task box. There will be additional help documents
throughout Site Builder. Any time that you see an orange circle with a blue question mark in it,
clicking it will give you a help file related to that topic.
Expanded Task Box
Show/Hide
Task Box
Hidden Task Box
Help for this
Task Box
Show/Hide
Task Box
Help for this
Task Box
Anchorage School District Site Builder Tutorial
14
The six task boxes currently on the dashboard are:
•
Manage Content
This box has links to all the forms for the active templates that you are using on your web
pages. As you add or remove templates in Site Builder, this box will grow and shrink. For
most templates, there will be an “Add” function and an “Edit” function. For example. If you
have a new homework assignment, you will click on the “Add Homework Assignments” link
in your “Manage Content” task box. If you need to change, delete, or re-assign an existing
homework assignment, you will click on the “Edit Homework Assignments” link. The two
current exceptions to this rule are your Homepage and Class Schedule. They are created and
edited from the same link.
•
My To Do List
This box is a place where you can leave notes for yourself about your site. For example, if
you need to finish adding the homework for a class, but don’t have time, you can leave your
self a note. When you’ve completed the task, click on the “Delete” button.
•
Directory/Folder Info
This shows you all the folders in your directory on the server, the amount of space that each
one takes up and the total amount of space that you are using on the server. This is also
where you will create an FTP account if you decide that you want one. The first time you log
in, you will notice that there are three folders. As you upload files or create an FTP account,
folders will be added to that list accordingly.
•
Add/Delete Templates
In this box, you may add or delete the templates that your site is using at any time. If you
start using a template then decide to delete it, the information for that template will still be
stored, and you can add the template back in if you wish.
•
Current ASD Info
This is the same information that you confirmed when you registered. It is provided here just
as a double check. If you ever change work locations or departments, make sure the change is
reflected in this box.
Anchorage School District Site Builder Tutorial
15
Building Your Web Site
There are a few steps involved in putting your site together. First you need to create your
homepage. After that’s done, you’ll create your class schedule. The class schedule is what drives
the rest of the site. (If you’re an elementary teacher and you only have one class, you still need to
add it to your class schedule.) Once you’ve created the schedule, you’ll have the opportunity to
create information pages, calendars, homework pages, and link pages for each class on your
schedule.
Homepage
The first thing to do is to get your homepage done. Until you have added some content to your
homepage, you’ll see this message on the Site Builder dashboard:
and your homepage will simply display your name.
In the Manage Content task box, click on the “Home Page” link. This will take you to the form
for creating and updating your homepage. Your home page will be the gateway to your site. It
has places for your name, your District email address, your work phone number, a list of the
subjects that you teach, your room number and an introductory or welcome message. This page
will also have a menu of links to pages for all your specific classes, but we’ll get to those in a
little bit.
Your Picture
You may upload a picture to help personalize your
page. The picture must be a JPEG and will be
automatically resized and optimized for display on
the web, so bear that in mind when choosing which
picture you want to upload. You will have a choice
of three sizes: 150 pixels wide, 250 pixels wide, or
350 pixels wide. The height will be adjusted
proportionately so that your picture won’t be
distorted. You will see a preview of the picture on
your editing page, and you may delete it or replace
it as often as you like.
What’s a JPEG?
JPEG (pronounced “jay peg”) is a graphic
format that is common on the World Wide
Web. It is the preferred format for
photographs because it has a higher ratio
of colors to file size than GIFs, the other
predominant image format on the web. For
the purposes of the Site Builder, the main
thing to remember is that while most
modern digital cameras can save photos in
a JPG format, some don’t. Be sure to
consult your camera’s user manual. If you
are scanning an image, be sure to save
your image as a JPG.
To upload your picture, first click on the “Browse”
button. This will open a window to your hard drive
where you can select the picture to upload. Once
you have selected the picture click the “Upload!”
button. The picture will be uploaded and adjusted, and your editing page will reload to show you
what the picture looks like. If you decide you want a different picture, just upload a new one; the
old picture will be replaced. If you decide you don’t want a picture at all, use the “Delete my
picture” link.
Anchorage School District Site Builder Tutorial
16
Contact Information
You may choose to display your District email address and work phone on the District web site.
By default, this information is not displayed; you must set each of these options to “Yes.” As
with anything on your homepage, you can change it at any time, so if you want to start without
your email and phone on your home page, you can add them later.
Subjects and Room Information
You may display a list of the subjects that you teach, as well as your home room number. Again,
these are optional. The list of subjects should be just the subject names themselves, not specific
classes, e.g., “Math” or “Calculus 2”. The home room can contain any combination of numbers
and letters. Note that your subjects list is separate from your class schedule, which you will enter
later. This is simply a general listing of the subjects you teach.
Additional Pages
You have the option of adding pages to your site that you have created yourself outside of Site
Builder. If you decide that you want pages that are not currently created by the Site Builder
templates (say a book list or photo album), or if you have web pages on the other District web
server (http://www.asd.k12.ak.us/), you simply use the “Add an FTP Account” link on
the Folder/Directory Taskbox to create your account. After you have created it, use the
“Additional Pages” field to create a link to those pages. For more information see FTP Access
later in this tutorial.
Welcome Message
You might wish to introduce yourself to
parents or others with your home page, or
perhaps there is a special message that you
would like to share. You may put that
information here. You may simply type into
this field and the server will convert it to
proper HTML. You may also use HTML if
you’d like. If you already have another
District web site, this is a good place to add a
link to it. (See FTP Access later in this
tutorial.)
When you are finished making your additions
and/or changes, click the “Create/Update My
Home Page” button at the bottom of the
page, and your page will be created. You
may then go back to the dashboard and work
on your other templates. (The Admin Notice
should be gone now.)
Using HTML with Site Builder
You have the option of using HTML in your
welcome message/class description. You may
use full HTML including paragraph tags, etc., or
just using word formatting, like bold and italics. If
you want to use full HTML, check the "Use full
HTML" box above the welcome message/class
description editing box. If you only use word
formatting, Site Builder will insert appropriate line
breaks and nothing else. You may change this
option at any time.
If you use the full HTML formatting option,
include only the code between the <body> and
</body> tags. If you include <head> tags,
<meta> tags, or <body> tags, your homepage
will not display properly. To stay in conformance
with the American with Disabilities Act, you
should only use HTML 4.01 Transitional or
higher. For more information about writing HTML
for the District web site, there is a tutorial about
that at
http://www.asd.k12.ak.us/internet/webguides/.
Class Schedule
This is the second important step in creating
your web site. Your homepage tells people who you are and where you are. Your Class Schedule
Anchorage School District Site Builder Tutorial
17
will be the first building block for all the other information on your site. You must add classes to
your Class Schedule before you can add calendar events or homework assignments. If you are an
elementary teacher and have only one class, just enter that one class.
From the Manage Content task box, click on “Class Schedule.” This will take you to a page
where you can add your classes one at a time, in any order. First enter a class name. Because this
class name will be used to create your menu of classes on your web site, don’t use a name that’s
too long. You can put a much longer description of your class in the description field below.
When you have finished adding all your information for your first class, click the “Add This
Class” button. The page will reload, and the class will be added to the chart of classes at the
bottom of the page.
Repeat this step for each class that you’ll be posting to the web site. You don’t need to add all
your classes at once; you can always add more later if you just want to start with one. Each time
you add a class, the server will create a class page for that class.
Class Pages
After you’ve add all the classes you want, you can start putting in the information about them.
Depending on which templates you chose at registration, you’ll see several links in the Manage
Content task box. (You may add templates to your site using the Add/Delete Templates task
box.) We’ll go through the templates one by one. If you chose not to install a template, you can
skip it for now and come back to it later.
Class News
Each class page that the server created as you entered your schedule information has a spot for
class news. This is a place for announcements that may not belong on the calendar or other
special items. The class page will display the three most recent items, and will have a link to an
archive of past items.
To add a news item to a class page, go to the Manage Content task box on your Site Builder
dashboard. Click on the link that says “Add Class News.” After you have added a class news
item, you may edit it at any time by clicking on the “Edit Class News” link in the Manage
Content task box. You’ll be presented with a list of all class news articles. Click on the “edit”
icon to edit a particular story.
Calendar
This creates a calendar for each of your classes. The purpose of the class calendar is to post
information about special events for your class. Each item on the calendar will be linked to page
with event details and any files that the students may need. For example, if you are taking a class
on a field trip, you can place the field trip on the class calendar and upload a permission slip that
the student or his or her parents can print at home to sign and bring in.
Note: The class calendar will also display homework assignments on their due dates, but you
must enter homework assignments on the Homework template.
You may also choose to display a combined calendar on your web site, but you will always edit
each class calendar separately.
Anchorage School District Site Builder Tutorial
18
To add a calendar event
1. To begin adding items to your class
calendar, click on the link “Add
Calendar Events.” This will take you
to a form that has a few options.
Cross-Platform File Naming
2. First, select the class calendar that you
want to edit. After you have selected
the class calendar, enter a short title
for the event, such as “Field Trip to
Museum” or “Class Party”. This title
is what will display on the actual
calendar and will be a link to a details
page, so keep it brief.
File Extensions
3. Next enter the date for the event. You
may type the date in by hand using the
format mm/dd/yyyy (so March 3,
2001 would be 03/03/2001) or by
using the button to the right of the
input field. This will pop up a
calendar in a small window. Click on
the date that you want to enter and the
calendar will automatically close and
put the appropriate date into the field.
Microsoft Word
Microsoft Excel
Adobe Acrobat
Plain text files
To be sure that your files will upload and
download properly, you must follow these
naming conventions.
All files must have appropriate filename
extensions to work across platforms. If you are
on a Windows machine, your file will already
have the extension, even if you can’t see it. If
you are on a Mac, be sure to tag your files with
the appropriate extension. Here’s a list of
common extensions.
If you find any extensions that should be added
to this list, contact us at
[email protected]
Special Characters
You must also avoid certain characters which are
reserved by the web server. It’s a short list:
4. When the date has been entered, you
may enter any other information or
details that you want to display on the
event details page. This is the page
that will be linked from the event title
on the calendar.
#, $, !, /, @
5. Click “Add This Event”
Example
After you have added the event, the page will
reload and you will be presented with the
option of uploading any files that are
associated with the event, such as permission
slips or supply lists. Uploading a file is very
similar to uploading your picture for your
homepage, but any files that you want to
upload must follow some naming
conventions. (See “Cross-Platform File
Naming.)
.doc
.xls
.pdf
.txt
The safest bet is to use only letters and numbers
in your file names. Avoid punctuation, spaces,
and symbols. If you don’t like running document
names together, use the underscore (also called
“underbar”).
You’ve just created a Word document on your
Mac called “Monday’s Homework”, and you’re
ready to upload it. It has an apostrophe and a
space in it, both of which could cause problems
on the web or another machine. You’ll want to
rename it something like
“mondayshomework.doc.”
If you want to break up pieces or words of a
document title, use underscores ( _ ) rather than
spaces. Then “Monday’s Homework” could
become “mondays_homework.doc.” Or if you
want to identify files by date, you could use
something like “homework020401.doc” for an
assignment from February 4, 2001.
Anchorage School District Site Builder Tutorial
To upload a file scroll down to “Files for this event” and
click on the “Browse” button. This will open a window to
your hard drive where you can select the file that you want
to upload. You may also choose to convert your file to PDF
for cross-platform compatibility. Once you have selected
the file click the “Upload!” button.
The file will be uploaded and your editing page will reload
to show you a list of files. If you look at this list, you’ll
notice a few things. The filename will have a number and
an underscore in front of it (“43_filename.pdf”). This is to
make sure that the file is correctly associated with the
event. You will also see the path to the file from the
homepage (this is the link that the server will build) and the
filetype. The last item on the table is the delete button. You
can use this to delete the document if you need to upload a
new version.
You may upload as many files as you need to for any
event, but bear in mind that you have a 20 megabyte limit
on your web site.
To edit or delete a calendar event
19
Convert Uploaded Files to
PDF
You may opt to convert the file that
you're uploading to PDF. PDF stands
for "Portable Document Format." It is
a special document format that is
readable with the Adobe Acrobat
Reader, which is available from
Adobe. We will provide a link to this
free software on the public site.
The advantage of PDF is that almost
any computer can read it, so you'll
have fewer problems with people not
being able to open homework files.
We can currently convert several
word processor document formats to
PDF, but the best bets are Microsoft
Word (Mac or Windows), RTF (Rich
Text Format), or plain text. Be sure to
give your file the appropriate
extension, or the server won't know
what to do with it. Here are the
appropriate file extensions:
Format
Microsoft Word
Rich Text Format
Plain Text
Extension
.doc
.rtf
.txt
From the Manage Content task box on your Site Builder
dashboard, click on “Edit a Calendar Event.” You will be
taken to a page where you may select the class calendar
and see a list of all the events. Click on the “Edit” icon to
go to the editing form. Using this form is essentially just the same as adding a calendar event, but
you start with all the information already in the form.
Click on the “Delete” icon to remove the event from the class calendar. Note: If you delete an
event, you will also delete all files associated with it. This cannot be “undone.” You’ll have to
recreate it from scratch, including uploading any associated files.
Homework
Adding or editing a homework assignment is essentially the same as adding or editing Calendar
events. The only difference is that you will have an “Assignment Date” and a “Due Date”.
Everything else, including the instructions for uploading files is the same as the Calendar
instructions. You can enter homework assignments as far in advance as you would like, but they
will not display on homework list pages or class calendars until the assignment date. For
example, if you enter assignments at the beginning of the month with assignment dates of the
15th, 21st, and 30th, the assignments will not appear on homework pages or calendar page until the
15th, 21st, and 30th.
Note: Homework assignments will appear on class calendars, but you must add and edit them
using the “Homework” pages.
Anchorage School District Site Builder Tutorial
20
Links
Creating a links page for a class is one of the simplest things to do with the Site Builder. From
the Manage Content task box, click on “Add Links.” This will take you to a page where you’ll
have three fields to fill in. Just as with Calendar and Homework, you’ll need to select a class.
Then you enter a link description, such as “NASA” or “CNN” or “Apple’s education site”. After
you enter the description, you can enter the link. The link must be fully-qualified, which means
you need to include the entire link. For example, to link to NASA, you must enter
http://www.nasa.gov/. You cannot simply enter www.nasa.gov or nasa.gov; those will
not work. One way to make sure that you have the complete URL is to actually go to the page or
site that you want to link to and copy the URL from the address window of your browser.
Fully-qualified URL
Anchorage School District Site Builder Tutorial
21
FTP Access
If you’re not sure what FTP is or what an FTP client is, don’t worry about it. That’s a discussion
for a different tutorial. Suffice to say that you don’t need to know anything about FTP to use the
Site Builder. If you DO know what FTP is and you’re used to using it, read on.
After you register for the Site Builder, you will have the option of creating an FTP account from
the Site Builder dashboard. In the Directory/Folder taskbox, you’ll see an option to create your
account. All you have to do is click that link. When you do that, the account will be created for
you, using your email name (the first part of your email address, usually ‘lastname_firstname’)
and your Site Builder password. Any time you update your Site Builder password, your FTP
password will be updated as well.
server: www.asdk12.org
username: lastname_firstname (the first part of your email address)
password: the same as your Site Builder password
When you connect to your account using an FTP client, you will be in your “pages” directory.
You cannot affect any of the other directories using FTP. This means that you can’t delete files
that you uploaded with the Site Builder (for example, a homework attachment.)
The URL for accessing anything that you upload from via FTP will be:
http://www.asdk12.org/staff/lastname_firstname/pages/
You can put a link to that on your Site Builder-generated homepage using a field on your “Edit
Home” form in the Site Builder.
For more information about using FTP, see the Help section of the District Connection.
Transferring an old site
If you previously had a web site on the District server, this is where you would put it in this
“pages” directory.
You’ll still need to register for Site Builder to create your account and you’ll still need to create a
Site Builder homepage. After you’ve done that, you can simply upload your existing site onto the
new server.
Simply use your FTP account to upload all the information from your old site to your new one.
That’s it!
That is essentially all there is to building a web site with the Site Builder. If you run into
problems, you can send questions to [email protected] . We’re usually
around but if we don’t get back to you immediately, be patient.
ASD IT Department, Web Development Team