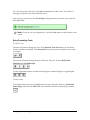
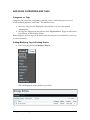
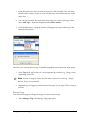
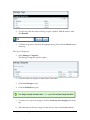
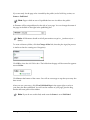
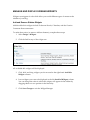
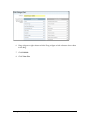
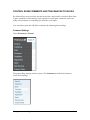
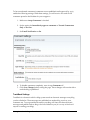
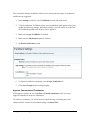
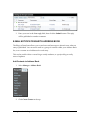
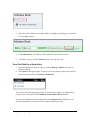
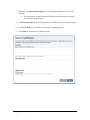
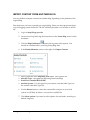
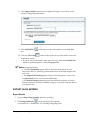
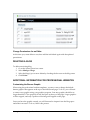
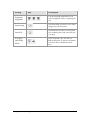
1
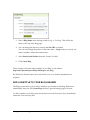
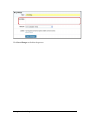
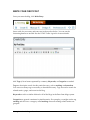
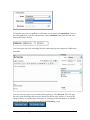
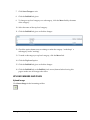
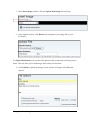
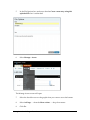
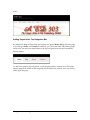
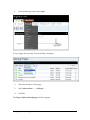
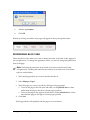
Getting Started with Blogs at Penn State Delivered by ITS Training Services for Penn State ITS Training Services 23 Willard Building University Park, PA 16802 814-863-9522 [email protected] http://its.psu.edu/training/ Version 10/04/2011 Alternative Format Statement This publication is available in alternative media upon request. Statement of Non-Discrimination The Pennsylvania State University is committed to the policy that all persons shall have equal access to programs, facilities, admission, and employment without regard to personal characteristics not related to ability, performance, or qualifications as determined by University policy or by state or federal authorities. It is the policy of the University to maintain an academic and work environment free of discrimination, including harassment. The Pennsylvania State University prohibits discrimination and harassment against any person because of age, ancestry, color, disability or handicap, national origin, race, religious creed, sex, sexual orientation, or veteran status. Discrimination or harassment against faculty, staff, or students will not be tolerated at The Pennsylvania State University. Direct all inquiries regarding the nondiscrimination policy to the Affirmative Action Director, The Pennsylvania State University, 328 Boucke Building, University Park, PA 16802-5901; Tel 814-865-4700/V, 814-863-1150/TTY. TABLE OF CONTENTS Blog Basics ....................................................................................................................................... 3 Activate Personal Web Space ........................................................................................................ 3 Create Blog ..................................................................................................................................... 3 Add a Subtitle to Your Blog Header ................................................................................................ 4 Add a Creative Commons License .................................................................................................. 6 Select Styles (Colors/Fonts) ............................................................................................................ 7 Write your First Post......................................................................................................................... 9 Entry Formatting Tools.................................................................................................................. 12 Format Text ............................................................................................................................... 12 Insert Links ................................................................................................................................ 12 Indent Lists and Create Lists .................................................................................................... 13 Upload Image and Files ............................................................................................................ 13 Toggle to HTML View ............................................................................................................... 13 Add Blog Categories and Tags...................................................................................................... 14 Categories vs. Tags ...................................................................................................................... 14 Adding/Modifying Tags to Existing Entries .................................................................................... 14 Manage Tags ............................................................................................................................ 15 Manage Categories ................................................................................................................... 16 Upload Images and Files ................................................................................................................ 17 Upload Image................................................................................................................................ 17 Create a Podcast Audio or Video File ....................................................................................... 19 Upload the Audio File ................................................................................................................ 19 Viewing Podcast in iTunes ........................................................................................................ 20 Other Podcast Viewing Options ................................................................................................ 21 Podcast Through iTunes U ....................................................................................................... 21 Include a Link to Other Files ......................................................................................................... 21 Create Static Pages ........................................................................................................................ 21 Create a Page ............................................................................................................................... 21 Edit and Delete Pages .................................................................................................................. 23 Hide Pages ................................................................................................................................... 23 Hiding the Blogs Tab..................................................................................................................... 23 Manage and Display Sidebar Widgets .......................................................................................... 24 Add and Remove Sidebar Widgets ............................................................................................... 24 Add a Headline Feed from Another Blog ...................................................................................... 26 Finding the Feed Link ............................................................................................................... 26 Adding the Feed Link ................................................................................................................ 26 Displaying the Feed Link ........................................................................................................... 27 Control Spam Comments and Trackbacks to Blogs ................................................................... 28 Comment Settings ........................................................................................................................ 28 TrackBack Settings ....................................................................................................................... 29 Approve Comments and Trackbacks ............................................................................................ 30 Reply to a Comment ..................................................................................................................... 31 E-Mail Notifications with Address Book ....................................................................................... 32 Add Contacts to Address Book ..................................................................................................... 32 Send Out E-Mail for a Single Entry ............................................................................................... 33 Manage Multiple Blogs ................................................................................................................... 35 Creating Another Blog................................................................................................................... 35 Switch Between Blogs .................................................................................................................. 35 Adjust Blog Settings....................................................................................................................... 35 View Blog Post and URL ................................................................................................................ 37 What is Blog URL? .................................................................................................................... 37 Edit Older Entries ........................................................................................................................... 37 Editing an Entry............................................................................................................................. 37 Hiding an Entry ............................................................................................................................. 37 Import Content from Another Blog ............................................................................................... 38 Export Blog Entries ........................................................................................................................ 39 Export Entries ............................................................................................................................... 39 Save Static Blog Files ................................................................................................................... 40 Add Editors and Commenters ....................................................................................................... 40 Potential Editors Must Login ......................................................................................................... 40 Add an Editor ................................................................................................................................ 40 Delete an Editor ............................................................................................................................ 41 Change Permissions for an Editor ................................................................................................ 42 Deleting a blog ................................................................................................................................ 42 Additional information for Professional Websites ...................................................................... 42 Customizing the banner graphic ................................................................................................... 42 Adding Pages to the Top Navigation Bar ...................................................................................... 46 Reordering Blog Tabs .................................................................................................................... 48 Embedding Other Types of Content ............................................................................................. 49 Appendix: Entry Formatting Tools ................................................................................................ 52 Getting Started with Blogs at Penn State OBJECTIVES Participants will be able to Create a basic blog using professional Web site styling Create, edit and post a blog entry Edit and use blog widgets BLOG BASICS Activate Personal Web Space You must activate your Penn State Personal Web space in order to use the Penn State blog service. To activate your personal Web space, go to http://www.work.psu.edu/ and click Apply for Web space on www.personal.psu.edu. Create Blog 1. Log on to http://blogs.psu.edu. The first time you log in, you will see the System Overview page. 2. In the Create menu on the top, select Blog. Note: If you do not see the Blogs option in the Create menu, go to the top white location tab in the upper left and select System Overview. The Create Blog dialog will open. Getting Started with Blogs at Penn State 3 3. Enter a Blog Name in the Settings window (e.g. A Test Blog). This will be the name on the top of the blog page. 4. You can change the directory name in the Site URL as needed. You can only change the portion of the name after …blogs/ and you can only use letters, numbers, dashes and underscores. 5. Select Professional Website from the Template Set field. 6. Click Create Blog. These settings will create a blog entitled “A Test Blog” at the address http://www.personal.psu.edu/xyz123/blogs/a_test_blog. By default, the Eastern time zone is selected for you, so no further adjustments are required. ADD A SUBTITLE TO YOUR BLOG HEADER The Blogs system allows you to add a subtitle to your header in the Blogs Preferences. Immediately after you click Create Blog, the blog’s general settings page will open. To add a subtitle to your blog, enter the desired text in the Description box, immediately under the Name text entry box. Getting Started with Blogs at Penn State 4 Click Save Changes to finalize the process. Getting Started with Blogs at Penn State 5 ADD A CREATIVE COMMONS LICENSE You can determine how the content of your blog is used by others. To do so, you will need to create and assign a Creative Commons license. 1. Next to license, click Select a license. A new dialog box will open. For more, detailed information about the license, you can select the more info links in the dialog box. 2. When you have decided on the license that you want to apply to your blog, click Select a License to create the license and add it to your blog. The dialog box will confirm the type of license that you have selected, and indicate the permanent location of the license. 3. Click Proceed to return to the general settings screen. The general settings will now indicate that a license is present. You can always change or remove the license later if you choose to do so. Getting Started with Blogs at Penn State 6 To access the blog general settings page at any time, select Preferences > General on the toolbar. Note: if the Entries link is not active, then click the white System Overview tab, then the name of your blog SELECT STYLES (COLORS/FONTS) You can use the Styles options to make basic changes in overall appearance of your blog. Note: if the Design link is not visible, then click the white System Overview tab, then the name of your blog To select a style for your blog, select Design > Styles. Getting Started with Blogs at Penn State 7 You should see a list of available preformatted styles: Select a style from the Professional Website styles. When you select a style, it will appear in the Selected Design column so that you can have an idea of its look. It will also contain any authoring information as well as a link to the CSS (Cascading Style Sheet) file if you choose to modify the CSS for that particular design. In the Layout drop‐down, you can select the layout of your blog. After you have selected the design, and chosen a layout for your blog, click Apply Design. You must publish your blog to view it after you have applied the design. In the information box at the top of the screen, click on the Publish link. Getting Started with Blogs at Penn State 8 WRITE YOUR FIRST POST Once you enter the blog, click Write Entry. , Insert a title for your entry and enter text in the text box below. You can use the formatting buttons as needed. See the HTML Toolbar Appendix for more details. Add Tags (a list of terms separated by commas), Keywords, or Categories as needed. Tags are descriptive words for this particular entry, such as training or observation. You can use as many tags as necessary to describe this entry. Tags are used to search for related entries, pages, and assets in this blog. Keywords work in a similar fashion for all of the blogs in the Penn State blogs system. Categories are general containers for similar entries. For example, you might use the tag training and also have a category called training where all training related entries are grouped. Getting Started with Blogs at Penn State 9 To add tags, enter them in the tags box separated by commas. Consider using lower case for your tags unless they are proper nouns or acronyms. Do the same for keywords. To add a category, click the Add new link. A separate Categories dialog box will open. Any categories that have previously been added will appear in the Categories box. To add a new category, click Add New. In the entry box, add the name of the category and click the plus button. The category is added to the list. To remove a category from this entry, click on the button to the right of the category. Please refer to the section on Categories and Tags (page 14) for more detailed information. To set the status of this entry, select Published, Unpublished, or Scheduled from the status dropdown. Getting Started with Blogs at Penn State 10 To keep the entry, but not publish it at this time, set the status to Unpublished. To have the entry publish at a specific date and time, select Scheduled, then enter the time and date in the Publish date box. Your first entry may look something like this with some tags and categories added to the metadata: You may choose to preview your entry before posting it. Click Preview. This will open the entry with the design that you have selected in the browser window. You have the option of either saving the entry at this time or returning to the edit mode to re‐edit the entry. In either case, you will be returned to the Edit Entry screen. Getting Started with Blogs at Penn State 11 If you do not preview the entry, click Save at the bottom of the screen. You will see a message on top that your entry has been saved. After you save your entry, click View Entry in the green box to see how your entry has been published. Note: If you do not see the green box, click the Save button at the bottom of the screen. Entry Formatting Tools Format Text The first two buttons change text size. Click Decrease Text Size button (A with down arrow) to make text smaller. Click Increase Text (A with up arrow) button size to make text larger. The next four buttons change the style of the text. They are, in order Bold, Italic, Underline and Strikethrough. Use the alignment buttons to make text left aligned, centered aligned, or right aligned. Insert Links To include a link in your text, highlight the text you want to be a link (e.g. Penn State Home Page), then click the Link chain icon and fill in the URL in the pop‐up window. Getting Started with Blogs at Penn State 12 To include an e‐mail link, highlight the text you want to be a link (e.g. Contact the Webmaster), then click the E‐mail Link envelope icon and fill in the e‐mail address in the pop‐up window. Indent Lists and Create Lists To indent an entire paragraph as a quote, highlight the text, and click Begin Blockquote. Click End Blockquote to end the indent. For bulleted (unordered) and numbered (ordered) lists: • Click Bulleted List to create a bulleted list. Click the button again to stop the list. • Click Numbered List to create an ordered list. Click the button again to stop the list. • Click Tab to indent a list item in one level. • Click Shift‐Tab to out dent a list item out one level. Upload Image and Files Click Insert Image to upload an image. See the Insert Image section for details. Click Insert File to upload a file. See the Insert Files section for details. Toggle to HTML View To view the HTML code, click the <A> HTML mode button. To return to formatted text, click the blue A WYSIWYG Mode button. Getting Started with Blogs at Penn State 13 ADD BLOG CATEGORIES AND TAGS Categories vs. Tags Categories are a fixed list configured by the blog creator, while free tags are a set of words manually added to each entry. The differences are: • Links for Categories are displayed in the side bar. You can create nested subcategories. • All Tags are displayed in the side bar in the Tag Cloud area. Pages for individual tags include an RSS feed by default. Both categories and free tags can be used in the same blog, but you should be sure to use words consistently. Adding/Modifying Tags to Existing Entries Enter your blog and select Manage > Entries. This will display all of the entries in your blog. Getting Started with Blogs at Penn State 14 1. From the entries list, click on the entry that you wish to modify. This will open the edit entry window where you can edit the entry and edit/modify any of the other data. 2. You can also check the box next to the entry that you want to add tags to, then select Add Tags… from the dropdown menu More actions . . .. 3. Click the Go button. A pop‐up window will appear for you to add a tag to the selected entry/entries. Likewise, you can also remove tags, or publish/unpublish entries from this same menu. 1. In the Tags field, add a series of words separated by commas (e.g. “blogs, social computing, Web 2.0”). Note: For best sorting, be sure to use the same version of a word (e.g., “blogs”, but not “blog”) across entries. 2. Repeated tags will appear at the bottom of the page as you type. Click on a tag to insert it. Manage Tags You can use this page to edit typos in tags or remove unused tags. 1. Select Manage >Tags. The Manage Tags page opens. Getting Started with Blogs at Penn State 15 2. To edit a tag, click the name of the tag to open a textbox. Edit the textbox, then click Rename. 3. To delete a tag, place a check by the appropriate tag, then click the Delete button at the top. Manage Categories 1. Select Manage > Categories. The Manage Categories window opens. 2. Click the name of a category to make edits to the name. 3. Click Save Changes to exit. 4. Click the Publish link given. 5. To create a new top level category, click the Create top level category link at the top. 6. Enter the name of the new category in the text box, then click the Save button. Getting Started with Blogs at Penn State 16 7. Click Save Changes to exit. 8. Click the Publish link given. 9. To change a top level category to a subcategory, click the Move link by the name of the category. 10. Select the name of the top level category. 11. Click the Publish link given to finalize changes. 12. Check the option button next to training to make the category “workshops” a subcategory under “training”. 13. 14. 15. 16. To make a subcategory a top‐level category, click the Move link. Click the Top Level option. Click the Publish link given to finalize changes. Click the Publish link or the Publish (circle arrow) button before leaving this page to make sure all changes take effect. UPLOAD IMAGES AND FILES Upload Image Click Insert Image in the formatting toolbar. Getting Started with Blogs at Penn State 17 1. In the Insert Image window, click the Upload New Image link in the top. 2. In the upload window, click Browse and navigate to your image file on your local drive. For Upload Destination, you can select the option for the current date in the drop‐down menu. This will allow you to find images more easily at a later date. 3. Click Upload to upload the image. A new window will open with additional options. Getting Started with Blogs at Penn State 18 Additional options include: • • • • • • • • Add a description and appropriate tags separated by commas. Select an alignment option (left, center or right) if you want your image to be placed in reference to your text. Check Display image in entry if you want to see the image within a blog entry. Check Use thumbnail if you want to reduce the width of an image. Check Link image to full‐size version if you want users to be able to click on an image and see the original size. Click Finish to complete the image insertion process. Include a Podcast Audio File. You can create a podcast feed by uploading an audio file into your Web space and linking to it. The feed will be available in iTunes. Create a Podcast Audio or Video File The Digital Commons Tutorials page (http://digitalcommons.psu.edu/tutorials) includes tutorials for software such as Garage Band or QuickTimePro that allow you to create MP3 audio and other podcast format files. Upload the Audio File 1. Click Insert File in the formatting toolbar. 2. In the Insert Asset window, click Upload New File link. 3. In the upload window, click Browse and navigate to your image file on your local drive. Getting Started with Blogs at Penn State 19 4. Click Browse to find your audio file, then click Upload to copy the file into the blog. For Upload Destination, you can select the option for the current date in the drop‐down menu. This will allow you to find images more easily at a later date. 5. Click Upload to upload the file. A new window will open with additional options. Add a description and appropriate tags separated by commas. Click Finish to complete the image insertion process. A link to the file will be included in the blog entry. Note: If you know HTML coding, you can toggle to the HTML mode and edit the name of the file. For example, this MP3 file may be re‐titled “Blogs at Penn State: An Audio Introduction”. Viewing Podcast in iTunes To view the podcast in iTunes, do the following. 1. Navigate to your published blog (e.g. http://www.personal.psu.edu/xyz123/blogs/). 2. Find the link for Subscribe to this blogʹs feed in the sidebar. Right click and select the option for copying the link URL. 3. Open the iTunes application. 4. Go to Advanced menu then Subscribe to Podcasts..., then paste the URL into the pop‐up window. 5. You will see a list of available files in that podcast. You will not see any text written in the blog entry. Getting Started with Blogs at Penn State 20 Note: The most recent file will be downloaded unless you select click the X cancel icon at top. Other Podcast Viewing Options Users can click on the link within the entry to listen to the file within an MP3 plug‐in such as Quicktime, Windows Media Player, or iTunes. Users can subscribe to the feed using a news reader such as Feed Reader (Windows) and NetNewsWire Lite (Mac), then click on links for audio. Podcast Through iTunes U If you wish to use the iTunes podcasting service, please review information at http://podcasts.psu.edu/. This service allows you to lock down podcast viewing rights by course or other Penn State unit and to navigate to the podcast directly within iTunes, however it is accessible only through iTunes. Include a Link to Other Files To upload another type of file, such as a PowerPoint, Word document or PDF, follow the same process that was used for uploading a podcast audio file. A link will be created within the blog entry. CREATE STATIC PAGES The Blogs at Penn State tool allows you to create static content pages which are part of your blog. Create a Page Click Create > Page. A form similar to that for a blog entry will appear. Fill in a title for your entry and enter text in the textbox below. You can use the formatting buttons as needed. See the HTML Toolbar Appendix for details. To have the page appear in the top navigation bar, make the first tag @topnav. Add other tags (separated by commas) as needed. Getting Started with Blogs at Penn State 21 If you are ready for the page to be viewable by the public; in the Publishing section, set Status to Published. Note: Pages which are set to Unpublished are not viewable to the public. A filename will be assigned based on the title of your page. You can change the name of the page in the field on the right in the publishing box. Note: All filenames should avoid all punctuation except for _ (underscore) or – (dash). To create a directory folder, click the Change folder link, then the plus sign (the process is similar to that for creating new Categories). Click OK to close the Add Folders box. The folder that the page will be created in appears next to Folder. Click Save at the bottom of the screen. You will see a message on top that your entry has been saved. After you save your entry, click View Published Page in the upper right to see how your entry has been published. You will see the contents of your page, plus the blog header and some parts of the sidebar. Note: If you do not see this link, make sure the Status is set to Published. Getting Started with Blogs at Penn State 22 Edit and Delete Pages Select Manage > Pages. The functionality here is essentially the same as that for editing entries. Hide Pages To hide a page, select Manage > Pages. From the Manage Pages screen, enter the page for editing; set the status to Unpublished. You can also select the page by clicking its check box, selecting Unpublish Pages from the More actions … menu, and clicking Go. You will be able to edit and preview pages, but no one will be able to view them. Change the status to Published when you are ready for the public to view the pages. Hiding the Blogs Tab If you choose not to include a blog as part of the site/portfolio, you can hide the blogs tab in the top navigation bar. To hide the tab (so that you can use the blogs portion of the site at a later date): 1. In the blog, select Manage > Entries. 2. Select all entries by checking the selection box next to the entry title. 3. Click Delete. If you do not create any blog entries, the blog tab will stay hidden. If you create and publish a blog entry, the blog tab will reappear in the top navigation bar next to the Home tab. Getting Started with Blogs at Penn State 23 MANAGE AND DISPLAY SIDEBAR WIDGETS Widgets are snippets of code which allow you to add different types of content to the sidebar of your blog. Add and Remove Sidebar Widgets Additional built‐in widgets include Technorati Search, Calendars, and the Creative Commons license statement. To make these active (or remove sidebar elements), complete these steps. 1. Select Design > Widgets. 2. Click the link for any of the widget sets. All available able widgets will be displayed. 3. Click, hold, and drag widgets you do not need to the right‐hand Available Widgets column. 4. Leave widgets you want to be displayed to the left Installed Widgets column. You can change the order in which the widgets will appear in the sidebar by dragging them to a new position in the hierarchy. 5. Click Save Changes to exit the Widget Manager. Getting Started with Blogs at Penn State 24 6. Drag widgets to right column to hide. Drag widgets to left column to show them in the blog. 7. Click Publish. 8. Click View Site. Getting Started with Blogs at Penn State 25 Add a Headline Feed from Another Blog This widget tool allows you to add headlines from another blog or news service to your sidebar. Finding the Feed Link Blog headlines are stored in an RSS, ATOM or other XML file. To find a newsfeed link: 1. Navigate to a blog or news service like http://live.psu.edu. 2. Look for the feed link button. It can be in several locations. Many sites include orange or blue colored boxes like the ones below. ATOM RSS XML In Firefox or Internet Explorer 7, an orange feed icon may be seen to the right of the URL. In Safari, a blue RSS icon may be may be seen to the right of the URL. Click the feed icon button to determine the URL of the feed XML file. In many cases, the file will end with the .xml the .rss extension. Some example feed URL’s include: • PSU Live ‐ http://live.psu.edu/wirerss/30 • ITS News ‐ https://mac.its.psu.edu/news/news.rss Adding the Feed Link 1. Select Design > Templates. 2. Click Create a Feed Widget in the right column under Actions. Getting Started with Blogs at Penn State 26 The Feeds.App Lite Widget Creator will open. 3. Copy and paste the newsfeed URL into the Feed or Site URL textbox. 4. Click Continue. The name of the newsfeed will be displayed. Note: The http:// prefix must be included (not the feed:// prefix found in Safari). 5. On the next screen, edit the Title of the feed as needed. 6. Select the number of entries you wish to display. 7. Click Save. 8. To add another entry, click Create Another; otherwise, click Finish to exit. Displaying the Feed Link 1. Select Design > Widgets. 2. Select the sidebar where you want to place the widget. 3. Drag the feed widget (named after the feed) from the right hand Available Widgets column to the left Installed Widgets column. 4. Click Save Changes to exit. 5. Click Publish > View Site to check your blog sidebar. Getting Started with Blogs at Penn State 27 CONTROL SPAM COMMENTS AND TRACKBACKS TO BLOGS By default, blogs are set to allow anyone from inside, and possibly, outside of Penn State to post comments. Unfortunately, some operations create spam comments, which are really advertisements or something else related to your topics. You can reduce spam but still allow comments by adjusting these settings. Comment Settings Select Preferences > General. The general blog settings window opens. Click Comment in the left hand menu to access those settings. Getting Started with Blogs at Penn State 28 To have moderated comments (comments are not published until approved by you), enable the following settings. With these settings, you will receive an e‐mail for all comments posted to the Website for you to approve. 1. Make sure Accept Comments is checked. 2. Set the option for Immediately approve comments to Trusted Commenters Only or No One. 3. Set E‐mail Notification to On. 4. To disable comments completely, turn Accept Comments off. 5. Click Save Changes before exiting the page. These changes will not take effect until the blog is published. TrackBack Settings TrackBack is a feature in which a blog system sends an electronic message to any blog you have linked to. These messages are published on another blog, much as your comments are. To accept trackbacks means your blog will listen for these electronic messages and publish links to blogs who have linked to you (it is a way to find out if anyone is reading your blog). Getting Started with Blogs at Penn State 29 Like comments though, trackbacks can be used to send spam messages, so moderated trackbacks are suggested. 1. In the Settings windows, select TrackBack from the left hand menu. 2. To have moderated TrackBacks (these are not published until approved by you), enable the following settings. With these settings, you will receive an e‐mail for all TrackBacks posted to the Web for you to approve. 3. Make sure Accept TrackBacks is checked. 4. Make sure the Moderation option is checked. 5. Set E‐mail Notification to On. 6. To disable TrackBacks completely, turn Accept TrackBacks off. 7. Click Save Changes before exiting the page. Approve Comments and Trackbacks If the approve options are set to No One or Trusted commenters, then you must approve submissions from new submitters. For each new comment, you will receive an e‐mail message, including the e‐mail address and the content of the comment along with three links. Getting Started with Blogs at Penn State 30 Click on Edit link to go to that comment or trackback. If the link does not work, log in and enter your blog, then click the Manage in the upper toolbar. Select Comments or Trackbacks, then you can choose from the list given. You have the following options available in the Comments window: o To publish a comment, change the Status to Approved, then click Save Changes at the bottom. o To unpublish a comment, change the Status to Unapproved, then click Save Changes at the bottom. o To delete a comment, click Delete at the bottom of the page. o To set a comment as junk, change the Status to Reported as Spam. o To ban a commenter, go to the More Actions menu at the lower right and select Ban commenter. Reply to a Comment 1. Click Manage in the upper toolbar and select Comments. You will see a list of submitted comments. 2. Click Reply beneath the appropriate comment. Getting Started with Blogs at Penn State 31 3. Enter your text in the Your reply field, then click the Submit button. The reply will be published as another comment. E-MAIL NOTIFICATIONS WITH ADDRESS BOOK The Blogs at Penn State allows you to send an e‐mail message to selected users when an entry is published. You can send e‐mail to a group of contacts within your Address Book list, or to a custom set of addresses for each entry. This can be useful within a course blog to notify students, or a project blog to notify users of updates. Add Contacts to Address Book 1. Select Manage > Address Book. 2. Click Create Contact at the top. Getting Started with Blogs at Penn State 32 3. Enter an e‐mail address and website URL (if available). Each blog you create has its own address book. 4. Click Add Contact. The address will be added to a new list of contacts. 5. To delete a contact, click the Delete button at the top of the list. Send Out E-Mail for a Single Entry 1. Write and publish an entry in a blog, or select Manage > Entries and open an entry for editing. 2. Click Share in the upper right. If you do not see this option, make sure you have saved your entry and set the Status to Published. You will see an e‐mail message window. If you want to e‐mail your Address Book Contacts, leave the option for All addresses from Address Book checked. You can enter additional e‐mail addresses in the Recipients field. Addresses can either be separated by commas or listed with one address per line. Getting Started with Blogs at Penn State 33 3. Enter text into Optional Message if you want to add explanatory text to your message. a. If no message is written, the e‐mail will just include the entry title, date, and a link to the blog entry. 4. Click Entry Excerpt option to include part of your blog entry text in the message. 5. Click Entry Body if you want to forward your entire blog entry. 6. Click Send at the bottom to send the e‐mail. Getting Started with Blogs at Penn State 34 MANAGE MULTIPLE BLOGS The Blogs system allows you create multiple blogs for multiple topics. For instance, you can create one blog for a course, another as a portfolio, and a third for a hobby or personal news. Creating Another Blog 1. Click on the white system overview tab to see a list of your current blogs. Depending on your location, the tab may list the name of your first blog or say System Overview. 2. Click Create a new blog to start a new blog. You will see the form to enter your blog title. Switch Between Blogs Once you have created an additional blog, you can switch between blogs by clicking the white System Overview tab, and then selecting the blog you want to work with. ADJUST BLOG SETTINGS By default, the blog will archive your postings by the month and by category. You can adjust blog settings to display by category, by month, by week, or by day. 1. Select Preferences > General. A set of blog settings will be opened. Getting Started with Blogs at Penn State 35 2. To change the blog name and subtitle, change the information in the Name and Description fields, then click Save Changes. Click Publish. 3. To add a Creative Commons license, click Select a license at the bottom. 4. Click Publish. The Entry preferences control how many entries are displayed on the home page. The Comment and TrackBack preferences are used to control spam. See the Control Spam Comments and Trackbacks to Blog section for details. Other preferences are used to control spam and how blogs are publicized to the outside world. Getting Started with Blogs at Penn State 36 VIEW BLOG POST AND URL To view the public version of the blog, click the View button (page icon) in the top set of tool links. What is Blog URL? The blog URL you share with your friends and colleagues is different from the one used to create your blog (http://blogs.psu.edu). If your blog is open to the public, the URL will be structured as follows: http://www.personal.psu.edu/<Userid>/blogs/<Site URL name> For instance, if user xyz123 had a blog with the Site URL name worknotes, the URL would be http://www.personal.psu.edu/xyz123/blogs/worknotes. EDIT OLDER ENTRIES Editing an Entry 1. Select Manage > Entries. a. If the Entries link is not active, then click the white System Overview tab, then the name of your blog. 2. Click the link for the entry you wish to edit. 3. Edit the entry and click Save. Hiding an Entry If you want to hide an entry, follow the steps above, but set the Status menu to Unpublished. The Unpublished option is a good way to write a draft for a long blog entry without the public seeing it until it is ready. Getting Started with Blogs at Penn State 37 IMPORT CONTENT FROM ANOTHER BLOG You may be able to import content from another blog depending on the platform of the original blog. First make sure you have exported your original blog. Please see the export instructions of your blogging system for details. The file will likely be either a .txt text file or an RSS file. 1. Log in to http://blogs.psu.edu. 2. Create a new blog following the instructions in the Create Blog section of this document. 3. Click the Blog Dashboard icon in the top menu (first option). You should see a dashboard for your blog listing Blog Stats. 4. In the Handy Shortcuts section to the right, click Import Content. 5. • • • Select a platform in the Importing from menu. Your options are: Movable Type – the option for importing Penn State blogs Word Press extended RSS (WXR) Another System – Use this option if your system is not Movable Type, but has created a Movable Type File. 6. Use the Browse button to select the external file to import on your local system. It will likely be either a .txt text file or an RSS file. 7. Click More options if you need to select options for text breaks, encoding, or default categories. Getting Started with Blogs at Penn State 38 8. Click Import Entries at the bottom to begin the import. You will see a new window listing imported entries. 9. Click Publish Site site. in the top bar to post the entries to your blog Web 10. Click the View Site button in the top bar to see if the entries have been imported correctly. If you do not see the entries, make sure you have clicked the Publish Site button. If problems persist, contact [email protected]. Notes on Import Options • The Text Formatting option refers to the line‐break options of your import file. Refer to your blog system instructions if the initial import does not work. • The Import File Encoding option refers to Unicode options. Leave it set to Auto‐Detect unless you encounter difficulties. • The Default Category menu lets you select default categories you have already created. If you need a Default Category, you must create one before you import a file. EXPORT BLOG ENTRIES Export Entries 1. Log in to http://blogs.psu.edu and enter your blog. 2. Click Blog Dashboard in the top menu (first option). You should see a “dashboard” for your blog listing Blog Stats. Getting Started with Blogs at Penn State 39 3. In the Handy Shortcuts section to the right, click the link for Import Content. This takes you to both import and export. 4. Click Export in the left Activity Log menu of the import window. 5. Click Export Blog in the next window. A .txt file will be downloaded onto your computer. Save Static Blog Files You can use SFTP or the Penn State Pass Explorer to save all the published files including uploaded images, raw HTML code, and custom style sheets. Use SFTP or the Penn State Portal Pass Explorer (http://www.psu.edu/portalproject/passexplorer/) to navigate to the /blogs folder in your Personal Web space www/ folder. These files can be downloaded and saved. The files can be uploaded into another Web space, but you will not be able to edit them via the Blogs at Penn State. ADD EDITORS AND COMMENTERS This version of the blogging tool allows you to add users with Penn State Access Account user IDs as editors or commenters to your blog. Potential Editors Must Login In order for you to add a Penn State person as an editor to your blog, you must ask that person to log in to http://blogs.psu.edu at least once. It is not necessary for that person to create a blog. Add an Editor 1. 2. Login. Enter your blog. Getting Started with Blogs at Penn State 40 3. 4. 5. Click Manage in the top links, then select Users. Click the link Add a user to this blog. Type the person’s last name into the Search Users box and click the magnifying glass. It will take a moment to load. 6. 7. Check the entry for the appropriate user, then click Continue. Check the appropriate role name, then click Confirm. Names and descriptions of selected roles follow: • • • • • • • • Author – Can create entries, edit their own, upload files and publish Blog Administrator – Can administer the blog Commenter – Can comment Contributor – Can create entries, edit their own and comment Designer – Can edit, manage and publish blog templates Editor – Can upload files, edit all entries/categories/tags on a blog, and publish the blog Moderator – Can comment and manage feedback Webmaster – Can manage pages and publish blog templates Delete an Editor 1. 2. 3. 4. Login. Enter your blog. Click Manage in the top links, then select Users. You will see a list of users with different access permissions. Place a check for any user you wish to remove, then click the Remove button above the list. Getting Started with Blogs at Penn State 41 Change Permissions for an Editor At this time you, must delete a user, then add the individual again with the updated permissions. DELETING A BLOG To delete an existing blog: 1. Go to the System Overview screen. 2. Select Manage > Blogs. 3. Select the blog(s) you want to delete by checking the box next to the blog name. 4. Click Delete. ADDITIONAL INFORMATION FOR PROFESSIONAL WEBSITES Customizing the Banner Graphic When using the professional website templates, you may want to change the default banner graphic that appears at the top of the index/home page. To do so, you will need to create a new graphic using your graphics program. Your new graphic should be no larger than 900 x 170 to properly fit into the space at the top of the page. Larger graphics will be cropped, and only a portion of the image will appear on the page. Once you have the graphic created, you will first need to import it into the blog space and make it an asset. To do so, follow this process: Getting Started with Blogs at Penn State 42 1. From the Create menu, select Upload File. The Upload File dialog box will appear. 2. Click Browse to search your computer for the graphic that you want to use for your banner. 3. Double‐click on the graphic file and the Upload File window will return. 4. Click Upload to add the file to the assets in your blog. Getting Started with Blogs at Penn State 43 5. In the File Options box, make sure that the Create a new entry using this uploaded file. box is unchecked. 6. Select Manage > Assets. The Manage Assets screen will open. 7. Select the check box next to the graphic that you want to use as the banner. 8. Select Add tags . . . from the More actions . . . drop down menu. 9. Click Go. Getting Started with Blogs at Penn State 44 10. A small dialog box will open to add the tag. Enter the tag @banner to assign this tag to the image. 11. Click OK. The tag has now been assigned to the image. To complete the process, republish the indexes. View the blog. The top graphic should be updated to the image that was just added and tagged. Before . . . Getting Started with Blogs at Penn State 45 After . . . Adding Pages to the Top Navigation Bar By default, the Blogs at Penn State tool creates four pages: Home, Blog ( the front page to your blog), About, and Contact. In addition, you can create static information pages inside your site and have them linked to the top navigation bar directly beneath the banner graphic. To add a new page to the navigation, create the page and its content. We will assume that the page to be added to the navigation has already been created. Next, we need to add a tag to the page. Getting Started with Blogs at Penn State 46 1. From the Manage menu, select Pages. A list of pages that currently exist in the blog will appear. 2. 3. 4. Select the checkbox for the page. Select More actions . . . > Add tags . . . Click Go. The Tags to add to selected pages window appears. Getting Started with Blogs at Penn State 47 5. 6. Add the tag @topnav Click OK. Refresh your blog site and the new page will appear in the top navigation menu. REORDERING BLOG TABS There may be occasion when you want to change the order of the tabs as they appear in the navigation bar. To change the appearance order, you need to change the publication date of the page. Note: The Home tab cannot be moved from its location at the left end of the navigation bar. The Blog tab cannot be moved from its location next to the Home tab, but can be hidden. 1. Select the blog/portfolio you want to reorder the tabs in. 2. Select Manage > Pages. 3. Select the page you want to reorder by clicking on the page name • To move the page to the left in the tab order, set the publish date to a date earlier than the page to the left of current pages position. • To move the page to the right in the tab order, set the publish date to a date later than the page to the right of current pages position. 4. Click Save The blog/portfolio will republish and the page is now reordered. Getting Started with Blogs at Penn State 48 Note: These changes must be done one page at a time. To move the tab more than one place to the left or right, the published date must be earlier than (left) or later than (right) the page you want to precede or succeed. To change the order of the About and/or Contact page: 1. Select Manage > Pages. 2. Click on the title of the About or Contact page. 3. In the Tags box in the Edit Page view, replace the @about (or @contact) tag with @topnav. 4. Click Save. The blog/portfolio will republish and the page is now (in most cases) next to the Home tab. Note: To move the page to another location in the navigation order, use the process above. EMBEDDING OTHER TYPES OF CONTENT You can embed many media objects within your blog site including YouTube Videos, your personal Flickr Photos, and other objects by including the ʺHTML Embed codeʺ within your blog entry. Note: In order for the embed codes to work, you must switch your entry format from Rich Text to HTML. YouTube 1. Write and format the text for the body of your entry. 2. Click the <A> HTML Mode button. You will see the HTML tags for your entry. 3. Open a new browser window and search for a video on YouTube. 4. Look for the Embed code on the YouTube page and cut and paste it into the text body. The embed code begins as ʺ<object width =...ʺ 5. Save and publish the entry. The video stream will be displayed in your blog. If the entry shows the code instead of the video, make sure your Format is not Rich Text. Getting Started with Blogs at Penn State 49 Flickr Photos These instructions only work for your own Flickr photos. 1. Upload any image files you wish to post on to your blog into your Flickr account. 2. Write and format the text for the body of your entry. The easiest approach is to describe the photos first, then insert them. 3. Click the <A> HTML Mode button. You will see the HTML tags for your entry. 4. Open a new browser window and search for the uploaded Flickr photo. 5. Select All Sizes in the Flickr Toolbar and select the appropriate size. 6. Save and publish the entry. Your Flickr photo will be displayed in your blog. If the entry shows the code instead of the video, make sure your Format is NOT Rich Text. Google Maps These instructions only work for your own Google Maps and Google Maps released to the public. 1. Create a custom Google Map following the Google MyMaps Instructions. 2. Click Link to this Map in the upper right, then click Customize and preview embedded map. 3. Set the zoom and location in the preview window to the appropriate settings. 4. Write and format the text for the body of your entry. 5. Click the <A> HTML Mode button. You will see the HTML tags for your entry. 6. Close the window, then cut and post the HTML code into your blog entry. The code looks something like: <iframe width="425" height="350" frameborder="0" scrolling="no" marginheight="0" marginwidth="0" src="http://maps.google.com/maps?f=q&hl=en&geocode=&q=16805&ie=UTF8&om=1&s=AARTsJpP8HuZtt zsTmaO5qSXfC_JN95p2w&ll=40.822643,77.844315&spn=0.181863,0.291824&z=11&iwloc=addr&output=embed"> </iframe><br /> <small><a href="http://maps.google.com/maps?f=q&hl=en&geocode=&q=16805&ie=UTF8&om=1&ll=40.822643,77.844315&spn=0.181863,0.291824&z=11&iwloc=addr&source=embed" style="color:#0000FF;textalign:left">View Larger Map</a></small> See Google Maps for instructions with screen captures. Getting Started with Blogs at Penn State 50 (http://maps.google.com/help/maps/share/embed.html#utm_source=en‐mapshpp‐na‐ us‐google‐gm) Other Content The capability of embedding content from other sites depends on whether they release an embed code or not. Some sites may only allow you to embed your own items. Getting Started with Blogs at Penn State 51 APPENDIX: ENTRY FORMATTING TOOLS Setting Icon Description Font Size Font Formatting Link E‐mail Link Click Decrease Text Size to make text smaller. Click Increase Text size to make text larger. Use the Font formatting tools to add bold, italic, underline, or strikethrough formatting to selected text. The Link tool allows you to create hyperlinks within your document. Highlight text which will become a link, click the Link tool, then enter the URL in the pop‐up window. Use this tool to create links to e‐mail addresses. Highlight text which will become a link, click the Email Link tool, then enter the e‐mail address in the pop‐ up window. Begin/End Blockquote Use the Begin Blockquote to indent a paragraph Use the End Blockquote to remove an indent. Click the Bulleted List option to create a bulleted list. Bulleted List Click the button again to stop the list. Click Tab to indent a list item in one level. Click Shift‐Tab out dent a list item out one level. Click the Numbered List option to create a bulleted list. Numbered List Click the button again to stop the list. Click Tab to indent a list item in one level. Click Shift‐Tab out dent a list item out one level. Getting Started with Blogs at Penn State 52 Setting Icon Description Paragraph Alignment Insert Image Insert File WYSWYG and HTML Mode Use the Paragraph Alignment tools to select left aligned, center, or right aligned text The Insert Image tool allows you to insert images into your document. The Insert File tool allows you to upload files, including audio and video files into your blog. To view the HTML code, click the <A> HTML mode button. To return to formatted text, click the blue A WYSIWYG Mode button. Getting Started with Blogs at Penn State 53 Technology Training Resources To look for more sessions on today’s training topic and to view all available sessions, visit http://its.psu.edu/training/catalog/ To browse additional technology training options, visit http://its.psu.edu/training/ To learn about Training On Demand (sessions upon request for groups of 5 or more), visit http://its.psu.edu/training/ondemand/ To browse or join in online discussions about technology topics at Penn State, visit http://technologytraining.psu.edu/ To join the Training News List and receive monthly e-mail notification of all upcoming technology training opportunities, send a blank e-mail to [email protected] To find free online books on a variety of popular technology topics, visit http://proquest.safaribooksonline.com/ To explore hundreds of free video tutorials that are available for self-paced learning, visit http://lynda.psu.edu/ Follow us on Twitter at http://twitter.com/psuITStraining Become a Facebook fan of ITS Technology Training at http://www.facebook.com/psuitstraining Additional Technology Resources To contact the ITS Help Desk with general technology-related questions, e-mail [email protected] or call 814-865-4357 (HELP) To search for technology-related information in the ITS Knowledge Base, visit http://kb.its.psu.edu/ To purchase discounted hardware and software at Penn State’s Computer Store, visit http://computerstore.psu.edu/ Technology Training Provided by ITS Training Services 23 Willard Building • University Park, PA 16802 Phone: 814-863-9522 • Fax: 814-865-3556 • [email protected] Visit the ITS Training Services website at http://its.psu.edu/training/