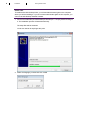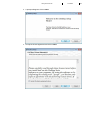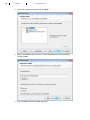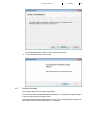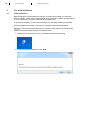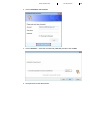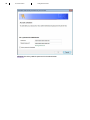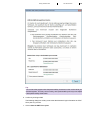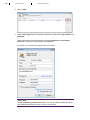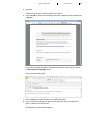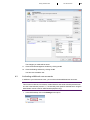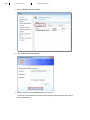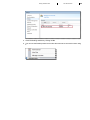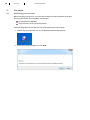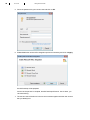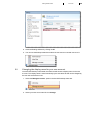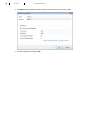
1
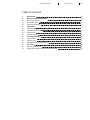
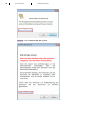
T-SYSTEMS MULTIMEDIA SOLUTIONS
GETTING STARTED
VERSION 3.1
DATE: 20.08.2014
© Document Future AG 03/2015
Document Future AG holds the copyright to this documentation. No part of this documentation may be reproduced, regardless of the method used (e.g., printing, photocopy, microfilm), without previous written consent from Document Future AG. No part of this documentation may be processed, copied, or distributed with the use of electronic systems without previous written consent from Document Future AG.
http://www.documentfuture.com
Getting Started doculife
Table of Contents
iii
Table of Contents
1
Introduction
5
2
General security information
6
2.1
2.2
2.3
Anti-virus protection
Saving passwords
Using mobile devices
6
6
6
3
Installation
7
3.1
3.2
3.3
3.4
Installation packages
Installation requirements
Desktop Suite
Desktop Portable
7
7
7
11
4
For administrators
12
4.1
4.2
4.3
Initial activation
Creating users
Activating additional user accounts
12
19
23
5
For users
26
5.1
5.2
Activating your account
Changing the display name for your user account
26
29
Getting Started doculife
1
1 Introduction
5
Introduction
Welcome!
We’re glad that you decided on doculife for your needs. doculife is designed to enable you to
manage your files and documents in the cloud easily and intelligently.
This document will help get you started with doculife. Please note that the description refers
to doculife Desktop Version 5.4.9!
As you go through this guide, you will be taken through the installation and activation process
for doculifeDesktop and will learn how to create additional users and user accounts.
Once you are done with the initial steps in this document, you will be ready to use doculife
efficiently and will be familiar with all available functions.
Section 5 of the doculifeDesktop user manual shows how to get started in the installed and
activated application (e.g., how to create files, registers, and documents).
Details particular to the workflow used in doculifeSECplus will be identified by being preceded by the following word: SECplus
6
2
2 General security information
Getting Started doculife
General security information
This section contains general security information concerning the use of doculife.
Make sure to read it carefully.
2.1
Anti-virus protection
doculife does not provide any additional anti-virus protection.
This means that documents and e-mails transferred todoculife will not be checked for malware in doculife.
Make sure to check all documents and e-mails for malicious code on the computer before storing them in doculife.
Attention! Risk of data loss
Use an anti-virus product that monitors your data, e-mail, and Internet communications and
protects your computer from attacks.
2.2
Saving passwords
Due to security reasons, users have to enter their password every time they log in to their
doculife account (i.e., connect to the system).
It is possible to configure the system in such a way that users will be able to save their password for a tenant.
Attention! Risk of misuse of data
Saving login information can enable unauthorized users to access your data. Please make
absolutely sure that saving login information is allowed by your company’s security policies
before doing so.
2.3
Using mobile devices
Mobile devices are more vulnerable to malware and spyware attacks. Users are responsible
for the security of their own devices.
Attention! Risk posed by unauthorized data mining and access
Make sure to only load apps from trustworthy sources on your device. Use appropriate software designed to protect you from spyware and similar attacks.
Getting Started doculife
3
Installation
3.1
Installation packages
3 Installation
7
The following installation packages are available for doculife Desktop:
doculife Desktop Suite
Includes doculife Desktop with the Microsoft Office add-in and the components for scanning
and for supporting multifunction devices.
doculife Desktop Portable
Portable version of doculife Desktop without the Microsoft Office add-in and without
scan integration
Does not need to be installed, and can be used on external memory devices such as
USB flash drives
3.2
Installation requirements
Supported operating systems
32-bit / 64-bit Windows 8 Pro
32-bit / 64-bit Windows 7
Windows Vista
Windows XP Professional
Hardware system requirements
A current PC with one of the operating systems listed above
Supported Microsoft Office versions (doculifeDesktop Suite)
Microsoft Office Professional 2003/2007/2010/2013
Requirements (doculife Desktop Suite)
The following components are required for the doculifeDesktop Suite:
Microsoft .NET Framework 3.5
Windows Installer 3.1
Visual C++ Runtime Library (only if the scan option is installed (default))
If you do not have these components on the computer where the software will be installed,
they will be installed automatically.
3.3
Desktop Suite
doculife Desktop is available as a convenient client that enables access to doculife.
It seamlessly integrates itself into Microsoft Outlook and provides direct access to the contents in doculife from Microsoft Office. This means that you, as a user, can simply continue
to work with the applications with which you are already familiar while taking advantage of
direct access to doculife.
8
3 Installation
Getting Started doculife
Please note:
To install the doculife Desktop Suite, you will need administrator rights on the computer
where you will be installing it. If you do not have administrator rights for the computer, you
can use “doculife Desktop Portable” instead.
1. Run the executable file (doculife-Desktop-Suite-setup-5.x.x.exe) by double-clicking on
it. The installation process will start automatically.
The setup files will be extracted.
You do not need to do anything at this point.
2. Select the language you want and click on OK.
Getting Started doculife
3. A prompt will appear. Click on Next.
4. Accept the license agreement and click on Next.
3 Installation
9
10
3 Installation
Getting Started doculife
5. To do a full install (recommended), click on Next.
6. Select the installation path you want or confirm the default path (recommended) by
clicking on Next.
7. Click on Install to start the installation process.
Getting Started doculife
3 Installation
11
doculife Desktop will be installed. This may take a few minutes.
8. Click on Finish to exit the setup wizard.
3.4
Desktop Portable
The Portable version does not need to be installed.
You will receive a ZIP file (doculife-Desktop-Portable-5.x.x.zip) that you will need to unzip to
a directory before using the Portable version.
The doculife Desktop.exe executable file, which you can use to start Desktop Portable, will
be located in the doculife Desktop Portable 5.x.x subfolder.
12
4 For administrators
4
For administrators
4.1
Initial activation
Getting Started doculife
Before being able to use doculife for the first time, it needs to be activated. This initial activation is normally carried out by the administrator and is necessary in order to enable doculife
to communicate with your tenant at the high-security data centre.
To activate the software, you will need an activation file (.iadc file) provided by the operator.
When the software is activated, you will have to change the administrator password.
SECplus: In the case of doculife SECplus, they key that can be used to lock and unlock the
tenant must also be changed during the activation process.
1. Double-click on the doculife icon on your desktop to start doculife Desktop.
2. A welcome prompt will appear. Click on Next.
Getting Started doculife
4 For administrators
3. Click on Activate a new account.
4. Click on Browse…, select the activation file (.iadc file), and then click on Next.
5. Set a password for the administrator.
13
14
4 For administrators
Getting Started doculife
SECplus: Set the key and the password for the administrator.
Getting Started doculife
4 For administrators
15
Tip:
You can have the program show the password/key characters on the monitor while you
are entering them. This may come in handy, as the password/key will only be accepted
if both password/key fields match.
6. Confirm by clicking on OK.
The following dialog box will let you save the administrator’s login information as a PDF
file or print it if you want.
7. Click on Save as PDF file or print.
16
4 For administrators
Getting Started doculife
SECplus: Click on Save as PDF file or print.
Getting Started doculife
4 For administrators
17
Please note:
Make sure to safely store your administrator password/your key. If you can do so, take
this opportunity to print out the login information and store it in a safe place.
8. Print and/or save the login information, then close the window.
You will be taken back to the original dialog box.
9. Click on OK.
The software will be activated.
10. Enable/disable the various Office integration options as necessary and click on Apply.
18
4 For administrators
Getting Started doculife
doculife Desktop will be prepared.
11. Select the solution you need or select the doculife Start option.
If you have received a solution update from your solution vendor, click on Load from
file and open the solution, which will be found in .zip format, in your filesystem.
12. Click OK.
The account will be set up.
The system will establish a connection and communications between doculife Desktop
and your tenant at the high-security data centre. In addition, all templates required for
file and document types, as well as other settings, will be loaded. This may take a few
minutes.
As soon as the loading process is completed, your doculife Desktop will appear. Once it
does, you can start working.
Getting Started doculife
4.2
4 For administrators
19
Creating users
Once you activate the program, you can create additional users so that they can work with
doculife.
Please note:
This function will only be available to users with administrator rights
1. In doculife Desktop, click on the Settings menu option.
2. Click on System Configuration and then on User Management.
20
4 For administrators
Getting Started doculife
3. Click on Add...
4. Select a User Type (used for information purposes only) and enter a Login, Name, and
Password.
Please make sure to read the information provided in Guidelines of secure passwords and to follow the corresponding recommendations.
If you want, you can enter a description of the user context.
Please note
Enable the Send login data to user option. This way, you will get a PDF file with all
the required information for the new user once you are done.
Getting Started doculife
4 For administrators
21
5. Click OK.
A PDF file with the user’s login information will be shown.
6. Click on E-mail to send the user their login information together with their activation file
(.iadc file).
If you want to send the password in a separate e-mail due to security reasons, enable
the Send password separately option.
The e-mail window will appear.
7. Click on Send and close the window with the login information.
8. Now you will need to add the new user to a user group so that the user will get the
group’s content access permissions.
Click OK when the prompt below appears.
22
4 For administrators
Getting Started doculife
9. In the Groups pane, select the user group(s) to which you want to add the user. Then
click on the left arrow icon to add the group to the Member of groups pane.
Please note
The system will automatically assign technical groups. Do not add these groups manually. In order to ensure that you will not add a technical group by mistake, make sure to
leave the Show also technical users and groups option disabled.
10. Click on Apply.
Getting Started doculife
4 For administrators
23
The changes you made will be saved.
11. Close the Usersmanagement window by clicking on OK.
12. Close the Settings window by clicking on OK.
You have now created a user.
4.3
Activating additional user accounts
In addition to your initial user account, you can also activate additional user accounts.
Please note:
This function is relevant, for instance, to administrators who work with their personal user
account in the business process, i.e., for their daily work (and limit themselves to using the
administrator user account for administrative purposes only).
1. In doculife Desktop click on the Settings menu option.
24
4 For administrators
Getting Started doculife
2. Click on Profiles and then on Add...
3. Click on Activate a new account.
4. Select the activation file (.iadc file) for the new account.
The new account will be shown in the account overview together with the user account
that you already had.
Getting Started doculife
4 For administrators
25
5. Close the Settings window by clicking on OK.
6. You can use the Desktop status bar to select the new user account and connect using
it.
26
5 For users
Getting Started doculife
5
For users
5.1
Activating your account
Before activating your account, you must have received your login information for doculife
from the administrator. This information will consist of:
An activation file (.iadc file)
A PDF file with your account and username
Follow the steps below to activate your account and get access to the program.
1. Double-click on the doculife icon on your desktop to start doculife Desktop.
2. A welcome prompt will appear. Click on Next.
Getting Started doculife
5 For users
3. Click on Activate a new account.
4. Click on Browse…, select the activation file (.iadc file), and then click on Next.
27
28
5 For users
Getting Started doculife
5. Set a new password for your user account and click on OK.
6. Enable/disable the various Office integration options as necessary and click on Apply.
doculife Desktop will be prepared.
As soon as the process is complete, doculife Desktop will launch. Once it does, you
can start working.
7. The new account will be shown in the account overview together with the user account
that you already had.
Getting Started doculife
5 For users
29
8. Close the Settings window by clicking on OK.
9. You can use the desktop status bar to select the new user account and connect to it.
5.2
Changing the display name for your user account
Once doculife Desktop is activated, the status bar will show the display name for the user
account. This display name is set automatically by the activation file and can be changed by
the user who owns the account.
1. Select the Manage accounts.. option in the doculife Desktop status bar.
2. Select your user account and click on Change.
30
5 For users
Getting Started doculife
3. In the Name field, change the display name for the user account. Then click on OK.
4. Close the window by clicking on OK.
OUR CONTACT DATA:
Please call us.
Monday till Friday 9:00 a.m. – 5:00 p.m.
+49 351 4188 5841
Or write us to [email protected]