1
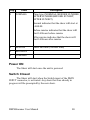
DMXStreamer
User Manual
Firmware V2.0
DMXStreamer User Manual
16-Feb-2004
1
This page Blank
DMXStreamer User Manual
2
Table of Contents
This page Blank................................................................................. 2
Contents...............................................................................................5
Contacting ENTTEC........................................................................... 5
Warranty.............................................................................................. 6
Introduction......................................................................................... 7
Features................................................................................................8
Basic Concepts.................................................................................... 8
The DMXStreamer......................................................................... 8
DMX OUT :.......................................................................... 9
DMX IN:............................................................................... 9
RS232:...................................................................................9
The Menus.................................................................................... 10
Menu Structure.................................................................................. 11
Getting Started...................................................................................12
Setting the time............................................................................. 12
Memory usage................................................................................... 13
1-Select Show....................................................................................15
2-Show...............................................................................................15
2-1 Play......................................................................................... 15
2-2 Record/ReRecord................................................................... 15
2-3 Erase....................................................................................... 15
2-4 Name...................................................................................... 16
2-5 Frame Rate..............................................................................16
2-6 Number of Channels...............................................................16
3-Memory Used.................................................................................16
4-Playlist............................................................................................17
4-1 Edit......................................................................................... 17
4-2 Goto Line.................................................................................... 17
4-3 Conflict check.........................................................................17
4-4 Enter Show............................................................................. 17
4-5 Timing.................................................................................... 18
DMXStreamer User Manual
3
5-Setup...............................................................................................20
5-1 Erase All................................................................................. 20
5-2 Set Time................................................................................. 20
5-3 Set Date.................................................................................. 20
5-4 Local time...............................................................................20
5-5 Latitude...................................................................................20
5-6 Longitude................................................................................20
5-7 Start Frame............................................................................. 20
5-8 Start Delay.............................................................................. 21
5-9 Backup Show..........................................................................21
6-Backup ...........................................................................................21
7-Test DMX.......................................................................................23
8-Stop................................................................................................ 23
Solar Clock........................................................................................ 24
Internal Battery.................................................................................. 25
Compact Flash Memory.................................................................... 26
Boot Software....................................................................................28
1-Self test...................................................................................... 28
2-Firmware....................................................................................29
3-Checksum.................................................................................. 30
Appendix 1............................................................................................
........................................................................................................... 31
RS232 Commands supported by the DMXStreamer.................. 31
Appendix 2........................................................................................ 31
Appendix 3........................................................................................ 32
Appendix 4........................................................................................ 34
DMXStreamer User Manual
4
Contents
When you open the packaging, you should find these items in the
box:
•
•
•
•
•
•
DMXStreamer
Compact Flash Memory Expansion Module (if ordered)
DB9 to DB9 1.8m cable
2 x Mounting brackets
DC Power pack (Australia only)
User Manual
If you did not receive a plug pack in the box, we recommend you
purchase one rated for 9V 500mA. If you are using an old one, please
make sure it is in good working order. We can recommend in the
USA DIGIKEY PN: T405-ND
Please download the software from our website, this
ensures you have the latest version available.
DMXStreamer User Manual
5
DMXStreamer User Manual
6
Warranty
ENTTEC warrants that the product that is manufactures and sells will
be free from defects in materials and workmanship for a period of 1
year from the date of shipment from an authorized ENTTEC
wholesaler. If the device proves defective within the respective
period, ENTTEC will repair or replace at its sole discretion, the
defective hardware. If the failure is due to an operator error, the users
accepts to pay for any charge relating to the diagnosis of the
hardware, faulty parts or shipping from our factory.
ENTTEC makes no warranty of any kind, express or implied,
including without limitation the implied warranties of
merchantability and fitness for a particular purpose. In no event
shall ENTTEC be liable for indirect, special or consequential
damages.
Opening the unit for any other reason than changing the battery
voids the warranty as described above.
DMXStreamer User Manual
7
Introduction
Thank you for buying the DMXStreamer. At ENTTEC we are proud
of our products and we hope you will enjoy them as much as we
enjoy making them.
Firstly, un-pack the unit from the box, the DMXStreamer is a 1U 9.5
inch rack, you can mount 2 together to form a standard 19 inch rack.
Physical size: 182x44x105mm
On the front panel, you will find :
• DB9 RS232 Connector for programming
• MENU Button
• SCROLL Button
• ENTER Button
• Power switch
On the back of the rack you will find:
• Power input Jack (2.1mm), you can insert any AC or DC source
MAX 16V
• DMX512 Input (5 pin Male XLR)
• DMX512 Output (5 pin Female XLR)
• Slot to accept a Compact Flash memory card
If at any moment you require support for the DMXStreamer,
please go to our website, we regularly update the support pages
with problems solved by our technical support. The answer to
your questions might already be there.
DMXStreamer User Manual
8
Features
The DMXStreamer provides the following features:
•
•
•
•
•
•
•
•
•
•
•
•
•
Full 512 channel streaming recorder
Up to 26 shows
Up to 23 hours of recording
Show scheduling: Time of day, power up and switch closure
Internal battery backed real time clock
Shows can be given names
Automatic backup mode
Complete standalone operation
RS232 remote controlled
Bright back lit LCD screen
Easy firmware upgrades
Save data to PC.
Restore saved data from PC.
Basic Concepts
The DMXStreamer
The DMXStreamer is a streaming recorder, that means it works like a
VCR. Once you have pressed record the DMXStreamer will record
each DMX512 frame on its input. That light show is now stored in
memory and can be played back manually or automatically using the
inbuilt real time clock and scheduler.
DMXStreamer User Manual
9
Connector Pin out
DMX OUT :
Pin 1: Ground
Pin 2: Data Pin 3: Data +
Pin 4: NC
Pin 5: NC
DMX IN:
Pin 1: Ground
Pin 2: Data Pin 3: Data +
Pin 4: Switch
To activate the switch input, you must make an electrical contact
between PIN4 (switch) and PIN1 (ground) of the DMX input. The
switch input is edge sensitive, and is only activated when the switch
input changes from open circuit to grounded.
RS232:
Pin 2: TX
Pin 3: RX
Pin 5: Ground
DMXStreamer User Manual
10
The Menus
To access the menus the DMXStreamer offers 3 buttons on the front
panel:
MENU, SCROLL, ENTER
MENU is used to cancel the current action or go up one level in the
menus
SCROLL is used to scroll through the menus or scroll through values
ENTER is used to validate the current setting, or enter the selected
menu.
DMXStreamer User Manual
11
Menu Structure
1-Select Show
2-Show
2-1 Play
2-2 Record/ReRecord
2-3 Erase
2-4 Name
2-5 Frame Rate
2-6 Number of Channels
3-Memory Used
4-Playlist
4-1 Edit
4-2 Goto Line
4-3 Conflict Check
4-4 Enter Show
4-5 Timing
5-Setup
5-1 Erase All
5-2 Set Time
5-3 Set Date
5-4 Local Time
5-5 Latitude
5-6 Longitude
DMXStreamer User Manual
12
5-7 Start Frame
5-8 Start Delay
5-9 Backup Show
6-Auto Backup
7-Test DMX
8-Stop
Getting Started
Start by connecting the power pack to the DMXStreamer, switch it
on. The LCD screen will light up and the product name and version
number will appear.
The DMXStreamer will probably display NO TIME SET, meaning
you have to set the time for the first time.
Setting the time
To set the time:
1-Press SCROLL until you select the Setup menu
2-Press ENTER
3-Press SCROLL until you select Set Time
4-Press ENTER
5-Press SCROLL to select the the current hour
6-Press ENTER
7-Press SCROLL to select the the current minute
8-Press ENTER
9-Press SCROLL to select the the current second
10-Press ENTER
DMXStreamer User Manual
13
The time is set.
To go back up to the top menu press MENU
You can also set the date in the same way you set the time.
Now connect the DMX512 network to the DMX OUT connector of
the DMXStreamer and your lighting console to the DMX IN.
Memory usage
The basic DMXStreamer is equipped with 8 Mbytes of FLASH
memory. The actual recording time can vary a lot depending on the
number of channels that are recorded and the frame rate.
This table will give you an indication of the minimum recording time
you will achieve.
Please keep in mind that the DMXStreamer will save memory by
not recording frames that it does not need to. The time estimates
below are the absolute minimum times you will be able to record.
DMXStreamer User Manual
14
Frame Rate
Channels
10
20
30
40
50
60
70
80
90
100
110
120
130
140
150
160
170
180
190
200
210
220
230
240
250
260
270
280
290
300
310
320
330
340
350
360
370
380
390
400
410
420
430
440
450
460
470
480
490
500
510
10
15
20
25
30
35
40
23:18:06
15:32:04
11:39:03
09:19:14
07:46:02
06:39:27
05:49:32
11:39:03
07:46:02
05:49:32
04:39:37
03:53:01
03:19:44
02:54:46
07:46:02
05:10:41
03:53:01
03:06:25
02:35:21
02:13:09
01:56:31
05:49:32
03:53:01
02:54:46
02:19:49
01:56:31
01:39:52
01:27:23
04:39:37
03:06:25
02:19:49
01:51:51
01:33:12
01:19:53
01:09:54
03:53:01
02:35:21
01:56:31
01:33:12
01:17:40
01:06:35
00:58:15
03:19:44
02:54:46
02:13:09
01:56:31
01:39:52
01:27:23
01:19:53
01:09:54
01:06:35
00:58:15
00:57:04
00:49:56
00:49:56
00:43:41
02:35:21
01:43:34
01:17:40
01:02:08
00:51:47
00:44:23
00:38:50
02:19:49
01:33:12
01:09:54
00:55:55
00:46:36
00:39:57
00:34:57
02:07:06
01:24:44
01:03:33
00:50:50
00:42:22
00:36:19
00:31:47
01:56:31
01:17:40
00:58:15
00:46:36
00:38:50
00:33:17
00:29:08
01:47:33
01:39:52
01:11:42
01:06:35
00:53:46
00:49:56
00:43:01
00:39:57
00:35:51
00:33:17
00:30:44
00:28:32
00:26:53
00:24:58
01:33:12
01:02:08
00:46:36
00:37:17
00:31:04
00:26:38
00:23:18
01:27:23
00:58:15
00:43:41
00:34:57
00:29:08
00:24:58
00:21:51
01:22:14
00:54:50
00:41:07
00:32:54
00:27:25
00:23:30
00:20:34
01:17:40
00:51:47
00:38:50
00:31:04
00:25:53
00:22:12
00:19:25
01:13:35
00:49:03
00:36:48
00:29:26
00:24:32
00:21:01
00:18:24
01:09:54
00:46:36
00:34:57
00:27:58
00:23:18
00:19:58
00:17:29
01:06:35
00:44:23
00:33:17
00:26:38
00:22:12
00:19:01
00:16:39
01:03:33
00:42:22
00:31:47
00:25:25
00:21:11
00:18:09
00:15:53
01:00:47
00:40:31
00:30:24
00:24:19
00:20:16
00:17:22
00:15:12
00:58:15
00:38:50
00:29:08
00:23:18
00:19:25
00:16:39
00:14:34
00:55:55
00:37:17
00:27:58
00:22:22
00:18:38
00:15:59
00:13:59
00:53:46
00:35:51
00:26:53
00:21:31
00:17:55
00:15:22
00:13:27
00:51:47
00:34:31
00:25:53
00:20:43
00:17:16
00:14:48
00:12:57
00:49:56
00:33:17
00:24:58
00:19:58
00:16:39
00:14:16
00:12:29
00:48:13
00:32:08
00:24:06
00:19:17
00:16:04
00:13:46
00:12:03
00:46:36
00:31:04
00:23:18
00:18:38
00:15:32
00:13:19
00:11:39
00:45:06
00:30:04
00:22:33
00:18:02
00:15:02
00:12:53
00:11:17
00:43:41
00:29:08
00:21:51
00:17:29
00:14:34
00:12:29
00:10:55
00:42:22
00:28:15
00:21:11
00:16:57
00:14:07
00:12:06
00:10:36
00:41:07
00:27:25
00:20:34
00:16:27
00:13:42
00:11:45
00:10:17
00:39:57
00:26:38
00:19:58
00:15:59
00:13:19
00:11:25
00:09:59
00:38:50
00:25:53
00:19:25
00:15:32
00:12:57
00:11:06
00:09:43
00:37:47
00:25:11
00:18:54
00:15:07
00:12:36
00:10:48
00:09:27
00:36:48
00:24:32
00:18:24
00:14:43
00:12:16
00:10:31
00:09:12
00:35:51
00:23:54
00:17:55
00:14:20
00:11:57
00:10:15
00:08:58
00:34:57
00:23:18
00:17:29
00:13:59
00:11:39
00:09:59
00:08:44
00:34:06
00:22:44
00:17:03
00:13:38
00:11:22
00:09:45
00:08:32
00:33:17
00:22:12
00:16:39
00:13:19
00:11:06
00:09:31
00:08:19
00:32:31
00:21:41
00:16:15
00:13:00
00:10:50
00:09:17
00:08:08
00:31:47
00:21:11
00:15:53
00:12:43
00:10:36
00:09:05
00:07:57
00:31:04
00:20:43
00:15:32
00:12:26
00:10:21
00:08:53
00:07:46
00:30:24
00:20:16
00:15:12
00:12:09
00:10:08
00:08:41
00:07:36
00:29:45
00:19:50
00:14:52
00:11:54
00:09:55
00:08:30
00:07:26
00:29:08
00:19:25
00:14:34
00:11:39
00:09:43
00:08:19
00:07:17
00:28:32
00:19:01
00:14:16
00:11:25
00:09:31
00:08:09
00:07:08
00:27:58
00:18:38
00:13:59
00:11:11
00:09:19
00:07:59
00:06:59
00:27:25
00:18:17
00:13:42
00:10:58
00:09:08
00:07:50
00:06:51
DMXStreamer User Manual
15
1-Select Show
This menu will let you select the show you want to act upon.
To select the show simply press ENTER, and use SCROLL to select
the desired show. Press ENTER to validate or MENU to cancel.
2-Show
The Show menu will let you record, playback and setup various
parameters. Some menus may not appear when scrolling through, this
means that this option in not available e.g: The 2-1-Play menu does
not appear when the show is empty.
2-1 Play
This menu will enable you to start playback of the current selected
show.
2-2 Record/ReRecord
The menu will show Record (record new show) when the current
selected show is empty, or ReRecord (replace existing show) when
the current selected show already exists.
This menu will enable you to start recording of the current selected
show. When recording the memory indicator will display how much
memory you have left.
2-3 Erase
This menu will erase the current show from memory.
DMXStreamer User Manual
16
2-4 Name
Each show can be given a 16 character name, that is displayed while
the show is running.
2-5 Frame Rate
This menu will let you select the recording frame rate for this show.
The frame rate can vary between 10 and 40 frames/sec.
A higher frame rate will use more memory but fades will be
smoother. You will have to find the setting that best suits your needs.
The default frame rate is 25 frames per second. The majority of
lighting control systems do not generate more than 25 frames per
second, so keeping the default value will yield the best results.
2-6 Number of Channels
This menu will let you select how many DMX channels the
DMXStreamer should record at each frame. Setting this to 64 will
record the first 64 channels of the DMX input. Only record the
channels you are actually using. Storing the full 512 byte frame each
time uses a lot of memory space.
3-Memory Used
The percentage of memory which contains recorded shows is
displayed. When this reaches 100%, no more shows can be recorded
unless an existing show is erased (or re-recorded).
This menu also indicates whether the basic memory
(UNREMOVABLE) or the Compact Flash Expansion memory
(REMOVABLE) is being used for data storage.
DMXStreamer User Manual
17
4-Playlist
The Playlist in the DMXStreamer has 100 entries, each entry contains
a : show, start and stop time.
4-1 Edit
This menu will let you select the playlist entry you want to edit.
To select the show simply press ENTER, and use SCROLL to select
the desired show. Press ENTER to edit or MENU to cancel.
While scrolling the DMXStreamer will display in short form the
show number, and show start and stop time associated with each
entry. To edit that entry press ENTER
4-2 Goto Line
This menu can be used to quickly access a specific line in the
playlist, you can also scroll through the lines using the Edit menu.
4-3 Conflict check
The DMXStreamer has an inbuilt conflict checker for the playlist. It
will check that no shows times overlap.
Please check your playlist after each modification.
4-4 Enter Show
Select the show that will be associated with the selected playlist
entry.
DMXStreamer User Manual
18
4-5 Timing
The show can be setup to start and stop at specified times, the options
are:
Each playlist entry has the following time types:
Looped Auto Play
The show will start at a specified time, loop for the
programmed times and then stop.
Timed Auto Play
Using this option you can schedule your show to start on a
preset time, and day of week.
Step
Value
Description
1
14:00:00
Show start time (24 hour time)
2
MONDAY
Start day (ANYDAY, SUN->SAT, or
SPECIAL)
Anyday indicates a time which occurs once
every day.
Special indicates a special date, which
occurs once in a year. This is entered as a
day of month and a month.
DMXStreamer User Manual
19
Step
3
Value
NORMAL
Description
Time type (NORMAL, BEFORE SUNRISE,
AFTER SUNRISE,BEFORE SUNSET,
AFTER SUNSET)
Normal indicates that the show will start at
14:00:00
Before sunrise indicates that the show will
start 14 Hours before sunrise
After sunrise indicates that the show will
start 14 Hours after sunrise
4
20:00:00
5
MONDAY
6
NORMAL
Show end time (24 hour time)
Power ON
The Show will start once the unit is powered.
Switch Closed
The Show will start when the Switch input of the DMX
INPUT connector, is activated. Any show that was already in
progress will be preempted by the new show.
DMXStreamer User Manual
20
5-Setup
5-1 Erase All
This command will erase every show in memory.
5-2 Set Time
This menu can be used to set the system time
5-3 Set Date
This menu can be used to set the system date
5-4 Local time
This menu can be used to set your current time zone, this is
only needed for sunrise/sunset scheduling.
5-5 Latitude
This menu can be used to set the latitude of your current
location, this is only needed for sunrise/sunset scheduling.
5-6 Longitude
This menu can be used to set the longitude of your current
location, this is only needed for sunrise/sunset scheduling.
5-7 Start Frame
You can set the DMX frame that is used as default when the unit
powers up.
This can be very useful to strike lamps or perform any one-off task.
To program this frame, press ENTER to select the menu, the
DMXStreamer will indicate if it has a valid DMX512 signal on the
DMXStreamer User Manual
21
input. To capture that frame press ENTER.
The DMXStreamer will record that frame in memory and use it each
time it starts up.
5-8 Start Delay
The start frame can be activated for a set time. After that time lapses,
the DMXStreamer will continue normal operation and run the
playlist as programmed.
During the start delay no shows will start.
5-9 Backup Show
To enable the show backup, you must program which show you want
to start when the DMX fails.
Use the SCROLL key to select any of the 26 shows, and confirm with
ENTER.
6-Backup
The backup mode will enable you to play a show automatically in
case of a DMX failure.
The DMXStreamer will monitor the DMX input, if the DMX drops
out for more than 2 seconds, the selected show will automatically
start.
The DMXStreamer can be inserted into any DMX512 link and will
remain transparent until the DMX signal fails.
DMXStreamer User Manual
22
If the DMXStreamer is turned off or loses power, it will re enter
backup mode on power up.
To exit backup mode, you must go to the 4-9 menu (backup show)
and select (no show).
DMXStreamer User Manual
23
7-Test DMX
Using this menu, the DXMStreamer can be used as a simple tester to
check your lamps.
Connect the DMX network to the DMX output of the DMXStreamer.
Press SCROLL key to select the channel
Press ENTER
Press SCROLL to modify the value
Press ENTER to select the channel again.
8-Stop
This menu will stop the current running show.
DMXStreamer User Manual
24
Solar Clock
The DMXStreamer is equipped with solar clock calculations. The
Solar clock will enable scheduling of shows based around sunrise
and sunset times.
For this to be accurate you must enter your current geographical
location and time zone in the setup menu.
To find out the location and time zone of your location please go
to appendix 2
To program your show according to sunrise & sunset times please go
to section 2-5-3
DMXStreamer User Manual
25
Internal Battery
The internal real time clock runs on a standard lithium coin type
battery CR2032. If the clock loses its time when the DMXStreamer is
switched off the battery is probably flat.
To replace the battery simply open the unit and replace with a new
battery.
DMXStreamer User Manual
26
Compact Flash Memory
This section is only applicable if the DMXStreamer has the optional
Compact Flash (CF) Memory Expansion Module fitted.
The following cautions apply when using the CF, to avoid
corrupting files stored on the CF card:
1. Ensure the DMXStreamer is powered off while inserting or
removing the CF card.
2. Do not power off the DMXStreamer while recording a show.
After recording is finished and the display shows the next show
set to play, it is safe to power off the DMXStreamer.
The DMXStreamer accepts standard CF cards with a capacity
between 1Megabyte and 2Gigabytes inclusive.
The CF card must be formatted as a FAT disk (FAT12, FAT16 or
FAT32) before the CF card can be used with the DMXStreamer. To
format the CF card, install the CF card in the PCMCIA slot of a PC
and use the disk format command of the PC to format the CF card.
This will erase all data from the CF card.
Insert the CF card into the Compact Flash slot at the back of the
DMXStreamer. At this point, the DMXStreamer is ready to use.
When no CF card is present in the DMXStreamer, the DMXStreamer
uses internal memory for storing data. When a working CF card is
inserted into the DMXStreamer, the DMXStreamer uses the CF card
for storing data. The Memory Used menu indicates which memory is
being used.
DMXStreamer User Manual
27
The basic memory and the CF memory operate totally separately as
the following example describes.
Example:
No CF card is present. The user sets configuration parameters and
records shows, in basic memory.
A CF card is then inserted. The DMXStreamer now uses the
configuration parameters and shows from the CF card, not those in
the basic memory. The user sets configuration parameters and
records shows, in CF memory.
The CF card is removed. The DMXStreamer now uses the
configuration parameters and shows from the basic memory, that
were stored when no CF card was present..
The CF card is inserted in the same DMXStreamer or a different
DMXStreamer. The DMXStreamer now uses the configuration
parameters and shows from the CF card, not those in the basic
memory.
DMXStreamer User Manual
28
Boot Software
The DMXStreamer offers a special operating mode which allows you
to upgrade the firmware or perform a self test, this is the boot
software.
To enter this special operating mode, hold down the MENU and
SCROLL keys simultaneously when turning on the
DMXStreamer.
The display will show BOOT V1.2
You can use the scroll keys to scroll through the menu:
1 - Self test
2 - Firmware
3 - Checksum
1-Self test
The self test will check correct operation of all the internal electronic
components and connections.
Warning: Running the self test will erase any shows
you have in memory
To run the self test you must connect a DMX cable between the input
and output of the DMXStreamer when prompted, and remove the
cable when prompted.
Once activated the test will run on its own, except for the DMX and
key tests. If a test fails it will be displayed in the LCD. If any test
DMXStreamer User Manual
29
fails unexpectedly, please contact the support department.
If the DMXStreamer does not have the optional Compact Flash (CF)
card installed, the error "CF MEM FAILED" will display and this
error should be ignored.
2-Firmware
Upgrading the firmware is very easy, you will need a Windows PC
running Streamer Utilities availabe from the ENTTEC website.
Connect the PC and the DMXStreamer together
1. Start Streamer Utilities
2. Select the correct Com port using the Setup menu.
3. So to the Update Firmware tab
4. Slect the new ROM file using the browse button
5. Click on Activate
6. Scroll to menu option 2-1 Change code and press ENTER.
DMXStreamer User Manual
30
Uploading will start immediately. Monitor the display on the
DMXStreamer, if any errors occur please restart the process from
point 5.
If the programming is successful the display will show
“Programming done”
It is recommended that you scroll to the checksum menu on the
DMXStreamer and check the checksum of the uploaded file against
the reference number on our website.
DMXStreamer User Manual
31
3-Checksum
This menu will display the checksum on the boot and application
software. The reference numbers for each versions are displayed on
our website.
DMXStreamer User Manual
32
Appendix 1
RS232 Commands supported by the
DMXStreamer
Description
Command Letter
Read Ram Command
Write Ram Command
Version Command
Show Command
DMX Read Command
Set Speed Command
D
W
V
H
C
R
Appendix 2
Major Cities Location and time zones
Please go to http://www.timeanddate.com/worldclock/full.html
for a full time zone / location table.
DMXStreamer User Manual
33
Appendix 3
Federal Communications Commission
(FCC) Declaration of Conformity
Responsible Party:
ENTTEC Pty/Ltd
110 Auburn Rd
Hawthorn,Vic,3122
Australia
declares that the products:
Product Name: DMXStreamer
complies with Part 15 of the FCC Rules.
Operation is subject to the following two
conditions: (1) This device may not cause
harmful interference, and (2) this device
must accept any interference received,
including
interference
that
may
cause
undesired operation.
This equipment has been tested and found to
comply with the limits for a Class B
digital device, pursuant to Part 15 of the
FCC rules. These limits are designed to
provide
reasonable
protection
against
harmful
interference
in
a
residential
installation.
This equipment generates,
uses and can radiate radio frequency energy
and,
if
not
installed
and
used
in
accordance with the instructions, may cause
harmful
interference
to
radio
communications.
However, there is no
guarantee that interference will not occur
in a particular installation.
If this
equipment does cause harmful interference
to radio or television reception, which can
DMXStreamer User Manual
34
be determined by turning the equipment off
and on, the user is encouraged to try to
correct the interference by one or more of
the following measures:
- Reorient or relocate the receiving
antenna.
- Increase the separation between the
equipment and the receiver.
- Connect the equipment into an
outlet on a circuit different from
that
to
which
the
receiver
is
connected.
Consult
the
dealer
or
experienced radio/TV technician
help.
an
for
*
In order to maintain compliance with
FCC regulations shielded cables must be
used with this equipment.
Operation with
non-approved equipment or unshielded cables
is likely to result in interference to
radio & television reception.
DMXStreamer User Manual
35
Appendix 4
We
ENTTEC Pty Ltd
110 Auburn Rd,
Hawthorn, Vic, 3122
Australia
declare under our sole responsibility that out product:
DMXStreamer
conforms to the requirements of Council Directives 89/336/EEC and
73/23/EEC and therefore complies with the requirements of Council
Directive 73/23/EEC, (The Low Voltage Directive) on the
harmonisation of the laws of Member States relating to electrical
equipment designed for use within certain voltage limits as amended
by Article 13 of Council Directive 93/68/EEC
•
•
•
EN 55103-1
EN 50103-2
EN 60065/AS 3650
Signed Nicolas Moreau
Date: 5/01/2003
Position: Technical Director
DMXStreamer User Manual
36