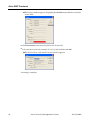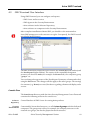
1
www.avira.com
User Manual
Avira SMC
More Than Security
Security Management Center
Chapter 1. About this Manual ..........................................................3
1.1 Introduction ..................................................................................................................
1.2 Structure of the Manual................................................................................................
1.3 Signs and Symbols.........................................................................................................
1.4 Abbreviations ................................................................................................................
3
3
4
5
Chapter 2. Product Information ......................................................7
2.1 Functions ....................................................................................................................... 8
2.2 Features ......................................................................................................................... 9
2.3 Licensing ...................................................................................................................... 10
2.4 System Requirements ................................................................................................. 10
Chapter 3. Installation .................................................................11
3.1 Important Information on Installation ..................................................................... 11
3.2 Performing Installation .............................................................................................. 12
3.2.1.Installing SMC Server..............................................................................................12
3.2.2.Installing SMC Frontend.........................................................................................13
Chapter 4. Avira SMC Frontend .....................................................15
4.1 Starting SMC Frontend and Connecting to SMC Server........................................... 15
4.2 Licensing Avira SMC ................................................................................................... 17
4.3 SMC Frontend User Interface..................................................................................... 19
Chapter 5. Configuration ..............................................................23
5.1 Overview ...................................................................................................................... 23
5.2 Configuring Network and SMC Server Connections ................................................. 24
5.3 Setting the Security Environment.............................................................................. 25
5.4 Installing SMC Agents in the Security Environment ................................................ 29
5.4.1.Installing SMC Agent through SMC Frontend
(Windows 2000/ XP Professional/ Vista/ UNIX)30
5.4.2.Installing SMC Agent Manually
(Win XP Home Edition, optional: Windows 2000/ XP Professional)31
5.4.3.Silent Agent Setup on Windows .............................................................................32
5.4.4.Installing SMC Agent Manually (optional for UNIX Systems)..............................33
5.4.5.Uninstalling SMC Agent..........................................................................................34
5.5 Configuring Avira SMC ............................................................................................... 35
5.5.1.Changing the Configuration of Services.................................................................35
5.5.2.Configuration Options of Avira SMC Components...............................................36
5.6 Updating Avira SMC.................................................................................................... 40
5.6.1.Updating SMC Server and Frontend ......................................................................41
5.6.2.Displaying and Changing Update Tasks for SMC Server.......................................42
5.6.3.Updating SMC Agents .............................................................................................42
5.7 User Management ....................................................................................................... 43
Chapter 6. Operation ....................................................................49
6.1 Overview ...................................................................................................................... 49
6.2 Managing the Software Packs..................................................................................... 50
6.2.1.Adding and Deleting a Software Pack.....................................................................50
6.2.2.Installing and Uninstalling a Software Pack ..........................................................52
6.2.3.Changing the Configuration of an Avira Product ..................................................53
6.3 Displaying Information about a Computer or Group................................................ 55
6.3.1.Displaying Information about a Node/Computer .................................................55
6.3.2.Displaying Information in the Details panel .........................................................56
6.4 Viewing Events ............................................................................................................ 62
6.5 Performing Commands and Planning Tasks ............................................................. 64
6.6 Creating and Listing Reports ...................................................................................... 69
Avira GmbH
Avira Security Management Center
1
6.7 Sharing Files/ Licenses/ Programs in the Security Environment............................. 72
6.8 Handling Errors........................................................................................................... 75
6.8.1.Viewing Logfiles.......................................................................................................75
6.8.2.Resetting the Error Status ......................................................................................76
Chapter 7. Updating Avira Products ..............................................77
7.1 Using the Internet Update Manager .......................................................................... 78
7.2 Updating Packs in the Software Repository............................................................... 80
7.3 Updating Avira Products............................................................................................. 81
Chapter 8. Troubleshooting ..........................................................82
8.1 Prerequisites for communication between
SMC Agents and SMC Server...........................................................................
8.2 Backup SMC Server Files.............................................................................................
8.3 MMC Error when Installing SMC Agent ....................................................................
8.4 Software Pack IDs........................................................................................................
82
82
83
83
Chapter 9. Products Supported by Avira SMC ................................84
9.1 Supported Avira Products ........................................................................................... 84
9.2 Product-specific Configuration Panels....................................................................... 84
Chapter 10. Service .......................................................................85
10.1 Support ...................................................................................................................... 85
10.2 Online Shop ............................................................................................................... 86
10.3 Contact....................................................................................................................... 86
Avira GmbH
Avira Security Management Center
2
About this Manual
1
About this Manual
In this Chapter you will find an overview of the structure and contents of this
manual:
•
•
1.1
Structure of the Manual – Page 3
Signs and Symbols – Page 4
Introduction
In this manual, we have included all the information you need on Avira Security
Management Center.
For further information and assistance, please refer to our website, to our
Technical Support hotline and to our regular Newsletter (see Service – Page 85).
Your Avira Team
1.2
Structure of the Manual
The manual for your Avira software consists of a number of Chapters, providing
the following information:
Avira GmbH
Chapter
Contents
1 About this Manual
The structure of the manual, signs and
symbols.
2 Product Information
Overview of the software features.
3 Installation
Important information on installation.
4 Avira SMC Frontend
Overview of Avira SMC
5 Configuration
Configuration of Avira SMC
6 Operation
Working with Avira SMC
7 Updating Avira Products
Methods of updating Avira products in SMC
8 Troubleshooting
Workarounds and solutions for Avira SMC
9 Products Supported by Avira
SMC
Avira products, supported by Avira SMC.
10 Service
Avira GmbH Support and Service.
Avira Security Management Center
3
About this Manual
1.3
Signs and Symbols
The following signs and symbols appear in this manual:
Symbol
Meaning
... shown before a condition that must be met prior to
performing an action
... shown before a step you have to perform
3
... shown before the result that directly follows your action
... shown before a warning if there is a danger of critical data
loss or hardware damage
... shown before a note containing particularly important
information, e.g. on the steps to be followed
... shown before a tip that makes it easier to understand and
use Avira Security Management Center
For improved legibility and clear marking, the following types of emphasis are also
used in the text:
4
Emphasis in text
Explanation
C:\Avira\
Path and filename
Choose component
Select all
Elements of the software interface such
as menu items, window titles and
buttons in dialog windows
http://www.avira.com
URLs
Signs and Symbols – Page 4
Cross references within the document
setup.exe /remove
Commands and editable text within
files
Avira Security Management Center
Avira GmbH
About this Manual
1.4
Abbreviations
This manual uses the following abbreviations:
Avira GmbH
Abbreviation
Meaning
DHCP
Dynamic Host Configuration Protocol
(a protocol for dynamic allocation of the host IP address)
GUI
Graphical User Interface
IUM
Avira Internet Update Manager
MMC
Microsoft Management Console
TCP/IP
Transmission Control Protocol/Internet Protocol
SFX
Self-Extracting Program
SMC
Avira Security Management Center
SSL
Secure Socket Layer
Avira Security Management Center
5
About this Manual
6
Avira Security Management Center
Avira GmbH
Product Information
2
Product Information
Avira Security Management Center (Avira SMC) is used for remote installation and
management of Avira products via the network.
Components
and Services
Avira SMC consists of three components:
z
SMC Server, which runs on a central network server with three services:
– Server
– Event Manager
– Internet Update Manager
– and two integrated databases for storing Avira products and for events
management.
Avira GmbH
z
The SMC Agent client service, which runs on the network computers and makes
the connection between the main application (SMC Server) and the Avira
products on the computers.
z
The SMC Frontend graphical user interface, which can run on the
administrator's computer and manages the services and components of Avira
SMC.
Avira Security Management Center
7
Product Information
2.1
Functions
The main application, SMC Server, comprises three services with different tasks
that communicate with each other through an SSL encrypted TCP/IP connection.
The Server service manages information on:
•
•
•
the computers integrated into the Security Environment of Avira SMC,
the Avira products installed on the computers and
the software packs supported by Avira SMC.
The installation of Avira products on the network computers through Avira SMC
accesses an internal database containing the Avira products as stored software
packs. An Avira product on a computer in the Security Environment inherits the
configuration settings of its group, when installed from Avira SMC.
The Event Manager service records the events (for example virus alerts), saves
them to a database and forwards them for display or reports in the SMC Frontend.
The Internet Update Manager service performs updates for the installed Avira
products, for software packs in the Repository and for the Avira SMC components.
The SMC Agent, installed on the Security Environment computers, forwards the
commands, tasks and configurations from the main application SMC Server to
Avira products on the computers. The SMC Agent can send events and
notifications about the Avira products to the SMC Server, to be displayed on the
SMC Frontend.
The SMC Frontend is a snap-in for Microsoft Management Console (MMC) and it
integrates the components, services and functions in a graphical user interface and
displays the entire information.
In addition, the SMC Agents can distribute and run files between individual
computers or groups of computers within the Security Environment (providing
start parameters and commands if necessary), such as special virus definitions,
special virus removers, license files etc.
8
Avira Security Management Center
Avira GmbH
Product Information
2.2
Features
Avira SMC can manage and monitor all computers in the specified Security
Environment of the company's network (Windows and Linux desktops and
servers). Consequently, the computers are integrated into the Security
Environment under a customized tree structure, arranged in hierarchical groups.
The most important features of Avira SMC are:
Configuring a secure network environment:
•
•
•
•
•
•
•
•
Graphical user interface for configuration and operation of Avira SMC (snapin for Microsoft Management Console);
Silent setup of SMC Agents over the network;
Remote installation, configuration and uninstallation of the Avira security
software on all network computers;
Central storage of Avira products for network installation;
User management for adding and monitoring users and access rights, on
computers or groups;
Backup for server files;
SSL encrypted communication protocol;
Support for computers with dynamically allocated IP addresses (DHCP).
Operating Avira security products over the network:
•
•
•
Central management for product-specific actions (scan, update…) through
configurable commands and tasks;
Sharing files/ licenses and running programs remotely from the SMC Server’s
share directory;
Saving of pending tasks (installation, configuration, commands) for offline
computers.
Updating Avira software over the network:
•
•
•
•
Central, automatic updates of the supported software packs and of Avira SMC
components, using the Internet Update Manager;
Product status monitoring;
Central update command for installed Avira products, via Internet Update
Manager or in a schedule;
Update test mode, before committing the updates to the release repository.
Monitoring the activity of Avira products over the network:
•
•
•
Avira GmbH
Alert manager, to send network warnings and email messages in the case of a
certain event;
Configurable reports for Avira network products;
Central view for all events and reports issued by Avira products via the
network.
Avira Security Management Center
9
Product Information
2.3
Licensing
The licensing process consists of two steps: acquiring the license and activating it
after you install Avira SMC. Usually you receive an SMC license file by email when
you buy Avira products and purchase Avira SMC.
When installing SMC Agents on network computers, the license is checked: for
example, if you have a license for 500 Clients, you can add up to 500 computers in
the Security Environment.
You will perform the licensing after installing Avira SMC (see Licensing Avira SMC
– Page 17).
Evaluation
Mode
2.4
If the product is not licensed, a warning appears every time you start SMC
Frontend, reminding you that Avira SMC runs for 30 days in evaluation mode. You
can add a maximum of 100 computers in the Security Environment in evaluation
mode.
System Requirements
SMC Server:
•
•
•
Operating system: Windows 2000 Server, Windows 2003 Server (x32 or x64)
RAM: 128MB
Disk space: 512MB (including all products and update files)
SMC Frontend:
•
•
•
Operating system: Windows 2000 (Workstation or Server), Windows XP (x32
or x64), Windows Vista (x32 or x64), Windows 2003 Server (x32 or x64)
RAM: 32MB
Disk space: 16MB
SMC Agent:
•
•
•
10
Operating system: Windows 2000 (Workstation or Server), Windows XP (x32
or x64), Windows Vista (x32 or x64), Windows 2003 Server (x32 or x64),
Linux (glibc22)
RAM: 32MB
Disk space: 16MB
Avira Security Management Center
Avira GmbH
Installation
3
Installation
3.1
Important Information on Installation
Before installation
Usually you will install Avira SMC with the services on a central Windows network
server and the SMC Frontend user interface on a computer in the network on
which you can manage the Avira SMC as administrator. You can also install both
components on the same computer.
As the services and program components of Avira SMC require the IP addresses of
the computers and certain open ports for communication, this data is read out
during installation and displayed in a dialog window.
If you install the SMC Frontend on a computer outside the network, you must ensure that
the ports 7000 and 7001 are open in the firewall for communication with the SMC
Server.
If you use dynamic IP addresses in the network (DHCP), we recommend that you enter
the host name of the server instead of the actual IP addresses.
Installation Steps
You will perform the following installation steps:
1. SMC Server installation;
2. SMC Frontend installation.
After carrying out these steps, you will configure the SMC, add computers into the
Security Environment, install and manage SMC Agents and Avira products over
the network, as described in the following Chapters.
Avira GmbH
Avira Security Management Center
11
Installation
3.2
Performing Installation
3.2.1 Installing SMC Server
3 You need administrator access to the server.
3 The ports required by SMC Server must be opened (in the firewall if necessary)
and they must not be used by other applications:
7000, 7001, 7020, 7021, 7030, 7050, 7051, 7100.
Place the Avira CD-ROM in the CD drive and click on the CD-ROM icon
– OR –
Download the current version of Avira SMC as a .zip archive from the Avira
website (http://www.avira.com) and unzip it to a local directory.
Unzip the .zip archive from the Avira CD-ROM or the local directory and
double-click the self-extracting file:
AntiVir_Security_Management_Center_Server_en.exe.
A dialog window appears to unzip installation files and start setup.
Click Install.
The installation files are unzipped. The InstallShield Wizard begins.
Click Next.
The License Agreement window appears.
Activate the "I accept..." option and click Next.
The install path window appears.
Change the path for installation, if necessary, and click Next.
You will see the Configuration window for IP address and server ports.
Set the Network interface, if necessary, and confirm with Next.
A window for entering the user data appears.
Enter the Username of the administrator account and the Password for
operating on this computer and click Next.
The program is ready to be installed.
Click Install.
The main application SMC Server, the services and database will be installed.
The dialog window for completing installation appears.
Click Finish.
SMC Server is installed. The Server, Event Manager and Internet Update
Manager services start on the server.
12
Avira Security Management Center
Avira GmbH
Installation
3.2.2 Installing SMC Frontend
3 You need administrator access to the server.
3 The ports required by SMC Server and SMC Frontend must be opened (in the
firewall if necessary) and they must not be used by other applications:
7000, 7001, 7020, 7021, 7030, 7050, 7051, 7100.
Unzip the .zip archive from the Avira CD-ROM or the local directory and
double-click the self-extracting file:
AntiVir_Security_Management_Center_Frontend_en.exe.
A dialog window appears to unzip installation files and start setup.
Click Setup.
The installation files are unzipped. The InstallShield Wizard begins.
Click Next.
The License Agreement window appears.
Activate the "I accept..." option and click Next.
The install path window appears.
Change the path for installation, if necessary, and click Next.
The dialog window for completing installation appears.
Click Install.
SMC Frontend is installed.
Click Finish.
In the Windows taskbar, the program group Avira/ Avira Security
Management Center will appear with the Management Center Frontend
entry.
Avira GmbH
Avira Security Management Center
13
Installation
14
Avira Security Management Center
Avira GmbH
Avira SMC Frontend
4
Avira SMC Frontend
You can manage the services and components of Avira SMC using the SMC
Frontend graphical user interface, which has been developed as an MMC snap-in.
The MMC appearance, structure and menu options may vary according to your operating
system. The following specifications are related to MMC 1.2 version 5.0 for MS Windows
2000 Professional operating system.
This section will only describe proprietary elements of SMC Frontend.
For further information on MMC and manual integration of a snap-in, please refer to
the instruction manual or online help provided with your operating system.
When pointing your mouse to input fields inside SMC Windows, you will see a yellow
infotip.
4.1
Starting SMC Frontend and Connecting to SMC Server
Starting SMC Frontend
In the Windows Start menu, go to Start/Programs/Avira/Avira Security
Management Center/Management Center Frontend.
The MMC with the Avira SMC snap-in appears. In the navigation window you
will see the Console Root and the integrated SMC Frontend (Avira Security
Management Center Frontend).
Avira GmbH
Avira Security Management Center
15
Avira SMC Frontend
Connecting to SMC Server
Click on Avira Security Management Center Frontend.
The SMC Frontend initiates connection to the SMC Server. The Login window
appears:
Select Local Computer or Remote computer, according to the location of SMC
Server and if necessary use the Browse button to select the server.
For initial login, enter Administrator for username and a as password and
confirm with OK.
We recommend that you change the password for SMC Frontend connection to the SMC
Server after first installation (see Configuring Network and SMC Server Connections
– Page 24).
If you use a proxy for network Internet connection and if you have changed the
ports when installing Avira SMC:
Click Settings.
Select Use proxy and specify address and ports. Click OK .
16
Avira Security Management Center
Avira GmbH
Avira SMC Frontend
The SMC Frontend makes the connection to SMC Server. The other
directories (nodes) will appear in the navigation window.
Error?
No license?
4.2
If an error message appears:
Perform the licensing process if necessary (see below) and retry to login
– OR –
Retry to login using the correct password.
Licensing Avira SMC
3 The main application SMC Server and the SMC Frontend graphical user
interface are installed (see Installation – Page 11)
3 License file is available (saved locally)
Start the SMC Frontend and connect to the SMC Server (see Starting SMC
Frontend and Connecting to SMC Server – Page 15).
The MMC with the Avira SMC snap-in will appear and you will see the panel
named Avira Security Management Center in the console root.
Right-click on Avira Security Management Center Frontend and select License.
Avira GmbH
Avira Security Management Center
17
Avira SMC Frontend
The license window appears, displaying the Invalid entry marked in red in the
status field.
Click New License and enter the path to the license file.
Select the license file (for example hbedv.key) and confirm with OK .
The license file is read and the license window appears:
Licensing is complete.
18
Avira Security Management Center
Avira GmbH
Avira SMC Frontend
4.3
SMC Frontend User Interface
Using SMC Frontend, you can configure and operate:
- SMC Server and its services
- SMC Agents in the Security Environment
- Avira software in the Software Repository
- Avira software on computers in the Security Environment.
After complete installation of Avira SMC, you should see the main window.
Avira SMC manages users with various access rights. Consequently, the SMC Frontend
may display limited features.
The SMC Frontend is composed of two sections: the Console tree (left window) and
the Details panel (right window). The entries of the expandable navigation
structure are shown as nodes; for example: the Events node, the computers group
"group 1" etc.
You can change the appearance of the Details panel (contents, columns and order)
using the View menu. The changes will also apply to the other groups. The settings
for contents (e.g. Events) are saved, but those regarding columns and display order
are not.
Console Tree
The Console root directory with the Avira Security Management Center Frontend
contains the following nodes in the console tree:
Software
Repository
Security
Environment
Avira GmbH
Central database of SMC Server for storing Avira products.
Customizable, hierarchical structure, so-called virtual groups with the dedicated
computers. The groups may reflect, for example, the company structure or the
network user groups, but not the physical network structure.
Avira Security Management Center
19
Avira SMC Frontend
Under the Security Environment node, the following nodes appear:
•
•
Network
neighborhood
Events
Reports
Configurations
User
Management
Internet
Update
Manager
The Group nodes, with all computers included in the group;
The Computer and New computer nodes, with sub-nodes corresponding to all
Avira products and SMC Agents.
Workgroups and computers in the MS Windows network. You can choose to
display the network computers by name or by IP address (right-click, Display IP
Addresses).
List events that have occurred on the computers in a sorted or filtered list.
View of report templates and reports created by the computers.
Configuration dialogs for Avira SMC services: Server, Event Manager, Internet
Update Manager, Alert Manager.
List of all managed users.
Update status for Avira AntiVir installed products, managed by the IUM, including
SMC components.
Details panel
The Details panel contains further information for the selected nodes.
Select View> Large/Small Icons from the right-click menu, to display small or
large icons for the computers, products, tasks or events in the Details panel.
Select View> List or View> Details from the right-click menu, to display the
items or item details in table form.
Using the option Add/Remove Columns from the View menu, you can
customize the view in the Details panel. You can also sort the table by clicking
the column headers.
Software
Repository
Security
Environment
20
Information on the stored software packs: name, setup file, version and license file.
Detailed information, for example on the status of groups or integrated
computers.
Group nodes
On a group level (e.g. departments), it displays information either on sub-groups
or on integrated computers: products’ names and status icons, version, status,
operating system, Agent available.
Computer
nodes/New
Computer
According to the Views menu settings (Action/ Views in the menu bar or Views in
the context menu) or using the toolbar, the following information is displayed for
every computer:
Avira Security Management Center
Avira GmbH
Avira SMC Frontend
Events
Reports
z
Product status:
Displays products’ names and status icons, state and details.
z
Product version:
Displays products’ names and version numbers.
z
Error messages:
Displays errors issued by Avira products on a computer (with details of product
name, error status and message).
z
Events:
Displays the events reported by Avira products on the computer.
z
Tasks:
Displays the scheduled tasks that Avira products regularly perform on the
computer.
z
Pending operations:
Displays the scheduled tasks for offline computers, which will be performed
when the clients are back online (available).
Further details of the reported events. The events list can be filtered, so that
specific lists of events can be viewed (for example by critical level or virus file type).
Information on report templates and the reports already created.
Configurations
This node will not show information in the Details panel. A click on the node will
open the corresponding Configuration window (see Configuring Avira SMC –
Page 35).
User
Management
More information on users: name, real name, description, email address and last
login date to the SMC Frontend.
Internet
Update
Manager
Update status of all software packs, including SMC components: product name and
last update time. When running in test mode (see Internet Update Manager
Configuration – Page 38), the Internet Update Manager has two nodes: Approved
files and Test files.
Avira GmbH
Avira Security Management Center
21
Avira SMC Frontend
22
Avira Security Management Center
Avira GmbH
Configuration
5
Configuration
5.1
Overview
You will configure the main application SMC Server and its services using the SMC
Frontend graphical user interface. The following steps are recommended after the
initial installation:
z
Configuring Network and SMC Server Connections – Page 24
z
Setting the Security Environment – Page 25
z
Installing SMC Agents in the Security Environment – Page 29
You can make settings for SMC Server services if required:
z
Configuring Avira SMC – Page 35
In addition you can easily update Avira SMC via the Internet when updates are
available.
z
Updating Avira SMC – Page 40
z
Creating a Server Update Task – Page 42
z
Displaying and Changing Update Tasks for SMC Server – Page 42
You can set the defined access rights for the SMC users in the User Management
according to your IT administration requirements:
z
User Management – Page 43
Starting SMC Frontend
See the procedure described in Starting SMC Frontend and Connecting to SMC
Server – Page 15.
Avira GmbH
Avira Security Management Center
23
Configuration
5.2
Configuring Network and SMC Server Connections
You can configure the connection so that these processes are simplified when the
computer reboots and SMC Frontend starts.
We recommend that you change the Frontend login password to the SMC Server after the
initial installation. You can use one of the following setting options:
z
Enter an administrator account (or domain administrator) for network
connection. This can be useful if you use two different accounts for the
computer and the network connection.
z
Save the user name for network connection for one session or permanently.
The password for network connection will not be saved.
z
Change and save the password for SMC Server login. The default password for
the first login is a.
You can also add and manage users, set or remove access rights and thus control
the connection of all users to SMC Server (see 5.7 User Management)
Configuring the Connection
Right-click the Avira Security Management Center Frontend node and select
Settings.
The Settings window appears:
Enter the required information in the fields of the Administrator Account tab
and save them. You may choose to "Use the server’s current account", if there is
a common administrator account for more computers over the network.
In case you connect to other client computers (for example Linux) over SSH,
you can activate the option "Use SSH public/ private key authentication" and
then specify the Key file using the browse [...] button.
24
Avira Security Management Center
Avira GmbH
Configuration
Change the password for SMC Server connection in the Login tab and click OK .
The entries are saved.
5.3
Setting the Security Environment
In the Security Environment, Avira SMC uses so-called virtual groups of computers
in order to perform installation, configuration and monitoring tasks. Only
computers integrated into the Security Environment can be managed with Avira
SMC.
Security Environment Nodes
You must configure the hierarchical structure of your network in the Security
Environment in such a way that the structure complies with the specifications for
general installation and configuration of the Avira products on your computers.
For this purpose, you should organize the so-called virtual groups under the
Security Environment nodes, where you can create various network groups, such
as computers in specific departments, or you can group computers with similar
installation or configuration (products in English, for example).
You can also create nested groups. Single or multiple groups can always be nested
into other groups and reordered. You can also freely choose the names for
computers and groups in the Security Environment.
Status in Security
Environment
The status for computers and groups is displayed as an icon when SMC Frontend
starts, depending on the login account.
Green monitor, green arrow: computer started, SMC Agent installed and running,
full access possible.
Light blue monitor, red arrow: computer started, SMC Agent not installed.
Avira GmbH
Avira Security Management Center
25
Configuration
Light blue monitor, orange arrow: computer started, SMC Agent installed, but no
access rights granted.
Dark monitor, orange arrow: computer off or not connected to network, SMC
Agent installed, no access possible.
Dark monitor, red arrow: computer off or not connected to network, SMC Agent
not installed.
Dark/light blue monitor, orange arrow, red marker on the left side: pending
operation (SMC-based task or command) saved, because the computer is off or
not connected to the network, or no access is possible to the SMC Agent. The task
is executed as soon as the computer is available in the Security Environment.
Avira SMC tries to establish a connection or is running a command.
Computer or group error.
Computer/ group warning or hint.
Agent installed on the computer.
Software pack in Software Repository, no license available.
Software pack in Software Repository, license available.
Software pack installed on the computer.
You should check product status.
Creating Virtual Groups
Right-click Security Environment in the console tree and select New/Group.
You will see the Create new group window.
Type the group name and click OK .
The new group will appear in the console tree under the Security
Environment node.
26
Avira Security Management Center
Avira GmbH
Configuration
Displaying Computer Names or IP Addresses
Right-click Network Neighborhood in the console tree and select Display IP
Addresses.
The option is checked in the context menu: the computers list shows the IP
addresses.
If your action deactivates the option in the context-menu: the list only shows
the names of the computers.
Adding Computers to Virtual Groups
From the Network
Neighborhood
The computers list contains computer names or IP addresses, depending on the
display settings you make in Network Neighborhood.
Go to the Console tree and expand the Network Neighborhood node and then
to the node corresponding to your network (for example Microsoft Windows
network).
You will see the connected computers in the Details panel.
Drag and drop the computer/group from Network Neighborhood to Security
Environment
– OR –
Right-click on a group or sub-group in the Security Environment and select
New/Computer.
You will see the Add new computer window.
Type the Display name for the computer to be displayed in the Security
Environment, as well as the Hostname/IP and click OK .
Now the added computer will appear in the console tree in its group under
Security Environment.
From the New
Computer node
There may be computers with installed SMC Agents that have not yet been added
to the Security Environment (such as laptops or computers on which the SMC
Agent has been manually installed). These will automatically signal to the SMC
Server when connected to the network.
In the Security Environment, click on New Computer.
You will see the new computers available with installed SMC Agents.
Add the required computer to the Security Environment as described above.
Avira GmbH
Avira Security Management Center
27
Configuration
Importing Computers in the Security Environment
You can also import a list of computers into the Security Environment using the
Import option from the context menu of the Security Environment. It offers the
following three options:
•
•
•
Import computer list
From network neighborhood
From Active Directory
To import a computer list:
Create the Computers List in a text editor and save it on your system. You can
give any name to the file (*.txt). The list has the following structure:
Group; Name; IP
Marketing; Computer 01; 192.168.146.1
Groundfloor; Reception; PC-Reception
•Group: Name of the group in the Security Environment, e.g. Marketing
•Name: Display name of the computer in the Security Environment
•IP: IP address or network name of the computer.
Right-click on Security Environment and select Import/ Import computer list.
Type the path to the file [ComputersList.txt] and click Open.
The Computers List is imported. The computer names appear in the Security
Environment.
To import the computers from your Network neighborhood:
Right-click on Security Environment and select Import/ From network
neighborhood.
The computers list from the neighborhood is imported in the New computers
group.
To import the computers from active directory:
Right-click on Security Environment and select Import/ From active directory.
The ADS update window asks the method you want to apply when importing
the group:
Select the desired method.
The computers list from the ADS is imported according to your choice.
28
Avira Security Management Center
Avira GmbH
Configuration
Renaming Virtual Groups
Right-click a group and select Rename.
The name field appears.
Edit the name field and click somewhere near it.
The new name is saved and displayed.
Deleting Virtual Groups/Computers
If you are sure there are no Avira products installed on those computers, rightclick the group or the computer and select Delete.
The group/computer will be deleted from the Security Environment.
5.4
Installing SMC Agents in the Security Environment
To install SMC Agents in the Security Environment, you require administrator
rights on all computers.
Please make sure you keep all SMC components and Avira products up to date, in order
to ensure effective communication between them over the Security Environment.
Avira SMC can only monitor computers on which SMC Agent has been installed. You
have to install SMC Agent for the entire Security Environment immediately after
installing Avira SMC.
If you will later add new groups or computers to the system, you will be able to perform
specific installation of SMC Agents.
If necessary, you can configure the SMC Agent for the whole system or just for
certain groups or computers after installation, and assign the new configuration to
the required groups or computers (see SMC Agent Configuration – Page 36).
Prerequisites for communication between SMC Agents and SMC Server
3 If there is a firewall installed on a client computer, the following ports (TCP)
have to be open: 7000, 7001, 7010, 7020, 7021, 7030. Furthermore, ICMP
requests and ping must be allowed.
3 The Guest account must be deactivated.
3 The Simple file sharing should be deactivated: in Windows Explorer, Tools/
Folder Options/ View/ Use simple file sharing (recommended).
3 The SMC Server must have access to the client’s hidden drive C$ (\\<client’s IP
address\c$\).
3 To ease the installation of SMC Agents over the network, you should use an
administrative user account, common to all computers.
Avira GmbH
Avira Security Management Center
29
Configuration
Installation Procedures
According to the operating system, the SMC Agent has different installation
procedures:
z
Remote installation through SMC Frontend - Installing SMC Agent through
SMC Frontend (Windows 2000/ XP Professional/ Vista/ UNIX) – Page 30
z
(optional) Manual installation with setup file - Installing SMC Agent Manually
(Win XP Home Edition, optional: Windows 2000/ XP Professional) – Page 31
z
(optional) Silent Agent setup on Windows, using a logon script - Silent Agent
Setup on Windows – Page 32
z
(optional) UNIX: manual installation with setup file - Installing SMC Agent
Manually (optional for UNIX Systems) – Page 33
5.4.1 Installing SMC Agent through SMC Frontend
(Windows 2000/ XP Professional/ Vista/ UNIX)
3 Computers/groups must be integrated into the Security Environment and the
status must be: light-blue monitor, red arrow.
In the console tree, click on Security Environment and, if necessary, on the
groups/computers on which you want to install the SMC Agent.
The computers or groups with the status icons will appear in the Details
panel.
Right-click the group and select Installation/Avira SMC Agent/Install.
After filling in the username and password for the administrator account, you
will see the Installation window.
Click OK .
SMC Agent will be installed on the required computers and groups.
If necessary, restart the client computer.
Start the SMC Frontend (see Starting SMC Frontend and Connecting to SMC
Server – Page 15).
Check that all computers and groups have the SMC Agent status True in the
Details panel of the Security Environment.
30
Avira Security Management Center
Avira GmbH
Configuration
5.4.2 Installing SMC Agent Manually
(Win XP Home Edition, optional: Windows 2000/ XP Professional)
To install SMC Agent on Windows XP Home Edition, you need the file
AntiVir_Security_Management_Center_Agent_en.exe. You can find it on the CD-ROM
or on the local directory, where you unpacked the .zip archive (see Performing
Installation – Page 12).
3Computers/groups must be integrated into the Security Environment and the
status must be: light-blue monitor, red arrow.
Copy the file AntiVir_Security_Management_Center_Agent_en.exe to the local
computer on which you want to install SMC Agent.
Double-click on the file.
A window for unzipping and installation is displayed.
Click Setup.
The installation file is unzipped. InstallShield Wizard appears.
Click Next.
You will see the License Agreement.
Select I accept... and click Next.
The next window asks for SMC Server data.
Enter the data and click Next.
The following window contains SMC Agent configuration data.
Enter the data for the local computer and click Next.
The window for Path selection appears.
If necessary, select another path for the installation and click Next.
You will see the Ready to install window.
Click Install.
The SMC Agent will be installed and then the final window appears.
Click Finished.
SMC Agent is locally installed.
Restart the computer.
Start the SMC Frontend on the SMC Server (see Starting SMC Frontend and
Connecting to SMC Server – Page 15).
Avira GmbH
Avira Security Management Center
31
Configuration
Computers/groups are now integrated into the Security Environment and the
status icon is: green monitor, green arrow. SMC Agent status is Yes.
5.4.3 Silent Agent Setup on Windows
If you prefer using a Windows logon script to install SMC Agents, instead of the
interactive remote installation feature in SMC Frontend, you can execute an install
script via file share. Agents will be installed without any further user interaction.
3 Make sure the client computers have access to the shared directory, where SMC
Server keeps the SMC Agent setup file (default: C:\Program Files\Avira\Avira
Security Management Center Server\Agent\installagent.bat) .
Integrate the batch file in a logon script, to call the Agent installation in silent
mode, or use the following command:
•
•
•
•
•
32
setup.exe /serverip=servercomputer /serverport=7000 /
evmgrip=servercomputer /evmgrport=7010 /
upmgrip=servercomputer /upmgrport=7020 /agentip=0.0.0.0
/agentport=7030
Notes:
The parameters must be separated by a single space. If there are errors in the
syntax, the interactive setup will start, instead of the silent one.
/agentip=0.0.0.0 should be the computer’s (host)name, as specified in
SMC Frontend. But since there appears to be a problem in case of logon
scripts, you may use the "any" IP here. The Agent will then get the computer
name from the operating system.
servercomputer is the IP or name of the computer with SMC installed.
If you changed the default communication ports in SMC’s configuration,
please specify them accordingly.
If you installed the Agent on computers outside the Security Environment,
they will be added in the "New computers" group.
Avira Security Management Center
Avira GmbH
Configuration
5.4.4 Installing SMC Agent Manually (optional for UNIX Systems)
If required, you can install SMC Agent manually.
You can find the SMC Agent installation kit for UNIX systems on the Avira CD-ROM or
on our website http://www.avira.com .
3Computers/groups must be integrated into the Security Environment and the
status must be: light-blue monitor, red arrow.
3 You must know the IP address of the server.
Save the kit for UNIX SMC Agent on the computer.
Unpack the archive:
linux:/tmp# tar -xzvf AntiVir_Security_
Management_Center_UNIX_Agent.tgz
The files are extracted.
Change to the installation directory:
linux:/tmp# cd AntiVir_Security_
Management_Center_UNIX_Agent.tgz/
Install the SMC Agent: you must enter the server IP address.
linux:/tmp/AntiVir_Security_
Management_Center_UNIX_Agent.tgz# ./install [--fast] -server=HOST[:PORT] --display-name=<SMC display name>
You must specify the server’s IP address and the computer name to be displayed in SMC Security Environment. The port is optional, and it has to be
specified if you changed the default ports for Agent’s communication with the
SMC Server.
The SMC Agent is installed. The following message appears:
Starting Security Management Center UNIX Agent installation ...
And then the message:
Installation of the SMC UNIX Agent complete.
Change to the installation directory:
cd /usr/lib/Avira/agent
Start the SMC Agent:
./smc-agent.sh start
Check that all computers and groups have the SMC Agent status Yes in the
Details panel of the Security Environment.
Avira GmbH
Avira Security Management Center
33
Configuration
5.4.5 Uninstalling SMC Agent
If you uninstall SMC Agent from a computer, the Avira products installed on that
computer can no longer be managed by Avira SMC.
We recommend that you uninstall SMC Agent from a computer only after it has been
removed from the Security Environment and all Avira products have been uninstalled.
3 Computers/groups must be integrated into the Security Environment and the
status must be: green monitor, green arrow.
Right-click on the group/computer in the Security Environment and select
Installation/Avira SMC Agent/Uninstall.
A question appears:
Answer Yes.
SMC Agent is uninstalled. The status icon of the group/computer(s) is
changed.
34
Avira Security Management Center
Avira GmbH
Configuration
5.5
Configuring Avira SMC
Avira SMC includes the four services: Server, Event Manager, Internet Update
Manager and Alert Manager as well as the SMC Agent client service. All services are
automatically configured when Avira SMC is installed.
The default configuration of the services and the configuration made during Avira SMC
installation on the server are optimized for the current network.
We recommend that you change them only if absolutely necessary and with extreme
caution.
Avira SMC errors!
Changes in settings may cause functional errors in Avira SMC!
Please contact our support before changing any settings.
You can configure the services in the Configuration windows of every service, as
described below.
5.5.1 Changing the Configuration of Services
Changing SMC Agent Configuration
3 Computers/groups must be integrated into the Security Environment and the
status must be: green monitor, green arrow.
Right-click the computer/group and select Configuration/Avira SMC Agent/
Configure.
The Configuration window appears.
Make the changes you need in the configuration tabs.
If you want to immediately apply the new settings to the computer/group:
Click Send now.
The new configuration is applied to the computer/group.
If you need to apply this configuration to the respective computer/group later:
Click Send later.
The new configuration will be saved locally. You will be able to apply it to the
chosen computer/group at the required time.
Changing the Configuration for SMC components:
Server, Event Manager, Internet Update Manager, Alert Manager
3Computers/groups must be integrated into the Security Environment and the
status must be: green monitor, green arrow.
Click on Configuration in the console tree.
Avira GmbH
Avira Security Management Center
35
Configuration
The services will appear in the Details panel.
Double-click the required service.
You will see the Configuration window.
Make the changes in the configuration tabs.
Click OK .
You will be prompted to restart the services, in order to apply the changes.
5.5.2 Configuration Options of Avira SMC Components
SMC Agent Configuration
The SMC Agent configuration is specific to the structure nodes. Therefore, you can
change the settings for every node. The settings are inherited downwards on every
level, the changes being marked in a black frame. All unchanged settings will be
taken from the superior node.
It is recommended to configure the SMC Agents starting from the root node
Security Environment (right-click on the node and choose Configuration/Avira
SMC Agent/Configure, as described further in this Chapter). All the computers in
the group will inherit the settings. Then you can make changes for certain
computers or sub-groups: the computer will overwrite the settings inherited from
the root.
General Settings
Registration
attempts
Events commit
interval(s)
Registration delay
36
The number of attempts for the SMC Agent to connect to the SMC Server.
The time interval for the services to send the events to the Event Manager. The
events are not sent immediately, but are collected in order to ease network traffic.
The time interval for the Agent to start, after the client computers start, to avoid
traffic overload.
Avira Security Management Center
Avira GmbH
Configuration
Communication
related settings
Enterprise Event
manager URL
HTTP address and communication port on which the Event Manager service is
installed.
Enterprise Server
URL
HTTP address and communication port on which the server is installed.
Update URL
Use client
authentication
HTTP address and communication port on which the Update service is installed.
SSL-authentication for computer login.
General Configuration Settings
Communication
related settings
SMTP Server
Name of the mail server.
SMTP Login,
Password
Username and password for connecting to the mail server.
Use Proxy
Avira GmbH
Option to set a proxy for SMC Server Internet communication.
Avira Security Management Center
37
Configuration
Proxy
authentication
Option for authentication on proxy if necessary.
Proxy Username,
password
Username and password for connecting to proxy.
Proxy IP address,
port
Address and communication port for the proxy computer.
SMC Server Configuration
Communication
related settings
Retrieve ...
Retrieve computer hostname from agent: the SMC gets the IP address of the client
computer from the Agent every time.
Event Manager Configuration
General Settings
Drop info events
Logging of only the Critical and Warning events, to avoid logfile overload.
Internet Update Manager Configuration
38
Avira Security Management Center
Avira GmbH
Configuration
Internal
HTTP Server's
IP address, port
Address and port of the Internet server to connect the Internet Update Manager in
order to perform updates of SMC components or software packages.
Max. connections
The maximum number of simultaneous connections set up by the Internet Update
Manager on the server.
Update Server list
List of update servers, from which the IUM is retrieving the update packages
(default: Avira download servers).
Root directory ...
Activate test
mode
Automatic mode
Root directory for updated files: the directory, which mirrors the Avira update
server, on the SMC Server computer.
New files are downloaded to a test directory (hosted by a second HTTP server) for
approval. When validated, they can be committed to the default HTTP server and
deployed over the Security Environment.
All updates are performed automatically by the Internet Update Manager.
Alert Manager Configuration
The Alert Manager is a component of the Event Manager service.
The events sent by the Avira products to the Event Manager via the network (such
as a virus alert) can be transmitted by the Alert Manager directly to an email
address or via Netsend as a message window to a computer. Therefore, in addition
to the events being displayed in SMC Frontend, the administrator can be directly
informed, for example, of critical events. The configuration of Alert Manager is
carried out in the Configuration window, which has two tabs as described below.
General Settings
In this tab you enter the addresses for Email Notification and Network
Notification (via Netsend). The specific types of message and event will then be set
in the Rules Settings tab.
Email Address
Computer Name
Avira GmbH
Email address of the recipient, for example the administrator or the collective
address for system administration, so that more team members receive the
message.
The name of the computer on which the message should appear, for example the
network administrator's computer.
Avira Security Management Center
39
Configuration
Rules Settings
In this tab you can configure (enable) up to ten rules for messages. The following
options are available:
Multiple of
The number of events necessary for a message to be sent.
Event Level
The message will be sent if any level of event is met (All, including Information) or
for a certain level (Critical, Warning).
Event Type
The event type is set for all software and cannot be configured.
Notification
5.6
The message is sent to an email address (Email) or to a computer via Netsend
(Network) or both (All).
Updating Avira SMC
It is very important to keep your software up to date and to make sure the
components’ versions are compatible. You can easily update Avira SMC’s
components: SMC Frontend, SMC Server with all its services and the SMC Agents.
Avira SMC has an Internet connection to the Avira GmbH public servers and is able
to download and install available SMC updates.
In order to perform Avira SMC updates, you need an Internet connection and you have
to open the necessary ports in your network firewall.
During installation of updates, the connection to SMC Server will be interrupted and the
SMC Frontend must be closed.
Apart from executing direct updates, the Security Management Center supports
automatic updates:
•
•
40
via the Internet Update Manager or
through scheduled update tasks (see Creating a Server Update Task –
Page 42), if the automatic mode is inactive.
Avira Security Management Center
Avira GmbH
Configuration
5.6.1 Updating SMC Server and Frontend
In order to perform update commands and tasks, without using the Internet Update
Manager, you have to disable the Automatic mode from the Server Configuration
window.
Performing Direct Updates
Right-click Avira Security Management Center Frontend and select Update.
Select Server/Execute for immediate server update
– OR –
Select Update frontend.
The following message appears:
– for Server update:
– for Frontend update:
Confirm with Yes and close SMC Frontend if necessary.
The connection to the SMC Server will be interrupted.
The Avira SMC connects to the Internet, downloads the update files from the
Avira GmbH server and installs them.
Restart SMC Frontend and connect to SMC Server (see Starting SMC Frontend
and Connecting to SMC Server – Page 15).
Updating via the Internet Update Manager
Expand the Internet Update Manager node, right-click Avira Security
Management Center Frontend or Avira Security Management Center Server
and select Update now.
The Internet Update Manager Status window shows the update progress.
Avira GmbH
Avira Security Management Center
41
Configuration
Creating a Server Update Task
You can use update tasks for regular SMC Server updates.
Scheduled update tasks must be approved by the administrator.
Right-click Avira Security Management Center Frontend and select Update/
Server/Schedule.
The window Create a task appears.
Type a name for the task, select the task frequency and click Next.
Select the start date and time for the task and click Finish.
The task is scheduled.
You can modify the task settings at any time from the context menu (see below).
5.6.2 Displaying and Changing Update Tasks for SMC Server
Right-click Avira Security Management Center Frontend and select Update/
Show tasks.
The details for the update server task are displayed in the Details panel (see
Displaying Tasks for Software Packs or for SMC Server – Page 68).
In order to modify a task:
Double-click the task.
The window Create a task appears.
Make the changes and save the task again.
5.6.3 Updating SMC Agents
To update SMC Agents over the entire network or on a certain group:
Right-click Security Environment or the group node and select Commands/
Avira SMC Agent/Update agent.
To update SMC Agents on a certain computer:
Right-click the Avira SMC Agent under the computer node in the Security
Environment and select Commands/Update agent.
The SMC Agent update can also be scheduled, by pressing the button Schedule this
command in the Commands window.
Updating SMC Agents via the Internet Update Manager:
Expand the IUM node, right-click Avira Security Management Center Agent
and select Update now.
The Internet Update Manager Status window shows the update progress.
42
Avira Security Management Center
Avira GmbH
Configuration
5.7
User Management
With the User Management you can create a hierarchy with certain access rights.
This helps the administrators to effectively organize the monitoring of the
Security Environment in the case of divided IT tasks, for example, or for vacation
replacements. Certain SMC users will be able to connect to the server to view
events or reports, but they will not be allowed to change relevant security settings.
Adding New Users
Right-click on the User Management node and select Create new user.
The New user window appears:
Type the user name, complete name and optionally a description and email
address.
If you do not want the account to be active yet, check the option Account is
deactivated.
Configure the user rights in the Permissions tab.
Click OK to save the settings.
Avira GmbH
Avira Security Management Center
43
Configuration
The new user appears in the Details panel.
Configure User Account
The following settings are available for every user account:
•
•
•
password: type the login password of the user to Avira SMC
properties: enter user name, complete name, description and email address
permissions: establish the access rights to Avira SMC
All users can see the Security Environment.
You can set the following rights for every user:
• display Network neighborhood
• display reports
• modify/delete reports
• manage users
• display events
• delete events
• display software packages
• change login password
• configure SMC
• configure IUM
Set password
Right-click a user icon in User Management and select Set password.
The Password window appears.
Type the password, confirm it and click OK .
The access to the user account is now password-protected.
Configure
properties and
rights
44
Right-click a user icon in User Management and select Properties.
Avira Security Management Center
Avira GmbH
Configuration
The window Properties of [Name] appears.
Make the changes to the user properties.
Click on the Permissions tab.
The tab opens.
Delete user
Avira GmbH
Select or deactivate the rights of the user and confirm with OK .
Right-click a user icon in User Management and select Delete.
Answer Yes to the inquiry.
The user is deleted.
Avira Security Management Center
45
Configuration
Configuring User Rights in Virtual Groups
You can set access and rights to virtual groups or to computers in the Security
Environment for all users. These rights are assigned in cascading form and
inherited downwards in the hierarchy of the virtual groups.
Consequently, you can set the authorized users for every node and establish their
access rights or just let them inherit the rights from the nodes above.
The following rights are available for every group or user:
•
•
•
•
•
•
•
•
•
•
browse
create/delete groups
add/delete computers
deploy/uninstall/configure agents
install/uninstall/configure products
send commands
manage server tasks
generate reports
manage group permissions
receive product status emails
The rights for the Administrator user cannot be modified.
Right-click the node of a computer or virtual group in the Security
Environment and select User permissions.
The User permissions window appears.
Select a user and configure the rights in the Permissions area.
46
Avira Security Management Center
Avira GmbH
Configuration
Manage users
Use Parent
Settings
Avira GmbH
You can configure the users and their rights for every node. When settings are
inherited from superior nodes, parts of the window are gray (inactive).
If necessary, deactivate the option Use parent settings.
Click on Manage users.
The Users window appears.
In the Available users area, select the users that should have access to the node
and confirm with Add
– OR –
Select the users that should not have access to the node and confirm with Remove.
The users are added/removed in the Selected users area.
In order to inherit the settings from its superior node: select the option Use
parent settings.
The settings for users and rights are inherited.
Avira Security Management Center
47
Configuration
48
Avira Security Management Center
Avira GmbH
Operation
6
Operation
6.1
Overview
This chapter describes the integral functions of Avira SMC. They may vary slightly
according to the operating system and MMC version on your computers.
You can manage Avira products using the following functions of Avira SMC:
z
Store, install, uninstall and configure software packs:
Managing the Software Packs – Page 50
z
Perform product-specific actions (e.g. scan or update) or schedule regular tasks.
These can be SMC-based or Agent-based tasks for computer groups:
Performing Commands and Planning Tasks – Page 64.
z
Display various information about the computers in the Security Environment
after installing the software packs:
Displaying Information about a Computer or Group – Page 55
z
Display and filter Avira SMC messages after installing and configuring the
software packs:
Viewing Events – Page 62
z
Access reports and periodically inquire the status of installed software and
overview past events and messages that occurred on computers in the Security
Environment:
Creating and Listing Reports – Page 69
z
Share and run files and special Avira tools via the network within the Security
Environment:
Sharing Files/ Licenses/ Programs in the Security Environment – Page 72
z
Register all Avira SMC actions in logfiles (optional). In this way it is easier to
identify software installation errors in the network, for example:
Handling Errors – Page 75
Starting SMC Frontend
see procedure in section Starting SMC Frontend and Connecting to SMC Server
– Page 15).
Avira GmbH
Avira Security Management Center
49
Operation
6.2
Managing the Software Packs
Using Avira SMC Frontend, you can easily and conveniently install, configure and
uninstall Avira products in virtual groups of the Security Environment. Avira SMC
treats Avira products as so-called software packs in its own database.
Software Repository Node
The software packs are displayed in the SMC Frontend under the Software
Repository node.
The Details panel shows general information on the packs: Avira product name,
name of the setup file, version, as well as license file.
6.2.1 Adding and Deleting a Software Pack
For example, an Avira product is stored in the Software Repository directory: Avira
Windows Workstation. A software pack consists of all program files of the Avira
product and an info file, all archived in a self-extracting file and saved to Avira SMC
database.
Software packs cannot be stored twice in Avira SMC - the SMC Server does not allow
this.
You cannot install a software pack in the network until you purchase a license from Avira
GmbH. You can find details about licensing in the Avira product documentation.
50
Avira Security Management Center
Avira GmbH
Operation
Adding a Software Pack
3 The Avira product must be saved on a computer in the local network.
Right-click Software Repository and select New/Software.
The window for Selecting the Software Package opens.
Select the path to the software pack and click Open.
The software pack will be saved. The Details panel will display the data
contained in the package Info File.
Click on the browse […] button, enter the path to the software license file and
click Open.
The Details panel will show the path to the license file.
Click Accept.
The software is licensed and it will appear under Software Repository. The
Details panel displays information on the software.
Please note that this license file is used only for software (re)installation. In order to
extend the license for a certain product, you have to load a license file using the Copy files
function, as described in Sharing License Files – Page 74.
Avira GmbH
Avira Security Management Center
51
Operation
Deleting a Software Pack
We recommend that you do not delete the existing software packs because you may
accidentally delete related files from the hard disk of the server.
Expand the Software Repository node.
The stored software packs are displayed.
Right-click the software pack and select Delete.
The software will be deleted from the Avira SMC database.
6.2.2 Installing and Uninstalling a Software Pack
Please read the file README.TXT in the main directory of Avira SMC.
The installation and uninstallation of software packs on computers in Security
Environment using Avira SMC runs protected, meaning it cannot be interrupted or
cancelled.
The installation and uninstallation of software packs will be carried out if all
computers in the Security Environment are online, administrator access is granted
and SMC Agents are on.
In the case of offline computers, the actions and commands (for example installing
a software pack) are saved and automatically triggered by the program
immediately after the computers/groups go online. The computers will have the
status for pending operations: dark monitor, orange arrow, red marker on the left
side.
The installation of software packs also implies the configuration of Avira products. The
configuration of installed Avira products requires good knowledge of configuration
parameters.
Please read and follow the configuration instructions from the Avira product User
Manuals before performing remote installation/configuration with Avira SMC.
Installing a Software Pack
Using Avira SMC you can simultaneously install Avira product packs on more than
one computer with a similar configuration. Therefore, the Security Environment
virtual groups must be structured according to similar configuration requirements
(see Setting the Security Environment – Page 25).
If the SMC Agent is not available on a computer on which you want to install a software
pack, the SMC Agent will be automatically installed first.
During installation, a product-specific dialog window Install- Setup Configuration
appears, where parameters can be set (see Product-specific Configuration Panels –
Page 84).
52
Avira Security Management Center
Avira GmbH
Operation
3 Computers/groups must be integrated into the Security Environment and the
status must be: green monitor, green arrow.
Right-click the computer/group on which you want to install the software.
Select Installation/[software name]/Install.
A window is displayed: Installation- Setup Configuration.
Set the configuration of the Avira product and click OK .
The SMC Agent installs the software pack. Program-specific dialogs and
messages may appear. The options are similar to those in the installation
dialogs of every Avira product, but they are displayed in another form in SMC.
In the console tree, click on the computer or group on which the installation
has been made.
The Details panel will display further information on the installed Avira
products on the computer.
Uninstalling a Software Pack
3 Computers/groups must be integrated into the Security Environment and the
status must be: green monitor, green arrow.
Right-click on the computer or group which contains the software you want to
remove.
In the context menu select Installation/[software name]/Uninstall.
Click Yes.
The software pack is uninstalled. The entries of this pack will be deleted from
the computer details in the Details panel.
6.2.3 Changing the Configuration of an Avira Product
The configuration of an installed Avira product is context-specific, meaning that
you can adjust the settings for every node. The settings are inherited downwards
on every level, the changes being marked with a black frame in the configuration
window. All unchanged settings will be inherited from the superior node.
It is recommended to configure the Avira product starting from the root node
Security Environment. All the computers in the group will inherit the settings.
Then you can make changes for certain computers or sub-groups: the computer
will overwrite the settings inherited from the root.
During configuration of each Avira product, a product-specific Configuration
dialog window is displayed, where parameters can be set (see Product-specific
Configuration Panels – Page 84).
Avira GmbH
Avira Security Management Center
53
Operation
When installing and configuring a software pack on a computer in the Security
Environment, a product-specific configuration panel appears. The settings available in
this window are almost similar to the configuration options available for that Avira
product. Avira SMC displays them in another form.
For further details on configuration parameters, please refer to the Avira product
documentation.
In the case of offline computers, actions and commands (such as configuring an
installed Avira product) are saved in SMC as pending operations and automatically
triggered by the program immediately after the computers/groups go online. The
computers will have the status for pending operations: dark monitor, orange
arrow, red marker on the left side.
Configuring an Avira Product
3 Computers/groups must be integrated into the Security Environment and the
status must be: green monitor, green arrow.
Right-click the computer/group.
Select Configuration/[software name]/Configure.
You will see the product-specific Configuration window.
Adjust the product settings.
If you want to immediately apply the new settings to the computer/group:
click Send now.
The new configuration is applied to the computer/group.
If you want to apply these settings to the computer/group later:
click Send later.
Avira SMC will save the new configuration locally for every node. You can
apply it to the computer/group later.
54
Avira Security Management Center
Avira GmbH
Operation
6.3
Displaying Information about a Computer or Group
6.3.1 Displaying Information about a Node/Computer
You can use the right-click menu to view some basic information on a node or
computer.
The information on a virtual group:
•
•
•
Computer amount in group: number of computers in the group.
Available: the number of computers currently connected to the Avira SMC.
Product and count: name and number of the products installed in the group.
The information on a computer:
•
•
Virtual Group
Properties
Computer
Properties
Avira GmbH
Display name: the name of the computer in the Security Environment.
Hostname/IP: host name or network IP address.
Right-click on a virtual group in the Security Management and select Properties.
The Properties window appears:
Right-click on a computer in the Security Management and select Properties.
The Properties window appears:
Avira Security Management Center
55
Operation
6.3.2 Displaying Information in the Details panel
Avira SMC stores various information on every computer or group in the Security
Environment, which you can display and also sort in the Details panel.
When selecting a computer, the right-click menu as well as the toolbar offer various
view modes:
z
for a group: Status, Error Messages, Tasks and Pending operations.
z
for a computer: Products status, Product version, Error Messages, Events,
Tasks and Pending operations.
Setting and Sorting the Displayed Information
3 Computers/groups must be integrated into the Security Environment and the
status must be: green monitor, green arrow.
Right-click the computer/group for which you require information (or use the
toolbar buttons).
Select the required view: Status, Products, Events, Tasks or Pending
operations.
The required information is displayed in the Details panel.
Select View> Large/Small Icons from the right-click menu, to display small or
large icons for the computers, products, tasks or events in the Details panel.
Select View> List or View> Details from the right-click menu, to display the
items or item details in table form.
Using the option Add/Remove Columns from the View menu, you can
customize the view in the Details panel. You can also sort the table by clicking
the column headers.
56
Avira Security Management Center
Avira GmbH
Operation
Status View
This displays the following information on every group:
Name
Computer name.
Operating
system
Information on the operating system.
Computer
status
Information on the computer: "Online", "Online, no agent installed" or "N/A".
Hostname/ IP
Hostname or network IP address.
Configuration
The Agents’ configuration settings are inherited or specific.
If you select a computer in the Security Environment, the Product Status view
displays details about: product name, product state, status details.
Avira GmbH
Avira Security Management Center
57
Operation
Product Version View
This will display information on all modules of Avira programs installed on the
computer:
Module name
Module version
Module details
List of installed Avira products on the computer.
File version information.
File description.
Events View
Every Avira product on a computer will issue product-specific events, which the
SMC Agent retrieves and saves:
Computer
name
Level
58
The name of the computer on which the event has been reported by the Avira
product.
Avira products assign a level to every event (degree of importance), such as Critical,
Avira Security Management Center
Avira GmbH
Operation
Warning or Info.
Product
Actor
Message
The name of the Avira product reporting the event.
The name of the program component reporting the event.
Product-specific text for the event.
Time
Date/time of the event.
Type
Avira products assign a type to every event, such as General, Error, File virus, Email
virus.
Tasks View
There are product-specific commands for every Avira product on a computer (e.g.
scanning or update). Using Avira SMC, these commands can be scheduled to run as
scheduled, regular tasks.
You can see the tasks for every computer or group. The group tasks are also listed
in the schedule of every computer.
Scheduled tasks are displayed as pending operations until their start time (see Pending
Operations View – Page 60).
Node
Computer or group name.
Name
Custom name of the task.
Task type
Period
Start
Avira GmbH
Server task: the task is SMC-based.
Agent task: the task is Agent-based
The selected frequency.
The first task performance.
Avira Security Management Center
59
Operation
Actor
Status
Command
The Avira product performing the task.
Information on the status of the task.
Product-specific command for the task. The parameters are not shown here.
Pending Operations View
There are product-specific commands for every Avira product (for example,
scanning or updating), which can be scheduled as regular tasks using Avira SMC. If
the task cannot be performed because the computers are offline, SMC saves the
command or task as a pending operation. These operations are executed as soon as
the computers are accessible.
You can see the pending operations for every group or computer.
Computer
name
The name of the computer on which the task is to be executed.
Operation
The type of task (for example, installation or command).
Product
Remarks
60
The product related to the task.
Information on the pending task, such as the command type and creation date.
Avira Security Management Center
Avira GmbH
Operation
Errors View
If errors occur during installation, configuration or uninstallation of software
packs, or during Avira product actions on computers in the Security Environment,
or when executing tasks and commands, Avira SMC can display the logfiles of Avira
products and those of the SMC services in the SMC Frontend.
Errors always occur at computer level, therefore the nodes cannot produce errors
because they do not represent physical networks.
You can view the errors for every group or computer.
Computer
name
Product name
Error status
Error message
Created
Avira GmbH
The name of the computer on which the error occurred.
The name of the product that signaled the error.
The status of the error.
The contents of the error message.
The date and time of the event.
Avira Security Management Center
61
Operation
6.4
Viewing Events
Every Avira product triggers specific events, which are collected by Avira SMC and
displayed by SMC Frontend. First, the SMC Agent collects the events issued by the
Avira products and saves them to the local database.
Then you can see these events in the SMC Frontend:
z
You can view and sort the events that have occurred on every computer in the
Security Environment node (see Displaying Information about a Computer or
Group – Page 55).
z
You can view and sort the events that have occurred on all computers in the
Security Environment in the Events node. You can use filter criteria only on the
Events node.
Events Node
The Details panel of the Events node displays all events that have occurred in the
Security Environment with detailed information.
The Events view structure for the entire Security Environment is similar to the
Computer node view structure (see also Displaying Information about a
Computer or Group – Page 55).
Events Filtering
You can filter the events and display only the targeted results. The following
options are available:
62
z
All: displays all events in the database;
z
Level: only displays events with a certain level (Critical, Warning or
Information);
z
Type: only lists events of a selected type;
z
Product: shows the events produced by a certain Avira product. The products
available for filtering are listed in the Filter/Product menu;
z
String: only displays the events containing a given string.
Avira Security Management Center
Avira GmbH
Operation
Viewing and Filtering Events
The Events node shows the events received by SMC Agent from the Avira products
in the Security Environment, for example events produced by virus scanning.
Click on Events.
The Details panel will show all events in the Security Environment,
unfiltered.
If you click on a column header, the data is sorted by that criterion, e.g. Level or
Time.
Right-click Events.
Select Filter and then make the required filter settings.
You will see the filtered data in the Details panel
– OR –
Select Filter/String to type the string for data filtering in the String filter
window:
After writing the text, click OK .
The required data is displayed in the Details panel.
Deleting Events
As the list grows over time, you may want to delete it to save space on your system.
Right-click Events and select Delete all.
Avira GmbH
Avira Security Management Center
63
Operation
6.5
Performing Commands and Planning Tasks
For every Avira product there are various ways of performing actions such as scan
and update, using specific parameters or schedules. You can configure, activate and
plan these actions using Avira SMC for computers and groups in the Security
Environment. An action initiated by Avira SMC (e.g. Scan) is referred to as a
Command, while the planned, single or periodical action is called a Task (e.g.
weekly update).
Tasks can be SMC-based or Agent-based:
z
SMC-based tasks are saved in SMC. This ensures that the tasks will also be
performed on other computers that will be integrated into the group later.
z
Agent-based tasks are saved on the computer on which they will be
performed by the installed Agent. This ensures that regular tasks, such as
scanning, will be performed on an offline computer, for example a laptop.
The Avira SMC is able to run all commands accepted by the installed Avira
products.
For more details on Avira commands and parameters, please refer to the Avira product
documentation.
You should read and observe all instructions before performing Avira SMC
commands and planning tasks.
You can see the results of a command (e.g. Scan) or task (e.g. Scan hard disk) in the
Details panel of the Events node or of the group/computer.
In the case of offline computers, actions and commands are saved by SMC as
pending operations and automatically triggered by the program immediately after
the computers/groups go online. The computers will have the status for pending
operations: dark monitor, orange arrow, red marker on the left side.
Performing Commands
3 Computers/groups must be integrated into the Security Environment and the
status must be: green monitor, green arrow.
Right-click the computer/group and select Commands.
The sub-menu displays all installed Avira products and all their commands.
Select a command (for example Scan).
64
Avira Security Management Center
Avira GmbH
Operation
If the command accepts parameters, the Commands dialog window asks for
application path and parameters.
Type the required parameters and click OK .
The command is executed and the results are displayed in the Details panel of
the Events node.
Planning Agent-based Tasks
This procedure is especially recommended for computers that are not constantly online,
such as laptops.
All available commands can be scheduled for a certain time. Such a scheduled
command in Avira SMC is called a task.
3 Computers/groups must be integrated into the Security Environment and the
status must be: green monitor, green arrow.
Right-click the computer/group and select Commands.
The submenu displays all Avira products and their commands.
Select a command (for example Scan).
Avira GmbH
Avira Security Management Center
65
Operation
If the command accepts parameters, the Commands dialog window asks for
application path and parameters.
Type the required parameters and click Schedule this command.
The dialog window for Creating a task appears:
Type a name for the task and select the frequency.
Make sure that the option Server based is not activated.
Click Next.
The window with time and date settings appears:
66
Avira Security Management Center
Avira GmbH
Operation
Select the start time and date and click Finish.
The task is set and displayed in the Details panel of the computer/group (see
Tasks View – Page 59).
Planning SMC-based Tasks
Proceed as described above for Planning Agent-based Tasks – Page 65, until the
window for Creating a task appears:
Type a name for the task and select the frequency.
Activate the option Server based.
Then continue the procedure as described for Planning Agent-based Tasks –
Page 65.
Avira GmbH
Avira Security Management Center
67
Operation
Displaying Tasks or Pending Operations
The planned tasks are listed in the Details panel of the computer/group on which
they are scheduled to run.
Right-click the computer/group and select Tasks or Pending operations.
You will see the tasks listed in the Details panel with more information (see
Tasks View – Page 59).
Displaying Tasks for Software Packs or for SMC Server
Scheduled tasks for updating SMC Server components or software packs appear in
the Events node of Avira Security Management Center Frontend.
Right-click Avira Security Management Center Frontend and select Update/
Show tasks.
The tasks appear in the Details panel:
Name
Task type
Period
Start
Status
68
Name of the tasks.
Server task: the tasks for software packs and for SMC Server are always SMCbased.
The selected task frequency.
The first start time.
Information on task performance.
Avira Security Management Center
Avira GmbH
Operation
6.6
Creating and Listing Reports
You can create reports on single computers/groups in the Security Environment
using SMC Agent.
First you should create a report template for a certain report type. Avira SMC
supports all report types accepted by the Avira products installed in the Security
Environment:
•
•
•
•
•
•
•
•
•
•
•
•
Managed Products
Installed VDF version
Installed engine version
Installed VDF and engine version
Found malware
Found file malware
Found email malware
Top 10 malware
Top 10 infected files
Top 10 infected computers
Top 10 infected users
License information
You can find more details of report types in the Avira product documentation.
Please read and observe all given instructions concerning report types before you
create and schedule Avira SMC reports.
The SMC Agent will arrange the report results according to the template and send
them to the SMC Server.
Reports Node
Both reports and report templates are displayed in the Details panel when
selecting Reports.
Avira GmbH
Avira Security Management Center
69
Operation
Template
name
Template
type
Group
Timeframe
Start time
The report name defined by the user.
Schedule
The selected reporting time interval.
The selected report type.
The virtual computer/group on which the report is run.
The frequency of the report (where applicable).
The time of the first reported results.
Creating Report Templates
3 Computers/groups must be integrated into the Security Environment and the
status must be: green monitor, green arrow.
Right-click on the computer/group and select Create report.
The following window appears:
Select the report type and time interval for the report and click Next.
70
Avira Security Management Center
Avira GmbH
Operation
The Configure Report window appears:
Enter a name for the report template.
If you want to run the report regularly:
Select the option Schedule report, enter a start date and time and the report
frequency.
Click Finish.
The report template is created. The report is either run immediately or
scheduled periodically and is displayed in the Reports node.
Editing Report Templates
You cannot change the selected report type in the template.
If you want the report to be of a different type, you must create a new template.
Right-click on a report template in Reports and select Properties.
The window Select Report Type appears.
Here you can edit the time frame and click Next.
The Configure Report window appears.
You can edit the Name and Scheduler settings and click Finish.
The changes are saved. The modified report template is displayed in the
Reports Details panel.
Listing Reports
You can view SMC Agent reports as tables or as HTML pages.
Expand the Reports node in the console tree.
Avira GmbH
Avira Security Management Center
71
Operation
The Details panel displays the existing report templates.
Right-click on a report template in the Details panel.
You will see the reports created, with beginning and end date/time.
Right-click on the required report in the console tree and select List or HTML .
The report is listed as the outcome of the Reports node.
Printing Reports
Avira SMC structures the reports as HTML pages using an HTML editor provided with
your operating system (e.g. Microsoft Word or Microsoft Internet Explorer).
Select a report in the HTML view, as in the above section.
Right-click the report and select Print.
The report is opened in the HTML editor.
Use the print command of the editor.
6.7
Sharing Files/ Licenses/ Programs in the Security Environment
You can only share certain programs, signed by Avira, between computers in the Security
Environment.
Avira SMC offers two ways of sharing and running files or executable programs
(certified by Avira) remotely on all computers in the Security Environment.
z
You can share any file or program (possibly configured with start parameters
and commands) between computers or groups, such as special virus removers,
license files etc. and run them immediately if necessary.
z
You can remotely configure SMC Agents to run programs on other computers.
Or you can schedule these tasks (see also Planning Agent-based Tasks –
Page 65).
When shared, the files are copied to the installation directory of Avira products
that you selected ( \\<smc server>\C:\Program Files\Avira Security Management
Center Agent\). This directory will be the root for this kind of actions in Avira SMC.
You can also create subdirectories (e.g. ...\New-VDF-files) so that you can find your
files more quickly.
In order for the program to be opened remotely, it must be placed in the SMC
Agent installation directory (\\<smc server>\C:\Program Files\Avira Security
Management Center Agent\).
72
Avira Security Management Center
Avira GmbH
Operation
If you want to use this function more often, a standard directory is recommended for the
copied files. For example: …\Shared Files.
Data loss in the event of improper program configuration!
When sharing executable files:
please read and observe all instructions for programs, commands and parameters
given in the documentation before sharing and running Avira SMC programs.
If the result of a program is not zero, an error event is sent to SMC Agent. This is
displayed in Events Details.
In the case of offline computers, actions and commands are saved and
automatically triggered by the program immediately after the computers/groups
go online. The computers will have the status of pending operations: dark monitor,
orange arrow, red marker on the left side.
Sharing and Opening Files/Programs
3 Computers/groups must be integrated into the Security Environment and the
status must be: green monitor, green arrow.
Right-click on the computer/group and select Installation/[Avira product]/
Copy files.
The Copy files window appears:
Click Add and select the file(s)/program(s) to be copied from the standard Open
window.
You can enter a Subdirectory for the copied files.
If you want to open the copied files immediately:
Select the Execute … option and type the required parameters and command.
Avira GmbH
Avira Security Management Center
73
Operation
Sharing License Files
In order to extend the license for an Avira product, you have to load a new license
file using the Copy files function.
Update the license file in the Software Repository, to be used for future
installations.
Right-click on the computer/group on which the product is installed in the
Security Environment, select Installation/[Avira product]/Copy files and
proceed as described above.
Running Programs
3 Computers/groups must be integrated into the Security Environment and the
status must be: green monitor, green arrow.
3 The program files are saved in the installation (sub-)directory on the computer/
group.
Right-click the computer/group and select Command/Avira SMC Agent/
Execute application.
The Commands window appears.
Enter the path and the file name (e.g. Shared Files/Notepad.exe).
If you want to run the program immediately and only once:
Click OK .
The program is executed
– OR –
If you want to run the program at regular intervals as a scheduled task:
Click the button Schedule this command (see Planning Agent-based Tasks –
Page 65).
The task is displayed in the computer/group Details panel.
74
Avira Security Management Center
Avira GmbH
Operation
6.8
Handling Errors
If errors occur during installation, configuration or uninstallation of software
packs, or during actions of Avira products on computers or groups, or when
executing commands and tasks, Avira SMC can display the logfiles of Avira
products and of SMC services in the SMC Frontend.
Errors always occur at computer level, so the nodes cannot produce errors because
they do not form physical networks.
For troubleshooting, we recommend that you first check the logfiles of the Avira products
and, if necessary, keep them at hand for support questions.
6.8.1 Viewing Logfiles
3 Computers/groups must be integrated into the Security Environment and the
status must be: green monitor, green arrow.
Right-click on the computer and select View logfile.
The window Logfile of [computer name] appears.
Click on the arrow of the drop-down list in the Choose logfile section.
The drop-down list shows all available logfiles:
Select a logfile.
The logfile is listed in the window.
Click on the arrow of the filter drop-down list.
Avira GmbH
Avira Security Management Center
75
Operation
The drop-down list shows all available filters:
Select a filter.
The logfile is filtered and listed in the window.
6.8.2 Resetting the Error Status
When an error occurs in Avira SMC, the affected Security Environment areas are
marked with a red Stop icon in the console tree.
3 An error icon appears next to the computer/group node.
Select the Error messages view for the computer/group in the Security
Environment.
Check Logfile
Delete Error
First check the logfile of the affected node, as described above, for identifying
and handling the error.
In order to avoid deleting relevant error messages: right-click the error and
select Delete.
Confirm with Yes.
The error message is deleted.
Reset Error
Status
76
If you have solved the problem:
Reset the error status of the node: Right-click the node and select Reset error
state.
Avira Security Management Center
Avira GmbH
Updating Avira Products
7
Updating Avira Products
Avira SMC offers more ways to update Avira products:
z
You can update the integrated software packs and installed Avira products
automatically, using the Internet Update Manager, which is integrated with
Avira SMC and part of SMC’s setup.
-ORIf you disable the Automatic mode from the Server Configuration node, on the
Update settings tab:
z
You can update the software packs in the Software Repository via an Internet
connection (command or scheduled task).
z
You can update the products installed on computers in the Security
Environment (using remote update commands and also regularly with a
scheduled task).
According to the configuration options for the updating routine of each Avira product,
you can update Avira products installed on computers in the Security Environment via
the Internet or via your Intranet. These updates are performed by each computer
individually. The products in the Software Repository are not updated in this way.
Please read and follow the updating procedures described in Avira product manuals
before performing updates via Avira SMC.
When updating the Avira products stored in the Software Repository, the products
installed on the Security Environment computers are not updated.
Avira GmbH
Avira Security Management Center
77
Updating Avira Products
7.1
Using the Internet Update Manager
The Internet Update Manager service is part of SMC Server’s installation and its
role is to keep all Avira products over the entire enterprise up to date. The IUM
comes preconfigured along with SMC Server and it does not need any user
interaction. It also brings the advantage of deploying over the network the updated
files, so that the client computers do not need to access the Internet.
The Internet Update Manager mirrors the following files:
•
•
•
•
•
SMC Agent update files
SMC Server update files
SMC Frontend update files
SMC Software Repository files (product packs)
Product binaries of all Avira products
Basic IUM’s options are (right-click menu):
•
•
•
•
•
Status
: Retrieving status information about all the mirrored products
Update now: carrying out update commands
Schedule Updates: Scheduling periodical update tasks
Cancel update: Stops an update in progress.
Freeze current files: Update tasks can not be performed on these files.
The Internet Update Manager logs update events and sends email update
notifications about errors, warnings or successful updates.
78
Avira Security Management Center
Avira GmbH
Updating Avira Products
To update all Avira products mirrored by the IUM:
Right-click on Internet Update Manager or on a certain product and select
Update now.
The Status window displays the update progress:
-ORIf you want to schedule an update task for the entire IUM contents:
Right-click on Internet Update Manager or on a certain product and select
Schedule Updates.
The window Create a task appears, where you can set the interval and the
time of the update process:
Avira GmbH
Avira Security Management Center
79
Updating Avira Products
You can also use the IUM in test mode (which can be enabled in the Configuration
dialog). In test mode, new files are downloaded to a special test directory (Test
files), hosted by a second HTTP server, waiting for approval. When the new files are
validated (Approved files), they can be committed to the default HTTP server for
enterprise deployment.
The command line parameters for SMC Internet Update Manager are:
IUM.exe --uninstall
Unregisters the IUM service from SMC
IUM.exe -u
IUM.exe -install
Registers the IUM service to SMC
IUM.exe -i
IUM.exe --start
IUM.exe --stop
IUM.exe --restart
IUM.exe --run
IUM.exe --checkstatus
7.2
Starts the (registered) service
Stops the (registered) service
Restarts the (registered) service
Runs the service from the console
Returns information about current IUM status
as error levels
Updating Packs in the Software Repository
In order to perform update commands and tasks, without using the Internet Update
Manager, you have to disable the Automatic mode from the Server Configuration
window.
Updating Software Packs Manually
Right-click on Software Repository and select Update Software Repository/
Execute
– OR –
80
Avira Security Management Center
Avira GmbH
Updating Avira Products
Right-click on a single software pack in Software Repository and select Update/
Execute.
Avira SMC connects via the Internet to the Avira GmbH server, downloads
the available software updates and then saves them in the Software
Repository node.
Scheduling Regular Updates for Software Packs
You can also schedule regular update tasks for software packs in the SMC Server.
Via the Software packs node you can update all software packs or also select
individual software packs.
Right-click on Software Repository and select Update Software Repository/
Schedule
– OR –
Right-click on an individual software pack in Software Repository and select
Update/Schedule.
The window Create a task appears.
Type a name for the task, select the frequency for updates and click Next.
The next window asks for the start date and time.
Select the start date and time and click Finish.
The task is saved.
You can edit the task at any time using the right-click menu (see Displaying Tasks
for Software Packs or for SMC Server – Page 68).
7.3
Updating Avira Products
You can schedule update tasks for Avira products installed on the computers in
Security Environment. See Performing Commands and Planning Tasks – Page 64.
In order to perform update commands and tasks, without using the Internet Update
Manager, you have to disable the Automatic mode from the Server Configuration
window.
3 Computers/groups must be integrated into the Security Environment and the
status must be: green monitor, green arrow.
Right-click on the group or computer and select Commands/[Avira product]/
Update.
The Avira product starts its own update routine and installs the new program
files.
Avira GmbH
Avira Security Management Center
81
Troubleshooting
8
Troubleshooting
Please make sure you keep all SMC components and Avira products up to date, in order
to ensure effective communication between them over the Security Environment.
8.1
Prerequisites for communication between
SMC Agents and SMC Server
3 If there is a firewall installed on a client computer, the following ports (TCP)
have to be open: 7000, 7001, 7010, 7020, 7021, 7030. Furthermore, ICMP
requests and ping must be allowed.
3 The Guest account must be deactivated.
3 The Simple file sharing should be deactivated: in Windows Explorer, Tools/
Folder Options/ View/ Use simple file sharing (recommended).
3 The SMC Server must have access to the client’s hidden drive C$ (\\<client’s IP
address>\c$\).
3 To ease the installation of SMC Agents over the network, you should use an
administrative user account, common to all computers.
8.2
Backup SMC Server Files
To keep a backup for SMC Server, right-click the Avira SMC Frontend node and
select Backup server files.
An explorer window will allow you to navigate on your server and to select a
name and a location for the backup archive, as .zip file.
A message appears at the end of the backup process, telling you how to use
the archive if necessary:
82
Avira Security Management Center
Avira GmbH
Troubleshooting
8.3
MMC Error when Installing SMC Agent
Cause
The option Use simple file sharing (Recommended) is activated in the Windows
menu Control Panel/Folder Options/View, Advanced Settings.
This option sets the flag Force Guest to value 1. Thus, no administrator right
is possible any more and the SMC Agent cannot be installed.
Solution
8.4
Remove the check symbol to deactivate the option.
Software Pack IDs
If the Frontend displays the message "Missing software package with ID...", it
means that SMC has detected an Avira product on the client computer, which is
not integrated in the Software Repository or it has an outdated version. The
software IDs are the following:
3
30
31
51
71
91
111
121
200
201
Avira GmbH
SMC Agent
AntiVir Windows Server German
AntiVir Windows Server English
UNIX Server
UNIX Workstation
UNIX MailGate
UNIX WebGate
UNIX Updater for SMC
AntiVir Windows Workstation German
AntiVir Windows Workstation English
Avira Security Management Center
83
Products Supported by Avira SMC
9
Products Supported by Avira SMC
9.1
Supported Avira Products
Avira Security Management Center currently supports the following Avira
products, which must be purchased separately. For further details, please visit our
website: http://www.avira.com.
•
•
•
•
•
•
•
9.2
Avira SmallBusiness Suite
Avira AntiVir Windows Workstation
– AntiVir Guard (On-Access Scanner)
– AntiVir MailGuard
Avira AntiVir Windows Server 2000/2003
Avira AntiVir UNIX Server (Linux)
Avira AntiVir UNIX Workstation (Linux)
Avira AntiVir UNIX MailGate (Linux)
Avira AntiVir UNIX WebGate (Linux)
Product-specific Configuration Panels
Avira SMC manages Avira products as software packs. When installing and
configuring a software pack on a computer in the Security Environment, a productspecific configuration panel appears. The settings available in this window are
almost similar to the configuration options available for that Avira product. Avira
SMC displays them in another form. See Changing the Configuration of an Avira
Product – Page 53.
For detailed information on the configuration options, please refer to the manuals
of the Avira products you are using.
Loss of product performance in the event of incorrect configuration!
Read the Configuration Chapter in the Avira product User Manual before
changing the configuration settings with Avira SMC.
84
Avira Security Management Center
Avira GmbH
Service
10
Service
10.1 Support
Support Service
Our website http://www.avira.com contains all the necessary information on our
extensive support service.
Our developers' expertise and experience is available to you. The experts from
Avira answer your questions and help you with difficult technical problems.
During the first 30 days after you have purchased a license, you can use our Avira
Installation Support by phone, email or by online form.
In addition, we recommend that you purchase our Avira Classic Support, with
which you can contact and obtain advice from our experts during business hours
when technical problems are encountered. The annual fee for this service, which
includes eliminating viruses and hoax support, is 20 % of the list price of your
purchased Avira program.
Another optional service is the Avira Premium Support which in addition to the
scope of the Avira Classic Support enables you to contact expert partners at any
time, even after business hours in the event of an emergency. When virus alerts
occur, you will receive an SMS on your cellphone.
Forum
Email Support
Avira GmbH
Before you contact our Hotline, we recommend that you visit our user forum at
http://forum.antivir.de.
Your questions may already have been answered for another user and posted on
the forum.
Support via email can be obtained at http://www.avira.com.
Avira Security Management Center
85
Service
10.2 Online Shop
Would you like to buy our products by mouse-click?
You can visit Avira Online Shop at http://www.avira.com and buy, upgrade or
extend Avira licenses quickly and safely. The Online Shop guides you step by step
through the order menu. A multi-lingual Customer Care Center explains the
order process, payment transactions and delivery. Resellers can order by invoice
and use a reseller panel.
10.3 Contact
86
Address
Avira GmbH
Lindauer Strasse 21
D-88069 Tettnang
Germany
Internet
You can find further information on us and our products by visiting
http://www.avira.com.
Avira Security Management Center
Avira GmbH
Service
Avira GmbH
Avira Security Management Center
87
www.avira.com
Avira GmbH
More Than Security
Lindauer Str. 21
88069 Tettnang
Germany
Telephone: +49 (0) 7542-500 0
Fax: +49 (0) 7542-525 10
Internet: http://www.avira.com
© Avira GmbH. All rights reserved.
This manual was created with great care. However, errors in design and contents cannot be excluded.
The reproduction of this publication or parts thereof in any form is prohibited without previous
written consent from Avira GmbH.
Errors and technical subject to change.
Issued Q3/2007
AntiVir® is a registered trademark of the Avira GmbH.
All other brand and product names are trademarks or registered trademarks of their respective owners.
Protected trademarks are not marked as such in this manual. However, this does not mean that they may be used freely.