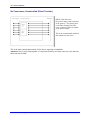
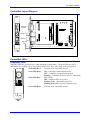
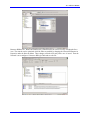
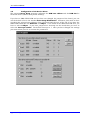
1
1 USER MANUAL
^2 Accessory 72E
^3 UMAC Fieldbus Interface
^4 3x0-603777-xUxx
^5 August 5, 2008
Single Source Machine Control
Power // Flexibility // Ease of Use
21314 Lassen Street Chatsworth, CA 91311 // Tel. (818) 998-2095 Fax. (818) 998-7807 // www.deltatau.com
Copyright Information
© 2008 Delta Tau Data Systems, Inc. All rights reserved.
This document is furnished for the customers of Delta Tau Data Systems, Inc. Other uses are
unauthorized without written permission of Delta Tau Data Systems, Inc. Information contained in
this manual may be updated from time-to-time due to product improvements, etc., and may not
conform in every respect to former issues.
To report errors or inconsistencies, call or email:
Delta Tau Data Systems, Inc. Technical Support
Phone: (818) 717-5656
Fax: (818) 998-7807
Email: [email protected]
Website: http://www.deltatau.com
Operating Conditions
All Delta Tau Data Systems, Inc. motion controller products, accessories, and amplifiers contain
static sensitive components that can be damaged by incorrect handling. When installing or handling
Delta Tau Data Systems, Inc. products, avoid contact with highly insulated materials. Only
qualified personnel should be allowed to handle this equipment.
In the case of industrial applications, we expect our products to be protected from hazardous or
conductive materials and/or environments that could cause harm to the controller by damaging
components or causing electrical shorts. When our products are used in an industrial environment,
install them into an industrial electrical cabinet or industrial PC to protect them from excessive or
corrosive moisture, abnormal ambient temperatures, and conductive materials. If Delta Tau Data
Systems, Inc. products are directly exposed to hazardous or conductive materials and/or
environments, we cannot guarantee their operation.
REV
DESCRIPTION
DATE
CHG
APPVD
1
REMOVED “SYCON CONFIGURATION” SECTION
05/21/06
C.PERRY
A. SOTELO
2
CORRECTED E-POINT JUMPER DESCRIPTIONS
05/23/06
C.PERRY
A. SOTELO
3
REMOVED APPENDIX A (SYCON MANUAL), REARRAGED APPENDIX
ORDER, CREATED APPENDIX C (HILSCHER HYPERLINKS)
05/23/06
C.PERRY
A. SOTELO
4
UPDATED ID JUMPERS FOR REV 100 AND NEWER REVISIONS.
05/26/06
C.PERRY
A. SOTELO
UPDATED PINOUTS FOR REV 100 AND NEWER REVISIONS.
5
UPDATED “DATA HANDSHAKING MODES” SECTION
05/30/06
C.PERRY
A. SOTELO
6
ADDED PDACK AND PDCOM STATES TO “DATA HANDSHAKING MODES”
SECTION; UPDATED DESCRIPTIONS IN DPRAM MEMORY MAP
06/13/06
C.PERRY
A. SOTELO
7
ADDED DIAGNOSTIC FLAG DESC. TO PROFIBUS & DEVICENET
06/16/06
C.PERRY
A. SOTELO
8
ADDED DIAGNOSTIC FLAG DESC. TO CANOPEN & CONTROLNET
06/19/06
C.PERRY
A. SOTELO
REMOVED APPENDIX A, UPDATED APPENDICES NAMING CONVENTION
9
ADDED SW1 DESCRIPTION
07/06/06
C.PERRY
A. SOTELO
10
ADDED CC-LINK SECTION, APPENDICES B AND C
UPDATED UBUS ADDRESSES, P. 5
UPDATED Profibus LED's, page22
UPDATED CC-LINK LED INFO, P. 66
08/05/08
C.PERRY
M. COGUR
Acc-72E User Manual
Table of Contents
INTRODUCTION .......................................................................................................................................................1
Configuring the Gateway ..........................................................................................................................................1
THEORY OF OPERATION ......................................................................................................................................3
UBUS Interface .........................................................................................................................................................3
How it Works ........................................................................................................................................................3
PMAC Memory.........................................................................................................................................................4
Consumed Process Data Flow ...................................................................................................................................4
Produced Process Data Flow.....................................................................................................................................5
UBUS Address ..........................................................................................................................................................5
HARDWARE...............................................................................................................................................................7
SW1: DPRAM Address............................................................................................................................................7
CS16\ Identification ..................................................................................................................................................7
Identification Information.....................................................................................................................................7
Revision 100 Jumper Descriptions............................................................................................................................8
Option Jumpers.....................................................................................................................................................8
Revision Jumpers ..................................................................................................................................................9
Product ID Jumpers..............................................................................................................................................9
Revision 101 and Later Jumper Descriptions............................................................................................................9
Option Jumpers.....................................................................................................................................................9
E-Point Jumper Settings ............................................................................................................................................9
All Revisions .........................................................................................................................................................9
CONNECTOR PINOUTS.........................................................................................................................................10
Pinouts for Revision 100 .........................................................................................................................................10
Connector TB1 - CANOpen/DeviceNet Options – TB5 Combicon Female ........................................................10
Connector J3 & J4 – ControlNet Option – BNC Channel A & B .......................................................................10
Connector P1 – Profibus Options – DB9 Female...............................................................................................10
Connector P2 Sycon Diagnostic – DB9 Male.....................................................................................................11
Revisions 101 and Later Pinout Descriptions..........................................................................................................11
Connector J6 Sycon Diagnostic – IDC 10-pin Header.......................................................................................11
DPRAM MEMORY MAP ........................................................................................................................................12
PMAC and Gateway Flags .................................................................................................................................13
DPRAM DATA PROCESSING ...............................................................................................................................14
Bus Synchronous (Direct Transfer), Device Controlled .....................................................................................15
Buffered, Device Controlled ...............................................................................................................................16
No Conscience, Uncontrolled (Direct Transfer).................................................................................................17
Bus Synchronous (Direct Transfer), Host Controlled.........................................................................................18
Buffered, Host Controlled...................................................................................................................................19
PROFIBUS.................................................................................................................................................................21
Profibus Specifications............................................................................................................................................21
Profibus Layout Diagram ........................................................................................................................................22
Profibus LEDs .........................................................................................................................................................22
Diagnostic LEDs.................................................................................................................................................22
Profibus Fieldbus Configuration .............................................................................................................................23
Profibus Master Settings.....................................................................................................................................23
Profibus Slave Settings .......................................................................................................................................23
Profibus Sycon Configuration .................................................................................................................................24
Profibus Master Settings .........................................................................................................................................24
Configuring the Slave for Profibus..........................................................................................................................25
Downloading the Slave Configuration for Profibus ................................................................................................26
Testing and Monitoring the PMAC Gateway for Profibus......................................................................................27
Table of Contents
i
Acc-72E User Manual
Monitoring Online Diagnostic Flags from PMAC ..................................................................................................27
Profibus Master Diagnostics ..............................................................................................................................28
Profibus Slave Diagnostics.................................................................................................................................30
DEVICENET .............................................................................................................................................................31
DeviceNet Specifications ........................................................................................................................................31
DeviceNet Layout Diagram.....................................................................................................................................32
DeviceNet LEDs .....................................................................................................................................................32
Diagnostic LEDs.................................................................................................................................................32
DeviceNet Typical Interconnection.........................................................................................................................33
DeviceNet Fieldbus Configuration..........................................................................................................................33
DeviceNet Master Settings..................................................................................................................................33
DeviceNet Slave Settings ....................................................................................................................................33
DeviceNet Sycon Configuration..............................................................................................................................34
DeviceNet Master Settings..................................................................................................................................34
DeviceNet Insert Slave........................................................................................................................................35
DeviceNet Slave Configuration...............................................................................................................................35
Downloading the Configuration to PMAC Gateway...............................................................................................35
DeviceNet Debugging .............................................................................................................................................36
DeviceNet Auto Network Scan ...............................................................................................................................36
Monitoring Online Diagnostic Flags from PMAC ..................................................................................................36
CANOPEN .................................................................................................................................................................39
CANopen Specifications .........................................................................................................................................39
CANopen Layout Diagram .....................................................................................................................................40
CANopen LEDs ......................................................................................................................................................40
Diagnostic LEDs.................................................................................................................................................40
CANopen Typical Interconnection..........................................................................................................................41
CANopen Fieldbus Configuration...........................................................................................................................41
CANopen Master Settings...................................................................................................................................41
CANopen Slave Settings......................................................................................................................................42
CANopen SyCon Configuration .............................................................................................................................42
CANopen Master Settings.......................................................................................................................................43
CANopen Insert Slave.............................................................................................................................................43
Configuring the Slave for CANopen.......................................................................................................................43
Downloading the Configuration for CANopen .......................................................................................................44
Monitoring Online Diagnostic Flags from PMAC ..................................................................................................44
CANOpen Master Diagnostics............................................................................................................................44
CANOpen Slave Diagnostics ..............................................................................................................................46
CONTROLNET.........................................................................................................................................................47
ControlNet Specifications .......................................................................................................................................47
ControlNet Layout Diagram....................................................................................................................................48
ControlNet LEDs.....................................................................................................................................................48
Diagnostic LEDs.................................................................................................................................................48
Global (Network) Fault Indications....................................................................................................................49
Channel Fault Indications (Non-Flashing Patterns) ..........................................................................................49
Channel Fault Indications (Flashing Patterns) ..................................................................................................49
ControlNet Settings .................................................................................................................................................50
Device Settings....................................................................................................................................................50
Data Settings.......................................................................................................................................................50
ControlNet SyCon Configuration............................................................................................................................50
ControlNET for ControlLogix Configuration .........................................................................................................55
Monitoring Online Diagnostic Flags from PMAC ..................................................................................................61
ControlNet Slave Diagnostics.............................................................................................................................61
CC-LINK....................................................................................................................................................................64
CC-Link Specifications ...........................................................................................................................................64
ii
Table of Contents
Acc-72E User Manual
CC-Link Layout Diagram .......................................................................................................................................65
CC-Link LEDs ........................................................................................................................................................65
Diagnostic LEDs.................................................................................................................................................65
CC-Link Typical Interconnection............................................................................................................................67
CC-Link Fieldbus Configuration.............................................................................................................................67
CC-Link Fieldbus Switch Settings ..........................................................................................................................67
CC-Link Fieldbus Baud Rate Settings ....................................................................................................................68
APPENDIX A — SYCON MANUAL......................................................................................................................69
APPENDIX B – SAMPLE PMAC PLC TO TRANSFER 16-BIT INTEGER DATA.........................................87
M-Variables (16-bit) for Use in Programs ..............................................................................................................87
Allocate M-Variables for Receive Process (Input) Data .........................................................................................87
Allocate M-Variables for Send Process (Outputs) Data..........................................................................................87
Programming Example for Word Oriented Data.....................................................................................................88
APPENDIX C – HILSCHER HYPERLINKS ........................................................................................................89
Table of Contents
iii
Acc-72E User Manual
INTRODUCTION
This manual provides the information needed to configure a fieldbus interface for the UMAC. The ACC72E is equipped with a “gateway” daughter card that allows the UMAC to send and receive data through
the supported fieldbus protocol. The gateway used is the COM series, provided by the Hilscher
Corporation. Relevant hyperlinks are provided in Appendix C for in-depth information regarding these
modules.
There are two connectors located on the front of the ACC-72E. For Profibus, DeviceNET, CANopen and
ControlNET options a male DB9 connector is specified as the Diagnostic Connector and provides a
RS232 link for the SyCon software. The second connector is referred to as the fieldbus connector as it
provides a means to become connected to the fieldbus link. The form factor of this connection is
dependent on which fieldbus protocol is being utilized. For the Control & Communication Link (CCLink) option, the first connector is 10 pin IDC male header which provides a RS232 link for
communication with the Compro software. The second connector is the 5 pin Combicon male connector
which is the fieldbus link.
The PMAC Gateway 3U supports the following protocols:
• ProfiBus Master-Opt1
(Female DB9)
• ProfiBus Slave-Opt2
(Female DB9)
• DeviceNet Master-Opt3
(5-pin Terminal Block)
• DeviceNet Slave-Opt4
(5-pin Terminal Block)
• CANopen Master-Opt5
(Female DB9)
• CANopen Slave-Opt6
(Female DB9)
• ControlNET Adapter-Opt7
(BNC)
• CC-Link Adapter-Opt11
(5-pin Terminal Block)
The protocol is dependent upon the equipped COM gateway. The hardware cannot be programmed for an
alternate protocol including master/slave. However, should the COM gateway be replaced with one
supporting another protocol, the baseboard would function properly as a communications link to UMAC
although the fieldbus connector might be incorrect for the new fieldbus.
Most gateway cards get their power from the UBUS back plane. However, the DeviceNet version
(Options 3 & 4) require an external 24Vdc power supply for the fieldbus.
Configuring the Gateway
There are ten steps in applying the Gateway for ProfiBus, DeviceNET, CANopen and ControlNET. The
CC-Link set up is explained in its section:
1. Install the SyCon and PEWIN software on the PC.
2. With the power off, plug the ACC-72E into the UBUS backplane.
3. Connect the diagnostic interface to the serial port on the PC.
4. Launch the SyCon setup utility from the PC.
5. Establish communications to the COM gateway.
6. Configure the fieldbus and download it to the card. (The default configuration can be used for
testing.)
7. Assign PMAC M -variables to access the fieldbus bytes at the appropriate Dual Port RAM address.
8. Manually test by setting byte values in PMAC, verifying that they get to the appropriate fieldbus
location. Also, check communication from the fieldbus to PMAC.
9. Configure the gateway’s fieldbus characteristics via the diagnostic port if required by the application.
Introduction
1
Acc-72E User Manual
10. Implement the assigned M-variables in PLCs or motion programs as required. Appendix A and B
provide examples for M-variable assignment and implementation. Appendix C provides hyperlinks
to Sycon configuration files for each fieldbus device, provided by Hilscher Corp.
SyCon is provided with the gateway module under license from Hilscher Corp. PEWin32 is a Delta Tau
product and normally is purchased with the first PMAC.
2
Introduction
Acc-72E User Manual
THEORY OF OPERATION
The PMAC Gateway 3U board is organized as a motherboard/daughter board system. The motherboard
contains the UBUS interface, diagnostics, and the fieldbus connections. The daughter board contains the
intelligence and the interface electronics required for each fieldbus. There is a different daughter board
for each fieldbus.
A micro controller on the daughter board implements each fieldbus communications protocol. Fieldbus
data is transferred to/from the fieldbus and placed in a dual-port ram (memory) on the daughter board.
The structure of this DPRAM is given later in this manual and is common for all the field buses
supported. There are two different DPRAMs used, a 2K-byte device and an 8K-byte device.
The PMAC side of the DPRAM is interfaced to the UBUS. PMAC programs access the fieldbus data by
reading or writing data to memory addresses corresponding to the location of the PMAC Gateway 3U
board’s DPRAM.
PMAC Gateway Version
DPRAM Size
ProfiBus Master
ProfiBus Slave
ControlNet Adapter
CANopen Master
CANopen Slave
DeviceNet Master
DeviceNet Slave (COM-DNS)
CC-Link Slave (COM-C-CCS)
2k bytes
2k bytes
2k bytes
8k bytes
8k bytes
8k bytes
2k bytes
8k bytes
UBUS Interface
The UBUS is Delta Tau’s bus interface for the UMAC controller. The PMAC Gateway 3U maps to the
UBUS as a DPRAM style board. It occupies contiguous memory locations (both X and Y memory) of
the upper byte, of the 24-bit, DPRAM addresses. Both MEMCS0 and MEMCS1 chip selects are
supported.
M-variables are mapped to these locations to move data to and from the fieldbus and PMAC. In addition
to fieldbus data, a block of memory indicates the PMAC Gateway 3U board’s status. Examples of Mvariable definitions for each fieldbus are included in this document.
How it Works
1. The PMAC Gateway board organizes fieldbus bytes in a dual-port memory on the gateway module.
These fieldbus bytes are mapped into PMAC’s memory space via the UBUS interface.
2. PMAC M-Variables are used to move data to and from the fieldbus or to control the gateway board.
3. A switch on the PMAC Gateway board sets the address of the board in PMAC’s memory space.
4. The gateway board is configurable via a serial (RS232) port. SyCon is provided with the gateway
board for this purpose.
5. Diagnostic LEDs are provided for a visual indication of the board’s status.
Theory of Operation
3
Acc-72E User Manual
PMAC Memory
PMAC uses a DSP (Digital Signal Processor) with a 24-Bit architecture that uses two memory areas – Y
and X Memory. Memory is accessed in PMAC programs using M-variables. The definition of an Mvariable includes its number, address, offset, width and type. Refer to the PMAC Manual for additional
explanation of M-variables and their specification.
PMAC Memory Organization
Consumed Process Data Flow
Consumed data (from the gateway’s point of view) flows into the DPRAM from the fieldbus and gets
mapped to the UBUS as shown in the following diagram. The 100 hex offset shown is for gateway
modules with a 2k byte DPRAM.
Consumed Data Flow
4
Theory of Operation
Acc-72E User Manual
Produced Process Data Flow
Produced data (from the gateway’s point of view) flows from PMAC to the gateway DPRAM and out to
the fieldbus.
Produced Data Flow
UBUS Address
Switch SW1 on the PMAC Gateway controls the address of the PMAC Gateway 3U on the UBUS.
SW1
SW2
SW3
SW4
SW5
SW6
ON
ON
ON
ON
ON
ON
ON
ON
ON
OFF
ON
OFF
ON
OFF
ON
OFF
ON
ON
OFF
OFF
ON
ON
OFF
OFF
ON
ON
ON
ON
OFF
OFF
OFF
OFF
ON
ON
ON
ON
ON
ON
ON
ON
ON
ON
ON
ON
ON
ON
ON
ON
Address Range
Y/X:$6C000 - $6CFFF
Y/X:$74000 - $74FFF
Y/X:$6D000 - $6DFFF
Y/X:$75000 - $75FFF
Y/X:$6E000 - $6EFFF
Y/X:$76000 - $75FFF
Y/X:$6F000 - $6FFFF
Y/X:$77000 - $75FFF
The default location is:
SW1
SW2
SW3
SW4
SW5
SW6
ON
ON
ON
ON
ON
ON
Address Range
Y/X:$6C000 - $6CFFF
Note:
Do not set the PMAC Gateway to the DPR address range $6C000-$6CFFF if the
UMAC is equipped with Acc-54E. Acc-54E is set to this range as default.
Theory of Operation
5
Acc-72E User Manual
This places fieldbus data beginning at:
6
Gateway Byte
Turbo PMAC2 Location
0
1
2
3
4
5
6
7
Etc.
Y:$6C000,16,8
X:$6C000,16,8
Y:$6C001,16,8
X:$6C001,16,8
Y:$6C002,16,8
X:$6C002,16,8
Y:$6C003,16,8
X:$6C003,16,8
Etc.
Theory of Operation
Acc-72E User Manual
HARDWARE
SW1: DPRAM Address
The following settings for SW1 can be used to configure the base address of the ACC-72E Gateway card.
CS16\ Identification
The UBUS Specification provides for some plug and play features. Currently, on power up, PMAC tests
the valid UBUS base addresses to see if a board is present. One of the techniques used by PMAC is to
write patterns to UBUS memory locations and read them back. One reason we mapped the fieldbus bytes
to the upper byte of PMAC’s memory is that this memory is not written to during PMAC’s power up test
routines since DPRAM boards are assumed 16-bit not 24-bit boards. If the fieldbus bytes were mapped to
the lower bytes, fieldbus outputs could be turned on by the test patterns written to these locations.
Another feature of the UBUS is that memory locations selected by CS16\ (chip select 16...active low)
were reserved for board identification information.
• Vendor ID
(8 bits)
• Options Present
(10 bits)
• Revision Number (4 bits)
• Product ID
(14 bits)
This information (36 bits) is accessible directly with I-Variables added in Firmware 1.936 or later. A
summary of the PMAC Gateway ID information is in the table below.
I39 controls the values reported.
I39= I4942…I4952 reports the following
0
1
2
3
4
5
36 bits (Vendor ID, Options present, Rev Number, Product ID)
8 bits (Vendor ID)
10 bits (Options Present) Reported by PMAC in HEX ($)
4 bits (Revision Number)
14 bits (Product ID)
19 bits (Card Base Address)
Identification Information
The Vendor ID is programmed into the PMAC Gateway. The Option Number, Rev Level and Part
Number are set by jumpers on the board. The settings below are given for reference only. There is no
need to change these from the factory settings. For jumper settings, refer to each individual section.
DPRAM Memory Map
7
Acc-72E User Manual
Revision 100 Jumper Descriptions
Option Jumpers
Item
1
2
3
4
5
6
7
8
Description
Part Number
JP1
Bit 9
JP2
Bit 10
JP3
Bit 11
JP4
Bit 12
JP5
Bit 13
JP6
Bit 14
JP7
Bit 15
JP8
Bit 16
JP9
Bit 17
ProfiBus Master
ProfiBus Slave
DeviceNet Master
DeviceNet Slave
CANopen Master
CANopen Slave
ControlNet Slave
3A1-603777-10x
3A2-603777-10x
3A3-603777-10x
3A4-603777-10x
3A5-603777-10x
3A6-603777-10x
3A7-603777-10x
ON
OFF
ON
OFF
ON
OFF
ON
OFF
ON
ON
OFF
OFF
ON
ON
OFF
OFF
OFF
ON
ON
ON
ON
OFF
OFF
OFF
OFF
OFF
OFF
OFF
OFF
OFF
OFF
OFF
OFF
OFF
OFF
OFF
OFF
OFF
OFF
OFF
OFF
OFF
OFF
OFF
OFF
OFF
OFF
OFF
OFF
OFF
OFF
OFF
OFF
OFF
OFF
OFF
OFF
OFF
OFF
OFF
OFF
OFF
OFF
DPRAM Memory Map
Acc-72E User Manual
Revision Jumpers
Item
1
2
3
4
5
6
7
Description
Part Number
ProfiBus Master
ProfiBus Slave
DeviceNet Master
Device Net Slave
CANopen Master
CANopen Slave
ControlNet Slave
3A1-603777-10x
3A2-603777-10x
3A3-603777-10x
3A4-603777-10x
3A5-603777-10x
3A6-603777-10x
3A7-603777-10x
JP10
Bit18
ON
ON
ON
ON
ON
ON
ON
JP11
Bit19
OFF
OFF
OFF
OFF
OFF
OFF
OFF
JP21
Bit29
ON
ON
ON
ON
ON
ON
ON
JP22
Bit30
OFF
OFF
OFF
OFF
OFF
OFF
OFF
JP12
Bit20
OFF
OFF
OFF
OFF
OFF
OFF
OFF
JP13
Bit21
OFF
OFF
OFF
OFF
OFF
OFF
OFF
Product ID Jumpers
Item
Description
1
2
3
4
5
6
7
ProfiBus Master
ProfiBus Slave
DeviceNet Master
DeviceNet Slave
CANopen Master
CANopen Slave
ControlNet Slave
JP14
Bit22
ON
ON
ON
ON
ON
ON
ON
JP15
Bit23
OFF
OFF
OFF
OFF
OFF
OFF
OFF
JP16
Bit24
OFF
OFF
OFF
OFF
OFF
OFF
OFF
JP17
Bit25
OFF
OFF
OFF
OFF
OFF
OFF
OFF
JP18
Bit26
OFF
OFF
OFF
OFF
OFF
OFF
OFF
JP19
Bit27
OFF
OFF
OFF
OFF
OFF
OFF
OFF
JP20
Bit28
ON
ON
ON
ON
ON
ON
ON
JP23
Bit31
ON
ON
ON
ON
ON
ON
ON
JP24
Bit32
ON
ON
ON
ON
ON
ON
ON
JP25
Bit33
ON
ON
ON
ON
ON
ON
ON
JP26
Bit34
OFF
OFF
OFF
OFF
OFF
OFF
OFF
JP27
Bit35
OFF
OFF
OFF
OFF
OFF
OFF
OFF
Revision 101 and Later Jumper Descriptions
Option Jumpers
Item
1
2
3
4
5
6
7
8
Description
ProfiBus Master
ProfiBus Slave
DeviceNet Master
DeviceNet Slave
CANopen Master
CANopen Slave
ControlNet Slave
CC-Link Slave
Part Number
JP1
Bit 9
JP2
Bit 10
JP3
Bit 11
JP4
Bit 12
JP5
Bit 13
JP6
Bit 14
JP7
Bit 15
JP8
Bit 16
JP9
Bit 17
3A1-603777-10x
3A2-603777-10x
3A3-603777-10x
3A4-603777-10x
3A5-603777-10x
3A6-603777-10x
3A7-603777-10x
3A11-603777-10x
ON
OFF
ON
OFF
ON
OFF
ON
ON
OFF
ON
ON
OFF
OFF
ON
ON
ON
OFF
OFF
OFF
ON
ON
ON
ON
OFF
OFF
OFF
OFF
OFF
OFF
OFF
OFF
ON
OFF
OFF
OFF
OFF
OFF
OFF
OFF
OFF
OFF
OFF
OFF
OFF
OFF
OFF
OFF
OFF
OFF
OFF
OFF
OFF
OFF
OFF
OFF
OFF
OFF
OFF
OFF
OFF
OFF
OFF
OFF
OFF
OFF
OFF
OFF
OFF
OFF
OFF
OFF
OFF
E-Point Jumper Settings
All Revisions
Point
Default
E1
1-2
E2
ON
E3
OFF
E4
E5
E6
E7
1-2
OFF
OFF
OFF
DPRAM Memory Map
Description
1-2 Allows reset of DPRAM by PMAC
2-3 DPRAM reset disabled
ON – Connects gateway module GND to UMAC GND
OFF – Separates fieldbus and UMAC GND
1-2 Connects 1st order filter circuit to fieldbus connector
2-3 Connects 1st order filter circuit to diagnostic connector
OFF 1st order filter not used
Factory Use ONLY
Connects DPRAM interrupt to UBUS IRQ-1
Connects DPRAM interrupt to UBUS IRQ-2
Connects DPRAM interrupt to UBUS IRQ-3
9
Acc-72E User Manual
CONNECTOR PINOUTS
Pinouts for Revision 100
Connector TB1 - CANOpen/DeviceNet Options – TB5 Combicon Female
Pin#
Symbol
1
DGND
2
CANL
3
SLD
4
CANH
5
+V
Function
Description
Notes
-
0V Return line
X5 pin 9
Input/Output
Data Line Low
X5 pin 8
Shield of bus cable
X5 pin 10
Input/Output
Data Line High
X5 pin 7
Input
+24 external power
X5 pin 3
-
Connector J3 & J4 – ControlNet Option – BNC Channel A & B
Pin#
Symbol
Function
Description
1
(signal)
2
(shield)
TXD
Input/Output
Data Transmit Line, Channel A
TXD-Shield
Input/Output
Cable shield for Data Transmit Line
Notes
X5 pin 3 (Ch. A)
X5 pin 8 (Ch. B)
X5 pin 7 (Ch. A)
X5 pin 9 (Ch. B)
Connector P1 – Profibus Options – DB9 Female
Pin#
Symbol
Function
Description
Notes
1
PE
-
Earth Ground
X5 pin 2
2
-
-
-
X5 pin 4
3
RXD/TXD-P
Input/Output
4
CNTR-A
5
Data line B on PROFIBUS connector 1
X5 pin 6
Output
Repeater Control Signal
X5 pin 8
GND
-
Digital Reference Potential
X5 pin 10
6
7
8
VP
RXD/TXD-N
Input/Output
+5V Reference from UBUS
-
X5 pin 3
X5 pin 5
X5 pin 7
9
-
-
Data line inverse A on PROFIBUS connector 1
-
X5 pin 9
1 Note: Designation A and B at the PROFIBUS connector is not equal to the designation A and B of the RS485 driver
circuit of most manufacturers. The RXD/TXD-P signal and the RXD/TXD-N signal have a clear meaning.
10
DPRAM Memory Map
Acc-72E User Manual
Connector P2 Sycon Diagnostic – DB9 Male
Pin#
Symbol
Function
Description
1
-
-
-
2
TXD
Output
Transmit data
X3 pin 6
3
RXD
Input
Receive data
X3 pin 4
4
DTR
Output
X3 pin 8
5
GND
-
Data terminal ready, 3.3k Ohm
resistor to high level
Fieldbus module Ground
6
-
-
7
RTS
Output
Ready to Send
X3 pin 5
8
CTS
Input
Clear to Send
X3 pin 7
9
-
-
-
-
Notes
X3 pin 2
X3 pin 10
X3 pin 3
X3 pin 9
Revisions 101 and Later Pinout Descriptions
Described below are the alternate pinouts found on Gateway boards with Revisions 101 or later (released
1st quarter of 2006 – Assy. No 603777-101 and later).
Connector J6 Sycon Diagnostic – IDC 10-pin Header
Pin#
Symbol
Function
Description
Notes
1
PE
-
Earth Ground
X3 pin 1
2
-
-
-
X3 pin 2
3
-
-
-
X3 pin 3
4
RXD
Input
5
RTS
6
Receive data
X3 pin 4
Output
Ready to Send
X3 pin 5
TXD
Output
Transmit data
X3 pin 6
7
CTS
Input
Clear to Send
X3 pin 7
8
DTR
Output
Data terminal ready, 3.3k Ohm
resistor to high level
X3 pin 8
9
-
-
10
GND
-
DPRAM Memory Map
Fieldbus module Ground
X3 pin 9
X3 pin 10
11
Acc-72E User Manual
DPRAM MEMORY MAP
Below is the memory map of relevant addresses found in the DPRAM of the gateway module. See page 3
of this module to determine whether the option ordered on the ACC-72E has a 8KByte cache or a 2KByte
cache. In order to read and write to these registers, define an M-variable that points to the upper 8 bits in
memory with an offset from the base address that is configured with SW1:
For example, if we were to look at the PMAC Flags on an ACC-72E Option 3 (DeviceNet Master) with a
base address of $6D000, we would enter the following into the operator terminal:
M1->X:$06D00,16,8,U
Offset
Offset
(8K DPRAM)
(2K DPRAM)
000h-6FFH
Usage
Number of
Bytes
Comments
000h-0FFh
Send Process Data
Send Process Data
700h-7FFh
100h-1FFh
Received Process Data
400h-51Fh
E90h-E91h
E92h-E93h
E94h-E95h
E96h-E97h
E98h-E99h
E9Ah-E9Bh
E9Ch-E9Dh
E9Eh-E9Fh
540H-065FH
FF8h
FF9h (y)
FF9h (x)
FFAh (y)
FFAh (x)
FFBh (y)
FFBh (x)
FFCh (y)
400h-51Fh
290h-291h
292h-293h
294h-295h
296h-297h
298h-299h
29Ah-29Bh
29Ch-29Dh
29Eh-29Fh
540H-065FH
3F8h
3F9h (y)
3F9h (x)
3FAh (y)
3FAh (x)
3FBh (y)
3FBh (x)
3FCh (y)
Message Buffer
Date[4]
DeviceNumber[4]
SerialNumber[4]
Reserved[4]
PcOsName0[4]
PcOsName1[4]
PcOsName2[4]
OemIdentifier[4]
Message Buffer
RcsVersion
RcsError
HostWatchDog
DevWatchDog
SegmentCount
DeviceAddress
DriverType
DpmSize
FFCh (x)
FFDh-FFEh
3FCh (x)
3FDh-3FEh
FFFH (y)
3FFH (y)
DevType
DevModel
DevIdentifier[3]
Gateway Flags
512 bytes (2K)
3584 bytes(8K)
512 bytes (2K)
3584 bytes(8K)
288
4 bytes
4 bytes
4 bytes
4 bytes
4 bytes
4 bytes
4 bytes
4 bytes
288
integer
byte
byte
byte
byte
byte
byte
Byte
byte
byte
3 bytes
Byte
FFFH (x)
3FFH (x)
PMAC Flags
Byte
Receive Process Data
PMAC to Fieldbus
Gateway module Information
Gateway module Information
Fieldbus to PMAC
Gateway Operating System
Information
PMAC Gateway Information
CMD and Acknowledge
gateway to PMAC
Handshake
CMD and Acknowledge
PMAC to gateway
Handshake
Note: Message Buffers are not applicable to Master devices.
12
DPRAM Memory Map
Acc-72E User Manual
PMAC and Gateway Flags
The handshaking bits for the PMAC and gateway flags reside in the X and Y word, respectively, of the
last address in DPRAM memory. “D0” refers to the first bit in the address; since the byte resides in the
upper 8 bits of PMAC’s addressing scheme, D0 would be equivalent to bit 16, D1 to bit 17, etc. These
flags give the user the ability to control the flow of data from the PMAC to the gateway:
DPRAM Memory Map
13
Acc-72E User Manual
DPRAM DATA PROCESSING
Since there are two processors attempting to access data registers in Dual-Ported Memory (PMAC and the
gateway) simultaneously, several handshaking modes can be used to guarantee data consistency. These
modes can be selected in Sycon under device settings. Not all modes are supported for every fieldbus
protocol. Consult the Sycon manual for each gateway module for handshaking capability. Should
handshaking not be necessary, collision circuitry on the gateway will in the very least guarantee
consistency within single byte boundaries. For this reason, the default configuration (No Conscience,
Uncontrolled) is recommended. Any handshaking is recommended for use only by advanced users that
have extensive knowledge of the underlying fieldbus communications protocol.
14
DPRAM Data Processing
Acc-72E User Manual
Bus Synchronous (Direct Transfer), Device Controlled
The gateway automatically starts
a data exchange cycle if it is a
master, or it receives a data
exchange cycle if it is slave.
Subsequently it complements
the bit PdAck.
PdAck
0
1
PdCom 0
0
The PMAC can then read the
new input data and write
the output data in the dual-port
memory. Then PMAC must
complement the bit PdCom.
PdAck
1
PdCom 0
1
1
The gateway starts the
next data exchange cycle.
PdAck 1
PdCom 0
This handshake is used most commonly in a slave system that must guarantee that the data from
every fieldbus cycle must be given to the PMAC.
DPRAM Data Processing
15
Acc-72E User Manual
Buffered, Device Controlled
The gateway makes cyclic
data exchanges on the bus.
After each data exchange
the gateway checks if
the dual-port memory is
available (i.e. PdCom is equal
to PdAck.)
PdAck 1
PdCom 0
If PdCom is not equal to PdAck, the user
program knows that there is new data in the
dual-port memory. PMAC can read out the
input data and write the new output data. PMAC
must then complement PdCom.
PdAck
1
PdCom 0
1
1
If there was data exchange detected, the gateway
exchanges the data between the internal buffer
and the dual-port memory. The gateway then
complements PdCom
PdAck
PdCom
1
1
1
0
The gateway cycles the data exchange again.
PdAck 1
PdCom 0
This handshake is commonly used in slave systems, where the slave gets an interrupt
with the next data exchange cycle.
16
DPRAM Data Processing
Acc-72E User Manual
No Conscience, Uncontrolled (Direct Transfer)
PMAC reads and writes
the process image, at the same time
as the gateway. The gateway does
cyclic data exchanges and after
every exchange it makes an update
of the process image.
This is the recommended method of
data transfer for most users.
This is the most common data transfer for IO devices requiring no handshake.
Attention: If two bytes belong together it is imperative that they are on the same bus cycle otherwise
this mode can't be used!
DPRAM Data Processing
17
Acc-72E User Manual
Bus Synchronous (Direct Transfer), Host Controlled
No data exchange.
PdAck 0
PdCom 0
PMAC writes new output
data.
PdAck 0
PdCom 0
PMAC must then complement PdCom:
Gateway starts
one data
exchange with
the output data from the dual-port memory and
writes the new input data in the dual-port
memory.
PdAck
0
PdCom 0
0
1
Gateway then complements PdAck after all
data is updated:
PdAck
0
PdCom 1
1
1
User reads new input data.
This handshake is used most commonly in a master system with synchronous IO devices.
18
DPRAM Data Processing
Acc-72E User Manual
Buffered, Host Controlled
Cyclic data exchange between internal buffer
and the gateway occur.
PdAck 0
PdCom 0
PMAC reads last input data and writes new
output data. Data exchange with the gateway
continues to cycle.
PdAck 0
PdCom 0
PMAC must then complement PdCom:
Gateway stops
data exchange,
puts the output
data in its internal buffer and the latest input
data in the dual-port memory.
PdAck
0
PdCom 0
0
1
Gateway then complements PdAck and
starts cyclic data exchange.
PdAck
0
PdCom 1
1
1
PMAC then reads input data and
writes output data.
This is the easiest handshake in master and slave systems with a guaranteed consistence of the complete
process image.
DPRAM Data Processing
19
Acc-72E User Manual
20
DPRAM Data Processing
Acc-72E User Manual
PROFIBUS
Profibus represents one of the best-known industrial FieldBus protocols from Europe. Profibus can be
used in a very wide range of applications as a multi-application communications link for industrial
devices, as well as cell-level communication. Profibus is an established standard, first introduced in 1989.
The Profibus protocol was originally developed by the committee founded by the German government.
The resulting protocol was initially adopted as DIN standard 19245 and was then adopted as a European
Common Standard EC50170. Profibus connects to a wide variety of field devices including discrete and
analog I/O, drives, robots, MMI products, pneumatic valves, barcode readers, weigh scales, transducers,
and flow measuring equipment.
• Profibus utilizes a non-powered two-wire (RS485) network.
• It can transfer a maximum of 244 bytes data per node per cycle.
• Communication rates are selectable but overall end-to-end network distance varies as indicated below:
•
12Mbps with a maximum distance of 100m
•
93.75Kbps at maximum distance of 1200m without repeaters
Profibus Specifications
Size
Power Requirements
Connector Types
Dual Port Memory Size
Communication Maximum Size
Inputs
Outputs
I/O Capacity
Baud Rate(s)
Max. Nodes
Diagnostic RS232C Port
Program Storage
Watchdog Timer
Operating Temperature
Profibus Chip Technology
Lab Certified
Profibus
3Ux 4HP (UMAC Compatible)
+5vdc, 700ma (from UBUS)
96 Pin UBUS interface
9 Pin D-sub Male Diagnostic interface
9 Pin D-Profibus interface
2048 Bytes (2K)
368 Bytes
244 Bytes
244Bytes
1k Bytes
9.6k up to 12 Mbaud
126
Yes
Flash Memory
Yes
0-55Deg C
Master = ASPC2
Slave = SPC3
Yes
21
Acc-72E User Manual
Profibus Layout Diagram
E3
Diagnostic
Interface
Profibus
3
P2
P2
D1
D2
TP5
TP4
GND
GND
JP25
JP26
JP27
TP3
CBA
1
JP1
JP2
JP3
JP4
JP5
JP6
JP7
JP8 1
JP9
JP10
JP11
JP12
JP13
JP14
JP15
JP16
JP17
JP18
JP19
JP20
JP21
JP22
JP23
JP24
E2
Diagnostic
Led's
TP6
GND
E1
+5V
J1
8
P1
UBus Interface
1
1
E4
3
E6
E7
E5
1 2 34 5 6
TB2
SW1
OFF
3
2
1
CBA
Profibus LEDs
Diagnostic LEDs
Diagnostic LEDs are provided to give visual indications of board status. The green LEDs are easy to
understand. If everything is okay, the two inner LEDs will be ON. Other states are discussed below. The
yellow LEDs are used to indicate more states than the green ones. Look for patterns as described below
to decipher the meaning.
Green LED D1-A
Not used on Profibus version
Green LED D1-B
ON = Communication Active
OFF = Communication Stopped
Flashing = Parameter Error (i.e. Mismatch)
Green LED D1-C
d c b a
D1
ON = Ready
OFF = Hardware Error or no power
D2
Flashing Cyclic = Bootstrap loader active
Flashing Non-Cyclic = System or hardware error
Green LED D1-D
Not used on Profibus version
Yellow LED D2-A
ON = Fieldbus Data Exchange Occurring
OFF = No Fieldbus Data Exchange Occurring
Diagnostic
Yellow LED D2-B
LEDs
ON = Communication Error
OFF = No Communication Error
22
Profibus
Acc-72E User Manual
Yellow LED D2-C
Not used on the Profibus Version
Yellow LED D2-D
Not used on the Profibus Version
Profibus Fieldbus Configuration
The fieldbus side of the PMAC Gateway conforms to the Profibus fieldbus standard. The characteristics
of the fieldbus side of the PMAC Gateway are configurable from the configuration port on the PMAC
Gateway using the Sycon Configuration software shipped with the PMAC Gateway. The PMAC
Gateway slave may be configured from the fieldbus master. The following table summarizes the
characteristics that can be configured.
Profibus Master Settings
Item
1
2
3
4
5
6
7
Parameter
Bus speed
Handshake mode
Behavior after power up
Watchdog time
Addressing mode
Storage format
General
Setting As Shipped
1200 K bit/S
No consistence, uncontrolled
Automatic release of communication by the device
1000 msec
Byte addresses
Big Endian
Station address = 0
Profibus Slave Settings
Item
Parameter
1
2
3
4
5
6
7
Handshake Mode
Configuration Mode
Behavior after power up
Configuration Data
Watchdog time
DPV1 Parameter
General
8
I/O Configuration
Length of input data
Length of output data
Number of modules
Setting As Shipped
No consistence, uncontrolled
By SyCon
Automatic release of communication by the device
Standard
1000 msec
Class 2 buffer length = 0
Station Address = 1
Activate device in actual configuration
Enable Watchdog Control
1
184 bytes
184 bytes
10
The fieldbus characteristics of the PMAC Gateway are defined in GSD files that come with the SyCon
software. The Profibus master is defined in HIL 7506.GSD and the Profibus slave is defined in
HIL_7501.GSD. The configuration/diagnostic port on PMAC Gateway provides a convenient method for
configuration and for monitoring the fieldbus side of the PMAC Gateway. The following provides an
example of how to use Sycon and the diagnostic port to configure and monitor the PMAC Gateway.
Profibus
23
Acc-72E User Manual
Profibus Sycon Configuration
To insert a new master into the configuration, select the Master icon in the menu toolbar and insert a new
master on the bus. Once loaded, the screen should be displayed on the PC.
\
Profibus Master Settings
To enter the master settings, select Settings – Master Settings or use the right mouse button at the DP
device. The Master settings contain parameters which define the behavior of the PMAC Gateway
DPRAM.
24
Profibus
Acc-72E User Manual
Set the baud rate that the PMAC Gateway should use by selecting the master and selecting Bus
Parameter under Settings. The baud rate is selected from the dialog box shown below:
Configuring the Slave for Profibus
Insert a slave onto the bus by using the Insert Slave icon in the toolbar menu. Select DP Slave Settings
from the dialog box. The dialog box below should display. It contains all the communications setting
options. The settings shown are the ones set at the time the PMAC Gateway was shipped, and should be
sufficient for most applications.
Repeating the process but selecting Slave Configuration will result in the screen shown below. The
primary purpose of this screen is to define the type of data being communicated to/from the master and
the PMAC Gateway. The table in the middle of the screen contains all the possible settings for inputs
(Send Process Data) and outputs (Receive Process Data). The lower table displays the current
configuration. 184 bytes of input and output were configured when the PMAC Gateway was tested at the
factory. This is sufficient for many applications.
Profibus
25
Acc-72E User Manual
If more or less is needed, delete the current setup by selecting the element to change and selecting
Remove Module. Select the new configuration from the middle table and select Append Module.
Downloading the Slave Configuration for Profibus
Once the configuration has been completed, it must be downloaded to the PMAC Gateway where it will
be saved in flash memory. Downloading also saves the configuration in the PMAC Gateway.
With the slave selected as the actual slave, select the Online-Download option in the menu. If
communication has not been established, a Driver Select window will appear. Choose CIF Serial Driver
and establish communication through the COM port.
Repeat the process for the master.
26
Profibus
Acc-72E User Manual
Testing and Monitoring the PMAC Gateway for Profibus
Once the hardware has been configured, test the system to ensure that the fieldbus is working properly
and that data sent by the fieldbus Master is received by PMAC and data sent by PMAC is received by the
Master. The diagnostic LEDs and the online menu in SyCon are useful tools to determine if the system is
working.
The online menu has many useful items. First, explore the I/O monitor function. Once the PMAC
Gateway is configured, manually change the Send Process Data and see if the master receives it and
monitors the Receive Process Data from the master.
Next, ensure that Send Process Data changed by a PMAC PLC makes it to the master. If writing,
downloading and executing a PMAC PLC program similar to the one in Appendix C, and the appropriate
bytes change in the PMAC Gateway and in the Master can be seen, the Send Process Data has been
checked.
Finally, change data in the Master that becomes Receive Process Data in the PMAC Gateway, and verify
that the appropriate M-Variables in PMAC are changed to correctly reflect the values sent by the master.
Monitoring Online Diagnostic Flags from PMAC
Once communications are established to all devices in the fieldbus network, diagnostic flags build into the
gateway module can be monitored by PMAC to determine the status of the network during online
communications.
Profibus
27
Acc-72E User Manual
Profibus Master Diagnostics
Below are the diagnostic flags that can be found in DPRAM:
Variable
Size
Offset Description
Global_bits
1 byte
740H
Global error bits
DPM_state
1 byte
741H
Main state of the master system
Err_rem_adr
1 byte
742H
Faulty remote address
•
28
Global bits:
Profibus
Acc-72E User Manual
The bit field serves as collective display of global notifications. Notified errors
can either occur at the DEVICE itself or at the slaves. To distinguish the different
errors the variable err_rem_adr contains the error location (bus address). If more
than one error is determined, the error location will always show the lowest faulty
bus address.
•
Variable DPM_state
This variable represents the main state of the master system. Following values are
possible:
$00: state OFFLINE
$40: state STOP
$80: state CLEAR
$C0: state OPERATE
•
Variable Err_rem_adr
Some bits in the Global_Bit field could indicate errors in the network or in the
DEVICE itself.. In this case, the variable Err_rem_adr represents the source of the error. If the source
where the error was detected in the DEVICE itself., then this flag contains the
value 255. If the error was detected in another device, the station number (between 0 and 125) will be the
value.
Profibus
29
Acc-72E User Manual
Profibus Slave Diagnostics
Below are the diagnostic flags that can be found in DPRAM:
Parameter
Offset
Value
Description
Baud rate
(in kBaud)
740h – 741h
12000
6000
3000
1500
500
187
93
9
0
Last detected baud rate
12 MBaud
6 MBaud
3 MBaud
1.5 MBaud
500 kBaud
187.5 kBaud
93,75 kBaud
9600 Baud
not detected
Bus Address
742h
1 .. 126
Actual configured bus address.
Ident Number
743h – 744h
7501
ID number of gateway module (COM-DPS)
Task State
745h
xxx1 (bit 16)
xx1x (bit 17)
x1xx (bit 18)
1xxx (bit 19)
Task is initializing.
If this state stays for some time, the
configuration parameters may be invalid.
Task running
The initialization happened without error, and a
task is running on the bus.
Static Diagnosis
Slave diagnostic flags are being sent.
Data exchange
The data exchange mode is active. The
user-data will be transferred on the bus
between the master and the slave.
30
Profibus
Acc-72E User Manual
DEVICENET
DeviceNet is a low cost communications link that connects industrial devices to a network and eliminates
expensive hardwiring. It is based on a broadcast-oriented communications protocol called the Controller
Area Network (CAN). The CAN protocol was originally developed by Bosch for the European
automotive market for replacing expensive wiring harnesses with low cost network cable on automobiles.
The CAN interface and protocol has fast response and high reliability for applications such as controlling
anti-lock brakes and airbags.
• DeviceNet utilizes a powered four-wire network.
• It can transfer up to eight bytes of data per node per communication cycle.
• Communication rates are configurable as indicated below:
•
125 Kbps with maximum distance of 500 meters
•
250 Kbps with maximum distance of 250 meters
•
500 Kbps with maximum distance of 100 meters
• Although multiple masters are possible, usually a DeviceNet network consists of one master and
many slaves.
DeviceNet Specifications
Size
Power Requirements
Connector Types – Rev 100
Dual Port Memory Size
Communication Maximum Size
Inputs
Outputs
I/O Capacity
Baud Rate(s)
Maximum Nodes
Diagnostic RS232C Port
Program Storage
Watchdog Timer
Operating Temperature
Chip Technology
Lab Certified
DeviceNet
3Ux 4HP (UMAC compatible)
+5Vdc, 500ma (UBUS)
+24Vdc, 50ma (from external power supply)
96 Pin UBUS interface
9-Pin D-Male Diagnostic interface
5 Position TB connector
Slave (COM-DNS) -- 2048 Bytes (2K)
Slave (COM-C-DNS) – 8192 Bytes (8K)
Master – 8192 Bytes (8K)
255 Bytes
255 Bytes
255 Bytes
1k Bytes
125K, 250K, 500K
64
Yes
Flash Memory
Yes
0-55Deg C
SJA1000
Yes
31
Acc-72E User Manual
DeviceNet Layout Diagram
DeviceNet LEDs
Diagnostic LEDs
Diagnostic LEDs are provided to give visual indications of board status. The green LEDs are easy to
understand. If everything is okay, the two inner LEDs will be ON. Other states are discussed below.
Green LED D1-A
Not used.
Green LED D1-B
ON = DeviceNet Communication Active
OFF = DeviceNet Communication Stopped
Flashing = DeviceNet Parameter Error (i.e. Mismatch)
Green LED D1-C
ON = Ready
OFF = Hardware Error or no power
Flashing Cyclic = Bootstrap loader active
Flashing Non-Cyclic = System or hardware error
d c b a
D1
Green LED D1-D
Not used
D2
Yellow LED D2-A
ON = Normal no fault
OFF = Fault
Flash = Fault
Yellow LED D2-B
ON = Critical link failure
OFF = Normal
Flash = Connection time out
Yellow LED D2-C
ON = On line link OK
OFF = Device not powered – off line
Diagnostic
Flash = Online not connected
LEDs
Yellow LED D2-D
ON = not applicable
OFF = Normal
Flash = Configuration failure
32
DeviceNet
Acc-72E User Manual
DeviceNet Typical Interconnection
DeviceNet Fieldbus Configuration
The fieldbus side of the PMAC Gateway conforms to the DeviceNet fieldbus standard. The
characteristics of the fieldbus side of the PMAC Gateway are configurable from the configuration port on
the PMAC Gateway using the Sycon Configuration software shipped with the PMAC Gateway. The
PMAC Gateway slave may be configured from the fieldbus master. The following table summarizes the
characteristics that can be configured:
DeviceNet Master Settings
Item
Parameter
Setting As Shipped
1
2
3
4
5
6
7
Bus Speed
Handshake Mode
Behavior after power up
Watchdog time
Addressing Mode
Storage Format
General
500k bit/s
No consistence, uncontrolled
Automatic release of communication by the device
1000 msec
Byte addresses
Big Endian
Mac ID = 0
DeviceNet Slave Settings
DeviceNet
Item
Parameter
Setting As Shipped
1
2
3
4
Handshake Mode
Behavior after power up
Watchdog time
General
5
6
I/O Connection
I/O Configuration
No consistence, uncontrolled
Automatic release of communication by the device
1000 msec
Mac ID = 1
Activate device in actual configuration
Poll
Input_Data Type IB Ilen=255 Iaddr0
Output_Data Type QB Olen=255 Oaddr=0
33
Acc-72E User Manual
The fieldbus characteristics of the PMAC Gateway are defined in EDS files that come with the SyCon
software. The DeviceNet master is defined in COMDNM.EDS and the DeviceNet slave is defined in
COMDNS.EDS. The configuration/diagnostic port on PMAC Gateway provides a convenient method for
configuration and for monitoring the fieldbus side of the PMAC Gateway. The following provides an
example of how to use Sycon and the diagnostic port to configure and monitor the PMAC Gateway.
DeviceNet Sycon Configuration
To insert a new master in the configuration, select the Master item in the Insert menu or click the icon in
the left corner of the screen. In the Insert Master window, add COM-DNM to the configuration.
DeviceNet Master Settings
Setup the PMAC Gateway with SyCon using the following settings:
• For DeviceNet Master, use the 8k DPRAM setting (see below).
• To enter the master settings, select the Settings - Master Settings menu or use the right mouse button
at a DP master device. There is also a Master Settings button in the Master Configuration window
available.
The Master settings contain parameters which defines the behavior of the PMAC Gateway DPRAM.
34
DeviceNet
Acc-72E User Manual
DeviceNet Insert Slave
To insert a new slave in the configuration, select the Slave item in the menu Insert. Click on the position
where to insert the new slave. When a dialog box appears, select COM-DNS.
In the left list box all slave devices which are presented in the EDS directory are listed. If there are too
many, set a filter to select only a special slave family or vendor. When one slave is selected, see
additional information about the slave in the list box below. With a double click or with the Add button,
the slave appears in the right list box. All devices in this box will be connected to the active master who
is displayed in the window. If selecting the slaves individually, give every device a name or a short
description in the Description field.
With the addition of every slave, the MAC ID is incremented, but this valve can be changed manually in
the MAC ID field.
DeviceNet Slave Configuration
The slave specific configuration is set in this window. Assign the modules and their data to addresses for
the process data image in the master device. Remember that these addresses correspond to the application
in the PC.
Assign the addresses of the module data in the process image for each module in the lower table. This is
set in the columns Type and Addr for input and output separately.
The I/O address can be entered manually or set automatically by SyCon using the Auto Addressing flag,
which must be set in the Master Settings window.
Caution:
If Watchdog Control is switched off, it is possible that the slave will not reset slave
outputs, even though the communication is broken.
Downloading the Configuration to PMAC Gateway
Use the Online - Download menu to download the configuration data to the device.
Before the download happens, SyCon will check the configuration. If any error message appears, the
configuration should be checked. Most errors are overlapping addresses which can be located by looking
at the Address Table. This can be avoided by keeping Auto Addressing enabled.
The configuration will be transmitted to the selected device and stored in static Flash memory, so that it is
available after the power is switched off and on in this device.
DeviceNet
35
Acc-72E User Manual
DeviceNet Debugging
After an actual master has been selected, start the debug mode. From this time, SyCon requests the status
of all slaves of the actual master. If there is an error on a slave, the bus line to this slave is drawn in red.
Otherwise, it is green. In addition, SyCon displays the Diagnostic message if the slave signals diagnostic
information. This information is displayed by clicking with the mouse at the corresponding device in
debug mode.
To activate the debug mode, select Online - Start Debug Mode. The Online - Device Diagnostic menu
activates the DP slave diagnostic. To end the Debug Mode, select Online - Stop Debug Mode.
DeviceNet Auto Network Scan
The current version of Sycon and PMAC Gateway firmware supports automatic network scan. Once the
Master is configured, choose Automatic Network Scan from the Online pull down menu. The Master
(PMAC Gateway) will poll the slave devices from the lowest MACID to the highest. Once the scan is
finished, it will display a list of devices that it found. To accept this configuration, select Automatic
Configuration from the dialog box. Typically, the chosen connection is polling so it should be changed
in the Chosen Configuration. Column before it is accepted.
Download the new configuration to the master to establish communication. Usually, this is the easiest
way to get a network up and running.
Monitoring Online Diagnostic Flags from PMAC
Once communications are established to all devices in the fieldbus network, diagnostic flags build into the
gateway module can be monitored by PMAC to determine the status of the network during online
communications.
Diagnostic flags are not available for ACC-72E Option 4 (DeviceNet Slave).
36
DeviceNet
Acc-72E User Manual
DeviceNet Master Diagnostics
Below are the diagnostic flags that can be found in DPRAM:
Variable
Size
Offset
Description
bGlobalBits
1 byte
1F40H
Global error bits
bDNM_State
1 byte
1F41H
Main state of the master system
bErrDevAdr
1 byte
1F42H
Faulty remote address
•
bGlobalBits
The bit field serves as collective display of global event indications. Notified errors
can either occur at the DEVICE itself or at the handled devices. To distinguish
the different errors the variable Err_dev_adr contains the error location
(address=MAC-ID). If more than one error is determined, the error location will contain
the device with lowest MAC-ID.
• Variable bDNM_State
This variable represents the main state of the DEVICE system. Following values
are possible:
DeviceNet
37
Acc-72E User Manual
$00: state OFFLINE
$40: state STOP
$80: state CLEAR
$C0: state OPERATE
•
Variable bErrDevAdr
If either the bits CTRL, ACLR or NDATA are set, this variable is set to the lowest MAC-ID location
where the error subsides. If the source of the error is inside the DEVICE itself,
the value 255 is written in. For all other instances the faulty device’s MAC-ID is
written in directly.
38
DeviceNet
Acc-72E User Manual
CANOPEN
CANopen is a network concept based on the serial bus system Controller Area Network (CAN) and the
CAN Application Layer (CAL). Developed originally for passenger cars, the CAN two-wire bus system is
already in use in over one million industrial control devices, sensors and actuators. Hallmarks of the
internationally standardized bus system (ISO 11898) are its simplicity, high transmission reliability and
extremely short reaction times. Many major semiconductor manufacturers sell CAN chips, and the fact
that millions of them are used in automobiles guarantees low chip prices and long-term availability.
CANopen permits both cyclic and event-controlled communication. This makes it possible to reduce the
busload to a minimum and achieve high communication performance at relatively low baud rates.
In CANopen, timing behavior can be adapted individually to the particular tasks of the stations involved.
This means it is not essential for the entire communication system to have higher performance if it is only
required by certain participants. In addition, an automation task may be divided up among several
CANopen participants to make optimum use of the power of control devices already in the network, and
this can be increased gradually by additional participants.
CANopen allows the creation of inexpensive de-centralized control systems, distributed input/output
systems, and networked sensor/actuator systems.
CANopen Specifications
Size
Power Requirements
Connector Types
Dual Port Memory Size
Communication Maximum Size
Inputs
Outputs
I/O Capacity
Baud Rate(s)
Maximum Nodes
Diagnostic RS232C Port
Program Storage
Watchdog Timer
Operating Temperature
Chip Technology
Lab Certified
CANopen
3Ux 4HP (UMAC Compatible)
+5Vdc, 700ma (from UBUS)
96 pin UBUS Interface
9-Pin D-Male Diagnostic Interface
9-Pin D-CANopen Interface
8192 bytes (8k)
64 bytes
32 bytes
32 bytes
7k bytes
10k up to 1 Mbaud
125
Yes
Flash Memory
Yes
0-55Deg C
SJA1000
Yes
39
Acc-72E User Manual
CANopen Layout Diagram
E3
Diagnostic
Interface
Profibus
3
P2
P2
D1
D2
TP5
TP4
G ND
GND
GND
JP25
JP26
JP27
TP3
CBA
1
JP1
JP2
JP3
JP4
JP5
JP6
JP7
JP8 1
JP9
JP10
JP11
JP12
JP13
JP14
JP15
JP16
JP17
JP18
JP19
JP20
JP21
JP22
JP23
JP24
E2
Diagnostic
Led's
TP6
E1
+5V
J1
8
P1
UBus Interface
1
1
E4
3
E6
E7
E5
1 2 34 5 6
TB2
SW1
OFF
3
2
1
CB A
CANopen LEDs
Diagnostic LEDs
Diagnostic LEDs are provided to give visual indications of board status. The green LEDs are easy to
understand. If everything is okay, the two inner LEDs will be ON. Other states are discussed below.
Green LED D1-A
Green LED D1-B
Green LED D1-C
d c b a
D1
D2
Green LED D1-D
Yellow LED D2-A
Yellow LED D2-B
Diagnostic
LEDs
40
Yellow LED D2-C
Yellow LED D2-D
Not used.
ON = CANOpen Communication Active
OFF = CANOpen Communication Stopped
Flashing = CANOpen Parameter Error (i.e. Mismatch)
ON = Ready
OFF = Hardware Error or no power
Flashing Cyclic = Bootstrap loader active
Flashing Non-Cyclic = System or hardware error
Not used
OFF = Off line
Flashing Cyclic = Online link OK
Flashing Non-Cyclic = Online not connected
ON = Critical link failure
OFF = Normal
Flash = Connection time out
Not used on the CANOpen version
Not used on the CANOpen version
CANopen
Acc-72E User Manual
CANopen Typical Interconnection
CANopen Fieldbus Configuration
The fieldbus side of the PMAC Gateway conforms to the CANopen fieldbus standard. The characteristics
of the fieldbus side of the PMAC Gateway are configurable from the configuration port on the PMAC
Gateway using the Sycon Configuration software shipped with the PMAC Gateway. The PMAC
Gateway slave may be configured from the fieldbus master. The following tables summarize the
characteristics that can be configured:
CANopen Master Settings
CANopen
Item
Parameter
Setting As Shipped
1
2
3
4
5
6
Bus Speed
Handshake Mode
Behavior after power up
Watchdog time
Addressing Mode
Storage Format
1M bit/s
No consistence, uncontrolled
Automatic release of communication by the device
1000 msec
Byte addresses
Big Endian
41
Acc-72E User Manual
CANopen Slave Settings
Item
Parameter
Setting As Shipped
1
2
3
4
5
6
7
Handshake Mode
Configuration Mode
Behavior after power up
Configuration Data
Watchdog time
DPV1 Parameter
General
8
I/O Configuration
(Input Length =32)
(Output Length=32)
No consistence, uncontrolled
By SyCon
Automatic release of communication by the device
Standard
1000 msec
Class 2 buffer length = 0
Node Address = 1
Activate device in actual configuration
Automatic COB=1D allocation
TxPDB1 Type IB Iaddr = 0 Ilen = 8
TxPDB2 Type IB Iaddr = 8 Ilen = 8
TxPDB3 Type IB Iaddr = 16 Ilen = 8
TxPDB4 Type IB Iaddr = 24 Ilen = 8
RxPD01 Type QB Iaddr = 0 Ilen = 8
RxPD02 Type QB Iaddr = 8 Ilen = 8
RxPD03 Type QB Iaddr = 16 Ilen = 8
RxPD04 Type QB Iaddr = 24 Ilen = 8
The fieldbus characteristics of the PMAC Gateway are defined in EDS files that come with the SyCon
software. The CANopen slave is defined in COMCOS.EDS. The configuration/diagnostic port on
PMAC Gateway provides a convenient method for configuration and for monitoring the fieldbus side of
the PMAC Gateway. The following section provides an example of how to use Sycon and the diagnostic
port to configure and monitor the PMAC Gateway.
CANopen SyCon Configuration
To insert a new master in the configuration, select the Master item in the Insert menu or click on the
icon in the toolbar menu.
42
CANopen
Acc-72E User Manual
CANopen Master Settings
To enter the master settings, select Settings - Master Settings or use the right mouse button at the master
device. There is also a Master Settings button in the Master Configuration window available. The
Master settings contain parameters which defines the behavior of the PMAC Gateway DPRAM.
CANopen Insert Slave
To insert a new slave in the configuration, select the Slave item in the Insert menu. Click on the position
where the new slave should be inserted. When a dialog box appears, select one or more slaves.
In the left list box, all slave devices are listed which are presented in the EDS directory. If there are too
many, set a filter to select only a special slave family or vendor. When one slave is selected, see
additional information about the slave in the list box below. With a double click or with the Add button,
the slave appears in the right list box. All devices in this box will be connected to the active master who
is displayed in the window. If selecting the slaves individually, give every device a name or a short
description in the Description field.
With the addition of every slave, the Node address is incremented, but this value can be changed
manually in the Node ID field.
Configuring the Slave for CANopen
Select Slave Settings from Settings or by using the right mouse button. It contains all the
communications setting options. The settings are the ones set at the time the PMAC Gateway was
shipped and should be sufficient for most applications.
Repeating the process but selecting Slave Configuration will result in the screen shown below. The
primary purpose of this screen is to define the type of data being communicated to/from the master and
the PMAC Gateway. The table in the middle of the screen contains all the possible settings for inputs
(Send Process Data) and outputs (Receive Process Data). Change the current setup by selecting the
element to change and selecting either Delete new Receive PDO or Delete new Transmit PDO
depending on the parameter selected. Select the new configuration from the middle table and select Add
to configured PDOs.
CANopen
43
Acc-72E User Manual
Downloading the Configuration for CANopen
The download of the configuration data to the device can be started by selecting Online - Download.
Before the download happens, SyCon will check the configuration. If an error message appears, the
configuration should be checked. The configuration will be transmitted to the selected device and stored
in static Flash memory, so that it is available after the power is switched off and on in the device. Repeat
the download process for both devices to establish communications.
Monitoring Online Diagnostic Flags from PMAC
Once communications are established to all devices in the fieldbus network, diagnostic flags build into the
gateway module can be monitored by PMAC to determine the status of the network during online
communications.
CANOpen Master Diagnostics
Below are the diagnostic flags that can be found in DPRAM:
Variable
Size
Offset
Description
Global_bits
1 byte
1F40H
Global error bits
CAN_State
1 byte
1F41H
Main state of the master system
Err_node_adr
1 byte
1F42H
Faulty node address
44
CANopen
Acc-72E User Manual
•
Global_bits
The bit field serves as collective display of global notifications. Notified errors
can either occur at the DEVICE itself or at the nodes. To distinguish the different
errors the variable err_node_adr contains the error location ( address). If more than
one error is determined, the error location will always show the lowest faulty bus
address.
•
Variable CAN_state
This variable represents the main state of the master system. Following values are
possible:
$00: state OFFLINE
$40: state STOP
$80: state CLEAR
$C0: state OPERATE
•
Variable Err_Node_adr
If either the bits Ctrl, Aclr or NData are set, this variable is set to the lowest node
CANopen
45
Acc-72E User Manual
location of the error. If the source of the error is determined inside the DEVICE
itself, the value 255 is written in. For all other instances, the faulty node address is displayed.
CANOpen Slave Diagnostics
Variable
Size
Offset
Description
bNmtState
1 byte
1F40H
Node Management State
bBusEnable
1 byte
1F41H
Bus communication is enabled/disabled
usBusEventCnt
2 byte
1F42H
Bus event counter
usBusOffCnt
2 byte
1F44H
Bus off event counter
•
bNmtState
•
bBusEnable
1 bus communication is enabled
0 bus communication is disabled
•
usBusEventCnt
This variable holds a counter for bus events detected by the CAN chip. It includes
warnings, bus off situations and receive queue overruns.
•
usBusOffCnt
Bus off events indicate severe communication problems on the CAN bus. When the
CAN chip detects such a situation it goes to disabled state and is not involved in
bus operations anymore. To get it operative again it must be re-initialized which is
done by the firmware automatically.
46
CANopen
Acc-72E User Manual
CONTROLNET
ControlNet is a real-time, control-layer network providing high-speed transport of both time-critical I/O
data and messaging data, including upload/download of programming and configuration data and peer-topeer messaging, on a single physical media link. ControlNet’s high-speed (five Mbits/sec) control and
data capabilities enhance I/O performance and peer-to-peer communications.
The distance of a segment depends on the number of nodes, respectively on the number of taps. There is
no minimum length requirement. The maximum allowable total length of a segment is 1000 m with two
taps connected. Each additional tap decreases the maximum length of a segment by 16.3 m. From this it
follows the number of taps allowed on a segment (48 with a maximum length of 250 m). Install a
repeater if the system requires more than 48 taps per segment, or a longer segment becomes essential. For
each segment of the ControlNet system, 75 Ohm terminators are needed.
ControlNet allows multiple controllers to control I/O on the same wire. This provides an advantage over
other networks, which only allow one master controller on the wire. In addition, ControlNet allows
multicast of both inputs and peer-to-peer data, thus reducing traffic on the wire and increasing system
performance.
ControlNet Specifications
Size
Power Requirements
Connector Types
Dual Port Memory Size
Process Data Maximum Size
Inputs
Outputs
I/O Capacity
Baud Rate(s)
Maximum Nodes
Diagnostic RS232C Port
Program Storage
Watchdog Timer
Operating Temperature
ControlNet Chip Technology
Network Access Port
Lab Certified
ControlNet
3Ux 4HP (UMAC Compatible)
+5vdc, 700ma (UBUS)
50 Pin JEXP (Expansion Port) interface
9 Pin D-Male Diagnostic interface
BNC (ControlNET Channel A)
BNC (ControlNET Channel B)
2048 Bytes (2K)
510 Bytes
510 Bytes
1020 Bytes
5 Mbaud
99
Yes, on standard board
No, on NAP version
Flash Memory
Yes
0-55Deg C
Rockwell CNA 10
No on standard board
Yes on NAP version
Yes
47
Acc-72E User Manual
ControlNet Layout Diagram
E3
Diagnostic
Interface
J4
E2
D1
D2
TP5
TP4
GND
G ND
G ND
TP3
CBA
1
JP1
JP2
JP3
JP4
JP5
JP6
JP7
JP8 1
JP9
JP10
JP11
JP12
JP13
JP14
JP15
JP16
JP17
JP18
JP19
JP20
JP21
JP22
JP23
JP24
J3
Channel B
TP6
E1
P2
Channel A
Diagnostic
Led's
3
JP25
JP26
JP27
+5V
J1
8
P1
UBus Interface
1
1
E4
3
E6
E7
E5
1 2 34 5 6
TB2
SW1
OFF
3
2
1
CB A
PMAC Gateway 3U ControlNet Version
ControlNet LEDs
Diagnostic LEDs
Diagnostic LEDs are provided to give visual indications of board status. The green LEDs are easy to
understand. If everything is okay, the two inner LEDs will be ON. Other states are discussed below.
Green LED D1-A
Not used on the ControlNet Version
d c b a
Green LED D1-B
ON = ControlNet Communication Active
OFF = ControlNet Communication Stopped
Flashing = ControlNet Parameter Error (i.e. Mismatch)
Green LED D1-C
ON = Ready
OFF = Hardware Error or no power
Flashing Cyclic = Bootstrap loader active
Flashing Non-Cyclic = System or hardware error
Green LED D1-D
Not used on the ControlNet Version
D1
D2
Diagnostic
LEDs
48
ControlNet
Acc-72E User Manual
The yellow LEDs operate in pairs. The following pairs are used:
• D2-A, B, C, D can operate together to indicate global of Network faults
• D2-A and D2-D can operate in pairs to indicate conditions of Channel B
• D2-B and D2-C can operate in pairs to indicate conditions of Channel B
Global (Network) Fault Indications
Pattern
D2-D
D2-C
D2-B
D2-A
1
2
OFF
ON
OFF
ON
ON
OFF
ON
OFF
Pattern
D2-D
D2-C
D2-B
D2-A
1
2
ON
ON
OFF
ON
ON
ON
ON
OFF
Meaning
Self Test alternates between pattern 1 and 2
Meaning
Bad Node alternates between pattern 1 and 2
Channel Fault Indications (Non-Flashing Patterns)
Pattern
D2-D
D2-C
D2-B
D2-A
1
2
3
4
5
6
x
x
x
ON
OFF
ON
OFF
ON
ON
x
x
x
ON
OFF
ON
x
x
x
x
x
x
OFF
ON
ON
Meaning
Channel A hardware Failure
Channel A OK
Channel A Disabled
Channel B hardware Failure
Channel B OK
Channel B Disabled
Channel Fault Indications (Flashing Patterns)
Pattern
D2-D
D2-C
D2-B
D2-A
1
2
x
x
OFF
ON
ON
OFF
x
x
Pattern
D2-D
D2-C
D2-B
D2-A
1
2
ON
OFF
x
x
x
x
OFF
ON
Pattern
D2-D
D2-C
D2-B
D2-A
1
2
x
x
OFF
ON
ON
ON
x
x
Pattern
D2-D
D2-C
D2-B
D2-A
1
2
ON
ON
x
x
x
x
OFF
ON
Pattern
D2-D
D2-C
D2-B
D2-A
1
2
x
x
ON
ON
OFF
ON
x
x
Pattern
D2-D
D2-C
D2-B
D2-A
1
2
OFF
ON
x
x
x
x
ON
ON
ControlNet
Meaning
Channel A Bad Network Connection
Alternates between pattern 1 and 2
Meaning
Channel B Bad Network Connection
Alternates between pattern 1 and 2
Meaning
Channel A Cable Fault
Alternates between pattern 1 and 2
Meaning
Channel B Cable Fault
Alternates between pattern 1 and 2
Meaning
Channel A Temporary Network Error
Alternates between pattern 1 and 2
Meaning
Channel B Temporary Network Error
Alternates between pattern 1 and 2
49
Acc-72E User Manual
ControlNet Settings
The fieldbus side of the PMAC Gateway conforms to the ControlNet fieldbus standard. The
characteristics of the fieldbus side of the PMAC Gateway are configurable from the configuration port on
the PMAC Gateway using the Sycon Configuration software shipped with the PMAC Gateway. The
following tables summarize the characteristics that can be configured:
Device Settings
Item
1
2
3
4
5
6
Parameter
Setting as Shipped
Handshake Mode
Behavior after power up
Watchdog time
Addressing Mode
Storage Format
General
No consistence, uncontrolled
Automatic release of communication by the device
1000 msec
Byte addresses
Little Endian
Mac ID = 3
Data Settings
Parameter
Setting as Shipped
Range
215
215
434 words total
(inputs + ouputs)
0
0
0
0
0-1000 words
0-1000 words
0-1000 words
0-1000 words
Number of input words
Number of output words
Unscheduled Services
Length of file 3
Length of file 4
Length of file 5
Length of file 6
The fieldbus characteristics of the PMAC Gateway are defined in EDS files that come with the SyCon
software. The ControlNet slave is defined in COMCNS.EDS. The configuration/diagnostic port on
PMAC Gateway provides a convenient method for configuration and for monitoring the fieldbus side of
the PMAC Gateway. The following section provides an example of how to use Sycon and the diagnostic
port to configure and monitor the PMAC Gate
ControlNet SyCon Configuration
Start SyCon and start a new setup file.
50
ControlNet
Acc-72E User Manual
Select ControlNet as the fieldbus.
Choose Insert-Device or click the icon in the left corner of the screen. Add COM-CNS as the selected
devices and press OK.
ControlNet
51
Acc-72E User Manual
52
ControlNet
Acc-72E User Manual
Establish communications to the PMAC Gateway in Settings – Device Assignment. Select CIF Serial
Driver.
Choose Connect COM n depending on the COM port that is connected.
Configure the settings of the PMAC Gateway. In the Device Configuration, the MAC ID is equivalent to
the Node number. The Input Length and Output Length will correspond to the Input and Output settings
in ControlLogix.
ControlNet
53
Acc-72E User Manual
Download the configuration to the PMAC Gateway. Note that downloading the configuration to the
PMAC Gateway saves it automatically and resets the PMAC Gateway.
54
ControlNet
Acc-72E User Manual
ControlNET for ControlLogix Configuration
In the RSLogix 5000 software under I/O configuration module folder, right click and select New Module.
Select the type of ControlNet bridge that is in the Allen Bradley rack along with the Major Revision.
In Module Properties, assign a name and description for the device. Indicate what slot it is in the rack and
what node is selected by the switch.
Right click on the ControlNet Bridge that was just inserted and select New Module. Select module type
CONTOLNET-MODULE with description Generic ControlNet Module. This will be the PMAC
Gateway ControlNet adapter. In Module Properties, enter a name and description for the device. Select
COMM Format Data-INT and indicate what node was assigned during the software configuration with
SyCon.
ControlNet
55
Acc-72E User Manual
In the Connection Parameters box, the Assembly Instances and Sizes must be configured. The Input is
Assembly Instance=1 and Size= Inputs +2. The Output is Assembly Instance=2 and Size= Outputs+0.
The size of the inputs and outputs correspond to the Input Length and Output Length that was assigned
for the Scheduled Services with SyCon and then downloaded to the PMAC Gateway ControlNet adapter.
So if the Input Length = 215 words and Output Length = 215 words with the SyCon software, then the
Size in RSLogix 5000 would be Input = 217 and Output =215. Lastly for Configuration, Assembly
Instance = 4 and Size =0. Then select Next.
Set the Requested Packet Interval rate (RPI). In this example, it is set at 5 ms. The RPI can be set at
different rates but it cannot be faster the slowest RPI. This value is sometimes set by trial and error.
Select the Finish button.
56
ControlNet
Acc-72E User Manual
Return to the ControlNet Bridge, right click, and select Properties. Go to the RSNetWorx tab and create
a ControlNet_file. Select Schedule a ControlNet Network and click Apply.
Now select View and Edit the ControlNet Network and click the network icon button the left.
Once RSNetworx has launched, a network must be selected. Select the Online icon as indicated below,
or select Online from the Network menu.
ControlNet
57
Acc-72E User Manual
In the Browse for Network box, select the communication path the network is using. Find the ControlNet
Bridge that was selected to communicate to the PMAC Gateway ControlNet adapter and select the
network below it. Then click the OK button.
The ControlNet network will appear with the ControlNet devices along with the Allen Bradley rack.
58
ControlNet
Acc-72E User Manual
Now select Edits Enabled and the Online/Offline mismatch dialog box will appear. Select Use offline
data (download) and click OK.
Return to RSLogix 5000, go to the Communications menu and select Download. If the communications
path has not been specified to the ControlLogix controller then the path must be selected in Who Active.
Once the path to the controller has been specified, then select Download.
ControlNet
59
Acc-72E User Manual
Return to RSNetworx. With Edits Enabled, the ControlNet network can be saved by selecting the Save
icon. The network can be optimized while the Edits are enabled by changing the Network Parameters in
Properties under the Network Menu. These changes will take effect only after a save is issued. Then the
Network is now configured. Return to RSLogix 5000 and save the file.
60
ControlNet
Acc-72E User Manual
Monitoring Online Diagnostic Flags from PMAC
Once communications are established to all devices in the fieldbus network, diagnostic flags build into the
gateway module can be monitored by PMAC to determine the status of the network during online
communications.
ControlNet Slave Diagnostics
Variable
Size
Offset Description
Global_Bits
1 byte
740H
Global error bits
Cns_State
1 byte
741H
Main state of the DEVICE system
Mac_ID
1 byte
742H
Current configured MAC ID
CNet_State
2 byte
744H
Status instance attribute of the ID object
•
Global_Bits
ControlNet
61
Acc-72E User Manual
•
Variable Cns_State
This variable represents the main state of the DEVICE system. Following values
are possible:
00h: state OFFLINE
40h: state STOP
80h: state CLEAR
C0h: state OPERATE
•
Mac_ID
The current (configured) MAC ID appears here.
•
CNet_State
This variable represents the current status of the DEVICE. Its value changes as
the state of the DEVICE changes.
62
ControlNet
Acc-72E User Manual
ControlNet
63
Acc-72E User Manual
CC-LINK
CC-Link (Control & Communication Link) is a Fieldbus network that processes both cyclic I/O data and
acyclic parameter data at high speed. CC-Link was developed by Mitsubishi and today, it is managed by
the CC-Link Partner Association (CLPA). CC-Link is a very popular network in Asia. Worldwide, it is
used for time critical applications based on Mitsubishi Automation technology. CC-Link products are
certified by the CLPA, guaranteeing worldwide compatibility
CC-Link is a Fieldbus for high-speed communication between controllers and intelligent field devices
like I/Os, sensors and actuators. In networks with up to 65 stations, it provides reliable communication
without any need for repeaters. Supported by a broad spectrum of automation equipment from many
manufacturers, CC-Link provides communication facilities for integrated and efficient production or
process facilities via a single cable. CC-Link includes many advanced features such as stand-by master
function, detach and auto return Slave function as well as auto recovery from communication fault
functions.
CC-Link incorporates an RS-485 topology and runs on a 3-conductor twisted pair cable. It can
communicate to multiple devices on a single wire with a maximum length of 1.2 km at 156 kbaud without
a repeater. CC-Link can communicate at speeds of up to 10 Mbaud at shorter wire lengths.
CC-Link Specifications
Size
3U x 4HP (UMAC Compatible)
Power Requirements
+5VDC, 500 mA (UBUS)
Connector Types
96 Pin UBUS interface
10-pin IDC Male Diagnostic interface (ComPro)
5 Position TB Connector
Dual Port Memory Size
8192 Bytes (8k)
Communication Maximum Size
96 Bytes
Inputs
48 Bytes
Outputs
48 Bytes
I/O Capacity
1024 Bytes (1k)
Baud Rate
125 k, 625k, 2.5M, 5M, 10M
Maximum Stations
64
Diagnostic RS232 Port
Yes
Program Storage
Flash Memory
Watchdog Timer
Yes
Operating Temperature
0-45 Degrees Celsius
Chip Technology
EC1
Lab Certified
Yes
64
CC-Link
Acc-72E User Manual
CC-Link Layout Diagram
PMAC Gateway 3U CC-Link Version
CC-Link LEDs
Diagnostic LEDs
Diagnostic LEDs are provided to give visual indications of board status. The green LEDs are easy to
understand. If the gateway card’s b green LED and the daughter board green LED cyclic at the same
frequency, it means the hardware is working properly. When the CC-Link cable is connected, both
LED’s will turn on and the fieldbus communications will be active. All the LED states are discussed
below.
CC-Link
65
Acc-72E User Manual
Green LED D1-A
Green LED D1-B
Green LED D1-C
Green LED D1-D
Yellow LED D2-A
Yellow LED D2-B
Yellow LED D2-C
Yellow LED D2-D
66
Not used in CC-Link version
ON = Slave in cyclic data exchange with CC-link Master
Flashing cyclic at 5 Hz= No error in the configuration
found, communication is stopped or ready for
communication but the device has no cyclic data
exchange with the CC-Link Master
Flashing irregular= Power Up: Configuration missing or
faulty, device needs commissioning, Runtime: Host
watchdog timeout
OFF = No power or hardware/system error.
Flashing cyclic at 1 Hz= Device is in bootloader mode
and is waiting for firmware download
Flashing cyclic at 5 Hz= Firmware download is in
progress
Flashing irregular= Hardware or heavy runtime error
detected
OFF = Ready
Not used in CC-Link version
ON = Connection to CC-Link Master established
OFF = No connection to CC-Link Master
ON = CRC error detected or station address not valid
(valid is 1..64) or baud rate not valid (valid is 0..4)
Flashing cyclic at 2.5 Hz= Station address or baud rate
setting was changed since the last network controller reset
OFF = No Error
Not used in CC-Link version.
Not used in CC-Link version.
CC-Link
Acc-72E User Manual
CC-Link Typical Interconnection
.
Only use cable types approved for CC-Link networks. CC-Link specifies shielded three-core Twisted
Pair cables. It is recommended to use only one type of cable for an installation.
Please ensure that termination resistors are available at both ends of the cable. The value of the
termination resistor depends on the used type of cable and can be 100, 110, and 130 ohms.
(*) For more information, go to the CC-Link Booklet (Hardware) in Appendix C
CC-Link Fieldbus Configuration
The fieldbus side of the 3U PMAC Gateway conforms to the CC-Link fieldbus standard. The
characteristics of the fieldbus side of the 3U PMAC Gateway are hardware configurable. The daughter
board, L0401813 by Hilscher, plug into the C-X1 and C-X2 connectors on the 3U PMAC Gateway
mother board. The switch settings and the baud rate settings are shown in the following sections. CC-Link
does not need a particular software configuration to provide communication. The hardware starts
communicating at power up. Once the PMAC gateway card DPRAM registers are set up correctly,
PMAC reads or writes data from/to the Fieldbus via CC-Link. This procedure is given in Appendix B.
CC-Link Fieldbus Switch Settings
There are three switches on the CC-Link Fieldbus, daughter board which are shown in the following
picture.
CC-Link
67
Acc-72E User Manual
The first and second switch set the CC-Link slave station address 10x and 1x respectively. The CC-Link
slave station address can be set the range of 1 to 64. The third switch sets the baud rate to operate at the
CC-Link network. It can be set the value of 0 to 4. The available baud rate settings are given in the next
discussion.
.
CC-Link Fieldbus Baud Rate Settings
The CC-Link Fieldbus can be operated with five different baud rate settings. The valid baud rates are:
68
CC-Link
Acc-72E User Manual
APPENDIX A — SYCON MANUAL
The Sycon2 (universal system configuration software) Operating Instructions from Synergetic™ are
reprinted here as Appendix A.
Operating instructions
SyCon 2
Universal System Configurator Software
Appendix A – Sycon Manual
69
Acc-72E User Manual
Overview
SyCon is a universal fieldbus configuration tool developed by Hilscher Corp., which we are
initially using to configure the PmacGate-Way. SyCon can configure the fieldbus systems like
ProfiBus, Interbus, SDS, DeviceNet, CANopen, etc. with a common tool that provides consistent
user interface for all protocols.
SyCon allows you to configure all master and slave devices using one tool. SyCon checks the
dependencies between the devices, checks for configuration conflicts and warns you of possible
errors. Some protocols support standardized files containing information about all features
and limitations of the slave device. SyCon uses these files for the configuration.
After the configuration, you can switch SyCon into a diagnostic mode. In diagnostic mode, you
can watch all status information of devices connected to the network. For example, you can
see the node list or slave diagnostic information. If a slave is not operating correctly it will be
displayed in a different color, normally red.
SyCon consists of a universal.exe - file and several specific protocol DLLs. Most customers
will use SyCon for only one bus system however SyCon can be expanded later by adding one or
more DLLs for other available protocols.
2.0
Installation System Requirements
PC with 486 Pentium processor or higher
Windows 95, Windows NT 3.51, Windows NT 4.0
Free disk space: minimum 10 MB
RAM: minute 16 MB
Graphic resolution: 800 x 600 pixel or greater
Floppy Disk 1.44M or CD Rom
You have to install:
1. The system configurator
2. The device driver
3. One of the fieldbus protocols (ProfiBus, SDS, DeviceNet, Interbus S,..)
3.0
Installation Procedure
1. Close down all application programs on your system.
2. Insert the installation disk 1 (or CD) of SyCon in your floppy or CD drive.
3. To install SyCon select the Software-install icon in the start-settings-control
panel menu or select the command Run from the start menu of Windows 95 or
Windows NT and type a:\setup.exe (a: is the letter of your floppy drive) and select
OK.
4. Follow the instructions of the installation program and answer each question with
OK or Next. The installation program will ask you for additional components
(fieldbus system and device driver) to install. Install all parts. Without installing a
fieldbus system SyCon is not able to run the configuration. The device driver is
necessary to access the PC interface card in your system. Of course you can install
these components by using their own setup programs later. Depending on the
selected components (fieldbus/device driver) insert the disk and the corresponding
setup program will be started automatically.
70
Appendix A – Sycon Manual
Acc-72E User Manual
4.0
Configuration of the Device Driver
The program Driver Setup program configures the DPM base address and the DPM size for
the device driver (DPM is dual-ported memory).
If you have a SMS-CIF30-DPM and you have not changed the jumpers of the board, you can
use the default value in the window Driver Setup Windows NT. Otherwise, this must be done
according the selected start address of the CIF board and the type of the CIF. If you have the
SMS-CIF30-DPM then the DPM size is 2 KByte. If the board is the SMS-CIF30-PB then you
have to select 8 KByte. If you have jumpered an interrupt on the board then you have to
select the Interrupt number. The default interrupt is 7. After you have changed the settings
you must reboot your PC to activate the parameters.
Appendix A – Sycon Manual
71
Acc-72E User Manual
5.0
Configuration ProfiBus DP with SyCon
SyCon helps you to configure your ProfiBus DP system quickly & easily.
Follow these steps:
1.
First select the fieldbus system and create a new file. Select the File-NewProfiBus menu item. SyCon will start the configuration mode and opens
the window for the bus. Insert all the Masters that you will have on the
bus. If you do not find your Master in the list choose Unknown FMS
Master, Unknown DP Master, or Unknown Combi Master ProfiBus-DP
2.
First you have to insert the DP slaves and assign them to their master.
The next step is to configure these DP slaves with the actual I/O modules,
and their parameter data. Be sure that you have selected the right
addressing mode.
3.
Save your configuration. Select the board as actual device, which you
want to configure and download(s) to all the CIF devices. Connect the bus
cable, and test the communications using the I/O-Monitor for DP, and the
FMS Monitor for FMS.
4.
Finally, print out the documentation of your ProfiBus system.
GSD Files
Each ProfiBus-DP manufacturer uses standard device description files to define the ProfiBusDP device on the network. These definitions are called GSD files. The set of device
description files (GSD file) build the device database.
All possible devices the configuration or GSD files must be in the GSD directory during the
startup of the SyCon software. If you need another GSD file during SyCon runtime you have to
copy this file with the File - Copy GSD menu item.
Note: You need GSD files only for ProfiBus-DP.
The GSD directory path is changeable. To modify it from the default to an another path use
the Settings – Path menu. All GSD files have to be present in this directory for SyCon to
recognize the device.
72
Appendix A – Sycon Manual
Acc-72E User Manual
Selecting a fieldbus system and creating a new file
At the beginning of a design, you must create a new configuration file, which is done in the File
– New menu item. You can select between the different fieldbus systems Select ProfiBus.
The name for the configuration can be assigned when you leave the system configurator or
using the File - Save AS menu.
Insert Master
To insert a new master in the configuration select the Master item in the menu Insert or click
the following icon:
The mouse cursor changes to the insert master cursor. Click on that position, where you want
to insert the new master. A dialog box appears where you have to select one or more masters.
You can select the master types:
ProfiBus Combi Master (ProfiBus-FMS and ProfiBus-DP)
ProfiBus-FMS Master
ProfiBus-DP Master
Appendix A – Sycon Manual
73
Acc-72E User Manual
Settings
Bus Parameter
The bus parameter is normally the baud rate of the fieldbus network, which is determined by
the master controller. Each fieldbus has a set of different baud rate options.
In a ProfiBus-DP system, the only parameter, which is required, is the baud rate. The baud
rate of the ProfiBus is common for all bus nodes. Changing the baud rate causes all other
parameters to be re-calculated. The System Configurator checks that all configured devices
based on the information in the GSD file support the baud rate.
If the System Configurator finds at least one device in the configuration that does not support
the selected baud rate an error message appears, because this information is missing in the
device description file. The user can check the actual parameter, if he opens the Actual Bus
Parameter window with the Edit button. Some of the parameters can be changed individually.
Please note if you make any changes in the bus parameters the parameter for the Optimize
field must be changed from by SyCon to by User.
Caution: Changing the bus parameter can stop the communications
The Highest Station Address is the highest bus address up to which the master will search for
another active master station to transfer the send permission. This value should not be set
below the master address.
The field Watchdog control / TTR allows the user to enter a factor to control the watchdog
time of the slaves. If this factor is chosen to large, it is possible that the slaves could set their
outputs to Zero .
With the Auto Clear flag it is possible to select a global error flag. The Master controls the
process data transfer for the slaves with a timer. If the data transfer is not successful during
one data control time interval with activated option Auto clear modus on, then the Master
leaves the user data transfer and switches the outputs of all assigned slaves to the fail-safe
state.
74
Appendix A – Sycon Manual
Acc-72E User Manual
Master Settings
To enter the master settings select the Settings - Master Settings menu or use the right
mouse button at a DP master device. There is also a Master Settings button in the Master
Configuration window available.
The Master settings contain parameters, which defines the behavior of the PMAC
GatewayDPRAM.
Startup behavior after system initialization
If Automatic release of the communication by the device is selected, the master starts with
the data transfer on the bus when initialization is finished. If Controlled release of the
communication by the application program is selected, the user has to start the data
transfer on the bus, by a defined release procedure.
User program monitoring
The watchdog time appointed how long the device will wait for a user trigger of the watchdog,
upon a watchdog all outputs are set. This procedure must be activated by the user application
software and is not started automatically.
Appendix A – Sycon Manual
75
Acc-72E User Manual
Addressing mode
The addressing mode of the process data is how to interpret the addresses of the process
image. There are the possibilities Byte addresses or Word addresses. For performance
reasons the PMAC Gatewayworks internally with word structures. Therefore if you have
configured the Byte address mode, the data for the slaves modules starts on even addresses.
Storage formats (word module)
The storage format fixes the format, how the data is placed and interpreted in the process
images. For data types, the Little Endian format and Big Endian format can be selected.
Handshake of the process data
Different modes of handshaking the process data can be selected for the master. The selection
of this mode is important for the correct data exchange between the application and the device.
Hardware parameter
With this parameter you select the size of the dual-ported memory of the hardware. The
parameter will enlarge or reduce the possible value ranges for the I/O offsets.
Addressing mode
The addresses in the configuration data of the devices determine the starting points of the
corresponding data in the process image.
Byte address The process image has a byte structure and every byte has its own address.
Word address The process image has a word structure and every word has its own address.
This has nothing to do with the physical data size of the dual-ported memory, which is always
byte oriented! The following table shows how the different data types in the process image in
byte or word address mode:
IEC Address
in byte mode
in word mode
QB 2
QB 2
QB 4
QW 6
QB 4
QW 3
Offset address
in the dual-ported
memory
(first 8 bytes)
0
1
Data in the
Process
Image
(example)
0000 0000
0000 0000
2
1110 0010
3
0000 0000
4
1111 1000
5
0000 0111
6
7
1111 1111
0100 0100
Output in Little Endian format
- byte module
- module with two single bytes
- word module
Output QB2 / QB1
D7 D6 D5 D4 D3 D2 D1 D0
n n n b b b n b
Output QB4 / QB2
D7 D6 D5 D4 D3 D2 D1 D0
n n n n n b b b
D7 D6 D5 D4 D3 D2 D1 D0
b b b b b n n n
Output QW6 / QW3 in Little Endian format (LSB - MSB)
D15 D14 D13 D12 D11 D10 D9 D8 D7 D6 D5 D4 D3 D2 D1 D0
b n b b b n b b n n n n n n n n
Output QW6 / QW3 in Big Endian format (MSB - LSB)
D15 D14 D13 D12 D11 D10 D9 D8 D7 D6 D5 D4 D3 D2 D1 D0
n n n n n n n n b n b b b n b b
76
Appendix A – Sycon Manual
Acc-72E User Manual
Insert Slave
To insert a new slave in the configuration select the Slave item in the menu Insert. Click on
that position, where you want to insert the new slave. A dialog box appears where you have to
select one or more slaves.
In the left list box there are listed all slave devices which are presented in the GSD directory. If
there are too many you can set a filter to select only a special slave family or vendor. When one
slave is selected, you can see additional information about the slave in the list box below. With
a double click or with the Add button the slave appears in the right list box. All devices in this
box will be connected to the active master who is displayed in the window. If you select the
slaves individually, you can give every device a name or a short description in the description
field.
With the addition of every slave the station address is incremented, but this valve can be
changed manually in the Station address field.
Slave configuration
The slave specific configuration is done in this window. Here you have to assign the modules
and their data to addresses for the process data image in the master device. Remember that
these addresses correspond to your application in the PC.
Appendix A – Sycon Manual
77
Acc-72E User Manual
There are two types of slaves. A simple slave, which has a fixed data length, and a modular
slave, which has variable, date length and is configurable. This type of slave can be
understood as an assembly of one or more simple slaves with one bus address.
The upper table contains all available modules of the slave device. In the case of a simple slave
there is only one module, which is already copied, into the lower table automatically by SyCon.
If it is a modular slave, the user must do this with a double click on the module or selected
module or by clicking on the Append Module button. If a module has several inputs or
outputs, then it gets more lines in the configuration table. These additional lines will be
assigned with a higher index in the Idx column.
To configure the modules of the slave do the following steps:
If not already present, select all modules from the upper table and insert them in the lower
table. The sequence of the modules in the lower list is important and must correspond to the
real physical slave configuration.
Assign the addresses of the module data in the process image for each module in the lower
table. This is done in the columns Type and Addr for input and output separately.
The I/O address can be entered by the user or set automatically by SyCon using
the Auto Addressing flag, which must be set in the Master Settings window.
If the flag is active SyCon will place all I/O data offsets in physical order. This is done during
the download procedure and the assigned addresses can be checked in the Address Table.
If the addresses are entered manually the default address 0 in the field I Addr. O Addr must be
overwritten by the user. Depending on the Addressing mode in the DP Master Settings the
addresses are byte addresses or word addresses. This is described in the chapter Addressing
mode. The DP-Slaves use the Watchdog Control flag to detect communication errors of their
assigned DP master. If a DP slave recognizes an interrupted communication to his master
during a defined watchdog timer interval, when he was operational once, he resets himself and
sets his outputs into a safe zero state.
Caution:
If Watchdog Control is switched off, it is
possible that the slave will not reset slave outputs, even though
the communication is broken.
78
Appendix A – Sycon Manual
Acc-72E User Manual
DP Slave Settings
The DP Slave settings contain parameters, which define the behavior of the PMAC interface. To
enter the DP slave settings select at first the slave than open the window with the menu
Settings - DP Slave Settings.
User program monitoring
The watchdog time appointed how long the device will wait for a user trigger of the watchdog,
until it resets all outputs to zero. This must be activated from the application.
Configuration mode
If the slave device should take the parameter out of the configuration which is downloaded
from SyCon then you must select for the Configuration mode the mode Configuration by
SyCon. If the configuration is written in the dual-ported memory from the application then you
must select Configuration by application.
Handshake of the process data
With these different modes, the handshake of the process data is selected for the master. The
selection of this mode is important for the correct data exchange between the application and
the device.
Appendix A – Sycon Manual
79
Acc-72E User Manual
Startup behavior after system initialization
If Automatic release of the communication by the device is selected, the slave is ready to
communicate with the master when started. If Controlled release of the communication by
the application program is selected, the user has to start the communication with the master.
Board Assignment
SyCon is able to configure all devices in a network. To run the online functions of such a
device you must define how SyCon can communicate with it. This is done in the menu item
Board Assignment. You have the choice between four boards, which are installed internally in
the PC and four devices, which are connected with the serial port to the PC.
SyCon looks in the registry of the device driver and displays all boards that are available
internally.
The externally connection can be checked with the buttons Check COM 1 to Com 4. SyCon
sends a request on that serial port and asked for the firmware. If there is a device connected
the firmware is displayed otherwise there will be a time-out error.
Now you can assign the configured devices to the boards and to the serial ports. If the
assignment for one device is done, it is no longer available in the select list for a further
assignment. Therefore if you want to change an assignment, you have to select No device
instead of a device, before you can get the device in the selection list for or other board or serial
port.
Viewing, Printing and Saving Your Configuration
View Device Table
The list of devices is displayed with the menu item View - Device Table.
Address Table
To display the list of salve addresses use the menu item View - Address
Table. Select the master as actual master to display its’ address table.
CRL Table (ProfiBus)
Display the Communication Reference List.
OD Table (Profibus)
- OD Table.
The Object Directory is displayed with the menu item View
Print
After you have selected the actual printer with the menu item Print
Setup you can print out the configuration with the menu item Print. If
you want to have a preview of the print before printing you can use the
function Print Preview.
Save
You can save the configuration with the menu item Save if the file
name is known otherwise you must use the function Save as with a
new file name.
80
Appendix A – Sycon Manual
Acc-72E User Manual
Downloading the Configuration to PmacGate-Way
The download of the configuration data to the device can be started with the menu Online Download.
At first you have to select the desired device, so that it is signed with a blue frame around it.
This is done with the function Actual Master in the window Master Configuration or with the
function Select as actual master in the menu which appears if you click with the right mouse
button on a master device.
Before the download happens, SyCon will check the configuration. If there appears any error
message, the configuration should be checked. Most errors are overlapping addresses, which
can be located by looking into the Address Table.
The configuration will be transmitted to the selected device and stored in static FLASH
memory, so that it is available after the power is switched off and on in this device.
Appendix A – Sycon Manual
81
Acc-72E User Manual
Debugging
Debug Mode and Device Diagnostic
After you have selected an actual master, you can start the debug mode. From this time,
SyCon requests the status of all slaves of the actual master. If there is an error on a slave the
bus line to this slave is drawn in red otherwise it is green. SyCon also display the Diag
message, if the slave signals diagnostic information. This information is displayed if you click
with the mouse at the corresponding device in debug mode.
To activate the debug mode select the menu Online - Start Debug Mode. The menu Online Device Diagnostic activates the DP slave diagnostic. To end the Debug Mode select the menu
Online - Stop Debug Mode.
Device Diagnostic Descriptions:
Master_Lock
The slave has been parameterized by another master. DP master (class
1) sets this bit, when the address is unequal to 255 and unequal to the
own address.
Param_Fault
This bit is set by the slave, when the last parameter telegram has an
error, for example wrong length, wrong Ident_Number, invalid
parameter.
Invalid_Slave_Resp
This bit is set by the master, when the master has received an invalid
answer from the slave.
Not_Supported
This bit is set by the slave, when a function is asked to be performed
but does the slave does not support.
Ext_Diag
This bit is set by the slave. If the bit is set, then there is diagnostic
information in the slave-specific diagnostic area (EXT_DIAG_DATA).
Cfg_Fault
This bit is set by the slave, when the configuration data is not unequal.
Station_Not_Rdy
This bit is set by the slave, when the slave is not ready for data
exchange.
Station_Non_Existent This bit is set by the master, if this slave is not reachable on the bus. If
this bit is set, the diagnostic bits holds the state of the last diagnostic
information or the initial values.
82
Appendix A – Sycon Manual
Acc-72E User Manual
Diag.Deactivated
This bit is set by the master, when the slave in the slave parameter set is
not marked as active and is take out of the cyclic processing.
Diag.Sync_Mode
This bit is set by the slave, when he has received the sync-control
command.
Diag.Freeze_Mode
This bit is set by the slave, when he has received the freeze-control
command.
Diag.WD_ON
This bit is set by the slave, when its watchdog control is active.
Diag.Stat_Diag
If the slave sets this bit, the master has to collect diagnostic information
as long as this bit is active. The slave sets this bit for example when
there are no valid user data. If the bit Diag.Prm_Req and the bit
Diag.Stat_Diag are set, the bit Diag.Prm_Req has the higher priority.
Diag_Prm_Req
If the slave sets this bit, a new parameterization has to be performed.
This bit is set as long as no new parameterization has been performed.
This bit is set from the slave.
Ext_Diag_Overflow
If this bit is set, there are more diagnostic information as in
EXT_DIAG_DATA given. The DP-slave set this bit for example if there are
more channel information as the slave can hold in its send buffer; or the
master set this bit, when the DP-slave send more diagnostic information,
as the master can hold in its diagnostic buffer.
Diag.Master_Add
In this octet the address of the master is entered, which has done the
parameterization of the this slave. If the salve is not parameterized from
any master, the slave put the address 255 (FF) into this octet.
Ident Code
The identifier of the manufacturer is reserved for every participant. This
identifier can be used for checks or can be used for an exact
identification.
Appendix A – Sycon Manual
83
Acc-72E User Manual
I/O Monitor
This is a simple tool, which allows displaying and entering at the first 32 bytes of the process
image.
FMS Monitor (Profibus FMS)
This tool allows starting a ProfiBus-FMS service based on the configured objects and
communication references. You must select on of the service Read or Write and the parameter
in the select list. If it is a write, the output data are entered in the Value field. The service is
activated with the button Send. At the left side of the window appears the confirmation.
Task States
Task states are online counters, values, parameters and states that can be displayed. Several
task states are available. The Online - Task State menu activates a list of available
structures. The listed structures can be displayed to show the values.
84
Appendix A – Sycon Manual
Acc-72E User Manual
Error numbers
The following table lists the error numbers of the converting functions.
Number
4000
4001
4002
4003
4004
4005
4006
4007
4008
4009
4010
4011
4012
4013
4014
4015
4016
4034
4035
4036
4037
4038
4039
4040
4041
4042
4043
4044
4045
4046
4047
4048
4049
4050
4051
4052
4053
4054
4055
4056
4057
4058
4059
Description
No table existing
Success in compromising
Set not existing
Last respectively first entry reached
Not enough memory
Directory table full
Max number of entries reached
No writing to this table possible, because the table is located in the FLASH
Table name already exists
File name does not exist
Free RAM length from RCS_CNF.P86 is smaller than E_F_INDEX * 2
Parameter next wrong
Not enough free space to copy data set
Set is deleted
Value for Index is wrong
Access not allowed
Open_file used before init_file
Length of converting stream is 0
Non equal data set found
Writing of set 0 is not allowed
No entriy in this file
Data set has length 0
The function DbmInit has assigned a Zero pointer during RCS initialization
Printer not ready
The data base is used from another function
New length of data base is smaller than used
Unknown access mode
Old data base has to be converted
Error while converting. Function not known
Unknown type in set 0 found
No float function available
Function not in RCS module
Check failed
Checksum ckeck failed
More segments are existing in file, than in the structure FILE_INFO_T
SegLen in structure FILE_INFO_T is smaller then the length in the file. Return of
function dbm_restore_data
The header file holds an other information for a length than in the segment itself
Not enough memory for allocation on the PC
No index for file handle in structure FLASH_DIR of RCS found
File type 2 can not be printed because of too many definitions
The definitions need too many lines to display them, than in the program available
An unknown format for the parameter. Valid is U, H, or S
Appendix A – Sycon Manual
85
Acc-72E User Manual
Number
4060
4061
4062
4063
4064
4065
4066
4067
4068
4069
4070
4071
4072
4073
4074
4075
4076
4077
4078
4079
4080
4081
4082
4083
4084
4085
4086
4087
4088
4089
4090
4091
4092
4093
4094
4095
4096
4097
4098
5001
5002
5003
5004
5005
5006
5007
5008
86
Description
Unknown parameter type
The data base was transmitted into the FLASH
Set 0 contains no structure definition
Set 0 can not be deleted
Error during execution of a ODBC data base access
Initializing of DBM through RCS had no success
Passed data length incorrect
Sorting function not linked
Error in function parameter
Error from ODBC table
No free handle available. Too many data base links are already opened
Unknown data type found in the table
Structure of table GLOBAL not correct or no such table existing
No name of an ACCESS data base
Download window can't be created
Download not fully performable
Parameter SourceType of table SourceTab not existing
Parameter Translate of table CreateTab does not exists
Parameter Sourcefile of table CreateTab does not exists
Parameter Sourcetable of table CreateTab does not exists
Parameter Desttable of table CreateTab does not exists
Parameter Special of table CreateTab does not exists
More than 32 tables shoul be created
No entry in element szSourceFile
ODBC connection initialization not possible. This could happen when in file
ODBCINST.INI in section [Microsoft Access Driver (*.mdb)] is no valid path to
ODBCJT16/32.DLL.
Error in structure in the ACCESS data base that is in DBM format
Error in structure in the ACCESS data base that is in DBM format
No data in a ODBC table
No entry
ODBC set length not valid
Not enough data sets in ODBC table
Table CreateTab not found
Error in structure of table CreateTab
No entry in element szSourceTable
No entry in element szDestTable
Entry in iSourceType of table CreateTab is wrong
Entry in iTranslate of table CreateTab is wrong
Function SQLAllocStmt reports an error
OdDBC source table not found
Function PackLongToByteShort: Not enough space in pvD (Number of elements
greater than reserved memory)
Function PackLongToByteShort: Not enough space in pvD. Detected during
converting of pvS
Function StringToByte: Not enough space in pvD
Function IntToByte: Not enough space in pvD
Function LongToShort: Not enough space in pvD
Function PackStringDumpToByteArray: Not enough space in pvD
Function PackStringBumpToByteArray: A character was found, which is not
convertable into a HEX value
Function PackStringDumpToByteArray: Number of character odd
Appendix A – Sycon Manual
Acc-72E User Manual
APPENDIX B – SAMPLE PMAC PLC TO TRANSFER 16-BIT
INTEGER DATA
The variables defined to access the PMAC Gateway hardware are all 8-bit unsigned data types because
the hardware on the PMAC Gateway is byte oriented. In many cases, individual bits of the fieldbus data
representing discrete I/O may be dealt with, or bytes may be combined in order to represent data as 16-bit
integer or floating point values.
M-Variables (16-bit) for Use in Programs
The memory address used for the following M-Variables are valid only for a Turbo PMAC2 in which a
User Buffer has been created to allocate this memory. (Refer to the PMAC On-Line command section of
the Software Reference manual.)
Example:
M6000->Y:$6C000,16,8
M6001->X:$6C000,16,8
M6002->Y:$6C001,16,8
M6003->X:$6C001,16,8
M6004->Y:$6C002,16,8
M6005->X:$6C002,16,8
M6006->Y:$6C003,16,8
M6007->X:$6C003,16,8
M6500->Y:$6C100,16,8
M6501->X:$6C100,16,8
M6502->Y:$6C101,16,8
M6503->X:$6C101,16,8
M6504->Y:$6C102,16,8
M6505->X:$6C102,16,8
M6506->Y:$6C103,16,8
M6507->X:$6C103,16,8
;Low Byte of first output word
;High Byte of first output word
;Low Byte of second output word
;High Byte of second output word
;Low Byte of third output word
;High Byte of third output word
;Low Byte of fourth output word
;High Byte of fourth output word
;Low Byte of first input word
;High Byte of first input word
;Low Byte of second input word
;High Byte of second input word
;Low Byte of third input word
;High Byte of third input word
;Low Byte of fourth input word
;High Byte of fourth input word
Allocate M-Variables for Receive Process (Input) Data
M3300->Y:$010700,0,16,u
M3301->Y:$010701,0,16,u
M3302->Y:$010702,0,16,u
M3303->Y:$010703,0,16,u
;Input
;Input
;Input
;Input
Word1
Word2
Word3
Word4
Allocate M-Variables for Send Process (Outputs) Data
M4300->Y:$010600,0,16,u
M4301->Y:$010601,0,16,u
M4302->Y:$010602,0,16,u
M4303->Y:$010603,0,16,u
;Output
;Output
;Output
;Output
Word1
Word2
Word3
Word4
Appendix B – Sample Pmac PLC toTransfer 16-Bit Integer Data
87
Acc-72E User Manual
Programming Example for Word Oriented Data
The conversion of 8-bit to 16-bit or 16-bit to 8-bit requires a program.
The following is an example of a PMAC compiled PLC that effectively sends or receives the application's
16-bit data to/from the bytes that are transferred to/from the fieldbus.
close
open plcc1 clear
M6000=M4300&$00FF
M6001=(M4300&$FF00)/256
M6002=M4301&$00FF
M6003=(M4301&$FF00)/256
M6004=M4302&$00FF
M6005=(M4302&$FF00)/256
M6006=M4303&$00FF
M6007=(M4303&$FF00)/256
M3300=M6500+(256)*M6501
M3301=M6502+(256)*M6503
M3302=M6504+(256)*M6505
M3303=M6506+(256)*M6507
Close
88
Appendix B – Sample Pmac PLC toTransfer 16-Bit Integer Data
Acc-72E User Manual
APPENDIX C – HILSCHER HYPERLINKS
System Configurator (Sycon) PROFIBUS:
http://www.hilscher.com/files_manuals/pb_oie9.pdf
System Configurator (Sycon) CANopen:
http://www.hilscher.com/files_manuals/co_oie8.pdf
System Configurator (Sycon) DeviceNet:
http://www.hilscher.com/files_manuals/dn_oie7.pdf
CC-Link Slave Protocol Manual (COMPRO configurator):
http://www.hilscher.com/files_manuals/ccs_pre.pdf
CC-Link Booklet (Hardware):
http://www.hilscher.com/files_manuals/CC-Link%20Booklet.pdf
Booklet DeviceNet (Hardware):
http://www.hilscher.com/files_manuals/DeviceNet%20Booklet.pdf
Profibus Booklet (Hardware):
http://www.22hilscher.com/files_manuals/PROFIBUS%20Booklet.pdf
CANOpen Booklet (Hardware):
http://www.hilscher.com/files_manuals/CANopen%20Booklet.pdf
Hilscher Manuals (For In-Depth Protocol Explanations and Memory Map – except
CC-Link):
ftp://support.deltatau.com/DT-USA/Delta%20Tau%20Fieldbus/MANUALS/manuals.pdf
Appendix C – Hilscher Hyperlinks
89