1
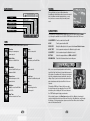
WARNING: PHOTOSENSITIVITY/EPILEPSY/SEIZURES
A very small percentage of individuals may experience epileptic seizures or blackouts when exposed
to certain light patterns or flashing lights. Exposure to certain patterns or backgrounds on a television
screen or when playing video games may trigger epileptic seizures or blackouts in these individuals.
These conditions may trigger previously undetected epileptic symptoms or seizures in persons who
have no history of prior seizures or epilepsy. If you, or anyone in your family, has an epileptic condition
or has had seizures of any kind, consult your physician before playing. IMMEDIATELY DISCONTINUE
use and consult your physician before resuming gameplay if you or your child experience any of the
following health problems or symptoms:
• dizziness
• eye or muscle twitches
• disorientation
• any involuntary movement
• altered vision
• loss of awareness
• seizures, or
or convulsion.
Thank you for purchasing Sonic’s Ultimate Genesis Collection™. Please note that this software is
designed for use with the PLAYSTATION®3 computer entertainment system. Be sure to read this
software manual thoroughly before you start playing.
RESUME GAMEPLAY ONLY ON APPROVAL OF YOUR PHYSICIAN.
_____________________________________________________________________________
Use and handling of video games to reduce the likelihood of a seizure
• Use in a well-lit area and keep as far away as possible from the television screen.
• Avoid large screen televisions. Use the smallest television screen available.
• Avoid prolonged use of the PLAYSTATION®3 system. Take a 15-minute break during each hour of play.
• Avoid playing when you are tired or need sleep.
_____________________________________________________________________________
Stop using the system immediately if you experience any of the following symptoms: lightheadedness,
nausea, or a sensation similar to motion sickness; discomfort or pain in the eyes, ears, hands, arms, or
any other part of the body. If the condition persists, consult a doctor.
NOTICE:
Use caution when using the SIXAXIS™ wireless controller motion sensor function. When using the
SIXAXIS™ wireless controller motion sensor function, be cautious of the following points. If the
controller hits a person or object, this may cause accidental, injury or damage. Before using, check
that there is plenty of space around you. When using the controller, grip it firmly to make sure it
cannot slip out of your hand. If using a controller that is connected to the PS3™ system with a USB
cable, make sure there is enough space for the cable so that the cable will not hit a person or object.
Also, take care to avoid pulling the cable out of the PS3™ system while using the controller.
WARNING TO OWNERS OF PROJECTION TELEVISIONS:
Do not connect your PLAYSTATION®3 system to a projection TV without first consulting the user manual
for your projection TV, unless it is of the LCD type. Otherwise, it may permanently damage your TV screen.
HANDLING YOUR PLAYSTATION®3 FORMAT DISC:
• Do not bend it, crush it or submerge it in liquids. • Do not leave it in direct sunlight or near a radiator
or other source of heat. • Be sure to take an occasional rest break during extended play. • Keep this
disc clean. Always hold the disc by the edges and keep it in its protective case when not in use. Clean
the disc with a lint-free, soft, dry cloth, wiping in straight lines from center to outer edge. Never use
solvents or abrasive cleaners.
Contents
Getting Started . . . . . . . . . . . . . . . . . . . . . . . . . . . . . . . .
Game Select Menu . . . . . . . . . . . . . . . . . . . . . . . . . . . . . .
Options Menu . . . . . . . . . . . . . . . . . . . . . . . . . . . . . . . . . . .
Extras Menu . . . . . . . . . . . . . . . . . . . . . . . . . . . . . . . . . . . .
Museum . . . . . . . . . . . . . . . . . . . . . . . . . . . . . . . . . . . . . . . .
Pause Menu . . . . . . . . . . . . . . . . . . . . . . . . . . . . . . . . . . . . .
Games . . . . . . . . . . . . . . . . . . . . . . . . . . . . . . . . . . . . . . . . . .
2
4
4
5
5
5
6
Sonic The Hedgehog . . . . . . . . . . . . . . . . . . . . . . . . . . . . . . .
Golden Axe . . . . . . . . . . . . . . . . . . . . . . . . . . . . . . . . . . . . . . . .
Ecco the Dolphin . . . . . . . . . . . . . . . . . . . . . . . . . . . . . . . . . .
Streets of Rage . . . . . . . . . . . . . . . . . . . . . . . . . . . . . . . . . . .
Vectorman . . . . . . . . . . . . . . . . . . . . . . . . . . . . . . . . . . . . . . . .
Phantasy Star II . . . . . . . . . . . . . . . . . . . . . . . . . . . . . . . . . . .
7
9
11
12
15
17
■
■
■
■
■
■
Sonic’s Ultimate Genesis Collection™ contains over 40 classic titles, only a small number of
which are introduced in this manual. Please see the official website for this title at
http://www.sega.com/sonicsugc for information on how to play the other games.
1
Using the SIXAXIS™ Wireless Controller (for PLAYSTATION®3)
Getting Started
Port indicators
Slot cover
PLAYSTATION®3 System
Front
CF*1 slot
Directional
buttons
SD* Memory
Memory
Card slot
Stick™ slot
2
Memory
Stick™ slot
SD/miniSD
R2 button
R1 button
L2 button
L1 button
SD*2 Memory
Eject button
Card
slot
SD/miniSD
R1 button
L1 button
CF*1 slot
CF
R2 button
USB connector
L2 button
Port indicators
Slot cover
Eject button
CF
USB connector
Insert the disc with the
label side facing up.
*1 CompactFlash®
*2 Secure Digital
Insert the disc with the
label side facing up.
*1 CompactFlash®
*2 Secure Digital
button
button
button
button
Directional
buttons
Left stick/
L3 button*
Left stick/
L3 button*
Right stick/
R3 button*
SELECT button
Disc slot
START button
Power button
* The L3 and R3 buttons function when the sticks are pressed.
Vent
Note: To use the controller, you must first register or “pair” the controller with the
PLAYSTATION®3 system and assign a number to the controller. For details, refer to the
instructions supplied with the system.
Vent
Eject
button
Eject button
WLAN
access
indicator
WLAN
access
indicator
HDDHDD
access
indicator
access
indicator
Saved data for PLAYSTATION®3 format software
connectors
USBUSB
connectors
Saved data for PLAYSTATION®3 format software is saved on the system’s hard disk. The data
is displayed under “Saved Game Utility” in the [Game] menu.
Note: Some models of the PLAYSTATION®3 system do not include media slots. For specific
features included, refer to the instructions for use of your model of the PLAYSTATION®3
system.
Starting a game: Before use, carefully read the instructions supplied with the
PLAYSTATION®3 computer entertainment system. The documentation contains information
on setting up and using your system as well as important safety information.
Check that the MAIN POWER switch (located on the system rear) is turned on. Insert the
Sonic’s Ultimate Genesis Collection™ disc with the label facing up into the disc slot. Select the
icon for the software title under [Game] in the PLAYSTATION®3 system’s home menu, and then
press the S
g button. Refer to this manual for information on using the software.
Quitting a game: During gameplay, press and hold down the PS button on the wireless
controller for at least 2 seconds. Then select “Quit Game” from the screen that is displayed.
HINT
Right stick/
R3 button*
START button PS button
PS button
SELECT button
Disc slot
Power button
button
button
button
button
Saving Scores and Settings
As long as Autosave is enabled, your scores and settings will be saved automatically after
you change the settings and options, in-between games, and when you return to the Game
Select menu. If Autosave is disabled, scores and settings will need to be saved manually by
selecting Save Settings in the Options menu.
Scores and game progress (“game state”) can also be saved on a title by title basis, to be
resumed at a later time. Press SELECT anytime during a game and select Save Game Data.
Up to three game states can be saved.
Loading Scores and Settings
Game settings are automatically loaded when you start up Sonic’s Ultimate Genesis
Collection™. They can also be loaded manually via Options.
To remove a disc, touch the eject button after quitting the game.
2
3
Game Select Menu
Press the START button at the Title Screen to open
the Game Select menu. From here you are able
to scroll through the entire game collection, select
a game to play, view the Museum for each game,
adjust the game’s Options, and check out bonus
games and other unlockable Extras. Use the left
stick or directional buttons C V to cycle through
the list of games, and Z X to rate each game as
a favorite. You can also press the tQ and tE
buttons to sort alphabetically, by year, genre or
favorites. On the right side of the Game Select menu you will find information regarding the
release year of each game.
Extras Menu
Press the D
g button at the Game Select menu to
open the Extras menu. In addition to the 40 games,
Sonic’s Ultimate Genesis Collection™ contains nine
classic games that can be unlocked, as well as
interviews. Use the left stick or directional buttons
C V to highlight an item and press the S
g button to
g button to view the Sonic’s Ultimate
play. Press the D
Genesis Collection™ game credits, and the A
g button
to return to the Game Select menu.
Highlight the game or interview to see how to
unlock bonus items.
Use the following buttons to access the different game features.
gS button
Play the selected game.
gA button
View the Museum for the selected game.
gD button
Open the Extras menu to access unlockable games and movies.
gF button
Open the Options menu to change game settings.
Options Menu
Press the gF button at the Game Select menu
to open the Options menu. Use the left stick or
directional buttons C V to highlight an option and
press the gS button to select. Once selected, use
the directional buttons to make changes. Press the
gA button to return to the Game Select menu.
Museum
Each game in the collection has its own Museum,
which includes a history of the game and artwork.
Highlight a game in the Game Select menu and
press the gA button to enter the Museum for that
title. While in the Museum, press the tQ and tE
buttons to cycle between the History and Artwork
sections. Press the gA button to return to the Game
Select menu.
Pause Menu
While playing any game, press the SELECT button to pause the game and open the Pause
menu with the following options:
Resume Game
Return to the game in progress.
Control Setup
Select Save Settings to manually save your game settings and unlocked content, or Load
Settings to manually load. If Autosave is set to ON, then it’s unnecessary to use the Save
Settings option.
View the unique controls for the game, and customize the button
assignments. For two-player games, each player will need to
individually access the Control Setup menu to change their controls.
Video Setup
Adjust your game’s viewing area on your television, and turn ON/OFF
the Smoothing option.
Audio / Video Settings
Save Game
Save the game in its current state. Up to three game states can be saved.
Use the left stick or directional buttons C V to select from Brightness, Music or SFX (sound
effects), and Z X to change their respective levels.
Load Game
Load a previously saved game.
Reset Game
Reset High Scores for the game. The game will also restart from its Title Screen.
Exit Game
Return to the Game Select menu.
Autosave Settings
4
5
Games
Sonic the Hedgehog
Here is the complete list of the titles included in the collection. A small selection of the games
are introduced in the pages that follow. Additionally, a brief description of the controls for
each game can be found by accessing the title’s Pause menu and selecting Control Setup.
For detailed instructions for all games, check out the official website at
http://www.sega.com/sonicsugc
The evil scientist Dr. Eggman (AKA Dr. Robotnik) has
snatched the poor animals of Emerald Island and turned
them into robots. Only one hero can defeat Dr. Eggman and
rescue the animals from his vile clutches -- it’s the supercool hedgehog with the blue spiky hair, Sonic!
■■ Alex Kidd in the Enchanted Castle
■■ Phantasy Star III: Generations of Doom
■■ Alien Storm
■■ Altered Beast
■■ Phantasy Star IV: The End of the
Millennium
■■ Beyond Oasis
■■ Ristar
■■ Bonanza Bros.
■■ Shining Force
■■ Columns
■■ Shining Force 2
■■ Comix Zone
■■ Shining in the Darkness
■■ Decap Attack starring Chuck D. Head
■■ Shinobi III: Return of the Ninja Master
■■ Dr. Robotnik’s Mean Bean Machine
■■ Sonic 3
Rush through six exciting Zones collecting Rings, avoiding
traps and destroying enemies. Each Zone is divided into
three Acts. At the end of the third Act, you must defeat Dr.
Eggman and release the captured animals from the capsule
to clear the Zone.
■■ Dynamite Headdy
■■ Sonic 3D Blast
Walking/Running
■■ Ecco the Dolphin
■■ Sonic & Knuckles
■■ Ecco: The Tides of Time
■■ Sonic Spinball
Use the left stick or directional buttons Z X to move
Sonic left and right.
■■ E-SWAT
■■ Sonic The Hedgehog
■■ Fatal Labyrinth
■■ Sonic The Hedgehog 2
■■ Flicky
■■ Streets of Rage
■■ Gain Ground
■■ Streets of Rage 2
■■ Golden Axe
■■ Streets of Rage 3
■■ Golden Axe II
■■ Super Thunder Blade
■■ Golden Axe III
■■ Vectorman
■■ Kid Chameleon
■■ Vectorman 2
From the Title Screen, press the START button to begin the
game.
Playing the Game
ATTACK
To attack enemies, use the left stick or directional button V while running to perform a Spin
Attack, or press the gS, gA or gF button to jump and perform a mid-air Spin Attack.
RINGS
Pick up Rings to protect yourself from enemy attacks. When you are attacked, you will lose all
your Rings which leaves you vulnerable.
TIME
You have ten minutes to complete each Act. Exceed this and you will lose one try.
■■ Phantasy Star II
The following games for the SEGA Master System™ and arcade can also be unlocked and
played via Extras.
■■ Golden Axe Warrior
■■ Altered Beast
■■ Shinobi
■■ Phantasy Star
■■ Congo Bongo
■■ Space Harrier
■■ Alien Syndrome
■■ Fantasy Zone
■■ Zaxxon
6
7
Game Screen
Golden Axe
Current Score
Time Elapsed
Rings
The land of Yuria has been invaded and is now ruled by the
iron fist of Death Adder, who secured his throne by seizing
the Golden Axe. Three brave warriors now rise to the
challenge of defeating Death Adder and his soldiers and
restoring peace to the Kingdom.
From the Title Screen, press the START button on controller
1 for one player or controller 2 for two players. Use
controller 1 to select from the following modes:
Remaining Tries
Items
Use the Spin Attack to smash open video monitors and receive the item inside.
Super Ring
Earns you ten Rings.
Power Sneakers
Makes you run even faster.
Shield
Protects you from damage one
time only.
Invincible
Protects you from damage for a
limited time.
1-UP
Gives you one extra try to finish the game.
Arcade
Play the arcade version of Golden Axe™.
Your journey takes place over eight stages.
Beginner
Play a simplified version of Golden Axe™. In this mode, the game ends at
stage 3, after a battle with Death Adder Jr.
The Duel
Test your skill against other game characters. In one-player games, you fight
one-by-one against 12 of Death Adder’s soldiers, each more powerful than the
last. The battle ends if you lose a duel. In two-player games, the two players
fight each other until one warrior defeats the other.
Once the game mode is selected, select a warrior to play using the left stick or directional
buttons.
Playing the Game
Make your way through the playfield fending off Death Adder’s minions.
Moving
Use the left stick or directional buttons to move the warrior in any direction. Push the
gF button to jump.
Secret Zone
Attacks
Clear Act One or Act Two with 50 or more Rings and you
will be transported to the Secret Zone by jumping through
the giant gold Ring.
● Press the gS button while jumping for a downward slash with your weapon.
Use the Spin Attack by ricocheting off multi-colored blocks
in a 360° rotating maze. In each Secret Zone, the aim is to
grab the Chaos Emerald (one in each Secret Zone) and as
many Rings as you can while keeping away from the Goal
Blocks.
● Press the gS and gF buttons together for a special skill attack.
8
● Press the gS button while running for a body slam, kick or head butt, depending on your
warrior.
● Press the gD button for a Magic attack.
Remember that each warrior has their own unique skills. What one warrior can do, the others
may not be able to. Experiment with the Jump and Attack buttons to discover all the special
moves, and learn the best ways to control each warrior.
9
Gameplay Hints
Ecco the Dolphin
● Nudge passing elves and pick up the Magic Pots and Strength Bars they drop to increase
your power.
● Some enemies are mounted on Bizarrians, creatures native to the land of Yuria. Try to
knock the riders off of the Bizarrians, and mount the creature yourself to use its special
skills to your advantage. When you ride a Bizarrian, it will take all damage from enemy hits
instead of you.
Game Screen
A freak waterspout storm has sucked up all the marine life,
leaving Ecco all alone in the bay. Ecco must now travel the
ocean far and wide gathering clues and solving puzzles in
order to find his lost pod and unravel the mystery of their
disappearance.
At the Title Screen, press the START button to go to a
submerged cavern, where Ecco waits to begin the long
journey through the timeless seas. Push the left stick or
directional buttons X to start from the beginning, or Z to
go to the Password screen.
Magic Box
A Password is given at the beginning of each new level which allows you to continue from
where you left off or from any previously played levels.
Playing the Game
Use the left stick or directional buttons to swim as Ecco around the sea, searching for the
path to the next level, and solving puzzles along the way. Hold down the gS button while
moving to swim at a greater speed, or push the gF button to charge. With enough speed,
Ecco can leap out of the water.
Remaining Lives
Remaining Hits
Singing
Game Over
The game ends when you die with no lives remaining.
If you have Credits, then the Continue Game message will be displayed. Select Yes and
press the START button to continue the game from the last stage you were playing. Select No
to proceed to the Scoreboard.
The Scoreboard will be displayed before returning to the Title Screen. It shows your score,
the number of times your warrior has been revived, your total strength and your game ranking.
Options
From the Title Screen, select Options to change a variety of game settings. Use the left stick
or directional buttons C V to select an option and Z X to change the setting.
Life Meter
Choose the number of hits your warrior can take from 3 to 5.
Control
Change the controller button settings. Note that A, B and C represent the
SEGA Genesis™ buttons.
Sound Test Press the START button to display the Sound Test menu. Select a game sound
with the left stick or directional buttons and press the START button to preview.
10
Press the gA button to use sonar. Ecco uses sonar to sing songs. Songs can be used to
communicate, ward off enemies, or get information from Glyphs. Also, hold down the
gA button until the song echoes back to display part of a map in front of you. As the story
progresses, you will learn more songs with varied effects.
Health and Breath
The gauges at the top left of the screen indicate Health
(top) and Breath (bottom). If you are hurt in any way you will
lose Health. Breath depletes slowly by being underwater.
To regain Health, charge a school of fish and eat. To regain
Breath, find open air or an air pocket, and either leap out or
push your nose above water.
If either gauge is depleted, you must restart the level from
the beginning.
Glyphs
Glyphs are mysterious crystals scattered in the ocean depths. Some Glyphs give you
information when you sing at them, while others give you various kinds of temporary powers.
Some Glyphs simply block your way and you must find a way to move them.
11
Streets of Rage
An influential criminal syndicate has taken control over the
once peaceful city. Take on the role of one of the ex-police
officers Adam, Axel or Blaze and clean up the Streets of
Rage.
Press the START button at the Title Screen to display
the Mode Select screen. Use the left stick or directional
buttons C V to select a menu item and press the gS button
to enter one of the following:
1 PLAYER
Start a single-player game.
Once you’re out in the streets, it’s time to battle with your
fighter’s hand-to-hand combat skills. Use all of the attack
methods at your disposal to knockout every hoodlum in the
area and advance further in the Streets of Rage.
A noticeably stronger (and usually bigger) Boss is waiting
in the final area of the Round. Quickly learn the behavior of
the Boss and find the right timing to make your move. The
Round is completed when you successfully deplete the
Boss Gauge (displayed below the Player 1’s Life Gauge)
for a victory.
Game Screen
2 PLAYERS Start a two-player cooperative game.
OPTIONS
Score
Access the Options screen.
Life Gauge
For both game modes, you will need to choose a fighter from the Fighter Select screen.
Fighters are rated from A (highest) to B (lowest), so pick a fighter that suits your style.
Remaining Lives
Joining a Game in Progress
Special Attacks
During a single-player game, a second player can join the ongoing battle by pressing the
START button on his/her controller. The new fighter is determined based on the existing
fighter, and will drop in from the top right corner of the screen.
Timer
Playing the Game
Use the left stick or directional buttons to move your fighter in all directions, and press the
gS button to Jump. Additionally, press the gA button to Attack, or the gD button for a Special
Attack. By combining the directional input buttons with the Jump and Attack buttons, a wide
variety of attacks and moves are possible as follows:
Combo Hits Repeatedly tap the gA button (up to 4 hits).
Jump Kick
Press the gS button, followed by the gA button.
Rear Attack Press the gS and gA button together.
Grab
Move right in front or behind the enemy.
Fury
Grab and repeatedly tap the gA button.
Throw
Grab an enemy face front, then press Z or X (away from your foe) and the
gA button together.
Backdrop
Grab an enemy from behind and press the gA button.
Vault
Grab an enemy and press the gS button.
Team Attack Grab your partner (player), then press Z or X (away from your partner) and
the gA button together.
12
Note: For a two-player game, Player 2’s information will be displayed on the top right corner
display area of the screen.
Items
Apple
Recover a small amount of your
Life Gauge.
Beef
Completely recover your Life
Gauge.
1-UP
Gain an extra life to continue
the battle.
Special
Gain the additional use of
Special Attack.
Cash
Add 1,000 points to your score.
13
Weapons
You can pick up weapons that either enemies have
dropped or that can be found inside breakable objects.
When you see a weapon you’d like to use, move your
fighter over it and press the gA button to grab the item.
Once the weapon is in your fighter’s hand, take advantage
of it by simply pressing the gA button. Note that taking a hit
will force you to drop the weapon.
Game Over/Continue
When the Life Gauge is completely depleted or you run out
of time, you will lose a Life. You start the game with three
lives and the game will end when all of your lives are lost.
A Game Over/Continue option will appear at the end of
your game (see the top section of the screen). Press the left
stick or directional buttons C V to select either Continue
to continue play or New Game to quit the game.
Note that the number displayed next to Continue is your
remaining credits, and when this runs out, the game is truly
over.
Game Options
Use the left stick or directional buttons C V to select one of
the options, and then Z X to cycle through the available
choices.
SOUND TEST
Choose a sound and press the gA button
to play it.
LEVEL
Set the difficulty level of the game.
CONTROL
Change the button functions of the gA,
gS and gF buttons. Note that A, B, and C
represent the SEGA Genesis™ buttons.
EXIT
Select EXIT and press the gA button to return to the Mode Select screen.
14
Vectorman
By the year 2049, Earth has been turned into a toxic waste
dump. Humankind has fled into space leaving behind an
army of mechanized “Orbots” to clean up Earth. But when
the Orbot leader “WarHead” goes haywire and starts a
global revolt against the humans, it falls on the shoulders of
the last Orbot loyal to its human masters to save the planet.
Press the START button at the Title Screen to display the
Main Menu. Use the left stick or directional buttons C V to
select a menu item and press the START button to enter.
START GAME Start the game from Day (stage) 1.
OPTIONS
Access the Options screen.
Playing the Game
VectorMan must defeat the Orbot leader WarHead to save
Earth. Our hero will continue to fight against the evil Orbots
as long as he has a Health Point remaining. Break television
monitors found throughout the stage and pick up powerups and weapons to help you complete your day’s work.
The game will end if you lose all of your lives.
Use the left stick or directional buttons Z X to move, and
press the gS button to Jump. Press the gS button while in
mid-air to activate the booster. Pressing either the gA or
gF button fires the weapon, while holding it down fires with Rapid Fire (when available). Using
the left stick or directional buttons C V allows you to look up and down the game screen.
Weapons
VectorMan’s default weapon is a standard gun that fires a
single shot per tap. Picking up Weapon Icons (five in all)
will allow you to use advanced weapons, each with its own
unique fire power. Note that there is limited ammunition
and whenever the ammo runs out, the special weapon will
change back into your standard gun.
15
Game Screen
Morphs
Pick up a Morph icon (seven in all) and transform
VectorMan for a limited time in order to carry out a special
task. VectorMan is invincible during this time, so move
freely and access new areas that you normally cannot
reach.
Score
Timer
Health Points
Remaining Lives
Equipped Weapon
Game Options
Use the left stick or directional buttons C V to select one of the options, and then Z X to
cycle through the available choices. Press the START button to return to the Title Screen.
SOUND EFFECTS Turn the sound effects On or Off.
Items
A variety of useful items can be found around the gamefield.
Television
Destroy to earn weapons,
power-ups, etc.
Photon
Collect to earn points.
Health Points
Restore one Health Point.
Full Health
Fully restore your Health Points.
Max Health
Add one Health Point to your
maximum Health.
1-UP
Earn an extra life.
Weapon Icons
Advanced weapons to fire
powerful shots.
Morph Icons
Transform VectorMan for special
tasks.
Multipliers
Multiply scores, Health Points
and 1-UPs.
Milestone
Retry the stage from the
Milestone point.
Extra Time
Add two minutes to the Timer.
MUSIC
Turn the game tune On or Off.
DIFFICULTY
Modify the difficulty level of the game to either Lame, Wicked or Insane.
MUSIC TEST
Select a game tune and press the gS button to play the track.
SOUND TEST
Select a sound and press the gS button to hear it.
BUTTONS
Switch the assigned buttons of JUMP and SHOOT.
INFORMATION
Check all of the featured items found in this game.
Phantasy Star II
Moto, a once peaceful tropical paradise and the shining
jewel of the Algo Star System, is facing terrible oppression
at the hands of an unknown evil. Strange, vicious creatures
infest the countryside and people are afraid to leave their
villages. It’s up to you to uncover the mystery behind these
grim circumstances and help restore Moto to its former
splendor.
Following the SEGA logo, Phantasy Star II opens with
the story that precedes your adventure. Press the START
button at any time to display the Title Screen, then press
the START button again to begin your adventure.
After you start the game, select New Game and press the gS or gA button. An automated
sequence that introduces the story will then run. Press the gF, gS or gA button to scroll through
the dialogue. To load a previous game, please access the Pause Menu, select Load Game
and select the desired Save File.
16
17
Playing the Game
TECH
As you embark on your quest, you will find yourself in three
main game environments as detailed below.
Towns and Villages
Make use of your party’s Techniques. Choose a character and one of their Techniques. Some
Techniques will also require you to select a target character who will receive the effects of the
Technique. If the character has sufficient TP, the Technique will then be performed and the
allotted TP will be consumed.
Here you can gather information from the locals, purchase
weapons and items (see Shops and Facilities on p.21), and
trigger events that progress the story.
STRNG
Wilderness and Dungeons
EQP
Select a character to see a full rundown of their current parameters (see “Status” below).
When confronted by monsters, defeat them to gain EXP (experience) and Meseta (currency).
Equip or unequip weapons and armor, etc. for each character. Select a character to display
their inventory and the status of each body part. Next select an unequipped item to equip, or
an equipped item to unequip. If an item is already equipped for the selected body part, then
the old item will be unequipped automatically. Depending on the combination of weapons and
armor, the character’s AGILITY, ATTACK and DEFENSE will vary. Note the player’s status
displayed in the lower right of the screen. Not all items can be equipped by all characters.
Basic Controls
Status
In the Town and Wilderness areas, use the left stick or directional buttons to make your party
walk in all directions. To talk to people, approach them and press the gF button, then any
action button to progress the dialogue. Talking to people can bring you valuable information
to help in your adventure.
Select STRNG (strength) from the Command Menu and a character that you want to see a
detailed status for. These are displayed in four windows as follows:
Make your way through treacherous landscapes and
puzzling mazes to complete objectives and discover new destinations. You will frequently
encounter ferocious monsters to fight against.
Combat Areas
Some buildings can also be entered. Approach the building from the front (lower part) and use
the left stick or directional button C to enter. If you can’t enter, press the gF button to inspect
it for clues.
Profession (upper left)
Shows the selected character’s LV (level), Profession and EXP (experience).
Equipment (lower left)
Shows items equipped for each body part. This window is the same as used in EQP.
HP/TP (upper right)
Command Menu
In the town and wilderness areas, press the gS button to display the Command Menu:
Shows the current and maximum HP and TP levels.
Personal Characteristics (upper left)
ITEM
Use, exchange or discard your own or your party’s items. First choose the character that
possesses the item, and the item from their inventory. Then choose USE to use the item, GIV
to give it to another character, or TOS to discard. In the case of GIV (and in some instances
USE), you will need to specify a target character. Up to 16 items can be held. Equipped items
are marked with the letter E (see EQP).
STATE
Check simplified character status levels and reorganize your party.
STATE
See a quick reading of each character’s HP (Hit Points), TP (Technique Points),
LV (level) and the party’s Meseta.
ORDER
Change the order of your party. Characters near the top stand a greater chance
of being attacked, so weaker characters with lower HP should be placed at the
bottom.
18
STRNGTH
HP rises with STRNGTH, allowing stronger attacks and reduced injury.
MENTAL
As mental awareness increases, maximum HP also increases. Higher MENTAL
combined with TP allows the character to use more Techniques.
AGILITY
Characters become more coordinated in battle as this number increases.
LUCK
A higher value increases the effectiveness of Techniques.
DEXTRTY
Handling weapons increases DEXTRTY and the amount of injury one can inflict.
ATTACK
Higher numbers mean greater ATTACK skills.
DEFENSE
Higher numbers mean greater resistance to attacks.
Techniques
Press the gS button to reveal another two windows. The left window shows healing and other
Techniques, and the right window shows attack and defense Techniques.
19
Battle Mode
HP (Hit Points)
When confronted by enemies, the game will switch to Battle Mode with a flash of light.
The character dies if HP reaches zero. The following icons may also be displayed:
Select FGHT (fight) and the battle will begin. Action becomes automated with all characters
and enemies taking turns to attack until one side completely defeats the other, or you
intervene (see below). In the event that all your party members are killed, the game will end.
If you’re merely unlucky enough to lose some of your party members, they can be cloned
(revived) at the nearest village for a small fee.
The character has been
poisoned.
The character is temporarily
knocked out by sleeping potion.
The character is temporarily
paralyzed and cannot move.
The character has been killed.
To intervene once battle has commenced, use the left stick or directional buttons in any
direction and an action button, and the fighting will stop at the end of the current cycle of
turns. Here you can select FGHT (fight) to continue the battle as is or STGY (strategy) to
update your team tactics as follows:
TP (Technique Points)
ORDR (Order)
The number shows how much power the character has available for using Techniques.
Use the left stick or directional buttons to select a character in your party and press the
gS button to display the strategy icons. Set the character’s strategy as follows:
Symbol
Indicates the character’s strategy as attack, Technique or shield.
Battle
Command the character to fight,
and select an enemy type to
prioritize.
Technique
Command the character to
utilize Techniques and specify
which to use against whom.
Enemy Damage
Item
Choose an item and select a
party member to use it on.
Defense
If the character is unable to fight,
protect them with a shield, emel
or other covering.
Most towns will have some or all of the following shops and facilities for your use:
RUN
Cut your losses and flee. This can be a life-saver, but take care as some enemies won’t let you
get away so easily, and your party will lose its chance to attack for the duration of the turn cycle.
Battle Screen
Biomonster ID
Indicates the level of damage the enemy sustains while your party members attack.
Shops and Facilities
Item Shop
Buy techniques and potions, and
sell off unused items.
Armor Shop
Buy shields and armor to protect
your characters.
Weapons Shop
Buy weapons for each of your
characters.
Teleport Station
Rapidly transport to any previously
visited town, for a fee.
Data Memory
Save your game progress from
the Pause Menu.
Hospital
Heal your party’s injuries/restore
TP and cure any poisoning.
Clone Labs
Resurrect a dead party member
as a precisely copied clone,
complete with all statistics and
possessions intact.
Central Tower
The central base of operations. Drop
in to the Library to gather information
or leave excess weapons and items
in your Room.
Enemy Damage*
Decision Box
Home
Come here for a rest, to meet new ally characters and to organize your party.
Up to four characters can form your party at a time.
Party Status
*Enemy Damage visible during party attack.
20
21
Notes
Notes
22
23
LIMITED WARRANTY:
Notes
SEGA of America, Inc. warrants to the original consumer purchaser that the game disc or
cartridge shall be free from defects in material and workmanship for a period of 90-days
from the original date of purchase. If a defect covered by this limited warranty occurs during
this 90-day warranty period, the defective game disc or cartridge will be replaced free of
charge. This limited warranty does not apply if the defects have been caused by negligence,
accident, unreasonable use, modification, tampering, or any other causes not related to
defective materials or manufacturing workmanship. This limited warranty does not apply to
used software or to software acquired through private transactions between individuals or
purchased from online auction sites. Please retain the original, or a photocopy, of your dated
sales receipt to establish the date of purchase for in-warranty replacement. For replacement,
return the product, with its original packaging and receipt, to the retailer from which the
software was originally purchased. In the event that you cannot obtain a replacement from
the retailer, please contact SEGA to obtain support.
Obtaining technical support/service
To receive additional support, including troubleshooting assistance, please contact SEGA at:
●● Website: www.sega.com/support
●● Telephone: 1-800-USA-SEGA
LIMITATIONS ON WARRANTY
ANY APPLICABLE IMPLIED WARRANTIES, INCLUDING WARRANTIES OF
MERCHANTABILITY AND FITNESS FOR A PARTICULAR PURPOSE, ARE HEREBY LIMITED
TO 90 DAYS FROM THE DATE OF PURCHASE AND ARE SUBJECT TO THE CONDITIONS
SET FORTH HEREIN. IN NO EVENT SHALL SEGA OF AMERICA, INC. BE LIABLE FOR
CONSEQUENTIAL OR INCIDENTAL DAMAGES RESULTING FROM THE BREACH OF ANY
EXPRESS OR IMPLIED WARRANTIES. THE PROVISIONS OF THIS LIMITED WARRANTY
ARE VALID IN THE UNITED STATES AND CANADA ONLY. SOME STATES DO NOT
ALLOW LIMITATIONS ON HOW LONG AN IMPLIED WARRANTY LASTS, OR EXCLUSION
OF CONSEQUENTIAL OR INCIDENTAL DAMAGES, SO THE ABOVE LIMITATION OR
EXCLUSION MAY NOT APPLY TO YOU. THIS WARRANTY PROVIDES YOU WITH SPECIFIC
LEGAL RIGHTS. YOU MAY HAVE OTHER RIGHTS THAT VARY FROM STATE TO STATE.
To register this product, please go to www.sega.com
SEGA of America, Inc.
350 Rhode Island Street, Suite 400, San Francisco, CA 94103
© SEGA. SEGA is registered in the U.S. Patent and Trademark Office. SEGA, the SEGA logo and Sonic’s
Ultimate Genesis Collection are either registered trademarks or trademarks of SEGA Corporation, All
other trademarks are owned by their respective owners. All rights reserved. Developed by Backbone
Entertainment, a division of Foundation 9 Entertainment, Inc. All Rights Reserved.
24
“PLAYSTATION” is a registered trademark and “PS3” is a trademark of Sony Computer Entertainment Inc. The ratings icon is a trademark of the
Entertainment Software Association. SIXAXIS is a trademark of Sony Computer Entertainment Inc. ® 2008 Sony Computer Entertainment Inc.