1
i-Inventory for TurningPoint
by Total BusinessWare, Inc
i-Inventory for TurningPoint
Introduction ......................................................................................................................... 3
Will i-Inventory work for my company? ........................................................................ 3
The TurningPoint Physical Inventory routine................................................................. 3
Counting methods: .......................................................................................................... 4
Area Types ...................................................................................................................... 4
Streamline the process with i-Inventory ............................................................................. 5
Best Practices .................................................................................................................. 5
Serial Numbers & Lot Numbers ..................................................................................... 6
Tutorial ................................................................................................................................ 7
Prerequisites. ................................................................................................................... 7
Gathering Data .............................................................................................................. 10
Upload Data from Data Collection Terminal to Computer .......................................... 12
Run the Add New Counts Program .............................................................................. 13
Count the serialized inventory at MAIN. ...................................................................... 16
Installation of Hardware & Software ................................................................................ 19
i-Inventory Installation Prerequisites. ........................................................................... 19
Picture of Data Collection Terminal data collection device. ........................................ 19
Installation of Data Collection Terminal ...................................................................... 20
Installing Software ........................................................................................................ 22
Re-installing i-Inventory on the Data Collection Terminal .......................................... 24
Log Files & Backups ........................................................................................................ 25
Rules and Error Handling ................................................................................................. 25
Support and contact information ....................................................................................... 26
2 of 26
Introduction
This program is designed to work with and like the TurningPoint Physical Inventory process.
The difference is that with i-Inventory the item counts are gathered (scanned in) using a portable
data collection device with built in bar code scanner. With the standard TurningPoint process the
counts are gathered on paper.
Will i-Inventory work for my company?
To use this product you need to have bar coded inventory. It does not ALL have to be bar coded.
The items that are not bar coded can be inventoried using TurningPoints standard process in
conjunction with i-Inventory.
The inventory bar codes can be stored in TurningPoint as Item Codes and or UPC’s (on the UOM
tab). If your inventory is not bar coded you could consider bar coding it. TurningPoint comes with
the ability to print 8.5x11 sheets of bar coded labels for inventory items and there are other
commercial packages available.
If you have serialized inventory, you should be aware of how i-Inventory handles serial numbers.
When serialized items are counted using i-Inventory only the serial number is scanned. If a single
serial number is associated with more than one inventory item in TurningPoint than those items
are handled using TurningPoints standard Physical Inventory process.
There is currently no support for LOTTED items. If only part of your inventory is lotted, you could
use i-Inventory on your non-lotted items and use TurningPoints standard Physical Inventory
process for the lotted items.
i-Inventory can be used for annual inventory as well as spot checking or “cycle counting” parts of
your inventory on a regular basis.
The TurningPoint Physical Inventory routine.
This section provides some background on the way TurningPoint handles physical inventory “out
of the box”. After a brief discussion on this, we will cover some terminology and then move into
how i-Inventory streamlines the process.
1.
2.
3.
4.
5.
6.
7.
Create Physical Inventory File (the freeze file)
Print Count Sheets for desired area
Count items on hand an enter that data onto count sheets.
Enter data from count sheets into TurningPoint.
Calculate Cost Variance
Print Variance Report
Update Physical Inventory Count -The difference between the on hand level in the freeze
file (step 1) and what you entered (step 3) is posted against inventory as an adjustment.
You could do steps 1-7 once, for the entire business. In affect using only one “area” or
you could split the inventory into Areas and complete 1-7 for each Area (preferred).
For more information see Counting Methods and Areas below.
The Physical Inventory File keeps track of the inventory that was on hand when the file
was created. This frozen on-hand quantity is later compared to the counted quantity. The
difference between the two numbers is used by the Update Physical Inventory Count
routine to make an inventory adjustment. Any quantities of the item issues or received in
the time between the creation of the Physical Inventory File and the physical count will
3 of 26
result in an on hand discrepancy. Any inventory issued or received after the count will be
handled appropriately.
The following any inventory activity that occurs between step 1 and 7 can adversely
affect the accuracy of your count. This includes:
Sales (Invoice)
Returns (Credit Memo)
Receiving Purchase Orders (PO’s).
Missed items.
Missed items are items you forgot or couldn’t count. Perhaps they were in staging areas
waiting to ship, or shopping carts waiting to be sold.
To minimize the impact of these things avoid the following during steps 1-7
Recording invoices. Sales and returns only affect on hand counts after you
record them.
Delay receiving of PO’s.
Don’t count inventory that is on hand unless its PO has been received.
Missing items. Keep counting areas small and complete them quickly if you
have people pulling orders or filling shopping carts.
Counting methods:
There are basically three different counting methods that you can choose from:
A. Close the doors, and count everything. Then open back up for business.
B. Close certain areas during counting. (see area types below).
C. Keep selling while you count. Count small enough areas, in a fast enough manner, under
the premise that the sales that occur in between the creation of the physical inventory
and the count will be in-consequential or the inaccuracies are tolerable as they would fall
within an acceptable margin of error.
Area Types
The areas you work with can be easily based on one or more of the following:
Range of Items
Range of Product Lines
Range of Locations
Range of Bin Numbers
If you cannot close your doors and stop selling during physical inventory or if you wish to “cycle
count” parts of your business on different schedules then break your business down into Areas
and create a Physical Inventory File for each Area. See the Tutorial for more information.
As you can see, Counting Methods A and B help you to do a perfect inventory. Method C can get
you close, but you will be off by any sales, returns, or PO receipts that happened between
creation of the Physical Inventory (freeze) File and the time the item was counted.
With i-Inventory and your Data Collection Terminal you can count faster and more accurately.
Using method A or B, the Areas need to be closed for shorter periods of time, if using method C
the Area is vulnerable to discrepancy for a shorter period of time.
4 of 26
Streamline the process with i-Inventory
1.
2.
3.
4.
5.
6.
Create Physical Inventory File (the freeze file)
Use your Data Collection Terminal and count the first Area.
Upload data to Computer. Then Add New Counts to TurningPoint.
Calculate Cost Variance
Print Variance Report ( filter it to show only the Area you just inventoried)
Update Physical Inventory Counts -The difference between the on hand level in the
freeze file and what you scanned is posted against inventory as a receipt or issuance.
This completes one Area. Repeat steps 1-6 for each area.
Best Practices
1. Start by planning what areas will be used to manage your inventory.
a. Make a list or map of your Areas.
Check each one off as it is inventory is completed.
b. Areas cannot include inventory from more than one TurningPoint Location. When
data is sent from the Data Collection Terminal into TurningPoint the user assigns
a TurningPoint Inventory Location to that data. You must inventory one Location
at a time.
See Tutorial for details.
c. Make sure that each item is only in one Area at each location. Or if an item is in
more than one Area make sure that any time that item is counted you count ALL
of it, in all Areas, at the location you are working prior to running the Update
Physical Inventory Count routine.
See FOOTNOTE: Items found in more than one area below.
2. Always print the Variance Report and review missed items and exceptions. You can easily do
this by changing the level of detail on the report format.
3. When working by Area, make sure you run the Variance Report for ALL Items, Product Lines,
Locations and Bins with the Level of Detail set to “Exceptions Only” prior to doing the Update
Physical Inventory Count routine. This way you can review every change that would be made
before it is made and while you still have time to make easy corrections.
4. The on hand counts in the Imported Data Collection Terminal data always get added to
whatever is in the Counted Qty field in the Physical Inventory File.
5. Check the log file after each Import of Data Collection Terminal Data.
Each time you import Data Collection Terminal data into the TurningPoint Physical Inventory
File an import log will be created. It MAY contain items that need your attention. New log files
are created with each import. See Log Files & Backups below.
6. More than one Data Collection Terminal unit can be used at a time, on a single computer.
Items found in more than one area:
If you have items that are found in more than one Area, and they are in the TurningPoint
database under ONE LOCATION you need to inventory all of that item at the same time. For
example, you have a retail store and you have Widgets on their normal shelf as well as some on
a temporary end cap display. Make sure to inventory (scan) both places before running the
TurningPoint Update Physical Inventory Count routine. This can be done as multiple scans into
the Data Collection Terminal. –If the same item is scanned more than once Add New Counts
program adds the counts together. Running the TurningPoint Variance Report for Exceptions
Only and then for Missed Items Only will often help you find items of this nature.
Force Counted Quantity
The Physical Inventory file is always created for all items at all locations. Since it would be rare
for any business to be able to actually count all items at all locations at one time the “Enter
5 of 26
Physical Counts” routine offers help. Each time you exit the routine you will receive a prompt like
this if you haven’t entered counts for everything:
Answer No if you are going to return to this process later to enter more counts.
Zero Counted Items
If you have a large number of items that have on hand quantities in the system but you no longer
have in stock you may be interested in our “Zero Counted’ routine. It looks into your TurningPoint
Physical Inventory file and mark all items that have not been counted as having been counted,
and as having a count of zero. Zero Counted utility is free if you purchase i-Inventory and sold for
a nominal otherwise.
Serial Numbers & Lot Numbers
i-Inventory handles serial numbers but it does not currently handle LOT numbers.
If you need support for LOTS please contact Total BusinessWare.
When serialized items are inventoried, only the serial number is scanned into the Data
Collection Terminal. You do not need to scan in the item number or quantity. If a serial
number is not unique the user is alerted and manual action can be taken. For example, if
you have two different items each with the serial number 123 the Add Counts program
would not know which item was actually inventoried. A log file is created for your
review so these exceptions can be dealt with using the TurningPoint Enter Physical Count
routine.
6 of 26
Tutorial
Prerequisites.
1. You should have already installed the software. Instructions for installation of the
Data Collection Terminal, the programs on its CD and Add New Counts programs
are in the document. See the table of contents.
2. The Tutorial assumes you have read this document, from the “Introduction” to the
“Best Practices”.
Your Data Collection Terminal comes with two i-Inventory programs loaded on it. If for
any reason you need to re-install these programs see “Re-Installing i-Inventory on the
Data Collection Terminal”. The program files are included on the i-Inventory CD.
This tutorial is based on our own TurningPoint the sample company called Acme
Enterprises. Restore this data from the i-Inventory CD into your TurningPoint accounting
system. The file is called: TPAcmeEnterprisesData.zip
See TurningPoint F1 help if you require assistance restoring the company.
Since it is impossible for you to travel to our virtual office supply store to do inventory,
we have provided a Tutorial Cheat Sheet on the i-Inventory CD. Print this sheet and you
will have bar codes that match our sample company. You will scan the use these codes as
if they were on inventory items during the tutorial.
The Tutorial Cheat Sheet intentionally includes some troublesome codes.
Scanning these codes will cause the Add New Counts routine to discard them, and the
reasons, while apparent, can be viewed in the log files.
*notatMAIN*
*00002*
notatMAIN
Item not at MAIN location
00002
Orphan Code Item Not Anywhere
7 of 26
“badcode” (shown below) is an illegible code. No bar code scanner can read it. When you
encounter a code like this you could type the text part into the Data Collection Terminal.
Use the red SH button to shift from number to letter input. If you would rather not put
alpha type codes into the Data Collection Terminal, then just set the “item” aside and
later use the TurningPoint Enter Physical Counts routine.
StaplerMINI
*025500802565*
badcode
025500802565
upc (24) Coffee 13oz Auto Drip
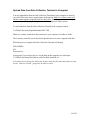
“025500802565” shown above is a code that is related to a unit of measure.
Use of this code will add 796749001025 Columbian Coffee 13oz Auto Drp into
inventory in groups of 24. So if you key Qty = 2 you would be saying that 48 of
these are in stock. This makes sense since the code 025500802565
would be for an entire case of 24.
Here is what the item looks like in TurningPoint:
8 of 26
Acme Enterprises has three physical inventory locations. MAIN, Store 1, and Store 2.
The inventory for our office supply store and is broken down into several TurningPoint
Product Lines. For the sake of this exercise we are going to assume the Product Lines are
stored in separate physical areas at each TurningPoint Location, similar to the way a
department store would split its item into different physical areas in the store. Each
Product Line at each Location will be an Area to inventory.
In TurningPoint click >Inventory >Physical Inventory >Create Physical Inventory File.
If prompted that one exists click YES to replace it with a new one. This process creates a
file that contains all of the current on hand values “frozen” in time. If anyone sells an
item in TurningPoint this freeze file (and the resulting inventory adjustments) will not
reflect the change so it is important to get the counting done before any sales are done.
Let’s start by inventorying all Binders and Folders at the MAIN Location.
It could be said that our first Area is “Binders and Folders at MAIN”.
During a real inventory it may be helpful to draw a map of each Area. The map could
show all shelves that hold inventory, and the order you would like them done. It could
also serve as a checklist to help insure no Area goes uncounted.
9 of 26
Gathering Data
i-Inventory includes two different programs that are loaded onto your Data Collection
Terminal.
>F3 Serials Only (gathers serial numbers only)
>F4 Item, Qty (gathers Item or UPC Codes and Quantities)
Turn on the data collection terminal. You should see the User Mode screen:
If you don’t see the User Mode screen displayed on your
device you are probably in the BIOS screen. Press and hold
the CMD button until and the User Mode screen appears. If it
does not please see the User guide on your Unitech CD.
Select (1) RUN. If necessary scroll through available
programs using the arrow keys, select HT630IIN.exe, press
ENT button.
You should now see the i-Inventory Main Menu:
10 of 26
Press 2 to scan items and enter quantities.
On the Tutorial Cheat Sheet find the codes that represent Binders and Folders at MAIN.
Scan each code with the Data Collection Terminal and record the quantity on hand. For
tutorial, make up any on hand number you wish…
After you scan an item, the scan button is disabled until you key in the QTY for that item.
If you scan an item and press the <ENT> enter key prior to keying in a quantity the Data
Collection Terminal responds with a beep and waits for a quantity.
Once you have entered a quantity the Data Collection Terminal is ready for you to scan
another item.
At any time you may also ESC and press F3 to revue previous scans. During the revue
process you can see how many items have been scanned since the last time the data file
was erased. You may also delete any data that was entered incorrectly, so that it may be
re-entered.
There is an opportunity to edit the records after they have been uploaded to the computer.
At the time you scan an item (assuming they are not in more than one Area) it is “safe”
to start selling the item again, because it is the difference between the scanned quantity
and the frozen quantity that is used for the inventory adjustment, not the number that was
scanned.
When you are done inventorying the Binders and Folders at MAIN upload the data from
the Data Collection Terminal into your computer, and then add the counts from the
uploaded data into the TurningPoint Physical Inventory file. We will see how in the next
section.
11 of 26
Upload Data from Data Collection Terminal to Computer
You may upload data from the Data Collection Terminal(s) to the computer as often as
you wish. If the same item is scanned more than once the Add New Counts routine will
add the counts together in the Physical Inventory File. If this happened inadvertently, the
counts can be edited using TurningPoints own Enter Physical Counts routine.
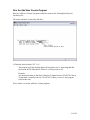
To upload the data from the Data Collection Terminal to the computer launch:
C:\JGPlus5\iInventory\IIuploadScannerToPC.FXP
Make sure scanner is turned on and connected to your computer via cable or cradle.
The inventory count file is moved from the portable device to your computer hard drive.
When the process completes the Data Collection Terminal will display
UPLOADING
OK
Press any key…
At this point if you wish to edit or view the data on the computer you could open
C:\JGPlus5\iInventory\IInvUpld.txt with WordPad, NotePad, etc. –
Use caution to not change the file format. It must retain the file name and format in order
for the “Add New Counts” program to be able to read it.
12 of 26
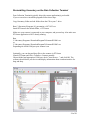
Run the Add New Counts Program
Run the “Add New Counts” program to add the counts to the TurningPoint Physical
Inventory File.
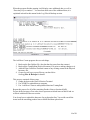
Fill in the Add New Counts form like this:
If “Inferred Item Lookup Y/N?” is Y:
The program will strip leading digits off scans that were 11 digits long that did
not exist in the TP data and see if there is a 10 digit code to use.
Example:
You scanned an item on the Data Collection Terminal and as 01234567891 but in
TP that item is actually stored as 1234567891, if Retry is set to Y the program
will find the item.
Press <Enter> to run the Add New Counts program.
13 of 26
When the program finishes running it will display some additional data, as well as
“Press Any key to continue”. You need not make note of the additional data, it is
explained in detail in this manual in the Log Files & Backups section.
The Add New Counts program does several things:
1. Backs up the IInvUpld.txt file. (the data that last came from the scanner).
2. Backs up the TurningPoint Physical Inventory File prior to making changes to it.
3. Adds the Data Collection Terminal counts to any existing counts in the Physical
Inventory file.
4. Creates several log or report files on your hard drive.
See Log Files & Backups for details.
This process consisted of three steps.
1. Gather the data on the Data Collection Terminal
2. Use XFER32 to upload data to computer
3. Use “Add New Counts to add uploaded data into TurningPoint.
Repeat this process for all of the remaining Product Lines at location MAIN.
Do not do the last page of bar codes, these represent serialized items at MAIN and we
will deal with them in the next section.
You do not have to upload the data once for each product line. You could scan all the
items in all the remaining product lines at MAIN and then upload once.
14 of 26
At this point you should have
Scanned all the remaining non-serialized inventory at Location MAIN
Uploaded it all into the computer.
Run Add New Counts.
Now we can move on to count the serialized data at MAIN.
15 of 26
Count the serialized inventory at MAIN.
On the Data Collection Terminal i-inventory Main Menu select 1) Scan Serial Number
Begin scanning serial numbers found at MAIN on the Cheat Sheet.
When you are done scanning serial numbers, dock the Data Collection Terminal, upload
the data to the computer and then add the counts into TurningPoint just like we did
previously.
The Add New Counts program does several things:
1. Backs up the IIncUpld.txt file.
2. Backs up the TurningPoint Physical Inventory File prior to making changes to it.
3. Adds the Data Collection Terminal counts to any existing counts in the Physical
Inventory file
4. Creates several log or report files on your hard drive.
See Log Files & Backups for details.
5. Since serial numbers are involved it checks TurningPoint for duplicates. If the
scanned serial number is found more than once in TurningPoint at the Location
being worked the count is discarded since the routine would not know which item
was scanned. These items should be handled by using TurningPoints own Enter
Physical Counts routine. You can see the discarded counts when you review the
Log files or TurningPoint Variance Report.
Since the Add New Counts program ran without error, you should erase the data that is
on the Data Collection Terminal because you do not want that data added into the counts
a second time.
When you think you have all the items (serial and otherwise) at Location MAIN counted
go into TurningPoint and Calculate Cost Variances and then print the Variance Report.
This report shows the results of the inventory.
When you print the Variance Report you should limit its output to Location = Main and
check the box to Print Serial Numbers.
16 of 26
Run the report for “Missed Items Only” to see the inventory in this Location that
still needs to be counted.
Run the report for “Exceptions Only” to see just the items that have been counted
where the counts would result in inventory adjustments.
Run the report for “All Entries” to see every item in the Physical Inventory File.
You can re-Calculate Cost Variances and re-run the Variance Report as needed.
To edit any of the Counts reflected on the Variance Report use the TurningPoint “Enter
Physical Counts” routine.
When you run the Variance Report for items at MAIN in all three different levels of
detail and the output looks acceptable you are done with Location MAIN.
Now repeat the process for Store 1 and Store 2.
For Review:
This process consisted of three main steps steps.
1. Gather the data on the Data Collection Terminal
2. Upload data to computer
3. Use “Add New Counts” to add uploaded data into TurningPoint.
Eventually you would be able to run the Variance Report for:
All Items
All Product Lines
All Locations
All Bins
Level of Detail = All Entries…
…and all the lines on the report will look acceptable. At this point all counting is done.
Now you may Update Physical Inventory Counts in TurningPoint.
This step creates the inventory adjustments in the accounting system.
Update Physical Inventory Counts in TurningPoint only updates the items that were
counted. This is true regardless of whether the item was counted with the Data Collection
Terminal or by hand and later keyed into TurningPoints Enter Physical Counts routine.
Tip:
If your inventory takes a long time consider creating multiple Physical Inventory Files,
one for each Area. Each time you create a Physical Inventory File it has one record in it
for each item at each location. If the items are serialized there is one record for each serial
number for each item at each location.
Even though the file always contains all items, only the items counted will be updated
when you run the Update Physical Inventory Count routine.
17 of 26
The Variance Reports will still be used, but you can filter them to reflect only the Area
being worked. The key to making this work is keeping track of the Areas inventoried on a
map or worksheet. The work flow would break out like this:
1. Create a Physical Inventory File.
2. Scan one area of the business. Transfer the data to the computer, and add the
counts into TurningPoint.
3. Calculate Cost Variances.
4. Update Physical Inventory Count (only the counted items are updated).
5. Repeat steps 1-4 for next area.
This makes it easier to have a perfect inventory. You only need to stop using inventory in
the Area being counted, because when each Area is done you are going to create a new
Physical Inventory (freeze) file.
Even if your goal is not perfection, because you don’t (or cannot) close down the Area
being counted, this method is still beneficial because it will minimized the time between
the freeze and the count.
18 of 26
Installation of Hardware & Software
i-Inventory Installation Prerequisites.
1. TurningPoint should already be installed on this computer.
2. Your computer must have a free serial port to connect the dock to.
3. To install some of the programs you need to know how to copy files from the
supplied i-Inventory CD to specific places on your computer or network hard
drive. If you do not understand how to do this find someone that does.
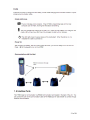
Picture of Data Collection Terminal data collection device.
19 of 26
Installation of Data Collection Terminal
Excerpts from the user manual, for full text see the PDF file on the Unitech CD.
20 of 26
21 of 26
Installing Software
Copy iInventory folder and sub folders from the CD to your C: drive.
Run C:\iInventory\Programs\10_ptcommins-v4.8.71023.exe and install PTComm to the
default folder, c:\PTComm
=
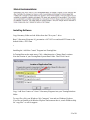
Installing the “Add New Counts” Program into TurningPoint
In TurningPoint on the main menu, Click >Administration >Change Data Locations.
Note the location of your TurningPoint System Data Folder. Then Click Cancel.
Copy “Add New Counts.exe” from C:\iInventory\Programs into your TurningPoint data
folder.
To copy files, click your Windows “My Computer” icon and use Windows Explorer.
If you are not familiar with Window Explorer find someone that is, search Windows help
for “copy files” or call for support.
22 of 26
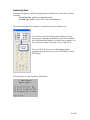
Once the file is located in the TurningPoint System Data folder, RIGHT (not left) click
on the file and click >Send To >Desktop. This will create a shortcut on your computer
desktop. The shortcut will look something like this:
Optional:
If you want the shortcut to appear in TurningPoint drag it with your mouse from
the Desktop and drop it into the >Inventory >Physical Inventory >Selections area.
Shortcuts added to TP this way are user specific, you must log on as each user and repeat
the process if you want the shortcut available to others. Do not drag the file itself into the
Turningpoint Selections Area. You must drag in a shortcut to the file.
23 of 26
Re-installing i-Inventory on the Data Collection Terminal
Data Collection Terminals typically ship with custom application(s) pre-loaded.
If you ever need to re-install the programs follow these steps.
Copy iInventory folder and sub folders from the CD to your C: drive.
Run C:\iInventory\Programs\10_ptcommins-v4.8.71023.exe
Install PTComm to the default folder, c:\PTComm
Make sure your scanner is connected to your computer, and powered up. Also make sure
PTComm application is NOT already running.
Run
C:\iInventory\Programs\ DownloadProgramToScannerIICOM1.exe
or
C:\iInventory\Programs\ DownloadProgramToScannerIICOM3.exe
Depending on which COM port your scanner is on.
Optionally, you can drag and drop files to the scanner via PTComm
Launch PTComm and click >Transfers >Connect portable.
Choose Model and appropriate COM port, check “Auto Detect…” and click OK. The
software should detect your device and display information about it and an interface for
drag and drop.
24 of 26
If your scanner is not recognized by PTComm follow these steps:
1. Make sure device is plugged into serial port and AC power
2. Turn device on.
3. Reboot computer while device is turned on
Log Files & Backups
Each time you run “Add New Counts” a log number is generated and log files are
created. The log number is added onto each files name so that they are related, unique
and do not get overwritten the next time you run the program. The log number is
sequential, and is date – seconds since midnight. 20051201-3068 is 3068 seconds past
midnight on December 1, 2005.
When running “Add New Counts”:
In the c:\iInventory\Backups folder
InvUpld.txt is backed up to InvUpld{lognumber}.txt
TurningPoint Physical Inventory File is backed up to inPhysicalCount{lognumber}.dbf
In the c:\iInventory\Data folder
If Item & Qty data was used a log file called QTYReport{lognumber}.xls is created.
If Serial data was used SerlReport{lognumber}.xls is created.
The files that end in XLS are Microsoft Excel format.
If you do not have Excel and you wish to view these files you may download a free
viewer on Microsoft.com
You can and should manually delete or archive the log and backup files as you see fit.
Sample log files:
Rules and Error Handling
If multi-locations turned on, we make sure you they have no inventory at the ALL location. -If you
do we dump a list out to a text file.
Check for multi-location flag, and set filt to locid = 1 (this is always the ALL record)
25 of 26
inphysicalcount and inlocation
If someone accidentally inventories serialized product using the F4 program the data will
be automatically discarded by the “Add New Counts” program. Those items will later be
re-inventoried using the F3 program. The discarded items are listed in the import XXX
log file, and they will also show up on the Variance Report until they are properly
inventoried.
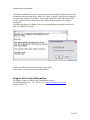
The following dialog will display if you try to upload data from portable terminal and
there is no data file to upload.
Click Cancel Button and close the dialog (using red X).
(other choices are harmless, but not helpful either)
Support and contact information
For support contact your Red Wing TurningPoint dealer or
Total BusinessWare, Inc 952-447-6624 or www.totalbusinessware.com
Savage, MN 55378
26 of 26