1
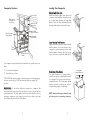
Viking Use & Care Manual
Viking Range Corporation
111 Front Street
Greenwood, Mississippi 38930 USA
(662) 455-1200
For product information,
call 1-888-VIKING1 (845-4641)
or visit the Viking Web site at
vikingrange.com
Professional Series
Undercounter Trash Compactor
F1213G EN
(070609J)
Congratulations
IMPORTANT SAFETY INSTRUCTIONS
Your purchase of this product attests to the importance you place upon
the quality and performance of the major appliances you choose. With
minimal care, as outlined in this manual, this product is designed to
provide you with years of dependable service. Please take the few
minutes necessary to learn the proper and efficient use and care of this
quality product.
1.
2.
3.
4.
We appreciate your choosing a Viking Range Corporation product, and
hope that you will again select our products for your other major
appliance needs.
5.
6.
Table of Contents
Important Safety Instructions . . . . . . . . . . . . . . . . . . . . . . . . . . . . 2
Compactor Features . . . . . . . . . . . . . . . . . . . . . . . . . . . . . . . . . . . 4
Loading Your Compactor . . . . . . . . . . . . . . . . . . . . . . . . . . . . . . . 5
Use of Break-Away Trash Basket Without Bag . . . . . . . . . . . . . . . 6
Use of Break-Away Trash Basket With Bag . . . . . . . . . . . . . . . . . 7
Bag Removal . . . . . . . . . . . . . . . . . . . . . . . . . . . . . . . . . . . . . . . . 8
Operating Your Trash Compactor . . . . . . . . . . . . . . . . . . . . . . . . 9
Charcoal Air Filter With Fan . . . . . . . . . . . . . . . . . . . . . . . . . . . . .11
Special Use Tips . . . . . . . . . . . . . . . . . . . . . . . . . . . . . . . . . . . . . .12
Caring for Your Compactor . . . . . . . . . . . . . . . . . . . . . . . . . . . . .13
Service Information . . . . . . . . . . . . . . . . . . . . . . . . . . . . . . . . . . . .15
Warranty . . . . . . . . . . . . . . . . . . . . . . . . . . . . . . . . . . . . . . . . . . . 16
FOR YOUR SAFETY
DO NOT STORE OR USE GASOLINE OR OTHER
FLAMMABLE VAPORS AND LIQUIDS IN THE VICINITY
OF THIS OR ANY OTHER APPLIANCE. THE FUMES
CAN CREATE A FIRE HAZARD OR EXPLOSION.
WARNING
To reduce the risk of fire, electrical shock, or injury
when using your compactor, follow basic
precautions, including the following safety
instructions
2
7.
8.
9.
10.
11.
12.
13.
14.
15.
16.
17.
18.
19.
Read all instructions.
This compactor must be properly connected to electricity.
Use the compactor only for its intended use.
Do Not allow to be used as a toy, or to run unattended at any
time. Close supervision is necessary when used by or near
children. Lock when not in use and store key out or reach of
children.
Do not operate with a damaged cord, plug, motor, or after
compactor has been damaged in any manner. Have the compactor
examined, repaired, or adjusted by an authorized servicer.
Do not take compactor apart. Incorrect reassembly can cause
electrical shock when next used.
Do not touch moving parts.
Do not overload compactor. Do not overload trash with heavy
material such as glass.
Always place glass bottles, etc., on their sides in the center of the
drawer so the wastepaper below and beside the bottle can help
keep broken glass near the center of the bag, away from the sides.
Do not compact any container or material which might contain
poisonous or explosive products.
Do not compact cloths or cans containing paint liquids, thinners,
etc., which could create a hazard.
Do not shove items down into the compactor with hands or feet.
To avoid being cut, let the compactor do the compacting.
Do not lift a trash bag by the sides. Sharp objects can pierce the
bag and cause injury. Always carry a filled trash bag by the top.
Always wipe off any broken glass before touching the ram cover.
Do not use the compactor as a counter for electrical cooking
appliances nor as a cutting board.
Do not set hot pans, etc., on the compactor top.
Do not compact toxic or volatile flammable material such as oily
rags and insect sprays. Do not compact lighted cigarettes, cigars
or other hot or burning items.
Do not spill any liquids on the compactor top.
Do not use accessories other than those recommended by the
manufacturer.
SAVE THESE INSTRUCTIONS
3
Compactor Features
Loading Your Compactor
Control Panel
Charcoal Air
Filter with Fan
(not shown)
Built-In Small
Litter Area
Built-in Small Litter Area
Small cans, paper scraps, small boxes and
containers may simply be dropped into the
door, rather than opening the large trash
drawer. Trash will drop automatically into
the large trash drawer when pulled open.
Basket Wall
Support Channel
Built-In Storage
Compartment
Break-Away
Trash Basket
Trash
Drawer
Basket Release
Handle
Large Capacity Trash Drawer
Large, bulky items should be placed directly
into the drawer. It is not necessary to run a
compaction cycle everytime you place trash
into the drawer. However, the more you run
a cycle, the more compact the trash will be.
Your compactor has a built-in interlock and will not operate unless you
have:
1. Closed the trash drawer.
2. Turned the key to start.
STOP/LOCK will stop the ram movement at any point. After stopping
the unit, turn the key to START and ram will return to original “up”
position.
WARNING: Do not allow children to operate the compactor. We
recommend that you remove the key when not in use. The unit will not
operate without it. The trash drawer cannot be locked. Therefore, before
running a compactor cycle, always check to be sure that no item has
been mistakenly placed in the trash drawer.
4
Break-Away Trash Basket
Your trash compactor is equipped with a
versatile two-piece, polypropylene basket.
It is designed for easy use and removal of
compacted trash. The break-away basket
may be used with or without the enclosed
complimentary supply of trash bags.
NOTE: Basket wall support channels must
be in place prior to operating compactor.
5
Basket Wall
Support Channels
Use of Break-Away Trash Basket Without Bag
1. Place basket release handle in upright
position.
5. Dump compacted trash from half basket into
waste receptacle.
6. Replace support channels after dumping.
2. Put trash directly into the basket. We
recommend placing several thicknesses of
newspaper at the bottom of the basket when
bags are not used. This will minimize clean-up of the basket after
emptying compacted trash.
WARNING: PERSONAL INJURY HAZARD
Compacted trash may contain broken glass, metal cans and other sharp
objects. Always use the half basket to dump trash. DO NOT USE BARE
HANDS.
NOTE: Compacting a folded newspaper on top of loose trash will
keep the ram clean of trash or broken glass.
Use of Break-Away Trash Basket With Bag
To Remove Break-Away Trash Basket
We recommend removing the basket when trash is compacted to four or
five inches below the top of the basket. If you find this too heavy,
compact less trash next time. REMEMBER - the weight of the compacted
trash will vary with the contents. Cans and bottles may weigh more than
paper products.
1. Lift built-in storage compartment
cover.
2. Pull basket release handle down.
1. Place basket release handle in down
position. Lift built-in storage compartment
cover up.
3. Place folded bag inside Break-Away
trash basket.
2. Grasp both handles of basket and remove
from drawer. Carry basket to trash storage
area.
3. Remove basket wall support channels.
4. Open bag. Pull top edges of bag
over top of drawer.
4. Pull handles of basket away from each
other.
6
7
5. Lock bag in place by pulling four prepunched holes over buttons on
drawer sides. Holes will expand over
buttons without damaging bag.
4. Grasp handles and remove from drawer.
Carry basket with bag to trash storage
area.
6. Spread bag to fit interior of basket.
Closing storage compartment cover.
Pull basket release handle up.
5. Pull handles of basket
away from each other to
loosen bag.
Bag Removal
6. Lift bag out.
We recommend removing bag when trash is compacted to four or five
inches below top of basket. If you find this is too heavy, compact less
trash next time.
1. Pull basket release handle down.
WARNING: PERSONAL INJURY HAZARD
Sharp objects may protrude through bag after removal from trash basket.
Handle carefully by the top to avoid injury.
Operating Your Trash Compactor
2. Lift storage compartment cover up.
Release bag from buttons. Pull up top
edges of bag.
To Start:
1. Close large trash drawer.
3. Close bag with twist-ties provided.
2. Turn key to START position and HOLD
momentarily. Release key.
8
9
Compaction Cycle
The compactor ram will move down inside the trash drawer, reverse, and
return to original position, completing the cycle in approximately 35
seconds. As the basket is filled, the ram travels a shorter distance and
cycle time decreases.
Your trash compactor features an activated charcoal air filter and fan
which absorbs and minimizes odor. The charcoal filter is located in the
left rear section of the compactor.
DURING THE COMPACTION CYCLE, THE RAM DOES NOT TOUCH
THE BOTTOM OF THE DRAWER. THEREFORE, YOU CAN EXPECT TO
CYCLE SEVERAL LOOSE TRASH LOADS BEFORE COMPACTION IS
EVIDENT. THIS IS NORMAL AND NOT A CAUSE FOR CONCERN.
The degree of odor in your compactor will depend upon the type of
trash you place in it. Since odors are absorbed into the pores of the
charcoal filter, it may need to be replaced once or twice a year. Length
of time before filter replacement is necessary varies with the types of
trash compacted.
As the ram compacts difficult to break items, you may notice a downward
movement of the compactor drawer. This in normal and will not cause
damage. The spring-loaded drawer is specially designed to move down
freely and return to original position. The force of the ram during a
compaction cycle is absorbed by the heavy gauge steel frame of the
compactor.
Charcoal Air Filter Fan
ON
- The fan creates fast air
movement for greater odor
removal. While the fan is on,
a fan “on” light will glow on
the control panel.
To Stop Cycle and Open Drawer
You may stop or interrupt a compaction cycle at any time and raise the
ram to its original position.
1. Turn the key to STOP/LOCK position to
stop the ram.
2. Turn the key to START position and
HOLD momentarily to return the ram to
original position. The drawer may then
be opened.
3. Turn key to START position and HOLD
to start another cycle.
OFF
Charcoal Air Filter with Fan
- Even when the fan isn’t
running, the filter is working
to remove odor.
To Remove Filter:
1. With trash drawer in open position,
reach into left rear corner where
filter is located.
2. Release filter from bottom clip, pull
down.
To Replace Filter:
Push replacement filter into place behind top clip. Snap securely into
bottom clip.
10
11
Special Use Tips
Caring for Your Compactor
-Your compactor is designed to handle most dry trash. The compactor is
not a substitute for a food waste disposer. We urge you to continue to
dispose of garbage through a food waste disposer. Most food waste will
sour and become odorous when held at room temperature.
-Liquid or messy items should be wrapped ina newspaper or several
thicknesses of paper toweling to help keep the ram and Break-Away
basket clean.
-More trash can be compacted if you stop the ram in the “down”
position and allow it to dwell there overnight. This will result in heavier
bags of compacted trash.
-Place glass bottles on their side in the center for compacting rather than
upright. Bottles and cans may nest in lightly compacted paper. When
sufficient load is accumulated, most will be crushed. However, due to
the resiliency of paper, some bottles may not break. Don’t be alarmed
by the popping noise made when bottles are crushed. This is normal
and will not damage compactor. Placing a newspaper over bottles
before compacting will help muffle noise.
COMPACTOR INTERIOR
WE DO NOT RECOMMEND COMPACTING THESE ITEMS
-Trimmings from cleaning fish or chicken
-Grapefruit or cantaloupe rinds
-Paint, oil, gasoline or turpentine cans or rags which have been used
with these materials
-Aerosol cans
-Insecticide, toxic or caustic containers
-Wood scraps, rocks, solid metal or large quantities of newspaper.
These items are already in their compacted form.
WARNING: FIRE/HEALTH HAZARDS
Do not compact containers of flammable or toxic materials or aerosol cans.
Vacation Care
-If you are planning a weekend vacation, you may not want to remove
compacted trash if basket is not full. We recommend you simply lock the
compactor. On your return, you may wish to run the charcoal air filter for
a short time before opening the drawer.
-If you are planning to be away for more than a weekend, we recommend
that you remove and discard the compacted trash, replace basket and
lock the compactor. Before running a compaction cycle, always check
that no item has been mistakenly placed in the trash drawer.
12
Built-in Small Litter Door and Area:
Wipe clean with a cloth or sponge and a mild detergent or ammonia and
water. Rinse with clear water and dry. Do not use abrasive or harsh
cleaners.
Break-Away Trash Basket
Clean as necessary after emptying compacted trash. Wearing rubber
gloves and using paper towels, remove any small pieces of debris from
basket such as crushed glass. AVOID CONTACT WITH BARE HANDS.
Light soil may be wiped away with a damp sponge or cloth. Heavy soil
may require use of mild detergent and water. Rinse with clear water and
dry.
Ram
Clean as necessary. Wearing rubber gloves and using paper towels,
remove any small pieces of debris from ram, such as paper or crushed
glass. AVOID CONTACT WITH BARE HANDS. Light soil may be wiped
clean with a cloth and mild detergent and water. Heavy soil may require
the use of a dampened scouring pad. Rinse with clear water and dry.
Metal Drawer Liner:
Clean as necessary using a cloth or sponge and mild detergent and
water. Rinse with clear water and dry. Do not use abrasive cleaners.
Metal Drawer:
Occasionally the drawer latch rod and slide hood located on both sides
of the drawer opening should be lubricated. This will prevent the door
latch from squeaking or sticking and help insure and extend the life of
the latch mechanism. We suggest soap or a solid stick lubricant which
can be purchased at auto supply or hardware stores.
Behind Metal Drawer:
Occasionally check the area behind the trash drawer and remove any
small pieces of trash. Placing a folded newspaper on top of trash will
help prevent small items from sticking to the ram and falling behind the
drawer.
13
NOTE: Drawer may be removed to facilitate the cleaning surrounding
areas.
1. Disconnect power supply to compactor before removing drawer.
2. Be sure ram is in “up” position.
3. Open drawer to fully extended position.
4. Remove any drawer retaining screws which hold drawer to track
assembly. Carefully remove drawer from track assembly, making
sure that the full weight of the drawer is supported at all times.
If you are unable to obtain the name of an authorized service agency,
or continue to have service problems, call Viking Range Corporation,
1-888-VIKING1 (845-4641), or write to:
COMPACTOR EXTERIOR
Record the information indicated below. You will need it if service is ever
required. The serial and model numbers for your oven are located on an
identification plate mounted on the bottom left side of the oven door
opening.
Front Panels:
Wipe clean with a cloth or sponge and mild detergent and water. Rinse
with clear water and wipe dry. Do not use abrasive cleaners. On stainless
steel models, use a stainless steel cleaner and polish.
USE ENERGY WISELY
A trash compactor uses a negligible amount of energy. Total energy
requirements associated with the trash compactor will be minimized by
following the recommendations in the Use and Care Guide.
VIKING RANGE CORPORATION
PREFERRED SERVICE
1803 Hwy 82W
Greenwood, Mississippi 38930 USA
Model Number
Serial Number
Date Purchased
Date Installed
Dealer’s Name
Address
Service Information
It is assumed that your trash compactor has been properly installed in
accordance with all specifications and local codes and that the appliance
has been properly grounded. If your trash compactor should fail to
operate, check the troubleshooting guide before calling your dealer. You
could save the cost of a service call.
If your trash compactor should fail to operate:
-Have you read and followed the instructions provided with this unit?
-Is a fuse blown or the circuit breaker open?
-Is the trash drawer tightly closed? It is possible for a cycle to be
incomplete when the drawer has not been firmly closed before turning
the key to START. If this occurs, the unit will shut-off, but the drawer
cannot be pulled open. Close the drawer firmly and turn the key to
START. The ram will return to the original “up” position. Drawer will
open only when ram is all the way up.
-Compacting works best when only a few items are loaded. Use the
compacting cycle frequently.
-Not all bottles will break every time, depending upon trash load below.
14
If service requires installation of parts, use only authorized parts to
ensure protection under the warranty.
This manual should remain with the trash compactor for future
reference.
15
VUC PROFESSIONAL SERIES
UNDERCOUNTER TRASH COMPACTOR WARRANTY
ONE YEAR FULL WARRANTY
Undercounter trash compactors and all of their component parts, except as detailed below*, are warranted to be
free from defective materials or workmanship in normal household use for a period of twelve (12) months from the
date of original retail purchase. Viking Range Corporation, warrantor, agrees to repair or replace, at its option, any
part which fails or is found to be defective during the warranty period.
*Painted and decorative items are warranted to be free from defective materials or workmanship for a period of
ninety (90) days from the date of original retail purchase. ANY DEFECTS MUST BE REPORTED TO THE SELLING
DEALER WITHIN NINETY (90) DAYS FROM DATE OF ORIGINAL RETAIL PURCHASE.
FIVE YEAR LIMITED WARRANTY
Any drive system motor which fails due to defective materials or workmanship in normal household use during the
second through the fifth year from the date of original retail purchase will be repaired or replaced, free of charge
for the part itself, with the owner paying all other costs, including labor.
NINETY (90) DAY RESIDENTIAL PLUS WARRANTY This warranty applies to applications where use of the
product extends beyond normal residential use. Examples are, but not limited to, bed and breakfasts, fire stations,
private clubs, churches, etc. This warranty excludes all commercial locations such as restaurants, food service
locations, and institutional food service locations.
This warranty extends to the original purchaser of the product warranted hereunder and to each transferee owner
of the product during the term of the warranty.
This warranty shall apply to products purchased and located in the United States and Canada. Products must be
purchased in the country where service is requested. Warranty labor shall be performed by an authorized Viking
Range Corporation service agency or representative. Warranty shall not apply to damage resulting form abuse,
accident, natural disaster, loss of electrical power to the product for any reason, alteration, outdoor use, improper
installation, improper operation or repair or service of the product by anyone other than an authorized Viking
Range Corporation service agency or representative. This warranty does not apply to commercial usage. Warrantor
is not responsible for consequential or incidental damage whether arising out of breach of warranty, breach of
contract, or otherwise. Some jurisdictions do not allow the exclusion of limitation of incidental or consequential
damages, so the above limitation or exclusion may not apply to you.
Owner shall be responsible for proper installation, providing normal care and maintenance, providing proof of
purchase upon request, and making the appliance reasonably accessible for service. It the product or one of its
component parts contains a defect or malfunction during the warranty period, after a reasonable number of
attempts by the warrantor to remedy the defects or malfunctions, the owner is entitled to either a refund or
replacement of the product or its component part or parts. Replacement of a component part includes its free
installation. Warrantor’s liability on any claim of any kind, with respect to the goods or services covered hereunder,
shall in no case exceed the price of the goods or service or part thereof which give rise to the claim.
WARRANTY SERVICE:Under the terms of this warranty, service must be performed by a factory authorized Viking
Range Corporation service agent or representative. Service will be provided during normal business hours, and
labor performed at overtime or premium rates shall not be covered by this warranty. To obtain warranty service,
contact the dealer from whom the product was purchased, an authorized Viking Range Corporation service agent,
or Viking Range Corporation. Provide model and serial number and date of original retail purchase. For the name
of your nearest authorized Viking Range Corporation service agency, call the dealer form whom the product was
purchased or Viking Range Corporation. IMPORTANT: Retain proof of original purchase to establish warranty
period.
The return of the Owner Registration Card is not a condition of warranty coverage. You, however, should return the
Owner Registration Card so that Viking Range Corporation can contact you should any question of safety arise
which could affect you.
Any implied warranties of merchantability and fitness applicable to the above described drive system motor is
limited in duration to the period of coverage of the applicable express written limited warranties set forth above.
Some jurisdictions do not allow limitations on how long an implied warranty lasts, so the above limitation may not
apply to you. This warranty gives you specific legal rights, and you may also have other rights which may vary from
jurisdiction to jurisdiction.
Specifications subject to change without notice.
16
17
18
19