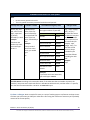
1
Shoot and Share: A Quick ‘n Dirty (but effective!) Manual for IA-‐DMM on Using Digital Video By Larry Edelman [email protected] © 2013 Larry Edelman Suggested citation: Edelman, L. (2013). Shoot and share: A quick ‘n dirty manual for IA-‐DMM on using digital video. Distance Mentoring Model, The Communication and Early Childhood Research and Practice Center, Florida Sate University. Edelman – Shoot and Share (11/18/13) Distance Mentoring Model is a project within The Communication and Early Childhood Research and Practice Center (CEC-RAP). CEC-RAP is a collaborative center within the College of Communication and Information, School of Communication Science and Disorders at Florida State University 1 . Contents Introduction: From shooting to sharing in six steps ............................................................... 3 1. Shoot: Shoot “good enough” video ................................................................................. 4 2. Copy: Copy the video clips to your computer ................................................................... 7 3. Title: Watching and titling your files ...............................................................................10 4. Organize: Organize and store your video files using folders...........................................11 5. Edit/compress: Edit and Compress your video............................................................... 12 6. Share: Share your video ..................................................................................................13 Edelman – Shoot and Share (11/18/13) Distance Mentoring Model is a project within The Communication and Early Childhood Research and Practice Center (CEC-RAP). CEC-RAP is a collaborative center within the College of Communication and Information, School of Communication Science and Disorders at Florida State University 2 From shooting to sharing in six tasks Welcome to the world of digital video! Video has been used for decades in early intervention and early childhood services to enhance all aspects of service delivery, professional development, and research. As part of your participation in IA-‐DMM you will be asked to record and share video clips at various times and we are confident that you will find these uses of video to be worthwhile. If you don’t have experience capturing digital video, don’t despair – it’s not as difficult as you may think! In the past, video equipment was relatively expensive, bulky, and it was complicated to use. But thanks to recent innovations, we now have access to the use of digital video, which is much more affordable, more accessible, and it is now vastly easier to shoot, edit, store, and share video. In order to succeed in using digital video for this project, you need to learn how to do six specific tasks and you probably already know how to do a number of them. These tasks are very manageable with a little time, practice, and guidance. This resource guide will provide the guidance, and you will need to make the time and practice the new skills. This resource guide is organized around the following six tasks, or work flow, involved in producing and managing digital video files Before you get started Please note three things: 1) Before you begin recording video you need to obtain written, informed consent from everyone who will appear in the videos using the authorized consent form. 2) We are assuming that you have already obtained a digital recording device. If you haven’t, or are considering switching to another device, please refer to the document titled, “Choosing a low-‐ cost, handheld digital video recording device.” 3) If you run into any problems, don’t hesitate to get in touch with Kat Cripe at [email protected] or (850) 339-‐1564. Edelman – Shoot and Share (11/18/13) Distance Mentoring Model is a project within The Communication and Early Childhood Research and Practice Center (CEC-RAP). CEC-RAP is a collaborative center within the College of Communication and Information, School of Communication Science and Disorders at Florida State University 3 Shoot “good enough” video The goal for this project is not to produce award-‐winning films, but rather to capture “good enough” video clips. What does “good enough” imply? It means that you capture the content that is important and viewers will be able to clearly see and hear what is happening. Plan your shot by paying attention to the details described below and you’ll do fine! ! Learn how to operate your device Refer to the User’s Manual that came with you device (or that can be found online) to learn how to operate the basic functions, including how to: • charge and/or change the batteries, • turn it on and off, • start and stop recording, and • zoom in and out. NOTE: Some video recording devices have a menu that you can go to adjust the kind of video that you will shoot. If you device has these settings, learn how to use them. Two examples: • One such adjustment is referred to a frame size (or resolution). For example, you can capture very large HD files or much smaller VGA files. I recommend that you avoid shooting the larger frame sizes – although the quality is better, the file sizes will be enormous and much more difficult for you to manage and share. I recommend that if given choices between one VGA setting and a number of HD settings, choose either the VGA setting or the smallest of the HD settings. I suggest that you experiment by capturing exactly one-‐minute of footage in a couple of the settings and then copy the clips to your computer. Compare the file sizes and the quality. Use the smallest file that also is good enough, e.g., the viewer can clearly see and hear what’s happening. Tips for Apple Device Users: Apple devices produce relatively large video files (about 75 MB per minute). Although the built-‐in camera does not enable you to lower the frame size, there are a number of low costs or free apps that enable you to do this, e.g., Blux Movie. • If your device enables you to adjust the sensitivity of the microphone, you might want to experiment with boosting it some. Again, experiment: shoot a few clips at various levels, copy them to your computer, compare the results, and choose the level that you feel is best. • Some devices have settings for “effects,” such as shooting in black and white, sepia, etc. I recommend that you do not use any effects. Edelman – Shoot and Share (11/18/13) Distance Mentoring Model is a project within The Communication and Early Childhood Research and Practice Center (CEC-RAP). CEC-RAP is a collaborative center within the College of Communication and Information, School of Communication Science and Disorders at Florida State University 4 ! Be prepared As needed, be sure to have blank tapes, charged batteries, a power cord, and a charger on hand. Home-‐ based providers might be useful to purchase a battery charger that can be plugged into a car so that batteries can be charged while traveling from visit to visit. ! ALWAYS capture video horizontally – and ALWAYS means ALWAYS! Trust me on this. If you’re not convinced, watch: http://youtu.be/Bt9zSfinwFA Tips for Apple Device Users: Apple devices allow you to shoot video horizontally or vertically. ALWAYS capture video holding your device horizontally with the home button to the right! ! Use a tripod! Reason 1: To frame the shot so you capture the right content You want to capture the action that you and other viewers will need to see – yourself interacting with a child and their family members or other caregivers. Because you’ll be in the action, you need to position the device so that it is stable and at the right distance and at the right angle to capture everything. Frame the shot so you avoid “cutting off people’s heads” or shooting their backs rather than fronts. Reason 2: Avoid camera shake Shaky video is usually every viewer’s primary complaint about “bad” video. A tripod will enable you to avoid shaky footage. Tips for Apple Device Users: Apple devices do not have a port so that you can screw in a tripod, but there are some good alternatives: For iPhone and iPod Touch: The iStabilizer is a spring-‐loaded mount that connects a standard ¼ x 20” port to your device so you can use any tripod with it. It works with most smart phones and costs less than $20 from online stores. http://www.istabilizer.com/store/products/mount.html For iPad (full size): iPads do not have a tripod port and are very heavy, so you need a very well made mount to attach a tripod AND you need a very strong and well-‐made tripod. There are a lot of mounts available, with new ones coming out all the time. My favorite one that I’ve found at a reasonable price is the Ultimate Support Hyperpad that will enable you to stabilize your iPad at a variety of angles to a variety of surfaces, e.g., table, pole, microphone stand, and desktop. Expect to pay around $60 from online stores. ! Be a gracious visitor AND be sure to capture “good enough” video When we visit families in their homes, we want to behave as gracious visitors and avoid any behavior that would make it seem as though we are “taking over.” It is important to do that and at the same time, be able to gently make suggestions about capturing that will help you capture “good enough” sound and visuals. Talk with the family about the goals and benefits of capturing video and the conversations should come easily and naturally. For example, to capture “good enough” sound, you might ask if it would be okay to turn down the volume of a television or radio while capturing video. In another example, if it wouldn’t disrupt the authenticity of the routine or activity that you’ll be capturing, if Edelman – Shoot and Share (11/18/13) Distance Mentoring Model is a project within The Communication and Early Childhood Research and Practice Center (CEC-RAP). CEC-RAP is a collaborative center within the College of Communication and Information, School of Communication Science and Disorders at Florida State University 5 you’re sitting in a spot on the living room floor that doesn’t allow you to place to tripod appropriately or that means the camera will be shooting into the bright light of a window in the background, you might ask if you and the family can sit elsewhere on the living room floor. ! Adjust for lighting You will get better results by being aware of the natural lighting and using it to your advantage, e.g., avoiding shooting directly into a window or sunlight. ! Do what you can to capture adequate quality sound Audio is at least as important as the visuals, and in some cases more important. Low-‐cost hand-‐held devices are not great at capturing audio, but if you do what you can to accommodate for the environment, you should be able to capture “good enough” sound. Here are some tips: • Position the device as close to the subjects as possible, while also enabling you to capture all of the action without leaving someone out of the shot. • Place the recording device so that the subjects’ mouths are facing the camera. • Place cameras away from loud adjacent sound sources, e.g. avoid placing the device right next to an open window with someone mowing the lawn nearby. • See the notes above under “Be a gracious visitor AND be sure to capture “good enough” video.” • If your device has an input for an external microphone, consider purchasing and using one. A good external microphone is often better than the devices built-‐in microphone – but be aware: with some external microphones the quality of the sound is better, but the volume is lower! If you use an external microphone that can connect to the device via a cable, then you can position the device far enough back to capture the visuals, but keep the microphone closer to the subjects. • If your device enables you to adjust the sensitivity of the microphone, you might want to experiment with boosting it some. ! Keep it authentic Capture video footage of typical interactions, routines, and activities that occur during the home visit. ! It gets easier with practice Take some practice video and watch it with colleagues and get feedback on the technical merits of your work. Practice enough so that you will be well at ease operating the device and setting up your shots. If you are practiced and prepared, videotaping will become a natural and comfortable process. A Couple of Resources: In case you’d like to learn more: • Vimeo Video School is a fun place for anyone to learn how to make better videos. Start by browsing the Vimeo Lessons, or find specific video tutorials created by other Vimeo members: http://vimeo.com/videoschool?utm_source=newsletter&utm_medium=email&utm_campaign=Dec2010 Edelman – Shoot and Share (11/18/13) Distance Mentoring Model is a project within The Communication and Early Childhood Research and Practice Center (CEC-RAP). CEC-RAP is a collaborative center within the College of Communication and Information, School of Communication Science and Disorders at Florida State University 6 • Videomaker’s tutorials may be more sophisticated that what you need, but they are a good source of information. http://www.videomaker.com/video/tutorials Copy the video to your computer You need to learn how to copy files from your device to your computer. Look for information in the quick start guides and manuals that are available for your device and search the manufacturer’s support page. NOTE: Do not used your device to store video files: copy them from your device to your computer and then delete them from your device frequently (e.g., at least weekly). Steps for getting clips from a low-‐cost, hand-‐held camcorder to your computer The steps vary somewhat among devices, but are similar in nature. Understanding that there are differences among various models and brands, following is a GENERAL process. 1. If your camera records to a SD card and you have a built-‐in or plug-‐in card reader, remove the SD card from your camcorder and insert it into your computer. If you don’t have a card reader or if your camcorder records to internal memory, plug your camcorder into the computer using the USB cable or built in USB connector that came with your camcorder. Note: if you’d like to purchase a card ready, buy a good one. I recommend the SanDisk MicroMate SD /SDHC Memory Card Reader, about $13 from online stores. 2. Once you insert your card or connect your device, it will behave as a flash drive (thumb drive). When the card opens up in a window select “Open Folder to View Files.” If the card doesn’t appear, on a PC look for it in “My Computer.” On a Mac, look for an icon on the desktop that looks like a removable drive. It may be titled “NO NAME.” 3. Double click on the folder labeled DCIM (this is an acronym for “Digital Camera Images”). 4. There may be one or more folders in the DCIM folder. Double click on the folders that you find in the DCIM folder to find which one(s) store your video files. The folder with the files will typically reference the name of the camcorder or manufacturer. For example, the folder in a Sanyo camcorder might be named “100SANYO.” 5. Create a temporary folder on your desktop and copy the video files from the camcorder to your computer by dragging and dropping the files to the temporary folder that you created. 6. Double check to make sure that the files copied successfully to your computer by playing one of them and looking to be sure that the files are large in size as measured in MB). 7. Once you’re confident that the files copied successfully, if you desire, you can easily delete all of the files from your camcorder before ejecting the device by dragging the files to the recycle bin on a PC Edelman – Shoot and Share (11/18/13) Distance Mentoring Model is a project within The Communication and Early Childhood Research and Practice Center (CEC-RAP). CEC-RAP is a collaborative center within the College of Communication and Information, School of Communication Science and Disorders at Florida State University 7 or the trash can on a Mac. NOTE: in some camcorders it is recommended that you delete the files from the camcorder rather than when it is plugged into your computer. 8. Proceed with the steps in the following section for naming and organizing your files. Tips for Apple Device Users: There are many ways to copy your photos and videos from your Apple devices to your computer. One thing to keep in mind: every time Apple updates its operating system, these procedures are prone to change! To copy your video files from your device to the computer that you use to sync your device there are several options: • On a Mac, when you sync your device, sync the video or photo files from your camera roll to iTunes/iPhoto. • On a Mac, connect your device to your computer and in your applications folder, open up Image Capture. To copy your video files from your device to a computer that you do not use to sync your device to, there are several options: • Save your photos and videos that you shoot on your device to iCloud and open iCloud on the computer to access these files. • Use one of the many apps that enable you to transfer/copy files from Apple devices to any computer that is on the same internet network. I use the free app Wi-‐Fi Photo Transfer to do this. PLEASE NOTE: The options above are general – you may need to modify the steps based on the specific computer, set-‐up, and operating system that you are using. For more information from Apple on how to import your photos and videos for specific computers and operating systems, visit: http://support.apple.com/kb/HT4083 Useful iPod Touch resources: 1) The iPod Touch manual: http://manuals.info.apple.com/en_US/iPod_touch_3.0_User_Guide.pdf 2) Apple’s iPod Get Started Page: http://www.apple.com/support/ipodtouch/getstarted/ 3) Apple’s iPod Support page: http://www.apple.com/support/ipodtouch/ Useful iPad resources: 1) The iPad manual: http://manuals.info.apple.com/en/ipad_user_guide.pdf 2) Apple’s iPod Get Started Page: http://www.apple.com/support/ipad/getstarted/ 3) Apple’s iPod Support page: http://www.apple.com/support/ipad/ Edelman – Shoot and Share (11/18/13) Distance Mentoring Model is a project within The Communication and Early Childhood Research and Practice Center (CEC-RAP). CEC-RAP is a collaborative center within the College of Communication and Information, School of Communication Science and Disorders at Florida State University 8 Titling your video files Watch your video file before titling it: Before you title your clip, you’ll want to watch a little bit of it so you know what you have. There are lots of free media players available. If you install the two free players below you will be able to watch just about any video file that you encounter. Both players work on both PCs and Macs. " VLC Media Player – A great free multimedia player that plays a very large assortment of audio and video formats: http://www.videolan.org/vlc/ " QuickTime – A great free multimedia player that plays certain kinds of audio and video files; available from http://www.apple.com/ Optional: For editing tasks, you might also want to purchase the $29 QuickTime Pro update from www.apple.com. Title your video file: It’s important that you use IA-‐DMM’s uniform system for titling your video files – this will help you, and others, be able to identify clips and keep them organized. On the following page is a set of instructions for the uniform system for naming files that you should use. Edelman – Shoot and Share (11/18/13) Distance Mentoring Model is a project within The Communication and Early Childhood Research and Practice Center (CEC-RAP). CEC-RAP is a collaborative center within the College of Communication and Information, School of Communication Science and Disorders at Florida State University 9 IA-‐DMM Uniform Video File Title System Note: • • Do not use any spaces in the title. The only special characters permitted are dashes and periods. Date clip was shot Provider’s initials Month, day, and year, each in two digits, separated by periods, followed by a dash Capitalized first letter of the first name followed by the capitalized first letter of the last name, followed by a dash Example: If the date was October 24, 2013, you would type: 10.24.13-‐ Area Education Agency Code The letters “DMM” followed by the region number of your AEA: AEA Code AEA267 DMM7 Grant Wood AEA DMM10 Example: Great Prairie AEA DMM15 If the provider’s name was Joann Smith, you would type: Green Hills AEA DMM13 Heartland AEA DMM11 Keystone AEA DMM1 Mississippi Bend AEA DMM9 Northwest AEA DMM12 Prairie Lakes AEA DMM8 Des Moines Public Schools DMPS JS-‐ File type suffix (e.g., .mp4, .mpeg4, .mov, .avi, etc.) The video file format the identical way that the file was named when imported from the camcorder (for example, .mp4, mpeg4, .mov) – be sure that the file format is always preceded by the period that follows preceding the AEA code Example: .mp4 Example: If your AEA was Grant Wood AEA, you would type: DMM10 Final File Name: According to the examples above, if the video was shot on October 24, 2013, the provider’s name was Joann Smith who works in Des Moines Public Schools, and the video is a .mp4 file, then the final file name would be: 10.24.13-‐JS-‐DMMDMPS.mp4 Tip form a colleague: Write a sample file name on a strip of masking tape as a reference and tape it near to where you work when you label your video files. After using the reference a few times you’ll probably memorize the format quickly. Edelman – Shoot and Share (11/18/13) 10 Distance Mentoring Model is a project within The Communication and Early Childhood Research and Practice Center (CEC-RAP). CEC-RAP is a collaborative center within the College of Communication and Information, School of Communication Science and Disorders at Florida State University Organize and store your video files using folders Even though you will be sharing video clips with IA-‐DMM project staff, you will be keeping and storing copies of the clips as well. Now that you’ve mastered the system for titling your files, it’s time to develop a system for organizing your clips into folders. Create an intuitive and useful system that will organize the clips in ways that you will be able to find clips easily in the future. One simple way to organize folders is by the names of the children. Here is an example of how Deb, an early interventionist organized and stored her video files: Organizing the video files: Deb created a folder labeled “IA-‐DMM Videos” in the Documents folder of her password-‐protected computer. In this folder, she created a subfolder with the name of each child with whom she works. This system helps Deb store and easily locate her video clips. Storing the video files over time: Storing the videos in the IA-‐DMM Videos” in the Documents folder of Deb’s password-‐protected computer worked well for the first year. But Deb had amassed a good deal of videos so she wanted a way to store and/or backup her files other than on her computer’s hard drive. Her program purchased for her an inexpensive, but reliable, 500 GB password-‐protected external hard drive to store and/or back up all of her video files. A year later, recognizing how valuable digital video was for early intervention practitioners and programs, Deb’s program was able to budget for a shared server so that all of the staff members could store their video files in one secure place with backup. Tip: Be sure any equipment that you purchase is compatible with your platform, i.e., PC or Mac – not all drives work on both platforms. Edelman – Shoot and Share (11/18/13) 11 Distance Mentoring Model is a project within The Communication and Early Childhood Research and Practice Center (CEC-RAP). CEC-RAP is a collaborative center within the College of Communication and Information, School of Communication Science and Disorders at Florida State University Edit/compress the video What are the basic video editing functions? In all likelihood, for your work in IA-‐DMM, you may not need to do any editing at all to your video clips. If you were to do any editing, it would probably entail these three basic editing functions: 1) Cutting unwanted footage from clips: you might do this so you are sharing only the important footage. 2) Joining multiple clips: you might want to join multiple clips if there was an interruption during a video recording session or to join clips from different visits to show progress over time. 3) Compressing your video: you might do this to make the file smaller so it is easier to share – it is very easy to compress a file by 75% or more. This is very useful for long clips. Other common video editing functions include: adding captions or titles, adding transition effects between clips (e.g., a cross-‐dissolve), adding a sound track, converting video to another file format, etc. You won’t need to use these editing functions for this project. There are many good choices for both free and low-‐cost video editing programs. For the purposes of this project, I recommend that you use a free video editing application that works great on both PCs and Macs and is great for the three basic editing functions described above. MPEG Streamclip (http://www.squared5.com/) is a free application that works on both Macs and PCs that you can use for the basic video editing functions. MPEG Streamclip does not enable you to insert titles or fancy transitions between scenes – but as I mentioned, you don’t need those functions for IA-‐DMM. Key tips for getting stated using MPEG Streamclip: • • • Download MPEG Streamclip only from one site: http://www.squared5.com You need to have the free QuickTime Player (www.apple.com) installed on your computer in order for MPEG Streamclip to work. Once you install MPEG Streamclip, plan to spend about 30 – 45 minutes completing a video tutorial that I produced that walks you through the basic steps in using it. You can watch this tutorial online or download it and keep it on your computer for easy reference: www.cde.state.co.us/resultsmatter/RMVideoSeries_UsingTechnology.htm#top Tips for Apple Device Users: Edelman – Shoot and Share (11/18/13) 12 Distance Mentoring Model is a project within The Communication and Early Childhood Research and Practice Center (CEC-RAP). CEC-RAP is a collaborative center within the College of Communication and Information, School of Communication Science and Disorders at Florida State University There is a growing number of free or blow-‐cost video applications for both shooting and editing video available for Apple devices. Two of the better full-‐featured video editing applications are iMovie and Pinnacle Studio. Edelman – Shoot and Share (11/18/13) 13 Distance Mentoring Model is a project within The Communication and Early Childhood Research and Practice Center (CEC-RAP). CEC-RAP is a collaborative center within the College of Communication and Information, School of Communication Science and Disorders at Florida State University Share your video There are lots of ways to share large files. For the purpose of IA-‐DMM we developed a system that meets several criteria, including: ease-‐of-‐use, secure, and HIPAA-‐complaint. You’ll receive guidance on using the IA-‐DMM video file transfer system in a separate document. Edelman – Shoot and Share (11/18/13) 14 Distance Mentoring Model is a project within The Communication and Early Childhood Research and Practice Center (CEC-RAP). CEC-RAP is a collaborative center within the College of Communication and Information, School of Communication Science and Disorders at Florida State University