1
2-Notice Sweepy UK.qxd
8/12/08
16:30
Page 12
Dear Customer,
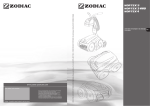
Thank you for choosing our Sweepy Free ® automatic swimming pool cleaner by ZODIAC.
The robot has been designed, manufactured and controlled with great care to ensure that it will
satisfy your requirements.
Please read this user guide carefully before using it for the first time. This document presents all
the information you will need to ensure optimal operation and safety of your robot.
For additional information, please contact your usual retailer who, being a swimming pool
professional, will provide recommendations concerning the use and maintenance of your robot.
Your retailer will also provide any spare parts you may require and also provide qualified after
sales service.
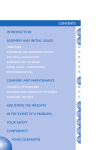
USER GUIDE
1 / YOUR SAFETY
13
2 / FIRST OPERATIONS
13
UNPACKING
ASSEMBLING THE TRANSPORT CART
ELECTRICAL CONNECTION
IMMERSION OF THE ROBOT
OPERATION
REMOTE CONTROL MODE
13
13
14
14
14
15
Using the remote control
Switching to remote control mode
Return to automatic operation
Synchronising the remote control
16
16
16
16
RECOMMENDATIONS
16
3 / CLEANING AND MAINTENANCE
CLEANING THE FILTER-BAG
CLEANING AND STORAGE
17
17
17
4 / CHANGING THE BRUSHES
18
5 / ADJUSTING THE BALLAST
19
6 / POTENTIAL PROBLEMS
19
7 / CONFORMITY
20
8 / SWEEPY FREE GENERAL SPECIFICATIONS
20
9 / WARRANTY
21
Disposing of the product / Protection of the environment:
In accordance with the requirements of French Directive DEEE - 2002/96/CE (Disposal of Electrical and
Electronic Equipment Waste), used electrical and electronic appliances must be disposed of separately from
normal household waste in order to promote reuse, recycling and other forms of recovery, also to limit the
quantity of waste that needs to be destroyed and to reduce the number of dumps. When disposing of this
product, respect local laws applying to waste disposal.
Do not dump it in nature areas. Take it to a centre specialised in dealing with electrical and electronic waste
and/or enquire with your retailer when purchasing a new product.
12
2-Notice Sweepy UK.qxd
8/12/08
16:30
Page 13
1/ YOUR SAFETY
The Sweepy Free ® robot has been manufactured in conformity with the most demanding norms.
In order to ensure optimal and safe functioning of your swimming pool cleaner, you must
respect the following instructions:
> Only plug the control box to a power socket protected with a residual differential current
protection system of 30 mA maximum.
> Make sure that the electric plug is always easily accessible.
> The control box must not be installed in a place that is liable to flooding.
> The control box must be placed at a distance of at least 3.5 m from the edge of the swimming
pool, and should not be directly exposed to the sun.
> Never allow anyone to bathe in the pool whilst the robot is in the swimming pool.
> If the control box were to accidentally fall into the pool, unplug it from the electrical socket before
retrieving it.
> To avoid electrical shock, do not open the electronic control box. If you encounter a problem,
contact a qualified technician.
> Do not operate the robot when it is out of the water.
> Do not attempt to repair the electric power cord. Contact the after-sales service to have it
replaced by an original spare part so as to avoid danger.
> Do not use the robot in the swimming pool if the water temperature is above 35°C.
> Unplug the power cord before any cleaning, service or maintenance operation and after using
the robot.
This appliance is not intended for use by persons (including children) with reduced physical,
sensory or mental capabilities, or lack of experience and knowledge, unless they have been given
supervision or instruction concerning use of the appliance by a person responsible for their safety.
2 / FIRST OPERATIONS
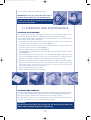
UNPACKING
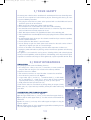
The packaging should contain the following elements:
> the Sweepy Free ® robot; a carry cart; a control box; a remote control box
complete with neck strap; the user manual and the warranty certificate.
Unpack the elements as follows:
> First remove the box that is on top of the robot: it contains the control box.
> Then take out the parts for the cart. Figure 1.
> 2 upper tubes: right (1) and left (2), 1 control box hook (3), 2 cable hooks:
top (4) and bottom (5), 1 hook cap (6) and one bag of screws containing
2 special plastic screws (7), 4 long screws (8), 4 nuts (9) and a spanner.
> Finally, extract the lower part of the cart (10).
Check that the device has not suffered any damage during its transport (shocks,
broken parts, etc.). if you notice any anomalies, contact your retailer before using
your robot.
1
2
3
4
7
9
8
5
6
10
Figure 1
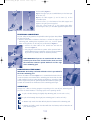
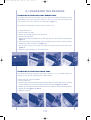
ASSEMBLING THE TRANSPORT CART
Assembling the upper part of the cart. Figure 2.
a) Fit the upper handle tubes (1) and (2) on the control box support hook (3).
b) Then place the cable support hook (4) - the tubes must be turned towards the
cable hook.
c) Place the screw (7) at the top of the cable support and tighten it using the
spanner supplied.
d) Insert the long screws (8) in the control box support whilst maintaining the nuts
(9) in the cable support and tighten them.
13
a
b
c
d
Figure 2
2-Notice Sweepy UK.qxd
8/12/08
16:30
Page 14
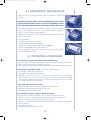
Final assembly. Figure 3.
a) Place the upper part, as assembled above, on the lower part
of the cart (10).
b) Place the cable support (5) and its cover (6) on the
assembled parts.
Insert the screw (7) at the bottom of the cable support and
tighten it using the spanner supplied.
Insert the 2 long screws (8), in the support cover whilst
maintaining the nuts (9) in the cable support and tighten them.
Figure 3
ELECTRICAL CONNECTION
For your safety and to guarantee the optimal functioning of your robot, follow
the steps hereunder:
> Place the control box at a distance of at least 3.5 m from the edge of the
swimming pool, avoiding direct exposition to the sun; it can be placed
either on the ground or on the carry cart, as illustrated in Figure 4.
> Connect the robot cable to the control box and lock the
connector. Figure 5.
> Only plug the control box to a power socket protected with a
residual differential current protection system of 30 mA maximum
(if you have any doubts, contact an electrician/installer).
VERY IMPORTANT! If you use an extension cable in order to
connect your robot to the electrical mains, make sure that
the control box cannot be placed within 3.5 m of the edge
of the swimming pool.
Figure 4
Figure 5
IMMERSION OF THE ROBOT
IMPORTANT: No bathing is allowed whilst the robot is operational in
the in the swimming pool.
Immerse the robot in the water. Figure 6. It is essential that the device sinks on
its own and settles on the bottom of the swimming pool. Ensure that the cable
is fully unrolled in order to reduce twisting and tangling up. Stretch the cable
over the length of the pool. For optimal operation we recommend placing the
cart with the control box at mid-distance of the swimming pool length.
Figure 6
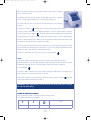
OPERATION
Sweepy Free ® offers 4 cleaning programs. Depending on the state of your swimming pool,
you have the choice between 2 cleaning cycles and 2 operating modes:
> Cycle I: for fast cleaning of a slightly dirty swimming pool (45 min and 1.15 hrs).
> Cycle II: for thorough cleaning of your swimming pool (1.20 hrs and 2 hrs).
> "Bottom only" mode: the robot will only clean the bottom of the swimming pool.
> "Bottom and walls" mode: the robot will clean the bottom, wall and waterline of
your swimming pool.
14
2-Notice Sweepy UK.qxd
8/12/08
16:30
Page 15
When you switch the power on the robot it will be in sleep mode. It is waiting
for an instruction to start.
The robot is started by pressing a button corresponding to one of the 2 cleaning
cycles. The light corresponding to the selected cycle will light up.
The robot will start after a few seconds and will calculate its own cleaning
trajectory.
Pressing on the button
will light up the indicator corresponding to the current
operating mode ("Bottom only" or "Bottom and Walls"). You can switch between operating
modes by pressing the button
. The robot will not start immediately, pressing the button
corresponding to one of the 2 cleaning cycles will instruct the robot to start the cleaning cycle.
When the robot is switched on, it will be set to the operating mode that was active when it was
last switched off ("Bottom only" or "Bottom and Walls").
You can change the cleaning cycle and cleaning mode at any time during the operation. Simply
press the button corresponding to the other cycle (I or II) or to the other mode (Bottom only or
Bottom and walls). This will start a new full cleaning cycle.
To stop the robot during the course of a cycle, press on the button
.
NOTE:
Pressing the button corresponding to the cycle currently running will have no effect.
After completing the cycle the robot will stop: the lights indicating the selected cycle and mode
will blink to show that the unit is still under power and that the cycle is completed.
Press the button
.
Unplug the power cable from the mains socket. Unplug the cable from the control box and
wrap it around the support hooks fitted on the cart.
If you wish to initiate a new cycle after the robot has stopped, press the button
a few seconds before restarting your robot.
and wait
IMPORTANT: Wait approximately 1/4 hour after the end of the cycle before removing
the robot from the water.
REMOTE CONTROL MODE
You can control the robot as you wish using the remote control.
The remote control features 4 buttons:
L
B
Forward
Reverse
Auto
Rotate
15
Return to automatic mode
2-Notice Sweepy UK.qxd
8/12/08
16:30
Page 16
Using the remote control
The direction of the robot is determined by the cable outlet from the casing.
Note: the robot always rotates around the cable, so it will turn to the right or to
the left depending on whether the robot is moving forwards or reversing.
Switching to remote control mode
The remote control mode is activated as soon as one of the keys on the remote
control unit is pressed. The LED on the control panel will blink alternately.
The robot will then move in the selected direction.
Pressing on the
button will make the robot move Forwards and turn
Forward
(to the right).
Reverse
Cable
The robot will continue to turn whilst the button is pressed (right or left depending
on the current direction of displacement). Once the button is released, the robot
continues its initial movement (forward or backward).
L
B
Pressing the
buttons
will move the device in the chosen direction.
The light indicators situated on the control box, showing the current cycle and mode, will
blink alternately.
Return to automatic operation
Return to automatic mode is achieved by pressing the Auto button.
The robot will also return to automatic mode if no button has been pressed during 30s.
In all cases, the robot will stop for 3 seconds (the pump continues to operate) before resuming
the cleaning cycle in automatic mode.
The diode indicators on the box will stop blinking.
Synchronising the remote control
If you need to replace the control box or the remote control unit, the new remote control unit
must be matched with the control box. To this effect:
Plug the control box to the power supply. It is not necessary for the robot to be connected to the
control box.
> Press the button
on the remote control and keep it pressed down for the continuation
dof the peering procedure.
> Press the button
then the Cycle I button whilst at the same time pressing
.
> After approximately 6 seconds, the 4 indicators on the box will light up.
> Release the button; the remote control unit is now ready.
If the light indicators switch off when the 3 buttons are held down, restart the synchronisation
procedure.
RECOMMENDATIONS
Use your automatic cleaning robot as often as possible. You will enjoy a swimming pool that is
always clean and the filter bag will clog up less often.
The robot must operate in swimming pool water that has the following properties: Chlorine
< 2mg/l, pH between 6.8 and 7.6, temperature between 10°C and 35°C.
It is possible that part of the pool is not perfectly clean after executing the automatic program.
In this case, you can use the remote control mode in order to perfect the cleaning easily and
quickly.
16
2-Notice Sweepy UK.qxd
8/12/08
16:30
Page 17
Do not leave the robot permanently in the water.
OK
IMPORTANT: Do not use your robot after using a
chlorine shock treatment in your swimming pool!
Do not pull on the cable to lift the robot out of the
water. Use only the handle.
3 / CLEANING AND MAINTENANCE
CLEANING THE FILTER-BAG
We recommend cleaning the filter-bag after each cycle. Do not let debris or dirt dry up in
the filter-bag. This would make it very difficult to clean and could make it unusable.
Ensure that the power cable is unplugged from the power mains or that the floating cable is
disconnected from the power supply unit.
> Lift the robot out of the water and place it upside down on the deck, so as to enable access
to the filter-support plate fitted on the underside. Figure 7.
> Pull back the 4 clips that hold the plate in place. Remove the plate, keeping it upside down
so that the contents remain in the bag. Figure 8.
> Undo the 2 plastic clips to extract the bag. Figure 9.
> Gently pull back the elastic band at the base of the filter and remove the latter from its support
plate. Schéma 10.
> Empty the bag and clean it using tap water or if necessary using slightly soapy water. In this
case, rinse thoroughly, taking care to turn it over. It can be washed in a washing machine
following the instructions mentioned on the label fitted on the inside of the bag.
> Also rinse the filter support plate and remove any impurities that might be stuck under the clips.
> Replace the filter-bag by placing the knot in the elastic band at the middle of the length
of the filter-support, and the corners of the bag on the angles of the metal rods. The
Zodiac label is fitted to one of the metal rods.
> Place the plastic locking clips on the rods.
> Replace the filter-support and clip it into place.
Figure 7
Figure 8
Figure 9
Figure 10
CLEANING AND STORAGE
The robot must be cleaned regularly using plain tap water or slightly soapy water, excluding any detergent such as trichloroethylene or equivalent products. Rinse the robot thoroughly using tap water.
None of the external mechanical parts accessible to the user require greasing.
The robot must be stored on its carry cart, which has been specially designed to avoid squashing the brushes and to ensure that it can dry safely and quickly.
IMPORTANT :
Do not leave the robot to dry in the sun by the pool side. Do not leave the control unit
and the remote control box in the sun or under the rain.
17
2-Notice Sweepy UK.qxd
8/12/08
16:30
Page 18
4 / CHANGING THE BRUSHES
THE ROBOT IS FITTED WITH SEBS RUBBER PADS
The rubber pads include wear indicators. To ensure that your swimming pool cleaner remains
highly efficient, you must change the brushes as soon as one of the wear indicators has
been reached (even if the strips are not evenly worn). Figure 11.
We recommend changing the brushes after 2 seasons of use.
To change the brushes:
> Turn the robot on its back.
> Pull the strips through the slots in the first brush.
> Remove the worn brush.
> Place the new brush by wrapping the smooth part with no strips around the brush support.
Figure 12.
> Insert each strip in the corresponding notch and pull gently on the strips in order to pull them
through to the other side of the slot. Figure 13.
> Cut the strips using a pair of scissors to match their length with that of the other strips.
Figure 14.
> Repeat the above operations on the second brush.
Figure 11
Figure 12
Figure 13
Figure 14
THE ROBOT IS FITTED WITH FOAM PADS
We recommend that you change the pads after a season's use. It is essential that they are
changed as soon as their surface becomes smooth or worn.
In order to do this, proceed as follows:
> Turn the robot over.
> Push the pads aside to reveal the pad clips. Slide your fingers under the pads in order to release
the clips holding them in place. Be careful not push them too far. Figures 15 and 16.
> Remove the used pads and replace them with new ones (with the smooth side facing inwards).
> Replace the clips. Figures 17 and 18.
> Retighten the pads.
Figure 15
Figure 16
Figure 17
18
Figure 18
2-Notice Sweepy UK.qxd
8/12/08
16:30
Page 19
5 / ADJUSTING THE BALLAST
It might be necessary to adjust the ballast in order to enhance the efficiency of
the robot.
Important: the filter-bag must be clean, the swimming pool water must be
properly balanced and there must be no algae on the swimming pool walls
before proceeding with adjusting the ballast of the swimming pool cleaner.
Figure 19
If the robot floats too high above the waterline and takes in air, move the ballast
(2 plates) from position 3 to position 2 and add another ballast (2 plates) to
position 4 so that the ballast remains balanced.
If the robot does not float up to the waterline, remove the ballast (2 plates) situated
under the motor casing.
To adjust the ballast:
> Carefully turn the robot on to its back.
> Remove the filter-support plate. Figure 19.
> Unscrew and remove the casing protection grid. Figure 20.
> Adjust the ballast. Figure 21 (5 cable outlet side).
> Put the grid back into place and screw it onto the casing, then put the filtersupport plate back into place.
Figure 20
1
2
3
4
5
Figure 21
6 / POTENTIAL PROBLEMS
The robot does not stay on the bottom of the swimming pool:
There is air trapped in the robot casing. Repeat the immersion procedure, following the instructions
under the section “Immersion of the robot” step by step.
Turn the robot upside down whilst keeping it under water to release the air trapped in the casing.
The robot does not climb the walls. There can be 3 reasons for this:
> the filter bag is full or dirty: simply clean it.
> the ballast is not adapted. Adjust the ballast.
> although the water may seem clear, there can be microscopic algae in your swimming
pool, invisible to the eye, that make the wall slippery and prevent the robot from climbing.
Give the pool a chlorine shock treatment and lower the pH slightly. Do not leave the robot
in the water during the shock treatment.
Upon starting the robot does not move:
Check that the power cable to which the control box is properly connected.
Check that you have correctly initiated cleaning cycles I or II.
If the problem persists, contact your retailer.
The 2 indicators for Cycle I and Cycle II blink alternately:
Your robot has encountered a problem or an error occurred during its operation.
Unplug the power cord, wait 10 seconds minimum then reconnect the power cord.
Check that the cable is correctly connected to the control box.
Check there are no debris preventing brush rotation and/or that there is no debris near the propeller.
Clean the filter-bag.
Start a new cleaning cycle.
If the problem persists, contact your retailer.
19
2-Notice Sweepy UK.qxd
8/12/08
16:30
Page 20
7 / CONFORMITY
This device has been designed and manufactured according to the following norms:
According to the directive on Electromagnetic compatibility: 2004/108/EC and norms
EN 55014-1: 2000 +A1:2001 +A2:2002
EN 55014-2: 1997 +A1:2002
EN 61000-3-2: 2000 + A2:2005
EN 61000-3-3: 1995 + A1:2001 +A2:2005
According to the directive on low voltage: 2006/95/EC and the norms:
EN 60335-1 : 2002 + A1:2004 + A2:2006 +A11:2004 + A12:2006
EN 60335-2-41 : 2003 + A1:2004
The device conforms to all of the above.
It has been tested under normal conditions of use.
R&TTE CONFORMITY
BZT - ETS Certification Gmbh, attests under its responsibility that the product ERONE 024A
manufactured by ELPRO INNOTEK S.p.A, Via Piave, 23 - I.31020. to which the present certificate
refers is conform to the appropriate normalisation norms and documents:
> EN 300 220-3 V1.1.1 (2000-09): Electromagnetic and radiofrequency spectrum compatibility
(ERM); low range apparatus (SRD); radio equipment used in the frequency range between
25 MHz and 1 000 MHz for power levels of up to 500 mW. Part 3: harmonised EN norm
covering the essential requirements of article 3.2 of R&TTE Directive.
> EN 301 489-03 (2000-07): Electromagnetic and radiofrequency spectrum compatibility (ERM);
electromagnetic compatibility norm (EMC) for radio equipment and services. Part 3: Conditions
specific to low range apparatus (SRD) operating at frequencies between 9 kHz and 40 GHz.
> EN 60 065 (1998): Audio and video devices and similar electronic appliances. - Safety
requirements.
This apparatus is not designed for use by persons (including children) whose physical, sensory
or mental abilities are reduced, nor by persons lacking in experience or knowledge, except if they
have benefited from supervision or prior instructions concerning the use of the apparatus given
by a person responsible for their safety.
8 / SWEEPY FREE
GENERAL SPECIFICATIONS
Control box supply voltage: 230V 50 Hz
Robot supply voltage: 30 V DC
Installed load: 150 W max
Cable length: 16.5 m or 25 m
Robot size (WxDxH): 42 x 40 x 28 cm
Pack size (WxDxH): 58 x 58 x 59 cm
Weight of robot: 9.9 kg
Packed weight: 22.1 kg
Filtration capacity: 20 microns
Theoretical width cleaned: 330 mm
Pump output: 16m 3 / h
Cycle lengths: 45 min, 1.15 hrs, 1.20 hrs, 2 hrs
The manufacturer reserves the right to modify these specifications without notice.
Although the Sweepy Free ® robot has been tested in a large range of pools, ZODIAC cannot
guarantee that it will be perfectly adapted to a specific type of pool.
20
2-Notice Sweepy UK.qxd
8/12/08
16:30
Page 21
9 / WARRANTY
The present terms and conditions are based on French law as in force at the time of printing.
TERMS & CONDITIONS
We guarantee that the equipment is technically flawless and free from defects, both with respect to material and workmanship, and that it corresponds to the evolution of technology and
to the industry standards in force at the time of its introduction for sale to the market.
Subsequent modifications made to our products (enhancements or modifications related to the
technological evolution of the product) will not result in any intervention on our behalf.
The warranty is limited to the repair or replacement of the apparatus, only in the case of recognised conformity-related defect. The choice between these two options will be our decision.
The operations covered by the warranty will not exceed the damage suffered directly, and will
not entail unreasonable costs to be borne by the retailer or manufacturer.
The warranty will automatically become void if the device has been tampered with (for repair or
other) by a third party external to our services or by a repair service not approved by us, or if
modifications have been made without our written approval. The warranty will also be void in
the case of use non conform to the User Manual supplied together with the apparatus.
Any legal warranty such as described under article 1641 of the French Civil Code will apply. Any
law entering into force after the date of publishing of the present warranty, and the terms of
which concern the general public, will apply automatically, even if said terms were to differ from
those stated in the present document.
EXCLUSIONS FROM THE WARRANTY:
>
>
>
>
Parts subject to normal wear such as the wheel tracks, brushes, belt straps and filter-bags.
Electrical damage caused by lightning or due to a faulty electrical connection.
Damage due to shock or mishandling (robot, including accessories and cables).
Under no circumstances will repair work or replacement under the terms of the warranty entail
an extension or renewal of the period of warranty of the apparatus.
Period covered by the warranty
The warranty runs for two years, from the date of invoicing to the first owner.
Object of the warranty
During the period covered by the warranty as defined here-above, any part recognised as presenting a defect will be repaired or exchanged by the manufacturer with a new or fully operational part.
Under reservations related to future French legal provisions concerning the general public that may
come into force after the date of publication of the present warranty, travel and labour expenses
will be borne by the user.
In the case of return to our workshop, shipping costs (return) will be borne by the user, labour
expenses will be covered by the manufacturer.
Immobilisation and deprivation of use of a device for purposes related to its repair will not open
right to compensation. In all cases, the retailer's legal warranty will continue to apply as provided
for under article 4 of Decree n°78-464 dated 24 th March 1978.
Damage in transit
Appliances are transported at the users' own risk.
It is the user's responsibility to check that the appliance is in perfect condition, prior to accepting
its delivery. Our responsibility will not be engaged in this respect.
21