1
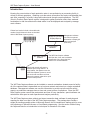
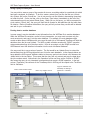
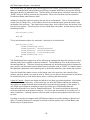
WIP Data Capture System - User Manual
*MEC*
MEC Software
WIP Data Capture System
User Manual
© Copyright 2001-2004 Measurement Equipment Corporation
All Rights Reserved
Distributed by:
The Barcode Software Center
1113 Hull Terrace
Evanston, Illinois USA 60202
Tel. 847-866-7940
Fax. 847-866-9836
www.makebarcode.com
-1-
WIP Data Capture System - User Manual
Introduction
Knowing the current status of each production order in a manufacturing or processing facility is
critical to efficient operations. Obtaining up-to-the-minute information can require considerable time
and effort, especially if a facility is large and orders travel through several operations. The WIP
(Work In Process) Data Capture system is designed to gather production status from scattered
workstations in real time and store the data where it can be displayed and analyzed by management software.
Printed work orders include a barcoded order
number (Code 39 barcode fonts are included
with the WIP Data Capture system)
Management Software Management software
can use the captured
Displays/Reports
information to display job
status and analyze
productivity.
*WO4095*
WORK ORDER
*WO4095*
○ ○
○ ○
○
○
○ ○
○ ○
Job Information
Database
WIP Data Capture
software
WORK ORDER
*WO4095*
The WIP Data Capture software
adds the date, time, and workstation
identification, then stores the information on a central database.
Work order travels with parts to
different processing stations. At
each station, the operator uses the
WIP Data Capture System to record
the work order and the work done.
Barcode scanners make this a quick
and accurate process.
The WIP Data Capture software can be installed on several workstations located around a facility;
all of the captured data is transmitted over a local area network and stored on a single centralized
database. Management software can use this information to provide up-to-the-minute activity
reports, so production managers have a clear and current picture of operations. Since the WIP
Data Capture system records the precise date and time of every transaction, special software can
calculate the time spent on each operation and analyze productivity.
The WIP Data Capture system collects and stores transaction data; software for analyzing and
reporting the data is not part of the WIP Data Capture package.. The package does include a
simple job tracking example written in Microsoft Access; this is intended as a starting point for users
with experience in Microsoft Access or Visual Basic programming. See the section entitled Using
the Captured Data for an introduction to techniques for extraction of the data.
-2-
WIP Data Capture System - User Manual
Architecture of the WIP Data Capture System
The arrangement of data entry fields on the WIP Capture screen is flexible, and is centrally controlled by the system manager. The manager can specify what fields will appear, where they will be
located on the screen, and where the captured data should be stored. This information is stored in
one shared network database, WIPConfig.mdb. The system manager uses the program
WIPConfig.exe to manage the settings.
Whenever a WIP Data Capture program starts running anywhere in the facility, it reads the configuration database to see how it should arrange the display. Any changes made by the system manager are automatically reflected in the appearance of the display. This means that in a facility with
multiple data capture stations the system manager does not have to go to each workstation to
make changes.
When several workstations are involved, it is often the case that different departments require
different screen layouts. The system manager can define any number of “profiles” in the configuration database; each profile defines a different screen layout. Each workstation may be locally
configured to automatically use one of the defined profiles.
In addition to the screen layout, the configuration specifies where the captured data should be
stored. This includes the full network pathname of the database file, the name of the data table,
and the names of the individual data fields. The database may be dedicated soley to captured data,
or it may be a larger database used for other purposes with one data table set aside for captured
data.
Data Capture Workstations
read setup information
from the central configuration file
Configuration information
and captured data reside
on central network disk
System Manager uses
WIPConfig.exe to maintain
the configuration database
-3-
WIP Data Capture System - User Manual
Installation
Install the WIPConfig.exe program on the workstation to be used by the system manager:
√
Go to the WIPConfig directory on the CD-ROM and run the setup.exe program.
√
Decide on a shared network disk location for the central configuration file, then copy the file
WIPConfig.mdb from the CD-ROM to the network disk.
√
Decide where the captured information will be saved. If you already have a database, you
will need to create a data table for the captured information. If you do not already have a database,
you can create one (use Microsoft Access) or copy WIPData.mdb from the CD-ROM.
Note: The CD-ROM includes a directory named JobTrackingExample which includes
sample WIPConfig.mdb and WIPData.mdb files. You may wish to copy these files to your
network disk to provide a starting point.
Install the WIPCapture.exe program on each workstation that will be used to collect production data:
√
Go to the WIPCapture directory on the CD-ROM and run the setup program.
Install the Code 39 barcode fonts (optional):
√
Click on Start -> Settings -> Control Panel -> Fonts, then select File -> Install New Fonts.
When prompted for the fonts, browse to the CD-ROM and select all of the files which end in .TTF.
Setting the License Key
When you run WIPConfig or WIPCapture for the first time, a pop-up window will ask for the license
key. Copy this number from the label on your installation CD-ROM.
If you click Install as Demo the software will operate in demonstration mode: WIPconfig operates
normally, but WIPCapture limits you to a total of 25 capture records at any one time. A copy of the
software installed as a demonstration can be activated with an unlock license key. Contact the
publisher for details.
If you click Cancel, the software will operate in demonstration mode and the pop-up window will
appear every time you start the program.
-4-
WIP Data Capture System - User Manual
Setting up the Database for Captured Information
The WIP Data Capture System needs a place to store all of the information that it will collect. At
present, the WIP Data Capture system records transaction data in Microsoft Access database
format (either Access/97 or Access/2000 format). You can use a database that already exists on
your system, create a new one from scratch, or start with the example WIPData.mdb included on
the CD-ROM (WIPData.mdb is Access/2000 format; for Access/97, use WIPData97.mdb).
The database must contain a table which will receive the captured data; it does not matter if it is the
only table in the database or one of many. In the sample WIPData.mdb, the name of this table is
WIPLog. You can give the database and data table any name you choose.
Each profile in the WIP configuration allows you to specify the full pathname to the database and
the name of the data table. While the WIPConfig utility allows the system manager to specify a
different database for each profile, it is common practice for all profiles to store captured data in the
same database and table.
Database
MyTable1
MyTable2
WIPLog
Captured data will be stored here
The individual fields within the data table can be named anything you wish. The only requirement is
that the field names referred to in the WIP Configuration match the actual names of the fields in the
database. The data table might contain fields like the following:
Name
RecordNumber
TimeStamp
Workstation
JobNumber
Operation
Quantity
Employee
Type of Data
AutoNumber
Date/Time
Text
Text
Text
Text
Text
Purpose
Provides unique ID for each record
Date and time of transaction
Workstation which captured data
Job Number this applies to
Operation code (Start, Finished, Hold, etc.)
Number of units involved in operation
Employee recording transaction
Any number of data fields can be used to fit your specific needs. It is a good idea not to require too
much data; every piece of information is another field for the user to fill in, and too many fields can
cause delays and lead to frustration.
-5-
WIP Data Capture System - User Manual
Using the WIPConfig Program
The first time you run the WIPConfig.exe program, you will need to specify where the
WIPConfig.mdb database is located. Click on the Settings button at the bottom of the WIPConfig
screen to display the local settings screen.
Fill in the full pathname to the WIPConfig.mdb database or click on the button to the right of the
field to browse to the filename. It is common practice to to save this database on a shared network
drive where it is available to any workstation on the network. For example, if your shared network
disk is mapped as drive S: with a folder named JobTracking, the full pathname would be
S:\JobTracking\WIPConfig.mdb. Click Save to store the pathname and go back to the main
WIPConfig screen.
-6-
WIP Data Capture System - User Manual
Profiles
You may define any number of profiles. Each profile defines the appearance and behaviour of a
data capture screen; a separate profile can be created to meet the specific needs of each department in a facility. Click Data Capture Profiles on the main menu and select an existing profile from
the pop-up list or click Add New to create a new profile. The Edit Profile screen will appear:
Click Done to save and exit or cancel to exit without saving. To delete the profile, click the Delete
Profile button. Here are descriptions of the profile settings:
Profile Name: This is the name used by WIP workstations to refer to the profile. The name is set
when a profile is created, and may not be changed.
Displayed Title: This text will be displayed at the top of the WIP Capture screen
Form Width, Height: The size of the data entry form measured in screen units (about 1000/inch).
Database Path: The full pathname to the database which will receive captured data. Enter the
complete pathname or click on the button at the right of the field to browse to the file.
Database Table: The name of the table which will receive the captured data. The scroll-down list
displays all of the fields available in the specified table; point and click to select.
Time Stamp Field: The name of the field which will receive the transaction date/time information.
Use the scroll-down list to select the correct field.
Workstation Field: The name of the field which will receive the workstation identification. Select a
field from the scroll-down list.
-7-
WIP Data Capture System - User Manual
Data Fields
The Data Capture Fields list at the bottom of the profile screen shows the data fields that will appear on this profile’s capture screen (a profile may contain any number of fields). Highlight a field
on the list and click Edit to display the Edit Field screen shown below. Click Delete to remove the
selected field, or click Add New to create a new field. Click Done to save your changes and
return to the main profile screen. Click on cancel to return without saving changes.
Field Name: This is the reference name for this field.
Operator Prompt: This text will appear on the WIP Capture screen just above the entry field; this
text tells the user what information is expected.
Store in Field: The name of the field where the captured information will be stored. The database
and the data table are defined in the main profile screen.
Default Entry: The data entry for this field if the operator does not fill in a value.
Entry Required: Check this box to force the user to enter data in this field.
Visible: Uncheck this box to hide the field on the capture screen.
Erase After Save: After a user saves a transaction, the field will be erased if this box is checked.
Tab Stop, Index: Checking Tab Stop indicates that this field should be included as the operator
tabs from one field to the next. Index specifies the tab order of the fields.
X, Y Position: These settings define where the field will appear on the screen. X Position controls
the horizontal, Y Position the vertical. Units are screen units, roughly 1000 per inch.
Width, Height: The size of the entry field in screen units.
-8-
WIP Data Capture System - User Manual
Barcodes
It is very convenient for an operator to simply scan a barcode and have the data appear in the
correct field regardless of where the keyboard cursor happens to be located on the screen. The
best way to accomplish this is to include a prefix at the beginning of each barcode to indicate the
type of data it contains. Here are some sample barcodes created with the Code 39 TrueType fonts
included with the WIP Data Capture System:
*WO12345*
WO = Work Order Number
*PN12AA-B5*
PN = Part Number
*OP330*
OP = Operation Code (drill, sand, assemble, etc.)
*STDONE*
ST = Status (start, finish, hold, etc.)
A Work Order barcode would typically be printed at the top of each order’s cover sheet; Part Number barcodes would generally be on bin labels or on part labels; Operation and Status codes can be
printed on “crib sheets” and posted next to each data capture workstation. You can define as many
different types of barcodes as you wish and you can choose to define only some of the barcodes
you will use. If the WIP Data Capture system cannot identify a barcode by its prefix it will put the
data wherever the keyboard cursor is located at the moment.
Click on the Barcode Formats button on the main menu to display the Barcodes screen shown on
the next page.
-9-
WIP Data Capture System - User Manual
This screen displays a list of barcodes which have been defined:
Create new barcode formats by clicking Add New; you will be asked for a name to help you keep
track of the different barcode types. To edit an existing format select it on the list and click Edit. To
remove or rename a format, highlight the name and click Delete or Rename.
Fill in a format string for each barcode. Prefix characters are entered just as they will appear in the
barcode. The names of the fields where the data should be stored are enclosed in square brackets;
you may type the field name manually or double-click the desired field on the list... it will be inserted
into the format string at the cursor position. The field name used here must match one of the Field
Names shown on the list.
If you want the barcode prefix to be removed before the data is stored, check the Strip Prefix box,
otherwise leave it unchecked.
The sample screen above tells the WIP Data Capture system that whenever it sees a barcode
beginning with “OP” it should put the data in the Operation field. This will be true for all profiles.
This means that you only have to define the OP barcode one time. The destination database field
in which the data will be stored is defined separately for each profile. This means that OP barcodes
will always be treated as Operations, but may be stored in different locations in different profiles.
- 10 -
WIP Data Capture System - User Manual
It may be convenient to have a single barcode contain more than one piece of information. For
example, instead of having the operator scan three different barcodes to enter the order number,
part number, and operation code, the information could be printed on a shop order worksheet as a
single barcode. Since this is a shop order Line Item let’s use the barcode prefix “LI”:
*LI10077/ABB-4894/DRILL*
The barcode begins with “LI” (line item) and is followed by the order number, part number, and
scheduled operation code. A slash character (/) is used to separate the fields. The separator can
be any character supported by the barcode symbology as long as it is not used within the data. For
example, a dash (-) would be a bad choice for a separator in this example because it is used in the
part numbers.
Here is the format string that will tell the WIP Data Capture system how to divide up the Line Item
barcode. Note that the separator character appears between the fields, which are enclosed in
square brackets:
LI[OrdNo]/[PartNo]/[Operation]
When the LI barcode is scanned, the WIP Data Capture system will automatically separate the
pieces of data and put them in the correct fields on the screen. Since separator characters mark
field boundaries, the length of each piece of data can vary from one barcode to the next.
At the risk of complicating matters, you should know that different separators can be used within the
same barcode. The following example uses a dollar sign ($) to divide the order number and part
number, and a pound sign (#) to divide the part number and operation:
LI[OrdNo]$[PartNo]#[Operation]
Separators can be more than one character. This might be useful in cases where all likely candidates for separator characters are used in the data. For example, say that # could not be used
because it appears in part numbers, but ## (two pound signs in a row) never appears in part numbers. The following format would confuse the WIP Data Capture system if a # appeared in a part
number:
LI[OrdNo]#[PartNo]#[Operation]
By using a ## pair, the WIP Data Capture system will be able to distinguish a single # in a part
number from a ## separator (assuming that the # in the part number is never the first or the last
character in the part number):
LI[OrdNo]##[PartNo]##[Operation]
It is still a good idea, if possible, to use a single separator character that will never appear as part of
the data.
- 11 -
WIP Data Capture System - User Manual
Configuring the WIP Capture Program
The first time WIPCapture is run at each workstation, the local configuration will have to be set.
Click the Configure button at the bottom of the screen to display the configuration screen:
Enter the full pathname to the WIPConfig.mdb configuration database. Then select the name of the
Profile to be used at this workstation and enter an identification code or name for this workstation.
The WIP Capture screen may be used with a barcode scanner for increased speed and accuracy.
A barcode scanner may be attached using a “keyboard wedge” interface (barcode data looks to the
computer and software as though it had been typed at the keyboard) or a serial communications
port. If a serial scanner is used, set the communications port and settings used by the scanner.
A keyboard wedge interface can be used with almost any software; the serial interface, on the other
hand, gives WIP Capture more control and permits some additional features that provide greater
convenience for the user: For example, special command barcodes can be scanned to save data,
hide the screen, or clear the screen; the operator does not need to use a mouse to click an onscreen button. If the WIP Capture screen is hidden on the Windows Task Bar, scanning a barcode
will automatically return WIP Capture to its normal size. Barcode prefixes can be reliably interpreted with a serial scanner; as of this writing, prefix identification does not work with keyboard
wedge scanners.
NOTE: If you plan to run more than one copy of WIP Capture on a single computer
The configuration settings for WIP Capture are stored in the Windows registry. If more than one
copy of the program is running on a single computer they will all use the same configuration settings. This is not good because all copies of the program will use the same workstation identification and there will be conflict when they all try to open the same serial scanner port. To avoid this
problem, use command line parameters to set the configuration for each running copy of the program individually (see the next section in the manual).
- 12 -
WIP Data Capture System - User Manual
WIP Capture Command Line Parameters
The configuration settings for WIP Capture are stored in the Windows registry and loaded when the
program is executed. All copies of WIP Capture running on a single computer will share the same
configuration settings. If more than one copy of WIP Capture will be running on a computer at one
time, or if you wish to change profiles without reconfiguring, the solution is to use command line
parameters.
If you display the properties for a Windows shortcut to WIP Capture, the Target field contains the
command line that actually executes the program. This will typically look something like this:
C:\Program Files\WIPCapture\WIPCapture.exe
With this command line, WIP Capture will load, retrieve the configuration settings from the registry,
and start running. You can override the configuration settings by adding parameters to the command line. Here is a list of the available options:
/B
Show configuration button
/B=<yes/no>
Including /B=NO on the command line will hide the configuration button. This will keep
unauthorized people from exploring and possibly altering settings. The default setting is Yes
(show the button) .
/S
Scanner communication settings
/S=<COM port>:<baud rate>,<parity>,<data bits>,<stop bits>
The COM port should be COM1, COM2, or whatever other serial port the scanner is connected to. The other settings should match the scanner’s communication parameters
(check the manual that came with your scanner. Here is an example for a scanner attached
to COM2 running at 9600 Baud, No Parity, 8 data bits, 1 stop bit:
/S=COM2:9600,N,8,1
/W
Workstation Identification
/S=<workstation identification>
This text string identifies the workstation at which a data record was collected.
/P
Profile
/P=<profile name>
Specifies the name of the data capture profile to be used. Profiles are defined using the
WIP Config program.
- 13 -
WIP Data Capture System - User Manual
/C
Configuration Path
/C=<configuration database pathname>
This specifies the full pathname to the WIPConfig.mdb configuration database where all the
profiles are stored.
You may create a number of Windows shortcuts to the WIP Capture program. By including command line parameters in each shortcut you can make each copy of the program run differently. For
example, let’s say that we want to run two copies of WIP Capture on a computer. Both copies will
behave very much the same so they can share most of the configuration settings, but each copy
will use its own scanner.
We can create two separate shortcuts with the following command lines:
C:\Program Files\WIPCapture\WIPCapture.exe /S=COM1:9600,N,8,1 /W=STN1
C:\Program Files\WIPCapture\WIPCapture.exe /S=COM2:9600,N,8,1 /W=STN2
The copy of the program executed by the first command line will use the scanner on COM1 and
identify itself in the data log as STN1. The copy executed by the second line will use the scanner
on COM2 and identify itself as STN2.
If we did not explicitly tell the two copies to use different serial ports, they would obtain their settings
from the registry and would both try to use the same port. One copy would take possession of the
port and the other would report an error because the port was already taken.
Shortcuts are convenient for initiating programs manually. You can also put shortcuts in the Windows startup folder so they will start automatically when the system starts up.
- 14 -
WIP Data Capture System - User Manual
Using the WIP Capture Screen
The WIP Capture screen shown here is just an example. Actual appearance will be controlled by
settings in your WIP Configuration file. In this example, there are five data fields shown; the
TimeStamp and Workstation ID codes are filled in automatically by the WIP Capture software and
do not appear on the screen. When all of the fields are filled in, the operator can click on the
Record Data button to save the information to the network database.
The About button displays version and copyright information about WIP Capture. The Configuration
button displays the local settings for this worksation. The Hide button minimizes the WIP Capture
screen onto the Windows Task Bar, and Quit terminates the program.
If a serial scanner is being used, special command barcodes may be scanned instead of clicking
buttons. These barcodes may be copied from the next page or re-created using the Code 39
barcode fonts included on the CD-ROM.
- 15 -
WIP Data Capture System - User Manual
Command Barcodes
When using the WIPCapture system with a scanner connected to a serial port, special
command barcodes can be used to control operation of the software:
Save (same as clickingthe Record Data button)
*CMDSAVE*
Save and Hide (same as clicking the Record Data button followed by the Hide button)
*CMDSAVEHIDE*
Hide (same as clicking the Hide button)
*CMDHIDE*
Clear (erases all of the data entered on the screen)
*CMDCLEAR*
Clear and Hide (erases all of the data entered on the screen, then hides the screen)
*CMDCLEARHIDE*
- 16 -
WIP Data Capture System - User Manual
Using the Captured Data
The WIPCapture system builds a chronological log, a list of every transaction captured at the
workstations. The task of organizing and presenting this information in useful ways is really a job
for a programmer or someone with a good understanding of Microsoft Access (or someone determined to learn). Since the WIP Capture data is stored in Microsoft Access format, Access provides
a convenient and flexible tool for manipulating the data.
Creating an application database
A database can contain information plus all the things that organize and present the information
(queries, forms, reports, macros, and modules). It is very important that information reside in one
database file and that all the queries, reports, etc. reside in a separate database file. The database
with the forms, etc. can reference the information with a Link to the other database.
The reason for doing this is that when you open a database and display a form or report in
Microsoft Access, you are given exclusive access to that database. If data is stored in your database, no one else can modify it while you have that file open. This would be bad if a WIPCapture
workstation wants to record an entry. If, however, your database does not contain the actual data
but has links to another database file, that database is shared. Other programs can read and write
information at the same time you are creating reports and displays.
Open Microsoft Access and create a new blank database; call it something like WIPApps.mdb. To
link your new database to the captured data, click on File -> Get External Data -> Link Tables. You
can then browse and select WIPData.mdb database file and the WIPLog data table which it contains. The table WIPLog will now appear on your list of data tables, but with an arrow to the left,
indicating that it is a link rather than a local table. If you double-click on WIPLog, Access will display the current contents; you are looking at data which is actually located in WIPData.mdb.
All of the queries, code modules, etc. which you create to organize, analyze, and report the data
should be created in the new WIPApps.mdb file.
- 17 -
WIP Data Capture System - User Manual
Using a simple query
Displaying a list of transactions related to just one job can be done with a simple “Select Query”.
Click on Queries, then on Create Query in Design View. Select WIPLog from the Add Table list and
click OK. A list of the fields available in WIPLog will appear in the top half of the design screen;
double click on TimeStamp, JobNo, Partno, and Operation to add them to the grid below:
To run the query, click on the red exclamation point button located on the tool bar at the top of the
screen. What you will see is a list of every transaction currently on file; very complete, but not
necessarily useful. In the JobNo column, add the expression =[Select Job] in the Criteria row; this
will cause the query to ask you for a job number and then select only the records related to the job
you are interested in. In the TimeStamp column, select Descending in the Sort row; this will cause
the query to organize the entries with the most recent at the top of the list.
- 18 -
WIP Data Capture System - User Manual
Using a query to erase jobs
You may wish to erase a group of log records all at once; everything related to a particular job which
has been completed, for example. To do this, create a select query just like the last one; include
the =[Select Job] on the Criteria line. You do not need to sort the records in descending chronological order this time. On the tool bar, click on the Query Type button (immediately to the left of the
red exclamation point) and select Delete Query. When you run this query, you will be prompted for
a job number (“Select Job”); the query will then find all records for that particular job and mark them
for deletion. Before it finalizes the deletion, the query will tell you how many records will be deleted
and ask for your confirmation.
Posting data to another database
In some cases it may be desirable to post information from the WIPData file to another database.
While the WIPData file contains a record of every transaction, you may want to extract only the
most recent entry and copy it into the main database. For example, the main database might
contain a table named JobStatus with one record for each job; a field named TimeDone will hold the
date/time when the job was finished. The WIPLog table contains records with “DONE” operation
codes scattered among all of the other entries. How do we extract only the DONE records from
WIPData and insert the date/time information into the main JobStatus database?
One way would be to use a series of queries. The first would be an Update Query to extract the
desired data from the WIPLog table and insert it into the main database. In the example below we
have added the WIPLog and JobStatus tables to the query, and we have forced a link between the
JobNo fields in the two tables. This means that the query will only extract and copy the data when
the job numbers match. Notice that in the Operation column we have set the Criteria to “DONE”;
this means the query is only interested in transactions that record a DONE operation. In the last
column (TimeDone), the contents of the TimeStamp field in WIPLog will be copied to the TimeDone
field in JobStatus:
Match JobNo between tables
Select only “DONE” records
ni
- 19 -
Copy the date/time from
TimeStamp in WIPLog to
TimeDone in JobStatus
WIP Data Capture System - User Manual
The second query (an Append query) would copy all of the “DONE” log records from the WIPLog
table to a separate table (same structure as WIPLog but named WIPArchive) to keep the WIPLog
table pared down to a reasonable size. The third query (a Delete query) would then erase all of the
“DONE” entries in WIPLog now that they are posted. Other sets of queries could be created to
Post/Archive/Delete other pieces of data.
Instead of running the queries manually, they can be run automatically. Click on Forms and then
Create Form in Design View. In the toolbox, click on the command button control and drop it onto
the middle of the new form. Then right-click the new button, click on Build Event; and choose Code
from the list of options. This will pop you into the Visual Basic code editor, and the scenery will look
something like this:
Sub Button1_Click()
End Sub
This is just the barest outline of a subroutine. Add code so it looks like this:
Sub Button1_Click()
DoCmd.SetWarnings False
DoCmd.OpenQuery “PostDoneRecords”
DoCmd.OpenQuery “ArchiveDoneRecords”
DoCmd.OpenQuery “DeleteDoneRecords”
DoCmd.SetWarnings True
End Sub
The SetWarnings False simply turns off the little pop-up message that asks the operator to confirm
that they really want to update or delete or whatever. The SetWarnings True at the end just turns
the warnings back on. The three OpenQuery statements run the three queries that we designed to
post, archive, and then delete records which have an operation code of “DONE”; the names used in
the OpenQuery statement are the names given to the queries when they were saved after creation.
Close the Visual Basic editor to return to the design view of the new form, then close the form
(answer yes when asked if you want to save it). When you run the new form and click on the button
we created the piece of code shown above will run, executing the three queries.
A word of Caution: Queries are simple and effective, but there is a potential problem: time passes
while the queries are executing. If the queries are run while WIPCapture stations are collecting
data, there is a danger that new data records will be recorded during execution of the queries. A
new DONE record might be recorded too late to be picked up by PostDoneRecords and
ArchiveDoneRecords, but in time for DeleteDoneRecords. The result would be that the record
would be erased but never posted or archived. The size of the time window is very small, but it is
there nonetheless. If posting is done in off hours when no data is being captured, then this is not
an issue.
If posting of records must happen while WIPCapture stations are merrily sending in data left and
right, or if posting becomes too complex for a series of simple queries, then a Visual Basic code
module may be a good solution.
- 20 -
WIP Data Capture System - User Manual
Using Visual Basic code to post data
One advantage of using code is that the program can process WIPLog records one at a time... it
can post, archive, and delete each record before moving on to the next. WIPCapture records that
arrive while processing is active will either be processed or left for the next time; the danger of only
partially processing a record is avoided.
Writing VB code to do the posting can be a bit complex unless you have some experience with
writing database functions. We’ll try to make the following example as clear as possible.
Start by clicking on Modules and then on New. You will then be faced with a VB edit screen, blank
save for the cryptic phrase Option Compare Database.
If you are using Access/2000, click on Tools on the menu, and then on References; on the list of
available libraries, check Microsoft DAO 3.6 Object Libraries (3.6 was the latest version as of this
writing; use the highest version number on the list).
If you are using Access/97 you should not need to set up the reference to the DAO Object Libraries.
You can also eliminate the DAO prefixes shown the in the code on the following pasges. For
example, here is a Dim statement as it would appear in Access/2000:
Dim MyDb As DAO.Recordset
The same thing can be done in Access/97 without the DAO reference:
Dim MyDb as Recordset
We’ll create a subroutine called PostData. We are assuming here that the captured data is in a
table named WIPLog, that main job data is stored in JobStatus, and that we have created an Access table named WIPArchive with the same structure as WIPLog. The code begins on the next
page. In the program, text which follows a single quote mark is a comment; it is provided for explanation and does not affect operation of the program.
- 21 -
WIP Data Capture System - User Manual
Public Sub PostData()
‘
‘
Set aside memory space for the variables we will need
‘
Dim MyDb as DAO.Database
Dim LogRec as DAO.Recordset
Dim MainRec as DAO.Recordset
Dim ArcRec as DAO.Recordset
Dim Criteria as String
‘
‘
‘
‘
Set
Set
Set
Set
Get a pointer to the database (MyDb), then open the
WIPLog, JobStatus, and WIPArchive tables
MyDb = CurrentDb
LogRec = MyDb.OpenDatabase(“WIPLog”, DB_OPEN_DYNASET)
MainRec = MyDb.OpenDatabase(“JobStatus”, DB_OPEN_DYNASET)
ArcRec = MyDb.OpenDatabase(“WIPArchive”, DB_OPEN_DYNASET)
‘
‘
Starting at the beginning of WIPLog (LogRec), step through
‘
every record until we reach the end of the file (EOF)
‘
While LogRec.EOF = False
‘
‘
Check to see if this particular log record has “DONE”
‘
for an operation code. In real code you will probably
‘
handle all possible operation codes, not just “DONE”
‘
If LogRec!Operation = “DONE” then
‘
‘
Create a search string and locate the desired
‘
job record on the main database. The actual
‘
string will be something like JobNo = “12345”.
‘
The Chr(34) is the code for a double quote (“)
‘
Criteria = “JobNo = “ & Chr(34) & LogRec!JobNo & Chr(34)
MainRec.FindFirst Criteria
If MainRec.NoMatch = False Then
‘
‘
We found the job! Edit the Main record,
‘
inserting the date/time from the log record.
‘
Be sure to use Update to record the change.
‘
MainRec.Edit
MainRec!TimeDone = LogRec!TimeStamp
MainRec.Update
‘
‘
Now that the information has been posted,
‘
archive it: create a new archive record,
- 22 -
WIP Data Capture System - User Manual
‘
copy all of the fields, then Update to save.
‘
ArcRec.AddNew
ArcRec!TimeStamp = LogRec!TimeStamp
ArcRec!JobNo = LogRec!JobNo
ArcRec!PartNo = LogRec!PartNo
ArcRec!Workstation = LogRec!Workstation
ArcRec!Operation = LogRec!Operation
ArcRec!Employee = LogRec!Employee
ArcRec.Update
‘
‘
The information has been posted and archived,
‘
so delete the WIPLog record. This avoids
‘
dealing with an ever-increasing number of
‘
records and insures we don’t accidentally
‘
double-post a record.
‘
LogRec.Delete
Endif
Endif
‘
‘
Move to the next WIPLog record
‘
LogRec.MoveNext
Wend ‘this is the end of the While LogRec.EOF = False loop
‘
‘
We arrive here once the end of the WIPLog file has been
‘
reached. Clean up and exit
‘
MainRec.Close
LogRec.Close
ArcRec.Close
Set MyDb = Nothing
End Sub
Running this subroutine will post all of the DONE records that have been captured since the last
time we ran it. Causing this function to run automatically is relatively simple. For example, assume
you have created a report that lists the status of all jobs (“CurrentJobList”); before printing the
report, you want to make sure that all captured data has been posted. Add a new button to the
form we created earlier; right click on the button, select Build Event, and select Code. Let’s write
code that will print your report, but run the PostData subroutine first:
Sub Button2_Click()
PostData
DoCmd.OpenReport “CurrentJobList”
End Sub
PostData is a simple example, but it includes the structural foundation for more sophisticated
processing. Using code to post records is more complicated at the beginning, but it provides much
greater control and flexibility, and is worth serious consideration.
- 23 -