1
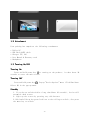
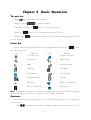
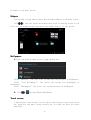
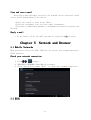
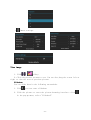
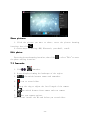
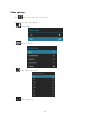
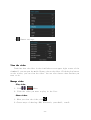
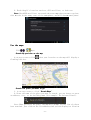
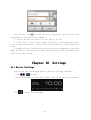
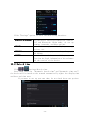
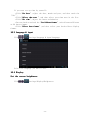
Content
1.1
Outlook for your tablet PC ............................................ - 3 -
1.2 Attachment............................................................... - 4 1.3 Turning On/Off.......................................................... - 4 Turning On ....................................................................... - 4 Turning Off ...................................................................... - 4 Standby .......................................................................... - 4 The main key ..................................................................... - 5 Status Bar ....................................................................... - 5 Shortcuts ........................................................................ - 5 Widgets .......................................................................... - 6 Wallpapers ....................................................................... - 6 Touch screen ..................................................................... - 6 2.2 Volumes.................................................................. - 7 Set the volumes .................................................................. - 7 2.3 People................................................................... - 7 New contact ...................................................................... - 8 Edit contacts/ Delete contacts.................................................... - 8 Backup contacts .................................................................. - 9 Import contacts .................................................................. - 9 Favorite contacts ................................................................ - 9 3.1 Phone................................................................... - 10 Make a phone call ............................................................... - 10 Receive calls ................................................................... - 11 Handsfree ....................................................................... - 11 Mute ............................................................................ - 11 Telephone conference............................................................. - 11 Call history .................................................................... - 11 Emergency call .................................................................. - 11 3.2 Message................................................................. - 12 Write messages .................................................................. - 12 Answer messages ................................................................. - 12 Write MMS ....................................................................... - 13 4.1 Use the Google Account login............................................ - 14 Regain your Google account's password............................................ - 14 Set data synchronization......................................................... - 14 -
-1-
4.2 Gmail................................................................... - 15 Write a new Gmail ............................................................... - 15 4.3 E-mail.................................................................. - 15 E-mail account settings.......................................................... - 16 Write and send messages.......................................................... - 16 View and save e-mail............................................................. - 17 Reply e-mail .................................................................... - 17 5.1 Mobile Networks......................................................... - 17 Check your network connection.................................................... - 17 5.2 WLAN.................................................................... - 17 On / off the WLAN ............................................................... - 18 Search and connect WLAN..................................................... - 18 5.3 Browser................................................................. - 18 View the links in the page....................................................... - 19 Zoom pages ...................................................................... - 19 Set your browser ................................................................ - 19 6.1 Using Bluetooth......................................................... - 19 On / off the Bluetooth........................................................... - 19 Connect the equipment to the new equipment....................................... - 20 Disconnect the Bluetooth and equipment........................................... - 20 7.1 Music................................................................... - 20 Play music ...................................................................... - 20 7.2 Camera.................................................................. - 21 Photo Options ................................................................... - 22 View image ...................................................................... - 23 Share pictures .................................................................. - 24 Edit photos ..................................................................... - 24 7.3 Camcorder............................................................... - 24 Video options ................................................................... - 25 View the video .................................................................. - 26 Manage video .................................................................... - 26 7.4 Sound Recorder.......................................................... - 27 8.1 USB connection.......................................................... - 28 8.2 SD card................................................................. - 28 -
-2-
9.1 Alarm Clock............................................................. - 29 Add alarm ....................................................................... - 29 9.2 Calendar................................................................ - 29 New event ....................................................................... - 29 Edit the event .................................................................. - 30 9.3 Maps.................................................................... - 30 Use the maps .................................................................... - 31 View Maps ....................................................................... - 32 Get Directions .................................................................. - 32 10.1 Device Settings........................................................ - 33 10.2 Date & time............................................................ - 34 10.3 Language & input....................................................... - 35 10.4 Display................................................................ - 35 Set the screen brightness........................................................ - 35 Sleep ........................................................................... - 37 10.5 Factory data reset..................................................... - 37 10.6 Protect your device.................................................... - 38 Protect your SIM card by PIN..................................................... - 38 Screen security ........................................................................................................................................- 38 -
11. Operation of Battery..........................................................................................................................-53-
Chapter 1 Quick Start
1.1 Outlook for your tablet PC
-3-
1.2
1.2 Attachment
Your packing box comprises the following attachments
•
•
•
•
•
Tablet PC
USB Cable &OTG cable
Charger (5V, 2A)
User Manual & Warranty card
Headphones
1.3
1.3 Turning On/O
On/Off
/Off
Turning On
Press and hold power key
to turning on the product,it takes about 30
seconds to enter the main screen.
Turning Off
Press and hold power key
,Pop-up "Device Options" menu,Click Shut Down.
Select OK in the pop-up menu.
Standby
1. If you do not unlock within a long time(about 10 seconds) , device will
automatic dark screen.
2. Light up the screen by pressing any side buttons.
3. Hold and slide up the green lock icon to the ceiling to unlock ; also press
the menu key to unlock.
-4-
Chapter 2 Basic Operation
The main key
·Menu
:Open the application menu.
·Google Search
Use google search.
·The main screen key
·Back key
Back to the main screen.
Return to the previous operation screen.
·Daemon icon
Recently used applications, click the desired application
can be opened.
Status Bar
Status bar will display various status information.You can click
off the status bar.
Icon
Explain
No Sim card
Icon
to turn
Explain
Signal strength
3g signal
GSM signal
EDGE
Airplane mode
Charging
Low power
Full power
Silent mode
Vibration mode
Alarm
GPS open
Wifi is connected
USB is connected
Bluetooth
Note:
Note: The machine software is constantly upgraded, the status indicator may be
different with your device, subject to the actual equipment.
Shortcuts
To customize different home screen, you can add apps shortcut; reposition
the shortcut.
·Click
to open the application menu,long press and drag the icon to
-5-
be added to the main screen.
Widgets
Widgets
You can add a clock, music player and calendar widgets on the main screen.
Click
to open the application menu,then click or sliding screen to the
left into the widgets page,long press any widget drag it to the screen.
Wallpapers
1.Touch
and hold on home screen, popup dialog box.
1.
Click “Gallery” Can select the system your own pictures as wallpapers.
Click “ Live Wallpapers ” Can select the system live wallpapers as
wallpapers.
Click “Wallpapers” Can select the system pictures as wallpapers.
2. Click
>
Settings>Display>Wallpaper
Touch screen
1. Short Press touch screen: Use the tip of your finger to press exactly on
the touch key you want, being careful not to touch the keys for other
functions.
-6-
2. Long press touch screen: Press for more than 1.5 seconds to get into the
submenu.
3. Drag: Press and hold the scroll bar and drag up or down. On some screens
such as web pages, you can also scroll side to side.
4. Zoom: when you view page, you can double-click the screen to zoom in or
out the page.
2.2 Volumes
Volumes
·Media volumes:Set the volumes of music, video, games and other media
players.
· Ringtone volumes:Set the volumes of the ringtone and notifications.
·Alarms volumes:Set the alarm volumes.
·Call volumes:Set the volumes of calls.
Set the volume
volumes
lumes
>
Settings>Sound>Volumes
·Set vibrate
>
Settings>Sound>Volumes
Check“Vibrate on ring”to Turned on or off the equipment vibration.
2.3 People
You can save contacts, phone numbers and e-mail and other related content.
-7-
New contact
>
People>
new contact
1. Enter your contact’s information.
2. Click “DONE” to save the contact.
Edit contacts
contacts/ Delete contacts
Edit contacts:
1. Click
,open the contact list.
2. Choose the contact you want to edit,click
. After editing, click
“DONE” to save the contact.
Delete contacts:
1. Click
2.Click
,open the contact list.
,in the pop-up menu, choose “Delete”
3. Check the contacts you want to delete, click “OK” to delete the checked
contacts.
-8-
Backup contacts
You can export your contact data to the SD card.
Steps:
1. Click
2. Click
,open the contact list.
> Import/export.
3. Click “Export to storage”
Import contacts
·Import
Import from SD card
1. Click
2. Click
,open the contact list.
> Import/export.
3.Click “Import from storage”.
.
Favorite contacts
You can add commonly used contacts and special contacts to your collection,
in order to find and use.
Select a contact in your contact list, then click the star icon to make it
-9-
turn blue.
Chapter 3 Use the device
3.1 Phone
Make a phone call
1.
>
Phone
2. Press the number keys, enter the phone number.
3. Click
,make a call.
4. When the call is completed, press the hang up to end the call.
Note:
Note: Click
can remove the number.
1. You can also select a contact to call.
2. During a call, click
can open the dial pad to the digital input.
- 10 -
Receive calls
When the incoming call, the device will issue a prompt,you can hold down
the
,drag it to the
Note: you can hold down the
phone and send a message.
to receive calls;or drag it to the
to hang up.
and drag it to the message icon to hang up the
Handsfree
You can use the handsfree to ensure traffic safety while driving.
Use hands-free speaker / microphone device / Bluetooth headset to make and
receive calls.
Mute
During a call, you can make the other side can not hear your voice.
Press the mute, turn on or turn off mute.
Telephone conference
1.
>
Phone.
2. Press the number keys to input the number of the first person.
3. Outgoing calls.
4. The other party answers,click
.
5. Press the number keys to enter the next party calls and outgoing calls.
6.Click
to connect the two sides call.
Call history
You can view the received calls, missed calls, dialed calls and other
information in the call history.
>
Click
Phone.
to view the call history.
Emergency call
1.
>
Phone(If the device is locked, click Emergency Call.)
2. Press the number keys to enter the emergency number.
Note: 1. Different countries have different emergency call numbers, so the
emergency call number in your device is not effective in all regions. Sometimes
- 11 -
due to network, environmental, or interference with the impact of events, an
emergency call may not call.
2. The phone features of the device must be turned on when you make an
emergency call.
3.2 Message
Write messages
essages
>
Messaging>
new message.
1. Enter the message receiver,you can also press
the contacts.
2. Enter the text you want to send.
3. Click
,Find a receiver from
,send the message.
Answer messages
messages
The top status bar will be prompted when you receive new information.
>
Messaging
Select the message you want to reply:
1. Enter the text you want to send.
2. Click
,send the message.
- 12 -
Write MMS
>
Messaging>
new message.
Enter the message receiver,you can also press
,Find a receiver
Next, in the following ways you can make a SMS converted into a MMS.
1.Click
2.Click
>add subject.
to add pictures, music or video files for MMS。
- 13 -
Chapter 4 E-mail
4.1 Use the Google Account login
Using the Google Account login can make your device synchronized with the
server,and you must use a Google account to synchronize Google Apps, Google
Talk,and Android Market.
Click
>
Setting> Accounts & sync>ADD ACCOUNT>Google
Click “Sign in”, enter your user name and password, then click “Sign in”.
After logging in,all e-mail, contacts and calendar in your Google account will
be synchronized to the device.
Note: If you do not have a Google account, click Create.
Regain your Google account's password
If you have forgotten your Google account's password, you can perform the
following steps to obtain the password:
1. On tn the computer, open a browser and go to:
http://google.com/accounts
2. In the right side of the web page ,click“Can't access your account? ”.
3. Select “I don't know my password”.
4. Then follow the procedure t to reset your password.
Set data synchronization
You can bind a Google account for synchronize the contacts in the device
to the website. This will facilitate the continuous update of the Google
application information.
1. Click
>
Setting> Accounts & sync.
- 14 -
2. Click the account you want to synchronize.
4.2 Gmail
Write a new Gmail
1.Click
2.Click
>
Gmail.
, then select“Compose”.
Enter the recipient's e-mail address and message content, and then press
to Send the mail.
4.3
4.3 E-mail
You can use email to send or receive e-mail messages.
Note:1. You must set up your e-mail at first,and then send or receive e-mail.
- 15 -
2. E-mail must be send by internet connection.You can consult your specific
setup parameters with your network service provider.
E-mail account settings
Click
>
E-mail.
Account setup:
1. Enter the e-mail address and password,and then click “Next”.
2. Select the type of the Email account:POP3/IMAP/Exchange。If you do not
know the configuration parameters, you can consult the e-mail service provider.
3. You can set the frequency of mail checks.After setting, click Next.
4. Created name and signature,for your account.
You can also set multiple email addresses:
1.After Set the initial e-mail address,Click
,select "Settings" option
to enter the account settings page.
2. Click the "Add Account" to add other email accounts.
Write and send messages
1. Click
2. Click
>
E-mail.
to editor the e-mail message.
3. Enter the E-mail address of the recipient.
4. Enter a subject.
5. Write the message content.
6. Click
to send the E-mail.
- 16 -
View and save e-mail
Receiving e-mail messages stored in the network service provider's mail
server before downloading to the device.
·Select the e-mail to read in the Inbox.
·Click the attachment icon can view e-mail attachments.
·Click Save to download attachments, attachments are usually stored in your
SD card.
Reply e-mail
· In the Inbox, select the mail you want to reply,click
to reply.
Chapter 5 Network and Browser
5.1 Mobile Networks
Networks
When your device insert the SIM / UIM card, you can use your network operator's
2G/3G business.
Check your network connection
1. Click
>
Settings
2. WIRELESS & NETWORKS >More>Mobile networks.
3. Click“Access Point Names(APN)” to check your network connection.
5.2 WLAN
- 17 -
On / off the WLAN
1. Click
>
Settings>WIRELESS & NETWORKS
2. Click switch to turn on or off the WLAN.
Search and connect WLAN
1. Click
>
Settings>WIRELESS & NETWORKS
2. Open the WLAN,your device will automatically lists the networks.
·If you select an open network, you can directly connect to the network.
·If you select an encrypted network, you must enter a password to connect
to the network.
·Click on the "Add Network" can add a new WLAN.
When your device is connected to the network,
Will appear in the status
bar.
Note: When you enter the network coverage, and your WLAN is turned on, your device
will automatically reconnect to the network you have connected.
5.3
5.3 Browser
Use the browser allows your devices to access Web pages and Web-based
applications..Consult with your network service provider for how to connect.
Note: The network connection type depending on your network service provider.Use
a different type of connection, your network connection costs are
different.Specific tariff details, please consult your network service
provider.
- 18 -
1. Click
>
Browser,
you can click on the tab bar to open pages.
2. Click × you can close the page.
3. Click + you can create a new page.
4. Click
you can refresh the page.
5. Click
you can back or forward to view the page.
6. Click
you can add a bookmark of the current page.
7. Click
you can search or enter the URL.
8. Click
you can view all of your bookmarks, history, saved pages.
you can do more actions.
9. Click
View the links in the page
You can click the link in the page to open it.
Tap and hold the link in a Web page can choose to open the link in a new
window or bookmark.it. You can also enter the URL you want to access directly
in the address bar.
Zoom pages
Double-click the web page to zoom the page.
Drag up and down the page, you can quickly browse the Web.
Set your browser
Click
>
Browser >
>Settings.
Chapter 6 Bluetooth
6.1 Using Bluetooth
On / off the Bluetooth
1. Click
>
Settings>Bluetooth
2. Click switch to turn on or off the Bluetooth.
- 19 -
Connect the equipment to the new equipment
1. To confirm the device you want to pair with Bluetooth connectivity is
turned on and visible.
3. After turn on Bluetooth,click “SEARCH FOR DEVICES”.
4.Select a device in the list to connect.
5. Enter the PIN (eg 0000),then press the “Pair”to connect the device.
When Bluetooth is turned on, will be displayed in the status bar.
Note: Bluetooth device connection methods may be different,.This manual is for
reference only.
Disconnect the Bluetooth and equipment
Click the device name,which you want to disconnect in the list,and then click
“Unpair”to disconnect.
Chapter 7 Multimedia
7.1 Music
Play music
Click
>
Music.
Your device will automatically search your music on the SD card.
Select song title to play the music.
/
: Play/ Pause.
/
: Prev/Next.
: Open now playing list.
- 20 -
: Repeat play all songs or current song.
: Turn on or turn off shuffle.
Click ,in the pop-up menu can do more action.
Note:
Note: 1. To store some music files in SD card.
2.Click
3.Click
can use other applications,and the music continues to play.
can stop the music.
7.2 Camera
1. Click
>
Camera
2. Screen display framing the landscape of the region.
3.
4.
5.
Can switch between camera and camcorder.
Photo shoot button.
Drag the ring to adjust the focal length of the camera.
6.
Can switch between front camera and rear camera.
7.
Set your camera options.
- 21 -
Note:
Note: Please install the SD card before you take a picture.
Touch the thumbnail of the photo, you can open the media library to view
the pictures. Click Options on the screen, you can operate the pictures.
Photo Options
Click
can enter the set interface.
You can set the following:
·
Flash mode.
·
White balance.
·
Exposure.
- 22 -
·
Camera settings.
View image
1. Click
>
Gallery.
2. Click the picture you want to see. You can also,drag the screen left or
right to view the next or previous picture.
Slideshow
You can slide show in the following two methods.
1. Click
,you can start slideshow.
2. Click the picture to enter the picture browsing interface,click
in the pop-up menu, select "slideshow".
- 23 -
,
Share pictures
1. Click the picture you want to share , enter the picture browsing
interface,then click
.
2. Choose ways of sharing: SMS, Bluetooth, your Gmail, e-mail.
Edit photos
Enter the picture browsing interface,then click
,select "Edit" to enter
the photo editing interface.
7.3 Camcorder
1. Click
>
Camcorder.
2. Screen display framing the landscape of the region.
3.
4.
5.
6.
7.
Can switch between camera and camcorder.
icon to record video.
Drag the ring to adjust the focal length of the camera.
Can switch between front camera and rear camera.
Set your camera options.
Note: Please install the SD card before you record video.
- 24 -
Video options
Click
can enter the set interface.
You can set the following:
·
Flash mode.
·
White balance.
·
·
Time lapse interval.
Video quality.
- 25 -
·
Camera settings.
View the video
Touch has shot the video in the viewfinder screen upper right corner of the
thumbnail, you can open the media library view to the video. Click the play button
on the screen, you can view the video. You can also choose other buttons you
want to do.
Manage video
·Play
Play video.
video.
1. Click
>
Videos.
2. Click the video you want to play in the list.
·Share
Share videos.
videos.
1. When you view the video,click
.
2. Choose ways of sharing: SMS, Bluetooth, your Gmail, e-mail.
- 26 -
7.4 Sound Recorder
Click
>
Sound recorder.
Record button.
stop recording.
After the recording is completed, you can press the button to play
the audio you just recorded.
- 27 -
Chapter 8 USB & SD card
8.1 USB connection
You can use the USB data cable to connect the device to the computer, in
order to transfer pictures, videos, music and more between SD card and computer.
1. The SD card into the device. Using a USB data cable to connect the device
to high-speed USB port on your computer.
2. The status bar will show the USB connection icon
.
3. Click the "USB connection" option, and transferred to the USB connection
interface and select OK, connect the device to the computer.
Note:
Note: In the meantime, you can not use the devices to access the memory card,
so you can not use the application requires memory card (such as cameras, photo
gallery, or music).
4. Find a "Removable Disk" icon in "My Computer".
5. On your computer, click "Removable Disk" icon to access the device memory
card.
6. Drop the pictures, video, music and other files on your computer to the
device memory card folder.
7. Click to turn off USB storage devices, to safely disconnect the device
from the computer.
8.2 SD card
In the "Storage" function, you can view the memory card usage.
Note: Please install the memory card before use, otherwise it will affect the
use of photography, camera and other functions.
- 28 -
Before removing the memory card, make sure the memory card with the device
disconnected.
Click
>
Settings>Storage>Unmount SD card.
After unmount SD card.,you can click “Erase SD card”to erases all data
on the SD card.
Note:
Note: Before installing or removing memory card, turn off the equipment, or they
may damage your memory card.
Chapter 9 Other applications
9.1 Alarm Clock
Add alarm
Click
>
Clock>alarm set.
Add alarm, set the alarm information, then click Done.
9.2 Calendar
Use the calendar, you can arrange and manage your schedule.
Note:
Note: To use the calendar, you must login to Google account first, and
correctly set the time and date of the equipment.
Click
>
Calendar.
New event
Click
to set new event,enter the event option, click Done to save the event.
- 29 -
Edit the event
·Edit.
Select a Event and into the activities interface,click
to edit the event.
·Delete.
Delete.
Select a Event and into the activities interface,click
to delete the
event.
9.3 Maps
The map allows you to track your current location, view traffic conditions,
as well as receive detailed direction of the destination. Provide a search tool
that allows you to find a place to go or address of the vector.
Note:
Note: ·You must open 3G/GPRS or Wi-Fi to use the map.
·Maps application does not cover all countries and cities.
·Open
Open the location service.
you must open the location service first in order to open the map and search
for your location or search a place to go.
1. Click
>
Settings>Location services.
- 30 -
2. Check Google's location services, GPS satellites, or both two.
Note:
Note: Check GPS satellites,can search the street map that you want to go,but,
this must be in the sunny state of the atmosphere, and will consume more power.
Use the maps
Click
>
Maps.
·Search
Search My position on the map.
map.
In the map interface,click
,then your location on the map will display a
flashing blue dot.
·Search
Search the place you want to go.
go.
Search Maps”.
1. In the map interface,click“Search
Maps
2. Enter the name of the place you want to search, you can choose to enter
an address, city, or the building name (for example: The Oriental Pearl).
Note: When you enter the place, the map will prompt you the list of places
have searched. Just click on the list address,then you can display its location
- 31 -
on the map.
3.Click
,the search results will display on the map.
4.Click the text box to display the search details about the places and the
operation.
View Maps
Maps
While viewing the map, you can use the following zoom and navigation skills.
Zoom the map.
Through the fingers outward or inward sliding the screen at the same time,can
zoom in or out the map.
Change the map mode.
Click
to change the map mode.
·Traffic (only to the specific area):Real-time traffic updates will display
a different color lines on the road, each color represents a different traffic
movement speed.
·Satelite:Use the same satellite data as Google Earth. However, satellite
imagery is not a real-time video. Google Earth will achieve the best quality
images, but most of the images have a history of one to three years.
·Terrain:This mode is the default view, not only can display the name of
the map will be added to the streets, rivers, lakes, mountains, parks and the
border.
Get Directions
1.Click
to search routes.
2. In the first input box, enter the starting point,in the second input
box, enter the destination.
- 32 -
You can also click
to open the list of position,and then select the
starting point and destination address.
3. Select the way you travel:By car, bus or on foot.
4. Click “Go”, wait a little longer,it will be a list showing the routes
to go to your destination.. Click on the route guidance on a map showing the
route.
5. Complete view or finished using the routes, press the Menu key, then click
empty the results, you can reset the map. Your destination will be automatically
saved in the map records.
Chapter 10
Settings
10.1
10.1 Device Settings
You can use the following methods to open the settings interface:
·Click
>
Settings.
·Click the status bar of the main screen, then you can see the pop-up menu.
Click
to enter the setup menu.
- 33 -
Click "Settings" option to enter the main setup interface.
WIRELESS & NETWORKS Set your device's wireless connection, such as:
wifi and Bluetooth flight mode, or set up
roaming, networks, and more options.
DEVICE
Set the theme style, sound, display, storage
devices, etc.
PERSONAL
Set up accounts, equipment safety, language,
and backup.
SYSTEM
Set the time and date,accessibilty. You can
also view the legal information of the software
and the version of the device.
10.2
10.2 Date & time
Click
>
Settings>Date & time.
Note: When check the “Automatic data & time”and“Automatic time zone”,
the device will be based on the network automatically adjust the display time
and date and time zone.
If you want to set up your own time, do not check these two options.
- 34 -
If you want set up time by yourself:
·Click“Set
Set date”,adjust
the date, month and year, and then touch the
date
“Set”.
·Click“Select
Select time zone ”,and then select your time zone in the list.
·Click“Set
Set time”,adjust
the hours and minutes.
time
·You can check or uncheck the“Use
Use 24between 12 hours
24-hour format”,switch
format
or 24 hours format.
·Click“S
Select date format”,and
then select your desired date display
format
format.
10.3
10.3 Language & input
Click
>
Settings>Language & input>Language.
Select the language you want to use.
10.4
10.4 Display
Set the screen brightness
Click
>
Settings>Display>Brightness.
- 35 -
Note:
Note: If you want to adjust the brightness by yourself, , please set
the“Choose Brightness Settings”to“Normal”.
When the “Choose Brightness Settings” is“Normal”,click“Brightness”,
adjust the brightness in the pop-up box.
- 36 -
Sleep
Click
>
Settings>Display>Sleep
Set the screen auto-lock delay time.
10.5
10.5 Factory data reset
You can use this feature to erases all data on phone:
Note: This operation will clear the following data in your device.
·Your account.
·System and application’s data and settings.
·Application.
Does not clear the following data:
·System software and bundled applications.
·The file in the SD card, such as music or photos.
Click
>
Settings>Backup & reset>Factory data reset.
- 37 -
10.
10.6 Protect your device
Protect your SIM card by PIN
You set a PIN (Personal Identification Number) to protect the SIM card.
·Set
Set a PIN.
Click
>
Settings>Security> Set up SIM/RUIM card lock> Lock SIM/RUIM
card.
Use the keyboard to enter the PIN code.If you want to change the PIN, please
click“Change SIM PIN”.
Note:
Note: You do not need to enter the PIN at any time to make an emergency call.
·Unlock
Unlock the SIM card
If you enter the wrong PIN code more than the allowed times (3 times), your
SIM card will become the “PUK locked.”,You must enter the PUK code in order
to restore the device.This password will be provided with the service provider's
SIM card.
Click on an emergency call, and then enter the following sequence:
**05*[PUK]*[New PIN]*[New PIN]#
For example: If your PUK is 888888, and you want the SIM card's PIN be reseted
to 7777, please call the emergency telephone:
**05*888888*7777*7777#
Screen security
You can lock the screen or request to draw the screen unlock pattern every
time you start the device.
·Screen
Screen lock.
It can protect the screen does not be touched when the device in a backpack,
purse, pocke.
Will have the following screen Unlock mode:
- 38 -
·Slide
Slide
Slide is the system default unlock method.It will into the lock screen after
the device is turned on.
Press and hold
move to the unlock icon to unlock.
.
·Crea
Create
Create a screen unlock pattern.
pattern.
Create a personal screen unlock pattern can improve the security of the
devices.
1. Click
>
Settings>Security>Screen lock>Pattern.
2. Read the instructions on the screen,and then click“Next”.
3. Draw at least four points connected to the vertical, horizontal or
diagonal direction.
Note:
Note: You must use the finger slide on the screen to draw the unlock pattern,
rather than click on the i point.
4. The device will record the unlock pattern,click“Continue”.
5. Draw the unlock pattern again,and then click“Confirm”.
Note:
Note 1. If you do not want to unlock pattern appears on the screen,un-check
- 39 -
“Make the passwords visible”.
2. To change the screen unlock pattern, please enter the interface
of the screen unlock pattern, confirmed once the original stored pattern, and
then touch the "pattern" option to draw a new pattern.
3. If you fail to draw the correct unlock pattern of five on the screen,
the screen will prompt you must wait 30 seconds later to try again. If you forgot
your screen unlock pattern, please click“Forgot pattern” .The interface will
prompt you to use your Google account name and password to create a new screen
unlock pattern.
Chapter 11. Operation of Battery
uch
11.1 The operation time of the battery depends on conditions ssuch
as:
• Transmitting power level
• Signal (distance between the phone and the base station)
• Network parameters defined by the operator
• Phone use (WAP, games, SMS)
• Charging procedure used
Exclusions:
Subject to the exclusions contained below:
1. Damage due to the improper use.
2. User does not follow the manual.
Explanation:
The company has the final right of the explanation for this document.
Software upgrades will not be announced.
All pictures are for reference only in the instruction book; please refer to the
actual phone.
Disclaimer
© Intex. All rights reserved.
Features and specifications are subject to change without prior notice. Certain
tablet features may not be activated by your service provider, and / or their network setting
may limit the feature's functionality. Services and some features such as GPRS, email may
be dependent on the network, SIM card, as well as on the compatibility of the devices used
and content formats supported and may require network/service subscription/solutions. Data
transfers speeds are network dependent. Always contact your service provider for details
or help. Talk and standby time is quoted in digital mode and are approximate; battery
performance and the signal reception depend on network configuration, signal strength, type
of SIM card, operating temperature, features selected as well as voice, data and other
application usage pattern. To determine the profiles supported by other Intex products,
visit www.intexuae.com for other devices, contact their respective manufacturers. Always
- 40 -
demand for original Intex tablet to protect against buying tinkered and/or used, refurbished
or tampered phones. The warranty is applicable only for Intex tablet; the company is not
responsible for any loss or theft. Always use Intex original Enhancements (including
batteries) for safety. The use of any other type may invalidate and approval or warranty
applying to the tablet and may be dangerous. The tablet is designed to operate using Li-ion
batteries approved by the phone manufactures. Using non approved batteries with the tablet
may result in poor performance and damage to the tablet or its enhancements. The display
and products visualization here are illustrative purposes only; Display / color of the
tablet may differ from that shown on the manual. All features, functionality and other
product specifications are based on the latest available information and are correct at
the time of printing; however such product specifications are subject to change without
notice. Copyrights are reserved. Intex is the trademark of INTEX TECHNOLOGIES LLC. Which
is registered. The unauthorized copying of copyrighted material is not legalized is inimical
to the provisions of the copyright laws of Dubai and other countries.
Do’s for disposal of product
Always drop your used electronic products, batteries, and packaging materials
after the end of their life in nearest collection point or collection center
Separate the packaging material according to responsible waste disposal options
and sorting for recycling.
The battery can easily be removed from the product for recycling.
Don’t of disposal of equipment
Never dump E-waste in garbage bins or municipal solid waste stream.
Do not dispose of your product as unsorted municipal waste.
Do not throw used batteries into household waste.
Do not dispose damaged or leaking Lithium Ion (Li-Ion) battery with normal
household waste.
Information on the consequences of improper handling, accidental breakage damage
and improper recycling of the end of life product.
If batteries are not properly disposed of, it can cause harm to human health or
the environment.
Placing of batteries or devices on or in heating devices, such as microwave ovens,
stoves, or radiators and improper disposal of batteries may lead to explosion.
If the battery terminals are in contact with metal objects, it may cause a fire.
For devices with external power supplies, plug socket should be placed in short
distance and easily accessible.
Using the wrong type battery replacement there is a danger of explosion, be sure
to follow the instructions disposal of used batteries.
- 41 -