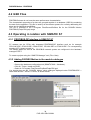
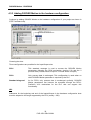
1
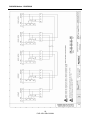
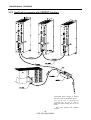
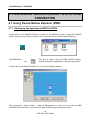
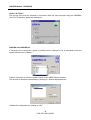
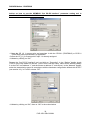
SSD Parvex SAS
8, avenue du Lac - B.P. 249
F-21007 Dijon Cedex
www.SSDdrives.com
DIGIVEX Motion
PROFIBUS
User and commissioning manual
PVD 3554 GB – 01/2004
PRODUCT RANGE
1-
« BRUSHLESS » SERVODRIVES
TORQUE OR
POWER RANGES
•
•
•
2•
•
3•
•
•
4•
•
5•
•
•
•
BRUSHLESS SERVOMOTORS, LOW INERTIA, WITH RESOLVER
Very high torque/inertia ratio (high dynamic performance machinery):
⇒ NX -HX - HXA
⇒ NX - LX
High rotor inertia for better inertia load matching:
⇒ HS - LS
Varied geometrical choice :
⇒ short motors range HS - LS
⇒ or small diameter motors : HD, LD
Voltages to suit different mains supplies :
⇒ 230V
three-phase for «série L - NX»
⇒ 400V, 460V three-phase for «série H - NX»
"DIGIVEX DRIVE" DIGITAL SERVOAMPLIFIERS
⇒ SINGLE-AXIS
DSD
⇒ COMPACT SINGLE-AXIS DµD, DLD
⇒ POWER SINGLE-AXIS DPD
⇒ MULTIPLE-AXIS
DMD
"PARVEX MOTION EXPLORER" ADJUSTING SOFTWARE
1 to 320 N.m
0,45 to 64 N.m
3,3 to 31 N.m
3,3 to 31 N.m
9 to 100 N.m
SPINDLE DRIVES
SPINDLE SYNCHRONOUS MOTORS
⇒ "HV" COMPACT SERIES
⇒ "HW" ELECTROSPINDLE,frameless, water-cooled motor
From 5 to 110 kW
up to 60,000 rpm
"DIGIVEX" DIGITAL SERVOAMPLIFIERS
DC SERVODRIVES
"AXEM", "RS" SERIES SERVOMOTORS
"RTS" SERVOAMPLIFIERS
"RTE" SERVOAMPLIFIERS for DC motors + resolver giving position
measurement
0.08 to 13 N.m
SPECIAL ADAPTATION SERVODRIVES
"EX" SERVOMOTORS for explosive atmosphere
"AXL" COMPACT SERIES SERVOREDUCERS
5 to 700 N.m
POSITIONING SYSTEMS
Numerical Controls « CYBER 4000 » 1 to 4 axes
"CYBER 2000" NC 1 to 2 axes
DRIVE - POSITIONER
⇒ SINGLE-AXIS
DSM
⇒ POWER SINGLE-AXIS DPM
⇒ MULTIPLE-AXIS
DMM
ADJUSTMENT AND PROGRAMMING SOFTWARE PARVEX MOTION EXPLORER
DIGIVEX Motion - PROFIBUS
Contents
1. PROFIBUS-DP GENERAL DEFINITIONS
1.1
1.2
1.3
1.4
Definition
Transmission via RS-485
Bus access and data exchange procedure
Standards, guidelines and profiles
3
3
3
4
4
2. COMMUNICATING WITH DIGIVEX Motion
6
2.1
2.1.1
2.1.2
2.2
2.3
2.4
2.5
2.6
7
7
8
9
10
13
14
18
Cyclical data transmission
Useful data structure in accordance with PROFIDrive Profiles V2.0 and V3.0
DIGIVEX Motion response time
Acyclical data transmission
Control and status words
List of standard PROFIDrive parameters
PKW Profidrive V2.0 mechanism for processing parameters
DPV1-Profidrive V3.0 mechanism for processing parameters
3. CONNECTING
20
3.1
Connecting the bus cable (RS485)
3.1.1
Pin configuration of the Sub-D connector
3.1.2
Cables
3.1.3
Bus connector
3.1.4
Cable connecting diagram
3.1.5
Bus cable shielding / EMC precautions
3.2
Connecting for drives setting
3.2.1
Général points
3.2.2
Application example with USBPRO interface
3.2.3
Application example with PCIPRO interface
3.2.4
Application example with PCMCIAPRO interface
3.2.5
Application example with RS232PRO interface
3.3
PROFIBUS address
20
20
20
21
22
24
24
24
25
26
27
28
29
4. PROFIBUS-DP MASTER (CLASS 1 & 2) SYSTEM
CONNECTION
30
4.1
Using Parvex Motion Explorer (PME)
4.1.1
Starting up the application INSTALLATION
4.1.2
Using PME tools
4.2
GSD Files
4.3
Operating in relation with SIMATIC S7
1
PVD 3554 GB 01/2004
30
30
31
34
34
DIGIVEX Motion - PROFIBUS
4.3.1
4.3.2
4.3.3
4.3.4
PROFIBUS-DP interface in SIMATIC S7
Adding DIGIVEX Motion to the module catalogue
Adding DIGIVEX Motion to the hardware configuration
Setting the parameters for the DP master bus
34
34
35
36
Characteristic and dimensions subject to change without notice.
YOUR LOCAL CORRESPONDENT
SSD Parvex SAS
8 Avenue du Lac / B.P 249 / F-21007 Dijon Cedex
Tél. : +33 (0)3 80 42 41 40 / Fax : +33 (0)3 80 42 41 23
www.SSDdrives.com
Available DIGIVEX MOTION instructions
♦
♦
♦
♦
♦
♦
♦
♦
♦
♦
♦
♦
♦
♦
DIGIVEX Single Motion (DSM) User Manual
DIGIVEX Power Motion (DPM) User Manual
DIGIVEX Multi Motion (DMM) User Manual
DIGIVEX Motion - CANopen
DIGIVEX Motion - Profibus
PME-DIGIVEX Motion Adjustment Manual
DIGIVEX Motion Directory of Variables
DIGIVEX Motion Programming
DIGIVEX Motion - Cam Function
PME Tool kit User and Commissioning Manual
CANopen - CAN Bus Access via CIM03
CANopen - Remote control using PDO messages
"Block Positioning" Application Software
"Fly shear linear cutting" software application
♦ "Rotary blade cutting" software application
(DSM)
(DPM)
(DMM)
2
PVD 3554 GB 01/2004
PVD3515
PVD3522
PVD3523
PVD3518
PVD3554
PVD3516
PVD3527
PVD3517
PVD3538
PVD3528
PVD3533
PVD3543
PVD3519
PVD3531
PVD3532
DIGIVEX Motion - PROFIBUS
1. PROFIBUS-DP GENERAL DEFINITIONS
1.1 Definition
PROFIBUS (PROcess FIeld BUS) is an international open field bus standard. It is defined by
international standards EN 50170 and/or IEC 61158, and has a wide range of applications in
manufacturing and industrial process automation.
PROFIBUS-DP is a PROFIBUS communication profile. It is optimized for high-speed, time-critical
data transmission at field level using low-cost connectors.
PROFIBUS is a multi-master system which allows the joint operation of several automation,
engineering or visualization systems with their on-site centralized devices on one bus. PROFIBUS
differentiates between master and slave devices:
•
Masters control data traffic on the bus and are also called “active” subscribers. A master can
send information without having received an external request when it has bus access
authorization (token).
There are two categories of master:
•
Master Class 1:
This concerns central automation stations (e.g. PLC), which exchange cyclic messages
with the slaves.
•
Master Class 2:
This includes equipment such as consoles for programming, and parameter setting, or for
operator control and monitoring which are used for configuring, starting up (e.g. Parvex
Motion Explorer on PC) or monitoring whilst the plant is operating.
•
Slaves are field devices such as, for example, DIGIVEX Motion drives, independent
inputs/outputs and solenoid valves. They have no bus access authorization; that is to say, they
are only empowered to acknowledge received messages or, to return messages to masters on
request. Slaves are also called “passive” subscribers.
1.2 Transmission via RS-485
A two-wire shielded cable, with a twisted pair of copper conductors is used as it meets high
transmission speed, and simple low-cost installation criteria.
Transmission speed can be freely selected between 9.6 kBauds and 12 MBauds. This same speed
is defined for all devices connected to the bus when the system starts up.
3
PVD 3554 GB 01/2004
DIGIVEX Motion - PROFIBUS
A line bus structure is used to connect up all the devices. It is possible to interconnect up to 32
subscribers (masters or slaves) in one segment.
The bus is terminated at the beginning and the end of each segment by an active terminal.
Voltage must always be applied to both bus terminals for the bus to work correctly. The terminals
are usually switchable in the bus connectors.
Repeaters (cable amplifiers) can be used to link the different bus segments when there are more
than 32 subscribers, or to extend the network.
1.3 Bus access and data exchange procedure
The PROFIBUS bus operates in accordance with the principle of token passing. Active stations or
masters receive transmit authorization in a logical ring for a defined time window. These masters
can, then, communicate in this time window with other masters or manage communication with
associated slaves in accordance with a low priority master / slave procedure.
The PROFIBUS-DP uses, first and foremost, the master–slave procedure for exchanging data,
predominantly cyclically, with drives such as the DIGIVEX Motion.
Access to the drives is always carried out in accordance with the master-slave procedure; the
drives automatically being the slaves. Each slave can be identified through its unique MACaddress on the bus. Data exchange is predominantly carried out cyclically with drives such as
DIGIVEX Motion.
1.4 Standards, guidelines and profiles
The standards and guidelines shown below can be obtained from PNO, the PROFIBUS user
organization; www.profibus.com.
• PROFIBUS
"Technical Overview" September 1999
Order no. 4.001 (German)
• PROFIBUS Specification (FMS, DP, PA)
All standard definitions relating to the PROFIBUS specification in accordance with EN 50170
vol. 2.0 (version 1.0)
Order no. 0.042 (English)
• PROFIBUS-DP Extensions
contains, amongst other things, the acyclic communication functions using PROFIBUS-DP
"Extensions to EN 50170"
EN 50 170 vol. 2 (version 2.0)
Order no. 2.082 (English)
• PROFIBUS Technical Guideline
"Installation guidelines for PROFIBUS-DP/FMS" September 1998
Order reference 2.111 (German)
• PROFIBUS guideline
"Connections for PROFIBUS" February 2000. Version 1.0
Order no. 2.141 (German)
• PROFIBUS guideline
"Optical transmission system for PROFIBUS" July 1999 (draft). Version 2.0
Order no. 2.021 (German)
4
PVD 3554 GB 01/2004
DIGIVEX Motion - PROFIBUS
• PROFIdrive Profile version 2.0:
"Profile for variable speed drives" September 1997
PNO - PROFIBUS Profile –
Order no. 3.071 (German) / 3.072 (English)
• PROFIdrive profile version 3.0:
"PROFIdrive Profile Drive Technology" September 2000 (draft)
PNO – PROFIBUS profile – Order no. 3.172 (English)
5
PVD 3554 GB 01/2004
DIGIVEX Motion - PROFIBUS
2. COMMUNICATING WITH DIGIVEX Motion
Technical specifications
Connection to the PROFIBUS bus is carried out using a 9-pin Sub-D plug in compliance with the
PROFIBUS standard. All RS485 interface connections are protected against short-circuiting and
have galvanic insulation.
The PROFIBUS interface supports transmission speeds of between 9.6 kbauds and 12 MBauds.
Functionalities
• c Cyclical process data exchange (PZD-DPV0) in accordance with the PROFIdrive Profile V2.0
and/or V3.0
• Parameter access:
- d Cyclical parameter access (PKW-DPV0) in accordance with the PROFIdrive ProfileV2.0
- e Acyclical parameter access (data block 47-DPV1) in accordance with the PROFIdrive
Profile V3.0
The diagram shown below gives a preview of the communication functions carried out by
DIGIVEX Motion using PROFIBUS-DP:
Configuring
(Class master 2)
PME
Automation
(Class master 1)
PLC
1
2
3
Operation
(Class master 2)
HMI
3
PROFIBUS-DP
Cyclic channels
Acyclic channels
PROFIBUS communication Interface
DIGIVEX Motion
DIGIVEX Motion PROFIBUS-DP data channels
6
PVD 3554 GB 01/2004
DIGIVEX Motion - PROFIBUS
2.1 Cyclical data transmission
DIGIVEX Motion is controlled through the cyclical PROFIBUS-DP channel. Moreover, this same
channel can be used for exchanging parameters.
The structure of useful data for the cyclical channel is defined in the PROFIDrive Profile version
2.0, and is called PPO (Parameter Process Data Object). This structure is used by the master to
access drive slaves by exchanging cyclical data.
2.1.1 Useful data structure in accordance with PROFIDrive Profiles V2.0
and V3.0
Useful data structure according to the PPO
The useful data structure in cyclical transmission is divided into two sections which can be
transmitted in each telegram:
Protocol frame
(header)
Useful data
PKW parameters
PZD process data
Protocol frame
(trailer)
PPO
• PZD, process data area, that is to say, control words or status information.
• PKW, parameter area for reading / writing drive parameters.
It is possible, when configuring the master, to define the type of PPO (see below) with which the
master is to access the drives when the network is starts up. The type of PPO selected depends
on the task assigned to the drive in the automation system.
Process data is automatically transmitted. They are processed as top priority in the shortest time
slots in the drives. The drive is controlled by process data; e.g. On / Off, etc.
The parameter area gives the user complete access to all parameters and variables in the drive
via the bus. It is possible, for example, to write a target position or to read detailed information
concerning diagnosis, fault messages, etc.
DIGIVEX Motion supports two types of PPO from amongst those defined in the PROFIDrive
Profile version 2.0:
• PPO1: PKW, parameter area with 4 words and 2 words of PZD, process data.
• PPO3: PKW, without parameter area with - 2 words of PZD, process data.
7
PVD 3554 GB 01/2004
DIGIVEX Motion - PROFIBUS
PKW
PZD
PWE
PKE
IND
1st word
2nd word
3rd word
4th word
STW1
ZSW1
STW2
ZSW2
1st word
2nd word
PPO1
PPO3
PKW: Parameter identifier and value
PKE: Parameter identifier and request type
IND: Index
PWE: Parameter value
PZD: Process data
STW: Control word
ZSW: Status word
The various essential tasks are accounted for by subdividing the useful data into PKW parameter
data, and PZD process data.
Parameter setting data area (PKW)
The PKW (parameter identifier value) telegram section is used for monitoring and/or modifying
any of the parameters in the drive. The required request / response identifier mechanisms are
described in section 2.4 ” PKW mechanism”.
Process data area (PZD)
Process data is used to transmit control words (requests: master → drive) or status words
(responses: drive → master).
2.1.2 DIGIVEX Motion response time
The DIGIVEX Motion response time with regard to PZD is 0.8 milliseconds.
This is the time between the “control word arriving in the DP slave” and the “status word being
made available to PROFIBUS-DP”.
The DIGIVEX Motion response time for a PKW, parameter modification, goes up to 1.5
milliseconds.
8
PVD 3554 GB 01/2004
DIGIVEX Motion - PROFIBUS
2.2 Acyclical data transmission
Extended PROFIBUS-DP functions (DPV1)
The PROFIBUS-DP extensions DPV1 include the definition of an acyclic data exchange which
takes place at the same time as the cyclical data transmissions.
Acyclic data transmission is used for:
• exchanging large quantities (up to 240 bytes) of useful data.
• simultaneous access by other PROFIBUS masters (class 2 master, e.g. PME (Parvex Motion
Explorer) start-up tool)
• reducing the bus cycle time by removing the PKW area from cyclical transmission and assigning
it to acyclical data transmission.
Implementing the extended PROFIBUS-DP functionality
The different masters and/or the different types of data exchange are represented by channels in
DIGIVEX Motion:
• Acyclic data exchange with the same class 1 master (if supported).
Use of DPV1 READ and WRITE functions.
The contents of the transmitted data block correspond to the structure of the acyclic parameter
channel as defined in the PROFIdrive Profile version 3.0 (with data block 47).
• Acyclic transmission using the PME, Parvex Motion Explorer, start-up tool (class 2 master)
PME can acyclically access parameter and process data in the drive.
• Acyclic transmission with an HMI (second class 2 master) which can acyclically access
parameters in the drive.
9
PVD 3554 GB 01/2004
DIGIVEX Motion - PROFIBUS
2.3 Control and status words
The control and status words correspond to the specifications in PROVIdrive Profile V2.0 and/or
V3.0 for the “positioning” mode.
Assigning STW1 control word bits
STW1 control word (bits 0 - 11 as defined in the PROFIDrive Profile, bits 12 - 15 specific to
DIGIVEX Motion.
BIT
VALUE
1
0
MEANING
ON
OFF 1 = ABORT
0
1
2
3
4
5
6
1
0
ON
OFF2 = TORQUE CMD
1
0
ON
ARRET3 = EMERGENCY
1
Torque mode
0
Zero torque
1
0
ON
EMERGENCY STOP
1
0
MOVE EN
Movement stoppage
1
Acknowledge fault
0
1
0
1
0
Control word validation
Invalid control words
HOME
-
7
8
9
10
11
COMMENTS
Sets the drive to “ready to run” status
Stoppage
using
brakes:
movement
stops
(abort_cmd = 1) in accordance with programmed
acceleration (accel_prog) then set to zero torque
(torque_cmd = 0) when the axis is shutdown
(moving = 0)
This function is not active when the drive is in speed
drive mode (drive_mode = 1)
Operating condition
Freewheel stoppage: motor set to zero torque
(torque_cmd = 0)
Operating condition
Fast stoppage (emergency_cmd = 1) fastest
possible deceleration (accel_max) then set to zero
torque (torque_cmd = 0) when moving = 0
Automatic drive control lifted (torque_cmd = 1):
motor torque set
Automatic control implemented: motor set to zero
torque (torque_cmd = 0)
Operating condition
Fastest possible braking (emergency_cmd = 1). No
zero torque setting when the axis is shutdown
(different from STW1 bit 2)
Movement is authorized (move_en = 1)
Movement in progress is suspended (move_en = 0).
Movement
is
stopped
using
programmed
deceleration (accel_prog)
Not in use
Fault is acknowledged with a rising front (reset_cmd
= 1)
Normal operating condition
Not in use
Not in use
Drive follows control words from the Master
Drive ignores control words from the Master
Origin setting sequence is running (home_cmd = 1)
Origin setting sequence is not running (home_cmd =
0)
10
PVD 3554 GB 01/2004
DIGIVEX Motion - PROFIBUS
12
13
14
15
1
EXEC EN
0
-
1
0
1
0
1
0
Authorizes the program in DIGIVEX Motion to run
(exec_en = 1)
Prohibits the program in DIGIVEX Motion from
running (exec_en = 0)
ub0
DIGIVEX Motion ub0 binary variable
ub1
DIGIVEX Motion ub1 binary variable
out0
DIGIVEX Motion out0 logic output
The abort_cmd, torque_cmd, emergency_cmd, move_en, home_cmd, exec_en and
moving variables are detailed in user manual PVD 3517 “Programming”.
MOVE EN is only taken into account if in14 input is not assigned to move_en
EXEC EN is only taken into account if in15 input is not assigned to exec_en
The STW2 control word is assigned to the DIGIVEX Motion ui0 low order 16-bit variable.
Assigning ZSW1 control word bits
Status word (bits 0 - 13 as defined in the PROFIDrive Profile, bits 14 - 15 specific to DIGIVEX
Motion).
BIT
VALUE
MEANING
COMMENTS
1
DRIVE OK
Power supply present and no serious faults
(fatal_error = 0): drive_ok = 1
Torque may or may not be present
0
0
No power supply or presence of a serious
fault (fatal_error = 1): drive_ok = 0
1
READY
Drive turned on (drive_ok = 1) and no faults
(Ready to run)
present (fault = 0).
The drive can start with the command
1
“Enable operation” (STW1 bit 3)
0
Not ready to run
Causes: no ON command, fault present,
OFF2 or OFF3 command
1
Operation enabled
Torque set (torque_on = 1)
2
0
Operation disabled
Motor set to zero torque (torque_on = 0)
1
A serious fault is present
Serious fault (fatal_error = 1): drive fault
relay opens and zero torque is set
3
0
No serious fault present (fatal_error = 0)
1
4
0
OFF2 command applied
See STW1 bit 1
1
5
0
OFF3 command applied
See STW1 bit 2
6
-
11
PVD 3554 GB 01/2004
DIGIVEX Motion - PROFIBUS
1
A warning is present
A minor fault is present: status does not
change for the drive fault relay and the
torque
0
1
Setpoint-measured
deviation ok
0
Setpoint-measured
deviation fault
1
0
1
0
1
Valid control word
Invalid control word
Target position reached
Target position not reached
HOME MADE
7
8
9
10
11
12
position
1
Movement in progress
0
1
0
1
0
No movement in progress
Program running
No program running
Deviation between setpoint position and
measured position values is within
tolerance limits
(tracking_error < trackerror_max)
Deviation between setpoint position and
measured position values has exceeded the
limits set by trackerror_max (tracking_error
> trackerror_max)
The control word is enforced
The control word is ignored
in_position = 1
in_position = 0
Origin setting sequence carried out
(home_made = 1)
Origin setting sequence not carried out
(home_made = 0)
Not in use
moving = 1
This bit is always set to 1 in "speed" and
"master-slave" synchronization mode
moving = 0
exec_on = 1
exec_on = 0
ub10
DIGIVEX Motion ub10 variable
position
0
13
14
15
The ZSW2 control word is assigned to the DIGIVEX Motion ui10 low order 16-bit variable.
12
PVD 3554 GB 01/2004
DIGIVEX Motion - PROFIBUS
2.4 List of standard PROFIDrive parameters
The standard parameters defined by PROFIDrive V3.0 and supported by DIGIVEX Motion are
listed below, except 967):
NB: These parameters are only accessible in read mode.
Index
918 (0x396)
922 (0x39A)
930 (0x3A2)
964 (0x3C4)
965 (0x3C5)
967 (0x3C7)
968 (0x3C8)
980 (0x3D4)
Designation
Param_PB_918
PROFIBUS address
Param_PB_922
Standard telegram
Param_PB_930
Operating mode
Param_PB_964
Equipment
identification
Param_PB_965
Profile number
Param_PB_967
STW1 control word
Param_PB_968
ZSW1 status word
Param_PB_980
List of the defined
parameter numbers
Comments
Selected address returned with the “address”
code wheel.
Positioning interface
(default value = 0)
Positioning mode
(default value = 2)
Subindex:
0: manufacturer’s code (0x0792)
1: type = DIGIVEX Motion
2: version
3: date / year
4: date-day/month
PROFIDrive V3.0
(default value = 0x03)
See description section 2.3
See description section 2.3
Each subindex of this parameter indicates a
number of a parameter supported by
DIGIVEX Motion (in ascending order).
13
PVD 3554 GB 01/2004
DIGIVEX Motion - PROFIBUS
2.5 PKW Profidrive V2.0 mechanism for processing
parameters
Parameter area (PKW)
The PKW mechanism is used to manipulate and observe (write / read) parameters as follows:
Condition:
PPO type 1 for DIGIVEX Motion in accordance with PROVIdrive Profile V2.0
The parameter area always contains 4 words.
Bit no.
Bit no.:
Parameter identifier
15
AK
12
Parameter identifier
15
SSIND
8
11
0
0
PNU
2nd word
(IND)
5
4
7
0
Parameter value
High order word (PWE1)
Low order word (PWE2)
1st word
(PKE)
10
0
PNUE
(PWE)
3rd word
4th word
AK: Request and/or response identifier
PNU: Parameter number
Parameter identifier (PKE), 1st word
The parameter identifier (PKE) is always a 16-bit value.
Bits 0 - 10 (PNU) contain the low order parameter number required.
Bit 11 is reserved.
Bits 12 - 15 (AK) contain the request and/or response identifier.
The meaning of the request identifier is shown in the 1st table below.
The meaning of the request identifier for response telegrams (drive → master), is shown in the
2nd table below. Only certain response identifiers are possible according to the request identifier.
An error code is put in parameter 2 value (PWE2) as shown in the 3rd table below when the value
of the response identifier is 7 (request cannot be processed).
14
PVD 3554 GB 01/2004
DIGIVEX Motion - PROFIBUS
Request identifier table (master - > drive)
REQUEST
IDENTIFIER
RESPONSE
IDENTIFIER
Positive Negative
0
7
1/2
7
1
7
2
MEANING
No request
Parameter value request
Parameter value modification (word)
Parameter value modification (double word)
0
1
2
3
Response identifier table (drive -> master)
RESPONSE
IDENTIFIER
0
1
2
7
MEANING
No response
Parameter value transmission (word)
Parameter value transmission (double word)
Request cannot be processed (with error number)
Error codes returned with the response "request cannot be processed"
No.
0
1
2
3
11
MEANING
Wrong parameter number (PNU + PNUE)
Parameter value cannot be modified
Overrunning of upper or lower limits
Wrong subindex
Parameter unavailable
Parameter does not exist
This is a parameter which is only accessible
in read mode
Modification request when access is not
available
Parameter identifier (IND) 2nd word
PKE
IND
HIGH
PWE1
LOW
SSIND
PNUE
Specific to
DIGIVEX Motion
Subindex
15
PWE2
8 7
5 4
0
Subindex 0 - 255
The subindex is an 8-bit value which, in the case of cyclical data exchange, is transmitted by the
PPO in the high order byte (HIGH, bits 8 - 15) of the parameter index (IND). Low order byte
(LOW, bits 0 - 7) is not defined in the PROVIdrive Profile V2.0. The low order byte of the
parameter index for DIGIVEX Motion is used to define the high order bits of the parameter
number.
15
PVD 3554 GB 01/2004
DIGIVEX Motion - PROFIBUS
The number of index of the DIGIVEX Motion parameter (as defined in user PVD 3527 “Directory
of Variables”) is defined using16-bits and made up as follows:
15
4
PNUE
INDEX
0 10
0
0
PNU
CONVERSION TABLE index range / PKW parameter header
The following values are given in hexadecimal format.
The digit of the AK section of the PKW is replaced by the letter “k” in this table.
The 2 digits of the SSIND section of the PKW are replaced by the letters “si” in this table.
16-bit parameter index
Parameter header in the PKW
(PKE+IND) 32-bits
0x0000
0xk000si00
…
…
0x03C4
0xk3C4si00
…
…
0x07FF
0xk7FFsi00
0x2800
0xk000si05
…
…
0x2DC7
0xk5C7si05
…
…
0x2FFF
0xk7FFsi05
Parameter value (PWE) 3rd and 4th word
The parameter value (PWE) is automatically transmitted as a double mot (32-bits). A PPO
telegram can only transmit a single value.
A 32-bit parameter value is made up of PWE1 (high order word, 3rd word) and PWE2 (low order
word, 4th word).
A 16-bit parameter value is transmitted in PWE2 (low order word, 4th word). In this case, PWE1
(high order word, 3rd word) must be given the value 0.
Rules for processing requests / responses
• A request or a response can only ever refer to one parameter.
• The master must continue to repeat a request until a corresponding response is received.
• The master identifies the response to a previously sent request by:
- analyzing the response identifier
- analyzing the parameter number PNU
- analyzing, if necessary, the parameter index IND
- analyzing, if necessary the parameter value PWE.
16
PVD 3554 GB 01/2004
DIGIVEX Motion - PROFIBUS
• The complete request must be sent in one telegram; telegrams cannot be split. The same
applies to the responses.
• As regards response telegrams containing parameter values, the drive will always reply giving
the actual value in the event that the response telegrams are repeated.
• If there is not a requirement for information from the PKW interface operating cyclically (only
PZD data is relevant), then a “no request” request must be sent (AK=0).
Example:
Below is the request and the response for a request to modify parameter number 0x2900,
subindex 0, with the value 40.00 (this parameter has a 32-bit, 40.00 floating format and is written:
0x4220 0000
Request
Response
AK
3
2
PNU
0x100
0x100
SSIND
0
0
PNUE
5
5
PWE1
0x4220
0x4220
PWE2
0
0
i.e.
Request
Response
PKE
0x3100
0x2100
IND
0x0005
0x0005
PWE1
0x4220
0x4220
PWE2
0x0000
0x0000
The PPOConverter.exe software tool to be found in the C:\Program
Files\Parvex\Profibus file can be used to carry out the conversion between a parameter
index number and the corresponding values for the PKW section of the PPO.
Moreover, this tool can be used to carry out the conversion between a floating value
and the PWE fields of the PPO, and display the uncoded contents of STW1 control
words and ZSW1 status words.
NB:
The SFC15 function contained in the SIEMENS S7 automate program is used to access the write
mode for outgoing PPO. Likewise, the SFC14 function is used to access the read mode for
incoming PPO.
17
PVD 3554 GB 01/2004
DIGIVEX Motion - PROFIBUS
2.6 DPV1-Profidrive V3.0 mechanism for processing
parameters
This mechanism is supported by the range S7-400 which has the latest firmware as well as the
PME, Parvex Motion Explorer, tool through the PROFIBUS PC interfaces. It has the advantage of
reducing the cycle time since the PKW cyclical exchange is no longer required to occasionally
access the parameters. This mechanism is also used to access large scale parameters (for
example DIGIVEX Motion firmware upgrade by PME).
This mechanism can be broken down into 4 phases:
1) Parameter request (from the Master)
This 1st phase is carried out as the result of a DB47 data block write request integrating either a
read request, or a write parameter request:
DPV1 Write Header
Fct_num = Wr (octet 0)
0x5F
Slot_num
0x00
Parameter Request Header
Request ref
Request ID
Selected by the 0x01 (Rd), 0x02 (Wr)
master
Parameter address
Attribute
0x10
No. of elements
0x00
Index = DB47
0x2F
Length (bytes)
0x0A(Rd), > 0x0C(Wr)
Axis
0x00
No. of parameters
0x01
Param. Num. (16-bit)
0xXXXX
Parameter value (for a write request only)
Format
No. of values
cf. table page 2
0x01
Subindex (16-bit)
0xXXXX
Value
Variable size
2) Request acknowledgment (from the Slave)
DPV1 Write Acknowledgement
Fct_num = Wr (octet 0)
Slot_num
0x5F
0x00
Index = DB47
0x2F
Length (bytes)
0x0A(Rd), > 0x0C(Wr)
3) Response request (from the Master)
DPV1 Read Header
Fct_num = Rd (octet 0)
0x5E
Slot_num
0x00
Index = DB47
0x2F
18
PVD 3554 GB 01/2004
Length (bytes)
0xF0 (max. size)
DIGIVEX Motion - PROFIBUS
4) Response acknowledgement (from the Slave)
1st case: the response is negative
DPV1 Read Acknowledgement
Fct_num = Rd (0 byte)
Slot_num
0x5E
0x00
Index = DB47
0x2F
Length (bytes)
0x0A
Parameter Response Header
Request ref
Request ID
Request repeated
0x81 (Rd), 0x82 (Wr)
Axis
0x00
No. of parameters
0x01
Parameter value
Format
0x44
No. of values
0x01
Value
Error code (16-bit)
NB: If the acknowledgment of the response is not ready, only the first 4 bytes are returned.
2nd case: the response is positive
DPV1 Read Acknowledgment
Fct_num = Rd (0 byte)
Slot_num
0x5E
0x00
Index = DB47
0x2F
Parameter Response Header
Request ref
Request ID
Request repeated
0x01 (Rd), 0x02 (Wr)
Length (bytes)
> 0x06(Rd), 0x04(Wr)
Axis
0x00
Parameter value (for a read only request)
Format
No. of values
cf. table page 2
0x01
No. of parameters
0x01
Value
Variable size
Data code (8-bit) format table (taken from PROFIDrive V3.0):
Integer16
Code
“Format”
0x03
Integer32
0x04
Unsigned16
0x06
Unsigned32
0x07
Floating32
0x08
VisibleString (ascii–16 bytes)
0x09
OctetString (16 bytes)
0x0A
Bit Sequence (32 bits)
0x23
Error (16 bits)
0x44
OctetString (128 bytes)
0xFE
Floating64
0xFF
Data type
19
PVD 3554 GB 01/2004
DIGIVEX Motion - PROFIBUS
3. CONNECTING
3.1 Connecting the bus cable (RS485)
3.1.1 Pin configuration of the Sub-D connector
DIGIVEX Motion PROFIBUS comprises a 9-pin Sub-D female connector (X1) for connecting it to
the PROFIBUS system. All RS485 interface connections are protected against short-circuiting
and have galvanic insulation.
Pin configuration of the Sub-D female connector
PIN
1
2
3
4
5
6
7
8
9
DESIGNATION
TxD
RTS
DGND
VP
RxD
-
MEANING
Not assigned
Not assigned
Emission data (B)
Control signal
PROFIBUS data reference potential (C)
Power supply voltage (+5V)
Not assigned
Receiving data (A)
Not assigned
3.1.2 Cables
RS485 technology is the most frequently used transmission mode for PROFIBUS-DP. Thus a
two-wire shielded cable, with a twisted pair of copper conductors is used.
It is possible to connect up to a maximum of 124 devices with one PROFIBUS line. Up to 32
devices can be interconnected in a linear topology within one bus segment. Repeaters (cable
amplifiers) can be used to link the different bus segments if the number of subscribers exceeds
32.
The maximum cable lengths are dependant on the baud rate (transmission speed).
The maximum cable lengths given in the table below can only by guaranteed with PROFIBUS
bus cables CB08320.
REFERENCE
CB08320
DESIGNATION
PROFIBUS cable by the
metre
20
PVD 3554 GB 01/2004
DIGIVEX Motion - PROFIBUS
Permissible cable length for one segment
Max. cable length for one
segment
1000 m
400 m
200 m
100 m
Transmission speed
9.6 – 187.5 kbauds
500 kbauds
1.5 Mbauds
3 - 12 Mbauds
Repeaters can be installed to increase the length of a segment.
Cable installation rules
It is prohibited for the bus cable to be:
• twisted
• stretched
• or compressed
during installation. Moreover, the conditions linked to electromagnetic compatibility must also be
observed during installation.
PROFIBus cable requirements for DIGIVEX Multi Motion (DMM
REFERENCE DMM
DMM06002P
DMM06004P
DMM06008P
DMM06016P
DMM06032P
REQUIRED LENGTH
0,17 mm between axes
0,22 mm between axes
0,30 mm between axes
3.1.3 Bus connector
Use a bus connector such as one of those described in the table below to connect up the
PROFIBUS cable to the communication module.
Recommended PROFIBUS connectors
REFERENCE
AC62001
AC62002
AC62003
Max. transmission speed
Terminal resistor
Cable output
Interfaces
PROFIBUS subscribers
12 Mbauds
On/Off switch
45°
PROFIBUS bus cable
PROFIBUS cable diameter
4 junction terminals for wires up to 1.5 mm²
8 ± 0.5mm
180° (coaxial)
45°
9-pin Sub-D female connector
Please refer to the manual delivered with the connector for connector cable assembly instructions
and wire baring lengths.
21
PVD 3554 GB 01/2004
DIGIVEX Motion - PROFIBUS
Each bus segment must have a resistor network i.e. a bus terminal at both ends.
The terminal can be switched on and off if the recommended connectors have been used for the
connections.
Terminal
switched ON
resistor
ON
Terminal resistor switched
OFF
OFF
Position of the switch for activating and deactivating the terminal resistor
Users must ensure that a resistor terminal network is installed on the first and last subscriber as
specified in the diagram below if these bus connectors are not used.
VP (PIN6)
390 ohms
Data lines
RxD/TxD-P (PIN 3)
220 ohms
Data lines
RxD/TxD-N (PIN 8)
390 ohms
DGND (PIN 5)
Resistor terminal network
A bus segment must always be terminated at both ends by a terminal resistor. This
condition is not fulfilled, for example, if the last slave with bus connector is switched off.
The resistor is inoperative if the bus connector voltage is supplied by the station.
Please make sure that all stations comprising an active terminal resistor are supplied
with power at all times.
The bus connector with looped-though bus cable can be disconnected from a drive PROFIBUSDP interface without interrupting the data transmission on the bus.
3.1.4 Cable connecting diagram
22
PVD 3554 GB 01/2004
DIGIVEX Motion - PROFIBUS
23
PVD 3554 GB 01/2004
DIGIVEX Motion - PROFIBUS
3.1.5 Bus cable shielding / EMC precautions
The following precautions should be taken to ensure that the PROFIBUS-DP works correctly,
particularly for data transmission using RS485:
Shielding
The shielding for the PROFIBUS bus cable must be connected in the bus connector. Additional
shielding is given by a collar placed around the bus cable shielding and connected with a wide
contact surface to the protective earth. Be careful not to damage the solid copper core when
baring the ends of the conductors. Also make sure that the shielding for each bus cable is not
only connected to the protective earth at the entrance to the electric cabinet but also in the drive
housing.
RECOMMENDATIONS for installation
The bus cables must be made up of twisted conductors and be shielded. They should be laid
separately to the power cables and spaced 20 cm apart.
The braided shielding and any underlying shielding strapping should be connected at both ends
with a wide contact surface guaranteeing a good electric connection, that is to say, the bus cable
shielding linking two drives should be connected to the housing on each of the drives. The same
applies to the shielding on the bus cable between the PROFIBUS-DP master and the drives.
Power supply and bus cables should only cross one another at right angles.
Equipotential bonding
Differences in potential such as different power supplies between the drives and the PROFIBUSDP master must be avoided.
• Use equipotential bonding conductors:
- 16 mm2 Cu for equipotential bonding cables up to 200 m long
- 25 mm2 Cu for equipotential bonding cables of over 200 m long
• Equipotential bonding cables must be laid so that the area between the equipotential
bonding conductors and the signal cables is as small as possible.
• Equipotential bonding conductors must be connected up to the earth / PE conductor with
a wide contact surface.
3.2 Connecting for drives setting
3.2.1 Général points
To set a DIGIVEX Motion drive from a PC using PME software, it is necessary to use one of the
following interfaces :
REFERENCE
USBPRO or
USBPROx12
PCIPRO
PCMCIAPRO
RS232PRO
DESIGNATION
USB-PROFIBUS Interface
CP5611 PCI-PROFIBUS card
CP5511 PCMCIA – PROFIBUS card
RS232 interface can communicate with one drive at a time
Caution! It is only possible to use this interface if the drive is not
connected to PROFIBUS network.
(the drive mustn’t be connected to a supervisor or a PLC via PROFIBUS
network).
24
PVD 3554 GB 01/2004
DIGIVEX Motion - PROFIBUS
3.2.2 Application example with USBPRO interface
PC/DIGIVEX Motion dialogue is possible
with all the drives via PROFIBUS network.
Turn off the PLC or disconnect the
connection with the PLC in case of
Basic_DM program loading into one of the
drives.
* USB cable
interface.
25
PVD 3554 GB 01/2004
provided
with
USBPRO
DIGIVEX Motion - PROFIBUS
3.2.3 Application example with PCIPRO interface
PC/DIGIVEX
Motion
dialogue
is
possible with all the drives via
PROFIBUS network.
Turn off the PLC or disconnect the
connection with the PLC in case of
Basic_DM program loading into one of
the drives.
26
PVD 3554 GB 01/2004
DIGIVEX Motion - PROFIBUS
3.2.4 Application example with PCMCIAPRO interface
PC/DIGIVEX
Motion
dialogue
is
possible with all the drives via Profibus
network.
Turn off the PLC or disconnect the
connection with the PLC in case of
Basic_DM program loading into one of
the drives.
27
PVD 3554 GB 01/2004
DIGIVEX Motion - PROFIBUS
3.2.5 Application example with RS232PRO interface
(the drive mustn’t be connected to PROFIBUS network)
PC/DIGIVEX Motion dialogue is
only possible with one drive at a time
The drive mustn’t be connected to a
supervisor or a PLC via PROFIBUS
network when RS232PRO is used.
28
PVD 3554 GB 01/2004
DIGIVEX Motion - PROFIBUS
3.3 PROFIBUS address
Starting up the DIGIVEX Motion PROFIBUS simply requires the PROFIBUS address to be set.
The PROFIBUS address is set using the “address” code wheel.
NB:
The manoeuvring of the code wheel must be carried out with the drive in shutdown status; power
turned off. The address modification will not take effect unit the drive has been restarted. The new
restart is activated by cutting the power supply, and then turning it back on again.
The “0”, “1” and “2” addresses are prohibited to the drive. Address “1” and “2” being reserved for
the PROFIBUS-DP masters.
The first available address for the drive is therefore “3”.
29
PVD 3554 GB 01/2004
DIGIVEX Motion - PROFIBUS
4. PROFIBUS-DP MASTER (CLASS 1 & 2) SYSTEM
CONNECTION
4.1 Using Parvex Motion Explorer (PME)
4.1.1 Starting up the application INSTALLATION
Double click on the PARVEX PME icon located on the desktop in order to open the PARVEX
Motion Explorer control panel (or select: Start, Programs, Parvex, Parvex Motion Explorer).
DIGIVEX Motion
icon
This icon is used to start the PME DIGIVEX Motion
module dedicated to applications using drive positioners.
Double click on the DIGIVEX Motion icon to open the following window:
This environment, called Profibus - Network Management, is used to have access to PME
DIGIVEX Motion functions. A preview of the main functions proposed is given below.
30
PVD 3554 GB 01/2004
DIGIVEX Motion - PROFIBUS
4.1.2 Using PME tools
Please refer user manual PVD 3516 “Parvex Motion Explorer Software” for details regarding PME
tools.
It is essential that any connected automates be turned off when loading a program with
the “Program Editor” tool, and when updating Firmware with the “Incident Diagnosis
Assistant” tool.
4.1.2.1.1 PROFIBUS Interface Configuration
The PROFIBUS interface configuration is carried out using the following control sequence:
Options
Configuration
PROFIBUS Interface
Check “Profibus” and indicate which PROFIBUS interface module
is used:
• USBPRO module (max rate: 5Mbaud)
• CP5611module
• CP5511module
• RS232PRO module
• USBPROx12 module (max rate: 12Mbaud)
PROFIBUS interfaces are supplied by a third party, please refer to the manufacturer’s installation
procedures beforehand.
REFERENCE
USBPRO or USBPROx12
PCIPRO
PCMCIAPRO
DESIGNATION
USB-PROFIBUS Interface
PCI-PROFIBUS CP5611 Card
PCMCIA - PROFIBUS CP5511 Card
Properties
31
PVD 3554 GB 01/2004
DIGIVEX Motion - PROFIBUS
CP5611 & CP5511
The access point must be selected in accordance with the value selected using the SIEMENS
“Set PG-PC interface” parameter setting tool
USBPRO and USBPROx12
If necessary the transmission speed of porfibus will be changed to be in accordance with the
speed imposed by the "Master " :
Click on Properties to select the serial number for the USB/Profibus interface.
This number is detected automatically by clicking on “Search attached device”.
Validate the configuration by clicking on “OK”.
32
PVD 3554 GB 01/2004
DIGIVEX Motion - PROFIBUS
Advice on how to use the SIEMENS “Set PG-PC interface” parameter setting tool is
provided with the CP5611 and CP5511 cards:
• Select the CP_L2_1 access point and associate it with the CP5611 (PROFIBUS) or CP5511
(PROFIBUS) set of parameters, as applicable.
• Select the CP_L2_2 access point if input 1 is already assigned.
• Validate by clicking on “OK”.
Reopen the “Set PG-PC interface” tool, and click on “Properties”. In the “Station” details, check
“PG-PC is the only master on the bus” (even if this is not the case!), select a free address (ideally
2 as the PLC is at address “1” and the slaves at address “3” and above). In the “Network” details,
select the transmission speed in accordance with the hardware configuration defined with STEP7
(see section 4.3), in “Profile” selector “DP”.
• Validate by clicking on “OK”, then on “OK” in the main window.
33
PVD 3554 GB 01/2004
DIGIVEX Motion - PROFIBUS
4.2 GSD Files
PROFIBUS slaves do not have the same performance characteristics.
The characteristic properties of a slave are grouped together in a database (GSD file) containing
the data for the appliance. This file is used by all the master systems for correctly addressing the
slave and its individual possibilities.
This file is available in the C:\Program Files\Parvex\Profibus file for the DIGIVEX Motion
PROFIBUS (Eudp0792.gsd) range.
4.3 Operating in relation with SIMATIC S7
4.3.1 PROFIBUS-DP interface in SIMATIC S7
S7 masters can be CPUs with integrated PROFIBUS-DP interface such as for example
CPU314C-2DP, CPU315-2DP, CPU413-2DP, CPU414-2DP or CPU416-2DP. For corresponding
couplers (CP), please consult us.
The master station as well as the PROFIBUS network system are configured in the hardware
manager STEP7.
To create a project using the “SIMATIC Manager” tool (File > New)
4.3.2 Adding DIGIVEX Motion to the module catalogue
• Start up the hardware configuration tool (SIMATICXXX > Hardware).
• Click on “Tools > Install new GSD”
• Select in C:\Program Files\Parvex\Profibus\Eudp0792.gsd
You should then see the “DIGIVEX Motion” slave catalogue displayed under PROFIBUS-DP >
Other field devices > Drives > Parvex, as shown below:
34
PVD 3554 GB 01/2004
DIGIVEX Motion - PROFIBUS
4.3.3 Adding DIGIVEX Motion to the hardware configuration
Continue by adding DIGIVEX Motion to the hardware configuration of your project as shown in
STEP7 software help.
Choosing the slots:
Three configurations are possible for the Input/Output slots:
PP01
This standard message is used to access the DIGIVEX Motion
parameters following the PKW mechanism (section 2.4) and the 2
process data (2 status words in input or 2 control words in output).
PP03
Only process data is exchanged. This configuration is used when no
other DIGIVEX Motion parameter is required by the PLC.
Standard telegram1
As for PP03, only process data is exchanged cyclically. DIGIVEX
Motion parameters can however be accessed through the DPV1Profidrive V3.0 mechanism for the PLC that can support this
functionality.
NB:
Addresses for the beginning and end of the Inputs/Outputs in the hardware configuration slots
must be adapted to the range supported by the CPU (usually < 256).
35
PVD 3554 GB 01/2004
DIGIVEX Motion - PROFIBUS
4.3.4 Setting the parameters for the DP master bus
Double click on the “DP” icon associated with the CPU in the hardware configuration window. The
following window will open:
• Click on “Properties”.
• Select the sub-network proposed if it is suitable (if not, create a new one with the
desired transmission speed).
• Click on ”Properties.
• Select the “Network parameters” tab.
• Click on “Options”.
• Under the “Equidistance” tab, check “Activate the bus cycle”.
• Enter “1” in the “Total” box for the “number of PG”.
• Click on “Details”.
This will then give:
The minimum values are displayed, it is advisable to make the value slightly higher while
guaranteeing the shortest possible DP cycle.
NB
A short DP cycle ensures amongst other things better dynamics from PME, Parvex Motion
Explorer, tools.
36
PVD 3554 GB 01/2004