1
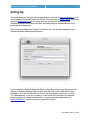
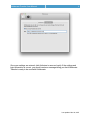
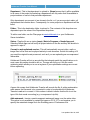
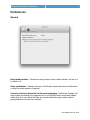
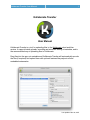
Kollaborate Transfer User Manual!
! 1
!
Kollaborate Transfer!
!
User Manual!
Kollaborate Transfer is a tool for uploading files to the Kollaborate cloud workflow
service. It supports batch uploads, encoding and automatic setting of metadata, and is
the recommended way of uploading files to Kollaborate.!
!
Drag files into the app, set metadata and Kollaborate Transfer will automatically encode
the files (if required) and upload them with optional features like pre/post-roll and
embedded watermarks.!
Last updated Jan 18, 2015
Kollaborate Transfer User Manual!
! 2
Contents!
Setting Up!
3!
Uploads!
5!
Transfers!
8!
Preferences!
9!
Support!
12
Last updated Jan 18, 2015
Kollaborate Transfer User Manual!
! 3
Setting Up!
!
This guide assumes that you have already have an account at www.kollaborate.tv or on
your company’s in-house Kollaborate Server. You can create a kollaborate.tv account by
using the registration form or by being invited to a project by an existing user.
Kollaborate Server users must have their accounts setup by an administrator or be
invited by an existing user.!
!
Upon launching Kollaborate Transfer for the first time, you will be prompted for your
Kollaborate email address and password.!
!
!
If your company is using Kollaborate Server in-house, go to the Local Server tab, tick
the box to enable Kollaborate Server then enter the URL to the Kollaborate Server
installation. The URL should take the form of http://mydomain.mysite.com or http://
1.2.3.4/kollaborate. If you are in doubt as to the exact URL that should be entered,
please consult your system administrator. If you are using the cloud version at
www.kollaborate.tv, you do not need to adjust this section.!
!
!
!
Last updated Jan 18, 2015
Kollaborate Transfer User Manual!
! 4
!
!
Once your settings are entered, click Authorize to save and verify. If the settings and
login information is correct, you should receive a message telling you that Kollaborate
Transfer is ready to be used with Kollaborate.!
!
Last updated Jan 18, 2015
Kollaborate Transfer User Manual!
! 5
Uploads!
!
Your projects appear at the top of the Upload pane. New projects can either be created
directly in Kollaborate Transfer or from the web interface at www.kollaborate.tv or your
Kollaborate Server installation.!
!
“My Private Files” is a private storage area that is only available to Kollaborate
subscribers. Files uploaded to this area are not visible to anyone else.!
!
To upload a file, drag it into the Uploads window. Settings for the file can be adjusted in
the right-hand pane. To adjust settings for multiple files at once, select the files and then
adjust the settings in the right-hand pane.!
!
!
!
!
Last updated Jan 18, 2015
Kollaborate Transfer User Manual!
! 6
Department - This is the department to upload to. (None) means that it will be available
to all users of the project but selecting a department will only make that file available to
project admins or users in that particular department.!
!
Only departments you are part of are shown in the list, or if you are a project admin, all
departments that contain users. Consequently, for some projects no departments will be
listed.!
!
Folder - This is the destination folder to upload to. The contents of this dropdown are
dependent upon the value of the Department dropdown.!
!
To add a new folder, use the Files page at www.kollaborate.tv or your Kollaborate
Server installation.!
!
Status - Flag the file as no status (none), Work in Progress or Needs Approval.
Selecting Needs Approval will notify all project admins to the file and they will be able to
approve or reject it.!
!
Convert to web-optimized version - This will automatically convert video, audio or
image files to files that can be played natively in web browsers. Switch this setting off if
you need the original format preserved, such as if you are uploading an uncompressed
deliverable.!
!
Kollaborate Transfer will not re-encode files that already match the specifications so in
most cases this setting should be left on. The app will notify you if the file needs
optimizing which allows you to see at a glance if your optimization settings are correct
before uploading.!
!
A green tick means that Kollaborate Transfer will encode the file. A yellow exclamation
mark means the file needs to be converted in order to be playable but Kollaborate
Transfer is not set to convert it. If this column is blank it means that the file is not the
type of file that needs converting (e.g. a compressed .zip file).!
!
Add watermark - Inserts a semi-transparent watermark image over the entire video.
This option is only available for certain file types on OS X 10.7+ and requires you to
specify the watermark image file in the Encoding pane of Preferences first.!
!
!
Last updated Jan 18, 2015
Kollaborate Transfer User Manual!
! 7
Upload original file - Uploads both the web-optimized version and the original version
of a file, then links them together. The optimized version will play on the web and the
user will be able to download the higher-quality file to their computer.!
!
Alert other users to this file - Automatically emails everyone on the project who has
access to the department to notify them of the new file. Users can choose to switch this
off in the notification settings on their Profile page or by unsubscribing from the link in
the email.!
!
Create revision for matching files - Automatically creates a revision if a file already
exists with an exact filename. It will also create revisions for variations on a filename
such as (MyFile_v002.mp4 if MyFile.mp4 already exists). Switching this off will create
an independent file no matter what the filename is.!
!
To combine revisions after uploading, select files in the web UI and click Combine
Revisions. To split revisions into separate files, click “x Revisions” (e.g. “3 Revisions”)
underneath the filename in the web UI, select the revisions and click Make Independent.!
!
Email To - Upon successful upload this emails a link to an email address. Separate
multiple addresses with commas.!
This setting is only intended for people who are not part of the project, because anyone
in the same department will automatically be notified via email and dashboard alerts
when a new file is uploaded.!
!
Require Password - The user must enter a password before they can view this link.
The password can be specified in the adjacent text field and is set to a random set of
letters and numbers by default.!
!
Allow comments - This allows users who have been emailed the link to leave
comments. This does not apply to users who are part of the project, who will always be
able to leave comments.!
!
Hide download button - Hides the Download button on the player page. This does not
prevent users from downloading a file but makes it less obvious.!
!
Make revisions accessible - Allows the link recipient to see all prior and future
revisions to a file.!
!
Expires - The date the link will no longer be accessible. Setting this to Never means it
will not expire until removed from the Share page.!
!
After customizing the settings for your batch, click Upload to submit it.!
!
!
Last updated Jan 18, 2015
Kollaborate Transfer User Manual!
! 8
Transfers!
!
The Transfers pane shows current, failed and completed uploads. To cancel an upload,
select the upload and press the Cancel button. To cancel all uploads, deselect any
selected uploads and then press Cancel.!
!
If an upload fails Kollaborate Transfer will automatically retry it three times (this is
customizable). To retry a failed or cancelled upload, ctrl-click it and select Retry.!
!
Uploading a file with the same name as an existing file or with a sequential number (e.g.
My_File.2.jpg when there is already My_File.jpg) will automatically create a revision. If
you want to make this an individual file, you can login to the site and make that revision
independent. Last updated Jan 18, 2015
Kollaborate Transfer User Manual!
! 9
Preferences!
General
!
!
!
Retry failed transfers - Choose how many times to retry a failed transfer. Set this to 0
to switch it off.
!
Show notifications - Displays a Growl or Notification Center alert when a file finishes
or when the entire queue is complete.
!
Use strict criteria to determine if a file needs optimizing - Kollaborate Transfer will
mark videos as needing to be optimized if it is not 960x540 and is more than 5 Mbps.
Switch this off to only check that files are encoded with the proper codecs without
paying attention to frame size or bitrate.!
!
Last updated Jan 18, 2015
Kollaborate Transfer User Manual!
!10
Encoding
Pre-roll movie - A movie file that will be added to the front of every encoded movie.
This is useful for slates, logos, copyright notices, etc.!
!
Post-roll movie - A movie file that will be added to the end of every encoded movie.
This is useful for slates, logos, credits, etc.!
!
Watermark image - An image file that will be displayed over the video with a copyright
or similar notice. An image format that supports transparency such as PNG or TIFF is
recommended. !
!
Preferred video quality - In the majority of cases you will be fine with the default
setting of Normal Quality, however if you are on a slower connection you may get better
results with the Lower Quality setting. If you find Normal Quality insufficient for scenes
with lots of action or graphics with subtle gradients, choose Higher Quality instead.!
!
Last updated Jan 18, 2015
Kollaborate Transfer User Manual!
!11
Always use QuickTime API for video encoding - Forces Kollaborate Transfer to use
QuickTime instead of AV Foundation. This is a troubleshooting feature that should
ordinarily be switched off.
Last updated Jan 18, 2015
Kollaborate Transfer User Manual!
!12
Support!
!
Email support can be accessed directly within the application.!
! To report a bug or any other issue, go to Help > Report a Bug. !
! To request a new feature, go to Help > Suggest a Feature.!
!
When emailing customer support, it is helpful to include log files from the application. To
access the logs, go to Help > Troubleshooting > View Log.
Last updated Jan 18, 2015